
IHD171 - Radio ILUV - Free user manual and instructions
Find the device manual for free IHD171 ILUV in PDF.


| Product Type | HD Radio Receiver with iTunes Tagging, Digital Dual Alarm Clock, and iPod/iPhone Dock |
| Dimensions (W x H x D) | 11.8" x 3.9" x 7.75" (300mm x 99mm x 197mm) |
| Weight | Approximately 3.5 lbs (1.6 kg) |
| Power Supply | AC 120V, 60Hz; Backup: 9V battery (not included) |
| Audio Output | 4W RMS per channel (L+R), 8W RMS total, 15W peak |
| Radio Frequency Range | AM: 520 kHz – 1710 kHz; FM: 87.5 MHz – 107.9 MHz (HD Radio capable) |
| Connectivity | 30-pin dock connector (for iPod/iPhone), 3.5mm headphone jack, 3.5mm AUX input, 3.5mm video output, FM wire antenna, AM loop antenna |
| Preset Stations | 30 presets total: 10 AM, 20 FM |
| Alarm Features | Dual alarm (Alarm 1 & 2), wake to iPod, AM/FM radio, or buzzer; snooze (9 min), sleep timer (15-120 min) with gradual volume reduction |
| iTunes Tagging | One-touch tag of HD Radio songs; stores up to 50 tags; transfers to iPod for later iTunes purchase |
| Clock & Time Sync | Digital display with 12/24 hour modes; automatic time sync from docked iPhone/iPod |
| iPod/iPhone Compatibility | Compatible with iPhone, iPhone 3G, iPod touch (1st/2nd gen), iPod nano (1st-4th gen), iPod classic, iPod with video; includes dock adapters |
| Remote Control | Infrared remote with CR2025 lithium battery (included); range approx. 19 ft, 45° angle |
| Maintenance & Cleaning | Unplug before cleaning; use soft cloth dampened with mild soap and water; avoid solvents |
| Safety Certifications | FCC Part 15 Class B, IC (Canada), Class 1 Laser product (internal) |
Frequently Asked Questions - IHD171 ILUV
User questions about IHD171 ILUV
0 question about this device. Answer the ones you know or ask your own.
Ask a new question about this device
Download the instructions for your Radio in PDF format for free! Find your manual IHD171 - ILUV and take your electronic device back in hand. On this page are published all the documents necessary for the use of your device. IHD171 by ILUV.
USER MANUAL IHD171 ILUV
HD Radio™ Receiver with iTunes Tagging
INTRODUCTION
Congratulations on your purchase of the new iLuy IHD171 HD Radio™ receiver with iTunes tagging. Targeted specifically to work with your iPhone and iPod. Luy stereo audio system with the built in universal dock provides advanced audio and radio performance that brings out the best in your music. Do not forget to keep this manual for future reference.
HD Radio receiver with iTunes tagging
HD Radio receiver
- Provides crystal clear, digital stereo for AM/FM HD Radio and multicast stations
- Receive HD radio signals to increase the clarity of your FM radio stations to CD-quality sound
• Displays information such as station and song name, band, frequency and more if available from the station - One touch "iTunes Tagging"; tag a currently playing song from HD Radio receiver and download it to your iPod ^®
• Receives standard analog AM and FM stereo radio - PLL digital tuning technology
- Programmable presets for 30 radio stations (10 for AM / 20 for FM)
IPod
- Enjoy rich sound from your iPhone or iPod ^TM
• Plays and charges your iPhone or iPod
• Outputs your favorite videos to your TV if your iPhone or iPod**
The following table
Digital Dual Alarm Clock
• Digital clock display with dual alarm function
- Wake to iPod, AM/FM radio, or buzzer
- Sleep to iPod, AM/FM radio
(1) 本说明仅供参考。
What's indu
- Mar unit
- Remote control battery included
- Deerable - Viable
- Sarcha patrib. p#le 13.5mm (a 3.5mm)
- AM loop antenna
• FM antenna
• instruellen manual
• Thine Tree is a fault to support 4th generation of red class, Red class 3rd and 5th generation, Red team 1st and 7nd generation.
your Phone or Post with the online deliveries, refer to the Use Manual for your Phone or Post.
“Compared with any End-to-docs connector Excluding 1st, 2nd, and 3rd generation Port
- Including iPod 5th generation on Microsoft iPod classic, iPod name 3rd and 4th generation, iPod touch 1st and 2nd generation, iPhone and iPhone 9G
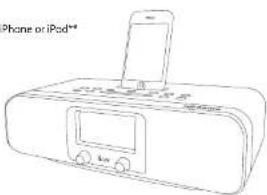
TABLE OF CONTENTS
Introduction 1
Getting Started
| Power Source | 3 |
| Installing the Backup Satteries | 3 |
| Protect your Furniture | 3 |
| Installing the Remote Control Facility | 4 |
| Preparing the Remote Control | 4 |
| Installing the Dock Adapter | 4 |
| Locations of Controls on the Main Unit | 5 |
| Locations of Controls on the Remote Control | 6 |
| Location of Indications on the LCD Screen | 7 |
Operational Instructions
| Using the Time Sync Feature | 5 |
| Sorting the Clock Time and Calendar | 8 |
| Setting the Alarm Time | 9 |
| Using the Alarm | 9 |
| Snooner Dinner Operation | 10 |
| Sleep Operation | 10 |
| Listening in the Radio | 11 |
| Storing Press Station | 12 |
| Think Tagging | 13 |
| Changing your iPhone or iPod | 14 |
| Listening to your Phone or iPad | 14 |
| Using your iPhone | 15 |
| Listening to a Non-Checking iPod of other Portable Audio Devices | 15 |
| Watching Videos on an External Monitor or TV | 16 |
Maintenance and Troubleshooting Guide
| Maintenance | 17 |
| Troubleshooting | 17 |
| User Safety Guide | 19 |
| Specifications | 26 |
Luc|2010171
GETTING STARTED
Power Source
- This HD Radio System operates from AC120V/50Hz line power supply.
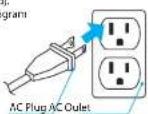
- The Remote Control operates on 1 Lithium battery, CR2025 (Included). Insert the AC plug into a standard 120V AC outlet as shown in the diagram on this page. The Radio will automatically go into standby mode.
Note:
The system has an AC plug and will only fit into matching AC outlets. This is a safety feature to reduce the possibility of electric shock. If the plug will not fit in your AC outlets, you should have the outlet changed by a qualified, licence electrician. Do not use an adaptor to make the plug fit into your outlet. This defects the safety feature and could expose you to electric shock.
Installing the Backup Batteries
The clock radio uses a backup battery system to provide continuous alarm operation and clock settings in the event of a power failure. If the Backup Battery has been installed and a power failure occurs or the DC cord is accidentally disconnected, the display will not remain lit, but the current time and alarm time settings will be temporarily maintained. Otherwise, you must reset the time and alarm settings.
-
Make sure the AC power is connected. Otherwise all settings may be lost during battery replacement.
-
Open the battery compartment cover located on the bottom of the unit.
-
Attach a 9V battery to the connector and insert into the battery compartment.
-
Close the compartment cover
-
Close the comparison to
Protect your Furniture
This model is equipped with non-sled rubber 'feet' to prevent the product from moving when you operate the controls. These 'feet' are made from non-migrating rubber material specially formulated to avoid leaving any marks or stains on your furniture. However certain types of oil based furniture polishes, wood preservatives, or cleaning sprays may cause the rubber 'feet' to soften, and leave marks or a rubber residue on the furniture. To prevent any damage to your furniture we strongly recommend that you purchase small self-adhesive felt pads, available at hardware stones and home improvement centers everywhere, and apply these pads to the bottom of the rubber 'feet' before you place the product on fine wooden furniture.
GETTING STARTED
Installing the Remote Control Battery
The remote control battery has been previously installed and ready for operation for the first time use. When the remote control stops functioning, replace the battery with a new one. To do so, locate the battery compartment and follow the steps below:
-
Remove the battery cover. Squeeze notched tab A while pulling battery door latch B to re lease the battery door latch and slide the battery holder outward.
-
Insert a "CR2025" 3V lithium battery making certain to follow the correct polarity (+/-).
-
Slide the battery holder back into the remote control.
Preparing the Remote Control
-
Remove the battery protective film.
-
Point remote control toward the front of the main unit. The effective range of the remote is about 19 ft from the remote sensor and within an angle of about 45° from the front of the unit.
Installing the Dock Adapter
To ensure that your iPhone or iPod will fit properly into the built-in universal dock, we have included several detachable dock adapters for many iPod players with this product. Please check the bottom of dock adapters to see the compatibility with your iPhone or iPod.
- How to insert a dock adapter
a. First choose the dock adapter that corresponds with the type of iPhone or iPod you would like to dock. Using the correct dock adapter ensures the proper fit for your iPhone or iPod. b. Gently push the dock adapter down into the universal dock. c. Carefully place your iPhone or iPod into the universal dock. It must not be in a case or "Skin".
- How to remove the dock adapter
- Remove your iPhone or iPod first, then grasp the dock adapter and lift upwards carefully.
Note: The HID/1 is not magnetically shielded and may cause color distortion on the screen of some TVs or video monitors. To avoid this, you may need to move the unit further away from the TV or monitor if unnatural color shifts or image distortion occurs.

Luc|41017
GETTING STARTED
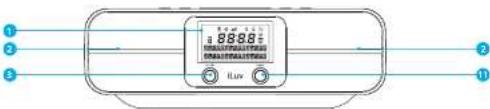
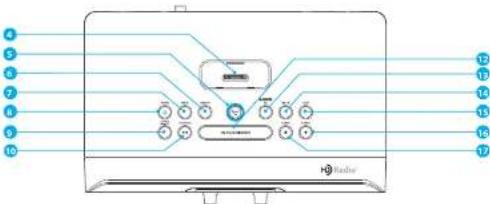
Location of Controls on the Main Unit
- LCD Screen
- Stereo Speakers
- VOLUME Knob
- iPhone/iPod Dock
- iTunes TAG Button
- MEMORY Button
7 PRESET Button - POWER BUTTER
- SOURCE/WAKE TO Button
GETTING STARTED
Location of Controls on the Main Unit - continued

- HEADPHONE jack
- AUX IN jack
- AUDIO OUTRISK
- AUDIO OUT R JACK
- AUDIO OUT Ljack
- VIDEO OUT lack
- AMI-DRP ANTENNA (in €)
- AM LOOP ANTENNA JACK
- FM ANTENNA connection
Location of Controls on the Remote Control

- ALARM/RESET/POWER Button
- SOURCE Button
- MEMORY Button
- MEMORY SATCH
- PLAY/PAUSE ■ Potion
- PLAY/PAUSE
- REWINDI Batten
- VOLUME - Button
- MUTE Button
- PRESET Button
- SLEEP Button
- SHOATE / DIMMER DUTTER
- SNOOZE / DIMMER BUTTON
- FAST FORWARD POSITION
- VOLUME + Button
Note: The Included remote control commands all of the basic functions on HD171. Aim the remote control towards the center of the main unit for the best results. To install a new battery, please refer to the section "Installing the Remote Control Battery".
Luc[6]D17
GETTING STARTED
Location of Indications on the LCD Screen

Connecting the FM Antenna Wire
- Push the connector plug on the end of the antenna wire onto the FM Antenna Connector at the rear of the radio.
- Straighten out the Antenna to its full length and orient the wire for the best reception.
Connecting the AM Loop Antenna
Connect the provided Loop Antenna as described below:
1. Connect the 3.5mm plug of AM loop antenna to the AM ANTENNA jack at the rear of the unit.
2. Orient the AM loop antenna for the best reception.
OPERATIONAL INSTRUCTIONS
Using the Time Sync Feature
The iHD171 is equipped with a Time Sync feature which sets the time and date on the clock of the iHD171 in sync with the docked iPhone or iPod.
-
Press and hold EQ / TIME SYNC Button for approximately two (2) seconds to turn Time Sync function ON or OFF. "TIME SYNC ON" or "TIME SYNC OFF" will temporarily display on the LCD screen for five (5) seconds.
-
After the Time Sync function is turned ON, dock your iPhone or iPod, the unit will start authentication and will sync time/date from docked iPhone or iPod.
-
As Time Sync processes, "TIME SYNC" will flash for approximately two (2) minutes on LCD.
-
If Time Sync is turned ON while your iPhone or iPod is docked, the IHD171 will automatically synchronize time and date from the docked iPhone or iPod
Note: Time Sync is compatible with iPhone 3G, iPhone, iPod touch (2nd generation), iPod nano (4th generation), iPod classic, iPod touch (1st generation), iPod nano (3rd generation), iPod nano (2nd generation), iPod with video, iPod nano (1st generation).
Setting the Clock Time and Calendar
- Press and hold the TIME SET Button located on the top of the unit until 12H or 24H appears. Select your desired clock display either 12 hour or 24 hour by turning TUNING Knob (or press IN or IN on the remote control). Then press the TIME SET Button again to confirm 12H or 24H mode setting.
- The hour display at the center will flash. Turn the TUNING Knob (or press IR or IR on the remote control) to set the current time, then press the TIME SET Button again to confirm clock setting. (Note: if the system is set to 12-hour mode, the AM or PM indicator will be lighted on.) The minute display will now flash. Follow the same procedure to set the minute.
- The month, date and year display at the lower right will flash successively. Press the TIME SET Button to accept the current setting, or turn TUNING Knob (or press 📄 or 📋) on the remote control) until current month, date or year is displayed. Press the TIME SET Button to confirm month, date or year setting.
Luc|01017
OPERATIONAL INSTRUCTIONS OPERATIONAL INSTRUCTIONS
Setting the Alarm Time
- The unit can set two Alarm Times.
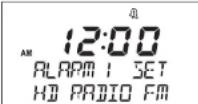
- Press and hold the ALARM 1 or ALARM 2 Button until the display flashes. Press the SOURCE / WAKE TO Button to select mode of HD RADIO FM, HD RADIO AM, IPOD or BUZZER to wake to, then press ALARM 1 or ALARM 2 Button to confirm.
- The Hour display will flash, turn TUNING Knob (or press or Button on the remote control) to select, press ALARM 1 or ALARM 2 Button to confirm.
- The Minute display will flash, turn TUNING Knob (or press or Button on the remote control) to select, press ALARM 1 or ALARM 2 Button to confirm.
- The Volume level display will flash, turn VOLUME Knob to select, press ALARM 1 or ALARM 2 Button to confirm.
- The Alarm 1 or Alarm 2 icon will light up.
Notes: Once you set the alarm time, the alarm will be automatically armed. The Alarm Iron will appear to indicate the alarm is armed. Make sure to adjust volume level for comfortable wake up volume.
Using the Alarm
- To preview the alarm time, just press the ALARM 1 button or ALARM 2 button to view.
- Press the ALARM 1 button or ALARM 2 button again to arm or disarm the alarm.
-
When the alarm is sounding, press the POWER button to turn the alarm OFF. The alarm will come on again the next day at the same time.
-
To stop the alarm from coming on the following day, press the ALARM 1 button or ALARM 2 button to turn it OFF. The Alarm Icon will disappear to indicate the alarm is disarmed.
-
If the alarm is not turned off after it sounds it will play for approximately 1 hour then turn off automatically. This cycle will repeat every 24 hours unless the controls are changed.
Note: When setting the unit to "Wake to iPod," Your iPod must be properly docked and turned off (Not in Play mode) or the alarm will not sound. When you select "Wake to iPod," be sure your iPod has enough songs to play for 1 hour, otherwise set the iPod repeat mode to ON. If there is no iPod is present or there is no music on your iPod at alarm time, the clock radio will automatically switch to buzzer alarm.
Snooze/Dimmer Operation
- Press the SNOOZE / DIMMER button on the clock radio (or remote control) after the alarm sounds. The alarm will go off and will come on again in approx. 9 minutes. You may repeat this cycle several times during the 1 hour alarm cycle.
- During normal operation, press the SNOOZE / DIMMER button to control the brightness of the LCD display.
Sleep Operation
- When the clock radio is OFF or while listening to your iPod or the radio, press the SLEEP button to enter sleep mode.
- The unit will automatically turn off after the selected time. Sleep mode has a Gentle Sleep feature which gradually lowers the volume.
- You can adjust the sleep timer from 120 ->90 ->75 ->60 ->45 ->30 ->15 ->00 minutes by pressing the SLEEP button again.
- Pressing the SLEEP button to "00" will turn off the unit.
- When the display changes back to show the real time, pressing the SLEEP button once will show the sleep time remaining. Pressing it again will change sleep time to the next lowest increment.
- Clock radio has independent volume setting for sleep mode so you can adjust the sleeping volume without affecting the alarm volume. Turn the VOLUME knob or press Volume + / - But tons on the remote control to adjust sleep volume. The sleep volume will remain at that level the next time you enter sleep mode until controls are changed.
- To stop listening at any time, press the POWER button.
OPERATIONAL INSTRUCTIONS
Listening to the Radio
Extend the FM wire antenna fully for best reception (do not strip, alter or attach to other antennas). The AM loop antenna should be placed up to 12" away from the unit for best reception. Rotate the AM loop antenna as required for best reception.
1. Press the POWER button to turn on the unit. Press the SOURCE / WAKE TO button on the clock radio to select AM or FM band to play the radio. The radio frequency appears at the center of the display.
2. Tum the TUNING knob on the clock radio (or press I or on the remote control) to tune in the desired station. Press and hold the I or on the remote control for about two (2) seconds to Auto scan to the next clear station.
3. Turn the VOLUME knob on the clock radio for press Volume+/- button on the remote control) to adjust the system volume.
4. Press the EQ button to select ROCK, POP, CLASSIC, JAZZ, BASS or NORMAL for the desired sound effect.
5. Press the MUTE button on the remote control to turn OFF the sound. Press the MUTE button again to restore the sound.
6. To turn off the unit, press the POWER button to turn it off.


OPERATIONAL INSTRUCTIONS
Storing Preset Stations
This unit allows you to program 20 stations on FM and 10 stations on the AM band.
1. Turn the TUNING knob on the clock radio (or press I or the remote control) to tune to the station you wish to store.
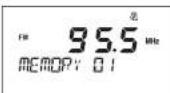
2. Press the MEMORY button once to store the station.
3. While preset track indicator flashing on the display, press PRESET button repeatedly to select preset track.
4. Press MEMORY button again to confirm after your preset number selected.
5. To store other stations, repeat the steps above.
Recalling Preset Stations: Press the PRESET button repeatedly to select the desired station.

|Luy|12H0171
OPERATIONAL INSTRUCTIONS
iTunes Tagging
- While listening to broadcast music on an HD Radio station, the user can hear a song and tag it (if available) for feature review or purchase from Apple iTunes store by pressing the iTunes Tag button.
-
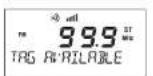
The radio equipped with an iTunes Tag button store data for the currently playing song. If tagging data is available for the song, the LCD will display the screens shown below.
-
If iTunes tagging is successful, the LCD will display the screens shown below. Up to 50 tags can be stored.



-
The user can tag the song without needing to know anything about it or its originating station. The song information is stored on the radio until your iPod is connected to it.
-
When your iPod is connected to it, the unit will transfer the tagged song information to your iPod. Your iPod then stores the data until it is synched with iTunes.
-
When your iPod is connected to your computer, iTunes will imports the tag data ^® , analyze it, and present it to the user in the form of a tagged play list. iTunes then displays the song title, artist, album and other information for each tagged song.
- With iTunes, you can save, review or delete any item in the tagged play list and easily purchase any of the listed titles through iTunes.
(Note: "iTures Tagging" function supports iPod 5th generation (video), iPod classic, iPod nano 3rd and 4th generation, iPod touch 1st and 2nd generation, and iPhone, iPhone 3G.)

**Sync* must be clicked in iTunes. Tagged information can be found under "Store" tab in iTunes.
OPERATIONAL INSTRUCTIONS
Charging your iPhone or iPod
Make sure you are using the correct dock adapter for your iPhone or iPod and that it is properly docked into the unit. Failure to do so may damage your iPhone or iPod.
- Whenever your iPhone or iPad is docked in the system, it recharges (until fully charged).
Note: Your iPhone or iPod will not charge in radio mode to prevent radio interference.
Listening to your iPhone or iPod
- Dock your iPhone or iPod. Press the POWER button to turn on the clock radio.
- Press the SOURCE/WAKE TO button (or press SOURCE button on the remote control) to select iPod mode. You will hear the music playing from your iPhone or iPod, and an iPod icon will appear on the clock radio LCD display to indicate iPod Playing mode.
- Press the PLAY/PAUSE button again to pause play; press again to resume play;
- Turn the VOLUME knob on the unit (or press Volume +/- buttons on the remote control) to adjust the system volume.
- Press the EQ Button to select ROCK, POP, CLASSIC, JAZZ, BASS or NORMAL for desired sound effect.
- Press the MUTE button on the remote control to turn OFF the sound. Press the MUTE button again to restore the sound.
- Turn the TUNING knob (or press 🎋 or 🌘 on the remote control) to go to the next or beginning of current track. Press and hold the 🎋 or 🌘 button on the remote control to start high speed search.
- To turn off the unit, press the POWER button to turn it off. Your iPhone or iPod will continue charging while in the dock.
OPERATIONAL INSTRUCTIONS
Using your iPhone
- When your iPhone is successfully detected in the dock, the "iPod" icon is shown on the display.
- During playback, hold 🎨 or 🌘 on the remote control to start high speed search. When the desired passage is found, release the key. Normal playback will resume.
- You can watch your favorite movies on your TV.
- If there is an incoming call during playback of music or movies, the word "Decline" or "Answer" will appear on the screen if your iPhone is unlocked (or has warning notice "slide to unlock"). Normal playback will resume at the end of the call.
Listening to a non-docking iPod or other portable audio devices
If you are using your iPod without a docking port, other MP3 player or other portable audio device, it can still be played on the iHD171.
- Plug one end of the audio cable into the headphone or LINE OUT jack on your device and the
other end of the cable into the clock radio AUX in Jack, located on the back of the unit. - Press the SOURCE/WARE TO BUTTON ON THE CLOCK TABLE UNTL AUX ITEM DISPLAYS ON LCD.
- Turn on and play your device.
- Turn the VOLUME knob on the clock radio (or press Volume+/- buttons on the remote control) to adjust the system volume. You may need to adjust your device volume, too.
- To turn off the unit, press the POWER button.
OPERATIONAL INSTRUCTIONS
Watching Videos on an External Monitor or TV
- Connect the provided video cable (yellow) into the rear of the ID171 (VIDEO). Then connect the opposite plug side of the video cable to the video input jacks of the external display device.
- Connect the provided audio cable (red and white) into the rear of the iHD171 (AUDIO). Then connect the opposite plug side of the video cable to the audio input jacks of the external display device.
- Turn on the external display device. Change the mode of the external display device to the AV mode if necessary. (Note: Please refer to the owner's manual of external devices for AV Mode)
- Place your iPhone or iPad in the built-in universal clock.
- Play the video on your iPhone or iPod. (Please note that the "TV Out" setting of your iPod must be set to "On" in order to see the iPod video contents on your TV via the iHD171.
IMPORTANT: When Using TV Out, please make sure your iPod Video setting is set to "TV Out-ON" Please follow the instructions below on your iPhone or iPod to change the setting:
- On the menu screen of your iPhone or iPod, select the "Videos" option.
- On the next menu screen, select the "Video Settings" option.
- On the next menu screen, select the 'TV Out' option and set it to 'On.'
Note: When watching video content using Video-cut lock and TV Out is set to ON on your iPhone or iPod, your iPhone or iPod can the connected external device will not simultaneously display camera or video. To play videos from your iPhone or iPod, TV-out should be set to "OFF."
MAINTENANCE AND TROUBLESHOOTING GUIDE
Maintenance
- Place the unit on a level surface away from sources of direct sunlight or excessive heat.
- Protect your furniture when placing your unit on a natural wood and loquered finish. A cloth or other protective material should be placed between it and the furniture.
- Clean your unit with a soft cloth moistened only with mild soap and water. Stronger cleaning agents, such as Benzine, thinner or similar materials can damage the surface of the unit.
Troubleshooting
• The unit does not turn on.
- The AC plug may not be connected properly. Check the connection.
The wall outlet may not function. Try another outlet.
- Your iPhone or iPod does not fit into the built-in universal dock.
- The installed dock adapter is not the correct one. Check whether a correct dock adapter is installed. - There might be some obstructions on the dock. Check whether there are any obstructions on the connector and on the dock. If everything is secured, place your iPod back into the dock.
- It does not recognize your iPhone or iPod when docked.
Your iPhone or iPod may not be properly docked. Take your iPhone or iPod out of the dock, and remove any obstructions on the connector from the dock and on your iPhone or iPod. Place your iPhone or iPod back into the dock.
- Your iPhone or iPod is frozen or locked up. Check whether your iPhone or iPod operates correctly before placing it back into the dock. Please refer to the owner's instruction manual of your iPod or iPhone.
The software of your iPhone or iPod is outdated. Upgrade the software on your iPhone or iPod. For the details on how to upgrade the software on your iPhone or iPod, please visit the Apple website: http://www.apple.com.
- Your iPhone or iPod is not charged even though it is in the clock.
- Your iPhone or iPod might not be properly docked. Take your iPhone or iPod out of the dock, and remove any obstructions on the connector from the dock and on your iPhone or iPod. Place your iPhone or iPod back into the dock.
TROUBLESHOOTING GUIDE
Troubleshooting - continued
- Your iPhone or iPod is frozen or locked up. Check whether your iPhone or iPod operates correctly before placing it back into the dock. Please refer to the owner's instruction manual of your iPhone or iPod.
- Your iPhone or iPod will not be charged in Radio mode to avoid major radio interference.
- When playing music, the sound gets distorted.
- The volume level on the connected device or the iHD171 is set too high. Decrease the volume until the distortion has disappeared.
The source sound is distorted. If the original sound source (MP3) on your iPod is poor quality, the distortion and noises are easily noticed with high-power speakers. Try a different audio source like a music CD to test.
• The remote control does not operate properly.
- The installed battery is weak. Replace with a new battery.
- It is not aimed to the IHD171 or too far away from it. Move within 20 feet of the unit and point the remote control toward the IHD171.
- AM band is too noisy.
- The reception at the set location is poor. Rotate the AM loop antenna position for best reception. - Move the antenna away from the unit to avoid interference.
• FM band is too noisy.
- The reception at the set location is poor. Check that the FM antenna is properly connected to the jack in the rear of the unit.
- Stretch the antenna to a 'T' shape and move slightly closer to a window.
USER SAFETY GUIDE
WARNING
- TO PREVENT FIRE OR SHOCK HAZARD. DO NOT EXPOSE THIS APPLIANCE TO RAIN OR MOISTURE. - THIS APPLIANCE SHALL NOT BE EXPOSED TO DRIPPING OR SPLASHING WATER AND THAT NO OBJECT FILLED WITH LIQUIDS SUCH AS VASES SHALL BE PLACED ON APPARATUS.

The lightning flash with an arrowhead symbol within an equilateral triangle is intended to alert the user of the presence of un-insulated "dangerous voltage" within the product's enclosure that may be of sufficient magnitude to constitute a risk of electric shock to people.

WARNING: TO REDUCE THE RISK OF ELECTRIC SHOCK, DO NOT REMOVE COVER (OR BACK). NO USER-SERVIC-ABLE PARTS INSIDE. REFER SERVICING TO QUALIFIED SERVICE PERSONNEL.

The exclamation point within an equilateral triangle is intended to alert the user of the presence of important operating and maintenance (servicing) instruction in the literature accompanying the apliance.
IMPORTANT SAFETY INSTRUCTIONS
- Read these instructions
- Keep these instructions
- Heed all warnings
- Follow all instructions
- Do not use this apparatus near water
- Clean only with dry cloth
- Do not block any ventilation openings. Install in accordance with the manufacturer's instructions
- Do not install near any heat sources such as radiators, heat registers, stoves, or other apparatus (including amplifiers) that produce heat
- Do not defeat the safety purpose of the polarized or grounding-type plug. A polarized plug has two blades with one wider than the other. A grounding type plug has two blades and a third grounding prong. The wide blade or the third prong are provided for your safety. If the
USER SAFETY GUIDE
IMPORTANT SAFETY INSTRUCTIONS - continued
provided plug does not fit into your outlet, consult an electrician for replacement of the obsolete outlet.
- Protect the power cord from being walked on or pinched particularly at plugs, convenience receptacles, and the point where they exit from the apparatus.
- Only use attachments/accessories specified by the manufacturer.
- Use only with the cart, stand, tripod, bracket, or table specified by the manufacturer, or sold with the apparatus. When a cart is used, use caution when moving the cart/apparatus combination to avoid injury from tip-over.
- Unplug this apparatus during lightning storms or when unused for long periods of time.
- Refer all servicing to qualified service personnel. Servicing is required when the apparatus has been damaged in any way, such as power supply cord or plug is damaged, liquid has been spilled or objects have fallen into the apparatus, the apparatus has been exposed to rain or moisture, does not operate normally, or has been dropped.
- Grounding or Polarization - This product may be equipped with a polarized alternating-current line plug (a plug having one blade wider than the other). This plug will fit into the power outlet only one way. This is a safety feature. If you are unable to insert the plug fully into the outlet, try reversing the plug. If the plug should still fail to fit, contact your electrician to replace your obsolete outlet. Do not defeat the safety purpose of the polarized plug. Alternate Warnings: This product is equipped with a three-wire grounding-type plug, a plug having a third groundpin pin. This plug will only fit into a grounding-type power outlet. This is a safety fixture that you are able to use the plug into a single power outlet to replace your obsolete outlet. Do not defeat the same resources of the grounding-type plug.
- Ventilation - Slots and openings in the cabinet are provided for ventilation and to ensure reliable operation of the product and to protect it from overheating, and these openings must not be blocked or covered. The openings should never be blocked by placing the product on a bed, sofa, rug, or other similar surface. This product should not be placed in a built-in installation such as a bookcase or rack unless proper ventilation is provided or the manufacturer's instructions have been adhered to.
- The MAINS plug or an appliance coupler is used as the disconnect device, the disconnect device shall remain readily operable.

|Luv|201-0171
USER SAFETY GUIDE
IMPORTANT SAFETY INSTRUCTIONS - continued

CLEANING
Always disconnect unit from power supply before attempting to clean it. Use soft clothmoistened with soapy water, and wipe gently. Do not use solvents or abrasive materials.

LASER SAFETY
This unit uses laser technology. Only a qualified professional should remove the cover or attempt to service this device, due to possible eye injury.

CAUTION - CLASS 1 LASER PRODUCT
Use of controls adjustments and/or performance of procedure other than specified herein may result in hazardous radiation exposure.

DANGER
Invisible laser radiation when open and interlock failed or defeated. Avoid direct exposure to beam. CAUTION: HAZAROUS LASER RADIATION WHEN OPEN AND INTERLOCK DEFEATED.

YOU CAN HELP TO PROTECT THE ENVIRONMENT!
Please remember to respect the local regulations: Hand in the non working electrical equipment to an appropriate waste disposal center.
FOR USED BATTERIES
Disposed of the used batteries properly. Please follow the local regulations for the battery disposal.
USER SAFETY GUIDE
IMPORTANT SAFETY INSTRUCTIONS - continued
FCC NOTICE TO A USER IN USA
This equipment has been tested and found to comply with the limits for a Class B digital device, pursuant to Part 15 of the FCC Rules. These limits are designed to provide reasonable protection against harmful interference in a residential installation. This equipment generates, uses, and can radiate radio frequency energy and, if not installed and used in accordance with the instructions, may cause harmful interference to radio communications. However, there is no guarantee that interference will not occur in a particular installation. If this equipment does cause harmful interference in a residential installation, which can be determined by turning the equipment off and on, the user is encouraged to try to cut the interference by one or more of the following measures:
-
Reorient or relocate the receiving antenna.
-
Increase the separation between the equipment and receiver.
-
Connect the equipment into an outlet on a circuit different from that to which the receiver is connected.
-
Consult the dealer or an experienced radio/TV technician for help.
FCC RULES
This device complies with Part 15 of the FCC Rules. Operation is subject to the condition that this device does not cause harmful interference.
Note: Do not make changes or modify the device in any way. Changes or modifications not expressly approved by the party responsible for compliance could void the user's authority to operate the equipment.
ILuv|22HD171
USER SAFETY GUIDE
IMPORTANT SAFETY INSTRUCTIONS - continued
IMPORTANT NOTES ON HEARING
Your hearing is very important to you and to us, so please take care when operating this equipment. We strongly recommend you to follow the guideline below in order to prevent possible damage or loss of hearing.
If you continuously listen to the loud sounds, your hearing will adapt to continuous loud sounds and will give you the impression that the volume has been reduced. What seems normal to you may in fact be harmful. To guard against this BEFORE YOUR HEARING ADAPTS, set the volume at a low level and slowly increase the volume level until you can hear comfortably and clearly without distortion. Damage to your hearing is accumulative and is irreversible. Any ringing or discomfort in the ears indicates that the volume is too loud. Once you have established a comfortable listening level, DO NOT INCREASE THE VOLUME LEVEL FURTHER.
In the use of headphones, please take more attention. Hearing experts say that listening to a loud music can damage your hearing, especially when listening to music with headphones.
USER SAFETY GUIDE
IMPORTANT SAFETY INSTRUCTIONS - continued
IC NOTICE TO A USER IN CANADA
Since digital circuitry may cause interference to other radio or television tuners nearby, switch this unit off when not in use or move it away from the affected radio/television tuner.
NOTE: This digital apparatus does not exceed the Class B limits for radio noise emissions from digital apparatus as set out in the Radio Interference flegalations of Industry Canada. These limits are designed to provide reasonable protection against harmful interference in a residential installation. This equipment generates, uses and can radiate radio frequency energy and, if not installed and used in accordance with the instructions, may cause harmful interference to radio communications. However, there is no guarantee that interference will not occur in a particular direction or direction of the system. The equipment must be tested for radio or television operation (which can be determined by turning the equipment off), the user is encouraged to try to correct the interference by one or more of the following measures:
- Reorient or relocate the receiving antenna.
- Increase the separation between the equipment and receiver.
- Connect the equipment into an outlet on a circuit different from that to which the receiver is connected.
Consult the dealer or an experienced radio / TV technician for help.
WARNING!
- The apparatus shall not be exposed to dripping or splashing and that no objects filled with liquids, such as vases, shall be placed on apparatus.
- Mains plug is used as the disconnect device. It shall remain readily operable and should not be obstructed during intended use. To be completely disconnected, the apparatus from supply mains, the mains plug of the apparatus shall be disconnected from the mains socket outlet completely.
|Luv|24|HD171
USER SAFETY GUIDE
ADDITIONAL IMPORTANT INSTRUCTIONS
- Place the apparatus with some distances from the nearby objects or walls for sufficient ventilations. The ventilation should not be impeded by covering the ventilation openings with items such as newspapers, table-cloths, curtains, etc.
- No naked flame sources such as lighted candles should be placed on the apparatus.
- Dispose of used batteries properly. Follow the local regulation for the battery disposal.
- Use this apparatus in the moderate climates. It is recommended not to use this apparatus such in a lighting storm.
SPECIFICATIONS
- Audio output: 4Wms(L) + 4Wms(R)
Total: SWAMS / 15WPEAK / 160WWPO - Connectivity
30-pin male connector for iPod / iPhone
3.5mm stereo headphone jack
3.5mm aux. in jack
3.5mm Video cut jack
FM antenna
AM antenna - Radio Frequency Range
AM: 520kHz - 1710kHz
FM: 87.5MHz - 107.9MHz
• Power Requirement
AC120V60Hz - Backup: 5V battery
- Dimensions (W x H x D):
11.8"×3.9"×7.75"(300mm×99mm×197mm)
iLuv
THANK YOU FOR YOUR PURCHASE
Visit our website at www.-LUV.com
©2008 www.iLure.com
Davis is a trademark of GWA Systems Corp. Ltd. in a trademark of Apple Inc., which is a registered in the U.S. and other countries. This is a trademark of Apple Inc. (The following company is not registered in the U.S. and other countries). All rights and/or the property of the respective owners, 400 Radio Technology manufacturer, Inc. from Equity Digital Corp. U.S. and foreign patents. HD Radio has the 400 and HD Radio logos and proprietary trademarks of Equity Digital Corp. (Financial Post are not included in this package). Features and specifications are subject to change without prior restrictions.
© 2001 MNE Electronics Corp. All rights reserved. No portion of this prior works on product and other networks including design, template materials, may be reproduced or transmitted by any form without the express written consent of MNE Electrical Corp. by any means electronic or mechanical, including photooperating according to use of an information storage and retrieval system. Any one thereof a conclusion or reproduction of this prior material or product, or any portion thereof will be presented to the future possible extent of the use.
Printed in China


- INTRODUCTION
- HD Radio receiver with iTunes tagging
- HD Radio receiver
- IPod
- TABLE OF CONTENTS
- GETTING STARTED
- Power Source
- Note:
- Installing the Backup Batteries
- Protect your Furniture
- Installing the Remote Control Battery
- Preparing the Remote Control
- Installing the Dock Adapter
- Connecting the FM Antenna Wire
- Connecting the AM Loop Antenna
- OPERATIONAL INSTRUCTIONS
- Using the Time Sync Feature
- Setting the Clock Time and Calendar
- OPERATIONAL INSTRUCTIONS OPERATIONAL INSTRUCTIONS
- Setting the Alarm Time
- Using the Alarm
- Snooze/Dimmer Operation
- Sleep Operation
- iTunes Tagging
- Charging your iPhone or iPod
- Listening to your iPhone or iPod
- Using your iPhone
- Listening to a non-docking iPod or other portable audio devices
- Watching Videos on an External Monitor or TV
- IMPORTANT: When Using TV Out, please make sure your iPod Video setting is set to "TV Out-ON" Please follow the instructions below on your iPhone or iPod to change the setting:
- MAINTENANCE AND TROUBLESHOOTING GUIDE
- Maintenance
- Troubleshooting
- TROUBLESHOOTING GUIDE
- Troubleshooting - continued
- USER SAFETY GUIDE
- WARNING
- IMPORTANT SAFETY INSTRUCTIONS
- CLEANING
- LASER SAFETY
- CAUTION - CLASS 1 LASER PRODUCT
- DANGER
- YOU CAN HELP TO PROTECT THE ENVIRONMENT!
- FOR USED BATTERIES
- FCC NOTICE TO A USER IN USA
- FCC RULES
- ADDITIONAL IMPORTANT INSTRUCTIONS
- SPECIFICATIONS
- iLuv
Brand : ILUV
Model : IHD171
Category : Radio