
Vibro Classic - Radio ILUV - Free user manual and instructions
Find the device manual for free Vibro Classic ILUV in PDF.


| Brand | iLuv |
| Model | Vibro Classic |
| Product Type | Radio (AM/FM) |
| Tuning Type | Analog |
| Frequency Range FM | 88 - 108 MHz |
| Frequency Range AM | 530 - 1600 kHz |
| Antenna | Telescopic |
| Speaker Power | 3 W |
| Headphone Jack | 3.5 mm |
| Power Source | 4 x AA batteries (not included) or AC adapter (not included) |
| Battery Life | Approximately 20 hours |
| Power Consumption | 2 W |
| Dimensions (W x H x D) | 20 x 12 x 8 cm |
| Weight | 0.5 kg |
| Color | Black / Retro Design |
| Functions | AM/FM tuning, volume control, sleep timer (if applicable), LED indicator |
| Package Contents | Radio, user manual |
| Maintenance | Wipe with a dry, soft cloth. Do not use liquid cleaners. |
| Safety | Do not expose to water, do not disassemble, keep away from heat sources. |
| Spare Parts & Repairability | No spare parts available. Dispose according to local electronic waste regulations. |
| Warranty | 1 year |
Frequently Asked Questions - Vibro Classic ILUV
User questions about Vibro Classic ILUV
0 question about this device. Answer the ones you know or ask your own.
Ask a new question about this device
Download the instructions for your Radio in PDF format for free! Find your manual Vibro Classic - ILUV and take your electronic device back in hand. On this page are published all the documents necessary for the use of your device. Vibro Classic by ILUV.
USER MANUAL Vibro Classic ILUV
Visit our website at www.i-Luv.com
© 2011 www.i-Luv.com
iLuv is a trademark of iLuv Creative Technology. iPod is a trademark of Apple Inc. registered in the U.S. and other countries. All logos and brands are property of their respective owners. iPod not included in this package. Features and specifications are subject to change without prior notification.
© 2011 iLuv Creative Technology. All rights reserved. No portion of this printed material or product enclosed herewith including design, shape or graphics, may be reproduced or transmitted in any form without the expressed written consent of iLuv Creative Technology, by any means, electronic or mechanical, including photocopying, recording or use of an information storage and retrieval system. Any unauthorized distribution or reproduction of this printed material or product, or any portion thereof, will be prosecuted to the fullest possible extent of the law.
Designed in New York, USA / Printed in China
English
iLuv®
Model : iMM153
Instruction Manual
Desktop Alarm Clock with Bed Shaker for your iPod®
INTRODUCTION
Congratulations on your purchase of the new iMM153 your iPod. Please keep this manual for future reference.
Desktop Alarm Clock with Bed Shaker for your iPod
• Built-in speakers allow you to hear your music with depth and clarity
• Large display; easy to read
- Auxiliary line input for any audio devices with 3.5mm jack
• LCD dimmer level control (10 steps)
Features
iPod\*
- Enjoy rich sound from your iPod
- Plays and charges your iPod
- Integrated universal dock for your iPod
Digital Dual Alarm Clock
• Digital clock display with dual alarm clock
- Bed shaker vibrates a bed or pillow to wake up the heaviest sleepers
- Wake to iPod, FM radio, buzzer, or bed shaker
- Sleep iPod, FM radio
Radio
- FM stereo radio
- PLL digital tuning technology
- Programmable presets for 10 radio stations
What's included
- AC adapter
- Bed shaker
* iPod touch (1st, 2nd, 3rd, and 4th generation), iPod nano (1st, 2nd, 3rd, 4th, 5th, and 6th generation), iPod classic, iPod with video, iPod 4th generation, iPod mini.

TABLE OF CONTENTS
Getting Started
Installing the AC Adapter 3
Protect your Furniture 3
Installing the Dock Adapter 3
Location of Controls on the Main Unit 4
Power (On/Off) 5
Backup Battery 5
Backup Function 5
Operational Instructions
Setting the Clock 6
Setting the Alarm 6
Using the Snooze Function 7
Using the Sleep Function 7
Listening to your iPod 7
Listening to the Radio 8
Charging your iPod 9
AUX In 9
Adjusting the Brightness of the LCD Screen 9
Resetting the Unit 9
Maintenance 9
Troubleshooting Guide 10
User Safety Guide 11
Specifications 18
GETTING STARTED
Installing the AC Adapter
Locate the AC adapter jack on the back of the unit. Insert the AC adapter cable into the jack, and plug into the wall outlet.
Protect your Furniture
This model is equipped with foam 'feet' to prevent the product from moving when you operate the controls.
Installing the Dock Adapter
1. How to insert a dock adapter
a. Please use dock adapter that came with your iPod.
b. Using the correct dock adapter ensures the proper fit for your iPod.
c. Gently push the dock adapter down into the universal dock.
d. Carefully place your iPod into the universal dock. Your iPod must not be in a case or "Skin".
2. How to remove the dock adapter
- Remove your iPod first, then carefully remove the dock adapter.
GETTING STARTED
Location of Controls on the Main Unit
- iPod dock
- SLEEP/MEMORY button
- POWER /AL OFF/MODE button
- Alarm 1 button
- TIME SET button
- Alarm 2 button
- LCD screen
- AUX IN jack
-
POWER jack
-
VOLUME UP ◀ button
- PLAY/PAUSE ▶ PRESET button
- FAST FORWARD▶ button
- VOLUME DOWN ◀ button
- FAST BACKWARD button
- SNOOZE/DIMMER button
- BED SHAKER jack
- FM ANT.
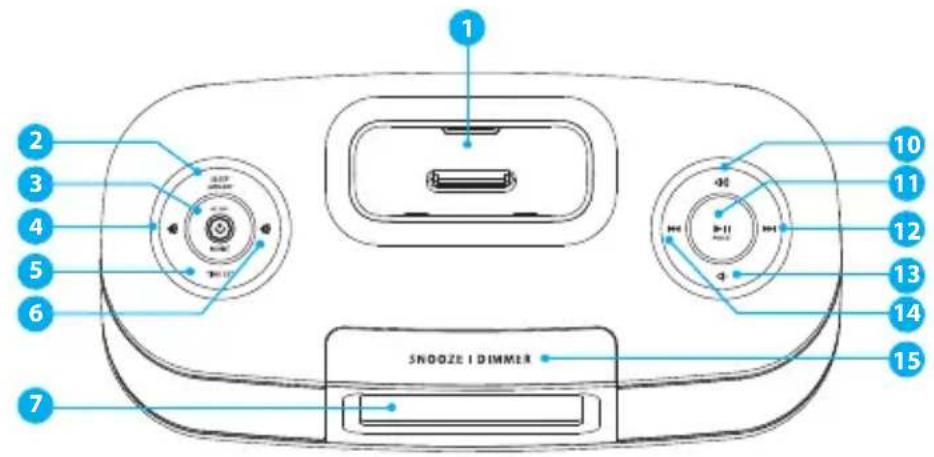

GETTING STARTED
Power
On
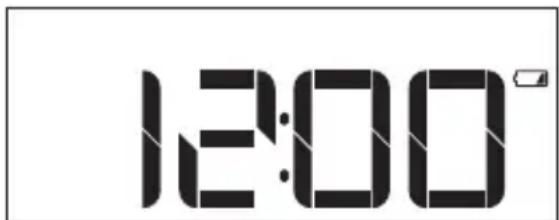
Connect AC power adapter to the unit. Then plug into AC wall outlet. Clock will appear on LCD. Press POWER/MODE/AL OFF to turn on the unit. Power indication LED will light and LCD will display current playing mode.

OFF
Press and hold POWER/MODE/AL OFF for three (3) seconds to turn off the unit. LCD will display current time only.
Back Up battery
Insert two (2) AAA batteries. When there's a power outage, clock will still be displayed. In this status, the unit will not fully function. When the inserted battery is low, low battery indicator will display on the LCD.
Back Up Function
If the AC supply is interrupted, the clock display and preset radio stations will go off and all settings will be canceled. To back up the clock and preset stations, insert two "AAA" size batteries (not supplied) in the battery compartment in the base of the unit. The back up battery does not provide operation of your iPod.
Note: Always use Alkaline batteries and remove the batteries when the unit is not to be used for an extended period of time.
OPERATIONAL INSTRUCTIONS
Setting the Clock
- In standby mode, press and hold TIME SET on the top panel for 3sec. to enter Clock set mode.
- The hour digit will begin flashing. Press◀ or ▶ to set the hour. Press TIME SET to confirm.
- When hour is confirmed, minute digit will begin flashing. Press ◀ or ▶ to set the minute. Press TIME SET to confirm.
Setting the Alarm
User is able to set two distinct alarms on the unit.
Press ☐ or ☐ to enable Alarm 1 or Alarm 2. When Alarm 1 or Alarm 2 or both Alarm 1 and Alarm 2 is enabled, icon will be displayed on the LCD. To disable, Press ☐ or ☐ again. Icon will disappear
- Press and hold the 🔒 button for three(3) sec. and the hour digit will begin flashing. Press◀◀ or ▶▶ to set the hour. Press 🔒 to confirm.
- Minute digit will begin flashing, Press or to set the minute. Press to confirm.
-
Wake up mode display will begin flashing, Press◀◀ or ▶to select from below:
-
Wake to FM radio. Pre-tune your desired radio channel in FM radio mode before setting the wake up function.
· Wake to your iPod.
· Wake to Buzzer.
· Wake to Shaker. Make sure the Shaker is plugged in into "SHAKER" behind the unit.
Notes: Shaker can be combined with other wake to modes.
When FM radio, iPod, or Buzzer is selected, the iMM153 will ask whether or not to enable shaker.
When asked, press ◀◀ or ▶▶ to choose "On" or "Off" then press 🔍 to confirm.
* "On" or "OFF" on LCD screen refers to the shaker function, not the alarm itself.
- When the wake up mode is selected, the Alarm indicator appears on the display.
Notes: For Radio wake up and iPod playback, user must set desired volume for alarm. The iMM153 will remember last volume setting to play music for alarm. If the wake up mode is set to iPod playback with no iPod connected, it will become the buzzer alarm.

If the wake up mode is set to Shaker but the Shaker is not connected, it will become the buzzer alarm
- To set Alarm 2, press and hold the button and repeat steps 1 to 4 above.
OPERATIONAL INSTRUCTIONS
Using the Snooze Function
After Alarm is ON, press SNOOZE/DIMMER button to temporarily deactivate the alarm which will activate again after 7 minutes. Press POWER/MODE/AL OFF to switch off the Alarm.
Using the Sleep Function
Press SLEEP/MEMORY and the sleep indication will turn ON. Press the SLEEP button again to change and select from "15" to "30", "60", "90", "120", or "OFF". Selectinig "OFF" disables the sleep function. While the sleep function is activated, press SLEEP/MEMORY once and the remaining sleep time will be shown. Press SLEEP/MEMORY again to select other sleep times.
IMPORTANT:
- Occasionally, files on your iPod may become corrupted. This may cause erratic behavior with your iLuv products. Apple recommends visiting their website www.apple.com to obtain instructions on resetting or restoring your iPod to factory settings.
- It is imperative to your iPod and the built-in universal dock that you use the correct dock adapter for your iPod and that the dock adapter fits appropriately into the built-in universal dock. Ignoring these rules can cause severe damage to your iPod. Please refer to the section "Installing the Dock Adapter" to install the dock adapter properly before operating iMM153 with your iPod.
Listening to your iPod
- Press POWER/ MODE/AL OFF to Power on the unit. To select iPod mode, press POWER/ MODE/ AL OFF again until the "iPod" icon is shown on the top of display.
- While the iPod mode is on, insert your iPod to the universal dock and press▶ II/PRESET to play.
- Press▶/PRESET to control the play and pause functions.
- Press or to select previous or next song.
- Press and hold ◀ or ▶ to rewind or fast forward currently playing music from iPod.
- Press the ◀/◀ to adjust the VOLUME level of this unit as desired.
OPERATIONAL INSTRUCTIONS
Listening to the Radio
Note: Unwind and extend antenna to its full length. It may be necessary to adjust the direction of this wire antenna until you find the position that provides the best reception for your favorite FM stations.
- Press POWER/MODE/AL OFF to Power on the unit. To select radio, press POWER/MODE/AL OFF until "FM" icon is shown on the top of display.
- FM radio frequency will show on the display.
- Tune to the desired frequency as follows:
a) Automatic Tuning
i) Press and hold or for three (3) seconds. Auto tuning will start.
ii) The tuner will search the frequency for the next strong station and stop on that station. Repeat this procedure until the tuner stops on your desired station.
b) Manual Tuning
Repeatedly press ◀ or ▶ until the frequency of the desired station appears on the display.
After entering the radio mode for about 3 seconds, the display will show the time mode again. Press TIME SET again to show the radio frequency.
- Preset FM stations in the tuner memory
This unit includes a 10 station preset memory. Store up to 10 FM stations in the tuner memory for immediate recall. The procedure for storing stations in memory is as follows:
a) Preset FM channel
i) Follow instructions above to select the first station you wish to memorize and the FM frequency will show on the display. For example: FM 91.8 MHz.
ii) Press and hold SLEEP/MEMORY, the preset channel number "P-1" begins flashing on the display
iii) Press ▶I/PRESET to select preset channel (P-1 to P-10)
iv) Press SLEEP/MEMORY to confirm.
v) Repeat step i) to iv) to until you have memorized up to 10 stations. Press ▶ II /PRESET to listen to preset FM channel P-1 to P-10 at FM radio mode.
Note: The saved preset station will be lost if the AC Power is interrupted and the backup battery is not inserted.
OPERATIONAL INSTRUCTIONS
Charging your iPod
If your iPod is connected to the unit, it will charge automatically.
AUX In
Connect the Audio Output jacks of your auxiliary sound source (MP3 player, CD player, Laptop, TV, etc.) to the AUX IN jack on the back panel of the unit. The auxiliary function will only activate when the aux in jack is fitted with connection cable.
- Press POWER/MODE/AL OFF to select AUX function. "→" will show on the top of the display
- Turn your auxiliary source ON and operate it as usual. The sound from the auxiliary source will be heard through the speakers of the iMM153.
- Adjust the VOLUME level controls of this unit and the auxiliary sound source as desired.
Note: Connection cables are not included with this unit.
Adjusting the Brightness of the LCD Screen
Press SNOOZE/DIMMER to adjust the brightness of the display. It will return to normal after three(3) seconds. Brightness setting ranges from OFF to 9.
Resetting the Unit
If the system does not respond, there may have been a power surge that triggered the internal computer to shut down automatically. If this occurs, disconnect the main power and connect it again after approximately one minute.
Maintenance
- Place the unit on a level surface away from sources of direct sunlight or excessive heat.
- Protect your furniture when placing your unit on a natural wood and lacquered finish. A cloth or other protective material should be placed between it and the furniture.
- Clean your unit with a soft cloth moistened only with mild soap and water. Stronger cleaning agents, such as Benzine, thinner or similar materials can damage the surface of the unit.
TROUBLESHOOTING GUIDE
- The stereo speaker system (iMM153) does not turn on.
a. The AC adapter may not be connected properly. Check the connection.
b. The wall outlet may not function. Try another outlet.
- Your iPod does not fit into the built-in universal dock.
a. The installed dock adapter is not the correct one. Check whether a correct dock adapter is installed.
b. There might be some obstructions on the dock. Check whether there are any obstructions on the connector and on the dock. If everything is secured, place your iPod back into the dock.
- It does not recognize your iPod when docked.
a. Your iPod may not be properly docked. Take your iPod out of the dock, and remove any obstructions on the connector from the dock and on your iPod. Place your iPod back into the dock.
b. Your iPod is frozen or locked up. Check whether your iPod operates correctly before placing it back into the dock. Please refer to the owner's instruction manual of your iPod.
c. The software of your iPod is outdated. Upgrade the software on your iPod. For the details on how to upgrade the software on your iPod, please visit the Apple website: http://www.apple.com.
- Your iPod is not charged even though it is in the dock.
a. Your iPod might not be properly docked. Take your iPod out of the dock, and remove any obstructions on the connector from the dock and on your iPod. Place your iPod back into the dock.
b. Your iPod is frozen or locked up. Check whether your iPod operates correctly before placing it back into the dock. Please refer to the owner's instruction manual of your iPod.
- When playing music, the sound gets distorted.
a. The volume level on the connected device or the iMM153 is set too high. Decrease the volume until the distortion has disappeared.
b. The source sound is distorted. If the original sound source (MP3) on your iPod is poor quality, the distortion and noises are easily noticed with high-power speakers. Try a different audio source like a music CD to test.
USER SAFETY GUIDE
WARNING
· TO PREVENT FIRE OR SHOCK HAZARD. DO NOT EXPOSE THIS APPLIANCE TO RAIN OR MOISTURE.
- THIS APPLIANCE SHALL NOT BE EXPOSED TO DRIPPING OR SPLASHING WATER AND THAT NO OBJECT FILLED WITH LIQUIDS SUCH AS VASES SHALL BE PLACED ON APPARATUS.

CAUTION
RISK OF ELECTRIC SHOCK DO NOT OPEN
The lightning flash with an arrowhead symbol within an equilateral triangle is intended to alert the user of the presence of un-insulated “dangerous voltage” within the product’s enclosure that may be of sufficient magnitude to constitute a risk of electric shock to people.
WARNING: To reduce the risk of electric shock, do not remove cover (or back). No user-servic-able parts inside. Refer servicing to qualified service personnel.

The exclamation point within an equilateral triangle is intended to alert the user of the presence of important operating and maintenance (servicing) instruction in the literature accompanying the apliance.
IMPORTANT SAFETY INSTRUCTIONS
- Read these instructions
- Keep these instructions
- Heed all warnings
- Follow all instructions
- Do not use this apparatus near water
- Clean only with dry cloth
- Do not block any ventilation openings. Install in accordance with the manufacturer's instructions
- Do not install near any heat sources such as radiators, heat registers, stoves, or other apparatus (including amplifiers) that produce heat
- Do not defeat the safety purpose of the polarized or grounding-type plug. A polarized plug has two blades with one wider than the other. A grounding type plug has two blades and a third grounding prong. The wide blade or the third prong are provided for your safety. If the
USER SAFETY GUIDE
IMPORTANT SAFETY INSTRUCTIONS - continued
provided plug does not fit into your outlet, consult an electrician for replacement of the obsolete outlet.
-
Protect the power cord from being walked on or pinched particularly at plugs, convenience receptacles, and the point where they exit from the apparatus.
-
Only use attachments/accessories specified by the manufacturer.
-
Use only with the cart, stand, tripod, bracket, or table specified by the manufacturer, or sold with the apparatus. When a cart is used, use caution when moving the cart/apparatus combination to avoid injury from tip-over.
-
Unplug this apparatus during lightning storms or when unused for long periods of time.

natural_image
Symbolic icon of a person climbing a ladder inside a circle (no text or symbols)-
Refer all servicing to qualified service personnel. Servicing is required when the apparatus has been damaged in any way, such as power-supply cord or plug is damaged, liquid has been spilled or objects have fallen into the apparatus, the apparatus has been exposed to rain or moisture, does not operate normally, or has been dropped.
-
Grounding or Polarization – This product may be equipped with a polarized alternating-current line plug (a plug having one blade wider than the other). This plug will fit into the power outlet only one way. This is a safety feature. If you are unable to insert the plug fully into the outlet, try reversing the plug. If the plug should still fail to fit, contact your electrician to replace your obsolete outlet. Do not defeat the safety purpose of the polarized plug.
Alternate Warnings – This product is equipped with a three-wire grounding-type plug, a plug having a third (grounding) pin. This plug will only fit into a grounding-type power outlet. This is a safety feature. If you are unable to insert the plug into the outlet, contact your electrician to replace your obsolete outlet. Do not defeat the safety purpose of the grounding-type plug.
-
Ventilation – Slots and openings in the cabinet are provided for ventilation and to ensure reliable operation of the product and to protect it from overheating, and these openings must not be blocked or covered. The openings should never be blocked by placing the product on a bed, sofa, rug, or other similar surface. This product should not be placed in a built-in installation such as a bookcase or rack unless proper ventilation is provided or the manufacturer's instructions have been adhered to.
-
The MAINS plug or an appliance coupler is used as the disconnect device, the disconnect device shall remain readily operable.
USER SAFETY GUIDE
IMPORTANT SAFETY INSTRUCTIONS - continued

CLEANING
Always disconnect unit from power supply before attempting to clean it. Use soft clothmoistened with soapy water, and wipe gently. Do not use solvents or abrasive materials.

YOU CAN HELP TO PROTECT THE ENVIRONMENT!
Please remember to respect the local regulations: Hand in the non-working electrical equipment to an appropriate waste disposal center.
FOR USED BATTERIES
Disposed of the used batteries properly. Please follow the local regulations for the battery disposal.
USER SAFETY GUIDE
FCC NOTICE TO A USER IN USA
This equipment has been tested and found to comply with the limits for a Class B digital device, pursuant to Part 15 of the FCC Rules. These limits are designed to provide reasonable protection against harmful interference in a residential installation. This equipment generates, uses, and can radiate radio frequency energy and, if not installed and used in accordance with the instructions, may cause harmful interference to radio communications. However, there is no guarantee that interference will not occur in a particular installation. If this equipment does cause harmful interference to radio or television reception, which can be determined by turning the equipment off and on, the user is encouraged to try to correct the interference by one or more of the following measures:
- Reorient or relocate the receiving antenna.
- Increase the separation between the equipment and receiver.
- Connect the equipment into an outlet on a circuit different from that to which the receiver is connected.
- Consult the dealer or an experienced radio/TV technician for help.
FCC RULES
This device complies with Part 15 of the FCC Rules. Operation is subject to the condition that this device does not cause harmful interference.
Note: Do not make changes or modify the device in any way. Changes or modifications not expressly approved by the party responsible for compliance could void the user's authority to operate the equipment.
USER SAFETY GUIDE
FCC NOTICE TO A USER IN USA - continued
IMPORTANT NOTES ON HEARING
Your hearing is very important to you and to us, so please take care when operating this equipment. We strongly recommend you to follow the guideline below in order to prevent possible damage or loss of hearing.
If you continuously listen to the loud sounds, your hearing will adapt to continuous loud sounds and will give you the impression that the volume has been reduced.
What seems normal to you may in fact be harmful. To guard against this BEFORE YOUR HEARING ADAPTS, set the volume at a low level and slowly increase the volume level until you can hear comfortably and clearly without distortion. Damage to your hearing is accumulative and is irreversible. Any ringing or discomfort in the ears indicates that the volume is too loud. Once you have established a comfortable listening level, DO NOT INCREASE THE VOLUME LEVEL FURTHER.
In the use of headphones, please take more attention. Hearing experts say that listening to a loud music can damage your hearing, especially when listening to music with headphones.
USER SAFETY GUIDE
IC NOTICE TO A USER IN CANADA
Since digital circuitry may cause interference to other radio or television tuners nearby, switch this unit off when not in use or move it away from the affected radio/television tuner.
NOTE: This digital apparatus does not exceed the Class B limits for radio noise emissions from digital apparatus as set out in the Radio Interference Regulations of Industry Canada. These limits are designed to provide reasonable protection against harmful interference in a residential installation. This equipment generates, uses and can radiate radio frequency energy and, if not installed and used in accordance with the instructions, may cause harmful interference to radio communications. However, there is no guarantee that interference will not occur in a particular installation. If this equipment does cause harmful interference to radio or television operation (which can be determined by turning the equipment off), the user is encouraged to try to correct the interference by one or more of the following measures:
- Reorient or relocate the receiving antenna.
- Increase the separation between the equipment and receiver.
- Connect the equipment into an outlet on a circuit different from that to which the receiver is connected.
- Consult the dealer or an experienced radio / TV technician for help.
WARNING!
- The apparatus shall not be exposed to dripping or splashing and that no objects filled with liquids, such as vases, shall be placed on apparatus.
- Mains plug is used as the disconnect device. It shall remain readily operable and should not be obstructed during intended use. To be completely disconnected, the apparatus from supply mains, the mains plug of the apparatus shall be disconnected from the mains socket outlet completely.
USER SAFETY GUIDE
IMPORTANT NOTICE TO UK USERS
Electrical Safety
Read these electrical safety instructions carefully before connecting the adapter to the mains supply.
- This clock radio is supplied with a mains adapter which has been designed for indoor use only.
- The mains adapter is a sealed unit. There are no user-serviceable parts inside and it does not require any electrical adjustments.
- Do not attempt to open the mains adapter.
- If the mains adapter becomes damaged, or fails to operate your clock radio, it must be replaced or disposed of in a safe and environmentally protective way.
- The mains adapter is designed to operate on 230VAC 50Hz supply. Connecting it to any other power sources may damage the adapter and the clock radio.
ADDITIONAL IMPORTANT INSTRUCTIONS
- Place the apparatus with some distances from the nearby objects or walls for sufficient ventilations. The ventilation should not be impeded by covering the ventilation openings with items such as newspapers, table-cloths, curtains, etc.
- No naked flame sources such as lighted candles should be placed on the apparatus.
- Dispose of used batteries properly. Follow the local regulation for the battery disposal.
- Use this apparatus in the moderate climates. It is recommended not to use this apparatus such in a lighting storm.
SPECIFICATIONS
- Radio frequency
FM: 87.5MHz - 108MHz
• Audio output: 2.5WRMS(L) + 2.5WRMS(R)
Total: 5W RMS / 10W PEAK / 100W PMPO
- Connectivity
3.5mm aux. in jack
Power jack
FM antenna
Shaker jack
• Power Requirement
AC100V\~240V 60/50Hz Adapter
- Batteries for time-setting backup: 2 x 1.5V "AAA" batteries (not included)
• Power consumption: ≤10W
- Dimensions (W x H x D):
8.4" x 3" x 4.3" (213mm x 76mm x 109mm)
- Unit weight:
1lbs (0.45kg)


- iLuv®
- Instruction Manual
- INTRODUCTION
- Desktop Alarm Clock with Bed Shaker for your iPod
- Features
- iPod\*
- Digital Dual Alarm Clock
- Radio
- What's included
- TABLE OF CONTENTS
- Getting Started
- Operational Instructions
- Installing the AC Adapter
- Protect your Furniture
- Installing the Dock Adapter
- How to insert a dock adapter
- How to remove the dock adapter
- Location of Controls on the Main Unit
- Power
- On
- OFF
- Back Up battery
- Back Up Function
- Setting the Clock
- Setting the Alarm
- Using the Snooze Function
- Using the Sleep Function
- IMPORTANT:
- Listening to your iPod
- Listening to the Radio
- Charging your iPod
- AUX In
- Adjusting the Brightness of the LCD Screen
- Resetting the Unit
- Maintenance
- TROUBLESHOOTING GUIDE
- - The stereo speaker system (iMM153) does not turn on.
- - Your iPod does not fit into the built-in universal dock.
- - It does not recognize your iPod when docked.
- - Your iPod is not charged even though it is in the dock.
- - When playing music, the sound gets distorted.
- USER SAFETY GUIDE
- WARNING
- CAUTION
- IMPORTANT SAFETY INSTRUCTIONS
- IMPORTANT SAFETY INSTRUCTIONS - continued
- CLEANING
- YOU CAN HELP TO PROTECT THE ENVIRONMENT!
- FOR USED BATTERIES
- FCC NOTICE TO A USER IN USA
- FCC RULES
- IMPORTANT NOTES ON HEARING
- IC NOTICE TO A USER IN CANADA
- WARNING!
- IMPORTANT NOTICE TO UK USERS
- Electrical Safety
- ADDITIONAL IMPORTANT INSTRUCTIONS
- SPECIFICATIONS
- - Radio frequency
- • Audio output: 2.5WRMS(L) + 2.5WRMS(R)
- - Connectivity
- • Power Requirement
- • Power consumption: ≤10W
- - Dimensions (W x H x D):
- - Unit weight:
Brand : ILUV
Model : Vibro Classic
Category : Radio