
IPX-2100 - IP Telephony Planet - Free user manual and instructions
Find the device manual for free IPX-2100 Planet in PDF.


| Product Type | Internet Telephony PBX System |
| Model | IPX-2100 |
| Max IP Phone Registrations | 100 |
| Max Concurrent Calls | 30 |
| Voice Recording / Voicemail Storage | 150 hours (external USB storage) |
| LAN Interface | 1 x 10/100BASE-TX RJ45 |
| WAN Interface | 1 x 10/100BASE-TX RJ45 |
| Expansion Slots | 2 (for FXO/GSM/FXS modules) |
| Max FXO/GSM Ports | 8 (with modules) |
| Power Supply | 12V DC, 1.5A (adapter included) |
| Supported Audio Codecs | G.711 (μ-law/A-law), G.722, G.726, G.729, GSM, Speex, Opus |
| Supported Video Codecs | H.261, H.263, H.263+, H.264, VP8 |
| Fax over IP | T.38 pass-through |
| Protocols | SIP 2.0 (RFC3261), IAX2, TCP/IP, UDP, RTP, HTTP, ICMP, ARP, DNS, DHCP, NTP, PPPoE |
| Management Interface | Web-based GUI (HTTPS) |
| Security Features | Firewall, Intrusion Detection, IP Blacklist/Whitelist |
| Languages | Multi-language GUI and system prompts |
| Mounting | Desktop or rack-mountable (brackets included) |
| Package Contents | Quick Installation Guide, Power Adapter, RJ45 cable, Brackets |
Frequently Asked Questions - IPX-2100 Planet
User questions about IPX-2100 Planet
0 question about this device. Answer the ones you know or ask your own.
Ask a new question about this device
Download the instructions for your IP Telephony in PDF format for free! Find your manual IPX-2100 - Planet and take your electronic device back in hand. On this page are published all the documents necessary for the use of your device. IPX-2100 by Planet.
USER MANUAL IPX-2100 Planet
Networking & Communication
User's Manual

Internet Telephony PBX System
IPX-330 / IPX2100
IPX-2200 / IPX-2500
Internet Telephony PBX System
IPX-330/IPX-2100/IPX-2200/IPX-2500
Copyright
Copyright (C) 2018 PLANET Technology Corp. All rights reserved.
The products and programs described in this User's Manual are licensed products of PLANET Technology. This User's Manual contains proprietary information protected by copyright, and this User's Manual and all accompanying hardware, software, and documentation are copyrighted.
No part of this User's Manual may be copied, photocopied, reproduced, translated, or reduced to any electronic medium or machine-readable form by any means by electronic or mechanical including photocopying, recording, or information storage and retrieval systems, for any purpose other than the purchaser's personal use, and without the prior written permission of PLANET Technology.
Disclaimer
PLANET Technology does not warrant that the hardware will work properly in all environments and applications, and makes no warranty and representation, either implied or expressed, with respect to the quality, performance, merchantability, or fitness for a particular purpose.
PLANET has made every effort to ensure that this User's Manual is accurate; PLANET disclaims liability for any inaccuracies or omissions that may have occurred.
Information in this User's Manual is subject to change without notice and does not represent a commitment on the part of PLANET. PLANET assumes no responsibility for any inaccuracies that may be contained in this User's Manual. PLANET makes no commitment to update or keep current the information in this User's Manual, and reserves the right to make improvements to this User's Manual and/or to the products described in this User's Manual, at any time without notice.
Internet Telephony PBX System
IPX-330/IPX-2100/IPX-2200/IPX-2500
WEEE Warning

To avoid the potential effects on the environment and human health as a result of the presence of hazardous substances in electrical and electronic equipment, end users of electrical and electronic equipment should understand the meaning of the crossed-out wheeled bin symbol. Do not dispose of WEEE as unsorted municipal
waste and have to collect such WEEE separately.
Trademarks
The PLANET logo is a trademark of PLANET Technology. This documentation may refer to numerous hardware and software products by their trade names. In most, if not all cases, their respective companies claim these designations as trademarks or registered trademarks.
Revision
User's Manual of PLANET Internet Telephony PBX System
Model: IPX-330/IPX-2100/IPX-2200/IPX-2500
Rev: 3 (May, 2018)
Internet Telephony PBX System
IPX-330/IPX-2100/IPX-2200/IPX-2500
Table of Contents
Introduction - 1 -
Features....-5-
Package Contents 7 -
Physical Specifications of IPX-330 - 8 -
Physical Specifications of IPX-2100 - 9 -
Physical Specifications of IPX-2200 / IPX-2500.... - 10 -
Plug-in modules for IPX-2100/IPX-2200/IPX-2500.... - 12 -
Specifications - 15 -
Installation Procedure - 27 -
New System Setup Wizard - 27 -
Extensions 33
Departments - 33 -
IP Extensions - 34 -
Analog Extensions - 38 -
Inbound Control - 39 -
Inbound Destinations....- 39 -
IVR - 39 -
Time Conditions - 41 -
Inbound Routes 42
Direct Routing - 43 -
Inbound Fax.... - 45 -
Blacklist - 46 -
Outbound Control - 47 -
Trunks....-47-
FXO/GSM/WCDMA Trunks (IPX-21FO/IPX-21GS/IPX-21MA) - 47 -
E1 Trunks (IPX-21PR) - 48 -
Internet Telephony PBX System
IPX-330/IPX-2100/IPX-2200/IPX-2500
Smart DID - 67 -
Phonebook 68
LDAP - 68 -
Feature Codes - 69 -
Voicemail feature codes.... - 69 -
Call Pickup feature codes 69
Call Parking feature codes.... - 70 -
Call Transfer feature codes.... - 70 -
Blacklist feature codes - 71 -
Call Spy feature codes.... - 71 -
Call Queue feature codes.... - 72 -
Conference feature codes - 72 -
Wakeup call feature codes.... - 73 -
Call Forward feature codes 73
DND feature codes - 74 -
Other feature codes - 74 -
Preferences - 76 -
Global PBX Options - 76 -
VoIP Advanced - 77 -
Analog Settings.... - 79 -
Module Settings - 80 -
E1 PRI Signaling - 80 -
T1 PRI Signaling - 81 -
MFC/R2 Signaling - 81 -
SS7 Signaling....- 82 -
BRI Settings - 83
Reports....- 85 -
Internet Telephony PBX System
IPX-330/IPX-2100/IPX-2200/IPX-2500
Static Routing - 102 -
DHCP Server 102
DDNS - 103 -
Security Center....- 104 -
Firewall - 104 -
Intrusion Detection and Prevention.... - 107
IP Blacklist - 108 -
IP Whitelist - 108 -
Email Services.... - 109 -
Mail Server Settings - 109 -
Vocemall to Email Settings.... - 110 -
Fax to Email Settings - 110 -
Email Notifications.... - 111 -
Maintenance 112
Users....- 112 -
Admin User....- 112 -
Operator User - 112 -
Root User....- 112 -
Upgrade....- 113 -
Diagnostic....-113-
PING - 113 -
Traceroute - 114 -
Ethernet Capture.... - 114 -
Channel Monitor - 115 -
Backup....- 115 -
Reboot and Reset 116
Reboot....- 116 -

PLANET Networking & Communication
Introduction
| Model | IPX-330 | IPX-2100 | IPX-2200 | IPX-2500 |
 |  |  |  | |
| Extension User | 30 | 100 | 200 | 500 |
| Concurrent Call | 15 | 30 | 60 | 100 |
| Room Concurrent Call | 10 | 20 | 40 | 80 |
| Recording/Voicemail | 150 hrs | 150 hrs | 150 hrs | 7,500 hrs |
| HDD | - | - | - | Yes |
| Module | 0 | Slot 1/2 for Analog and GSM Module | ||
Intuitive, Ease-of-Use IP PBX Management
PLANET next-generation Internet Telephony PBX system is easy to set up and manage thanks to a perceptive web-based user interface and quick setup wizard. Since it is an asterisk-based equipment, the entire benefits of the pre-loaded SIP can be had as any other enterprise-level appliance would come equipped with the feature. The Internet Telephony PBX system is able to accept 30/100/200/500 user registrations, and easy to manage a full voice over IP system with the convenience and cost advantages. The equipment is best paired with PLANET color IP phones to get the function going smoothly and to have a seamless connection between the software and hardware.
PLANET Internet Business Telephone PBX Series
Fully Functional Asterisk-based Advanced Internet
Telephony PBX System
IPX Series

PLANET Networking & Communication
Off-net Calling Capability, Call Restriction, Call Access Control
The IPX-330 comes with 2 FXO ports and the IPX-2000 series integrates up to 8 calls via the IPX-21FO (4 FXO), IPX-21SL (2 FXO + 2 FXS) and IPX-21GS (4 GSM) modules to form a feature-rich PBX system that supports seamless communications between the existing PSTN calls, analog phones, IP phones and SIP-based endpoints.
![graph TD A["Restraum"] --> B["PSTN"] C["Home"] --> D["IPX-330"] B --> E["FXO"] B --> F["FXO"] B --> G["Analog Phone"] D --> H["SIP Door Phone"] D --> I["SIP Color Phone"] D --> J["SIP Video Phone"] H --> K["Pul Switch"] I --> K J --> K style B fill:#f9f,stroke:#333 style D fill:#f9f,stroke:#333 styl…](/content/2026/05/925179/images/dc7d8d2877791ef18e5b7907bba7320a03425acf8c121741d050f335468b92d1.jpg)
Replacing Old PBX Easily without New Wiring
Cost-effective, easy-to-install and simple-to-use, the Internet Telephony PBX system converts standard telephones into IP-based networks. It enables the service providers and enterprises to offer users traditional and enhanced telephony communication services via the existing broadband connection to the Internet or corporation network.

PLANET Networking & Communication
system can be the bridge between the traditional analog system and IP network without having to invest heavily.
Distributed VoIP Network Infrastructure
In the new-generation communication age, the Internet Telephony PBX system supports IPv6 and VPN (client/server) connection to provide users with more flexible and advantageous communications products. With PLANET DDNS function, the Internet Telephony PBX system also helps users to apply and remember the login information easier. Its multiple-language feature helps user to quickly and easily manage the system. Moreover, the Internet Telephony PBX system supports Lync server to which smart phone (using third-party app) and analog phone are connected via its communication with other devices of Lync server.

Standard Compliance
Compliant with the Session Initiation Protocol 2.0 (RFC 3261), the Internet Telephony PBX system is able to broadly interoperate with equipment provided by VoIP infrastructure providers, thus enabling them to provide their customers with better multi-media exchange services.
图 10

PLANET Networking & Communication
![graph TD A["Fax"] --> B["IPX-330"] B --> C["PC"] B --> D["Global Network"] D --> E["Internet"] E --> B](/content/2026/05/925179/images/c4d82f09186e7fda40439bf2f1788ab6459717276755edacbce07b6c3385ab0d.jpg)
Green Office (Fax to Email / Email to Fax)

PLANET Networking & Communication
Features
System Highlights
■ 15 concurrent calls and up to 30 registers (For IPX-330)
■ 30 concurrent calls and up to 100 registers (For IPX-2100)
■ 60 concurrent calls and up to 200 registers (For IPX-2200)
■ 100 concurrent calls and up to 500 registers (For IPX-2500)
■ HD voice codec G.722 to perfect voice quality
■ Fax to Email/Email to Fax for green office
■ Voicemail to Email for not missing any important message
■ Paging and intercom function strengthens work efficiency
■ Built-in SIP Proxy Server following RFC 3261
■ Multiple Language of GUI for international business
■ Web-based Control Panel for easy configuration and management of the system
■ Strong security features protect your system from hacking
■ Supports maximum 8 ports for FXO/GSM (on 2 slots)
■ Supports 2 FXO interfaces (For IPX-330)
■ Records voice and voicemail to external USB disk
■ Supports Lync server
Codec and Protocol
■ SIP 2.0 (RFC3261), IAX2 compliant
■ Audio Codec: G.722/G.711-Ulaw/G.711-Alaw/G.726/G.729/GSM/SPEEX
■ Video Codec: H.261/H.263/H.263+/H.264
■ DTMF: RFC 2833, SIP info, in-band

PLANET Networking & Communication
PBX Features
■ Black List
■ BLF (Busy Lamp Field)
■ CDR (Call Detailed Record)
■ Conference Room (20 rooms)
■ DID (Direct Inward Dialing Number)
■ DISA (Direct Inward System Access)
■ DND/Feature Codes/Flash Operation Panel
■ Follow Me/Auto-Provision
■ IVR (Interactive Voice Responses)
■ Multi-language System Prompt
■ Multiple-language GUI
■ Phone Book/PIN Set
■ LDAP Server for phonebook
■ Record Files downloaded
■ Ring Group/SIP Trunk
■ Skype for SIP/Smart DID/System Log
■ T.38 Fax (pass-through)/time-based rule
■ Virtual Fax, Voicemail and Voice Mail to E-Mail
Call Features
■ Call Back, Call Forward, Call Group
■ Call Hold, Call Paging and Intercom
■ Call Park, Call Pickup, Call Queue
■ Call Record, Call Route, Blind Transfer
■ Attend Transfer Call Waiting

PLANET Networking & Communication
Package Contents
Thank you for purchasing PLANET Internet Telephony PBX system. Open the box of the Internet Telephony PBX system and carefully unpack it. The box should contain the following items:
| Model | Package Description |
| IPX-330 | ● Quick Installation Guide x 1● Power Adapter x 1 (12V DC)● RJ45 x 1 |
| IPX-2100 | ● Quick Installation Guide x 1● Power Adapter x 1 (12V DC)● RJ45 x 1● Bracket x 2 |
| IPX-2200 | ● Quick Installation Guide x 1● Power Cord x 1 |
| IPX-2500 | ● RJ45 x 1● Bracket x 2 |

If any of the above items are damaged or missing, please contact your dealer immediately.

PLANET Networking & Communication
Physical Specifications of IPX-330
Front Panel

Rear Panel

LED definitions
| Identification | Indication | Status | Specification |
| PWR | Power Status | On | Power on |
| Off | Power off | ||
| WAN | WAN Status | On | Connected but no data transmitting |
| Blink | Data transmitting | ||
| Off | Disconnected | ||
| LAN | LAN Status | On | Connected but no data transmitting |
| Blink | Data transmitting | ||
| Off | Disconnected | ||
| Red | Channel available |

PLANET Networking & Communication
Physical Specifications of IPX-2100
Front Panel

Rear Panel

LED definitions
| Identification | Indication | Status | Specification |
| PWR | Power Status | On | Power on |
| Off | Power off | ||
| SYS | System Status | On | System initiating |
| Blink | System is functioning | ||
| Off | System failure | ||
| WAN | WAN Data Status | On | Connected but no data transmitting |
| Blink | Data transmitting | ||
| Off | Disconnected | ||
| LAN | LAN Data Status | On | Connected but no data transmitting |
| Blink | Data transmitting | ||
| Off | Disconnected |

PLANET Networking & Communication
Physical Specifications of IPX-2200 / IPX-2500
Front Panel

Front Panel of the IPX-2200

Front Panel of the IPX-2500
Rear Panel

Rear Panel of the IPX-2200/IPX-2500
LED definitions
| Identification | Indication | Status | Specification | |
| PWR | Power States | Green | Power On | |
| Off | Power Off | |||
| SYS | System States | Wink | System is Running | |
| Off | System Booting or Failed | |||
| WAN/LAN | WAN/LAN Interface States | Wink | Data Transmitting | |
| Off | No Data Transmitting | |||
| EWS | Green | Channel Loading Succeeded | ||

PLANET Networking & Communication
Physical interface description
| 1 | Power Switch | Switch the power on or off |
| 2 | Power Cord | 100~240V AC, 50/60Hz, 1.5A max |
| 3 | WAN/LAN | The WAN/LAN port supports auto negotiating Fast Ethernet 10/100/1000BASE-T networks. The WAN port allows your IP PBX to be connected to an Internet Access device, e.g., router, cable modem or ADSL modem through a Cat5 twisted-pair Ethernet cable. |
| 4 | HDMI Port | For video output (factory use) |
| 5 | USB | For external store device to store voice and voicemail |
| 6 | Audio In/Out | For external paging |
| 7 | Module Slot 1/Slot 2 | 2 external slots with compliant FXO/FXS/GSM module-FXO module is connected to PBX or CO line with RJ11 analog line, FXO port is connected to the extension port of a PBX directly connected to a PSTN line of carrier-GSM module is connected to Global System for Mobile Communications (GSM) with SIM card |

-
Supporting 2 slots, user can buy expansion module like IPX-21FO (4 x FXO) or IPX-21GS (4 x GSM) for extending port service.
-
If IPX-21GS is used, please disable pin lock function. Otherwise, dial out or call in will not be available.

PLANET Networking & Communication
Plug-in modules for IPX-2100/IPX-2200/IPX-2500
IPX-21FO Module

IPX-21FO module provides 4 FXO interfaces for connecting PSTN lines provided by the telecom. It can be installed on both slots of IPX-2100, IPX-2200 and IPX-2500 and provides maximal 8 FXO interfaces.
IPX-21GS Module

IDY-71GS module provides A GSM channels: it can be installed on IDY-7100, IDY-7200 and IDY-7500 for making and

PLANET Networking & Communication
IPX-21SL Module (by project order)

The IPX-21SL module provides 2 FXO and 2 FXS interfaces; it can be installed on both slots of the IPX-2100, IPX-2200 and IPX-2500. With the IPX-21SL module installed, it enables the IPPBX system with FXO to FXS lifeline feature. When there's power failure, you may still use the analog phone to make and receive phone calls.
IPX-21MA Module (by project order)
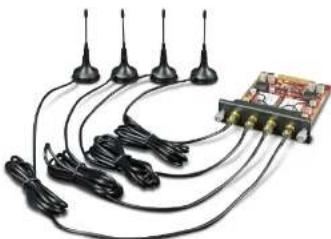
The IPX-21MA (WCDMA) module provides 4 GSM/3G voice channels; it can be installed on IPX-2100, IPX-2200 and IPX-2500 for making and receiving phone calls from the GSM/3G network. It is designed with SIM5320 series

PLANET Networking & Communication
IPX-21BR Module (by project order)
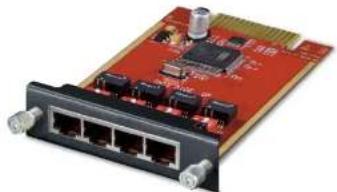
The IPX-21BR module provides 4 BRI interfaces which can be configured to work in NT or TE mode. It can be installed on IPX-2200 and IPX-2500 but not IPX-2100. Regarding the IPX-2200 and IPX-2500, only one 4BRI module can be installed. And if it's going to be installed with other modules (IPX-21FO, IPX-21FS, IPX-21GS, IPX-21MA modules), it should be installed in Slot 2. The IPX-21BR cannot be installed with E1 module like the IPX-2200 or IPX-2500.
IPX-21PR Module (by project order)

-
-
-
-
-
-
-
-
-
-
-
-
-
-
-
-
-
-
-
-
-
-
-
-
-
- 27.
-
-
-
-
-
-
-
-
-
-
-
-
-
-
-
-
-
-
-
-
-
-
-
-

PLANET Networking & Communication
Specifications

| Product | IPX-330Internet Telephony PBX system (30 SIP Users registrations) |
| Hardware | |
| LAN | 1 x 100BASE-TX RJ45 for LAN |

PLANET Networking & Communication
| RFC 3261, RFC 3311, RFC 3515RFC 3265, RFC 3892, RFC 3361RFC 3842, RFC 3389, RFC 3489RFC 3428, RFC 2327, RFC 2833RFC 2976, RFC 3263 | |
| Voice Codec | G.711-Ulaw, G.711-Alaw, G.722, G.726, G.729, GSM, Speex and Opus |
| Video Codec | H.261, H.263, H.263+, H.264 and VP8 |
| Fax over IP | T.38 Fax (pass-through)Note: T.38 support is dependent on fax machine, SIP provider and network/transport resilience |
| Voice Processing | DTMF detection and generationRFC 4733, SIP info, in-band and Auto |
| Protocols | SIP 2.0 (RFC 3261), TCP/IP, UDP/RTP/RTCP, HTTP, ICMP, ARP, DNS, DHCP, NTP/SNTP, PPP, PPPoE |
| Internet Sharing | |
| Network Features | DDNS client (Planet DDNS and easy DDNS)DHCP server, SNMP v1/v2IEEE 802.1Q of VLANIP assignment (DHCP/Static)IPv4, IPv6Manual configuration of static route tableTroubleshooting (ping, traceroute)VPN server ,VPN client |
| Refuse SIP Register DoS | |

PLANET Networking & Communication
| DND (Do Not Disturb)FOP (Flash Operation Panel) Status MonitoringIVR (Interactive Voice Responses)Follow Me, Call Spy and PIN SetDistinctive RingtoneMulti-language System PromptMultiple Language of GUIPhone Book, Speed DialLDAP Server for phonebookRecord Files DownloadRing Group, SIP TrunkSkype for SIP, Smart DID, System LogT.38 fax (pass-through), voicemail and voicemail to e-mailTime-based RulePBX log, web access log and PBX debug log | |
| Call Features | Call Back, Call Forward, Call GroupCall Hold, Call Paging and IntercomCall Park, Call Pickup, Call QueueCall Record, Call Route, Blind TransferAttend Transfer, Call WaitingCaller ID, Dial by NameCustomized IVR, On-hold Music, TransferThree-way Conferencing, Video Call |
| System Capacity | |
| System Capacity | 15 concurrent call legsUp to 30 IP phone registers/extensions |

PLANET Networking & Communication
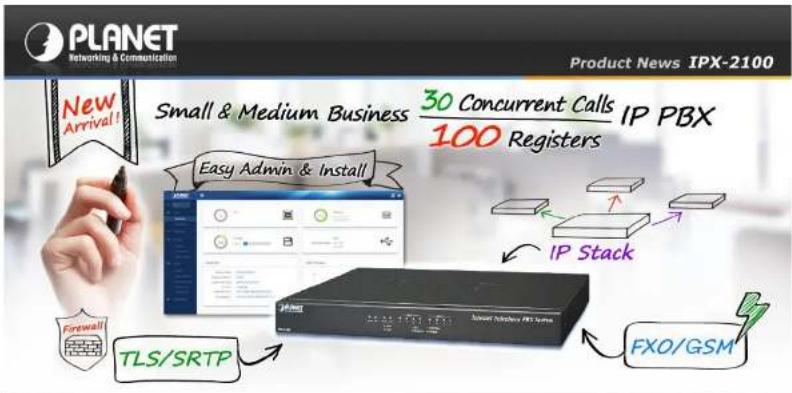
Fully Functional Asterisk-based Advanced Internet Business Telephone System 100 SIP User Registrations Internet Telephony PBX System • IPX-2100
| Product | IPX-2100Internet Telephony PBX system (100 SIP Users registrations) |
| Hardware | |
| LAN | 1 x 100BASE-TX RJ45 for LAN |
| WAN | 1 x 100BASE-TX RJ45 for WAN |
| 2 Slots | Supports maximum 8 ports (FXS/FXO/GSM) |

PLANET Networking & Communication
| RFC 3428, RFC 2327, RFC 2833RFC 2976, RFC 3263 | |
| Voice Codec | G.711-Ulaw, G.711-Alaw, G.722, G.726, G.729, GSM, Speex and Opus |
| Video Codec | H.261, H.263, H.263+, H.264 and VP8 |
| Fax over IP | T.38 Fax (pass-through)Note: T.38 support is dependent on fax machine, SIP provider and network/transport resilience |
| Voice Processing | DTMF detection and generationRFC 4733, SIP info, in-band and Auto |
| Protocols | SIP 2.0 (RFC 3261), TCP/IP, UDP/RTP/RTCP, HTTP, ICMP, ARP, DNS, DHCP, NTP/SNTP, PPP, PPPoE |
| Internet Sharing | |
| Network Features | DDNS client (Planet DDNS and easy DDNS)DHCP server/SNMP v1/v2IEEE 802.1Q of VLANIP assignment (DHCP/Static)IPv4, IPv6Manual configuration of static route tableTroubleshooting (ping, traceroute)VPN server ,VPN client |
| Security Features | Refuse SIP Register DoSRefuse Abort Invite DosRefuse SSH Login DoSFirewall and enhances HTTPS connection |

PLANET Networking & Communication
| Follow Me, Call Spy and PIN SetDistinctive RingtoneMulti-language System PromptMultiple Language of GUIPhone Book, Speed DialLDAP Server for phonebookRecord Files DownloadRing Group, SIP TrunkSkype for SIP, Smart DID, System LogT.38 fax (pass-through), voicemail and voicemail to e-mailTime-based RulePBX log, web access log and PBX debug log | |
| Call Features | Call Back, Call Forward, Call GroupCall Hold, Call Paging and IntercomCall Park, Call Pickup, Call QueueCall Record, Call Route, Blind TransferAttend Transfer, Call WaitingCaller ID, Dial by NameCustomized IVR, On-hold Music, TransferThree-way Conferencing, Video Call |
| System Capacity | |
| System Capacity | 30 concurrent call legsUp to 100 IP phone registers/extensionsRecording and Voicemail: 150 hours |
| Network and Configuration | |

PLANET Networking & Communication

| Product | IPX-2200Internet Telephony PBX system (200 SIP Users registrations) |
| Hardware | |
| WAN | 1 x 1000BASE-T RJ45 for WAN, connecting to broadband modem or a WAN router |
| LAN | 1 x 1000BASE-T RJ45 for LAN, connecting to a LAN switch |
| HDMI Port | For video output (factory use) |

PLANET Networking & Communication
| RFC 3265, RFC 3892, RFC 3361RFC 3842, RFC 3389, RFC 3489RFC 3428, RFC 2327, RFC 2833RFC 2976, RFC 3263TCP/IP, UDP/RTP/RTCP, HTTP, ICMP, ARP, DNS, DHCP, NTP/SNTP, PPP, PPPo | |
| Voice Codec | G.711-Ulaw, G.711-Alaw, G.722, G.726, G.729, GSM, Speex and Opus |
| Video Codec | H.261, H.263, H.263+, H.264 and VP8 |
| Fax over IP | T.38 Fax (pass-through)Note: T.38 support is dependent on fax machine, SIP provider and network/transport resilience |
| Voice Processing | DTMF detection and generationRFC 4733, SIP info, in-band and Auto |
| Internet Sharing | |
| Network Features | DDNS client (Planet DDNS and easy DDNS)DHCP server/SNMP v1/v2IEEE 802.1Q of VLANIP assignment (DHCP/Static)IPv4, IPv6Manual configuration of static route tableTroubleshooting (ping, traceroute)VPN server ,VPN client |
| Security Features | Refuse SIP Register DoSRefuse Abort Invite DosRefuse SSH LogIn DoSFirwall and enharras HTTPS connection |

PLANET Networking & Communication
| IVR (Interactive Voice Responses)Follow Me, Call Spy and PIN SetDistinctive RingtoneMulti-language System PromptMultiple Language of GUIPhone Book, Speed DialLDAP Server for phonebookRecord Files DownloadRing Group, SIP TrunkSkype for SIP, Smart DID, System LogT.38 fax (pass-through), voicemail and voicemail to e-mailTime-based RulePBX log, web access log and PBX debug log | |
| Call Features | Call Back, Call Forward, Call GroupCall Hold, Call Paging and IntercomCall Park, Call Pickup, Call QueueCall Record, Call Route, Blind TransferAttend Transfer, Call WaitingCaller ID, Dial by NameCustomized IVR, On-hold Music, TransferThree-way Conferencing, Video Call |
| System Capacity | |
| System Capacity | 60 concurrent call legsUp to 200 IP phone registers/extensionsRecording and Voicemail: 150 hours |
| Network and Configuration | |

PLANET Networking & Communication
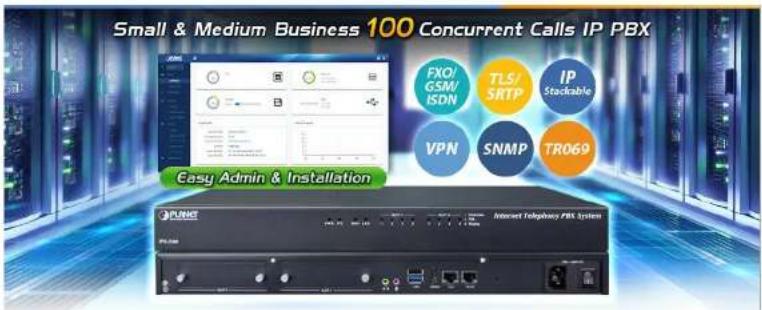
| Product | IPX-2500Internet Telephony PBX system (500 SIP Users registrations) |
| Hardware | |
| WAN | 1 x 1000BASE-T RJ45 for WAN, connecting to broadband modem or a WAN router |
| LAN | 1 x 1000BASE-T RJ45 for LAN, connecting to a LAN switch |
| HDMI Port | For video output (factory use) |
| USB | For external store device to store voice and volcemallStore data for external disk |
| Audio In/Out | For external paging |
| 2 Slots | Supports maximum 8 ports (FXO/GSM) |

PLANET Networking & Communication
| Video Codec | H.261, H.263, H.263+, H.264 and VP8 |
| Fax over IP | T.38 Fax (pass-through)Note: T.38 support is dependent on fax machine, SIP provider and network/transport resilience |
| Voice Processing | DTMF detection and generationRFC 4733, SIP info, in-band and Auto |
| Internet Sharing | |
| Network Features | DDNS client (Planet DDNS and easy DDNS)DHCP server/SNMP v1/v2IEEE 802.1Q of VLANIP assignment (DHCP/Static)IPv4, IPv6Manual configuration of static route tableTroubleshooting (ping, traceroute)VPN server ,VPN client |
| Security Features | Refuse SIP Register DoSRefuse Abort Invite DosRefuse SSH Login DoSFirewall and enhances HTTPS connection |
| Features | |
| SIP Register with UDP/TCP/TLSPhone Auto-ProvisionOne Touch RecordingMobility ExtensionBlack List | |

PLANET Networking & Communication
| Record Files DownloadRing Group, SIP TrunkSkype for SIP, Smart DID, System LogT.38 fax (pass-through), voicemail and voicemail to e-mailTime-based RulePBX log, web access log and PBX debug log | |
| Call Features | Call Back, Call Forward, Call GroupCall Hold, Call Paging and IntercomCall Park, Call Pickup, Call QueueCall Record, Call Route, Blind TransferAttend Transfer, Call WaitingCaller ID, Dial by NameCustomized IVR, On-hold Music, TransferThree-way Conferencing, Video Call |
| System Capacity | |
| System Capacity | 100 concurrent call legsUp to 500 IP phone registers/extensionsRecording and Voicemail: 7500 hours |
| Network and Configuration | |
| Access Mode | Static IP, DHCP |
| LED Indications | SYS: 1, LNK/OffWAN: 1, LNK/OffLAN: 1, LNK/OffPWR: 1, LNK/OffSLOT: FXO/GSM (Red), FXS (Green) |

PLANET Networking & Communication
Installation Procedure
New System Setup Wizard
Step 1. Connect a PC directly with the IP PBX on WAN or LAN port. Default IP of WAN port is 172.16.0.1, and default IP of LAN port is 192.168.0.1. Please change the PC IP address to 172.16.0.xx if you have connected WAN or 192.168.1.xx if you have connected LAN.
Step 2. Start a web browser. The browser should be IE11, Firefox or Google Chrome.
Step 3. Enter the default URL of WAN port "https://172.16.0.1" or enter URL of LAN port "https://192.168.0.1" into the browser address bar to access its Web interface.
Step 4. Now you should be made known by a security warning. Please ignore the warning and proceed to access the IP PBX Web interface.
Step 5. By now you should have seen the Quick Installation Wizard. Please follow the wizard to go through a few steps of basic settings. Or you can skip the installation wizard.
Step 1: Wizard Language


PLANET Networking & Communication
Step 2: Network Settings
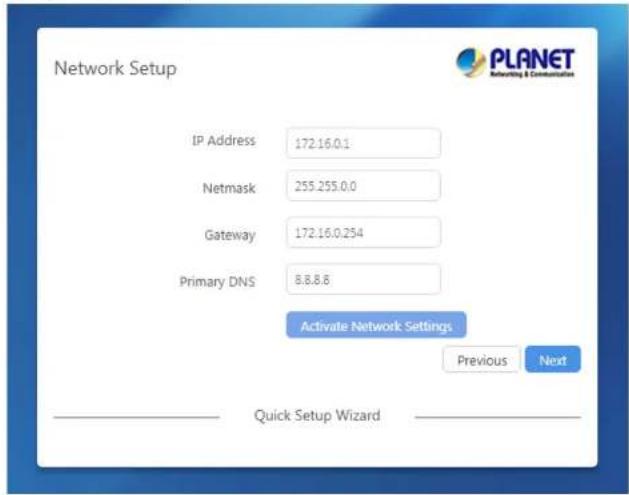
Change the network profiles per your local WAN environment. Once done, click on the button, it will take several seconds and you will be directed to the new page with new IP address automatically. Once done, please click on button to continue.
Step 3: Location

PLANET Networking & Communication
Select the country/region you live In, the location you selected will also tell the IPPBX system which time zone and tone zone you want the IPPBX to use. And some other regional settings will be defined as well.
Step 4: Module Settings

This step is only for IPX-2200 and IPX-2500. If you have installed FXS/FXO/GSM/WCDMA modules on both Slots then just simply click on button to continue. If you have installed E1/T1/BRI modules, please select the module type accordingly. For more configurations please refer to Module Settings.
Step 5: Create Departments and Extensions

PLANET Networking & Communication
According to your company organization structure you can add departments and extensions here per each department.
Specify the department name and number of the members, and then click on button to add another department the same way. Once done, specify a start extension number and click on button to continue.
Step 6: Specify Operator Extension
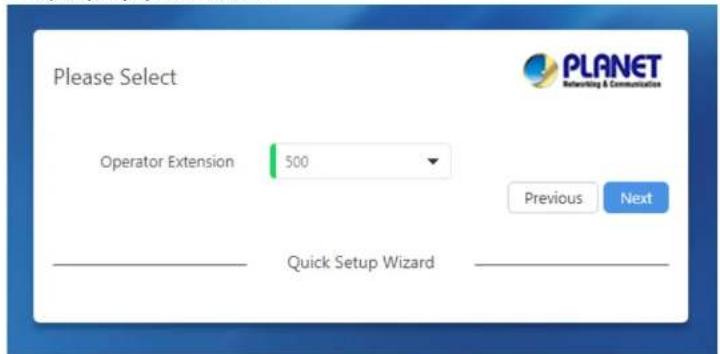
The operator extension is usually the extension number of the company receptionist or secretary. Please specify the extension number here, in certain circumstances calls will be sent directly to this extension for information.
Step 7: Create Admin Account


PLANET Networking & Communication
Admin account can be customized that you can use any user name you prefer. For security reasons, please do not use weak administrator credentials.
Step 8: Create Operator Account

Operator account has limited permissions compare to Admin user. It can be used by the operator user to manage extension numbers of the company, setup calling features, manage call logs and recordings.
"Enable AMI" option can be used to enable CTI (Computer Telephony Integration) connectivity using the operator account. Please keep it disabled if there's no such requirement.

PLANET Networking & Communication
Mail server will be used to send out email notifications from the IPPBX system. Please select a mail service provider from the list. Supported mail service providers' default settings will be filled in automatically. If the mail service provider of yours is not in the list please choose "Other".
Once done, please click on a button, now system will reboot for new settings take effect. If IPX-330 or IPX-2100, you'll have to wait around 4 minutes then refresh the page. If IPX-2200 or IPX-2500, it will take around 2 minutes to reboot, after this please refresh the page. Now you should see the login page like the screenshot shown below.

Please use the admin credentials you defined during the installation wizard to sign in.
The admin user name and password are defined by during the installation wizard process. If you have skipped the wizard, you'll need to log in with the default username and password which are both "admin". Once you have modified the network profile during the quick installation wizard or after admin login, then you can power off and deploy the IPPBX system to your local LAN, and then power It on for further configurations.
(Default IP) For increased security, please use https to access IP PBX.
Default WAN IP: https://172.16.0.1
Default LAN IP: https://192.168.0.1
Default User Name: admin

PLANET Networking & Communication
Extensions
Path: Telephony -> Extensions
Extensions and departments should have been created during the Quick Setup Wizard process. You may manage extensions and departments here on this screen. If you have skipped the Quick Setup Wizard, you may create them here on this screen as well.
Departments
Path: Telephony -> Extensions -> Departments
Department concept is new on IP PBX series v3.0 version. Extensions are grouped by your company's actual organizational structure.
A department is equal to a Pick-up group.
A department is equal to a Call groups (Ring Group).
If you have created departments and extensions from Quick Setup Wizard, you should see all your departments and extensions here.


PLANET Networking & Communication
![Edit Department Name dpt2 Ring Strategy Ring All Destination if no answer Hangup Select Department Members 110[110] 111[111] 112[112] 113[113] 114[114] 115[115] 116[116] 117[117] 118[118] 119[119] Cancel Submit](/content/2026/05/925179/images/fbaf3d22a9d7254f7ae6580c11dc01b8db263790e140ace856afe1dff280e14c.jpg)
- You may change the department name from the Department Name textbox.
In the Ring Strategy dropdown list select a desired ring strategy of how to ring the department (Ring Group) extensions upon incoming calls.
Ring All: Ring all available member extensions until one answers (default).
■ Leastrecent: Ring the extension of the member who has least recently received a call.
Fewestcalls: Ring the extension of the member who has taken the fewest number of calls.
Random: Ring the extension of a random member.
RRMemory: The system remembers which member was last called and begins the round robin with the next agent.
Linear: Starting with the first member, ring the extension of each member in turn until the call is answered.
■ RROrdered: Same as RRMemory, except the department member order is preserved.
- In Destination if no answer dropdown list select a call destination for the inbound calls when no one answers the call.
- You may add/remove members of your department from the Select Department Members field.

PLANET Networking & Communication

- User Name: Alias of this extension which can be the name of the extension user.
- Password: The password is used for the phones to register or by the extension user to sign in the extension web portal. This can be set manually or can be generated by the IPPBX system. Auto generated password consists of numbers, letters and special characters.
- Email: Email address of this extension user.
- Outbound CID: Choose a number to show the external called party. This feature only works with E1/T1, BRI and SIP trunks if the telco/ITSP (Internet Telephony Service Provider) allows this number to be passed.
Music On Hold: When the user holds a call the caller will listen to music, and the music can be set up here. - Mobile Number: The mobile phone number of the extension user.
- Dial Permission: Defines which type of numbers the extension can dial.
- Language: If the extension user is not a native speaker of the system default language, you may set a different language for this user.

PLANET Networking & Communication
Before doing this please ensure the extension uses a strong password.
- Simultaneous Register Count: The extensions could be registered on up to 5 different SIP endpoints at the same time, by default the value is 2. When there are already 2 registers the 3rd register will be responded with a 403 error.
Video Call: You may enable/disable video call support of this extension.
Video Codecs: Supported video codecs are H.261, H.263, H.263+, H.264, VP8.
Web Portal: If enabled, users can use their extension number and password to login to the IPPBX system web GUI. - Call Recording: This is an automated recording option, you may choose to automatically record the inbound, outbound or both inbound and outbound calls from/to this extension.
- Call Spy: Call Spy feature allows the phone calls of this extension to be monitored from other extensions, please refer to Call Spy Feature Codes for how to monitor phone calls.
Register Expiration: Default register expiration time, default value 120 seconds.


PLANET Networking & Communication
If you want more extensions to be created or if you had skipped the quick setup wizard so no extension had been created, you may click on add button to add a new extension or click on Pull Add button to create bulk extensions.
The extensions' properties could be set while you are creating them.

- Define a Start Extension Number and the number of extensions to be created in the Count field.
- If you want to associate outbound CID numbers to the extensions, you'll need to specify the first CID number in the Start Outbound CID field and in the CID Calculation field specify the calculating of the following CID numbers. Otherwise leave these two blanks.
- In the Password field you may leave it blank so the created extensions will use random passwords or you can define a password so the created extensions will share the same password.
As for other options, you may configure accordingly per your demands. The features/options configured will be applied to all newly created extensions.

PLANET Networking & Communication
Analog Extensions
Path: Telephony -> Extensions -> Analog Extensions
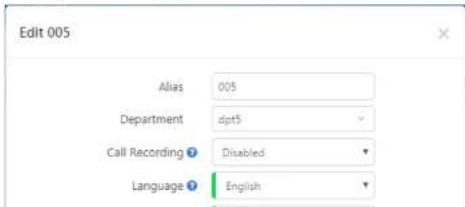
Analog extensions are generated automatically by the IPPBX system if FXS interfaces are detected. All you have to do is attaching analog phones or fax machine to the FXS interface, the analog extensions can be used directly for phone calls, no more additional settings required.

The Channel column and Extension column list the FXS interfaces and the corresponding extension numbers. They are generated by the IPPBX system which cannot be modified.
You may click on the button to change settings if necessary.

PLANET Networking & Communication
Inbound Control
Path: Telephony -> Inbound Control
The Inbound Control section is where you define how IPPBX system handles incoming calls. Typically, you determine the phone number that outside callers have called (DID Number) and then indicate which extension, Ring Group, Voicemail, or other destination to which the call should be directed.
Inbound Destinations
A call destination in IPPBX system might be an IVR menu that instructs the callers to press certain digits to route their calls, a queue to wait for specific telephone services, a ring group to call a number of user extensions, or virtually any other type of process to route the call in whatever way is desired. A call may have several destinations throughout its lifespan.
Below is a list of call destinations available in IPPBX system:
- IVR: Strictly speaking, IVR is not an actual call destination. The calls landed on IVR menu will finally be directed to other call destinations even another IVR menu and this is how you create multi-layer IVRs.
• Extension: to ring a specific extension. - Voicemail: direct the caller to the voicemail box of a specific extension.
- Trunk: direct the inbound call to a selected trunk and dial a specified number, it's mostly used when the IPPBX system is applied as a gateway.
- Department (Ring Group): to ring the extensions of a department at this same time, in other words, department equals to a ring group. If you want to exclude some extensions from the ring group, please disable "Ring Group Member" option from the department edit screen.
Conference: to send the caller to a specific conference room.

PLANET Networking & Communication
In order to create an IVR menu, please click on the 📄 button, you'll see a popup dialog as below:
![Add Name biz-en Number 0600 Voice Prompts biz-en Loop Count 3 Dial Extension On Dial Permission Extension Events Invalid Key Extension 101[101] No Press Extension 101[101] Press 0 Department dpt1 Press 1 Department dpt2 Cancel Submit](/content/2026/05/925179/images/c51de2cfd791d218c84c9b3db3b5a45f1934acc370ba0f06b2cef2860c1285b3.jpg)
In the Name blank a name is required to identify this IVR menu.
- In the Number blank a number had been created for this IVR menu for user being able to dial this number and test the IVR options.
In Voice Prompts drop-down list, select a pre-recorded voice prompts for this IVR menu. The prompts will be played to the callers as they enter the IVR. The voice prompts must be uploaded from the Audio Library ->

PLANET Networking & Communication
Time Conditions
Path: Telephony -> Inbound Control -> Time Conditions
Time conditions in IPPBX allow you to control what happens to inbound calls both during and outside (weekends/holidays) normal business hours.
Time condition settings include Time Rule, Weekday and Holiday settings.
- Time Rule:
- Weekdays:
● Holidays:
To create a time rule you need first set up weekdays and holidays.
To set up weekdays you may modify the default one or create a new one by clicking on Add button.
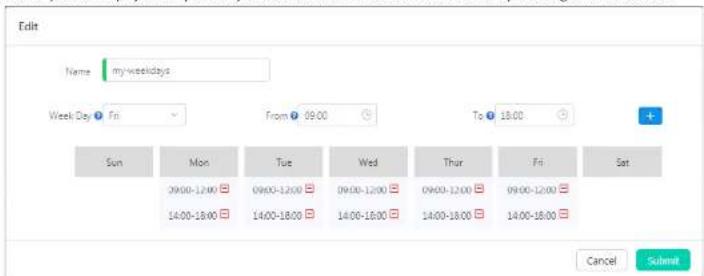
This example shows the company opens from Monday to Friday. On each weekday, it opens from 9 am to 12 pm, after a 2-hour break then opens from 2 pm to 6 pm. Any other time durations unspecified will be considered as non-business hours.
In order to exclude holidays from the weekdays, you'll also have to eat up holidays.

PLANET Networking & Communication

Now you could apply this time rule to the Inbound Routes.
Inbound Routes
Path: Telephony -> Inbound Control -> Inbound Routes
The Inbound Routes settings tell your IPPBX system where to send those inbound calls coming in from the trunks. Calls can be sent to a variety of destinations, including extensions, departments (ring groups), call queues, IVRs,
DISAs, conferences, paging groups, voicemail, fax, etc.
The Inbound Routes are configured per each trunk. You may set different inbound destinations for different trunks.


PLANET Networking & Communication
![Edit FXO-1 Time Conditions ? my-time_rule Business Hours ? IVR biz-en[0600] Non-business Hours ? Voicemail 101[101] Distinctive Ringtone ? Cancel Submit](/content/2026/05/925179/images/af3a09ac7d145a938ba24d708e33fec79e3de2d0b7c48a197b336eead60e828f.jpg)
In the Time Conditions drop-down list, select a time rule for this trunk, so the inbound calls will be routed on time basis.
In the Business Hours field you should select a calling destination for business hours, and in the Non-business Hours field select a calling destination for non-business hours.
Distinctive Ringtone is optional, if needed, you may specify the ringtone name of the phone, so when the callers call in from this trunk the phone will ring this specific ringtone. It requires the phone supporting distinctive ringtone feature.
This is how you configure inbound routes for a trunk, you may configure the same inbound routes for other trunks or use different inbound route settings per your requirements.
Direct Routing
Path: Telephony -> Inbound Control -> Direct Routing
You may set up Direct Routing based on the DID numbers of your VoIP/E1/T1/BRI trunk lines and the phone numbers of the external callers. Direct Routine has higher priority than time conditions and other general inbound

PLANET Networking & Communication
![Add DID Number 94088322 Destination Extension 105[105] Distinctive Ringtone Cancel Submit](/content/2026/05/925179/images/d0bca205265291b75e74d5855e10443ffac2c0cd6f748109282fc78a121fa22e.jpg)
In the above example, 94088322 is one of your DID numbers, you may configure it with an extension number, when someone calls this number the call will then directly go to the selected extension.
In the Distinctive Ringtone field you may specify the ringtone name of the phone, so when the callers call the DID number and the call goes to this extension the phone will ring this specific ringtone. It requires the phone supporting distinctive ringtone feature.
To add a Direct Routing rule base on the caller's number, please click "Add" button as shown below.

In the popup window, specify the caller's number, and assign a call destination for inbound calls from this external phone number.


PLANET Networking & Communication
Inbound Fax
Virtual Fax feature on IPPBX system has the ability to automatically detect incoming fax and send the fax to one of the destinations as below:
Save to System
Send as Email
Fax Machine
If the Fax Destination is set to Save in System.

The received faxes will be saved in the IPPBX system internal storage. Admin user and operator user are able to check faxes on Reports -> System Logging -> Fax Logs page.
If the Fax Destination is set to Send as Email.

You'll have to give an Email address for the IPPBX to send the receive faxes to this Email address. Each fax will be attached to the Email in .tif format.
If your IPPBX system has been equipped with FXS ports, you may set the Fax Destination to Fax Machine.
Inbound Fax Settings

PLANET Networking & Communication
Blacklist
Path: Telephony -> Inbound Control -> Blacklist
Blacklist feature allows you to create a list of numbers that are not allowed to call in to the IPPBX system. Blacklist could be managed by both the admin user and operator user. The extension user could also add numbers to the system blacklist by using Blacklist Feature Codes.

By specifying a number in the top right number blank, you may add a number to the system blacklist.
To add blacklist numbers by using a template file, please click on button to download the template file and edit with MS Excel, once done upload it from this page, the numbers you added in the template file will be added to the system blacklist.
If you want to share the blacklist numbers on other IPPBX systems, you may download it by clicking the button to download all blacklist numbers in a file and upload on other IPPBX systems.


PLANET Networking & Communication
Outbound Control
By default if you've not configured any outbound control settings, the extension users are not able to make outbound phone calls yet. Please follow the instructions of this chapter to configure the IPPBX system for outbound phone calls.
Trunks
A trunk on an IPPBX system is essential for extensions to be able to make outbound phone calls. On IPPBX system, the trunks will be detected and generated automatically at the first time of the system initialization.
FXO/GSM/WCDMA Trunks (IPX-21FO/IPX-21GS/IPX-21MA)
Path: Telephony -> Outbound Control -> Trunks
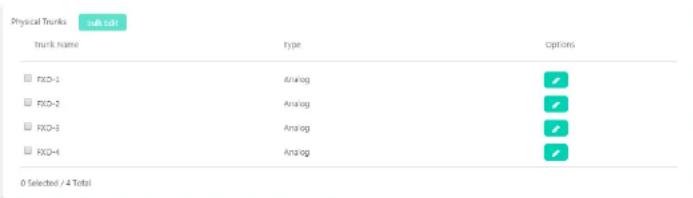
On the IPPBX front panel, red LED indicates the RJ11 interface is FXO. You should attach the telephone wire from your telecom socket to the FXO ports.

PLANET Networking & Communication
to record Inbound calls only, outbound calls only or both Inbound and outbound calls.
Output Volume: Sets the volume of the outgoing calls from the FXO channels.
Input Volume: Sets the volume of the incoming calls from the FXO channels.
- Answer Polarity Detection: When enabled, FXO (FXS signaled) ports watch for a polarity reversal to mark when an outgoing call is answered by the remote party.
- Hangup Polarity Detection: In certain countries, a polarity reversal is used to signal the disconnection of a phone line. If enabled, the calls will be considered "hang up" on a polarity reversal.
- Prompts Language: You can choose a desired language of the system voice prompts to play to the incoming calls from this trunk. For example, if the call is not answered or the user is busy, the IPPBX system will notify the caller to leave a voice message in the language you set.
- Busy Detection: Enable busy tone detection, it is also possible to specify how many busy tones to wait for before hanging up.
- Busy Count: Specify how many busy tones to wait for before hanging up, and it's configurable only if Busy Detection is enabled.
- Busy Pattern: If busy detection is enabled, it is also possible to specify the cadence of your busy signal.
E1 Trunks (IPX-21PR)
Path: Telephony -> Outbound Control -> Trunks
If your IPX-2200 or IPX-2500 IPPBX system has E1 module installed, you'll have an E1 trunk available for inbound and outbound phone calls.


PLANET Networking & Communication
- Call recording: To enable or disable call recording on the trunk/trunks. To enable recording you have options to record inbound calls only, outbound calls only or both inbound and outbound calls.
Overlap Dial: Overlap dialing mode (sending overlap digits).
Outbound CID: The number you want to display to the called party. - Reset Interval: To set the time in seconds between restart of unused B channels.
- Pri Indication: To enable this to report Busy and Congestion on a PRI using out-of-band notification.
- Switch Type: To set the type of PRI switch being used by the telephony provider.
- Prompts Language: Custom a system voice prompts language for the callers calling in from this trunk.
Fax Detect: Enable/disable fax detection on this trunk. - Dial Permission: Custom dial permission for this trunk, by default it uses the "Extension" dial permission. Configure only if this trunk is used for PBX integration, so calls coming from the other side can dial out from this IPPBX trunk directly. DO NOT change unless you fully understand how this feature works.
- Preferred outbound CID: To set preferred outbound CID of this trunk of the extensions.
BRI Trunks (IPX-21BRv2)
Path: Telephony -> Outbound Control -> Trunks
If your IPX-2200 or IPX-2500 IPPBX system has 4BRI module installed, you'll have 4 BRI trunks available for inbound and outbound phone calls.


PLANET Networking & Communication
- Call recording: To enable or disable call recording on the trunk/trunks. To enable recording you have options to record inbound calls only, outbound calls only or both inbound and outbound calls.
Overlap Dial: Overlap dialing mode (sending overlap digits).
Outbound CID: The number you want to display to the called party. - Reset Interval: To set the time in seconds between restart of unused B channels.
- Pri Indication: To enable this to report Busy and Congestion on a BRI using out-of-band notification.
- Switch Type: To set the type of PRI switch being used by the telephony provider.
- Prompts Language: Custom a system voice prompts language for the callers calling in from this trunk.
Fax Detect: To enable/disable fax detection on this trunk. - Dial Permission: Custom dial permission for this trunk, by default it uses the "Extension" dial permission. Configure only if this trunk is used for PBX integration, so calls coming from the other side can dial out from this IPPBX trunk directly. DO NOT change unless you fully understand how this feature works.
- Preferred outbound CID: To set preferred outbound CID of this trunk of the extensions.
VoIP Trunks
Path: Telephony -> Outbound Control -> Trunks
Asterisk PBX can be registered as a SIP user agent to a SIP proxy (provider). If you have subscribed to a VoIP service from an ITSP (Internet Telephony Service Provider), then with the account details provided by them you can configure a VoIP trunk on your IPPBX system for the user extensions to share and make outbound phone calls.
To implement your SIP trunk account on the IPPBX system, you'll need to create a VoIP trunk.


PLANET Networking & Communication
- Password: Password provided by VoIP Provider.
- Contact: Contact user to use in an outbound call request through this trunk.
- Retry Interval: Once registration expired, retry interval is the number of seconds system will wait before attempting to send another register request to the server.
- Trunk Type: In practical applications, client mode VoIP trunks are the most commonly used to connect to the VoIP providers for low cost, long distance and international phone calls, while server mode is only used when users want to do SIP trunking between IPPBXs.
- Registration Expiration: Expiration time of registration in seconds.
- Max Retry: Defines how many times the IPPBX system will attempt to register to the server before permanently giving up.
More advanced settings.


PLANET Networking & Communication
providers use UDP as default transport protocol.
- Prompts Language: You can choose a desired language of the system voice prompts to play for the incoming calls from this trunk. For example, if the call is not answered or the user is busy, the IPPBX system will notify the caller to leave a voice message in the language you set.
- Simultaneous Calls: This option will limit the number of simultaneous outbound calls can be made through this trunk, leave it blank as not limited.
- Preferred Outbound CID: To set preferred outbound CID of this trunk of the extensions.
From Domain: Your service provider's domain name. - Dial Permission: Custom dial permission for this trunk, by default it uses the "default" dial permission. Configure only if this trunk is for branch office integration, so calls coming from the other side can dial out from this IPPBX trunk directly. DO NOT change unless you fully understand how this feature works.
Dial Rules
Path: Telephony -> Outbound Control -> Trunks
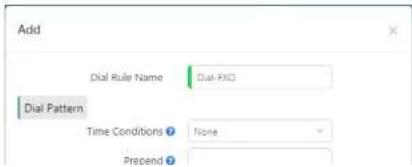
On the IPPBX system you can setup different dial rules, for users to dial numbers in different format/pattern and cause the IPPBX system to call out through different trunk lines. For example, users dial the numbers with a prefix 9 to call out through the CO lines (land lines). Or dial the numbers with a prefix 00 to call out through the VoIP lines (SIP trunks).
Click on button to create a dial rule, below is an example dial rule.

PLANET Networking & Communication
- Prepend option is used to always add specific digit/digits in front of the actual dialed number after the Dial Prefix is deleted. These extra digits will be sent along with the actual number to the service provider to exchange. For example, if you want to always add an area code in front of the dialed number, you can specify the area code in front of the dialed number, you can specify the area code here, otherwise leave this field blank.
- Dial Prefix is the first digit users have to dial while they want to make calls through the trunk/trunks selected in this dial rule. The system will strip the prefix from the number that is sent to the trunk.
- Dial Patterns act like a filter for matching numbers dialed with trunks. The various patterns you can enter are similar to Asterisk's definition of them:
X — Refers to any digit between 0 and 9
■ N — Refers to any digit between 2 and 9
■ Z — Any digit that is not zero. (E.g. 1 to 9)
. — Wildcard. Match any number of anything. Must match *something*.
- Pin Set is a collection of PIN codes for granting outbound phone calls.
- Call Method sets how to use the selected trunks for outbound phone calls.
Linear: Always take the first available trunk, if the first trunk is busy it will try the second trunk, if the second trunk is busy it will try the third, and so on.
Linear Cycle: Always take the next trunk, the trunk which the last had taken will not be used, it will call out through the next one directly.
- Double click one of the trunks or drag-and-drop to move the trunks from Available Trunks field to Selected Trunks field. The selected trunks will be used by this dial rule for outbound phone calls.

If you want all users to use the same dial rule for outbound phone calls, a dial prefix may not be necessary. But please make sure all available trunks should be included in the Selected Trunks field, otherwise unselected trunks will never be used. If you want to set different dial rules please make sure the dial rules use different dial prefixes.

PLANET Networking & Communication
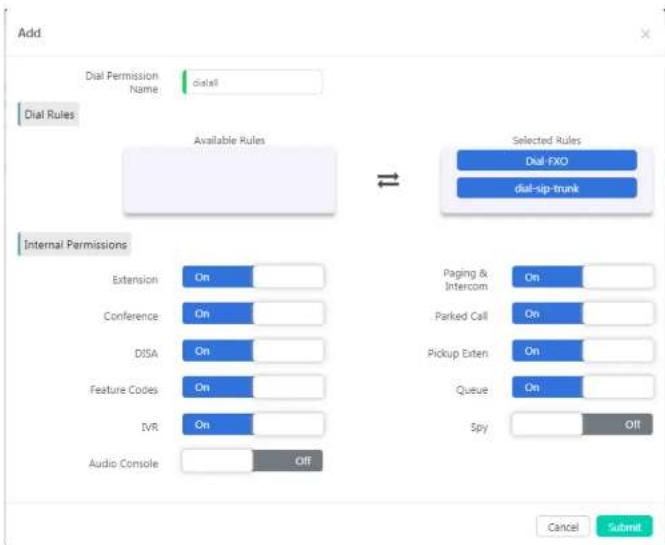
In the Dial Rules section by moving the dial rules from the Available Rules field to the Selected Rules field to enable the dial rules in this dial permission. In the above given example, 2 dial rules had been enabled. The "Dial-FXO" rule is used to make phone calls through CO lines (land lines). The "dial-sip-trunk" rule is used to make phone call through the SIP trunk. So if you assign this dial permission to the extension users, they will be able to make outbound phone call both through CO lines and the SIP trunk.

PLANET Networking & Communication
PIN Sets
Path: Telephony -> Outbound Control -> PIN Sets
Pin sets can be used to secure your IPPBX system phone services and in particular for outbound dial rules and DISA.
Each PIN Set consists of a series of PIN Codes.

The PIN codes could be any digits that you want, but usually recommended it to be 3 to 5 digits meaningless numbers.
You could distribute these PIN codes out to each of the extension users or several of them to share a same PIN per your demand. If the PIN set is implemented on a dial rule or DISA, the IPPBX system will ask them to enter one of these PIN codes before they can call out.

PLANET Networking & Communication
Audio Library
Music On Hold
Path: Telephony -> Audio Library -> Music On Hold
Music On Hold (MOH) is commonly known on an IPPBX system allows audio files (such as WAV or MP3 files) to be uploaded to the IPPBX system and played back when a caller is placed on hold or is waiting in a queue.
Audio files are managed by folder basis. You may use the system default MOH folder as on hold music or you may create new folders and upload your custom music files. Please first click on "Create New Folder" to create a new MOH folder.
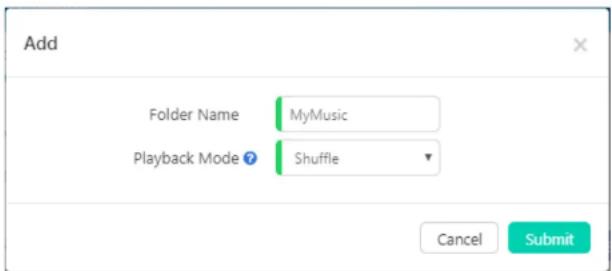
Give this folder a name and set the playback mode as shuffle (random playback) or in turn ( playback in order). Once done click on "Submit".
Now click on button to upload audio files to the newly created folder one by one. Supported File Format: MP3, WAV(8KHz, 16bit, Mono)

PLANET Networking & Communication

The recorded audio could be MP3 or WAV (16bit, 8KHz, Mono) format.
After uploading, you may playback on the web by clicking button or playback on a phone by clicking on the
button.
Custom Prompts
Path: Telephony -> Audio Library -> Other Custom Prompts
Custom prompts are to be used by call queue, call forward and some other advanced features, where customized voice prompts required.
You could record the voice prompts in MP3 or WAV (16bit, 8000Hz, mono) format and upload here. Then when you setup call queue periodic announcements you could select the customized voice prompts, or when you setup call forward notify message you could set the IPPBX system to notify callers before forwarding their calls.

PLANET Networking & Communication
Advanced Features
Call Forward
Path: Telephony -> Advanced Features -> Call Forward
Call forward allows calls to an extension to be forwarded to a specific internal extension number or an external phone number.
Before configuring call forward for user extensions, there are 2 advanced options you may want to know about.

- By enabling Passthrough Caller ID option to cause the IPPBX system passing the actual caller ID to the target number while forwarding.
- Notify Caller before Forwarding option allows you to choose a voice prompts to be played to the caller to notify caller that the call will be forwarded. The voice prompts is uploaded from Telephony -> Audio Library -> Other Custom Prompts page. If this option is not enabled, the call will be forwarded without notifying the caller.
To configure call forward please click on the button. And follow the explanations to complete the configurations as below.


PLANET Networking & Communication
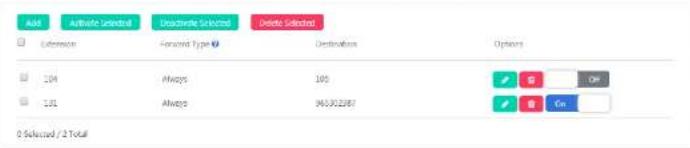
Call forward could be configured by Admin user and the operator user, and even by extension user from extension user web portal or by extension users from their phones by feature codes, please refer to Call Forward feature codes.
Follow Me
Path: Telephony -> Advanced Features -> Follow Me
The Follow Me feature allows you to set a list of numbers for an extension number that the extension user may possibly be contacted on. Therefore, if someone calls the extension and the user is not available then Follow Me will work through the list calling each of the numbers in turn until the user is contacted or the list is exhausted. Before configuring Follow Me there are 2 advanced options you may want to know about.

- Always Take Call: If enabled the forwarded call will be answered directly by a destination number, if disabled, when the forwarded call reaches the destination number, IPPBX system will give the destination number choices to decline or answer the call.
Record Caller Name: Ask the caller to say his/her name and record the name, so it can be announced to each

PLANET Networking & Communication
- Select the Extension which will be configured with Follow Me.
- Ring Duration (Sec): To set the time in seconds to ring the extension before Follow Me process starts.
Follow Me List: The list of numbers to be reached in order.
Number and Timeout (Sec): The number to be reached and the time to ring this number before trying the next one. If the number is an external number, don't forget to add a dial prefix in front of it.
Take the above settings as example, when extension 121 gets an incoming call, if it's not answered in 30 seconds, the call will be forwarded firstly to 122 and ring this extension for 30 seconds, if still not answered, it will try number 65302387 (9 is the dial prefix, not part of the number) for another 30 seconds. If extension 122 answered the call then 65302387 will not be called. If the call didn't answer by any of the numbers listed in Follow Me List, the Follow Me process will end and the caller will be disconnected.
Wake Up Call
Path: Telephony -> Advanced Features -> Wake Up Calls
Wake Up Call feature could be used to schedule reminders to the user extensions. Wakeup calls could be scheduled by admin user from admin Web interface, by operator user from operator Web interface, or could be scheduled by extension users by dialing Wake Up Call feature codes.
To schedule a wakeup call from admin user Web interface, please click on 📄 button, in the popup window set the time of the wakeup call and select the extension/extensions to be called at the scheduled time point.
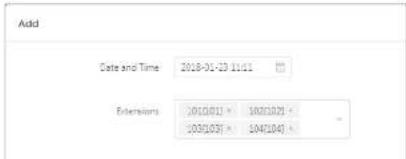

PLANET Networking & Communication
Or you may choose a date and then click on Set Time to set the exact time of the scheduled wakeup call.
In Extensions field you could select one or more extensions as you wish.
When it's time for wakeup call, IPPBX system will ring the selected extension/extensions. After user answering the wakeup call, IPPBX system will give user options to "Confirm" wakeup call or to "Snooze". If user press a key to confirm wakeup call then the schedule is completed, if user chooses to snooze, then the wakeup call will ring back later as per the user selected by key press.
If a wakeup call is not answered, system will try to ring back in the next minute, and will retry 2 times, after which system will consider the wakeup call completed, and the schedule will be canceled.
Conference
Path: Telephony -> Advanced Features -> Conference
Conferences allow two or more callers to be joined together so that all parties on the call can hear one another. Conferences are also referred as Conference Bridges or Conference Rooms.
There are 10 conference numbers for internal extension users to dial to join conference calls. You can also set conference as a destination in inbound routes to allow outside callers to reach the conferences.
| Call Forward | Follow Me | Walls Up Call | Conference | DISA | Paging & Intercom |
| Edwards | Gmail Password | Autumn Password | Leather Wall | Announce Coler | Call Recording Options |
| 90 | 1254 | 2345 | Yes | Yes | Yes |
| 91 | 1254 | 2345 | No | No | No |
| 92 | 1254 | 2345 | No | No | No |
| 93 | 1254 | 2345 | No | No | No |
| 94 | 1254 | 2345 | No | No | No |
| 95 | 1254 | 2345 | No | No | No |

PLANET Networking & Communication

- Guest Password is for ordinary conference users, only the users who enter the correct password can join in the conference.
- Admin Password is for conference admin, only the user/users who enter the admin password will become the conference administrator. Conference admin can invite other numbers to join in the conference by using Conference feature codes.
- Dial Permission could be used by the conference admin user to dial other numbers and invite them to join in the conference. By default, all conferences use Internal dial permission, which means by default the conference admin could only invite internal extension numbers to join in the conference, if inviting external number is necessary, please select a valid dial permission which could be used to dial external numbers.
- Leader Wait, if enabled, the conference will start when the conference admin entered. Before conference admin joining in, all other participants will be waiting with background music on.
- Announce Callers option causes the IPPBX system to notify all conference participants about new participants join-in. Before a new participant joining in the conference, the IPPBX system will ask the

PLANET Networking & Communication
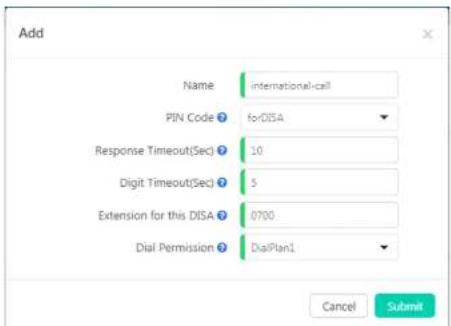
In the PIN Code dropdown list select a valid PIN Set. The PIN codes of this PIN set will be used to authorize all callers using the system features and facilities.
- Response Timeout(sec): The maximum waiting duration before hanging up if the dialed number is incomplete or invalid. Defaulted 10 seconds
- Digit Timeout(sec): The maximum interval time between digits when typing extension number. Defaulted 5 seconds.
- Extension for this DISA: If you want to access DISA by dialing an extension, you can define an extension number for this DISA.
- Dial Permission: Select a dial permission for this DISA so callers will be able to make outbound phone calls using the trunks on the IPPBX system.

PLANET Networking & Communication
Group Extension Number Range listed on Telephony -> Preferences -> Global PBX Options page, Extension Ranges section.
- In the Name field a name should be given to identify this paging group.
- In the Mode dropdown list, if "Simplex" is selected, calling the group number will page on the group members, if "Duplex", the group members are able to talk back to the caller (intercom).
- In the Group Members field, select the desired user extensions, make sure all extensions you selected are desktop based IP phones, otherwise if the phone is an analog one, paging/intercom will not work.
Except group paging and intercom, extension users could also paging/intercom an individual extension by using feature codes, please refer to introductions in Other feature codes section.
Call Queue
Path: Telephony -> Advanced Features -> Call Queue
A call queue places incoming calls in line to be answered while extension users are busy with other calls. The queued calls are distributed to the next available extension user in the order received. Once a call queue has been created, it can be assigned to specific extensions and configured to feature greetings, messages, and hold music. To create a call queue, please click on the button, a popup window will show up as below:
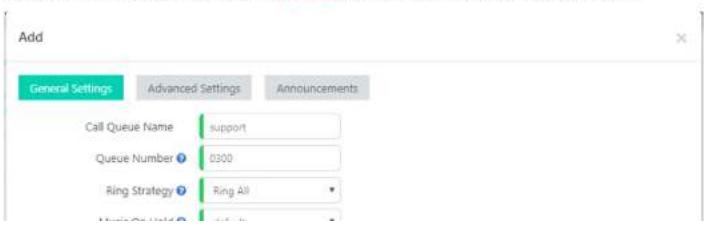

PLANET Networking & Communication

Ring All: Ring all available agents until one answers (default).
■ Leastrecent: Ring the extension of the Agent who has least recently received a call.
Fewestcalls: Ring the extension of the Agent who has taken the fewest number of calls.
Random: Ring the extension of a random Agent.
RRMemory: The system remembers which agent was last called and begins the round robin with the next agent.
Linear: Starting with the first agent, ring the extension of each agent in turn until the call is answered.
RROrdered: Same as RRMemory, except the queue member order is preserved.
In the Music On Hold dropdown list select a music folder as hold music when callers are waiting in the queue.
- Static Agents are extensions that are assumed to always be in the queue. Static agents do not need to "log in" to the queue, and cannot "log out" of the queue.
- Dynamic Agents are extensions that can log in and out of the queue. Extensions selected here will NOT automatically be logged in to the queue.
More advanced options for call queue is available, please click on button to show advanced options, they are optional but might be useful to improve the callers' experiences.


PLANET Networking & Communication
top call in the queue, making the other callers wait.
- Agent TimeOut specifies the number of seconds to ring an agent's extension before sending the call to the next Agent (based on Ring Strategy).
- If an agent's extension rings and the agent fails to answer the call, Auto Pause option can automatically pause that agent to stop them receiving further calls from the queue.
- Wrap Up time is the amount of time in seconds that an agent has to complete work on a call after which the call is disconnected.
- If Report Hold Time is enabled, it will report to the agent about how long the caller had been waiting in the queue.
- The value of Max Callers limits the maximum amount of callers can wait in the queue (Default is 0 -- unlimited). When the maximum number of callers in the queue is reached, subsequent callers will be sent to the If no answer destination.
- If Add Queue Name Caller ID option is enabled, when an incoming call is distributed to an agent the queue name will be displayed on the phone screen along with the caller ID. So a call queue agent knows which call queue the call is coming from. This feature is helpful if an agent belongs to multiple call queues.
- Calls that have been waiting in the queue for Max Wait Time(Sec) will be sent to the If no answer destination. If left blank, there will not be any time limitation of waiting time.
- Join Empty option allows callers to enter the queue when no agents are available. If this option is not enabled, callers will not be able to enter the queue without available agents - callers will be sent to the If no answer destination.
Leave When Empty option if it's enabled and calls are still in the queue when the last agent logs out, the remaining callers in the Queue will be transferred to the If no answer destination. This option cannot be used with Join Empty at the same time.
You may set the system to playback announcements to the callers while they are waiting in the queue. Please click on the button to setup customized announcements.
Add

PLANET Networking & Communication
- Caller Position Announcements is used to tell the callers how they've been waiting and the position in the queue.
Announce Hold Time: Announce to the callers of the time they have been waiting, the first minute callers waiting in the queue will not hear such announcements.
Announce Position: If set to be Yes, the system will announce the position of the caller is currently waiting in the queue.
■ Broadcast Frequency(Sec): To defines how often to announce queue position and estimate hold time.
Periodic Announcements can be used to periodically playback a voice prompts to the callers waiting in the queue.
■ Repeat Frequency(Sec): The time interval to repeat this periodic announcements.
■ Announcements Prompts: To select a voice prompts to be periodically played to the waiting callers.
Destination if no answer sets the final destination for the callers if no one answers the call when they were in the queue.
After setting up the queue, you may use internal extensions (non-agent extensions) to call the queue number to verify the queue settings.
Smart DID
Path: Telephony -> Advanced Features -> Smart DID
With Smart DID feature, the IPPBX system has the ability to route an inbound call directly to an extension if the extension had previously called or tried to call the external number. It is convenient for the called party to make a call back and be directly routed to the extension that called them without going through the IVR menu or reception desk.
For example, extension 100 called external number 1234567, no matter this number answered or not, when the number tries to ring back. the call will go directly to extension 100.

PLANET Networking & Communication
Phonebook
Path: Telephony -> Advanced Features -> Phonebook
Phonebook feature for IPPBX is just like a contact list on the mobile phones. You may add contacts to the IPPBX system, when the contacts calling in, on the ringing user extension phone screen will display the caller number and the contact name you have added before. If the number didn't match any contacts in the phonebook, then only caller number will be displayed on the ringing phone screen.
You may click on the Add button to add a new contact from the popup window.

Or you may export the phonebook template file to add the contacts by MS Excel and then upload the file to generate contacts.
Contacts could be added by admin user from admin web interface, by operator from operator web interface and by extension user from extension user web portal.
A contact added by admin user and operator user is visible to all extension users, but a contact added by an extension user is valid to the user who added it and the admin and operator user other extensions won't be

PLANET Networking & Communication
Feature Codes
Path: Telephony -> Feature Codes
Feature codes can be dialed from user extensions to enable and disable certain features or to achieve some call features. For example, enable and disable call forward, transfer incoming calls, check voice messages, etc.
Voicemail feature codes
| Voicemail | |
| Dial Voicemail: | *60 |
| My Voicemail: | *61 |
Dial *60 and you will enter the main menu of voicemail feature, by specifying the extension number and voicemail password of the required extension then you can check its voicemail and you can do this for any extension by following the system voice guidance.
By dialing *61 from an extension and entering the voicemail password for this extension you can follow the voice guidance to check voicemail of your own extension. Or alternatively, you can configure some advanced options for your voicemail box.

PLANET Networking & Communication
Call Parking feature codes
Call parking feature allows anyone who has received a call to park the call on an extension, allowing any other user to access the parked call.
| Call Parking 7 | |
| Parking Number: | *4 |
| Call Retrieve Number: | 41-49 |
To park a call, extension user could dial *4 during a live call, and then listen as the system tells you where you can retrieve the call (usually extension 41). The second call will be parked on 42, and it continues to park on orderly. To retrieve the parked calls, user should dial the retrieve number given by the IPPBX system. And this could be done by any extension.
A call could be parked for maximally 120 seconds before it goes back to the extension which parked it. And the parking lot (call retrieve numbers) could be monitored by BLF. It's helpful if the operator wants to know if there are calls parked on the IPPBX system.
Call Transfer feature codes
Call Transfer is used to transfer a call in progress to some other destinations. There are two types of call transfer.
- Attended call transfer - Where the call is placed on hold, a call is placed to another party, and a conversation can take place privately before the caller on hold is connected to the new destination. It is also referred to "Supervised Call Transfer".

PLANET Networking & Communication
party is still ringing.
Blacklist feature codes
Black list feature codes allow the extension users to add external phone numbers to IPPBX system blacklist from their phones, consequently the numbers added will not be able to dial in to the IPPBX system.
Adding blacklist numbers from phone by using feature codes is the same as adding blacklist numbers from admin and operator UI.
| Blacklist ? | |
| Blacklist the Last Caller: | *76 |
| Blacklist a Number: | *75 |
| Whitelist a Number: | *075 |
Blacklist the last caller allows you to dial *76 to directly add the last caller's number to the IPPBX blacklist.
You may also dial *75 (end with #) and follow the voice prompts to specify the number you wish to blacklist to add numbers to the IPPBX system blacklist.
To remove numbers from black list (whitelist a number), you can dial *075 (end with #) and follow the voice prompts to specify the number you wish to whitelist.
Call Spy feature codes
Call Spy allows users to dial the spy feature codes following by an extension number to listen to the call conversation in real-time.

PLANET Networking & Communication

Before you can spy on an extension, please enable "Call Spy" option on the extension edit popup window.
Call Queue feature codes
Call queue feature codes are for call queue agent extensions only. They are meaningless to the non-agent extensions.
| Call Queue | |
| Agent Login: | *62 |
| Agent Logout: | *062 |
| Agent Pause: | *95 |
| Agent Unpause: | *095 |
Agent Login and Agent Logout are for dynamic agents to login or out of the call queue. And for both static agents and dynamic agents, they can dial *95 to suspend their extensions temporarily, new calls will not be distributed to their extensions, until they dial *095 to resume.
Conference feature codes
Conference feature codes are used by conference admin for inviting participants to join in a conference or for creating a conference during a normal phone call.
Conference 7

PLANET Networking & Communication

After a dynamic conference is created, in reality you have entered a static conference room (by default 90 is the first available conference room). You are able to use conference admin menu to invite others to the conference and also others can dial 90 to enter this conference.
Wakeup call feature codes
Except configuring Wakeup Calls from admin and operator web user interface, extension users could request wakeup calls from their phones directly by feature codes.
| Wakeup Call 1 | |
| Cancel All Wakeup Calls: | *055 |
| Direct Wakeup Call Request: | *55* |
| Wakeup Call Main Menu: | *55 |
- Cancel All Wakeup Calls: By dialing this code to cancel all requested wakeup calls.
- Direct Wakeup Call Request: Add a wakeup call directly by dialing this feature code followed by a specific date and time in 8-digit number format, for example, feature code is *55*, you can dial *55*08010730 to add a wakeup call of 7:30am on August 1st.
Wakeup Call Main Menu: Advanced wakeup call menu for adding, viewing and canceling wakeup calls.
Call Forward feature codes
Call forward could be configured from admin and operator web user interface. With the following feature codes,

PLANET Networking & Communication
Activate Forward on Busy: Dial *72985337096, press 1 to confirm.
Deactivate Forward on Busy: Dial *072.
Activate Forward on No Answer: Dial *73985337096, press 1 to confirm.
Deactivate Forward on No Answer: Dial *073.
DND feature codes
DND (Do Not Disturb) could be set on the IP phones from the phone level, if the phone doesn't have DND feature you may use the DND feature code to set DND from IPPBX system level. Any phone connected to the IPPBX system can use the DND feature code, no matter it's IP phone, analog phone or softphone.
| DND ☑ | |
| DND Activate: | *74 |
| DND Deactivate: | *074 |
Simply dial *74 to enable DND, if you hear a beep sound that means DND is on. Once DND enabled, the extension will only be able to make calls, and inbound calls will be rejected.
Make sure when you are ready to receive inbound calls, dial *074 to deactivate DND.
Other feature codes


PLANET Networking & Communication
With this feature, you don't have to configure recording all calls for the extensions which may cause heavy system resource use if some call recordings are not required.
- Intercom: The intercom feature code allows you to intercom one extension only. You don't have to create a "Paging and Intercom" group for only one extension if you intend to intercom with only that extension.
- Paging: The paging feature code allows you to page one extension only. It's the same as the intercom feature code, the only difference between paging feature code and intercom feature code is by using intercom feature code both sides can talk to each other but using paging feature code, only the caller can talk to the called party.
- Audio Console: A speaker could be connected to the 3.5mm audio out (available on IPX-2200 and IPX-2500) interface, extension user could dial *911 to deliver a public address from the audio out interface.

PLANET Networking & Communication
Preferences
Global PBX Options
Path: Telephony -> Preferences -> Global PBX Options

Operator Extension: Choose an extension to be operator extension. When an incoming call has been directed to voicemail, then by pressing '0' the caller will be put through to the operator extension.
- Global Ring Time: If it's not specifically configured, an incoming call will ring the extension for the time given here.
- Outbound Call Transfer: Allow outbound phone calls to be transferred, if enabled it might cause phone call problem in certain situations. For example, an outbound phone call had been placed to another IVR system, the keypress might be recognized as transfer request on your own IPPBX system.

PLANET Networking & Communication
The user extension number and system extension number ranges are defined here to avoid any conflicts within the IPPBX system. You can modify these number ranges as per your requirements.
VoIP Advanced
Path: Telephony -> Preferences -> VoIP Advanced
Global SIP settings allow you to configure some general and advanced options for the IPPBX system global SIP preferences.

- UDP Port: SIP over UDP service port. By default IPPBX system uses UDP as SIP transmission protocol. Port number can be changed here if required. If changed on the IPPBX system, you'll also have to change on the

PLANET Networking & Communication
public IP address or domain name here.
External Signaling Address: This is similar to External Media Address except that the External Signaling Address is looked up regularly (every 10s).
- UDP Signaling Address Port: Port number of SIP signaling with UDP transport protocol on the public network.
TCP Signaling Address Port: Port number of SIP signaling with TCP transport protocol on the public network.
TLS Signaling Address Port: Port number of SIP signaling with TLS transport protocol on the public network.
- Local Net (IP/Netmask Length): Your local network address/addresses.

If you are going to map your IPPBX system to the Internet, the following configurations should be done.
- SIP port mapping on your router (one of the following: UDP: 5060; TCP: 5061; TLS: 5062).
- RTP port mapping on your router (UDP: 10001 to 10500).
- Specify External Media Address and External Signaling Address.
- Specify your local network address/addresses.
- For extensions remote registration, enable "Remote Extension" on extension edit popup window. Mapping your IPPBX to the Internet will be risky, for security precautions please always use strong passwords.

IAX2 extension support had been enabled by default for all extensions. And IAX2 works on UDP port 4569, you may modify the port number if required.

PLANET Networking & Communication
Analog Settings
Global Analog Settings are used for configuring the IPPBX system to seamlessly work with the telephone lines from your telecommunications providers.
Analog Settings

- Caller ID Signaling: The signaling type applied on the PSTN lines to pass caller ID.
Bell-US—Also known as Bellcore FSK. Used In the Canada, China, Hong Kong and US.
DTMF—Dual Tone Multi-Frequency. Used in Denmark, Finland and Sweden.
V23—Mostly used in UK.
V23-Japan—Mostly used in Japan.
- Caller ID Start: Defines when the caller ID starts.
Ring—Caller ID starts when a ring is received.
Polarity—Caller ID starts when polarity reversal starts.
Polarity(India)—Can be used in India.
Before Ring—Caller ID starts before a ring received,
CID Buffer Length: The buffer length can be used to store caller ID info.
- Ring Debounce: Sets the minimum time in milliseconds to debounce extraneous ring events.
DTMF Hits Begin: Sampling matching value of DTMF caller ID digits, you can choose 1 to 5 digits been matched than to consider it as part of the Caller ID.

PLANET Networking & Communication
Module Settings

Module Settings are only for configuring digital module cards (EI/T1, BRI) on IPX-2200 and IPX-2500 IPPBX systems. Ignore this part if you are using FXS/FXO/GSM/WCDMA modules.
Path: Telephony -> Preferences -> Module Settings
IPX-2200 and IPX-2500 IPPBX systems need proper module settings to load correct drivers and configure files to drive the E1 and BRI telephony modules.
Default module settings are with module types FXS/FXO/GSM/WCDMA on both telephony module slots. So if you don't have E1 and BRI modules installed then you don't have to configure module settings.
E1 PRI Signaling
E1 module can be installed on both Slot 1 and Slot 2. To ensure IPX-2200/IPX-2500 IPPBX can detect and drive E1 module in the Module Type field, you should choose "E1/T1".


PLANET Networking & Communication
T1 PRI Signaling
To configure PLANET E1 telephony module to work in T1 mode, please choose T1 in the Mode dropdown list. And then configure T1 related parameters given by the telephony provider.
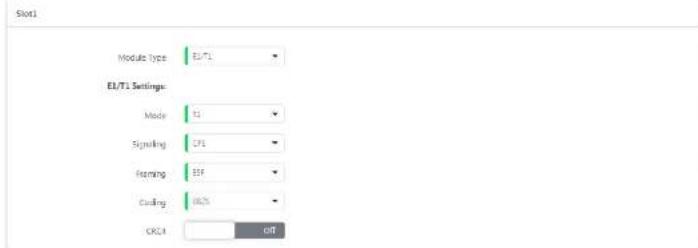
T1 runs on same signaling types as E1 mode. And T1 uses different Framing and Coding methods, configure these parameters according to the details provided by the telephony provider. In most cases CRC4 is not needed for T1 circuit, enable it only when the provider requires it.
After configurations been done, save and reboot the IPPBX system. In the meantime you attach the T1 line to the T1 interface. After rebooting you should get LED indication with L1 red, L2 red, L3 off, L4 green to indication PRI CPE signaling. For more details of the LED indications please check IPX-2200 and IPX-2500 chapter in the LED Indication section.
MFC/R2 Signaling

PLANET Networking & Communication
R2 Signaling Settings:
Variant
Mexico

Max ANI

Max DNIS

Get ANI First


Advanced Protocol File


Category
National Subscriber

- Variant: Protocol variant setting depends on country and carries.
Max ANI: The maximum expected number of ANI digits.
Max DNIS: The expected number of dialed digits. - Get ANI First: The usual behavior for incoming calls is to get the calling party category and the ANI as soon as possible, and to get the DNIS afterwards. This doesn't work on all systems, so the option to reverse this behavior is provided.
- Advanced Protocol File: Additional configurations for R2 signaling.
Category: Send calling party's category. Usually National Subscriber works just fine, you can set other options if needed in real application.
SS7 Signaling
Signaling System No.7 (SS7) is a set of telephony protocols that can be delivered via E1 and T1. In the E1 settings section and Signaling field by selecting SS7, you are able to configure E1 SS7 signaling.

PLANET Networking & Communication
SS7 Settings:
Variant
ITU
▼
Point Code
20
Point Code of Node Adjacent
20
ss7 dchan
15
Signaling Link Code
0
Default Destination Point Code
20
Network Indicator
International
▼
Called Nai
National
▼
Calling Nai
National
▼
International Prefix
-
National Prefix
-
Subscriber Prefix
-
Unknown Prefix
∴ m = 3/11
Please configure these parameters according to the instructions of the service provider or ask for advice from our support team. Otherwise, please do not change these settings without professional guidance.

PLANET Networking & Communication
The jumpers shown in the picture below are for crossover cables and straight cables to connect a BRI connection.

The Jumpers for Port 1, 2 and Port 3, 4 are on different position. Attach the BRI lines to these ports and then configure BRI parameters.


PLANET Networking & Communication
Reports
Call Logs
Path: Reports -> Call Log
Call logs are also known as CDR (Call Detailed Records), on the call logs page you can check records for any call that went through the IPPBX system.
To query call logs, you need to first specify the searching criteria.

- In the Type dropdown list choose Outbound, Inbound or Internal to search outbound calls, inbound call or Internal calls only.
In From and To fields set the start and end date to search call logs within this period of time.
- By specifying the name of a trunk in the Trunk Name field to search the inbound or outbound calls came in or sent out through this specific trunk only.
In the PIN Code field specify a PIN code of a PIN Set to search outbound calls made by using this PIN code.
The searching results might look like below.
| Start Time | Call From | Call To | Final Callon | Duration | Trunk Name | FNV Code | Type | Status | Call Thickness |
| 2018-02-11 15:17:46 | John Deaf"John Deaf" < 10. | 36300787 | 91100187 | 00:00:30 | FXO-1 | 9001 | Couchout Answered | Yes | |
| 2018-02-11 15:18:14 | 9332257 | 07Mo and | 200 | 00:00:47 | FXO-1 | inbound Answered | Yes | ||
The time when this call took place will be listed in the Start Time column.

PLANET Networking & Communication
Call Recordings
Call Recordings
Path: Reports -> Call Recordings -> Call Recordings
Call recordings to be checked here are for those extensions which had enabled call recording from the extension edit page.
Search criteria can be used to search call recordings are as follows.

- Type could be used to search the call recording according to outbound, inbound and internal calls.
- Call From could be used to search according to a specific caller's number (optional).
- Call To could be used to search according to a specific callee's number (optional).
Trunk Name could be used to search according to the inbound/outbound trunk's name (optional).
PIN Code could be used only for those calls which are dialed out with PIN codes define in PIN Set (optional).
The searched recordings will be displayed in a list with some detailed information.

You may playback the recording by built-in web player by clicking on the button.


PLANET Networking & Communication

One Touch Recordings
Path: Reports -> Call Recordings -> One Touch Recordings
One touch recording is for those extensions that are not enabled, when the user wants to record the call; by pressing 1, it will start recording.
The recordings of once touch recording could be found here. Search criteria and recording list options are the same as the "normal" call recordings, except one touch recording could not be found on the Call Recording page.

PLANET Networking & Communication
System Logging
Fax Logs
Path: Reports -> System Logging -> Fax Logs
Fax logs stores all your inbound faxes and the outbound faxes sent from the extension user portal.
The fax logs could be managed by both the Admin user and the Operator user.
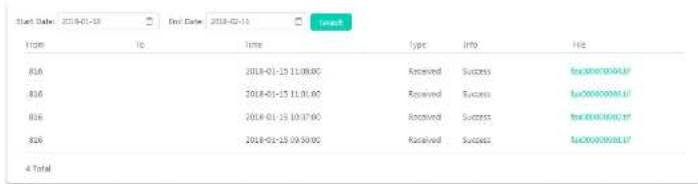
By downloading the .tif file to your operating system you may view the fax details.
Web Access Logging
Path: Reports -> System Logging -> Web Access Logging
On the Web Access Logging page you may check all the logs of the web access records, including admin user, operator user and extension users.


PLANET Networking & Communication

to download all web UI access logs in CSV format.
Advanced Logging
Path: Reports -> System Logging -> Advanced Logging
Advanced logging can be used for higher level of the IPPBX system troubleshooting.
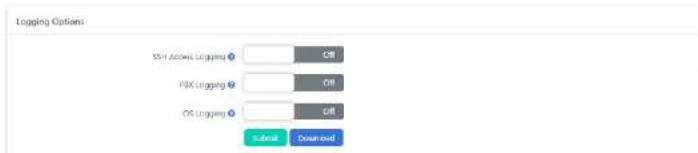
- SSH Access Logging can be used to trace the SSH login records.
PBX Logging can be used to analyze the phone services related issues.
The OS Logging can be used to analyze the IPPBX system OS level issues.
Enable the desired type of logging if you are qualified to analyze such kind of logs or if our support team asked for these kinds of logs for troubleshooting, otherwise please keep them disabled.

PLANET Networking & Communication
System
Storage
Data storage allows you to upload your recording files, log files and voicemail messages to an FTP server through the Ethernet. Or you may attach an external USB drive to the IPPBX USB interface for saving the above-mentioned files.
USB Storage
Path: System -> Storage -> USB Storage
On IPX-330 and IPX-2100 there's only 1 USB interface, on IPX-2200 and IPX-2500 there are 2 on the back panel. USB drives could be attached to the USB interface for data backup, only 1 USB drive supported on the IPX-2200 and IPX-2500.
Supported USB file system formats are: FAT16, FAT32, exFAT, NTFS, EXT3 and EXT4. If it's a portable USB hard drive, please make sure it uses external power supply. And please make sure the USB drive only has a single partition, otherwise it won't be detected by the IPPBX system.
Before attaching the USB drive and configuring data storage settings, please make sure no one else is signed in the IPPBX web UI and there's no phone call going on in the system. Because during the configuration process of USB data storage, the recordings, logs and voicemails generated would be lost.
Once a USB drive is detected, you'll see the USB Mount Status changed to Connected. Refresh the status by clicking on the button if nothing happens when you have attached the USB drive.
USB Storage Status (Must Unmount USB before unplugging)
USB Mount Status:
Connected


PLANET Networking & Communication
USB Storage Status (Must Umount USB before unplugging)
WEB Amount Status
Connected
1.53 Rainbow Street
The whole process will take a few seconds to few minutes depending on the amount and size of the files. You may click on the button to check the backup status. When done, the USB Backup Status will change to Backup End.
USB Storage Status (Must Unmount USB before unplugging)
USB Mount Status
(undirected)

USB Backup Status
Backup End
From now on the type of files you've selected will all be written directly to the USB drive. And can be browsed on the web GUI just the same as they are saved in the Internal system storage.
The volume info of the USB drive could be checked every time when you first sign in to the IPPBX system web GUI (Admin and Operator user).

USB
1216≤3.015倍
Free 7.5 GB

Please do remember that, DO NOT remove the USB drive from the IPPBX system unless you have disabled USB storage and unmounted the USB drive by clicking on the button from System -> Storage -> USB Storage page.

Note
If your USB drive could not be detected by the IPPBX system, please use USB disk format tool to delete all partitions on the USB drive and create a single new partition and try again. Before doing this, please back up the data in your USB drive. It will erase all data on the drive by doing it.

PLANET Networking & Communication
FTP Storage
Path: System -> Storage -> FTP Storage
By utilizing your existing FTP server, you can configure the IPPBX system to upload call recordings, voicemails and call log files to your FTP server. If you don't have one you can even use your Windows PC to set up an FTP server for the IPPBX system to connect to. You must however ensure that your PC is always turned on or at least available at the times when your IPPBX is going to upload files.
FTP storage should not be configured to work at the same time with USB data storage. Otherwise, the data on the USB will all be migrated to your FTP server.
To configure FTP storage, enable it and configure the FTP server credentials and the file uploading options.
FTP Storage Settings
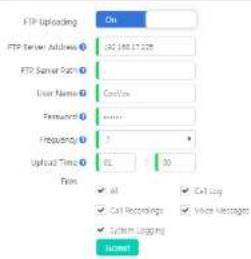
In the FTP Server Path field you may specify the directory of where to store the uploading files.
From the Frequency dropdown list select the number of days of each uploading.
In the Upload Time field specify the exact time of the uploading.
Once configurations are done, click on the button to connect the IPPBX system with the FTP server. Once connected, you'll see the FTP Connect Status has been changed to Connected.

PLANET Networking & Communication
Region and Time
Path: System -> Region and Time
System time is very important for the IPPBX system, especially when the IPPBX system handles inbound phone calls according to time conditions, then only if the system time is correct will calls be handled properly. Also, call logs and call recordings files are named with system time. If time's not correct on the system, the phone system will not work properly.
At the initial setup while you going through the quick setup wizard your location would be set. If you have skipped the quick setup wizard or you want to change the time zone, you may do it here.
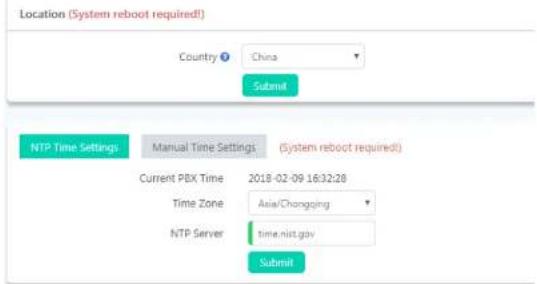
Location and time may be configured separately. Both modifying location and time settings require rebooting the IPPBX system.
The location settings will determine the type of tone (Dial tone, Busy, Congestion tone, etc.) you heard on the phones, the time zone and also the opermode on the Analog Settings page. So you may not change the location settings here but adjust the time settings only.
You may set the Time 70ms and MTD Carrier to let the I100V system synchronizing time from the MTD carrier. This is

PLANET Networking & Communication
Network Settings
Network Profiles
Path: System -> Network Settings -> Network Profiles
Network profiles could be configured through the quick setup wizard at the initial setup of the IPPBX system.
When modification of the network profiles is required, it could be done here.

The WAN network interface of IPPBXs could be configured to work in Static IP or DHCP mode. In most cases assign a static IP would be the best practice. As all the IP phones will communicate with the IPPBX through this IP address.
On WAN port, gateway and DNS could be configured so the IPPBX could have Internet access. As a result, SIP
VPN
Path: System -> Network Settings -> VPN
VPN (Virtual Private Network) is mainly used for setting up long-distance and/or secured network connections. When used on the IPPBX system, all phone calls made and received are encrypted so it secures your remote offices/extensions' phone services. Built-in VPN Server on the IPPBX system is an easy way to set up a secured connection between other or IP phones. You don't need to build a dedicated VPN server or buy a VPN router. This is also a workaround to avoid firewall issues when configuring remote VoIP client such as SIP protocol which is notoriously difficult to pass through a firewall due to its random port numbers to establish connection.
IPPBX supports 2 VPN varieties, PPTP VPN and OpenVPN. On a IPPBX system you can only configure one VPN variety to work in one role. In other words, on a IPPBX system you cannot configure OpenVPN and PPTP VPN to work at the same time or to configure VPN server and client at the same time.
OpenVPN Server
OpenVPN is an open-source software application that implements virtual private network (VPN) techniques for creating secure point-to-point or site-to-site connections in routed or bridged configurations and remote access facilities. It uses a custom security protocol that utilizes SSL/TLS for key exchange. It is capable of traversing network address translators (NATs) and firewalls. It was written by James Yonan and is published under the GNU General Public License (GPL).
OpenVPN allows peers to authenticate each other using a pre-shared secret key, certificates, or username/password. When used in a multi-client server configuration, it allows the server to release an authentication certificate for every client, using signature and Certificate authority. It uses the OpenSSL encryption library extensively, as well as the SSLv3/TL5v1 protocol, and contains many security and control features.
To configure OpenVPN server, please click on the button to show the configurations.

PLANET Networking & Communication
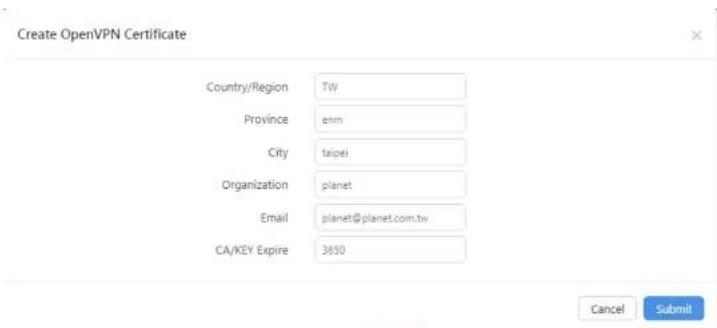
Specify your customized information and click on the button to continue. Click on the button to set up the OpenVPN server.


PLANET Networking & Communication
Route: The route entries adjust the local routing table, telling it which network to route over the VPN.
- Client-to-Client: Client-to-Client can enable intercommunication between clients.
Once configurations are done, click on the button to save the configurations and you may create certificates for the OpenVPN clients now. Each VPN client needs a certificate to be able to connect to the server. OpenVPN server on IPPBX system can connect up to 20 clients.

Each certificate entry created here is for an OpenVPN client. Download the certificate and extract files inside the package, 3 files you'll get and they should be uploaded on a client to be able to connect to this server.

Finally turn on the enable switch to enable OpenVPN server.
OpenVPN Client
To configure OpenVPN client, please click on the button to show the configurations.

PLANET Networking & Communication

- In the Server Address field you should specify the OpenVPN server address, which can be a public IP or a domain name.
The Port number should be exactly the same as on the OpenVPN server. By default it's 1194.
The transport Protocol should be exactly the same as on the OpenVPN server. By default UDP is used. - Device Node could be set to TUN or TAP, a TAP device is a virtual Ethernet adapter, while a TUN device is a virtual point-to-point IP link.
- Cipher (or Cypher) is an algorithm for performing encryption or decryption.
- Either to enable Compress LZO or not, depends on if you have enabled it on the server.
- If Default Gateway enabled, it will use VPN connection as default gateway, data which should be sent to the default gateway will now be sent though VPN connection.
Once done, click on submit to save the configurations. Finally click on Enable switch to switch on the VPN client connection.

PLANET Networking & Communication
PPTP VPN Server
PPTP (The Point-to-Point Tunneling Protocol) uses a control channel over TCP and a GRE tunnel operating to encapsulate PPP packets. The intended use of this protocol is to provide security levels and remote access levels comparable with typical VPN products.
Click on the button to show the configurations.

Configure the PPTP VPN server before enabling it.


PLANET Networking & Communication
- Enable MPPE128 Encryption: Microsoft Point-to-Point Encryption (MPPE) encrypts data in Point-to-Point Protocol (PPP)-based dial-up connections or Point-to-Point Tunneling Protocol (PPTP) virtual private network (VPN) connections with 128-bit key.
- Debug: Enable debug for PPTP VPN connection, debug information will be written into system logs. Once server configurations are done, you may create PPTP client users, each user created is for a VPN client to connect. PPTP VPN server on IPPBX can connect up to 20 PPTP VPN clients.

Remember to set the Availability to Yes, when you don't want this user to connect, just set Availability to No or you may remove the user from the VPN user list.

Finally click on the Enable switch to turn the PPTP VPN server on.


PLANET Networking & Communication

- Enable 40/148-bit encryption for MPPE: Tick to enable 40-bit key (standard) or 128-bit key (strong) MPPE encryption schemes.
Server Address: PPTP VPN server public IP. - Username: PPTP VPN user name given by the VPN server.
- Password: PPTP VPN user password given by the VPN server.
Default Gateway: If enabled, all network traffic will go through the PPTP VPN connection.
Once done, click on the button to continue, and now you may click on Enable switch to turn on PPTP VPN client.


PLANET Networking & Communication
Static Routing
Path: System -> Network Settings -> Static Routing
Static Routing is a form of routing that occurs when a router uses a manually-configured routing entry, rather than information from a dynamic routing protocol to forward traffic.
When needed you may click on the button to add a manual static route.

Destination is the IP address of the destination host or network address.
- If the packets are to be sent to the Destination specified above then send them to the Gateway address.
After the new record has been manually created you will see it listed in the route table.
DHCP Server
Path: System -> Network Settings -> DHCP Server
DHCP (Dynamic Host Configuration Protocol) is a standardized network protocol used on Internet Protocol (IP)

PLANET Networking & Communication

The DHCP clients which obtained IP addresses from the IPPBX system DHCP server will be listed on the right side of the page, in the DHCP Clients section.
If you want some host or client to always get the same IP address, IP Address Reservation will help.

PLANET Networking & Communication
services within your LAN via the domain name without needing to know your Dynamic public IP Address.
After setting DDNS, IP PBX phone services can be accessed from remote site via the domain name which your DDNS provider supplied you. Also remote management is possible, even without a static public IP.
IPPBX system supports the following DDNS service providers:
Easy DDNS
PlanetDDNS.com/
http://dyndns.org/
http://www.noip.com/
http://www.zoneedit.com/
http://www.oray.com/
http://www.3322.net
http://freedns.afraid.org/
Sign up to one of these DDNS service providers' website and subscribe a dynamic domain name. Once you have your account details, register it here and you DDNS domain will work with the IPPBX system.

After completing the above, please configure port forwarding on your router/firewall, then you'll be able to remote access IPPBX services from the internet using this dynamic domain. For example, you can port forward port number 443 and then you can access the IPPBX web interface by using the URL:

PLANET Networking & Communication

- First of all make sure the Firewall option is enabled. Only consider disabling your firewall if your PLNAET IPPBX is behind a router/firewall without any port forwarding from the Internet.
- Drop Ping will cause the system to ignore ping request. If enabled, you cannot ping the IPPBX system.
- Drop All will cause all packets sent to the IPPBX system being dropped, this will cause IPPBX system to block all communication with the outside world. Except web UI still works in local network, other services will all be terminated.
- Geo IP is a security policy which can be used to grant access of IP addresses from certain countries/regions, all IP addresses from other countries/regions which are not specified will all be blocked. By default, web UI will still be accessible. Enabling Geo IP requires Drop All to be enabled too.
To implement Geo IP please follow the steps below.
Step 1: Enable Geo IP and Drop All

Step 2: Select trusted countries/regions

Besides selecting the trusted IP addresses from certain countries/regions, you'll still need to add a common rule in the Common Rules section to grant access or the local network hosts/devices.
2.5.11 1.2.2 2.3.10

PLANET Networking & Communication
IP should be the local network address instead of a single IP address.
Netmask should be the subnet mask of the network address.
The Port range determines which kind of services to be granted. In this case you may leave it blank to grant local network all access to the IPPBX system.
Mac Address determines the action to be taken according to the Mac address of a device instead of its IP address, it only works with devices within the same local network because Mac addresses are not routable. In this case you are going to grant access of all the local network hosts/devices, so you may leave it blank.
By now, Geo IP security policy should work. The private IP addresses from your local network and the public IP addresses from the countries/regions you've selected should be able to access your IPPBX system. Other IP addresses will all be blocked.
Common Rules can be used to configure the firewall to grant or deny an IP address or a network from communicating with the IPPBX system. Even the service port number can be specified so it can grant or deny a specific IP or network to access a specific service. The priority from high to low of the firewall rules is from the top of the list to the bottom.
If you are going to grant access of some kind of services to specific IP address or network, add the grant rule/rules first then add the deny rules. If the order of the rules is not correct you may use the arrows in the Priority column to adjust the order of the rules.

In the above given example, the 2 rules "AcceptAMI" and "BlockAMI" limited that only the IP addresses from

PLANET Networking & Communication

You may specify the service port number and the maximum packets to be accepted on this port number in a certain time interval. Except the specified number of packets, more packets sent within the time interval will be dropped by the IPPBX system.
Intrusion Detection and Prevention
Path: System -> Security Center -> IP Blacklist
IPPBX system uses Fail2Ban to perform intrusion detection. Fail2Ban is an intrusion prevention framework written in the Python programming language. It works by reading Asterisk logs and some other logs in the IPPBX system, and uses iptables profiles to block brute-force attempts.
There are 4 default intrusion detection and prevention rules to secure SIP, IAX2, Web and SSH services on your IPPBX system. And by default all of them are activated to keep your IPPBX system safe.
SIP Intrusion Detection and Prevention

PLANET Networking & Communication
IP Blacklist
Path: System -> Security Center -> IP Blacklist
IP Blacklist will list all suspected intruders/attackers' IP addresses. The list is automatically generated by the system firewall if possible intrusion/attacking had been detected. And the list will show the IP address of the banned hosts, as well as what kind of service intrusion was detected.

If an IP address appears incorrectly in the list of rejected IP, you can click on the button to remove it from the IP blacklist.
IP Whitelist
Path: System -> Security Center -> IP Whitelist
IP Whitelist allows you to add IP addresses and network addresses to the IPPBX system as a trusted. The IP addresses in the whitelist will always be treated as trusted IP and will not be regulated by the firewall rules.


PLANET Networking & Communication
Email Services
Mail Server Settings
Path: System -> Email Services -> Mail Server Settings
Various kinds of Emails could be sent from the IPPBX system. The Emails could be automatically sent by the IPPBX system in certain circumstances or manually sent by admin and operator users.
To configure the IPPBX system being able to send out emails, mail (SMTP) server needs to be configured at first priority. At the initial system setup stage while you were going through the quick installation wizard, mail server could be configured, if you've not done it from the wizard, it still can be configured from here.
We have built-in some popular Email service providers' SMTP configuration templates for users to quickly deploy their mail server.
Mail Server Settings ?
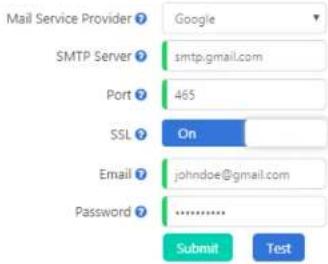

PLANET Networking & Communication
Voicemail to Email Settings
Path: System -> Email Services -> Voicemail to Email Settings
Voicemail to Email is a very useful feature for the extension users, as the IPPBX system has the ability to send received new voicemail messages of their extensions to their Email box.
It could be an Email notification or administrator could set the IPPBX system to send Email with voice messages attached in the Email notifications.

The Mail Subject field you can set customized Email subject which will be received by the extension users when they have new messages.
The Mail Body is also customizable, you may use variables in the mail body to describe the new voice messages they got. The format of the variables must be the same as listed in the Variables section.

PLANET Networking & Communication
Email Templates
Mail Subject
New York Times from 5.7
Mail body
B I U G 13
Heli
You have received a new fax from \$FXX_SPEDR, please see file attached.
varablog
S [MO_201028] The number of the fan sender.

You may customize the fax notification mail subject and mail body. The variable \${FAX_SENDER} could be used in mail subject or mail body to describe who sent the fax.
Email Notifications
Path: System -> Email Services -> Email Notifications
You may configure the IPPBX system to send Email notifications to the administrator on some system events.
System Resources Notification
Storage Usage Alert

Threshold
65%
Change: Submit Pressword 0

System Rubber

System Reset

Firmware Upgrade 0


PLANET Networking & Communication
Maintenance
Users
There are 3 user roles could be used to manage the IPPBXs.
Admin
Admin user is mainly used for IPPBX system administrations from the IPPBX web interface, including all system advanced configurations and management.
Operator
Operator user is mainly used by the company receptionist, secretary or some other employee who's responsible for managing the departments, extensions, call logs, recordings, faxes, some common call features, etc.
Root
Root user is used by highly experienced technicians for advanced managing and troubleshooting the IPPBX system from command line level.
Admin User
Path: Maintenance -> Users -> Admin User
Admin user password should be changed regularly on this page. And the password should be at least 6 characters long and contain a combination of letters, digits and symbols.
Operator User
Path: Maintenance -> Users -> Operator User

PLANET Networking & Communication
Upgrade
PLANET will update the IPPBX firmware at regular intervals for new features and bug fixes. You can visit our official website www.planet.com.tw to check the updates for your IPPBX system.
The downloaded firmware package should be in .rar or .zip format, please extract the package first and upgrade with the ulmage-md5.xxx file to upgrade your IPPBX system.
Path: Maintenance -> Upgrade
The current firmware version and the last time when the firmware was upgraded will be displayed on the firmware upgrade screen.
Firmware Version
Current Remote Version version v200
Last Upgrade ① 2017-11-09/15:24:00
Before upgrading, you may refer to the information and consider if a new firmware upgrading is necessary.
To upgrade the firmware please click on the Select File button to locate the ulmage-md5.xxx file, the file extension "xxx" should match your IPPBX model, otherwise the upgrade will fail.
After the file is located, click on the button to upgrade. For IPX-330 and IPX-2100, the whole process will take 4 to 5 minutes, for IPX-2200 and IPX-2500, the whole process will take 2 to 3 minutes, when done please refresh the web page to re-login.

Firmware upgrade will cause the IPPBX system to restart and as a result all the phone calls goir through the system will be terminated. So please make sure there're no phone calls going on before you upgrade.
Diagnostic

PLANET Networking & Communication

Traceroute
The traceroute command is used to discover the routes that the packets actually took while traveling to their destination.
Path: Maintenance -> Diagnostic -> Traceroute
In the IP Address/Domain Name field specify the IP or domain name that you want to lookup and click on button to begin tracing.


PLANET Networking & Communication

Once the process begins, the Start button will change to Stop. At this moment, you should make a call to recur the phone call problem or ensure some other problem had recurred, so the captured network traffic could content errors that are helpful for troubleshooting. Once done click on button, and the captured network traffic will be automatically downloaded.
The downloaded file could be analyzed by Wireshark or you could send the file to PLANET support team for help.
Channel Monitor
Channel Monitor, technically DAHDI Monitor allows you to monitor signal level on analog channel and record the output to a file. Recorded audio files are by default raw signed linear PCM. You can play it to the speaker to listen to the phone call signaling on the analog channel. Or you can use a sounds editor to visual display the audio level at both the Rx (audio Received by Asterisk) and Tx (audio Transmitted by Asterisk).
Usually Channel Monitor can be used to capture the caller ID signaling of an FXO channel. If you are experiencing caller ID problem you can perform channel monitor on the FXO port and then analyze the captured packets. If needed, you can send this file to PLANET support for help.
Path: Maintenance -> Diagnostic -> Channel Monitor
Before starting channel monitor, you need to select an FXO interface. Then click on button to capture signaling on the selected interface.


PLANET Networking & Communication
backup.
Path: Maintenance -> Backup
You may click on the button to take a backup of your IPPBX system when necessary. A backup file will be generated.

File name is generated according to the software version, date and exact time when the backup is performed. You may click on button to download the backup to you operating system. Or click on button to delete it from the IPPBX system.
When you want to restore the backup, you may click on the button. Restoring a backup will cause the system reboot, so please make sure there are no phone calls going on in the IPPBX system before you doing this. If you are going to restore an offline backup (backup downloaded to your operating system) please click on the button.

Backups will not be cleared after a system reset. So you may not need to download the backup to your operating system. And after a system reset, you may skip the quick setup wizard and go to the backup page to restore a backup directly to recover your previous configurations.
Reboot and Reset
Reboot

PLANET Networking & Communication
Method 1: Reset from web UI
Resetting the IPPBX system
Click on button and confirm with the popup window, reset process will begin. During the reset process the IPPBX system will restart and the whole process will take around 4 to 5mins for IPX-330 and IPX-2100, 2 to 3mins for IPX-2200 and IPX-2500.
Before resetting you may enable "I'd like to keep the network profiles" option, so after resetting you may still access the IPPBX system web UI from the same IP. If network profiles had been reset too, you'll need to access the IPPBX system via the default IP address.
WAN default IP: 172.16.0.1
LAN Default IP: 192.168.0.1
After resetting when you access the web UI you'll first see the quick setup wizard, if you choose to use backup file to restore the system configurations, you may skip the quick setup wizard, if you wish to configure a fresh new phone system, you may follow the wizard to complete the configurations.

Reset from web UI will clear all system configurations, except if you have enabled "I'd like to keep the network profiles" option which will keep the network configurations.
Except configurations to be erased, user data will also be erased, including call logs, call recordings, voicemails, faxes, etc.
By default backups will be kept, so after resetting from web UI you may restore backup directly from the IPPBX system.
Method 2: Reset by RESET button at system running stage (IPX-330 and IPX-2100 only)
When the IPX-330/IPX-2100 IPPBX system is running, the SYS LED indicator winks once every 2 seconds. Now you may press and hold the RESET button on the back panel of the IPPBX for about 7 seconds, then the SYS LED will go off, the IPPBX system will reboot and start the reset process.
Reset IPX-330/IPX-2100 IPPBX this way is the same as resetting from the web UI. Only difference would be you


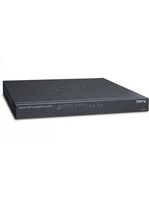
- USER'S MANUAL
- INTERNET TELEPHONY PBX SYSTEM
- COPYRIGHT
- DISCLAIMER
- WEEE WARNING
- TRADEMARKS
- REVISION
- TABLE OF CONTENTS
- IPX-330/IPX-2100/IPX-2200/IPX-2500
- INTUITIVE, EASE-OF-USE IP PBX MANAGEMENT
- PLANET INTERNET BUSINESS TELEPHONE PBX SERIES
- PLANET NETWORKING & COMMUNICATION
- OFF-NET CALLING CAPABILITY, CALL RESTRICTION, CALL ACCESS CONTROL
- REPLACING OLD PBX EASILY WITHOUT NEW WIRING
- DISTRIBUTED VOIP NETWORK INFRASTRUCTURE
- STANDARD COMPLIANCE
- FEATURES
- SYSTEM HIGHLIGHTS
- CODEC AND PROTOCOL
- PBX FEATURES
- CALL FEATURES
- PACKAGE CONTENTS
- PHYSICAL SPECIFICATIONS OF IPX-330
- PHYSICAL SPECIFICATIONS OF IPX-2100
- PHYSICAL SPECIFICATIONS OF IPX-2200 / IPX-2500
- PLUG-IN MODULES FOR IPX-2100/IPX-2200/IPX-2500
- SPECIFICATIONS
- INSTALLATION PROCEDURE
- NEW SYSTEM SETUP WIZARD
- STEP 4: MODULE SETTINGS
- STEP 5: CREATE DEPARTMENTS AND EXTENSIONS
- STEP 8: CREATE OPERATOR ACCOUNT
- EXTENSIONS
- PATH: TELEPHONY -> EXTENSIONS
- DEPARTMENTS
- PATH: TELEPHONY -> EXTENSIONS -> DEPARTMENTS
- ANALOG EXTENSIONS
- INBOUND CONTROL
- PATH: TELEPHONY -> INBOUND CONTROL
- INBOUND DESTINATIONS
- TIME CONDITIONS
- INBOUND ROUTES
- DIRECT ROUTING
- INBOUND FAX
- BLACKLIST
- OUTBOUND CONTROL
- TRUNKS
- E1 TRUNKS (IPX-21PR)
- PATH: TELEPHONY -> OUTBOUND CONTROL -> TRUNKS
- BRI TRUNKS (IPX-21BRV2)
- VOIP TRUNKS
- DIAL RULES
- PIN SETS
- AUDIO LIBRARY
- MUSIC ON HOLD
- CUSTOM PROMPTS
- ADVANCED FEATURES
- CALL FORWARD
- FOLLOW ME
- PATH: TELEPHONY -> ADVANCED FEATURES -> FOLLOW ME
- WAKE UP CALL
- PATH: TELEPHONY -> ADVANCED FEATURES -> WAKE UP CALLS
- CONFERENCE
- PATH: TELEPHONY -> ADVANCED FEATURES -> CONFERENCE
- CALL QUEUE
- PATH: TELEPHONY -> ADVANCED FEATURES -> CALL QUEUE
- SMART DID
- PHONEBOOK
- FEATURE CODES
- VOICEMAIL FEATURE CODES
- CALL PARKING FEATURE CODES
- CALL TRANSFER FEATURE CODES
- BLACKLIST FEATURE CODES
- CALL SPY FEATURE CODES
- CALL QUEUE FEATURE CODES
- CONFERENCE FEATURE CODES
- WAKEUP CALL FEATURE CODES
- CALL FORWARD FEATURE CODES
- DND FEATURE CODES
- OTHER FEATURE CODES
- PREFERENCES
- GLOBAL PBX OPTIONS
- VOIP ADVANCED
- ANALOG SETTINGS
- MODULE SETTINGS
- E1 PRI SIGNALING
- T1 PRI SIGNALING
- MFC/R2 SIGNALING
- R2 SIGNALING SETTINGS
- SS7 SIGNALING
- REPORTS
- CALL LOGS
- CALL RECORDINGS
- ONE TOUCH RECORDINGS
- PATH: REPORTS -> CALL RECORDINGS -> ONE TOUCH RECORDINGS
- SYSTEM LOGGING
- ADVANCED LOGGING
- PATH: REPORTS -> SYSTEM LOGGING -> ADVANCED LOGGING
- SYSTEM
- STORAGE
- USB STORAGE
- FTP STORAGE
- REGION AND TIME
- NETWORK SETTINGS
- VPN
- OPENVPN SERVER
- OPENVPN CLIENT
- PPTP VPN SERVER
- STATIC ROUTING
- DHCP SERVER
- INTRUSION DETECTION AND PREVENTION
- PATH: SYSTEM -> SECURITY CENTER -> IP BLACKLIST
- IP BLACKLIST
- IP WHITELIST
- EMAIL SERVICES
- VOICEMAIL TO EMAIL SETTINGS
- EMAIL NOTIFICATIONS
- MAINTENANCE
- USERS
- ADMIN USER
- OPERATOR USER
- UPGRADE
- DIAGNOSTIC
- TRACEROUTE
- ADDRESS/DOMAINNAME: 10.6.8
- CHANNEL MONITOR
- REBOOT AND RESET
Brand : Planet
Model : IPX-2100
Category : IP Telephony