
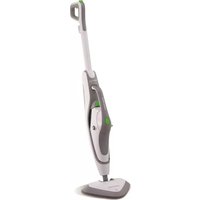
720022 - Steam cleaner MORPHY RICHARDS - Free user manual and instructions
Find the device manual for free 720022 MORPHY RICHARDS in PDF.


| Type de produit | Multifunction Steam Cleaner |
| Marque | Morphy Richards |
| Modèle | 720022 |
| Capacité du réservoir | 1 litre |
| Accessoires inclus | Upholstery nozzle, window squeegee, 3 extension tubes, stiff floor brush, floorhead, angled nozzle, small and large nylon brushes, small and large brass brushes, accessory adaptor, floor cloth, upholstery nozzle cloth, carpet glider |
| Fonctionnalités | Variable steam control, on/off power switch, steam ready light, carry handle, wheels, on-board tool storage cart, hose park position, steam trigger lock |
| Type d'eau recommandé | Eau déionisée, déminéralisée ou distillée ; ou adoucisseur Morphy Richards |
| Entretien | Vider le réservoir après chaque utilisation ; laver les chiffons en machine à 40°C max ; ne pas utiliser d'eau de Javel ni d'assouplissant |
| Sécurité | Ne jamais diriger la vapeur vers des composants électriques ; débrancher avant entretien ; ne pas laisser sans surveillance ; utiliser sous surveillance pour les enfants |
| Pièces détachées | Chiffons de rechange, adoucisseur d'eau (790002) disponibles via le service pièces |
| Garantie | 1 an standard, extensible à 2 ans si enregistré dans les 28 jours (UK et Irlande uniquement) |
| Utilisation | Domestique uniquement ; ne pas utiliser à l'extérieur ; ne pas stocker près de surfaces chaudes |
| Nettoyage | Essuyer avec un chiffon humide ; ne pas utiliser de nettoyants abrasifs |
| Stockage du cordon | Compartiment sous le socle avec système d'enroulement |
| Remplissage pendant l'utilisation | Éteindre, débrancher, relâcher la vapeur, laisser refroidir, puis remplir |
| Anti-calcaire | Utiliser de l'eau déionisée pour prévenir le tartre ; ne pas utiliser d'autres liquides |
| Contact service | UK Helpline: 0344 871 0944 ; Spares: 0344 873 0710 |
| Dimensions approx. | Non spécifiées dans le manuel |
| Poids approx. | Non spécifié dans le manuel |
| Puissance nominale | Non spécifiée dans le manuel |
| Alimentation | Secteur (220-240 V typique, non précisé) |
Frequently Asked Questions - 720022 MORPHY RICHARDS
User questions about 720022 MORPHY RICHARDS
0 question about this device. Answer the ones you know or ask your own.
Ask a new question about this device
Download the instructions for your Steam cleaner in PDF format for free! Find your manual 720022 - MORPHY RICHARDS and take your electronic device back in hand. On this page are published all the documents necessary for the use of your device. 720022 by MORPHY RICHARDS.
USER MANUAL 720022 MORPHY RICHARDS
VC720004MUK Rev1.qxp_Instruction Book 02/09/2014 27 Page 1
VC720004MUK Rev1
morphy richards
smart ideas for your home

Multifunction Steam Cleaner Tank

IMPORTANT: To prevent limescale problems which would not be covered by the guarantee, use only deionised, demineralised or distilled water (available from most large supermarkets), or Morphy Richards' Water Softener (for more information, call our UK spares helpline below).
All spares, eg. micro-fibre cloths and water softener, may be
Health and Safety
The use of any electrical appliance requires the following common sense safety rules. Please read these instructions carefully before using the product.
- WARNING: Disconnect from the mains supply before carrying out any routine maintenance.
- This appliance can be used by persons with reduced physical, sensory or mental capabilities, or lack of experience and knowledge, if they have been given supervision or instruction concerning the use of the appliance in a safe way and understand the hazards involved.
- Keep appliance out of the reach of children when it is energised or cooling down.
• Children shall not play with the appliance. - Cleaning and user maintenance shall not be undertaken by children without supervision.
Personal safety
- WARNING: Never direct steam at electrical components or fittings. If in doubt about the suitability of steam for cleaning an appliance, contact the appliance manufacturer for advice prior to cleaning.
- WARNING: Never touch the plug or cable with wet hands.
- WARNING: Attachments and tools will be hot after use. Allow to cool before attempting to remove.

- WARNING: Do not use the appliance without the filler can in place
Location
- Do not use or keep this product outside.
- Do not store the appliance near hot surfaces eg. ovens or heating appliances.
Mains cable
- WARNING: A damaged or severed mains cable fitted with a plug should never be connected to the mains supply. It must be destroyed, as a damaged cable becomes hazardous if connected to a power socket.
- If the supply cord is damaged, it must be replaced by the manufacturer. its service agent, or similarly qualified person to avoid a hazard.
- Do not allow the mains lead to become strained.
Product safety
• WARNING: Alvassie bed on an
The appliance is not to be used if it has been dropped, if there are visible signs of damage or if it is leaking.
Other safety considerations
- Do not use any chemical detergents, perfumes, alcohol or descaler etc in water.
- Repairs to electrical appliances are only to be undertaken by trained personnel.
- Unprofessional repairs can be
- dangerous for users.
- Use only genuine Morphy Richards spare parts and accessories.
- The appliance must not be left unattended while connected to the supply mains.
This steam cleaner is intended for domestic use only. Misuse or use for commercial or any other purpose will render the guarantee invalid.
Electrical requirements
VC720004MUK Rev1.qxp_Instruction Book 02/09/2014 27 Page 3
Contents
Health and safety 2
Electrical requirements 2
Product overview / Features 4
Operating the appliance 5
Steam cleaning floors 5-7
Using the accessories 7
List of attachments (excluding floorhead) 8
Refilling during use 9
Anti-scale 9
After use 9
Storage 9-10
Maintenance 10
Contact us 10
Notes 11
Guarantee 12
Product overview

Features
(1) Carrying handle
(2) On/off power switch
(3) Power indicator light
(4) Steam ready light
(5) Variable steam control
(6) Filler cap
(7) Tube park
(8) Wheels
(9) Hose inlet and flap
(10) On-board tool storage cart
(11) Hose handle
(12) Steam trigger lock
(13) Accessory release button
(14) Handle steam nozzle
(15) Steam trigger
(16) Hose
Accessories
(17) Upholstery nozzle
(18) Window squeegee attachment.
(19) Extension tubes (x3)
(20) Upholstery nozzle cloth
(21) Accessory adaptor
(22) Stiff floor brush (shown fitted into floorhead)
(23) Floorhead
(24) Angled nozzle
(25) Small and large nylon
Bros
Operating the appliance
IMPORTANT: The pressurised steam is at a high temperature. Always test on an inconspicuous area first. Never use it on objects or surfaces which cannot resist this temperature, or on surfaces with coatings or polishes, or on delicate materials such as dralon, plastic, natural fur or antique items etc. If in doubt, check carefully on a part of the material where minor marks will not matter.
Steam cleaning floors
IMPORTANT: The steam cleaner should not be used on:
- bare wooden floors or any surfaces where wood is exposed (as the surface will absorb moisture and may distort).
- damaged hardfloors or hardfloors with gaps present (as the flooring will absorb moisture and may distort). Additionally, do not keep the floorhead (23) in one place for an extended period because the continual heat may cause damage to carpets and some hardfloor types such as laminate flooring.
- Use the low steam setting on sealed wood and laminate flooring, do not make the floor overly wet.
- Use the medium steam setting on tiled flooring, do not make the floor overly wet.
- Use the high steam setting on stubborn marks and dirt.
Lock the trigger (see step 6 of "Steam Cleaning Floors" on page 6) and allow the cloth or attachment to cool before removing.
Thoroughly sweep or vacuum floors before steam cleaning.
The stiff floor brush (22) should only be used on hard ceramic type floors.

natural_image
Line drawing of a hand holding a device with a red arrow pointing to the screen (no text or symbols)Pull the hose inlet flap (9) down at the front of the cleaner.
Push the hose connector firmly and fully into the cleaner socket.
WARNING: Please allow the product to cool and release any pressure before removing the hose.

natural_image
Two-step illustration showing a hand holding a small object to form a bottle, with no visible text or symbols.Unscrew the filler cap (6) by turning anti-clockwise.
NOTE: If there is pressure in the boiler, the filler cap cannot be removed. Switch off, release any pressure via the hose trigger and press the red button on the filler cap to allow the cap to turn.
Fill the boiler with a maximum of 1 litre of water by using the jug and funnel provided.
IMPORTANT: To prevent limescale problems in the product, only use delonised, distilled or
Steam cleaning floors (continued)
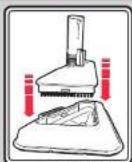

Ensure the stiff floor brush (22) is fitted into the floorhead (23), or use the stiff floor brush separately on tough areas. Press the pedal to remove the stiff floor brush.
Attach the floorhead to the extension tube(s) (19) or directly onto the hose handle (11).
If using the extension tubes, push them onto the handle steam nozzle (14) as far as they will go until you hear a click.
To clean very dirty areas, move the floorhead over the surface more slowly in order to increase the cleaning action of the steam.


Fit the cloth to the floorhead using the grips on the underside of the floorhead. If cleaning carpets, the carpet glider (28) should be attached to the floorhead.
The cleaning power of the cloth can be optimised by flipping, changing and washing the cloth regularly.
Additional cloths can be ordered through our helpline.
natural_image
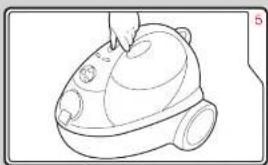
Line drawing of a vacuum cleaner device with no text or symbolsWARNING: Before switching ON, ensure the steam outlet is located safely away from persons or animals.
Plug in at the mains outlet and switch on the steam cleaner at the on/off power switch (2). The red power indicator light (3) will illuminate.

natural_image
Illustration of a medical or laboratory device with a red arrow pointing to a specific area (no text or symbols present)Press the steam trigger lock (12) to allow the steam trigger (15) to be operated. When not in use, press the lock 'on' to prevent accidental release of steam.
WARNING: When the trigger is first pressed, hot water may be ejected, especially if the water
Steam cleaning floors (continued)

natural_image
Line drawing of a hand holding a small object inside a bowl-like container (no text or symbols)The variable steam control (5), varies the steam output. Turn the knob anti-clockwise as far as it will go for the maximum amount of steam, or clockwise to decrease steam output.
natural_image
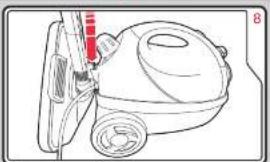
Line drawing of a vacuum cleaner with a red tool inserted, showing no text or symbolsDuring use, the tubes and nozzle can be stored in the park position for short breaks whilst cleaning.
Using the accessories
For a variety of cleaning tasks, alternative accessories can be used. Follow steps 1-2 & 5-7 from 'Steam cleaning floors' on pages 5-7, but use the accessory adaptor (21) with other accessories attached in place of the floorhead (23) at step 3.
WARNING: Unplug the steam cleaner and allow to cool before fitting or changing attachments or cloths as they become hot during use.

natural_image
Illustration of a soldering iron with a tip and handle, showing internal structure (no text or symbols)Push the accessory adaptor (21) as far as it will go onto the handle steam nozzle (14) until you hear it click into place.
The accessory adaptor can be removed again by pressing the accessory release button (13) to

Push the upholstery nozzle (17) or jet nozzle (29) onto the accessory adaptor (21) and turn in a clockwise direction to look into place.
If using the window squeegee attachment (18), it must be cloned onto the upholstery nozzle.
List of attachments (excluding floorhead)
Accessory adaptor (21) this attachment is the base attachment for all accessories supplied with the product (excluding the floorhead and the extension tubes).
Jet nozzle attachment (29) this attachment can be used alone to clean places or crevices that are not easily accessible. Also, this attachment is the base attachment if using the small and large nylon brushes (25) /small and large brass brushes (26) /angled nozzle (24).
Small and large nylon brush attachments (25) to remove stains on room-temperature surfaces, such as tiles, wheel trims, mirrors and windows.
Small and large brass brush attachments (26) to remove stubborn stains. Use only on hard metal surfaces, eg. draining boards, BBQs etc.
Angled nozzle attachment (24) to clean sanitary ware such as toilet bowls, tape or sinks. Point it directly at non-permanent stains on carpets or upholstery whilst holding a clean cloth near the stained area to capture any loosened dirt.

Upholstery nozzle attachment (17) once attached to the accessory adaptor (21), the utility attachment is the base attachment for attaching the following accessories:
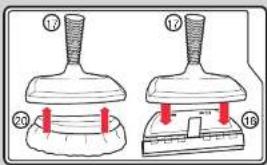
Upholstery nozzle cloth (20) for covering the utility attachment when freshening up upholstery, garments and bedding.
Squeegee attachment (18) is ideal for cleaning tiled or glass areas such as windows or mirror panels. To clean windows, start at the top, press the squeegee to the surface and drag downwards in straight passes from top to bottom. Wipe the rubber blade and the bottom edge of the window dry after each pass. For small window panels, remove the squeegee tool and spray the steam directly onto the surface. Use the squeegee separately to wipe away the moisture.
The squeegee attachment can be attached to the utility attachment by inserting the hooks at the back of the squeegee attachment into the loops on the back of the utility attachment, then securing the front of the utility attachment into the locking clip on the top of the squeegee attachment (as shown).

natural_image
Diagram showing a car being tested with a tool, and a magnified view of the vehicle's wheel (no text or symbols present)Remove the squeegee after use by holding the locking clip forward. Pivot the utility attachment up and unhook from the loops to lift it away.

Refilling during use
To refill the boiler during use, follow the procedure below:
WARNING: Always switch off, unplug from the mains supply and release all steam before opening and removing the filler cap (6).
Release the steam pressure by pressing the steam trigger (15) on the handle until all the steam has been expelled. Leave the steamer to cool down for a few minutes.

natural_image
Line drawing of a handheld electric shock absorber with red plastic clip (no text or symbols)Fill the boiler as previously (please see 'Anti-scale' section below for further information).
Anti-scale
Limescale
To prevent limescale build-up in the boiler, never till the steam cleaner's water tank with anything other than deionised, demineralised or distilled water (available from most leading supermarkets), or Morphy Richards' Water Softener (790002) - for more information or to purchase, call our UK spares line on 0344 873 0710.
The use of the correct water is an additional precaution that should be taken to ensure the performance of the boiler is maximised and the product is not damaged.
IMPORTANT: The use of any other fluids can be dangerous and can lead to damage of the heating element.
Rinsing the water tank
After use
Follow the maintenance steps below after every use.
-
Switch the cleaner off and unplug from the socket. Wait until the cleaner has cooled down completely.
-
Release any steam pressure by pressing the steam trigger on the handle.
-
Apply the steam safety lock.
-
Remove the filler cap.
-
Empty the water tank. Allow the inside of the water tank to dry out before replacing filler cap.
Storage
On-board tool storage
The cleaner may be used with or without the on-board tool storage cart (10).
Press the button at the rear of the cleaner and lift to remove the boiler from the cart.

natural_image
Illustration of a hand using a tool to lift a cylindrical object, with red arrows indicating motion direction (no text or symbols)The accessories for your steam cleaner can be neatly stored in the cart.

VC720004MUK Rev1.qxp_Instruction Book 02/09/2014 27 Page 10
Cord storage
There is a cord storage facility on the bottom of the cart. With the cleaner on its heel, pull-out the lower portion and rotate half a turn. Pull the latch in the centre downwards to allow the upper portion to move out. Wrap the cable around the two hooks.

natural_image
Line drawing of a fan with a bulb and internal blades, no text or symbols presentFor quick release of the cable, rotate the lower portion back half a turn.
Make sure cord storage is returned to its flattened position before using your steam cleaner.
Maintenance
WARNING: Always unplug the Steam cleaner from the mains supply before undertaking any maintenance procedures.
Overall maintenance
Your cleaner is manufactured to withstand normal day-to-day use, but an occasional wipe over with a damp cloth will help maintain it. Abrasive cleaners should not be used.
Cleaning the cloths
The floor cloth (27) and the upholstery nozzle cloth (20) can be machine washed (40°C max). For heavy soiling, soak the cloths in warm water and detergent or a mild stain remover. IMPORTANT: Do not use bleach or fabric softener.
Allow cloths to completely dry before storing. Replacement cloths can be purchased by calling
Contact us
Helpline
If you are having a problem with your appliance, please call our Helpline, as we are more likely to be able to help than the store you purchased the item from.
Please have the product name, model number and serial number to hand when you call to help us deal with your enquiry quicker.
UK Helpline: 0344 871 0944 JBS Helpline: 1709 150 119
Spares: 0344 873 0710
Talk To Us
If you have any questions or comments, or want some great tips to help you get the most out of your products. Join us online:
Blog: www.morphyrichards.co.uk/blog Facebook: www.facebook.com/morphyrichardsuk Twitter: www.twitter.com/loveyourmorphy Website: www.morphyrichards.com
VC720004MUK Rev1.qxp_Instruction Book 02/09/2014 27 Page 11
Please attach your receipt to this page. This will be needed if you have any issues with the appliance.
Notes
VCT20004MUK Pev1 09/14
Registering your 2 year guarantee
Your standard 1 year guarantee is extended for an additional 12 months when you register the product within 28 days of purchase with Murphy Richards. If you do not register the product with Murphy Richards within 28 days, your product is guaranteed for 1 year. To validate your 2-year guarantee, register with us online at
www.morphyrichards.co.uk
Or call our customer registration line
UK 0344 871 0242
IRE 1800 409 119
N.D. Each qualifying product needs to be registered with Morphy Richards individually.
Please note that the 2 year guarantee is only available in the UK and Ireland. Please refer to the 1 year guarantee for more information.
Your 1 year guarantee
To quality for the 1 year guarantee, the appliance must have been used according to the instructions supplied.
It is important to retain the retailer's receipt as proof of purchase. Staple your receipt to this back cover for future reference.
Please quote the following information if the product develops a fault. These numbers can be found on the base of the product.
Model no. Serial no.
All Morphy Richards products are individually tested before leaving the factory. In the unlikely event of any appliance proving to be faulty within 28 days of purchase, it should be returned to the place of purchase for it to be replaced.
If the fault develops after 28 days and within 12 months (2 years it registered) of original purchase, you should contact the Hepline number quoting Model number and Serial number or the product, or write to Morphy Richards at the address shown.
You may be asked to return a copy of proof of purchase.
Subject to the exclusions set out below (see Exclusions), the faulty appliance will then be repaired or replaced and dispatched usually within 7 working days of receipt.
If you suspect a fault, follow the simple checks detailed below before retrying the appliance or calling the helpine.
- Check the steam outlet is not blocked.
- Check the plug is firmly in the socket.
- Check the socket is working by trying another appliance.
- Check the fuse in the plug.
If, for any reason, this item is replaced during the 1 year guarantee period, the guarantee on the new item will be calculated from original purchase date. Therefore it is vital to retain your original till receipt or invoice to indicate the date of initial purchase.
This appliance is intended for domestic use only. Misuse or use for commercial or any other purpose will render the guarantee invalid.
Exclusions
Morphy Richards shall not be liable to replace or repair the goods under the terms of the guarantee where:
1 The fault has been caused or is attributable to accidental use, misuse, negligent use or used contrary to the manufacturer's recommendations or where the fault has been caused by power surges or damage caused in transit
2 The appliance has been used on a voltage supply other than that stamped on the products.
3 Repairs have been attempted by persons other than our service staff for authorised dealer.
4 The appliance has been used for hire purposes or non domestic use.
5 The appliance is second hand.
6 Morphy Richards reserves the right not to carry out any type of servicing under the guarantee at its discretion.
7 The guarantee excludes consumables such as cloths and brushes.
B Any problems arise as a result of Imescale build-up.
This guarantee does not confer any rights other than those expressly set out above and does not cover any claims for consequential loss or damage. This guarantee is offered as an additional benefit and does not affect your statutory rights as a consumer. Morphy Richards products are intended for household use only. See usage limitations within the location safety instructions.
Disclaimer
Morphy Richards has a policy of continuous improvement in product quality and design. The company, therefore reserves the right to change the specification of its models at any time.

For electrical products sold within the European Community. At the end of the electrical products useful life, it should not be disposed of with household waste. Please recycle where facilities exist. Check with your Local Authority or retailer for recycling advice in your country.



- morphy richards
- Health and Safety
- Mains cable
- Product safety
- Other safety considerations
- Contents
- Features
- Accessories
- Operating the appliance
- Steam cleaning floors
- Steam cleaning floors (continued)
- Using the accessories
- List of attachments (excluding floorhead)
- Refilling during use
- Anti-scale
- Limescale
- Rinsing the water tank
- After use
- Storage
- On-board tool storage
- Cord storage
- Maintenance
- Overall maintenance
- Cleaning the cloths
- Contact us
- Helpline
- Talk To Us
- Notes
- Registering your 2 year guarantee
- Your 1 year guarantee
- Exclusions
- Disclaimer
Brand : MORPHY RICHARDS
Model : 720022
Category : Steam cleaner