
PWD701 - Alarm system Pyle - Free user manual and instructions
Find the device manual for free PWD701 Pyle in PDF.


| Product Type | Vehicle Security System |
| Brand | Pyle |
| Model | PWD701 |
| Input Voltage | 12V DC (vehicle battery) |
| Current Supply (Red Wire) | 15A minimum |
| Siren Output | 3A (+) |
| Auxiliary Output | 500mA (-) per channel |
| Parking Light Output | 10A relay (+/-) |
| Door Lock Output | 500mA (-) |
| Number of Remotes | 2 (4-button transmitters) |
| Arming Modes | Active (manual), Passive (auto), Passive with countdown |
| Sensors | Dual-stage impact shock sensor, door/hood/trunk trigger inputs |
| Security Features | Remote panic, tamper alert, auto rearm, emergency override, valet mode, anti-hijack, sensor bypass |
| Optional Features | Starter disable, keyless entry, trunk release, illuminated entry, glass break sensor, remote auto start |
| Indicator LED Functions | Solid: valet mode; Slow flash: armed; Rapid flash: passive arming; On solid (not valet): open zone |
| Programming Features | 16 programmable options via valet switch and transmitter |
| Code Learning | Ignition on/off sequence; up to 4 transmitters |
| Maintenance | Keep components dry; check wiring periodically; avoid water ingress on siren |
| Installation Requirements | Secure module away from moving parts; protect wires with grommets; use multimeter for verification |
Frequently Asked Questions - PWD701 Pyle
User questions about PWD701 Pyle
0 question about this device. Answer the ones you know or ask your own.
Ask a new question about this device
Download the instructions for your Alarm system in PDF format for free! Find your manual PWD701 - Pyle and take your electronic device back in hand. On this page are published all the documents necessary for the use of your device. PWD701 by Pyle.
USER MANUAL PWD701 Pyle
1R / 4-BUTTON SERIES
VEHICLE SECURITY SYSTEM
Button 1


Button 3
Button 2


Button 4
Standard Features:
Two 4-Button Remote Transmitters
Status indicator (LED)
Valet / override switch
Multi-tone siren
Dual stage impact detector
Remote panic
Remote chirp mute
Remote sensor bypass
Active or passive arming
Optional Features:
Starter disable
Flashing parking lights
Keyless entry
Remote trunk or hatch release
Illuminated entry
Anti-Carjacking
Hood and trunk protection
Remote auto start
Power window roll up
Back-up battery w/charging circuit
Glass break sensor
Note: Some features may require additional parts and labor, and may not be appropriate for certain vehicles. Consult your authorized dealer.
System Operation
ARMING OPERATION
To arm the system press transmitter button 1:
• The siren will chirp once.
• The parking lights will flash once.*
• The doors will lock.*
- The LED will turn solid for 10 seconds then start flashing slowly. After 10 seconds the system is armed.
After Arming, if the system detects a bad sensor or an open zone, the siren will chirp and the parking lights will flash 4 times to indicate a zone is open. The system will ignore that input, but keep all other areas protected.
While Armed, the system will trigger if:
• The doors are opened.
- The shock sensor detects an impact to the vehicle.
• The hood or trunk is opened*.
When triggered, the siren will sound, the horn will honk*, and the parking lights will flash* for 30 seconds.
If the same input triggers the system 3 times during a single arming cycle, the system will bypass that input, keeping the other zones protected, until the next time the system is armed.
If the shock sensor detects a light impact to the vehicle, the siren will chirp and the parking lights will flash 5 times* to warn away the potential intruder.
*Optional Feature
PASSIVE ARMING
The passive arming feature automatically arms the system after closing all doors. The Passive Arming feature requires the ignition to have been on for at least 10 seconds prior to exiting the vehicle. This enables the key to be turned on then off quickly to avoid passive arming in the event of refueling, washing the vehicle, etc. The Passive Arming feature may be enabled during installation.
To arm the system passively:
- Turn the ignition key off (make sure ignition was on for at least 10 seconds).
-
Exit the vehicle and close all doors.
-
Siren will chirp 1 time when last door is closed.
- The LED flashes rapidly indicating that the system is preparing to arm. (The system can be armed any time by pressing transmitter button 1.)
- If the optional countdown feature is programmed, the siren will chirp every 2 seconds until armed.
- The siren will chirp 30 seconds after the last door is closed to indicate the system is armed. NOTE: Opening a door resets the passive arming timer.
• The doors will lock.†*
† If Passive Locking was enabled during installation.
DISARMING OPERATION
To disarm the system press transmitter button 2.
• The siren will chirp twice.
• The parking lights will flash twice.*
• The doors will unlock.*
- The dome light will turn on for 30 seconds.*
TWO STAGE DISARM
If the alarm has been triggered
- Press button 2 will turn off siren/horn, but alarm will remain armed.
- Press button 2 again.
• The siren will chirp 3 times.
• The parking will flash 3 times.*
• The doors will unlock.* - The Dome light will turn on for 30 seconds.*
TAMPER ALERT
If the alarm was triggered while away from the vehicle, the siren will chirp 3 times and the parking lights will flash 3 times on disarming for tamper indication.
AUTO REARM
The Auto Rearm feature allows the system to automatically re-arm and lock the doors* in the event the system is disarmed and a door is not opened within 30 seconds. This programmable feature may be enabled during installation.
SILENT ARMING/DISARMING
Press transmitter button 3 to silently Arm or Disarm the system for one-time operation. The system can also be programmed for full-time silent operation during installation.
IGNITION LOCK\*
The ignition locking feature automatically locks the doors 5 seconds after the ignition key is turned on, and automatically unlocks when the ignition key is turned off. To avoid locking keys in the vehicle, the ignition locking feature will be cancelled if a door is open when the ignition is turned on. This feature may be enabled during installation.
REMOTE PANIC
In the event of an emergency (PANIC) situation, the system's siren can be triggered for 30 seconds to attract attention. To activate the Panic Feature, press transmitter button 1 for 2 seconds:
• The siren will sound.
• The horn will honk*
• The parking lights will flash*.
Press button 1 to exit panic mode and rearm the system. Press button 2 to exit panic mode and disarm system. The Panic Feature will not operate when the ignition is on.
*Optional feature
EMERGENCY OVERRIDE
If the transmitter becomes lost or fails to operate, the system can be disarmed by using the emergency override feature.
To override the system:
- Enter the vehicle.
• The alarm will trigger. - Turn on the ignition key.
- Press the Valet switch for 3 seconds.
• The siren will stop sounding.
• The starter defeat will be bypassed.
• The system will enter valet mode.
VALET MODE
When the system is placed into the Valet Mode the security system will be disabled. However, the optional keyless entry and trunk release features will still function if installed. The valet feature may be accessed using the valet switch or using the remote transmitter.
To enter or exit valet mode using the switch:
- Be sure the system is disarmed.
- Turn the ignition key on.
- Press and hold the valet switch for 3 seconds.
• The siren will chirp once to enter valet or twice for exit. - The LED will turn on solid indicating the system is in valet mode, or turn off indicating valet mode exit.
To enter or exit valet mode using the remote:
-
Be sure the ignition key is off.
-
Press transmitter button 2 then button 1 and hold for 3 seconds.
-
The siren will chirp once to enter valet or twice for exit.
• The LED will turn on solid indicating the system is in Valet Mode, or turn off indicating Valet Mode exit.
OPTIONAL TRUNK RELEASE
Press button 4 for approximately 2 seconds to open the trunk.
OPTIONAL TRUNK DISARM
The trunk disarm feature allows the alarm to disarm automatically whenever transmitter button 4 is used to activate the optional trunk release. This eliminates having to first disarm the alarm before activating the trunk release. This feature may be programmed during installation.
Optional Auxiliary 2 output
This programmable output can be used to activate other accessories in your vehicle (remote engine start, turn on headlights, window roll up).
Pressing transmitter button 1 will arm the system and activate 30 second output.
Press and Hold buttons 3 and 4 will activate Auxiliary 2 output for as long as the buttons are depressed
This feature may be programmed during installation, and may require additional parts, and labor.
REMOTE SENSOR BYPASS
To arm the system and bypass the shock sensor, press button 1 to arm, then within 2 seconds press button 4. The siren will chirp once and sensors will be ignored until the system is disarmed and rearmed.
ANTI HIJACKING MODES\*
You may select from 1-3 options:
- Ignition Activated Anti Hijack Mode
Every time Ignition Key is turned on system will enter Anti Hijack Mode.
- Door Activated Anti Hijack Mode
When Ignition Key is on, and door is opened, system will enter Anti Hijack Mode.
- When Ignition Key is on, press button
4 for 3 seconds, system will enter Anti Hijack Mode.
The Anti Hijack Mode feature may be programmed during installation
After Anti Hijack has been triggered:
0-20 seconds there will be no indication
the Anti Hijack has been activated.
21-30 seconds LED will flash slowly.
31-45 seconds LED will flash quickly, and
siren will chirp every 2 seconds.
46-60 Seconds LED will flash quickly, and siren will chirp every 1 second.
61 seconds, LED will flash quickly, Siren, Horn* will sound, and Parking Lights will flash for 5 minutes.
Starter Disable will be activated.
To deactivate the Anti Hijack during the first 60 seconds,
Press the Valet switch 3 times.
To deactivate the Anti Hijack after 60 seconds press, and hold the valet switch for 5 seconds
Siren, Horn* will stop sounding, and
Parking Lights*will stop flashing.
System will enter the valet mode.
Starter Disable will be deactivated.
STATUS INDICATOR (LED) FUNCTIONS
On Solid = Valet Mode
On Solid and not in valet = Open Zone
Slow Flash = System Armed
Rapid Flash when disarmed = Passive Arming
PARKING LIGHT INDICATIONS
1 Flash = System Armed
2 Flashes = System Disarmed
3 Flashes = Tamper Alert
4 Flashes = Open Zone Indication (after arming)
5 Flashes = Shock Sensor Warn-away
*Optional Feature
Installation Instructions
Before you begin the installation
- Read the INSTRUCTIONS!
• Always use a multi-meter when verifying vehicle wiring. - Before mounting the product, verify with the customer the desired location for the valet switch and LED.
- Protect the vehicle by using fender covers.
• Always look before drilling. Make sure you will not cause damage to vehicle hoses, electrical looms or physical damage to vehicle.
Mounting The System Module
Mount the system module under the dash where it will be difficult for a potential thief to locate the module, and away from moving parts such as brake pedals, etc. Route the antenna wire away from wire looms, computer modules and metallic objects for better range.
Mounting The Siren
Mount the siren in a suitable place under the hood, away from hot and moving engine parts such as manifolds, fan belts, etc. Make sure the siren cannot be accessed from underneath the vehicle or through the grill. Face the siren down so that water cannot accumulate inside the siren bell. Protect wires running through the firewall using either tape or split loom tubing. If a new hole is needed, protect the wire from chaffing by installing a proper size grommet.
Mounting The Shock Sensor
Secure the shock sensor to the steering column, thick wire harness or a dash brace, using a wire tie. Make sure that the adjustment screw is accessible for later testing and adjustment.
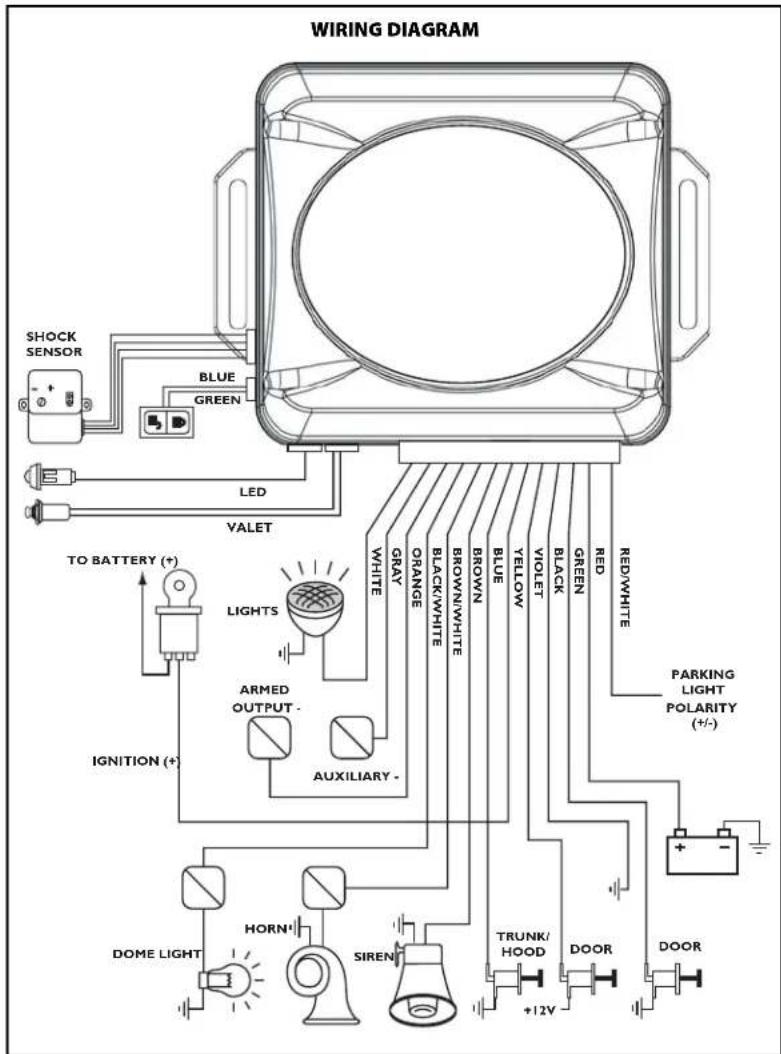
12-Pin Main Harness:
- RED WIRE - +12V Battery input. Connect the red fused wire on the main harness to a constant +12V source. This source wire should be at least 15 amp supply.
- BLACK WIRE - Ground input (-). Connect to a solid chassis ground that is clean and free of paint or dirt.
- YELLOW WIRE - +12V Ignition input. Connect to a main ignition wire at the ignition switch harness. This wire shows +12V when the ignition is on and while cranking. The voltage must not drop when the car is starting.
- GREEN WIRE - Negative door trigger (-). Connect to the door switch circuit wire that shows ground when the door is open.
- VIOLET WIRE - Positive door trigger (+). Connect to the door switch circuit wire that shows +12V when the door is open.
- BLUE WIRE - Trunk/Hood trigger (-). Connect the Blue wire to the trunk and/or optional hood pin switches. The switch must provide a ground output when switch is opened.
- BROWN WIRE - Siren wire output (+) 3A. Connect to the siren's red wire. Connect the siren's black wire to ground.
- BROWN/WHITE WIRE - 2nd Auxiliary Output 500mA (-) can be programmed for:
pulsing Horn output, variable pulse output, or 30 second output.
Connect to an optional relay to activate these accessories.
- BLACK/WHITE WIRE - Dome Light output (-) 500mA. Connect to an optional relay to activate the vehicle's dome light.
- ORANGE WIRE - Armed Output (-) 500mA. The ORANGE wire provides a ground when the unit is armed to activate a circuit disable relay or other device (i.e. window control module, etc.).
- GRAY WIRE - Auxiliary output (-) 500mA. Connect to a relay for an optional feature such as trunk release, etc.
- WHITE WIRE - Parking Light output (+/-) 10A relay. Connect to the vehicle's parking light wire. If the vehicle's parking light circuit exceeds 10 amps a relay is required. For vehicle's with independent left and right parking light circuits, the parking light wires must be connected using diodes to keep the circuits separate.
NOTE: Do not connect the WHITE wire to the vehicle's headlight circuit.
RED/WHITE WIRE – Parking Light Polarity Selection Input. Connect this wire to +12V Constant for Positive Output on White wire. Connect to Ground for Negative Output on White wire. For Multiplex activated parking light systems, install correct value resistor on this wire.
Plug in Connectors
3-Pin Red Door Lock Connector: Plug-in connector port for door lock harness or optional door lock relay module.
• BLUE WIRE - unlock output (-) 500mA.
• GREEN WIRE - lock output (-) 500mA.
2-Pin White Connector: Plug-in connector port for LED. Mount the LED in an area where it can easily be seen from either the
driver or passenger side of the vehicle.
2-Pin Blue Connector: Plug-in connector port for valet switch. Mount switch in an area that is easily accessible from the driver's seat.
4-Pin White Connector: Plug-in connector port for dual stage shock sensor.
Entering Programming
To enter System Programming:
-
Turn Ignition on.
-
Within 5 seconds press the valet switch 5 times.
The siren will emit a long chirp, to indicate entering the program mode.
- Press the valet switch the number of times equal to the desired feature step.
The siren will chirp, and the Led will flash to confirm your selection
(example:Step 7 = 1 long chirp, and 2 short chirps. LED will emit 1 long flash, and 2 short flashes.)
- Within 5 seconds, press the transmitter button corresponding to the desired operation mode for that feature.
The siren will chirp, and LED will flash to indicate the setting.
One chirp/flash = Button 1
Two chirps/flashes = Button 2
Three chirps/flashes = Button 3
Four chirps/flashes = Button 4
Turn off Ignition to save changes.
Siren will chirp 3 times.
Parking Lights will flash 3 times
Complete Default Reset
This procedure will reset all Programmable Features to factory default settings.
-
Enter System Programming.
-
Press valet switch 16 times. Siren will
emit 3 long chirps, and 1 short chirp LED will emit 3 long, and 1 short flash
-
Press button 4 for 3 seconds. Siren will chirp 6 times. Parking Lights will flash 6 times LED will flash 3 times.
-
Turn Ignition off to save changes Siren will chirp 3 times LED will flash 3 times Parking Lights will flash 3 times
Programmable Features
-
Arming Mode. Select between manual arming (Active), automatic arming (Passive), and automatic arming with chirps that countdown every 2 seconds until armed.
-
Parking Light Operation. Selects whether the parking lights flash twice or remain on for 30 seconds after disarming the system.
-
Auto Rearm. Automatically rearms the system in case of accidental disarming. The hood/trunk must not be opened or auto
rearm is bypassed. If button 3 is selected, the doors will lock on auto rearm.
-
Arming Chirps. Select Normal or Silent Arming.
-
Trunk Disarm Feature. When selected, activating the Auxiliary function to open the trunk will automatically disarm the system.
-
Ignition Locking. Automatically locks and unlocks the doors with the ignition. The system will not lock the doors if any door is open when the ignition is turned on.
-
Door Lock Pulse. Selects between a 0.8-second and a 3.5-second output for vehicles equipped with vacuum door locking systems.
-
Passive Locking. Selects whether or not the system will automatically lock the doors when Arming.
-
Door Unlock Pulse - Single or Double. Selects between a single pulse or a double pulse door unlock output.
-
Open Door Report. Siren will chirp 4
Programmable Features
| Sep Function | Button 1 | Button 2 | Button 3 | Button 4 | |
| 1. | Arming Mode | Active | Passive | Passive w/Countdown | |
| 2. | Parking Light Operation | Flash twice | 30 sec. | ||
| 3. | Auto Rearm | Off | Auto Rearm | Auto Rearm w/ Lock | |
| 4. | Arming Chirps | Normal | Silent | ||
| 5. | Trunk Disarm | Off | On | ||
| 6. | Ignition Locking | On | Off | ||
| 7. | Door Lock Pulse | 0.8 sec. | 3.5 sec. | ||
| 8. | Passive Locking | Off | On | ||
| 9. | Door Unlock Pulse | Single | Double | ||
| 10. | Open Zone Report | 10 seconds | 60 sec. | ||
| 11. | Auxiliary 2 | Siren Horn | Horn | Variable output | 30 sec.output |
| 12. | Not Used | ||||
| 13. | Ignition Anti-Hijack | Off | On | ||
| 14. | Door Anti-Hijack | Off | On | ||
| 15. | Remote Anti-Hijack | Off | On | ||
| 16. | Factory Default Reset | All Programmable options will reset to factory default settings | |||
times if a door remains open 10 seconds after arming. If vehicle has delayed dome light, program for 60 seconds.
- Auxiliary 2.
Select Siren/Horn (Default) Horn will sound when alarm is triggered.
Select Horn. Horn will sound with arm, disarm, shock sensor warn-away, and trigger.
Select Variable. Auxiliary 2 output will be activated for as long as you hold buttons 3, and 4.
Select 30 sec. output. Auxiliary 2 output will be activated 30 seconds upon arming system.
-
Not used
-
Ignition Anti-Hijack. Every time Ignition is turned on. Anti-Hijack Function will be activated.
-
Open Door Anti Hijack. Whenever any door is opened with Ignition on. Anti-Hijack Function will be activated.
-
Remote Anti Hijack. When Ignition is on, and Button # 4 is pressed for 3 Seconds.
Anti-Hijack Function will be activated.
- Resets all programs to factory default settings.
Test System and Adjust Shock Sensor
Arm and disarm system, checking that the siren chirps and parking lights are functioning normally. Make sure that the programmed features are performing correctly, i.e.: ignition locks, passive arming, passive locks, etc.
Test the doors and hood/trunk inputs (make sure all doors trigger the system, not just the driver's door).
Adjust the shock sensor.
Arm the system and try starting the vehicle, it should not start.
Arm the system and disarm it using the emergency override feature.
If programmed for passive arming make sure that the system arms properly.
Tie up wire harness, and replace any under dash panels.
Make sure the customer has physical knowledge of the location of the valet/override switch.
Adding Transmitters
To add a new transmitter to the system have the desired transmitters ready and follow the Code Learning sequence.
To enter Code Learning Mode:
- Turn the ignition on, off, on, off and leave on.
• The siren will chirp once.
- Press and hold the Valet switch for 5 seconds.
• The siren will chirp 3 times.
- Press the Lock Button on the transmitter.
• The siren will chirp once.
-
Repeat step 3 for each additional transmitter, up to four total transmitters.
-
Turn off the ignition.
• The siren will chirp 3 times.
NOTE: If a transmitter is lost or stolen, make sure to code all 4 transmitter memory locations. (Example: If only one transmitter is used, repeat step-3 three more times to remove any previously programmed transmitters.)
DOOR LOCK WIRING DIAGRAMS
NEGATIVE TRIGGER

flowchart
graph TD
    A["L"] -->|(-) LOCK| B["DOOR LOCK RELAYS"]
    C["UL"] -->|(-) UNLOCK| B
    D["GREEN"] --> B
    E["BLUE"] --> B
    B --> F["Switch"]
POSITIVE TRIGGER
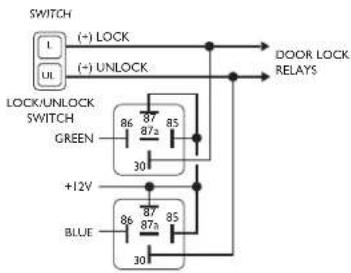
flowchart
graph TD
    A["Switch"] -->|(-) LOCK| B["Door Lock Relays"]
    A -->|(-) UNLOCK| B
    C["LOCK/UNLOCK SWITCH"] --> D["86 87 85"]
    E["GREEN"] --> F["30"]
    G["+12V"] --> H["86 87 85"]
    I["BLUE"] --> J["30"]
    D --> K["87 87a"]
    H --> L["86 87 85"]
ADDING ACTUATORS
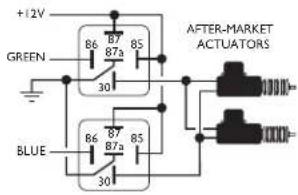
REVERSE POLARITY
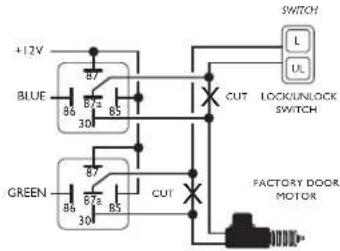
VACUUM SYSTEM
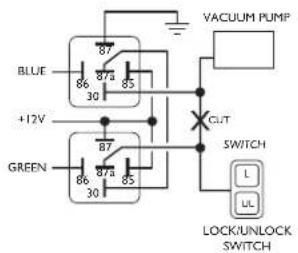
RELAY WIRING DIAGRAMS
POSITIVE TRIGGER
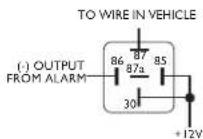
NEGATIVE TRIGGER

© 2005/2011 64-2750, 12/11 Rev.3


- 1R / 4-BUTTON SERIES
- VEHICLE SECURITY SYSTEM
- Button 1
- Button 3
- Button 2
- Button 4
- Standard Features:
- Optional Features:
- System Operation
- ARMING OPERATION
- PASSIVE ARMING
- DISARMING OPERATION
- TWO STAGE DISARM
- TAMPER ALERT
- AUTO REARM
- SILENT ARMING/DISARMING
- IGNITION LOCK\*
- REMOTE PANIC
- EMERGENCY OVERRIDE
- VALET MODE
- OPTIONAL TRUNK RELEASE
- OPTIONAL TRUNK DISARM
- Optional Auxiliary 2 output
- REMOTE SENSOR BYPASS
- ANTI HIJACKING MODES\*
- STATUS INDICATOR (LED) FUNCTIONS
- PARKING LIGHT INDICATIONS
- Installation Instructions
- Before you begin the installation
- Mounting The System Module
- Mounting The Siren
- Mounting The Shock Sensor
- 12-Pin Main Harness:
- Plug in Connectors
- Entering Programming
- Complete Default Reset
- Programmable Features
- Test System and Adjust Shock Sensor
- Adding Transmitters
- DOOR LOCK WIRING DIAGRAMS
- RELAY WIRING DIAGRAMS
Brand : Pyle
Model : PWD701
Category : Alarm system