PL-751-EU - Powerline Adapter Planet - Free user manual and instructions
Find the device manual for free PL-751-EU Planet in PDF.


| Product Type | 500M Powerline Pass-Through Ethernet Bridge |
| Model | PL-751-EU |
| Brand | Planet |
| Data Rate | Up to 500 Mbps over powerline; 10/100 Mbps on Ethernet |
| Standards Compliance | IEEE 1901, HomePlug AV; IEEE 802.3/802.3u; Backward compatible with HomePlug AV 200 Mbps |
| Interface | One RJ-45 10/100Base-TX Auto MDI/MDI-X; One 500 Mbps powerline port |
| Range | Up to 300 meters over household electrical wiring |
| Security | 128-bit AES encryption; push-button secure pairing (Privacy/Security button) |
| Quality of Service | 5 priority levels for internet, online gaming, IPTV, video, VoIP |
| Built-in AC Socket | Noise-filtered AC pass-through outlet; allows daisy-chaining without blocking wall socket |
| Power Saving | Green technology: reduces power consumption up to 80% when no Ethernet link is detected (standby mode) |
| Power Supply | Internal; 100-240V AC, 50/60 Hz; EU plug |
| Dimensions (W x D x H) | 92.4 x 62 x 38 mm |
| Weight | 134 g |
| LED Indicators | Power (on/off/standby), Ethernet (green on active), Data (red/orange/green for speed) |
| Operating Temperature | 0 to 40 °C |
| Storage Temperature | -20 to 70 °C |
| Humidity | 10% to 90% (operating); 5% to 95% (storage), non-condensing |
| Certifications | FCC Class B, CE |
| Package Contents | PL-751 adapter, RJ-45 cable, CD-ROM with utility and manual, quick installation guide |
| Management Software | PowerPacket Utility for Windows (98SE, ME, 2000, NT, XP, Vista, 7); device detection, diagnostics, password change |
| Reset Function | Hold Reset button 13 seconds to restore factory defaults |
Frequently Asked Questions - PL-751-EU Planet
User questions about PL-751-EU Planet
0 question about this device. Answer the ones you know or ask your own.
Ask a new question about this device
Download the instructions for your Powerline Adapter in PDF format for free! Find your manual PL-751-EU - Planet and take your electronic device back in hand. On this page are published all the documents necessary for the use of your device. PL-751-EU by Planet.
USER MANUAL PL-751-EU Planet
500M Powerline Pass-Through Ethernet Bridge
PL-751

natural_image
Man wearing headphones while using a laptop in a home studio with TV and speakers (no visible text or symbols)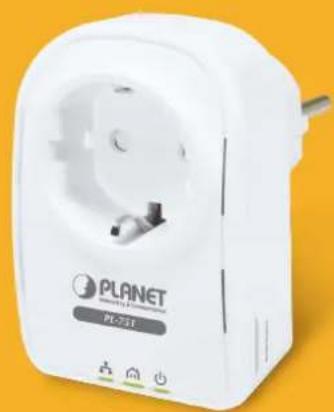
natural_image
White PLANNET power plug device with internal socket and terminal labels (no readable text beyond branding)Copyright
Copyright (C) 2013 PLANET Technology Corp. All rights reserved.
The products and programs described in this User's Manual are licensed products of PLANET Technology, This User's Manual contains proprietary information protected by copyright, and this User's Manual and all accompanying hardware, software, and documentation are copyrighted.
No part of this User's Manual may be copied, photocopied, reproduced, translated, or reduced to any electronic medium or machine-readable form by any means by electronic or mechanical. Including photocopying, recording, or information storage and retrieval systems, for any purpose other than the purchaser's personal use, and without the prior express written permission of PLANET Technology.
Disclaimer
PLANET Technology does not warrant that the hardware will work properly in all environments and applications, and makes no warranty and representation, either implied or expressed, with respect to the quality, performance, merchantability, or fitness for a particular purpose.
PLANET has made every effort to ensure that this User's Manual is accurate; PLANET disclaims liability for any inaccuracies or omissions that may have occurred. Information in this User's Manual is subject to change without notice and does not represent a commitment on the part of PLANET. PLANET assumes no responsibility for any inaccuracies that may be contained in this User's Manual. PLANET makes no commitment to update or keep current the information in this User's Manual, and reserves the right to make improvements to this User's Manual and/or to the products described in this User's Manual, at any time without notice.
If you find information in this manual that is incorrect, misleading, or incomplete, we would appreciate your comments and suggestions.
FCC Compliance Statement
This equipment has been tested and found to comply with the limits for a Class B digital device pursuant to Part 15 of the FCC Rules. These limits are designed to provide reasonable protection against radio interference in a commercial environment. This equipment can generate, use and radiate radio frequency energy and, if not installed and used in accordance with the instructions in this manual, it may cause harmful interference to radio communications. Operation of this equipment in a residential area is likely to cause interference, in which case the user, at his own expense, will be required to take whatever measure are necessary to correct the interference.
CE mark Warning

The is a class B device, In a domestic environment, this product may cause radio interference, in which case the user may be required to take adequate measures.
WEEE

To avoid the potential effects on the environment and human health as a result of the presence of hazardous substances in electrical and electronic equipment, end users of electrical and electronic equipment should understand the meaning of the crossed-out wheeled bin symbol. Do not dispose of WEEE as unsorted municipal waste and have to collect such
WEEE separately.
Trademarks
The PLANET logo is a trademark of PLANET Technology. This documentation may refer to numerous hardware and software products by their trade names. In most, if not all cases, these designations are claimed as trademarks or registered trademarks by their respective companies.
Revision
User's Manual for PLANET 500M Powerline Pass-Through Ethernet Bridge Model: PL-751
Contents
CHAPTER 1: PRODUCT INTRODUCTION....5
1.1 PACKAGE CONTENTS 5
1.2 PRODUCT DESCRIPTION 5
1.3 PRODUCT FEATURES....9
1.4 PRODUCT SPECIFICATION....10
1.5 PHYSICAL DESCRIPTION 11
1.6 WIRE DIAGRAM 12
CHAPTER2: INITIAL UTILITY INSTALLING....14
2.1 OVERVIEW....14
2.2 RUNNING THE INSTALL SHIELD WIZARD....14
CHAPTER 3: CONFIGURATION ....18
3.1 OVERVIEW....18
3.2 MAIN SCREEN....18
3.3 PRIVACY....21
3.4 DIAGNOSTICS....24
3.5 SECURITY BUTTON....25
3.6 RESET BUTTON....27
APPENDIX A TROUBLESHOOTING 28
Chapter 1: Product Introduction
1.1 Package Contents
■ PL-751×1 (PL-751×2 for PL-751-KIT)
■ CD ROM x 1 (User's Manual, Quick Guide and Utility)
■ RJ-45 Cable x 1 (RJ-45 Cable x 2 for PL-751-KIT)
■ Quick Installation Guide x 1
Note
If any of the above items are missing, please contact your dealer immediately.
1.2 Product Description
High Speed Ethernet Connection via HomePlug Powerline
With HomePlug AV technology, the PLANET PL-751 Powerline Pass-Through Ethernet Bridge extends a high speed up to 500Mbps networking connection to any power outlet. With hassle-free plug and play installation, it enables users only need to plug a pair of powerline adapters into the house power outlets, and then users can easily enjoy high definition video streaming and network transmission. No more tripping over tangled, messy wires running through your house, the PL-751 is an ideal solution to create a wall-to-wall home network.
Built-in Noise Filtering Power Socket
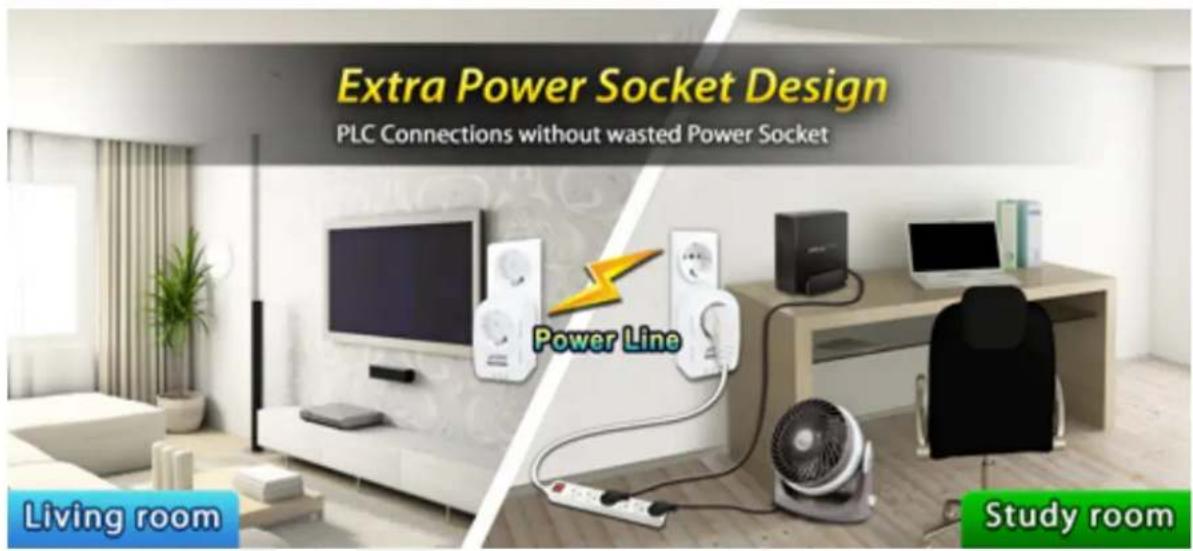
To efficiently make use of the power socket, the PL-751 is built-in with an extra AC power outlet with noise filtering feature. As a result, another device needing power can be plugged into the AC socket on the PL-751 directly without taking up another wall socket. While the appliances which use the powerline as communications medium will also contribute noise to it, with noise filtering function, the PL-751 can enhance powerline communications coverage in the home when its AC Pass Through outlet is in service.
Data Transfer Rate up to 500Mbps and Distance up to 300 Meters Wiring
With advanced HomePlug AV technology, the PL-751 provides users with stable, high speed data transfer rates up to 500Mbps on electric powerline length up to 300 meters. Therefore, the PL-751 can transmit multiple HD streams and even Full HD movies to every room, making it a great choice for easily building a multimedia entertainment network.
flowchart
graph TD
    A["PL-702"] -->|500Mbps| B["PL-751"]
    B -->|200Mbps| C["PL-510W"]
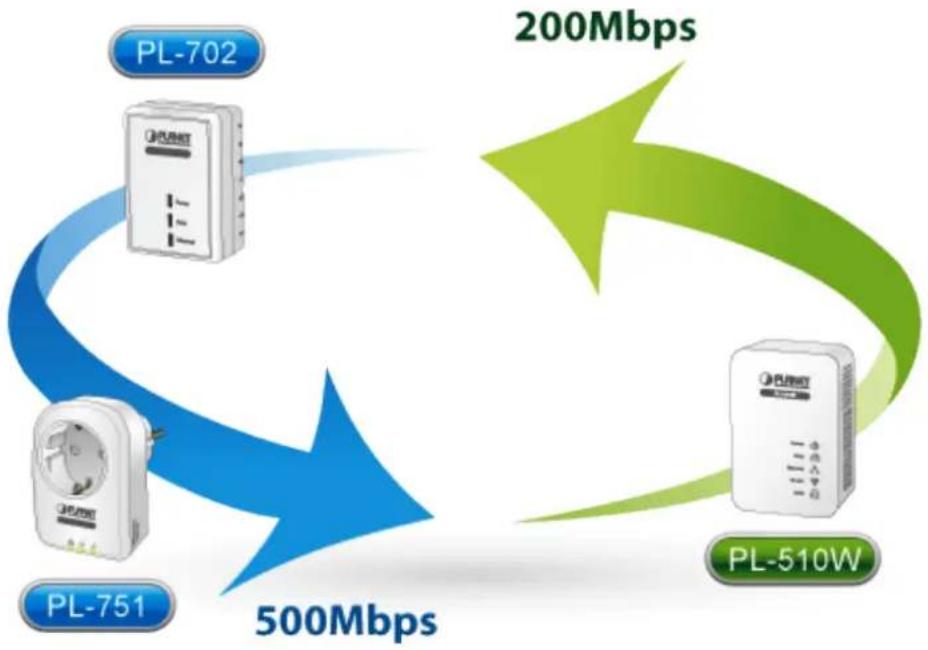
The PLANET 500M Powerline Series are compatible with the PLANET 200M Powerline Series.
Secures the network connection with the touch of a button, no need to remember passwords
Simply by pushing the button on the PL-751, users can easily set up a hassle-free secure Powerline network within minutes. It provides 128-bit AES encryption for network security and data protection.

natural_image
Illustration of a golden key encircling a blue shield with binary code (no text or symbols)128-bit AES Encryption for
Network Security and Data Protection
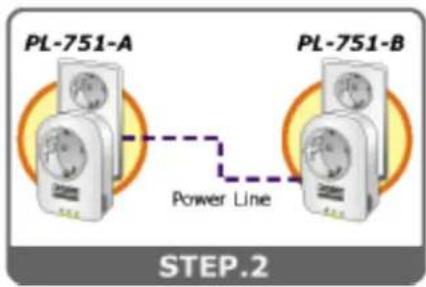
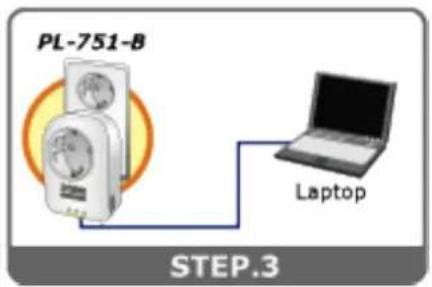
Getting started is as easy at 1-2-3
Users can immediately access to the Internet via the PC / Laptop connecting to PL-751 by simple three steps:
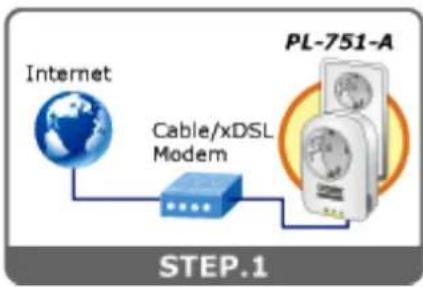
- Connects one Powerline Ethernet Bridge to your ADSL or Cable modem's Ethernet port and plug it into the nearest power socket.
- Plugs in the second Powerline Ethernet Bridge in your room or office.
- Connects the PC / Laptop to the Powerline Ethernet Bridge by the network cable.
Quick & Easy Connection
flowchart
graph LR
    A["Internet"] --> B["Cable/xDSL Modem"]
    B --> C["PL-751-A"]
Reduce Power Consumption Up to 80%
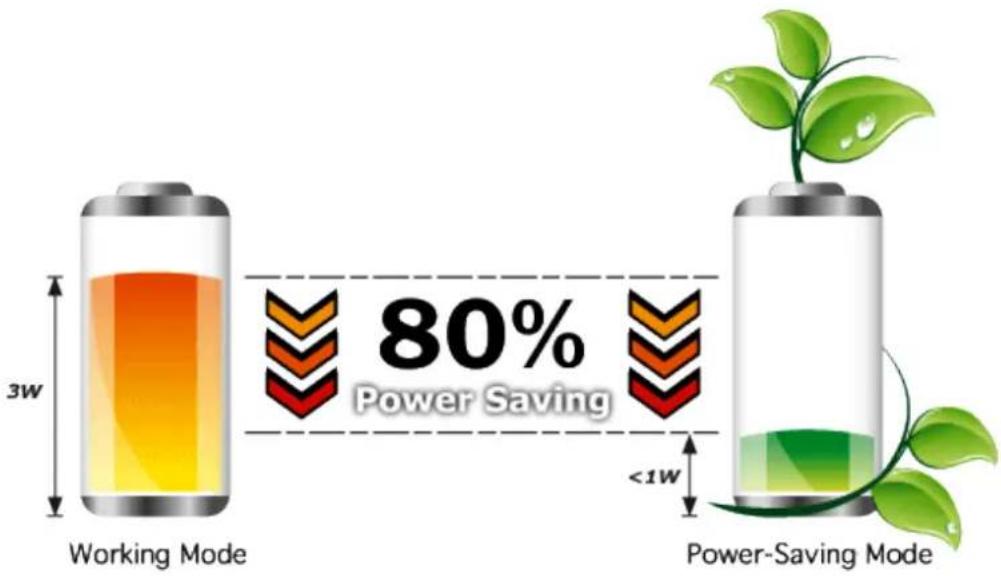
The PL-751 consumes less power when comparing to the existing Powerline Ethernet Adapters. Moreover, when there is no Ethernet link, the PL-751 will enter the "Power-saving" mode that reduces energy wasting for over 80% when comparing to the adapters without this feature.
*Actual data will vary because of the network conditions and environmental factors.
Efficient Bandwidth Management by QoS (Quality of Service)
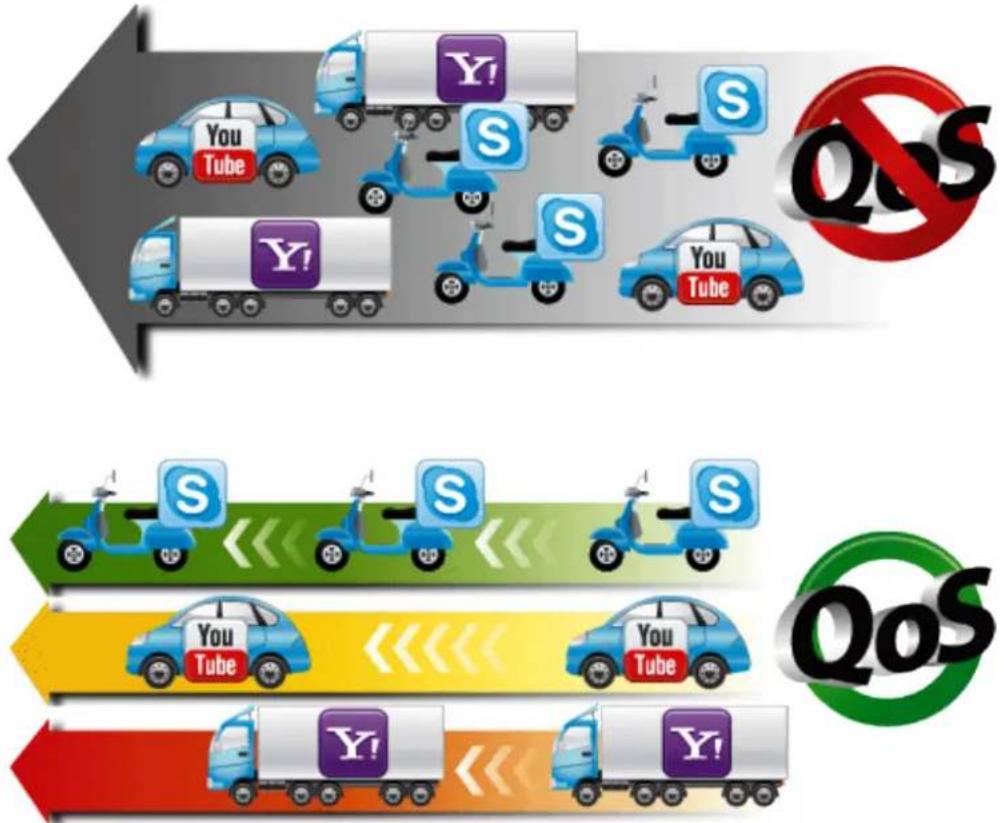
Quality of Service (QoS) is provided by the PL-751 enabling a network to provide better service to selected network traffic over various technologies. The PL-751 provides 5 priorities of QoS for quick setup such as internet, online game, IPTV, video and VoIP.
flowchart
graph TD
    A["Left Arrow"] --> B["Top Right: Social Media Platforms"]
    B --> C["Right Arrow: Mobile Vehicles"]
    subgraph Left Arrow
        D["You Tube"] --> E["Y!"]
        F["You Tube"] --> G["S"]
        H["You Tube"] --> I["S"]
        J["You Tube"] --> K["S"]
        L["You Tube"] --> M["S"]
        N["You Tube"] --> O["S"]
        P["You Tube"] --> Q["S"]
        R["You Tube"] --> S["S"]
        T["You Tube"] --> U["S"]
        V["You Tube"] --> W["S"]
        X["You Tube"] --> Y["S"]
        Z["You Tube"] --> AA["S"]
        AB["You Tube"] --> AC["S"]
        AD["You Tube"] --> AE["S"]
        AF["You Tube"] --> AG["S"]
        AH["You Tube"] --> AI["S"]
        AJ["You Tube"] --> AK["S"]
        AL["You Tube"] --> AM["S"]
        AN["You Tube"] --> AO["S"]
        AP["You Tube"] --> AQ["S"]
        AR["You Tube"] --> AS["S"]
        AT["You Tube"] --> AU["S"]
        AV["You Tube"] --> AW["S"]
        AX["You Tube"] --> AY["S"]
        AZ["You Tube"] --> BA["S"]
        BB["You Tube"] --> BC["S"]
        BD["You Tube"] --> BE["S"]
        BF["You Tube"] --> BG["S"]
        BH["You Tube"] --> BI["S"]
        BJ["You Tube"] --> BK["S"]
        BL["You Tube"] --> BM["S"]
        BN["You Tube"] --> BO["S"]
        BP["You Tube"] --> BQ["S"]
        BR["You Tube"] --> BS["S"]
        BT["You Tube"] --> BU["S"]
        BV["You Tube"] --> BW["S"]
        BX["You Tube"] --> BY["S"]
        BQ --> Z
    end
Quality of Service(QoS)
Ensure the quality of bandwidth sensitive applications
1.3 Product Features
IEEE Compliant HomePlug AV & LAN
■ Designed for high-definition multimedia streaming
■ Data rate of up to 500Mbps and 300 Meters over existing electrical wiring
■ IEEE 802.3, IEEE 802.3u, IEEE 1901 and HomePlug AV standard compliant
■ Backwards compatible with HomePlug AV (200Mbps) including PLANET Powerline products
■ Equipped with 10/100Mbps RJ-45 Ports for LAN/WAN, Auto MDI/MDI-X supported
Secure Network Connection
■ Plug-and-Play installation in minutes, converts any power socket into a wired connection point
■ Simple push-button setup with sophisticated data encryption128-bit AES encryption for network protection enhancement
Easy Installation & Management
■ Create a network connection throughout your home without the mess of cables
■ Easy-to-use utility for powerline network management
■ Up to 16 Powerline Network Adapters can communicate on a single network
■ Green technology helps conserve energy when no data link is detected
■ TDMA and priority-based CSMA/CA channel access schemes maximize efficiency and throughput
■ Provides a noise-filtered power outlet with AC Pass Through
■ Integrated Enhanced Quality of Service(QoS) features
1.4 Product Specification
| Model PL-751 | |
| Hardware Specification | |
| Network Interface | One RJ-45 port (10/100Base-TX Ethernet)One 500Mbps power line port supporting co-existence with HomePlug 1.0 |
| Cabling Cat. 5 UTP cable | |
| LED | Power : On / Off / BlinkingEthernet : Red / Orange / Green / OffData : Solid / Blinking / Off |
| Button | One Security / Reset button |
| Power Socket | Support EU / US / UK power connector |
| Standards Conformance | |
| Computer Interface | IEEE 802.3 10Base-TIEEE 802.3u 100Base-TX |
| Standards | IEEE 1901 / HomePlug AV |
| Security | 128-bit AES link encryption with key management |
| Data PHY Rate | 500Mbps over Powerline and 10/100Mbps over Ethernet |
| Modulation Schemes | OFDM symbol modulation on line synchronization1024/256/64/16/8 - QAM, QPSK, BPSK, ROBO carrier modulation |
| Frequency Band | 2 ~ 50 MHz |
| Additional Protocols | Mix of TDMA and CSMA/CA channel access scheme;CO device generates a periodic beacon carrier for channel access scheme |
| Operation Range | Estimated range of 300 meters in wall powerlines |
| Software Utility | Device detect / diagnostic, Windows 98 SE, ME, 2000, NT, XP, Vista, and Window 7 |
| Environment Specifications | |
| Operating | Temperature: 0~40 Degree CRelative Humidity:10~90% (non-condensing) |
| Storage | Temperature: -20~70 Degree CRelative Humidity: 5~95% (non-condensing) |
| Power Supply | 100~240V AC, 50~60Hz internal |
| Housing Dimension (W x D x H) | 92.4 x 62 x 38 mm |
| Weight | 134 g |
| Emission | FCC, CE |
1.5 Physical Description
Front View
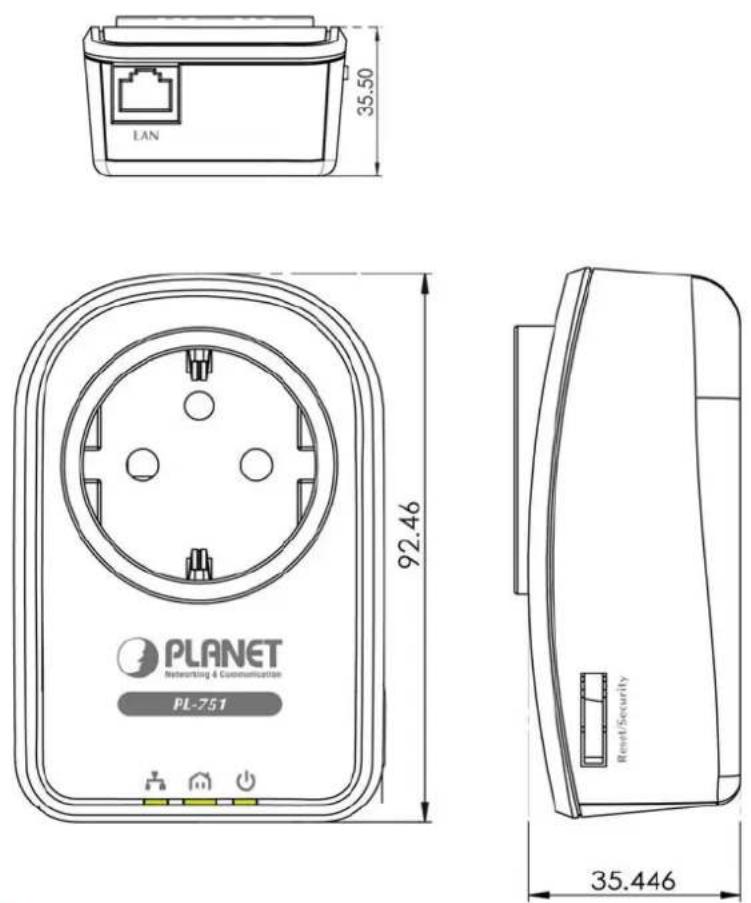
LED Definition
| LED Status Description | ||
| Power | On | Steady on indicate the Powerline device connect to the power outlet. |
| Off | Power off | |
| Green Device in standby mode | ||
| Ethernet | Off Ethernet Link not active | |
| Green | Steady on indicates the RJ-45 port has correctly connected to the network card of your PC or the Ethernet network | |
| Data | Off | This HomePlug Ethernet Bridge is not connected |
| Red | Minimum connection indicates weak signal and slower network speed: less than 50Mbps | |
| Orange | Normal signal with standard network speed: 50-99Mbps | |
| Green | Excellent signal with optimal network speed: 100Mbps+ | |
Button Definition
| Button Description | ||
| Reset | Hold the Reset button for 13 seconds to reset to default setting. | |
| Security | Press security button during 1~3 seconds. | Join a another HomePlug AV network |
| Press security button more than 10 seconds | Set its security to random value | |
1.6 Wire Diagram
High-Speed Ethernet Connection via Home's Power Supply
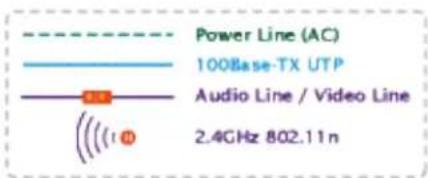
PLANET provides several types of powerline products to meet various demands on Internet access sharing at home. As illustrated, users may connect an IP STB to the Nano Powerline Adapter PL-751, or connect a PC to the PL-751 in the house freely. With the PLANET powerline products applied, no messy network cables and additional switches are required at home and users can entirely enjoy home broadband network from now on.
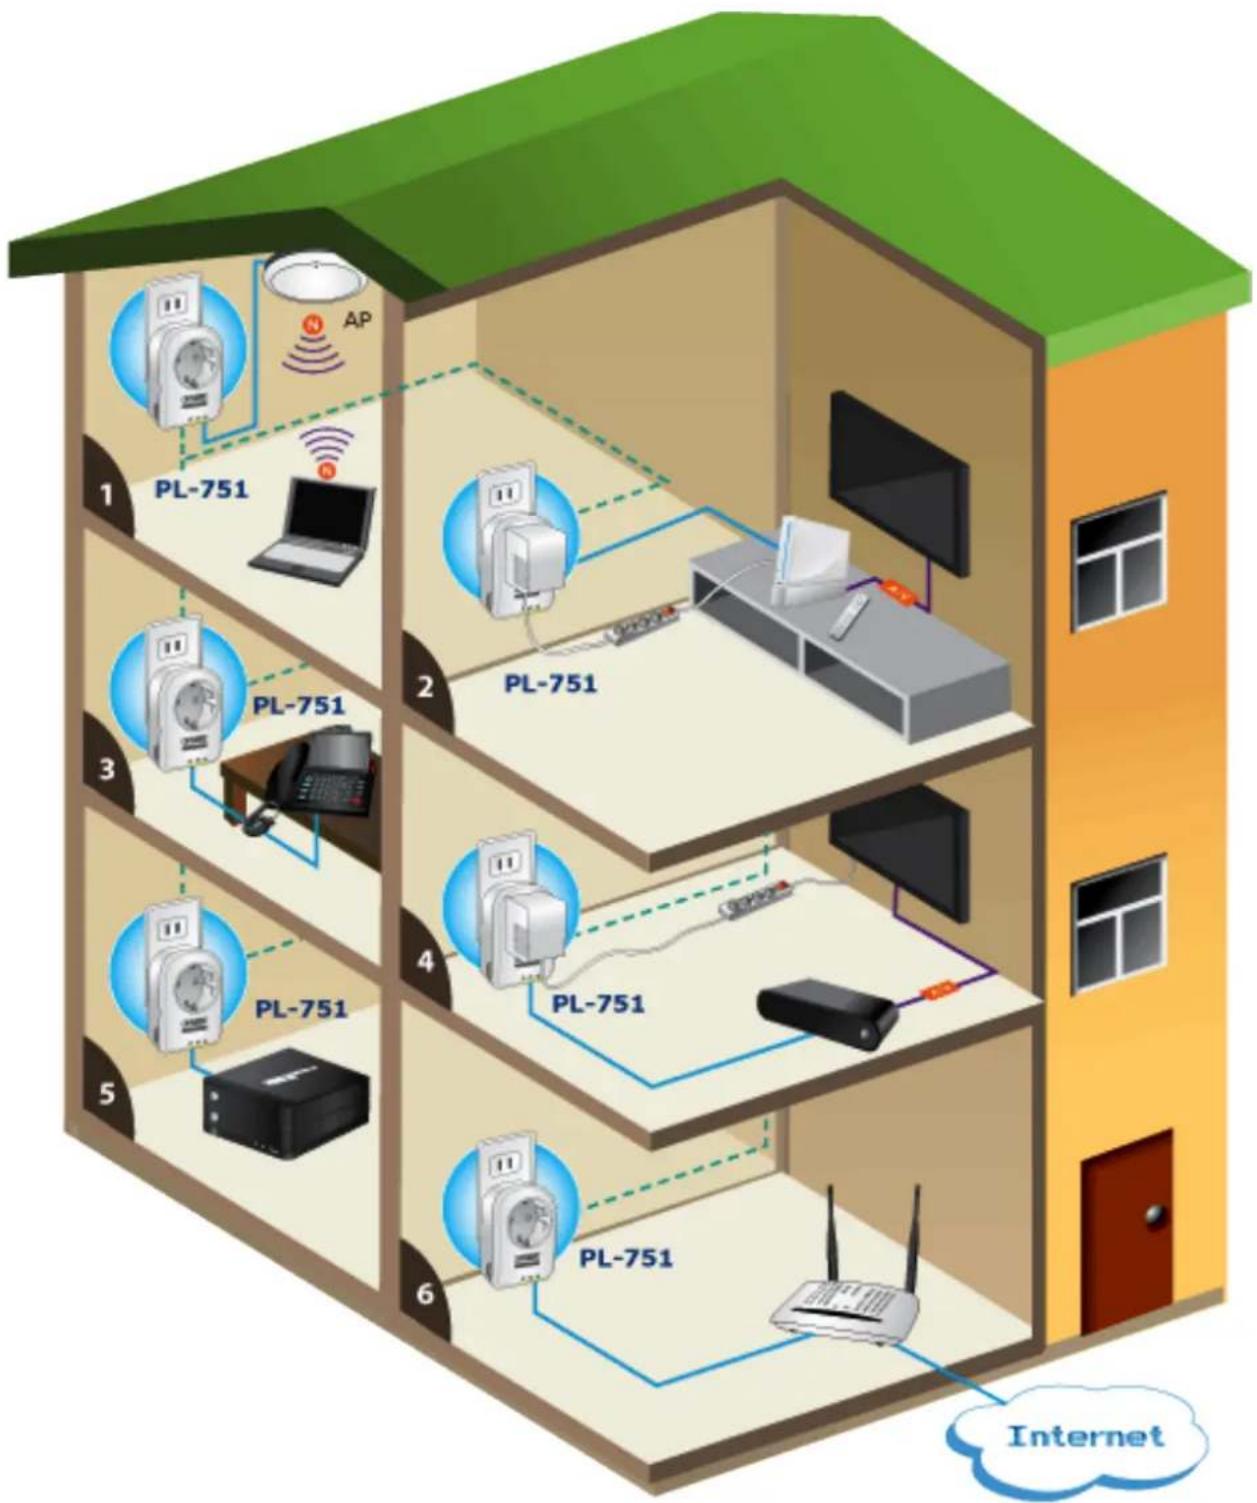
flowchart
graph TD
    subgraph Room1
        A["PL-751"] --> B["Laptop"]
        C["AP"] --> D["Wireless Signal"]
        E["PL-751"] --> F["Office"]
        G["PL-751"] --> H["Desktop"]
        I["PL-751"] --> J["Radio Station"]
    end
    subgraph Room2
        K["PL-751"] --> L["Office"]
        M["PL-751"] --> N["Desktop"]
        O["PL-751"] --> P["Radio Station"]
    end
    subgraph Room3
        Q["PL-751"] --> R["Phone"]
        S["PL-751"] --> T["Phone"]
        U["PL-751"] --> V["Phone"]
    end
    subgraph Room4
        W["PL-751"] --> X["TV"]
        Y["PL-751"] --> Z["Radio Station"]
        AA["PL-751"] --> AB["Phone"]
    end
    subgraph Room5
        AC["PL-751"] --> AD["Phone"]
        AE["PL-751"] --> AF["Phone"]
        AG["PL-751"] --> AH["Phone"]
    end
    subgraph Room6
        AI["PL-751"] --> AJ["RF"]
        AK["Internet"] --> AL["Cloud Icon"]
    end
1 Wireless Extender
3 VoIP
5 Data Storage Sharing
② Online Gaming
4 IPTV/VOD
⑥ Broadband Networking
Chapter2: Initial Utility Installing
2.1 Overview
The installation of 500M Ethernet Bridge will only take minutes. No need to set up long wires through out the house, just simply install the utility, and physically plug the unit into the wall outlet, then to connect RJ-45 to the computer. Users can select to adjust its security functions and the platform of the network after the installation. For further assistance, please read our Frequently Asked Questions section in our Web site.
2.2 Running the Install Shield Wizard
Please verify that no other Powerline Management Utilities are installed before installing this product. If other utilities were installed, uninstall them and restart before installing this software.
To install, insert the utility CD into the computer's CD-ROM drive. The main page shall pop up, then to press the link to install the software. Alternatively this can also be done manually by double clicking the "setup.exe" file on the CD.
Once the software is loaded, it will display a dialog as following, and please click on 'Next' to continue the installation.
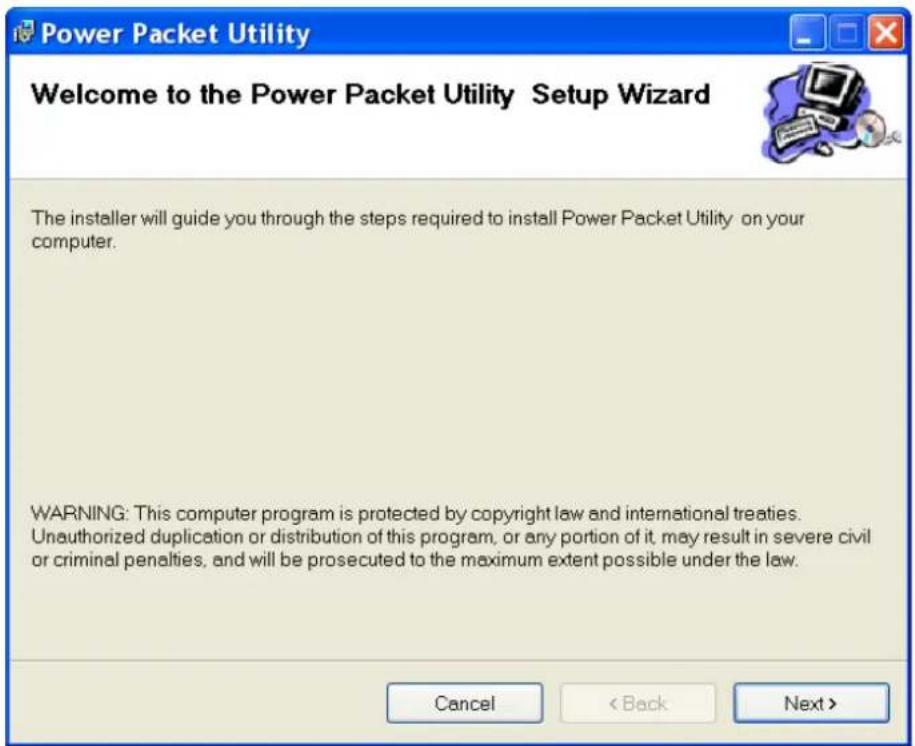
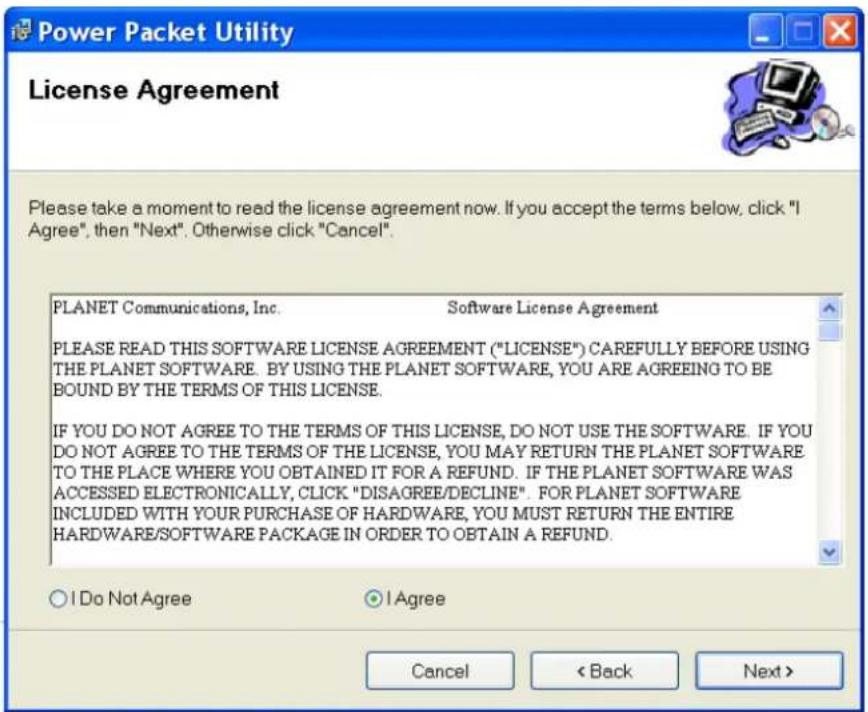
Please take a moment to read the license agreement now. If you accept the terms below, click "I Agree". Then "Next". Otherwise click "Cancel".
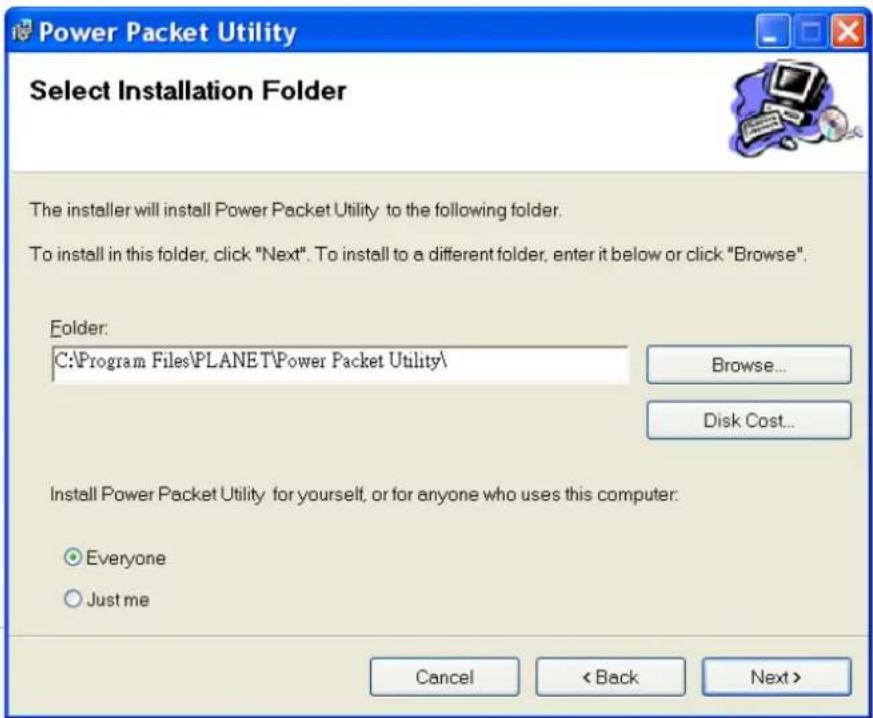
This section allows you to change the default directory where the program is installed. Or go 'Back'. If you don't want to change it, click on Next to continue the installation.
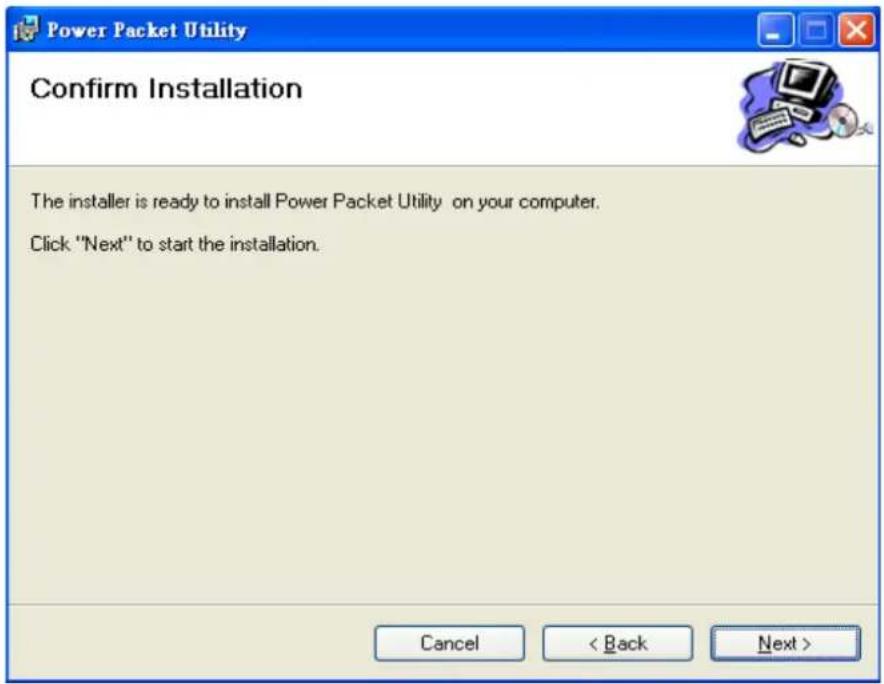
Please click on 'Next' to confirm the installation.
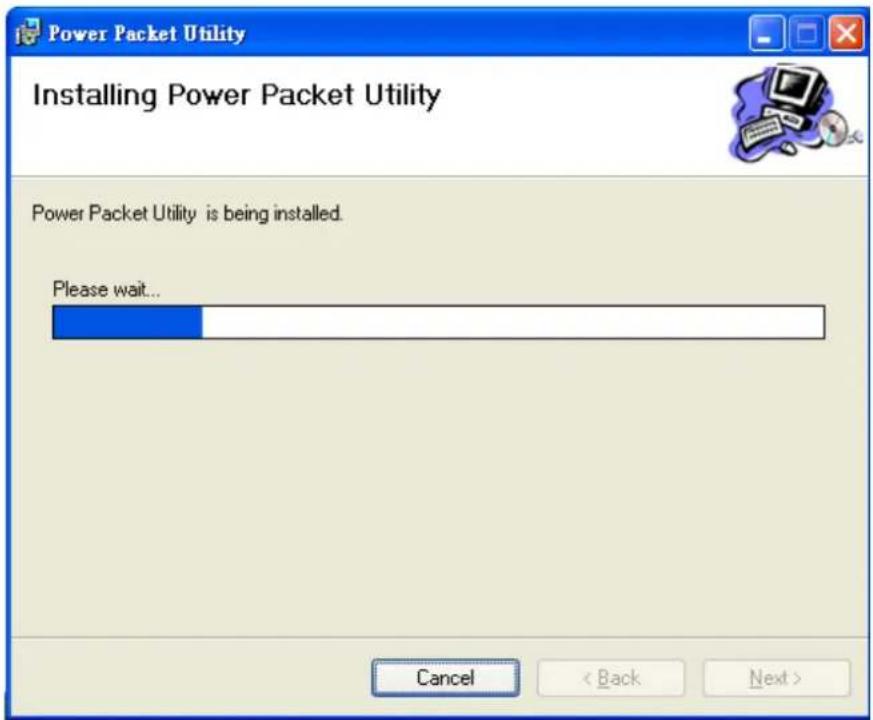
Powerline Utility is being installed, and please waits for installation.
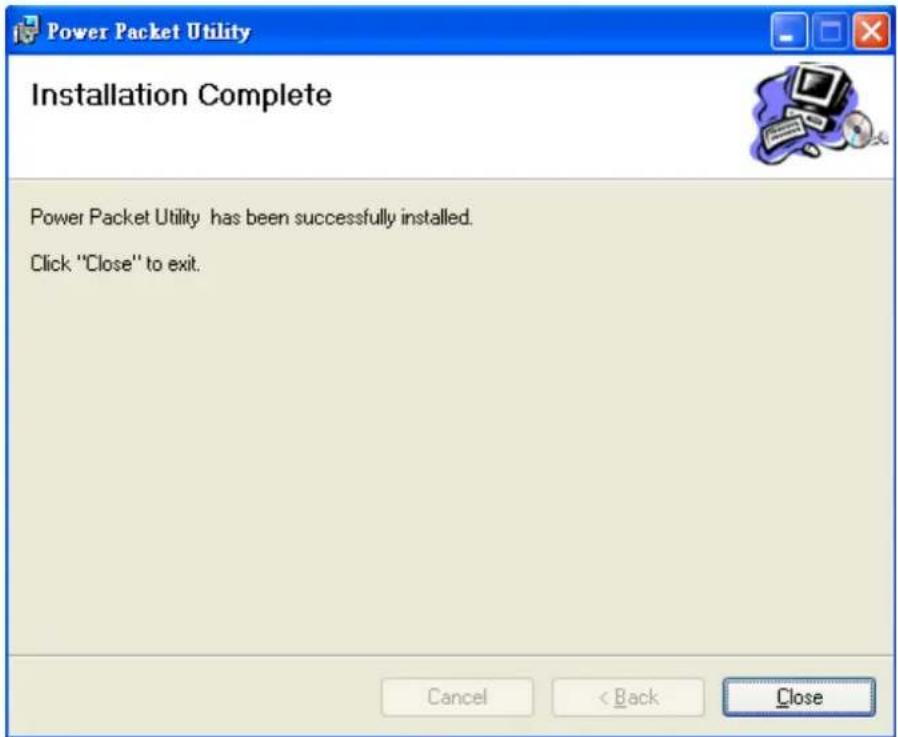
This screen shows that the installation was completed successfully. Click on Close to exit the wizard.
Chapter 3: Configuration
3.1 Overview
The PL-751 uses 128-bit AES encryption to block outside access. The key is set by using the Configuration Utility on the CD. By default, the protection is enabled, however, it is recommended to change the default network password. All your Powerline devices must use the same network password in order to be connected together.
3.2 Main Screen
■ Part 1: Scan a Local Powerline device
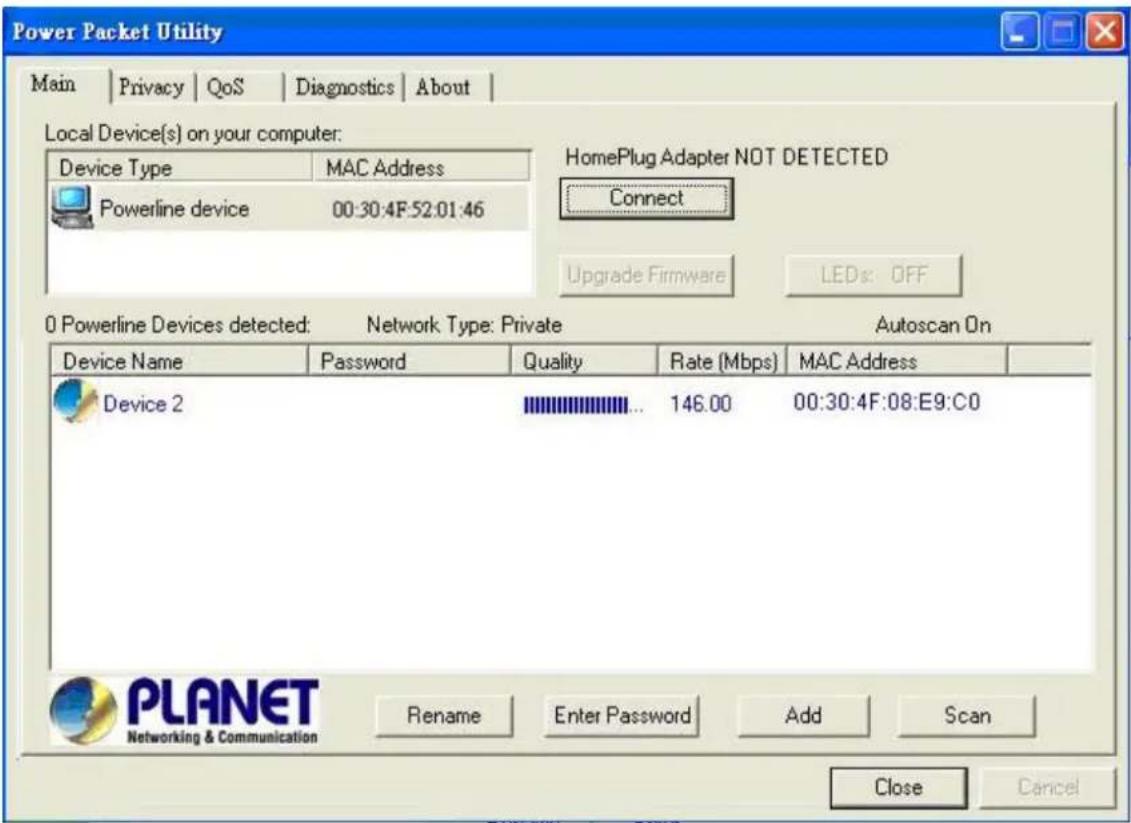
Double click the PowerPacket Utility icon on your desktop and utility screen will show up as below:
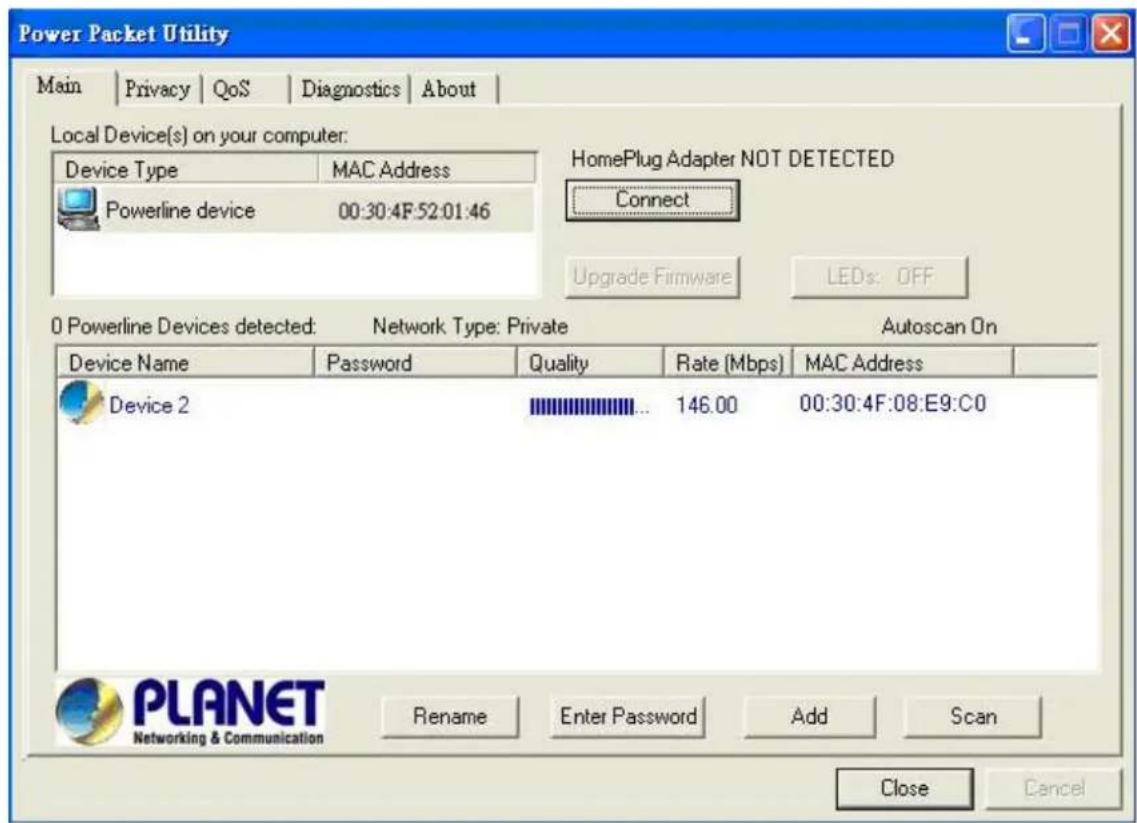
The Main tab shows the Powerline units that are connected to the current computer and other Powerline devices on the home network, and it will also display Mac Address of each device.
Note
If you do not see ANY unit in the device status but the Powerline device does exist, try to unplug all devices and plug them back.
Meanwhile, please make sure the cable is the right type and working correctly. If all seems to be correct, and you still receive nothing in the Device window, try rebooting your computer.
■ Part 2: Detect the Network Powerline device
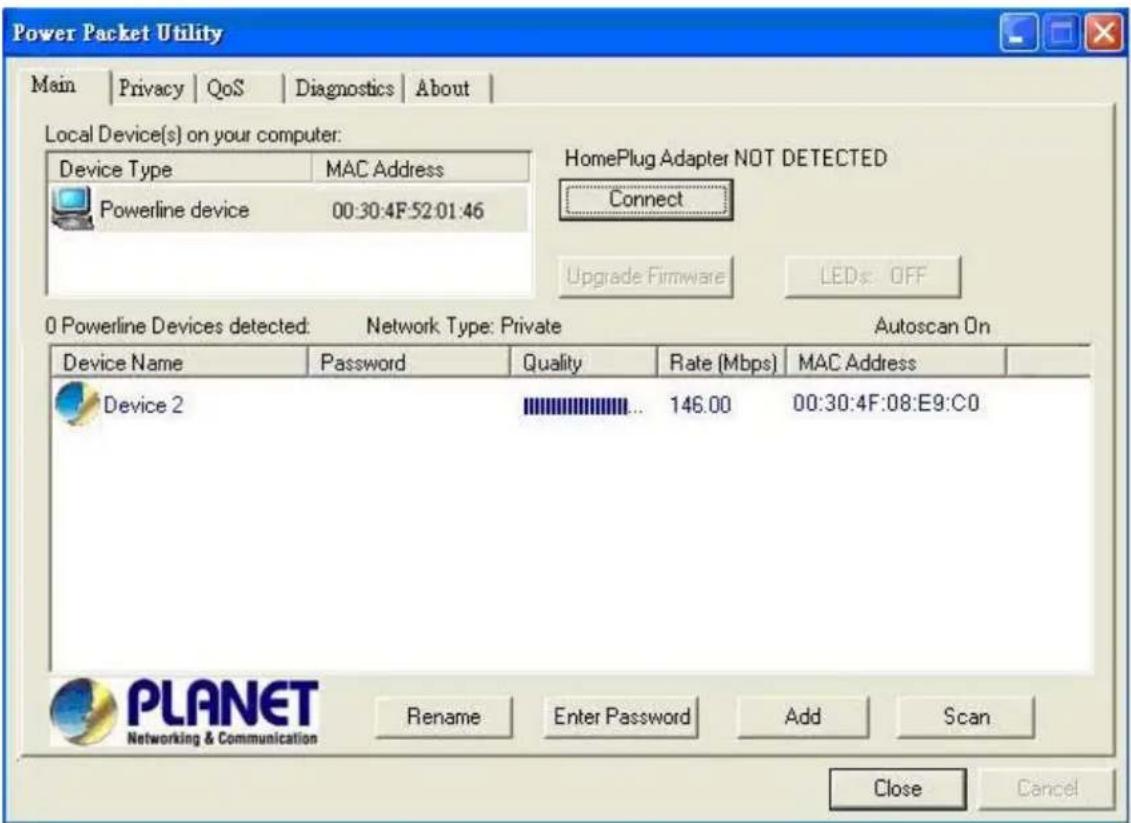
The Main tab shows all the other Powerline units on your home network. It will represent them by MAC Address, and will also show the available bandwidth to each unit (Units farther away from another Powerline device might have a lower Data Rate). If you add or remove units from your home network, click the "Scan" button to re-scan the network, and refresh with any changes.
| Note | Only units with the same Network Password will be shown, (Password case sensitive). |
| Note | If a unit shows MAC Address of all 0's, this unit might not have a solid connection, or might not connect at all. |
| Note | If there are units in the home network, but nothing displays in this Network scan, try to unplug all devices, and plug them back (Only do this with the units that you do not view in the network screen, you don't have to do this with all units.) |
If the problem persists, try to move the unit closer to this current unit (adjacent plugs on the same wall socket is most preferable). If the problem still persists and that unit is still not shown on the network, then the unit might be defective, please contact technical support. Otherwise if you view the unit working, distance might be the only issue.
3.3 Privacy
■ Setting Up Security on a Local Powerline device
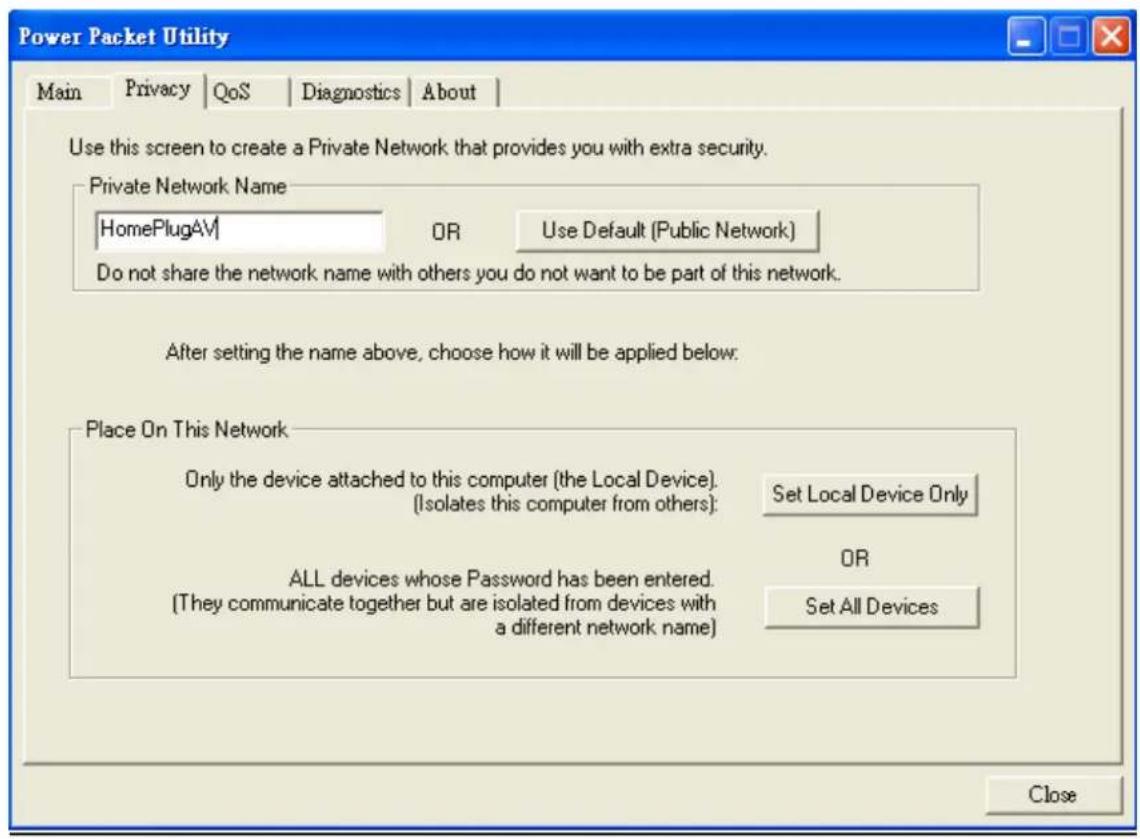
The Privacy tab will allow you to change the Network Password to the unit that is currently connected to this computer. This network password encrypts all data that is sent from this unit using 128-bit data encryption standard (AES).
Note
Every unit on your home network MUST have the same Network Password for connectivity to be established throughout your home. The default network password is "HomePlugAV"
■ Setting Up Security on a Network Powerline device
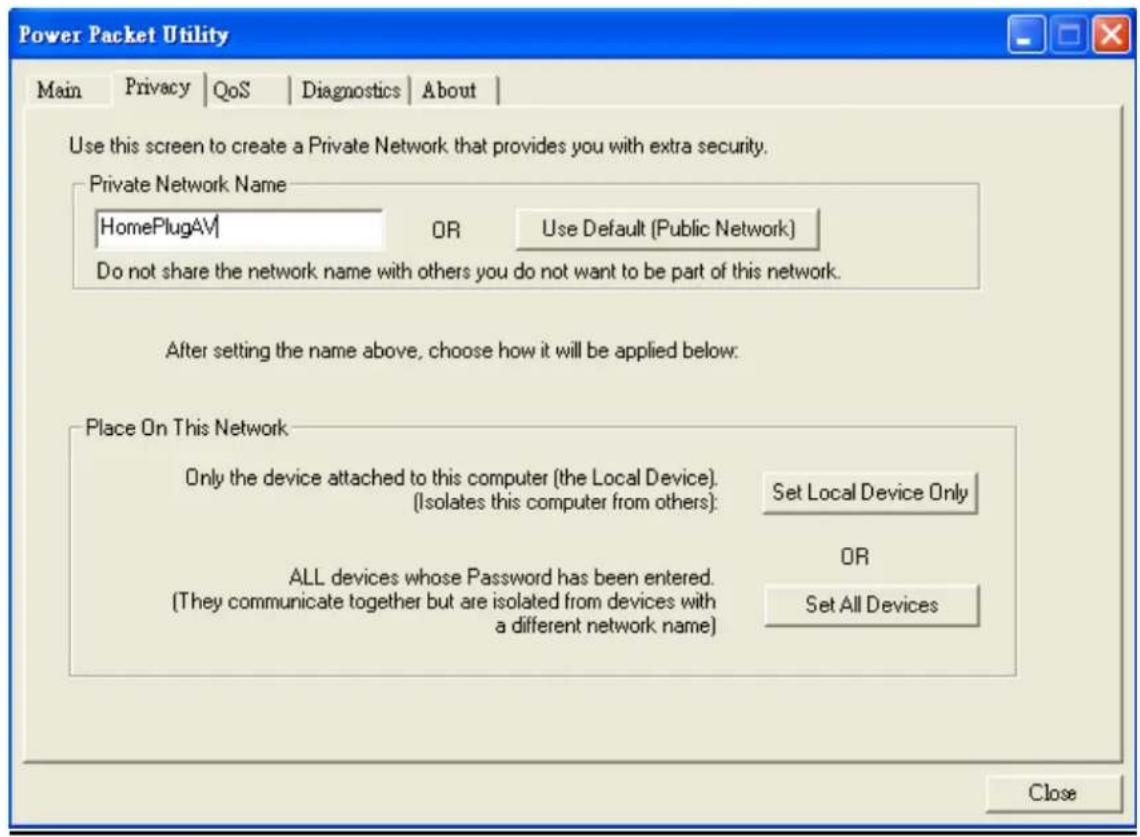
The Privacy Tab will allow users to use one primary computer to control the Network Password of all units on the home network.
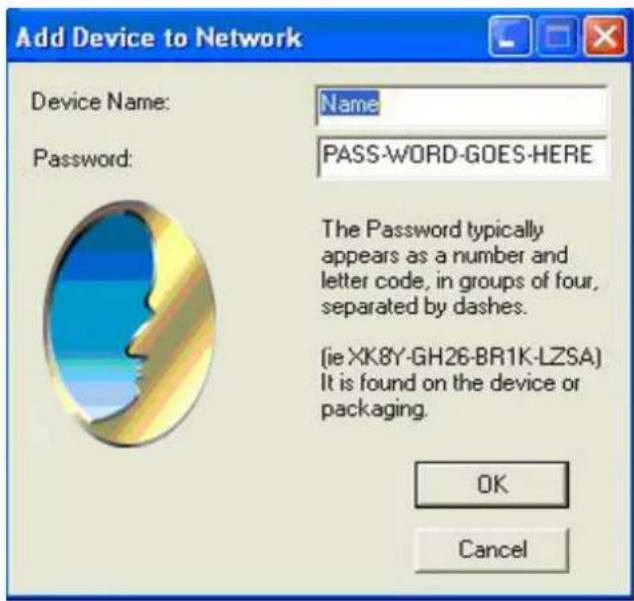
You will have to go back to the Main Tab first then find the DEK (Device Encryption Key) Key located on the bottom of each device. Enter this Key into the Device Password area. Click Add. This Device Key will then appear in the bottom window. Add all the DEK Keys for each unit in your house. You can now go back to the Main Tab then change the password remotely from one computer. This will allow you to change the password from one computer, instead of changing the password individually.
Note
The DEK is unique for EACH Powerline device. To use this you will need to input the DEK for each unit.
3.4 Diagnostics
The Diagnostics screen shows system information and a history of all devices seen.
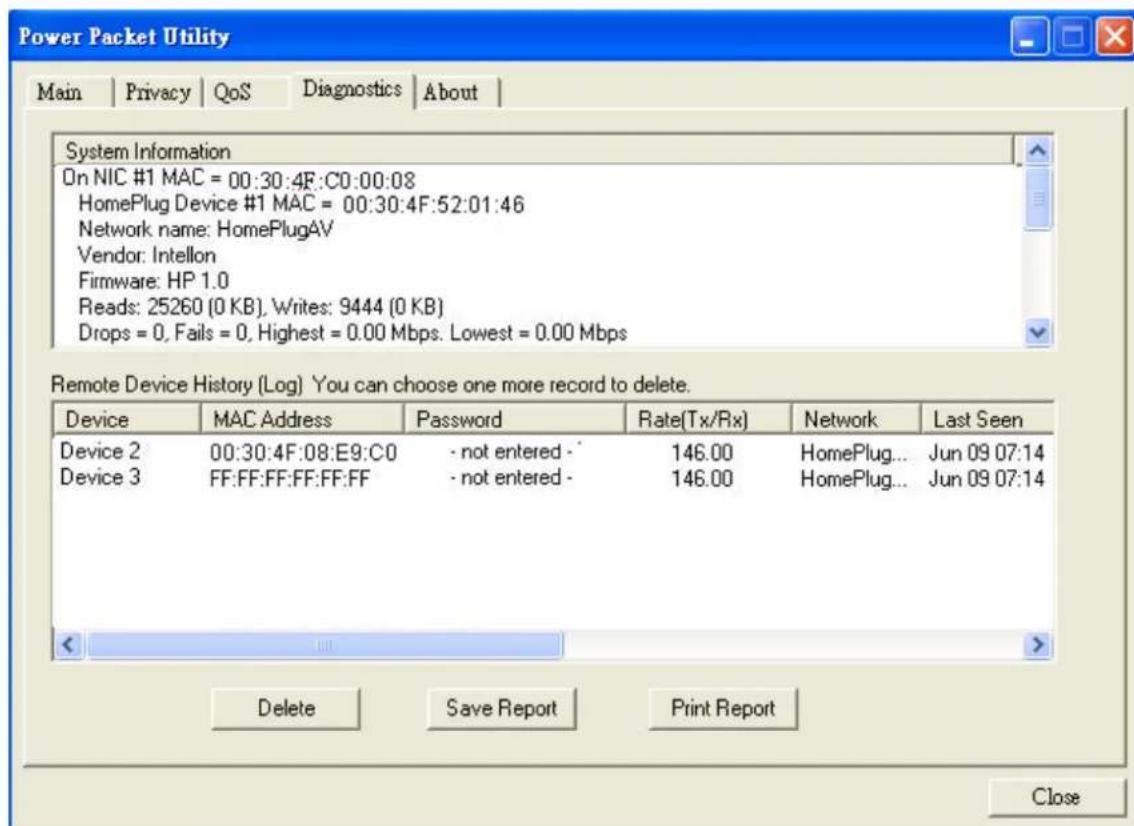
Diagnostics Screen
The upper panel shows technical data concerning software and hardware on the host computer used to communicate over HomePlug. It shall include the following:
■ Operating System Type/Version
■ Host Network Name
■ User Name
■ MAC Address of all NICs (network interface card)
■ Chipset manufacturer name (Turbo Only devices)
■ Firmware Version (Turbo Only devices)
The lower panel contains a history of all remote devices.
Devices are shown here regardless of whether or not they are on the same logical network.
■ Device Name
■ MAC Address
Password
■ Rate(Tx/Rx)
Network
■ Last Seen
■ Last Known Network
■ Chipset manufacturer name (Turbo Only devices)
■ Date device last scanned
3.5 Security Button
This section describes how to use Security button for configuration in the following situations:
■ Establish a new security network (Network AB)
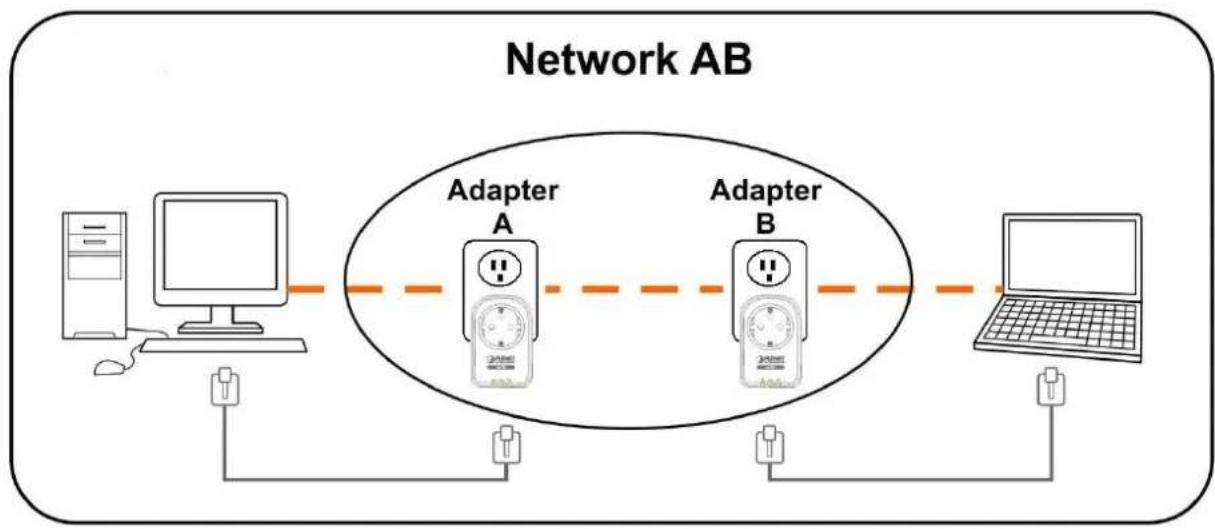
The procedure is as follows:
Step 1 Press and hold the Security button on Bridge A for no more than 10 seconds. Must release after 10 seconds. Once released, the Power light will flash. The password to Bridge A has just been erased and random security key has been generated. It must now be linked to your network to adopt the new network security key.
Step 2 Press and hold the security button on Bridge B for 10 seconds and release it when the Power light flashes. The password to Bridge B has just been
erased and random security key has been generated. It must now be linked to your network to adopt the new network security key.
Step 3 Currently, Bridge A and Bridge B are not networked
Step 4 Press and hold the Security button on Bridge A for 1\~3 seconds then release.
Step 5 The Power lights on Bridge A starts to flash.
Step 6 Within 120 seconds after the Power light on Bridge A starts to flash, press and hold the Security button on Bridge B for 1\~3 seconds then release.
Step 7 Both Bridge A and Bridge B are now networked together.
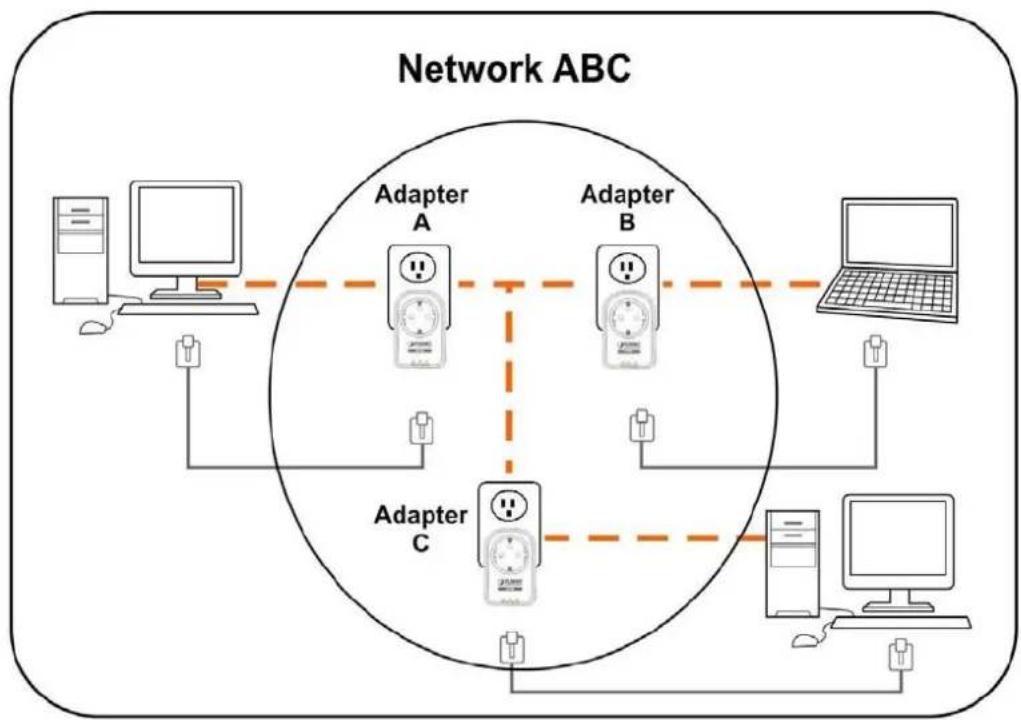
■ Establish Powerline (C) to join an existing network (Network AB)
flowchart
graph TD
    subgraph Network ABC
        A["Computer"] -->|Data Line| B["Adapter A"]
        B -->|Data Line| C["Adapter C"]
        C -->|Data Line| D["Adapter B"]
        D -->|Data Line| E["Computer"]
        E -->|Data Line| F["Adapter B"]
        F -->|Data Line| G["Adapter C"]
        G -->|Data Line| H["Adapter B"]
        H -->|Data Line| I["Adapter C"]
        I -->|Data Line| J["Adapter B"]
        J -->|Data Line| K["Adapter C"]
        K -->|Data Line| L["Adapter B"]
        L -->|Data Line| M["Adapter C"]
        M -->|Data Line| N["Adapter B"]
        N -->|Data Line| O["Adapter C"]
        O -->|Data Line| P["Adapter B"]
        P -->|Data Line| Q["Adapter C"]
        Q -->|Data Line| R["Adapter B"]
        R -->|Data Line| S["Adapter C"]
        S -->|Data Line| T["Adapter B"]
        T -->|Data Line| U["Adapter C"]
        U -->|Data Line| V["Adapter B"]
        V -->|Data Line| W["Adapter C"]
        W -->|Data Line| X["Adapter B"]
        X -->|Data Line| Y["Adapter C"]
        Y -->|Data Line| Z["Adapter B"]
        Z -->|Data Line| AA["Adapter C"]
The procedure is as follows:
Step 8 Press and hold the Security button on Bridge C for no more than 10 seconds. Must release after 10 seconds. Once released, the Power light will flash. The password to Bridge C has just been erased and random security key
has been generated. It must now be linked to your network to adopt the new network security key.
Step 9 Press and hold the security button on Bridge A for 1\~3 seconds. The Power lights on Bridge A starts to flash.
Step 10 Within 120 seconds after the Power light on Bridge A starts to flash, press and hold the security button on Bridge C for 1\~3 seconds then release.
Step 11 Bridge A, Bridge B and Bridge C is now networked to each other.
3.6 Reset Button
This section describes how to use Reset button, this button can be used to clear ALL data and restore ALL settings to the factory default values.
The procedure is as follows:
Step 12 Hold the reset Button down while Power On for a few seconds.
Step 13 Release the reset button.
Step 14 All the LEDs will off, and then start again.
Step 15 PL-751 is now using the factory default values.
Appendix A Troubleshooting
Q1 : If your PL-751 has difficulty communicating with each other, check the following:
A :
- Try power cycling the unit by unplugging it from the wall for 10 seconds and plugging it in again.
- Hold the security/reset button down for more than 15 seconds to reset to default setting. The PL-751 light will flash, the units will reset and attempt to link using default factory settings.
- Try plugging the PL-751 into an adjacent plug.
- HomePlug AV Ethernet Bridges work better when plugged directly into the wall outlet. Connecting these Ethernet Bridges to a power strip or surge protector may degrade network performance or completely stop network signals.
- This HomePlug AV nano Ethernet Bridge should not be used on GFI protected outlets as some outlets will filter out HomePlug Powerline signal.
- This HomePlug AV nano Ethernet Bridge should not be used in areas with excessive heat.
- Certain fluorescent or incandescent lights are noise sources on the electrical and can degrade performance.
- If your building has more than one circuit breaker box, your HomePlug AV Ethernet Bridges may not be able to connect between the different circuit breaker boxes. In this case, connect one HomePlug AV Ethernet Bridge to a power outlet located on each of the circuit boxes. Connect Ethernet cable between each of the HomePlug AV Ethernet Bridges to link the different circuits together. This will allow the HomePlug AV Ethernet Bridges from different circuit breaker boxes to connect.
- To enter standby mode for this device, simply remove the Ethernet cable and wait about 3 minutes.
- 500M Powerline Pass-Through Ethernet Bridge
- Copyright
- Disclaimer
- FCC Compliance Statement
- CE mark Warning
- WEEE
- Trademarks
- Revision
- Contents
- CHAPTER 1: PRODUCT INTRODUCTION....5
- CHAPTER2: INITIAL UTILITY INSTALLING....14
- CHAPTER 3: CONFIGURATION ....18
- APPENDIX A TROUBLESHOOTING 28
- Chapter 1: Product Introduction
- Package Contents
- Product Description
- High Speed Ethernet Connection via HomePlug Powerline
- Built-in Noise Filtering Power Socket
- Data Transfer Rate up to 500Mbps and Distance up to 300 Meters Wiring
- Secures the network connection with the touch of a button, no need to remember passwords
- 128-bit AES Encryption for
- Network Security and Data Protection
- Getting started is as easy at 1-2-3
- Reduce Power Consumption Up to 80%
- Product Features
- IEEE Compliant HomePlug AV & LAN
- Secure Network Connection
- Easy Installation & Management
- Product Specification
- Physical Description
- Button Definition
- Wire Diagram
- High-Speed Ethernet Connection via Home's Power Supply
- Chapter2: Initial Utility Installing
- Overview
- Running the Install Shield Wizard
- Chapter 3: Configuration
- Overview
- Main Screen
- ■ Part 1: Scan a Local Powerline device
- Note
- ■ Part 2: Detect the Network Powerline device
- Privacy
- ■ Setting Up Security on a Local Powerline device
- ■ Setting Up Security on a Network Powerline device
- Diagnostics
- Security Button
- Reset Button
- Appendix A Troubleshooting
- Q1 : If your PL-751 has difficulty communicating with each other, check the following:
Brand : Planet
Model : PL-751-EU
Category : Powerline Adapter