
LT-ADAT - Hi-Fi System LYNX - Free user manual and instructions
Find the device manual for free LT-ADAT LYNX in PDF.


| Product Type | 16-Channel ADAT LStream Interface for Aurora AD/DA Converters |
| Dimensions (H x W x D) | 3.0" x 5.0" x 0.75" |
| Weight | 2 pounds (0.9 kg) |
| Power Supply | Powered via Aurora LSlot interface; no external power required |
| Main Functions | Two ADAT optical inputs and outputs, 16 channels at 48 kHz, 8 channels at 96 kHz (S/MUX), 4 channels at 192 kHz (S/MUX). Compatible with Alesis ADAT Type I and II up to 24-bit. |
| Sample Rates Supported | 44.1 kHz to 192 kHz |
| Clock Synchronization | Clock sources: Aurora internal, Optical In 1, or external word clock. Supports master/slave configurations. |
| Architecture | FPGA-based core with field-upgradable firmware |
| Routing & Mixing | Integrates with Aurora's digital mixer for independent routing of ADAT I/O |
| Host Interface | Lynx LSlot proprietary LStream interface (24.5 Mbps bi-directional) |
| Compatibility | Requires Aurora 16 or Aurora 8 with firmware revision 12 or higher and available LSlot expansion slot |
| Connectors | 4 TOSLINK connectors (bracket-mounted) for ADAT I/O |
| EMI Certifications | FCC and CE |
| Care and Cleaning | Use a soft, dry cloth for cleaning. Avoid liquids and abrasives. Do not attempt to clean internal components. |
| Safety | Operate in a dry environment. Do not expose to moisture or extreme temperatures. Only qualified personnel should perform installation. |
| Spare Parts and Repairability | No user-serviceable parts inside. Contact Lynx technical support for repairs. Return requires RMA number. |
| Warranty | One year free labor/parts exchange. Must register within 14 days of purchase. |
Frequently Asked Questions - LT-ADAT LYNX
User questions about LT-ADAT LYNX
0 question about this device. Answer the ones you know or ask your own.
Ask a new question about this device
Download the instructions for your Hi-Fi System in PDF format for free! Find your manual LT-ADAT - LYNX and take your electronic device back in hand. On this page are published all the documents necessary for the use of your device. LT-ADAT by LYNX.
USER MANUAL LT-ADAT LYNX
support@lynxstudio.com
LT-ADAT
User Manual
Table of Contents
1 Introduction....1
2 Features....1
3 Before You Begin 1
3.1 Contents....1
3.2 Optional Equipment....1
3.3 Operation Requirements....1
4 Nomenclature used in this manual 2
5 Warranty Registration 2
5.1 Locating the Serial Number of Your LT-ADAT 2
6 Installation Procedure 3
7 External Connections 5
8 Aurora Routing 6
9 Clock Settings....6
9.1 Aurora as clock master, ADAT device slaves to wordclock 7
9.2 Aurora slaves to ADAT device via Lightpipe connection....7
9.3 Aurora and ADAT device slave to house clock....7
10 ADAT Channel Mapping and S/MUX....8
11 Specifications....9
12 Support....10
12.1 Lynx Website Support Resources.... 10
12.2 Telephone Support....10
12.3 Registering your LT-ADAT 10
12.4 Return Policy....10
13 Warranty Information .... 11
Please note: This is a preliminary user manual. If you would like to receive the completed version of this manual when it is available, send an email request with your name, address and the serial number of your Aurora to: sales@lynxstudio.com.
1 Introduction
Thank you for purchasing the LT-ADAT™! We are proud to provide you with a reliable, professional-quality product for your digital audio requirements.
This manual provides basic information to help you get started. Additional information is available via our web site and email support. Please refer to the support section at the end of this manual for support contact information.
The LT-ADAT is a 16-channel ADAT LStream™ interface that is designed for use with the Aurora professional audio AD/DA converters. The devices communicate via Lynx's proprietary LSlot multi-channel interface.
2 Features
Two ADAT Lightpipe inputs and outputs with S/MUX support
➢ 16 Channels at 48kHz
8 Channels at 96kHz
4 Channels at 192kHz
Easy installation into Aurora 8 or Aurora 16
3 Before You Begin
We recommend that you read through the manual to acquire an overview of the installation procedure and use of the LT-ADAT. This manual will presume a working knowledge of the Aurora converter. For additional information, please refer to the Aurora owner's manual.
3.1 Contents
Verify that you received the following in the LT-ADAT shipping carton:
- LT-ADAT card in cushioned antistatic bag
- Ribbon Cable
• One Standoff Post
• Warranty Registration Card - User Manual
3.2 Optional Equipment
The following cables are required for connection to external devices:
- TOSLINK optical cable (4), available from Lynx: Part # CBL-OPT3M - 3 meter length
3.3 Operation Requirements
Verify that your Aurora has firmware revision 11 or greater before installing and configuring the LT-ADAT card. To determine what firmware revision your Aurora has, please call Lynx technical support and provide your serial number. The Aurora firmware can be updated via a Lynx audio interface, MIDI or Infrared. To determine if you have the correct elements in place to program the Aurora firmware, call Lynx technical support, or visit the Lynx website (Support > Latest Driver Download) and review the Aurora firmware update instructions.
4 Nomenclature used in this manual
The following typographic conventions are used in this manual:
ALL UPPER CASE TEXT refers to a specific parameter selection control (i.e. SYNC SOURCE) or a cable connection.
➢ Text in quotation marks indicates a parameter selection value or menu option (i.e. “EXT”).
➢ Phrases, such as: Start > Programs > Lynx Studio Technology use the greater than symbol (“>”) to indicate multiple menu options or mouse selections within a software control context.
5 Warranty Registration
We are committed to providing you with the best service possible. To help us serve you better, please be sure to register your LT-ADAT using one of the following methods:
- Fill out and mail the Warranty Registration Card included with your LT-ADAT.
- Register on the web at: http://www.lynxstudio.com/support.html
Once you are registered you will automatically receive notifications of new products and upgrades.
5.1 Locating the Serial Number of Your LT-ADAT
To register your LT-ADAT, you must supply its serial number. The serial number is located on a label attached to the component side of the card and on the shipping carton.
6 Installation Procedure
- Remove the AC power cord. Take the top off of the Aurora 16 or Aurora 8. There are seven large screws plus one small screw near the center of the front faceplate.
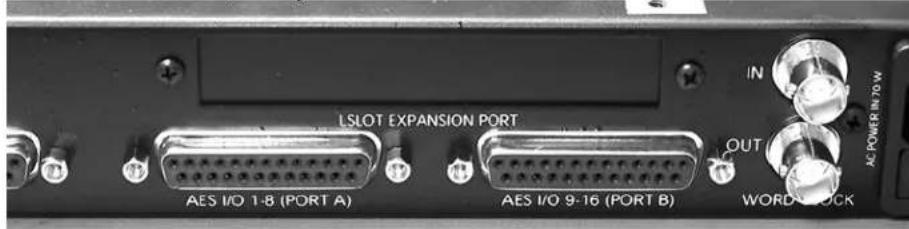
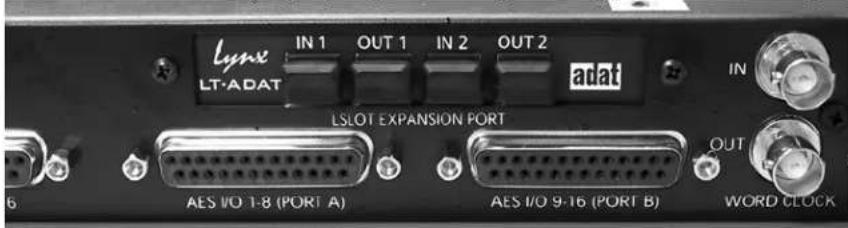
- Remove the LSlot Expansion Port cover above the AES I/O Ports by removing the two mounting screws. Set these two screws aside, as they will be used to install the LT-ADAT.
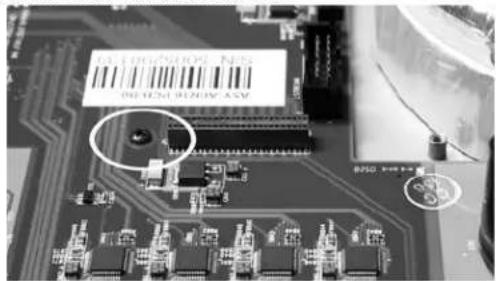
- Remove the screw from the Aurora circuit board that is adjacent to the JP1 connector and the white serial number/barcode label. Set the screw aside for reuse.
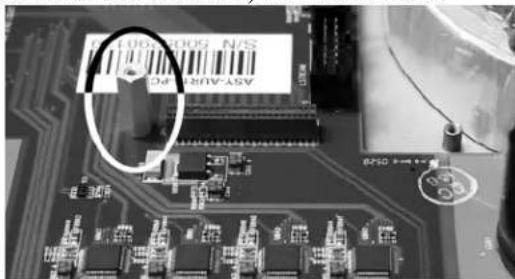
- Install the standoff post (included with the LT-ADAT) in this same hole.
-
Grounding yourself to the earth ground, remove the LT-ADAT from its protective static bag.
-
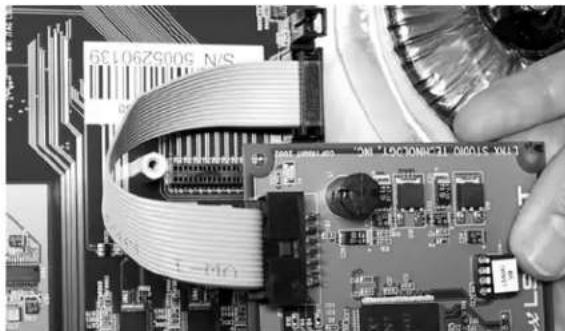
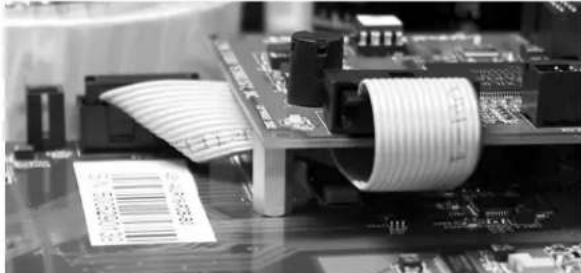
Attach one end of the included ribbon cable to the 14-pin header labeled "JP2" on the LT-ADAT. Insure that the ribbon cable is exiting the top side of JP2. Attach the other end of the cable to the LStream port labeled "JP3" on the Aurora main board. Note: The red stripe on the end of the ribbon cable will face the back of the Aurora.
natural_image
Close-up of a computer motherboard with visible traces and components, no readable text or symbols- Carefully route the ribbon cable underneath the LT-ADAT and inside of the standoff.
natural_image
Close-up of electronic circuit boards with a barcode patch and coiled components (no readable text or symbols)- Secure LT-ADAT with three screws; one on the standoff and two from the back panel of Aurora. Keep screws loose until LT-ADAT is properly aligned, then tighten snugly, but do not overtighten.
-
Plug in and power up the Aurora using the front panel standby switch. If the green LED on the LT-ADAT lights up, proceed to step 10. If the LED does not light, unplug Aurora and check the cable connections to and from the LT-ADAT. Then plug in and power up again. If the green LED still does not light, contact Lynx Customer Support.
-
Remove the power cord from Aurora and reinstall the Aurora top panel using the eight screws. Do not over tighten the small screw near the center of the front faceplate as it is easily damaged.
7 External Connections
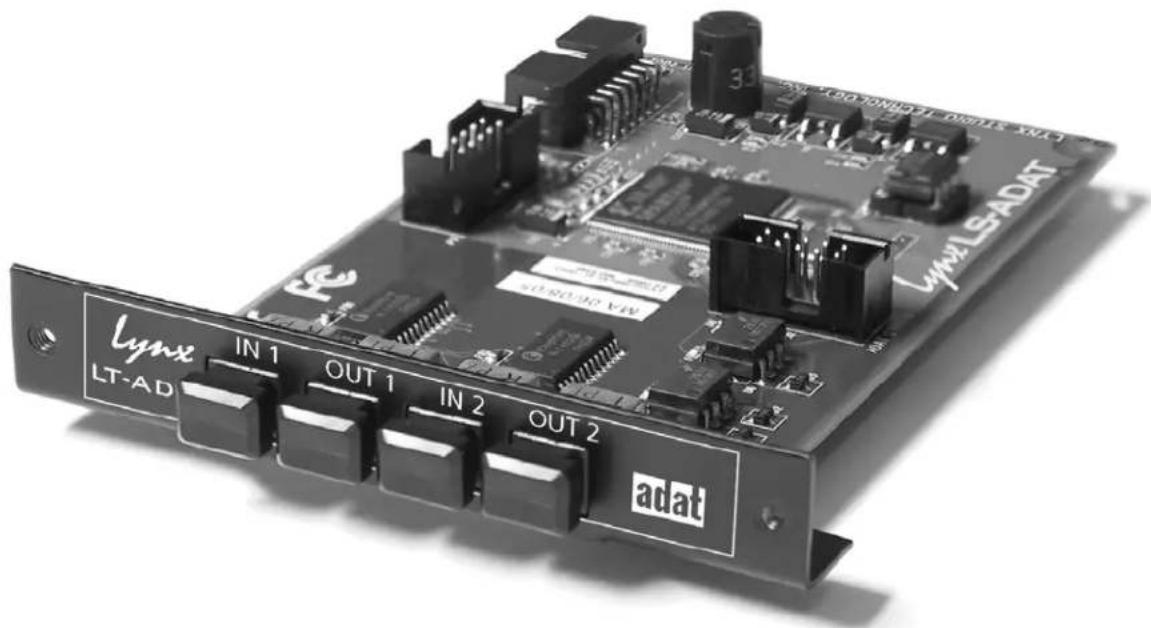
The photo below details LT-ADAT connectors.
natural_image
Electronic circuit board with labeled components including Lynx LT-AD, IN 1, OUT 1, IN 2, OUT 2, and adat (no readable text beyond labels)The LT-ADAT provides two ADAT optical inputs and outputs. They are labeled on the mounting bracket and in the figure above. The ADAT channels corresponding to each port are as follows:
IN 1 ADAT input channels 1-8
OUT 1 ADAT output channels 1-8
IN 2 ADAT input channels 9-16
OUT 2 ADAT output channels 9-16
Connect the LT-ADAT to ADAT devices in your system using standard ADAT compatible (Toslink) fiber optic cables. Refer to the "Optional Equipment" section at the beginning of this manual for part numbers of cables available from Lynx.
8 Aurora Routing
After installation, the Aurora will need to be configured to send and receive signals from the LT-ADAT.
Signals from the ADAT inputs can be delivered to the analog and/or digital outputs of the Aurora, and signals from the Aurora's analog or digital inputs can be routed to the LT-ADAT outputs. This routing can be established globally from the Aurora front panel or on a per-channel basis from the Aurora External Control Software. The External Control Software can be used with a PC or Macintosh computer equipped with a Lynx Audio Interface, MIDI Interface or Infrared transceiver. For more information, please consult the Aurora External Control manual.
Front panel routing affects all 16 LT-ADAT channels, which are mapped to directly corresponding Aurora channels (i.e. In 1 to Out 1, In 2 to Out 2, etc.). Port 1 provides channels 1-8, Port 2 provides channels 9-16.
| To route signals from the LT-ADAT inputs to the Aurora analog outputs, select “LSLOT IN” as the signal source from the TO ANALOG OUT selection button. | 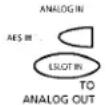 |
| To route signals from the LT-ADAT inputs to the Aurora digital outputs, select “LSLOT IN” as the signal source from the TO DIGITAL OUT selection button. | 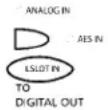 |
| When routing from the front panel, signals sent to the digital outputs are sent simultaneously to the LSLOT outputs. To choose the signal source to be routed to the LT-ADAT outputs, select the appropriate source with the TO DIGITAL OUT button. Note: When “LSLOT” is chosen here, signals from the LT-ADAT inputs will be routed to the LT-ADAT outputs as well as the AES/EBU digital outputs. | 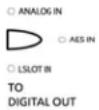 |
9 Clock Settings
In any system with more than one digital device, there can be only one master clock providing synchronization to all connected devices. Devices connected to the LT-ADAT can slave to the sample clock from the Aurora, or they can be configured as clock masters providing sample clock that the Aurora can slave to. It is also possible to have a separate clock source that provides clock to both the Aurora and Lightpipe device(s). The essential thing is that all devices synchronize to a single source. Please see section 2.4 of the Aurora manual for information about available clock settings with the Aurora.
If you choose to have the ADAT Lightpipe device(s) be clock slaves, in most cases they can be set to receive clock from their ADAT optical inputs, or via wordclock. Even if the Aurora is configured to slave to some other clock source, valid, low-jitter clock is presented to its Wordclock and LT-ADAT outputs. See the documentation for the ADAT Lightpipe device to determine how to change its clock source (most devices default to Internal).
The Aurora can also slave to the clock signal from the LT-ADAT inputs. To do so, simply choose “LSLOT” with the SYNC SOURCE button on the Aurora front panel, and make sure that the ADAT Lightpipe device is operating off of its Internal clock.
The figures below detail three common clock schemes:
9.1 Aurora as clock master, ADAT device slaves to wordclock
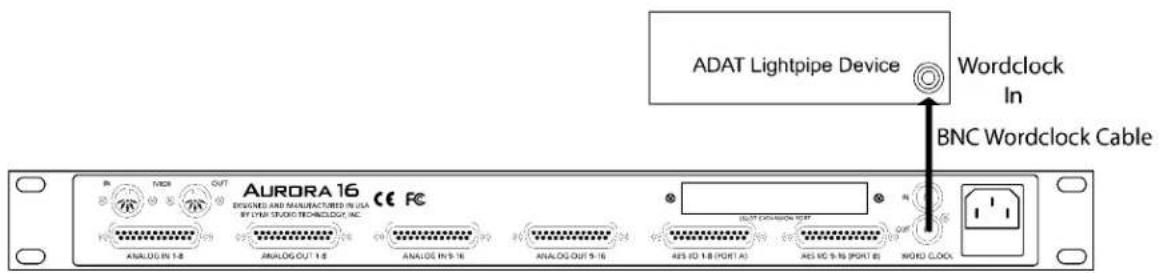
Aurora SYNC SOURCE: INT
ADAT Device Clock Source: Wordclock
9.2 Aurora slaves to ADAT device via Lightpipe connection
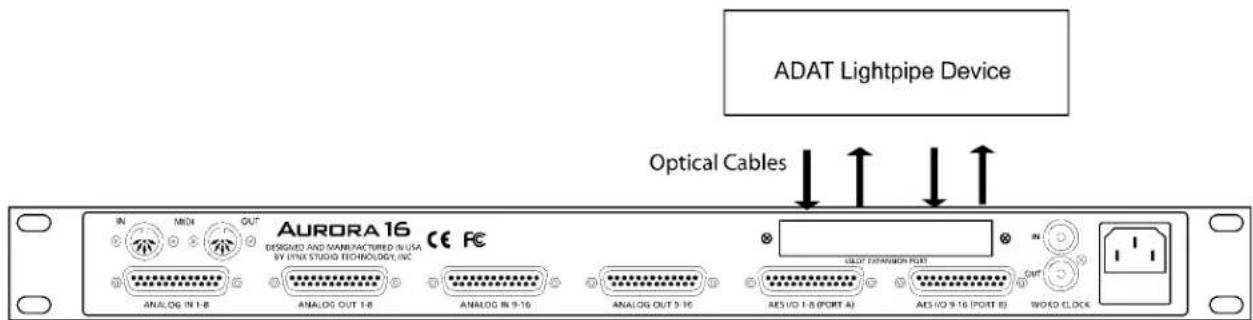
Aurora SYNC SOURCE: LSLOT
ADAT Device Clock Source: Internal
9.3 Aurora and ADAT device slave to house clock
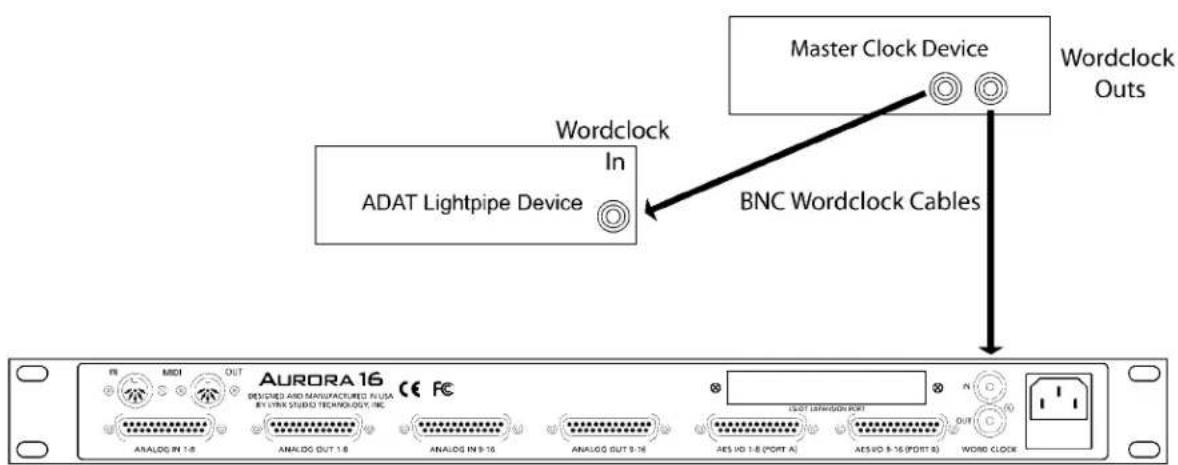
Aurora SYNC SOURCE: EXT
ADAT Device Clock Source: Wordclock
10 ADAT Channel Mapping and S/MUX
This section describes the mapping of LSLOT channels to LT-ADAT channels. This mapping varies with sample rate since S/MUX is required to support sample rates above the standard ADAT sample rate of 48 kHz.
At 44.1 kHz and 48 kHz there is a one-for-one correspondence between Aurora channels and LT-ADAT channels. All 16 input and output channels are available.
At sample rates above 48 kHz, the signal channel capacity (and the number of required LSlot channels) is reduced since S/MUX utilizes multiple ADAT channels for each signal channel. Refer to the following table.
| ADAT Port | ADAT Channel | 48kHz LSlot Channel | 96kHz LSlot Channel | 192kHz LSlot Channel |
| 1 | 1 | 1 | 1 | 1 |
| 1 | 2 | 2 | ||
| 1 | 3 | 3 | 2 | |
| 1 | 4 | 4 | ||
| 1 | 5 | 5 | 3 | 2 |
| 1 | 6 | 6 | ||
| 1 | 7 | 7 | 4 | |
| 1 | 8 | 8 | ||
| 2 | 1 | 9 | 5 | 3 |
| 2 | 2 | 10 | ||
| 2 | 3 | 11 | 6 | |
| 2 | 4 | 12 | ||
| 2 | 5 | 13 | 7 | 4 |
| 2 | 6 | 14 | ||
| 2 | 7 | 15 | 8 | |
| 2 | 8 | 16 |
S/MUX is enabled on demand, based on the current sample rate currently selected for recording or playback. As such, the mapping of channels will change when the sample rate changes. The user must be keenly aware of this “automatic” re-mapping to avoid mixing and routing problems.
When the Aurora has the SYNC SOURCE set to LSLOT, the LT-ADAT cannot determine if an incoming signal is using S/MUX. Because of this, the user must manually set the SAMPLE RATE on the front panel of the Aurora to match the sample rate of the ADAT device.
11 Specifications
ADAT OPTICAL I/O
| Number / Type | Two inputs and two outputs, compatible with Alesis ADAT Type I and Type II Optical Digital Interface Protocol, up to 24-bit data |
| Channels | 16 @ 44.1kHz 48 kHz sample rates8 @ 88.2 kHz and 96 kHz sample rates, S/MUX enabled4 @ 176.4 kHz and 192 kHz sample rates, SMUX enabled |
| Input Receiver | Fast-locking phase-locked loop with 30 kHz to 55 kHz lock range |
| CLOCK SYNCHRONIZATION | |
| Clock Sources | Aurora, Optical In 1 |
| ARCHITECTURE | |
| Core | FPGA-based core. Support for field upgrades of firmware. |
| Routing/Mixing | Integrates with Aurora's digital mixer to allow independent routing of ADAT I/O with onboard analog and digital I/O. |
| CONNECTIONS | |
| I/O Ports | (4) Bracket-mounted TOSLINK connectors. |
| Other | LStream interface headers |
| GENERAL | |
| Host Interface | Lynx LSlot proprietary LStreamTM Interface: 24.5 Mbps bi-directional |
| Requirements | Aurora 16/Aurora 8 with Firmware Revision 12 or higher and available LSlot expansion slot. |
| Size | 3.0" H X 5.0" W X 0.75" D |
| EMI Certifications | FCC and CE |
| Shipping Weight | 2 pounds |
12 Support
We are devoted to making your experience with the LT-ADAT trouble-free and productive. If the troubleshooting and operational sections of this manual did not help resolve your questions, several support options are available to you:
12.1 Lynx Website Support Resources
Logging on to http://www.lynxstudio.com/support.html will provide several options for resolving your support issues:
Support Ticket
For direct attention from the Lynx Technical Support Staff, registered users can submit a support ticket online that details their problem and steps they've taken to resolve it. Most Support Ticket submissions are responded to within 24 hours.
Frequently Asked Questions
An extensive catalog of FAQs derived directly from our most common tech support inquiries. Our FAQ section is updated regularly and designed to allow users to find the answers to their most common questions quickly.
Firmware and Driver Downloads
A library of current firmware and driver files are available for download and installation. Check back regularly to insure that your Aurora is up-to-date.
Lynx Support Forum
An online Lynx users support forum provides a venue for customers to post questions and issues and receive responses from other users as well as Lynx technical administrators. Searching previous posts is often an excellent way to uncover valuable information about Aurora operation and troubleshooting. See http://www.lynxstudio.com/forum
12.2 Telephone Support
Telephone support is available by calling +1 (949) 515-8265 extension 206 from 9AM to 5PM Pacific Time, Monday through Friday, excluding United States Holidays.
12.3 Registering your LT-ADAT
Lynx is committed to providing you with the best service possible. To help us serve you better, please be sure to register your LT-ADAT using one of the following methods:
➢ Fill out and mail the Warranty Registration Card included with your Aurora.
Register on the web at: http://www.lynxstudio.com/support.html
Once you are registered you will automatically receive notifications of new products and upgrades.
12.4 Return Policy
If you have a unit that you suspect is defective or is malfunctioning contact Lynx technical support via one of the means described above for diagnosis. If the technician determines that the unit is faulty, they will issue an RMA number so you can send the unit in for repair. Units received without a valid RMA number will be refused. All RMA numbers are valid for 30 days from the date of issue.
13 Warranty Information
One year Free Labor / One year Parts Exchange
This product must be returned to the factory for repair.
Who Is Covered?
You must have proof of purchase to receive warranty service. A sales receipt or other document showing when and where you purchased the product is consider proof of purchase. This warranty is enforceable only by the original retail purchaser. To be protected by this warranty, the purchaser must complete and return the enclosed warranty card or register online within 14 days of purchase.
What Is Covered?
Warranty coverage beings the day you buy your product. For one year thereafter, Lynx shall, at its sole and absolute option, either repair or replace free of charge any product that proves to be defective on inspection by Lynx or its authorized service representative. In all cases disputes concerning this warranty shall be resolved as prescribed by law. All parts, including repaired and replaced parts, are covered only for the original warranty period. When the warranty on the product expires, the warranty on all replaced and repaired parts also expires.
What Is Excluded?
You warranty does not cover:
- Labor charges for installation or setup of the product.
- Product repair and/or part replacement because of misuse, accident, unauthorized repair or other cause not within the control of Lynx.
- A product that requires modification or adaptation to enable it to operate in any country other than the country for which it was designed, manufactured, approved and/or authorized, or repair of products damaged by these modifications.
- Incidental or consequential damages result from the product, damage to property, damage based on inconvenience or on loss of use of the product, and, to the extent permitted by law, damages for personal injury. Some states do not allow the exclusion or limitation of incidental or consequential damages, so the above limitation or exclusion may not apply to you.
- A product that is used for rental purposes.
To Get Warranty Service...
To obtain warranty service, the purchaser must first call or email Lynx at the email address or telephone number printed in Section 12 to obtain a Return Authorization Number and instructions concerning where to return the unit for service. All inquiries must be accompanied by a description of the problem. All authorized returns must be sent to Lynx or an authorized Lynx repair facility postage prepaid insured and properly packaged. Proof of purchase must be presented in the form of a bill of sale, canceled check or some other positive proof that the product is within the warranty period. Lynx reserves the right to update any unit returned for repair. Lynx reserves the right to change or improve design of the product at any time without prior notice.
Lynx Studio Technology, Aurora and the Aurora Logo are trademarks of Lynx Studio Technology, Inc. All other product or company names are the trademarks or registered trademarks of their respective owners.
- LT-ADAT
- User Manual
- Table of Contents
- Introduction
- Features
- Before You Begin
- Contents
- Optional Equipment
- Operation Requirements
- Nomenclature used in this manual
- Warranty Registration
- Locating the Serial Number of Your LT-ADAT
- Installation Procedure
- External Connections
- Aurora Routing
- Clock Settings
- ADAT Channel Mapping and S/MUX
- Specifications
- Support
- Lynx Website Support Resources
- Support Ticket
- Frequently Asked Questions
- Firmware and Driver Downloads
- Lynx Support Forum
- Telephone Support
- Registering your LT-ADAT
- Return Policy
- Warranty Information
- Who Is Covered?
- What Is Covered?
- What Is Excluded?
- To Get Warranty Service...
Brand : LYNX
Model : LT-ADAT
Category : Hi-Fi System