
CDC-X227 YU - Car radio AIWA - Free user manual and instructions
Find the device manual for free CDC-X227 YU AIWA in PDF.


| Product Type | Car Stereo with CD Player |
| Brand | Aiwa |
| Model | CDC-X227 YU |
| Dimensions (W x H x D) | 178 mm x 50 mm x 160 mm (1 DIN) |
| Weight | 1.2 kg |
| Power Supply | 12V DC (negative ground) |
| Maximum Power Output | 4 x 40W (peak) |
| Playback Media | CD, CD-R, CD-RW |
| Tuner Bands | FM (87.5-108 MHz), AM (530-1710 kHz) |
| Preset Stations | 18 FM + 12 AM |
| Audio Features | Bass/Treble control, Loudness, Fader/Balance |
| Display | LCD with white illumination |
| Remote Control | Wired remote control included |
| Front Panel | Detachable face for theft protection |
| Supported Audio Formats | CD-DA, MP3 (on CD-R/RW) |
| Protection Fuse | 10A blade fuse |
| Operating Temperature | -10°C to +60°C |
| Installation Notes | Use ISO connectors, ensure proper grounding |
| Maintenance | Clean exterior with soft dry cloth; use CD lens cleaner |
Frequently Asked Questions - CDC-X227 YU AIWA
User questions about CDC-X227 YU AIWA
0 question about this device. Answer the ones you know or ask your own.
Ask a new question about this device
Download the instructions for your Car radio in PDF format for free! Find your manual CDC-X227 YU - AIWA and take your electronic device back in hand. On this page are published all the documents necessary for the use of your device. CDC-X227 YU by AIWA.
USER MANUAL CDC-X227 YU AIWA
For your convenience, record the model number and serial number (you will find them on the bottom side of your set) in the space provided below. Please refer to them when you contact your AIWA dealer in case of difficulty.
Model No. CDC-X227
Serial No.
8C-KCG-921-01
011120ATM-OX
PRECAUTIONS
- Use only in a 12-volt DC negative-ground electrical system.
- Disconnect the vehicle's negative battery terminal while mounting and connecting the unit.
- When replacing the fuse, be sure to use one with an identical amperage rating. Using a fuse with a higher amperage rating may cause serious damage to the unit.
- Do NOT attempt to disassemble the unit. Laser beams from the optical pickup are dangerous to the eyes.
- Make sure that pins or other foreign objects do not get inside the unit; they may cause malfunctions, or create safety hazards such as electrical shock or laser beam exposure.
- When your vehicle has been parked in direct sunlight resulting in a considerable rise in the temperature inside, allow the unit to cool off before operating it.
- Keep the volume at a level at which you can hear outside warning sounds (horns, sirens, etc.).
NOTE
This equipment has been tested and found to comply with the limits for a Class B digital device, pursuant to Part 15 of the FCC Rules. These limits are designed to provide reasonable protection against harmful interference in a residential installation.
This equipment generates, uses, and can radiate radio frequency energy and, if not installed and used in accordance with the instructions, may cause harmful interference to radio communications. However, there is no guarantee that interference will not occur in a particular installation. If this equipment does cause harmful interference to radio or television reception, which can be determined by turning the equipment off and on, the user is encouraged to try to correct the interference by one or more of the following measures:
— Reorient or relocate the receiving antenna.
— Increase the separation between the equipment and receiver.
— Connect the equipment into an outlet on circuit different from that to which the receiver is connected.
— Consult the dealer or an experienced radio/TV technician for help.
CAUTION
Modifications or adjustments to this product, which are not expressly approved by the manufacturer, may void the user's right or authority to operate this product.
In addition to ordinary CDs, CD-Rs or CD-RWs can be read by this unit. However, NEVER use a CD-R or CD-RW that contains no data or data in the wrong format, such as MP3 or other computer files.
TABLE OF CONTENTS
THEFT PROTECTION 2
BASIC OPERATION, AUDIO AND CLOCK ADJUSTMENT 2
RADIO OPERATION 3
Some buttons are assigned two or more functions.
For detailed descriptions, refer to the related pages.
CD Notes
- Playing a defective or dusty CD can cause dropouts in sound.
- Hold CDs as illustrated.
- Do NOT touch the unlabeled side.
- Do NOT attach any seal, label or data protection sheet to either side of CD.
- Do NOT expose a CD to direct sunlight or excessive heat.
- Wipe a dirty CD from the center outward with a cleaning cloth.
Never use solvents such as benzine or alcohol.
• This unit cannot play 3-inch (8 cm) CDs.
- NEVER insert a 3-inch CD contained in the adapter or any irregularly shaped CD.
The unit may not be able to eject it, resulting in a malfunction.

DEMO (Demonstration) mode
The unit has an extra display (DEMO) mode which demonstrates the illumination modes of the unit. The unit switches to DEMO mode automatically if you turn the unit on and leave it as it is for 5 seconds after all the connections have been completed.
To cancel DEMO mode
1 During DEMO mode, press and hold SRC until "ILL" appears in the display.
2 Press ▲ or ▼ to select "DE".
3 Turn AUDIO CONTROL to select "DE 0."
To resume DEMO mode, select "DE 1" in step 3.
THEFT PROTECTION
Take the front panel with you when leaving the car, and keep it in the supplied carrying case.
Detaching the front panel
Before detaching the front panel, remove the CD to prevent possible damage to the unit.
1 Press ▲ to remove the CD.
2 Press and hold PWR/MUTE until the unit turns off.
3 Press ↑. (Hold the panel with one hand to prevent accidentally dropping it.)
4 Remove the panel.

Attaching the front panel
1 Engage the left side of the front panel to the left catch on the unit.
2 Push the panel forward until it locks. Be sure not to press any buttons while you are attaching the panel.

Note
Do not touch the connector on the reverse side of the front panel. This could cause a poor or faulty connection.
BASIC OPERATION, AUDIO AND CLOCK ADJUSTMENT
PWR/MUTE SEL

Turning the unit on/off
- Press PWR/MUTE to turn on the unit. The unit also turns on when you insert a CD.
- Press and hold PWR/MUTE until the unit turns off.
Note
Most operations described in this manual require the unit to be turned on before starting the operation, unless explicitly stated otherwise.
Changing the source mode
1 Press SRC.
Pressing SRC cycles through source modes in the following order:
FM1 (FM2/FM3/AM1/AM2) → CD* → AUX
* "CD" does not appear in the display when there is no CD in the unit.
Adjusting the volume
1 Turn AUDIO CONTROL.
VOL (volume) indicator flashes.

Muting the sound
1 Press PWR/MUTE briefly.
MUTE indicator flashes.
To restore volume, briefly press PWR/MUTE again.
Adjusting sound
You can select the following modes for adjusting sound depending on the music you listen to: BASS (low frequencies), TRE (high frequencies), BAL (left/right), FAD (front/rear) and H-BASS (high bass).
1 Press SEL repeatedly to select the mode to be adjusted.
Pressing SEL cycles through the modes. The selected mode's indicator flashes.
2 Turn AUDIO CONTROL to increase/decrease the level or to select on/off for the selected mode.
Note
Adjust the level or select on/off within 5 seconds, or the selected mode will return to previous state.
Aligning the source levels
(Source Level Adjuster)
Volume may vary each time you change the source mode. In this case, you can align each source mode's volume to almost the same level.
1 Press SRC or BAND repeatedly to select the desired mode.
2 Press DISP while pressing SEL.
"LA 0" appears in the display.
3 Turn AUDIO CONTROL to adjust the level.
Note
Adjust the level within 5 seconds, or the selected mode will be canceled.
Restoring the factory settings
1 Turn off the unit.
2 Press and hold DISP until "LA --" appears in the display.
Note
You can restore the factory settings only for VOL, BASS, TRE, BAL, FAD, and H-BASS, and aligned source volume levels.
Muting button beep sounds
1 Turn off the unit.
2 Press and hold SEL until "bEEP" appears in the display.
3 Turn AUDIO CONTROL to select on (level indicators appear) or off (level indicators disappear).
4 Press SEL.
Setting the clock
1 Press and hold DISP until the clock indicator flashes in the display.
2 Press ▲ (to set hour) or ▼ (to set minute), and then turn AUDIO CONTROL.
3Press DISP.
Displaying the clock
1 Press DISP.
To return to the former display, press DISP again.
RADIO OPERATION
Tuning in to a station
(Seek/Manual Tuning)


1 Press BAND repeatedly to select the desired band (FM1, FM2, FM3, AM1, or AM2).
2* Press ▲ (to move to higher frequencies) or ▼ (to move to lower frequencies) to tune in to a station. "ST" appears in the display when an FM station is broadcasting in stereo, and receiving conditions are good.
*Seek Tuning and Manual Tuning
- Press and hold ▲ or ▼ until seek Tuning starts. The unit locates a station automatically (Seek Tuning).
- Press ▲ or ▼ repeatedly to search for a desired station while increasing or decreasing the frequency step by step (Manual Tuning).
To stop Seek Tuning, press ▲ or ▼ again.
Monaural mode
When signals become weak, or reception becomes poor, the unit automatically switches to Monaural mode to reduce noise.
Local mode
Local mode allows you to tune in only to strong stations during Seek Tuning.
1 Press LO before you start seek tuning.
"LO" appears in the display.
To return to Distant mode, press LO again.
"LO" disappears and the unit tunes in to all receivable stations.
Using preset stations
You must preset stations before you can tune in a station using preset station number buttons.


Preset station number
Presetting stations automatically
(Auto Memory)
1 Press BAND repeatedly to select the desired band (FM1, FM2, FM3, AM1, or AM2).
2 Press and hold PS/A.ME until automatic presetting starts.
The unit automatically stores up to 6 stations for each band.
After completion of automatic presetting, the unit tunes in to the station stored on preset station button 1.
To cancel automatic presetting, press PS/A.ME again.
Checking the preset stations (Preset Scan)
1 Press PS/A.ME briefly.
Each preset station will be tuned in for 5 seconds in order.
To cancel Preset Scan, press PS/A.ME again or any preset station button.
Presetting stations manually
(Manual Memory)
1 Press BAND repeatedly to select the desired band (FM1, FM2, FM3, AM1, or AM2).
2 Press ▲ or ▼ to tune in to a desired station (see "Tuning in to a station" as well for another tuning method).
3 Press and hold the desired preset station button until the unit beeps.
Note
A newly preset station replaces the station on the same band that was previously stored on that preset station button.
Tuning in to a preset station
1 Press BAND repeatedly to select the desired band (FM1, FM2, FM3, AM1 or AM2).
2 Press the preset station button on which the desired station is stored.
Active tuning reception control (ATRC)
The unit automatically suppresses FM noise caused by vehicle movement, and maintains sound quality.
CD PLAYER OPERATION
Playing a CD
You can play CDs, CD-Rs and CD-RWs using the procedure described below.
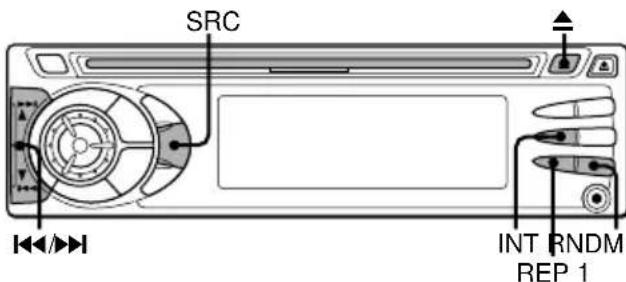
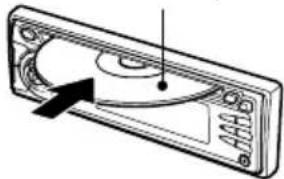
1 Insert a CD.
"CD" appears in the display.
CD play starts.
If a CD is already inserted, press SRC repeatedly to select CD play mode.
In normal play, when the last track finishes, the unit returns to the first track and continues to play.
Labeled-side up
natural_image
Diagram of a device casing with control panel and indicator lights (no text or symbols)Track number

CD indicator Elapsed playing time
| To | Press |
| Eject a CD | ▲ |
| Skip to the next track | ▶▶I |
| Go back to the beginning of the current trackEach extra press skips backward one extra track | I◀◀ |
| Locate a specific point in a track | Press and hold I◀◀ or ▶▶I until you find the point. |
Note
- When you play a CD that is already inserted, CD play starts at the point where it stopped the previous time. A newly inserted CD starts from the first track.
- A CD-R or CD-RW may take some time to start playing back, but this is not a malfunction.
- If a CD-R or CD-RW with no data or incompatible data is inserted, "E03" will appear in the display. The unit cannot play such discs.
Intro Play
You can locate a desired track by monitoring the first 10 seconds of all the tracks on a CD.
1 Press INT during CD play.
"SCAN" appears in the display.
2 Press INT again when the desired track is played.
The unit returns to normal CD play.
One track Repeat Play
You can play a track repeatedly.
1 Press REP1 during CD play. "REPEAT1" appears in the display.
To cancel One track Repeat Play, press REP1 again.
Random Play
You can play all the tracks in random order.
1 Press RNDM during CD play.
"RANDOM" appears in the display.
To cancel Random Play, press RNDM again.
Note
During Random Play, pressing ◀◀◀ allows you to skip only to the beginning of the current track, not to the previous track.
AUXILIARY EQUIPMENT
Listening to a cassette/MD/MP3 portable player or other equipment
You can listen to equipment connected to the unit. Refer to the operating instructions for the corresponding equipment for more detailed information. Be sure to remove inserted CDs to prevent possible damage to the unit before connecting the equipment.

1 Connect a cassette/MD/MP3 portable player or other equipment to the unit's AUX jack (3.5 mm dia.).
2 Press SRC repeatedly until "AUX" appears in the display.
During AUX mode, the clock display appears.
OTHER FUNCTIONS

CONTROL
Changing the key illumination color
You can choose blue or red as the key illumination color.
1 Press and hold SRC until "ILL" appears in the display.
2 Turn AUDIO CONTROL to select 1 (for blue) or 2 (for red).
Setting the dimmer of the display
1 Press and hold SEL until "D" appears in the display.
2 Turn AUDIO CONTROL to select "D 0 (bright)" or "D 1 (dimmed)."
TROUBLESHOOTING
Error code
In the following cases the corresponding error code indication appears. Follow the suggestions below to solve such problems. If the error code indication does not disappear, consult an AIWA service center.
E03 Focus error. Check that the CD is loaded properly (right side up, etc.), and the CD contains valid data.
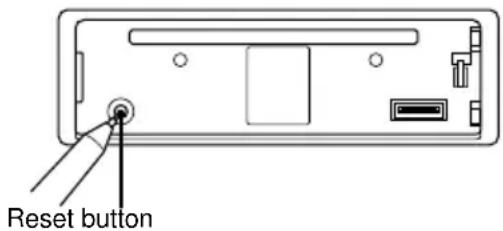
Reset button
If a CD does not operate properly, press the reset button with a pointed object such as a pencil, etc. Note that all your settings will be erased if this button is pressed.
MAINTENANCE
Cleaning the front panel
Wipe the surface with a soft, dry cloth. Do not use liquid cleaners or aerosol cleaners.
Cleaning the connector
The connector needs to be cleaned occasionally. Wipe the surface of the connector with a cotton swab slightly moistened with alcohol.
Back of the front panel

natural_image
Diagram of a device with an internal connector and cable, showing no text or symbolsSPECIFICATIONS
RADIO SECTION
(FM)
Frequency Range: 87.5 MHz – 108 MHz
Usable Sensitivity: 12.7 dBf
50 dB Quieting Sensitivity: 17.2 dBf
IF Rejection: 100 dB
Frequency Response: 30 Hz – 15,000 Hz
S/N Ratio: 70 dB
Stereo Separation: 35 dB at 1 kHz
Alternate Channel Selectivity: 90 dB
Capture Ratio: 3 dB
(AM)
Frequency Range: 530 kHz – 1,710 kHz
Usable Sensitivity: 30 μV (30 dB)
CD SECTION
Frequency Response: 17 Hz – 20 kHz +0/-3 dB
Dynamic Range: More than 85 dB
Channel Separation: More than 60 dB
S/N Ratio: More than 90 dB
Wow/Flutter: Unmeasurable
AUDIO SECTION
Max. Power Output: 45 W · 4 channels
AUX input
Input sensitivity (load impedance) AUX: 300 mV (10 kΩ)
GENERAL
Power-Supply Voltage: 14.4 V (11 to 16 V)
allowable), DC, negative ground
Load Impedance: 4 Ω
Tone Control:
Bass ± 10 dB at 100 Hz, Treble ± 10 dB at 10 kHz
Preamp Output Voltage (load impedance): 2.2 V (10 kΩ)
Supplied Accessory: Carrying case (1)
- Specifications and external appearance are subject to change without notice due to product improvement.
REAR PANEL

For details, refer to the separate "INSTALLATION AND CONNECTIONS".
- PRECAUTIONS
- NOTE
- CAUTION
- TABLE OF CONTENTS
- CD Notes
- DEMO (Demonstration) mode
- To cancel DEMO mode
- THEFT PROTECTION
- Detaching the front panel
- Attaching the front panel
- BASIC OPERATION, AUDIO AND CLOCK ADJUSTMENT
- Turning the unit on/off
- Changing the source mode
- Adjusting the volume
- Muting the sound
- Adjusting sound
- Aligning the source levels
- (Source Level Adjuster)
- Restoring the factory settings
- Muting button beep sounds
- Setting the clock
- Displaying the clock
- RADIO OPERATION
- Tuning in to a station
- (Seek/Manual Tuning)
- Monaural mode
- Local mode
- Using preset stations
- Presetting stations automatically
- (Auto Memory)
- Checking the preset stations (Preset Scan)
- Presetting stations manually
- (Manual Memory)
- Tuning in to a preset station
- Active tuning reception control (ATRC)
- CD PLAYER OPERATION
- Playing a CD
- Intro Play
- One track Repeat Play
- Random Play
- AUXILIARY EQUIPMENT
- Listening to a cassette/MD/MP3 portable player or other equipment
- OTHER FUNCTIONS
- Changing the key illumination color
- Setting the dimmer of the display
- TROUBLESHOOTING
- Error code
- Reset button
- MAINTENANCE
- Cleaning the front panel
- Cleaning the connector
- SPECIFICATIONS
- RADIO SECTION
- CD SECTION
- AUDIO SECTION
- AUX input
- GENERAL
Brand : AIWA
Model : CDC-X227 YU
Category : Car radio