
Speed Q - Disk array G-TECHNOLOGY - Free user manual and instructions
Find the device manual for free Speed Q G-TECHNOLOGY in PDF.


| Brand | G-Technology |
| Model | Speed Q (G-SPEED Q) |
| Product Type | RAID Protected Storage System |
| Interface | USB 3.0, eSATA (3Gbit), FireWire 800 (2 ports) |
| RAID Modes Supported | RAID 0 (Performance), RAID 5 (Protected) |
| Number of Drive Bays | 4 (hot-swappable) |
| Drive Type | HGST Enterprise 3.5-inch SATA hard drives (7200 RPM) |
| Total Capacity (as tested) | 12 TB (example configuration) |
| Data Protection | RAID 5 with distributed parity; automatic rebuild upon drive replacement |
| Cooling | Quiet fan with temperature monitoring |
| Enclosure Material | Aluminum |
| Operating Temperature | 5°C to 35°C (41°F to 95°F) |
| Operating Humidity | 5% to 80% (non-condensing) |
| Non-Operating Humidity | 10% to 90% (non-condensing) |
| Safety Features | Kensington security slot, visual warning LEDs (red/amber), power and activity LEDs |
| Warranty | 1 to 5 years depending on purchase; see manufacturer website |
| Included Accessories | USB 3.0 cable, eSATA cable, FireWire 800 cable, drive module keys, Quick Start Guide |
| Compatibility | Mac OS X 10.6+ (factory format HFS+ Journaled); Windows 8/7/Vista/XP 64-bit (after reformat); not compatible with Windows XP 32-bit |
| Management Software | G-Technology Configurator utility (USB connection required) for RAID mode changes |
Frequently Asked Questions - Speed Q G-TECHNOLOGY
User questions about Speed Q G-TECHNOLOGY
0 question about this device. Answer the ones you know or ask your own.
Ask a new question about this device
Download the instructions for your Disk array in PDF format for free! Find your manual Speed Q - G-TECHNOLOGY and take your electronic device back in hand. On this page are published all the documents necessary for the use of your device. Speed Q by G-TECHNOLOGY.
USER MANUAL Speed Q G-TECHNOLOGY
natural_image
Blue circular logo with a white stylized 'G' and metallic silver border (no text or symbols)USER MANUAL
G-Technology®
G | SPEED Q
High-Speed, RAID Protected Storage System
natural_image
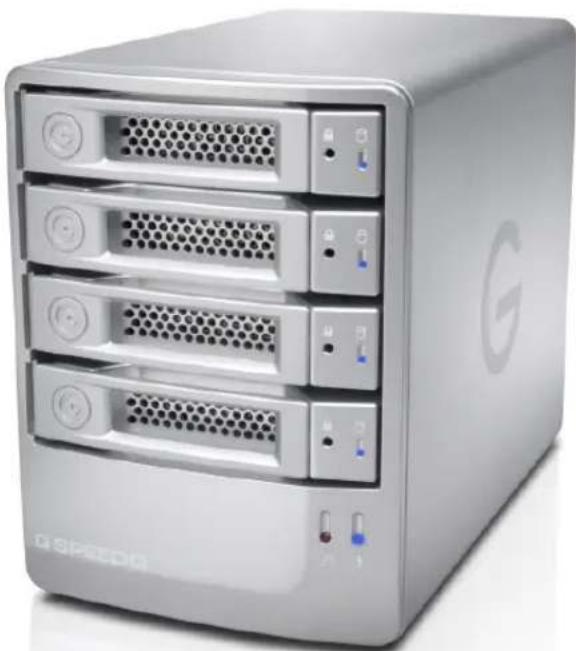
Exterior view of a silver server rack with multiple drive bays and indicator lights (no visible text or symbols)Welcome to G-SPEED Q
Table of Contents
Safety & General Use
Safety Precautions......4
Backup Your Data ....5
About Your G-SPEED Q
Introduction ......7
What's in the Box 8
System Requirements......8
Overview of the Drive ......9
Using Your Drive
Easy Installation for Mac 11
Optimize Performance 11
Disconnect the Drive ....12
Warning LED Alarms....12
Windows Use....13
Using RAID Modes
Supported RAID Modes 15
The Configurator Utility 16
Configure the RAID Mode .... 16
Maintenance for your Drive
Initialize Drive for Mac 21
Restore the Drive Icon 24
Reformat with Partitions......26
Replace a Failed Drive Module ..... 30
Support & Warranty
Technical Support 33
Limited Warranty 34
Copyright......36
G|SPEED Q
Safety & General Use
· Safety Precautions ...... p.4
· Backup Your Data ...... p.5
Safety Precautions
G-SPEED Q's warranty may be void as a result of the failure to respect the precautions listed here. If you detect a problem with your drive, please contact our Technical Support department.
If the product is returned with damage caused by improper handling, the warranty will be void and liability will rest with the user. Please read our Limited Warranty.
- Servicing: Your drive contains no user-serviceable parts. If it appears to be malfunctioning, have it inspected by a qualified Technical Support representative.
- Moisture: Place the device away from moisture or liquids. To reduce the risk of damage, do not expose this drive to rain or moisture. Do not use it in damp or wet conditions. Never place objects containing liquids on the drive as they may spill into its openings.
- Ventilation: Place the device in a vented area. The drive should never be placed near or over a radiator or heat source.
- Temperature: Do not expose this drive to temperatures outside the range of 5^ to 35^ (41°F to 95°F); or to operational humidity beyond 5-80%, non-condensing, or non-operating humidity beyond 10-90%, non-condensing. Avoid placing your drive near a source of heat, or exposing it to sunlight (even through a window), or in an environment that is too cold or humid.
- Physical Damage: Do not place heavy objects on the drive. Never use excessive force on your drive.
Backup Your Data
The disk drive contained in your G-SPEED Q device is a delicate electronic instrument and is susceptible to damage due to excessive physical shock. Under no circumstances will G-Technology be held liable for the recovery or restoration of lost data. Any loss, corruption or destruction of data while using a G-Technology drive is the sole responsibility of the user.
Make Two Backups
To help prevent the loss of your data, we highly recommend that you keep TWO copies of your data in separate storage locations. When in RAID 5 (Protected mode), G-SPEED Q will safeguard your data from hard drive failure. However, if any file system corruption occurs, the data contained on G-SPEED Q may be affected.
For critical data, it is recommended to keep one copy on G-SPEED Q and a second copy on your internal hard drive, another G-Technology drive, or a form of removable storage media.
G|SPEED Q
About Your G-SPEED Q
- Introduction ...... p.7
• What's in the Box ...... p.8 - System Requirements ...... p.8
• Overview of the Drive ...... p.9
Introduction
Thank you for purchasing the G-SPEED® Q from G-Technology. G-SPEED Q is a high-speed, low cost storage solution that was designed to safeguard digital photos, audio and video libraries and documents.
This quiet, compact four-bay unit delivers solid, affordable RAID storage for both Mac users and creative professionals doing high capacity tasks like HD video and photo editing. G-SPEED Q offers outstanding performance, high storage capacity and optional fail-safe operation at a low cost per gigabyte. Unlike single drive systems, if a hard drive failure occurs, your data is still safe and accessible. G-SPEED Q also features HGST Enterprise class hard drives for the best in performance and reliability.
With its built-in RAID controller, the G-SPEED Q is not tied to a single workstation and can be easily transported for use in the edit bay or on the road. The unit contains an internal RAID controller and can be configured in RAID 0 (Performance) or RAID 5 (Protected) mode.

natural_image
Desktop setup with a computer monitor displaying a colorful starry sky, accompanied by a tower, keyboard, mouse, and lamp (no visible text or symbols)What's in the Box
The following items are included in the box:
• G-SPEED Q Storage Unit with 4 Removable Disk Modules
- USB 3.0 cable
- eSATA cable
- FireWire cable
- Drive module keys
- Quik start guide
If any items are missing, please contact G-Technology at support@g-technology.com
natural_image
Exterior view of a silver GOSM server tower with multiple drive bays (no visible text or labels)System Requirements
G-SPEED Q supports the following Operating Systems. The drive is set up at the factory for use with Mac OS X systems, and formatted as 'HFS+ with Journaling'.
• Mac OS 10.6+
- Windows® 8,7 Vista® and XP 64 bit (via reformat)
NOTE: G-SPEED Q is NOT compatible with Windows XP and older 32-bit operating systems. These OS's are limited to a maximum volume size of 2.2TB.
Overview of the Drive
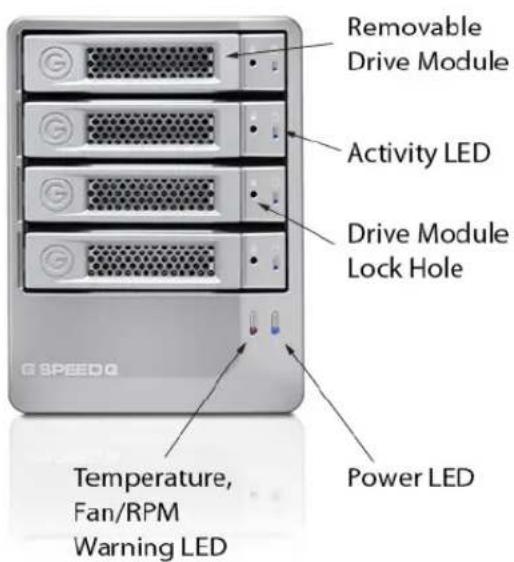
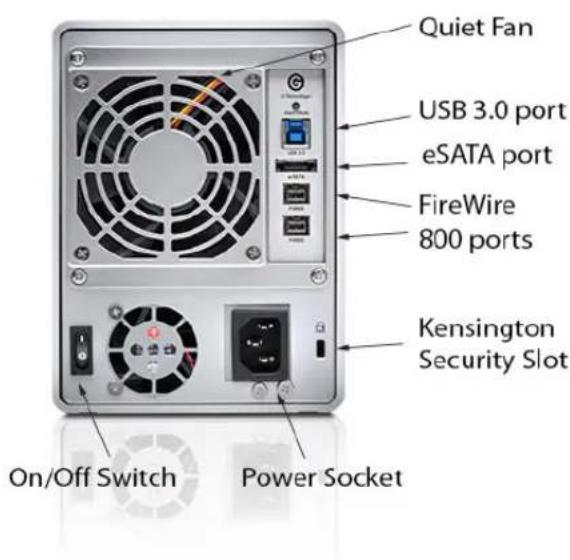
This diagram shows the helpful features of your G-SPEED Q.
The compact and quiet G-SPEED Q features four hot-swappable HGST 7200 RPM Enterprise class SATA hard drives. It has a uniquely designed all aluminum enclosure with a heavy duty power supply and a quiet cooling fan to ensure long life and reliable operation.
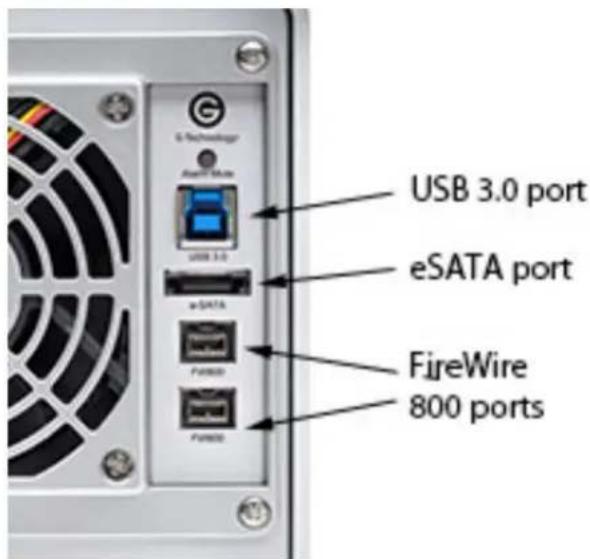
G-SPEED Q's quad interface features a high speed USB 3.0, 3Gbit eSATA and FireWire 800. This allows for universal connectivity and industry leading performance. All cables are included.
IMPORTANT: G-SPEED Q has been set up at the factory in RAID 5 (Protected) mode. To change to RAID 0 (Performance) operation, read the section Configure the RAID Mode.
G|SPEED Q
Using Your Drive
· Easy Installation for Mac ...... p.11
. Optimize Performance ...... p.11
• Disconnect the Drive ...... p.12
- Warning LED Alarms ...... p.12
- Windows Use ...... p.13
Easy Installation for Mac
G-SPEED Q attaches to your computer via a USB 3.0, high speed eSATA, or one of two FireWire 800 ports.
Choose the connection appropriate for your system and connect the drive with the matching supplied cable.
Connect the power cord to the unit and plug the other end into a surge protector or wall outlet. Turn on the power switch. After about 45 seconds, the drive will automatically mount on the desktop if you are running Mac OS X.
Optimize Performance
G-SPEED Q can be connected to any Mac or Windows machine equipped with USB, eSATA or FireWire port. For best performance, G-SPEED Q should be connected via USB 3.0 or eSATA.
Disconnect the Drive
A great feature of G-SPEED Q is its ability to connect and disconnect while your computer is running. To prevent failures and/or data loss, it is important to follow the steps below when disconnecting or 'unmounting' the drive from your computer.
- Before powering down and disconnecting the drive, unmount the system by simply dragging the G-SPEED Q icon to the trash located in the dock.
Keyboard shortcut: Select the drive icon and hit Command+E.
- It is safe to remove the drive from your system and power it down when the drive icon is no longer present on your desktop.
Warning LED Alarms
G-SPEED Q is equipped with visual alarms to alert you to any possible malfunction. There is a red LED on the bottom right of the unit and amber LEDs on each drive module. These LEDs will flash for about 45 seconds when the unit is first powered on.
- If the red warning light is lit, there is a failure of one of the internal components. Stop using G-SPEED Q and contact our Technical Support.
- If the amber warning light is lit, there is a drive failure for that particular module. You will need to replace a drive module. Read how in Replace a Failed Drive Module.
NOTE: Although there is a switch for the Audible Alarm on the rear of the unit,
it is not functional. G-SPEED Q only supports visual alarms.

Windows Use
G-SPEED Q is set up at the factory for use with Mac OS X systems. A simple initialization will prepare your drive for use with Windows Vista and Windows 7 systems.
G-SPEED Q is not supported by Windows XP or other 32-bit operating systems. These OS's are limited to a maximum volume size to 2.2TB.
For helpful information on configuring and using your drive with Windows, please visit www.g-technology.com/windows
G|SPEED Q
Using RAID Modes
- Supported RAID Modes ...... p.15
· The Configurator Utility ...... p.16 - Configure the RAID Mode ...... p.16
Supported RAID Modes
G-SPEED Q is configured in RAID 5 (Protected) mode at the factory. The drive also supports RAID 0 (Performance) configuration. The following table explains the advantages and disadvantages for each RAID level.
If you need to change the RAID level of G-SPEED Q, then follow the steps in Configure the RAID Mode.
| RAID Level | Description | Advantage | Disadvantage | Ideal For |
| 0 | Disk striping | Highest read/write performance. Has a useable storage capacity of 100% total capacity | No fault tolerance. The failure of one drive in the array will result in complete data loss | High storage capacity and best performance |
| 5 | Disk striping with distributed parity | High read/write performance. Gives data protection in case of a drive failure | Useable storage capacity equals total capacity of all drives in the array minus one drive | Data protection |
RAID 5 (Protected)
G-SPEED Q ships in RAID 5 mode. RAID 5 is great for protection and security of data, however, its storage capacity is reduced. This makes it ideal for sensitive data rather than large amounts. In RAID 5, your G-SPEED Q will be at 75% of its total capacity.
RAID 0 (Performance)
RAID 0 offers better performance mode and 100% storage capacity.
The Configurator Utility
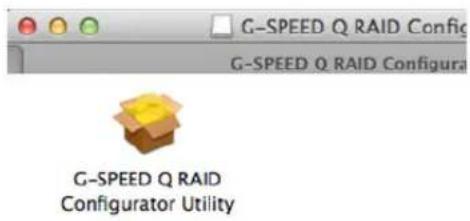
To change the RAID level for your G-SPEED Q, you will need a software utility from G-Technology called Configurator. NOTE: YOU MUST CONNECT THE DRIVE VIA THE USB PORT TO USE CONFIGURATOR.
The utility is available to download from the G-Technology website at www.g-technology.com/support
Once you have downloaded the Configurator, you can launch it directly from the mounted Disk Image.
Configure the RAID Mode
It is easy to configure the RAID mode with the following steps. NOTE: Changing the RAID level will erase all data on the drive. Be sure all the material you want to save is backed up to a separate disk.
- Connect G-SPEED Q via its USB port and launch the Configurator utility. A window will appear asking you to disconnect all other external hard disks from your computer. This is important to ensure that Configurator does not affect other FireWire or USB devices on your system.

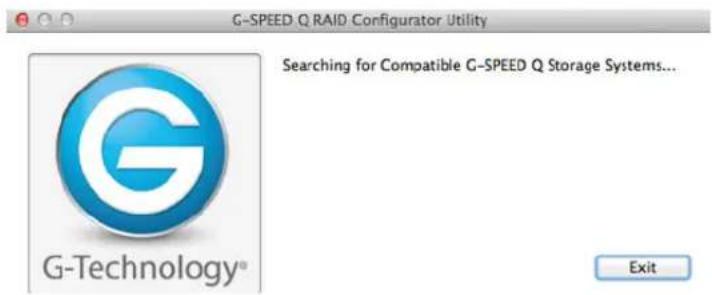
- Click on the Continue button. A window will appear telling you that Configurator is searching for G-SPEED Q. The search may take a few minutes.
- Once the utility finds your G-SPEED Q, the following window will appear. Select the RAID 5 (Protected) or RAID 0 (Performance) radio button. Then click the Configure button to continue.

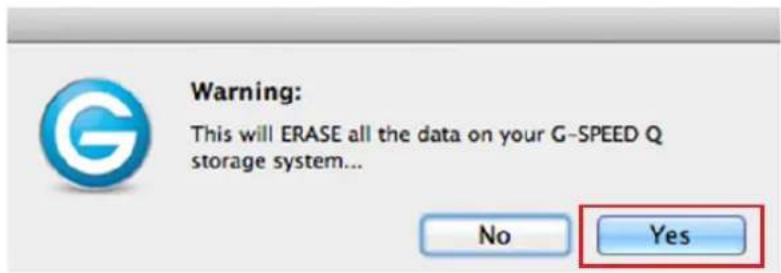
- Two Warning windows will appear, letting you know that the following step will erase all of your data. Click the OK/Yes buttons to continue.
- A window will appear telling you the configuration is in progress.
NOTE: After the configuration is complete, a system dialog box will warn that a device was not removed properly. Don't worry about this message; just click OK.

Device Removal
The device you removed was not properly put away. Data might have been lost or damaged. Before you unplug your device, you must first select its icon in the Finder and choose Eject from the File menu.

- Configurator will indicate that the RAID configuration is complete. Click the Exit button to close the utility.
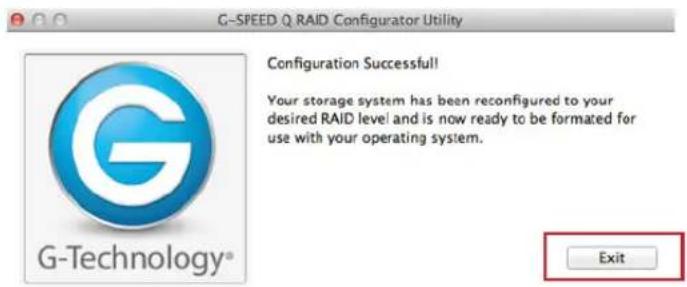
- Changing the RAID mode of the G-SPEED Q will require you to re-initialize the disk with the Disk Utility application. A Disk Insertion dialog box should appear. Click the Initialize button to launch Disk Utility.
If the Disk Insertion dialog does not appear, go to Application > Utilities and open the Disk Utility program.

Once Disk Utility is open, you are ready to initialize and partition G-SPEED Q for use with Mac. Read those steps in Initialize Drive for Mac.
G|SPEED Q
Maintenance for your Drive
· Initialize Drive for Mac ...... p.21
- Restore the Drive Icon ...... p.24
• Reformat with Partitions ...... p.26
- Replace a Failed Drive Module ...... p.30
Initialize Drive for Mac
G-SPEED Q was factory-formatted for use or 'initialized' for Mac OS X. You can reinitialize if you'd like to quickly erase the contents of the drive, or if you reconfigure the RAID mode. Here are the steps.
- First, open the Disk Utility program. This application is located on your hard drive under Applications > Utilities > Disk Utility. The window below will appear. Your G-SPEED Q will be displayed in the left-hand column.
- Select the G-SPEED Q by clicking its drive icon in the left-side column. Information about the drive will be displayed at the bottom of the window.
- Select the Erase tab to view the formatting options. By default, the Format pop-up menu is set to the Mac OS Extended (Journaled) option.

-
Choose the Format option that you prefer.
-
Mac OS Extended (Journaled): Use this format if you intend to use the drive for Time Machine or to create a separate bootable installation of OS X.
• Mac OS Extended: Use this format for best performance and media storage. To select, click the Format pop-up and its option to Mac OS Extended.

- Click the Erase button in the lower right corner of the window. A dialog box will appear asking if you want to erase the G-SPEED Q partition.

WARNING: THIS NEXT STEP WILL ERASE ALL DATA ON YOUR DRIVE.
- Click on the Erase button to continue. A progress bar in the lower right corner of the window will show the progress of the disk's reformatting.
Erasing Volume

-
After the drive is reinitialized, you should automatically see the Time Machine dialog box.
-
Click the Use as Backup Disk button if you want to use the drive with Time Machine.
- Click the Don't Use or Decide Later button if you do not want to use Time Machine at this point.
Do you want to use "G-SPEED Q" to back up with Time Machine?
Time Machine keeps an up-to-date copy of everything on your Mac. It not only keeps a spare copy of every file, it remembers how your system looked, so you can revisit your Mac as it appeared in the past.

Decide Later
Don't Use
Use as Backup Disk
- Quit the Disk Utility program. After reinitializing the drive, the custom icon for G-SPEED Q has been erased. You can optionally restore this icon with the steps on the next page.
Restore the Drive Icon
If the G-SPEED Q drive icon was erased during the reinitializing process (see previous section), you can restore the icon with the following easy steps.
This process is not required for the operation of G-SPEED Q. However, it will make your drive's appearance on the computer desktop look nicer and more accurate.
- To get the G-Technology icon package, go to www.g-technology.com/support and navigate to your product. There will be a link to download the icons.
- Once downloaded, double-click the Zip file to open. Next, double-click the DMG file to open the G-Technology Icons package.
- Click to select the drive icon for G-SPEED Q in the package window. Press Command+C to copy the icon. (below)

- Select the G-SPEED Q icon on your desktop and press Command+I. This opens its Get Info window. (below left)
- Select the default icon in the Get Info window. (below left)
- Press Command+V to paste the G-SPEED Q custom icon into the Get Info window. (below right)

The icon for your G-SPEED Q has been restored and you can close the Get Info window. Your drive is now fully ready for use!
Reformat with Partitions
'Partitioning' a hard drive is the process of dividing a hard drive into separate, discrete sections called 'volumes'. Each volume works like a separate disk. You can create up to 16 different partitions on a hard drive in OS X and each partition can be a different size and format.
With hard drives getting bigger, it is useful to partition your hard drive so sections of its space can be used for different purposes. For instance, segment user data from backup data, set up a multi-boot environment with different Operating Systems or create a dedicated capture scratch disk for programs like Final Cut Pro.
The following steps will guide you through this simple process of partitioning your drive.
- First, open the Disk Utility program. This application is located on your hard drive under Applications/Utilities/Disk Utility. The window below will appear. Your G-Technology drive will be displayed in the left-hand column.

- Select the FireWire or USB icon – not the G-Technology drive icon – by clicking it in the left-side column.
- Click on the Partition button in the main window.

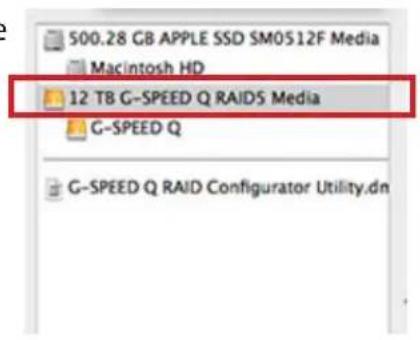
- Select the number of partitions you would like from the Volume Scheme menu. Below, we have selected '2 Partitions' to create two partitions.
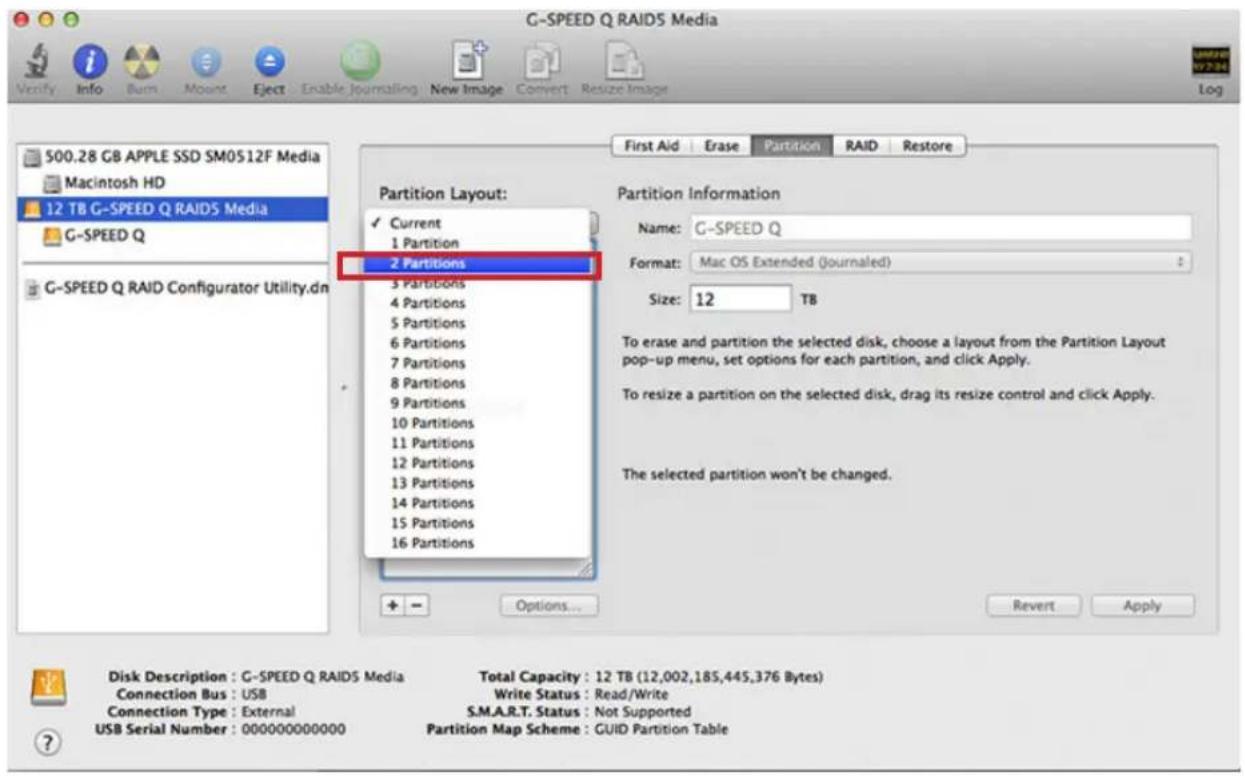
- Click on the first partition in the Volume Scheme area. Your partition will be highlighted by a blue bounding box.
• In the Name field, type a name for the partition.
- From the Format menu, choose your desired disk format. If you will use your drive primarily on Mac OSX, it is recommended to use Mac OS Extended or Mac OS Extended (Journaled). For info about formats, go here.
- In the Size field, type in a size for the partition. Alternately, you can drag the bar in between each partition to quickly change the size.
-
Repeat this process for each partition you have created.
-
Click the Apply button in the lower right corner of the window. A dialog box will appear asking if you want to erase the G-Technology drive partition.
WARNING: THIS NEXT STEP WILL ERASE ALL DATA ON YOUR DRIVE.

- Click on the Partition button to continue. A progress bar in the lower right corner of the window will show you the progress of the disk's reformatting.

-
When partitioning is complete, the multiple partitions will be displayed in the left-hand panel of Disk Utility.
-
Quit the Disk Utility program. After reinitializing the drive, the custom icon for the G-Technology drive has been erased. You can optionally restore this icon to each partition with the steps on this page.
-
The multiple partitions of the G-Technology drive will be displayed on the desktop. Your drive is now setup with two or more partitions and ready for use.


Replace a Failed Drive Module
The internal components of G-SPEED Q continually monitor the health of each of its disk drives. In the event of a drive failure, a visual alarm will appear. Read more in Warning LED Alarms.
RAID 5: If G-SPEED Q was configured in a protected RAID 5 mode, a drive failure will not result in data loss. However, the array is now in an unprotected state and the failed drive should be replaced as soon as possible to avoid data loss.
RAID 0: If G-SPEED Q is configured as RAID 0, there will be data loss. Read more in Supported RAID Modes.
Follow the steps below to identify and replace a failed drive.
-
With the unit powered up, locate the malfunctioning drive by visually inspecting the drive modules. If an amber LED is lit for a drive, that drive has failed.
-
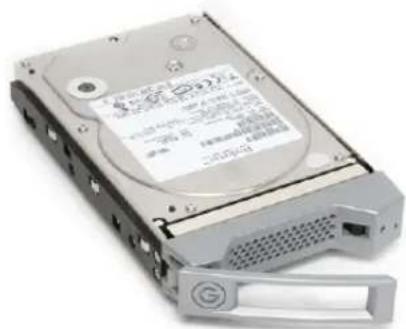
Remove the failed drive by inserting the provided key into the lock hole, and gently sliding the drive module out of the enclosure.
Be careful about which drive you pull out. REMOVING THE WRONG DRIVE WILL RESULT IN THE LOSS OF THE ARRAY AND ALL OF ITS CONTENT.
- Replace the failed drive with a new disk module. Secure it in place by pushing in the drive and latching the handle.
NOTE: During the 3 year warranty period, contact G-Technology Technical Support for the replacement of a defective drive module.

natural_image
Exterior view of a hard disk drive with visible internal components and a handle (no readable text or symbols)- If G-SPEED Q was setup in RAID 5 mode, the unit will begin rebuilding data on the drive. During this process, all drive LEDs will indicate data access. The rebuild time is approximately 2 hours per TB.
- Once the rebuild is complete, G-SPEED Q is back to normal and protecting your valuable data once again.
Helpful tips
You can continue using G-SPEED Q even while the drive volume is being rebuilt. However, it will run at a slower data rate.
It is good practice to keep at least one spare drive module on hand in case of a disk failure. This way, you can rebuild your array in hours rather than wait days for a new one to ship.
G|SPEED Q
Support & Warranty
- Technical Support ...... p.33
• Limited Warranty ...... p.34
. Copyright p.36
Technical Support
Thank you for purchasing G-SPEED Q. If you have any comments or questions about this manual or the product, please let us know!
G-Technology appreciates and values its customers, striving to give you the finest service and support. If you encounter any difficulties while installing or using G-SPEED Q, please contact G-Technology Technical Support at g-technology.com/support
Helpful information for support
When contacting Technical Support, it's best to be in front of your computer and have the following information available:
- Your G-SPEED Q serial number (on bottom of unit)
- Operating System and version
- Computer brand and model
- List of other devices attached to your computer
Limited Warranty
HGST, a Western Digital Company ("HGST")
Including G-Technology for External Hard Disk Drives
What does this limited warranty cover?
This Limited Warranty applies to new HGST products purchased from an authorized HGST dealer by the original purchaser for normal use and not for resale. HGST warrants that a covered product is free from defects in materials and workmanship, with the exceptions stated below.
How long does limited warranty coverage last?
This limited warranty lasts for 1 year, 2 years, 3 years or 5 years, or a fixed period from date of purchase, depending on when and where it was originally purchased. To determine the warranty specifically for your product, visit www.g-technology.com. A valid proof of purchase may be required to prove eligibility. If you do not have a valid proof of purchase, the limited warranty period will be measured from the date of sale from HGST to the authorized distributor.
What does this limited warranty not cover?
The limited warranty does not cover damage resulting from commercial use, misuse, accident, modification or alteration to hardware or software, tampering, unsuitable physical or operating environment beyond product specifications, improper maintenance, or failure caused by a product for which HGST is not responsible.
There is no warranty of uninterrupted or error-free operation. There is no warranty for loss of data—you must regularly back up the data stored on your product to a separate storage product. There is no warranty for product with removed or altered identification labels.
HGST DOES NOT PROVIDE ANY OTHER WARRANTIES OF ANY KIND, INCLUDING, BUT NOT LIMITED TO, THE IMPLIED WARRANTIES OR CONDITIONS OF MERCHANTABILITY AND FITNESS FOR A PARTICULAR PURPOSE. SOME JURISDICTIONS DO NOT ALLOW THE LIMITATION OF IMPLIED WARRANTIES, SO THIS LIMITATION MAY NOT APPLY TO YOU. HGST is not responsible for returning to you product which is not covered by this limited warranty.
What must you do?
If you are having trouble with a product, before seeking limited warranty service, first follow the troubleshooting procedures that HGST or your reseller provides.
To obtain limited warranty service, you must first obtain a Return Materials Authorization (RMA) and ship-to address by contacting G-Technology at http://www.g-technology.com/support. Please follow the instructions found on the website. You must return the covered hard disk drive using approved packaging to our logistics center. You must pay any associated transportation charges, duties and insurance in shipping the drive to our logistics center. You should remove all personal information from the product prior to its return.
What will HGST do?
HGST will replace the drive with a functionally equivalent replacement product, transportation prepaid. HGST may replace your product with a product that was previously used, repaired and tested to meet HGST specifications. You receive tile to the replaced product at delivery to carrier at HGST shipping point. You are responsible for importation of the replaced product, if applicable. HGST will not return the original drive to consumers; therefore, the consumer is responsible for moving data to another media before returning. Data Recovery is not covered under this warranty and is not part of the warranty returns process. HGST warrants that the replaced products are covered for the remainder of the original product warranty or 90 days, whichever is greater.
How is our liability limited?
HGST AND ITS AFFILIATES, SUPPLIERS, DISTRIBUTORS, AND RESELLERS ARE NOT LIABLE FOR ANY OF THE FOLLOWING: 1) THIRD-PARTY CLAIMS AGAINST YOU FOR DAMAGES (OTHER THAN BODILY INJURY INCLUDING DEATH AND TANGIBLE PERSONAL PROPERTY; 2) LOSS OF, OR DAMAGE TO, YOUR DATA; OR 3) SPECIAL, INCIDENTAL, OR INDIRECT DAMAGES OR FOR ANY ECONOMIC CONSEQUENTIAL DAMAGES (INCLUDING LOST PROFITS OR SAVINGS), EVEN IF INFORMED OF THE POSSIBILITY. SOME JURISDICATIONS DO NOT ALLOW LIMITATION OF LIABILITY, INCIDENTAL DAMAGES, OR CONSEQUENTIAL DAMAGES, SO THE ABOVE LIMITATIONS MAY NOT APPLY TO YOU.
How do local laws apply?
THIS LIMITED WARRANTY GIVES YOU SPECIFIC LEGAL RIGHTS, AND YOU MAY ALSO HAVE OTHER RIGHTS WHICH VARY FROM JURISDICTION TO JURISDICTION.
CAPACITY DEFINITION AND DISCLAIMER
For G-Technology products 1TB or greater: "One gigabyte (GB) is equal to one billion bytes and one terabyte (TB) equals 1,000 GB (one trillion bytes). Accessible capacity will vary from the stated capacity due to formatting and partitioning of the hard drive, the computer's operating system, and other factors"
For G-Technology products less than 1TB: "One gigabyte (GB) is equal to one billion bytes when referring to hard drive capacity. Accessible capacity will vary depending on the operating environment and formatting."
Copyright
One gigabyte (GB) is equal to one billion bytes when referring to hard drive capacity. Accessible capacity will vary depending on the operating environment and formatting.
G-SPEED and G-Technology are registered trademarks of G-Technology and its affiliates in the U.S. and other countries. Apple, Mac, FireWire, MacBook Pro, Time Machine and the Mac logo are trademarks of Apple, Inc. Microsoft, Windows, Windows Vista and Windows XP are trademarks or registered trademarks of Microsoft Corporation in the US and/or other countries. Other trademarks are the property of their respective owners.
©2015 G-Technology, a Western Digital Corporation brand. All rights reserved. R2 10/15


- G | SPEED Q
- Welcome to G-SPEED Q
- Table of Contents
- Safety & General Use
- About Your G-SPEED Q
- Using Your Drive
- Using RAID Modes
- Maintenance for your Drive
- Support & Warranty
- G|SPEED Q
- Safety Precautions
- Backup Your Data
- Make Two Backups
- Introduction
- What's in the Box
- System Requirements
- Overview of the Drive
- Easy Installation for Mac
- Optimize Performance
- Disconnect the Drive
- Warning LED Alarms
- Windows Use
- Supported RAID Modes
- RAID 5 (Protected)
- RAID 0 (Performance)
- The Configurator Utility
- Configure the RAID Mode
- Device Removal
- Initialize Drive for Mac
- WARNING: THIS NEXT STEP WILL ERASE ALL DATA ON YOUR DRIVE.
- Restore the Drive Icon
- Reformat with Partitions
- Replace a Failed Drive Module
- Helpful tips
- Technical Support
- Helpful information for support
- Limited Warranty
- What does this limited warranty cover?
- How long does limited warranty coverage last?
- What does this limited warranty not cover?
- What must you do?
- What will HGST do?
- How is our liability limited?
- How do local laws apply?
- CAPACITY DEFINITION AND DISCLAIMER
- Copyright
Brand : G-TECHNOLOGY
Model : Speed Q
Category : Disk array