Ventus - Mouse THERMALTAKE - Free user manual and instructions
Find the device manual for free Ventus THERMALTAKE in PDF.


| Type de produit | Souris gaming filaire |
| Marque | Thermaltake |
| Modèle | Ventus |
| Type de connexion | USB filaire |
| Nombre de boutons | 6 boutons programmables |
| Capteur | Optique avec résolution ajustable jusqu'à 5700 DPI |
| Plage de DPI | De 100 à 5700 DPI (par pas de 100) |
| Fréquence de rafraîchissement (Polling Rate) | 125, 250, 500 ou 1000 Hz |
| Contrôle de levée (Lift-off) | Ajustable via logiciel |
| Éclairage | RVB personnalisable (molette et logo Tt Dragon) |
| Mémoire intégrée | 5 profils stockables |
| Logiciel de configuration | GUI VENTUS (téléchargeable) |
| Macros | Enregistrement et assignation de macros |
| Mise à jour firmware | Via logiciel avec détection automatique |
| Dimensions (approx.) | 125 x 65 x 40 mm |
| Poids (approx.) | 100 g |
| Alimentation | Bus USB (5V, 100 mA) |
| Longueur de câble | 1.8 m tressé |
| Entretien et nettoyage | Chiffon doux légèrement humide ; éviter produits abrasifs |
| Politique de garantie | Garantie constructeur 2 ans |
Frequently Asked Questions - Ventus THERMALTAKE
User questions about Ventus THERMALTAKE
0 question about this device. Answer the ones you know or ask your own.
Ask a new question about this device
Download the instructions for your Mouse in PDF format for free! Find your manual Ventus - THERMALTAKE and take your electronic device back in hand. On this page are published all the documents necessary for the use of your device. Ventus by THERMALTAKE.
USER MANUAL Ventus THERMALTAKE
Tt ^® esports By Thermaltake
VENTUS GUI SOFTWARE GUIDE
A CONTENTS
PAGE 01 Main Interface
- Main 01
- Profiles 02
- Link to Program 03
● Normal Mode / Battle Mode 04
● Key Assignment 05
PAGE 17 Macro Setting
- Macro Setting Interface 17
- Macro Manager 18
- Macro Record Setting 19
- Macro Record Timeline 20
- Insert Function 22
PAGE 23 Performance Setting
- Performance Interface 23
- DPI 24
- Polling Rate 25
- Lift-off Control 26
PAGE 27 Light Setting
● Light Option Interface 27
PAGE 28 Firmware Update
● How to Update Firmware 28
I CONTENT ONE Main Interface
GUI Software User Guide
Reset / Register / Guide / Close
Reset : Reset all setting
Register : Register as Tt eSPORTS's follower and receive updates from Tt eSPORTS via E-mail.
Guide : Configuration software manual
Close : Close Tt eSPORTS VENTUS GUI Software
Page:04
Switch Normal/Battle Mode
The light frame indicates the Mode (Normal/Battle) you have selected
Page:05
Key Assignment
Assign function to each button
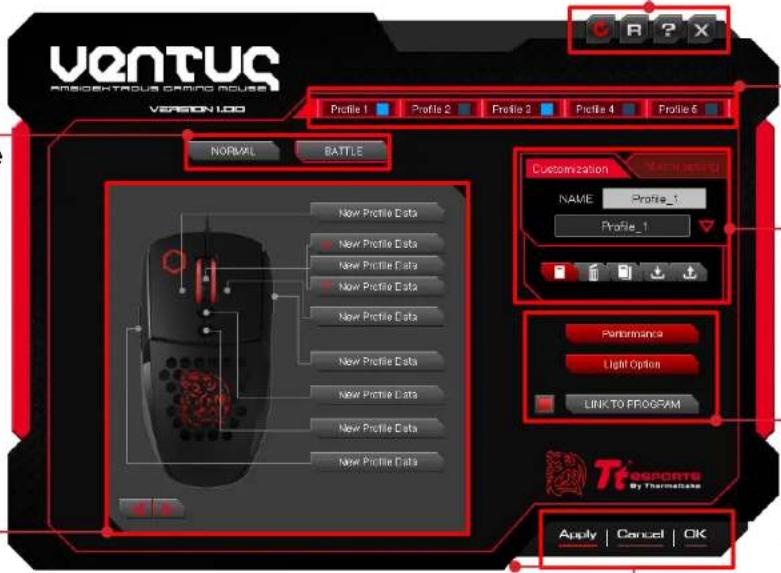
Apply / Cancel / OK
Apply: Click Apply after completing profile setting and it will import setting into VENTUS
Cancel: Click Cancel if you wish to cancel the setting
OK: Click OK after setting has been completed
Profile
VENTUS has 5 profiles setting. Now you can turn on or turn off profile on your command.
Profile / Macro Manager
Profile Manager: Page : 02
Naming / Changing Profile and add / delete / duplicate / import / export profile.
Macro Manager: Page : 17
Performance / Light / Link to Program
DPI / Polling Rate / Lift-off
Link to Program: Page : 03
Set a program and VENTUS will turn on Profile automatically if you launch the particular program
Tt eSPORTS 2015 New GUI
Tt eSPORTS unveils the new GUI Software in 2014. Many feedbacks from gamers received and we noted all suggestions and experiences from gamers. In 2015, Tt eSPORTS launches an enhanced version of GUI. The software has been improved, user-friendly for everyone and can disable profile if you don't need it. Turn on / off Profile is one of Tt eSPORTS's new GUI feature and this allow gamers to switch profile quickly with just one click!
We believe Less is More.

Switch to Profile
Choose the Profile you wanted to change to
Turn On or Turn Off Profile
Click the BLUE BOX to enable/disable:
Turn On - Light Blue Box
Turn Off - Grey Blue Box
![Customization Macro setting NAME Profile_1 Profile_1 Customization Macro setting NAME Profile_1 Profile_1 Naming Profile Click the field [NAME Profile_1] to name the profile Manage Profile Click the Triangle icon to see all profiles created Macro Setting Click Macro Setting for Macro Advanced Settings Create / Delete / Duplicate / Import / Export Profile](/content/2026/05/921224/images/09648748e6efc225ca9504966a33af518f3ff7d57ec0e8a9f4940cb23772e25f.jpg)
Sync Profile with Game
Do you ever feel frustrated or forget to switch profile manually while you were in game?
Now, with Tt eSPORTS 2015 new GUI, profile can be automatically switched once you launches a game or a program.
No more frustration and no more fail to remember. Auto Sync Profile with Game now!

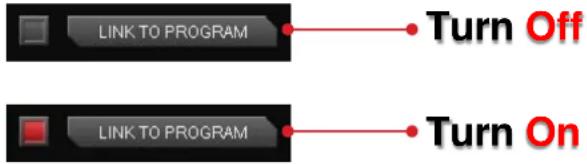
LINK TO PROGRAM
Link to Program
Turn On or Turn
Turn ON - RED : Automatically turn ON with the pre-set program when it is enabled (A program has to be assigned beforehand)
Turn OFF - GREY : Will not turn ON with the pre-set program when it is disabled (A program has to be assigned beforehand)
Assign Program (Profile will enabled automatically once the program has been launched)
Click the [LINK TO PROGRAM] button and system will pop out a file browser for you to choose which program you want to assign.

Normal / Battle Mode | Main Interface
Challenger is the Game
Tl eSPORTS | VENTUS GUI Software User Guide

Light Effect into Game
Tt eSPORTS develop a fancy light effect. Just switch the mode and you can experience a different sensation in your place. When you are in Battle Mode, higher A.P.M (Action Per Minute) will have a higher frequency flashes, while in lower A.P.M, the flash frequency decreases. This make VENTUS a gaming weapon that will enhance your gaming experience!
NORMAL
BATTLE
Normal Mode
In Normal Mode
Scroll Wheel lights up.
Tt Dragon light with Pulse-break lighting effect.
Two lights can turn on or off independently.
Battle Mode
In Battle Mode light flash frequency depend on current A.P.M
Scroll Wheel with Pulse-break lighting effect.
Tt Dragon light with Pulse-break lighting effect.
Once mode switched to Battle Mode, reminder as below will pop up:
WARNING
When the mode is switched to battle detection, the illumination effects will change according to the clicking frequency.
YES

Key Assignment | Main Interface
Challenger is the Game
Tl eSPORTS | VENTUS GUI Software User Guide
Customization for each of VENTUS's button
Each VENTUS's button can be customized as your preferred, even the Scroll Wheel's function can be changed!
Customize it and make the VENTUS your very own ultimate weapon to conquer!
VENTUS Can Do More than You Expect!
Buttons Configuration
Click on each button to change its function (See right picture)
Click each button to assign functions.
Key Assignment
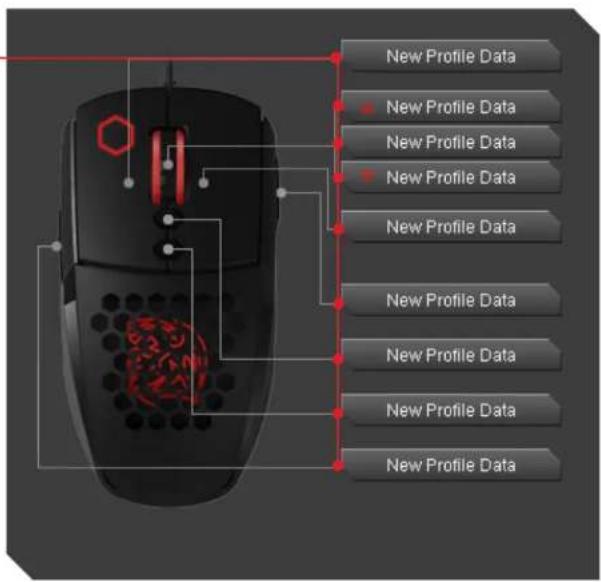
6 Key Functions to be Assigned!
Each of buttons of VENTUS can be assigned by six function (Default / Macro(T Key) / Single Key / Sensitivity / Launch Program / Disable).
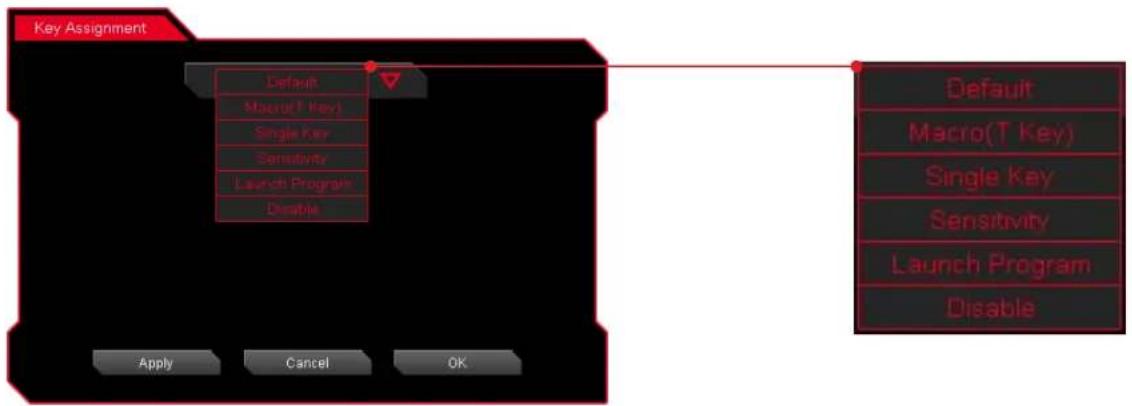
Default : All buttons function will be set as default setting. (i.g : Left button as the Click action)
Macro(T Key) : Assign macro that has been recorded from Macro Manager.
Single Key : Set be mouse click function or keyboard per key signal.
Sensitivity : Change DPI function there are 5 mode can be selected.
Launch Program : Launch the pre-set program directly
Disable : Disable button (No signal no function)
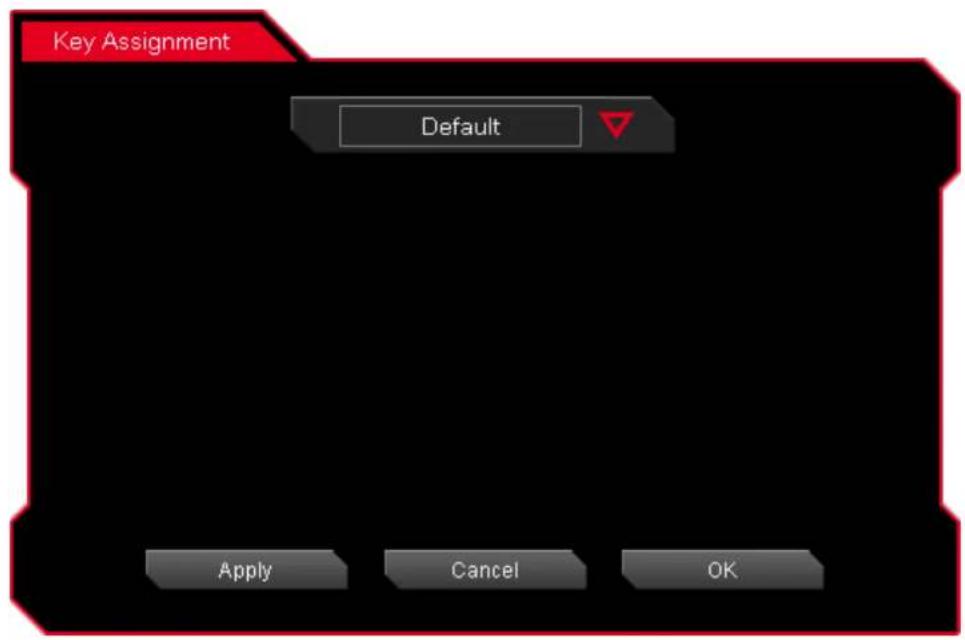
Default
VENTUS has its own pre-configured functions, which is the default. If you wanted to change back to the default setting, you can just choose Default and it will be changed back to the pre-configured functions.

Key Assignment | Main Interface
Challenger is the Game
TtcSPORTS | VENTUS GUI Software User Guide
08
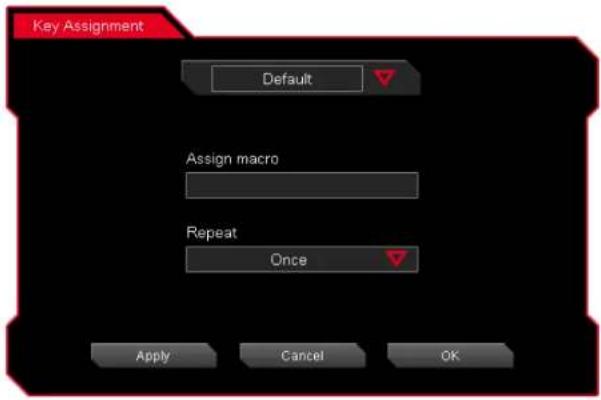
Macro (T Key)
T Key is the Macro key that you programmed.
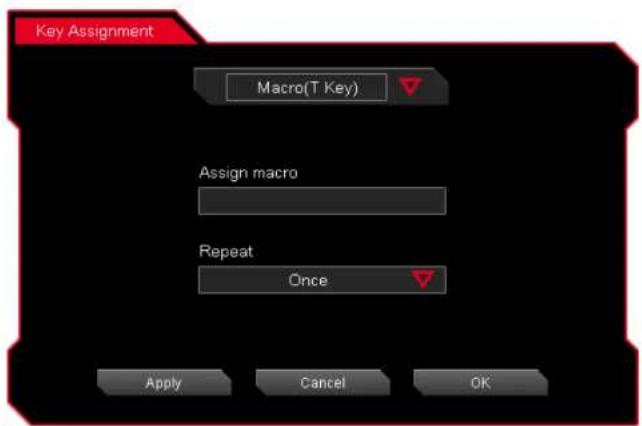
Assign macro
Select a programmed macro that already recorded from Macro Manager (Macro record detail, see Page 17)
Repeat
Customize the times that you want to have the macro repeats..
| Once |
| Multiple Times |
| When press & hold |
| Until press next time |
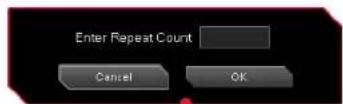
Once :
Multiple Times :
When press & hold :
Until press next time :
Macro will repeat once.
Macro will repeat depends on the repeat count set.
Macro will keep repeating while pressing and holding.
Macro will start repeating when you click and stop unless you click again

Key Assignment | Main Interface
Challenger is the Game
TtcSPORTS | VENTUS GUI Software User Guide
09
Single Key
Set only one key per button (function can be chose from mouse or keyboard function)
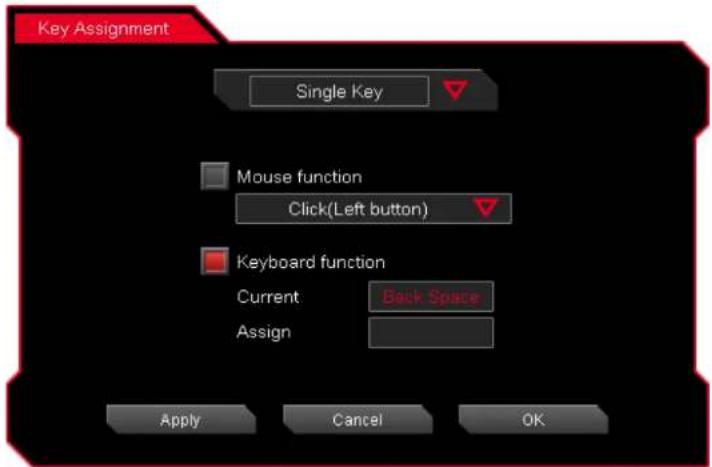
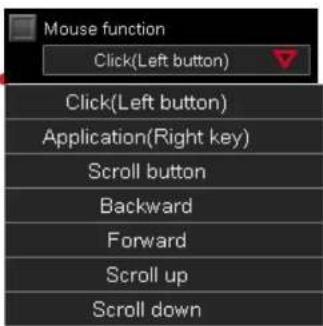
Mouse function
Mouse Function include left picture.
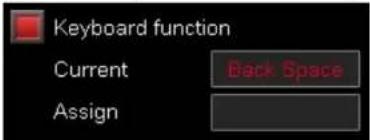
Keyboard function
You can type any keyboard signal into mouse button.
(i.g: If you set "Space" as one of the button, when you click on the button, it will act as "Space")

Key Assignment | Main Interface
Challenger is the Game
TtcSPORTS | VENTUS GUI Software User Guide
Sensitivity
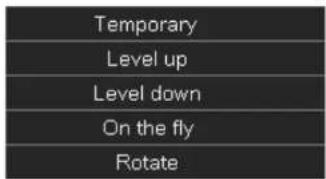
Adjust DPI sensitivity, there are 5 different modes to change DPI.
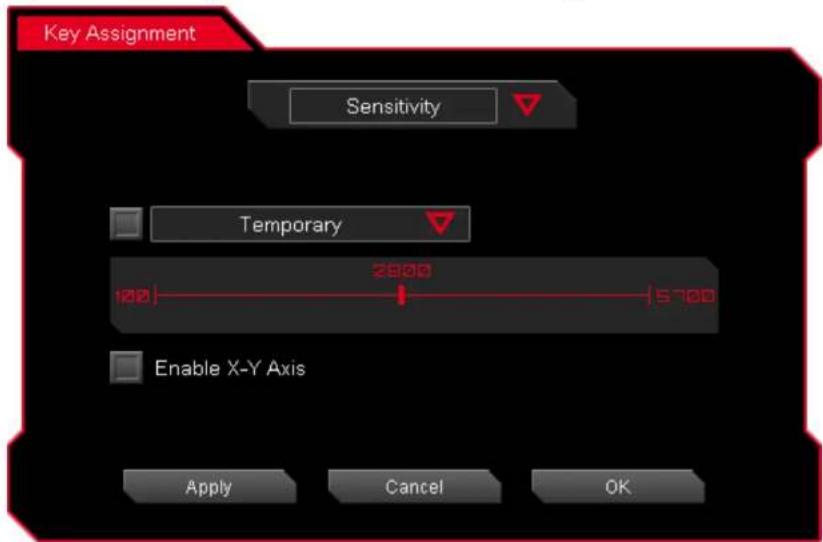
Five different Mode to change DPI as below

Key Assignment | Main Interface
Challenger is the Game
Tl eSPORTS | VENTUS GUI Software User Guide
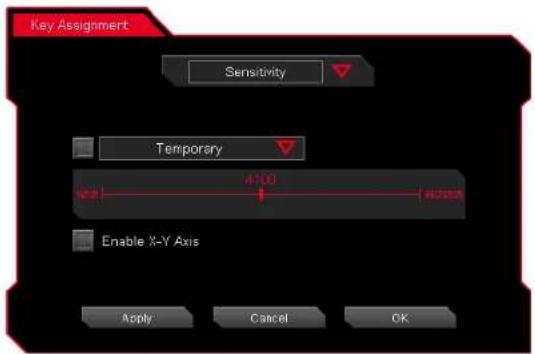
Sensitivity - Temporary Mode
Once DPI level has been set, pre-set DPI will start when you HOLD the button, pre-set DPI will stop and back to the original DPI once you RELEASE the button.
Temporary DPI
Drag the RED point on the line to adjust DPI.
![2900 [02] - 5700](/content/2026/05/921224/images/0011d17e9cc291e48a8e5edb6827fab9214c350139e682b30882477d42262d3f.jpg)
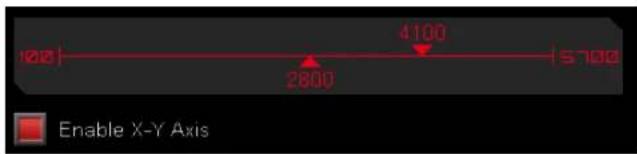
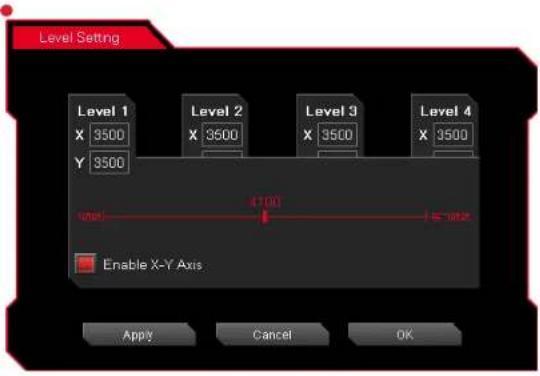
Enable X-Y Axis
Setting X (Horizontal movement) and Y (Vertical movement) to have different DPI.

Key Assignment | Main Interface
Challenger is the Game
Tl eSPORTS | VENTUS GUI Software User Guide
Sensitivity - Level Up / Level Down
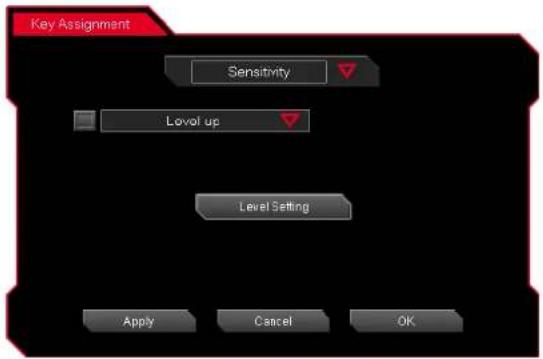
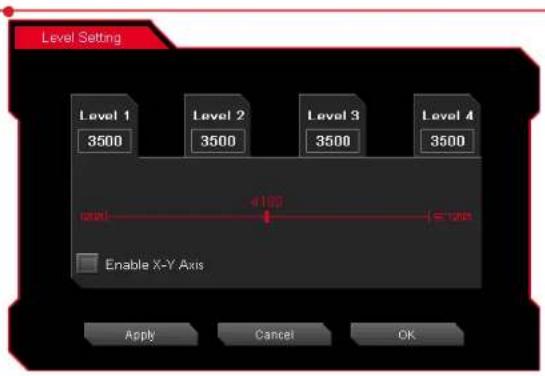
Setting Four Levels of DPI and change DPI by clicking the button.
Note: DPI level will not be cycling back to the first level when it reaches the last DPI
Level Up
Click the Level Setting button to set the DPI level
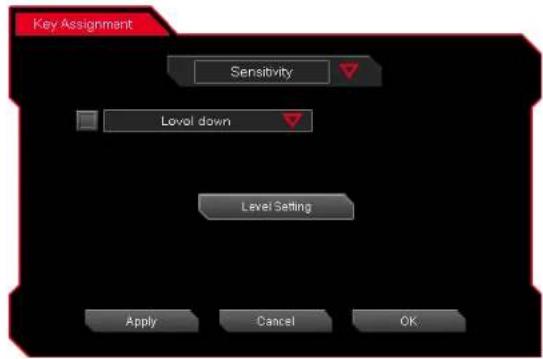
Level Down
Click the Level Setting button to set the DPI level
Level Setting
Click to manage DPI levels.
You can choose to enable the sensitivity for X-Y Axis too.

Key Assignment | Main Interface
Challenger is the Game
TtcSPORTS | VENTUS GUI Software User Guide
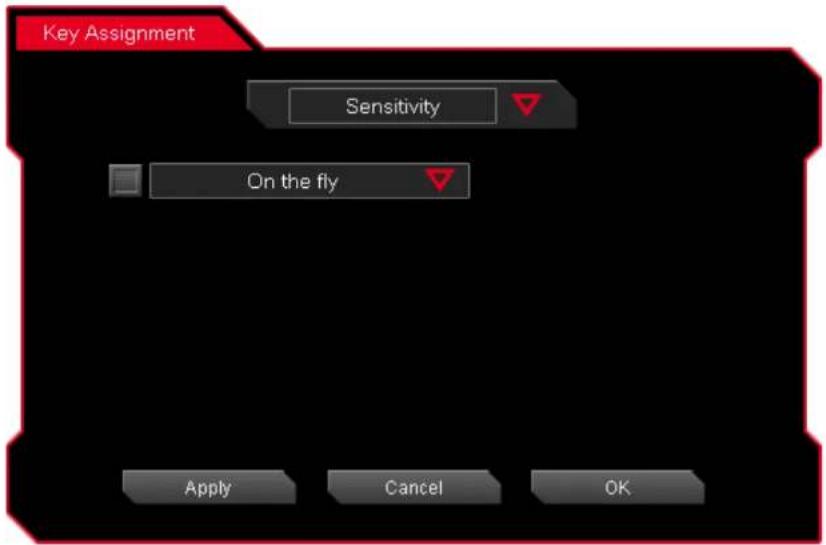
Sensitivity - On The Fly
Adjusting DPI level on the fly. You can set sensitivity by holding the assignment button and scroll up or down to adjust. So you don't need to go through GUI to change your DPI.

Key Assignment | Main Interface
Challenger is the Game
TtcSPORTS | VENTUS GUI Software User Guide
Sensitivity - Rotate
DPI level will cycle back to the first level when it reaches the highest DPI.
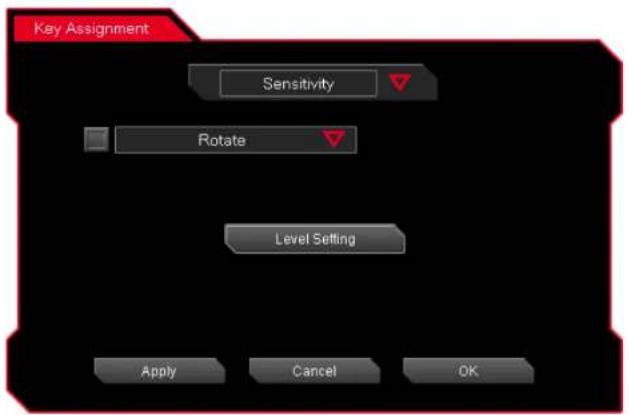
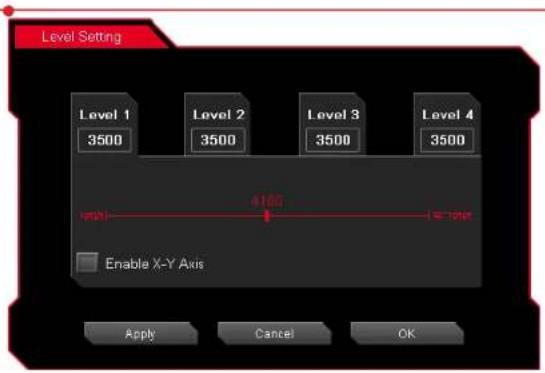
Level Setting
Click to manage DPI levels.
You can choose to enable the sensitivity for X-Y Axis too.
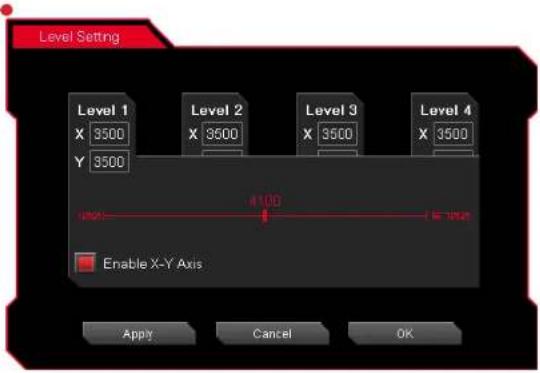
Launch Program
Pre-set a program and the program will show up whenever you click on the button that has been programmed.
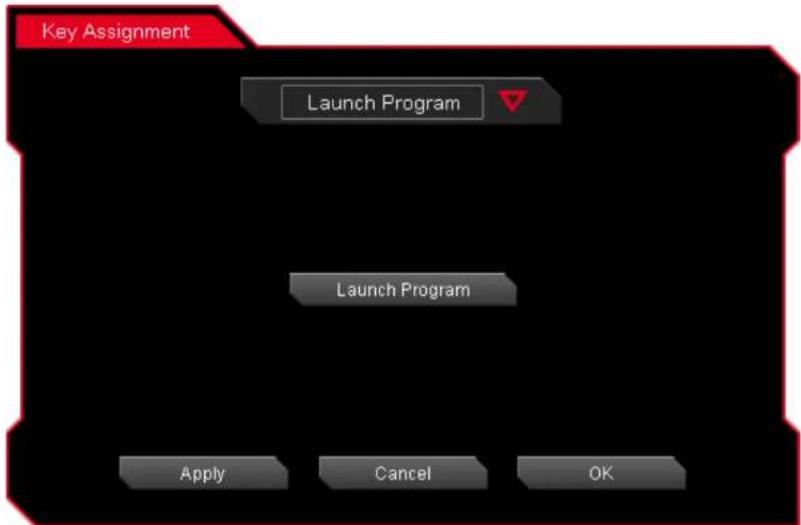
Launch Program button
Click the Launch Program button and system will pop out file manager for you to choose the program that you want to launch.

Key Assignment | Main Interface
Challenger is the Game
TtcSPORTS | VENTUS GUI Software User Guide
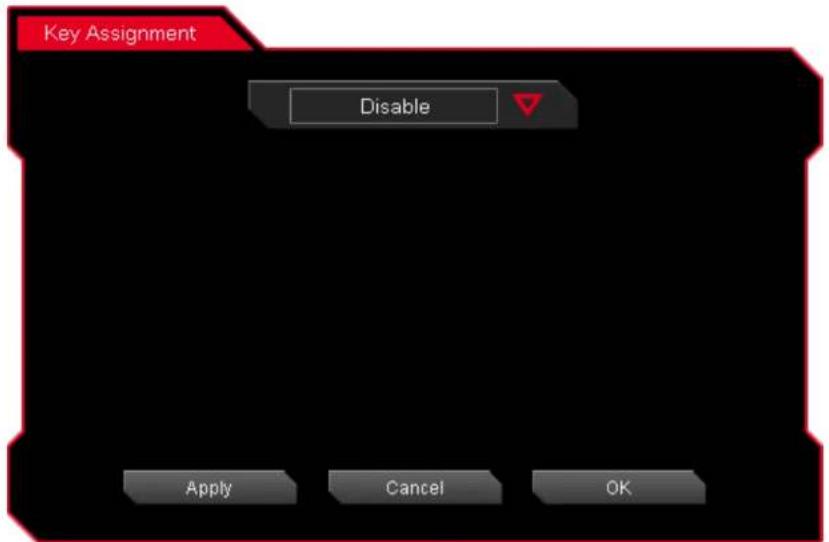
Disable
Choose "Disable" if you do not want the button have any function for particular buttons.
I CONTENT TWO Macro Setting
GUI Software User Guide

Macro setting Interface | Macro Setting
Challenger is the Game
Tl eSPORTS | VENTUS GUI Software User Guide

Macro Manager | Macro Setting
Challenger is the Game
Tt eSPORTS | VENTUS GUI Software User Guide
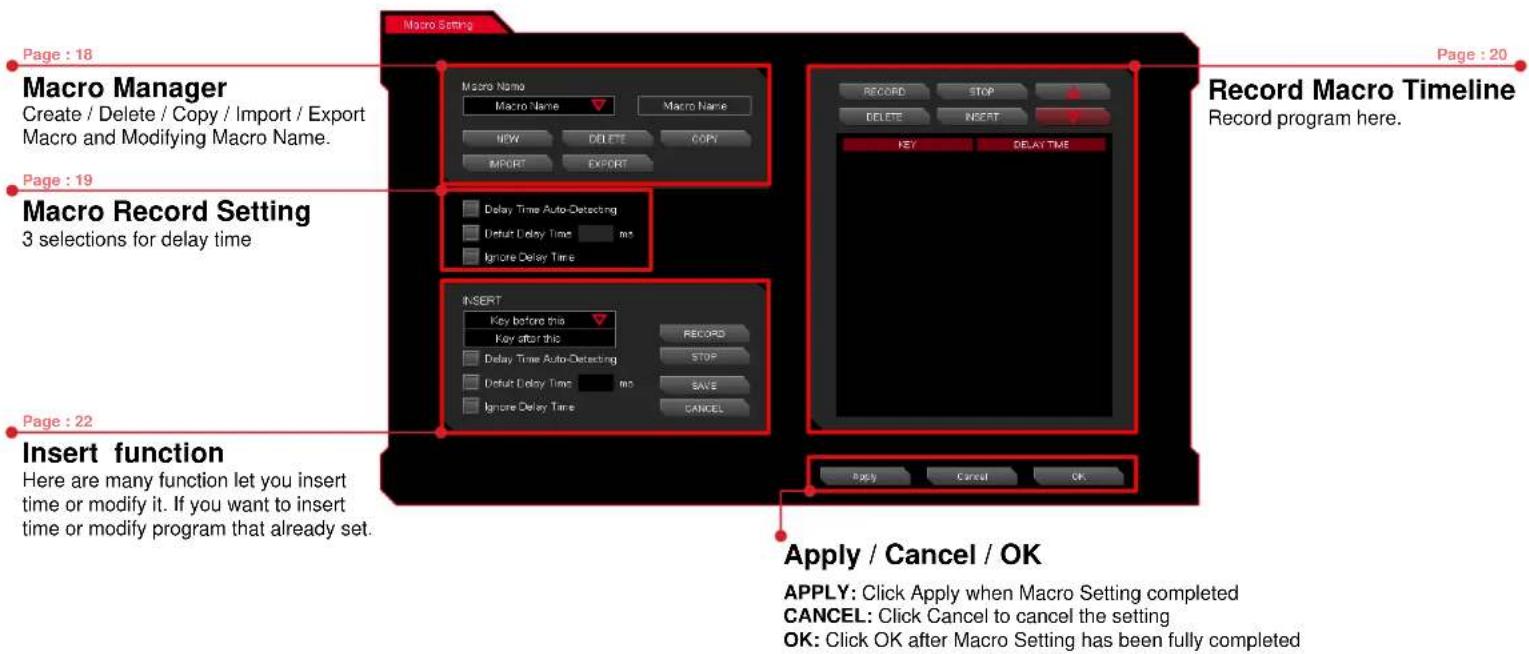
Macro Manager
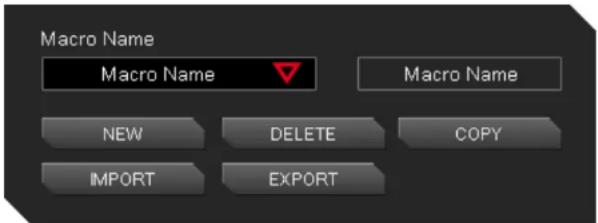
Macro manager allows you to create, delete, copy, import and export a profile.
Manage Macro
NEW / DELETE / COPY / IMPORT / EXPORT macro
NEW - Create a new Macro
DELETE - Delete existing macro
COPY - Duplicate an existing macro into a new macro.
IMPORT - Import a macro that has been exported
EXPORT - Export macro into a file.
Naming Macro
You will need to click on the box to change the name for the macro

Macro record setting
Macro Setting
Challenger is the Game
Tt eSPORTS | VENTUS GUI Software User Guide
Macro Record Setting
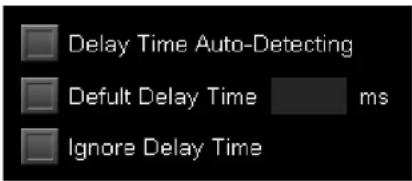
3 selections provided for you to choose for setting the Delay Time.
Macro Delay Time Setting
Delay Time Auto-Detecting : Delay time depend on the time you set the key at.
Default Delay Time ____ ms : Delay time depend on the preferred time set.
Ignore Delay Time : No delay time between key signal.

Macro record timeline
1 Macro Setting
Challenger is the Game
Tl eSPORTS | VENTUS GUI Software User Guide
Macro Record Timeline
Allow you to program your macro as preferred.
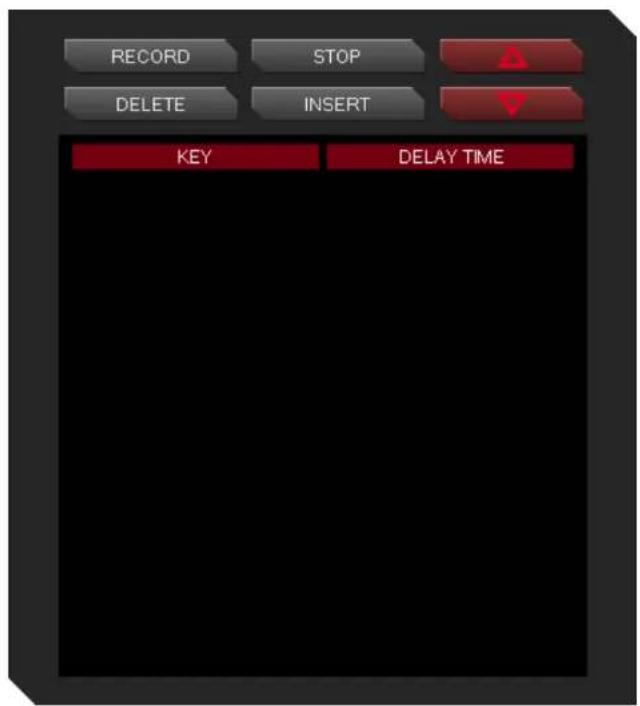
RECORD
Record program : Click Record to start recording via your keyboard or mouse and all signal will be recorded on this timeline.
DELETE
Delete signal : Choose the recorded signal that you wish to delete (Once signal has been chosen, the background will turn RED as below picture)

Click Delete and the selected signal will be removed.
STOP
Stop program : Click Stop whenever recording has been completed.
INSERT
Insert signal : Click Insert to modify/ insert signal to existing recorded signal.

Macro record timeline
1 Macro Setting
Challenger is the Game
TtcSPORTS | VENTUS GUI Software User Guide
Macro Record Timeline
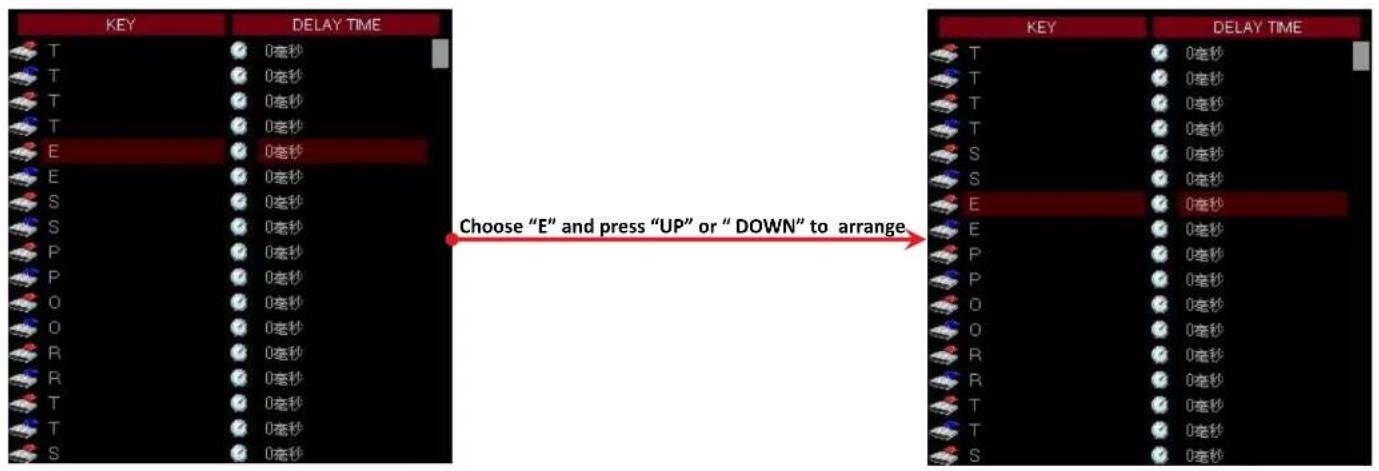
Once Macro Name and Recording have been completed, you can proceed to programming your macro now.


Switch signal up or down
Select the signal and click Up/ Down to rearrange the recorded signals
Note : Please be careful while arranging the "Press" & "Release" signal
Challenger is the Game
Tt eSPORTS | VENTUS GUI Software User Guide
Insert Delay Time or Signal between Key signal
If you want to modify or insert Delay time and Key signal to the programmed macro, please click the INSERT button to modify the programmed macros.
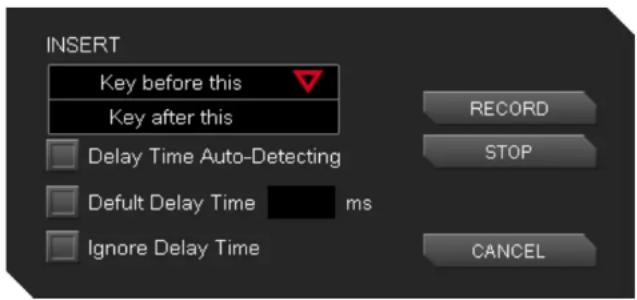
Insert Key Signal before and after
Insert key signal in macros that already programmed.
First : Choose a key that you want in Macro Timeline
Second : Click the INSERT button.
Third : Select Insert Function [Key before this] or [Key after this].
Fourth : Select Delay Time mode.
Fifth : Click RECORD button and record the macro you wanted to modify.
End : Click STOP to complete
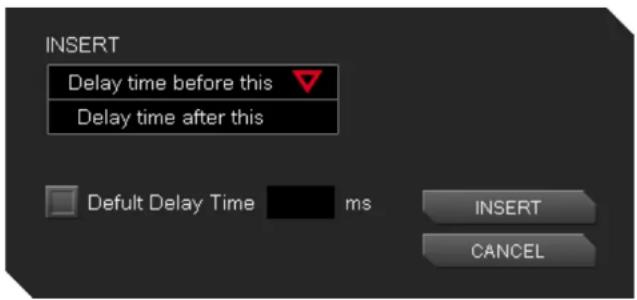
Insert Delay Time
Insert Delay Time in macros that already programmed
First : Choose a key that you want in Macro Timeline
Second : Click the INSERT button.
Third : Select Insert Function [Delay time before this] or [Delay time after this].
Fourth : Fill in the time for [Default Delay Time ____ ms] that you want to Delay.
Fifth : Click INSERT to change the delay time.
I CONTENT THREE Performance Setting
GUI Software User Guide
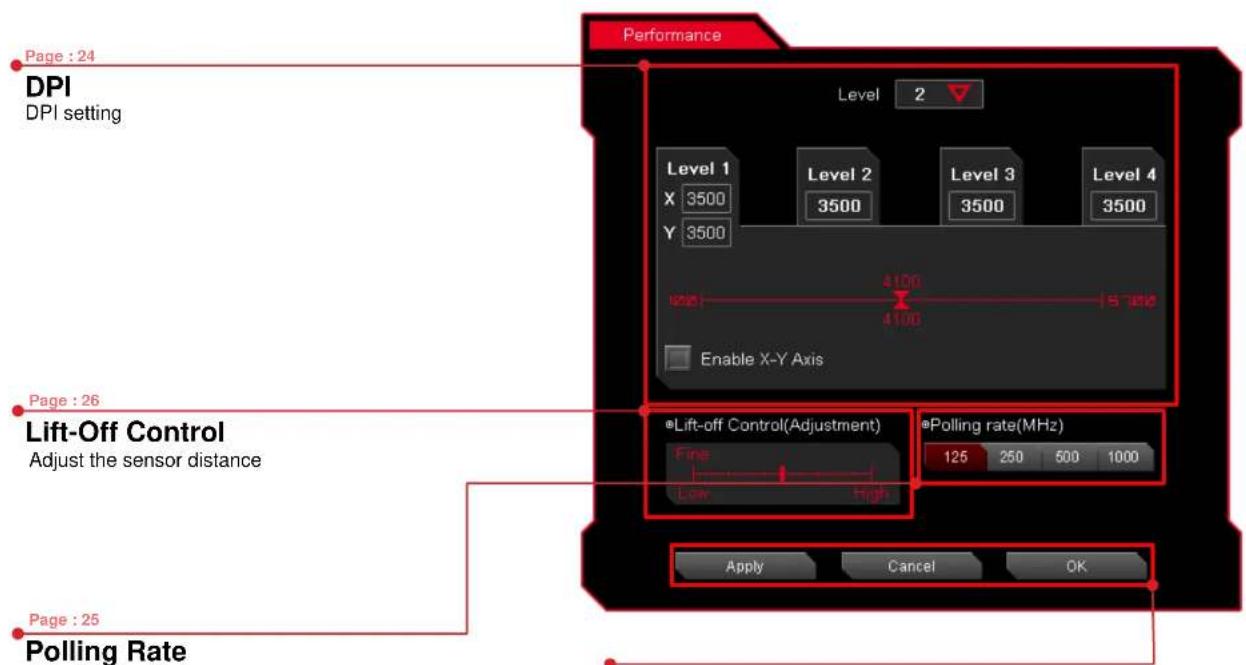
Apply / Cancel / OK
APPLY: Click Apply you completed the setting
CANCEL: Click Cancel to cancel the setting
OK: Click OK after DPI Setting has been fully completed
Dot Per Inch – The Mouse DPI
Do you know what is DPI meaning?
DPI stands for Dot Per Inch, is a measurement of how sensitive a mouse is. The higher a mouse's DPI, the farther the cursor on your screen will move when you move the mouse. A mouse with a higher DPI setting detects and reacts to smaller movements.
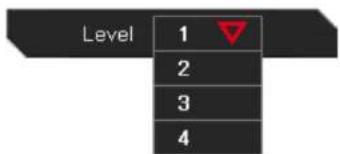
DPI levels for each Profile
You can choose how many levels of DPI you need for your Profile and you can use up to 4 DPI levels for each profiles!
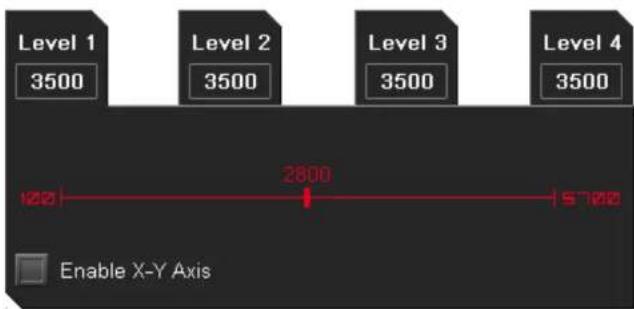
Configure a DPI
Choose the DPI level by adjusting RED point to your preferred DPI level
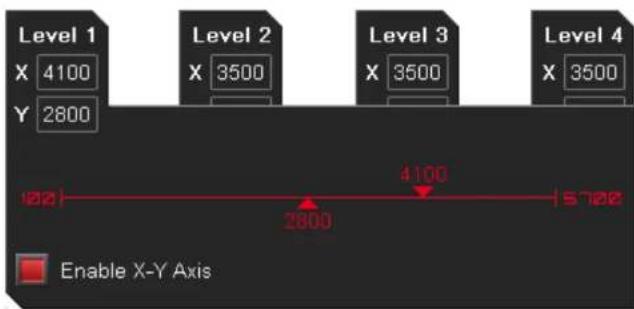
Configure a DPI for X-Y Axis
Choose the DPI level by adjusting both X & Y-Axis (Horizontal & Vertical) to your preferred DPI level. You can have different DPI level when you move for mouse horizontally and vertically by adjusting the DPI level for both X-Y Axis.
Polling Rate
Performance Setting
Challenger is the Game
Tt eSPORTS | VENTUS GUI Software User Guide
Polling Rate
A higher polling rate could decrease the lag that occurs between when you move your mouse and when the movement shows up on your screen. Higher Polling Rate does not mean that you can move fast, that will depends on what DPI level.
(Hz)
Adjust your VENTUS Polling Rate
There are 4 levels for Polling Rate to choose from:
125 Hz polling rate, it's reporting VENTUS's position to the computer 125 times every second (Also known as 8ms)
250 Hz polling rate, it's reporting VENTUS's position to the computer 250 times every second (Also known as 4ms)
500 Hz polling rate, it's reporting VENTUS's position to the computer 500 times every second (Also known as 2ms)
1000 Hz polling rate, it's reporting VENTUS's position to the computer 1000 times every second (Also known as 1ms)

Lift-Off Control
Performance Setting
Challenger is the Game
Tt eSPORTS | VENTUS GUI Software User Guide
Lift-Off Control
Lift-off trace sometimes required for particular games and some mouse-pads that will influence the trace distance and affected gameplay.
Now with VENTUS, this allows gamers to adjust the distance to the best distance they want while gaming!
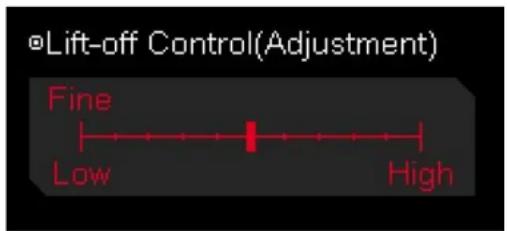
Adjust your VENTUS Lift-Off
Adjust the sensitivity by adjusting the level.
CAUTION : Lowest is not recommended as VENTUS might not be able to sense the mouse pad.
I CONTENT FOUR Light Setting
GUI Software User Guide
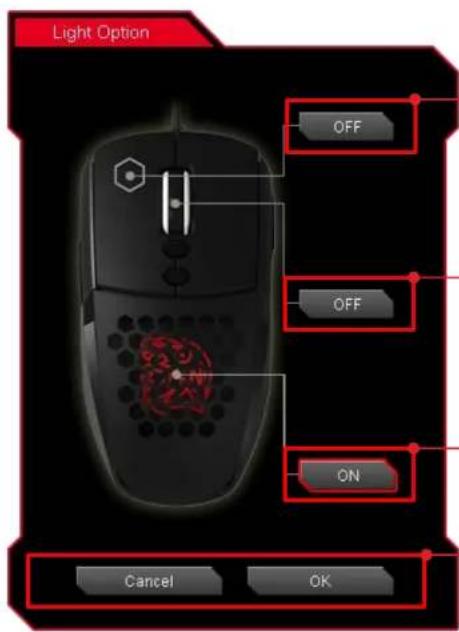
VENTUS LEFT-BUTTON HEX Light
You can select ON or OFF for HEX light.
Note: HEX Light will still flash to indicate DPI levels although Scroll Wheel light has been turned off.
VENTUS Scroll Wheel Light Option
You can select ON or OFF for Scroll Wheel light.
VENTUS Tt DRAGON LOGO Light Option
You can select ON or OFF for Tt DRAGON LOGO light.
Note: Tt DRAGON LOGO will have a pulse-break light effect.
Cancel / OK
OK: Click OK to save the setting
CANCEL: Click CANCEL to cancel the setting
I CONTENT FIVE Firmware Update
GUI Software User Guide
How to update Firmware
Firmware Update
Challenger is the Game
Tt eSPORTS | VENTUS GUI Software User Guide
Update Your VENTUS Firmware
The New GUI can automatically detect new updates whenever there is new update available for installation.
You will just need to plug the VENTUS and launch VENTUS's GUI and system will notify you about the new update.
If you missed or closed the update, just re-plug in VENTUS and launch VENTUS GUI and system will notify you again.
- Tt ® esports By Thermaltake
- VENTUS GUI SOFTWARE GUIDE
- A CONTENTS
- PAGE 01 Main Interface
- PAGE 17 Macro Setting
- PAGE 23 Performance Setting
- PAGE 27 Light Setting
- PAGE 28 Firmware Update
- I CONTENT ONE Main Interface
- Reset / Register / Guide / Close
- Switch Normal/Battle Mode
- Key Assignment
- Apply / Cancel / OK
- Profile
- Profile / Macro Manager
- Performance / Light / Link to Program
- Tt eSPORTS 2015 New GUI
- Switch to Profile
- Turn On or Turn Off Profile
- Sync Profile with Game
- Link to Program
- Normal / Battle Mode | Main Interface
- Light Effect into Game
- NORMAL
- BATTLE
- Normal Mode
- Battle Mode
- WARNING
- Key Assignment | Main Interface
- Customization for each of VENTUS's button
- Buttons Configuration
- Key Functions to be Assigned!
- Default
- Macro (T Key)
- Assign macro
- Repeat
- Single Key
- Mouse function
- Keyboard function
- Sensitivity
- Sensitivity - Temporary Mode
- Temporary DPI
- Enable X-Y Axis
- Sensitivity - Level Up / Level Down
- Level Up
- Level Down
- Level Setting
- Sensitivity - On The Fly
- Sensitivity - Rotate
- Launch Program
- Launch Program button
- Disable
- I CONTENT TWO Macro Setting
- Macro setting Interface | Macro Setting
- Macro Manager | Macro Setting
- Macro Manager
- Manage Macro
- Macro record setting
- Macro Setting
- Macro Delay Time Setting
- Macro record timeline
- Macro Setting
- RECORD
- DELETE
- STOP
- INSERT
- Switch signal up or down
- Insert Delay Time or Signal between Key signal
- Insert Key Signal before and after
- Insert Delay Time
- I CONTENT THREE Performance Setting
- Dot Per Inch – The Mouse DPI
- DPI levels for each Profile
- Configure a DPI
- Configure a DPI for X-Y Axis
- Polling Rate
- Performance Setting
- Adjust your VENTUS Polling Rate
- Lift-Off Control
- Adjust your VENTUS Lift-Off
- I CONTENT FOUR Light Setting
- VENTUS LEFT-BUTTON HEX Light
- VENTUS Scroll Wheel Light Option
- VENTUS Tt DRAGON LOGO Light Option
- Cancel / OK
- I CONTENT FIVE Firmware Update
- How to update Firmware
- Firmware Update
- Update Your VENTUS Firmware
Brand : THERMALTAKE
Model : Ventus
Category : Mouse