
Boom Box AZ329 - CD Player PHILIPS - Free user manual and instructions
Find the device manual for free Boom Box AZ329 PHILIPS in PDF.
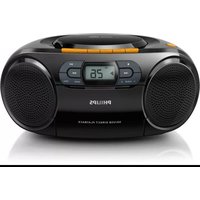


| Product Type | CD Boombox |
| Brand | Philips |
| Model | Boom Box AZ329 |
| Dimensions (approx.) | 25 x 35 x 15 cm |
| Weight (approx.) | 2.5 kg |
| Power Supply | AC 230V, 50Hz or 6x D batteries (not included) |
| CD Playback | Supports CD, CD-R, CD-RW |
| Radio Tuner | AM/FM with digital tuning and presets |
| Cassette Deck | Built-in cassette player/recorder |
| Auxiliary Input | 3.5mm stereo input for external devices |
| Headphone Jack | 3.5mm output for private listening |
| Built-in Speakers | Two full-range speakers |
| Display | LCD screen for track and radio information |
| Controls | Play, pause, stop, skip, volume, tuning knobs |
| Maintenance | Clean with soft dry cloth; do not use liquids |
| Safety | Avoid moisture and extreme temperatures |
| Spare Parts & Repairability | Contact Philips support for replacement parts |
| General Information | Portable design with carrying handle |
Frequently Asked Questions - Boom Box AZ329 PHILIPS
User questions about Boom Box AZ329 PHILIPS
0 question about this device. Answer the ones you know or ask your own.
Ask a new question about this device
Download the instructions for your CD Player in PDF format for free! Find your manual Boom Box AZ329 - PHILIPS and take your electronic device back in hand. On this page are published all the documents necessary for the use of your device. Boom Box AZ329 by PHILIPS.
USER MANUAL Boom Box AZ329 PHILIPS
Always there to help you
Register your product and get support at www.philips.com/support

AZ239

User manual
PHILIPS
Contents
1 Important 2
Safety 2
Notice 2
2 Your CD Soundmachine 4
Introduction 4
What's in the box 4
Overview of the main unit 4
3 Get started 6
Connect power 6
Turn on 7
Turn off 7
4 Play 8
Play a CD 8
Play from an external device 8
Play from USB devices 8
Play from SD card 9
Play tape 9
Tune to FM radio stations 10
5 Play options 10
Control play 10
Program tracks 10
Adjust sound 11
6 Product information 12
Specifications 12
Maintenance 12
7 Troubleshooting 14
1 Important
Safety
- Read these instructions. Follow all instructions.
- Do not block any ventilation openings. Install in accordance with the manufacturer's instructions.
- Do not install near any heat sources such as radiators, heat registers, stoves, or other apparatus (including amplifiers) that produce heat.
- Protect the power cord from being walked on or pinched, particularly at plugs, convenience receptacles, and the point where they exit from the unit.
- Only use attachments/accessories specified by the manufacturer.
- Unplug this unit during lightning storms or when unused for long periods of time.
- Recording is permissible insofar as copyright or other rights of third parties are not infringed upon.
- Refer all servicing to qualified service personnel. Servicing is required when the unit has been damaged in any way, such as power-supply cord or plug is damaged, liquid has been spilled or objects have fallen into the apparatus, the unit has been exposed to rain or moisture, does not operate normally, or has been dropped.
- Battery usage CAUTION – To prevent battery leakage which may result in bodily injury, property damage, or damage to the unit: Install all batteries correctly, + and - as marked on the unit.
- Do not mix batteries (old and new or carbon and alkaline, etc.).
- Remove batteries when the unit is not used for a long time.
- Batteries (battery pack or batteries installed) shall not be exposed to excessive heat such as sunshine, fire or the like.
- CAUTION: Danger of explosion if battery is incorrectly replaced. Replace only with the same or equivalent type.
- The unit shall not be exposed to dripping or splashing.
- Do not place any sources of danger on the unit (e.g. liquid filled objects, lighted candles).
- Where the MAINS plug or an appliance coupler is used as the disconnect device, the disconnect device shall remain readily operable.

Warning
• Never remove the casing of this apparatus. - Never place this apparatus on other electrical equipment. • Never look into the laser beam inside this apparatus.

Caution
- Use of controls or adjustments or performance of procedures other than herein may result in hazardous radiation exposure or other unsafe operation.
Notice
Any changes or modifications made to this device that are not expressly approved by WOOX Innovations may void the user's authority to operate the equipment.
Disposal of your old product and batteries
Your product is designed and manufactured with high quality materials and components, which can be recycled and reused.
Never dispose of your product with other household waste. Please inform yourself about the local rules on the separate collection of electrical and electronic products and batteries. The correct disposal of these products helps prevent potentially negative consequences on the environment and human health.
Your product contains batteries, which cannot be disposed of with normal household waste.
Please inform yourself about the local rules on separate collection of batteries. The correct disposal of batteries helps prevent potentially negative consequences on the environment and human health.
Please visit www.recycle.philips.com for additional information on a recycling center in your area.
Environmental information
All unnecessary packaging has been omitted. We have tried to make the packaging easy to separate into three materials: cardboard (box), paper pulp (buffer) and polyethylene (bags, protective foam sheet.)
Your system consists of materials which can be recycled and reused if disassembled by a specialized company. Please observe the local regulations regarding the disposal of packaging materials, exhausted batteries and old equipment.
This apparatus includes these labels:

Class II equipment symbol

This symbol indicates that the apparatus has a double insulation system.
Be responsible Respect copyrights
The making of unauthorized copies of copy-protected material, including computer programs, files, broadcasts and sound recordings, may be an infringement of copyrights and constitute a criminal offence. This equipment should not be used for such purposes.
USB DIRECT
The USB-IF Logos are trademarks of Universal Serial Bus Implementers Forum, Inc.
Note
- The type plate is located on the bottom of the apparatus.
2 Your CD Soundmachine
Introduction
With this CD Soundmachine, you can:
- listen to FM radio;
- enjoy audio from discs, tapes, USB device, Micro SD card, and other external audio devices; • program the play sequence of tracks.
What's in the box
Check and identify the contents of the package:
- Main unit • Short User Manual
Overview of the main unit
① SD/USB source selector
- Press to select SD or USB source.
- Stop playing.
② -ALBUM+
- Skip to the previous or next album.
③
- Skip to the previous or next track. • Search within a track.
④ OPEN·CLOSE
- Open or close the disc compartment.
⑤ Tape controls
• Start tape play.
• ◀◀ ▶▶
Fast rewind or fast forward the tape. Stop the tape play or open the tape door.
• II
Pause tape play or pause recording.
⑥ ▶ II
• Start or pause play.
⑦ PROG
• Program the play sequence of tracks.
⑧ MODE
- Select a play mode.
⑨ Display panel
- Displays current status.
⑩ FM antenna
- Improves FM reception.
⑪ + TUNING -
- Tune to FM radio stations.
⑫
- USB socket.
⑬ Source selector
- Select a source.
⑭ +VOLUME -
- Adjust volume.
⑮ SD
- Micro SD card slot.
⑯ AC~MAINS
• Power supply socket.
⑰ AUDIO-IN
- Connect an external audio device.
3 Get started

Caution
- Use of controls or adjustments or performance of procedures other than herein may result in hazardous radiation exposure or other unsafe operation.
Always follow the instructions in this chapter in sequence.
If you contact Philips, you will be asked for the model and serial number of your apparatus. The model number and serial number are on the bottom of your apparatus. Write the numbers here:
Model No. ____
Serial No.
Connect power
The unit can be powered by either AC power or batteries.
Option 1: AC power

Warning
- Risk of product damage! Make sure that the power supply voltage corresponds to the voltage printed on the back or the underside of the unit.
- Risk of electric shock! When you disconnect the AC power, always pull the plug from the socket. Never pull the cord.
Connect the AC power cord to the wall socket.

Tip
• To save energy, turn the unit off after use.

Option 2: Battery power

Caution
- Batteries contain chemical substances, so they should be disposed of properly.

Note
• Batteries are not supplied with the accessories.
1 Open the battery compartment. 2 Insert 6 batteries (type: 1.5V R14/UM2/C CELL) with correct polarity (+/-) as indicated. 3 Close the battery compartment.

Turn on
Switch the source selector on the main unit to AUDIO IN/CD/USB/SD/FM/TAPE.
When the source selector is in the AUDIO IN/CD position, CD is displayed.
Switch to standby mode
- The unit switches to standby mode automatically when there is no audio detected for over 15 minutes.
- Press ▶t to wake up the unit from standby mode.
Turn off
Switch the source selector on the main unit to OFF.
4 Play
Play a CD

Note
• You cannot play CDs encoded with copyright protection technologies. - When an audio-in cable is plugged, CD/USB playback stops, and the unit switches to audio in mode automatically.
You can play commercially available audio CDs:
• CD-Recordables (CD-R) • CD-Rewritables (CD-RW) - MP3-CDs
1 Switch the source selector to CD. 2 Open the CD compartment. 3 Insert a CD with the printed side facing up and close the CD lid gently.
→ The total number of tracks displays. → Your CD sound machine starts to play automatically.
• To select a track, press ◀◀. ▶▶ • To pause CD play, press▶.
[ ] flashes.
• To resume CD play, press▶ again. • To stop CD play, press ■

Play from an external device
You can also listen to an external audio device through this unit.
1 Connect an audio cable (3.5mm, not supplied) to:
• the AUDIO-IN socket on the unit. - the headphone socket on an external device.
→ "Au" shows on the display.
2 Play the external device (see the device's user manual).

Note
• The AUDIO-IN socket is not for headphones.
- The display panel lights off when the unit plays from the external device.
- The unit switches to Audio in mode automatically when it plays under CD or SD/USB mode.

Play from USB devices

Note
• Make sure that the USB device contains playable audio content.
1 Switch the source selector to USB/SD. 2 Insert the USB device into the socket.
3 Press down SD/USB source selector to choose USB source.
"USB" shows on the display. The unit starts to play. If not, press.


Play from SD card

Note
• Make sure that the SD card contains playable audio content.
1. Switch the source selector to USB/SD. 2. Insert the SD card into the SD slot on the back of the device. 3. Press to release the SD/USB source selector to choose SD source.
"SD" shows on the display.
The unit starts to play. If not, press.


Play tape
1. Slide the source selector to TAPE. 2. Press ■ on the main unit to open the tape door. 3. Load the tape with the open side upward and the full spool to the right. 4. Press on the main unit to start play.
- To pause/resume play, press on the main unit. • To rewind or fast-forward, press ◀◀ / ▶▶ on the main unit. • To stop play, press ■ ▲


Note
• In playback mode, the cassette will be stopped automatically when playback reaches the end.
Tune to FM radio stations

Note
- For optimal reception, fully extend and adjust the position of the FM antenna.
1 Switch the source selector to FM. 2 Rotate TUNING to select a station. 3 Repeat step 2 to tune to more stations.

5 Play options
Control play
In CD mode, you can control play through the following operations.
◀◀ / ▶ Skip to the previous/next track or search within play.
▶ II Start or pause play.
■ Stop play or erase a program.
PROG Program the play sequence of tracks.
+VOLUME- Adjust volume.
- ALBUM + Skip to the previous or next album.
MODE Select a play mode.
[ ]. Play the current track repeatedly.
[ ]: Play all tracks repeatedly.
[ ] Repeat all tracks randomly.
To return to normal play, press MODE repeatedly until the repeat icons disappear.

Tip
- Only [ ] and [ ] can be selected when you play the programmed tracks.
Program tracks
In CD/USB/SD mode, you can program a maximum of 20 tracks.
1 Press ■ to stop playback.
2 Press PROG to activate the program mode.
→ [PROG] (program) begins to blink.
3 Press I◄► to select a track number, then press PROG to confirm.
4 Repeat step 3 to program more tracks.
5 Press ▶ to play the programmed tracks.
→ During playback, [PROG] (program) is displayed.
• To erase the program, press ■ twice.
- When playback is stopped, press ◀, ▶▶I to review the program.
Adjust sound
During playback, you can adjust the volume and select the sound effects.
Key Function
+VOLUME- Increase or decrease volume.
6 Product information

Note
• Product information is subject to change without prior notice.
Specifications
Amplifier
| Max Output Power 2 x 1 W |
| Frequency Response 125 -16000Hz, -3dB |
| Signal to Noise Ratio >55 dBA |
| Total Harmonic Distortion <1 % |
| Audio-in Input 650 mV RMS |
Disc
| Laser Type Semiconductor | |
| Disc Diameter 12cm/8cm | |
| Support Disc CD-DA, CD-R, CD-RW, CD-MP3 | |
| Audio DAC | 24Bits / 44.1kHz |
| Total Harmonic Distortion | <1% |
| Frequency Response | 125 -16000 Hz, -3dB |
| S/N Ratio | >55 dBA |
Tuner
| Tuning Range | 87.5 - 108MHz |
| Tuning grid | 50 kHz |
| Total Harmonic Distortion | <3% |
| Signal to Noise Ratio | >50 dBA |
Tape deck
| Frequency response | 125 - 8000 Hz (8 dB) |
| - Normal tape (type I) | |
| Signal-to-noise ratio | 35 dBA |
| - Normal tape (type I) | |
| Wow and flutter | ≤ 0.4% DIN |
General
| Power supply | 220 - 240V~,50/60 Hz; |
| - AC Power | ==9 V, 6 × 1.5V type: R14/UM2/C CELL |
| - Battery | |
| Operation Power Consumption | 10 W |
| Standby Power Consumption | <0.5 W |
| Dimensions | 300 × 134 × 240 mm |
| - Main Unit (W × H × D) | |
| Weight (Main Unit) | 1.5 kg |
Maintenance
Clean the cabinet
- Use a soft cloth slightly moistened with a mild detergent solution. Do not use a solution containing alcohol, spirits, ammonia or abrasives.
Clean discs
- When a disc becomes dirty, clean it with a cleaning cloth. Wipe the disc from the centre out.

- Do not use solvents such as benzene, thinner, commercially available cleaners, or antistatic spray intended for analogue records.
Clean the disc lens
• After prolonged use, dirt or dust may accumulate at the disc lens. To ensure good play quality, clean the disc lens with Philips CD lens cleaner or any commercially available cleaner. Follow the instructions supplied with cleaner.
Clean the heads and the tape paths
- To ensure good recording and play quality, clean the heads A, the capstan(s) B, and pressure roller(s) C after every 50 hours of tape operation. - Use a cotton swab slightly moistened with cleaning fluid or alcohol.

• You can also clean the heads by playing a cleaning tape once.
Demagnetise the heads
• Use a demagnetising tape available at your dealer.
7 Troubleshooting

Warning
• Never remove the casing of this device.
To keep the warranty valid, never try to repair the system yourself.
If you encounter problems when using this device, check the following points before requesting service. If the problem remains unsolved, go to the Philips Web page (www.philips.com/support). When you contact Philips, make sure that the device is nearby and the model number and serial number are available.
No power
- Ensure that the Mains cord is connected securely.
- Ensure that there is power at the AC Mains.
- Ensure that the batteries are inserted correctly.
No sound or poor sound
- Adjust the volume.
No response from the unit
- Disconnect and reconnect the AC power plug, then turn on the system again.
- As a power-saving feature, the unit switches off automatically 15 minutes after track play reaches the end and no control is operated.
Poor cassette sound quality
- Ensure that heads in the cassette holder are clean.
- Ensure that a NORMAL (IECI) cassette tape is used for record.
Cassette does not work for record
• Ensure that cassette tabs are not broken.
No disc detected
- Insert a disc.
- Check if the disc is inserted upside down.
- Wait until the moisture condensation at the lens has cleared.
- Replace or clean the disc. • Use a finalized CD or correct format disc.
Poor radio reception
- Increase the distance between the unit and your TV or VCR. • Fully extend the FM antenna.

Specifications are subject to change without notice
2014 © WOOX Innovations Limited. All rights reserved.
Philips and the Philips' Shield Emblem are registered trademarks of Koninklijke
Philips N.V. and are used by WOOX Innovations Limited under license from

- ALWAYS THERE TO HELP YOU
- USER MANUAL
- PHILIPS
- CONTENTS
- IMPORTANT
- YOUR CD SOUNDMACHINE
- GET STARTED
- PLAY
- PLAY OPTIONS
- PRODUCT INFORMATION
- TROUBLESHOOTING
- SAFETY
- WARNING
- CAUTION
- NOTICE
- DISPOSAL OF YOUR OLD PRODUCT AND BATTERIES
- ENVIRONMENTAL INFORMATION
- BE RESPONSIBLE RESPECT COPYRIGHTS
- USB DIRECT
- NOTE
- INTRODUCTION
- WHAT'S IN THE BOX
- CONNECT POWER
- OPTION 1: AC POWER
- TIP
- OPTION 2: BATTERY POWER
- TURN ON
- SWITCH TO STANDBY MODE
- TURN OFF
- PLAY A CD
- PLAY FROM AN EXTERNAL DEVICE
- PLAY FROM USB DEVICES
- PLAY FROM SD CARD
- PLAY TAPE
- TUNE TO FM RADIO STATIONS
- CONTROL PLAY
- PROGRAM TRACKS
- ADJUST SOUND
- SPECIFICATIONS
- MAINTENANCE
- CLEAN THE CABINET
- CLEAN DISCS
- CLEAN THE DISC LENS
- CLEAN THE HEADS AND THE TAPE PATHS
- DEMAGNETISE THE HEADS
- NO POWER
- NO SOUND OR POOR SOUND
- NO RESPONSE FROM THE UNIT
- POOR CASSETTE SOUND QUALITY
- CASSETTE DOES NOT WORK FOR RECORD
- NO DISC DETECTED
- POOR RADIO RECEPTION
Brand : PHILIPS
Model : Boom Box AZ329
Category : CD Player