
EUB-362 EXT - Network card / adapter ENGENIUS - Free user manual and instructions
Find the device manual for free EUB-362 EXT ENGENIUS in PDF.


| Product Type | USB Wireless Adapter |
| Model | EUB-362 EXT |
| Brand | EnGenius |
| Wireless Standard | IEEE 802.11b/g/n |
| Maximum Speed | Up to 300 Mbps |
| Frequency Band | 2.4 GHz |
| Interface | USB 2.0 |
| Antenna | External, detachable RP-SMA |
| Security | WEP, WPA, WPA2, WPS |
| Dimensions (approx.) | 2.5 x 0.75 x 0.5 in (63 x 19 x 12 mm) |
| Weight (approx.) | 0.7 oz (20 g) |
| Power Supply | Via USB port (5V, 500mA) |
| Supported OS | Windows XP/Vista/7/8/10, Mac OS X, Linux |
| Operating Temperature | 0°C to 40°C (32°F to 104°F) |
| Storage Temperature | -20°C to 70°C (-4°F to 158°F) |
| Humidity | 10% to 90% non-condensing |
| LED Indicators | Power, Link/Activity |
| Maintenance | Keep dry, clean with soft cloth |
| Safety Precautions | Do not expose to water or extreme heat |
| Spare Parts & Repairability | Not user-serviceable; contact support for issues |
| General Information | Ideal for expanding wireless connectivity to desktops or laptops |
Frequently Asked Questions - EUB-362 EXT ENGENIUS
User questions about EUB-362 EXT ENGENIUS
0 question about this device. Answer the ones you know or ask your own.
Ask a new question about this device
Download the instructions for your Network card / adapter in PDF format for free! Find your manual EUB-362 EXT - ENGENIUS and take your electronic device back in hand. On this page are published all the documents necessary for the use of your device. EUB-362 EXT by ENGENIUS.
USER MANUAL EUB-362 EXT ENGENIUS
Wireless USB 2.0 Adapter

natural_image
Black wireless LAN device with antenna and base (no visible text or symbols on body)User's Manual
Version: 2.0
Table of Contents
1 INTRODUCTION .... 4
1.1 FEATURES & BENEFITS 4
1.2 PACKAGE CONTENTS....5
1.3 USB ADAPTER DESCRIPTION 5
1.4 SYSTEM REQUIREMENTS 5
1.5 APPLICATIONS 6
1.6 NETWORK CONFIGURATION....7
2 INSTALL DRIVERS & CLIENT UTILITY 9
2.1 BEFORE YOU BEGIN 9
2.2 INSTALLING THE DRIVERS....9
3 USING THE CLIENT UTILITY....15
3.1 CURRENT STATUS 15
3.2 PROFILE MANAGEMENT 16
3.2.1 Scan for available networks.... 17
3.2.2 Create a New Profile.... 18
3.2.3 Security 19
3.2.3.1 Security Disabled 19
3.2.3.2 WPA / WPA2 - TLS, TTLS 20
3.2.3.3 WPA / WPA2 – PEAP (EAP-GTC) 22
3.2.3.4 WPA / WPA2 - PEAP (EAP-MSCHAP-V2) 24
3.2.3.5 WPA / WPA2 – LEAP 26
3.2.3.6 WPA / WPA2 – Passphrase.... 27
3.2.3.7 802.1x-TLS, TTLS 28
3.2.3.8 802.1x - PEAP (EAP-GTC) 30
3.2.3.9 802.1x - PEAP (EAP-MSCHAP-V2) 32
3.2.3.10 802.1x-LEAP 34
3.2.3.11 Pre-Shared Key (Static WEP) 36
3.2.4 Advanced Settings 37
3.2.4.1 Infrastructure Settings 37
3.2.4.2 Ad Hoc Settings 38
3.3 DIAGNOSTICS 39
3.4 ENABLE / DISABLE RADIO 41
3.5 DISABLE TRAY ICON 43
3.6 DISPLAY SETTINGS 43
4 UNINSTALL THE DRIVERS & CLIENT UTILITY 45
APPENDIX A – SPECIFICATIONS...... 47
APPENDIX B – FCC INTERFERENCE STATEMENT 48
Revision History
| Version | Date | Notes | |
| 1.0 June 9, 2005 | Initial Version | ||
| 1.1 Oct. 12, 2005 | Utility Upgrading | ||
| 1.2 Oct 14, 2005 | Spec updating | ||
| 2.0 May 16, 2006 | Security spec updating | ||
1 Introduction
This is a wireless USB 2.0 adapter that supports the IEEE 802.11b/g (2.4GHz) radio operation. It provides a high-speed wireless connection with data rate up to 108Mbps.
To protect your wireless connectivity, the high-speed wireless USB adapter can encrypt all wireless transmissions through 64/128/152-bit WEP data encryption and also supports WPA. Dynamic Frequency Selection (DFS) puts your network on the cleanest channel in your location. With the high-speed wireless USB adapter, you will experience the best wireless connectivity available.
This chapter describes the features & benefits, package contents, applications, and network configuration.
1.1 Features & Benefits
| Features Benefits | |
| High Speed Data Rate up to 108 Mbps in Super G mode | Capable of handling heavy data payloads such as MPEG video streaming. |
| High Output Power up to 23 dBm More high power can advance the distance. | |
| Advanced Encryption Standard (AES), Temporal Key Integrity Protocol (TKIP) and Wired Equivalent Private (WEP) | Powerful data security. |
| IEEE802.1x Client Support Enhances authentication and security. | |
| Support for 802.11e standard | Wireless Multimedia Enhancements Quality of Service support (QoS) |
| Advanced Power Management | Low power consumption in power saving mode up to 98%. |
| Support eXtended Range technology | eXtended Range technology give Wi-Fi products twice the range of existing designs |
1.2 Package Contents
Open the package carefully, and make sure that none of the items listed below are missing. Do not discard the packing materials, in case of return; the unit must be shipped in its original package.
▶ One Wireless LAN USB Adapter
One USB Cable
One CD-ROM with User's Manual Included
1.3 USB Adapter Description
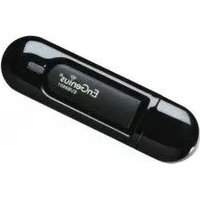
The USB adapter is a standard USB adapter that fits into any USB interface. The USB adapter has a LED indicator and an external high-sensitivity dipole antenna.

1.4 System Requirements
The following are the minimum system requirements in order to use the USB adapter.
▶ PC/AT compatible computer with a USB interface.
▶ Windows 2000/XP operating system.
- 20 MB of free disk space for installing the USB adapter driver and utility program.
1.5 Applications
The wireless LAN products are easy to install and highly efficient. The following list describes some of the many applications made possible through the power and flexibility of wireless LANs:
a) Difficult-to-wire environments
There are many situations where wires cannot be laid easily. Historic buildings, older buildings, open areas and across busy streets make the installation of LANs either impossible or very expensive.
b) Temporary workgroups
Consider situations in parks, athletic arenas, exhibition centers, disaster-recovery, temporary offices and construction sites where one wants a temporary WLAN established and removed.
c) The ability to access real-time information
Doctors/nurses, point-of-sale employees, and warehouse workers can access real-time information while dealing with patients, serving customers and processing information.
d) Frequently changed environments
Show rooms, meeting rooms, retail stores, and manufacturing sites where frequently rearrange the workplace.
e) Small Office and Home Office (SOHO) networks
SOHO users need a cost-effective, easy and quick installation of a small network.
f) Wireless extensions to Ethernet networks
Network managers in dynamic environments can minimize the overhead caused by moves, extensions to networks, and other changes with wireless LANs.
g) Wired LAN backup
Network managers implement wireless LANs to provide backup for mission-critical applications running on wired networks.
h) Training/Educational facilities
Training sites at corporations and students at universities use wireless connectivity to ease access to information, information exchanges, and learning.
1.6 Network Configuration
To better understand how the wireless LAN products work together to create a wireless network, it might be helpful to depict a few of the possible wireless LAN PC card network configurations. The wireless LAN products can be configured as:
a) Ad-hoc (or peer-to-peer) for departmental or SOHO LANs.
b) Infrastructure for enterprise LANs.
a) Ad-hoc (peer-to-peer) Mode

flowchart
graph TD
    A["Wireless LAN Client (PC/NB)"] -->|device| B["Device"]
    B --> C["Wireless LAN Client (PC/NB)"]
    C --> D["Device"]
    D --> E["Wireless LAN Client (PC/NB)"]
    E --> F["Device"]
    F --> G["Wireless LAN Client (PC/NB)"]
    G --> H["Device"]
    H --> I["Wireless LAN Client (PC/NB)"]
    I --> J["Device"]
    J --> K["Wireless LAN Client (PC/NB)"]
    K --> L["Device"]
    L --> M["Wireless LAN Client (PC/NB)"]
    M --> N["Device"]
    N --> O["Wireless LAN Client (PC/NB)"]
    O --> P["Device"]
    P --> Q["Wireless LAN Client (PC/NB)"]
    Q --> R["Device"]
    R --> S["Wireless LAN Client (PC/NB)"]
    S --> T["Device"]
    T --> U["Wireless LAN Client (PC/NB)"]
    U --> V["Device"]
    V --> W["Wireless LAN Client (PC/NB)"]
    W --> X["Device"]
    X --> Y["Wireless LAN Client (PC/NB)"]
    Y --> Z["Device"]
This is the simplest network configuration with several computers equipped with the PC Cards that form a wireless network whenever they are within range of one another. In ad-hoc mode, each client is peer-to-peer, would only have access to the resources of the other client and does not require an access point. This is the easiest and least expensive way for the SOHO to set up a wireless network. The image below depicts a network in ad-hoc mode.
b) Infrastructure Mode
The infrastructure mode requires the use of an access point (AP). In this mode, all wireless communication between two computers has to be via the AP. It doesn't matter if the AP is stand-alone or wired to an Ethernet network. If used in stand-alone, the AP can extend the range of independent wireless LANs by acting as a repeater, which effectively doubles the distance between wireless stations. The image below depicts a network in infrastructure mode.

flowchart
graph TD
    A["Wireless LAN Client (PC/NB)"] -->|device| B["Access Point"]
    C["Wireless LAN Client (PC/NB)"] -->|device| B
    D["Wireless LAN Client (PC/NB)"] -->|device| B
    B --> E["Wireless LAN Client (PC/NB)"]
    style B fill:#f9f,stroke:#333,stroke-width:2px
2 Install Drivers & Client Utility
2.1 Before You Begin
Before installing the new drivers of your USB adapter, you need to disable all of the Wireless LAN drivers that you have installed.
During the installation, Windows XP/2K/ME/98 may need to copy systems files from its installation CD. Therefore, you may need a copy of the Windows installation CD at hand before installing the drivers. On many systems, instead of a CD, the necessary installation files are archived on the hard disk in C:\WINDOWS \OPTIONS\CABS directory.
2.2 Installing the Drivers
Follow the steps below in order to install the USB adapter drivers:
- Insert the CD-ROM that was provided to you in this package. The setup should run automatically. If the setup does not run automatically, then you must manually select the setup.exe file from the CD-ROM drive.
- Once the setup begins you will see the Install Shield Wizard, as the image depicts below.

-
Click on the Next button to continue.
-
The Setup Wizard will then allow you to install the driver & utility or just the driver. Select the first option: Install Client Utilities and Driver.

-
Click on the Next button to continue.
-
This message informs you that the system must be restarted after the installation is complete.
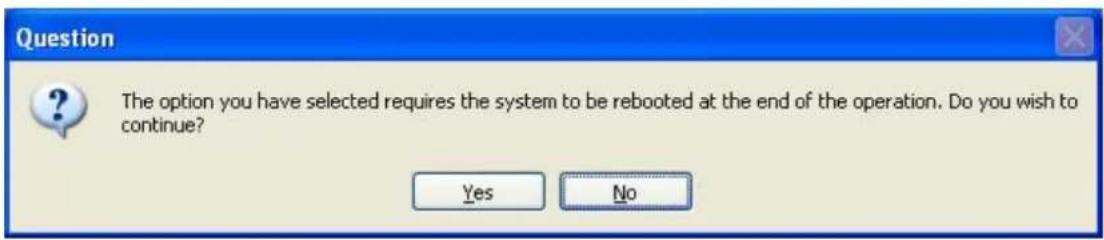
- Click on the Yes button to continue.
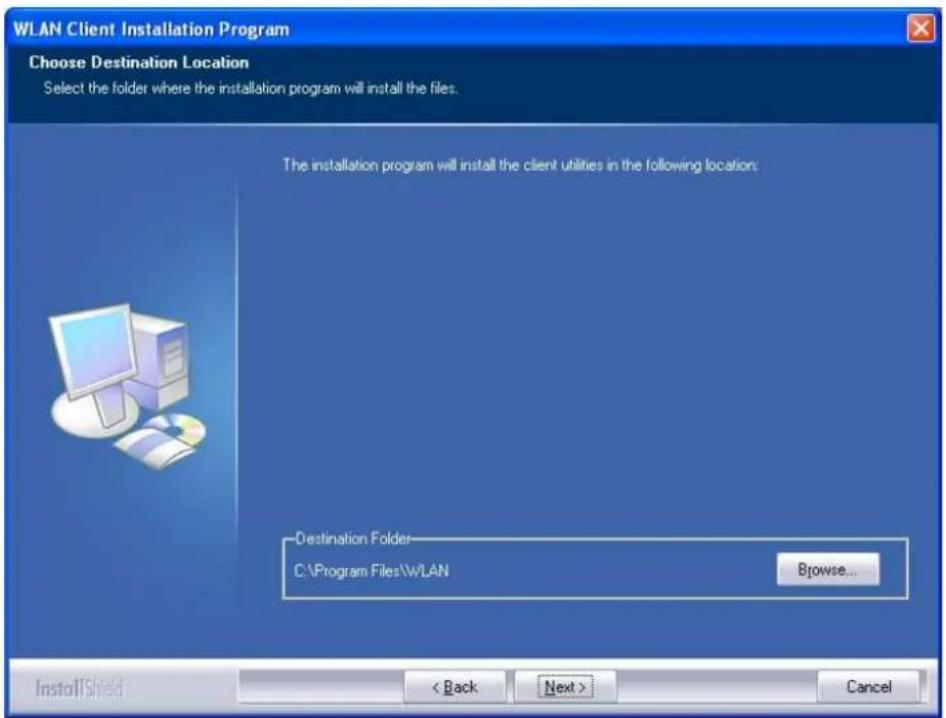
- Click on the Browse button to select another drive or folder to install the drivers, and then click on the Next button. If you would like to use the default destination folder, click on the Next button.

- Select a program folder for the Start menu, or use the default setting: WLAN. Click on the Next button to continue.

- The message depicted above informs you about configuring this device through the 802.11 Client Utility (ACU) or a third party supplicant. If you choose to use a third party supplicant, some of the ACU features will not be available. Click on the Next button to continue.

- Select one of the options. However, it is recommended to select the first option: 802.11 WLAN Client Utility and 802.1x Supplicant. Click on the Next button to continue.

-
At this point, carefully insert the device into the PCMCIA slot of your computer, and click on the OK button.
-
Windows will automatically detect the device and display the Found New Hardware Wizard, as the image depicts below. It will ask you to connect to the Windows Update website, to search for software. Select No, not this time, and click on the Next button.
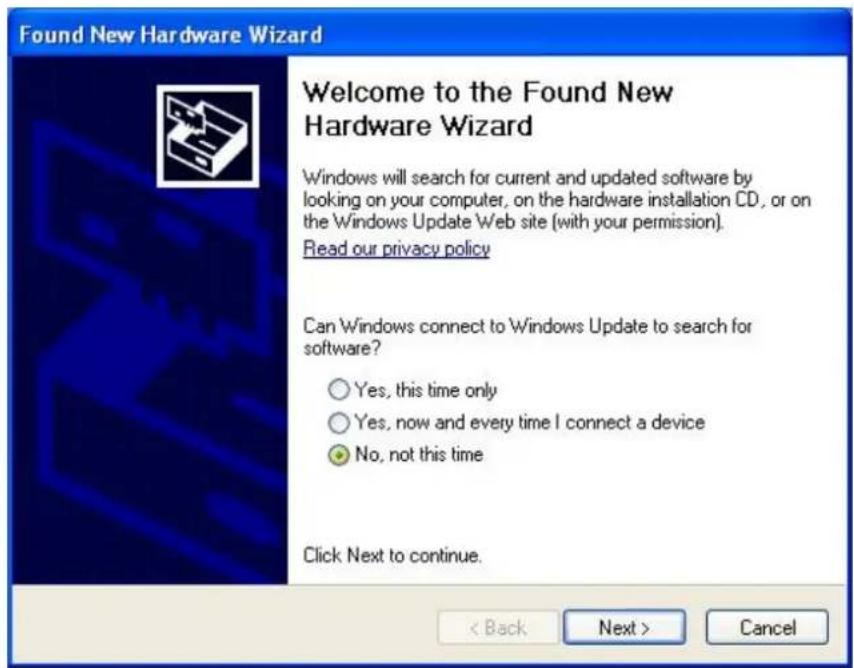
-
Once again the Found New Hardware Wizard will ask you to install software. Click on the Cancel button to continue.
-
If you are using Windows XP, you will see a message regarding Windows Logo Testing, click on the Continue Anyway button to continue.

- Once again, you will see a message regarding Windows Logo Testing, click on the Continue Anyway button to continue.

- A message will then appear indicating that the installation process is complete Click on the OK button to reboot the system.
3 Using the Client Utility
After a successful installation you will see the Cardbus adapter Client Utility in the Windows Program group called 802.11 WLAN.
To run the Client Utility click Start > Programs > IEEE WLAN USB. You will then see the Client Utility icon in the system tray of your computer.

Client Utility
To open the Client Utility, right click on the icon in the system tray, and then select Open WLAN Client Utility.

3.1 Current Status
The Current Status tab displays the current status of the wireless radio. The following information is included in this tab, as the image depicts below.

Profile Name: Displays the name of this profile. One device can have many profiles, but only one profile can be loaded at a time. Note: The profile name and network name (SSID) are not the same.
Link Status: This indicates the state of the client, associated or not associated.
Wireless Mode: Displays the 802.11 mode such as: 2.4GHz 11 Mbps, 2.4GHz 54 Mbps, 2.4GHz 108Mbps.
Network Type: Displays the type of network, such as: Infrastructure or Ad-hoc.
Server Based Authentication: Displays information about the authentication method.
IP address: Displays the IP address of this device.
Current Channel: Displays the channel at which this device is connected.
Current Channel: Displays the type of encryption used.
▶ Signal Strength: Displays the strength of the signal.
Click on the Advanced button to view more details about the current status. This window includes information such as: network name (SSID), AP MAC address, power save mode, power levels, signal strength, noise level, channel, frequency, and channel set (country). Click on the OK button to close the window.
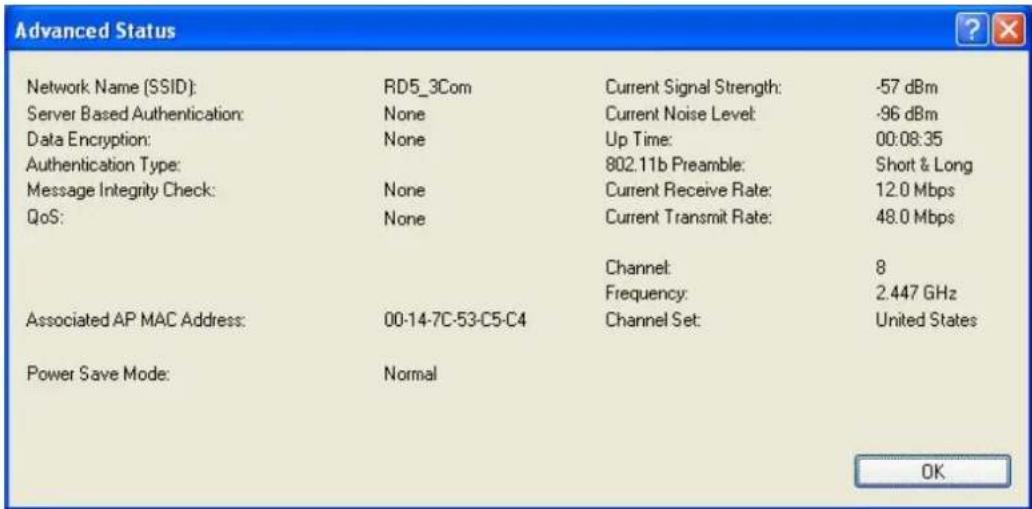
3.2 Profile Management
The second tab displayed is the Profile Management tab. This tab is used to create a new profile, modify an existing profile, remove an existing profile, and activate an existing profile.

3.2.1 Scan for available networks
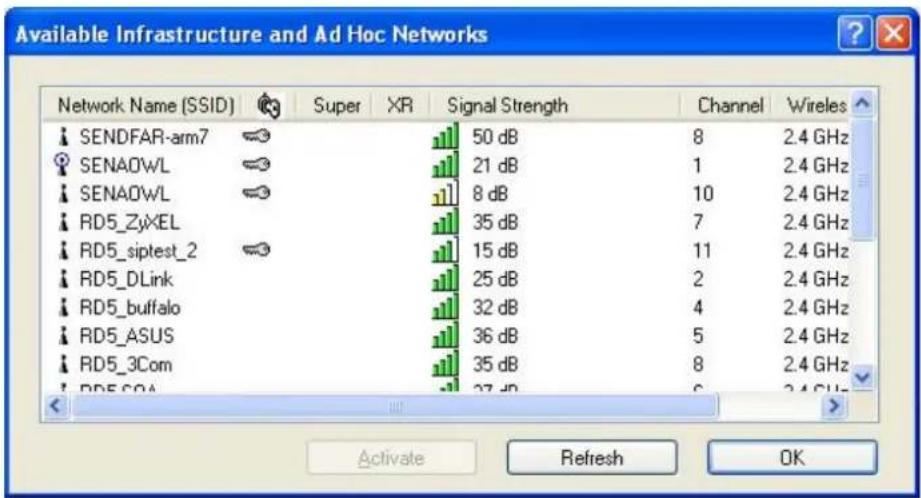
Click on the Scan button to view a list of available infrastructure and ad-hoc networks. This table lists the network name, encryption key if required, signal strength, channel, and wireless mode.
bar
Available Infrastructure and Ad Hoc Networks | Network Name (SSID) | Super | XR | Signal Strength | Channel | Wireless | |---|---|---|---|---|---| | SENDFAR-arm7 | | | 50 dB | 8 | 2.4 GHz | | SENAOWL | | | 21 dB | 1 | 2.4 GHz | | SENAOWL | | | 8 dB | 10 | 2.4 GHz | | RD5_ZyXEL | | | 35 dB | 7 | 2.4 GHz | | RD5_siptest_2 | | | 15 dB | 11 | 2.4 GHz | | RD5_DLink | | | 25 dB | 2 | 2.4 GHz | | RD5_buffalo | | | 32 dB | 4 | 2.4 GHz | | RD5_ASUS | | | 36 dB | 5 | 2.4 GHz | | RD5_3Com | | | 35 dB | 8 | 2.4 GHz | | RD5_COA | | | 37 dB | 6 | 2.4 GHz |If you would like to associate with a specific network, select the network name (SSID) and then click on the Activate button. You will then get connected to the network if you have the correct permission keys.
3.2.2 Create a New Profile
Multiple profiles can be created for different Network Names (SSIDs). This allows a user to quickly associate with another network, instead of entering the credentials each time.

Click on the New button to create a new profile. You will then see the General tab of the profile management window.

Profile Name: Enter a name for this profile; this can be any name that you may associate with your network. This feature comes in handy when you need to work at several locations where there are different network settings. Using this you can configure a different profile for each of your networks.
▶ Client Name: Enter any name to describe the profile.
SSID1: Enter the SSID of the network. The SSID is a unique name shared among all points in your wireless network. The SSID must be identical for all points in the network, and is case-sensitive.
▶ Click on the OK button to continue.
3.2.3 Security
The next tab displayed is the Security tab. Here you can configure the authentication and encryption method that is used on your network. There are five types of security methods available: none, WPA, WPA-PSK, 802.1x, Pre-shared WEP key. The configuration steps for each method are described below.
3.2.3.1 Security Disabled
If your network does not require any security methods, then select None in the security tab, and then click on the OK button.

3.2.3.2 WPA / WPA2-TLS, TTLS
WPA2 (Wi-Fi Protected Access 2) provides network administrators with a high level of assurance that only authorized users can access the network. WPA (Wi-Fi Protected Access) was designed to improve upon the security features of WEP (Wired Equivalent Privacy). The technology is designed to work with existing Wi-Fi products that have been enabled with WEP. WPA provides improved data encryption through the Temporal Integrity Protocol (TKIP), which scrambles the keys using a hashing algorithm and by adding an integrity-checking feature which makes sure that keys haven't been tampered with.
Select the WPA/WPA2 radio button, and then select EAP – TLS or EAP – TTLS from the drop-down list. TLS (Transport Layer Security) is an IETF standardized authentication protocol that uses PKI (Public Key Infrastructure) certificate-based authentication of both the client and authentication server.

Click on the Configure button to configure the TTLS settings.
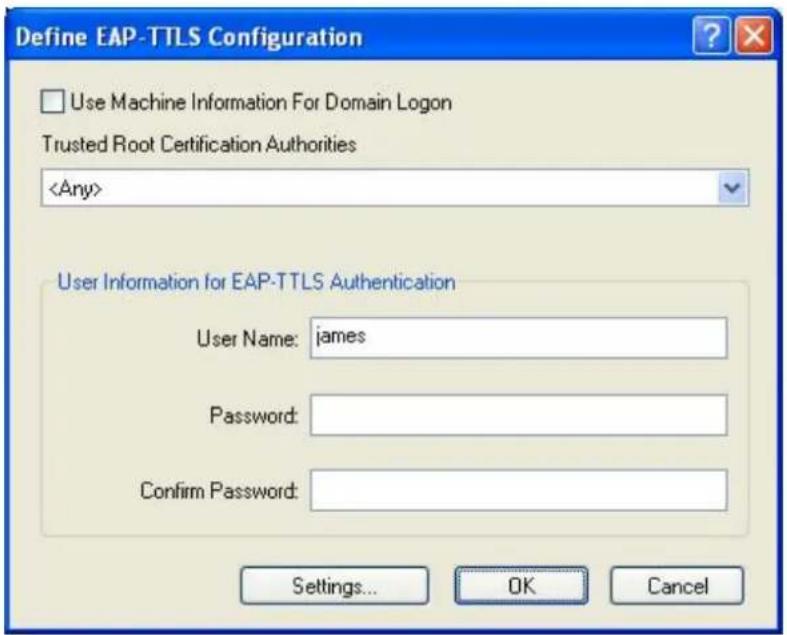
Trusted Root Certification Authorities: Select the appropriate certificate authority from the drop-down list.
▶ User Name: Enter the user name for the certificate authority.
Password: Enter the password that corresponds with the user name for the certificate authority.
▶ Confirm Password: Re-type the password.
Click on the Settings button.

Specific Server or Domain: Leave the server name blank for the client to accept a certificate from any server with a certificate signed by the authority listed in the Network Certificate Authority drop-down list. (Recommended). You can also enter the domain name of the server from which the client will accept a certificate.
Login Name: Enter the login name if required.
Click on the OK button to return to the previous window. Once again, click on the OK button to return to the Profile Management window.
3.2.3.3 WPA/WPA2 - PEAP (EAP-GTC)
PEAP (EAP-GTC) was standardized along with EAP in RFC 2284. EAP-GTC allows the exchange of clear text authentication credentials across the network. The GTC method does provide a way to move a simple username and password from client to server using an EAP method, so it can be used to provide an authentication method. Naturally, if EAP-GTC is used to transport reusable passwords, it must be used inside a tunnel for protection and server authentication. EAP-GTC can be used with both TTLS and PEAP.
Select the WPA/WPA2 radio button, and then select PEAP (EAP-GTC) from the drop-down list.

Click on the Configure button to configure the PEAP (EAP-GTC) settings.
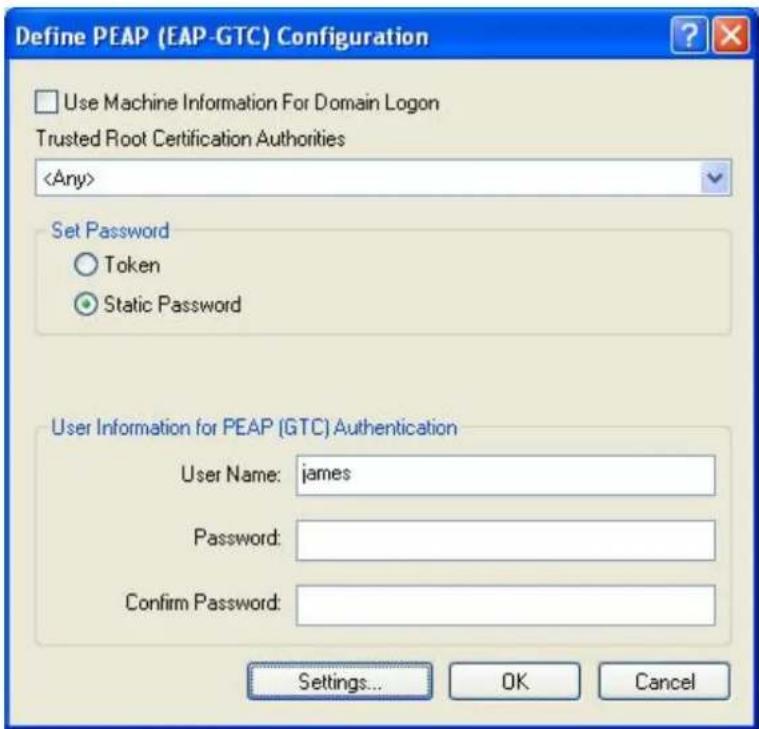
Trusted Root Certification Authorities: Select the appropriate certificate authority from the drop-down list.
▶ User Name: Enter the user name for the certificate authority.
Set Password: Select Token or Static Password radio button. The default setting is Static Password.
Click on the Settings button.
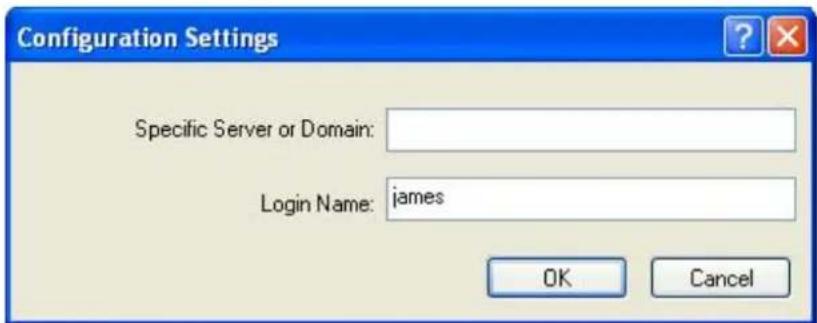
Specific Server or Domain: Leave the server name blank for the client to accept a certificate from any server with a certificate signed by the authority listed in the Network Certificate Authority drop-down list. (Recommended). You can also enter the domain name of the server from which the client will accept a certificate.
- Login Name: Enter the login name if required.
Click on the OK button to return to the previous window. Once again, click on
the OK button to return to the Profile Management window.
3.2.3.4 WPA/WPA2 - PEAP (EAP-MSCHAP-V2)
The PEAP (EAP-MSCHAP V2) authentication type is based on EAPTLS authentication, but uses a password instead of a client certificate for authentication. PEAP (EAP-MSCHAP V2) uses a dynamic session-based WEP key, which is derived from the device and RADIUS server, to encrypt data.
Select the WPA/WPA2 radio button, and then select PEAP (EAP-MSCHAP-V2) from the drop-down list.

Click on the Configure button to configure the PEAP (EAP-MSCHAP-V2) settings.

Trusted Root Certification Authorities: Select the appropriate certificate authority from the drop-down list.
User Name: Enter the user name for the certificate authority.
➢ Password: Enter the password that corresponds with the user name for the certificate authority.
▶ Confirm Password: Re-type the password.
Click on the Settings button.
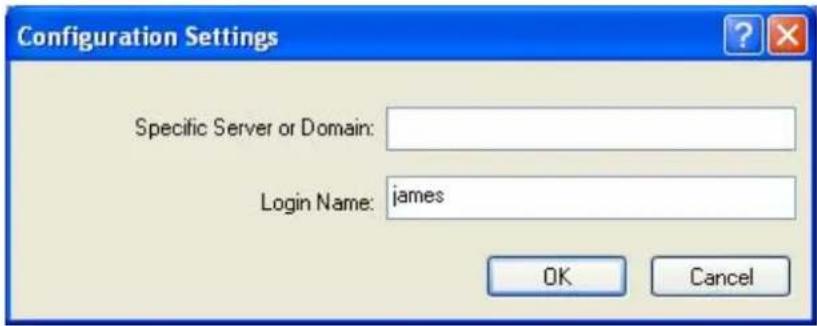
Specific Server or Domain: Leave the server name blank for the client to accept a certificate from any server with a certificate signed by the authority listed in the Network Certificate Authority drop-down list. (Recommended). You can also enter the domain name of the server from which the client will accept a certificate.
- Login Name: Enter the login name if required.
Click on the OK button to return to the previous window. Once again, click on the OK button to return to the Profile Management window.
3.2.3.5 WPA/WPA2 – LEAP
LEAP (Lightweight Extensible Authentication Protocol) also known as Cisco-Wireless EAP provides username/password-based authentication between a wireless client and a RADIUS server. LEAP is one of several protocols used with the IEEE 802.1X standard for LAN port access control. LEAP also delivers a session key to the authenticated station, so that future frames can be encrypted with a key that is different than keys used by others sessions. Dynamic key delivery eliminates one big vulnerability; static encryption keys that are shared by all stations in the WLAN.
Select the WPA/WPA2 radio button, and select LEAP from the drop-down list.

Click on the Configure button to configure the LEAP settings.

Use Temporary User Name and Password: Select this radio button for a temporary user name and password. This will manually prompt for the user name and password.
Use Saved User Name Password: Select this radio button if the user name and password will be saved in this profile.
▶ User Name: Enter the user name for the certificate authority.
➢ Password: Enter the password that corresponds with the user name for the certificate authority.
▶ Confirm Password: Re-type the password.
Click on the OK button to return to the previous window
3.2.3.6 WPA/WPA2 – Passphrase

Select the WPA/WPA2 Passphrase radio button and then click on the Configure button.

Enter a WPA/WPA2 passphrase. For ASCII text, enter 8-63 characters,
for hexadecimal enter 64 characters).
Click on the OK button to return to the previous window. Once again, click on the OK button to return to the Profile Management window.
3.2.3.7 802.1x - TLS, TTLS
802.1X provides an authentication framework for wireless LANs allowing a user to be authenticated by a central authority. 802.1X uses an existing protocol called EAP. EAP (Extensible Authentication Protocol) is an extension to the PPP protocol that enables a variety of authentication protocols to be used. It passes through the exchange of authentication messages, allowing the authentication software stored in a server to interact with its counterpart in the client.
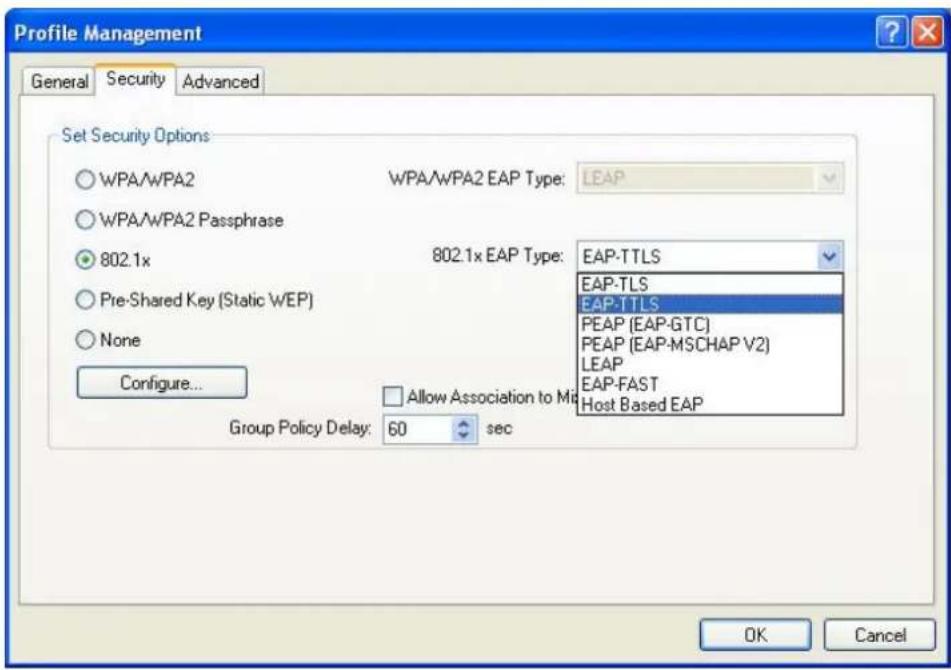
Select the 802.1x radio button, and then select EAP – TLS or EAP – TTLS from the drop-down list. TLS (Transport Layer Security) is an IETF standardized authentication protocol that uses PKI (Public Key Infrastructure) certificate-based authentication of both the client and authentication server.
Click on the Configure button to configure the TTLS settings.

Trusted Root Certification Authorities: Select the appropriate certificate authority from the drop-down list.
▶ User Name: Enter the user name for the certificate authority.
➢ Password: Enter the password that corresponds with the user name for the certificate authority.
▶ Confirm Password: Re-type the password.
Click on the Settings button.
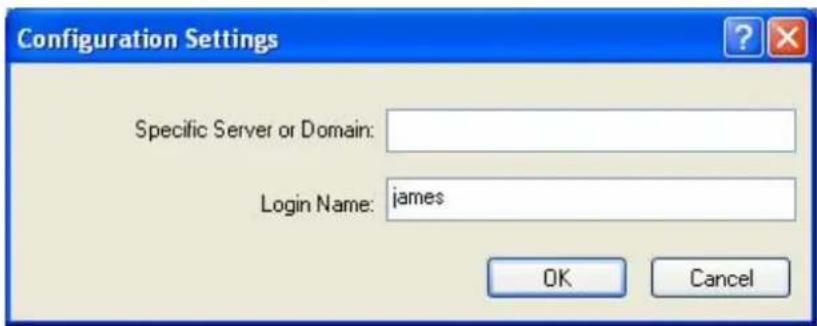
Specific Server or Domain: Leave the server name blank for the client to accept a certificate from any server with a certificate signed by the authority listed in the Network Certificate Authority drop-down list. (Recommended). You can also enter the domain name of the server from which the client will accept a certificate.
- Login Name: Enter the login name if required.
Click on the OK button to return to the previous window. Once again, click on the OK button to return to the Profile Management window.
3.2.3.8 802.1x - PEAP (EAP-GTC)
PEAP (EAP-GTC) was standardized along with EAP in RFC 2284. EAP-GTC allows the exchange of clear text authentication credentials across the network. The GTC method does provide a way to move a simple username and password from client to server using an EAP method, so it can be used to provide an authentication method. Naturally, if EAP-GTC is used to transport reusable passwords, it must be used inside a tunnel for protection and server authentication. EAP-GTC can be used with both TTLS and PEAP.
Select the 802.1x radio button, and then select PEAP (EAP-GTC) from the dropdown list.
![Profile Management General Security Advanced Set Security Options WPA/WPA2 WPA/WPA2 EAP Type: LEAP WPA/WPA2 Passphrase 802.1x 802.1x EAP Type: PEAP (EAP-GTC) Pre-Shared Key (Static WEP) PEAP [EAP-GTC] None PEAP (EAP-MSCHAP V2) PEAP-TTLS EAP-TTLS PEAP [EAP-GTC] PEAP (EAP-MSCHAP V2) LEAP EAP-FAST Host Based EAP Configure... Allow Association to Mit Group Policy Delay: 60 sec OK Cancel](/content/2026/05/920970/images/1981cfd6f7fa90fd958072ce89d111d047200a7f5ba25ce02d65b8223de8ef56.jpg)
Click on the Configure button to configure the PEAP (EAP-GTC) settings.

Trusted Root Certification Authorities: Select the appropriate certificate authority from the drop-down list.
▶ User Name: Enter the user name for the certificate authority.
Set Password: Select Token or Static Password radio button. The default setting is Static Password.
Click on the Settings button.
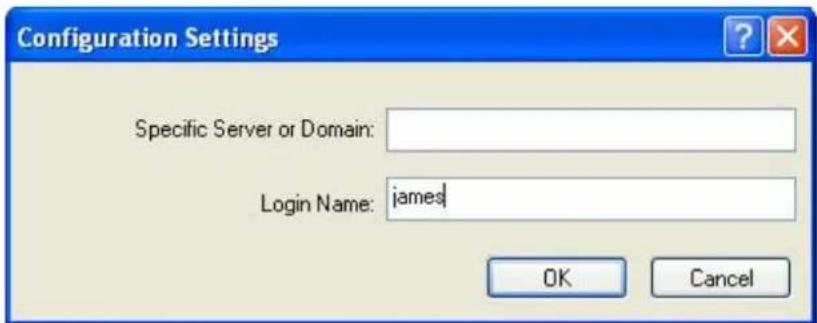
Specific Server or Domain: Leave the server name blank for the client to accept a certificate from any server with a certificate signed by the authority listed in the Network Certificate Authority drop-down list. (Recommended). You can also enter the domain name of the server from which the client will accept a certificate.
- Login Name: Enter the login name if required.
Click on the OK button to return to the previous window. Once again, click on
the OK button to return to the Profile Management window.
3.2.3.9 802.1x - PEAP (EAP-MSCHAP-V2)
The PEAP (EAP-MSCHAP V2) authentication type is based on EAPTLS authentication, but uses a password instead of a client certificate for authentication. PEAP (EAP-MSCHAP V2) uses a dynamic session-based WEP key, which is derived from the device and RADIUS server, to encrypt data.
Select the 802.1x radio button, and then select PEAP (EAP-MSCHAP-V2) from the drop-down list.

Click on the Configure button to configure the PEAP (EAP-MSCHAP-V2) settings.
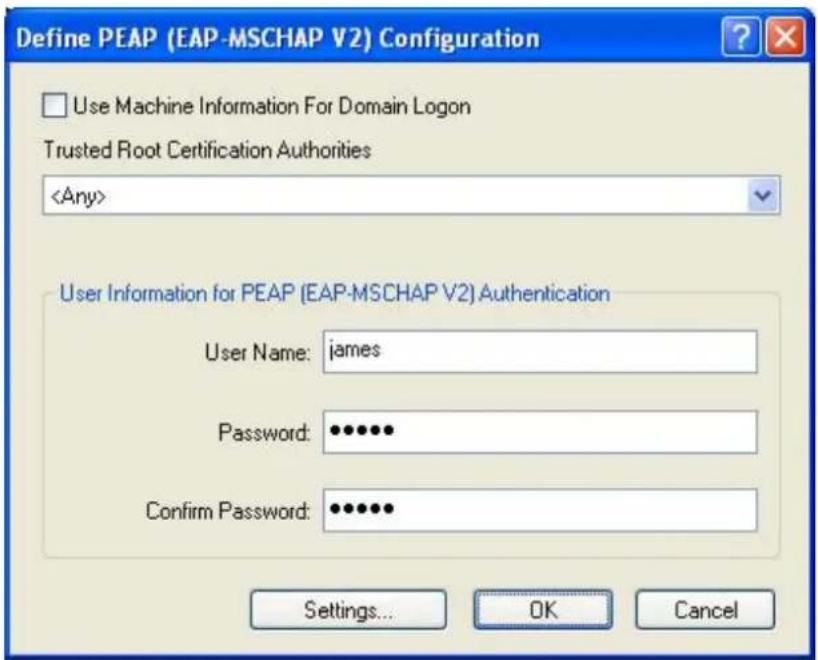
Trusted Root Certification Authorities: Select the appropriate certificate authority from the drop-down list.
User Name: Enter the user name for the certificate authority.
Password: Enter the password that corresponds with the user name for the certificate authority.
▶ Confirm Password: Re-type the password.
Click on the Settings button.

Specific Server or Domain: Leave the server name blank for the client to accept a certificate from any server with a certificate signed by the authority listed in the Network Certificate Authority drop-down list. (Recommended). You can also enter the domain name of the server from which the client will accept a certificate.
- Login Name: Enter the login name if required.
Click on the OK button to return to the previous window. Once again, click on the OK button to return to the Profile Management window.
3.2.3.10 802.1x - LEAP
LEAP (Lightweight Extensible Authentication Protocol) also known as Cisco-Wireless EAP provides username/password-based authentication between a wireless client and a RADIUS server. LEAP is one of several protocols used with the IEEE 802.1X standard for LAN port access control. LEAP also delivers a session key to the authenticated station, so that future frames can be encrypted with a key that is different than keys used by others sessions. Dynamic key delivery eliminates one big vulnerability; static encryption keys that are shared by all stations in the WLAN.
Select the 802.1x radio button, and then select LEAP from the drop-down list.

Click on the Configure button to configure the LEAP settings.

Use Temporary User Name and Password: Select this radio button for a temporary user name and password. This will manually prompt for the user name and password.
Use Saved User Name Password: Select this radio button if the user name and password will be saved in this profile.
▶ User Name: Enter the user name for the certificate authority.
➢ Password: Enter the password that corresponds with the user name for the certificate authority.
▶ Confirm Password: Re-type the password.
Click on the OK button to return to the previous window
3.2.3.11 Pre-Shared Key (Static WEP)
You may select 64, 128 or 152 bit WEP (Wired Equivalent Privacy) key to encrypt data (Default setting is Disable). WEP encrypts each frame transmitted from the radio using one of the Keys from a panel. When you use WEP to communicate with the other wireless clients, all the wireless devices in this network must have the same encryption key or pass phrase.

Select the Pre-Shared Key (Static WEP) radio button and click on the Configure button.

Key Entry: Select Hexadecimal or ASCII depending on the WEP key that is used.
WEP Key Size: Select 64, 128, or 152 bit WEP key size.
▶ Transmit Key: Enter the WEP key in the four WEP key text boxes.
Click on the OK button to return to the previous window
3.2.4 Advanced Settings
Click on the Advanced tab in the Profile Management section. Here you can configure the transmit power level, wireless mode, power save mode, and network type.
3.2.4.1 Infrastructure Settings

Wireless Mode: Place a check in the preferred frequency and data rates.
Power Save Mode: Select Maximum, Normal, or Off from the drop-down list. Selecting Maximum will save the most power; this is recommended if using a laptop running on battery. For other instances, use the Normal of Off setting.
▶ Network Type: Select Infrastructure from the drop-down list.
802.11b Preamble: This setting should be the same as the access point. If you are not sure of that setting, select Short & Long.
Preferred APs: Click on this button to add specific access points to this profile. Then enter the MAC addresses of the specific access points and then click on the OK button to return to the previous window.

3.2.4.2 Ad Hoc Settings

Wireless Mode: Place a check in the preferred frequency and data rates.
▶ Network Type: Select Ad hoc from the drop-down list.
802.11b Preamble: This setting should be the same as the access point. If you are not sure of that setting, select Short & Long.
Click on the OK button to return to the previous window
3.3 Diagnostics
The third tab displayed is the Diagnostics tab. This tab displays the number of transmitted and received packets.

Click on the Adapter Information button to view information about the Cardbus adapter such as: card name, MAC address, driver name, driver version, and driver date.

Click on the OK button to return to the previous window
Click on the Advanced Statistics button to view detailed statistics about transmit and receive frames.

Click on the OK button to return to the previous window
3.4 Enable / Disable Radio
To disable the radio, click on Action in the menu bar, and then click on Disable Radio.

You will then see a confirmation message "The RF signals for the following network card(s) have been successfully disabled".

Click on the OK button to continue.
To enable the radio, click on Action in the menu bar, and then click on Enable Radio.
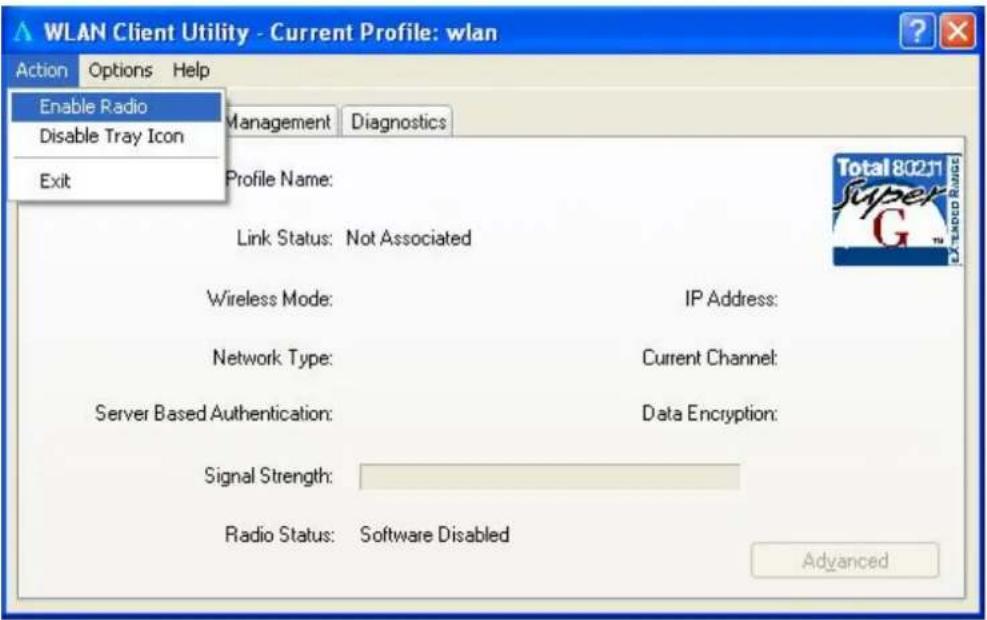
You will then see a confirmation message "The RF signals for the following network card(s) have been successfully enabled".

Click on the OK button to continue.
3.5 Disable Tray Icon
To disable the tray icon, click on Action in the menu bar, and then click on Disable Tray Icon.

You will then notice that the tray icon has disappeared from the system tray.
3.6 Display Settings
To change the display settings, click on Options in the menu bar, and then click on Display Settings.
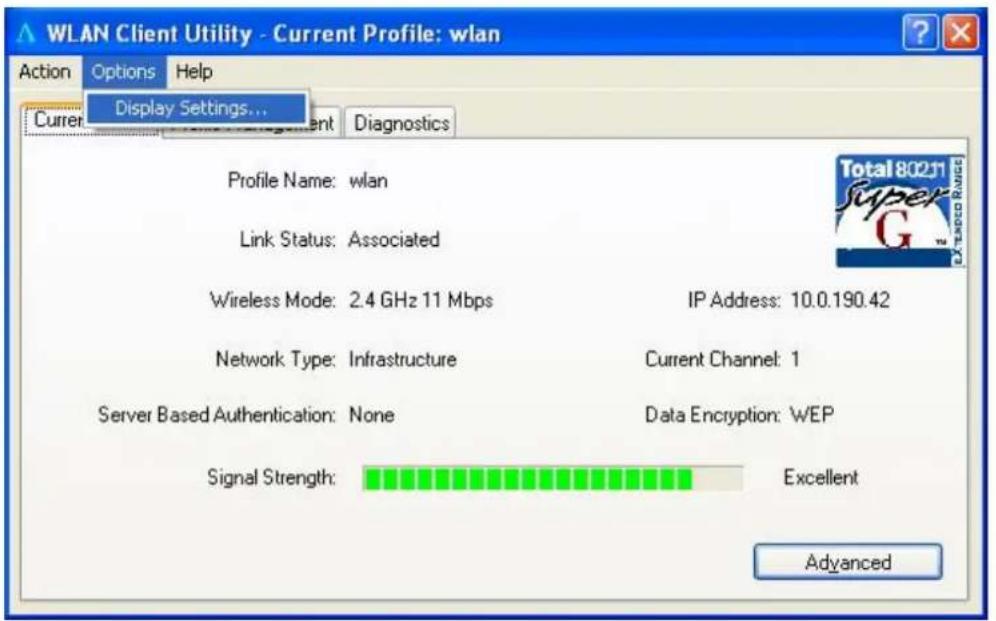
In this window you can change the Signal Strength Display Units from dBm to %, and increase or decrease the refresh interval rate, as well as displaying the data in a cumulative or relative fashion.
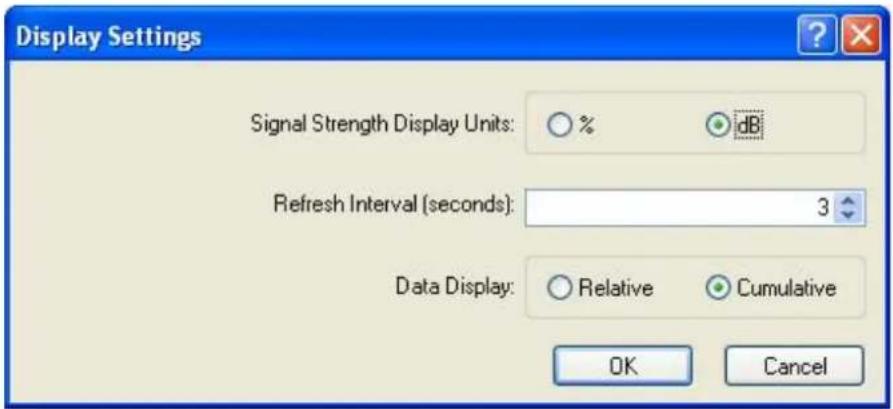
Click on the OK button to return to the previous window.
4 Uninstall the Drivers & Client Utility
If the device installation is unsuccessful for any reason, the best way to solve the problem may be to completely uninstall the device and its utility and repeat the installation procedure again.
Follow the steps below in order to uninstall the Drivers and Client Utility:
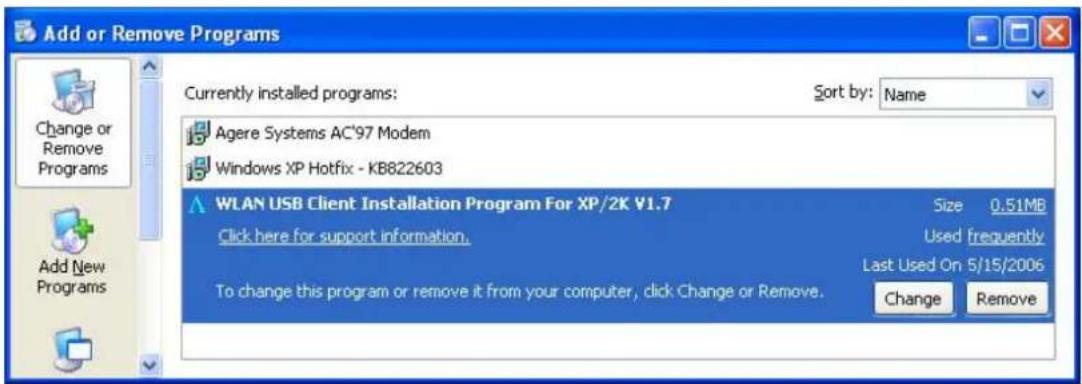
- Click on Start > Settings > Control Panel > Add or Remove Programs
- You will then see the following window. Select the Atheros Utility and then click on Change/Remove.
- Click on Uninstall the previous installation radio button.

- Click on the Next button to continue. You will then see the following message informing you that you must restart the system after installation.

- Click on the Yes button to continue. You will then see the following message asking you if you would like to remove the application.

- Click on the OK button to continue. You will then see the following message asking you if you would like to remove the driver and all the existing profiles.

- Click on the Yes button to continue. You must then restart your system to complete the Uninstallation.

- Remove the device form your computer and then click on the OK button. The Uninstallation process is complete.
Appendix A – Specifications
Data Rates
802.11g: 6, 9, 12, 18, 24, 36, 48, 54, 72, 96 & 108 (Super G) Mbps
802.11b: 1, 2, 5.5, 11Mbps
Standards / Compliance
IEEE802.11, IEEE802.11g, IEEE802.11b, draft IEEE 802.11e, and i standards, IEEE802.1x
Regulation Certifications
FCC Part 15/UL, ETSI 300/328/CE
Operating Voltage
5 V ± 0.25V
Status LEDs
RF link activity
Drivers
Windows XP/2K/ME/98
RF Information
Frequency Band
U.S., Europe and Japan product covering 2.4 to 2.484 GHz, programmable for different country regulations
Media Access Protocol
Carrier Sense Multiple Access with Collision Avoidance (CSMA/CA)
Modulation Technology
802.11g: OFDM (64-QAM, 16-QAM, QPSK, BPSK)
11 for North America, 14 for Japan, 13 for Europe
Receive Sensitivity (Typical)
- 2.412\~2.472G(IEEE802.11g) 6Mbps@ -91dBm; 54Mbps@ -76dBm
- 2.412\~2.472G(IEEE802.11b) 11Mbps@ -91dBm; 1Mbps@ -96dBm
Available transmit power
FCC
2.412\~2.472G(IEEE802.11g)
22 dBm @ 6 \~ 24 Mbps
21 dBm @ 36 Mbps
20 dBm @ 48 Mbps 19 dBm @ 54 Mbps
2.412\~2.472G(IEEE802.11b) 22 dBm @1\~11Mbps
ETSI
2.412\~2.472G(IEEE802.11g)
20 dBm @ 6 \~ 24 Mbps
20 dBm @ 36 Mbps
20 dBm @ 48 Mbps
19 dBm @ 54 Mbps
2.412\~2.472G(IEEE802.11b) 20 dBm @1\~11Mbps
Antenna
Detachable Dipole antenna (2dBi Gain)
Networking
Topology
Ad-Hoc, Infrastructure
Security
IEEE802.1x support for LEAP/PEAP
WEP 64,128,152bit
WPA (PSK,TKIP)
WPA2 (AES)
Physical
Form Factor
USB 2.0
Dimensions
75.2(L) mm x 53.9(W) mm x 14(H) mm
Weight
40 g/ 1.5oz
Environmental
Temperature Range
Operating: -0°C to 55°C
Storage: -20°C to 75°C
Humidity (non-condensing)
5%\~95% Typical
Package Contents
One USB Adapter
One USB Cable
One CD-ROM with User's Manual and Drivers
Appendix B – FCC Interference Statement
Federal Communication Commission Interference Statement
This equipment has been tested and found to comply with the limits for a Class B digital device, pursuant to Part 15 of the FCC Rules. These limits are designed to provide reasonable protection against harmful interference in a residential installation. This equipment generates uses and can radiate radio frequency energy and, if not installed and used in accordance with the instructions, may cause harmful interference to radio communications. However, there is no guarantee that interference will not occur in a particular installation. If this equipment does cause harmful interference to radio or television reception, which can be determined by turning the equipment off and on, the user is encouraged to try to correct the interference by one of the following measures:
● Reorient or relocate the receiving antenna.
- Increase the separation between the equipment and receiver.
- Connect the equipment into an outlet on a circuit different from that to which the receiver is connected.
- Consult the dealer or an experienced radio/TV technician for help.
FCC Caution: Any changes or modifications not expressly approved by the party responsible for compliance could void the user's authority to operate this equipment.
This device complies with Part 15 of the FCC Rules. Operation is subject to the following two conditions: (1) This device may not cause harmful interference, and (2) this device must accept any interference received, including interference that may cause undesired operation.
IMPORTANT NOTE:
FCC Radiation Exposure Statement:
This equipment complies with FCC radiation exposure limits set forth for an uncontrolled environment.
This device complies with FCC RF Exposure limits set forth for an uncontrolled environment, under 47 CFR 2.1093 paragraph (d)(2).
This transmitter must not be co-located or operating in conjunction with any other antenna or transmitter.
- Wireless USB 2.0 Adapter
- User's Manual
- Table of Contents
- INTRODUCTION .... 4
- INSTALL DRIVERS & CLIENT UTILITY 9
- USING THE CLIENT UTILITY....15
- UNINSTALL THE DRIVERS & CLIENT UTILITY 45
- APPENDIX A – SPECIFICATIONS...... 47
- APPENDIX B – FCC INTERFERENCE STATEMENT 48
- Introduction
- Features & Benefits
- Package Contents
- USB Adapter Description
- System Requirements
- Applications
- a) Difficult-to-wire environments
- b) Temporary workgroups
- c) The ability to access real-time information
- d) Frequently changed environments
- e) Small Office and Home Office (SOHO) networks
- f) Wireless extensions to Ethernet networks
- g) Wired LAN backup
- h) Training/Educational facilities
- Network Configuration
- b) Infrastructure Mode
- Install Drivers & Client Utility
- Before You Begin
- Installing the Drivers
- Using the Client Utility
- Current Status
- Profile Management
- Scan for available networks
- Create a New Profile
- Security
- Security Disabled
- WPA / WPA2-TLS, TTLS
- WPA/WPA2 - PEAP (EAP-GTC)
- WPA/WPA2 - PEAP (EAP-MSCHAP-V2)
- WPA/WPA2 – LEAP
- WPA/WPA2 – Passphrase
- 802.1x - TLS, TTLS
- 802.1x - PEAP (EAP-GTC)
- 802.1x - PEAP (EAP-MSCHAP-V2)
- 802.1x - LEAP
- Pre-Shared Key (Static WEP)
- Advanced Settings
- Infrastructure Settings
- Ad Hoc Settings
- Diagnostics
- Enable / Disable Radio
- Disable Tray Icon
- Display Settings
- Uninstall the Drivers & Client Utility
- Appendix A – Specifications
- Data Rates
- Standards / Compliance
- Regulation Certifications
- Operating Voltage
- Status LEDs
- Drivers
- RF Information
- Frequency Band
- Media Access Protocol
- Modulation Technology
- Receive Sensitivity (Typical)
- Available transmit power
- FCC
- ETSI
- Antenna
- Networking
- Topology
- Security
- Physical
- Form Factor
- Dimensions
- Weight
- Environmental
- Temperature Range
- Humidity (non-condensing)
- Package Contents
- Appendix B – FCC Interference Statement
- Federal Communication Commission Interference Statement
- IMPORTANT NOTE:
- FCC Radiation Exposure Statement:
Brand : ENGENIUS
Model : EUB-362 EXT
Category : Network card / adapter