
LW108P - DVD player AIRIS - Free user manual and instructions
Find the device manual for free LW108P AIRIS in PDF.


| Product Type | DVD Player |
| Brand | Airis |
| Model | LW108P |
| Dimensions (W x H x D) | 300 x 48.5 x 200 mm |
| Weight | ≤ 3 kg |
| Power Supply | 176-265 V AC, 50 Hz |
| Supported Disc Formats | DVD-VIDEO, SVCD, HDCD, VCD, MP3, WMA, JPEG, CD-R, CD-RW, DVD-R/RW, XviD |
| Video Outputs | RCA composite, S-Video, SCART (RGB), Component |
| Audio Outputs | 2-channel analog (RCA L/R), Coaxial digital |
| TV System Compatibility | PAL, NTSC, Multi |
| Aspect Ratio | 4:3, 16:9 |
| Playback Functions | Programmed playback, repeat, shuffle, A-B repeat, zoom (x1, x2, x3), slow motion, fast forward/rewind, angle, subtitle, audio language selection |
| Parental Control | Yes (password-protected rating) |
| Remote Control | Fully functional with AAA batteries (2 pcs) |
| OSD Languages | English, French, Spanish, Portuguese |
| Maintenance | Clean with soft dry cloth; do not use alcohol, benzene, or chemicals |
| Safety Precautions | Class 1 laser product; do not open casing; avoid moisture and direct sunlight |
| Repairability | Only qualified technician authorized for service |
| Copy Protection | Macrovision |
Frequently Asked Questions - LW108P AIRIS
User questions about LW108P AIRIS
0 question about this device. Answer the ones you know or ask your own.
Ask a new question about this device
Download the instructions for your DVD player in PDF format for free! Find your manual LW108P - AIRIS and take your electronic device back in hand. On this page are published all the documents necessary for the use of your device. LW108P by AIRIS.
USER MANUAL LW108P AIRIS
E
Conexiones básicas
Antes de conectar:
B


Nota:
natural_image
Line drawing of a vertical device with a handle and base, no text or symbols presentE
1. Idioma
5. Misc


Read through this manual prior to connection and operation, and retain it handy for convenient reference.
GB
Contents
Contents 2
Safety Information ....3
Features 4
Precautions....4
Accessories 5
Front Panel Guide 5
Rear Panel Guide 6
Remote Control Guide ....7
LED Display Description ....8
Basic Connection....9
Remote Control Preparation 11
Operation 12
Remote Control operation 12
Playing CD/ MP3/JPEG/MPEG4 discs ....14
Setup Operation 14
For Your Reference ....17
- Maintenance Information ....17
- Definition of Terms....17
- Specifications 18
- Troubleshooting ....19
Safety Information
Thanks for purchasing this DVD/ VCD/CD player. Read the Operation Manual thoroughly and keep the precautions in mind before attempting to connect and operate this player.
Note:
The appropriate power supply for this player should only be 176 - 265V , 50Hz .
Caution:
- This DVD/CD player is a class 1 laser product utilizing a visible laser beam, which may cause radiation hazard if it directly points to human body. However, it is safe enough to use as long as you follow the operation instruction closely and never open the casing or loader cover when operate it.
- Do not look closely at the disc tray or other openings on the apparatus or look into it when it is working.
- Do not remove the protective cap on the optical output jack and look into the socket through which certain red laser beam comes out and harm your eyes (esp. for children), once the player is plugged into the mains outlet. Whenever this jack is spared, be sure to put on the cap.
- Failing to follow the ways of operation, adjustment or control regulated herein when using the unit may lead to radioactive threat.
- Let a qualified and authorized technician do the service work for this player.
Warning
- To reduce the risk of fire or electric shock accident, do not expose this unit to moisture or rain;
- To reduce the chance of fire or electric shock, do utilize only the accessories recommended by the manufacturer.
Copy Protection
This DVD/VCD/ CD player supports Macrovison copy protection technology. On DVD discs that include a copy protection code, if the contents of the DVD disc are copied using a VCR, the copy protection code prevents the videotape copy from playing normally.
This product incorporates copyright protection technology that is protected by U.S. patents and other intellectual property rights. Use of this copyright protection technology must be authorized by Macrovision, and is intended for home and other limited viewing uses only unless otherwise authorized by Macrovision. Reverse engineering or disassembly is prohibited.
Feactures y Precautions
Features
- Compatible with various disc formats: DVD-VIDEO, SVCD, HDCD, VCD, MP3, WMA, JPEG, CD-R, CD-RW, DVD-R/ RW, XviD etc..
- Supports RCA Video and Europe SCART output in 16: 9 format.
- Compatible with PAL and NTSC systems
- SCART output: Composite video, RGB signal as well as Aspect Ratio control and RGB output control.
- Digital audio output: coaxial jack supports DTS output.
- 2 CH audio output
- Supports programmed playback
- Graphic operation interfaces, user-friendly
- Supports Parental Control functionality
- Fully functional remote control
- Smart software update
Precautions
Prior to any operation on this player, be sure to peruse the following precautions.
AC Power cord protection
To avoid any malfunctions of the unit, and unwanted electric shock or fire disaster, please observe the following:
- Hold the plug firmly when connecting or disconnecting the power cord to/from an outlet.
- Do not connect or disconnect the power cord when your hands are wet.
- Keep the power cord away from heating appliances.
-Do not rest heavy object on the power cord. - Do not attempt to repair or reconstruct the power cord in any way.
- Clean the plug periodically.
- In case the unit is dropped or damaged, cut off the power and disconnect the power cord.
- If smoke, malodors or noises are found emitting from the unit, cut off the power and disconnect the power cord immediately.
Placement
Avoid placing the unit in surroundings with:
- Direct sunlight or heat sources like heating radiators, or ovens etc..
- High temperature (over 35C) or high humidity (over 90%)
- Excessive dust
- High magnetic or electro-static effect.
- Vibration, impact or tilted surface
Otherwise the internal parts may get damaged.
Non-use Periods
- Best to turn off the power when the unit is not used.
- It should be unplugged from the AC outlet when the unit shall be idle for a long period of time.
No fingers or other objects put inside
- Because of high voltage risk inside the unit, touching internal parts proves to be dangerous, which may cause damage to the unit and even personal injury.
- Do not attempt to disassemble this unit.
- Do not put any foreign object other than a disc on the disc tray.
Keeping
- Keep the unit far away from flower vases, tubs, sinks, etc. If liquids were spilt into the unit, serious damage could occur.
- Avoid bring big magnetic objects such as speakers adjacent to the unit.
Stacking
- Place the unit in a horizontal place, and do not lay anything heavy on it.
- Do not place the unit on amplifiers or other equipment, which may get hot.
Accessories & Front Panel Guide
Accessories
Remote control one piece
Operation manual one piece
3P AV cable one piece
Battery two pieces
Front Panel Guide

- STANDBY button
- Remote control sensor
- OPEN/ CLOSE button
- DVD/ VCD/ CD disc tray
- PLAY/ PAUSE button
- STOP button
- SKIP - button
- SKIP+ button
GB
Rear Panel Guide

- COAXIAL jack:
Digital audio signal is output via this jack, which can be connected to a digital audio decoder or amplifier with Coaxial In connector. - Audio R channel output jack:
- VIDEO output jack:
- Audio L channel output jack:
- S-Video output jack
- Europe SCART output jack (R.G.B)
- AC power cord cable
Remote Control Guide
- STANDBY button
- AUDIO button
- ANGLE button
- SUBTITLE button
- SEARCH button
- PRG(Program) button
- TITLE button
- Combination buttons, and ▶
- DISPLAY button
- RETURN button
- SETUP button
- VOL+ button
- MUTE button
- VOL-button
- A-B button
- F.RWD button
- F.FWD button
- STOP button
- PAUSE/STEP button
- PLAYbutton
- SKIPbutton
- SKIP+ button
- SLOWR button
- SLOWF button
- ZOOM button
- MARK button
- MODE button
- VIDEO-OUT button
- OK button
- MENU button
- CLR(Clear) button
- Numeric (0-9, 10+) button
- OPEN/CLOSE button

GB
Basic Connections
Before connection:
- Ensure this player and other equipments to be connected are turned off before connection.
- Peruse the instructions before connecting other equipment.
- Observe the color-coding when connecting audio and video cords
- It is required that this unit be connected to a TV set in only one video output format, and it be set properly in settings, otherwise the picture might be distorted.
I. Connection to a TV set or a monitor
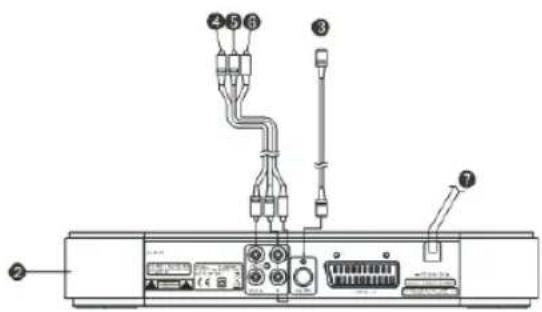
You can connect this unit to your TV set or monitor via the Video, S-video or SCART(RGB) jack.
A: Connection to TV set with AV cords
- TV set/ monitor
- DVD/VCD/ CD player
- S-video cable connected to TV set
4.5. 6 Audio and Video cables (white, red and yellow) connected to TV set. - AC power cord cable
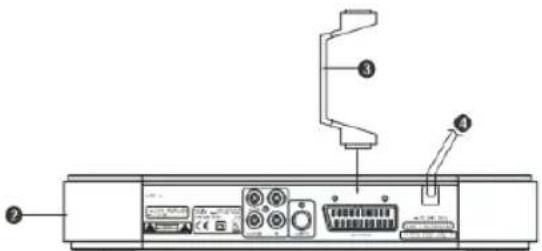
B: Connection to TV set with SCART cable
- TV set/ monitor
- DVD/CD player
- SCART cable connected to the TV set.
- AC power cable.
Note: If RGB input via SCART jack to TV set is applied, please set "Video Out" to "RGB" in the Video menu.
A

B
Basic Connections
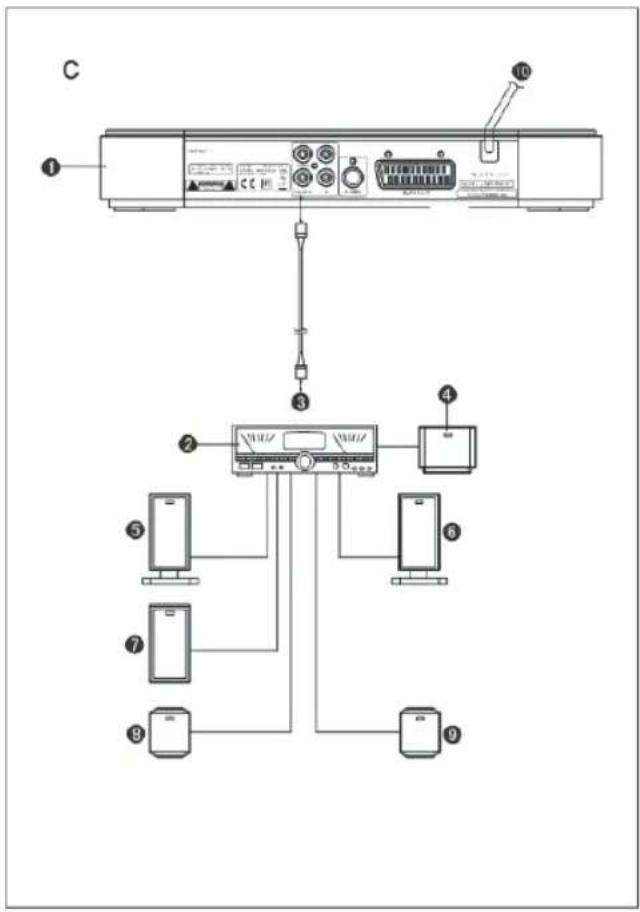
II: Connection to Audio equipments (C)
-
DVD /CD player
-
Audio equipments
-
Digital audio coaxial cable (75 ohm)
-
Subwoofer speaker.
-
- Front L/ R (Left/ Right) speakers
-
Center speaker
-
- Surround L/ R (Left/ Right) speakers
-
AC power cord
Relevant Setting
- When 75Ohm coaxial cable is applied in connecting the audio equipment, please set "Audio Output" to "PCM" or "RAW".
Regarding the audio coaxial connection
- During playback of DVD discs that are recorded in MPEG format, the digital signal stream will be transmitted through digital audio Coaxial cable connected with external MPEG audio decoder or amplifier, then you will be able to enjoy high quality sound effect similar to that of a home theatre.
- Do not connect the player via coaxial jack to an amplifier that does not support DTS/ MPEG audio decoding. In such case extremely high level noises that is harmful to your hearings may arise.
- When a DTS disc is played, there will be no digital output through the coaxial cable unless "Digital Output" is set to "RAW"
GB
Remote Control Preparation
Remote Control Preparation
Battery Installation (D)
Install batteries for the remote control as per Figure D. Service life of batteries
- The batteries normally last for about one year although this depends on how often and for what operations the remote control is used.
- If the remote control unit fails to work even when operated near the player, replace the batteries for a try.
- Use size AAA batteries (2 pieces)
Notes:
- Do not use rechargeable (Ni-Cd) batteries.
- Do not attempt to recharge, short circuit, disassemble, heat the batteries or throw them into the fire.
- Do not drop, tramp on or impact the remote control.
This may damage the internal parts or lead to malfunction.
- Do not mix used and new batteries on the remote control.
- If the remote control is going to be idle for a long time, remove the batteries. Otherwise, electrolyte may leak causing malfunction and even burns if contacted with human body.
- Wipe away any electrolyte leakage inside the remote control, and replace with new batteries
- If any electrolyte happens to contact with your body, wash it off thoroughly with clean water immediately.
D

natural_image
Simple line drawing of a device with a handle and base, no text or symbols presentE

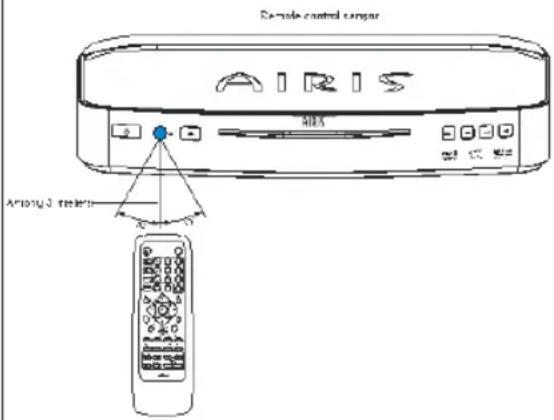
Operation range of Remote control (E)
- The normal operation range of the remote control is about 5m and within about 60 degrees in front of the unit.
- The effective distance varies slightly with the brightness of the room.
Notes:
- Do not point bright lights at the remote control sensor
- Do not place any shield between the remote control and the sensor.
- Do not use this remote control while operating the remote controls of any other equipment.
Operation
Before enjoying a disc
- The OSD language of this player is preset to English. If you want to change it into other languages, please refer to Setup operation.
- Most functions can be operated with the remote control. When the buttons on the remote control and the front panel have the same function, either would be fine for operation.
Remote control operation
STANDBY
When the player is working, press this button once to switch it to standby status, and press it again to resume to normal working status.
Note: If the player will not be used for a long time, it is better to cut off the power supply of the mains.
OPEN/ CLOSE
Press this button to open or close the disc tray. When the disc tray is open, the TV screen will show "OPEN"; When the disc tray is closed, the TV screen will show "CLOSE" and "Loading" sequentially.
AUDIO
Press this button during playback of DVD disc to switch audio languages recorded if several options are available.
As for VCD discs, pressing this button will enable shift of audio channels: Left/ Right/ Stereo.
ANGLE
During playback of a DVD disc that is recorded in multiple camera angles, pressing this button repeatedly will allow to shift the view angle of the picture.
Note: Such functionality is available to those multi-angle discs.
SUBTITLE
During playback, press this button repeatedly to shift the subtitle languages available. The screen shall show Subtitle [1], meaning the current subtitle language and Subtitle [2] meaning the second subtitle language. The number of languages depends on the disc. And Subtitle [OFF] indicates there will be no subtitle language displayed on the screen.
Note: Only multi-language DVD discs support such operation.
SEARCH
During playback of DVD discs, press this button to bring up a Time/Chapters/Title selection window, then use numeric buttons or UP/DOWN direction button to choose a particular chapter/ title item or time point to start playing with before pressing OK button to confirm.
For CD disc, though the search page "Track/ Time/ Disc Time" is kind of different from that of DVD discs, the operation method is the same.
Note: Some discs do not have this function or have just partial search function (e.g. with only Time as key word for search).
NUMBER (0-9)
Using the number (0-9) buttons to enter the track/ chapter numbers and OK button to confirm, you can access directly to the desired tracks or chapters while a disc is played.
PRG (Program)
Press PRG button during playback to bring up the program window, where there is a track or chapter list on the left, the program list on the right and a function operation zone at the bottom.
Select tracks / chapters to program and play:
In Program window, once a track or chapter on the list is selected with OK button to confirm, it will be added up to the program list on the right. In this way you can program up to 16 items one by one. When you don't want to add any item more to the program list, press PLAY button to start program playback. Or you can move to the functional operation zone at the bottom of the window, choose Play icon with OK button to start playback.
GB
Operación
Clear program list:
You can clear the program list by clicking Clear or Clear All icon here if you are not satisfied with it.
Note: 1. As for DVD discs, such operation can only be realized when the title menu has appeared.
-
The maximum number of chapters or tracks can be programmed is 16.
-
Some discs don't support such operation.
CLR (Clear)
You can cancel the unsatisfactory or wrong number input with this button during program and search operation.
TITLE
Press this button during playback of DVD disc, a title list (depending on the disc) will appear on the monitor.
Use direction button or number button to select your preferred title then press OK button to start playing.
MENU
Press MENU button on the remote control during playback, a menu (depends on the disc) shall be displayed on the screen.
Use the direction or number button to select your preferred item then press OK button to start playback as required. Such function is available only for DVD disc.
OK
Press this button to confirm an setting or particular operation.
DISPLAY
Press this button during playback to view the relevant information of the disc on the TV screen, e.g. elapsed time, total time, chapter No. and playing status etc.
VIDEO OUT
Pressing this button in DVD mode will enable the switch between the video output mode COMPONENT, S-VIDEO and RGB.
Note: These three video modes both support composite video output.
RETURN
Pressing this button will enable to get back to the Menu when VCD, SVCD disc is played with PBC function activated.
SETUP
Press this button to bring up the OSD menu system. Once a new setting is activated, the player will run in a new condition even after power interruption.
MODE
Press this button during playback, the sub-menu of MODE and REPEAT will appear. Use UP/DOWN button to browse the menu and shift the options before pressing OK button to confirm.
For DVD discs, there are 2 mode options: NORMAL/ SHUFFLE and three Repeat options: SINGLE/ ALL/ OFF. For VCD discs, there are three mode options: PBC/ NORMAL/ SHUFFLE and 3 Repeat options: SINGLE/ ALL/ Off.
Press this button again to quit current operation and proceed to other operation.
When playback stops, pressing MODE button shall enable to program the playback as well as clear preset programs.
Note: The playback mode of CD, MP3, MPEG4 discs can not be set until the disc menu appears.
VOL+/VOL-
During playback of a disc, use these two buttons to change the mains audio volume so as to control the volume sizes of the two channels.
Operation
Note: VOL+/ - buttons fails to work when digital audio output is adopted for all discs.
MUTE
Press this button during playback, the MUTE icon will appear on the monitor and there will be no audio output (i.e. silent). Press it again or VOL+/- button to cancel MUTE condition.
MARK
Press this button during playback, the BOOKMARK window will appear. If no bookmark has been set before, press OK to set the current time as the bookmark; If there has been any, press OK to start the playback from the mark point. In addition, the CLR button is available to clear off current bookmark, or you can open the tray to clear all marks off.
ZOOM
Press this button to zoom in the current picture when the playback stops or stay in pause status. There are 3 levels of zoom available: x1, x2, x3.
Note: Some discs do not support such function or have x1 or x2 zoom levels only.
A-B
During playback press this button once at a point (A) to commence repeat then press it again at a second point (B) to conclude. Then the repeat of playback from point (A) to (B) starts. Pressing "A-B" button again or STOP button will cancel such repeat and resume to normal playback.
Note: Some discs do not support such function.
SLOWF/ SLOWR
During playback use these two buttons to slow down the playback forward/ backward at 4 levels of speed: 1/2, 1/4, 1/6 1/8. Press PLAY button to resume to normal playback.
Note: Some discs do not support slow playback.
F.FWD/ F. RWD (/)
Press / button during playback, the playback speed can be raised either forward or backward. There are 5 levels as options: x 2, x 4, x 8, x 16, and x 32. To exit or to cancel this operation and resume to normal playback, press PLAY button.
Note: 1. JPEG discs don't support such function.
SKIP-/SKIP+ (/)
Press / button repeatedly to skip backward or forward chapter by chapter (DVD) or track by track (CD) accordingly.
STOP
Press this button to stop the playback. When playback is stopped, the unit memorizes the point when STOP is pressed (i.e. playback memory function). Press PLAY again, the unit shall resume to play from the stop point. Press STOP button twice, the playback will start from the very beginning. Only those discs that show the play time support such function.
PAUSE/STEP
Press this button during playback, the playback will pause. Press it again each time, the playback shall advance by one frame /step. To resume to normal playback, press PLAY button.
Note: Some discs don't have such function.
PLAY
Press this button to play the disc or proceed to normal playback when the playback pauses or stops.
GB
Operación
Playing CD/MP3/ JPEG / WP3/ MPEG4 discs
- Play Menu
Main Menu: Use UP/ DOWN direction button to select a directory and press OK to enter. If one file contains multiplex levels of directories, users have to open the menus level by level. When you want to return to menu at an upper level, just choose "GO UP" and press OK button.
- Play Mode
When a CD, MP3, JPEG, WMA or MPEG4 disc is loaded, press STOP button to stop the playback, then use direction button "▶" to select a play mode out of the following options: Photo, Audio, Video filter, Repeat & Random, and Program playback etc.
Instruction for program playback operation: (Select Edit Mode prior to any operation)
- Select and Add to Program :
In Stop state, choose the preferred track(s) out of the Play Menu and press OK button, when the target track(s) shall be marked with a tick in the front, then get to function list on the right to select Add to Program before pressing OK to confirm. Once the tick symbol(s) disappears, it indicates that the item(s) has been added up to the program list.
- Browse the program list and play a programmed item.
When the selected track(s) has been added up to the program list, move the cursor up to View Program and press OK to confirm, then BROWSER VIEW window appears with program list displayed on the right which shows all the programmed items, before pressing OK to start playback.
3. EDIT and EXIT
If you want to clear off some items from the Program list, select them one by one with OK button to confirm, they will be ticked automatically in the front; then turn back to the function list and choose Clear Program under Browser view and press OK, the ticks disappear indicating the program of the chosen items has been called off. If you want to cancel all program items and exit program operation, you can choose them all to clear as stated above, (they can be cleared only after STOP button has been pressed twice) and /or open the disc tray and close it or cut off the power supply and reconnect it to resume to normal playback..
Note: Up to ten items can be programmed.
- Playback control of CD, MP3, WMA and MPEG 4 discs
You can select one track to play with numeric buttons. MPEG4 discs don't support Search, Mark etc. control function.
- Playback control of JPEG discs
In the play menu of JPEG disc you can conduct the following operations.
Press TITLE button to browse 9 pictures each time
Press SKIP+ button to display next picture or next page of nine pictures.
Press SKIP- button to play last picture or previous page of nine pictures.
Press PAUSE/STEP button to pause, and press PLAY to resume.
Press ZOOM button to zoom in a picture at three levels: Off/ X1/X2/ X 3, and you can move the picture anywhere with the direction buttons..
Press Direction button to change the camera angles of pictures: 4 angles are available: Normal/90/180/270. Press Left button and Right button to rotate the picture in counter-clockwise and clockwise direction respectively by 90 degrees each time; press the UP button to rotate the picture clockwise by 180 degrees each time, and Down
button counterclockwise by 180 degrees each time.
SETUP Operation
Main Menu
Press SETUP button to bring up the Main Menu which includes 5 submenu items:
- Language
- Video
- Audio
- Rating
- Misc

Operation
Use direction button to move the cursor up or down to select a submenu item, the press OK button to open it. To return to an upper-level menu, press ◀ (Left) button.
1. Language
Move here. There are 5 options under this directory:
- OSD Language
- Subtitle
- DivX Subtitle
- DivX Sub Position
- Audio
- DVD Menu
1.1 OSD Language
There are four languages: English/ French/ Spanish/ Portuguese. Press OK or RIGHT button to enter, and use Up/ Down button to make a choice, then press OK again to confirm.
Note: OSD languages are used for the On-Screen Display system of this player. For instance, if the OSD Language is set to Spanish, the whole menu system will be displayed in Spanish.
1.2 Subtitle
Six options are available for this setting, English/ French/ Spanish/ Portuguese /Auto/ Off. Use Up/ Down button to make a choice, and OK button to confirm. This setting is used for those DVD discs that support multi-language subtitles.
1.3 DivX Subtitle
Enter this submenu, where there are many DivX subtitle languages for options. Use Up/ Down button to make a choice, and OK to confirm. This setting is designed only for DivX discs
1.4 DivX Sub Position
Three options are available for setting subtitle position: Bottom, Middle, and High.
1.5 Audio
Four options are available for this setting item: English/ French/ Spanish/ Portuguese. Use Up/ Down button to make a choice, and OK to confirm. Such setting is designed for those discs recorded in multiple languages.
1.6 DVD Menu
Four options are available for this setting, English, French, Spanish and Portuguese. Use Up/ Down button to make a choice, and OK to confirm. Such setting is designed for DVD discs that support multiple menu languages.
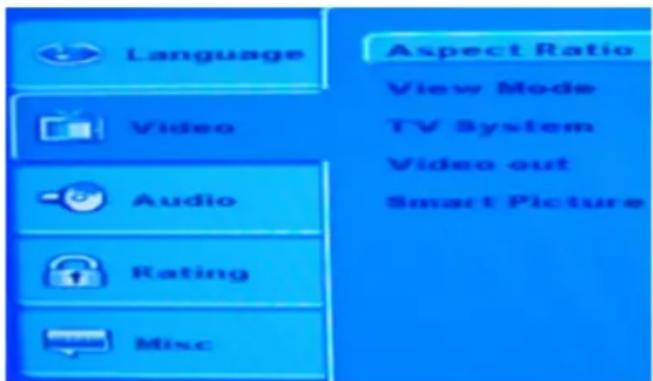
2. Video
This item has 5 submenu options:
- Aspect Ratio
- View Mode
- TV System
- Video out
- Smart Picture
GB
Operación
2.1 Aspect Ratio
Two options available: 4:3 and 16:9. Use Up/ Down button to make a choice, and OK to confirm.
2.2 View Mode
Here you can choose any out of the 4 view modes: Fill/ Original/ Auto Fit/ Pan Scan. Use Up/ Down button to make a choice, and OK to confirm.
2.3 TV System
There are 3 options of TV System submenu: NTSC/ PAL/ Multi. Use Up/ Down button to make a choice, and OK to confirm.
2.4 Video Out
Three options are available: S-VIDEO, COMPONENT and RGB. Use Up/ Down button to make a choice, and OK to confirm.
Note: All options support CVBS output.
2.5 Smart Picture
There are four options, Standard/ Bright/ Soft/ Dynamic.
Use Up/ Down button to make a choice, and OK to confirm.
3. Audio
There are 2 submenu items under this directory:
- Digital Output
- Night Mode
3.1 Digital Output
There are 3 options for this setting, Off/ PCM/ RAW. Use Up/ Down button to make a choice, and OK to confirm.
"Off" means to deactivate digital output;
"PCM" means to output PCM digital audio signal which can be output via coaxial jack.
"RAW" means to output whatever is available.
3.2 Night Mode
Two options are available for this setting: Off/ On. Use Up/ Down button to make a choice, and OK button to confirm.
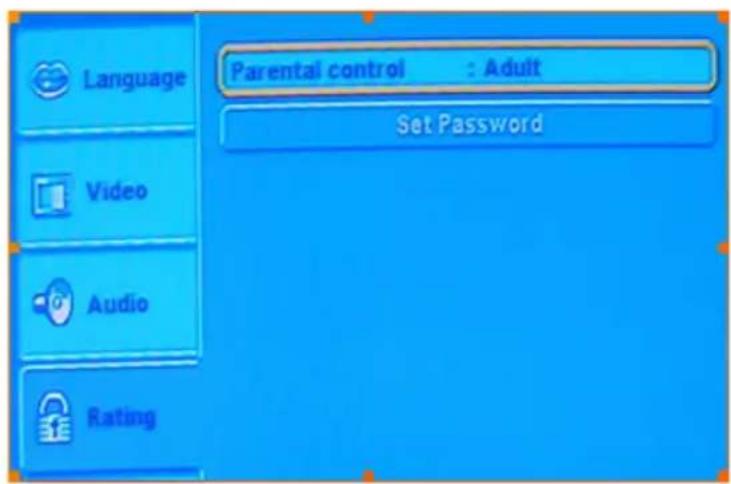
4. Rating
Move here to choose this setting item, then press OK button to confirm. Once a dialogue window appears requiring "Input the password", you can enter a four-digit number or preset password before pressing OK button again to confirm.
Note: The original password of this player is "8888".
Operation
5. Misc
Move here to setup the following submenus:
Use Default Settings
Move here. There will appear a window "Use default settings." If you click Yes button, the player will restore the original settings at the factory, and all settings defined by users will be canceled. Click No button to cancel this operation and leave current window.

GB
For your Reference
Maintenance Information
- Precautions for handling discs
Hold the disc by the edge so that the surface will not be soiled with fingerprints. Fingerprints, dirt and scratches can cause skipping and distortion.
Do not use record cleaning sprays, benzene, thinner, static electricity prevention liquids or any other solvent.
Be careful not to drop or bend the disc.
Do not try to close the disc tray when the disc is not installed properly.
Be sure to store the disc in its exclusive case when not in use.
- Maintenance of discs
Wipe the disc gently with a soft, damp (water only) cloth. Move the cloth from the centre hole towards the outer edge.
Improper disc storage
The discs may be damaged discs if they are stored in the following places:
Areas exposed to direct sunlight
Humid or dusty areas
Areas directly exposed to a heat outlet or heating appliance
- Maintenance of the player
Be sure to turn the unit off and disconnect the AC power cord before maintaining the unit.
Keep the unit clean. If the surfaces are extremely dirty, wipe the unit with some dry soft cloth.
Never use alcohol, benzene or other chemicals. Do not use compressed air to remove dust.
Ask the technician to maintain the unit when trouble happens.
Definition of Terms
- Angle
Recorded onto some DVD discs are scenes which have been simultaneously shot from a number of different angles (i.e. the same scene is shot from the front, left side and right side, etc.).
With such discs, the ANGLE button can be used to view the scene from different angles.
- Chapter No.
These numbers are recorded on DVD discs. A title is subdivided into many sections. Each of them is number, and specific parts of video presentations can be searched quickly using these numbers.
- DVD disc
This refers to a high-density optical disc on which high-quality pictures and sound have been recorded by means of digital signals. Incorporating a new video compression technology (MPEG2) and high-density recording technology, DVD enables esthetically pleasing full-motion video to be recorded over long periods of time (for instance, a whole movie can be recorded).
- Subtitle
These are the printed lines appearing at the bottom of the screen which translate or transcribe the dialogue. They are recorded on DVD discs and up to 32 languages
- Audio
Language recorded on discs and the maximum languages are up to 8.
For your Reference
- Time
This indicates the play time elapsed from the start of a disc or a title. It can be used to find a specific scene quickly (it may not work with some discs).
- Title Number
These numbers are recorded on DVD discs. When a disc contains two or more movies, these movies are numbered as title 1, title 2, etc.
- Track Number
These numbers are assigned to the tracks which are recorded on VCD and CDs. They enable specific tracks to be located quickly.
Specifications:
- Specification
Power Supply: 176\~265V AC, \~50Hz
Operating temperature: 0\~+40OC
Operating humidity range: 5\~90% (no condensation)
Weight: ≤3Kg
Measurements: 300 * 48.5* 200 mm
Discs that can be played:
1. DVD-video disc
- 12cm single-sided, single-layer
- 12cm single-sided, double-layer
- 8cm single-sided, single-layer
- 8cm single-sided, double-layer
2. VCD, CD, HDCD, DTS-CD, MP3, WMA, JPEG and MPEG4 discs:
- 12cm disc
- 8cm disc
Video output:
- output level: 1±0.2 Vp-p (75 ohm)
- horizontal resolution: > 500 lines
- luminance S/N ratio: > 60dB (unweighted)
Linear audio output (load impedance: 10k ohm):
- Output level: 1.8+0.2/-0.8Vrms (1KHz 0dB)
- Distortion and noises: ≤-40dB (JIS-A 1KHZ, typical)
- Dynamic range: ≥ 80 dB (JIS-A 1KHz typical)
- S/N ratio: ≥ 90 dB(JIS-A 1KHz, typical)
Digital audio output:
- Coaxial output
Specifications are subject to change with or without notice.
For your Reference
Troubleshooting
Check the chart below regarding possible problems you may confront during routine use of this unit before requesting service. Some simple checks or a minor adjustment on your part may help eliminate the problem and restore proper operation.
Let the qualified technician maintain the unit.
| Symptom | Suggested solution |
| No power | Plug the power cord into the outlet tightly; if still no power, reconnect it and switch it on 5-10 minutes later. |
| Hardly read disc | Normally disc access time is within 10-20 seconds (30 seconds for MP3);The disc is scratched or defiled (replace a new disc)The regional code of the disc doesn’t match that of the unit (change the disc) |
| No picture | Ensure that the equipment is connected properly.Ensure that AV In setting of the TV set complies with the video output mode of this unit. |
| No sound | Ensure that the equipment is connected properly.Ensure that the TV set or audio equipments are not muted or turned off.Ensure that the audio output setting is correct (Referring to audio output mode settings). |
| Picture is distorted during fast motion | The picture will be somehow distorted in this case, which is normal. |
| No (4:3)(16:9)Picture | Choose the correct Aspect Ratio that complies with the TV set. |
| Remote control doesn’t function | Check that batteries are installed correctly.Replace the batteries if they are exhausted.Point at remote control sensor and operate it within the regulated range. |
| Audio track and subtitle languages are not expected | If the preset audio track and subtitle language are not recorded on the disc, they will not be seen or heard. |
| Can not change camera angles | This function depends on software availability. Even if a disc has a number of angles recorded, these angles may be recorded for specific scenes only. |
| Forget password | In stop state, enter Setup Menu and input 8888 (initial password) |
- E
- Conexiones básicas
- Antes de conectar:
- Nota:
- Idioma
- Misc
- GB
- Contents
- Safety Information
- Note:
- Caution:
- Warning
- Copy Protection
- Feactures y Precautions
- Features
- Precautions
- AC Power cord protection
- Placement
- Avoid placing the unit in surroundings with:
- Non-use Periods
- No fingers or other objects put inside
- Keeping
- Stacking
- Accessories & Front Panel Guide
- Accessories
- Rear Panel Guide
- Remote Control Guide
- Basic Connections
- Before connection:
- Connection to a TV set or a monitor
- A: Connection to TV set with AV cords
- B: Connection to TV set with SCART cable
- II: Connection to Audio equipments (C)
- Relevant Setting
- Regarding the audio coaxial connection
- Remote Control Preparation
- Battery Installation (D)
- Notes:
- Operation range of Remote control (E)
- Operation
- Before enjoying a disc
- Remote control operation
- STANDBY
- OPEN/ CLOSE
- AUDIO
- ANGLE
- SUBTITLE
- SEARCH
- NUMBER (0-9)
- PRG (Program)
- Operación
- Clear program list:
- CLR (Clear)
- TITLE
- MENU
- OK
- DISPLAY
- VIDEO OUT
- RETURN
- SETUP
- MODE
- VOL+/VOL-
- MUTE
- MARK
- ZOOM
- A-B
- SLOWF/ SLOWR
- F.FWD/ F. RWD (/)
- SKIP-/SKIP+ (/)
- STOP
- PAUSE/STEP
- PLAY
- Instruction for program playback operation: (Select Edit Mode prior to any operation)
- EDIT and EXIT
- SETUP Operation
- Main Menu
- Language
- OSD Language
- Subtitle
- DivX Subtitle
- DivX Sub Position
- Audio
- DVD Menu
- Video
- Aspect Ratio
- View Mode
- TV System
- Video Out
- Smart Picture
- Audio
- Digital Output
- Night Mode
- Rating
- For your Reference
- Maintenance Information
- - Precautions for handling discs
- - Maintenance of discs
- - Maintenance of the player
- Definition of Terms
- - Angle
- - Chapter No.
- - DVD disc
- - Subtitle
- - Audio
- - Time
- - Title Number
- - Track Number
- Specifications:
- - Specification
- Discs that can be played:
- DVD-video disc
- VCD, CD, HDCD, DTS-CD, MP3, WMA, JPEG and MPEG4 discs:
- Video output:
- Linear audio output (load impedance: 10k ohm):
- Digital audio output:
- Troubleshooting
Brand : AIRIS
Model : LW108P
Category : DVD player