MC-WR11 - Router ModeCom - Free user manual and instructions
Find the device manual for free MC-WR11 ModeCom in PDF.


| Product Type | Wireless Router (11n, 150Mbps) |
| Model | MC-WR11 |
| Brand | ModeCom |
| Dimensions (L x W x H) | 202 x 120 x 31 mm |
| Weight | 324 g |
| Power Supply | 9V DC, 1A |
| Maximum Power Consumption | 13.5 W |
| Wireless Standard | IEEE 802.11n (1T1R), backward compatible with 802.11b/g |
| Wireless Speed | Up to 150 Mbps |
| Frequency Band | 2.4 GHz |
| Number of LAN Ports | 4 x 10/100 Mbps RJ45 |
| WAN Port | 1 x 10/100 Mbps RJ45 |
| Antenna | 2 external detachable antennas |
| Wireless Modes | AP, Client, WDS, AP+WDS, Universal Repeater |
| Security Encryption | WEP 64/128-bit, WPA, WPA2, WPA2 Mixed, 802.1x, WPS |
| Firewall Features | NAT, SPI, DoS prevention, MAC/IP/URL filtering |
| Quality of Service (QoS) | WMM, bandwidth control per IP |
| WAN Connection Types | DHCP, Static IP, PPPoE, PPTP, L2TP |
| Dynamic DNS | DynDNS, TZO, 3322.org |
| Operating Temperature | -10°C to 50°C |
| Storage Temperature | -40°C to 70°C |
| Humidity | 10% – 90% (non-condensing) |
| Default IP Address | 192.168.1.1 |
| Default Admin Credentials | Username: admin, Password: admin |
| Certifications | CE, FCC |
Frequently Asked Questions - MC-WR11 ModeCom
User questions about MC-WR11 ModeCom
0 question about this device. Answer the ones you know or ask your own.
Ask a new question about this device
Download the instructions for your Router in PDF format for free! Find your manual MC-WR11 - ModeCom and take your electronic device back in hand. On this page are published all the documents necessary for the use of your device. MC-WR11 by ModeCom.
USER MANUAL MC-WR11 ModeCom
natural_image
White wireless router with two black antennas, no visible text or symbols on bodyuser's manual
MODECOM
Contents
User's manual guide 4
Chapter 1 Introduction 4
Features 4
1.2 Operation Environment 5
1.3 System Requirements 6
Chapter 2 Hardware Installation 6
2.1 Led indicators 6
2.2 Back Panel Features 6
2.3 Typical install 7
Chapter 3 Quick Install Guide 8
3.1 TCP/IP Settings 8
3.2 Getting Started 9
3.3 Setup Wizard 10
Chapter 4 Advanced Setup 18
4.1 Wireless Advanced setup 18
4.2 Service Setup 21
4.3 Security Setup 24
4.4 QoS Setup 29
4.5 Router Setup 29
4.6 System 30
User's manual guide

Latest versions of manuals, quick start guides, drivers and software are available on www.modecom.eu website.
IMPORTANT NOTE:
Provided technical specifications are subject to change without prior notice. All brand and product names mentioned in this manual are trademarks and/or registered trademarks of their respective holders.
© 2010 MODECOM S.A.
All rights reserved. Duplication and copying requires approval from copyright holder.
Chapter 1 Introduction
Congratulations on your purchase of this outstanding Wireless Router. The Wireless Router integrates 4-port switch, firewall, NAT-router and Wireless Access Point. This product is specifically designed for Home networks and Medium or Small Corporation needs. It will allow you to connect your network wirelessly better than ever, sharing Internet Access, files and fun, easily and securely. It is easy to configure and operate even for users without wide experience with network devices. Instructions for installing and configuring this product can be found the manual delivered with the product and also available at www.modecom.eu website. Before you install and use this product, please read this manual carefully to exploit all the functions of this product.
Features
WAN: Gateway / Bridge / WISP / Static IP / DHCP / PPPoE / PPTP / L2TP / UPnP
LAN: RJ45 4port switch / DHCP Client, Server / Static DHCP / IP&MAC Bind
Wireless: Compliant with draft IEEE 802.11n standard (MC-WR22-2T2R / MC-WR11-1T1R)
Up to: 300Mbps (MC-WR22) / 150Mbps (MC-WR11) data transfer rates in IEEE 802.11n mode
Backward compatible with IEEE 802.11b/g
Supports both Infrastructure and Ad-Hoc Networking Modes
Work modes: AP / Client / WDS / AP+WDS / Universal Repeater (AP+Client)
Supports WPS, WPA2 (802.11i), WPA, WPA2/WPA Mixed, 802.1x advanced security
Supports 64/128-bit WEP Data Encryption
Quality of Service (QoS) - WMM, WMM-PS
Auto wireless transmission channel select for optimal performance
Wireless access control (MAC address filter)
Advanced Wireless control:
Fragment Threshold / RTS Threshold / Beacon Interval
Preamble Type: Long / Short
IAPP - Roaming (802.11f)
Protection / Aggregation / Short GI / WLAN Partition
RF Output Power control
Multiple BSSID
Dynamic DNS:
DynDNS.org / TZO / 3322.org
NAT:
NAT/NAPT IP sharing / DMZ / Port Forwarding / Port Trigger / UPnP
QoS:
Yes - IP (single or range) Grant MIN or MAX bandwidth
Firewall protection:
Ping Access on WAN / IGMP Proxy / Web Server Access on WAN / IPsec/
PPTP/L2TP VNP pass through /
Src MAC or IP Filter / URL Filter / Dst IP and Port Filter /
DoS Prevention:
Whole System Flood: SYN, FIN, UDP, ICMP
Per-Source IP Flood: SYN, FIN, UDP, ICMP
TCP/UDP Port Scan (High/Low Sensitivity)
ICMP Smurf, IP Land, IP Spoof, IP TearDrop, PingOfDeath, TCP Scan, TCP
SynWithData, UDP Bomb, UDP EchoChargen
Source IP Blocking (Block for a specified time)
System Management:
Access Schedule / NTP support / FW Upgrade / Save/Load Config / Reboot /
User name and password management
1.2 Operation Environment
Dimensions: 202 (L) x 120 (W) x 31 (H)mm
Unit Weight: 324g
Power Input: 9V DC, 1A
Consumption: 13.5W(Max)
Storage Temperature: -40°C \~70°C
Operating Temperature : -10°C \~50°C
Storage Humidity: 5% \~95% RH Non-condensing
Operating Humidity: 10% \~90% RH Non-condensing
1.3 System Requirements
An Ethernet-Based Cable or DSL modem
10/100M Ethernet Card on PC
TCP/IP network protocol for each PC
RJ45 Twisted-pair cable
Internet browser: Microsoft Internet Explorer, Firefox, Opera or Chrome
Chapter 2 Hardware Installation
2.1 Led indicators

SYS/Power (Red): Flickering light indicates a proper connection to the power supply.
While resetting the SYS LED will flash differently (shine for 2 seconds and stop for 1 second).
WPS (Green): The Led will flicker for about two minutes when WPS session is active.
WLAN (Wireless LAN) (green): The LED is flickering during wireless activity. LAN 1,2,3,4 (green): The Link/Act LED serves two purposes. If the LED is continuously illuminated, the Router is successfully connected to a device through the corresponding port. If the LED is flickering, the Router is actively sending or receiving data over that port.
WAN (Green): The Link/Act LED serves two purposes. If the LED is continuously illuminated, the Router is successfully connected to a device through the corresponding port. If the LED is flickering, the Router is actively sending or receiving data over that port.
2.2 Back Panel Features

LAN(1,2,3,4): 10/100Mbps RJ45 Auto-sensing. These four LAN ports are where you will connect other network devices, such as PCs/Laptops, print servers, remote hard drives, and anything else you want to put on your network. If you connect this product with the Network adapter, Hub (or Switch) correctly, the Router's corresponding LED and the Adapter's, Hub's (or the Switch) will illuminate.
WAN: 10/100Mbps RJ45 port. The WAN port is where you will connect Cable/DSL Modem or other LAN.
RESET(WPS): The Reset Button has three functions, WPS, reboot and Factory Default. When press it less than 2 seconds, it is WPS function and the SYS LED will flash two minutes (as long as WPS session is active); 2 to 5 seconds, the router will reboot; and more than 5 seconds, the router will restore to factory default settings.
Power inlet: 9V DC, 1A Power supply.
2.3 Typical install
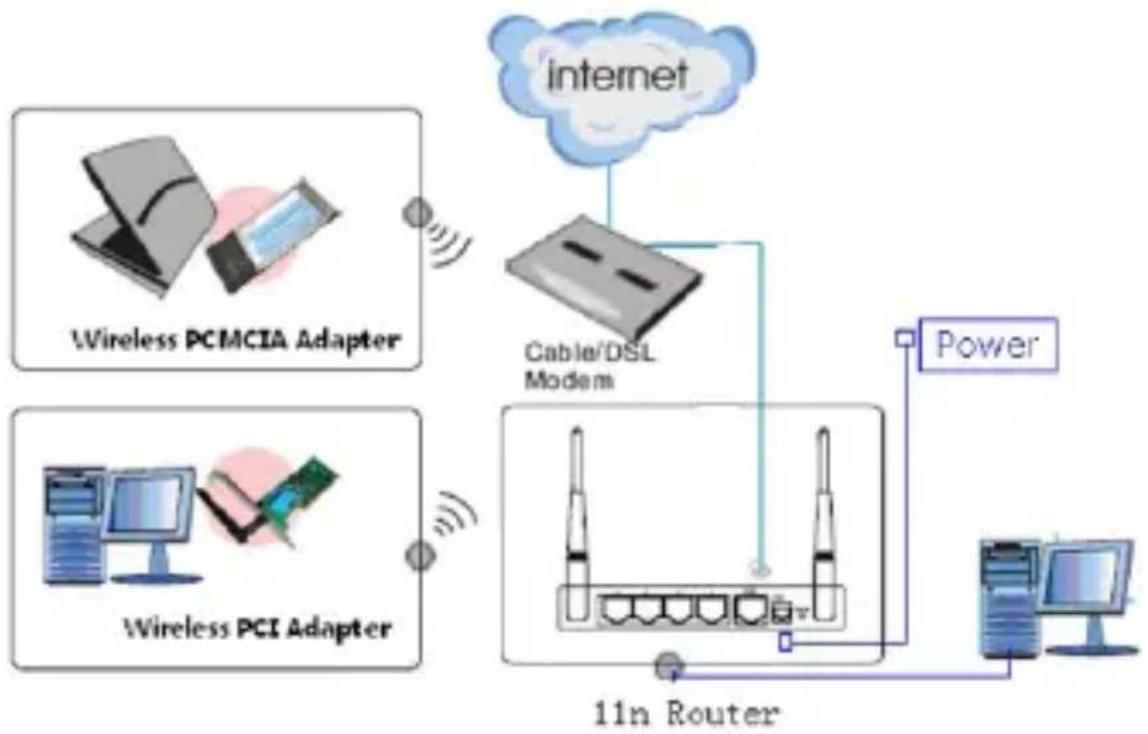
flowchart
graph TD
    A["Wireless PCMCIA Adapter"] -->|Signal| B["Cable/DSL Modem"]
    C["Wireless PCI Adapter"] -->|Signal| D["11n Router"]
    B --> E["Power"]
    D --> E
    E --> F["Internet"]
- Make sure all devices, including your PCs, modem, and Router, are turned on.
- Using an Ethernet network cable, connect the LAN device or Ethernet network port of the cable or DSL modem to the Router's WAN port.
Chapter 3 Quick Install Guide 3.1 TCP/IP Settings
Before you can access and configure router, you have to setup your network adapter IP address. According to the following steps to obtain IP address automatically from router DHCP Server, The following instruction set up the computer running windows operation system.
Note: The router default IP address is 192.168.1.1
- Click Start button and choose Settings, then click Control Panel.
- Double click Network icon and select Configuration tab in the Network window.
- Choose the connection you want to use and click it with right mouse button and choose "Properties".
- Double click TCP/IP Protocol.
- Make sure that option "Obtain IP address automatically" is chosen.
- Click OK to complete the install procedure.
After all is successful, you can check the TCP/IP information via the following command. Start -> run. Type cmd and in the window like the one below enter command: ipconfig /all.
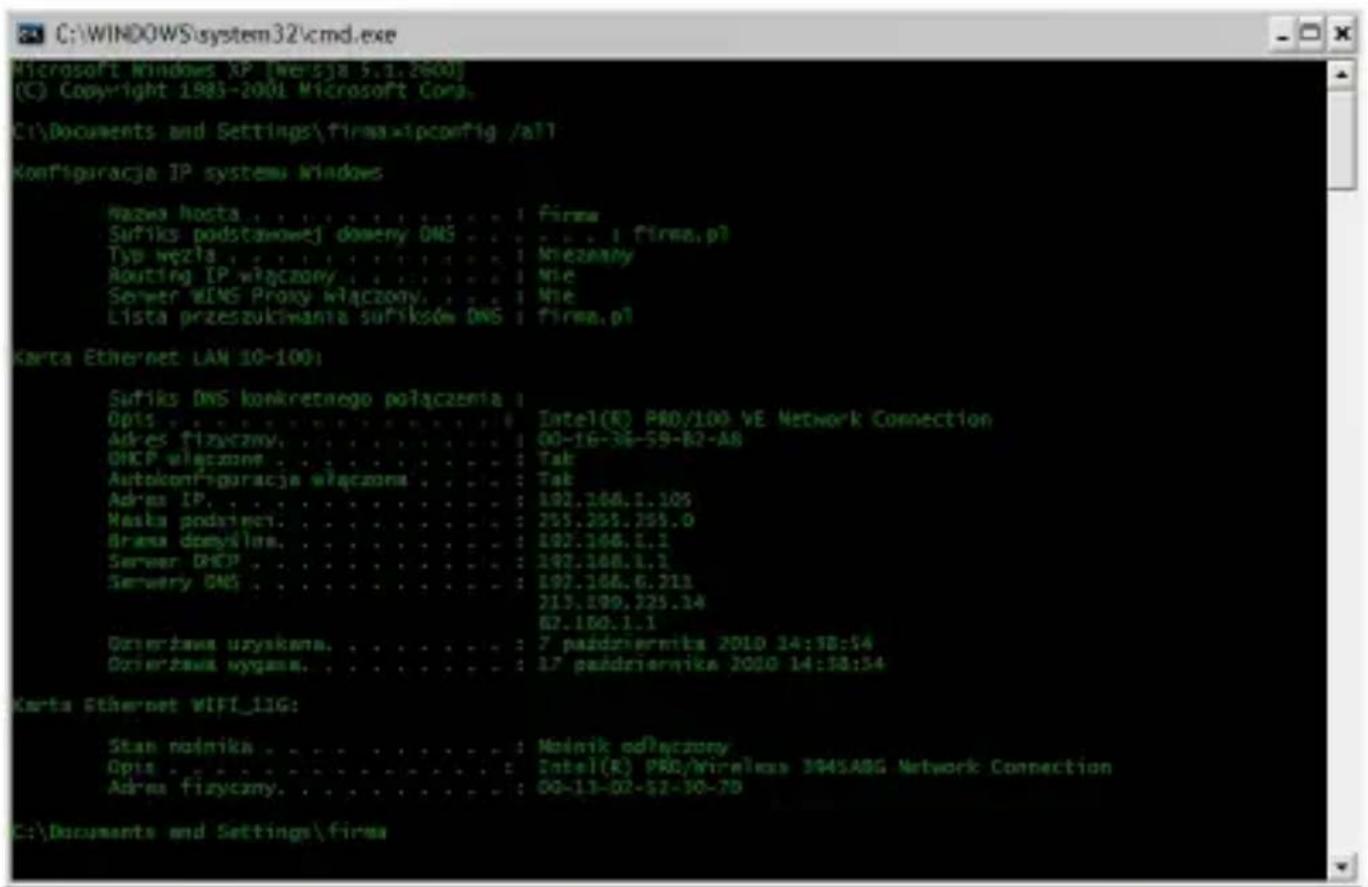
To access configuration panel open your web browser (MS Internet Explorer, Firefox, Opera or Chrome) and type the router's IP address: 192.168.1.1 Default User / Password: admin
If successful, you can see the status page.
![MODECOM Broadband Router MC-WR11 Wizard Status Statistics Log Operation Mode WAN Setup LAN Setup Wireless Setup Services Setup Security Setup Router Setup QoS Setup System Status Logout System Uptime 2day:17h:25m:38s Current Time 14:52:38 10/7 2010 Firmware Version v1.00.11NC Build Time Wed Jul 29 19:55:00 HKT 2009 Wireless Configuration Mode AP Band 2.4 Gbbr [B+G+N] SSID HC-WR11 Channel Number q Encryption WFA2 RSSID 00:e6:61:26:e0:05 Associated Clients 0 TCP/IP Configuration Allain IP Protocol Fixed IP IP Address 192.168.1.1 Subset Mask 255.255.255.0 DHCP Server Enabled MAC Address 00:e6:61:26:e0:05 WAN Configuration Allain IP Protocol DHCP IP Address 192.168.6.102 Subset Mask 255.255.255.0 Default Gateway 192.168.6.254 Primary DNS 192.168.6.211 Secondary DNS 213.199.225.14 MAC Address 00:e0:61:26:00:06](/content/2026/05/920352/images/af382a9600a64607ab91c62dda2cd2c87f258c6c259c72e95d28d12135a21885.jpg)
3.3 Setup Wizard
Click on "Wizard", it will guide you to setup your router in six simple steps.
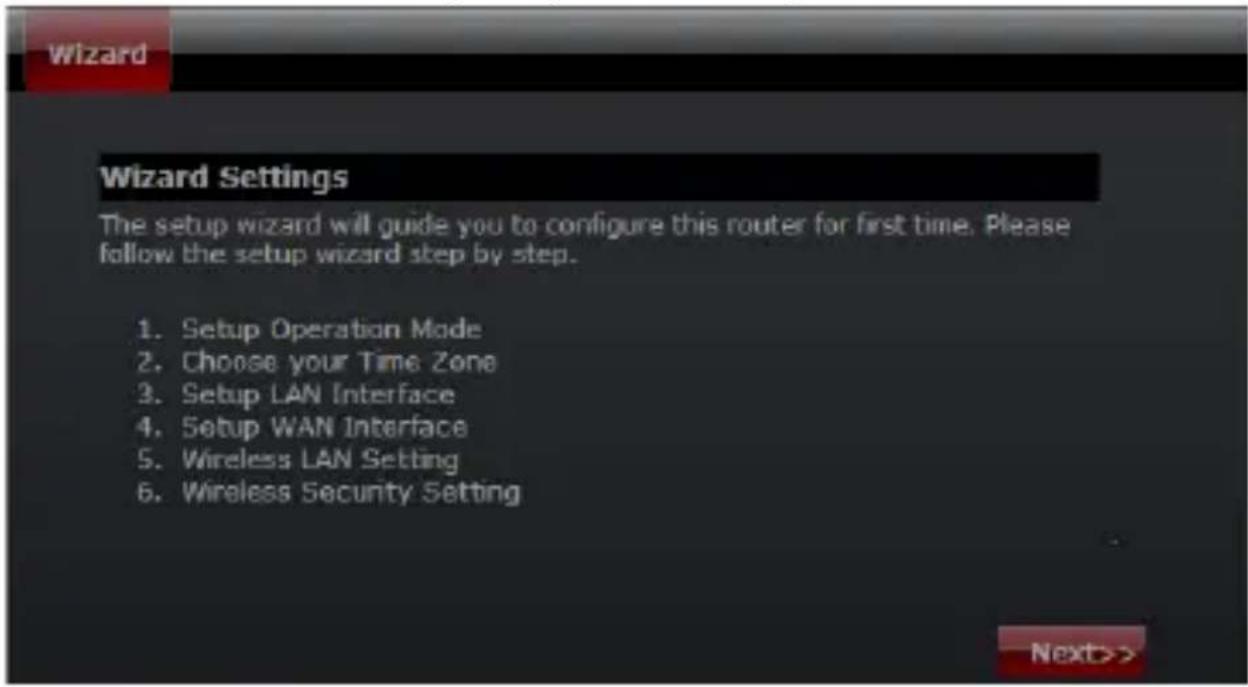
Please follow the steps and complete the router configuration.
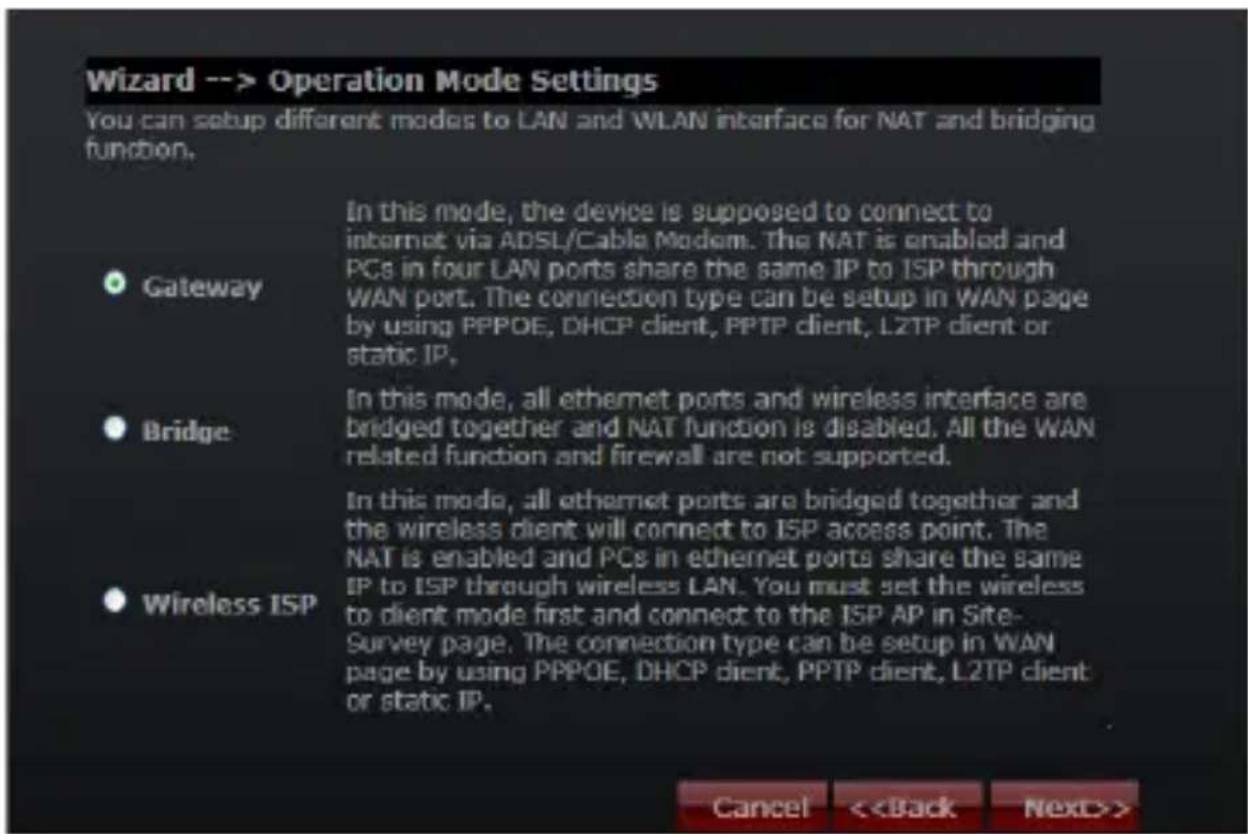
Step 1 - Setup Operation Mode
The router supports three operation modes, Gateway, Bridge and Wireless ISP. And each mode is suitable for different use, please choose correct mode.
Step 2 - Time Zone Settings
The Time Configuration option allows you to configure, update, and maintain the correct time on the internal system clock.
![Wizard Wizard --> Time Zone Settings You can maintain the system time by synchronizing with a public time server over the Internet. Time Zone Select [GMT+01:00]Belgrade, Bratislava, Budapest, Ljubljana, Prague NTP server 131.188 3.220 - Europe Cancel <](/content/2026/05/920352/images/ed8aaeac29948f2295ce1ebae35885a2519314af05cd9256792428198c4e0064.jpg)
Time Zone Select: Select the Time Zone from the drop-down menu.
NTP Server: Select the NTP Server from the drop-down menu.
Step 3 - LAN Settings
Setup the IP address and Subnet mask for the LAN interface.
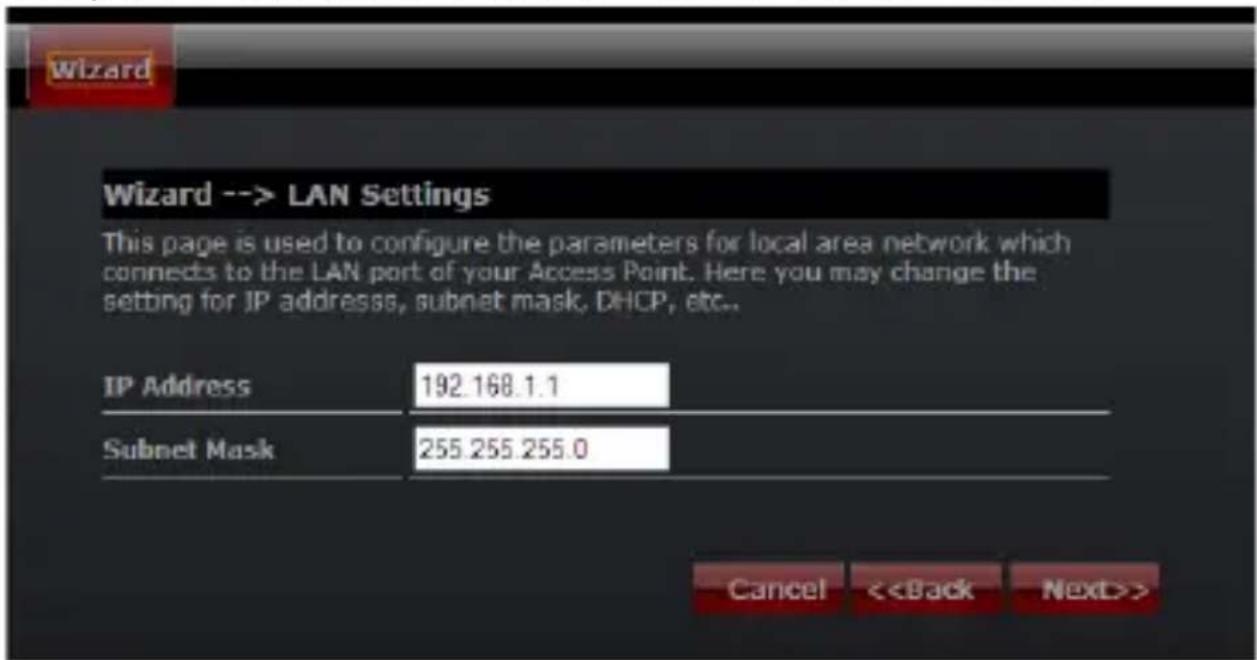
Step 4 - WAN Settings
The Router support five access modes in the WAN side, please choose correct mode according to your ISP Service.
Mode 1: DHCP Client
Select DHCP Client to obtain IP Address information automatically from your ISP. This mode is commonly used for Cable modem services.
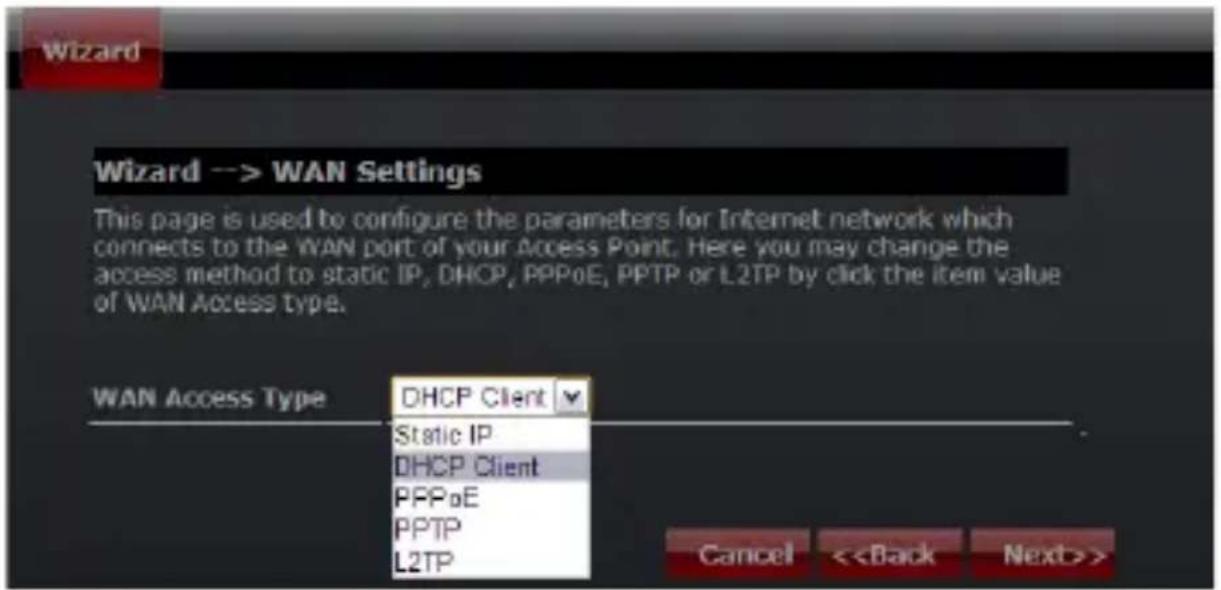
Mode 2: Static IP
Select Static IP Address if all IP information is provided to you by your ISP. You will need to enter in the IP address, subnet mask, gateway address, and DNS address(es) provided to you by your ISP. Each IP address entered in the fields must be in the appropriate IP form, which are four numbers (from 0 to 255) separated by dots (x.x.x.x). The Router will not accept the IP address if it is not typed in this format.
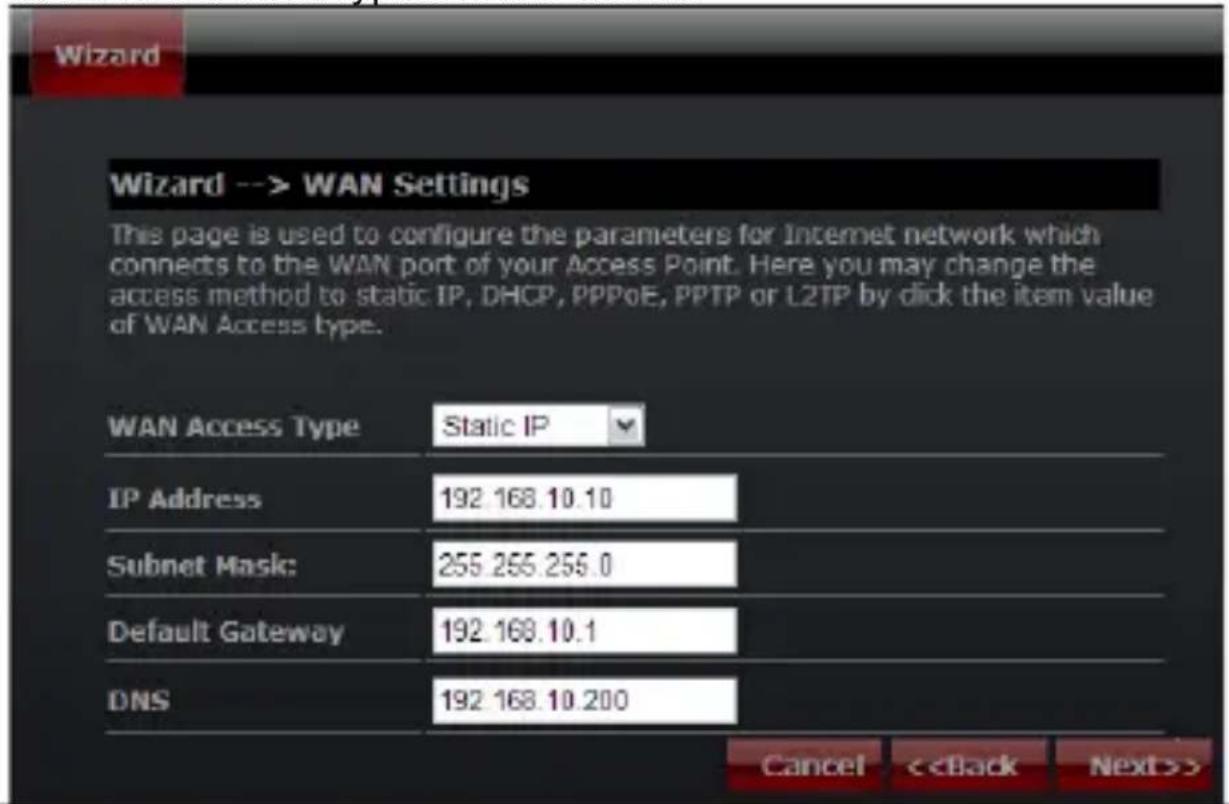
IP Address: Enter the IP address assigned by your ISP Subnet Mask: Enter the Subnet Mask assigned by your ISP. Default Gateway: Enter the Gateway assigned by your ISP. DNS: Enter the DNS server assigned by your ISP.
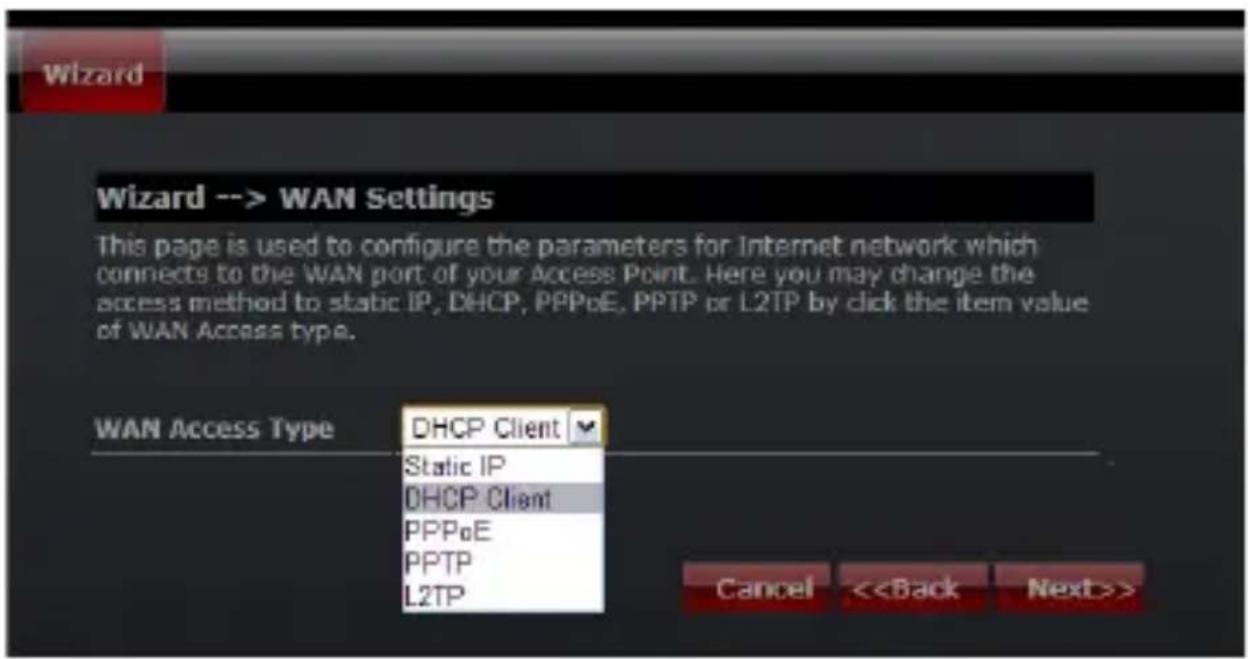
Mode 3: PPPoE
Choose PPPoE (Point to Point Protocol over Ethernet) if your ISP uses a PPPoE connection. Your ISP will provide you with a username and password.
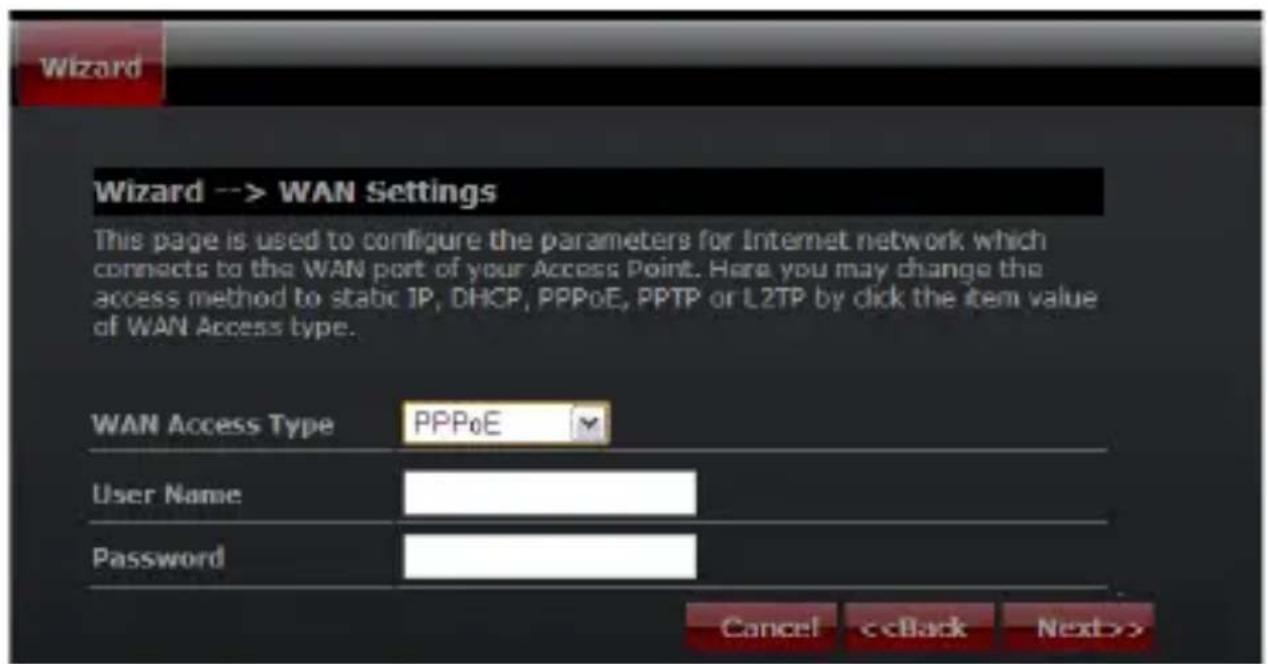
User Name: Enter your PPPoE user name.
Password: Enter your PPPoE password.
Mode 4: PPTP
Choose PPTP (Point-to-Point-Tunneling Protocol) if your ISP uses a PPTP connection. Your ISP will provide you with IP information and PPTP Server IP Address, of course it also includes a username and password.
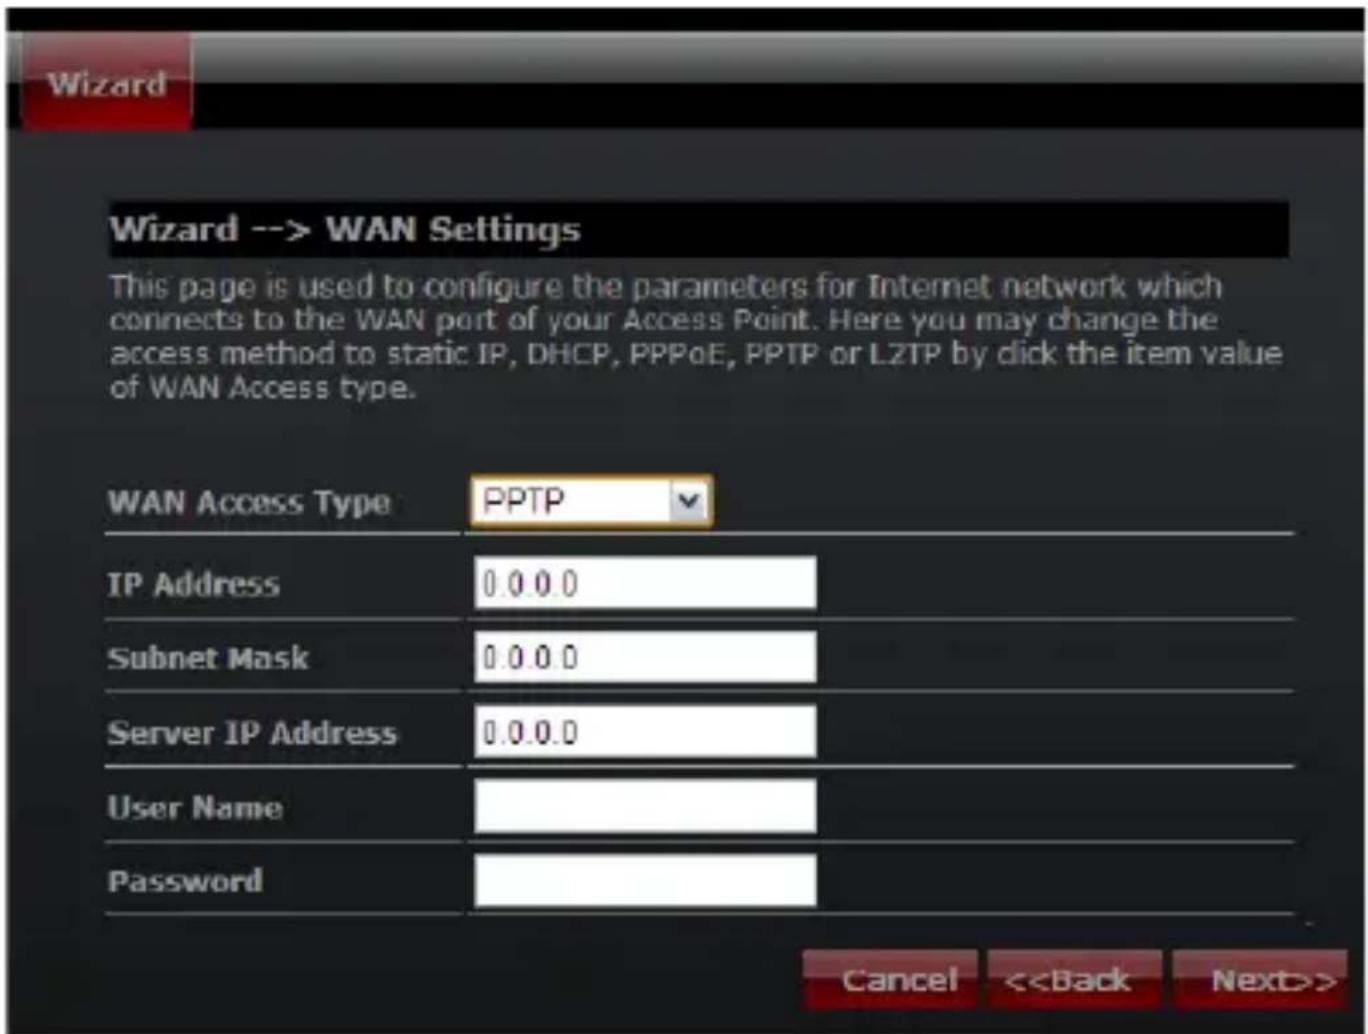
IP Address: Enter the IP address.
Subnet Mask: Enter the subnet Mask.
Server IP Address: Enter the PPTP Server IP address provided by your ISP.
User Name: Enter your PPTP username.
Password: Enter your PPTP password.
Mode 5: L2TP
Choose L2TP (Layer 2 Tunneling Protocol) if your ISP uses a L2TP connection. Your ISP should provide you with a username, password and all necessary data.
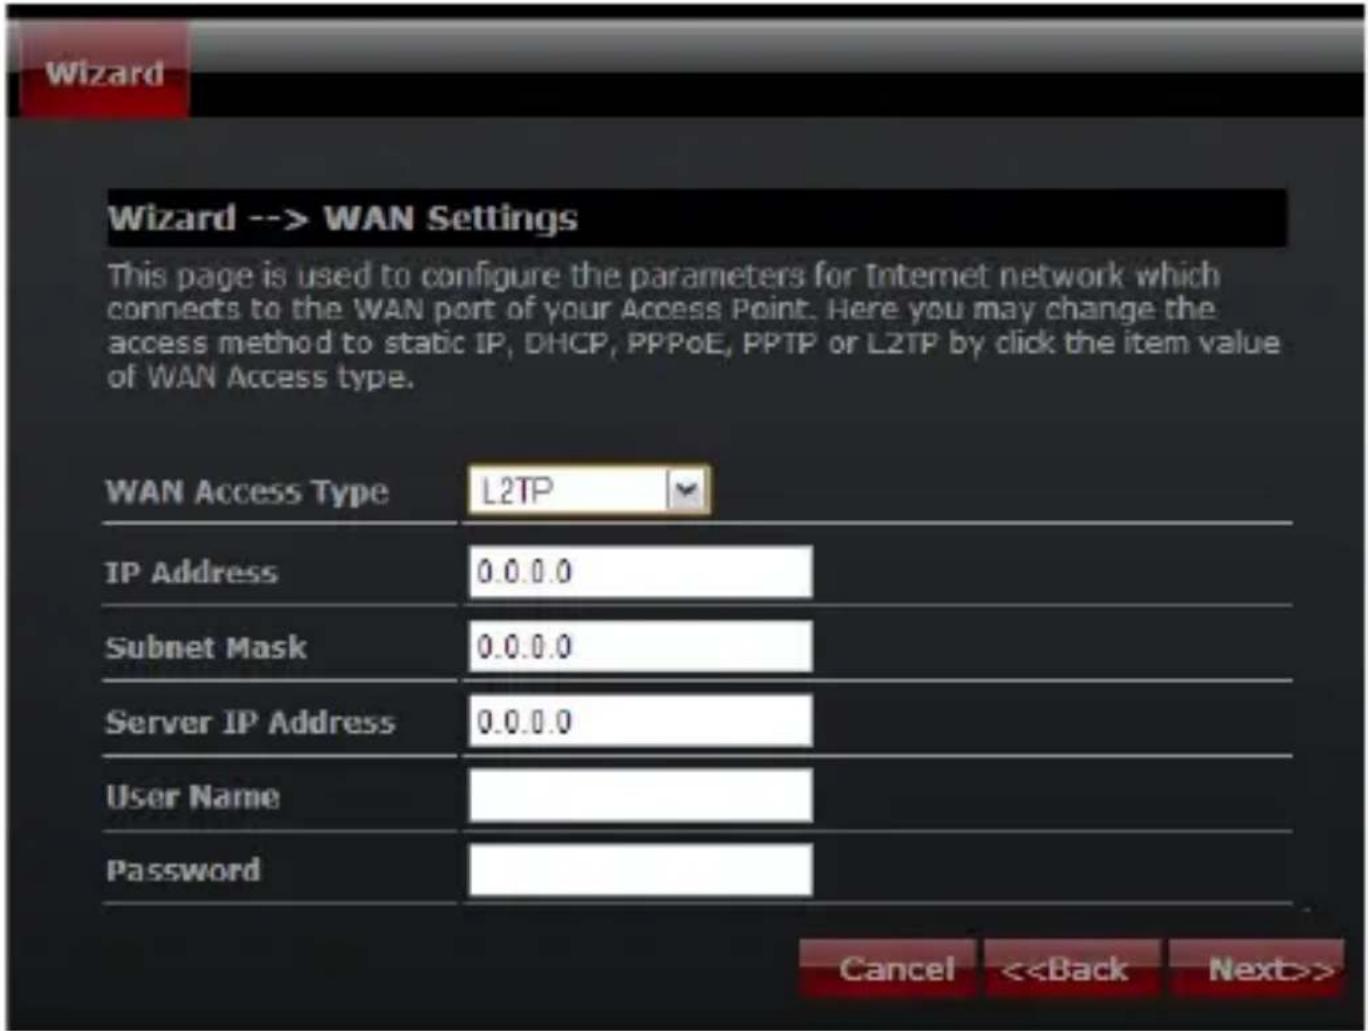
IP Address: Enter the IP address.
Subnet Mask: Enter the subnet Mask.
Server IP Address: Enter the PPTP Server IP address provided by your ISP.
User Name: Enter your PPTP username.
Password: Enter your PPTP password.
Step 5: WLAN Settings
Wireless Interface: If you do not want to use wireless, uncheck the box to disable all the wireless connections.
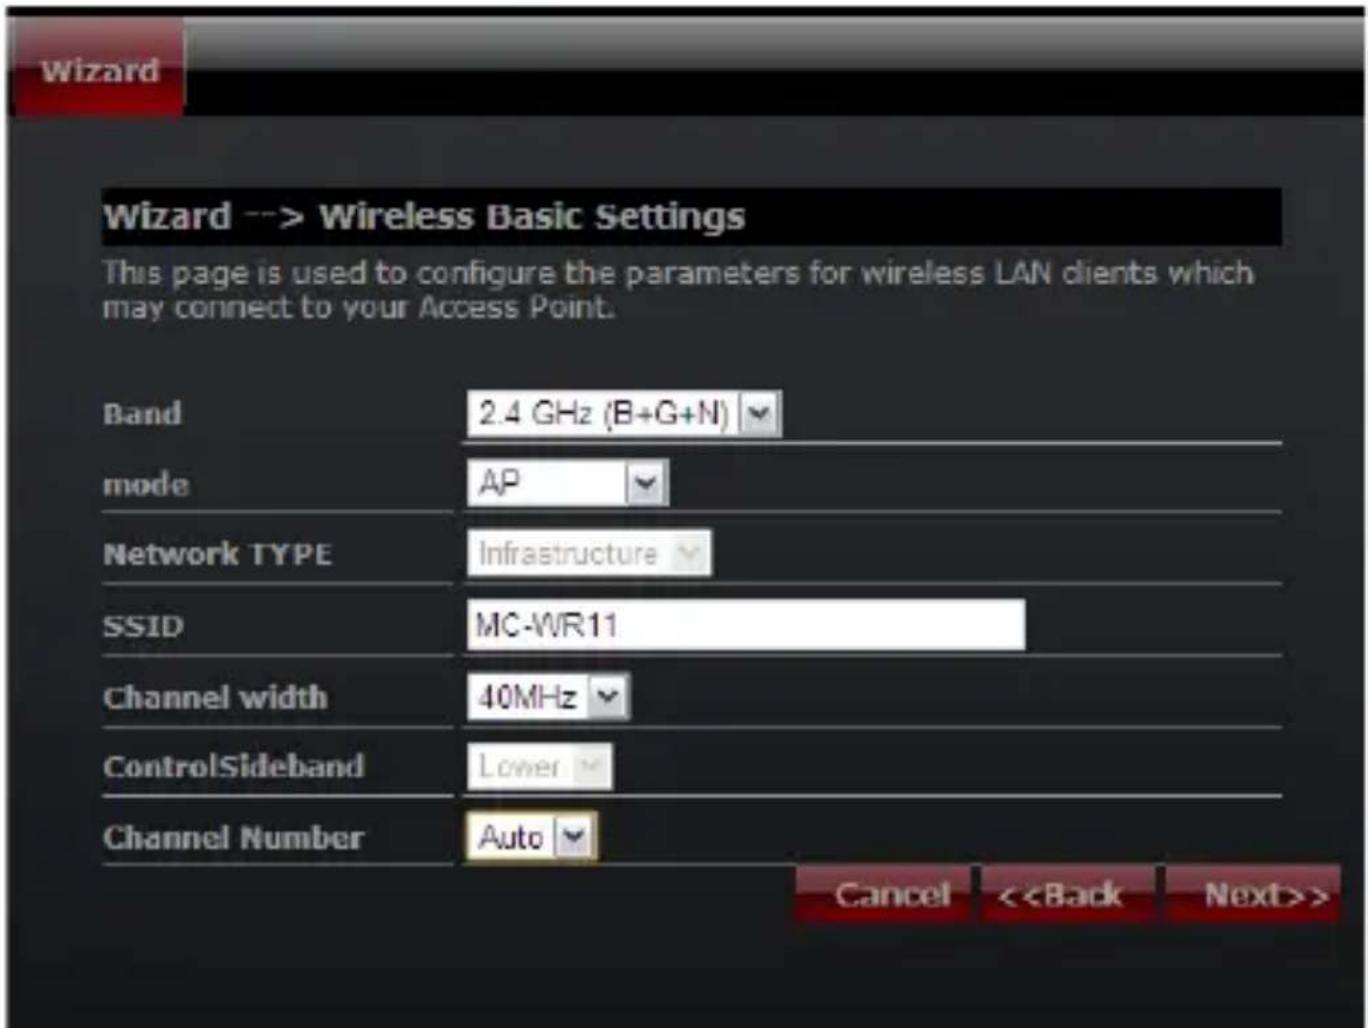
Band: Supported standards: 802.11B, 802.11G, 802.11N and mixed. Please choose its band according to standards used by devices which will be connected to router.
Mode: Support AP, Client, WDS and AP+WDS mode.
Network TYPE: This type is only valid in client mode.
SSID: Service Set Identifier, it identifies your wireless network.
Channel width: Select 40MHz if you use 802.11n or 802.11n mixed mode, otherwise 20MHz, it is default value.
Control Sideband: it is only valid when you choose channel width 40MHz.
Channel Number: Indicates the channel setting for the router. By default the channel is set to 6.
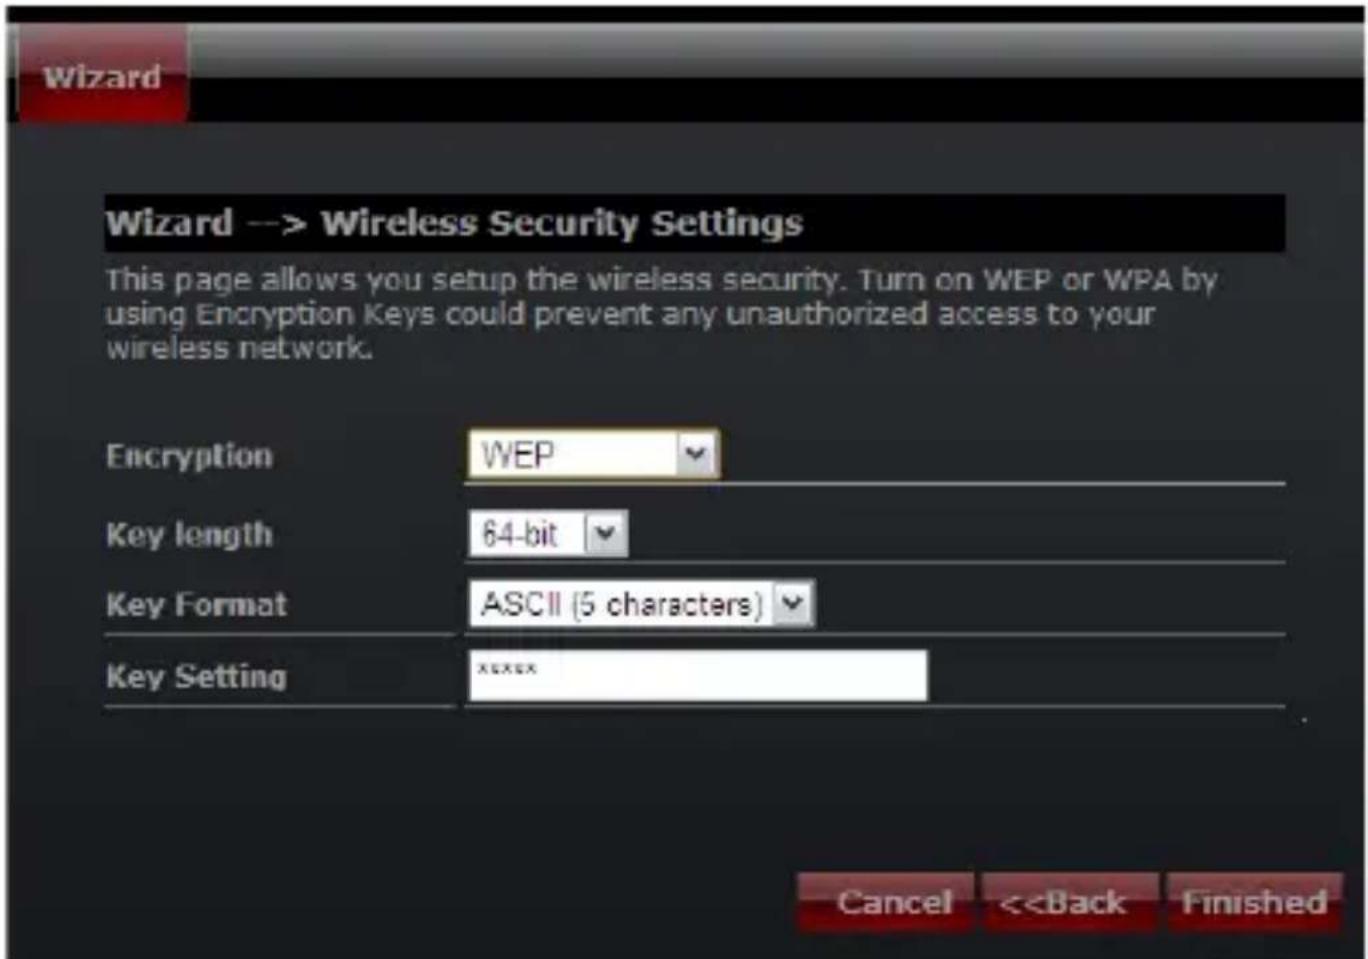
Step 5: WLAN Security Settings
Secure your wireless network by turning on the WPA or WEP security feature on the router. This section you can set WEP, WPA, WPA2 and mixed security mode.
The following picture shows how to set the WEP security.
- Contents
- User's manual guide 4
- Chapter 1 Introduction 4
- Features 4
- Chapter 2 Hardware Installation 6
- Chapter 3 Quick Install Guide 8
- Chapter 4 Advanced Setup 18
- User's manual guide
- Chapter 1 Introduction
- Features
- Advanced Wireless control:
- Dynamic DNS:
- NAT:
- QoS:
- Firewall protection:
- DoS Prevention:
- System Management:
- Operation Environment
- System Requirements
- Chapter 2 Hardware Installation
- Led indicators
- Back Panel Features
- Typical install
- Chapter 3 Quick Install Guide 3.1 TCP/IP Settings
- Setup Wizard
- Step 1 - Setup Operation Mode
- Step 2 - Time Zone Settings
- Step 3 - LAN Settings
- Step 4 - WAN Settings
- Mode 1: DHCP Client
- Mode 2: Static IP
- Mode 3: PPPoE
- Mode 4: PPTP
- Mode 5: L2TP
- Step 5: WLAN Settings
- Step 5: WLAN Security Settings
Brand : ModeCom
Model : MC-WR11
Category : Router