
AZ1134 - CD Player PHILIPS - Free user manual and instructions
Find the device manual for free AZ1134 PHILIPS in PDF.
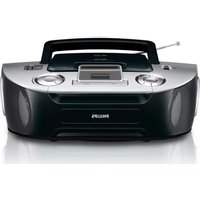


| Product Type | CD Player with FM/DAB+ Radio |
| Brand | Philips |
| Model | AZ1134 |
| Dimensions (W x H x D) | 245 x 131 x 212 mm |
| Weight | 1.1 kg |
| Power Supply | AC adapter (model HB18-090100SPA): Input 100-240V~, 50/60 Hz, 0.5A; Output DC 9V, 1000mA; or 6 x R14/C batteries (not included) |
| Power Consumption (Operation) | < 7 W |
| Standby Power Consumption | < 0.5 W |
| Speaker System | 2 x 3" full range |
| Output Power | 2 W RMS (10% THD) |
| Frequency Response | 70 Hz – 20 kHz |
| Disc Compatibility | CD, CD-R, CD-RW |
| FM Frequency Range | 87.5 – 108 MHz |
| DAB+ Frequency Range | 170 – 240 MHz |
| Preset Stations | 20 (FM and DAB+) |
| Audio Input | 3.5 mm AUDIO IN, input level 650 mV ±100 mV RMS |
| Display | Digital display panel |
| Antenna | Built-in radio antenna |
| Playback Functions | Program up to 20 tracks, repeat (single/all), shuffle |
| RDS | Radio Data System for FM station info |
| Battery Type | 6 x R14 (C size) – not included |
| Safety | Laser Class 1; do not expose to rain/moisture |
| Care Instructions | Use microfiber cloth; do not insert warped/cracked discs |
| Environmental Compliance | EU Directive 2012/19/EU (WEEE), 2013/56/EU (batteries) |
Frequently Asked Questions - AZ1134 PHILIPS
User questions about AZ1134 PHILIPS
0 question about this device. Answer the ones you know or ask your own.
Ask a new question about this device
Download the instructions for your CD Player in PDF format for free! Find your manual AZ1134 - PHILIPS and take your electronic device back in hand. On this page are published all the documents necessary for the use of your device. AZ1134 by PHILIPS.
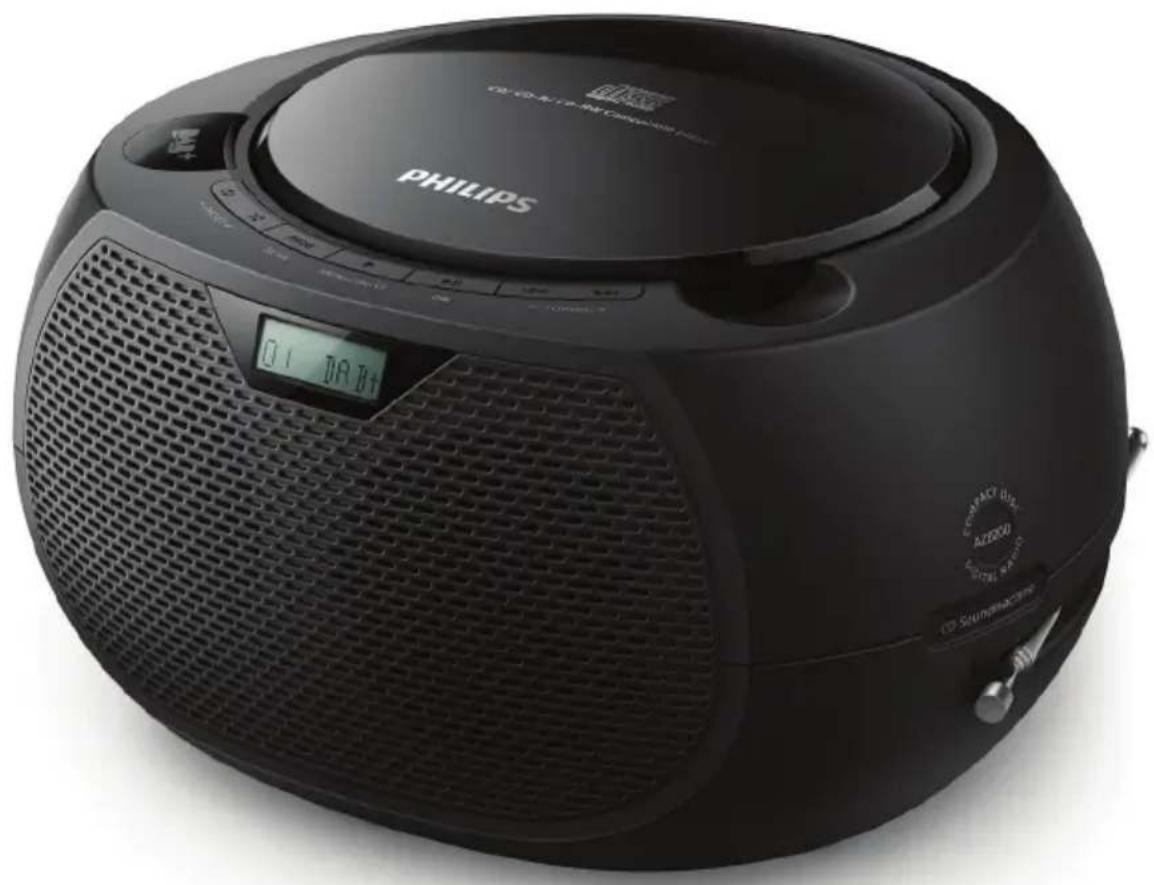
USER MANUAL AZ1134 PHILIPS
User manual
Contents
1 Important 2
Safety 2
Notice 3
2 Your CD Soundmachine 4
Introduction 4
What's in the box 4
Overview of the main unit 5
3 Get started 6
Connect power 6
Power on 7
4 Play 8
Play from disc 8
Control play 8
Skip tracks 8
Program tracks 8
5 Listen to the radio 9
Listen to DAB+ radio 9
Listen to FM radio 10
6 Other features 11
Listen to an external device 11
7 Product information 12
Specifications 12
8 Troubleshooting 13
1 Important
Safety
Read and understand all instructions before you use this micro music system. If damage is caused by failure to follow the instructions, the warranty does not apply.

This 'bolt of lightning' indicates uninsulated material within the device may cause an electrical shock. For the safety of everyone in your household, please do not remove the covering. The 'exclamation mark' calls attention to features for which you should read the enclosed literature closely to prevent operating and maintenance problems. WARNING: To reduce the risk of fire or electric shock, the device should not be exposed to rain or moisture and objects filled with liquids, such as vases, should not be placed on the device.
CAUTION: To prevent electric shock, fully insert the plug. (For regions with polarized plugs: To prevent electric shock, match wide blade to wide slot.)

Warning
- Never remove the casing of this apparatus.
- Never lubricate any part of this apparatus.
- Never look into the laser beam inside this apparatus.
- Never place this apparatus on other electrical equipment.
- Keep this apparatus away from direct sunlight, naked flames or heat.
- Ensure that you always have easy access to the power cord, plug or adaptor to disconnect the apparatus from the power.
• Make sure that there is enough free space around the product for ventilation. - Only use attachments/accessories specified by the manufacturer. - Battery usage CAUTION – To prevent battery leakage which may result in bodily injury, property damage, or damage to the product: • Install all batteries correctly, + and - as marked on the unit. - Batteries (packed or installed) shall not be exposed to excessive heat such as sunshine, fire or the like. - Remove batteries when the unit is not used for a long time. • The product shall not be exposed to dripping or splashing. - Do not place any source of danger on the product (e.g. liquid filled objects, lit candles). - Where the MAINS plug or an appliance coupler is used as the disconnect device, the disconnect device shall remain readily operable.
Notice
Any changes or modifications made to this device that are not expressly approved by MMD Hong Kong Holding Limited may void the user's authority to operate the equipment.
Compliance
Hereby, MMD Hong Kong Holding Limited declares that this product is in compliance with the essential requirements and other relevant provisions of Directive 2014/53/EU. You can find the Declaration of Conformity on www.philips.com/support.
Care of the environment
Disposal of your old product and battery

Your product is designed and manufactured with high quality materials and components, which can be recycled and reused.

This symbol on a product means that the product is covered by European Directive 2012/19/EU.

This symbol means that the product contains batteries covered by European Directive 2013/56/EU which cannot be disposed of with normal household waste.
Inform yourself about the local separate collection system for electrical and electronic products and batteries. Follow local rules and never dispose of the product and batteries with normal household waste. Correct disposal of old products and batteries helps prevent negative consequences for the environment and human health.
Removing the disposable batteries
To remove the disposable batteries, see battery installation section.
Environmental information
All unnecessary packaging has been omitted. We have tried to make the packaging easy to separate into three materials: cardboard (box), polystyrene foam (buffer) and polyethylene (bags, protective foam sheet.)
Your system consists of materials which can be recycled and reused if disassembled by a specialized company. Please observe the local regulations regarding the disposal of packaging materials, exhausted batteries and old equipment.

Be responsible Respect copyrights
The making of unauthorized copies of copy-protected material, including computer programs, files, broadcasts and sound recordings, may be an infringement of copyrights and constitute a criminal offence. This equipment should not be used for such purposes.
Care for your product
- Do not insert any objects other than discs into the disc compartment.
- Do not insert warped or cracked discs into the disc compartment.
- Remove the discs from the disc compartment if you are not using the product for an extended period of time.
- Only use a microfiber cloth to clean the product.
This apparatus includes this label:


Note
• The type plate is located on the back of the product.
2 Your CD Soundmachine
Congratulations on your purchase, and welcome to Philips! To fully benefit from the support that Philips offers, register your product at www.philips.com/support.
Introduction
With this unit, you can:
- enjoy audio from CDs, and other external devices;
- listen to FM and Digital Audio Broadcasting+ (DAB+) radio
The unit supports these media formats:

What's in the box
Check and identify the contents of your package:
- Main unit
- 1 x AC power adapter
- Printed materials
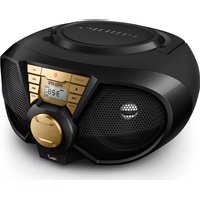
Overview of the main unit

① AUDIO IN
- Connect external audio devices.
② Source selector
- Select a source: DISC, DAB FM.
- Switch this product off.
③ DC jack
- Connect to the supplied power adapter.
④ VOLUME +/-
- Adjust volume.
⑤ PRESET +/-
- Select a preset radio station.
- Select shuffle mode to play tracks randomly.
- Select repeat mode to play a track or all tracks repeatedly.
⑥ PROG/SCAN
- Program tracks. • Program radio stations. • Auto store radio stations.
⑦ ■ / MENU / INFO
- Stop play or erase a program.
- Enter or exit DAB+ menu. • Display playback information, or radio service information.
⑧ ▶/OK
- Press to start, pause, or resume play.
- Confirm or select a DAB+ option.
⑨ Display panel
• Display current status.
⑩
- Skip to the previous/next track.
- Search within a track/disc.
- Tune to an FM station.
- Select a DAB+ station.
⑪ Battery compartment
⑫ Radio antenna
- Improve radio reception.
3 Get started

Caution
- Use of controls or adjustments or performance of procedures other than herein may result in hazardous radiation exposure or other unsafe operation.
Always follow the instructions in this chapter in sequence.
Connect power
This product can be powered by either AC power or batteries.
Option 1: AC power

Caution
- Risk of product damage! Ensure that the power supply voltage corresponds to the voltage printed on the back or the underside of the unit.
- Risk of electric shock! Before you plug the AC power adaptor, make sure that the adaptor plug converter is fixed securely. When you unplug the AC power adaptor, always pull the plug, never the cord.
- Before you connect the AC power adaptor, make sure that you have completed all the other connections.

Connect the power cable to the wall socket.
Option 2: Battery power
Batteries are not supplied with the accessories.
1 Open the battery compartment. 2 Insert 6 batteries (type: R-14 or C CELL) with correct polarity (+/-) as indicated. 3 Close the battery compartment.

Power on
Push the source selector to DAB, FM, or CD.
→ The selected source is displayed.
Switch off
Push the source selector to OFF
→ PHILIPS is displayed briefly.

Note
•The product switches to standby mode after 15 minutes inactive. • To power on again after switch-off, make sure that PHILIPS is no longer displayed.
4 Play
Play from disc
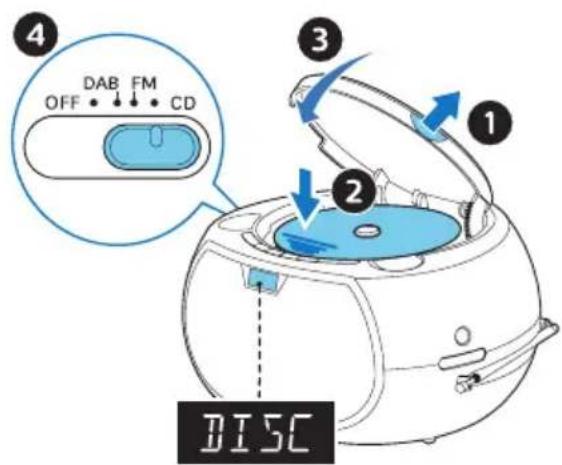
1 Push the source selector to CD 2 Lift up the cover to open the disc compartment. 3 Insert a disc with the label side up. 4 Close the disc compartment. - Play starts automatically. If not, press ▶II.
Control play
| ▶II | Start, pause, or resume play. |
| ■ | Stop play. |
| PRESET+/- (∞/⊕) | Play a track or all tracks repeatedly.Play tracks randomly. |
| ◀◀ / ▶◀ | Press to skip to the previous or next track.Press and hold to search backward/forward within a track. |
| VOLUME +/ Increase or decrease the volume. | |
| ■ /MENU/INFO | Show playback information. |
Skip tracks
Press ◀ to select tracks.
Program tracks
This function allows you to program 20 tracks in the desired sequence.
1 In stop mode, press PROG to activate the program mode. → [P01] is displayed. 2 Press ◀ to select a track, and then press PROG to confirm. 3 Repeat steps 2 to 3 to program more tracks. 4 Press ▶ to play the programmed tracks.
To erase the program
Press ■ twice.
5 Listen to the radio
With this product, you can listen to DAB+ radio and FM radio.

Note
- Position the antenna as far as possible from TV, or other radiation source.
- For optimal reception, fully extend and adjust the position of the antenna.
Listen to DAB+ radio
Digital Audio Broadcasting+ (DAB+) is a way of broadcasting radio digitally through a network of transmitters. It provides you with more choice, better sound quality and more information.
Store DAB+ radio stations automatically

Note
- New stations and services are added in DAB+ broadcast from time to time. To make new DAB+ stations and services available, perform scan regularly.
1 Push the source selector to DAB to select DAB+ source.
- If you enter DAB+ source for the first time or no DAB+ service is stored, [PRESS OK TO SCAN] is prompted, then press ▶II/OK to trigger scan, and skip step 2 below.
2 Press and hold PROG/SCAN more than 2 seconds.
→ The product scans and stores all DAB+ radio stations automatically. → After scan, the first available station is broadcast.
Select a DAB+ radio station
After DAB+ radio stations are scanned and stored, press ◀◀/▶▶ to select a DAB+ station.
Store DAB+ radio stations manually
1 Press ◀◀ to select a DAB+ radio station. 2 Press to activate program mode. 3 Press to allocate a number from 1–20 to this radio station, and then press PROG/SCAN to confirm. 4 Repeat steps 1-3 to program more stations.
To select a preset DAB+ radio station: In DAB+ mode, press PRESET +/-
Use DAB+ menu
1 In DAB+ mode, press ☐/MENU access DAB+ menu. 2 Press PRESET the menu options, then press ▶II/OK to select an option. • [SCAN] (scan): Scan and store all available DAB+ radio stations. • [MANUAL] (manual): Tune to a DAB+ station manually. • DRC : Compress sound dynamics in different levels.
• (PRB) Remove invalid stations from the station list. - [SYSTEM] (system): Adjust system settings.
3 If a sub-option is available, repeat step 2.
• To return to the previous menu, press ◀◀. - To exit the menu, press ■/MENU again.
Under [SYSTEM] (system) menu
- RESET : reset all settings to factory default. • [VERSION] (software version): show the software version of this unit.
Display DAB+ information
While listening to DAB+ radio, press ■ /MENU/INFO repeatedly to display various information (if available), such as frequency, signal strength, time, etc.
Listen to FM radio
Tune to an FM radio station
1 Push the source selector to FM to select FM source. 2 Press and hold ◀◀ for more than 2 seconds. → The radio tunes to a station with strong reception automatically. 3 Repeat step 2 to tune to more stations.
To tune to a weak station:
Press ◀◀/▶ repeatedly until you find optimal reception.
Store FM radio stations automatically

Note
- You can store a maximum of 20 FM radio stations.
1 Push the source selector to FM to select FM source. 2 Press and hold for PBOG/SCAN more than 2 seconds.
All available stations are programmed in the order of waveband reception strength.
→ The first programmed radio station is broadcast automatically.
Store FM radio stations manually
1 Tune to an FM radio station. 2 Press to activate program mode. 3 Press to allocate a number from 1–20 to this radio station, and then press PROG/SCAN to confirm. 4 Repeat steps 1-3 to program more stations.

Note
•To overwrite a programmed station, store another station in its place.
Select a preset FM radio station
In FM mode, press PRESET/-a preset number.
- While listening to FM radio, you may press▶II/OK to toggle stereo and mono sound.
Display RDS information
RDS (Radio Data System) is a service that allows FM stations to show additional information.
1 Tune to an FM radio station. 2 Press ■ reported INFO to display various RDS information (if available), such as station name, program type, time, etc.
6 Other features
Listen to an external device
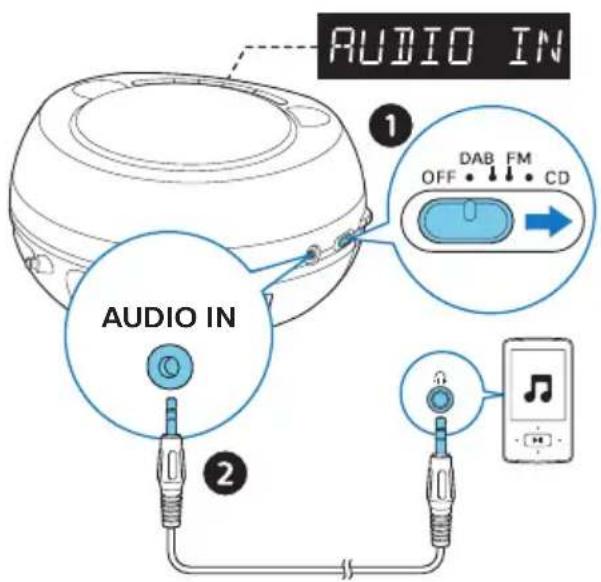
You can listen to an external device through this unit with an MP3 link cable.
1 Push the source selector to CD, DAB, or FM 2 Connect an MP3 link cable (not supplied) between:
• AUDIO IN jack (3.5 mm) on the product, • and the headphone jack on an external device.
3 The product automatically switches to AUDIO IN source. 4 Start to play the device (see the device user manual).
7 Product information

Note
•Product information is subject to change without prior notice.
Specifications
- Rated output power (Amplifier): 2W RMS (10% THD) • Acoustic frequency response: 70Hz - 20kHz
- Speaker driver: 2 x 3" full range • Support disc type: CD, CD-R, CD-RW
- Tuner frequency range: FM 87.5 - 108MHz; DAB 170MHz - 240MHz
- Preset stations: 20 • AUDIO IN input level: 650mV ±100mV RMS
- Power:
• Model (Philips branded AC power adapter): HB18-090100SPA - Input: 100-240 V\~, 50/60 Hz, 0.5A • Output: DC 9V, 1000mA
• Operation power consumption: < 7W - Standby power consumption: < 0.5W • Dimensions (W x H x D): 245 x 131 x 212 mm - Weight: 1.1 kg
8 Troubleshooting

Warning
Never remove the casing of this device.
To keep the warranty valid, never try to repair the system yourself.
If you encounter problems when using this device, check the following points before requesting service. If the problem remains unsolved, go to the Philips Web page (www.philips.com/support). When you contact Philips, make sure that the device is nearby and the model number and serial number are available.
No power
- Make sure that the AC power cord of the device is connected properly.
- Make sure that there is power at the AC outlet.
- Insert the batteries with their polarities (+/− signs) aligned as indicated. Replace the batteries.
No sound
Adjust the volume.
No response from the unit
- Disconnect and reconnect the AC power plug, then turn on the unit again.
- As a power-saving feature, the system switches off automatically 15 minutes after track play reaches the end and no control is operated.
No disc detected
- Insert a disc.
- Check if the disc is inserted upside down.
- Wait until the moisture condensation at the lens has cleared. Replace or clean the disc.
Use a finalized CD or correct format disc.
Poor radio reception
- Increase the distance between the unit and your TV or other radiation sources. Fully extend the radio antenna.

Philips and the Philips Shield Emblem are registered trademarks of Koninklijke Philips N.V. and are used under license.
This product has been manufactured by and is sold under the responsibility of MMD Hong Kong Holding Limited or one of its affiliates, and MMD Hong Kong Holding Limited is the warrantor in relation to this product.

- USER MANUAL
- CONTENTS
- IMPORTANT
- YOUR CD SOUNDMACHINE
- GET STARTED
- PLAY
- LISTEN TO THE RADIO
- OTHER FEATURES
- PRODUCT INFORMATION
- TROUBLESHOOTING
- SAFETY
- WARNING
- NOTICE
- COMPLIANCE
- CARE OF THE ENVIRONMENT
- REMOVING THE DISPOSABLE BATTERIES
- ENVIRONMENTAL INFORMATION
- BE RESPONSIBLE RESPECT COPYRIGHTS
- CARE FOR YOUR PRODUCT
- NOTE
- INTRODUCTION
- WITH THIS UNIT, YOU CAN
- WHAT'S IN THE BOX
- OVERVIEW OF THE MAIN UNIT
- ⑥ PROG/SCAN
- ⑦ ■ / MENU / INFO
- ⑧ ▶/OK
- ⑨ DISPLAY PANEL
- ⑩
- ⑪ BATTERY COMPARTMENT
- ⑫ RADIO ANTENNA
- CAUTION
- CONNECT POWER
- OPTION 1: AC POWER
- OPTION 2: BATTERY POWER
- POWER ON
- SWITCH OFF
- PLAY FROM DISC
- SKIP TRACKS
- PROGRAM TRACKS
- LISTEN TO DAB+ RADIO
- STORE DAB+ RADIO STATIONS AUTOMATICALLY
- SELECT A DAB+ RADIO STATION
- STORE DAB+ RADIO STATIONS MANUALLY
- USE DAB+ MENU
- DISPLAY DAB+ INFORMATION
- LISTEN TO FM RADIO
- TUNE TO AN FM RADIO STATION
- STORE FM RADIO STATIONS AUTOMATICALLY
- STORE FM RADIO STATIONS MANUALLY
- SELECT A PRESET FM RADIO STATION
- DISPLAY RDS INFORMATION
- LISTEN TO AN EXTERNAL DEVICE
- SPECIFICATIONS
- NO POWER
- NO SOUND
- NO RESPONSE FROM THE UNIT
- NO DISC DETECTED
- POOR RADIO RECEPTION
Brand : PHILIPS
Model : AZ1134
Category : CD Player