
FineReader 11 Corporate - Photo/Video Software ABBYY - Free user manual and instructions
Find the device manual for free FineReader 11 Corporate ABBYY in PDF.


| Product Type | OCR and PDF Software |
| Brand | ABBYY |
| Model | FineReader 11 Corporate |
| Main Functions | Optical character recognition, document conversion, PDF creation and editing, batch processing |
| Supported Input Formats | Scanned documents, PDF, images (TIFF, JPEG, PNG, BMP), Microsoft Office files |
| Supported Output Formats | PDF, Word, Excel, PowerPoint, HTML, TXT, CSV, searchable PDF, and more |
| OCR Languages | Over 190 languages, including dictionaries and recognition of mixed-language documents |
| System Requirements | Windows 7/8/10, 1 GHz CPU, 1 GB RAM, 2 GB free disk space |
| License Type | Corporate (multiple users, volume licensing) |
| Document Security | Password protection, digital signatures, permission settings for PDFs |
| Automation Features | Batch processing, hot folders, command-line interface, integration with network scanning |
| Maintenance and Updates | Software updates and technical support included during license period |
| Repair and Replacement | Software license replacement via support; no physical parts |
| User Interface Languages | Multilingual: English, French, German, Spanish, Italian, Japanese, Chinese, etc. |
| General Information | ABBYY FineReader 11 Corporate is designed for enterprise document digitization and workflow automation |
Frequently Asked Questions - FineReader 11 Corporate ABBYY
User questions about FineReader 11 Corporate ABBYY
0 question about this device. Answer the ones you know or ask your own.
Ask a new question about this device
Download the instructions for your Photo/Video Software in PDF format for free! Find your manual FineReader 11 Corporate - ABBYY and take your electronic device back in hand. On this page are published all the documents necessary for the use of your device. FineReader 11 Corporate by ABBYY.
USER MANUAL FineReader 11 Corporate ABBYY
ABBYY® FineReader 11 Corporate Edition
System Administrator's Guide
Information in this document is subject to change without notice and does not bear any commitment on the part of ABBYY.
The software described in this document is supplied under a license agreement. The software may only be used or copied in strict accordance with the terms of the agreement. No part of this document may be reproduced or transmitted in any from or by any means, electronic or other, for any purpose, without the express written permission of ABBYY.
© 2011 ABBYY. All rights reserved.
ABBYY, the ABBYY logo, ABBYY FineReader, ADRT are either registered trademarks or trademarks of ABBYY Software Ltd.
© 1984–2008 Adobe Systems Incorporated and its licensors. All rights reserved.
Protected by U.S. Patents 5,929,866; 5,943,063; 6,289,364; 6,563,502; 6,185,684; 6,205,549; 6,639,593; 7,213,269; 7,246,748;
7,272,628; 7,278,168; 7,343,551; 7,395,503; 7,389,200; 7,406,599; 6,754,382; Other Patents Pending.
Adobe® PDF Library is licensed from Adobe Systems Incorporated.
Adobe, Acrobat ^® , the Adobe logo, the Acrobat logo, the Adobe PDF logo and Adobe PDF Library are either registered trademarks or trademarks of Adobe Systems Incorporated in the United States and/or other countries.
© 1996–2007 LizardTech, Inc. All rights reserved. DjVu ^® is protected by U.S. Patent No. 6,058,214. Foreign Patents Pending.
© 2008 Celartem, Inc. All rights reserved.
© 2011 Caminova, Inc. All rights reserved.
Powered by AT&T Labs Technology.
© 2011 University of New South Wales. All rights reserved.
Fonts Newton, Pragmatica, Courier © 2001 ParaType, Inc.
Font OCR-v-GOST © 2003 ParaType, Inc.
© 2002–2008 Intel Corporation.
© 2010 Microsoft Corporation. All rights reserved.
Microsoft, Outlook, Excel, PowerPoint, Windows Vista, Windows are either registered trademarks or trademarks of Microsoft Corporation in the United States and/or other countries.
© 1991–2008 Unicode, Inc. All rights reserved.
© 2010, Oracle and/or its affiliates. All rights reserved
OpenOffice.org, OpenOffice.org logo are trademarks or registered trademarks of Oracle and/or its affiliates.
JasPer License Version 2.0:
© 2001–2006 Michael David Adams
© 1999–2000 Image Power, Inc.
© 1999–2000 The University of British Columbia
© 1996–2011, Amazon.com, Inc. or its affiliates. All rights reserved.
EPUB ^® is a registered trademark of the IDPF (International Digital Publishing Forum)
iPad ^® is a trademark of Apple Inc., registered in the U.S. and other countries.
All other trademarks are the sole property of their respective owners.
Table of Contents
Deploying ABBYY FineReader 11 in a LAN 3
Deploying ABBYY FineReader 11....3
Step 1. Administrative installation .... 5
Installing the License Server and the License Manager 5
Creating an administrative installation point 6
Step 2. Managing Licenses .... 7
Step 3. Installing ABBYY FineReader 11 on Workstations 8
Interactive installation 8
Command line installation 8
Using Active Directory 10
Using Microsoft Systems Management Server (SMS) 15
Using Task Scheduler 19
Frequently Asked Questions 20
How can I install ABBYY FineReader 11 on a terminal server? 20
How can I change the network connection settings? 20
How can I repair ABBYY FineReader 11 on the workstations? 21
How can I rename the computer hosting the License Server or move the License Server to another computer? 22
Group Work in a LAN 23
Processing the same ABBYY FineReader document on several computers 23
Using the same user languages and dictionaries on several computers 23
Technical Support 25
Deploying ABBYY FineReader 11 in a LAN
General
ABBYY FineReader 11 can be installed and used on a local area network.
The automated installation methods give you speed and flexibility when installing ABBYY FineReader 11 Corporate Edition on a local area network, as you do not have to install the program manually on each individual workstation.
Deploying ABBYY FineReader 11
ABBYY FineReader can be deployed from any computer running under Microsoft® Windows® XP (or later).
The deployment process comprises the following steps:
1. Administrative installation
a. Installing ABBYY FineReader 11 CE License Server and ABBYY FineReader 11 CE License Manager
For detailed instructions, see Installing the License Server and the License Manager.
Note: The computer on which ABBYY FineReader 11 CE License Manager is installed becomes a License Administrator Station.
b. Creating an administrative installation point
For detailed instructions, see Creating an administrative installation point
Note: You can change the network connection settings used by the License Server, the License Manager, and the workstations. For details, see How can I change the network connection settings?
Note. The administrative installation point and the License Server can be located either on the same or on different computers.
2. Managing the licenses
Licenses are managed by means of ABBYY FineReader 11 License Manager.
For the licenses to be correctly distributed among the workstations when installing ABBYY FineReader 11, you must give certain workstations priority in obtaining certain licenses. For this purpose, reserve licenses and pools of licenses for certain workstations.
For details, see Step 2. Managing Licenses.
3. Installing ABBYY FineReader on workstations using one of the following methods:
- manually in interactive mode
- via the command line
• Active Directory
• Microsoft Systems Management Server (SMS), - Task Scheduler
For detailed instructions, see Step 3. Installing ABBYY FineReader 11 on Workstations.
Important!
- Do not place the License Server into the same folder with the administrative installation point.
- You cannot install different editions of ABBYY FineReader on the same workstation.
Administrative installation folder requirements
- 750 MB free hard-disk space to create an administrative installation point
- Read access to the administrative installation folder (e.g.\ MyFileServer\ Programs Distribs\ ABBYY FineReader 11) for all users on whose computers ABBYY FineReader is to be installed.
- The server (\MyFileServer) on which the administrative installation point is created must be a file server running under any operating system that supports long file names.
- When using Active Directory® to deploy ABBYY FineReader 11, the Domain Computers accounts must have read permissions for the administrative installation folder.
License Server requirements
- 100 MB free hard-disk space to create license files and accounts.
- The server (\MyLicenseServer) on which the License Server is installed must run under Microsoft Windows XP, Microsoft Windows Server 2003, Microsoft Windows Vista, Microsoft Windows 7, Microsoft Windows Server 2008 or Microsoft Windows Server 2008 R2.
- The number of connections supported by the operating system of the License Server must be at least equal to the total number of potential users of the program (only for Concurrent licenses). Microsoft Windows XP, for example, allows no more than 10 simultaneous connections, allowing to run ABBYY FineReader only on 10 workstations at a time.
License Administrator Station requirements
-
PC running under Microsoft Windows XP, Microsoft Windows Server 2003, Microsoft Windows Vista, Microsoft Windows 7, Microsoft Windows Server 2008, Microsoft, or Windows Server 2008 R2.
-
100 MB free hard-disk space.
Workstation requirements
- 1-GHz or faster 32-bit (x86) or 64-bit (x64) CPU
- Operating System: Microsoft Windows XP, Microsoft Windows Server 2003, Microsoft Windows Vista, Microsoft Windows 7, Microsoft Windows Server 2008 or Microsoft Windows Server 2008 R2 (to work with localized interfaces, the operating system must support the corresponding language)
- 1024 RAM; in multiprocessor systems, an additional 512 MB of RAM is required for each additional processor
- 700 MB for installation of all program components; 700 MB for program operation
- Video card and monitor supporting min. resolution of 1024*768
- Keyboard and mouse or other pointing device
Step 1. Administrative installation
Installing the License Server and the License Manager
- Place the setup disk into the CD-ROM drive. The setup program will start automatically.
Note: If the setup program does not start automatically, run the file License Server\ Setup.exe from the ABBYY FineReader 11 CD-ROM.
-
Select Deploy ABBYY FineReader in LAN>Install ABBYY FineReader License Server.
-
Follow the instructions of the setup program.
During setup, you can:
• Install ABBYY FineReader License Server and ABBYY FineReader License Manager. The License Server and the License Manager will be installed on the same computer. You can specify a folder into which the License Manager is to be installed.
• Install only ABBYY FineReader 11 License Manager. You will need to specify a folder into which the License Manager is to be installed and specify the name of the computer hosting the License Server.

Note:
• If several users will be managing the ABBYY FineReader 11 licenses, they must have the License Manager utility installed on their computers.
• Each user must be a member of one of the two local groups on the server:
-
ABBYY Licensing Administrators
-
BUILTIN\Administrators
You can disable user authorization in the file
% programfiles% \ Common
Files\ ABBYY\ FineReader\ 11.00\ Licensing\ CE\ NetworkLicenseServer.ini
This file is located on the computer where the License Server has been installed. Add the following parameter to this file:
[Licensing]
EnableManagerAuthorization = false
Important! For the changes to take effect, you must restart the ABBYY FineReader 11 CE Licensing Service.
Creating an administrative installation point
- Place the setup disk into the CD-ROM drive. The setup program will start automatically
Note: If the setup program does not start automatically, run the AdminSetup.exe file from the ABBYY FineReader 11 CD-ROM.
-
Select Deploy ABBYY FineReader in LAN> Create administrative installation point.
-
Follow the instructions of the setup program.
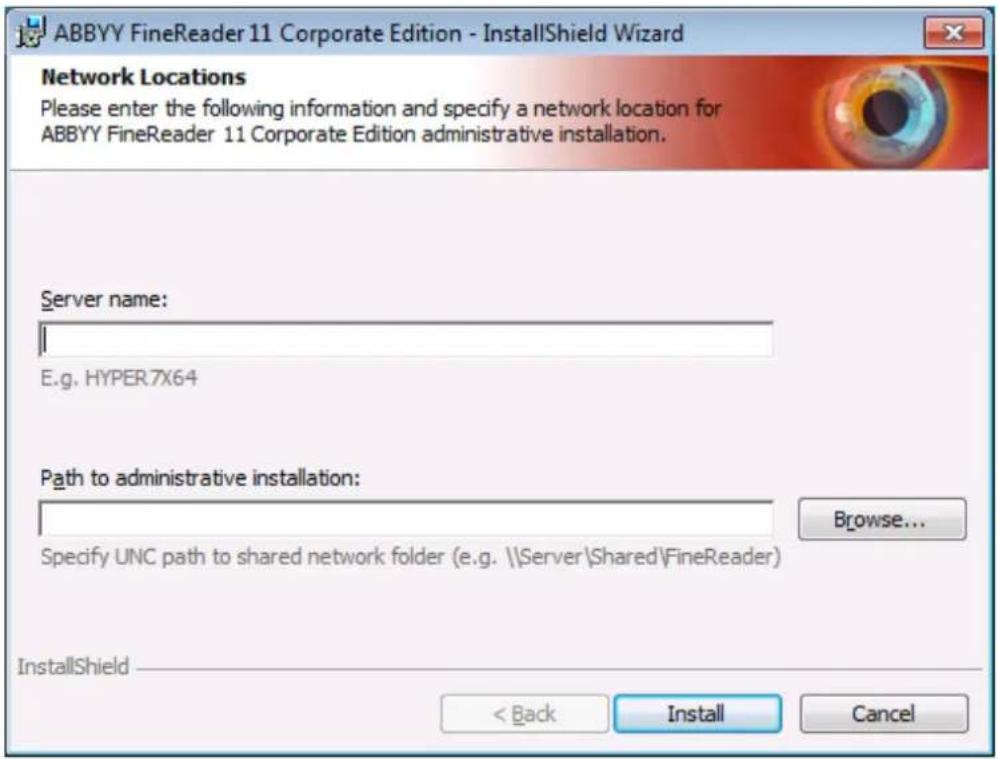
When the setup program prompts you, specify the following:
- The name of the computer where the License Server is to be installed
• The path to the administrative installation folder
Important! Avoid moving the administrative installation folder after ABBYY FineReader is installed on the workstations.
Step 2. Managing Licenses
ABBYY FineReader 11 License Manager is a special application provided with ABBYY FineReader 11 and intended for managing ABBYY FineReader licenses. The application is installed on the License Administration Station when ABBYY FineReader 11 is deployed in a local area network (see Installing the License Server and the License Manager for details).
Configure your licenses with ABBYY FineReader 11 License Manager:
1) Add your licenses to ABBYY FineReader 11 License Manager.
An ABBYY FineReader 11 license (or group of licenses) has a unique serial number which identifies it. To activate a license and add it to ABBYY FineReader 11 License Manager, you must activate its serial number.
2) Create license pools and add the necessary licenses to the pools.
A pool of licenses is a set of licenses or serial numbers of equal standing. License pools make working with licenses easier. For example, instead of reserving each license separately, you can add it into a pool and then reserve the pool for certain workstations.
3) Reserve the pools and licenses for the appropriate workstations.
Before you install ABBYY FineReader 11 on the workstations, you must distribute the licenses among the workstations, i.e. reserve them for the appropriate workstations by means of ABBYY FineReader 11 License Manager. Once a license is reserved for a workstation, only that workstation will be able to use the license.
Important! Reserve licenses and pools before you start installing ABBYY FineReader 11 on the workstations. To bind or unbind a workstation after ABBYY FineReader has been installed on it, you will need to remove the program from the workstation. To move a per-seat license from one workstation to another after ABBYY FineReader has been installed, you will need to deactivate the license. The number of allowed deactivations is limited.
For more information about license types and about working with ABBYY FineReader 11 License Manager, see the ABBYY FineReader 11 License Manager help file.
Step 3. Installing ABBYY FineReader 11 on Workstations
Important! Before installing ABBYY FineReader 11 on the workstations, be sure to complete Steps 1 and 2 (see Step 1. Administrative installation Step 2. Managing Licenses).
A workstation obtains a per-seat license and is bound to the server only when ABBYY FineReader 11 is installed on it in accordance with the configuration of the licenses at the time of the installation.
Note: You cannot install different editions of ABBYY FineReader on the same workstation.
Interactive installation
- Perform administrative installation of ABBYY FineReader 11 (see Step 1. Administrative installation for details).
- Run the setup.exe file in the administrative installation folder.
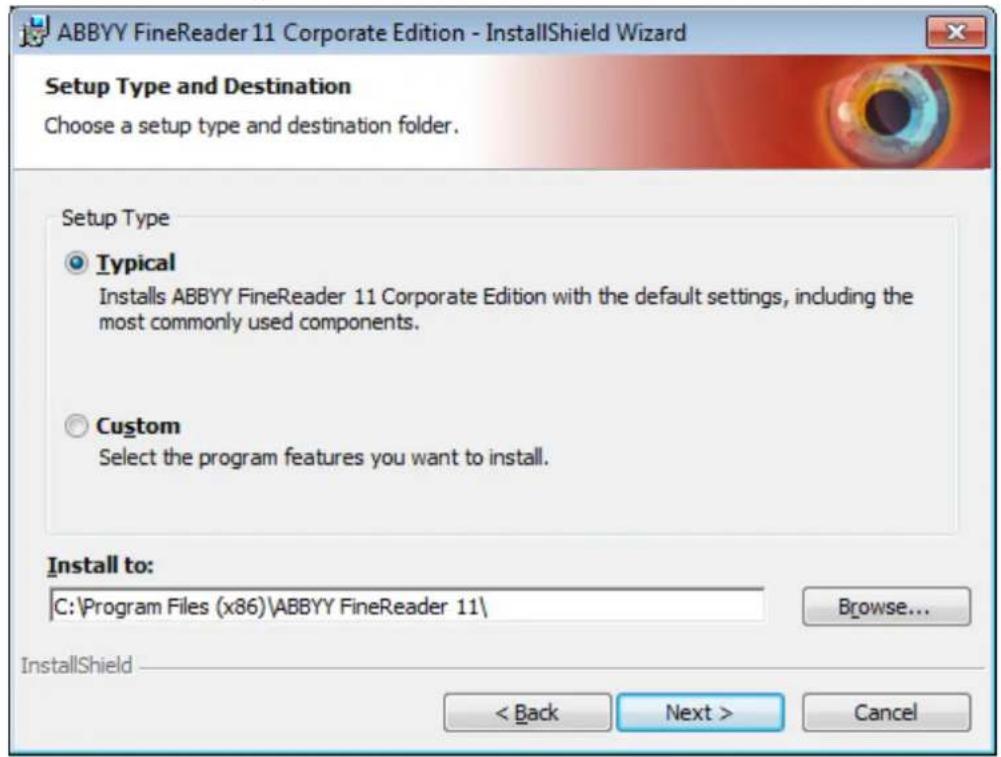
- Follow the instructions of the setup wizard.
Command line installation
- Perform administrative installation of ABBYY FineReader 11 (see Step 1. Administrative installation for details).
- Run the setup.exe file in the administrative installation folder using the command line parameters described below.
Advertise installation
For advertise installation, type
Setup.exe / j
The program icon will appear in the Start menu of the workstation. Clicking this icon automatically installs the program in default configuration (the interface language is selected automatically based on the regional settings of the computer).
Silent installation
For silent installation, type
Setup.exe / qn
In the case of silent installation, no set-up dialog boxes are displayed and the program is installed in default configuration (the interface language is selected automatically based on the regional settings of the computer).
Note: Change "/qn" to "/qb" if you want an installation progress bar to be displayed. No other dialog boxes will be displayed.

Additional command-line options for silent installation
/L
Possible language code* values:
1026 Bulgarian
1028 Chinese (Traditional)
1029 Czech
1030 Danish
1031 German
1032 Greek
1033 English
1034 Spanish
1036 French
1038 Hungarian
1040 Italian
1041 Japanese
1042 Korean
1043 Dutch
1045 Polish
1046 Portuguese (Brazilian)
1049 Russian
1051 Slovak
1053 Swedish
1055 Turkish
1058 Ukrainian
1061 Estonian
2052 Chinese (Simplified)
* The number of available interface languages depends on the type of your distribution package.
/V "
"command line" you can specify the following:
INSTALLDIR="
WEB_ALLOWED=
E.g.:
Setup.exe / qn / L1049 / v INSTALLDIR="C:\ ABBYY FineReader 11" WEB\_ALLOWED=Yes
This will install ABBYY FineReader 11 into C:\ABBYY FineReader 11. The menus, dialog boxes and other interface elements will be in Russian. Information about the selected ABBYY FineReader settings will be send to ABBYY over the Internet. The set of available OCR languages depends on the type of the distribution package.
Uninstalling ABBYY FineReader 11 in silent mode
msiexec /x {F1100000-0003-0000-0000-074957833700}
Using Active Directory
Microsoft Windows Server 2003 and Microsoft Windows Server 2008 include an integrated directory service, Active Directory, which, in turn, includes Group Policy. The Software Installation snap-in, which is part of Group Policy, allows you to install a software application on several workstations simultaneously.
Three major installation methods are implemented in Active Directory:
- Publish to User
- Assign to User
- Assign to Computer
ABBYY FineReader 11 can be installed using the Assign to Computer method.
Important!
- ABBYY FineReader 11 will be completely installed on a workstation only after the workstation is restarted.
- The Publish to User and Assign to User methods are not supported.
Example: Using Active Directory to deploy ABBYY FineReader 11
This example illustrates deployment under Microsoft Windows Server 2003 with Microsoft Group Management Console installed.
The program is installed on one domain computer or on a group of computers:
-
Perform administrative installation (see Step 1. Administrative installation).
-
Go to Start>Control Panel>Administrative and select Active Directory Users and Computers.

- Right-click the site, domain, or another organized unit that contains the computer or group of computers onto which ABBYY FineReader 11 is to be installed.
- On the shortcut menu, select Properties.

- In the Properties dialog box, click the Group Policy tab and then click Open...

- Right-click the organized unit that contains the computer or group of computers onto which ABBYY FineReader 11 is to be installed.
- On the shortcut menu, select Create and Link a GPO Here...
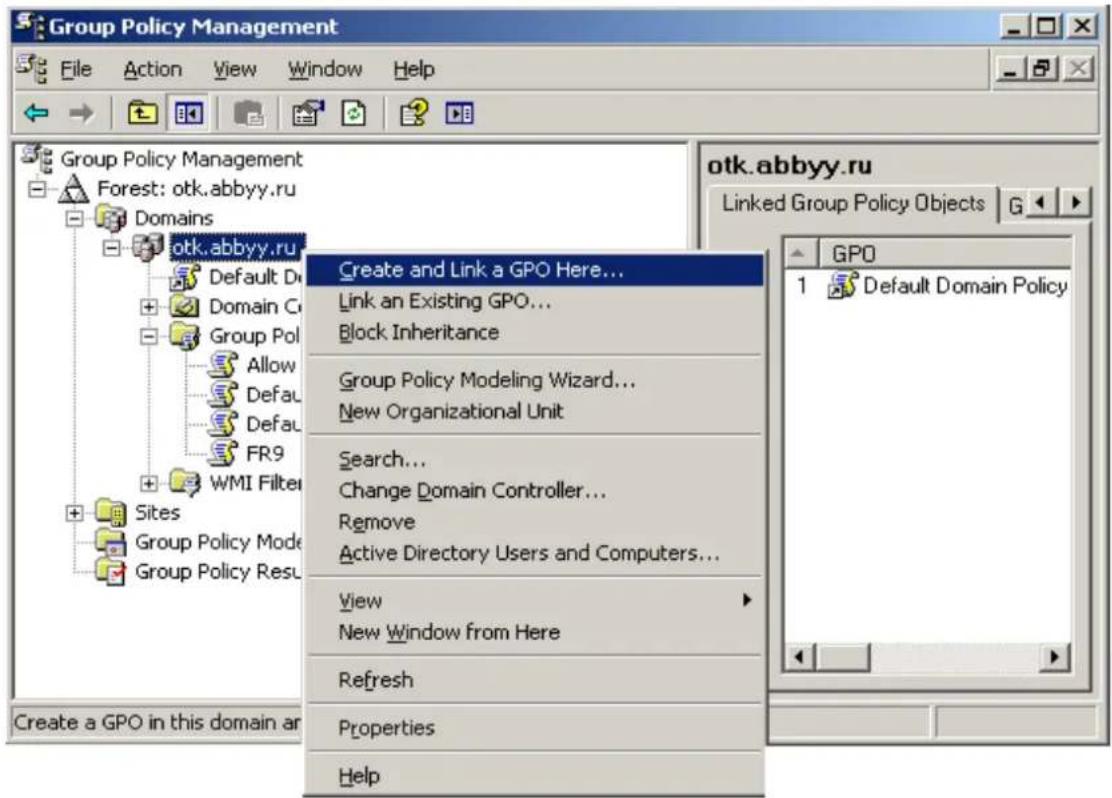
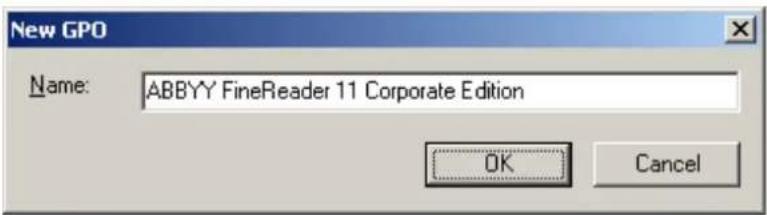
8. Enter a descriptive name and click OK.
9. Right-click the Group Policy object you have created and select Edit.
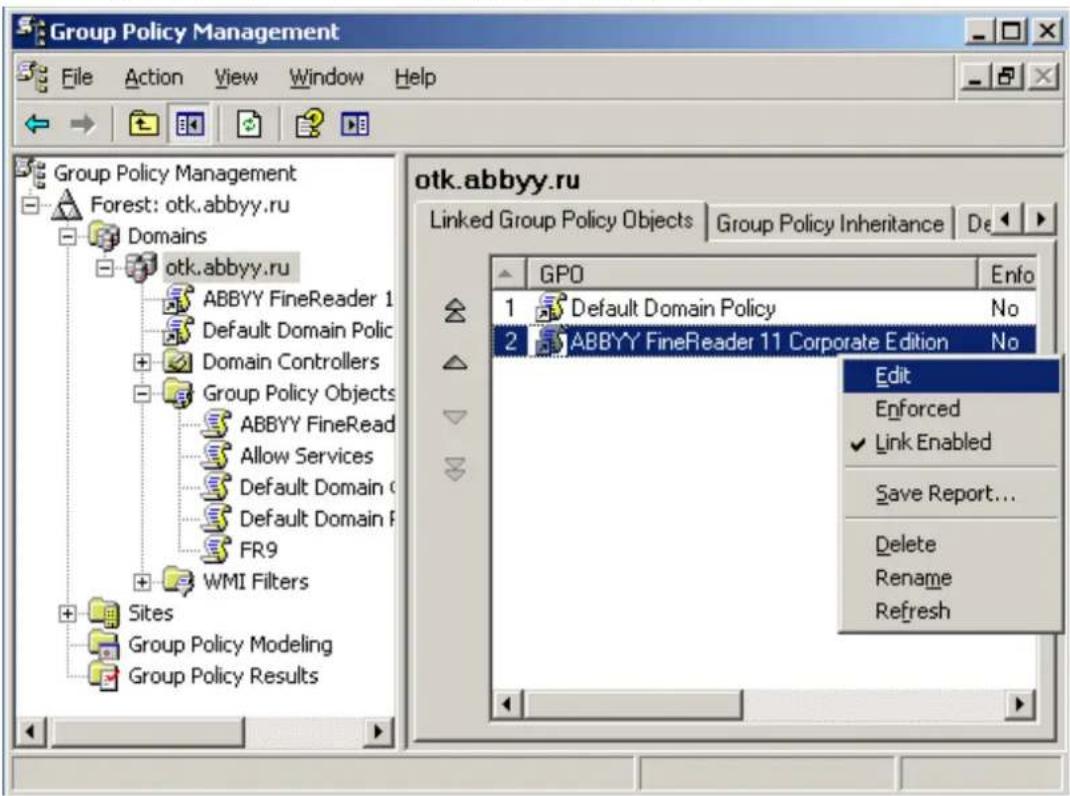
10. In the Group Policy Object Editor window, click Computer Configuration>Software Settings>Software Installation.
11. On the shortcut menu, select New/Package...

- Provide the network path to the file ABBYY FineReader 11 Corporate Edition.msi that is located in the administrative installation folder on the server (see Step 1. Administrative installation).
- Select the Advanced deployment method.

- In the dialog box that opens, click the Modifications tab and then click the Add... button.

- Select the interface language that will be used by ABBYY FineReader when installed on the workstations. The interface language files are located in the administrative installation folder on the server. File names and their languages:
1026.mst Bulgarian
1028.mst Chinese (Traditional)
1029.mst Czech
1030.mst Danish
1031.mst German
1032.mst Greek
ABBYY FineReader 11 Corporate Edition System Administrator's Guide
1033.mst English
1034.mst Spanish
1036.mst French
1038.mst Hungarian
1040.mst Italian
1041.mst Japanese
1042.mst Korean
1043.mst Dutch
1045.mst Polish
1046.mst Portuguese (Brazilian)
1049.mst Russian
1051.mst Slovak
1053.mst Swedish
1055.mst Turkish
1058.mst Ukrainian
1061.mst Estonian
2052.mst Chinese (Simplified)
E.g.: To install ABBYY FineReader with the Russian interface, select 1049.mst.
Using Microsoft Systems Management Server (SMS)
Microsoft Systems Management Server automates software deployment in a local area network and eliminates the need to go directly to the locations where the software is to be installed (computers, groups, or servers).
Software deployment using SMS comprises three stages:
- Preparing ABBYY FineReader 11 for automated installation (creating so-called "unattended setup").
- Creating a deployment script, i.e. choosing installation parameters:
- computer names
• time of installation
- conditions for installation
- Installing the software on the specified computers by SMS in accordance with the installation parameters specified in the script.
Example: Using SMS to deploy ABBYY FineReader 11
- Perform administrative installation (see Step 1. Administrative installation).
- In the SMS Administrator Console, select the Packages item.
- In the Action menu, select New>Package.

- In the Package Properties dialog box that opens, enter the required package properties.

- Click the Data Source tab.
- Make sure that the This package contains source files box is not selected and click OK.
- In the package you have just created, select Programs.
8. On the Action menu, select New>Program.
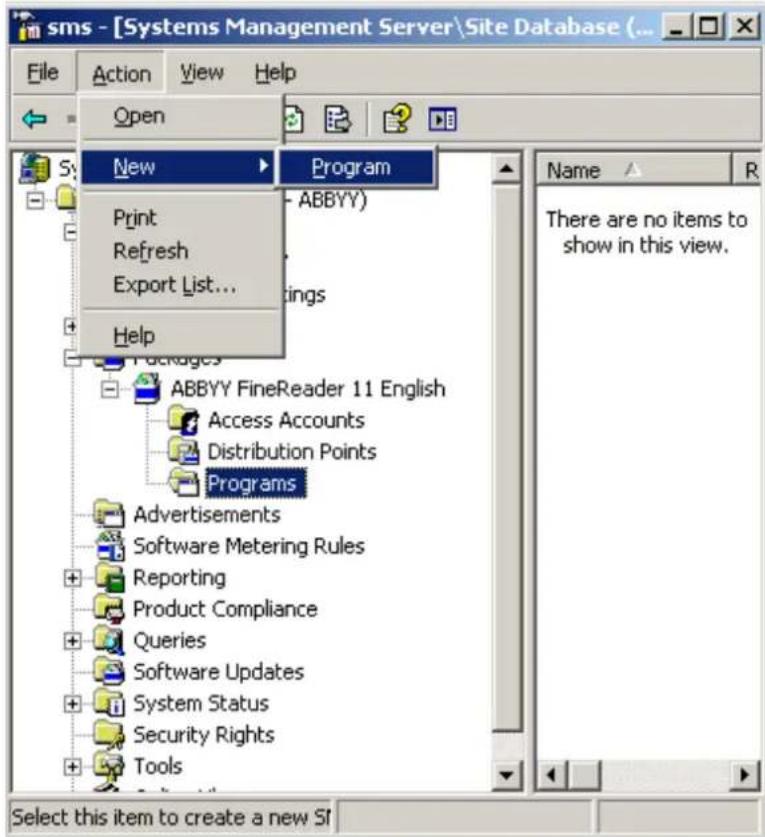
9. On the General tab of the Program Properties dialog box:
- Enter a descriptive name for the program in the Name field
• Type setup.exe / q in the Command Line field - In the Start in field, enter the path to the administrative installation folder (e.g. \MyFileServer\Programs Distribs\ ABBYY FineReader 11)

-
On the Environment tab of the Program Properties dialog box:
-
Select Run with administrative rights
• Make sure that Runs with UNC name is selected
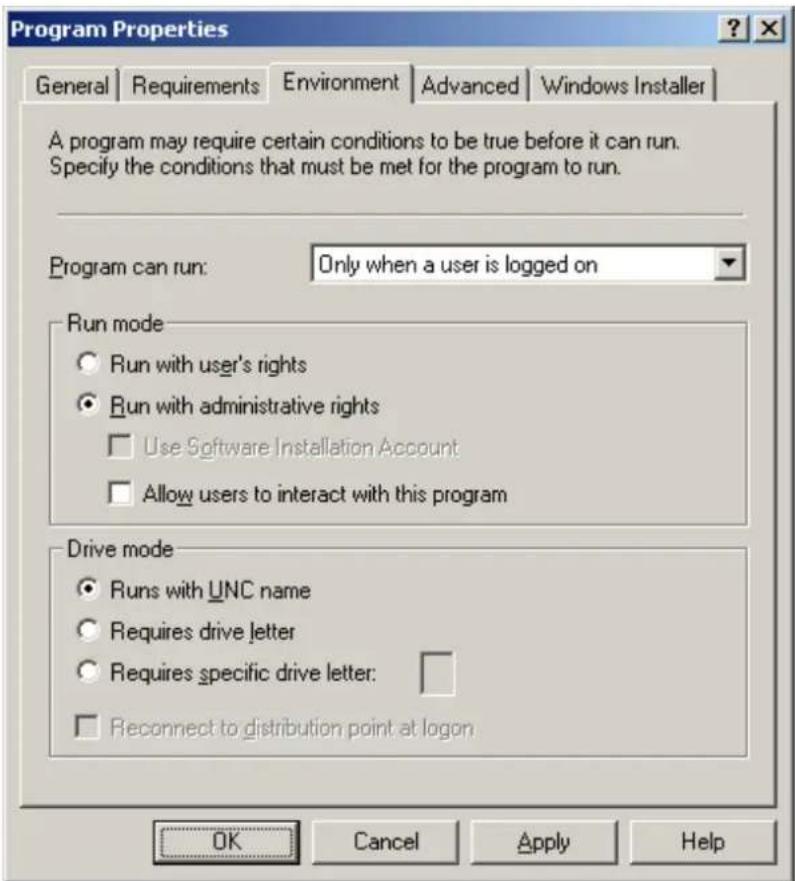
- Change the condition in the Program can run field if required and click OK.
- You can also use the Distribute Software Wizard. To run the wizard, on the Action menu, select All Tasks>Distribute Software and follow the instructions of the wizard.
Important! You cannot create Distribution Points.
Using Task Scheduler
To install ABBYY FineReader on workstations using Task Scheduler:
- Perform administrative installation (see Step 1. Administrative installation).
- Make sure that Task Scheduler is running on the workstation, that a user with local administrator rights is registered on the workstation, and that this user has access rights to the administrative installation folder and to ABBYY FineReader 11 License Server.
- Create a new task on the workstation:
- Specify the following parameters on the Task tab:
- Run field: "\"MyFileServer\Programs Distribrs\ABBYY FineReader 11\setup.exe" / qn / L1033.
For a detailed treatment of the parameters, see Command line installation.
- Run as field: DOMAIN\ Login
• In the Set Password dialog box, specify a password.
• Make sure that the Enabled option is selected.
Note: DOMAIN\ Login refers to the administrator of the workstation where ABBYY FineReader will be installed.
- On the Schedule tab, specify the time when the installation must start.
Note: Do not change the qn parameter.
Frequently Asked Questions
How can I install ABBYY FineReader 11 on a terminal server?
The operation of ABBYY FineReader 11 Corporate Edition in terminal mode has been tested for the following configurations:
• Windows 2003 Terminal Server
• Windows 2008 Terminal Server
Important! Only Concurrent licenses support terminal mode.
- Perform administrative installation.
The License Server and the License Manager can be installed on any computer in the local area network. See Step 1. Administrative installation for details.
- Launch the License Manager.
- Add all your licenses in the License Manager.
- Install ABBYY FineReader 11 from the administrative installation folder onto the terminal server.
ABBYY FineReader will be installed on the terminal server as if it was a workstation. Now multiple users can remotely access the client part of the application.
Note: The License Server can also be installed on a terminal server.
How can I change the network connection settings?
You can change the connection settings used for communication among the License Server, the License Manager, and the workstations.
Setting up a network connection
- To set up a network connection, use the following file
% programfiles% \ Common Files\ ABBYY\ FineReader\ 11.00\ Licensing\ CE\ Licensing.ini This file is located on the computer where the License Server is installed.
-
In the above file, change the desired parameters:
-
Connection protocol See Setting up the connection protocol for details.
- Connection port See Setting up the connection port for details.
E.g.:
[Licensing]
ConnectionProtocolType= TCP\IP
ConnectionEndpointName=81
Note: Make sure that your firewall does not prevent % programfiles% \ Common Files\ ABBYY\ FineReader\ 11.00\ Licensing\ CE\ NetworkLicenseServer.exe from accessing the specified port.
-
Copy the file Licensing.ini
-
in the License Manager folder on all the computers where the License Manager has been installed (by default, the License Manager is installed into % programfiles% \ ABBYY FineReader 11 CE License Manager)
- in the administrative installation folder where FineReader.exe is located, E.g. \MyFileServer\Programs Distribs\ ABBYY FineReader 11.
Important! For the changes to take effect, you must restart the ABBYY FineReader 11 CE Licensing Service
- Install ABBYY FineReader on the workstations.
For detailed instructions, see Step 3. Installing ABBYY FineReader 11 on Workstations
Note: If ABBYY FineReader is already installed on the workstations, repair ABBYY FineReader on all the workstations. For detailed instructions, see How can I repair ABBYY FineReader 11 on the workstations?
Setting up the connection protocol
[Licensing]
ConnectionProtocolType= [TCP\IP | NAMED PI PES]
This parameter allows you to specify the protocol to be used (TCP\IP) or Named Pipes. This information will be used:
• by the License Manager to access the License Server
• by the workstations to access the License Server when installing or repairing ABBYY FineReader on the workstations
By default, Named Pipes is used.
Setting up the connection port
[Licensing]
ConnectionEndpointName=[port number for TCP\IP | channel name for Named Pipes]
This parameter allows you to specify the number of the port for the connection protocol or the name of the channel for Named Pipes. This information is used:
• by the License Manager to access the License Server
• by the workstations to access the License Server when installing or repairing ABBYY FineReader on the workstations
Note: Avoid changing the name of the named channel for the Named Pipes protocol that is set by the program when installing the License Server.
How can I repair ABBYY FineReader 11 on the workstations?
Repairing ABBYY FineReader 11 in interactive mode
On the workstation, do the following:
- In Start>Control Panel, select Add and Remove Programs.
Note: In Microsoft Windows Vista and Microsoft Windows 7, this command is called Programs and Features. - In the list of installed programs, select ABBYY FineReader 11 Corporate Edition and click Change.
- In the Program Maintenance dialog box that opens, select Repair and click Next.
- Follow the instructions of the wizard.
Repairing ABBYY FineReader 11 via the command line
On the workstation, execute the following command:
• msiexec /f {F1100000-0003-0000-0000-074957833700}
How can I rename the computer hosting the License Server or move the License Server to another computer?
If you deployed ABBYY FineReader in the local area network and then changed the name of the computer hosting the License Server or an unexpected error occurred on the License Server computer, do the following:
- Remove the License Server from the computer on which it was installed.
Note: If this computer is inaccessible, go to step 2.
a. In Start>Control Panel, select Add and Remove Programs.
Note: In Microsoft Windows Vista and Microsoft Windows 7, this command is called Programs and Features.
b. In the list of installed programs, select ABBYY FineReader 11 CE License Server and click Remove.
-
Install the License Server on a different computer, for example on \NewServer.
-
On all the computers where the License Manager is installed, either edit or add the parameter [Licensing]
NetworkServerName=
%Program Files%\ABBYY FineReader 11 CE License Manager\LicenseManager.ini
This parameter allows you to specify the name of the server to be accessed by the License Manager. For example, specify
[Licensing]
NetworkServerName= MyComputerName
Important! For the changes to take effect, you must restart ABBYY FineReader 11 CE License Manager.
-
Add and activate your licenses in ABBYY FineReader 11 CE License Manager. For details, see the ABBYY FineReader License Manager help file.
-
In the administrative installation point, go to the ABBYY FineReader 11 folder and create a Licensing.ini file there.
The path to the administrative installation folder was specified earlier when creating the administrative installation point. For details, see Creating an administrative installation point.
- In the Licensing.ini file you have created, add the NetworkServerName parameter to the [Licensing] section. This parameter specifies the name of the server, for example [Licensing]
NetworkServerName= MyComputerName
- Reinstall ABBYY FineReader on all the workstations.
For detailed instructions, see Step 3. Installing ABBYY FineReader 11 on Workstations.
Group Work in a LAN
ABBYY FineReader 11 provides tools and capabilities for processing documents over a local area network (LAN).
Processing the same ABBYY FineReader document on several computers
When running ABBYY FineReader over a local area network, all the program tools and capabilities are available on the workstations.
If an ABBYY FineReader document is to be used on several LAN computers simultaneously, the following should be taken into account:
• A separate copy of ABBYY FineReader 11 should be installed on each computer.
• All the users must have full access to the ABBYY FineReader document.
• Each user may add pages to the document and modify them.
• A document page that is being processed by one user is locked for the other users.
- The statuses of the pages can be viewed in the Pages window. Users can see who is currently working with a page (i.e. see the name of the corresponding user and computer), whether a page was recognized or edited, etc. This information will be displayed in the corresponding columns of the Pages window when Details view is selected.
- The fonts that are used in the ABBYY FineReader document must be installed on each computer. Otherwise, the recognized text may be displayed incorrectly.
Using the same user languages and dictionaries on several computers
In ABBYY FineReader 11, several users can use the same user languages and dictionaries simultaneously.
To make user dictionaries and languages available to multiple users:
- Create/open an ABBYY FineReader document and select desired scanning and OCR options for the document.
- Prior to creating a user language, specify a folder where user dictionaries will be stored. This folder should be accessible to all network users.
Note: By default, user dictionaries are stored in %Userprofile%\Application Data\ABBYY\FineReader\11.00\UserDictionaries if your computer is running Windows XP and in %Userprofile%\AppData\Roaming\ABBYY\FineReader\11.00\UserDictionaries if your computer is running Microsoft Windows Vista or Windows 7.
To specify the dictionary folder:
- Select Tools>Options... and on the Advanced tab of the Options dialog box click the User Dictionaries... button.
-
Click Browse... and select the folder.
-
Save your user patterns and languages to an *.fbt file:
-
Select Tools>Options... and click the Read tab in the Options dialog box.
-
Under User patterns and languages, click the Save to File... button.
-
In the Save Options dialog box, specify a name for the *.fbt file and a folder where the file will be stored. This folder should be accessible to all network users.
-
Now when a user creates a new ABBYY FineReader document, they must load the user patterns and languages from the *.fbt file saved at step 3 and specify the path to the folder created at step 2, where the user dictionaries are stored.
Important! To be able to access the user dictionaries, patterns, and languages, users must have
read/write permissions for the folders where they are stored.
To view the list of available user languages in the Language Editor dialog box (select Tools>Language Editor... and scroll to User languages).
When a user language is being used by several users, it is available as "read-only," and users will not be able to change user language properties. However, words can be added to and deleted from a user dictionary that is being used on several LAN computers.
When a dictionary is being edited by a user, it is available as "read-only" to other users, i.e. users can use this dictionary to perform OCR and check spelling, but they cannot add or remove words.
Any changes a user makes to a user dictionary will become available to all users who have selected the folder where this dictionary is stored. For the changes to come into effect, users will need to restart ABBYY FineReader.
Technical Support
If you have any questions about how to install and use ABBYY FineReader 11 to which you cannot find answers in this System Administrator's Guide, please contact the ABBYY technical support service or ABBYY partners. For contact information, please refer to the "Support" section at www.abbyy.com.

- ABBYY® FineReader 11 Corporate Edition
- Table of Contents
- Deploying ABBYY FineReader 11 in a LAN
- General
- Deploying ABBYY FineReader 11
- Administrative installation
- Managing the licenses
- Installing ABBYY FineReader on workstations using one of the following methods:
- Important!
- Administrative installation folder requirements
- License Server requirements
- License Administrator Station requirements
- Workstation requirements
- Step 1. Administrative installation
- Installing the License Server and the License Manager
- Note:
- Creating an administrative installation point
- Step 2. Managing Licenses
- Step 3. Installing ABBYY FineReader 11 on Workstations
- Interactive installation
- Command line installation
- Advertise installation
- Silent installation
- Setup.exe / qn
- Additional command-line options for silent installation
- Chinese (Simplified)
- Setup.exe / qn / L1049 / v INSTALLDIR="C:\ ABBYY FineReader 11" WEB\_ALLOWED=Yes
- Uninstalling ABBYY FineReader 11 in silent mode
- Using Active Directory
- Example: Using Active Directory to deploy ABBYY FineReader 11
- Enter a descriptive name and click OK.
- Right-click the Group Policy object you have created and select Edit.
- In the Group Policy Object Editor window, click Computer Configuration>Software Settings>Software Installation.
- On the shortcut menu, select New/Package...
- Using Microsoft Systems Management Server (SMS)
- Example: Using SMS to deploy ABBYY FineReader 11
- On the Action menu, select New>Program.
- On the General tab of the Program Properties dialog box:
- Using Task Scheduler
- Frequently Asked Questions
- How can I install ABBYY FineReader 11 on a terminal server?
- How can I change the network connection settings?
- Setting up a network connection
- Setting up the connection protocol
- [Licensing]
- ConnectionProtocolType= [TCP\IP | NAMED PI PES]
- Setting up the connection port
- How can I repair ABBYY FineReader 11 on the workstations?
- Repairing ABBYY FineReader 11 in interactive mode
- Repairing ABBYY FineReader 11 via the command line
- How can I rename the computer hosting the License Server or move the License Server to another computer?
- Group Work in a LAN
- Processing the same ABBYY FineReader document on several computers
- Using the same user languages and dictionaries on several computers
- To make user dictionaries and languages available to multiple users:
- To specify the dictionary folder:
- Technical Support
Brand : ABBYY
Model : FineReader 11 Corporate
Category : Photo/Video Software