FineReader 6.0 OCR - Software License ABBYY - Free user manual and instructions
Find the device manual for free FineReader 6.0 OCR ABBYY in PDF.


| Type de produit | OCR Software License |
| Marque | ABBYY |
| Modèle | FineReader 6.0 |
| Version du logiciel | 6.0 |
| Plateforme | Microsoft Windows 95/98/2000/XP |
| Langues prises en charge | English, French, German, Italian, Spanish, Portuguese, Dutch, Swedish, Norwegian, Danish, Finnish, Polish, Czech, Hungarian, Russian, Ukrainian, Turkish, Arabic, Hebrew, Japanese, Chinese (Traditional/Simplified), Korean |
| Formats d'entrée | TIFF, JPEG, BMP, PNG, PCX, DCX, PDF (image) |
| Formats de sortie | Microsoft Word, Excel, PowerPoint, HTML, PDF, RTF, TXT, CSV |
| Reconnaissance OCR | Reconnaissance de texte imprimé avec préservation de la mise en page |
| Modes de numérisation | Numérisation directe (TWAIN/WIA), ouverture de fichiers image |
| Édition de documents | Correction intégrée des erreurs OCR, vérificateur orthographique |
| Exportation | Enregistrement direct dans les formats bureautiques |
| Configuration minimale | Pentium 166 MHz, 32 Mo RAM, 150 Mo espace disque |
| Licence | Licence perpétuelle pour un seul utilisateur |
| Type de support | CD-ROM (téléchargement possible) |
| Nettoyage et entretien | Aucun entretien physique requis; désinstaller avant mise à jour |
| Sécurité | Clé de licence requise pour l'activation |
| Pièces détachées et réparabilité | Non applicable (logiciel); réinstallation via support original |
Frequently Asked Questions - FineReader 6.0 OCR ABBYY
User questions about FineReader 6.0 OCR ABBYY
0 question about this device. Answer the ones you know or ask your own.
Ask a new question about this device
Download the instructions for your Software License in PDF format for free! Find your manual FineReader 6.0 OCR - ABBYY and take your electronic device back in hand. On this page are published all the documents necessary for the use of your device. FineReader 6.0 OCR by ABBYY.
USER MANUAL FineReader 6.0 OCR ABBYY
over 70 top industry awards worldwide
ABBYY
SOFTWARE HOUSE

ABBYY
FineReader®
Version 6.0
OCR
User's Guide
Optical Character Recognition Program
ABBYY FineReader
Version 6.0
User's Guide
Information in this document is subject to change without notice and does not bear any commitment on the part of ABBYY Software House.
The software described in this document is supplied under a license agreement. The software may only be used or copied in strict accordance with the terms of the agreement. It is a breach of the "On legal protection of software and databases" law of the Russian Federation and of international law to copy the software onto any medium unless specifically allowed in the license agreement or nondisclosure agreements.
No part of this document may be reproduced or transmitted in any from or by any means, electronic or other, for any purpose, without the express written permission of ABBYY Software House.
© ABBYY Software House, 2002. All rights reserved.
© ParaType, Inc., 2001. Type 1 fonts are licensed from ParaType, Inc.
ABBYY, BIT Software, FineReader, «fontain image transformation», Lingvo, Scan&Read, Scan&Translate, «one-button principle», «Your computer reads by itself» are registered trademarks of ABBYY; Try&Buy, DOCFLOW are trademarks of ABBYY Software House.
Adobe ^® , Adobe Logo, Adobe PDF (Portable Document Format) and Adobe Acrobat ^® are the registered trademarks of Adobe Systems Incorporated.
All other trademarks are trademarks or registered trademarks of their legal owners. P.O. Box 72, Moscow, 125015, Russia. ABBYY..
Contents
Chapter 1
Installing and Starting ABBYY FineReader ....3
Software and Hardware Requirements 4
Installing ABBYY FineReader 4
Installation on a Network Server and on a Network Workstation 5
Starting ABBYY FineReader 6
Chapter 2
Quickstart 7
How to input a Document in less than a Minute 8
The ABBYY FineReader Main Window 8
ABBYY FineReader Toolbars 10
Chapter 3
General Features of ABBYY FineReader 15
What is an OCR System? 16
New Features of ABBYY FineReader 6.0 16
Supported Document Saving Formats 17
Supported Image Formats 18
Chapter 4
Acquiring the Image 19
Scanning 20
Setting Scanning Parameters 21
Tips on Brightness Tuning 22
Scanning Multi-page Documents 22
Opening Images 23
Scanning Dual Pages 24
Adding images of business cards to a batch 24
Working with The Image 25
Page Numbering 26
Batch Image Options 27
Chapter 5
Page Layout Analysis 29
General Information on Page Layout Analysis 30
Block Types 30
Automatic Page Layout Analysis Options 31
Drawing and Editing Blocks Manually 32
Manual Table Layout Analysis 34
Using Block Templates 35
Chapter 6
Recognition 37
General Information on Recognition 38
Recognition Language 38
Source Text Print Type 39
Other Recognition Options 40
Background Recognition 40
Recognition with Training 41
How to Train a User Pattern 42
How to Edit a User Pattern 43
User Languages and Language Groups 44
How to Create a New Language 44
How to Create a New Language Group 45
Chapter 7
Checking and Editing Text 47
Checking Text in ABBYY FineReader 48
Options for Checking and Editing Text 49
Adding and Deleting Words To/from the User Dictionary 50
Editing Text in ABBYY FineReader 51
Editing Tables 54
Chapter 8
Saving into External Applications and Formats 55
General Information on Saving Recognized Text 56
Text Saving Options 56
Saving the Recognized Text in RTF and DOC Formats 58
Saving Recognized Text in PDF Format 58
Saving Recognized Text in HTML Format 59
Saving the Page Image 60
Chapter 9
Working with Batches 61
General Information on Working with Batches 62
Creating a New Batch 62
Opening a Batch 63
Adding Images to A Batch 63
Batch Page Number 63
Closing a batch page or the whole batch 64
Deleting a Batch 64
Full-text Search in Recognized Batch Pages 65
Chapter 10
Network Document Processing 67
Work with the Same Batch over A Network 68
Group Work with the Same User Languages and Dictionaries 68
Group Work with Customized Dictionaries (Languages with Dictionary Support ONLY) 69
Appendix 71
Hot Keys 72
WELCOME!
Thank you for choosing ABBYY FineReader!
We all need to input text into our computers from time to time, whether it be newspaper/magazine articles, contracts, business letters, faxes, price lists, or questionnaires. For years there was only one way to input printed documents – you had to type them in from the keyboard. Remember the long hours you spent typing in text from one document or another? What a great thing it would have been had the computer been able to read the text by itself, straight from the sheet of paper.
Sometimes dreams do come true! FineReader Optical Character Recognition (OCR) software enables your computer and scanner to do just this - to read printed text by themselves.
But can't the scanner do the job on its own?
No. The scanner only takes a photograph of the text and converts it into a set of black and white dots (an image file), which cannot be edited using word processing applications such as MS Word, WordPerfect, Word Pro, etc. What is needed instead is an OCR system that looks for symbols in each set of black and white dots, “recognizes” the letters in each symbol, and, finally, converts the image into text that text editors and desktop systems are able to deal with.
So now I can input documents into my computer automatically?
Yes, now you can input documents into your computer automatically, without having to retype them all out on your keyboard.
Enjoy!
User's Guide
The User's Guide introduces you to the basics of using ABBYY FineReader. Each chapter starts with a short summary description and a list of the chapter's contents.
Online Help
FineReader's online Help contains basic and advanced information on program features, settings and dialogs. Online Help is provided in HTML format and has been designed for quick and easy information retrieval.
Readme file
The Readme file contains the latest information on the software.
Technical Support
If, after having consulted both your documentation and the ABBYY website, you still require assistance, e-mail us at support@abbyy.com. Note that our technical support experts will need the following information from you to be able to deal with your enquiries:
● The serial number of your copy of FineReader
- Your scanner make and model
- A general description of the problem and the full error message text (if you have encountered an error message)
- Your Windows operating system version
- Any other information you consider important.
Note: Some system information can be obtained by clicking on System Info in the About ABBYY FineReader dialog (menu Help/About).
All licensed users of the current and previous versions of the application are entitled to free technical support.
Chapter 1
Installing and Starting ABBYY FineReader
This chapter deals with ABBYY FineReader installation procedures and related subjects, such as system requirements and workstation/network installation.
A special installation program carries out the set up of FineReader. Always use the diskette/CD-ROM supplied as part of your software package. Installation is not possible using copied files.
Chapter Contents:
● Software and hardware requirements
● Installing ABBYY FineReader
● Network server/workstation installation
● Starting ABBYY FineReader
Software and Hardware Requirements
For ABBYY FineReader to function correctly your computer must meet the following system requirements:
- PC with an Intel ^® Pentium ^® 200 MHz processor or higher
- Microsoft ^ Windows ^ XP, Microsoft ^ Windows ^ 2000, Windows ^ NT ^ Workstation 4.0 with Service Pack 6 or greater, Windows ^ 95/98/Me
- 64 Mb (Windows XP/2000), 32 Mb (Windows Me/98/NT 4.0), 16 Mb (Windows 95) of RAM, plus 16 Mb of RAM of memory for each additional processor (in case of a multi-processor system)
- Microsoft ^® Internet Explorer 5.0 or higher (Microsoft ^® Internet Explorer 5.5 included on the FineReader CD-ROM)
- 90 Mbytes of free hard-disk space for minimal program installation
- 70 Mbytes of free hard-disk space for the program operation
- 100% Twain-compatible scanner, digital camera or fax-modem
- CD-ROM drive
- Mouse or other pointing device
- VGA or other high-resolution monitor
Installing ABBYY FineReader
Installation options
Once the set-up program has run a system check, type in your name and select the folder you wish to install ABBYY FineReader in. The setup program will then display several installation options. Select the option of your choice.
- Typical (recommended) - all components are installed including all recognition languages, a single interface language selected during installation.
- Custom installation - any number of program components may be installed (including all available recognition languages).
Note: If you wish to use user dictionaries and patterns from a previously installed version of FineReader, do not uninstall it prior to installing the new version. All existing user patterns and dictionaries will then be available for use in the latest version.
Installing ABBYY FineReader
If your software package contains both a CD-ROM and a diskette, proceed as follows:
- Insert the Installation diskette into the floppy disk drive.
- Insert the CD-ROM into the CD-ROM drive.
- Click the Start button on the Taskbar and select the Settings/Control Panel item.
- Double-click the Add/Remove Programs icon.
- Select the Install/Uninstall tab and click the Install button.
- Follow the installation instructions.
If your software package contains only a CD-ROM, proceed as follows:
- Insert the CD-ROM into the CD-ROM drive.
- Click the Start button on the Taskbar and select the Settings/Control Panel item.
- Double-click the Add/Remove Programs icon.
- Select the Install/Uninstall tab and click the Install button.
- Follow the installation instructions.
Note: An Installation Code is required to complete installation if one of following applies to your computer: there is no 3.5" floppy disk drive present; installation is being carried out using non-original or corrupted media; applications have been installed that are in conflict with ABBYY FineReader. The Installation Code can be obtained from ABBYY or one of its resellers, and is created from the Product ID (issued automatically by the installation program) and the serial number (printed on the registration card). To obtain your Installation Code, simply fill out the relevant form at www.abbyy.com. Alternatively you can scan the completed registration card and e-mail it to us, or call the technical support number.
If you come across an error message, see the Readme.htm file for assistance (located on the ABBYY FineReader CD-ROM).
Installation on a Network Server and on a Network Workstation
Installation on a Network Server
(System Administrators Only)
Installation of the ABBYY FineReader 6.0 Corporate Edition on a network server can only be carried out by the system administrator. Proceed as follows:
- If your software package contains both a CD-ROM and floppy disk, insert the installation floppy disk and run setup.exe from the FineReader CD-ROM with the /a command-line option.
- If your software package contains only a CD-ROM, run setup.exe from the FineReader CD-ROM with the /a command-line option.
Additional licenses
Following installation on a network server, you will need to add serial numbers if FineReader is to be used by more than one user:
- Run LicSetup.exe from the folder\program files\ABBYY FineReader 6.0 where ABBYY FineReader 6.0 Corporate Edition was installed. The Add License dialog will be displayed.
- Enter a new serial number and click the Add button.
Note:
- You cannot use logical drives created by the SUBST command.
- If you choose "installation to a network", SP 6 and IE 5.5 will NOT be automatically installed on the server. If you choose any other installation method, SP 6 and IE 5.5 will be automatically installed on your system. To avoid any difficulties related to the absence of these components, the system administrator should check if both of these components are installed on the network station prior to installation. If they are not installed, the system should be updated before installing ABBYY FineReader.
- Check before installation that all users have read-write access to the network folder named Users (this folder is automatically created during application installation and stores temporary files).
Installation on a Network Workstation
If ABBYY FineReader 6.0 Corporate Edition has been installed on a network server, the setup program can be run directly from the server.
To install ABBYY FineReader 6.0 Corporate Edition on a workstation:
- Run Setup.exe from the network folder containing ABBYY FineReader Corporate Edition 6.0. Follow the installation instructions.
Note:
- You should have administrative rights to the workstation on which ABBYY FineReader is being installed.
- If the message "Can't load FineReader. There is no free license." is displayed, check the number of additional licenses added in the Add License dialog, as well as the number of users currently working with FineReader.
- For ABBYY FineReader 6.0 to function correctly, the user must have read-write access to the folder in which the batch is stored.
Starting ABBYY FineReader
To start ABBYY FineReader:
- Select the ABBYY FineReader Professional 6.0 (Corporate Edition 6.0) item in the Start/Programs menu.
Note: Make sure your scanner is connected to your computer, plugged-in, and turned on before you start FineReader. If your scanner has yet to be installed, please consult the user guide supplied with the scanner for instructions on how to install it.
If you do not have a scanner, you can still recognize image files using FineReader (see the sample files located in the ABBYY FineReader/Demo folder).
Chapter 2
Quick Start
In this chapter you will learn how to input a document without having to know anything about the way in which ABBYY FineReader works! You will also learn which windows and toolbars are contained within FineReader.
If you already have experience of working with FineReader, you may wish to skip this chapter altogether and go directly to New features of ABBYY FineReader 6.0 in chapter 3.
Chapter Contents:
● How to input a document in less than a minute
● The ABBYY FineReader main window
● ABBYY FineReader toolbars
How to Input a Document in Less than a Minute
- Turn on the scanner if it has a separate power source to your PC.
Note: Many scanner models have to be turned on before you turn on the computer.
- Turn on the computer and start FineReader (Start/Programs/ABBYY FineReader Professional 6.0 or Corporate Edition 6.0). The FineReader main window will appear on your screen.
- Place the page you want read onto the scanner.
- Click the arrow to the right of the Scan&Read button. Select the Scan&Read Wizard item in the local menu.

The Scan&Read Wizard is a special scan&read/open&read mode during which you are guided through each step of the scanning process. A sample image file is contained in the Demo folder, which, in turn, is located in the folder containing FineReader.
- Follow the Scan&Read Wizard instructions.
The document input process is made up of four steps: scanning, reading, spellcheck and saving the recognized text.
Once scanning is complete, a "photograph" of the source page will appear in the Image window. The application then asks you to set the recognition parameters. Once this has been done, it starts recognizing the image, analyzing its layout at the same time. Image areas already recognized are highlighted in blue.
Recognized text is displayed in the Text window, where it can be checked and edited. Once you have checked the document, the Scan&Read Wizard will prompt you to either send the recognized text to the application of your choice, save it to file, or go on processing more images.
The ABBYY FineReader Main Window
FineReader performs all document processing in batch mode. A batch is a folder containing images, recognized text files and other FineReader information files. Each scanned image is converted into a separate batch page. If there are several images in a single image file (for example, if you are dealing with a multipage TIFF), each file image will be converted into a separate batch page.
When you start FineReader for the first time, the default batch is opened. You can choose to work with the default batch or create a new batch of your own. See General Information on Working with Batches for more information.
![Default - ABBYY FineReader 6.0 Corporate Edition - [11 - Text] File Edit View Batch Image Process Tools Window Help Times New Roman 10.5 B I U English Scan&Read Open Image Read Check Spelling Save 9 Milky Way. This group, called Loca ies stretched over some 5 million xies of the Local Group are Milky y in the Triangulum constellation thick groups, called supergroups is in the Universe, stretched over s. The Local Group is a part of the which is located in the group in Ving Unregular galaxies The galaxies that have no regular form are called "irregular". An example is the Lesser Magillante Cloud. The irregular galaxies are very small, much less than the Milky Way, yet they contain great amounts of gas from which new mass are formed. The Lesser Magillante Cloud is among the nearest to the Milky Way. it can be seen in the Southern Hemisphere. 10 11 ich is located in the group in Vin Processes the source document in a special mode (Default) English (United States)](/content/2026/06/1345095/images/f0fa049be82b292ad9552d0049ed93d2c7e2a56ffff7487ad584e220a21ba58d.jpg)
Main window
Standard toolbar
Formatting toolbar
Wizard Bar
provides tools for full text processing: Scanning, Recognition, Spellcheck and Saving
Text window
displays the recognized text for checking and editing
Image window
displays the scanned image for viewing and drawing blocks
Zoom window
displays the zoomed-in image of the text line you edit or part of an image you are working on
Image Tools toolbar Batch window
provides tools for drawing and displays the pages of the open editing blocks, zoom tools batch in one of two modes: and tool for editing images thumbnail (as now) or details
You will see the FineReader main menu at the top of the FineReader Main window. The following four toolbars are displayed under the main menu: the Standard, Formatting, Image Tools, and WizardBar toolbars. You may show/hide any toolbar.
To show/hide a toolbar, click the Toolbar item in the View menu or the local menu. Right-click any toolbar to open the local menu. You will see the toolbar list, with the currently selected toolbars highlighted. Click the name of the toolbar you want shown/hidden.
At the bottom of the FineReader Main window you will find the status bar, which displays information on application status and the operations currently being performed, as well as brief information on menu items and buttons selected.
The Batch window is always displayed in the Main window. Three more windows may also be displayed: the Image, Zoom and Text windows.
The Image, Zoom and Text windows are interconnected: when you double-click a certain image area in the Image window, the respective area is displayed in the Zoom window, and the pointer in the Text window moved to the position clicked on (if text has already been recognized on the page).
To alter the on-screen windows arrangement:
- Select one of the following items: Batch Window >...; Image and Text Windows >...; Zoom Window >... in the View menu.
Some recommended windows arrangements: Useful if/when:
Batch window on the left; Batch View: Thumbnails; Image, Text and Zoom windows
Batch window at the top: Batch View: Details; Image, Text and Zoom windows
Batch window at the top; Batch View: Details; Image and Zoom windows and recognition
Batch window at the top; Batch View: Details; Text and Zoom windows
...a batch contains only a small number of pages
...a batch contains a large number of pages
...you perform layout analysis
...you edit the recognized text
To switch between windows:
- Press CTRL+TAB.
● Press ALT+1 to activate the Batch window.
● Press ALT+2 to activate the Image window. - Press ALT+3 to activate the Text window.
ABBYY FineReader Toolbars
There are four toolbars in FineReader: the Standard, Image Tools, Formatting and WizardBar toolbars. Using the toolbars is without doubt the most convenient way of accessing the application's functions. However, the same functions can also be accessed via menus or hot keys. To find out what function a particular toolbar button has, just move the mouse pointer to it. The button's tooltip will then be displayed, and the status bar will also display additional button details.
The WizardBar toolbar

flowchart
graph LR
    A["Scan&Read"] --> B["Scan"]
    B --> C["Read"]
    C --> D["Check Spelling"]
    D --> E["Save"]
The WizardBar toolbar buttons launch the main FineReader functions: Scanning, Reading, Checking and Saving the recognition results. The numbers on the buttons indicate the order in which the respective document input actions should be performed. You may perform each action separately or combine them into one by clicking the Scan&Read Wizard button. In the latter case, the Scan&Read Wizard will then perform the full document processing cycle automatically.
Each button features several function modes. Click the arrow to the right of the button and select the mode of your choice in the local menu. The button icon always displays the mode that was last selected. Click the button itself to run this mode again.
Scan&Read

Scan&Read Wizard - launchesScan&Read mode. FineReader guides you through the document processing process and advises you on how best to obtain the desired result.
Scan&Read - starts scanning and reading a document using the current options.
Scan&Read Multiple Images - scans and reads several consecutive images.
Open&Read - opens and reads the images selected in the Open dialog.
1-Scan

Open Image - adds image(s) to the batch. Each added image is copied to the batch folder.
Scan Image - scans an image.
Scan Multiple Images - scans images continuously. Select the Stop Scanning item in the File menu to bring scanning to a stop.
Options - opens the Scan/Open Image tab (Options dialog), to allow scanning options to be set etc.
2-Read

Read - reads the open batch page.
Read All - reads all unrecognized batch pages.
Options - opens the Recognition tab (Options dialog) to allow document recognition options to be set.
3-Check Spelling

Check Spelling - searches the text for misspelt and uncertain words (i.e. ones containing uncertainly recognized characters).
Options - opens the Check Spelling tab (Options dialog) to allow spellcheck options to be set.
4-Save
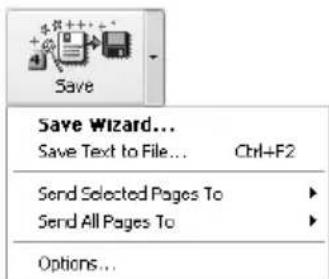
Save Wizard - opens the Save Wizard to allow saving options and the destination application to be selected.
Save Text to File - saves the recognized text to a disk file.
Send Selected Pages To – should you only want to export only selected batch pages, select the pages concerned and specify the application to which they should be exported. FineReader will export the pages to the application of your choice without saving the text beforehand.
Send All Pages To - exports all recognized pages to the application of your choice without saving the text beforehand.
Options - opens the Formatting tab (Options dialogue) to allow saving options to be set.
The Standard toolbar
The Standard toolbar features file and image tools (undo/redo an action, scroll the batch pages, clean and rotate the image) and the list of Recognition languages.
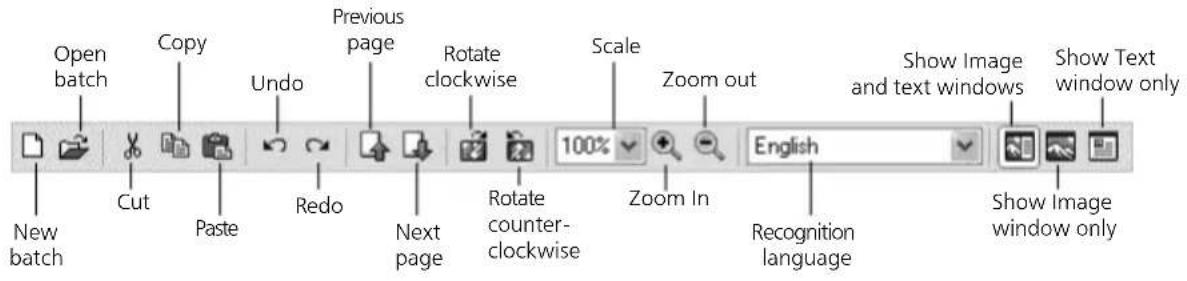
The Formatting toolbar

The Formatting toolbar features various text formatting tools. You can edit the text and text formatting in the Text window.
The Image Toolbar

The Image Toolbar features page layout analysis (e.g. block creation and editing) tools, as well as tools for increasing/decreasing the image scale and image editing (e.g. image despeckle etc.)
Note: Block creation and editing buttons can also be used in the Zoom and Image windows.
Setting up the toolbar
Note: The appearance of the FineReader main window, or more precisely, the number of buttons displayed on FineReader's toolbars, depends on your monitor's resolution. To display all available buttons you need to increase your monitor's resolution. However, note that FineReader's functionality is not reduced if some buttons remain invisible - the buttons represent only one way of accessing FineReader's functions, all of which are also accessible via menus. FineReader allows you to customize the Standard, Image and Formatting toolbars: application command buttons can be added and removed at will.
Each menu item has its own icon. See the full list of commands and their respective buttons in the Customize (Tools>Customize menu) dialog in the Commands list.
To add a button to a toolbar:
- Select the category of your choice in the Categories field.
Note: The list of commands is grouped according to menu item, and the choice of category will affect the list of commands displayed in the Commands list.
- Select the toolbar to which you wish to add a button in the Toolbars field.
- Select a command in the Commands list and click the (>>) button.
The selected command will be added to the list of toolbar commands and displayed on the chosen toolbar in the main window.
To remove a button from a toolbar:
- Select the button you wish removed in the Toolbar buttons list and click the (<<) button.
Note:
- The order in which buttons are listed also determines their order on the toolbar. To change button order, select the command in the list of current toolbar commands and click the Up (Down) button to move the command up (down) the list.
- Commands may be distributed between a set of groups: select the Separator item in the Commands list and click the Add button. A separator will be added to the list of toolbar buttons. The separator may be moved at will.
- To restore the default set of buttons on a given toolbar, select the toolbar concerned in the Toolbars list and click the Reset button. To restore the default set of buttons on all toolbars, click the Reset All button.
Chapter 3
General Features of ABBYY FineReader
FineReader provides you with all the tools you need for inputting documents into your computer. Just click on the Scan&Read button once and all the rest is done for you - so you don't have to spend hours studying the user's guide beforehand. You can either send the recognized text to the word processor or a spreadsheet application of your choice; save it in RTF/DOC, PDF or HTML format (and retain the full document layout); or export the recognized text to a database application.
Chapter Contents:
● What is an OCR-system?
● New features of ABBYY FineReader 6.0
● Supported document saving formats
● Supported image formats
What is an OCR System?
An OCR (Optical Character Recognition) system enables you to input printed documents into your computer automatically via a scanner.
FineReader is an omnifont optical text recognition system. As a result it can recognize texts set in practically any font without any prior training. FineReader features high recognition accuracy and low sensitivity to print defects due to its incorporation of special recognition technology based on the principles of Integral Purposeful Adaptive (IPA) perception.
The document input process can be divided into two stages:
- Scanning. During the first stage the scanner acts as the computer's "eye". It looks at the image and transfers it to the computer. The acquired image is nothing more than a picture, a set of black, white, and color dots impossible to edit in any word processor.
- Recognition. During the second stage FineReader carries out OCR image processing.
Let's take a closer look at the second stage.
FineReader OCR image processing involves analyzing the image file transmitted by the scanner (layout analysis) and recognizing each character. The layout analysis (selecting the recognition areas, tables, pictures, lines, and individual characters) and image reading processes are closely related. Page layout analysis is more accurate if the nature of the text is known to the application.
As mentioned previously, the image recognition process is based on the principles of Integral Purposeful Adaptive (IPA) perception.
- Integrity – the identification of recognition objects based on a set of basic elements and their interrelations.
- Purposefulness – the generation and purposeful verification of recognition hypotheses.
- Adaptability – the system's ability to learn and be trained
These three principles determine the system's behavior. The system generates a hypothesis concerning a recognition object (a character, part of a character, or several glued characters) and then accepts or rejects this hypotheses according to whether the structural elements are present. These structural elements are computer equivalents of character parts crucial for human perception (arcs, circles, dots etc.). The application then adapts itself to the text according to the degree of accuracy attained. Purposeful searching and context information enable the system to recognize even torn and distorted characters, rendering it almost insensitive to print defects.
The final result is the recognized text that you see in the FineReader Text window, a text you can edit and save in any convenient format.
New Features of ABBYY FineReader 6.0
General features
- Now you can open and read PDF files in FineReader. PDF is one of the standard formats used for publishing documents on the Internet, as well as for document archiving, etc. You can open, read, and edit any PDF file in FineReader, and then save it in either PDF or any other format supported by FineReader.
- Integration with Windows Explorer. Image files and FineReader batches can now be opened directly from Windows Explorer.
● Saving of recognized documents under source image names. - Customizable toolbars.
Image processing
● Printing of scanned images and recognized text.
● Automatic and manual splitting of dual-page- and business card scans.
Recognition
- 177 recognition languages. See the full list under Supported languages in ABBYY FineReader Help.
- An improved algorithm for the recognition of poor print quality documents. The improved algorithm incorporates a new adaptive image binarization method and a new method of background removal, and is particularly effective in the case of images scanned in “gray” mode.
Saving and editing
- Multicolumn WYSIWYG-editor. Blocks with recognized text, tables, and images are displayed in their original location.
- More precise saving of the original document layout in MS Word: saving of non-rectangular images, multi-column text flows and lists (numbered and bulleted).
- Support of multi-language PDF files: FineReader saves multi-language texts in PDF format without requiring the user to install additional fonts.
- New PDF saving mode - «Image only».
- Compression rate selection when saving in HTML- and PDF formats.
- JPEG image resolution selection when saving in RTF-, DOC- and PDF formats.
- Alignment of text in tables when exporting to MS Excel or saving in XLS format.
Professional features
- Shared group mode for the use of user languages, user dictionaries, and user dictionaries for pre-defined languages (FineReader Corporate Edition only).
- Full-text- and individual searches for words in any form can be carried out in any document (Edit>Advanced Search). Available in FineReader Corporate Edition only.
- A form-filling application ABBYY FormFiller (FineReader Corporate Edition only - a bonus application for registered ABBYY FineReader Professional users).
Supported Document Saving Formats
ABBYY FineReader saves recognition results in the following formats:
● Microsoft Word Document(*.DOC)
● Rich Text Format (*.RTF)
- Adobe Acrobat Format (*.PDF)
HTML
- Comma Separated Values file (*.CSV)
- Plain Text (*.TXT). FineReader supports various code pages (Windows, DOS, Mac, ISO) and Unicode encoding.
● Microsoft Excel Spreadsheet (*.XLS)
- DBF
Supported Image Formats
ABBYY FineReader opens image files in the following formats:
PDF: Files in PDF format (Version 1.3 or earlier).
BMP: 2-bit - black and white
4- and 8-bit - Palette
16-bit - Mask
24-bit - Palette and TrueColor
32-bit - Mask
PCX,
DCX: 2-bit - black and white
4- and 8-bit - gray
JPEG: gray and TrueColor
TIFF: black and white - uncompressed, CCITT3, CCITT3FAX, CCITT4, Packbits
gray - uncompressed, Packbits, JPEG
TrueColor - uncompressed, JPEG
Palette - uncompressed, Packbits
multi image TIFF
PNG: black and white, gray, color
ABBYY FineReader saves image files in the following formats:
BMP: black and white, gray, color
PCX: black and white, gray
JPEG: gray, color
TIFF: black and white - uncompressed, CCITT3, CCITT3FAX, CCITT4, Packbits
gray - uncompressed, Packbits, JPEG
color - uncompressed and JPEG
PNG: black and white, gray, color
Chapter 4
Acquiring the Image
Recognition quality depends greatly on the quality of the source image. In this chapter you will learn how to scan documents correctly, how to open and read saved images (see the list of supported image formats under Supported Image Formats in the ABBYY FineReader Help section), and how to process images and improve recognition quality (by eliminating scanning "dust") etc.
Chapter Contents:
- Scanning
- Setting scanning parameters
● Tips on brightness tuning
● Scanning multi-page documents - Opening images
- Scanning dual pages
- Adding images of business cards to a batch
- Page numbering
● Working with an image
● Batch Image Options
Scanning
FineReader "talks" with scanners via the TWAIN interface. This is a universal standard adopted in 1992 to unify the interaction of computer image inputting devices (such as scanners) and external applications. There are two ways in which FineReader can "talk" with a scanner via a TWAIN-driver:
- using its own interface: in this case use the FineReader Scanner Settings dialog to set scanning options; select Use FineReader interface;
- using the scanner's TWAIN interface: in this case use the scanner's TWAIN-dialog to set scanning options; select Use TWAIN-Source interface.
Both modes have their advantages and disadvantages
When you select the Use TWAIN-Source interface option, the preview image option normally becomes available. The option allows you to set the scanning area and tune brightness precisely, and to see how changes affect the previewed image. Note, however, that different scanners have different TWAIN driver dialogs. For instructions on how to use your scanner's TWAIN-dialog, consult your scanner's documentation.
If you select the Use FineReader interface option, you have access to the following additional features: a) you can scan multiple images using scanners without ADFs; b) you can save scanning options in the batch template file (*.fbt) and use them for other batches.
Switching from one mode to the other is easy:
- Select the Scan/Open Image tab in the Options dialog (menu Tools>Options) and click on the button of your choice - either Use TWAIN-Source interface or Use FineReader interface.
Note:
- The Use FineReader interface option may be unavailable (or disabled) in the case of certain scanner models.
- If you wish to see the Scanner Settings dialog in Use FineReader interface mode, select the Display options dialog before scanning item on the Scan/Open Image tab Tools>Options).
Important: Consult the documentation supplied with the scanner to ensure it is set up correctly. After connecting the scanner to the computer, don't forget to install a TWAIN-driver and/or the scanner software.
To start scanning:

Click the 1-Scan button or select the Scan item in the File menu. The Image window containing a "photograph" of the scanned page will appear in FineReader's Main window.
If you wish to scan several pages, click the arrow to the right of the 1-Scan button and select the Scan Multiple Images item.
If scanning does not start right away, one of following two dialogs will open:
- The scanner's TWAIN-Source dialog. Check the scanning options and click the OK button to start scanning.
- The Scanner Settings dialog. Check the scanning options and click the OK button to start scanning.
Tip:
To start recognition immediately after the source images have been scanned, use the Scan&Read or Scan&Read Multiple Images option:

Click the arrow to the right of the Scan&Read button and select either Scan&Read or Scan&Read Multiple Images item in the local menu.
FineReader will scan and read the images. The Image window displaying a "photograph" of the scanned page and the Text window displaying the recognition results will appear in FineReader's main window. The recognized text may be exported to various external applications and saved in various formats.
Setting Scanning Parameters
Recognition quality depends greatly on the quality of the scanned image. The image quality may be improved by altering the main scanning parameters: resolution, scan mode, and brightness.
The main scanning parameters are:
- Resolution - use 300 dpi resolution for regular texts (font size 10 pts. or greater) and 400-600 dpi resolution for texts set in smaller font sizes (9 pts. or less).
- Scan mode - gray.
Scanning in grayscale mode is best for recognition purposes. If you scan your images in grayscale, brightness is adjusted automatically.
- Scan mode - black and white.
Scanning in black and white enables the system to scan at a higher speed, but at the same time some character information is lost. This may have an adverse effect on recognition quality in the case of documents of medium-to-low print quality.
- Scan mode - color.
If you scan color documents that contain pictures, colored text, or colored backgrounds, you may wish to retain the original colors in your electronic document. Use the color scan mode in this case. Otherwise use gray scan mode.
- Brightness - a medium brightness value of around 50% should suffice for most cases. Some documents scanned in black and white mode may require additional brightness tuning.
Note: Scanning at 400-600 dpi resolution (instead of the default 300 dpi) or scanning in grayscale or color (instead of black & white) mode is more time consuming. In the case of certain scanner models, 600 dpi resolution scanning can take up to four times longer than 300 dpi resolution scanning.
To set scanning parameters:
- If you wish to scan your images using the FineReader TWAIN interface, select the Scanner settings item in the Tools menu. The Scanner settings dialog will then open. Select the scanning options of your choice in the dialog.
- If you wish to scan your images using the TWAIN-Source interface, your scanner's TWAIN dialog will open automatically when you click the 1-Scan button. Set the scanning parameters in the dialogue. Scanning options may have different names depending on the scanner model used. For example, for brightness the word "threshold", a "sun" symbol or a black and white circle may be used. The options available will be described in full in your scanner documentation.
Tips on Brightness Tuning
The scanned image has to be legible. To check its legibility, view the image in the Zoom window.
brightness - an example of a good image (from an OCR point of view)
If you see that the scanned image is far from perfect (characters are glued or torn), consult the table below to find out how you can improve image quality.
Your image looks like this: Possible remedy:
| brightness | characters are "torn" or very light (this will make the image darker) | ● Try lowering the brightness |
| ● Try scanning it in gray mode (brightness autotuning will then be used). | ||
 | characters are distorted, glued, or filled (this will make the image brighter) | ● Try increasing the brightness |
| ● Try scanning it in gray mode (brightness autotuning will then be used) |
Scanning Multi-Page Documents
FineReader features a special scanning mode for convenient multi-page document scanning: Scan Multiple Images. You may scan as many pages as you wish in this mode, however, note the following:
- If you scan your images using the FineReader TWAIN interface, scanning will be continuous. Once the application has completed scanning one page, it will automatically start scanning the next.
- If you scan your images using the TWAIN-Source interface, the TWAIN-dialog of the scanner will not close once a page has been scanned, and the next page can be placed onto the scanner immediately.
If you have a large number of pages to scan, there are two ways in which you can do this: using a scanner with an Automatic Document Feeder (ADF) or one without!
ADF Scanning:
-
If you are using the FineReader interface, select the Use ADF option in the Scanner Settings dialog (menu Tools>Scanner Settings) and then select File>Scan Multiple Images to start scanning multiple images.
-
If you are using the TWAIN-Source interface, select the Use ADF option in the TWAIN-dialog of your scanner (keep in mind that this option may be named differently depending on the scanner model used; consult your scanner documentation for the exact procedure) and then select File>Scan Multiple Images to start scanning.
Non-ADF Scanning:
- If you are using the FineReader interface
- Select the Scan Multiple Images item in the File menu.
If you are using a flatbed scanner without an ADF, to increase productivity try using one of the following two methods. Set a pause value i.e. the time that is to elapse between the scanning of one page and the next. Select the Pause between pages option and then set the
pause value (in seconds) in the Scanner Settings dialog (Tools>Scanner Settings menu). As a result, the scanner won't begin scanning the next page until the specified number of seconds has elapsed, thus allowing you sufficient time to place the next page onto the scanner. After the pause, scanning continues automatically.
- Select the Stop between pages option in the Scanner Settings dialog (Tools>Scanner Settings menu).
- Select the Stop between pages option in the Scanner Settings dialog (Tools>Scanner Settings menu).
As a result each time scanning of a page is complete, a dialog asking you if you wish to continue scanning will appear. Click the Yes button to continue scanning or No to finish scanning.
When you have finished scanning your pages, select the Stop scanning item in the File menu.
2. If you are using the TWAIN-Source interface
- Select the Scan Multiple Images item in the File menu. The TWAIN dialog of your scanner will open. Click the Scan (Final, or other) button to start scanning.
Scan your page, insert another page into your scanner and click the Scan button in the TWAIN-dialog of your scanner to continue scanning.
When you have finished scanning your pages, click the Close (or other scanner-specific-) button in the TWAIN-dialog of your scanner.
Tip: To have greater control over the quality of your scanned images, select the Open image during scanning option on the Scanning tab (Tools>Options). As a result, each scanned page will be opened in the Image window immediately after it has been scanned. If you believe the image has been scanned incorrectly, halt the scanning process (click on Stop Scanning in the File menu) and re-scan the image.
Opening Images
Even if you don't have a scanner, you can still recognize image files (see the list of supported image formats under Supported Image Formats).
To open an image:
- Click on the arrow to the right of the 1-Scan button and select the Open Image item in the local menu. The appearance of the 1-Scan button icon will change - the Scan caption will be replaced with the Open caption.
- Select the Open image item in the File menu.
- In Windows Explorer: right-click the image file you wish to open and select the Open with FineReader item in the local menu. If FineReader is already running, the image will be added to the current batch. Otherwise, before the image is added, FineReader will be launched and the most recently used batch opened.
Select one or several images in the Open dialog. The selected images will be displayed in the Batch window, and the last selected image displayed in the Image and Zoom windows. All selected images are copied into the batch folder. See General Information on Working with Batches section for more information on batch organization and the way in which pages are displayed within batches.
Tip: If you want the opened images to be recognized right away, select Open&Read mode:
-
Select the Open&Read item in the Process menu or just press CTRL+SHIFT+D. The Open dialog will open.
-
Select the images for recognition in the Open dialog.
Scanning Dual Pages
When scanning a book, although it is easier to scan both the left and right pages (i.e. a so-called 'dual page') at the same time, recognition quality is higher if, after scanning, the page is split into two, with each page corresponding to a single book page. Recognition and layout analysis are then performed separately for each page, along with de-skewing if required.
To split a dual page:
- Select the Split Dual Pages option on the Scan/Open Image tab (Tools>Options menu) before scanning.
Consequently, each dual page will be split into two batch pages. See General Information on Working with Batches section for more information on batches.
Note: If a dual page has been split incorrectly, clear the Split dual pages checkbox, scan the dual page again, or re-add the respective image to the batch and try to split the image manually using the Split Image dialog (Image>Split Image).
Adding Images of Business Cards to a Batch
When inputting business cards, it makes sense to input as many as you can fit onto your scanner. Recognition quality will be better (particularly if de-skewing is carried out) if each business card is recognized as a separate page. For this purpose, the application features both automatic and manual business card image splitting tools. Note that the business cards must be arranged in a particular order (for more information see Working with Business Cards).
To split the image:
- Select the image of your choice in the Batch window.
- Select the Split image item in the Image menu. The Split image dialog will open.
- Click the Split business cards button.
Note:
- The split page itself will be removed from the batch, and its place taken by the split part images. For more information, see General Information on Working with Batches in ABBYY FineReader Help.
- If the image has been split incorrectly, try splitting the image manually using the Add vertical separator/Add horizontal separator button.
- To delete all separators, click the Remove all separators button.
- To move a separator, switch to Select separator mode (click the button) and move the separator.
- To delete a separator, switch to Select separator mode (click the button) and move the separator outside the image.
Working with the Image
- Despeckle image
- Invert image
- Rotate or flip image
- Clear block
- Increase/Decrease the image scale
- Get image information
- Print image
- Undo the last action
1. Despeckle image
The recognized image may have a large amount of "dust" present on it, i.e. a large number of excess dots. The dots arise in the case of documents of medium-to-low print quality, and dots located close to character outlines may have an adverse effect on recognition quality.
To decrease the number of dots:
- Select the Despeckle image item in the Image menu.
To despeckle a particular block:
- Select the Despeckle block item in the Image menu.
Note: If the original document is very faint or set in a very light font, despeckling the image may cause periods, commas, and very thin character parts to disappear, decreasing recognition quality.
If you scan or open "dusty" images, select the Despeckle image item in the Image Preprocessing group on the Scan/Open Image tab (Tools>Options menu) to have images despeckled before the application adds them to the batch.
2. Invert image
Some scanners invert images (turning black into white and vice versa) during scanning.
You may wish to apply the Invert Image option to ensure that documents have a uniform or standard appearance, e.g. a black font against a white background. To do this:
- Select the Invert Image item in the Image menu.
Note: If you scan or open inverted images, select the Invert image item in the Image Preprocessing group on the Scan/Open Image tab (Tools>Options menu) before adding these images to the batch.
3. Rotate or Flip image
Recognition quality depends greatly on an image having a standard orientation (the text should be read from top to bottom and all lines should be horizontal). By default FineReader automatically detects page orientation during the recognition stage. If FineReader detects page orientation incorrectly, clear the Detect image orientation (during recognition) item on the Scan/Open Image tab and rotate the image manually so that it has a standard orientation:
- Click the button or select the Rotate Clockwise item in the Image menu to rotate the image 90° clockwise.
- Click the button or select the Rotate Counter-Clockwise item in the Image menu to rotate the image 90° counter-clockwise.
- Select the Rotate Upside Down item in the Image menu to rotate the image 180°.
To flip the image:
- horizontally (around the vertical axis) - select the Flip Horizontal item in the Image menu,
- vertically (around the horizontal axis) - select the Flip Vertical item in the Image menu.
4. Clear block
If you do not wish a certain image area to be recognized or if you have large areas of dust present on the image, you can simply erase them. To do this:
- Select the tool and then select the image area you wish to erase by holding down the left mouse button. Release the button to erase the selected image area.
5. Increase/Decrease the image scale
- Select the 🔒 / 🔒 tool on the Image bar (in the Image window) and click the image. The image scale will double/halve.
- Right-click the image and select the Scale item followed by the desired scale percentage in the local menu.
6. Get image information
The following image information can be obtained: image width and height in pixels; vertical and horizontal resolution per inch (dpi); image type.
- Right-click the image and select the Properties item in the local menu. A dialog will open. Select the Image tab in the dialog.
7. Print image
To print the image open in the Image window, the images of pages selected in the Batch window, or all batch page images:
- Select the Print Image item in the File menu. The Print dialog will open. Set the required printing parameters (the printer to be used, number of pages to be printed, number of copies etc.) in the dialog.
8. Undo the last action
- To undo the last action click the Undo button on the Standard bar
Tip: To undo the Undo action click the Redo button on the Standard bar ☐.
Page Numbering
Each scanned page is given a number. The number given by default is the number of the last batch page plus one.
You can also set page numbers manually. You might wish to do this, if, for example, you wish to retain the original page numbers or scan pages according to page number:
- Select the Ask for page number before adding page to the batch item on the Scan/Open Image tab (Tools>Options menu).
If you are scanning a large number of double-sided pages according to page number:
-
Select the Ask for page number before adding page to the batch item on the Scan/Open Image tab (Tools>Options).
-
Specify the number of the first scanned page in the Page number dialog, then select the Odd and even separately option in the Page numbering field. Select the page numbering order: ascending or descending depending on the way in which the double-sided pages have been entered into the automatic document feeder, i.e. on whether the last page or the first page has been placed on top.
Batch Image Options
Convert color and gray images to black and white (Scan/Open Image tab, Tools>Options menu) Select the Convert color and gray images to black and white item if you wish to scan your images in grayscale using the TWAIN-Source interface and the scanned images contain no color pictures, colored fonts or backgrounds, or you do not wish any colors to be retained on the scanned images. The scanned images will occupy less disk space if you select this option.
Chapter 5
Page Layout Analysis
FineReader must know which image areas it needs to recognize before starting the recognition process. Page layout analysis provides it with this information by identifying text blocks, picture blocks, table blocks, and barcode blocks (note: the latter are only available in the Corporate Edition).
In this chapter you will learn more about the following: when manual page analysis may be needed, what block types are available, how blocks drawn using the automatic layout analysis procedure can be edited, and also how the layout analysis process can be made easier by using block templates.
Chapter Contents:
● General information on page layout analysis
- Block types
● Automatic page layout analysis options
● Drawing and editing blocks manually
● Manual table layout analysis
● Using block templates
General Information on Page Layout Analysis
Page layout analysis can be carried out both automatically and manually. In most cases, FineReader manages the complex task of page layout analysis by itself. Start automatic analysis by clicking on the 2-Read button. Recognition and layout analysis are performed simultaneously.
Note: A stand-alone page layout analysis procedure is also available (Process>Analyze Layout menu). You may run this stand-alone procedure if needed, but note that here page layout analysis quality may be inferior, as the coupled layout analysis/recognition procedure uses additional information acquired during recognition to aid layout analysis.
You may wish to draw blocks manually if:
- Only part of a page is to be recognized;
- Automatic layout analysis has resulted in blocks being drawn incorrectly.
Tip:
- In some cases automatic layout analysis quality may be improved by altering the page layout analysis options. To view the current layout analysis options: Recognition tab, Tools>Options menu.
- If the application has drawn some blocks incorrectly, it is often faster to edit the incorrect blocks using the block editing tools than to delete the blocks and draw them manually again.
Block Types
Blocks are image areas enclosed in frames. They tell the system which image areas are to be recognized and in what order. The blocks also influence the way in which the original page layout is retained. Different types of blocks have differently colored frames. Block frame colors can be changed on the View tab of the Options dialog (Tools>Options menu) in the Appearance group. Select the required block type in the Item field and the color you want in the Color field.
The following block types are available:
Recognition Area - this block type is used for automatic recognition and analysis. After you click the 2-Read button, all blocks of this type will be automatically analyzed and recognized.
Text - this block type is used for text image areas and should only contain text formatted in one column. If there are pictures inside the text, draw separate blocks around them.
Table - this block type is used for table image areas or for areas of text structured in a table. When the application reads blocks of this type, it draws vertical and horizontal separators inside the block to form a table. This block is represented as a table in the output text. You can draw and edit tables manually.
Picture - this block type is used for image areas containing pictures. A block of this type may enclose an actual picture or any other object (e.g. a section of text) you wish displayed as a picture in the recognized text.
Barcode (Corporate Edition only) - this block type is used for barcode image areas. If your document contains a barcode, and you do not want it to be displayed as a picture but as a series of letters and numbers in the recognized text instead, draw a separate block for the barcode and set the block type to barcode.
Note: It is possible to have barcode analysis and recognition carried out automatically, but this option is not set by default. To enable this option, select the Look for barcodes item on the Recognition tab (Tools>Options menu).
Automatic Page Layout Analysis Options
As part of the automatic page layout analysis procedure the following types of blocks are drawn: text blocks, table blocks, picture blocks, and barcode blocks (note: the latter are only available in the Corporate Edition).
To start automatic layout analysis (and text recognition) click the 2-Read button. Before clicking this button, however, select the main layout analysis options: document type and table analysis options.
Document type
In most cases text layout is determined automatically. Automatic detection is performed if the Autodetect layout value on the Recognition tab in the Document Type group (Tools>Options menu) is set. Note that the value is set by default.
To select the document type manually:
- Select the desired type in the Document type group on the Recognition tab in the Options dialog (Tools>Options menu).
Document types available:
Autodetect layout - (set by default) Text layout is determined automatically. Recognition of all text types, including multi-column texts, and texts containing tables and pictures, is performed automatically.
Single column - The text is formatted into one column. Use this option if automatic page layout analysis incorrectly determines the text type as multi-column.
Plain text formatted with spaces - The text is formatted into one column and set in a monospaced font that is uniform in size throughout. In the recognized text left indents are represented by spaces, each line is made into a separate paragraph, and original paragraphs are separated by means of empty lines. Useful, for example, when recognizing C++ code printouts or old computer printouts.
Table analysis options
In most cases the application divides tables into rows and columns automatically. If additional tuning of table options is required, open the Recognition tab in the Tables group. Change these options if:
● automatic page layout analysis has drawn table rows and columns incorrectly;
- the document contains a large number of simple tables of the same type (i.e. there are no merged cells or there is always only one line of text per cell).
- Use the One line of text per cell option if your table has no (or only a few) black separators and there is only one line of text per cell. For example:
| Kilometers Miles | |
| 1 0.62 | |
| 5 3.2 | |
- this table has only one line of text per cell
| Physical Degrees, Phenomenon Centigrade | |
| Water boiling point | 100 |
| Water freezing point | 0 |
- this table has more than one line of text per cell
- Use the No merged cells in table option if your table has no merged cells. For example:
| Temperature | |
| Degrees Centigrade | Degrees Kelvin |
| -2730 | |
| 100 373 | |
- the Temperature cell is a merged cell
Note: Do not select One line of text per cell and/or No merged cells in table options if there are tables with differing structures in your text. Selecting these options may result in errors being made during layout analysis and have an adverse effect on recognition quality.
Drawing and Editing Blocks Manually
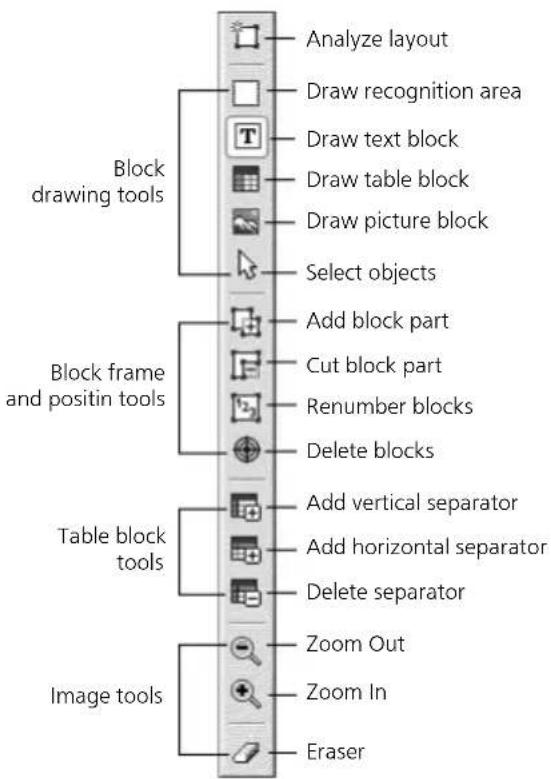
To create a new block:
- Select one of the following tools:
☐ to draw a recognition area;
to draw a text block;
to draw a picture block;
to draw a table block.
- Position the mouse at the point where you want a corner of your block to be. Hold down the left mouse button and drag the mouse pointer to the point where you want the opposite block corner to be.
- Release the mouse button.
A frame will enclose the image area selected.
You may then change the block type. The drawn block type may be one of the following: Recognition Area, Text, Table, Picture, or Barcode. To change block type:
- Right-click the block and select the Block Type item followed by the corresponding block type in the local menu.
Modifying blocks
To move the block borders:
- Click the block border and hold down the left mouse button. The mouse pointer will become a two-headed arrow.
- Drag the pointer in the direction you need.
- Release the mouse button.
Note: If you click a block corner, you can move both the horizontal and vertical borders of the block at the same time.
To add a rectangular block part:
- Select the tool.
- Click the block you wish to add a part to. Press and hold down the left mouse button then drag the mouse pointer diagonally. Select the image area you wish added to the block and release the button. The rectangle drawn will be added to the block.
- If necessary, move the block border.
To cut a rectangular block part:
- Select the tool.
- Click the block you wish to cut a part from. Press and hold down the left mouse button then drag the mouse pointer diagonally. Select the image area you want cut and release the button. The selected rectangle will be cut from the block.
- If necessary, move the block border.
Note:
- You can alter block borders by adding new nodes (splitting points) to them. Use the mouse to move segments in any direction you desire. To add a new node, press Shift then move the mouse pointer to the point where you wish a new node to be created (the pointer will become a cross) and click on the border. A new node will be created.
- FineReader imposes certain requirements on block form. These requirements exist as text lines within blocks must be unbroken if recognition is to be successful. To ensure that these requirements are met, FineReader automatically corrects block borders when parts are added or cut. For example, if you cut a part off the top or bottom of a block, a whole block corner will automatically be cut. Similarly, if you try to cut off a part between the two upper or lower corners, the application will cut the right block corner (upper or lower) regardless. It will also forbid certain operations if they involve moving the segments forming the block borders.
To select a block or a group of blocks:
- Select the 🔊 tool and click on the desired block or press the left mouse button and draw a rectangle around all the blocks you wish to select.
Note: You can select one or more blocks using the usual block drawing tools. To select several blocks at once hold down SHIFT or CTRL with one of the tools activated: □, ▶, △ or ▽ and drag the arrow over the blocks you want to select. To invert the selection (i.e. to select an unselected block or vice versa), hold down the CTRL key with one of the tools activated: □ or ▶ and drag the arrow over the desired blocks.
To move blocks:
- Hold down ALT with one of the tools activated: ☐, ☐, ☒, ☑, or ☐ and move the blocks.
To renumber blocks:
-
Select the tool.
-
Click the blocks in the order of your choice. The contents of blocks will be displayed in the output text in the same order.
Note: If you renumber blocks on a previously recognized image, the recognized text in the draft mode of Text window will be re-arranged to reflect the new numbering.
To delete a block:
- Select the tool and click the block you wish to delete.
- Select the blocks you wish to delete and press DEL.
Note: If you delete a previously recognized block, its text in the Text window will be deleted too.
To delete all image blocks:
- Select the Delete blocks and text item in the Batch menu.
Note: If you delete blocks on an image that has already been recognized, the recognized text in the Text window will also be deleted
Manual Table Layout Analysis
Tip: If automatic table layout analysis has resulted in table rows and columns being drawn incorrectly, try editing the automatic analysis results instead of deleting all the blocks and drawing them manually again. Almost invariably this proves less time consuming.
Editing a table manually:
Use the following Image toolbar tools to edit a table:
Add vertical separator
Add horizontal separator
Remove separator
If the table cell only contains a picture, select the Treat cell as a picture item in the Block Properties dialog (View>Properties menu). If the table cell contains both text and pictures, draw a separate picture block (or blocks) inside the cell.
To merge table cells or rows:
- Select the Merge Table Cells or Merge Table Rows item in the Edit menu.
Note: You can split previously merged cells using the Split Table Cells command (Edit menu). The Merge Table Rows option does not affect the division of the table into columns.
Note: To avoid drawing horizontal and vertical separators manually, draw a separate table block, then right-click it and select the Analyze Table Structure item in the local menu. The system will then draw all the separators it considers necessary. Should the system draw any separators incorrectly, you can edit the table manually.
Using Block Templates
If you are processing a large number of documents with an identical layout (e.g. forms or questionnaires), analyzing each page's layout separately will prove extremely time consuming. To save time you can create a block template, i.e. a standard set of blocks of a particular type that corresponds to the layout of your pages, and then apply the template to all pages you wish recognized that have the same layout.
Note: Documents should always be scanned using their respective template(s) and using the same resolution as that used to create the template(s).
To create a block template:
- Open an image and draw the blocks automatically or manually.
- Select the Save Blocks item in the Image menu. The Save Blocks as dialog will open. Type a file name for the block template in the dialog.
To load a block template:
- Click the Batch Window and select the pages you wish to apply the block template to.
- Select the Load Blocks item in the Image menu. The Open Blocks dialog will open.
- Select the relevant block template file in the dialog.
- Click the appropriate Apply to item in the group. The All pages item applies the block template to all batch pages, the Selected pages item applies the block template to selected pages only.
- Click the Open button.
Chapter 6
Recognition
The aim of OCR is to read text from a source image and retain the source page layout. Before this can be done, however, the main recognition parameters – recognition language, source text print type, and document type – need to be set. This chapter deals with these parameters and other important recognition issues, including the use of different recognition settings etc.
Chapter Contents:
● General information on recognition
● Recognition language
● Source text print type
● Other recognition options
● Background recognition mode
- Recognition with training
- How to train a user pattern
• How to edit a user pattern
- Creating a new language or new language group
• How to create a user language
• How to create a new language group
General Information on Recognition
Note: Always ensure that the following options have been correctly set before you start recognition: recognition language, source text print type, and document type.
You may:
- Recognize a block or several blocks drawn on an image.
- Recognize an open page or all pages selected in the Batch Window.
- Recognize all unrecognized batch pages.
- Recognize all pages in background mode. Background mode allows you to edit and recognize pages at the same time.
- Recognize pages in training mode. Training mode is used for recognizing texts set in decorative fonts or for processing large volumes (more than a hundred pages) of documents of inferior print quality.
- Recognize the same batch on several workstations.
To start recognition:
● Either click the 2-Read button on the WizardBar toolbar, or
- Select the item of your choice in the Process menu:
Read - to recognize the open page or all the pages selected in the Batch window; Read All Pages - to recognize all unrecognized batch pages;
Read Block - to recognize a block or several blocks drawn on the image; Start Background Recognition - to start recognition in background mode.

By default, the 2-Read button recognizes the open image. To change button mode, click the arrow to the right of the button and select the mode of your choice in the local menu.
Note: When you perform OCR on a block that has already been recognized, recognition will only be carried out on new or modified blocks.
Recognition Language
FineReader recognizes both mono- and multilingual (e.g. English and French) documents. To set the text recognition language, select it in the drop-down list on the Standard toolbar.
![[Select multiple languages...] [Choose more languages...] Armenian (Eastern) Armenian (Grabar) Armenian (Western) Catalan Croatian Czech Danish Digits Dutch Dutch (Belgian) English Estonian](/content/2026/06/1345095/images/9f22dbf253acf29a1d9237f1a220354c165d6337e554463a36c2ba3bd679d6a9.jpg)
To recognize a multilingual document:
- Select the Select multiple languages item in the language list on the Standard toolbar. The Recognition language dialog will open.
- Select the languages of your choice in the Recognition language dialog.
Note:
- If you find that you often use a certain language combination, you can create a new language group that includes the languages you most often use.
- Increasing the number of the recognition languages used simultaneously may have an adverse effect on recognition quality. A reasonable number of languages to use simultaneously is 2-3.
- Before recognizing a document, ensure that the fonts selected on the Formatting tab support all the characters contained in the recognition language(s) chosen, otherwise the recognized text will be displayed incorrectly ("?" or "_" symbols will appear instead of letters). See under Fonts for Recognition Languages that may be Displayed in Text Editor Incorrectly in ABBYY FineReader Help for more information.
You may find that your chosen recognition language is not listed. This can be because of one of the following reasons:
- The language is not supported by FineReader. See the complete list of recognition languages under Supported Languages in ABBYY FineReader Help.
- The language has not been included in the recognition language list displayed on the Recognition toolbar. To add a language, select the Choose more languages item in the language list on the Standard toolbar. The Recognition language dialog will open. Select the language of your choice in the dialog.
- The language was disabled during custom installation.
Note: Always ensure that you use the same folder as the one that contains FineReader.
To show/hide a language in the drop-down list on the toolbar:
- Select the language of your choice in the Language Editor dialog (Tools>Language Editor) and then check or uncheck the Show this language in the drop-down list on the toolbar item.
Tip: It is even possible to set a recognition language for an individual block. To do this, right-click the block concerned and select the Properties item in the local menu. The Properties dialog will open. Select the Block tab in the dialog and then select the block recognition language in the Languages field on the tab.
Source Text Print Type
As a rule source text print type is determined automatically. To ensure that this is the case, select Autodetect in the Print Type group (Tools>Options menu, Recognition tab).
When recognizing draft mode dot matrix printouts or typewritten texts, recognition quality can sometimes be increased by selecting another print type:
- Select the Typewriter item if you wish to recognize typewritten texts
- Select the Dot Matrix Printer item if you wish to recognize dot matrix printouts.
Software
An example of draft mode dot matrix text. Character lines are made up of individual dots.
Software
An example of typewritten text. All letters are of equal width (compare, for example, "w" and "a").
To change print type:
- Select the print type of your choice on the Recognition tab in the Options dialog (Tools>Options menu).
Note: Once you have completed recognition of typewritten texts or dot matrix printouts, remember to re-enable the Autodetect item to recognize normal texts once again.
Other Recognition Options
Show image during recognition
When processing large numbers of pages, recognition is invariably faster if the processed image is not displayed on-screen. To run recognition without displaying the image:
- Clear the Show image during recognition item on the General tab (Tools>Options menu).
Text direction
If the application recognizes blocks containing vertical text incorrectly (a text block or a table cell):
- right-click the block containing the vertical text and select the Properties item in the local menu. The Block properties dialog will open. Select the relevant item in the Text direction list in the dialog and re-recognize the image.
Inverted or flipped block
If the application recognizes blocks containing inverted or flipped text incorrectly (a text block, a table cell, or a whole table):
- Right-click the block concerned and select the Properties item in the local menu. The Block properties dialog will open. Select the Inverted or Flipped item in the dialog and re-recognize the image.
Background Recognition
If you wish to edit previously recognized pages and run recognition at the same time, you may find background recognition mode useful. To start background recognition:
- Select the Start Background Recognition item in the Process menu.
The sign will appear in the status line at the bottom of FineReader's main window. If Details view mode is active in the Batch window (to activate Details view mode, right-click on the Batch window and select View>Details in the local menu), the page currently being recognized will have the icon displayed in the Opened by column.
When background recognition mode is activated, recognition will resume automatically if an unrecognized page is added to the batch.
Note: Running Background mode in the case of multiprocessor systems only leads to an increase in recognition speed if the batch being processed contains a large number of pages.
To stop Background Recognition:
- Select the Stop Background Recognition item in the Process menu.
Note: Background recognition mode uses currently active recognition options.
Recognition with Training
As previously stated, FineReader can read texts set in practically any font regardless of print quality. Consequently, no prior training is normally required before recognition can take place. FineReader, nevertheless, features a number of user pattern training tools.
Train User Pattern mode
Train User pattern mode may come in useful when:
- recognizing texts set in decorative fonts;
- recognizing texts containing unusual characters (e.g. mathematical symbols);
- recognizing large volumes (more than a hundred pages) of texts of low print quality.
Tip: Use Train User Pattern mode only if one of the above applies. In other cases you may obtain a slight increase in recognition quality, but the time and effort involved will probably outweigh the benefit received.
Pattern training works as follows. One or two pages are recognized in training mode, and, subsequently, a pattern created. FineReader then uses this pattern to aid recognition of the remaining text.
Sometimes two or even three characters may get "glued" together, and FineReader may be unable to enclose each character in an individual frame to separate them. If this proves to be the case (i.e. you cannot move the frame so that it contains only one whole character and no other character parts), you can train FineReader to recognize the whole inseparable character combinations. Examples of character combinations frequently found glued together include ff, fi, and fl. Such combinations are referred to as ligatures.
Notes:
- A pattern is only useful in the case of documents that have the same font, font size, and resolution as the document used to create the user pattern.
- Each pattern is created for a particular batch. Consequently, if a batch is deleted, its user pattern is also deleted. Patterns can, however, be copied into other batches. To transfer a user pattern to another batch, simply save the batch options in a batch template format file.
- If you switch to recognizing texts set in a different font, always disable any user patterns – choose the Do not use user pattern item on the Recognition tab, menu Tools>Options.
To train a user pattern:
-
Start 'Train user pattern mode - click the Train user pattern radio button on the Recognition tab, Tools>Options menu, in the Training group. The default pattern name ("Default") will be displayed in the status line.
-
Click the 2-Read button.
-
Train your pattern - recognize one or more pages in Train user pattern mode. Trained characters are saved in the default pattern. Once you have completed training the pattern, FineReader will save the pattern (Default.pat) in the current batch folder.
-
Edit your pattern.
-
Deactivate training mode (click the Use user pattern radio button on the Recognition tab).
-
Recognize the rest of the text - click the 2-Read button.
Note:
- To create several patterns for the same batch, use the Pattern Editor dialog (click the Pattern Editor button on the Recognition tab or select the Tools>Pattern Editor menu item). Create a new pattern (click the New button in the dialog) and select it (click the Set Active button). Working with a created pattern is no different to working with a default pattern (see steps 1-5). Keep in mind, however, that only one pattern may be active at any one time.
- If you've created several patterns for the same batch, the active one will be the pattern that was last created. The active pattern name is displayed in the status bar. To activate another pattern, select the pattern of your choice in the pattern list in the Pattern Editor dialog (Tools>Pattern Editor menu) and click the Set Active button. Then click the Use user pattern radio button on the Recognition tab, Tools>Options menu, in the Training group.
- If the Use built-in patterns option is set, FineReader will read all texts using its built-in patterns and stop only at uncertain characters. If you are training the system to read decorative and/or non-standard fonts (for example, Tibetan) the use of in-built patterns may result in characters being read incorrectly. If the latter occurs, disable the use of in-built-patterns (clear the Use built-in patterns checkbox on the Recognition tab) and train the system to recognize each unknown character it is likely to encounter.
How to Train a User Pattern
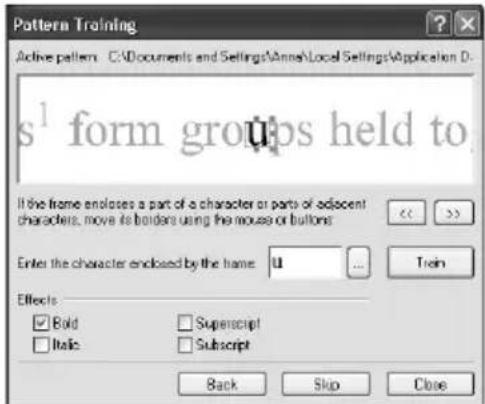
-
Make sure the Train user pattern radio button on the Recognition tab (Tools>Options menu) in the Training group is enabled.
-
Click the 2-Read button. FineReader will start recognition. Whenever it comes across an unknown character, the Pattern Training dialog will open, and the character image displayed within it.
Training to recognize a character:
The frame in the top dialog window should enclose a single character, and this character must be fully enclosed by the frame. If the frame encloses only part of a character or more than one character, click the frame borders and move them so that the above-stated requirements are met. The and
buttons move the frame border as well (and are useful for training italic symbols - see below). Once you have positioned the frame correctly, type in the character and click the Train button.
Note:
- You may only train the system to read characters included in the alphabet. If you wish to train FineReader to read characters that cannot be entered from the keyboard, use a combination of two characters to denote these non-existent characters or copy the required character from the Character Table (click the button in the Pattern Training dialog to open the Character Table).
- If you wish to train the system to retain character formatting, select the corresponding Italic or Bold item in the Pattern Training dialog before clicking the Train button.
- Make sure that only uppercase/lowercase characters are entered when training uppercase/lowercase character images respectively.
If you make a mistake during training, click the Back button to return the frame to its previous position. The last "image-character" pair to be entered will automatically be removed from the pattern. Note that this "undo" function is limited to the last word trained.
Training to recognize ligatures
A ligature is a combination of two or three "glued" characters, for example, fi, fl, ffi, etc. These characters are difficult to separate because they are "glued" as part of the printing process. In fact, better results can be obtained by treating them as "single" compound characters.
Training ligatures is no different to training separate characters:
- Type in the desired character combination and click the Train button.
- The frame in the top dialog window should enclose the entire ligature. You can move the frame border using the mouse or by clicking the and buttons.
Each pattern may contain up to 1000 new characters. However, avoid creating too many ligatures, as it may have an adverse effect on recognition quality.
Always take the following into account when training FineReader:
- FineReader does not differentiate between certain characters that are normally considered different. For example, the straight ('), right (') and left (') apostrophes are treated as one character - the straight apostrophe. Thus, you will never encounter right and left apostrophes in recognized text, even if you attempt to train FineReader into recognizing them.
- The way in which certain characters are recognized depends on their environment
How to Edit a User Pattern
You may wish to edit a new pattern before you start using it, as an incorrectly trained pattern will result in recognition quality being adversely affected.
The pattern should only contain whole characters or ligatures. Characters with cut edges and incorrectly labeled characters should be removed from the pattern.
To edit a user pattern:
- Select the Pattern Editor item in the Tools menu. The Pattern Editor dialog will open.
- Select the relevant pattern and click the Edit button in the dialog. The User Pattern dialog will open.
- Select a character and click the Properties button to edit the character caption and set the correct typeface: italic, bold, subscript or superscript. Click on the Delete button to remove any incorrectly trained characters from the batch.
User Languages and Language Groups
In addition to the built-in languages and language groups, you may also create new languages and language groups (made up of languages supported by FineReader) and use them for recognition.
You may want to create a new language if you wish:
- To use a user dictionary.
- For example, when recognizing an English text containing many abbreviations. You may wish to create an abbreviation dictionary, create a new language and link-up the dictionary to the language. You could then create a new language group consisting of English (using the application dictionary) and your new language (containing the abbreviations dictionary), and use this language group to recognize your texts.
- To recognize documents of a specialized nature, for example:
● supermarket product-line lists containing only product codes. Product codes are usually made up of numbers and letters. Consequently, you can create a language consisting only of the numbers and letters used in the codes to be applied when recognizing documents of this type.
● documents set in capitals only. Recognition quality is increased if you create a language in which all lowercase letters are prohibited.
You should create a language group if you use a particular language combination often. To create a new language or language group open the Language Editor dialog (Tools menu, Language Editor item).
How To Create a New Language
To create a new recognition language:
- Select the Language Editor item in the Tools menu.
- Click the New button and in the resulting dialog select the Create a Copy of the Language radio button, then select your preferred source language.
- The Simple Language Properties dialog will open.
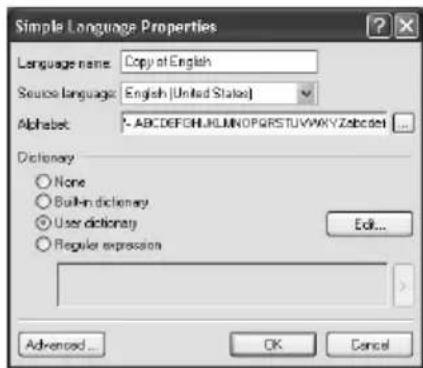
Set the following language parameters for the new language (all parameters are entered in the Simple Language Properties dialog):
- The new language name.
-
The basic alphabet to be used by the language. This parameter is set in the Alphabet field. If necessary, edit the alphabet by clicking the button.
-
The dictionary to be used by the application (for both recognition and spell check purposes). You may choose one of the following:
● None (no dictionary to be used)
● Built-in (the dictionary supplied with FineReader)
- User dictionary
To add words to the dictionary or to use an existing user dictionary or text file in Windows (ANSI) or Unicode encoding (the only requirement is that words be separated by spaces or other non-alphabetic characters) click the Edit Dictionary button.
Note: The spellchecker will consider user dictionary words to be correct if they are found in the text in one of the following capitalizations: dictionary set capitalization; lowercase only; uppercase only; first letter - capital, remaining letters small. Examples include:
| Dictionary set capitalization: Correct occurrences of the word: | |
| abc abc, Abc, ABC | |
| Abc abc, Abc, ABC | |
| ABC abc, Abc, ABC | |
| aBc aBc, abc, Abc, ABC | |
- Regular expression (used to specify the grammatical rules of the new language; see the Regular Expressions section for details).
Notes:
- Click on the Advanced button in the Simple Language Properties dialog to set advanced properties for the new language e.g. characters to be ignored, prohibited characters, etc.
- By default, all new user languages are saved into the batch folder. Note that ABBYY FineReader Corporate Edition allows you to specify the folder to which the language should be saved. For more information on group work with user languages and dictionaries, see under Group work with the same user languages and user dictionaries.
How to Create a New Language Group
If you often recognize texts written in a certain language combination, e.g. English-German, you can create a language group combining these languages. The created group will be displayed in the language list on the Standard toolbar.
Note: You can specify the recognition languages to be used in the language list on the Standard toolbar. To do this, select the Select multiple languages item in the list. The Recognition Language dialog will open. Select the languages you need in the dialog.
To create a recognition language group:
-
Select the Language Editor item in the Tools menu and click the New button. A dialog will open. Select the Create a new group of languages item in the dialog.
-
The Language Group Properties dialog will open.

Set the following new language group parameters (all parameters are set in the Language Group Properties dialog):
- Group name.
- Languages contained in the group.
Note:
- If you know that your text will not contain certain characters, you may wish to specify these as prohibited characters in the relevant language group's properties. Prohibiting such characters can increase both recognition speed and quality. To specify prohibited characters, click the Advanced button in the Language Group Properties dialog. The Advanced Language Group Properties dialog will open. Specify the set of prohibited characters in the Prohibited characters line.
- By default, the newly created user language group will be saved in the batch folder. In the case of the ABBYY FineReader Corporate Edition, you can specify the destination folder. For more information on group work with user languages and dictionaries, see under Group work with the same user languages and user dictionaries.
Chapter 7
Checking and Editing Text
Once recognition is over, you will see the recognized text displayed in the Text window. The Text window is ABBYY FineReader's built-in editor, used to check recognition results and edit any recognized text.
The FineReader text editor has two distinctive features:
- A built-in spell check system (see the list of languages with spell check support under Supported Languages in ABBYY FineReader Help).
- A convenient visual aid: the source image of the text line being edited is displayed in the Zoom window.
The built-in spell check system features:
- Tools for finding uncertain words (words containing uncertain characters).
- Tools for finding misspelt words.
- Tools for adding unknown words to the FineReader dictionary. Adding words to the dictionary improves recognition quality.
Chapter Contents:
- Checking text in ABBYY FineReader
- Options for checking and editing text
- Adding and deleting words to/from a user dictionary
● Editing text in ABBYY FineReader - Editing tables
Checking Text in ABBYY FineReader
Uncertainly recognized characters and words not found in dictionary are highlighted in different colors. By default, light blue is used for uncertain characters and pink for words not found in the dictionary. To change the colors used:
- Select the Uncertain Character (or Not in Dictionary word) item followed by the color of your choice in the Color item on the View tab (Tools>Options menu) in the Appearance group.
To check recognition results:
- Click the 3-Check Spelling button on the WizardBar toolbar (or select the Check Spelling item in the Tools menu).
- The Check Spelling dialog will open.

- There are three windows in the Check Spelling dialog. The top window is similar to the FineReader Zoom window and displays the original image of the word. The middle window displays the word itself, and the line above the name of the print type. The Suggestions window at the bottom provides you with replacement suggestions (if any exist). Note that suggestions are based on the dictionary selected in the Dictionary language drop-down list; any language may be chosen from this list.
Note: You can enlarge the Check Spelling dialog to make it easier to check and edit text. Simply click the dialog border; the mouse pointer will become a double-headed arrow. Drag the border to make the dialog larger or smaller.
-
If words have been misspelt, you can do one of the following:
-
Click the Ignore button to leave the word unchanged.
- Click the Ignore All button to leave all such words in the text unchanged.
Note. When you click the Ignore or Ignore All button, the "uncertain" flag is removed from the word i.e. the system assumes that the word no longer contains any unrecognized or uncertain characters and no longer needs to be highlighted. As a result, when you export such words in PDF format and select the Replace uncertain words with images mode, the words for which the "uncertain" flag has been removed will not be replaced with images.
- Select a replacement suggestion and then click the Replace or Replace All button to replace the current word or all such words in the text. If no correct suggestion has been
made for the word in the Suggestions window, you can enter one yourself in the middle window. (Important: when you switch to edit mode, certain buttons may change function and adopt new captions). Click the Confirm (Confirm All) button to change the current word (or all such words) in the text and move to the next uncertainly recognized word.
- Click Add... to add a word to the dictionary. Once a word is added, the application will consider all subsequent occurrences of this word in any of its word forms to be correct.
- Click Options... to set the spell check options.
- Click Close to close the dialog window.
Moving between uncertain words
To check recognition results quickly, you can use the ⏻ button and ⏱ button to move to the next or previous uncertain word respectively.
You can also use the F4 (SHIFT F4) hotkey to navigate between uncertain words.
Options for Checking and Editing Text
These options are set on the Check Spelling tab (Tools>Options menu).
● Error display level
Note: This option must be set before you start recognition.
- Stop at words with uncertain characters
- Stop at words not found in dictionary
- Stop at compound words
- Ignore words with digits and other non-alphabetic characters
● Correct spaces before and after punctuation marks
Error display level
The Error display level option allows you to select the degree to which errors are highlighted:
- None – no recognition errors are highlighted.
- Standard - unrecognized and uncertainly recognized characters are highlighted.
● Thorough - the same as Standard, however non-dictionary words are also highlighted.
Note: The number of errors displayed in the Text window will change if you re-read a page using a different error display level.
Stop at words with uncertain characters
The spell check stops each time it encounters words with uncertain characters.
Stop at words not found in the dictionary
The spell check stops each time it encounters non-dictionary words. Note that a word may well be contained in the dictionary, and has simply been read incorrectly.
Stop at compound words
The spell check stops at non-dictionary words that can, however, be made up according to available morphological models or from other dictionary words.
Ignore words with digits and other non-alphabetic characters
The spell check treats all words containing digits and other characters not included in recognition language as correct unless they also contain uncertain characters.
Correct spaces before and after punctuation marks
The spell check does not stop if it comes across incorrect spacings before or after punctuation marks, it simply corrects them automatically.
Adding and Deleting Words to/from the User Dictionary
Adding words to the user dictionary
Enlarging the dictionary is a good way of increasing recognition quality. During recognition, FineReader checks all words it comes across for possible dictionary entries. Therefore it makes sense to add new words that are likely to come up frequently (e.g. specialized terms, abbreviations, names etc.) to the user dictionary.
A distinctive feature of FineReader's spell check system is that a word is not only added to the dictionary in its original form, its paradigm (i.e. the set of all of its forms) is also added. This feature results in FineReader being able to recognize a word in all its forms once it has been entered.
To add a word to the dictionary during spell check:
- Click the Add button in the Check Spelling dialog.
Set the following parameters in the Primary Form dialog:
- Part of speech (Noun, Adjective, Verb, Uninflected).
- If the word is to always begin with a capital letter, select the Proper name item. If you add an abbreviation, select the Abbreviation item.
- The primary form of the word.
Click OK. The Create Paradigm dialog will open. FineReader will ask you questions about the word forms in order to be able to construct the paradigm of the word you wish to add. Click Yes or No to answer these questions. If you make a mistake, click the Anew button to have FineReader ask the question again. The constructed paradigm will be displayed in the Paradigm dialog.
Note:
- If you do not wish paradigms to be created for the words you add, and want them to be entered uninflected instead, select the Add without prompting for word forms option (English dictionary only) on the Check Spelling tab (Tools>Options menu).
- You may also add words when you view the list of added words. To do this, select the View Dictionaries item in the Tools menu. The Select Language dialog will open. Select the language of your choice in the Select Language dialog and click View. The dictionary with the list of the added words will open. Add words by clicking on the Add button.
- Paradigms can only be constructed for words added in the following languages: Armenian (Eastern, Western, Grabar), English, Italian, French, German (Old and New spelling), Russian, Spanish, and Ukrainian.
If the word you wish to add is already present in the dictionary, a notice to this effect will be issued. You may then wish to view its paradigm. If you think the existing paradigm is incorrect (this is often the case with homonymous words, for example), construct another one (click the Add button in the Add Word dialog).
Tip:
- FineReader allows you to import user dictionaries created by previous versions (3.0, 4.0 and 5.0).
- FineReader also allows you to import user dictionaries (*.dic) created using Microsoft Word 6.0, 7.0, 97, and 2000.
To import a dictionary:
- Select the View Dictionaries item in the Tools menu, select the dictionary language, and click the View button.
- Click the Import button in the View Dictionaries dialog and select files with *.pmd, *.txt or *.dic extensions.
To delete a word from the dictionary:
- Select the View Dictionaries item in the Tools menu. Select the language of your choice and click the OK button. A dialog will open.
- Select the word you wish to delete and click the Delete button.
Editing Text in ABBYY FineReader
Note: If the FineReader Text window does not display characters correctly (i.e. "?" orward) can be seen in place of some or all of the letters), this means that your current font does not support your recognition language alphabet in full. Select a font that supports your entire recognition set (for example, Arial Unicode or Bitstream Cyberbit) on the Formatting tab (Tools>Options menu) in the Fonts group, and recognize the document again. See under Fonts for Recognition Languages that may be Displayed in Text Editor Incorrectly in ABBYY FineReader Help.
After a page is read, its text is displayed in the Text window. When you send your text to an external application, the text layout is retained according to the layout retention options chosen. Set these options on the Formatting tab (Tools>Options menu) and in the dialogs of the respective formats. Uncertainly recognized characters are highlighted. To cancel this feature, unselect the Highlight uncertain characters item on the View tab (Tools>Options menu).
FineReader editor features two document viewing modes: full mode (the full layout is displayed) and draft mode.
In full mode blocks with recognized text, tables and pictures are displayed exactly as they are to be found on the original image. The complete original layout, therefore, is retained: columns, tables, pictures, and dropped capitals (oversized letters that take up several lines of space in a paragraph). The block in which the pointer is currently located is the active block. If the pointer is moved using the arrow keys, the order of navigation between blocks is determined by their numbering on the original image. If the amount of text inside a particular block becomes too large for the block concerned (e.g.

following editing), parts of other inactive blocks may become invisible. If this is the case, the borders of the block(s) concerned will be colored red. When a block is active, its borders are enlarged so as to display the entire block text.
The following text features are not displayed in draft mode: left indent; paragraph alignment (all paragraphs are aligned to the left); text and background color. A same-size font (12pt by default) is used throughout to display text in draft mode. Effects (bold, italic, underlined, superscript and subscript) are all retained.
Switch between draft and full modes by clicking the (full mode) or (draft mode) buttons in the Text window.
To change font size in draft mode:
- Select the Options item in the Tools menu.
- Set your preferred font size by selecting the Draft editor font size item on the View tab.
The FineReader built-in editor is supplied with the following text editing features:
- Copy, cut, paste
- Search and replace
● Font effects - Text alignment
- Undo and redo
Copy, cut, paste
- Before you use the copy, cut, and paste commands, highlight the relevant text.
- Follow the instructions below depending on the action you wish to carry out:
To copy the selection:

● Either click the Copy button on the Standard toolbar or
- Select the Copy command in the Edit menu or in the local menu or
- Press CTRL+C
To cut the selection:

● Either click the Cut button on the Standard toolbar or
- Select the Cut command in the Edit menu or local menu or
- Press CTRL+X
To paste the copied text:

● Either click the Paste button on the Standard toolbar or
- Select the Paste command in the Edit menu or local menu or
- Press CTRL+V
Search and replace
To find a word or phrase in the text you are editing:
- ● Either select the Find item in the Edit menu, or
- Press CTRL+F
- The Search dialog will open. Type the word or phrase you wish to find in the Find what line of the dialog and set the search parameters.
Note: To search for the same word again using the same parameters, press F3.
To search and replace a word or phrase in the text you are editing:
- Perform one of the following actions:
● Either select the Replace item on the Edit menu, or
- Press CTRL+H
- The Replace dialog will open. Type the word or the phrase you wish to find in the Find what line of the dialog, type the word or phrase that is to replace the search pattern in the Replace with line, and set the search parameters.
Font effects
- Click the word or highlight the text the font of which is to be changed.
- Perform one of the following actions:
● Either click the font effect button (e.g.) of your choice on the Formatting bar, or
- Right-click the Text window and select Character Properties in the local menu. The Character dialog will open. Select the font type you wish to use and set the required font parameters in the dialog, or
- Press CTRL+B - for boldface, CTRL+I - for italics, CTRL+U - to underline a word or text.
Note: You can also set the following additional text formatting parameters in the Font dialog: character spacing, character scale, and use of lowercase capitals. Keep in mind, however, that any formatting changes involving the latter will not be displayed in FineReader's built-in text editor. These changes will only become visible once you export your document to an application that supports the latter formatting options (e.g. MS Word).
Text alignment
- Select the text you wish to align.
- Perform one of the following actions:
● Either click the alignment button (e.g.) of your choice on the Formatting bar, or
- Right-click the Text window and select the Character Properties item in the local menu. The Character dialog will open. Select the item of your choice in the Alignment field.
Undo and redo
To undo an action:

● Either click the Undo button on the Standard toolbar, or
- Select the Undo item in the Edit menu, or
- Press CTRL+Z
To redo an undone action:

● Either click the Redo button on the Standard toolbar, or
- Select the Redo item in the Edit menu, or
- Press CTRL+Y
Editing Tables
The table editor provides you with tools to carry out the following:
- Merge cell or row contents
- Split cell contents
- Split row/column contents
- Delete cell contents
To merge cell or row contents:
- Hold down the CTRL button and select the cells or rows you wish to merge, followed by the Merge Table Cells or Merge Table Rows item in the Edit menu.
To split cell contents:
- Select the Split Table Cells item in the Edit menu.
Note: This command may only be applied to cells previously merged.
To split row or column contents:
- Select the 📄 or 📄 tool on the toolbar in the Image window, then click the row/column you wish to split or add a new horizontal/vertical separator to.
Tip: You can merge row contents by using the tool or the Merge Table Rows command (Edit menu).
To delete cell contents:
- Select the cell(s) you wish to delete in the Text window and press DEL.
Chapter 8
Saving into External Applications and Formats
Recognition results can be saved to a file, sent to an external application without saving, copied to the clipboard, or sent via e-mail. All pages or selected ones only may be saved.
FineReader can export recognition results to the following applications:
Microsoft Word 6.0, 7.0, 97 (8.0), 2000 (9.0) and 2002 (10.0); Microsoft Excel 6.0, 7.0, 97 (8.0), 2000 (9.0) and 2002 (10.0); Corel WordPerfect 7.0, 8.0, 9.0 and 2002 (10.0); Lotus Word Pro 9.5, 97 and Millennium Edition; StarWriter 4.x and 5.x, PROMT 98, as well as to any other application that supports the ODMA standard.
Chapter Contents:
● General information on saving recognized text
● Text saving options
● Saving recognized text in RTF and DOC formats
● Saving recognized text in PDF format
● Saving recognized text in HTML format
● Saving the page image
General Information on Saving Recognized Text
You may:
- save recognized text using the Save Wizard,
- save open or selected pages to file or send them to an external application,
- save all batch pages to a file or export them into an external application,
- save the page image.

Click the 4-Save button to export recognition results to the application of your choice or save them to file. The icon's appearance will depend on the currently active save mode. The Save button will display the name of the currently selected export application.
To save recognized text:
- Click the arrow to the right of the 4-Save button and select the item of your choice in the local menu.
Note: If you wish to save only a certain number of pages, select them before clicking the 4-Save button.
Once export is complete, the 4-Save button icon will change appearance depending on the action performed i.e. whether results are exported to an application, sent by e-mail, copied to the clipboard or saved to file. The 4-Save button icon always displays the last export mode used. If you wish to export (an)other image(s) using the same mode, just click on the icon itself; there is no need to use the button's local menu.
Text Saving Options
Text saving options are set on the Formatting tab in the Tools>Options menu. Note that some saving options can be set in the Save Wizard and Save Text as dialogs as well.
● Formatting and text layout retention modes
- Retain pictures
● Image resolution (saving in RTF, etc.)
- JPEG quality
- Fonts to use
- Save all batch pages or selected ones only
● Recognized text saving modes
Formatting and text layout retention modes (saving in RTF, DOC, and HTML formats)
- Retain full page layout - document layout is retained in full: paragraph arrangement, font and font size, columns, text direction, text color, and table structure.
- Retain font and font size – table structure, paragraph arrangement, font, and font size are all retained.
- Remove all formatting - only table structure and paragraph arrangement are retained.
Note: Some additional options may become available depending on the export format chosen. For example, in case of the RTF/DOC formats, you can set the default page size and highlight uncertain characters; in the case of HTML format, you can set the picture resolution and code page. You can set these options in the Formats Settings dialog (Tools>Formats Settings menu). The dialog has a separate tab for each format, just click on the format tab of your choice and set the options.
Retain pictures
If you choose this option, pictures will be saved together with recognized text. The option is only available in the case of RTF, DOC, and HTML formats.
Image resolution (RTF/DOC, PDF, and HTML formats)
Sometimes you may wish to reduce image resolution. For example, HTML files are normally viewed using browsers, and high-resolution files, due to their size, are usually unwelcome on the Internet. To reduce image resolution (and, consequently, HTML file size) without lowering image quality, enter a lower resolution value in the Reduce picture resolution to field on the Formats>RTF/DOC (PDF, HTML) tab.
Note: If you enter a higher resolution value than the one originally entered in the Reduce picture resolution to field, this value will be ignored; the pictures will be saved using the source resolution.
JPEG quality (saving in PDF and HTML)
When you save the text in PDF and HTML formats, the pictures are saved in JPEG format.
This format uses a so-called "quality loss" algorithm to compress the image, i.e. the compressing technology is based on averaging groups of pixels, so that a whole region is saved as a single number rather than a large amount of different numbers for each pixel. The quality of the image will be determined by the value specified in the JPEG quality field (Tools>Formats, PDF and HTML tabs). A value in the range 1 - 100 may be specified (the default value is 50 – the average value).
The higher the value you specify in this field, the higher the quality of the saved image. The size of the image is also affected by this value: the higher the value, the larger the *.jpg file that is created. To obtain the most favorable size/quality combination, save the image using different JPEG values, and open it in an image viewing application. The JPEG quality value is set on the Formats>PDF (HTML) tab.
Fonts to use (when saving in RTF, DOC, or HTML format)
By default the fonts specified on the Formatting tab are used when saving in RTF, DOC, or HTML format. You can, however, change the fonts that are used. Change fonts in the Text window or select other fonts on the Formatting tab in the Fonts group and re-read the document.
Save all batch pages or selected ones only
You may either save all batch pages or selected ones only. To save only certain pages, select them before saving.
Recognized text saving modes (when saving several batch pages at a time)
- Create a separate file for each page - each batch page is saved as a separate file. The batch page number is automatically added to the end of each file name.
- Name files as source images - use this option to save each page in a separate file the name of which is to be the same as that of the original image.
Note:
- Pages that are not related to the original image (e.g. scanned pages) will not be saved in this mode. A warning will be displayed if such a page is encountered among those to be saved.
- If a number of consecutive batch pages all contain the same image as the original image or the images all have the same name, the pages will be treated as a multi-page TIFF and the text saved into a single file. If a number of pages have identical names but are not in consecutive order, the pages will be treated as individual image files, and the text saved in different files, with an index appended to their file names: _1, _2, etc.
- Create a new file at each blank page - the whole batch is treated as a set of page groups, with each group ending with a blank page. Pages from different groups are saved into different files with file names consisting of the user-specified name and index number: -1, -2, -3 etc.
● Create a single file for all pages - all (or all selected) batch pages are saved as a single file.
Saving the Recognized Text in RTF and DOC Formats
Layout retention modes are set on the Formatting tab in the Options dialog (Tools>Options menu).
Note: When you save text in RTF or DOC formats, the fonts used are those set on the Formatting tab in the Options dialog (Tools>Options menu) or those set during text editing in the Text window.
Tip: If you prefer editing recognized text in Microsoft Word rather than in the FineReader text window, you may still have uncertain characters highlighted. For this to be the case, select the With background color and/or the With text color item(s) on the RTF/DOC tab in the Highlight uncertain characters group. The saved file will have all the uncertain characters highlighted in the color of your choice.
Saving Recognized Text in PDF Format
Document layout retention options:
-
Text and pictures only - only recognized text and pictures are retained.
-
Image only - only the image is retained.
-
Text over the page image - the entire image is saved as a picture. Text areas are saved as text over the picture.
-
Text under the page image - the entire image is saved as a picture, and the recognized text placed underneath. This option is useful if you export your text to document archives: the full page layout is retained and a full-text search is available if you save in this mode.
To set these options:
-
Select the Formats Settings item in the Tools menu. The Formats Settings dialog will open.
-
Set the options of your choice on the PDF tab in the dialog.
Note:
- A special Replace uncertain words with images option is available if you use Text and pictures only or Text over the page image mode. If you select this option, all uncertain words will be replaced with their images. Set this option on the PDF tab in the Formats Settings dialog.
- If you wish to edit recognized text before exporting it in PDF format, we recommend you pay special attention to preserving the original line division (i.e. avoid deleting existing lines and adding new ones), otherwise the resulting PDF file may be displayed incorrectly (e.g. lines may overlap).
- When you save texts that use non-Latin code page (e.g. Cyrillic, Greek, Czech, etc.), ABBYY FineReader will save them using ParaType company fonts (www.paratype.com/shop).
- If, during PDF export, a message appears informing you that your text contains a number of non-standard font characters, you must then select Type 1 working mode and corresponding Type 1 fonts. These fonts are supplied as part of Adobe Type Manager or in the Windows 2000 postscript font installer. For more information on Type 1 fonts, see "Using Type 1 fonts during export to PDF" in ABBYY FineReader Help.
- Before you can edit PDF files that contain non-Latin code page (e.g. Cyrillic, Greek, Czech, etc.) in Adobe Acrobat, the text font must be changed to one installed on your computer.
Saving Recognized Text in HTML Format
Layout retention modes are set on the Formatting tab in the Options dialog (Tools>Options menu).
Note: When you save text in HTML format, the fonts used are either those set on the Formatting tab in the Options dialog (Tools>Options menu) or those set during text editing in the Text window.
To retain pictures in a HTML file:
- Select the Keep pictures option on the Formatting tab in the Options dialog (Tools>Options menu)
Note: Pictures are saved into separate *.jpg files. The resolution of the images and their quality can be determined on the HTML tab of the Formats dialog (Tools>Formats).
HTML formats available:
-
Full (uses CSS and requires Internet Explorer 4.0 or later) - the latest HTML format - HTML 4 - is used. HTML 4 supports all document layout retention types (the actual retention type used depends on the options set on the Formatting tab in the Retain layout group). The built-in style sheet is used.
-
Simple (compatible with all (Internet-) browsers) - HTML 3 format is used. The approximate document layout is retained i.e. the first line indent is not retained but the approximate font size is (HTML 3 format supports only a limited number of font sizes; FineReader will choose the HTML 3 format font size that corresponds to the actual font size of your text). This HTML format is supported by all browsers (Netscape Navigator, Internet Explorer 3.0 and later).
-
Auto (saves Full and Simple formats in a single file with autoselection depending on browser type) - both formats (Simple and Full) are saved to the same file. The browser you use will determine the format that is used.
To set the HTML format of your choice:
- Click the relevant radio button on the HTML tab in the Formats Settings dialog (Tools>Formats menu) in the Formats group.
Note: The application detects the code page automatically. To change code page, select the code page of your choice in the Code page field on the HTML tab in the Formats Settings dialog.
Saving the Page Image
- Select a batch page.
- Select the Save Image As item in the File menu. The Save as dialog will open.
- Select the disk or the folder you wish to save the file to, along with the file format.
Note: If you wish, you can save only some of the image areas enclosed by blocks (regardless of type). To do this, select the block or blocks you wish to save, and then check the Save only selected blocks checkbox in the Save Image as dialog. Note that you can only do this when saving a single image. Enter the file name.
- Click OK.
Note:
To save several images to a single file (a multi-page TIFF):
- Select the images of your choice in the Batch window.
- Select the Save Image As item in the File menu. Select the TIFF format and the Save as multipage image file option.
Note: If you save several page images from the Batch window as separate files (i.e. the images are not being saved as one multi-page TIFF), the file names will consist of the file name entered, the page number (4 digits), and the file suffix.
Chapter 9
Working with Batches
The batch is the main ABBYY FineReader data depository: scanned images, recognized text and other data are all kept in the batch. The majority of FineReader settings are batch settings: scanning, recognition, saving options, etc. User patterns, user languages and user language groups are also batch "property". When you create a new batch, you may use the default batch settings, the settings of the current batch, or settings saved in an *.fbt file.
Chapter Contents:
● General information on working with batches
- Creating a new batch
- Opening a batch
- Adding images to a batch
● Batch page number
- Closing a batch
- Deleting a batch
● Full-text search in recognized batch pages
General Information on Working with Batches
When FineReader starts for the first time, it opens the batch located in the FineReader folder. You can choose to work with this batch or create a new one. A batch may contain up to 9999 pages.
Tip: You may find it useful to save similar-type pages (e.g. pages from the same book, written in the same language, or with a similar layout) in the same batch. By doing this you will find that it is much easier to find your work.
The Batch window displays a list of the pages contained in the open batch. To view a page, just click on its icon or double-click its page number. All files related to this batch page will open in their respective windows, i.e. text file (if the page has been recognized) in the Text window, the image file in the Image window, etc.
There are two main ways of displaying pages in the Batch window:
Batch View Description
Thumbnails Batch pages are displayed as thumbnails, a thumbnail being a miniature image of the original page. Additional icons appear on the thumbnails as you process the images. These inform you of the actions that have been performed on them, e.g. recognition, saving, etc. Thumbnail images are particularly useful when searching for a particular batch page. To open an image, just click on its thumbnail.
Details Here detailed information is displayed on each batch page in the batch window, and page lists created according to any feature specified. This is useful in the case of large batches, as the batch window can accommodate a much greater number of pages in this view than in Thumbnail view. Double-click on a page to open it.
To choose the page view in the Batch window:
- Right-click the Batch window and select the View>... item in the local menu.
To customize the Batch window, i.e. choose the features that are to be displayed, the way in which pages are sorted, etc:
- Right-click the Batch window and select the Batch View>Customize item in the local menu. A dialog will open. Select the options of your choice on the Thumbnails and Details tabs of the dialog.
You may select several different pages, a number of consecutive pages, or all batch pages:
- To select a number of pages in a row, hold down the SHIFT key and click the first and last page of the group you wish to select.
- To select several pages, hold down the CTRL key and click the pages of your choice.
- To select all batch pages, activate the Batch window and choose the Select All item in the Edit menu or press CTRL+A.
Creating a New Batch
To create a new batch:
-
Select the New Batch item in the File menu. The Create New Batch dialog will open.
-
Select or create a folder for the new batch in the Create New Batch dialog.
-
Select the Batch Template field and choose one of the following options depending on the settings you wish applied to the new batch: Default settings - to apply default settings, Current Batch - to apply the current batch settings, Batch Template (.fbt) - to apply settings saved previously to a special file.
Note: To save batch settings in a file, click the Save button on the General tab (Tools>Options menu). A Save Batch Template As dialog will open. Enter the file name. The following settings will be saved: the Recognition, Scan/Open Image, Formatting, and Check Spelling tab settings, as well as all Formats Settings dialog tab settings. User languages, user language groups and user patterns will also be saved in this file. To return to the default settings, click on the Use defaults button on the General tab. To load the settings click the Load button on the General tab and select the FineReader batch template (*.fbt) file containing the settings of your choice.
Opening a Batch
- Select the Open Batch item in the File menu. The Open Batch dialog will open.
- Select the folder containing the batch you wish to open in the Open Batch dialog.
When you open a batch, the previous batch is automatically closed and saved. FineReader opens the last batch you worked with automatically at start-up.
Note: Batches can be opened directly from Windows Explorer:
- Right-click the batch folder (represented by the 📄 icon) and select the Open with FineReader item in the local menu. FineReader will be started and the chosen batch opened.
Adding Images to a Batch
- Select the Open Image item in the File menu or press CTRL+O.
- Select the image(s) you wish to open in the Open Image dialog.
FineReader will add the image to the open batch and copy the image to the batch folder.
Note: You can also add images directly from Windows Explorer:
- Select an image file or group of files in Windows Explorer.
- Right-click the selection and select the Open with FineReader item in the local menu. If FineReader has been already started, the selected image(s) will be added to the current batch, otherwise FineReader will be started and the batch you last worked with opened. This local menu item is only enabled if the file format is supported by ABBYY FineReader 6.0..
Batch Page Number
All batch pages are numbered. One batch may contain up to 9999 pages. The page number is displayed in the batch.
You can renumber pages directly in the Batch window or in the Renumber Pages dialog.
To renumber pages directly in the Batch window :
- Click a page in the Batch window or press F2.
- Enter the new page number.
Once the page number has been changed, all pages in the Batch window will be re-ordered to reflect the new numbering.
Note: If you double-click a page number, the page concerned will be opened.
To renumber pages in the Renumber Pages dialog:
- Select a single page or several pages.
- Select the Renumber Pages item in the Batch menu.
- Set the new number for the first page selected (the page with the lowest number).
Note
- To renumber all batch pages, select the All Pages item in the Renumber Pages dialog.
- To renumber only part of a batch:
- Select the pages you wish to renumber in the Batch window.
- Select the Selected pages item in the Renumber Pages dialog.
- If you want selected pages to be renumbered continuously, select the Continuous page numbering option. For example, were this option to be selected in the case of page numbers 2,5, and 6, and 1 chosen as the first number, on renumbering the page numbers would become 1,2,3. Otherwise (i.e. if the Continuous page numbering option is not selected), on renumbering page numbers 2,5, and 6 would become 1,5,6. The first page has been assigned the chosen number, but the remaining pages have retained their original numbers.
Note: If you renumber only certain batch pages, and in the process allocate a number to a page that is already in use, a warning to this effect will be issued, and the whole operation will be undone.
Closing a Batch Page or the Whole Batch
To close a batch page:
- Select the Close current page item in the Batch menu.
To close a batch:
- Select the Close Batch item in the File menu.
Note: The batch will be automatically saved when you close it.
Deleting a Batch
Note: Deleting a batch involves deleting all its contents, i.e. all its pages (images and text) and related files e.g. user patterns, user languages, etc. The batch folder will, subsequently, be empty.
To delete a batch, select the Delete Batch item in the Batch menu.
To delete a batch page:
- Select the page(s) you wish to delete in the Batch window.
- Select the Delete Page item in the Batch menu or just press DEL.
Full-Text Search in Recognized Batch Pages
(FineReader Corporate Edition only)
You can search through all recognized pages for words in all of their grammatical forms. The search pattern may consist of one word or several words. This (These) word(s) may be in any form (for languages with dictionary support), and the words in the search pattern may be located at any distance from each other in the text and in any order.
To carry out a full-text search:
- Select the Advanced search item in the Edit menu or press ALT+F3.
- The Search window will open below the Zoom window.
- Enter the text you wish to find in the Find what field. You can also paste any clipboard contents into this field or select a previously searched-for word from the list.
- Click the Find button.
The Search results window will display the list of batch page numbers in which ALL the words from the Find what field were found. For each page identified, the window will display when the data was last altered and also the first page section to contain the search pattern (highlighted). Click the page number to open it in the Image, Text and Zoom windows; the words found will be highlighted in color in all three windows.
Note: You cannot search for specialized characters such as end-of-line characters and paragraph marks.
Chapter 10
Network Document Processing
The ABBYY FineReader Corporate Edition is especially designed for network document processing. Each computer involved in network processing must have a separate copy of FineReader installed (for more information on network installation of FineReader, see under Installation on a Network Server and on a Network Workstation).
1. Work with the same batch over a network
The Corporate Edition allows you to increase the speed at which documents are processed. In addition, the whole process is tracked, so that the logins and computer i.d. numbers of all those involved in opening, scanning, recognizing, and checking batch pages are noted. Changes made by a user are not user-specific and apply to all users of the same batch.
2. Group work with the same user languages and user dictionaries
The ABBYY FineReader Corporate Edition allows users to work with and expand (e.g. while running a spell check) the same user languages and dictionaries simultaneously.
3. Group work with customized dictionaries for languages with dictionary support
ABBYY FineReader provides built-in dictionaries for languages that have dictionary support. These dictionaries contain the most commonly encountered words, but might not include proper names, specialized technical terms, acronyms, etc. Adding the latter to customized dictionaries increases recognition quality and speeds up the spellchecking process. This is because FineReader searches for a dictionary entry for each word it encounters. In addition, the ABBYY FineReader Corporate Edition allows users to work simultaneously with the same customized dictionary.
Chapter Contents:
● Working with the same batch over a network
● Group work with the same user languages and dictionaries
● Group work with custom dictionaries (languages with dictionary support only)
Work with the Same Batch Over a Network
(FineReader Corporate Edition only)
- Create/Open a batch and set up the required scanning and recognition options.
- Run FineReader and open the relevant batch on all computers that are to process it.
- Run background recognition (Process>Start background recognition) on all computers involved in recognizing the batch.
- Start the scanning on a computer equipped with an ADF scanner.
Tip: If your high-speed scanner does not support the TWAIN standard, scan your pages directly into the FineReader batch folder. This can be done by scanning the images on the computer attached to the scanner (using the scanning application supplied with your scanner), and specifying the FineReader batch folder as the folder to which images should be saved. Note that scanned images should be named as follows: 0001.tif, 0002.tif, 0003.tif... etc., in accordance with the order in which they are scanned.
- FineReader will automatically detect and process all the images you scan.
- Edit the recognized text (if necessary) and save it to file or export it to the application of your choice.
You can monitor page status (i.e. see whether a page has been scanned, recognized, edited, or exported, etc., and by whom) in the Batch window. All this information is displayed in the corresponding columns in the Details batch page view. To set up the Details page view:
- Right-click the Batch window and select the View>Details item in the local menu.
You can customize the Details page view e.g. specify the columns you want displayed in theBatch window or select the characteristic by which pages are to be sorted:
- Right-click the Batch window and select View>Customize. Set the necessary options on the Details tab of the Batch View Settings dialog.
If batch pages are to be processed using several computers, FineReader will distribute the workload automatically between them: each newly scanned page is allocated to the first free workstation able to accept it (background recognition must be running on the workstation concerned) and no other workstation will be able to access it until recognition is complete. To refresh the batch page list, pressF5 or select the Update page list item in the Batch menu. Once a page has been recognized, any other workstation (or indeed the same workstation) can open the page concerned for checking, editing and saving. Changes made by a user are not user-specific and apply to all users of the same batch.
Note: If your batch contains a large number of pages, recognition speed will be increased if you use "Background mode" in combination with a multi-processor system.
Group Work with the Same User Languages and Dictionaries (FineReader Corporate Edition only)
Create a batch and set up the required scanning and recognition options. All the user languages and dictionaries you attach will be stored in one folder. By default this will be the batch folder. Before you can create a user language that makes use of a user dictionary, you have to specify the folder in which both are to be stored. To specify the folder:
- Click the Change button in the Language Editor dialog (Tools>Language editor) and select the folder in the resulting dialog. All user languages and related dictionaries will then be stored in this folder.
Once setup is complete, save the batch settings in a batch template file (*.fbt):
- Click the Save button on the Options>General tab (Tools>Options). In the Save Batch Template As dialog, open the folder and enter the file name.
Before several users can work with the same user languages and dictionaries stored in a new batch, each of them will need to load the batch settings from the previously saved *.fbt file.
Select the Batch template (.fbt) item in the Template field. In the Open Batch Template dialog select the desired *.fbt file. The previously saved batch settings, including user language paths and dictionaries, will be restored, and all users will have the same access to the user language paths and dictionaries. Users can also edit their dictionaries. Changes made by one user will be made available for all other users of the same folder, and, similarly, any user languages present in a folder are available to all those who load its template. You can find the list of the available user languages and their properties in the Language Editor dialog in the User-defined languages group.
Note that a dictionary cannot be accessed while a user is in the process of adding/removing a word to/from it. The dictionary is updated when the user clicks the Add in the Check Spelling dialog or any button in the View dictionaries dialog.
Note:
-
Before you can use the dictionaries contained in a particular folder, you must have read-write access to that folder.
-
When a user language is used simultaneously by several users, it will be available as "read-only", i.e. it will not be possible to change any existing parameters. However, entries can still be added/removed to/from the user dictionary of this language.
Group Work with Customized Dictionaries (Languages with Dictionary Support only)
(FineReader Corporate Edition only)
Create a batch and select the scanning and recognition options of your choice. By default the customized dictionaries for the pre-defined main languages (languages with dictionary support) are saved in the folder in which the application was installed (in the case of Windows 2000 - Documents and Settings[\user profile]\Application Data\ABBYY\FineReader\6.00\UserDictionaries).
To enable several users to use the same customized predefined user dictionaries at the same time, create a public folder in which all such dictionaries are contained. The folder can be a local or network folder. To specify the folder:
- Click the Browse button on the Check Spelling tab of the Options dialog (Tools>Options menu). Select the folder in which you wish to store predefined user language dictionaries.
A customized dictionary can be expanded at will. It cannot be accessed while a word is being added/removed to/from it, but any changes made immediately become available to all other users of the same folder when the dictionary is updated. A dictionary is updated when a user clicks the Add in the Check Spelling dialog or any button in the View dictionaries dialog.
Note: If several users wish to use a folder in which custom dictionaries are stored, all users must have read-write access to the folder concerned.
Appendix
Hot Keys
The File Menu
| To:Press | |
| Open an image from file CTRL+O | |
| Scan an image CTRL+K | |
| Scan multiple images CTRL+SHIFT+K | |
| Stop scanning CTRL+T | |
| Create a new batch CTRL+N | |
| Open a batch CTRL+P | |
| Save text to file CTRL+F2 | |
| Save image to file F12 |
The Edit Menu
| To:Press: | |
| Undo the last action CTRL+Z | |
| Redo the last undone action CTRL+Y | |
| Cut the selection and put it to the clipboard CTRL+X | |
| Copy the selection to the clipboard CTRL+INS or CTRL+C | |
| Paste the clipboard contents | CTRL+V or SHIFT+INS |
| Delete the active block, the selection, the selected pages | DEL |
| Select all text in the Text window, select all batch pages, select all blocks on the open image | CTRL+A |
| Find the specified text | CTRL+F |
| Find the next occurrence of the search text | F3 |
| Search for and replace the specified text | CTRL+H |
The View Menu
| To:Press: | |
| Magnify the image in the Image window | CTRL+SHIFT+NUM+ |
| Zoom Out the image in the Image window | CTRL+SHIFT+NUM- |
| Zoom In to selected blocks | CTRL+SHIFT+NUM* |
| View Properties | ALT+ENTER |
The Batch Menu
| To:Press: | |
| Open the next batch page ALT+Down | |
| Open the previous batch page ALT+Up | |
| Open a page with specified number CTRL+G | |
| Close the current page CTRL+4 | |
| Delete the recognized text in the Text window CTRL+SHIFT+Del | |
| Delete all blocks in the Image window and all recognized CTRL+Del text in the Text window | |
| Update page list F5 |
The Process Menu
| To:Press: | |
| Scan and read an image CTRL+D | |
| Open and read an image CTRL+SHIFT+D | |
| Start Scan&Read Wizard CTRL+W | |
| Analyze layout Ctrl+E | |
| Analyze layout on all batch pages CTRL+SHIFT+E | |
| Read active or selected pages | CTRL+R |
| Read all batch pages | CTRL+SHIFT+R |
| Read active or selected blocks | CTRL+SHIFT+B |
The Tools Menu
| To:Press: | |
| Spellcheck the recognized text | F7 |
| Move to the previous error or uncertain word | F4 |
| Move to the next error or uncertain word | SHIFT+F4 |
| View Dictionaries | CTRL+SHIFT+V |
| Translate word with Lingvo (only in the Cyrillic version) | CTRL+SHIFT+T |
| Open the Language Editor dialog where you can create and edit languages and language groups | CTRL+SHIFT+L |
| Open the Pattern Editor dialog to create and edit the user's patterns | CTRL+SHIFT+A |
| Set the scanner parameters | CTRL+SHIFT+S |
| Open the Formats settings dialog to set save options for supported output formats | CTRL+SHIFT+X |
| Open the Options dialog | CTRL+SHIFT+O |
The Window Menu
| To:Press: | |
| Open the next window CTRL+F6 | |
| Open the previous window CTRL+SHIFT+F6 | |
| Open the Batch window ALT+1 | |
| Open the Image window ALT+2 | |
| Open the Text window ALT+3 | |
| Open the Zoom window ALT+4 | |
| Switch to the Advanced search window ALT+5 | |
| Open the Advanced search window ALT+F3 |
The Help Menu
| To:Press: | |
| Open help | F1 |
General Hotkeys
| To:Press: | |
| Make the selection bold CTRL+B | |
| Make the selection italic CTRL+I | |
| Make the selection underlined CTRL+U | |
| Go to the next table cell left arrow, right arrow, | up arrow, down arrow |

- ABBYY
- FineReader®
- OCR
- Optical Character Recognition Program
- ABBYY FineReader
- Contents
- Chapter 1
- Installing and Starting ABBYY FineReader ....3
- Chapter 2
- Quickstart 7
- Chapter 3
- General Features of ABBYY FineReader 15
- Chapter 4
- Acquiring the Image 19
- Chapter 5
- Page Layout Analysis 29
- Chapter 6
- Recognition 37
- Chapter 7
- Checking and Editing Text 47
- Chapter 8
- Saving into External Applications and Formats 55
- Chapter 9
- Working with Batches 61
- Chapter 10
- Network Document Processing 67
- Appendix 71
- WELCOME!
- User's Guide
- Online Help
- Readme file
- Technical Support
- Installing and Starting ABBYY FineReader
- Chapter Contents:
- Software and Hardware Requirements
- For ABBYY FineReader to function correctly your computer must meet the following system requirements:
- Installing ABBYY FineReader
- Installation options
- Installation on a Network Server and on a Network Workstation
- Installation on a Network Server
- Additional licenses
- Note:
- Installation on a Network Workstation
- Starting ABBYY FineReader
- To start ABBYY FineReader:
- Quick Start
- How to Input a Document in Less than a Minute
- The ABBYY FineReader Main Window
- Image Tools toolbar Batch window
- To alter the on-screen windows arrangement:
- Some recommended windows arrangements: Useful if/when:
- To switch between windows:
- ABBYY FineReader Toolbars
- The WizardBar toolbar
- Scan&Read
- 1-Scan
- 2-Read
- 3-Check Spelling
- 4-Save
- The Standard toolbar
- Setting up the toolbar
- To add a button to a toolbar:
- To remove a button from a toolbar:
- General Features of ABBYY FineReader
- What is an OCR System?
- The document input process can be divided into two stages:
- Let's take a closer look at the second stage.
- New Features of ABBYY FineReader 6.0
- General features
- Image processing
- Recognition
- Saving and editing
- Professional features
- Supported Document Saving Formats
- ABBYY FineReader saves recognition results in the following formats:
- Supported Image Formats
- ABBYY FineReader opens image files in the following formats:
- ABBYY FineReader saves image files in the following formats:
- Acquiring the Image
- Scanning
- Both modes have their advantages and disadvantages
- Switching from one mode to the other is easy:
- To start scanning:
- If scanning does not start right away, one of following two dialogs will open:
- Tip:
- Setting Scanning Parameters
- The main scanning parameters are:
- To set scanning parameters:
- Tips on Brightness Tuning
- Your image looks like this: Possible remedy:
- Scanning Multi-Page Documents
- ADF Scanning:
- Non-ADF Scanning:
- If you are using the TWAIN-Source interface
- Opening Images
- To open an image:
- Scanning Dual Pages
- To split a dual page:
- Adding Images of Business Cards to a Batch
- To split the image:
- Working with the Image
- Despeckle image
- To decrease the number of dots:
- To despeckle a particular block:
- Invert image
- Rotate or Flip image
- To flip the image:
- Clear block
- Increase/Decrease the image scale
- Get image information
- Print image
- Undo the last action
- Page Numbering
- Batch Image Options
- Page Layout Analysis
- General Information on Page Layout Analysis
- You may wish to draw blocks manually if:
- Block Types
- The following block types are available:
- Automatic Page Layout Analysis Options
- Document type
- To select the document type manually:
- Document types available:
- Table analysis options
- Drawing and Editing Blocks Manually
- To create a new block:
- Modifying blocks
- To add a rectangular block part:
- To cut a rectangular block part:
- To select a block or a group of blocks:
- To move blocks:
- To renumber blocks:
- To delete a block:
- To delete all image blocks:
- Manual Table Layout Analysis
- Editing a table manually:
- To merge table cells or rows:
- Using Block Templates
- To create a block template:
- To load a block template:
- General Information on Recognition
- You may:
- To start recognition:
- Recognition Language
- To recognize a multilingual document:
- To show/hide a language in the drop-down list on the toolbar:
- Source Text Print Type
- Software
- To change print type:
- Other Recognition Options
- Show image during recognition
- Text direction
- Inverted or flipped block
- Background Recognition
- To stop Background Recognition:
- Recognition with Training
- Train User Pattern mode
- Notes:
- To train a user pattern:
- How to Train a User Pattern
- Training to recognize a character:
- Training to recognize ligatures
- Training ligatures is no different to training separate characters:
- Always take the following into account when training FineReader:
- How to Edit a User Pattern
- To edit a user pattern:
- User Languages and Language Groups
- How To Create a New Language
- To create a new recognition language:
- Set the following language parameters for the new language (all parameters are entered in the Simple Language Properties dialog):
- How to Create a New Language Group
- To create a recognition language group:
- Set the following new language group parameters (all parameters are set in the Language Group Properties dialog):
- Checking and Editing Text
- The FineReader text editor has two distinctive features:
- The built-in spell check system features:
- Checking Text in ABBYY FineReader
- To check recognition results:
- Moving between uncertain words
- Options for Checking and Editing Text
- Error display level
- Stop at words with uncertain characters
- Stop at words not found in the dictionary
- Stop at compound words
- Ignore words with digits and other non-alphabetic characters
- Correct spaces before and after punctuation marks
- Adding and Deleting Words to/from the User Dictionary
- Adding words to the user dictionary
- To add a word to the dictionary during spell check:
- To import a dictionary:
- To delete a word from the dictionary:
- Editing Text in ABBYY FineReader
- To change font size in draft mode:
- The FineReader built-in editor is supplied with the following text editing features:
- Copy, cut, paste
- To copy the selection:
- To cut the selection:
- To paste the copied text:
- Search and replace
- To search and replace a word or phrase in the text you are editing:
- Font effects
- Text alignment
- Undo and redo
- Editing Tables
- Saving into External Applications and Formats
- FineReader can export recognition results to the following applications:
- General Information on Saving Recognized Text
- To save recognized text:
- Text Saving Options
- Formatting and text layout retention modes (saving in RTF, DOC, and HTML formats)
- Retain pictures
- Image resolution (RTF/DOC, PDF, and HTML formats)
- JPEG quality (saving in PDF and HTML)
- Fonts to use (when saving in RTF, DOC, or HTML format)
- Save all batch pages or selected ones only
- Recognized text saving modes (when saving several batch pages at a time)
- Saving the Recognized Text in RTF and DOC Formats
- Saving Recognized Text in PDF Format
- Document layout retention options:
- To set these options:
- Saving Recognized Text in HTML Format
- To retain pictures in a HTML file:
- HTML formats available:
- To set the HTML format of your choice:
- Saving the Page Image
- Working with Batches
- General Information on Working with Batches
- There are two main ways of displaying pages in the Batch window:
- Batch View Description
- To choose the page view in the Batch window:
- You may select several different pages, a number of consecutive pages, or all batch pages:
- Creating a New Batch
- To create a new batch:
- Opening a Batch
- Adding Images to a Batch
- Batch Page Number
- Note
- Closing a Batch Page or the Whole Batch
- Deleting a Batch
- To delete a batch page:
- Full-Text Search in Recognized Batch Pages
- (FineReader Corporate Edition only)
- To carry out a full-text search:
- Network Document Processing
- Work with the same batch over a network
- Group work with the same user languages and user dictionaries
- Group work with customized dictionaries for languages with dictionary support
- Work with the Same Batch Over a Network
- Group Work with the Same User Languages and Dictionaries (FineReader Corporate Edition only)
- Group Work with Customized Dictionaries (Languages with Dictionary Support only)
- Appendix
- Hot Keys
Brand : ABBYY
Model : FineReader 6.0 OCR
Category : Software License