
VM9224R - Car radio JENSEN - Free user manual and instructions
Find the device manual for free VM9224R JENSEN in PDF.


| Product Type | Mobile Multimedia Receiver (Car Stereo) |
| Model | Jensen VM9224R |
| Dimensions (DIN Chassis) | 7" x 7" x 4" (178 mm x 178 mm x 50 mm) |
| Display | 6.2" High Definition TFT LCD, 1,152,000 sub-pixels (800x3 x 480), 16:9 widescreen |
| Power Supply | 11-16 VDC, negative ground |
| Power Output (CEA-2006) | 13 Watts RMS x 4 channels into 4 ohms, ≤1% THD+N |
| Media Compatibility | DVD±R/RW (single/dual layer), CD-R/RW, CD-DA, MP3, WMA, VCD, SVCD, Xvid, AVI, MPEG1/2 |
| Frequency Response | 20 Hz – 20 kHz, -3 dB |
| Signal-to-Noise Ratio | >95 dBA (CD player), 70 dBA (amplifier reference) |
| Tuner Bands | FM: 87.5–107.9 MHz; AM: 530–1720 kHz; 30 presets (18 FM, 12 AM) |
| Bluetooth | Optional BTM10 module; supports HFP and A2DP profiles |
| iPod/iPhone Compatibility | Made for iPod; supports music, video, and photo (with jLink-USB cable) |
| USB / SD Card | Front USB and SD slot; supports MP3/WMA up to 1500 files on DVD |
| Audio Controls | 3-band EQ (Bass, Mid, Treble) with 8 presets; Subwoofer output; Fader/Balance |
| Video Inputs/Outputs | Front A/V input; Rear camera input (Normal/Mirror); One composite video output |
| Steering Wheel Control | Compatible with PAC SWI-PS adapter (sold separately) |
| Rear Camera Input | Yes; supports Normal and Mirror image view |
| Navigation | Ready for optional NAV102 module |
| Maintenance | Clean front panel with soft silicone cloth and neutral detergent; avoid alcohol or rough cloth |
| Safety Features | Parking brake inhibit (video only when engaged); built-in fuse (20A); forced air cooling |
| Repairability | User-replaceable fuse; reset button; optional accessories (NAV102, BTM10) available |
| Warranty | 12 months parts and labor (original purchaser, USA/PR/Canada) |
Frequently Asked Questions - VM9224R JENSEN
User questions about VM9224R JENSEN
0 question about this device. Answer the ones you know or ask your own.
Ask a new question about this device
Download the instructions for your Car radio in PDF format for free! Find your manual VM9224R - JENSEN and take your electronic device back in hand. On this page are published all the documents necessary for the use of your device. VM9224R by JENSEN.
USER MANUAL VM9224R JENSEN
Operating Instructions
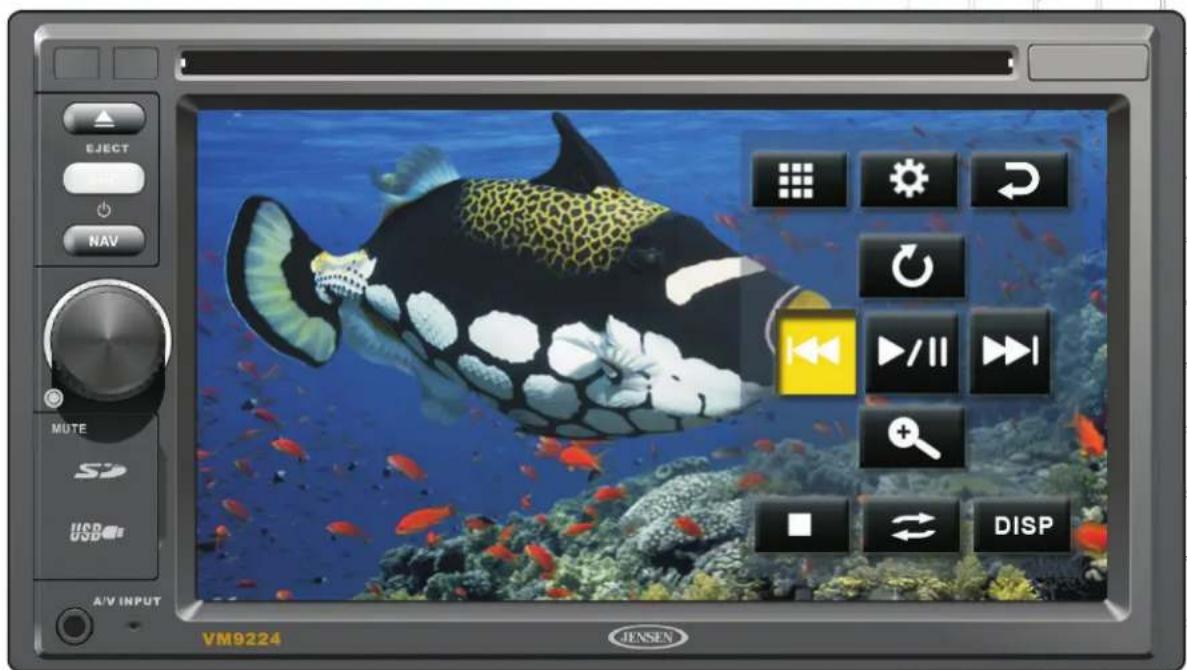
CONTENTS
Thank you for choosing a Jensen product. We hope you will find the instructions in this owner's manual clear and easy to follow. If you take a few minutes to look through it, you'll learn how to use all the features of your new Jensen VM9224 Mobile Multimedia Receiver for maximum enjoyment.
Features....1
Controls and Indicators 4
Operating Instructions....7
Setup Menu.... 11
Tuner Operation 17
DVD/VCD Video Operation 20
DVD/CD Audio Operation 27
MP3/WMA Operation 30
iPod Operation 35
Bluetooth Operation 39
Troubleshooting 46
Specifications 50
FEATURES
Congratulations on your purchase of the Jensen VM9224 Mobile Multimedia Receiver.
It's a good idea to read all of the instructions before beginning the installation. We recommend having your Jensen VM9224 installed by a reputable installation shop.
DVD
- Aspect Ratio - Full and Normal
- Fast Forward - 2X, 4X, 8X and 20X
- Slow Motion - 2X, 4X, 8X and 20X
- Play, Pause, Stop, Next Chapter and Previous Chapter
CD / MP3 / WMA
- CD-Text Compatible
• ID3 Tag Compatible - Directory Search (MP3 / WMA Only)
- Burn up to 1500 MP3 and WMA Files onto a DVD+ R / RW
- Audible Forward / Reverse Track Search (CD-DA Only)
• Random, Repeat and Intro - Play, Pause, Stop, Next Track and Previous Track
AM-FM
• USA / Europe / Latin America / Asia Frequency Spacing
• 30 Station Presets (18 FM / 12 AM)
- Auto Stereo / Mono
- Local / Distance
• Auto Store / Preview Scan
iPod
- iPod via USB
- High Speed Direct Connect Interface to Access iPod Playlists, Artists, Albums and Songs. Play music and view video/photo* files from your iPod. *Video/photo playback requires jLink-USB iPod interface cable (sold separately).
- Power Management Charges iPod while Connected
Chassis
• 2.0 DIN (Import / ISO-DIN Mountable)
- Fixed Front Panel
• 6.2" High Definition TFT LCD
• 1,152,000 Sub Pixels (800x3 X 480)
- Beep Tone Confirmation (ON-OFF Option)
- Heat Management System - Forced Air-Cooling To Keep The Chip-Sets Operating at Nominal Temperatures
General
- Navigation Ready (NAV102)
- Bluetooth Ready (with purchase of BTM10) providing hands-free profile for safety / convenience and A2DP profile for streaming music from a PDA / PMP
• One Composite Video Output for Additional Screens - Front Panel Audio/Video Input
- Three-Band Tone control (Bass, Mid and Treble) with Eight Preset EQ Curves
- Front Panel A/V Aux Input for Portable Media Devices
- Front, Rear and Subwoofer Line Output
- Programmable Volume Control
- Rear Camera Input (Normal and Mirror Image View)
- Touch Screen Calibration Mode
• 2VRMS Line Output - All Channels - Rotary Encoder Audio Control
- SWC Interface – Compatible with PAC adapter SWI-PS Steering Wheel Control Interface, sold separately
Optional Equipment
• NAV102
The VM9224 is "navigation ready." Before accessing any navigation features, you must purchase and install the navigation module (NAV102). All installation and operating instructions will be included with the navigation module.
Once the navigation module is connected and operating properly, the NAV source mode will become active. While the navigation module is not installed, the NAV option appears gray, indicating the function is not available.
• BTM10
Before you can connect to a Bluetooth enabled device, you must purchase and install the Jensen BTM10.
- Bluetooth Phone
See "Bluetooth Operation" on page 47.
- Rear Camera
The VM9224 is "camera ready." Before accessing any camera features, you must purchase and install a rear video camera. Once the rear camera is connected and operating properly, the CAMERA source mode will become active. While the camera is not installed, the CAMERA option appears gray, indicating the function is not available.
WARNING! Never install this unit where operation and viewing could interfere with safe driving conditions.
WARNING! To reduce the risk of a traffic accident (except when using for rear view video camera) never use the video display function while driving the vehicle. This is a violation of federal law.
WARNING! Never disassemble or adjust the unit.
WARNING! To prevent injury from shock or fire, never expose this unit to moisture or water.
WARNING! Never use irregular discs.
WARNING! To prevent damage to the mechanism inside this unit, avoid impact to the TFT monitor.
WARNING! The monitor employs an automatic motorized mechanism. To prevent damage to the core mechanism, please do not push, pull or swivel the monitor manually.
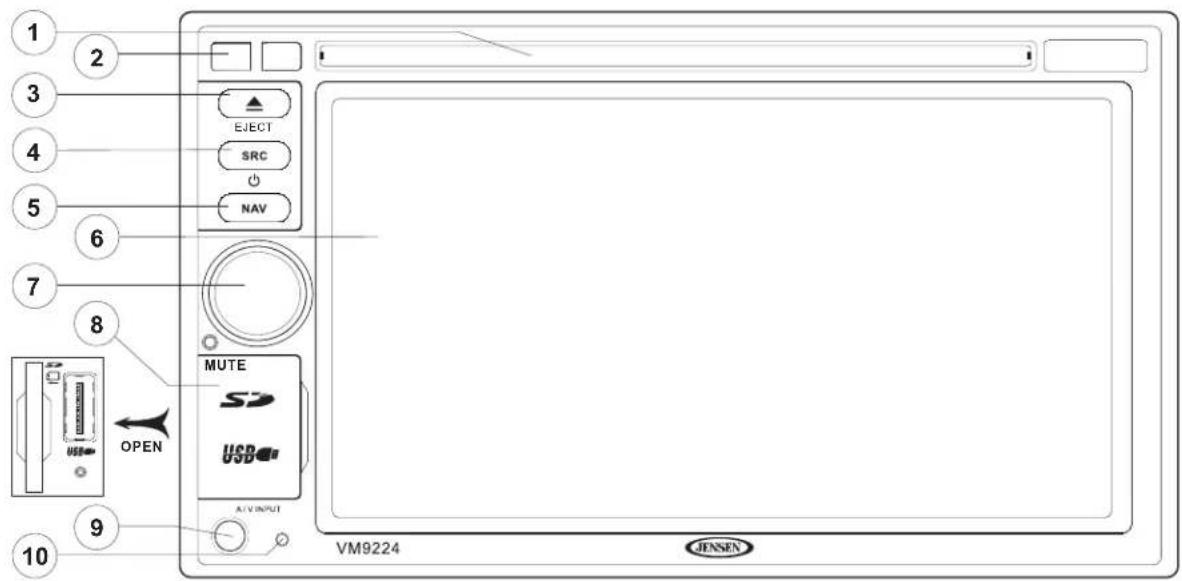
CONTROLS AND INDICATORS
- Disc Slot
- This is where the IR window was on older version of Radio.
- EJECT
Press to eject a disc.
Press and hold to reset core mechanism position.
- SRC
Press to turn the unit on. Press and hold to turn the unit off.
When on, press once to select playing mode.
- NAV
Press to display the navigation user interface.
-
TFT Display
-
Rotary Encoder
Rotate to adjust the volume. While in the audio menu, press and release to enter and/or confirm audio settings.
Press to activate the MUTE function and silence the receiver. Press again to resume sound.
Press and hold to activate the Local (LOC) setting. Press and hold again to turn Local reception off.
- USB/SD Interface Connector
Connect a USB device or insert an SD card for playback of music/video files.
- A/V Input
Attach a compatible A/V device.
- RESET
Press to reset system settings to factory default (except the password and parental lock setting).
Image/Display Settings
Video Output Modes
Table 2 shows the video output mode for each playing source.
Table 2: Video Output Modes
| Playing Source Video Output Modes | |
| AM/FM TUNER RGB Mode | |
| DVD RGB Mode | |
| AUX IN CVBS Mode | |
*CVBS – Composite Video Baseband Signal
Picture Adjustment
To adjust monitor display settings, perform the flooring steps:
- Long-press the NAV button on the front panel repeatedly to move from the "BRIGHT" setting to "CONTRAST".
- Turn the rotary encoder to adjust the setting level.
- Long-press the NAV button on the front panel 1-3 times to exit the picture adjustment menu.
Parking Brake Inhibit
When the pink "Parking" wire is connected to the vehicle Parking Brake circuit, the front TFT monitor will display video when the Parking Brake is engaged. (When the pink wire is grounded via the Parking Brake circuit, video will be displayed.)
OPERATING INSTRUCTIONS
Power On / Off
Press the ⏻/SRC button (4) on the unit to turn the unit on.
The buttons on the front of the unit light up and the current mode status appears in the LCD (7).
Press and hold the button to power off the unit.
Audible Beep Confirmation
An audible beep tone confirms each function selection. The Beep tone can be disabled through the Setup menu.
Mute/Line Mute
Press the rotary encoder button (7) on the front panel to mute the volume from the unit. Press the rotary encoder button again to restore the volume.
"MUTE" is displayed on the LCD. Adjusting the volume or using any of the audio setup features cancels the mute function.
If the “MUTE” wire is connected, audio output mutes when a telephone call is received by the car phone (using optional BTM10) or when verbal navigation is performed (using optional NAV102).
Playing Source Selection
When the monitor is closed, press the SRC button on the front panel (4) to change between available audio playing sources in the
following order: RADIO, DISC, USB1, USB2, SD, BT, NAV, AUX and CAMERA.
Source Menu
You can also use the touch screen to change the source through the SOURCE MENU. To access the SOURCE MENU, touch the top left corner of the screen or press the SRC button on the front panel (4).
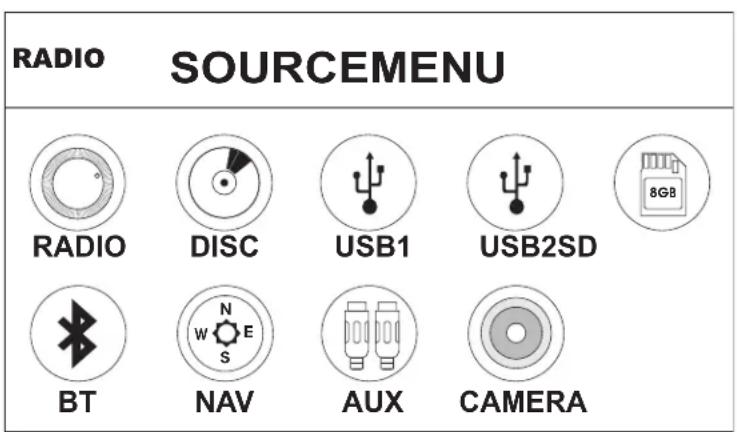
Touch the RADIO, DISC, USB1, USB2, SD, BT, NAV, AUX or CAMERA button to select the corresponding source.
NOTE: If an iPod is attached to a USB1 port, "IPOD" appears instead of the text "USB1."
External Devices
External peripheral devices, including a game console, camcorder, navigation unit, iPod, Zune, etc. can be connected to this unit via RCA output using an A/V Media Adapter Cable (not included).
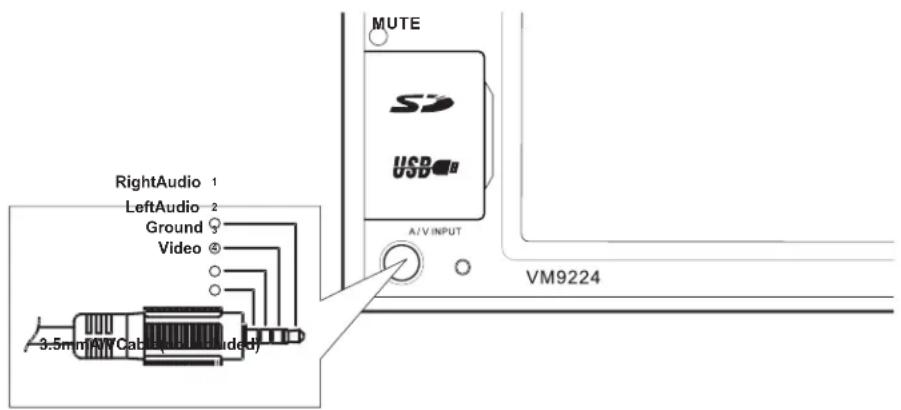
Connect the external device to the A/V Media Adapter Cable and then plug the cable into the A/V INPUT connector (9) on the front of the radio. Select "AUX" or "AUX IN" (when monitor is closed) mode to access auxiliary devices. You cannot directly control external devices connected to the A/V INPUT. For information regarding the use of USB devices, see "Inserting a USB Device or SD Card" on page 39.
Volume Adjustment
Volume Increase/Decrease
To increase or decrease the volume level, turn the rotary encoder (7) on the front panel. When the volume level reaches
“0” or “40”, a beep sounds, indicating that the adjustment limit has been reached. The TFT screen displays the volume level for 3 seconds.
Programmable Turn-On Volume
This feature allows the user to select a turn-on volume setting regardless of the volume setting prior to turning the unit off.
To program a specific turn-on volume level, turn the rotary encoder (7) to adjust the volume to the desired turn-on volume. Push and hold the rotary
encoder while the speaker icon and level indication is displayed on the screen. The unit will beep to confirm your turn-on volume setting.
Audio Control Menu
The Audio Control feature allows you to easily adjust your audio system to meet the acoustical characteristics of your vehicle, which vary depending on the type of vehicle and its measurements. Proper setting of the Fader and Balance boosts the effects of the cabin equalizer.
Touch the EQ button on the left side of the screen to display the audio menu.
- Use the touch screen +/- buttons to adjust the settings for an audio feature.
Table 3: Audio Adjustments
| Audio Function Adjustable Range | |
| EQ User | |
| Acoustic | |
| Urban | |
| Rave | |
| Latin | |
| Dance | |
| Hip Hop | |
| Rock | |
| BASS -14 to +14 | |
| MID -14 to +14 | |
| TREBLE -14 to +14 | |
| SUB -14 to 0 | |
| FAD Grid | |
| BAL Grid | |
NOTE: The EQ mode will automatically change to "USER" when individual audio functions are adjusted.
The Audio menu will automatically exit after a few seconds of inactivity. To exit quickly, touch the top left corner of the screen.
System Reset
To correct a system halt or other illegal operation, use the tip of a pen to press the reset button (10) located on the front bottom-right corner of the unit. After a system reset, the unit restores all factory default settings.

[RESET] Button
NOTE: If the unit is reset while a DVD is playing, the DVD resumes play once the reset is complete.
Steering Wheel Control (SWC)
The VM9224 is compatible with the PAC (Pacific Accessory Corporation) steering wheel control adapter SWI-PS. A 3.5mm female connector (labeled "SWC Interface") on the back of the head unit allows connectivity to the PAC adapter. Please refer to the instructions included with the PAC adapter for detailed installation information.
SWC Functions
The following controls are available for most vehicles:
- Vol Down
- Vol Up
- Mute
- Seek Down / Previous Track / ** Preset Down
- Seek Up / Next Track / ** Preset Up
- SRC (Source)
- ** Select
- ** Select
- Band
** If additional steering wheel control buttons are available on the vehicle, function 7 / 8 may be assigned the "Select" feature. This feature / function may not be available on some vehicles.
Select Operation
If "Select" (function 7 or 8) is held down and function 4 is pressed momentarily, Preset Up will be selected. If "Select" (function 7 or 8) is held down and function 5 is pressed momentarily, Preset Down will be selected.
SETUP MENU
To access system settings, touch the ⚙ button on the screen to enter the "SETUP" menu.
The "GENERAL" sub-menu appears highlighted in blue.
| RDS | GeneralLanguage | AudioBack | |
| Bluetooth | ClockMode12Hr | ||
| Rating | |||
| Hardware | Clock04:31AM | ||
| P.VOL | TunerRegionUSA | ||
| TSCal | BeepOn | ||
| DEMO | |||
Accessing Menu Items
Touch the sub-menu name, touch the <<, >>, |<<, or >>| direction on the screen to select a sub-menu (Language, Audio, RDS, etc.).
The features available for adjustment under the highlighted sub-menu option will appear in the center of the screen.
Adjusting a Feature
- Use the touchscreen to select the feature to be adjusted.
-
Enter the option field for the feature you want to adjust by using the touchscreen. A submenu appears in a second row with the selected option highlighted in blue.
-
Select a new value by using the touchscreen.
- Use the touchscreen to confirm setup.
General Sub-menu Features
| Setting Options Function | ||
| Clock Mode 12Hr | Clock displays 12 hour time using AM and PM. | |
| 24Hr Clock displays 24 hour time up to 23:59. | ||
| Clock (HH:MM) | Clock appears in the top right corner of the screen and on the LCD screen during certain operations. NOTE: The AM/PM indication will change as you continue to adjust the hour past 12. | |
| Tuner Region USA • AM Frequency Spacing - 10kHz• AM Frequency Band - 530kHz~1720kHz• FM Frequency Spacing - 200kHz• FM Frequency Band - 87.5MHz~107.9MHz | ||
Language Sub-menu Features
If a DVD supports more than 1 Subtitle or Audio language, all the languages are available for selection during playback. If the selected language is not supported by the DVD, then the default language is used.
| Setting Options Function | |
| Language English On Screen Display appears in English. | |
| Subtitle English DVD subtitles automatically appear in English when available. | |
| Auto DVD subtitles appear according to the default subtitle language specified on the disc. | |
| Off DVD subtitles do not appear automatically. | |
| Audio English DVD Audio is heard in English when the option is available. | |
| DVD Menu | English DVD menu (if applicable) is displayed in English. |
Audio Sub-menu Features
| Setting Options Function | |
| DRC Off Employ the Dynamic Range Control for better playback for low volumes. | |
| On | |
| Loudness Off Turn bass boost on/off | |
| On | |
| Sub-woofer | Off Turn the subwoofer on/off. |
| On | |
| Sub Filter 80Hz Selecting a crossover frequency sets a cut-off frequency of the subwoofer's LPF (low-pass filter). | |
RDS Sub-menu Features
| Setting Options Function | ||
| RDS Off | ||
| On | ||
| CT | Off | |
| On | ||
Bluetooth Sub-menu Features
| Setting Options Function | ||
| Bluetooth Off Disable Bluetooth function. | ||
| On Enable | Bluetooth function. | |
| Connect Manual Connect the last active mobile phone by touching the CONNECT icon when disconnected. | ||
| Auto Automatically connect when your paired phone is in range. | ||
| Auto Answer | Manual Manually answer calls by touching the “call” button. | |
| Auto The unit automatically answers all incoming calls. | ||
| Pairing Code | The default code is “1234”. Touch the keypad icon to open the keypad and enter the pairing code or pass key required for Bluetooth connection to your mobile phone. Not all phones/devices require a pairing code. The default code is “0000” for many models. | |
Rating Sub-menu Features
The DVD system has a built-in parental lock feature to prevent unauthorized persons from viewing restricted disc content. By default, the rating system is unlocked. Once setup, the parental lock is released only by entering the correct password. Once the password is entered, rating is available for setup.
| Setting Options Function | ||
| Set Password | ----Enter a 4-digit password to activate the “Rating” feature. | |
| Parental Ctrl | 1. Kid Safe | Select the appropriate rating level for the intended audience.You may override higher ratings by using your password. |
| 2. G | ||
| 3. PG | ||
| 4. PG-13 | ||
| 5. PG-R | ||
| 6. R | ||
| 7. NC-17 | ||
| 8. Adult | ||
| Load Factory | Reset Select “Reset” to restore the factory default settings for the Rating system only. | |
To reset the password, access the "RATING" menu and enter the current password. Once the correct password is entered, you can access the "Password" field and enter a new one.
NOTE: Record the password and keep it in a safe place for future reference. The rating for each disc is marked on the disc, disc packing, or documentation. If the rating is not available on the disc, the parental lock feature is unavailable. Some discs restrict only portions of the disc and the appropriate content will play. For details, please refer to the disc description.
Hardware Sub-menu Features
| Setting Options Function | |
| Camera In Normal | |
| Mirror Reverse the camera image as if looking through a rear-view mirror. | |
| Video Input (Input circuitry autodetects the video signal from the Aux In source). | NTSC The color signals are output in the standard NTSC format. |
| PAL The color signals are output in the standard PAL format. | |
| Auto The color signal output is switched automatically based on the current video input signal - NTSC or PAL. | |
If the monitor is in display mode, the monitor automatically switches to CAMERA mode upon reverse driving. When the reverse driving stops, the monitor return to its original input mode.
P.VOL Sub-menu Features
| Setting Options Function | ||
| Source RADIO Choose | a source for which you would like to increase the relative volume (LEVEL). | |
| Level 0-6 Increase relative volume for specified source up to 6 decibels. | ||
TS Cal (Screen Calibration)
To access the “Screen Calibration” function from the SETUP menu, select the “TS CAL” option.
After entering calibration mode, a crosshair + appears in a corner quadrant of the screen. To begin calibration, press and hold the crosshair for one second until it moves to the next quadrant. Continue for each quadrant until the calibration is completed.
Demo Sub-Menu Features
You can stop/run demonstration mode or turn Demo Auto Run on/off by choosing the "Demo" option from the SETUP MENU.
When Demo "Auto Run" is Off, you can select "Demo > Run" to start Demo Mode. Demo scrolls through the various source screens, simulating activity on the display. "Demo" is discreetly displayed in blue text (below the clock), to indicate the unit is in Demo Mode. To stop Demo Mode, press the upper-left quadrant of the TFT (Source select).
When Demo "Auto Run" is On, the unit will automatically display Demo Mode when powered on.
Exiting the System Setup Menu
To exit setup mode and resume normal playback, touch the BACK button on the screen.
TUNER OPERATION
Tuner TFT Display
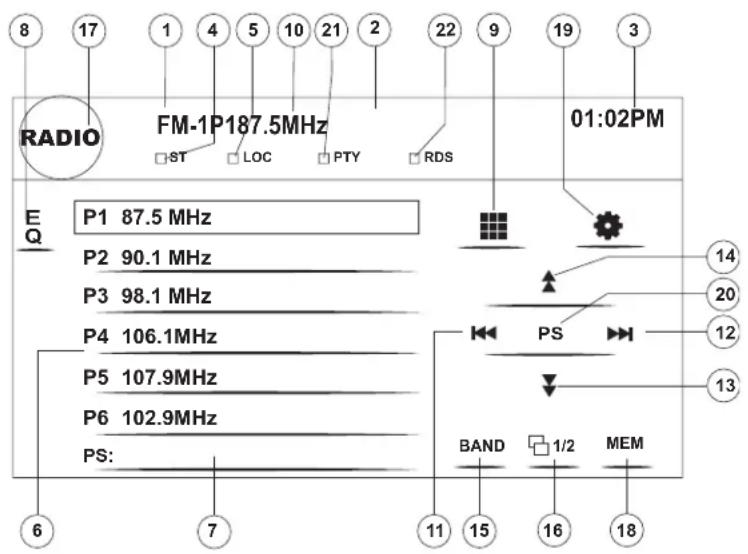
flowchart
graph TD
    A["Start"] --> B["PTY"]
    B --> C["AS"]
    B --> D["LOC"]
    B --> E["24"]
    F["Start"] --> G["23"]
    F --> H["16"]
    F --> I["25"]
- Current radio band indicator
- Radio frequency indicator
- Clock
- Stereo broadcasting indicator
- Strong Local signal broadcasting indicator
- Preset radio stations: Touch to recall preset stations
- Information about the current function
- EQ: Touch for quick access to Equalizer level settings
- : touch to access the direct entry screen
- Current preset station indicator
- |<<: Touch to seek backward
-
|: Touch to seek forward
- <<: Touch to tune backward one step
-
: Touch to tune forward one step
-
BAND: Touch to change between AM/FM bands
-
1/2: Touch to view a second screen of menu choices
- :touch to view the SOURCE MENU and select a new playback source
- MEM: View screen used to enter current channel into preset memory
- .Touch to view the SETUP menu
- PS (Preview Scan): Touch to scan all stations available, stopping for 5 seconds at each and continuing until a station is selected
- PTY Indicator
- RDS Indicator
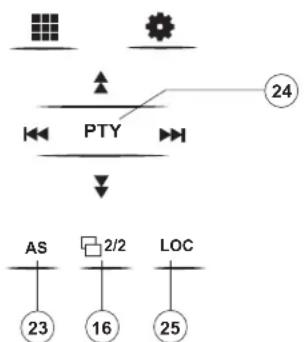
- AS: Touch to automatically store stations
- PTY: Touch to activate the PTY function
- LOC: Press to activate/deactivate the Local function
Switching to Radio Tuner Source
- Touch the top left corner of the screen (the RADIO circle) to view the SOURCE MENU. Touch "Radio".
- Press the SRC button (4) on the front panel to switch to the AM/FM or RADIO source.
Selecting FM/AM Band
Touch the BAND button (15) on the screen to change between the following bands: FM1, FM2, FM3, AM1, and AM2.
NOTE: The BAND button on the unit only works when the TFT is closed.
Seek Tuning
To seek the next higher station:
- Touch the >>| button on screen.
To seek the next lower station:
- Touch the |<< button on screen.
Manual Tuning
To increase or decrease the tuning frequency one step:
- Touch the >> or << buttons on screen.
Direct Tuning
To enter a radio station directly, touch the 📄 button to display the direct entry menu.
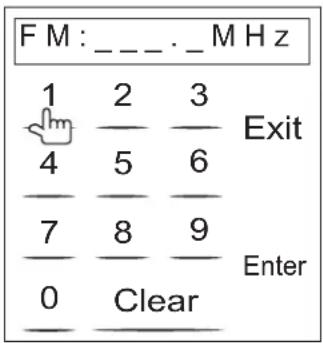
Enter the desired radio station using the on-screen number pad. Press the Enter button to tune to the selected station. To exit the screen without changing the station, touch Exit. To clear your entry and start over, touch Clear.
Using Preset Stations
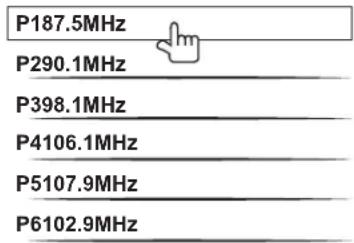
Six numbered preset buttons store and recall stations for each band. All six stored stations (P1-P6) for the current band appear on the screen.
Storing a Station
- Select a band (if needed), then select a station.
- Touch the on-screen MEM button (18) to open the preset screen.
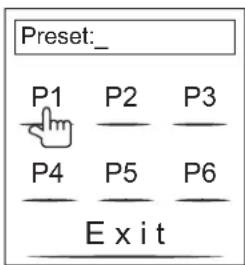
- Touch the preset number in which you would like to store the current station (or touch Exit to cancel and close the menu). The preset number and station appears highlighted.
Recalling a Station
- Select a band (if needed).
- Touch an on-screen preset button (6) to select the corresponding stored station.
Auto Store/Preview Scan (AS/PS)
Auto Store (AS)
To select six strong stations and store them in the current band:
- Select a band (if needed).
- Touch the AS button (23) on page 2/2 of the on-screen controls to activate the Auto Store function.
The new stations replace stations already stored in that band.
Preview Scan (PS)
To scan the AM or FM band for a preview of available stations in your particular area, touch the PS button (20). Touch again to stop preview scan.
Local Radio Station Seeking (LOC)
When the Local function is on, only radio stations with a strong local radio signal are played. To activate the Local function in AM/FM tuner mode, press and hold the rotary encoder button (7) on the front panel. Press and hold the rotary encoder again to turn Local off. When the Local function is active, the LOC indicator at the top of the screen is illuminated.
NOTE: When properly installed, DVD video cannot be displayed on the main TFT screen unless the parking brake is applied. If you attempt to play a DVD while the vehicle is moving, the TFT screen displays "PARKING" with a blue background. Rear video screens, if applicable, will operate normally.
Inserting a Disc
Upon inserting a DVD disc, DVD mode is entered and disc play begins.
NOTE: If Parental Lock (Rating) is activated and the disc inserted is not authorized, the 4-digit code must be entered and/or the disc must be authorized (see "Rating Sub-menu Features" on page 21).
You cannot insert a disc if there is already a disc in the unit or if the power is off.
NOTE: DVD-R and DVD-RW will not play unless the recording session is finalized and the DVD is closed.
Ejecting a Disc
Press the ▲ button (3) on the unit to eject the disc. The unit automatically reverts to Tuner mode. You may eject a disc with the unit powered off. The unit will remain off after the disc is ejected.
Resetting the Loading Mechanism
If the disc loads abnormally or an abnormal core mechanism operation occurs, press and hold the ▲ button (3) on the unit to reset the loading mechanism. Normal operation resumes.
Accessing DVD Mode
To switch to DVD mode when a disc is already inserted, press the SRC button (4) on the front panel.
Controlling Playback
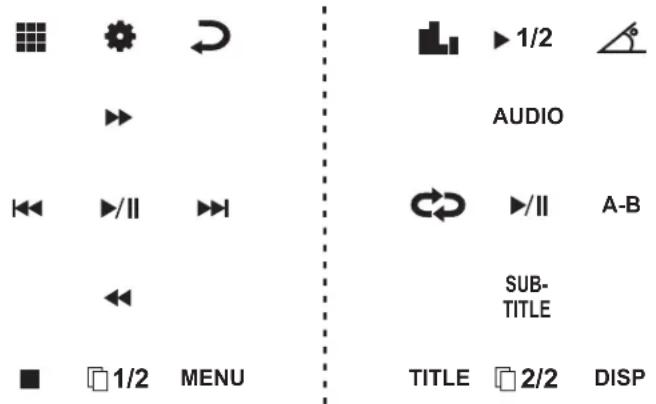
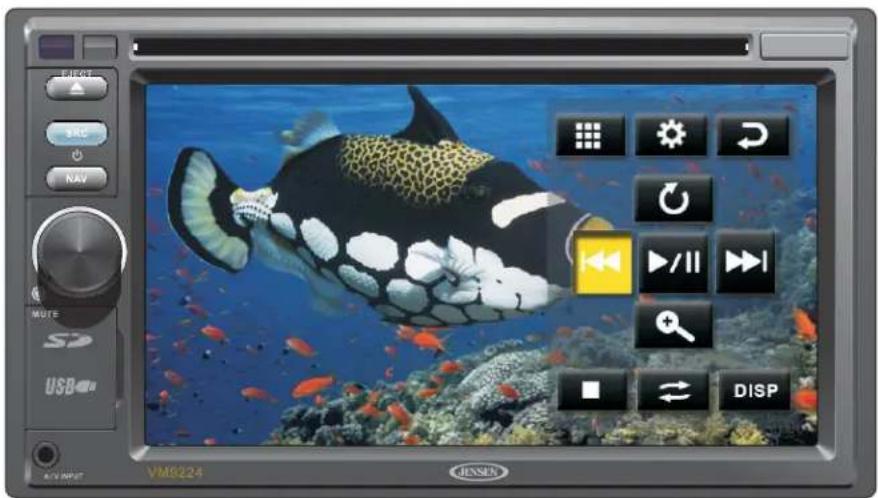
To access the on-screen controls, touch the bottom 1/3 of the screen while a DVD is playing. Touch the 1/2 button to view a second page of controls
Stopping Playback
Touch the stop button (■) on the screen to stop DVD play.
Pausing Playback
Touch the play/pause button (>) on the screen to suspend or resume disc play.
Slow Motion Playback
Touch the << button on the screen to play the current title in slow motion.
Keep pressing and releasing the button to increase the rate from "x2" to "x4", "x8", and "x20".
Touch the on-screen play button ( > ) to resume normal play.
Fast Forward Playback
Touch the >> button on the screen to fast forward.
Keep pressing and releasing the button to increase the rate from "x2" to "x4", "x8", and "x20".
Touch the on-screen play button ( ≥slant ) to resume normal play.
Repeat Playback
Touch the ➕ button on screen to alter repeat mode according to the following:
• DVD: Repeat Chapter, Repeat Title, Repeat Off
• VCD (PBC Off): Repeat Single, Repeat Off
NOTE: For VCD play, the repeat function is not available if PBC is on.
Sectional Repeat Function (A-B)
Use the A-B function to define a specific area of a disc to repeat.
- Touch the A-B button on screen to set the start point (A) of the repeated section.
- Touch the REPT A-B button again once you reach the desired end point (B) of the repeated section. The selected portion of the DVD will now repeat continuously.
- Touch the REPT A-B button again to cancel the A-B section setting and stop repeat play.
Accessing the DVD Menu
Touch the title on screen to select a title from the menu.
Press the TITLE on screen to select a different title for playback.
Touch the floating cursor of the screen to confirm your selection and begin playback. You can also select a title using the touch screen.
Moving Through Chapters
Press the >>| button on screen to advance to the next chapter on the DVD.
Press the |<< button on screen to move to the previous chapter.
Goto Search
During DVD or VCD playback, perform the following steps to use the GOTO feature to access a specific location on a disc:
Touch the 1/3 bottom of the screen to access the "Control" screen.
Direct Chapter / Track Selection
Touch Screen Direct Entry
To select a chapter/track directly, touch the button on screen control to display the direct entry menu.
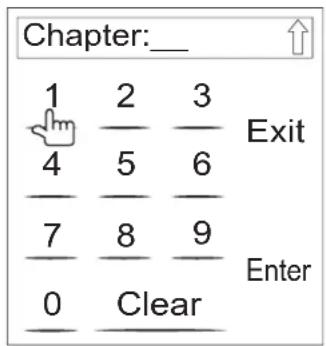
Enter the desired chapter/track using the on-screen number pad. Press the Enter button to tune to the selected station. To exit the screen without changing the station, touch Exit. To clear your entry and start over, touch Clear.
Viewing an Alternate Picture Angle (DVD Only)
Some DVDs contain scenes that have been shot simultaneously from different angles. For discs recorded with multiple angles, touch the 1/2 to the 2/2, touch the 🔒 to toggle available angles of the on-screen image.
Zooming (VCD and image Only)
Touch the + to enlarge and pan through the video image using the following options: "Q1", "Q2", "Q3" and "OFF".
Multi-Language Discs (DVD Only)
Changing Audio Language
If you are watching a disc recorded in multiple languages, press the AUDIO of the ☐2/2 to choose a language.
Changing Subtitle Language
If you are watching a disc recorded in multiple languages with subtitles, touch the SUBTITLE of the ☐2/2 to choose the language in which you would like the subtitles to appear.
NOTE: During VCD playback, press the AUDIO of the ☐2/2 on the screen to choose between Left Channel, Right Channel, and Stereo.
PBC - Play Back Control (VCD Only)
For VCDs with play back functionality, play back control (PBC) provides additional controls for VCD playback.
Touch the PBC on the ☐1/2 of the screen to toggle the PBC function "On"/"Off". Once PBC is on, playback starts from track one of the play list.
NOTE: When PBC is activated, fast forward, slow playback, and previous/next track are available. Repeat and direct track selection are not available.
When PBC is activated, selecting random, scan, or search playback automatically deactivates PBC.
Playback Information
During DVD and VCD playback, touch the DISP of the ☐2/2 to display playback information on the screen, including the media playing and current playback time.
DVD Playback Information
- DVD Video – Format of current disc.
- Time 00:01:30/00:36:10 – Indicates the playback time of the current track.
- Title 5/08 – Indicates the fifth of 8 titles on the DVD is currently playing.
- Chapter 2/16 – Indicates that the second of 16 titles on the DVD is currently playing.
VCD Playback Information
- VCD2.0 – Format of current disc.
- Time 00:01:30/00:36:10 – Indicates the playback time of the current track.
- PBC On/Off – Indocates whether Play Back Control is On or Off.
General Disc Information
Table 4: Disc Properties
| Symbol 1 | 2cm Disc Properties Max Play Time | |
 | Single side single layer (DVD-5) | (MPEG 2 Method) |
| Single side double layer (DVD-9) | 133 minutes | |
| Double side single layer (DVD-10) | 242 minutes | |
 | Double side double layer (DVD-18) | 266 minutes |
| 484 minutes | ||
 | Single side single layer (VCD) (MPEG 1 Method) | 74 minutes |
 | Single side single layer 74 minutes |
Table 5: Disc Symbols
| Symbol Meaning | |
| 8) | Number of voice languages recorded. The number inside the icon indicates the number languages on the disc (maximum of 8). |
 | Number of subtitle languages available on the disc (maximum of 32). |
 | Number of angles provided (maximum of 9). |
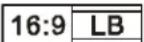 | Aspect ratios available. “LB” stands for Letter Box and “PS” stands for Pan/Scan. In the example on the left, the 16:9 video can be converted to Letter Box video. |
 | Indicates the region code where the disc can be played.• Region 1: USA, Canada, East Pacific Ocean Islands• Region 2: Japan, Western Europe, Northern Europe, Egypt, South Africa, Middle East• Region 3: Taiwan, Hong Kong, South Korea, Thailand, Indonesia, South-East Asia• Region 4: Australia, New Zealand, Middle and South America, South Pacific Ocean Islands/Oceania• Region 5: Russia, Mongolia, India, Middle Asia, Eastern Europe, North Korea, North Africa, North-West Asia• Region 6: Mainland China• ALL: All regions |
Instructions for TFT control and Insert/Eject are the same for DVD and CD operation. Please see the DVD/Disc Video Operation section for information about these topics.
The VM9224 will play music or other audio files from the following disc media:
• C D - D A
• C D - R / R W
- DVD
- DVD+R/RW
- DVD-R/RW
Upon inserting a disc with the TFT screen open, the disc and track title (if available), along with the track number and playing time appear on the screen.
CD Player User Interface
The on-screen indicators and touch key areas for CD playback are outlined below.
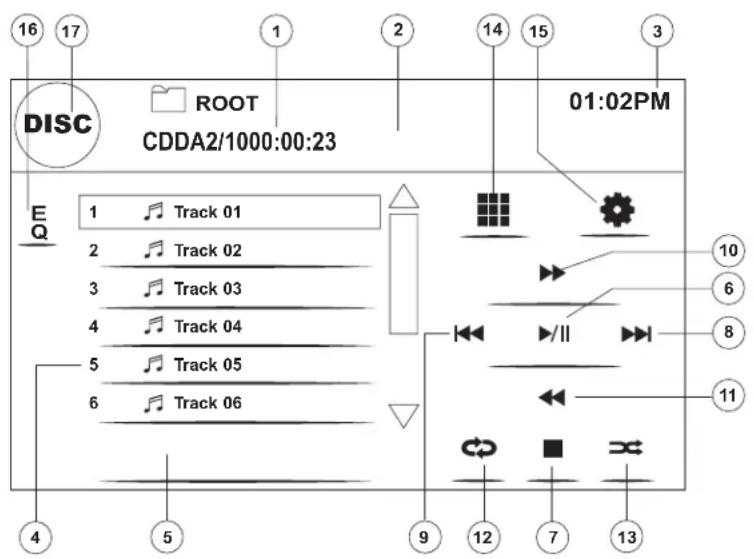
- Current track and total number of tracks on disc
- Elapsed playing time
- Current time
- Track titles
- Disc title
- /|▶ Touch to play/pause disc playback
- : Touch to stop disc playback
-
|: Touch to move to next track
- |<<: Touch to move to previous track
-
: Touch to fast forward current track
11.<<: Touch to rewind current track
12. Touch to activate/deactivate Repeat play mode
13. Touch to activate/deactivate Random mode
14. :■touch to access the direct entry screen
15. :●touch to view the SETUP menu
16. Touch for quick access to Equalizer level settings
17. Touch to view the SOURCE MENU and select a new playback source
Controlling Playback
Stopping Playback
Touch the ■button on screen to stop disc play.
To resume playback, touch the▶/|| button on screen.
Pausing Playback
Touch the ▶|| button on screen to suspend or resume disc play.
Moving Through Tracks
Touch the >>| button on screen to advance to the next track on the disc.
Touch the |<< button on screen to move to the previous track.
Repeat Playback
Touch the button on screen control to alter repeat mode according to the following:
• DVD: Repeat Chapter, Repeat Title, Repeat Off
• CDDA: Repeat Single, Repeat Folder, Repeat Off
• CD-R/RW: Repeat Single, Repeat Off
• DVD-R/RW: Repeat Single, Repeat Off
Track Scan Select (CD-DA discs only)
During disc play, touch the SCAN button on the screen to play the first 10 seconds of each track. When a desired track is reached, touch the SCAN button again to cancel the function and play the selected track.
Random Play Select
While disc play is stopped, touch the button on screen to play the tracks on the disc in a random, shuffled order.
Press the ≈ (RDM) button again to cancel Random Play mode.
NOTE: CD-R and CD-RW will not play unless the recording session is finalized.
Fast Forward
Touch the >> button on screen to fast forward.
Keep pressing and releasing the button to increase the rate from
"x2" to "x4", "x8", and "x20". Press the ≥slant || button to resume normal playback.
Direct Track Entry
To select a track directly, touch the button on screen control to display the direct entry menu.
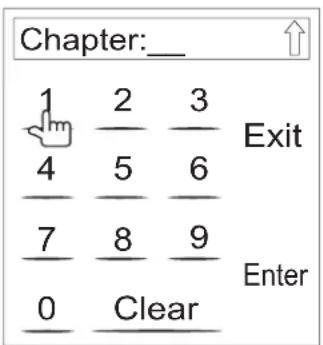
Enter the desired track using the on-screen number pad. Press the enter button (arrow) to tune to the selected station. To exit the screen without changing the station, touch Exit. To clear your entry and start over, touch Clear.
MP3/WMA OPERATION
Instructions for TFT control and Insert/Eject are the same for DVD and MP3 operation. Please see the DVD/Disc Video Operation section for information about these topics.
Media and File Requirements
This player allows you to play back MP3 and WMA files recorded onto CD-R/RWs, DVD+R/RWs, and DVD-R/RWs. For CD-RW discs, please make sure it is formatted using the full method and not the quick method to prevent illegal disc operation.
Up to 1500 songs/files can be burned onto a disc for a DVD music mix. Do not exceed this number of songs/files or disc readability problems may occur.
MP3 Format Compatibility
The file naming formats listed below are compatible with this unit:
- ISO 9660 – file name: 12 characters, file extension: 3 characters
- ISO 9660 – file name: 31 characters, file extension: 3 characters
- Joliet – 64 characters
If the file or folder name does not conform to ISO 9660 file system standards, it may not be displayed or played back correctly. Use the following settings when compressing audio data for your MP3 disc:
- Transfer Bit Rate: 128kbps
- Sampling Frequency: 48kHz
When recording MP3 up to the maximum disc capacity, disable additional writing. For recording on an empty disc up to maximum disc capacity, use the "Disc at once" setting.
MP3 Playing Order
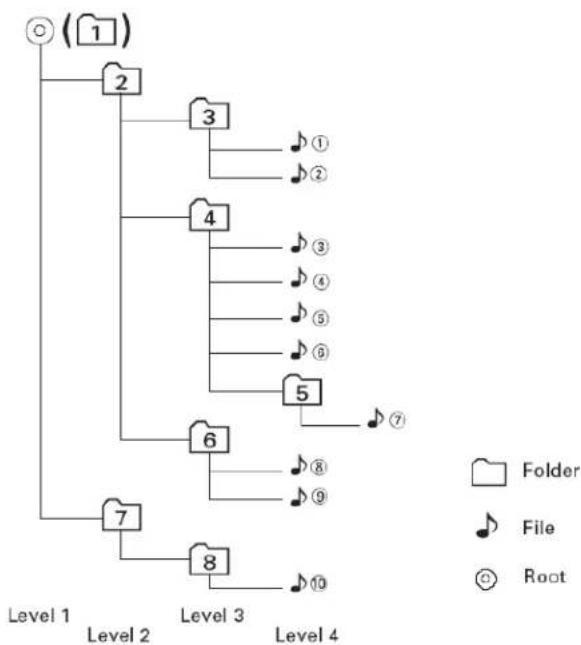
When selected for play, files and folders (Folder Search, File Search or Folder Select) are accessed in the order they were written by the CD writer. As a result, the order in which they are expected to be played may not match the order in which they are actually played. You may be able to set the order in which MP3/WMA files are to be played by writing them onto a medium such as a CD-R with their file names beginning with play sequence numbers such as "01" to "99".
For example, a medium with the following folder/file hierarchy is subject to Folder Search, File Search or Folder Select, as shown below.
flowchart
graph TD
    A["Level 1"] --> B["2"]
    B --> C["3"]
    C --> D["4"]
    D --> E["5"]
    E --> F["6"]
    F --> G["7"]
    G --> H["8"]
    H --> I["9"]
    style A fill:#f9f,stroke:#333
    style B fill:#ccf,stroke:#333
    style C fill:#cfc,stroke:#333
    style D fill:#fcc,stroke:#333
    style E fill:#cff,stroke:#333
    style F fill:#ffc,stroke:#333
    style G fill:#cfc,stroke:#333
    style H fill:#fcc,stroke:#333
    style I fill:#cfc,stroke:#333
The VM9224 player will only recognize three folder levels and does not display folders containing only other folders. In the example above, the unit will display folders 3, 4, 6, and 8, but not 2 and 7 since they do not contain any tracks directly. Folder 5 is not recognized at all since it is at the fourth level.
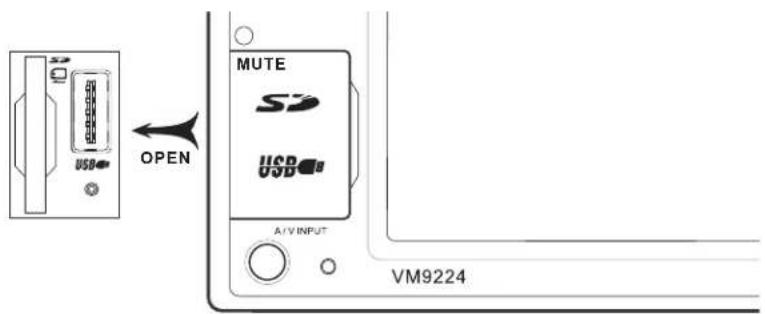
Inserting a USB Device or SD Card
NOTE: The USB port will recognize most USB flash memory devices and portable hard drives (hard drives must be formatted to FAT32, NTFS is not supported).
- Locate the USB/SD connector cover (8) on the front of the radio.
-
Lift the protective cover to reveal the connectors.
-
Insert the USB device or SD card into the appropriate connector. The unit will read the audio/video files automatically.
To remove the USB device or SD card, press the SRC button (4) to switch to another mode and then remove the device from the connector.
MP3 User Interface
The on-screen indicators and touch key areas for MP3 playback are outlined below.
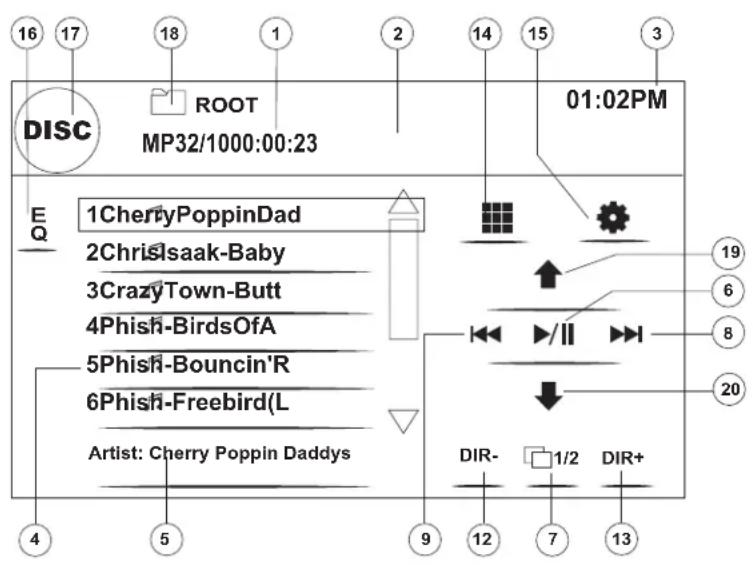
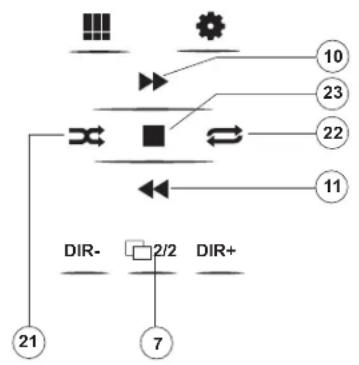
flowchart
graph TD
    A["Start"] --> B["Directional Arrow"]
    B --> C["Arrow to Right"]
    C --> D["Arrow to Left"]
    D --> E["Arrow to Right"]
    E --> F["Arrow to Left"]
    F --> G["Arrow to Right"]
    G --> H["Arrow to Left"]
    H --> I["Arrow to Right"]
    I --> J["Arrow to Left"]
    J --> K["Arrow to Right"]
    K --> L["Arrow to Left"]
    L --> M["Arrow to Right"]
    M --> N["Arrow to Left"]
    N --> O["Arrow to Right"]
    O --> P["Arrow to Left"]
    P --> Q["Arrow to Right"]
    Q --> R["Arrow to Left"]
    R --> S["Arrow to Right"]
    S --> T["Arrow to Left"]
    T --> U["Arrow to Right"]
    U --> V["Arrow to Left"]
    V --> W["Arrow to Right"]
    W --> X["Arrow to Left"]
    X --> Y["Arrow to Right"]
    Y --> Z["Arrow to Left"]
    Z --> AA["Arrow to Right"]
    AA --> AB["Arrow to Left"]
    AB --> AC["Arrow to Right"]
    AC --> AD["Arrow to Left"]
    AD --> AE["Arrow to Right"]
    AE --> AF["Arrow to Left"]
    AF --> AG["Arrow to Right"]
    AG --> AH["Arrow to Left"]
    AH --> AI["Arrow to Right"]
    AI --> AJ["Arrow to Left"]
    AJ --> AK["Arrow to Right"]
    AK --> AL["Arrow to Left"]
- Current track and total number of tracks on disc
- Elapsed playing time
- Current time
- Track titles
- ID3 information
- /||▶ Touch to play/pause disc playback
- 1/2, 2/2: Touch to move between page 1 and 2 of the on-screen controls
-
|: Touch to move to next track
-
|<<: Touch to move to previous track
-
: Touch to Fast Forward x2, x4, x8, x20
11.<<: Touch to Fast Backward x2, x4, x8, x20
-
DIR -: Touch to view the previous folder
-
DIR +: Touch to view the next folder
-
:touch to access the direct entry screen
-
🔊 touch to view the SETUP menu
-
Touch for quick access to Equalizer level settings
-
Touch to view the SOURCE MENU and select a new playback source
-
Folder name
-
Page Up
-
Page Down
-
Random On > Random Off
-
Repeat Single > Repeat Folder > Repeat Off
-
:Touch to stop disc playback
Controlling Playback
Playing MP3/WMA Files
After inserting a MP3/WMA disc, files will play in the sequence of the "Root" directory.
NOTE: When burning MP3 / WMA files onto a DVD disc, use the 2X or 4X burning option, if available. This slower burning speed will help eliminate buffer errors and increase disc reading reliability. Also, use folders when burning large numbers of songs / files to a disc for easy music navigation. Select the "Disc at Once" option and close your disc.
Stopping Playback
Touch the ■button on screen to stop disc play.
To resume playback, touch the▶/|| button on screen.
Pausing Playback
Touch the ▶/|| button on screen to suspend or resume disc play.
Moving Through Tracks
Touch the >>| button on screen to advance to the next track on the disc.
Touch the |<< button on screen to move to the previous track.
Repeat Playback
Press the ☐ on the screen to alter repeat mode according to the following: Repeat Single, Folder Repeat, Repeat Off.
NOTE: CD-R and CD-RW will not play unless the recording session is finalized.
Direct Track Entry
Touch the 📄 button (see "Direct Track Entry" on page 30).
iPod OPERATION
NOTE: Be sure your iPod has the latest Apple firmware installed to avoid connectivity issues.
Accessing iPod Mode
This unit is Made for iPod. You can control your iPod via touch screen to access Playlist, Artist, Album, Songs, etc. Supported models include, but are not limited to, the following:
- iPod Classic
- iPod Touch 2G / 3G
- iPod Nano 3G / 4G / 5G
- iPhone 3G / 3GS
The unit will automatically switch to iPod mode when an iPod or iPhone is plugged into the front or rear USB connector.
NOTE: For basic iPod connectivity, you can use the white 30-pin to USB iPod cable that came with your Apple device. For iPod video or photo playback, you must purchase the jLink-USB cable.
To return to the iPod menu from any other source menu, press the SRC button (4) on the front panel until the iPod menu appears on the screen.
The on-screen indicators and touch key areas for iPod playback are outlined below.
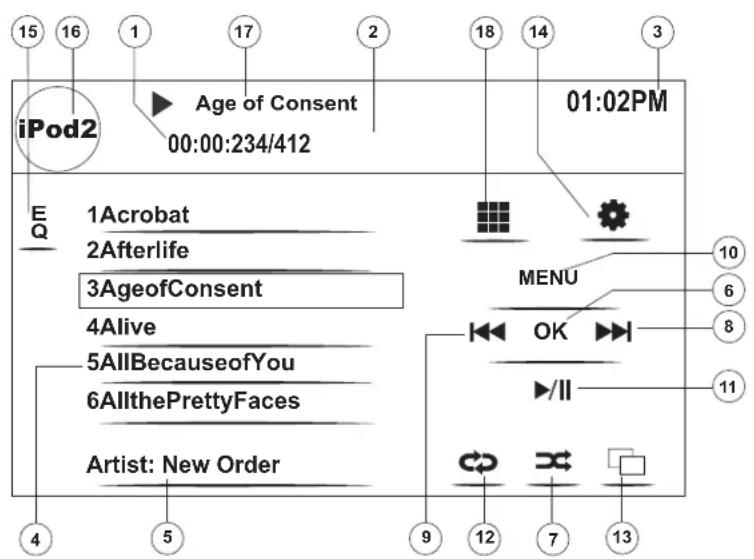
- Elapsed playing time for current file
-
File number and total number of files on the disc
-
Current time
- File titles
- ID3 information (Artist/Album)
- OK: Touch to "Enter"
- Touch to play all files in random order
-
|: Touch to move to next file
- |<<: Touch to move to previous file
- MENU: Touch to view the iPod main menu
- ▶Touch to play/pause disc playback
- Touch for Repeat File > Repeat Folder
- Touch to view the album art screen
- :●touch to view the SETUP menu
- Touch for quick access to Equalizer level settings
- View SOURCE MENU and select a new source
- Current file title
- :touch to access the direct entry screen
Controlling your iPod
Touch the MENU button to access the main iPod menu.
Use the touchscreen to navigate the iPod menus.
File Playback
To access files, touch the MENU button on screen until you return to the main iPod menu and then select "MUSIC," "VIDEO" or "PHOTO" indicated in the table above.
- Touch the > / || button on screen to play/pause.
- Touch >>| on screen to move to the next item on the menu.
- Touch |<< on screen to move to the previous item on the menu.
• Use the touch screen to select the highlighted menu option. - Touch the MENU button on screen, to return to the previous menu.
During music playback, the following screen is displayed:
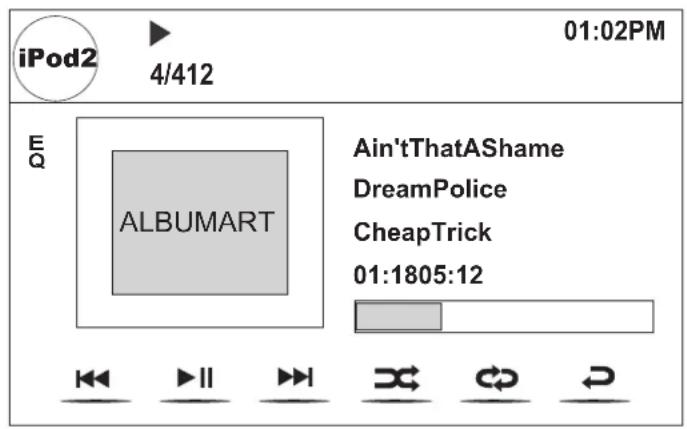
- To return to the iPod music menu from the album art screen, press .
- To return to the Video or Photo menu while viewing video or photo, touch the screen.
Fast Forward/Fast Reverse
Press and hold the |<< or >>| buttons on screen for 1 second and continue to hold for fast forward or fast reverse. Release to resume normal play.
Search Playlist/Artist/Album/Song
To search through Playlists, Artists, Albums and Songs, touch the MENU button on the screen while in one of the following directories:
Playlist, Artist, Album or Song. The selected directory will be accessed with the number of pages and files in that directory displayed at the top of the page. Touch the |<< or >>| button on the screen to select the desired song or file.
Direct Track Entry
To select a track directly, touch the button on screen control to display the direct entry menu.
Enter the desired track using the on-screen number pad. Press Enter to tune to the selected station. To exit the screen without changing the station, touch Exit. To clear your entry and start over, touch Clear.
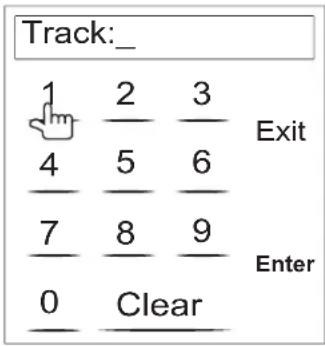
NOTE: To transmit the video from your iPod to the VM9224 screen, you must set the following options through the iPod video settings menu: TV Out = On, TV Signal = NTSC, and Widescreen = On.
NOTE: After disconnecting your iPod, the VM9224 will always return to the last mode accessed when the iPod is plugged back into the unit.
BLUETOOTH OPERATION
NOTE: Bluetooth operation requires optional BTM10 accessory.
About Bluetooth
Bluetooth is a short-range wireless radio connectivity technology that is developed as a cable replacement for mobile phones, handheld PCs and other devices. Bluetooth operates in 2.4 GHz frequency range and transmits voice and data at speeds up to 1 megabit per second. Bluetooth was launched by a special interest group (SIG) comprised of Ericsson Inc., Intel Corp., Nokia Corp., Toshiba and IBM in 1998, and it is currently developed by nearly 2,000 companies worldwide. The Bluetooth word mark and logos are owned by the Bluetooth SIG, Inc. and any use of such marks by Audiovox Corporation is under license. Other trademarks and trade names are those of their respective owners.
NOTE: The line-of-sight distance between this unit and your cellular phone must be 8 meters or less for sending and receiving voice and data via Bluetooth wireless technology. However, the transmission distance may become shorter than the estimated distance, depending on the environment in use.
Before attempting to use the Bluetooth functions on the VM9224, you must purchase and install the BTM10. When connected properly, the blue light appears illuminated. Bluetooth features are only available when the BTM10 is installed.
Please make sure your mobile phone supports Bluetooth functions (Headset or Handsfree profiles or both). Adhere to the following guidelines for successful operation.
- Before using Bluetooth functions, you must pair your mobile phone to the VM9224 head unit (see “Pairing the Bluetooth System with Your Mobile Phone and Head Unit”). To ensure the best reception for pairing and reconnection, please make sure the phone battery is fully charged before you begin.
- Try to perform pairing within a few minutes of the phone being turned on.
- Once the unit has been paired with the phone, the unit's model number, "VM9224", will be displayed on the mobile phone.
- To achieve the best performance, always keep the mobile phone within 3 meters of the head unit.
- Always keep a clear path between the mobile phone and the head unit. Never place a metal object or any other obstacle between the mobile phone and the head unit.
- Some mobile phones (like Sony Ericsson) may have a "Power Saving Mode" option. PLEASE DO NOT use the power saving mode with the VM9224.
- Before accepting or making a call, make sure your mobile phone's "Bluetooth function" is turned on.
- To ensure the best conversation quality/performance, stay within one meter of the BTM10 when talking.
- To "disconnect" the mobile phone from the head unit, turn the Bluetooth connectivity off on the mobile phone or touch the 📄 button.
- Phone Book direct searching through the head unit is only available if the mobile phone supports Phone Book Download. If the feature is not supported, the head unit will display “Phone book not provided by this phone” when an attempt is made to download a phone book.
Bluetooth User Interface
The on-screen indicators and touch key areas for Bluetooth operation are outlined below.
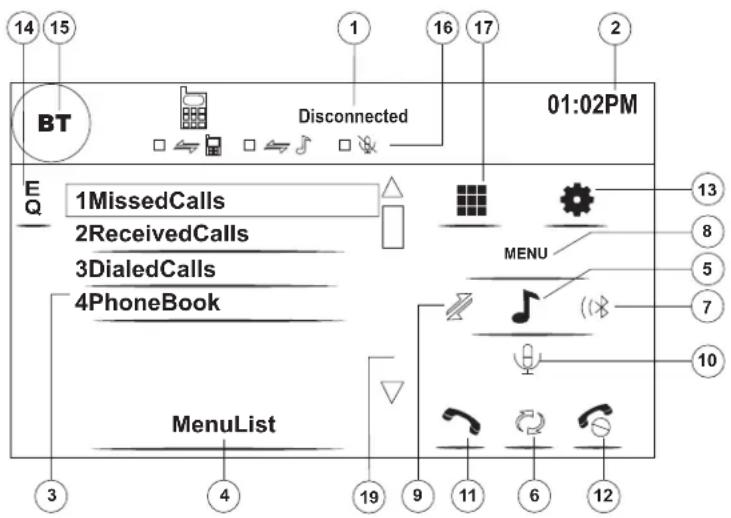
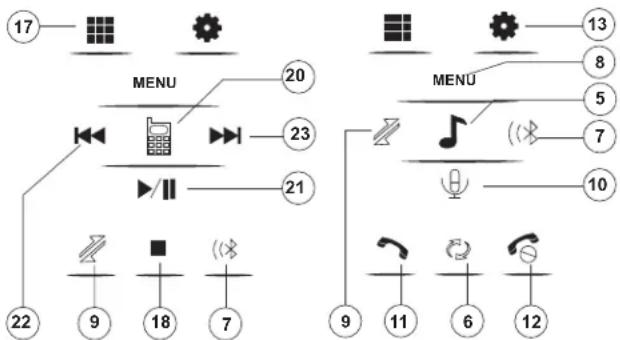
flowchart
graph TD
    A["17"] --> B["20"]
    B --> C["23"]
    C --> D["21"]
    D --> E["22"]
    E --> F["9"]
    F --> G["18"]
    G --> H["7"]

    I["13"] --> J["8"]
    J --> K["5"]
    K --> L["7"]
    L --> M["10"]
    M --> N["9"]
    N --> O["11"]
    O --> P["6"]
    P --> Q["12"]
PHONE INTERFACE
MUSIC INTERFACE
- Current connection status/device connected
- Current time
- Bluetooth menu
- Current operation status
- Toggle Music/Phone menu
- Transfer active call back to handset
- Pair your Bluetooth phone (first time use)
- Exit call listing display
- Connect/disconnect Bluetooth device (phone, PDA, personal music player, etc.) with hand-free function
- Mute/un-mute microphone during active call
- Answer incoming call/make call
- Reject incoming call/end call/quit pairing process/quit reading phone book or call listing
- .touch to view the SETUP menu
- Touch to view the equalizer
- Touch to view the SOURCE MENU and select a new playback source
- Status indicators (phone mode, music mode, mic mute)
- Touch to access the direct entry screen
- ■Touch to stop A2DP playback
- Touch the scroll bar and arrows to view the previous/ next page of choices (only visible when needed)
- Toggle Music/Phone menu/mode
-
/||: Play/Pause selected file
- |<<: Touch to move to the previous file
-
|: Touch to move to the next file
Hands Free Profile (HFP)
To use a phone wirelessly with this unit, it is necessary to first establish a connection using Bluetooth wireless technology. Connection is normally established using HFP (Hands Free Profile), which gives you full control of functions available on the telephone source. However, depending on your phone, the connection may be made using HSP (Head Set Profile), making some functions unavailable. This is a limitation of your phone, not the VM9224.
Since there are a number of Bluetooth mobile phone implementations available on the market, operations with your Bluetooth mobile phone using this unit vary greatly.
Please refer to the instruction manual that came with your Bluetooth mobile phone along with this manual while operating your phone with this unit.
Pairing the Bluetooth System with Your Mobile Phone and Head Unit
- Press the (○) button (7) to initiate the pairing process. Keep the mobile phone within 2 meters of the head unit when pairing. (To terminate the pairing process, press the (○) button again.)
- Select the Bluetooth setup option on the mobile phone to be paired (please refer to the phone's instruction manual to learn how to enter Bluetooth setup, turn Bluetooth on/off, and perform pairing).
NOTE: Some phones require a "pass key" or pairing code to connect. If your phone requires a pass key or pairing code, you will need to enter this number in the Pairing Code field under the Bluetooth SETUP menu. The default pairing code for many phones is "0000". The default code for the VM9224 is "1234". See "Bluetooth Sub-menu Features" on page 21 for instructions on entering the pairing code.
-
Select "VM9224" from the pairing list on the mobile phone.
-
If pairing is successful, the TFT will display the paired mobile phone model number or name (as specified in your phone's Bluetooth Setup menu).
- If pairing fails, "Phone Pairing Fail" is displayed at the bottom of the screen.
Reconnecting
Once the Bluetooth device has been paired, you can touch the connect 📋 button (9) to reconnect.
NOTE: You can only connect to a phone using the buttons on the on-screen Phone interface.
Each time the 📄 button is pressed, the head unit will automatically reconnect with the mobile phone once (only if the mobile phone was previously paired with the head unit).
Managing Incoming Calls
When connected to a Bluetooth phone, the unit will mute audio output, pause CD play, and change to the Bluetooth screen when a call is received. An incoming phone number will appear at the top of the screen.
Answering an Incoming Call
To answer the call, touch the button (11).
NOTE: The TALK button on the BTM10 can be used to answer calls or hang up.
For best reception, speak loudly and clearly.
To end the conversation, press the button (12). The screen will display the call duration for 3 seconds, and then return to the previous mode.
Rejecting an Incoming Call
Touch the button to reject an incoming call. The call will revert to your phone and can be answered directly or left for voice mail.
Volume Control
To increase or decrease the volume level, turn the rotary encoder (7) on the front panel.
Microphone Mute
To mute the microphone, touch the ⏻button (10). Touch again to resume microphone functionality.
Making an Outgoing Call
NOTE: Press the button from the main Bluetooth screen to automatically dial the last call received.
- Touch the button to open the direct dial screen.
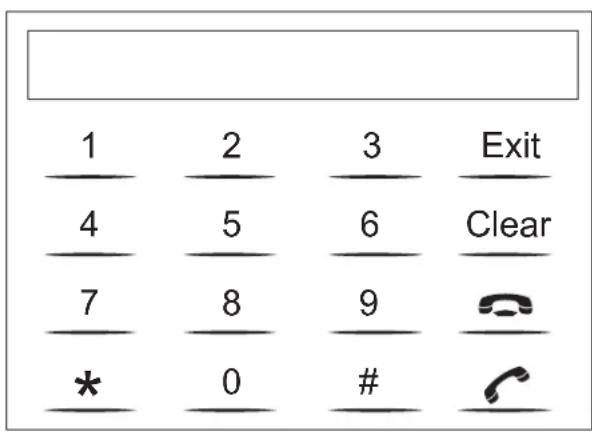
-
Use the 0-9, *, and # buttons to input the phone number.
-
Touch the CLEAR button to clear the last digit.
-
Touch the button to clear the entire number and start over.
-
After entering the phone number, press the button to dial the call. The direct dial screen will close once your call is connected.
To end the conversation, press the button.
Call Transfer
While talking, to transfer audio from the head unit back to the mobile phone, touch the 📄 button (6). The TFT will display “Transfer”. You can only transfer a call after it has been answered.
Menu List
The menu list appears on the left side of the screen and can be accessed from other modes by touching the MENU button on the right side of the screen.
NOTE: Not all phones allow access to missed, received or dialed calls and some will not allow uploading of your phone's address book.
Missed Calls
The Missed Calls list retrieves the list of Missed numbers from your phone. The last missed number is the first number on the list. Touch the Missed Calls menu option to view the list. To make a call from the Missed Calls list, touch the number and then touch the button. The TFT will display “Cannot get missed record” when the feature is not available.
Dialed Calls
The Dialed Calls list retrieves the list of dialed numbers from your phone. The last dialed number is the first number on the list. Touch the Dialed Calls menu option to view the list. To make a call from the Dialed Calls list, touch the number and then touch the button. The TFT will display “Cannot get dialed record” when the feature is not available.
Received Calls
Use the Received Calls list to view the last 10 received numbers stored on your phone. To access the Received list, touch the Received Calls menu option. The last received number is the first number on the list. To make a call from the Received Calls list, touch the number and then touch the button. The TFT will display “Cannot get received record” when the feature is not available.
Phone Book
- Touch the Phone Book menu option to display the phone book stored on your mobile phone, if compatible. The screen will display "Ready..." while the phone book is downloading.
- Once the download is completed, you can use the arrow buttons and scroll bar on the right side of the window to navigate the list. Since the unit downloads one page of entries at a time, there may be a slight delay while the next page of numbers is downloaded.
- Touch to highlight the number you want to dial and then touch the button.
NOTE: Some mobile phones do not support Phone Book upload through Bluetooth. This is a limitation of the phone, not the VM9224.
Bluetooth Setup
Auto Answer
You can choose to have the VM9224 automatically answer incoming calls to your paired Bluetooth phone. To turn "Auto answer" on:
- Touch the button to view the SETUP menu.
- Select the "Bluetooth" sub-menu.
- Touch the area to the right of "Auto answer" to select "Auto".
Auto Connect
The auto Connect option will allow the VM9224 to automatically connect to your previously paired Bluetooth when it is in range. When the Connect option is set to "Manual", you must press the 📋 button to re-establish a connection with your phone. To turn auto "Connect" on:
- Touch the button to view the SETUP menu.
- Select the "Bluetooth" sub-menu.
- Touch the area to the right of "Connect" to select "Auto".
Advanced Audio Distribution Profile (A2DP)
The VM9224 allows you to play back audio files from your phone, PDA or personal music player using a Bluetooth connection.
Before using an audio player, it may be necessary to enter a PIN code into the unit. Enter the PIN code referring to "Bluetooth Sub-menu Features" on page 21.
NOTE: Please quit A2DP mode before attempting to make a phone call, as unexpected results may occur depending on your mobile phone model.
The VM9224 can control a Bluetooth audio player via Advanced Audio Distribution Profile (A2DP).
Bluetooth audio players (or Bluetooth adapters) compatible with these profiles can be connected to this unit. Functionality varies depending on the profile used.
TROUBLESHOOTING
Table 6: Troubleshooting
| Problem | Cause | Corrective Action |
| GENERAL | ||
| Unit will not power on | Radio Fuse blown | Install new fuse with correct rating |
| Car battery fuse blown | Install new fuse with correct rating | |
| Illegal operation | Press the RESET button located in the bottom right corner of the front panel | |
| No/low audio output | Improper audio output connection | Check wiring and correct |
| Volume set too low | Increase volume level | |
| Improper "MUTE" connec-tion | Review wiring diagram and check "MUTE" connection | |
| Speakers damaged | Replace speakers | |
| Heavily biased volume balance | Adjust the channel balance to the cen-ter position | |
| Speaker wiring is in con-tact with metal part of car | Insulate all speaker wiring connections | |
| Poor sound quality or dis-tortion | Pirated disc is in use | Use original copy |
| Speaker power rating not compatible with unit | Connect proper speakers | |
| Speaker is shorted | Check speaker contact | |
| Unit resets itself when engine is off | Incorrect connection between ACC and posi-tive battery wire | Check wiring and correct |
| TFT MONITOR | ||
| No image | Incorrect connection to parking brake wire | Check wiring and correct |
| Parking brake is not engaged | Stop vehicle in safe place and apply parking brake | |
| Flashing image or inter-ference appears on screen | DVD is not compatible with current TV system settings | Change setup to accommodate disc |
| Improper video signal connections | Check wiring and correct | |
Table 6: Troubleshooting
| Problem Cause Corrective Action | ||
| Prolonged image or improper height/width ratio display | Improper aspect ratio setup | Use correct aspect ratio setting |
| TUNER | ||
| Weak station searching | Auto antenna is not fully extended | Connect the auto antenna control cable properly |
| Auto antenna not properly connected | Connect the auto antenna control cable properly | |
| LOCAL function is activated | Turn LOCAL function off | |
| Cannot insert disc | Disc already inside unit Eject current disc and insert new one | |
| Image blurred, distorted, or dark | Disc is illegally copied Use original disc | |
| Disc does not play back | Disc is warped or scratched | Use disc in good condition |
| Disc is dirty or wet Clean disc with soft cloth | ||
| Laser pickup is dirty Clean laser pickup with cleaning disc | ||
| Incompatible disc is used Use compatible disc | ||
| Disc rating exceeds Parental Lock rating limit | Change Parental Lock settings to lower restriction | |
| Disc region code is not compatible with unit | Use disc with proper region code | |
| Disc is inserted upside down | Insert disc with label side up | |
| PBC cannot be used during VCD playback | PCB is not available on the disc | |
| No repeat or searching while playing VCD | PCB is on Turn PCB off | |
| MP3 | ||
| Interruption occurred during playback | Disc is dirty or scratched Clean disc or replace | |
| File is damaged/bad recording | Recreate disc with good files | |
Error Messages
Table 7: Error Messages
| Message Displayed | Cause Corrective | Action |
| Loading Disc is being read | ||
| No Disc Disc is dirty Clean disc with soft cloth | ||
| Bad Disc Disc is dirty Clean disc with soft cloth | ||
| Unknown disc | Disc format is not compatible with this unit | |
| Region Error DVD is not compatible with region code of unit | ||
| Error Illegal mechanism operation Press EJECT key for 5 seconds to rese49t loading mechanism | ||
Care and Maintenance
-
Use only a clean silicone cloth and neutral detergent to clean the front panel or monitor. A rough cloth and non-neutral detergent (such as alcohol) may result in scratching or discoloration.
-
Do not get water or cleaning fluids on the unit.
-
If the temperature inside the player gets too hot, a protective circuit automatically stops play of the disc. If this occurs, allow the unit to cool before operating the player again.
-
Never insert anything other than a 5" (12 cm) compact disc into the player as the mechanism can be damaged by foreign objects.
-
Do not attempt to use a 3" (8 cm) CD-Single disc in this unit, either with or without an adaptor, as damage to the player and/or disc may occur. Such damage is not covered by the Warranty on this product.
-
The CD player may not operate properly in extreme hot or cold. If such conditions occur, allow the interior of the vehicle to reach a normal temperature before using player.
-
When the vehicle warms up during cold weather or under damp conditions, condensation may appear on the LCD panel. Should this occur, the screen will not operate properly until the moisture has evaporated.
-
We suggest you use a cleaning disc in this unit more frequently than in the unit in your home due to the environmental conditions of the vehicle.
SPECIFICATIONS
DVD/CD Player
Compatible Disc Media: DVD ± R / RW (Single and Dual Layer) and CD-R / RW
Compatible Media Formats: CD-DA, MP3, WMA, VCD, SVCD, Xvid, AVI, MPEG1 / 2
Signal to Noise Ratio: >95dBA
Dynamic Range: >95dB
Frequency Response: 20Hz to 20 kHz, -3dB
Channel Separation: > 60dB @ 1 kHz
D/A Converter: High performance 24-bit / 192 kHz sample rate, Multi-Bit
Sigma-Delta Modulator
Video
Format: NTSC, PAL (auto-detection)
Output: 1Vp-p (75-ohm)
Input: 1Vp-p (75-ohm)
FM Tuner
Tuning Range: 87.5MHz - 107.9MHz
Mono Sensitivity (-30dB): 9dBf
Quieting Sensitivity (-50dB): 15dBf
Alternate Channel Selectivity: 70dB
Signal to Noise Ratio @ 1 kHz: 58dB
Image Rejection: 80dB
Stereo Separation @ 1 kHz: >30dB
Frequency Response: 30Hz - 15 kHz, -3d
AM Tuner
Tuning Range: 530 kHz - 1720 kHz
Sensitivity (-20dB): 15uV
Signal to Noise Ratio @ 1 kHz: 50dB
Image Rejection: 60dB
Frequency Response: 50Hz - 2 kHz, -3dB
Monitor
Screen Size: 6.2" (Measured diagonally), 16:9 Widescreen
Screen Type: High Definition TFT Liquid Crystal Display (LCD)
Resolution: 1,152,000 sub pixels, 800x3 (W) X 480 (H)
General
Auxiliary Input impedance: 10k
Power Supply: 11 to 16VDC, negative ground
Power Antenna (Blue): 500mA max, current limited protection
Amplifier Remote (Blue/White): 500mA max, current limited protection
Operating Temperature: -20C \~ 65C
DIN chassis dimensions: 7" X 7" X 4" (178mm x 178mm x 50mm)
CEA Power Ratings

Power Output: 13 Watts RMS x 4 channels into 4-Ohms @ ≤ 1% THD+N
Signal to Noise Ratio: 70dBA below reference (Reference: 1 Watt, 4-Ohms)
Frequency Response: 20 Hz - 20 kHz, -3dB. (Aux Input used as reference input)
Reference Supply Voltage: 14.4VDC
*Specifications subject to change without notice.

Audiovox Electronics Corporation
Hauppauge, NY 11788
Technical Assistance: 1-800-323-4815
www.jensen.com
© 2010 Audiovox
Ver. 020510
Printed in China
VM9224
What's in the Box
VM9224 Head Unit Left and Right Double DIN Mounting Brackets Double DIN Half Sleeve Install Bracket Two Custom Cosmetic Trim Rings Parking Brake Wire Hardware Bag Speaker Output Harness Power Input Harness 2 x Accessory Harness Installation Guide
Tools and Supplies
You will need these tools and supplies to install your VM9224:
- Torx type, fl at-head and Philips screwdrivers
• Wire cutters and strippers - Tools to remove existing radio (screw driver, socket wrench set or other tools)
• Electrical tape - Crimping tool
- Volt meter/test light
- Crimp connections
• 18 gauge wire for power connections
• 16 – 18 gauge speaker wire
WARNING! Never install this unit where operation and viewing could interfere with safe driving conditions.
Optional Equipment
- NAV102: Allows you to access navigation features. All installation and operating instructions are included with the navigation module.
• BTM10: Allows you to connect to a Bluetooth enabled cell phone or other device. - Rear Camera
Disconnecting the Battery
To prevent a short circuit, be sure to turn off the ignition and remove the negative (-) battery cable prior to installation.
NOTE: If the VM9224 is to be installed in a car equipped with an on-board drive or navigation computer, do not disconnect the battery cable. If the cable is disconnected, the computer memory may be lost. Under these conditions, use extra caution during installation to avoid causing a short circuit.
Replacing the Fuse
When replacing the fuse, use a new 20A replacement fuse. Using a fuse with an improper rating could damage the unit and cause a fire.
ISO-DIN Installation
This unit is designed to fit into a 2.0 DIN dashboard opening, found in many imported cars. The unit has threaded holes in the chassis side panels which may be used with the original factory mounting brackets of some Toyota, Nissan, Mitsubishi, Isuzu, Hyundai and Honda vehicles to mount the radio to the dashboard. Please consult with your local car stereo specialty shop for assistance on this type of installation.
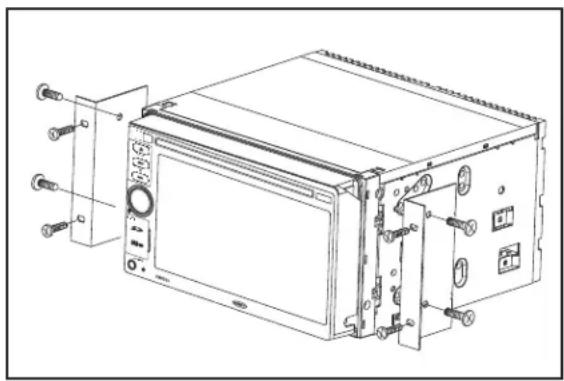
1 Remove the existing factory radio from the dashboard or center console mounting. Save all hardware and brackets as they will be used to mount the new radio.
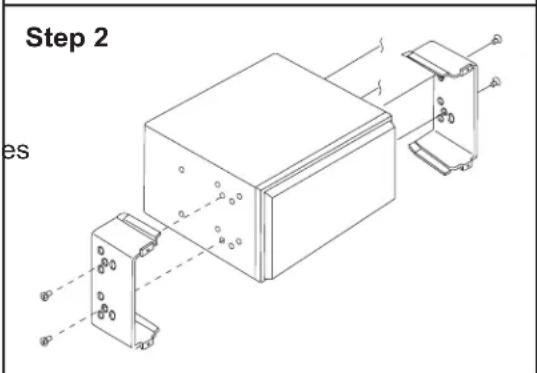
2 Remove the factory mounting brackets and hardware from the existing radio and attach them to the new radio.
CAUTION: Do not exceed M5 X 6MM screw size. Longer screws may damage components inside the chassis.
3 Place the radio in front of the dashboard opening so the wiring can be brought through the mounting sleeve. Follow the wiring diagram carefully and make certain all connections are secure and insulated with wire nuts or electrical tape. After completing the wiring connections, plug the
ISO connectors into the mating sockets on the rear of the
chassis. Turn the unit on to confirm operation (vehicle ignition switch must be "on"). If the unit does not operate, re-check all wiring until the problem is corrected.
4 Mount the new radio assembly to the dashboard or center console using the reverse procedure in step 1.
natural_image
Technical line drawing of an electronic device with mounting hardware and internal components (no text or symbols)CAUTION! Be careful not to damage the car wiring.
NOTE: It is the end-users responsibility to install and operate this unit in a manner in accordance with local, state and federal laws. The PARKING BRAKE wire MUST BE CONNECTED as directed in the manual.
CAUTION: Do not block the cooling fan exit. If blocked, the unit may overheat and become damaged.
Installation Using Half-Sleeve
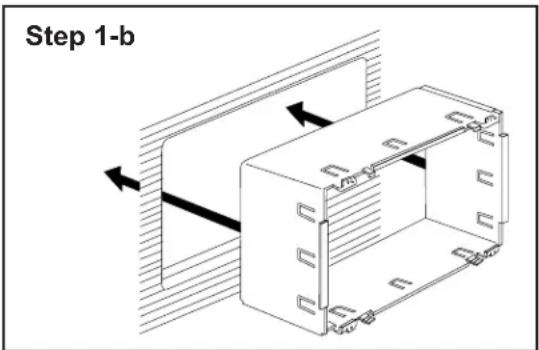
1 Install half-sleeve in the dashboard.
a. Install adapter if necessary (optional).
b. Install half-sleeve into adapter or dashboard (use only the supplied screws). Do not force the sleeve into the opening or cause it to bend or bow.
WARNING! Only connect the unit to a 12-volt power supply with proper grounding.
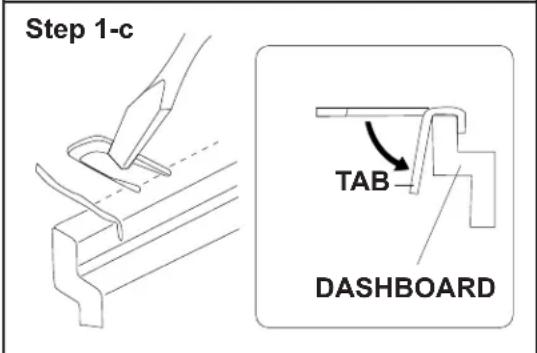
c. Locate the series of bend-tabs along the top, bottom and sides of the mounting sleeve. With the sleeve fully inserted into the dashboard opening, bend as many of the tabs outward as necessary so that the sleeve is firmly secured to the dashboard.
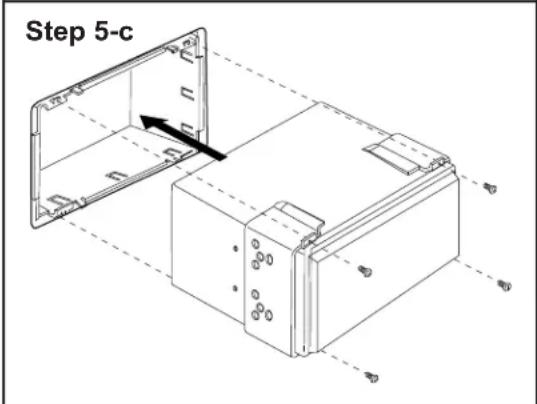
2 Use the M5 x 6 screws (provided) to install the mounting brackets to each side of the radio using the holes indicated in the diagram. DO NOT USE OTHER SCREWS.
3 Place the radio in front of the dashboard opening so the wiring can be brought through the mounting sleeve.
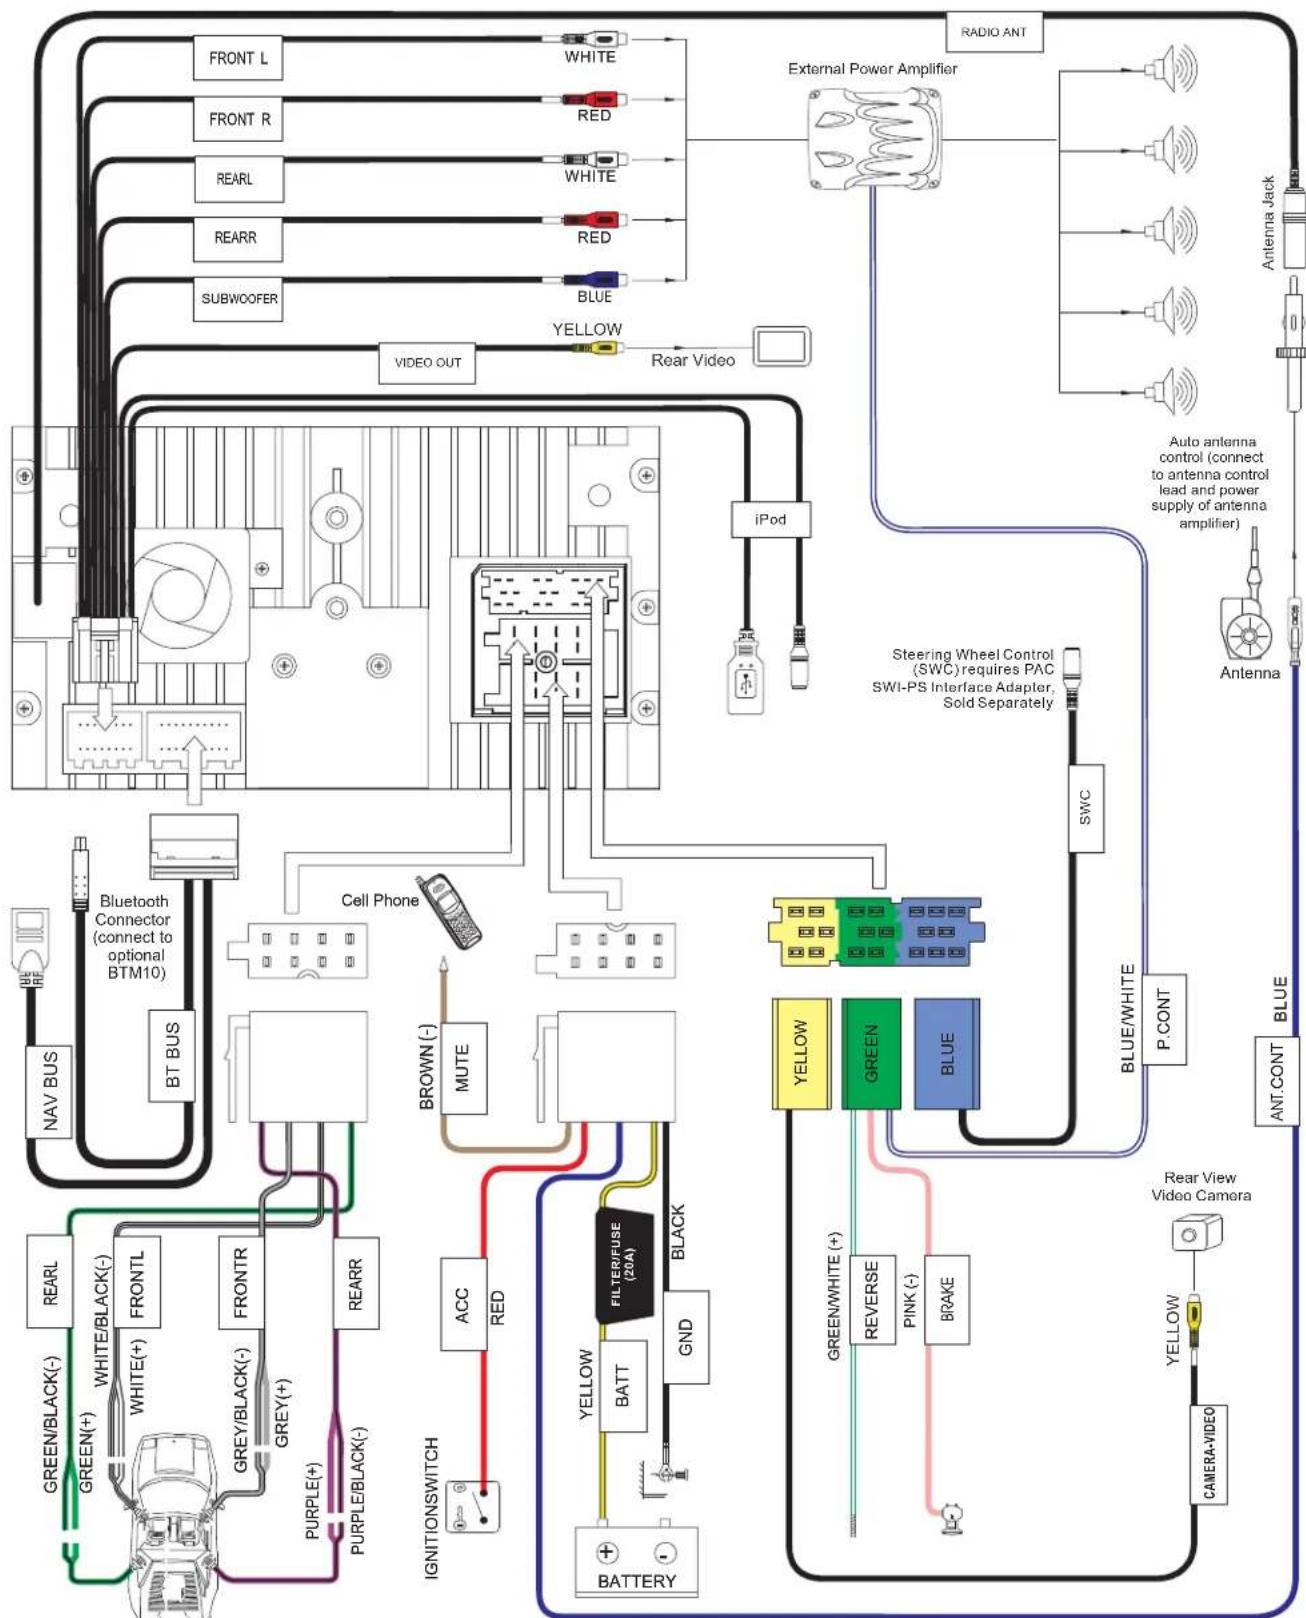
4 Complete wiring as illustrated in the wiring diagram. Once the wiring is complete, reconnect the battery negative terminal. If there is no ACC available, connect the ACC lead to the power supply with a switch.
CAUTION! Be careful not to damage the car wiring.
5 After completing the wiring connections, turn the unit on to confirm operation (ignition switch must be on). If unit does not operate, recheck all wiring until problem is corrected. Once proper operation is achieved, turn off the ignition switch and proceed with final mounting of the chassis.
a. Connect wiring adapter to existing wiring harness.
b. Connect antenna lead.
c. Carefully slide the radio into the half-sleeve, making sure it is right-side-up. Use the supplied screws to attach the radio to the half sleeve.
Using the Cosmetic Trim Ring
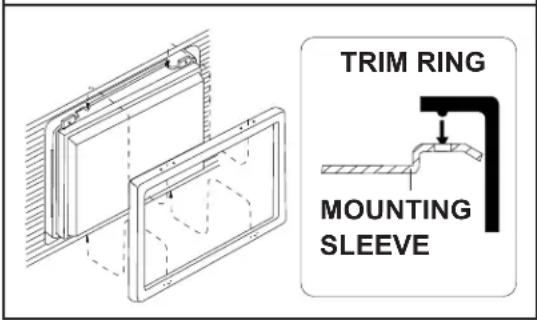
Two cosmetic trim rings are packaged with the head unit for installation fl exibility. This unit will fi t into most import dashes with little or no modifi cation to the dash board/cavity. Some US domestic vehicle dashes will accept a Double-DIN chassis, but there is usually a small gap between the radio and dash piece after installation is complete. In this case, use the appropriate trim ring to conceal any gaps that may be present.
NOTE: For proper operation of the CD/DVD player, the chassis must be mounted within 30^ of horizontal. Make sure the unit is mounted within this limitation.
Wiring Diagram
IMPORTANT: Incorrect wiring connections can damage the unit. Follow the wiring instructions carefully, or have the installation handled by an experienced technician.
Need Help? For technical assistance, call the Jensen customer support line at 1-800-323-4815.
flowchart
graph TD
    A["FRONT L"] --> B["WHITE"]
    C["FRONT R"] --> D["RED"]
    E["REARL"] --> F["WHITE"]
    G["REARR"] --> H["RED"]
    I["SUBWOOFER"] --> J["BLUE"]
    K["VIDEO OUT"] --> L["YELLOW"]
    M["External Power Amplifier"] --> N["RF"]
    O["iPod"] --> P["RF"]
    Q["SWC"] --> R["P.CONT"]
    S["ANT. CONT"] --> T["Blue"]
    U["Rear View Video Camera"] --> V["Yellow"]
    W["CAMERA-VIDEO"] --> X["BRAKE"]
    Y["Battery"] --> Z["GND"]
    AA["FILTER/FUSE (20A)"] --> AB["BATT"]
    AC["IGNITIONSWITCH"] --> AD["PURPLE/BLACK(-)"]
    AE["REARR"] --> AF["GREY/BLACK(-)"]
    AG["WHITE/BLACK(-)"] --> AH["FRONTL"]
    AI["NAV BUS"] --> AJ["BT BUS"]
    AK["BMW (-)"] --> AL["MUTE"]
    AM["ACCC RED"] --> AN["Black"]
    AO["CELL PHONE"] --> AP["BATTS"]
    AQ["Steering Wheel Control (SWC) requires PAC SWI-PS Interface Adapter, Sold Separately"] --> AR["PAC"]
    AS["Auto antenna control (connect to antenna control lead and power supply of antenna amplifier)"] --> AT["Antenna Jack"]
    AU["RADIO ANT"] --> AV["Speaker"]
InstallerNet
"Leave the Installation to us"
PROFESSIONAL INSTALLATION OR DIY INSTALLATION INSTRUCTIONS

Do-it-Yourself with our easy instructions
If
▶ Online Scheduling
Customer Service
Certified Installers
The Right Tools

Need Professional Installation?

InstallCard
installation to go
Choose DIY or Professional Installation
Professional Installation

56-2000
PROFESSIONAL INSTALLATION® OR DIY SERVICES
\*separate purchase required
Online Scheduling
Customer Service



Certified Installers

The Right Tools

Including In-Car Product Demonstration
DO-IT-YOURSELF INSTALLATION SUPPORT

Download Instructions Day or Night 24-7

Easy-to-follow instructions just a click away

Professional Installation services available if needed*
*SEPARATE PURCHASE REQUIRED
THE PROFESSIONAL INSTALLATION ADVANTAGE

Friendly Customer Service available 24-7

Certified Installers

Lifetime Warranty on your Installation

Convenient Online Scheduling
INCLUDES BASIC INSTALLATION IN MOST VEHICLES
Visit www.Jensen.InstallCard.com for more information

Questions or Comments
e-mail: service@InstallerNet.com
InstallerNet
(800) 950-9869
NOT VALID FOR RETURN IF INSTALLCARD IS DETACHED
How to Activate your InstallCard and Choose DIY or Schedule Installation
Visit www.Jensen.InstallCard.com
② Choose DIY or Schedule Installation
③ Enter the InstallCard Number below
4 Download your instructions or Schedule your installation
InstallCard No:
managed by Installer Net
(800) 950-9869
After activating this InstallCard, you may use it to install your mobile electronics product at any of our authorized InstallerNet member locations nationwide. Some vehicles will require additional parts or labor which may be purchased separately at time of installation. Lifetime warranty on installation for as long as you own the vehicle. This InstallCard is valid up to one year from date of purchase where permitted by law. Visit www.InstallCard.com for more information. NOT VALID UNTIL PURCHASED.
emusic.


35 FREE SONGS
+1 FREE AUDIOBOOK
- Choose from over 6 million songs and 6,000+ audiobooks
- DRM-free MP3 tracks play on your computer or any MP3 player
• Free 14-day trial – Cancel anytime, keep your downloads
REDEEM YOUR FREE MP3s HERE:

www.emusic.com/jensen35

natural_image
Woman wearing a red top and black headphones, smiling while holding her ear (no text or symbols visible)Get up to 35 music downloads and 1 audiobook download free with 14-day eMusic trial subscriptions. Offers available to first time eMusic customers only, located in the USA. Separate subscriptions required. Audiobook offer valid for one audiobook credit: some titles require multiple credits for download. Certain songs will not be available during your free trial. Internet access, registration and credit or debit card required. Limited time offers. You will automatically become a paying member unless you cancel your subscriptions before the end of your free trials or before you exceed your free trial downloads. Offers and eMusic's prices are subject to change without notice and are subject to eMusic's terms of use. eMusic and the eMusic logo are either trademarks or registered trademarks of eMusic.com Inc. in the U.S.A. and other countries. All rights reserved. eMusic is not responsible for products, services or claims made by Jensen or Audiovox Corporation.
35 CHANSONS GRATUITES + 1 LIVRE AUDIO GRATUIT
www.emusic.com/jensen35
35 CANCIONES GRATUITAS + 1 AUDIOLIBRO SIN CARGO
www.emusic.com/jensen35
NE RENVOYEZ PAS CE PRODUIT AU MAGASIN
DO NOT RETURN THIS PRODUCT TO THE STORE
Audiovox Electronics Corporation ("the Company") is committed to quality and customer service, and are pleased to offer you this Warranty. Please read it thoroughly and contact the Company at 1-800-323-4815 with any questions.
Who is covered?
The Company extends this warranty to the original retail purchaser of products purchased through an authorized Audiovox retailer in the U.S.A., Puerto Rico or Canada. This warranty is not transferable or assignable. Proof of purchase is required in the form of an original sales receipt.
What is covered?
The Company warrants that should this product or any part thereof, under normal use, be proven defective in material or workmanship within 12 months from the date of original purchase, such defect(s) will be repaired or replaced with a new or reconditioned product (at the Company's option) without charge for parts and repair labor.
What is not covered?
This Warranty does not cover the following:
- Damage incurred during shipping or transporting the product to the Company or a service center
• Elimination of car static or motor noise
• Defects in cosmetic, decorative or non-operative structural parts
• Correction of antenna problems
• Costs incurred for installation, removal or reinstallation of the product
- Consequential damage to compact discs, USB devices, digital media cards, accessories or vehicle electrical systems
- Damage caused by improper installation, mishandling, misuse, neglect, accident, blown fuse, battery leakage, theft or improper storage
- Products whose factory serial number/bar code label(s) or markings have been removed or defaced
- Damage resulting from moisture, humidity, excessive temperature, extreme environmental conditions or external natural causes
Please review the "Care and Maintenance" section of your Installation and Operation Manual for additional information regarding the proper use of your product.
Limitations
THE EXTENT OF THE COMPANY'S LIABILITY UNDER THIS WARRANTY IS LIMITED TO THE REPAIR OR REPLACEMENT PROVIDED ABOVE AND, IN NO EVENT, SHALL THE COMPANY'S LIABILITY EXCEED THE PURCHASE PRICE PAID BY PURCHASER FOR THE PRODUCT.
This Warranty is in lieu of all other express warranties or liabilities. ANY IMPLIED WARRANTIES, INCLUDING ANY IMPLIED WARRANTY OF MERCHANTABILITY, SHALL BE LIMITED TO THE DURATION OF THIS WRITTEN WARRANTY. ANY ACTION FOR BREACH OF ANY WARRANTY HEREUNDER INCLUDING ANY IMPLIED WARRANTY OF MERCHANTABILITY MUST BE BROUGHT WITHIN A PERIOD OF 24 MONTHS FROM DATE OF ORIGINAL PURCHASE. IN NO CASE SHALL THE COMPANY BE LIABLE FOR ANY CONSEQUENTIAL OR INCIDENTAL DAMAGES FOR BREACH OF THIS OR ANY OTHER WARRANTY, EXPRESS OR IMPLIED, WHATSOEVER. No person or representative is authorized to assume for the Company any liability other than expressed herein in connection with the sale of this product.
Some states do not allow limitations on how long an implied warranty lasts or the exclusion or limitation of incidental or consequential damage so the above limitations or exclusions may not apply to you. This Warranty gives you specific legal rights and you may also have other rights which vary from state to state.
Obtaining Warranty Service
- To obtain repair or replacement within the terms of this Warranty, call 1-800-323-4815 for the location of a warranty station serving your area.
- You must prepay the initial shipping charges to the Company. The Company will pay the return shipping charges for all warranted products returned to an address within the U.S.A., Puerto Rico or Canada.
- Please package the product securely to avoid shipping damage. We recommend using a carrier that provides tracking service to prevent lost packages. Lost or damaged packages are not covered by this warranty.
- Provide a detailed description of the problem(s) for which you require service.
- CONTENTS
- FEATURES
- DVD
- CD / MP3 / WMA
- AM-FM
- iPod
- Chassis
- General
- Optional Equipment
- • NAV102
- • BTM10
- - Bluetooth Phone
- - Rear Camera
- CONTROLS AND INDICATORS
- Image/Display Settings
- Video Output Modes
- Picture Adjustment
- Parking Brake Inhibit
- OPERATING INSTRUCTIONS
- Power On / Off
- Audible Beep Confirmation
- Mute/Line Mute
- Playing Source Selection
- Source Menu
- External Devices
- Volume Adjustment
- Volume Increase/Decrease
- Programmable Turn-On Volume
- Audio Control Menu
- System Reset
- Steering Wheel Control (SWC)
- SWC Functions
- Select Operation
- SETUP MENU
- Accessing Menu Items
- Adjusting a Feature
- Language Sub-menu Features
- Audio Sub-menu Features
- RDS Sub-menu Features
- Rating Sub-menu Features
- TS Cal (Screen Calibration)
- Demo Sub-Menu Features
- Exiting the System Setup Menu
- TUNER OPERATION
- Tuner TFT Display
- Switching to Radio Tuner Source
- Selecting FM/AM Band
- Seek Tuning
- Manual Tuning
- Direct Tuning
- Using Preset Stations
- Storing a Station
- Recalling a Station
- Auto Store/Preview Scan (AS/PS)
- Auto Store (AS)
- Preview Scan (PS)
- Local Radio Station Seeking (LOC)
- Inserting a Disc
- Ejecting a Disc
- Resetting the Loading Mechanism
- Accessing DVD Mode
- Controlling Playback
- Stopping Playback
- Pausing Playback
- Slow Motion Playback
- Fast Forward Playback
- Repeat Playback
- Sectional Repeat Function (A-B)
- Accessing the DVD Menu
- Moving Through Chapters
- Goto Search
- Direct Chapter / Track Selection
- Touch Screen Direct Entry
- Viewing an Alternate Picture Angle (DVD Only)
- Zooming (VCD and image Only)
- Multi-Language Discs (DVD Only)
- Changing Audio Language
- Changing Subtitle Language
- PBC - Play Back Control (VCD Only)
- Playback Information
- DVD Playback Information
- VCD Playback Information
- General Disc Information
- CD Player User Interface
- Moving Through Tracks
- Track Scan Select (CD-DA discs only)
- Random Play Select
- Fast Forward
- Direct Track Entry
- MP3/WMA OPERATION
- Media and File Requirements
- MP3 Format Compatibility
- MP3 Playing Order
- Inserting a USB Device or SD Card
- MP3 User Interface
- Playing MP3/WMA Files
- iPod OPERATION
- Accessing iPod Mode
- Controlling your iPod
- Fast Forward/Fast Reverse
- Search Playlist/Artist/Album/Song
- BLUETOOTH OPERATION
- About Bluetooth
- Bluetooth User Interface
- Hands Free Profile (HFP)
- Pairing the Bluetooth System with Your Mobile Phone and Head Unit
- Reconnecting
- Managing Incoming Calls
- Answering an Incoming Call
- NOTE: The TALK button on the BTM10 can be used to answer calls or hang up.
- Rejecting an Incoming Call
- Volume Control
- Microphone Mute
- Making an Outgoing Call
- Call Transfer
- Menu List
- Missed Calls
- Dialed Calls
- Received Calls
- Phone Book
- Bluetooth Setup
- Auto Answer
- Auto Connect
- Advanced Audio Distribution Profile (A2DP)
- TROUBLESHOOTING
- Error Messages
- Care and Maintenance
- SPECIFICATIONS
- DVD/CD Player
- Video
- FM Tuner
- AM Tuner
- Monitor
- CEA Power Ratings
- VM9224
- What's in the Box
- Tools and Supplies
- Disconnecting the Battery
- Replacing the Fuse
- ISO-DIN Installation
- Installation Using Half-Sleeve
- Install half-sleeve in the dashboard.
- Use the M5 x 6 screws (provided) to install the mounting brackets to each side of the radio using the holes indicated in the diagram. DO NOT USE OTHER SCREWS.
- Place the radio in front of the dashboard opening so the wiring can be brought through the mounting sleeve.
- Complete wiring as illustrated in the wiring diagram. Once the wiring is complete, reconnect the battery negative terminal. If there is no ACC available, connect the ACC lead to the power supply with a switch.
- After completing the wiring connections, turn the unit on to confirm operation (ignition switch must be on). If unit does not operate, recheck all wiring until problem is corrected. Once proper operation is achieved, turn off the ignition switch and proceed with final mounting of the chassis.
- Using the Cosmetic Trim Ring
- Wiring Diagram
- InstallerNet
- PROFESSIONAL INSTALLATION OR DIY INSTALLATION INSTRUCTIONS
- InstallCard
- PROFESSIONAL INSTALLATION® OR DIY SERVICES
- \*separate purchase required
- DO-IT-YOURSELF INSTALLATION SUPPORT
- THE PROFESSIONAL INSTALLATION ADVANTAGE
- How to Activate your InstallCard and Choose DIY or Schedule Installation
- FREE SONGS
- CHANSONS GRATUITES + 1 LIVRE AUDIO GRATUIT
- CANCIONES GRATUITAS + 1 AUDIOLIBRO SIN CARGO
- NE RENVOYEZ PAS CE PRODUIT AU MAGASIN
- DO NOT RETURN THIS PRODUCT TO THE STORE
- Who is covered?
- What is covered?
- What is not covered?
- Limitations
- Obtaining Warranty Service
Brand : JENSEN
Model : VM9224R
Category : Car radio