
DC-1041 - Camera LENCO - Free user manual and instructions
Find the device manual for free DC-1041 LENCO in PDF.


| Product type | Digital still camera and video camcorder |
| Brand | Lenco |
| Model | DC-1041 |
| Sensor resolution | 8.0 megapixels CMOS |
| Image resolution (max) | 16.0 megapixels interpolated (4608x3456) |
| Lens | F:2.8, focal length 4.8mm |
| Focus range | 0.5m to infinity (normal), 11-18cm (macro) |
| Digital zoom | 4x |
| Display | 2.7" + 1.8" TFT color LCD |
| Flash | Built-in (auto/force/off), range up to 1.5m |
| Storage | MicroSD card (up to 32GB, not included) |
| Power source | 2 x AAA alkaline batteries |
| Dimensions (approx) | 100 x 60 x 30 mm |
| Weight (approx) | 100 g (without batteries) |
| Video mode | VGA (640x480) and QVGA (320x240) at 30fps |
| File formats | JPEG (photo), AVI (video) |
| Self-timer | 10-second delay |
| PC interface | USB 2.0 |
| Water resistance | Water-resistant with proper sealing; rinse after use |
| Cleaning and maintenance | Rinse with clean water after use, keep dry; clean lens with soft dry cloth |
| Safety notes | Do not open battery door underwater; ensure door is closed properly |
| Spare parts and reparability | No official spare parts listed; repairs by authorized service only |
| General information | Lenco DC-1041, suitable for non-professional use, warranty void if opened by non-official service |
Frequently Asked Questions - DC-1041 LENCO
User questions about DC-1041 LENCO
0 question about this device. Answer the ones you know or ask your own.
Ask a new question about this device
Download the instructions for your Camera in PDF format for free! Find your manual DC-1041 - LENCO and take your electronic device back in hand. On this page are published all the documents necessary for the use of your device. DC-1041 by LENCO.
USER MANUAL DC-1041 LENCO
- Don't open the battery door under water.
- Close the battery door properly for best water sealing.
- Rinse the camera with clean water after used and keep it dry for storage.
1. Getting to know your camera
8.0 Mega pixels resolution sensor
Digital still camera
Digital video camcorder
Built-in flash light
4x digital zoom
2.7+1.8 " TFT color display
MicroSD card support
2 x AAA alkaline batteries
2. Functional parts
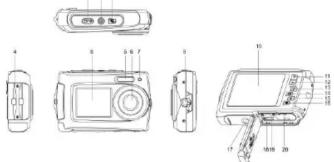
| 1 | Shutter | Press this button to take photographs or to start /stop recording a video clip, or to confirm changes in menu mode |
| 2 | Power on/off button | Press this button to switch on and press it for at least 2 seconds to shut off, or press it to display or hide the status icon on LCD. |
| 3 | LCD switch button | Press this button to switch LCD between the small monitor and the big monitor. |
| 4 | Strap hook | Hook for attaching the wrist strap to the camera. |
| 5 | Flash light | Use the built-in flash to give the subject extra lighting if it is in dark surroundings (the best flash distance is recommended within 1.5m). |
| 6 | Lens | Records the image to be taken.Note: Keep the lens clean. Dirt and fingerprints will affect the quality of the picture. |
| 7 | Busy indicator | When the indicator is blinking, the camera is busy. |
| 8 | Small monitor | Use the small monitor to take photos of yourself |
| 9 | Macro/normal switch | Macro mode: Select this mode to take close-up photographs (distance 11cm - 18cm).Normal mode: Select this mode to take photographs from 0.5m - infinity. |
| 10 | LCD screen | Display photographs, video clips, camera setting and menu. |
| 11 | Up/Tele | In Preview mode: press this button to Tele (zoom in);In Menu mode: press this button to up the selection bar.In Playback mode ( photo ) : press this button to zoom in.In playback (Video playing) mode: press it to start/pause the video. |
| 12 | Down/Wide | In Preview mode: press this button to Wide (zoom out);In Menu mode: press this button to down the selection bar.In Playback mode ( photo ) : press this button to zoom out.In Playback mode: press this button to get into the thumbnail mode |
| 13 | Left / Flash light | In Menu mode: press this button for the left selection;In Playback mode: press this button to the previous one;In Photo infinite Preview mode:press this button to switch Flash modes; (the flash light cannot be used in macro mode )In Photo (zoom in) Playback mode: press it to move to the left area of the photo.In playback (Video playing) mode: press it to fast rewind. |
| 14 | Right / Playback | Press this button to get into Playback mode;In Playback mode: press this button to the next one;In Menu mode: press this button for the right selection;In Photo (zoom in) Playback mode: press it to move to the right area of the photo.In playback (Video playing) mode: press it to fast forward. |
| 15 | Mode Switch | Press this button to switch between movie and still capture mode;In Playback mode: press this button to exit.In Photo (zoom in) Playback mode: press it to move to the up area of the photo. In playback (Video playing) mode: press it to stop the video. |
| 16 | Menu / Delete | In Preview mode: press it to enter the settings Menus.In Playback mode:Press it for a short time to enter “Delete single/ all files” mode;Press it for a long time to enter file compiling and system setting menu. In Photo (zoom in) Playback mode: press it to move to the down area of the photo. |
| 17 | Tripod connector | To fix the camera on the tripod. |
| 18 | USB interface | Via this connection, you can download photographs and video clips to a computer. |
| 19 | MicroSD card slot | MicroSD card storage location. |
| 20 | Battery compartment | Compartment for 2 x AAA alkaline batteries |
3. Explanation of the status icons
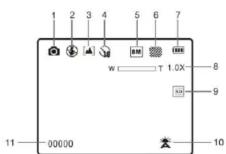
| Item | Function | Description |
| 1 | Mode selected | |
| 2 | Flash indicator | |
| 3 | Normal/Macro mode indicator | |
| 4 | Self-timer | Shows selected Self-timer setting |
| 5 | Selected resolution | 16M = 4608x3456; 8M = 3264x2448;5M = 2592x1944; 3M = 2048x1536;VGA = 640x480 |
| 6 | Picture quality | Super fine.Fine.Normal. |
| 7 | Battery indicator | |
| 8 | Zoom indicator | Shows the zoom ratio in preview mode |
| 9 | The MicroSD card indication | |
| 10 | White Balance | Shows selected White-balance mode. |
| 11 | Photo/Video counter | Photo mode: No. of pictures that can be taken.Video mode: Recording time in seconds. |
4. Details for camera setting
| settings | Photo | Resolution | 16M pixel resolution | 4608x3456 |
| 8.0M pixel resolution | 3264x2448 | |||
| 5.0M pixel resolution | 2592x1944 | |||
| 3.0M pixel resolution | 2048 x 1536 | |||
| VGA resolution | 640 x 480 | |||
| Quality | Super Fine/Fine/Normal | Picture quality setting | ||
| Metering | Center/Multi/Spot | Metering setting | ||
| White Balance | Auto | Automatic white balance | ||
| Daylight | White balance selected for daylight surrounding | |||
| Cloudy | White balance selected for cloudy surrounding | |||
| Tungsten | White balance selected for tungsten lighting | |||
| Fluorescent | White balance selected for fluorescent surrounding | |||
| ISO | Auto/100/200/400/800 | Sensitivity selection | ||
| Exposure | ± 2.0, ± 5/3, ± 4/3, ± 1.0, ± 2/3, ± 1/3, 0 | Exposure setting | ||
| Self Timer | On/Off | Self timer setting | ||
| Sharpness | Hard/ Normal/ Soft | Sharpness setting | ||
| Effect | Normal/ B&W/ Sepia/Negative/ Lomo/ PencilSketch/ Red/ Green/Blue/ Vivid | Effect setting | ||
| Date Stamp | On/ Off | Date stamp setting | ||
| Quick View | On/ Off | Quick view setting | ||
| Video | Movie Size | VGA 640 x 480QVGA 320 x 240 | Video resolution setting | |
| White balance | Auto | Automatic white balance | ||
| Daylight | White balance selected for daylight surrounding | |||
| Cloudy | White balance selected for cloudy surrounding | |||
| Tungsten | White balance selected for tungsten lighting | |||
| Fluorescent | White balance selected for fluorescent surrounding | |||
| Sounds | Off/On | Sounds setting | ||
| Frequency | 50Hz / 60Hz | Select power frequency in your location | ||
| Setup | Power Save | Off / 1Minute / 3 Minutes | Auto power off selection | |
| Language | English/ French/Deutsch/Italian/Spanish/Portuguese/Japanese | Display language selection | ||
| Date/Time | YY/MM/DD | Date or time setting | ||
| Format | Yes/No | Format the memory location selection. | ||
| Reset All | Yes/No | Reset all setting | ||
| Version | See the firmware version |
Note: The camera will remain the last setting when it is turned off.
5. Using the camera
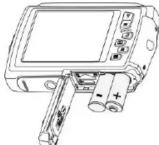
5.1 Installing the batteries
- Open the battery door.
- Insert 2 x AAA alkaline batteries into the camera.
- Close the battery door.
5.2 Inserting a memory card (not included)
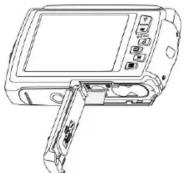
This camera has no built-in internal memory. The memory can be gained with a MicroSD memory card (not included).
Follow the instructions below to insert the optional MicroSD memory card into the camera.
1. Turn off the camera first.
- Open the battery door (please make sure the battery door was unlocked before open).
- Insert the MicroSD card into the camera.
Note:
-
There is only one right direction to insert the MicroSD memory card into the slot. Do not force the card into the memory card slot, since it may damage both the camera and the MicroSD memory card.
-
The MicroSD memory card must be formatted before taking photographs. See the following sections for more information.
5.3 Formatting the memory or MicroSD card
- Press the Menu button (☐) in PHOTO or VIDEO mode.
- Select the setup mode by pressing the Right button.
- Select the format icon by pressing the W(√) button and press the Shutter button to
- Press the Shutter button to format the SD memory card.
5.4 Setting the resolution
The camera can be set to different resolutions.
- Press the Menu button (☐) in PHOTO mode, select the resolutions icon by the W (√) key and press the Shutter to confirm.
Resolutions: VGA (640 x 480), 3M (2048 x 1536),
5M(2592x1944); 8M(3264x2448); - Five different resolutions will be displayed. Select the desired resolution by using the Up or Down button and press the Shutter button to confirm the selection.
5.5 Taking photographs
-
Turn on the camera.
-
Depending on the distance to the object being photographed, use macro switch to adjust the distance. Select the flower symbol ( ) if you wish to take a close-up photograph (11cm - 18 cm).
If you wish to take a video or a photograph of surroundings or people (0.5m – infinity), set the macro switch to normal mode (▲).
-
If you are not sure if there is enough lighting, turn on the automatic flash( A ) by pressing the Flash button. (If the battery power is too low, the flash won't be activated).
-
Use the LCD screen to aim at the object you wish to take photographs of.
-
Press the Shutter button and wait until the LCD display turns on again
Caution: 1) Taking pictures for fast-moving object is not recommended. 2) Image may be distorted when taking pictures in a moving vehicle.
5.6 Zoom in and out
The camera can zoom in up to 4 times.
Zoom in or out by pressing the Up or Down button, a number will appear on the display, 4.x is the maximum zoom ratio.
5.7 Self-photography using the small monitor
If you want to take a photo of yourself, you can simply use the small monitor LCD screen. Follow the steps below:
-
Press the LCD switch button to switch to the small monitor.
-
Use the small monitor as a viewfinder to aim at yourself
-
Press the Shutter button to take the photo of yourself.
5.7 Self-timer setting
You can also use the self-timer function when you take a photograph of yourself or when you take a photograph without flash of an object. To avoid shaking of the camera a tripod is recommended. 1. Set the camera to photo mode
-
Press the Menu button (☐). The menu will appear.
-
Press the W(√) button to select Self Timer and confirm by pressing the SHUTTER button.
- Press the W( √ ) button to select the "On" option set the protect setting for the
- Press the Shutter button to confirm. The self-timer function is now ready for use.
- Aim at the object you wish to take photos of.
- Press the Shutter button to take a photograph
- The photo will be taken after the timer reaches the delay time of 10 seconds. The camera will beep during the delay time.
5.8 Recording video clips
- Press the Mode button to select the video clip mode (☐).
- For setting the resolution, Press the Menu (☐) button and select Resolution, then press the
Shutter button to confirm. Two resolutions will be displayed. VGA (640 x 480), OVGA (320 x 340). - Press the Shutter button to start recording videos, press the right button to pause and press the Shutter button again to stop recording. The video clip will now be saved as an AVI file in the camera memory.
5.9 Playback photographs
The camera provides two options for playback: a) Single b) Thumbnail
-
Press the Playback (▶) button to get into Playback mode
-
The last picture or video clip taken will be displayed. Press the W( √) to get into the thumbnail mode. Press the Left /Right /Up /Down button to select the desired picture, and press the Shutter button to view.
-
In full screen display, press the T(∧) button to zoom in the photo.
-
To shift the image in zoom-in mode, press the Shutter button and then use the
Mode/Menu/Left/Right buttons.
-
Press the Menu (☐) button in Playback mode, press again and hold the Menu button until the menu options displayed. Select SLIDE SHOW and set up the desired slide show way. Press the Shutter button to confirm. The pictures saved in the MicroSD card will be displayed in sequence automatically. To stop slide show, press the Menu button.
-
Press the Menu (☐) button in Playback mode, press again and hold the menu button until the menu options displayed. Select Photo Effect and press the SHUTTER button. Select the desired effect by pressing the up/down button and press the shutter button to confirm. The image will be saved as a separate image.
5.10 Protecting photographs/videos
You can prevent the photographs/videos in the MicroSD card from accidental erasure.
Follow the instructions below to protect photographs/videos.
-
Press the Playback (▶) button to get into Photo playback mode.
-
Press the Left or Right button to select the photograph/video clip to be protected.
-
Press the Menu (☐) button in Playback mode, press it again and hold the Menu button until
the menu options displayed. Select Protect and press the Shutter button 4. Select "Protect single" or "All" and press the Shutter button to confirm
- Select Protect single of All and press the Shutter button to confirm.
5.11 Resizing photographs
A captured image can be resized to a smaller size and saved as a separate image.
Follow the instructions below to resize photographs.
1. Press the Playback (▶) button to get into Photo playback mode.
2. Press the Left or Right button to select the photograph/video clip to be resized.
3. Press the Menu (☐) button in Playback mode, press it again and hold the Menu button until
the menu options displayed. Select Resize and press the Shutter button
4. Select the new size and press the Shutter button to conform. The image will be saved as a
5.12 Playback video clips
-
When video clips are displayed, press the Up button to start playing the video and press the Up button again to pause the playback.
-
Press the Right button to fast forward or press the Left button to rewind.
-
Press the Mode button to stop and exit.
5.13 Deleting photographs and video clips
You can delete a single photograph / video clip, or delete all the photographs / video clips in the memory.
Follow the instructions below to delete photographs/videos.
1. Press the (▶) button to enter the playback mode.
2. Press the Left or Right button to select the photograph/video clip to be deleted.
3. Press the Menu/Delete button (☐) and select "Delete This Image(Video)" or "All".
4. Press the Shutter button to cor
5. Press the Menu button to exit.
NOTE: Select "All" and Press the Shutter button to confirm, all the pictures and videos will be deleted.
Photos that are protected from accidental erasure cannot be deleted. To delete photos,
set photos to unprotect mode (Section 5.10), and then follow the file delete procedure.
6. Connecting to a PC
The unit can be connected to the computer as mass storage device and transfer photo/video files for storage.
7. Specifications
| Sensor | 8.0 Mega pixels CMOS sensor |
| Image resolution | 16.0 Mega pixels: (4608x3456) |
| 8.0 Mega pixels: (3264x2448) | |
| 5.0 Mega pixels: (2592x1944) | |
| 3.0 Mega pixels: (2048x1536) | |
| VGA: (640x480) | |
| Lens | F/2.8 l = 4.8mm |
| Focus range | 0.5m. ~ Infinity |
| Macro mode | 11cm – 18cm |
| Digital zoom | 4x |
| Flash strobe | Built-in ( Auto / force / off ) |
| LCD display | 2.7+1.8" TFT color display |
| White balance | Auto / Daylight / Cloudv / Fluorescent / Tunsten |
| Video mode | 30fps@VGA / 30fps@QVGA with MicroSD card |
| External memory card | Supports MicroSD cards up to 32GB |
| File format | Picture: JPEG, Video: AVI |
| Self timer | 10 seconds |
| PC interface | USB 2.0 |
| Power source | 2 x AAA alkaline batteries |
8. System requirement
| Operating system | WinXP (SP3)、Vista32/64 Win7 32/64 and Mac OS X 10.6. or above |
| CPU | Pentium III or above |
| RAM | At least 64MB |
| Interface | USB port |
| CD | 4x speed CD ROM or above |
9. Troubleshooting
| Problem | Cause | Solution |
| Cannot turn on the camera | Low battery power.Battery placed at wrong polarities. | Replace or install the battery correctly. |
| Photos can not be saved when taking pictures. | The memory card hasn't been formatted properly. | Format the memory in setup mode of the camera. Please refer to section 5.3. |
| Cannot find removable disk after connecting the camera to the computer. | Connection failure. | Make sure all cable connections are secured and restart the computer if necessary. |
| Flash does not work. | Battery power is too low. | Replace with new 2 x AAA alkaline batteries |
| The batteries used up very fast. | Incorrect or old, used up, battery | Replace with new 2 x AAA alkaline batteries |
| The photos are blurry | 1. The camera is not held steadily2. The lens of camera is dirty. | 1. Hold the camera steadily until it beeps when taking video photo.2. Clean the lens with soft dry cloth. |
10. Service and support
For information: www.lenco.com
For support: http://lencosupport.zendesk.com
Lenco helpdesk:
Germany 0900-1520530 (Local charges)
The Netherlands 0900-23553626 (Local charges + 1ct p/min)
Belgium 02-6200115 (Local charges)
France 03-81484280 (Local charges)
The helpdesk is accessible from Monday till Friday from 9 AM till 6 PM.
When contacting Lenco, you will always be asked for the model and serial number of your product.
The serial number can be found on the back of the device. Please write down the serial number below:
Model:
Serial number:
Lenco offers service and warranty in accordance to European law, which means that in case of repairs (both during and after the warranty period) you should contact your local dealer.
Important note: It is not possible to send products that need repairs to Lenco directly.
Important note: If this unit is opened or accessed by a non-official service center in any way, the warranty expires.
This device is not suitable for professional use. In case of professional use, all warranty obligations of the manufacturer will be voided.

For EU only
- Getting to know your camera
- Functional parts
- Explanation of the status icons
- Details for camera setting
- Using the camera
- Installing the batteries
- Inserting a memory card (not included)
- Formatting the memory or MicroSD card
- Setting the resolution
- Taking photographs
- Zoom in and out
- Self-photography using the small monitor
- Self-timer setting
- Recording video clips
- Playback photographs
- Protecting photographs/videos
- Resizing photographs
- Playback video clips
- Deleting photographs and video clips
- Connecting to a PC
- Specifications
- System requirement
- Troubleshooting
- Service and support
- Lenco helpdesk:
Brand : LENCO
Model : DC-1041
Category : Camera