P4K - Security Camera BirdDog - Free user manual and instructions
Find the device manual for free P4K BirdDog in PDF.


| Product Type | Security Camera |
| Model | P4K |
| Brand | BirdDog |
| Resolution | 4K (3840 x 2160 pixels) |
| Dimensions | Approx. 150 x 150 x 180 mm |
| Weight | Approx. 1.5 kg |
| Power Supply | Power over Ethernet (PoE) or 12V DC |
| Pan/Tilt/Zoom | Pan: 360°, Tilt: 120°, Zoom: 4x optical |
| Night Vision | Infrared LEDs up to 30m |
| Video Compression | H.264/H.265 |
| Connectivity | Ethernet, HDMI, MicroSD slot |
| Audio | Built-in microphone and speaker |
| Storage | MicroSD card up to 128GB, NVR compatible |
| Weatherproof Rating | IP66 |
| Mounting | Ceiling or wall mount included |
| Maintenance | Clean lens with soft cloth; avoid harsh chemicals |
| Safety | Operating temperature -10°C to 50°C |
| Spare Parts & Repairability | Contact BirdDog support for replacement parts |
| General Information | Includes manual, mounting kit, power adapter |
Frequently Asked Questions - P4K BirdDog
User questions about P4K BirdDog
0 question about this device. Answer the ones you know or ask your own.
Ask a new question about this device
Download the instructions for your Security Camera in PDF format for free! Find your manual P4K - BirdDog and take your electronic device back in hand. On this page are published all the documents necessary for the use of your device. P4K by BirdDog.
USER MANUAL P4K BirdDog
natural_image
Black BirdDog 4K camera with blue circular background and rainbow gradient (no text or symbols on device)USER GUIDE
December 2022
NDI
Table of Contents
Welcome to BirdDog! 3
Using This Manual....3
First Step 3
BirdDog P4K Overview 4
Camera Features....4
Specifications 4
Welcome to the Future 5
What's in the Box? 6
Optional Accessories 6
Quick Start Guide....7
Basic Connections....7
Power Up....7
Computer, say hello to P4K 7
Basic Configuration....8
Camera Connections....11
Powering P4K....13
Thermal Management....13
Video Output 14
Audio In/Output....14
Using the Camera Menus....15
Camera Menus....16
White Balance Menu 17
Detail Menu....18
Picture Menu 19
Gamma Menu....20
Pan Tilt Zoom Menu....21
System Menu....21
Remote Controller....23
Controlling the Camera Using the Remote Controller.... 24
Panning and Tilting 24
Zooming 25
Focusing 25
Shooting with Back Lighting 25
Changing Resolution 25
Storing the Camera Settings in Memory Using Presets 26
Operating Multiple Cameras with the Infrared Remote Controller 27
Web Configuration Panel 28
Password Management 28
BirdUI Layout....29
Dashboard 30
Network....30
NDI Network Settings 31
System....32
System Update 33
Access Manager Configuration....33
Unit Reboot....33
AV Setup 34
NDI Encode Settings.... 34
Cam Control....36
FreeD Tab 36
Preset Tab....36
Exposure Tab 37
White Balance Tab 38
Detail Tab 39
Picture Tab 40
Gamma Tab....41
Colour Matrix Tab 42
Scopes 43
Receiving NDI ^® Video 44
NDI® Camera Control 45
IP Connection 45
Remote Controller 45
Controlling Your Camera Via Other Protocols 46
Camera Initial setting status Information 46
VISCA over IP Control....47
Setting the Switches....48
Using RS-232 (VISCA) 50
Using RS422 (VISCA) 53
PELCO P/D Keyboard RS485 Connection 56
Operating Multiple Cameras using RS-232 and 422/485....59
Camera Dimensions....60
Glossary 61
Copyright
Copyright 2022 BirdDog Australia all rights reserved. No part of this manual may be copied, reproduced, translated, or distributed in any form or by any means without prior consent in writing from our company.
Trademark Acknowledgement
BirdDog and other BirdDog trademarks and logos are the property of BirdDog Australia. Other trademarks, company names and product names contained in this manual are the property of their respective owners.
• Microsoft, Windows, ActiveX, and Internet Explorer are registered trademarks of Microsoft Corporation in the U.S. and/or other countries.
- HDMI, the HDMI logo and High-Definition Multimedia Interface are the trademarks or registered trademarks of HDMI Licensing, LLC in the United States and other countries.
- Other trademarks, company names and product names contained in this manual are the property of their respective owners.
- NDI® is a registered trademark of NewTek, Inc.
Important Information
Legal Notice
To ensure account security, please change the password after your first login. You are recommended to set a strong password (no less than eight characters).
The contents of this document are subject to change without prior notice. Updates will be added to the new version of this manual. We will readily improve or update the products or procedures described in the manual.
Best effort has been made to verify the integrity and correctness of the contents in this document, but no statement, information, or recommendation in this manual shall constitute formal guarantee of any kind, expressed or implied. We shall not be held responsible for any technical or typographical errors in this manual.
The product appearance shown in this manual is for reference only and may be different from the actual appearance of your device.
Due to uncertainties such as physical environment, discrepancy may exist between the actual values and reference values provided in this manual.
Use of this document and the subsequent results shall be entirely on the user's own responsibility.
Warnings
- If the product does not work properly, please contact your dealer. Never attempt to disassemble the camera yourself. (We will not assume any responsibility for problems caused by unauthorized repair or maintenance.)
• This installation should be made by a qualified service person and should conform to all the local codes.
• When shipping, the camera should be packed in its original packaging.
- Ensure the power supply voltage is correct before using the camera.
- Do not drop the camera or subject it to physical shock.
• If the camera will not be used for an extended period of time, attach the lens cap to protect the lens.
• Do not aim the camera lens directly at the sun. This may cause irreversible damage to the camera.
Maintenance Precautions
- If there is dust on the front glass surface, remove the dust gently using an oil-free brush or a rubber dust blowing ball.
- If there is grease or a dust stain on the front glass surface, clean the glass surface gently from the center outward using anti-static gloves or an oil-free cloth. If the grease or the stain still cannot be removed, use anti-static gloves or an oil-free cloth dipped with detergent and clean the glass surface gently until it is removed.
• Do not use organic solvents, such as benzene or ethanol when cleaning the front glass surface.
Regulatory Compliance
FCC Part 15
This equipment has been tested and found to comply with the limits for digital device, pursuant to part 15 of the FCC Rules. These limits are designed to provide reasonable protection against harmful interference when the equipment is operated in a commercial environment.
This equipment generates, uses, and can radiate radio frequency energy and, if not installed and used in accordance with the instruction manual, may cause harmful interference to radio communications. Operation of this equipment in a residential area is likely to cause harmful interference in which case the user will be required to correct the interference at his own expense.
This product complies with Part 15 of the FCC Rules. Operation is subject to the following two conditions:
•This device may not cause harmful interference.
- This device must accept any interference received, including interference that may cause undesired operation.
LVD/EMC Directive
This product complies with the European Low Voltage Directive 2006/95/EC and EMC Directive 2004/108/EC.
Welcome to BirdDog!
Thank you for purchasing your P4K camera. If you have any questions regarding the camera, please contact your authorized dealer or view our P4K Knowledge Base.
Our website also has a User Stories page to help inspire you to get the most out of your camera.
Using This Manual
Your P4K is a powerful and sophisticated device, so please read this manual before use and retain for future reference.
If you are new to the world of NDI® or BirdDog cameras, begin with the Quick Start Guide. This will give you a good introduction to the setup of your new camera.
Tip
You can use the controls in your browser or PDF reader to increase the page size when viewing the diagrams to reveal much more detail.
First Step
Firmware Upgrade
Before you use your new P4K, it's a good idea to upgrade to the latest firmware. We are always adding new features and improving the performance of our products, so installing the latest firmware will provide you with the best user experience.
To upgrade the firmware, please follow the Firmware Upgrade Instructions located in your firmware download folder and perform upgrade process.
The latest firmware files are available for download here.
We're Invested In Your Success
We pride ourselves on being approachable and easily contactable. We'd love to hear from you.
Dan Miall Co-Founder and CEO dan@bird-dog.tv
Eamon Drew Co-Founder and CMO eamon@bird-dog.tv
BirdDog P4K Overview
Camera Features
• 1 inch "Exmor R" CMOS sensor, Effective pixel number: 14.2 Megapixels.
•4K Video Formats: 4Kp 29.97, 25, 24, 23.98, 23.97
• HD Video Formats: 1080p 60, 59.94, 50, 29.97, 25, 24, 23.97 · 1080i 60, 59.94, 50 · 720p 60, 59.94, 50
• Zoom: Optical 12X, Digital Zoom 12X, with SRZ feature, 18X zoom at 4K, or 24X zoom at FHD.
•Color Matrix, Image stabilizer and true WDR 130dB.
•Video Output: NDI®/HDMI/6G-SDI
•Supports Black Level, NDI® Genlock, Tally Light.
- ±350-degree continuous pan, ±120-degree continuous tilt.
•128 presets, Speed up to 150 degrees/sec.
• Wall and ceiling mounting with E-Flip function.
• Control Control: RS232/RS-422/RS485(RJ45 x2), NDI®/IP Control (RJ45), IR Remote Control
•Control Protocol: NDI®, VISCA, VISCA IP
• Image parameter setting restore with presets and quick access operation.
- Audio Output: Embedded with main HDMI, 24bit, Embedded with SDI, 24bit, Embedded with NDI® - Power: DC 12V, PoE+ (IEEE 802.3at).
Specifications
Please refer to the product webpage for complete specifications.
Welcome to the Future
What is NDI®?
Your new P4K camera has been designed from the ground up to support the cutting edge NDI® video transmission standard.
NDI® (Network Device Interface) is a high-quality, low-latency, frame-accurate standard that enables compatible devices to communicate, deliver, and receive high definition video over your existing Gigabit Ethernet network.
Operating bi-directionally, NDI® devices can be auto-detected, powered and controlled over the same Ethernet cable used to send the video and audio. If you have a Gigabit network, you have the potential for a streamlined, interconnected, video production environment.
With the introduction of NDI®5, you can now securely share network sources between remote sites anywhere in the world – on a single network port. Even a smartphone can be a NDI® source.
Transitioning to NDI® can also occur gradually. Existing SDI or HDMI signals can easily be converted to an NDI® stream and piped where required on your network and converted back only at the necessary endpoints.
BirdDog has been on the NDI® journey since the very beginning and your P4K is just one of our products designed to take advantage of the features and potential of NDI®.
For more information on NDI ^® , please refer to this page on our website.
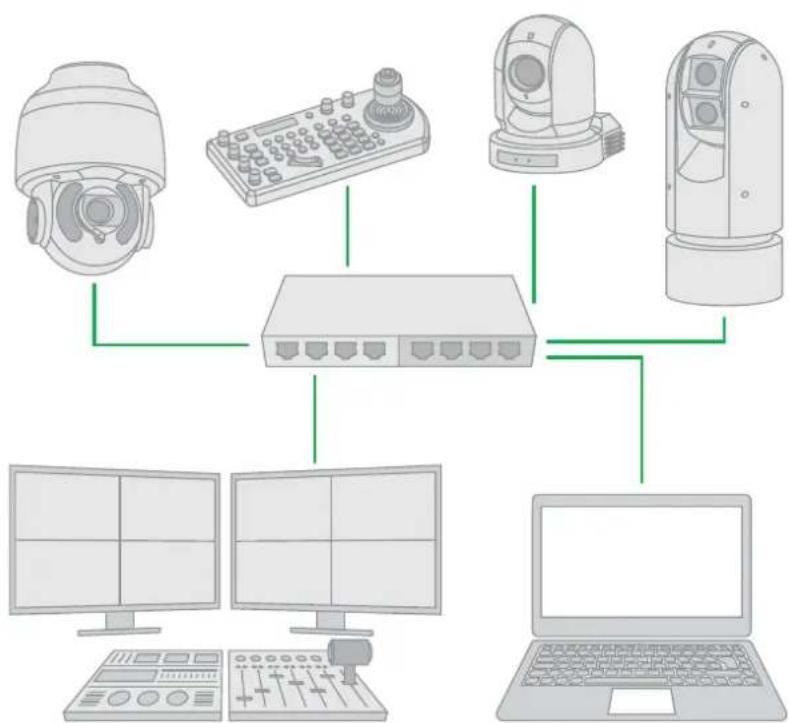
flowchart
graph TD
    A[" surveillance camera"] --> B[" network switch "]
    C[" remote control device"] --> B
    D[" monitoring device"] --> B
    E[" laptop"] --> B
    B --> F[" monitor with 6 screens"]
    B --> G[" monitor with 5 screens"]
    B --> H[" monitor with 4 screens"]
What's in the Box?
NOTE: The camera color may be white or black in colour depending on the item purchased. Optional
1 x BirdDog P4K
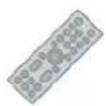
1 x IR Remote Controller (3V CR2032 Coin Lithium Battery Required)
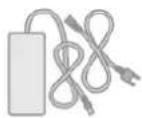
1 x Camera Power Adaptor

1 x Bag of Camera Mounting Screws
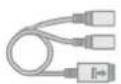
1 x RJ45 to RS232 Adaptor Cable
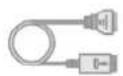
1x RJ45 to RS422 Adaptor Cable
Optional Accessories
Depending on your requirements, you may need to purchase these optional accessories. Please browse to this page on our website for all your accessory needs.
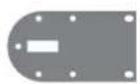
Wall Mount

Ceiling Mount
Quick Start Guide
If you are new to the world of NDI® or BirdDog cameras, please follow this quick start guide to become familiar with the basic setup of your new camera. You can also view a similar online video.
Be sure to check the many helpful product videos on our YouTube page.
Basic Connections
Power
To start using your new camera, you'll have to decide how you are going to power the device. You have two choices. You can use PoE+ (Power over Ethernet) or, if your network doesn't support PoE+, you can use the included 12VDC power adaptor. If available, PoE is the easier choice, since you can use the same Ethernet cable to power and control the camera, as well as send the video. For the purposes of this quick start guide, we'll use the power adaptor, so plug the jack into the 12VDC power port on the back of the camera.
Network
Since we're supplying power via the adaptor, the NDI®/PoE Ethernet connection will be used purely for NDI® video. Let's keep things simple and plug an Ethernet cable directly from your computer into the camera NDI®/PoE Ethernet port.
Power Up
Once you've made the power and Ethernet connections, turn on the adapter power. When first powered up, the camera will perform it's initialization routine by rotating to the left and then centering again. When this is finished, the indicator light on the front of the camera will display green (and occasionally amber) and the camera is ready to be accessed.
Computer, say hello to P4K
Since we're connecting your camera directly to your computer, we need to configure the network settings of your computer to allow communication with the camera.
Navigate to the Network Properties in your computer preferences and make the following settings.
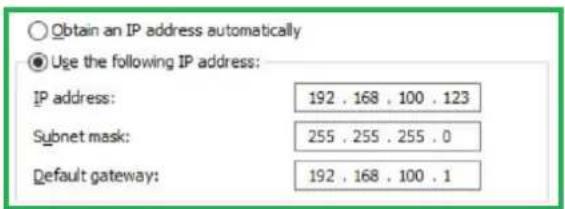
Select Use the following IP address: and enter an IP address. The default IP address of the camera is 192.168.100.100, so we need to enter an address where the first three numbers are the same as the camera IP address, i.e., 192.168.100 but the last number is a different number, in the range of 0 – 255, that is not currently assigned. Usually numbers less than 200 are more likely to be available. The subnet mask can be set as shown.
P4K and the computer are now configured on the same subnet and should be able to communicate with each other.
Basic Configuration
NDI® Tools
NDI® Tools is a free suite of applications designed to introduce you to the world of IP video and is available here.
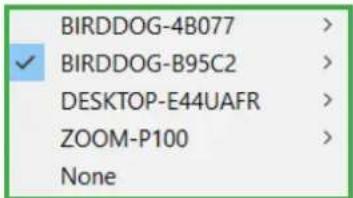
Once installed, launch the Studio Monitor (Video Monitor, if using a Mac) application. This simple application allows you to view all NDI® sources on your network. Right click on the Studio Monitor window to view your camera as an NDI® source. In the example to the right, three cameras and a desktop computer are shown as NDI® sources.
Tip
By default, the displayed sources have names that include the last five digits of your camera MAC address which is displayed on the bottom of the camera.
Clicking on your camera in the source list will display the image from your camera with the default automatic settings.
The BirdUI
other
| Category | Value | | :--- | :--- | | Device Mode: Source Status | Encode Streaming NDI To 3 | | End of the chart | 75% System Info extra text | | Network Bandwidth (%) | 90% Network Bandwidth extra text | | NDI Video Stream Name | Name HDMI IN | | Video Format | 720p59.94 | | Audio Status | Mute | | Stream Info | ... | | Video Resolution: Audio Channels:BirdDog cameras have a web interface (BirdUI) that is displayed by your computer browser and can be used to configure your camera remotely.
- Click on the gear icon on the bottom right of the Studio Monitor window.
- In the displayed window, type the default password 'birddog' (all lower case) and click the OK button. The Dashboard window is displayed.
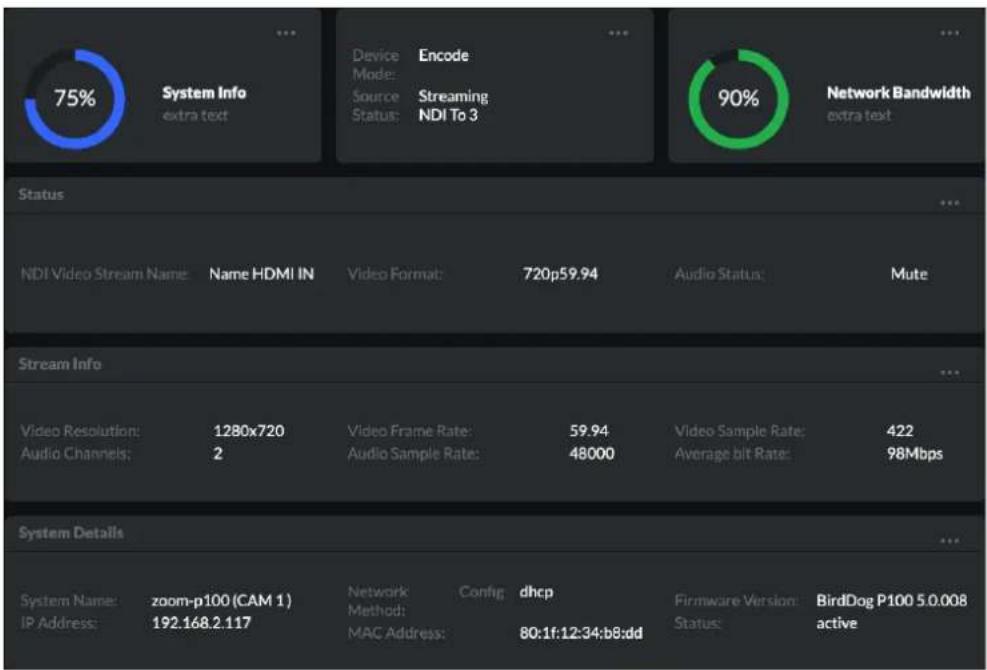
The Dashboard shows important basic camera settings. For now, check that the displayed Status is Active and take note of the frame rate that is currently output from the camera (displayed under NDI® connection info). In the example above, it is 29.97 fps. This frame rate should be set identically for all cameras according to the requirements of your production. Let's see how to change this and other important camera settings.
NDI Encode Settings
Bitrate Management
Because you're sending NDI® video over your computer network, you may need to be mindful of the amount of bandwidth your video will consume. By setting Bitrate Management to NDI MANAGED, the target bitrate will be set in accordance with the NDI® standard. This will achieve an optimum balance between bandwidth consumption and video quality. In this mode, the video bitrate will be around 120–140 Mbps.
If you do opt for Manual management, you may select a bitrate within a range of 60–360 Mbps. Do this with care, as the actual bitrate may be greater, straining the capacity of the network and the receiving device, and lower settings may result in reduced image quality.
Video Format
Here you can set the frame rate of the camera to match that of your production. All cameras should be set to the same frame rate. You can also set the desired level of chroma subsampling.
NDI Group
NDI® supports Grouping which allows you to hide the visibility of video sources to viewers that are not part of the group. If disabled, the video source is public and viewable by any receiver on your network.
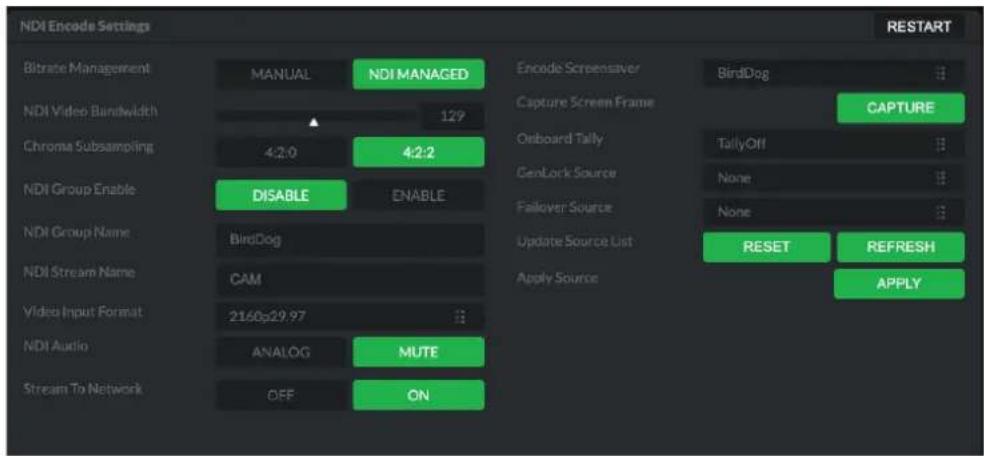
Stream Name
Give the output video stream of the camera a memorable name to make identification easier on other devices.
NDI Failover Source
If the selected HDMI source is interrupted for any reason, P4K can automatically switch to a pre-determined alternative NDI® source. Select an available NDI® source for the failover function from the Available NDI® sources dropdown list. Pressing the Refresh button will add new sources to the list, whereas pressing Reset will populate the list with only active NDI® sources. Click the Apply button to apply your failover source change.
Network Configuration
For the final part of this quick start guide, let's set up the network configuration of your camera so it can work with your wider network. Most computer networks provide for both automatic and manual configuration of network devices and the P4K can accommodate both.
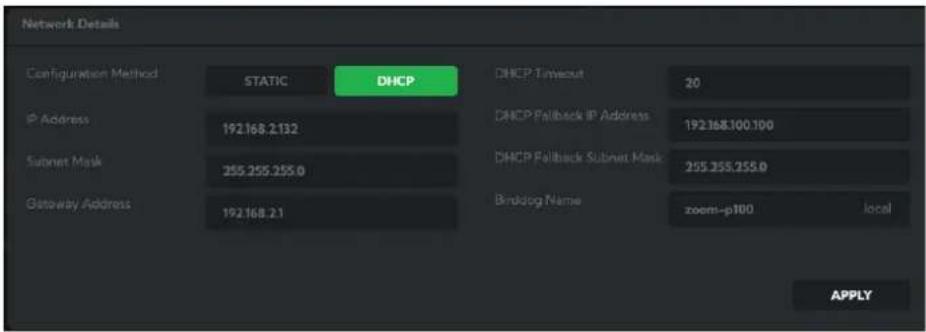
Static or DHCP
Here you can set the network configuration to either DHCP (default) or Static. DHCP simplifies the management of IP addresses on networks. No two hosts can have the same IP address, so assigning them manually can potentially lead to errors.
If your network is set up for DHCP, this is generally the best configuration to choose. If you do choose to go with a Static IP address, you'll need to add the IP Address, Subnet Mask and Gateway Address information according to the requirements of your network.
DHCP Timeout, Fallback IP address, Fallback Subnet Mask
You can set the timeout period during which P4K will look for a DHCP IP address. After this period, the camera will default to the designated fallback IP address.
This can be useful if you use your camera in other network environments. For example, if a DHCP server is available in your normal office or studio application, the camera will use the DHCP supplied IP address. If you then use the camera in another application without a DHCP server, your camera will always default to the known fallover IP address.
BirdDog Name
You can give your camera a meaningful name to make identification easier when viewing NDI® sources on a receiver such as a TriCaster, vMix or Studio Monitor. Be sure to make the name unique, as no two devices on the network should have the same name. The name can be any combination of a-z, 0-9, and '-'.
After renaming your camera, navigate back to the Dashboard and click REBOOT DEVICE. The camera will re-initialize and you'll be good to go.
NOTE: Your computer will need to have 'Bonjour' services loaded in order to access the unit via it's user defined name. Apple devices come pre-installed with Bonjour, while Windows devices need a plugin available here.
You're Done!
That concludes our quick start guide for P4K. Your camera has many other features, so to get the most out of your camera, please review the rest of this manual.
To learn about more advanced camera options, such as exposure, white balance and colour management, please refer to here in this manual.
Camera Connections
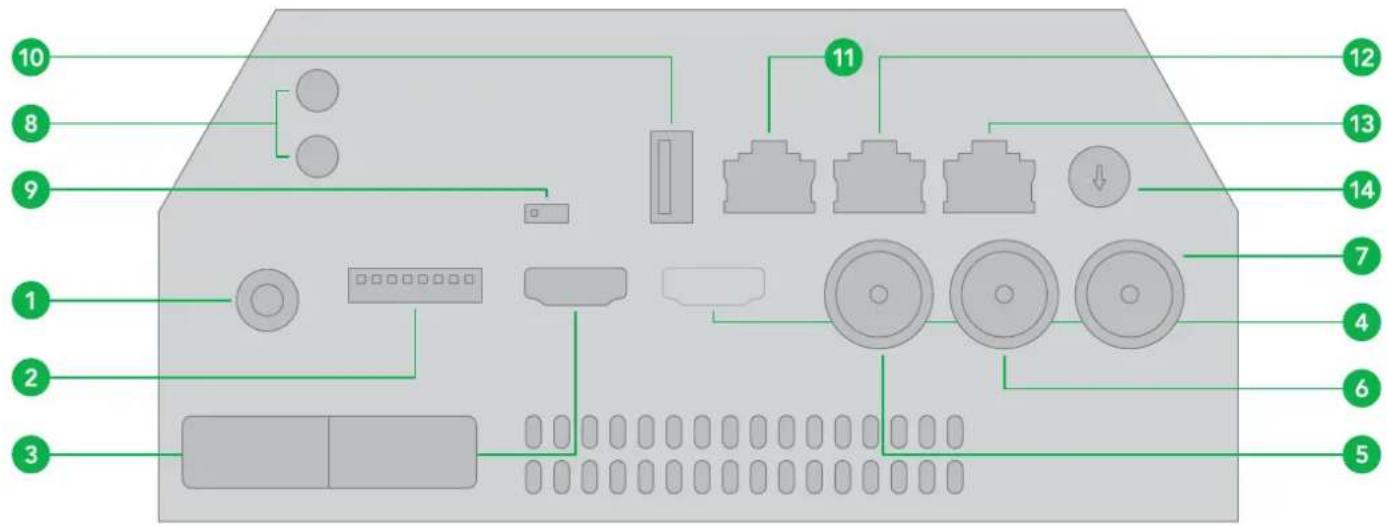
- 12V DC Power Port
- DIP Switch
For video format selection. It is recommended to set this to the most frequently used resolution and thereafter use the BirdUI to make changes.
- Main HDMI 1.4 (4K) Video Output
- Sub HD HDMI Video Output
- 6G-SDI Video Output, Dual Link 3G-SDI Video
Output combines with #6.
- 6G-SDI Video Output, Dual Link 3G-SDI Video
Output combines with #5.
- BNC Connector
Used for genlock which is not currently enabled. However, NDI ^® genlock is supported.
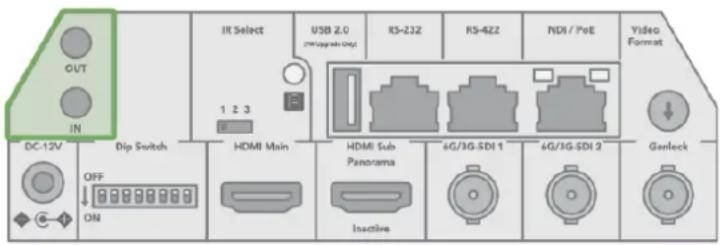
- Audio Line-in / Line-out
Analog 3.5mm Audio Input/Output. Audio format is stereo, unbalanced line level.
-
IR Remote ID Selector
-
USB2.0
For Firmware upgrade
- RJ45 port
For RS232 Control
- RJ45 port
For RS-422/485 Control
- Ethernet Port
For VISCA over IP control and NDI® output. Supports PoE+ (IEEE802.3at).
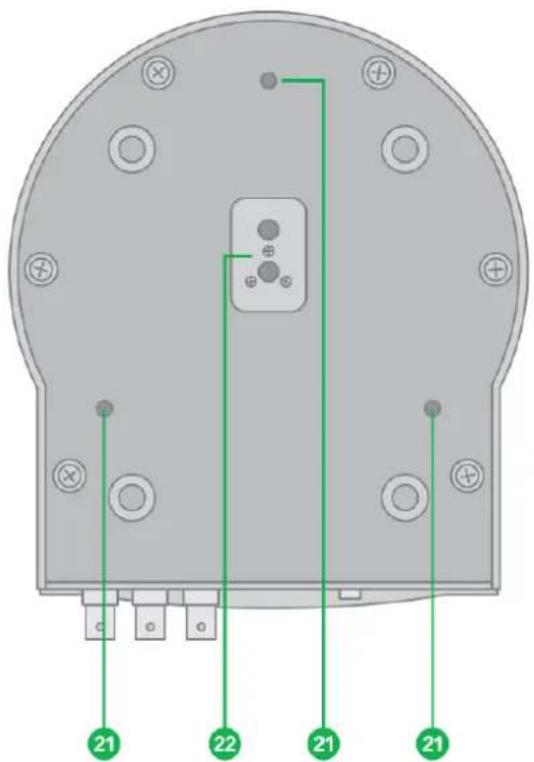
- Video Format Selector
For video format selection. It is recommended to set this to the most frequently used resolution and thereafter use the BirdUI to make changes.
- Tally Lamps (front)
- Tally Lamp (rear)
- Audio Mics
- LED Operation Indicators
- Lens
12X optical zoom - IR sensors
- Fixed Mounting Holes
- Tripod Mounting Holes
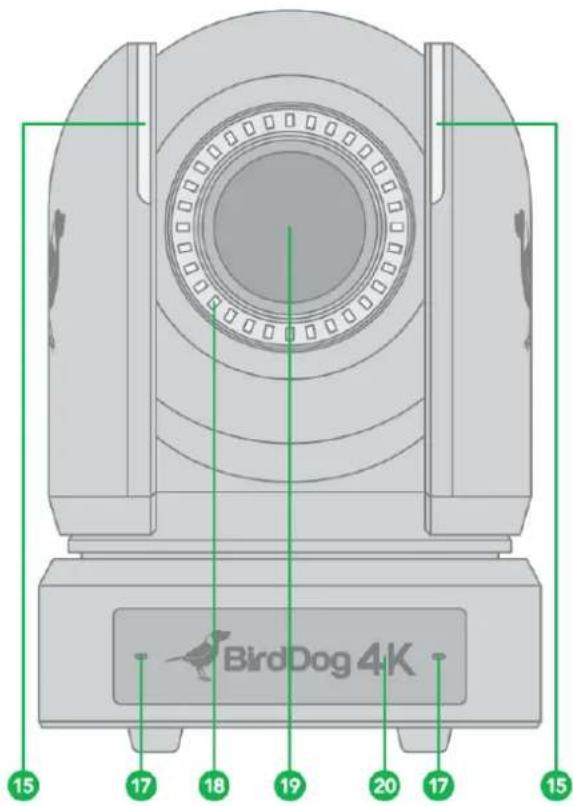
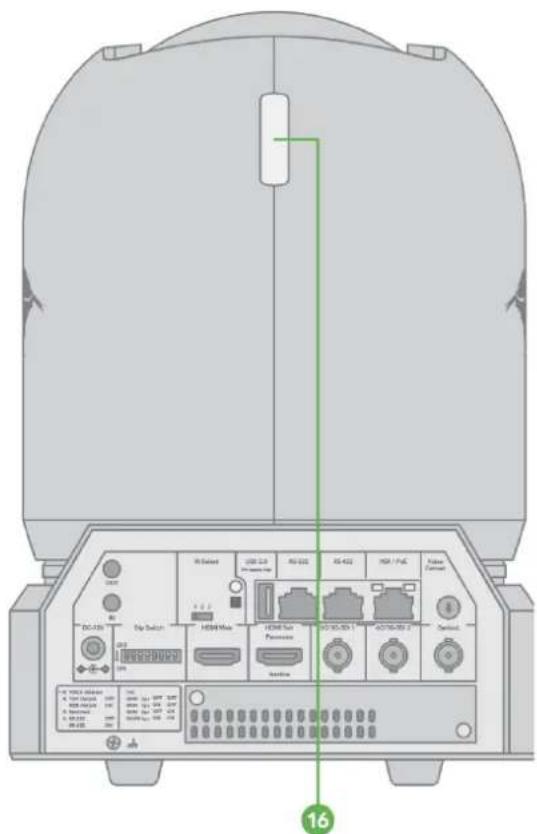
Powering P4K
P4K can be powered in two ways.
- PoE+ (Power over Ethernet)
PoE+ is a convenient way to power P4K as it allows both data and power to be sent through the same standard Ethernet cable. The network switch must support PoE+ (802.3at).
- DC Connection
Located at the rear of the P4K is a 12VDC connection port. Use only the DC power adaptor (JEITA type4) supplied with the unit.
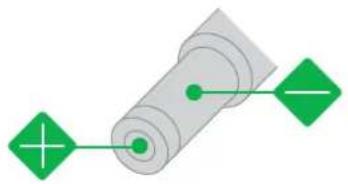
natural_image
Pure electrical circuit lines without any symbolsWARNING
Do not attempt to manually move the camera head when the device is powered up. Doing so may damage the camera.
Thermal Management
Although the camera is equipped with a fan, the entire enclosure is designed to dissipate heat. The main processor is capable of operating up to 100^ C / 212^ F. Various factors can affect how much heat the camera will produce, and it is normal for it to feel warm to the touch. In extreme circumstances (a hot day/direct hot sun) it is advised to power P4K via DC as this produces less heat than PoE.
Video Output
The camera can simultaneously produce SDI, HDMI and NDI ^® video output.
NDI Signal
- Connect the camera to the network using Cat5e/Cat6 network cable.
- You'll need to use web browser on a connected computer for camera configuration.
- To obtain NDI ^® video and configure NDI ^® video, please refer to NDI Encode Settings.
HDMI Signal
- Connect the camera to a HD monitor/TV using HDMI cable.
- Turn on the camera. After initialization, video will display on the monitor.
- Information of the camera initial setting status will display on the monitor for 5 seconds.
- You can set the displayed video format in the camera System menu.
SDI Signal
- Connect an SDI cable in between the camera your SDI Device/display.
Audio In/Output
Analog 3.5mm audio In\Out ports. The Audio Out will output any audio that is captured on the Audio In port. Audio format is stereo, unbalanced line level.
Using the Camera Menus
You can use the infrared remote controller to change camera settings while viewing the On Screen Display (OSD) menus on a connected monitor. The OSD is viewable over NDI®, SDI or HDMI.
However, the Web Configuration Panel (BirdUI) affords greater control of your camera with more parameters as well as allowing remote adjusting of camera settings over NDI ^® , and is the recommended method of adjusting your camera.
- To display the main menu, press the MENU button on the supplied infrared remote controller. The main menu is displayed.
OSD
EXPOSURE
WHITE BALANCE
PICTURE 1
PICTURE 2
PAN TILT ZOOM
SYSTEM
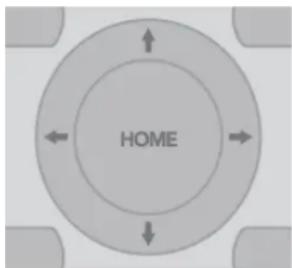
- Use the "↑, ↓" buttons to navigate between main menu items. For example, clicking the "↓" button once will move the cursor to the item below.
| OSD |
| EXPOSURE |
| WHITE BALANCE |
| PICTURE 1 |
| PICTURE 2 |
| PAN TILT ZOOM |
| SYSTEM |
| WHITE BALANCE MENU | |
| WB MODE | AUTO |
- To enter the sub menu of a selected item, click either the "→" button or the HOME button. In the example below, we are navigating between two sub menus of the Exposure main menu. Sub menus can also be navigated vertically to select sub menu items.
| OSD | EXPOSURE MENU: FULL AUTO | |
| EXPOSURE | MODE | FULL AUTO |
| WHITE BALANCE | SLOW SHUTTER | OFF |
| PICTURE 1 | S. SHUTTER LIMIT | 1/4 |
| PICTURE 2 | AE RESPONSE | 01 |
| PAN TILT ZOOM | GAIN LIMIT | 21.4dB |
| SYSTEM | EX COMP | OFF |
| OSD | EXPOSURE MENU: MANUAL | |
| EXPOSURE | MODE | MANUAL |
| WHITE BALANCE | GAIN | 12dB |
| PICTURE 1 | GAIN LIMIT | 21.4dB |
| PICTURE 2 | SPEED | 1/60 |
| PAN TILT ZOOM | IRIS | F1.6 |
| SYSTEM | HIGH SENSITIVITY | OFF |
-
Once you've navigated to a setting value, use the "←, →" buttons to increment or decrement the value.
-
Press the MENU button to exit the menus.
NOTE: When you are operating the menu using the infrared remote controller, you cannot set IR- RECEIVE in the SYSTEM menu to OFF. To set IR- RECEIVE to OFF, use the appropriate VISCA command.
Camera Menus
Exposure Menu
The Exposure menu sets items related to exposure.
Mode
Full Auto: IRIS, GAIN and SPEED (shutter speed) are set automatically using the values set for SLOW SHUTTER, S. SHUTTER LIMIT, AE SPEED, GAIN LIMIT, GAIN POINT, POINT, HIGH SENSITIVITY, MAX SPEED, MIN SPEED, BACK LIGHT, SPOT LIGHT and EX-COMP.
Manual: Allows manual adjustment of the GAIN, GAIN LIMIT, SPEED, IRIS, and HIGH SENSITIVITY.
Iris Pri: Iris Priority mode. This mode allows you to set a fixed IRIS. The gain and shutter speed are set automatically according to the brightness of the subject. The exposure is adjusted automatically using the values manually set for IRIS, GAIN LIMIT, GAIN POINT, AE SPEED, MAX SPEED, MIN SPEED, BACK LIGHT, SPOT LIGHT and EX-COMP.
Shutter Pri: Shutter Priority mode. This mode allows you to set a fixed shutter SPEED with exposure achieved by automatic setting of IRIS and GAIN, according to the brightness of the subject. The exposure is adjusted automatically using the values manually set for SPEED, GAIN LIMIT, AE SPEED, BACK LIGHT, SPOT LIGHT and EX-COMP.
Bright: The bright control function adjusts both gain and iris using an internal algorithm, according to a brightness level freely set by the user. Exposure is controlled by gain when dark, and by iris when bright. As both gain and iris are fixed, this mode is used when exposing at a fixed camera sensitivity. When switching from Full Auto or Shutter Priority Mode to Bright Mode, the current status will be retained for a short period of time. The exposure is adjusted automatically using the values manually set for the bright level (LEVEL) and HIGH SENSITIVITY.
Gain Pri: Gain Priority mode. This mode allows you to set a fixed GAIN. The IRIS and SPEED are set automatically according to the brightness of the subject. The exposure is adjusted automatically using the values manually set for GAIN, GAIN POINT, AE SPEED, HIGH SENSITIVITY, MAX SPEED, MIN SPEED, BACK LIGHT, SPOT LIGHT and EX-COMP.
Below are the various settings for these exposure modes.
Gain
Select the gain from the following: 0dB, 3dB, 6dB, 9dB, 12dB, 15dB, 18dB, 21dB, 24dB, 27dB, 30dB, 33dB, 36dB.
Gain Limit
The gain limit can be set at Full Auto, Shutter Priority, Iris Priority, Bright, Spot Exposure and Manual in AE mode. This is useful to limit the automatic setting of gain which can lead to excessive image noise at extreme settings. Choose from: 9dB, 12dB, 15dB, 18dB, 21dB, 24dB, 27dB, 30dB, 33dB, 36dB.
Gain Point
Set the Gain Point between 0dB and the gain limit. The shutter speed can be changed from the point when the set gain value is reached. When you want to obtain a motion-priority image, use this setting.
High Sensitivity
This function increases the max. gain to allow bright output in darker environments. However, with a strong gain (up to 10×), the image may exhibit higher levels of noise.
Iris
Select the iris the following: F11, F10, F9.6, F8.7, F8.0, F7.3, F6.8, F6.2, F5.6, F5.2, F4.8, F4.4, F4.0, F3.7, F3.4, F3.1, F2.8
Slow Shutter
When set to "On," the slow shutter functions automatically in low light conditions. This setting is available only when the AE mode is set to "Full Auto." The default setting is Off.
S. Shutter Limit
With certain settings, in low light conditions, the shutter speed slows and the gain is increased. This function allows you to limit the shutter speed reduction. This helps prevent image shake when shooting a moving subject in low light conditions.
AE Speed
This setting allows you to reduce the exposure response speed. By default, optimum exposure can be obtained automatically within approx. 1 second. The slow AE response function allows you to lengthen this response time.
Maximum Speed (Maximum Shutter Limit)
In auto modes, the brighter the object is, the shutter speed will increase. You can set the upper limit on the shutter speed increase, helping to make images with motion more smooth.
Minimum Speed (Minimum Shutter Limit)
In low light conditions, the shutter speed may become slow and the gain is increased. Here you can put a limit on the shutter speed reduction, helping to prevent camera shake when you shootingb moving subjects.
Back Light
When the background of the subject is too bright, or when the subject is too dark due to shooting in the AE mode, back light compensation can help make the subject better exposed.
Spot Light
Spotlight compensation will attempt to compensate exposure in conditions where strong light falls on the subject, such as a person's face in a spotlight. You can choose either ON or OFF. This setting is enabled when MODE is FULL AUTO, SHUTTER PRI, IRIS PRI, or GAIN PRI. SPOT LIGHT becomes disabled when BACK LIGHT is ON.
Ex-Comp (Exposure Compensation)
When MODE is set to FULL AUTO, SHUTTER PRI or IRIS PRI, setting EX-COMP to ON allows exposure compensation levels to be set from the following values: -10.5, -9, -7.5, -6, -4.5, -3, -1.5, 0, +1.5, +3, +4.5, +6, +7.5, +9, +10.5.
Setting the level to 0 disables exposure compensation. Level +10.5 is the brightest and -10.5 is the darkest compensation value. When EX-COMP is set to OFF, exposure compensation is disabled.
White Balance Menu
WB Mode (White balance mode)
Select the white balance mode from the following:
Auto: This mode computes the white balance value within a range of values from 2500K to 7500K. This mode uses color information from the entire frame and calculates according to manually set values for SPEED (white balance speed), OFFSET and the MATRIX. This mode is the default setting.
Indoor: Sets the color temperature to 3200K. You can fine tune this setting using the MATRIX.
Outdoor: Sets the color temperature to 5800K. You can fine tune this setting using the MATRIX.
OPW (One Push White Balance): The One Push White Balance mode is a fixed white balance mode that may be automatically readjusted only at the request of the user (One Push Trigger), assuming that a white subject, in correct lighting conditions can occupying more than 1/2 of the image. One Push White Balance data is lost when the power is turned off. If the power is turned off, you'll need to reset One Push White Balance.
To select OPW:
- Place a white subject (i.e., sheet of white paper) in the center of the frame.
- Press the remote controller HOME button to activate the one-push white balance adjustment. You can fine tune this setting using the MATRIX and OFFSET.
ATW (Auto Tracking White Balance): Auto Tracking White balance (2000K to 10000K), allows the camera to adjust the white balance according to the temperature of the light source illuminating the subject. You can fine tune this setting using the MATRIX, SPEED (white balance speed) and OFFSET.
User: This is a mode that enables you to manually set the control of Red and Blue gain up to 256 steps. You can fine tune this setting using the MATRIX.
Outdoor Auto: This is an auto white balance mode specifically for outdoors. It allows you to capture images with natural white balance in morning and evening light. You can fine tune this setting using the MATRIX.
SVL Auto (Sodium Vapor Lamp Auto): This is an auto white balance mode that compensates for the orange light from sodium vapor lamps. You can fine tune this setting using the MATRIX.
SVL (Sodium Vapor Lamp): This is a fixed white balance mode specifically for sodium vapor lamps. You can fine tune this setting using the MATRIX.
SVL Outdoor A. (Sodium Vapor Lamp Outdoor Auto): This is an auto white balance mode specifically for outdoors, which is compatible with sodium vapor lamps. You can fine tune this setting using the MATRIX.
The following parameters are available depending on the chosen white balance mode:
Speed (white balance speed)
You can adjust the speed at which the camera reaches the white convergence point when AUTO1 or AUTO2 is chosen. Choose a value from 1, 2, 3, 4, and 5. 5 is the fastest and 1 is the slowest.
Offset
The white convergence point can be shifted when WHITE BALANCE mode is AUTO1, AUTO2, or ONE PUSH. The range is from -7 to 0 to +7. White balance is shifted toward blue when a negative value is chosen, and it is shifted toward red when a positive value is chosen.
Matrix (Color Matrix)
You can emphasize or weaken a specific color region while keeping the white convergence point unchanged. When you turn this ON, the following items are displayed for adjustment.
Select
You can choose an internal preset matrix for matrix calculation. You can choose from STD, HIGH SAT, FL LIGHT, MOVIE, STILL, CINEMA, PRO, ITU709, and B/W. This becomes disabled when MATRIX is turned OFF.
Level (color level)
You can adjust the color density of the picture. Choose a value in the range from 0 to 14. The greater the number, the denser the colors, and vice versa. This becomes disabled when MATRIX is turned OFF.
Phase
You can adjust the color tone of the entire picture. Choose a value from -7 to 0 to +7. This becomes disabled when MATRIX is turned OFF.
R-G, R-B, G-R, G-B, B-R, B-G
You can set a coefficient for each combination of RGB individually, to adjust the hue of the entire picture. Choose a value from -99 to 0 to +99. This becomes disabled when MATRIX is turned OFF.
Detail Menu
When you choose AUTO as the mode, contour correction signal is automatically added. When you want to make adjustment by yourself, choose MANUAL. Only LEVEL will be displayed when you choose AUTO.
Mode
Auto: Contour correction signal is automatically added. You can set the amount of the contour correction signal. Choose a LEVEL value from 0 to 15. The greater the value, the stronger the contour correction signal.
Manual: You can set the bandwidth for signals undergoing contour emphasis. You can choose from DEFAULT, LOW, MIDDLE, HIGH, and WIDE. For example, when you choose MIDDLE, the middle range of the signals is elevated, and contours in that middle range are emphasized.
Crispening
You can choose the fineness of the objects subject to contour correction with contour correction signals. Choose a value from 0 to 7. When you choose a higher value, minute contour correction signal elements are removed, and only the high level contour correction signals are left, which reduces noise. When you choose a lower value, minute contour correction signal elements are added to the picture, increasing noise.
H/V Balance
You can choose the ratio for horizontal and vertical contour correction signal elements. Choose a value from -2 to 0 to +2. When you choose a higher value, the horizontal contour correction elements become greater compared to the vertical elements.
B/W Balance
You can adjust the balance between contours in black on the low brightness side of the spectrum and contours in white on the high brightness side. Choose from TYPE 1 to TYPE 5. The ratio of contours in black is higher for TYPE1 while the ratio of contours in white is higher for TYPE 5.
Limit
You can set the maximum value for the amount of contour emphasis in black on the low brightness side of the spectrum and in white on the high brightness side. Choose a value from 0 to 7.
Highlight Detail
You can adjust the level of contour added to brightly lit objects. Choose a value from 0 to 4. Adjust this when you want to emphasize the contour of a brightly lit object in a bright background.
Super Low
Emphasizes contours in the super low range. Choose a value from 0 to 7. The greater the value, the greater the contour emphasis. Contrast and resolution increase.
Picture Menu
2D /3D NR
2D Noise Reduction is a method of reducing noise within an image by comparing the image from frame to frame, removing variations that do not appear in each frame. 3D Noise Reduction is a method of reducing noise by comparing variances within the same frame, as well as comparing frame to frame. This will often reduce noise without leaving trails behind a moving object.
Flip
Flips the image upside down for ceiling mounted cameras. Select from upright mode (OFF) or ceiling mount (ON).
Mirror
Displays a mirror image of the video image.
Color
Adjusts the intensity of colours in the image from a range of 1-15.
Hue
Adjusts the color phase from 1-15.
ND filter
The ND Filter installed in front of the image sensor can be mechanically engaged or disengaged. The adjustable range of iris and shutter speed are increased by using the ND Filter. There are 2 types of ND Filters, and by combining them, the light quantity can be reduced. Values are 1 × (Filter Off), 1/4 × , 1/16 × , or 1/64 × .
IR Cut Filter
An IR (infrared) cut filter can be disengaged for increased image sensitivity in low light conditions. The filter will automatically engage depending on the ambient light, allowing the camera to be effective in day/night environments. When the mode is set to NIGHT, a monochrome (black and white) image will be displayed.
Chroma Suppress
The chroma suppress mode can be engaged for low light conditions when color noise may be particularly noticeable. You can set the brightness from OFF, LOW, MID, HIGH in each mode of the variable gamma modes.
HLC Mode (Highlight Light Compensation)
HLC attempts to adjust AE and AF to compensate for high intensity spot lights aimed toward the camera lens.
Stabliser
This function can reduce image blur caused by camera movement. The correction effect works best at vibration frequencies of around 10 Hz and may not be as effective in conditions of high frequency vibration. In such high frequency vibration conditions, turn the image stabiliser function off. The image stabilizer function uses digital zoom methodology that may result in reduced angle of view and resolution.
Gamma Menu
Mode
Standard: Standard setting (same as the MOVIE setting on the camera).
Straight: This selects a straight GAMMA curve.
Pattern: You can choose a gamma curve from 512 patterns stored in the camera. You can specify the pattern from 512 patterns using PATTERN and PATTERN FINE. PATTERN defines the upper two digits of the pattern, and PATTERN FINE defines the last digit.
Pattern
Choose a value from 0 to 51. This can be chosen when Mode is PATTERN.
Pattern Fine
Choose a value from 0 to 9. When PATTERN is 0 (zero), zero cannot be chosen for PATTERN FINE. When PATTERN is 51, a value larger than 2 cannot be chosen for PATTERN FINE. This can be chosen when Mode is PATTERN.
Offset
You can choose the offset of the output level of gamma curves. Choose a value from -64 to +64.
Level
Gamma level, you can choose a level value from -7 to +7.
Black Gamma
You can adjust the black gamma level to recreate gradation in the dark areas of the picture or to sup- press noise with blackout. Choose a value from -7 to +7.
Black Gamma Range
You can adjust the brightness range for which BLACK GAMMA becomes effective. Choose from LOW, MIDDLE, and HIGH. The range becomes small when LOW is chosen, and it becomes large when HIGH is chosen.
Black Level
You can adjust the master BLACK LEVEL. Choose a value from -48 to +48.
Visibility Enhancer
Depending on the imaging scene, the Visibility Enhancer function makes the darker part of a camera image brighter, and automatically correct brightness and contrast to show bright parts clearly.
Pan Tilt Zoom Menu
The Pan Tilt Zoom menu is used to select the pan/tilt/zoom mode.
Digital Zoom
On: 12X digital zoom is activated. Digital zoom activates after the optical zoom reaches its maximum of 12X.
Off: Only optical zoom is available.
SRZ (Super Resolution Zoom): expands zoom range to 18X zoom at 4K, or 24X zoom at FHD without sacrificing detail.
Zoom Ration OSD
Determines whether the zoom ratio displays on screen.
AF Sen
When set to NORMAL, autofocus response will be fast and suited for frequently moving subjects. When set to LOW, the autofocus response is slowed which can improve the stability of the focus in low light conditions.
MF Speed
Choose between eight manual focus speeds.
Near Limit
You can set the camera to ignore focusing on subjects that are closer than a designated distance. Can be set in a range from OVER, 1cm, 11cm, 30cm, 80cm, 1.2m, 1.4m, 1.6m, 2.0m, 2.5m, 3.1m, 4.2m, 6m, 10m, 20m.
Adaptive P/T
When set to ON, P/T speed are adaptive to the zoom range. For example, the higher zoom ratio you use, the slower the speed of P/T.
P/T Speed
The P/T Speed can be set from 0 to 5 (from low to high), when controlling using the remote controller.
Preset Speed
Set the preset recall movement speed from 0 to 5.
Pan Dir
Camera horizontal Left and right orientation setting with the option to Invert.
Tilt Dir
Camera tilt up and down orientation setting with the option to Invert.
System Menu
Pelco ID
When using RS485 (PELCO P/D) control, set Camera ID to the controlled address. This value is from 001-255.
IR-Receive (Infrared Signal Reception)
When this is set to OFF, the camera does not receive the signal from the infrared remote controller. Be sure to keep it set to ON when you use the infrared remote controller. Note that you cannot set IR-RECEIVE to OFF when you operate the menu using the infrared remote controller. To set it to OFF, use the appropriate VISCA controller.
Display Info
When this item is set to ON, the camera configuration is displayed for approx. 3 seconds on the screen when the camera is powered on or rebooted.
Preset Memory
This feature allows you to save the image parameters to PRESET memory. Parameters such as picture, white balance, exposure, focus mode, zoom positions can be saved with the preset.
Factory Reset
Select this item to set camera back to the factory default setting. Press the HOME button to confirm the action. All user settings for the camera will be deleted.
Reload Preset 1
When set to ON, preset 1 is set to the Home position. The camera moves to the Home position when it is powered on or reset.
Auto Focus
Set the speed of auto-focusing from Low to Normal.
Video Format
Select VIDEO FORMAT, press the "←" button to choose the video format, then press "→" (Pressing "→" button changes the value on some product models) or HOME button to confirm. After confirmation, press the HOME button again to restore it. The camera will reboot by itself and the new video format is activated.
- You can cancel it by pressing the MENU button.
- Depending on the video client software you are using, some video software may need to be restarted to obtain the new video format.
The camera video format can also be changed by setting the rotary DIP switch at the back of the unit.
SV (Software Version)
Software Version Number that is currently running on the camera, you may need this information for technical support.
Remote Controller
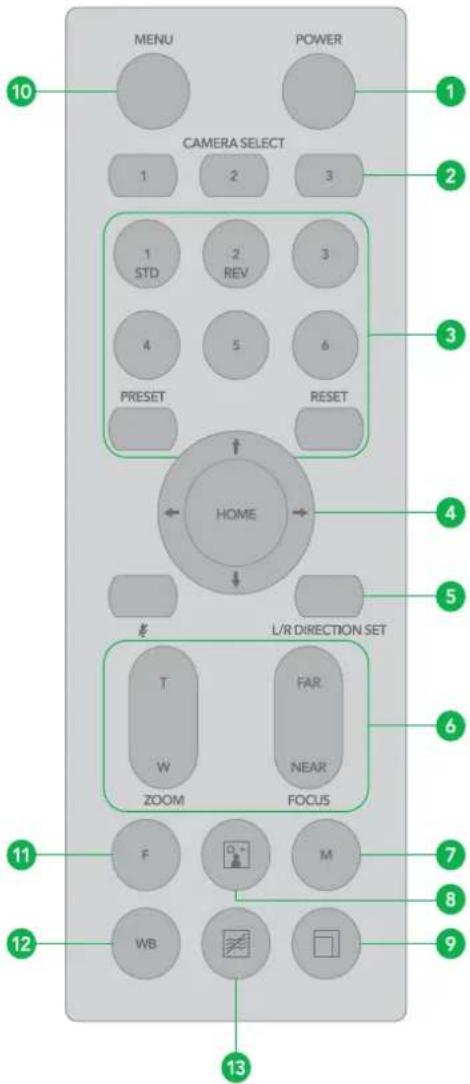
1. Power
•Power ON the camera to set the camera to operational status.
•Power OFF the camera to set the camera to standby status.
- When the camera is powered OFF, the camera turns to the rear.
- When the camera is powered ON, the camera turns to the front.
• Powering the camera ON/OFF would not restart the camera.
2. Camera ID (Total 3) Selector
3. Preset Position (Total 6) Calling and Setting
4. PAN-TILT
•Pan and Tilt direction control.
•HOME: Home position, Resolution reset.
5. L/R Direction Set
• Left and right orientation setting.
6. ZOOM/FOCUS
- Far - for objects further from the camera.
- Near - for objects closer to the camera.
7. Auto/Manual Focus
8. Back Light
9. Video Format Switching
- You can change the video format by keep pressing the button. (When video format is changed, the camera would restart and the screen turns black for few seconds.)
10. MENU
• On screen menu display ON/OFF.
11. Fast/Slow Zooming Speed Switching
12. White Balance
- Change the White Balance setting by pressing the button.
13. De-Flicker
- When you find the video flicking, press the button once to eliminate flickering.
Controlling the Camera Using the Remote Controller
Panning and Tilting
- Press the POWER switch. The camera will turn on and perform the pan/tilt reset operation automatically.
- Press the arrow button to pan or tilt the camera. While checking the picture on the screen, press the desired arrow button.
- To move the camera in short increments, press the button.
- o move the camera in long increments, press and hold the button.
- To move the camera diagonally, press the "← or →" button while holding down the "↑ or ↓" button.
- Press the HOME button to return to the starting position
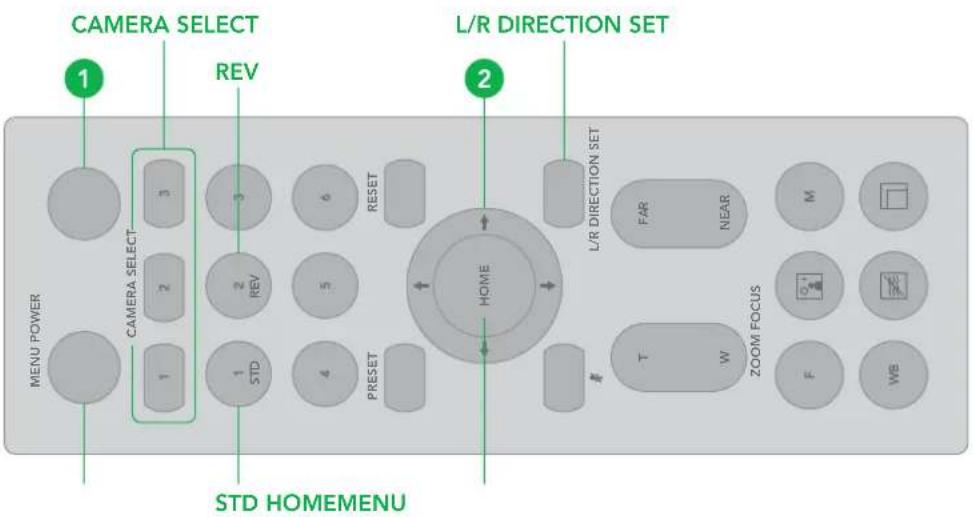
- If the camera moves in a different direction from the one that you intended, be aware that the camera is set so that the image output from the camera is rotated toward the right whenever you press the "→" button.
To set the remote to move the camera toward the opposite direction from that of the button you pressed, press the 2 (REV) button while holding down the L/R DIRECTION SET button.
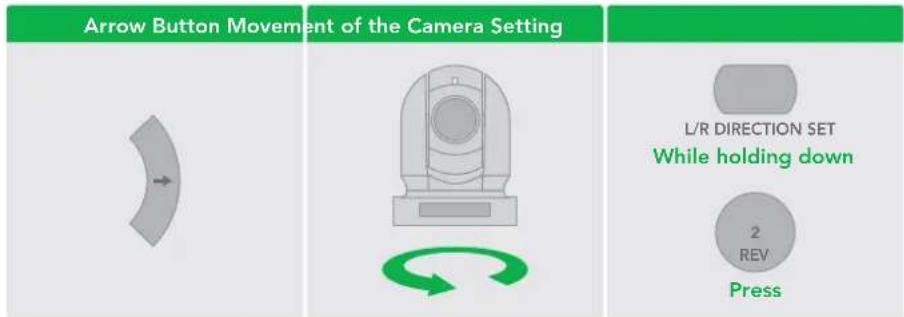
NOTE: The above setting only changes the signal emitted from the infrared remote controller, and does not change the setting of the camera itself. Therefore, repeat the setting for each infrared remote controller if you are using more than one infrared remote controller.
A blinking STANDBY lamp may indicate physical interference with the camera movement, and the camera may fail to memorize the pan/tilt position. In this case, press the PAN-TILT RESET button to reset the pan/tilt position.
Zooming
Button [T]: Zoom In.
Button [W]: Zoom Out.
Button [F]: Fast / Slow toggle.
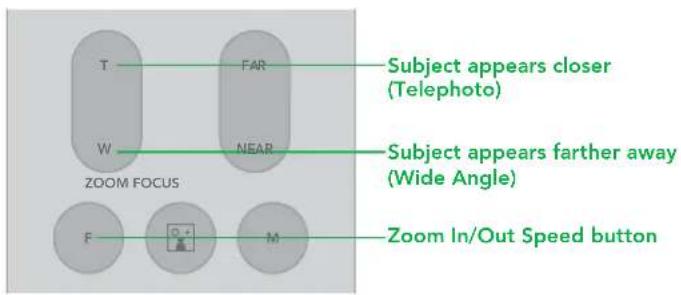
Focusing
Focusing the camera on a subject automatically
Press the AUTO button. The camera focuses on the subject at the center of the screen automatically.
Focusing the camera on a subject manually
After pressing the MANUAL button, press either the FAR or the NEAR button to have the camera focus on the subject.
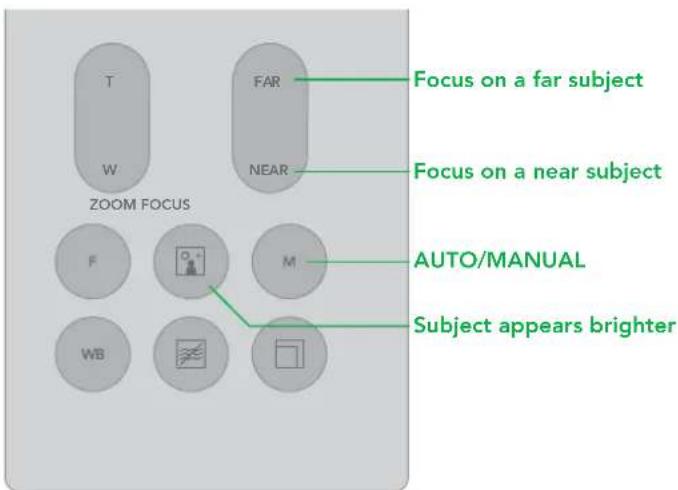
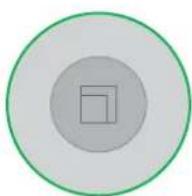
Shooting with Back Lighting
When you shoot a subject with a light source behind it, the subject becomes dark. In such a case, press the BACK LIGHT button. To cancel the function, press the BACK LIGHT button again.
NOTE: The BACK LIGHT function is effective if MODE is set to FULL AUTO in the EXPOSURE menu of the camera.
Changing Resolution
- Press the RESOLUTION button.
- Use the arrow keys to navigate the displayed menu.
- Press Home to select.
- Screen will display 'CHANGING...'
- Press Menu to exit.
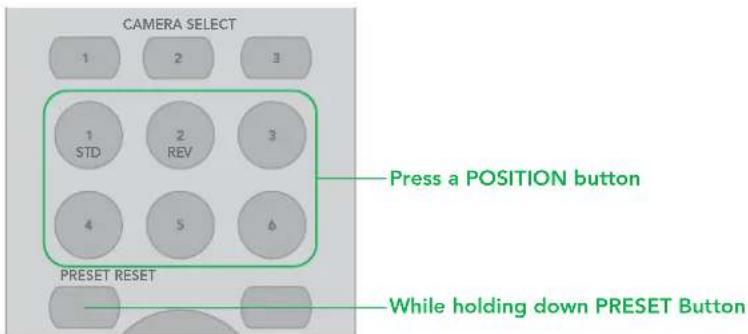
Storing the Camera Settings in Memory Using Presets
Using the preset function, six sets of camera shooting conditions can be stored and recalled. The six sets of camera shooting conditions can be stored and recalled by using remote controller. Up to 128 presets via protocol programming.
This function allows you to achieve the desired status instantly, even without adjusting the following items each time.
- Pan/Tilt Position
•Exposure Compensation On/Off - Zoom Position
- Exposure Level
• Focus Auto/Manual
•Backlight Compensation On/Off - Focus Position
- White Balance Mode
- AE Mode
•R/B Gain
•Shutter control parameters
•Aperture Control
•Bright Control - WD Parameter
•Iris control parameters
•Gain control parameters
The settings stored using this function are recalled when the power is turned on.
- Press the RESET button to reset the pan/tilt position.
- Adjust the position, zooming, focusing and backlighting of the camera.
- While holding down the PRESET button, press any of the POSITION buttons, 1 to 6, in which you want to store the settings.
Recalling the stored settings
Press any of the POSITION buttons, 1 to 6, in which you have stored the settings.
Cancelling the preset memory
While holding down the RESET button, press the POSITION button from which you want to cancel the settings.
NOTE:
- When the power is turned on, the camera starts with the settings stored in POSITION 1, so if you want to retain the previous pan and tilt positions, store those positions in POSITION 1.
- When you are storing or cancelling the settings in one POSITION, you cannot call up, store or cancel the settings in another POSITION.
- When the menu is displayed on the screen, you cannot perform the operation for storing, recalling, or cancelling the setting. Be sure to return to the normal display before starting these operations.
Operating Multiple Cameras with the Infrared Remote Controller
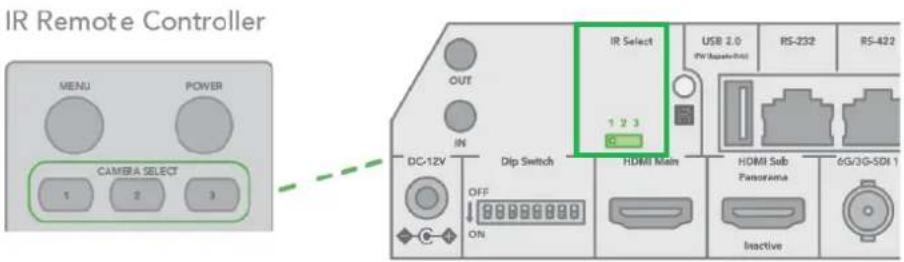
- Using the switch on the rear of the camera, assign a number to the camera (1, 2 or 3).
- Press the CAMERA SELECT button on the infrared remote controller that corresponds to the number set in step 1.
- You can now operate the camera(s) specified by number. Every time you operate the camera(s) using the infrared remote controller, the CAMERA SELECT button pressed in step 2 illuminates.
Web Configuration Panel
The web configuration panel (BirdUI) allows you to alter key settings of P4K, such as A/V settings, video frame rates, restarting the video processing engine, changing networking parameters, recalling PTZ presets and applying firmware updates.
Access via web browser (URL)
P4K is configured to automatically receive a network IP address from the computer network via DHCP (Dynamic Host Configuration Protocol). Most corporate, education and home networks have a DHCP server present on the network to allow this to occur. Usually your Internet Router provides this.
If P4K receives an IP address automatically from this server (DHCP), the IP address can be discovered in several ways, including BirdDog Central Lite available from here.
NOTE: Your computer will need to have 'Bonjour' services loaded in order to access the unit via it's user defined name. Apple devices come pre-installed with Bonjour, while Windows devices need a plugin available here.
Accessing P4K on a network without a DHCP server
Some standalone or private networks may not have a DHCP server. After 30 seconds of waiting for an automatically assigned IP address, the camera will reassign to the designated fallback address (the default is 192.168.100.100).
In order to access the BirdUI on a network which is configured to a different subnet, change your computers IP address to match the BirdDog unit. Once you gain access to the BirdUI, choose your IP address to match the rest of the devices on your network.
For instructions on setting your computer's IP address, please consult your computer operating system manual or IT support resources.
Password Management
Once you direct your web browser to the BirdUI you will need to log in to change any settings.
Default Password
The BirdUI is secured by a user-selectable password. The default password is: birddog (one word, lower case).
Password Reset
To change the password simply login using the default password, navigate to the Network tab in the BirdUI, and select Change Password.
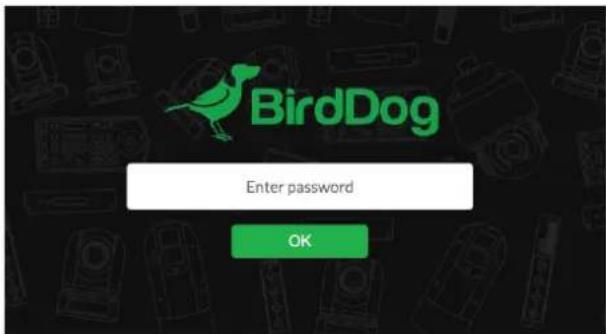
It is recommended to change this password in a network environment where P4K is shared with other users (e.g. not private). By entering this password, the user is granted full access to the configuration settings and could interrupt a live program.
BirdUI Layout
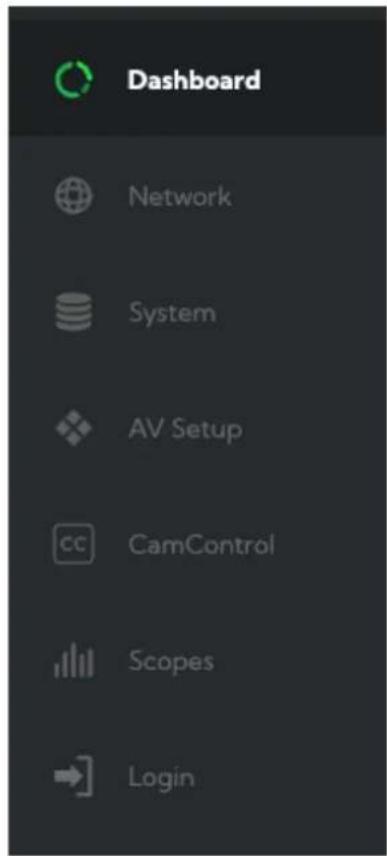
The BirdUI is organized into the following panels:
1. Dashboard
Overall view of important information such as the network connection type and video stream format and resolution.
2. Network
General network settings such as DHCP IP Address details, timeout fallback address and camera network name, as well as NDI® specific network settings
3. System
System admin functions such as updates, password change, designation of group access and camera reboot.
4. AV Setup
Full NDI ^® encode management and audio settings.
5. CamControl
Exposure, white balance, picture and color settings.
6. Scopes
Settings for the Histogram, Waveform, RGB Parade and Vectorscope.
7. Logout
Click to logout from the BirdUI.
Dashboard
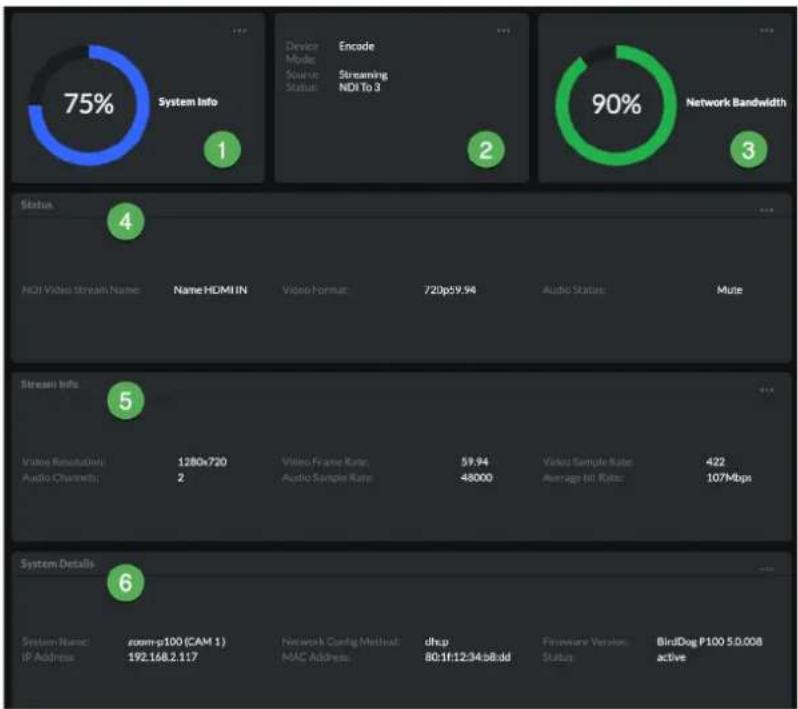
The Dashboard displays an overall view of important information.
1. System Info
Current computer system CPU utilization.
2. Device mode
Encode or Decode. For a camera this is fixed at Decode.
3. Network Bandwidth
Network bandwidth consumption of the current NDI® output stream(s).
4. Status
a. NDI video stream name
b. Selected video format.
c. NDI audio status.
pie
| Category | Value | |---|---| | System Info | 75% | | Device Mode: Source Status | Encode Streaming NDI To 3 | | Network Bandwidth | 90% | | Stream Info | | Video Resolution: Audio Channels | | Video Frame Rate: Audio Sample Rate | | Video Sample Rate: Average-bit Rate: | | | | | | | | | | | | | | | | | | | | | | | | | | | | | | | | | | | | | | | | | | | | | | | | | | | | | | | | | | | | | | | | | | | | | | | | | | | | | | | | | | | | | | | | | | | | | | | | | | | | | System Name: IP Address : zoom-p100 (CAM 1) 192.168.2.117 Network Config Method: MAC Address : dhp 80:1f:12:34:b8:dd Firewire Version: Status : BirdDog P100 5.0.008 active5. Stream Info
a. Video resolution. Number of audio channels of the camera.
b. Video frame rate. The audio output sample rate of the camera.
c. Video chroma subsample rate and average NDI® bitrate of the camera.
6. System Details.
a. Camera name.
b. Network details.
c. Online status of the camera.
d. MAC address and current firmware version of the camera.
Network
Network Details
Most computer networks provide for both automatic and manual configuration of network devices and the P4K can accommodate both.
Configuration Method
Here you can set the network configuration to either DHCP (default) or Static. DHCP simplifies the management of IP addresses on networks. No two hosts can have the same IP address, so assigning them manually can potentially lead to errors. If your network is set up for DHCP, this is generally the best configuration to choose. If you do choose to go with a Static IP address, you'll need to add the IP Address, Subnet Mask and Gateway Address information according to the requirements of your network.
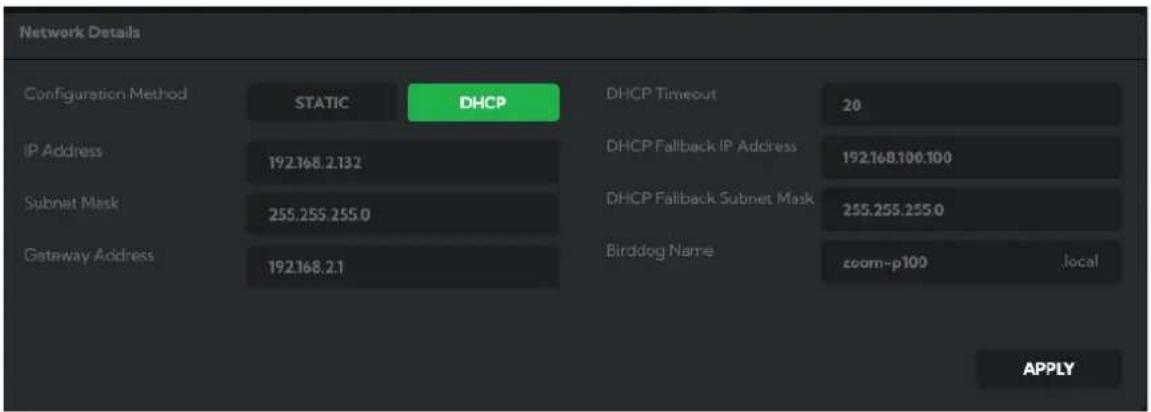
DHCP Timeout, Fallback IP address, Fallback Subnet Mask
You can set the timeout period during which P4K will look for a DHCP IP address. After this period, the camera will default to the designated fallback IP address.
This can be useful if you use your camera in other network environments. For example, if a DHCP server is available in your normal office or studio application, the camera will use the DHCP supplied IP address. If you then use the camera in another application without a DHCP server, your camera will always default to the known fallover IP address. NOTE: Do not set the fallback IP address the same as the camera IP address. It is recommended to keep the fallback IP address.
BirdDog Name
You can give your camera a meaningful name to make identification easier when viewing NDI® sources on a receiver such as a TriCaster, vMix or Studio Monitor. Be sure to make the name unique, as no two devices on the network should have the same name. The name can be any combination of a-z, 0-9, and '-'.
After renaming your camera, navigate back to the Dashboard and click REBOOT DEVICE. The camera will re-initialize and you'll be good to go.
NDI Network Settings
P4K operates with the latest NDI® Libraries. There are several options to configure camera behaviour in an NDI® network. Each configuration has its benefits, however it is recommended to utilise the default TCP transmit method unless you have reason to change.
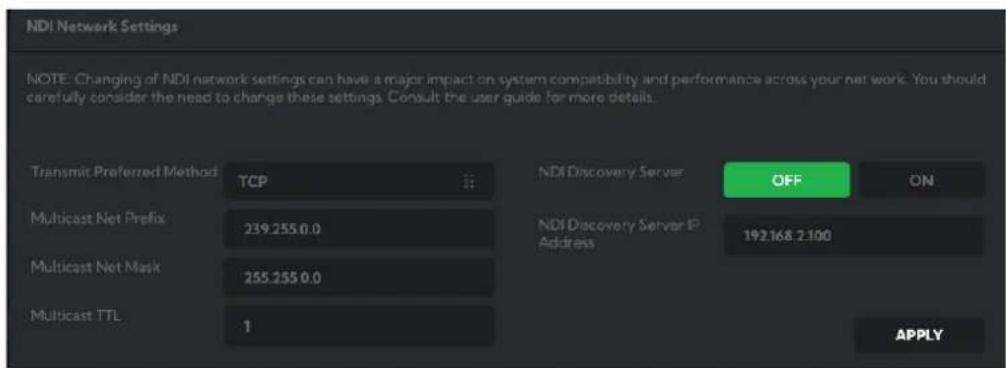
Preferred Transmit Method
TCP
TCP is the default method of transmission for NDI®. It operates well within local networks with predictable latency and limited jitter. BirdDog recommends that TCP be used for typical applications, and only using alternative transports for specific reasons.
UDP
UDP is recommended for networks where there is extended latency from one end to the other. The nature of UDP means that it does not receive a confirmation of each packet being received successfully – vastly improving performance on busy networks. UDP can have some consequences f there are other issues on the network such as jitter or lost packets as it will not inherently re-sent a lost packet.
R-UDP (Reliable UDP)
This protocol bridges the performance of TCP and UDP. Compared to TCP, it reduces overall network load (allowing more NDI ^® streams) by not requiring every packet to be 'acknowledged' by every receiver – has error correction built in for smoothness and reliability.
Multicast
Multicast is especially useful for use-cases that require a single source to be received on multiple receivers simultaneously. Utilizing Multicast offloads the distribution of the NDI® A/V packets from the camera to the network infrastructure. You should take care to ensure your network is specifically configured to support Multicast as using it on an ill-prepared network can create unintended network problems.
NDI Discovery
If you choose to use a NDI® Discovery Server, you can configure it in this tab. By default, NDI® utilizes mDNS (multicast Domain Name System) to create the zero configuration environment for discovery. Unless the network is specifically configured to not allow mDNS, NDI® sources will be discovered.
The NDI ^® discovery service is designed to replace the automatic discovery NDI ^® uses with a server that operates as an efficient centralized registry of NDI ^® sources that requires much less bandwidth. Multiple servers can be specified for failover redundancy. NDI ^® discovery server also helps with location of devices that reside on different subnets. The NDI ^® Discovery Server is available in the free NDI SDK.
- If you are using one or more NDI® Discovery Servers, click the ON button.
- Enter a comma delimited list of the IP address(es) of your NDI® Discovery Server(s).
- Click the APPLY button to save your changes.
System
Password Settings
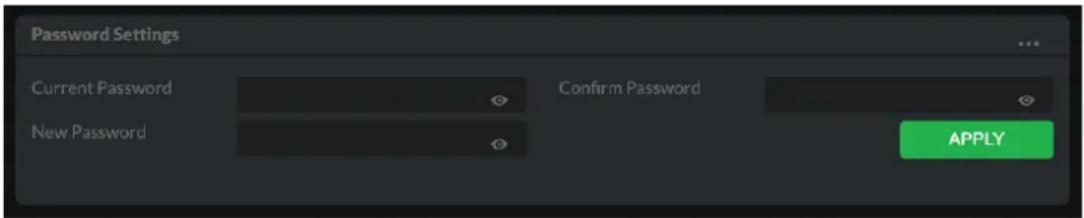
The BirdUI is secured by a user-selectable password. The default password is birddog (one word, lower case). It is recommended that the default password be changed, since the BirdUI grants full access to the camera configuration settings.
You can change the password in the Password Settings tab.
- Enter the current password.
- Enter the new password. It is recommended to change this password to retain administration rights to prevent unauthorized changes in a network environment where PTZ Keyboard is shared with other users (e.g. not private). Confirm the new password and click the Apply button.
System Update
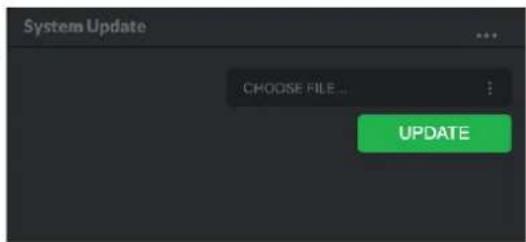
We are always adding new features and improving the performance of our products, so installing the latest firmware will provide you with the best user experience.
To upgrade the firmware, please download the firmware and follow the Firmware Upgrade Instructions located in your firmware folder.
Access Manager Configuration
Remote IP List
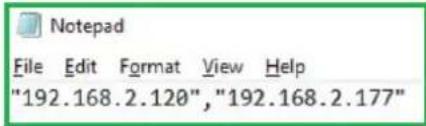
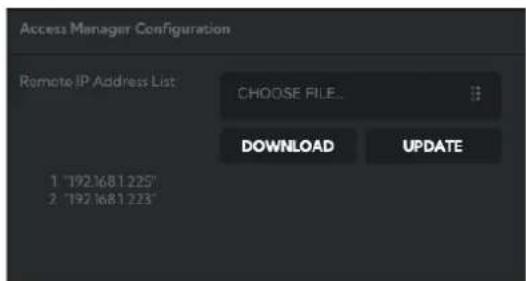
By default, NDI® devices are visible to each other only when they're on the same VLAN. If you want visibility or control of a device on a different VLAN, you need to add it's address manually as a Remote IP. You can upload and download Remote IP Lists for sharing with other cameras. To upload a list:
- Click the CHOOSE FILE button to load your Remote IP List in UTF-8 encoded string format.
- Click the UPDATE button. Do not upload a blank list.
NDI Group List
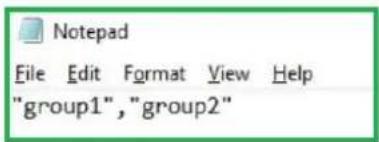
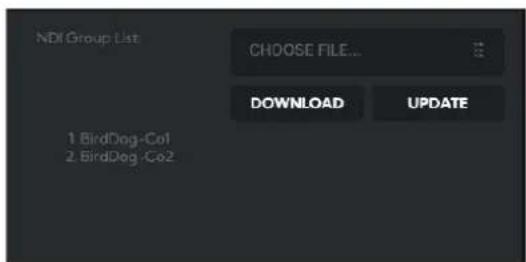
Set the NDI® group list. NDI® groups allow you to restrict communication to only devices that belong to the same NDI® group. NDI® Groups can be very useful in larger environments to control visibility and access amongst various groups. You can upload and download group lists for sharing with other cameras. Groups also need setting up in NDI Access Manager, available in NDI Tools.
To upload a list:
- Click the CHOOSE FILE button to load your NDI® Group List in UTF-8 encoded string format.
- Click the UPDATE button. Do not upload a blank list.
Unit Reboot
Click the Reboot button to perform a camera reboot.
AV Setup
Device Settings
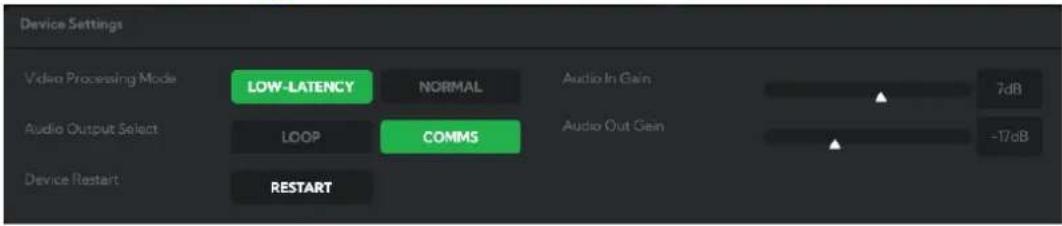
Video Processing Mode
You can choose Low Latency mode to improve performance in applications where latency may be an issue. In this mode, SDI and HDMI outputs, as well as the OSD (On Screen Display) are disabled. Click the Device Restart button when changing this setting. Video formats available in this mode are 2160p30, 29.97, 25, 24, 23.97 and 1080p60, 59.94, 50.
Audio Output Select
Loop: Audio from the Audio In port, for example, from a connected microphone, is directed to the Audio Out port for monitoring.
Comms: Audio from NDI ^® stream is directed to the audio out for camera operator comms. You'll need software such as BirdDog Comms Lite/Pro to use this function.
Audio In / Out Gain
Controls for adjusting the audio in/out gain.
Device Restart
Restarts the NDI ^® stream. This may be necessary after changing key image settings e.g., resolution and Low latency mode.
NDI Encode Settings
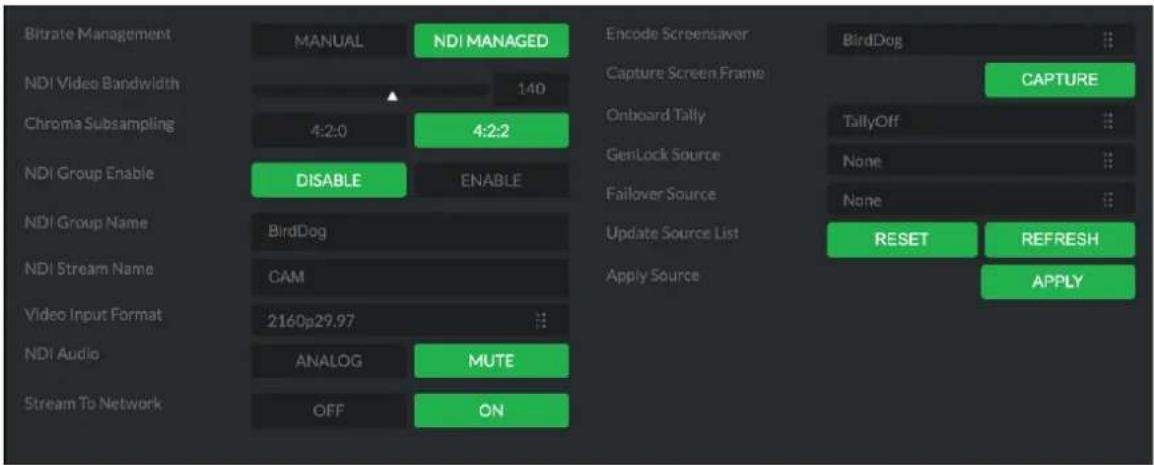
Bitrate Management
Birddog Devices allow you to set your target NDI® output bitrate. This allows you to select a compression ratio that is more efficient for your networking infrastructure (lower bandwidth) or higher image quality for critical footage. The scale allows you to select the range of 60 Mbps - 360 Mbps.
By setting Bitrate Management to NDI MANAGED, the target bitrate will be set in accordance with the NDI® standard. By selecting MANUAL you are able to manually select a target bitrate. Select MANUAL with care, as you will need to account for the capacity of the network and the receiving device.
Chroma Subsampling
Set the desired level of chroma subsampling.
NDI Groups
NDI® supports Grouping which allows you to hide the visibility of video sources to viewers that are not part of the group. If disabled (default), the video source is public and viewable by any receiver on your network. Click on the field and type a group name. Receivers can then scan for, and select your group.
Stream Name
You can give the camera NDI® output stream a meaningful name to make identification easier on any NDI®-capable receiver, particularly on networks where there are a large amount of NDI® streams.
NDI Video Format
P4K is capable of outputting independent video formats for both NDI® and SDI/HDMI. This setting affects only the NDI® video output. Please note that the video rate you select here must be of the same family as the SDI/HDMI video output, for example 720p50 aligns with 1080i50/1080p50 but will not co-exist with any 29.97/30fps based camera setting.
NDI Audio
Select MUTE to disable the NDI® audio. Select ANALOG to receive audio from the audio inputs.
Stream to Network
You can choose to disable the NDI output stream.
Encoder Screensaver
Assign a captured frame, black frame, or BirdDog logo as a screensaver.
Capture Screensaver Frame
Click the Capture button to capture the current frame for use as a screensaver.
Onboard Tally
Enable the camera Tally lights.
Genlock Source
Select the NDI® genlock source from the dropdown list.
NDI Failover Source
NDI® has a failover function whewre you can designate an alternate camera or NDI® source for the receiver, should this camera become disconnected or otherwise unavailable on the network. Click on the Available NDI Sources field to select your alternate source.
Update Source List
Pressing the Refresh button will add new sources to the list, whereas pressing the RESET button will populate the list with only active NDI® sources. Click the APPLY button to apply your failover source change.
Cam Control
Camera Control Tab
Menu On / Off
To adjust cameras settings via the OSD (On Screen Display), click the Menu ON/OFF button.
The OSD is visible on both the NDI® output and SDI/HDMI, and can also be accessed via the included remote control. Since it uses the same controls for menu navigation, PTZ control of the camera movement will not be possible until the OSD menu is closed again.
Zoom
Click the TELE button to zoom in and the WIDE button to zoom out.
Focus Mode
Select between Auto and Manual focus modes.
Focus
Click the IN button to focus on nearer subjects and the OUT button to focus on subjects further from the camera.
Pan / Tilt / Zoom Speed
When controlling P120 over NDI® you can individually set the maximum speed of PTZ movements. Higher numbers produce faster and more sensitive movements of the camera.
Image Settings Reset
Click this button to reset all image settings to their factory default.
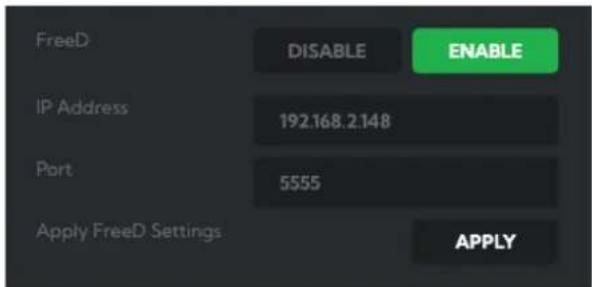
FreeD Tab
Enable or disable FreeD. FreeD is a protocol for real time camera PTZ position query. Any application that uses FreeD can use this data, usually in a virtual environment, where a physical camera move (i.e. pan, tilt, zoom or iris change) can trigger the virtual environment to follow that move in real time.
IP Address / Port
Enter the IP address of the host and the port that the data package will be sent to.
Apply FreeD Settings
Click the APPLY button to save your changes.
Preset Tab
To save a Preset select a number, make your desired changes, click the Save button and then click a Preset number. To recall a Preset, click the Preset number. You can save two separate and different types of Presets:
BirdDog
Saves only PTZ information with the Preset.
Camera
If System/Preset Memory is enabled in the camera Menu via the OSD, image parameters such as picture, white balance, exposure, focus mode, zoom positions will also be saved with the Preset.
Exposure Tab
Mode
Full Auto: IRIS, GAIN and SPEED (shutter speed) are set automatically using the values set for SLOW SHUTTER, S. SHUTTER LIMIT, AE SPEED, GAIN LIMIT, GAIN POINT, POINT, HIGH SENSITIVITY, MAX SPEED, MIN SPEED, BACK LIGHT, SPOT LIGHT and EXPOSURE COMPENSATION.
Manual: Allows manual adjustment of the GAIN, GAIN LIMIT, SPEED, IRIS, and HIGH SENSITIVITY.
Iris Pri: Iris Priority mode. This mode allows you to set a fixed IRIS. The gain and shutter speed are set automatically according to the brightness of the subject. The exposure is adjusted automatically using the values manually set for IRIS, GAIN LIMIT, GAIN POINT, AE SPEED, MAX SPEED, MIN SPEED, BACK LIGHT, SPOT LIGHT and EXPOSURE COMPENSATION.
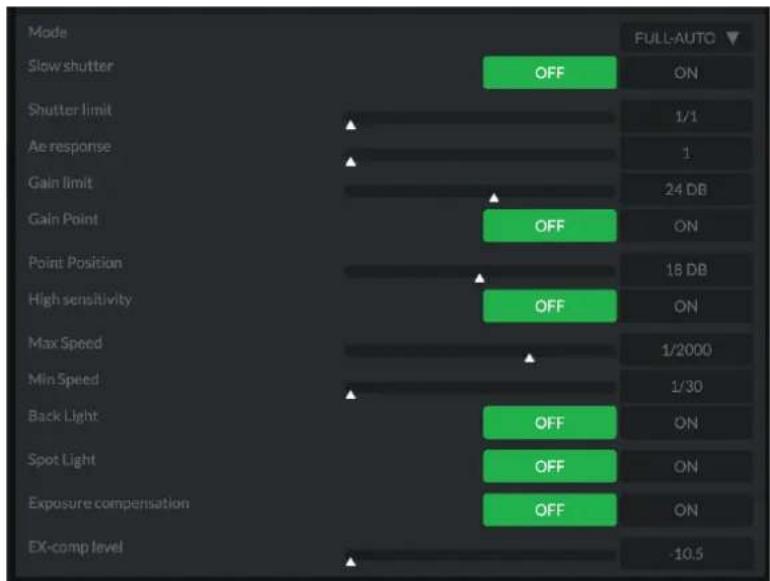
Shutter Pri: Shutter Priority mode. This mode allows you to set a fixed shutter SPEED with exposure achieved by automatic setting of IRIS and GAIN, according to the brightness of the subject. The exposure is adjusted automatically using the values manually set for SPEED, GAIN LIMIT, AE SPEED, BACK LIGHT, SPOT LIGHT and EXPOSURE COMPENSATION.
Bright: The bright control function adjusts both gain and iris using an internal algorithm, according to a brightness level freely set by the user. Exposure is controlled by gain when dark, and by iris when bright. As both gain and iris are fixed, this mode is used when exposing at a fixed camera sensitivity. When switching from Full Auto or Shutter Priority Mode to Bright Mode, the current status will be retained for a short period of time. The exposure is adjusted automatically using the values manually set for the bright level (LEVEL) and HIGH SENSITIVITY.
Gain Pri: Gain Priority mode. This mode allows you to set a fixed GAIN. The IRIS and SPEED are set automatically according to the brightness of the subject. The exposure is adjusted automatically using the values manually set for GAIN, GAIN POINT, AE SPEED, HIGH SENSITIVITY, MAX SPEED, MIN SPEED, BACKLIGHT, SPOTLIGHT and EXPOSURE COMPENSATION.
Below are the various parameters for these exposure modes.
Gain
Select the gain from the following: 0dB, 3dB, 6dB, 9dB, 12dB, 15dB, 18dB, 21dB, 24dB, 27dB, 30dB, 33dB, 36dB.
Gain Limit
The gain limit can be set at Full Auto, Shutter Priority, Iris Priority, Bright, Spot Exposure and Manual in AE mode. This is useful to limit the automatic setting of gain which can lead to excessive image noise at extreme settings. Choose from: 9dB, 12dB, 15dB, 18dB, 21dB, 24dB, 27dB, 30dB, 33dB, 36dB.
Gain Point/Position
Set the Gain Point between 0dB and the gain limit. The shutter speed can be changed from the point when the set gain value is reached. When you want to obtain a motion-priority image, use this setting.
High Sensitivity
This function increases the max. gain to allow bright output in darker environments. However, with a strong gain (up to 10×), the image may exhibit higher levels of noise.
Iris
Select the iris the following: F11, F10, F9.6, F8.7, F8.0, F7.3, F6.8, F6.2, F5.6, F5.2, F4.8, F4.4, F4.0, F3.7, F3.4, F3.1, F2.8
Slow Shutter
When set to "On," the slow shutter functions automatically in low light conditions. This setting is available only when the AE mode is set to "Full Auto." The default setting is Off.
Shutter Limit
With certain settings, in low light conditions, the shutter speed slows and the gain is increased. This function allows you to limit the shutter speed reduction. This helps prevent image shake when shooting a moving subject in low light conditions.
AE Response
This setting allows you to reduce the exposure response speed. By default, optimum exposure can be obtained automatically within approx. 1 second. The slow AE response function allows you to lengthen this response time.
Maximum SPEED (Maximum Shutter Limit)
In auto modes, the brighter the object is, the shutter speed will increase. You can set the upper limit on the shutter speed increase, helping to make images with motion more smooth.
Minimum SPEED (Minimum Shutter Limit)
In low light conditions, the shutter speed may become slow and the gain is increased. Here you can put a limit on the shutter speed reduction, helping to prevent camera shake when you shootingb moving subjects.
Backlight
When the background of the subject is too bright, or when the subject is too dark due to shooting in the AE mode, back light compensation can help make the subject better exposed.
Spotlight
Spotlight compensation will attempt to compensate exposure in conditions where strong light falls on the subject, such as a person's face in a spotlight. You can choose either ON or OFF. This setting is enabled when MODE is FULL AUTO, SHUTTER PRI, IRIS PRI, or GAIN PRI. SPOT LIGHT becomes disabled when BACK LIGHT is ON.
Exposure Compensation
When MODE is set to FULL AUTO, SHUTTER PRI or IRIS PRI, setting EXPOSURE COMPENSATION to ON allows exposure compensation levels to be set from the following values: -10.5, -9, -7.5, -6, -4.5, -3, -1.5, 0, +1.5, +3, +4.5, +6, +7.5, +9, +10.5. Setting the level to 0 disables exposure compensation. Level +10.5 is the brightest and -10.5 is the darkest compensation value. EXPOSURE COMPENSATION is set to OFF, exposure compensation is disabled.
White Balance Tab
Cam White Balance
Auto: This mode computes the white balance value output using color information from the entire frame with a range of values from 2500K to 7500K. This mode is the default setting.
Indoor: Sets the color temperature to 3200K.
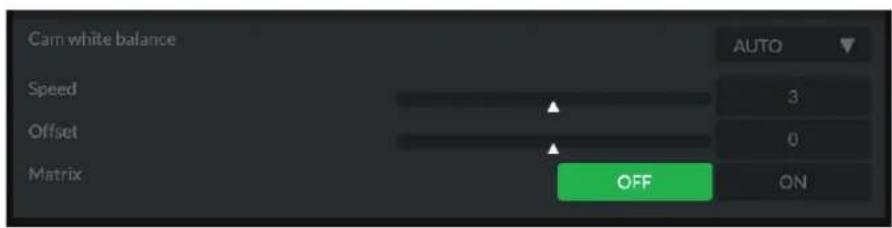
Outdoor: Sets the color temperature to 5800K.
OPW (One Push White Balance): The One Push White Balance mode is a fixed white balance mode that may be automatically readjusted only at the request of the user (One Push Trigger), assuming that a white subject, in correct lighting conditions can occupying more than 1/2 of the image. One Push White Balance data is lost when the power is turned off. If the power is turned off, you'll need to reset One Push White Balance.
To select OPW:
- Place a white subject (i.e., sheet of white paper) in the center of the frame.
- Press the remote controller HOME button to activate the one-push white balance adjustment.
ATW (Auto Tracking White Balance): Auto Tracking White balance (2000K to 10000K), allows the camera to adjust the white balance according to the temperature of the light source illuminating the subject.
Manual 1: This user mode allows you to manually set the color balance parameters.
Below are the various parameters for these white balance modes.
Cam Red/Blue Gain
Sets the intensity of red and blue colors of the image.
Cam Color Temp
Sets the color temperature of the image in degrees Kelvin.
Speed (white balance speed)
You can adjust the speed at which the camera reaches the white convergence point when AUTO is chosen. Choose a value from 1 - 5, from slow to fast.
Offset
The white convergence point can be shifted when WHITE BALANCE mode is AUTO or ONE PUSH. The range is from -7 to 0 to +7. White balance is shifted toward blue when a negative value is chosen, and it is shifted toward red when a positive value is chosen.
Matrix (Color Matrix)
You can emphasize or weaken a specific color region while keeping the white convergence point unchanged. When you turn this ON, the following items are displayed for adjustment.
Detail Tab

Mode
Auto: Contour correction signal is automatically added. You can set the volume of the contour correction signal. Choose a LEVEL value from 0 to 15. The greater the value, the stronger the contour correction signal.
Manual: Configure the following settings manually.
Bandwidth
Set the bandwidth for signals undergoing contour emphasis. You can choose from DEFAULT, LOW, MIDDLE, HIGH, and WIDE. For example, when you choose MIDDLE, the middle range of the signals is elevated, and contours in that middle range are emphasized.
Crispening
Choose the fineness of the objects subject to contour correction with contour correction signals. Choose a value from 0 to 7. When you choose a higher value, minute contour correction signal elements are removed, and only the high level contour correction signals are left, which reduces noise. When you choose a lower value, minute contour correction signal elements are added to the picture, increasing noise.
H/V Balance
Choose the ratio for horizontal and vertical contour correction signal elements. Choose a value from -2 to 0 to +2. When you choose a higher value, the horizontal contour correction elements become greater compared to the vertical elements.
B/W Balance
Adjust the balance between contours in black on the low brightness side of the spectrum and contours in white on the high brightness side. Choose from TYPE 1 to TYPE 5. The ratio of contours in black is higher for TYPE1 while the ratio of contours in white is higher for TYPE 5.
Limit
Choose the maximum value for the amount of contour emphasis in black on the low brightness side of the spectrum and in white on the high brightness side. Choose a value from 0 to 7.
Highlight Detail
Adjust the level of contour added to brightly lit objects. Choose a value from 0 to 4. Adjust this when you want to emphasize the contour of a brightly lit object in a bright background.
Super Low
Emphasizes contours in the super low range. Choose a value from 0 to 7. The greater the value, the greater the contour emphasis. Contrast and resolution increase.
Picture Tab
2D/3D NR
2D Noise Reduction is a method of reducing noise within an image by comparing the image from frame to frame, removing variations that do not appear in each frame. 3D Noise Reduction is a method of reducing noise by comparing variances within the same frame, as well as comparing frame to frame. This will often reduce noise without leaving trails behind a moving object.
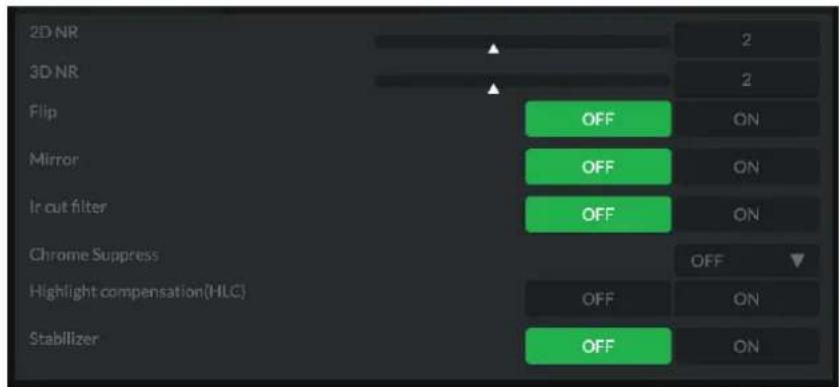
Flip
Flips the image upside down for ceiling mounted cameras. Select from upright mode (OFF) or ceiling mount (ON).
Mirror
Displays a mirror image of the video image.
IR Cut Filter
An IR (infrared) cut filter can be disengaged for increased image sensitivity in low light conditions. The filter will automatically engage depending on the ambient light, allowing the camera to be effective in day/night environments. When the mode is set to NIGHT, a monochrome (black and white) image will be displayed.
Chroma Suppress
The chroma suppress mode can be engaged for low light conditions when color noise may be particularly noticeable. You can set the brightness from OFF, LOW, MID, HIGH in each mode of the variable gamma modes.
Highlight Compensation
Highlight Light Compensation attempts to adjust AE and AF to compensate for when high intensity spot lights are detected.
Stabilizer (available on 30X zoom)
This function can reduce image blur caused by camera movement. The correction effect works best at vibration frequencies of around 10 Hz and may not be as effective in conditions of high frequency vibration. In such high frequency vibration conditions, turn the image stabilizer function off.
The image stabilizer function uses the digital zoom methodology and may result reduced angle of view and resolution.
Gamma Tab
Gamma Mode
Standard: Standard setting (same as the MOVIE setting on the camera).
Straight: This selects a straight GAMMA curve.
Pattern: You can choose a gamma curve from 512 patterns stored in the camera. You can specify the a pattern from 512 patterns using PATTERN and PATTERN FINE. PATTERN defines the upper two digits of the pattern, and PATTERN FINE defines the last digit.
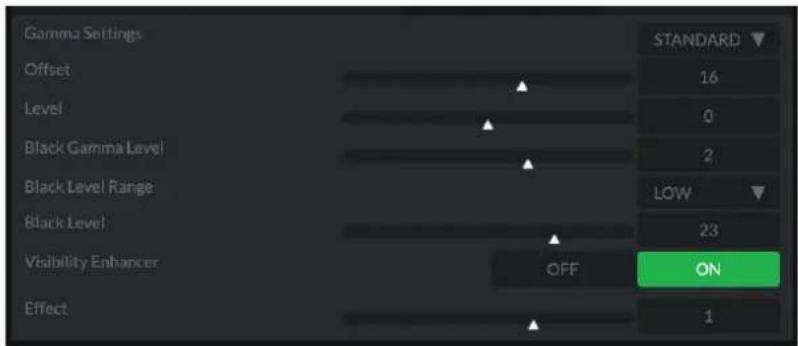
Pattern
Choose a value from 0 to 51. This can be chosen when SELECT is PATTERN.
Pattern Fine
Choose a value from 0 to 9. When PATTERN is 0 (zero), zero cannot be chosen for PATTERN FINE. When PATTERN is 51, a value larger than 2 cannot be chosen for PATTERN FINE. This can be chosen when SELECT is PATTERN.
Offset
You can choose the offset of the output level of gamma curves. Choose a value from -64 to +64.
Level
Gamma level, you can choose a level value from -7 to +7.
Black Gamma
You can adjust the black gamma level to recreate gradation in the dark areas of the picture or to sup- press noise with blackout. Choose a value from -7 to +7.
Black Gamma Range
You can adjust the brightness range for which BLACK GAMMA becomes effective. Choose from LOW, MIDDLE, and HIGH. The range becomes small when LOW is chosen, and it becomes large when HIGH is chosen.
Black Level
You can adjust the master BLACK LEVEL. Choose a value from -48 to +48.
Visibility Enhancer
Depending on the imaging scene, the Visibility Enhancer function makes the darker part of a camera image brighter, and automatically correct brightness and contrast to show bright parts clearly.
Effect
The Effect setting sets the intensity of the Visibility Enhancer function. Values range from -3 to +3.
Colour Matrix Tab
The Color Matrix features 64 levels of adjustment of Gain (Intensity) and Hue (offset) across six color sections, Red, Green, Blue, Cyan, Magenta and Yellow, and allows individual fine-tuning of each of these without affecting the response of other color components.
You can also view an online video that covers this section.
Colour Gain
The Gain control of each colour component defines how intense that colour is represented in the image. The default level (32) is a moderate gain which shows an even bias between all pixels that contain the colour. I.e. a dark red with have the red component shown as vividly as a bright red, this generally gives a balanced look to your colour representation.
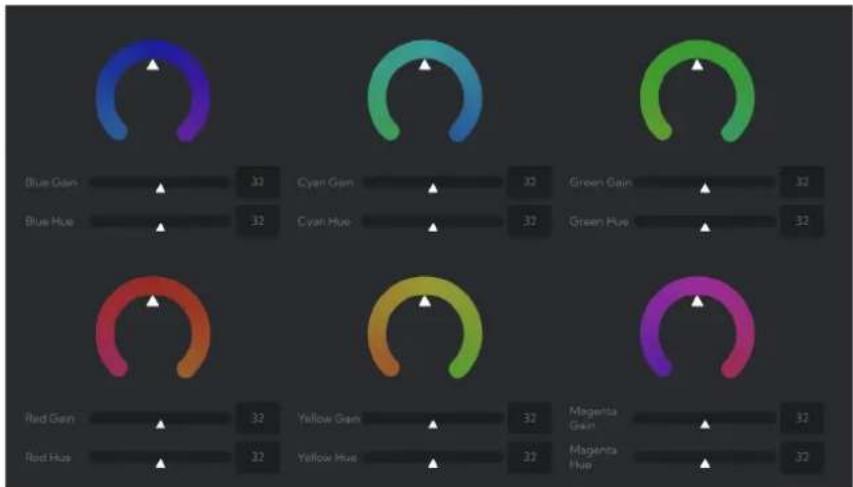
gauge
| Channel | Value | |---------|-------| | Blue Gain | 32 | | Cyan Gain | 32 | | Green Gain | 32 | | Blue Hue | 32 | | Cyan Hue | 32 | | Green Hue | 32 | | Red Gain | 32 | | Yellow Gain | 32 | | Magenta Gain | 32 | | Red Hue | 32 | | Yellow Hue | 32 | | Magenta Hue | 32 |Increasing the gain valueb will add additional intensity to all parts of the image pertaining to this colour. For example, if you increase the Red gain value to 64 all pixels that are red in the image will have a boost of colour compared to other colours in the image resulting in a more vivid representation of this colour. Conversely reducing the colour gain will take some intensity out of the target colour. This can be useful in some lighting conditions where certain colours appear over saturated to the camera.
Colour Hue
The Colour Hue option adjusts the temperature or phase in which any colour is represented. When looking at the colour spectrum, beyond the true colour points for each of the main colour adjustments in the camera (Red, Green, Blue, Cyan, Magenta and Yellow there are areas where the colours transition to their neighbouring colour point. The Colour Matrix controls allow you to adjust the colour offset in a negative (counter clockwise) or positive (clockwise) direction, effectively moving the cameras response to any colour towards its neighbouring colour transition point. Adjusting individual colour Hue can assist dramatically in matching colour representation from the camera to true-to like colours or matching the camera to other cameras in your production.
Using a Colour Chart
It is recommended to utilise a colour chart or colour chip chart when adjusting the Colour Matrix controls. These charts are available readily and have colour chips for each of the colours that the camera can adjust. By utilising a colour chip chart you are more easily able to see the impact of any adjustment you are making.
Using a colour chip chart such as the Datacolor SpyderCheckr can be beneficial to fine-tuning adjustments in the Colour Matrix.
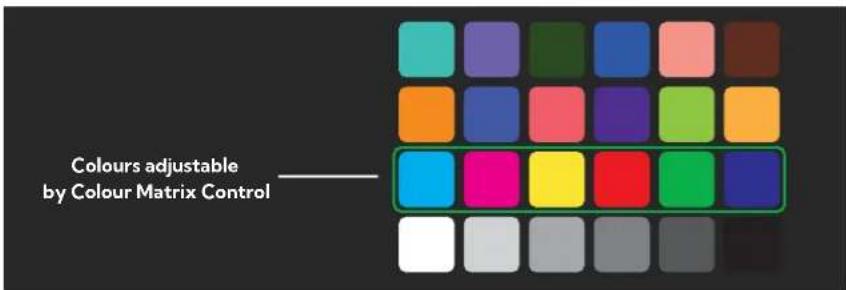
Scopes
Since there is variation in both the eyesight of individuals and video monitors, Cam Control offers NDI® video scopes to assist in evaluating the color and tonal qualities of your image.
Program / Preview Enable: Choose to overlay the scopes on either the program output, the preview output or both.
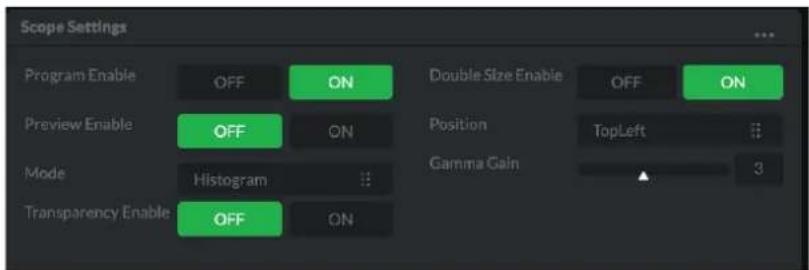
Transparency Enable: Click the ON button to enable scope transparency, allowing the video image to be visible behind the scopes.
Double Size Enable: Click the ON button to select the large scope size.
Position: Selects the position of the overlayed scope on the video image. Select from Top Left, Top Right, Bottom Left and Bottom Right.
Gamma Gain: Adjusts the brightness of the displayed scopes.
Mode
Histogram: The Histogram shows the distribution of luminance (brightness) in the image, from darker pixels on the left of the scope, to brighter pixels on the right. The height of the curve is a measure of the number of pixels in the image with a particular luminance value. Unlike the Waveform or RGB Parade scope, the Histogram does not indicate the left to right physical position of the luminance values in the image.
Waveform: The Waveform scope shows the distribution of luminance in the image as a waveform that ranges from zero at the lower horizontal line, to 100 % intensity at the upper horizontal line. The left to right position of the values match their position in the image.
RGB Parade: The RGB Parade shows the intensity of Red, Green and Blue in the image as separate waveforms that ranges from zero at the lower horizontal line, to 100 % intensity at the upper horizontal line. For each waveform, the left to right position of the values match their position in the image.
Vector: The Vectorscope is a circular graph that displays the chrominance (hue and saturation) of the image colors. The distance from the center indicates the degree of color saturation, from zero intensity at the center of the circle, to 100% intensity at the edge of the circle.
The graph is divided into color segments, each indicated by the colored perimeter of the circle, showing the dispersion of color in the image. A Waveform scope is also displayed on the left side of the Vectorscope.
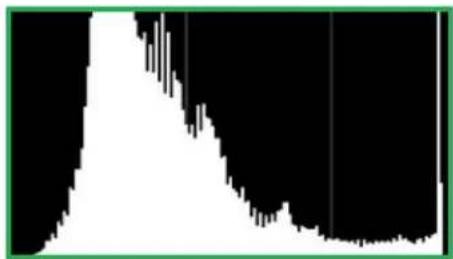
natural_image
Abstract black and white geometric pattern with a green border (no text or symbols)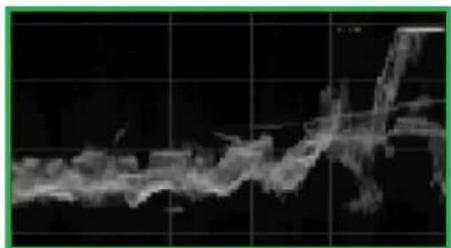
natural_image
Abstract grayscale image with faint horizontal streaks and grid lines, no visible text or symbols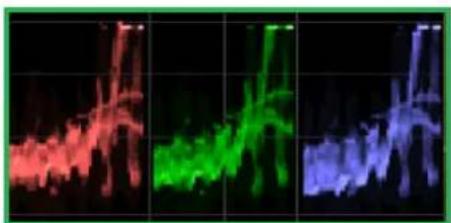
natural_image
Three-panel image showing abstract glowing shapes in red, green, and blue against a black background (no text or symbols)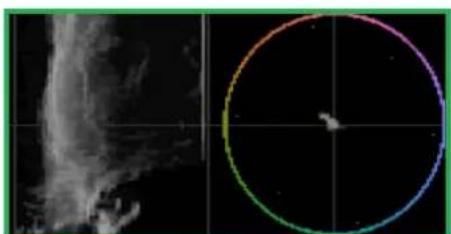
natural_image
Satellite image showing a cloud with a circular overlay on a black background (no text or symbols)Receiving NDI® Video
There are many applications that support receiving the NDI® signal that P4K produces. Each application will vary slightly on how you choose your source.
NewTek Studio Monitor
NDI® Tools is a free suite of applications designed to introduce you to the world of IP video and is available here.
The included Studio Monitor application allows you to monitor many NDI® sources on a standard Windows computer. Once Studio Monitor is launched on your computer, simply right click anywhere in the interface and select your camera from the dropdown list.
Once connected to P4K, a configuration gear icon is displayed on the bottom right-hand side of the video display that provides shortcut access the P4K BirdUI.
NewTek TriCaster Series
NewTek TriCaster series devices allow several NDI® sources to be received simultaneously, the amount of simultaneous connections varies by what model TriCaster you have. Consult your TriCaster user manual to determine how many connections are available on your device.
To select P4K as a source on your TriCaster, click on the configuration gear icon below your desired source location. This will display the Input Setting dialog, from which you can select your P4K source from the dropdown list.
Once connected to P4K, a configuration gear icon displays next to the source drop down window that provides shortcut access the P4K BirdUI.
NDI® Camera Control
The easiest way to control your camera is via the BirdDog PTZ Keyboard!
BirdDog PTZ Keyboard supports NDI®, NDI®|HX, Visca over IP, RS422, and RS232. By harnessing BirdDog's next generation NDI® and IP technology, it's never been easier to discover, connect, and control your PTZ cameras.
IP Connection
IP Port to Network Switch
- Connect the camera NDI Ethernet port to a port in a Ethernet switch on your network. The switch must provide PoE+ if you are not using the power adaptor.
- Connect the PTZ Keyboard's IP port to a port on the Ethernet switch (or other connected switch on the same network subnet).
- Login to the web interface (BirdUI) of the camera and PTZ Keyboard to configure the appropriate settings.
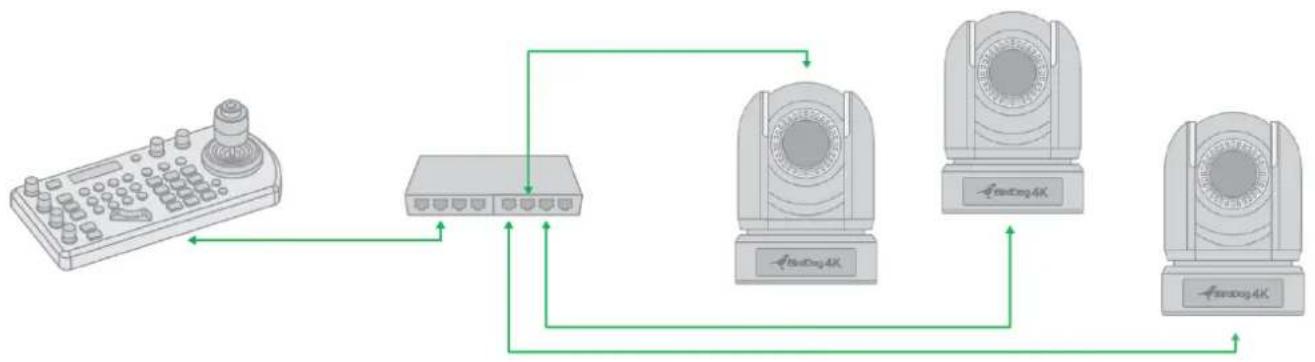
flowchart
graph TD
    A["Remote Control Device"] --> B["Switch"]
    B --> C["4X Radar"]
    C --> D["4X Radar 4X"]
    D --> E["4X Radar 4X"]
Remote Controller
You can use the supplied remote controller to control your camera. For instructions on use, please refer here.
Controlling Your Camera Via Other Protocols
P4K also supports control via VISCA-over-IP, RS-232 and RS-422/485. This section details how to configure control under these protocols.
When the camera is connected to a computer and joystick keyboard with a VISCA cable (cross type, RS-232), you can operate the camera with the computer and the joystick keyboard.
When the camera is connected to a joystick keyboard a control cable (cross type, RS-422/485), you can operate the camera's pan, tilt, zoom with the joystick keyboard.
In this connection configuration, a HDMI cable, SDI video cable, data cable and network cable is required. To obtain these third-party components or accessories, consult the dealer where you bought your camera.
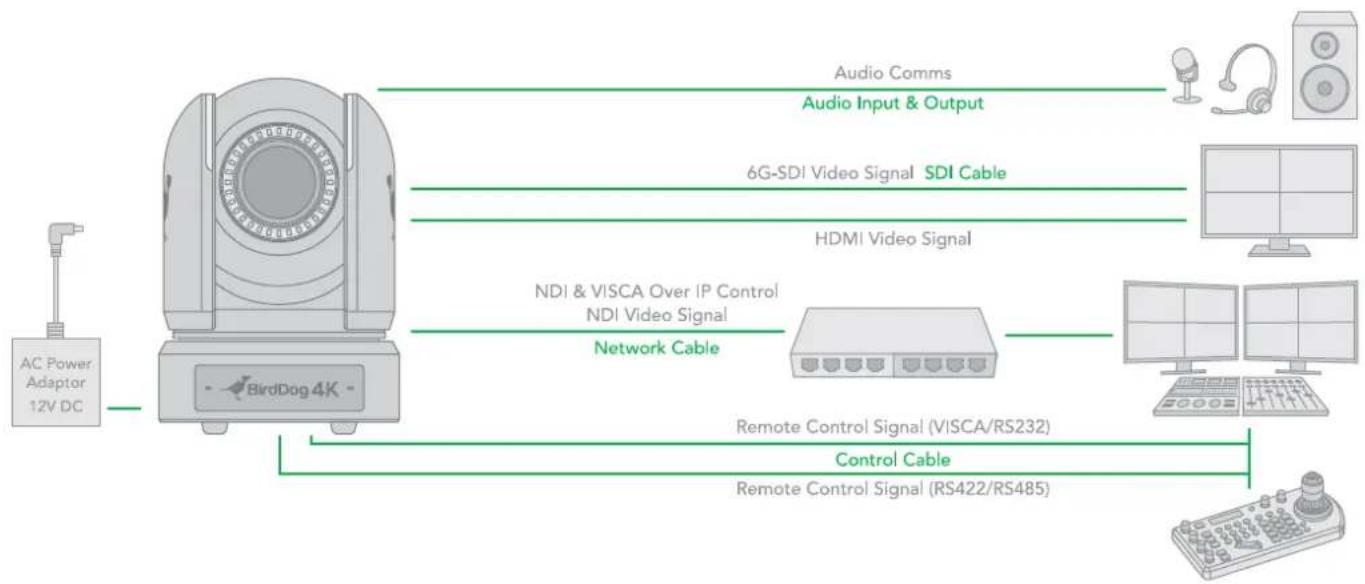
flowchart
graph LR
    A["AC Power Adaptor 12V DC"] --> B["BirdDog 4K"]
    B --> C["Audio Comms"]
    B --> D["Audio Input & Output"]
    B --> E["6G-SDI Video Signal SDI Cable"]
    B --> F["HDMI Video Signal"]
    B --> G["NDI & VISCA Over IP Control"]
    G --> H["NDI Video Signal"]
    H --> I["Network Cable"]
    I --> J["Remote Control Signal (VISCA/RS232)"]
    I --> K["Control Cable"]
    I --> L["Remote Control Signal (RS422/RS485)"]
Camera Initial setting status Information
The following information of the camera initial setting status will display on the monitor for 5 seconds.
- Camera PELCO ID for RS-485 control.
- Camera ID for IR Remote Controller.
- IR remote control signal receive current setting.
- Baud Rate current setting.
- Control COMM Port current setting.
- Video format current setting.
- HDMI current setting
- Model number.
- Firmware version.
| CAMERA STATUS INFO DISPLAY | |
| PELCO ID | 001 |
| IR ID | 01 |
| IR-RECEIVE | ON |
| BAUD RATE | 9600 |
| COMM TYPE | 422 |
| FORMAT | 1080p29.97 |
| HDMI OUT | YUV |
| MODEL TYPE | EYES P200 |
| SV | V0B1100S36[...] |
VISCA over IP Control
With VISCA over IP, you can control the camera using the VISCA protocol on a controller equipped with IP communication capabilities via LAN.
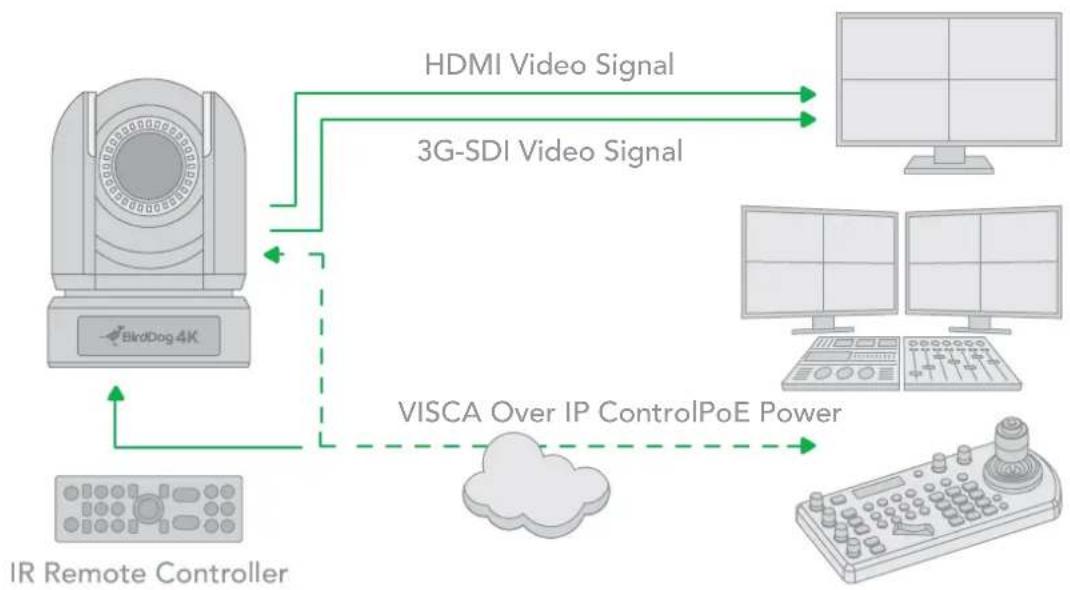
flowchart
graph TD
    A["IR Remote Controller"] -->|HDMI Video Signal| B["3G-SDI Video Signal"]
    A -->|VISCA Over IP ControlPoE Power| C["Monitor"]
    B --> D["Monitor"]
    C --> E["Monitor"]
    A --> F["BirdDog 4K"]
VISCA over IP communication specifications:
•Interface: RJ-45 10 / 100 / 1000 Mbps
•Interface protocol: IPv4
•Transport protocol: UDP
•IP address: 192.168.100.100 By default
- Port: 52381
Controlling via VISCA over IP
- Connect the network port on the camera to the network switch.
- Set the IP address and other network information appropriately to communicate on your network.
- Connect the VISCA over IP compatible controller to the network.
- Configure the controller to access the camera's IP address and VISCA over the IP port.
- The IP port within on your control MUST be set to 52381 to communicate with the camera.
- Select VISCA protocol on your IP control device.
Setting the Switches
The camera switches are located on the camera rear. Turn off power to the camera before changing the DIP switch settings. Power on the camera to have the new DIP switch setting activated.
DIP Switch (left side switch in the orientation below)
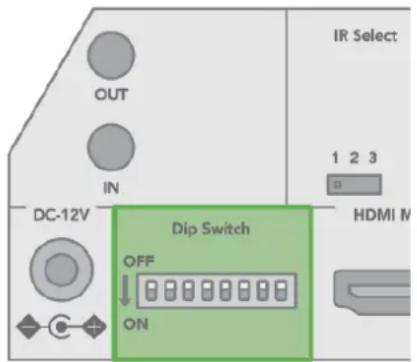
- Bit 1\~3: Camera Address setting for VISCA protocol
| 1 | 2 | 3 | VISCA Address |
| ON | OFF | OFF | 1 |
| OFF | ON | OFF | 2 |
| ON | ON | OFF | 3 |
| OFF | OFF | ON | 4 |
| ON | OFF | ON | 5 |
| OFF | ON | ON | 6 |
| ON | ON | ON | 7 |
2. Bit 4: Video Output/Video Color Space
When using HDMI output to display on HDMI device, set the DIP switch B4 to OFF. When using HDMI to DVI convertor to have DVI video output, set the DIP switch B4 to ON.
| 4 | Colour Space Setting |
| OFF | YUV Output |
| ON | RGB Output |
3. Bit 5: Reserved
4. Bit 6: RS-232/RS-422 Selection
| 6 | Control Mode |
| OFF | RS-232 |
| ON | RS-422 |
- Bit 7\~8: RS-232/RS-422 Baud Rate
| 7 | 8 | Baud Rate Setting |
| OFF | OFF | 2400 bps |
| ON | OFF | 4800 bps |
| OFF | ON | 9600 bps (Default) |
| ON | ON | 38400 bps |
Rotary Switch (right side switch in the orientation below)
The rotary switch is used for setting the video format. The switch can select the video formats shown below. It is recommended to leave the rotary switch in default position (4) and thereafter use the BirdUI to make format changes.
| Numbers & Letters | Video Resolution |
| 0 | 1080i 59.94 |
| 1 | 1080p 29.97 |
| 2 | 720p 59.94 |
| 3 | 1080p 59.94 |
| 4 | 2160p 29.97 |
| 5 | 1080i 60 |
| 6 | 1080p 23.98 |
| 7 | 1080p 30 |
| 8 | 1080p 60 |
| 9 | 1080i 50 |
| A | 1080p 25 |
| B | 720p 50 |
| C | 1080p 50 |
| D | 2160p 25 |
| E | 720p 60 |
| F | 2160p 23.98 |
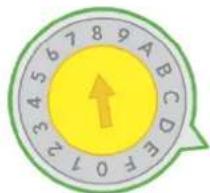
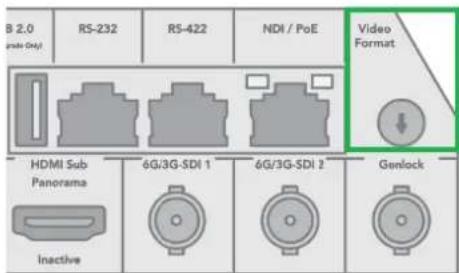
Using RS-232 (VISCA)
You can use the RS-232 port to connect to optional controllers, such as joystick control keyboard, control PC station, to operate the camera, perform pan, tilt and zoom operations using the joystick of the control keyboard, and to use the Preset function using the control buttons.
An application software that supports this unit is needed if you use a PC station.
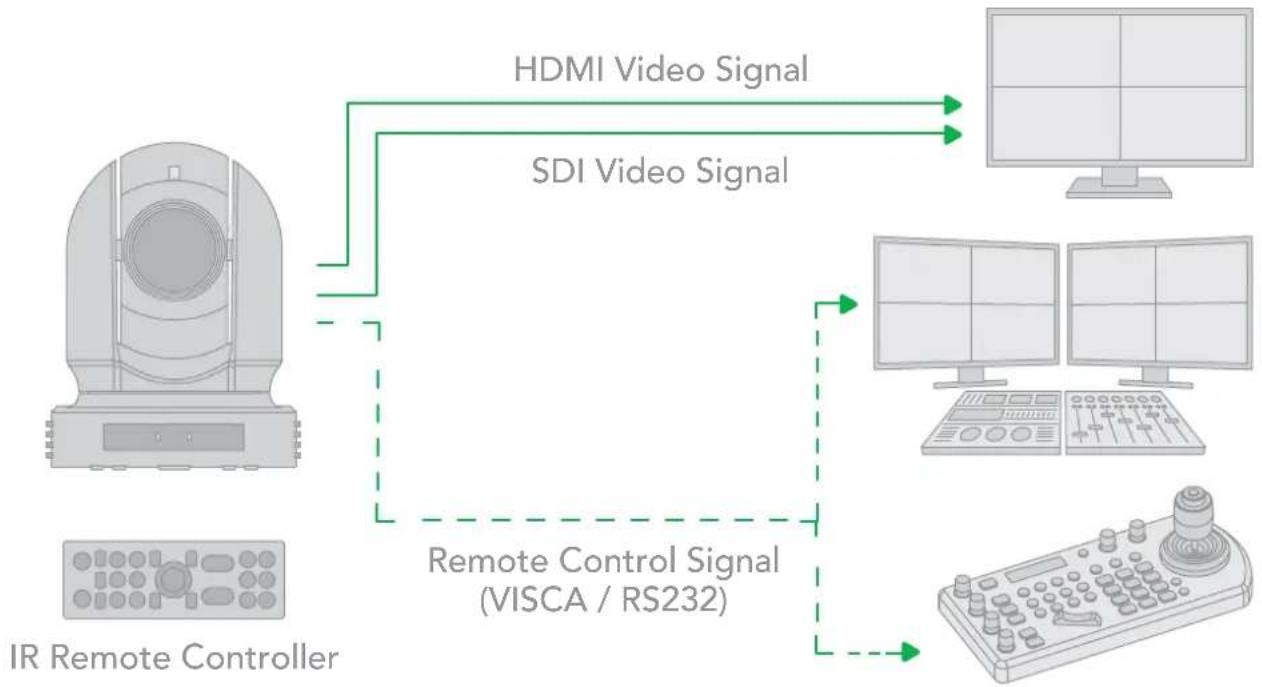
flowchart
graph TD
    A["IR Remote Controller"] --> B["Remote Control Signal (VISCA / RS232)"]
    B --> C["HDMI Video Signal"]
    B --> D["SDI Video Signal"]
    C --> E["Computer 1"]
    C --> F["Computer 2"]
    C --> G["Computer 3"]
    D --> H["Computer 4"]
    D --> I["Computer 5"]
RS232 Connection
-
For the DIP switch:
-
Set the RS432 control method.
- Set the Baud Rate to match the Baud Rate setting on the controller keyboard.
- Set the specific address for the controlled camera.
-
If you want to have the camera address to be automatically assigned by VISCA controller, set the DIP switch 1 address to 0.
-
Reboot the camera by turning it Off/On after the DIP switch has been set.
- The camera supports Daisy Chain connection up to 7 cameras.
-
Use the included RJ45 to RS232 (VISCA) control cable. The controller must be VISCA compatible.
-
Use the included RJ45 to RS232 adaptor cable and 8 pin Mini Din adaptor to make RS232 connection for your control device.
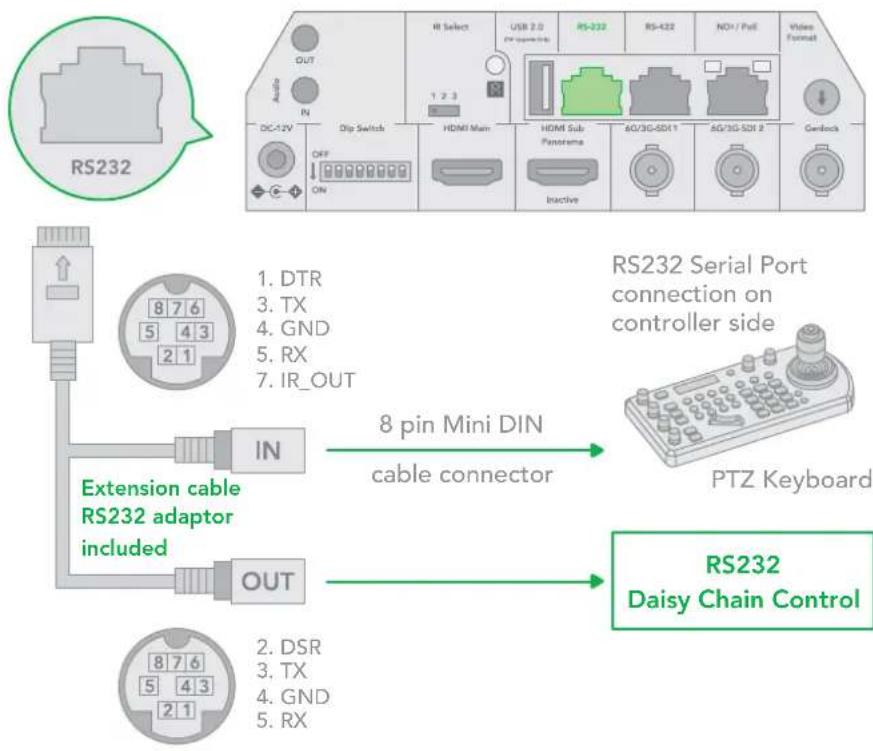
- Use the included adaptor cable and RJ45 to RS422/232 Phoenix terminal contact adaptor to make RS232 connection for your control device.
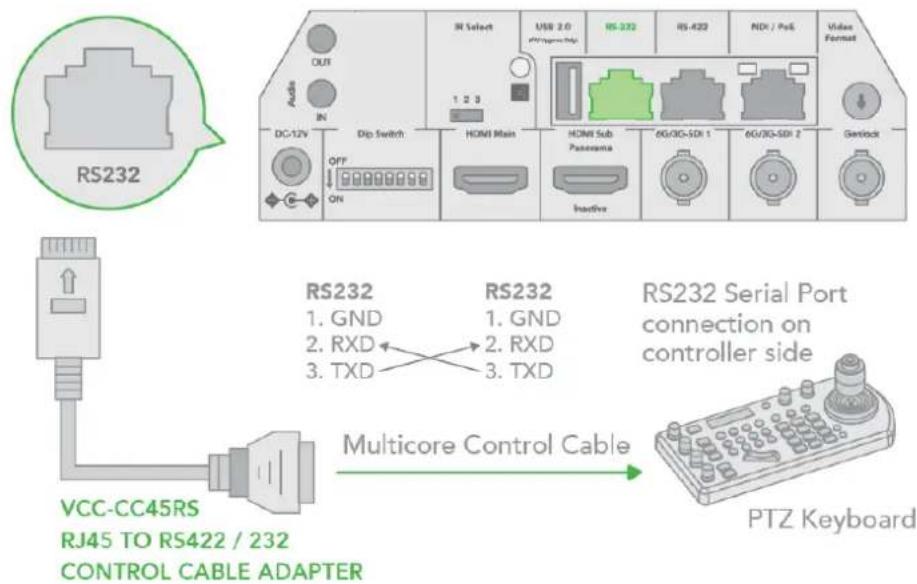
- Or you can use CAT5/6 network cable (T-568B standard pinout) to make RS232 connection by following the pin definition below:
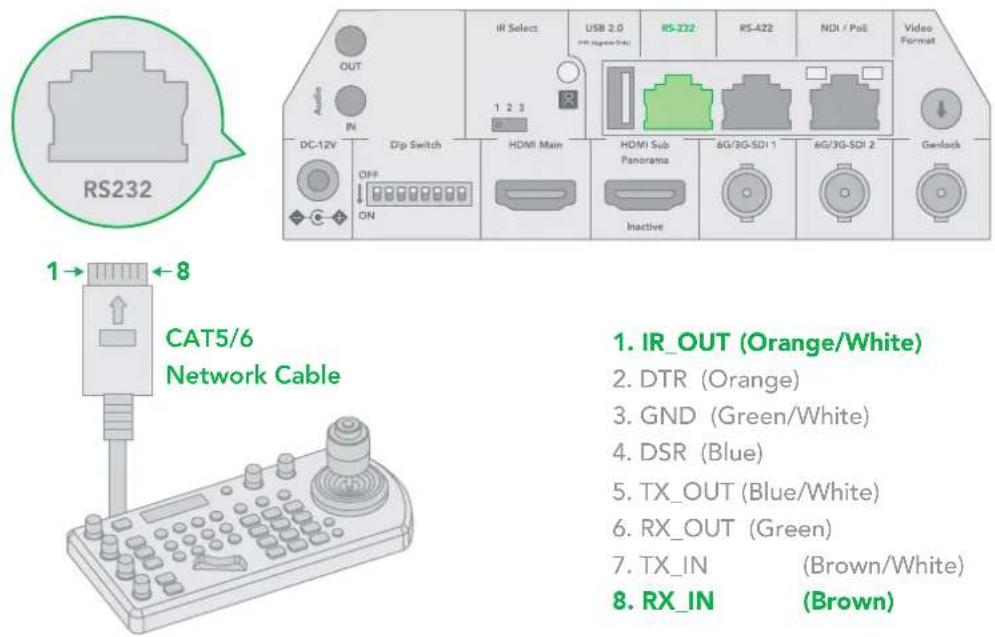
1. IR\_OUT (Orange/White)
- DTR (Orange)
- GND (Green/White)
- DSR (Blue)
- TX_OUT (Blue/White)
- RX_OUT (Green)
- TX_IN (Brown/White)
-
RX_IN (Brown)
-
You can make a RS232 Daisy Chain multiple camera connection with standard RS232 serial port controller as below:
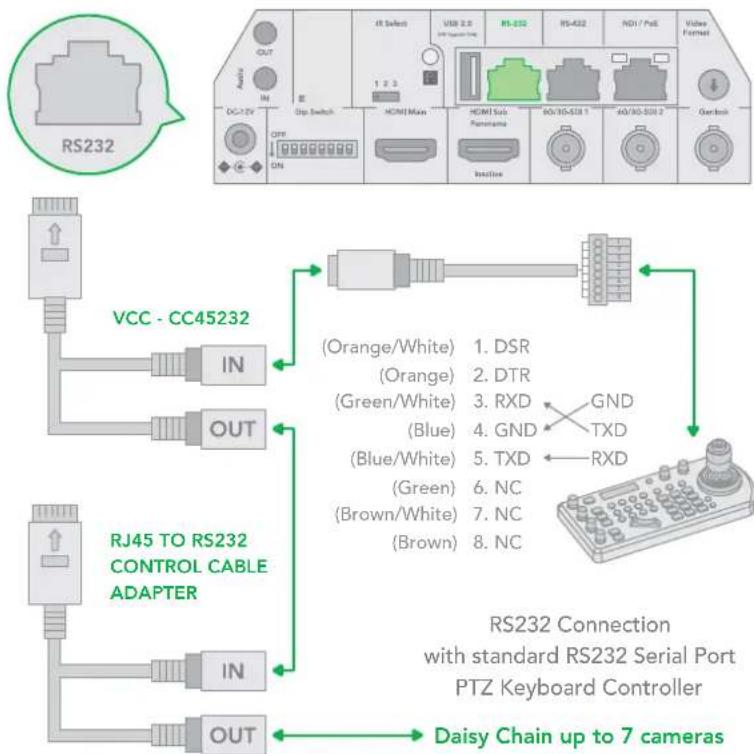
flowchart
graph TD
    A["RS232"] --> B["VCC - CC45232"]
    A --> C["RJ45 TO RS232 CONTROL CABLE ADAPTER"]
    B --> D["(Orange/White) 1. DSR"]
    B --> E["(Orange) 2. DTR"]
    B --> F["(Green/White) 3. RXD"]
    B --> G["(Blue) 4. GND"]
    B --> H["(Blue/White) 5. TXD"]
    B --> I["(Green) 6. NC"]
    B --> J["(Brown/White) 7. NC"]
    B --> K["(Brown) 8. NC"]
    C --> L["(IN)"]
    C --> M["(OUT)"]
    L --> N["Daisy Chain up to 7 cameras"]
    M --> N
    N --> O["RS232 Connection with standard RS232 Serial Port PTZ Keyboard Controller"]
Using RS422 (VISCA)
You can use the RS422/485 port to connect to optional controllers, such as a joystick control keyboard, or control PC station, to operate the camera, perform pan, tilt and zoom operations and to use the Preset function using the control buttons.
An application software that supports this unit is needed if you use a PC station.
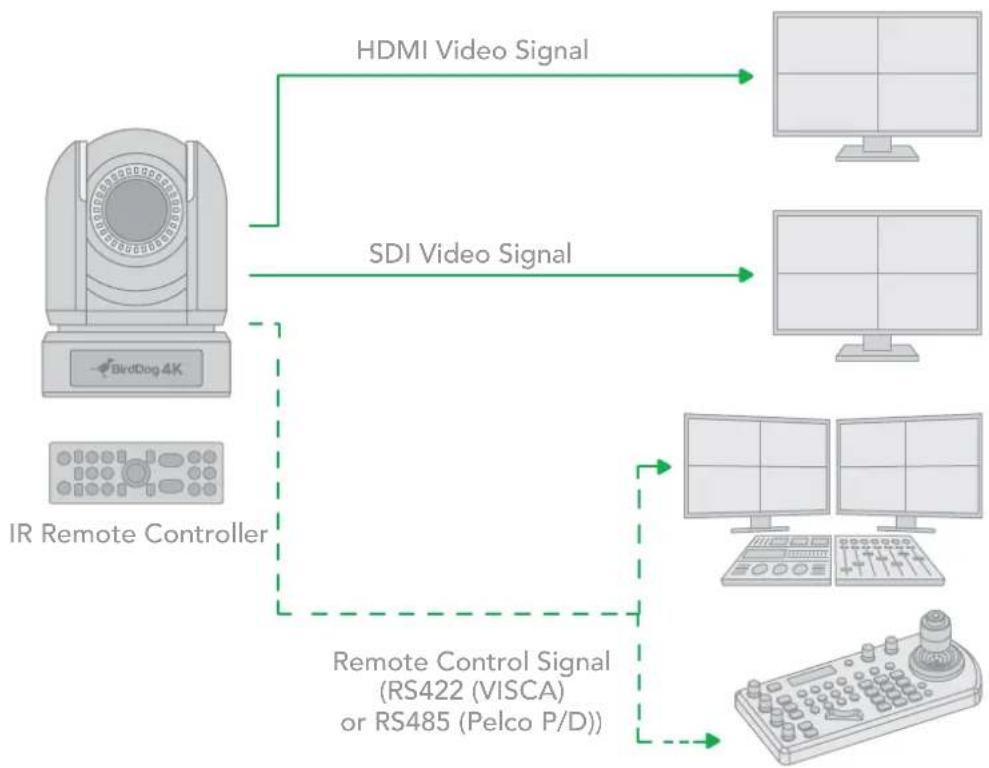
flowchart
graph TD
    A["IR Remote Controller"] -->|HDMI Video Signal| B["Computer"]
    A -->|SDI Video Signal| C["Computer"]
    A -->|Remote Control Signal (RS422 VISCA) or RS485 (Pelco P/D)| D["Computer"]
RS422 (VISCA) connection
- For the DIP switch:
- Set the RS422 control method.
- Set the Baud Rate to match the Baud Rate setting on the controller keyboard.
- Set the specific address for the controlled camera.
- If you want to have the camera address to be automatically assigned by VISCA controller, set the DIP switch 1 address to 0.
- Reboot the camera by turning it Off and On after the DIP switch has been set up correctly.
- Use the included RJ45 to RS422 cable. The controller must be VISCA compatible.
- The camera supports Daisy Chain connection of up to 7 cameras.
Sony Keyboard RS422 Connection
The connection of a SONY keyboard is different than other VISCA (non-Sony) keyboards. If using a SONY controller and Daisy Chaining multiple cameras via RS422 connection:
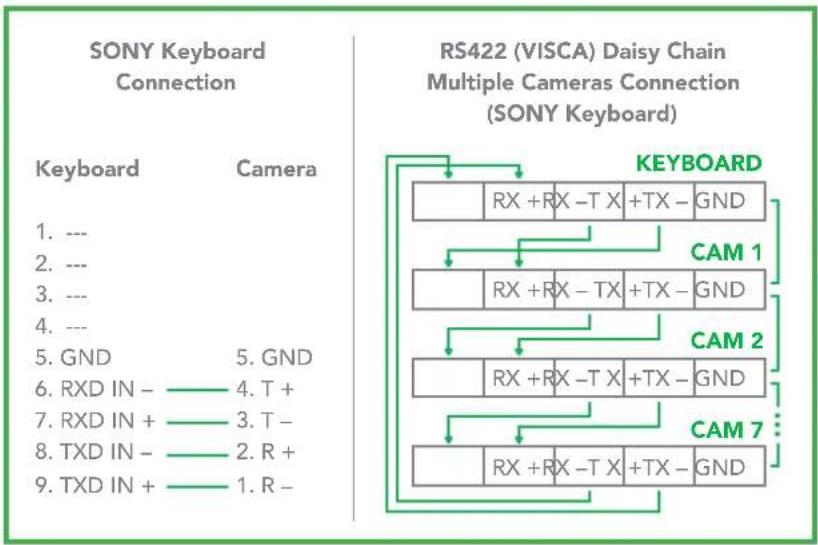
Non-Sony Keyboard RS422 Connection
Make an RS422 connection and RS422 Daisy Chain multiple cameras connection with non-Sony controller as below.
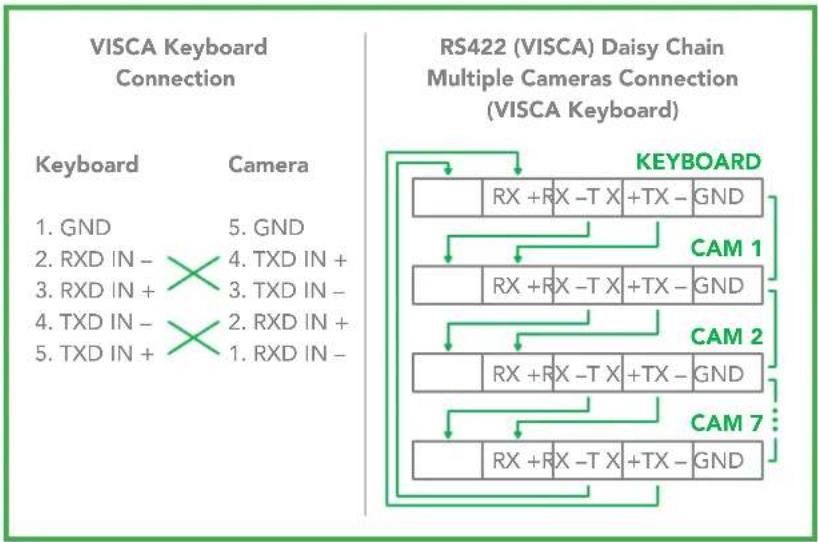
flowchart
graph TD
    A["VISCA Keyboard Connection"] --> B["Keyboard"]
    A --> C["Camera"]
    D["RS422 (VISCA) Daisy Chain Multiple Cameras Connection (VISCA Keyboard)"] --> E["KEYBOARD"]
    E --> F["RX + RX - TX + TX - GND"]
    E --> G["CAM 1"]
    E --> H["CAM 2"]
    E --> I["CAM 7"]
    F --> J["RX + RX - TX + TX - GND"]
    G --> K["RX + RX - TX + TX - GND"]
    H --> L["RX + RX - TX + TX - GND"]
    I --> M["RX + RX - TX + TX - GND"]
a. Use the included RJ45 to RS422 adaptor cable with a Phoenix connector adaptor to make an RS422 connection for your control device.
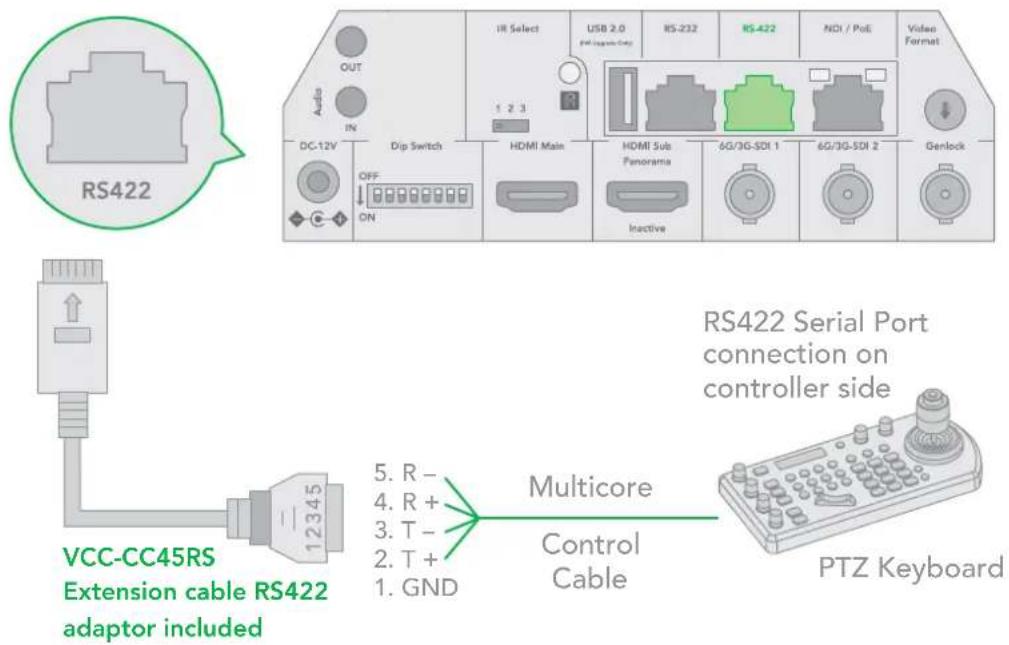
b. You can use a CAT5/6 T-568B cable direct connection between the camera and the controller by following the pin definition below.
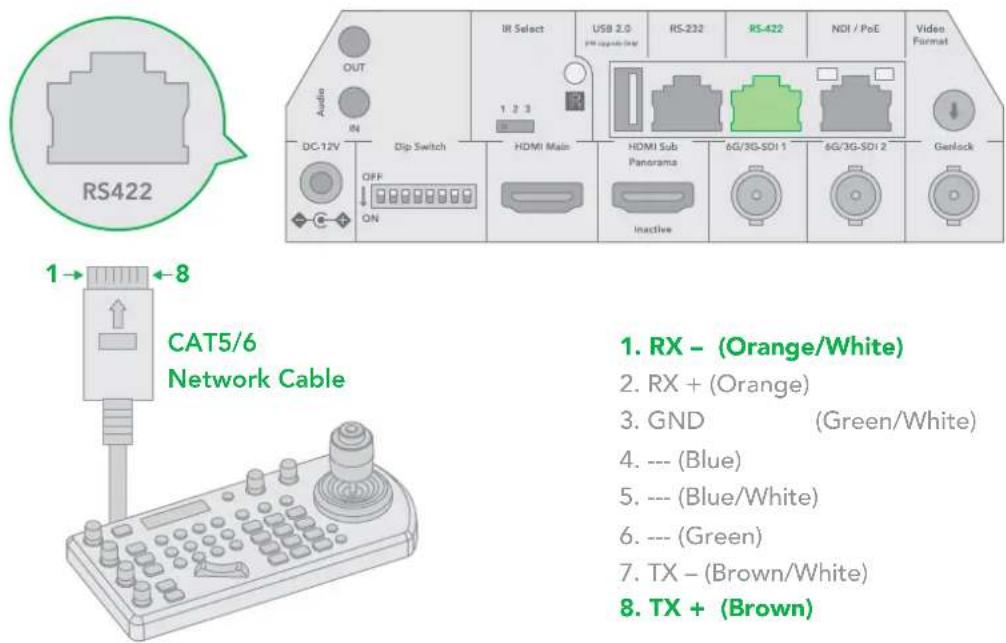
c. You can make an RS422 Daisy Chain multiple camera connection with an RS422 standard serial port controller.
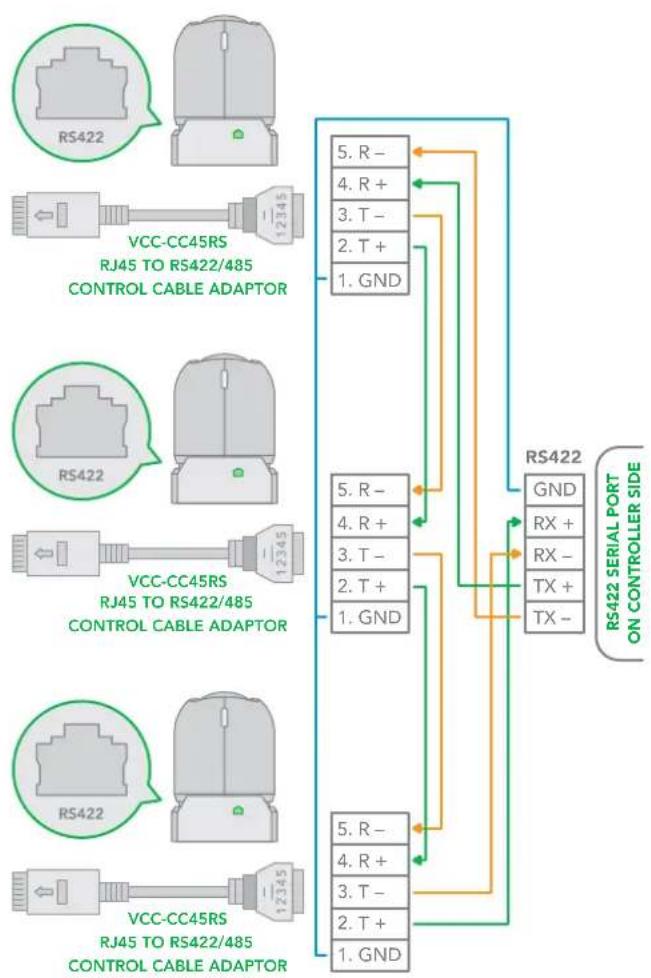
flowchart
graph TD
    A["RS422"] --> B["VCC-CC45RS"]
    B --> C["RJ45 TO RS422/485 CONTROL CABLE ADAPTOR"]
    D["RS422"] --> E["VCC-CC45RS"]
    E --> F["RJ45 TO RS422/485 CONTROL CABLE ADAPTOR"]
    G["RS422"] --> H["VCC-CC45RS"]
    H --> I["RJ45 TO RS422/485 CONTROL CABLE ADAPTOR"]
    J["RS422"] --> K["VCC-CC45RS"]
    K --> L["RJ45 TO RS422/485 CONTROL CABLE ADAPTOR"]
    M["RS422"] --> N["GND"]
    N --> O["RX +"]
    N --> P["RX -"]
    N --> Q["TX +"]
    N --> R["TX -"]
    S["1. GND"] --> T["5. R -"]
    S --> U["4. R +"]
    S --> V["3. T -"]
    S --> W["2. T +"]
    S --> X["1. GND"]
    Y["5. R -"] --> Z["5. R -"]
    Y --> AA["4. R +"]
    Y --> AB["3. T -"]
    Y --> AC["2. T +"]
    Y --> AD["1. GND"]
    AE["5. R -"] --> AF["5. R -"]
    AE --> AG["4. R +"]
    AE --> AH["3. T -"]
    AE --> AI["2. T +"]
    AE --> AJ["1. GND"]
    AK["1. GND"] --> AL["RS422"]
    AL --> AM["GND"]
    AL --> AN["RX +"]
    AL --> AO["RX -"]
    AL --> AP["TX +"]
    AL --> AQ["TX -"]
PELCO P/D Keyboard RS485 Connection
NOTE: Use the RS422 port for RS485 connection. Only use TX+ and TX- for RS485 connection.
- For the DIP switch:
- Set the RS422 control method.
- Set the Baud Rate to match the Baud Rate setting on the controller keyboard.
- Set the camera ID on OSD menu by remote controller
- Reboot the camera by turning it Off/On after the DIP switch has been set.
- Use a PELCO P/D compatible keyboard.
- Use preset #95 on the keyboard to display/exit camera OSD menu.
- Use joystick and button "OPEN" or "CLOSE" to navigate OSD menu.
- To operate the keyboard, please refer to the keyboard user manual.
PELCO RS485 Connection
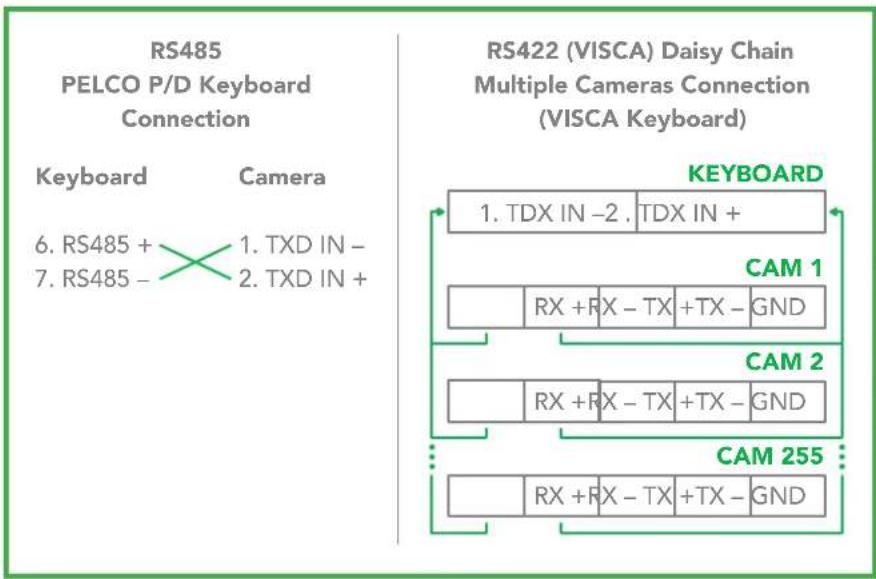
a. Use the included RJ45 to RS422 cable with a Phoenix connector adaptor to make an RS485 connection for your control device.
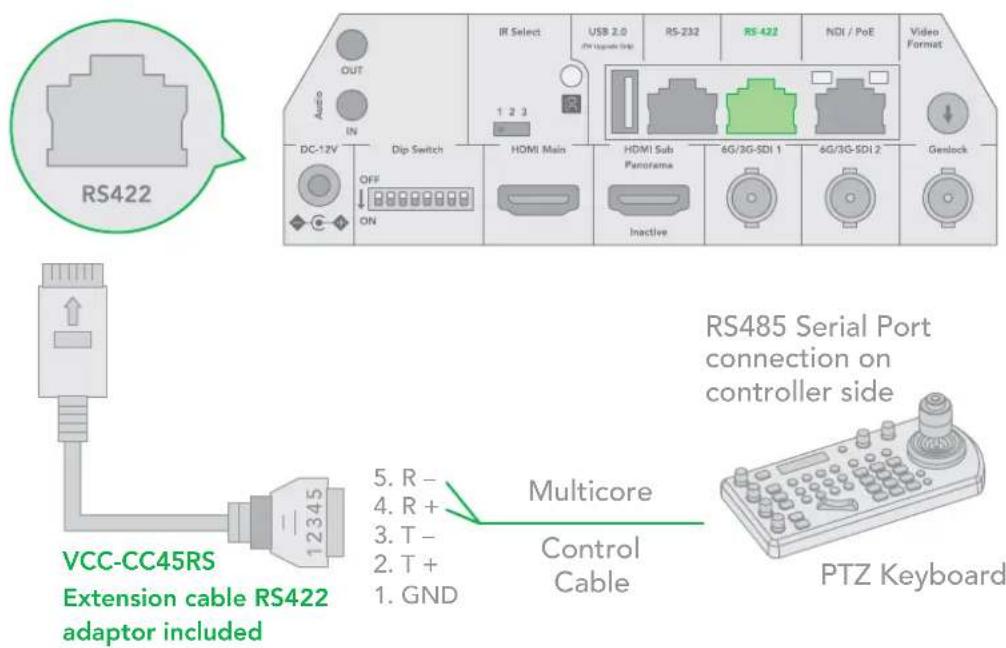
b. Use a CAT5/6 T-568B cable between the camera and the controller to make RS485 connection by following the pin definition below.
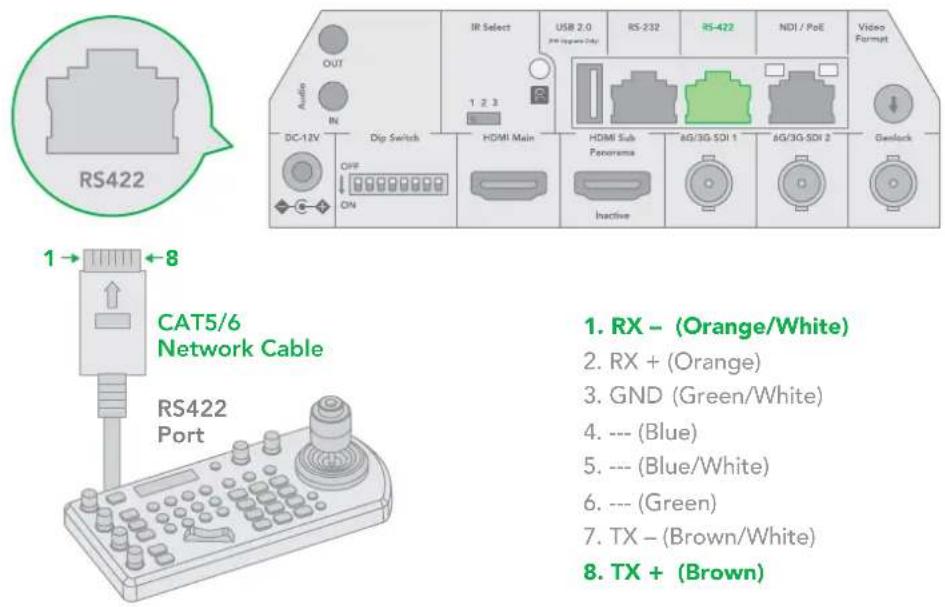
1. RX - (Orange/White)
- RX + (Orange)
- GND (Green/White)
- --- (Blue)
- --- (Blue/White)
- --- (Green)
- TX - (Brown/White)
- TX + (Brown)
c. Making connections for multiple cameras using RS485 standard serial port controller.
NOTE: For RS-232 VISCA control, P4K supports daisy chain connection of multiple cameras. For control details, refer to the operating instructions of your control keyboard/station software.
- You need to match the communication speed (Baud Rate) between the camera and the joystick controller.
- You cannot use the RS-232 connections while you are using the RS422/485 connection.
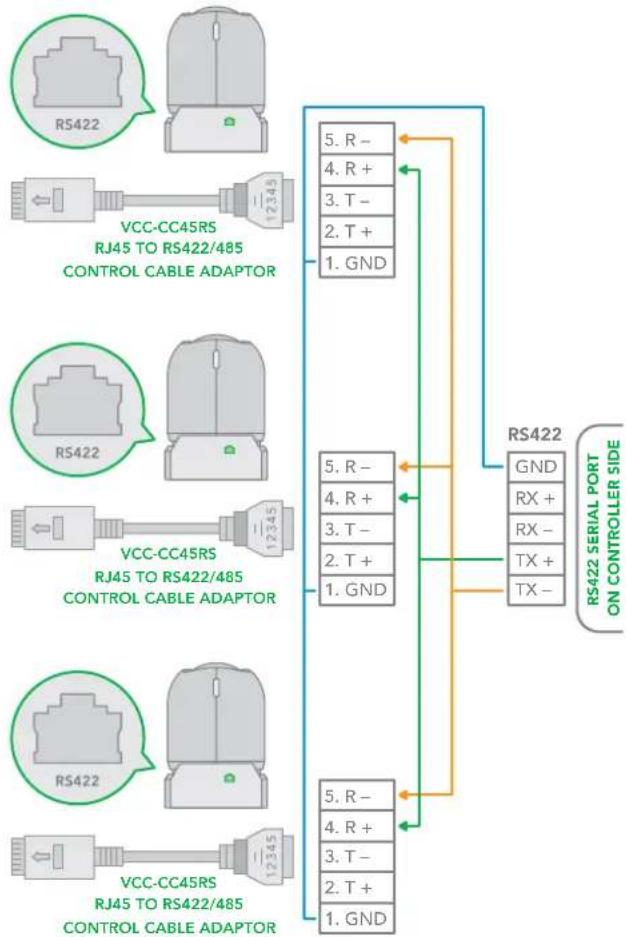
flowchart
graph TD
    A["RS422"] --> B["VCC-CC45RS RJ45 TO RS422/485 CONTROL CABLE ADAPTOR"]
    B --> C["1. GND"]
    B --> D["2. T +"]
    B --> E["3. T -"]
    B --> F["4. R +"]
    B --> G["5. R -"]
    H["RS422"] --> I["VCC-CC45RS RJ45 TO RS422/485 CONTROL CABLE ADAPTOR"]
    I --> J["1. GND"]
    I --> K["2. T +"]
    I --> L["3. T -"]
    I --> M["4. R +"]
    N["RS422"] --> O["VCC-CC45RS RJ45 TO RS422/485 CONTROL CABLE ADAPTOR"]
    O --> P["1. GND"]
    O --> Q["2. T +"]
    O --> R["3. T -"]
    O --> S["4. R +"]
    T["RS422"] --> U["GND RX + RX - TX + TX -"]
    U --> V["1. GND"]
    U --> W["2. T +"]
    U --> X["3. T -"]
    U --> Y["4. R +"]
    Z["RS422"] --> AA["GND RX + RX - TX + TX -"]
    AA --> AB["1. GND"]
    AA --> AC["2. T +"]
    AA --> AD["3. T -"]
    AA --> AE["4. R +"]
    AF["RS422"] --> AG["GND RX + RX - TX + TX -"]
    AG --> AH["1. GND"]
Operating Multiple Cameras using RS-232 and 422/485
• Using RS-232 (VISCA), you can connect to 7 cameras
• Using RS-422 (VISCA), you can connect to 7 cameras.
• Using RS-485 (PELCO), you can connect to 255 cameras.
- Using RS-485 (PELCO), all camera addresses must be set up before the connection. You can set the camera address by operating OSD menu, or by setting the DIP switch on the bottom of the camera. In this case, you can use multiple control keyboards.
Camera Dimensions
Unit: mm
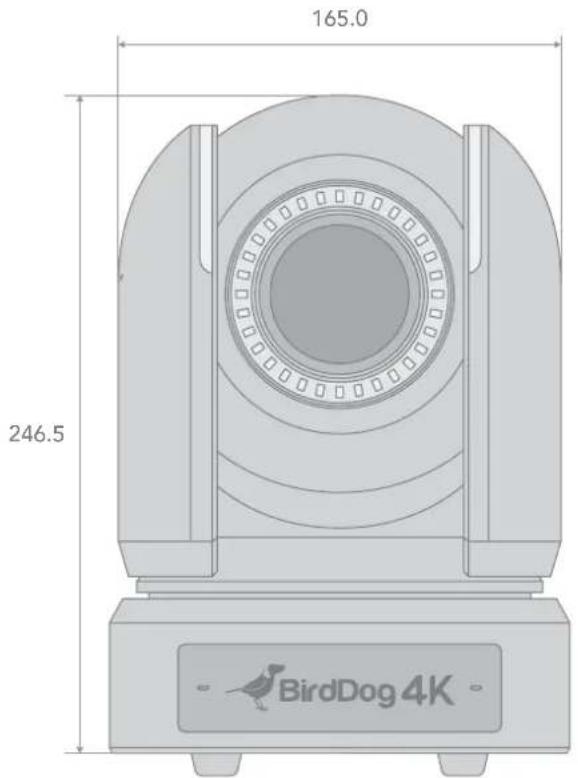
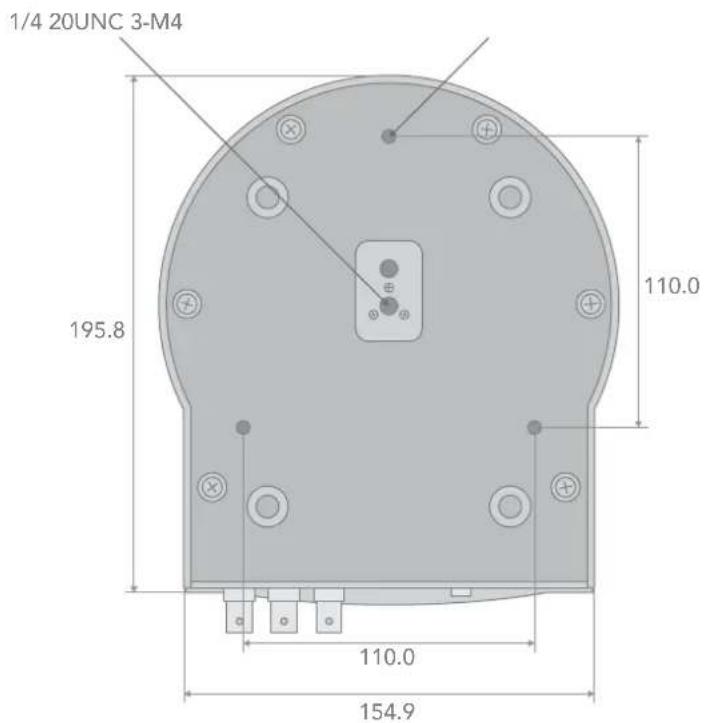
Glossary
Domain
A domain contains a group of computers that can be accessed and administered with a common set of rules. Domain can also refer to the IP address of a website on the Internet.
DNS
DNS (Domain Name System) is a system used by the Internet and private networks to translate domain names into IP addresses.
mDNS
mDNS (Multicast DNS) refers to the use of IP multicast with DNS to translate domain names into IP addresses and provide service discovery in a network that does not have access to a DNS server.
Ethernet
Ethernet, standardized as IEEE 802.3, refers to a series of technologies used to connect computers and other devices to a LAN (Local Area Network) or wide area network (WAN).
Firmware
Firmware is a class of software held in non-volatile memory that provides the low-level control for a device's hardware.
Gigabit Ethernet (GigE)
An Ethernet capable of transmitting frames at a rate of a gigabit per second. A Gigabit capable Ethernet network is recommended for NDI® production workflows.
IP
IP (Internet Protocol) is the communications protocol for the Internet, many wide area networks (WANs), and most local area networks (LANs) that defines the rules, formats, and address scheme for exchanging datagrams or packets between a source computer or device and a destination computer or device.
LAN
LAN (Local Area Network) is a network that connects computers and devices in a room, building, or group of buildings. A system of LANs can also be connected to form a WAN (Wide Area Network).
Mbps
Mbps (Megabits per second) is a unit of measurement for data transfer speed, with one megabit equal to one million bits. Network transmissions are commonly measured in Mbps.
NDI®
NDI® (Network Device Interface) is a standard allowing for transmission of video using standard LAN networking. NDI® comes in two flavours, NDI® and NDI®|HX. NDI® is a variable bit rate, I-Frame codec that reaches rates of around 140Mbps at 1080p60 and is visually lossless. NDI®|HX is a compressed, long-GOP, H.264 variant that achieves rates around 12Mbps at 1080p60.
PELCO
PELCO is a camera control protocol used with PTZ cameras. See also VISCA.
PoE
Power over Ethernet
Port
A port is a communications channel for data transmission to and from a computer on a network. Each port is identified by a 16-bit number between 0 and 65535, with each process, application, or service using a specific port (or multiple ports) for data transmission. Port can also refer to a hardware socket used to physically connect a device or device cable to your computer or network.
PTZ
Pan, Tilt and Zoom.
RJ45
A form of standard interface commonly used to connect computers onto Ethernet-based local area networks (LAN).
RS422, RS485, RS232
Physical layer, serial communication protocols.
Subnet
Subnet or subnetwork is a segmented piece of a larger network.
Tally
A system that indicates the on-air status of video signals usually by the use of a red illuminated lamp.
TCP
TCP (Transmission Control Protocol) is a network communications protocol.
UDP
UDP (User Datagram Protocol) is an alternative protocol to TCP that is used when reliable delivery of data packets in not required.
VISCA
VISCA is a camera control protocol used with PTZ cameras. See also PELCO.
WAN
WAN (Wide Area Network) is a network that spans a relatively broad geographical area, such as a state, region, or nation.
White Balance
White balance (WB) is the process of ensuring that white objects and by extension, all colour, in your video are rendered accurately. Without correct white balance, objects in your video display unrealistic color casts.

WELCOME TO THE FUTURE.
birddog.tv
hello@birddog.tv

- USER GUIDE
- Table of Contents
- Controlling the Camera Using the Remote Controller.... 24
- Web Configuration Panel 28
- BirdUI Layout....29
- Dashboard 30
- Network....30
- System....32
- AV Setup 34
- Cam Control....36
- Scopes 43
- Receiving NDI ® Video 44
- NDI® Camera Control 45
- Remote Controller 45
- Controlling Your Camera Via Other Protocols 46
- Camera Dimensions....60
- Glossary 61
- Copyright
- Trademark Acknowledgement
- Important Information
- Legal Notice
- Warnings
- Maintenance Precautions
- Regulatory Compliance
- FCC Part 15
- LVD/EMC Directive
- Welcome to BirdDog!
- Using This Manual
- Tip
- First Step
- Firmware Upgrade
- We're Invested In Your Success
- BirdDog P4K Overview
- Camera Features
- Specifications
- Welcome to the Future
- What is NDI®?
- What's in the Box?
- Optional Accessories
- Quick Start Guide
- Basic Connections
- Power
- Network
- Power Up
- Computer, say hello to P4K
- Basic Configuration
- NDI® Tools
- NDI Encode Settings
- Bitrate Management
- Video Format
- NDI Group
- Stream Name
- NDI Failover Source
- Network Configuration
- Static or DHCP
- DHCP Timeout, Fallback IP address, Fallback Subnet Mask
- BirdDog Name
- You're Done!
- Camera Connections
- Powering P4K
- WARNING
- Thermal Management
- Video Output
- NDI Signal
- HDMI Signal
- SDI Signal
- Audio In/Output
- Using the Camera Menus
- OSD
- Camera Menus
- Exposure Menu
- Mode
- Gain
- Gain Limit
- Gain Point
- High Sensitivity
- Iris
- Slow Shutter
- Shutter Limit
- AE Speed
- Maximum Speed (Maximum Shutter Limit)
- Minimum Speed (Minimum Shutter Limit)
- Back Light
- Spot Light
- Ex-Comp (Exposure Compensation)
- White Balance Menu
- WB Mode (White balance mode)
- Speed (white balance speed)
- Offset
- Matrix (Color Matrix)
- Select
- Level (color level)
- Phase
- R-G, R-B, G-R, G-B, B-R, B-G
- Detail Menu
- Crispening
- H/V Balance
- B/W Balance
- Limit
- Highlight Detail
- Super Low
- Picture Menu
- 2D /3D NR
- Flip
- Mirror
- Color
- Hue
- ND filter
- IR Cut Filter
- Chroma Suppress
- HLC Mode (Highlight Light Compensation)
- Stabliser
- Gamma Menu
- Pattern
- Pattern Fine
- Level
- Black Gamma
- Black Gamma Range
- Black Level
- Visibility Enhancer
- Pan Tilt Zoom Menu
- Digital Zoom
- Zoom Ration OSD
- AF Sen
- MF Speed
- Near Limit
- Adaptive P/T
- P/T Speed
- Preset Speed
- Pan Dir
- Tilt Dir
- System Menu
- Pelco ID
- IR-Receive (Infrared Signal Reception)
- Display Info
- Preset Memory
- Factory Reset
- Reload Preset 1
- Auto Focus
- SV (Software Version)
- Remote Controller
- Power
- Camera ID (Total 3) Selector
- Preset Position (Total 6) Calling and Setting
- PAN-TILT
- L/R Direction Set
- ZOOM/FOCUS
- Auto/Manual Focus
- Back Light
- Video Format Switching
- MENU
- Fast/Slow Zooming Speed Switching
- White Balance
- De-Flicker
- Controlling the Camera Using the Remote Controller
- Panning and Tilting
- Zooming
- Focusing
- Focusing the camera on a subject automatically
- Focusing the camera on a subject manually
- Shooting with Back Lighting
- Changing Resolution
- Storing the Camera Settings in Memory Using Presets
- Recalling the stored settings
- Cancelling the preset memory
- NOTE:
- Operating Multiple Cameras with the Infrared Remote Controller
- Web Configuration Panel
- Access via web browser (URL)
- Accessing P4K on a network without a DHCP server
- Password Management
- Default Password
- Password Reset
- BirdUI Layout
- Dashboard
- Network
- System
- AV Setup
- CamControl
- Scopes
- Logout
- Dashboard
- System Info
- Device mode
- Network Bandwidth
- Status
- Stream Info
- System Details.
- Network Details
- Configuration Method
- NDI Network Settings
- Preferred Transmit Method
- TCP
- UDP
- R-UDP (Reliable UDP)
- Multicast
- NDI Discovery
- System
- Password Settings
- System Update
- Access Manager Configuration
- Remote IP List
- NDI Group List
- To upload a list:
- Unit Reboot
- AV Setup
- Video Processing Mode
- Audio Output Select
- Audio In / Out Gain
- Device Restart
- Chroma Subsampling
- NDI Groups
- NDI Video Format
- NDI Audio
- Stream to Network
- Encoder Screensaver
- Capture Screensaver Frame
- Onboard Tally
- Genlock Source
- Update Source List
- Cam Control
- Camera Control Tab
- Menu On / Off
- Zoom
- Focus Mode
- Focus
- Pan / Tilt / Zoom Speed
- Image Settings Reset
- FreeD Tab
- IP Address / Port
- Apply FreeD Settings
- Preset Tab
- BirdDog
- Camera
- Exposure Tab
- Gain Point/Position
- Shutter Limit
- AE Response
- Backlight
- Spotlight
- Exposure Compensation
- White Balance Tab
- Cam White Balance
- Cam Red/Blue Gain
- Cam Color Temp
- Detail Tab
- Bandwidth
- Picture Tab
- 2D/3D NR
- Highlight Compensation
- Stabilizer (available on 30X zoom)
- Gamma Tab
- Gamma Mode
- Effect
- Colour Matrix Tab
- Colour Gain
- Colour Hue
- Using a Colour Chart
- Scopes
- Receiving NDI® Video
- NewTek Studio Monitor
- NewTek TriCaster Series
- NDI® Camera Control
- IP Connection
- IP Port to Network Switch
- Controlling Your Camera Via Other Protocols
- Camera Initial setting status Information
- VISCA over IP Control
- VISCA over IP communication specifications:
- Controlling via VISCA over IP
- Setting the Switches
- Bit 4: Video Output/Video Color Space
- Bit 5: Reserved
- Bit 6: RS-232/RS-422 Selection
- Rotary Switch (right side switch in the orientation below)
- Using RS-232 (VISCA)
- RS232 Connection
- IR\_OUT (Orange/White)
- Using RS422 (VISCA)
- RS422 (VISCA) connection
- Sony Keyboard RS422 Connection
- Non-Sony Keyboard RS422 Connection
- PELCO P/D Keyboard RS485 Connection
- PELCO RS485 Connection
- RX - (Orange/White)
- Operating Multiple Cameras using RS-232 and 422/485
- Camera Dimensions
- Glossary
- Domain
- DNS
- mDNS
- Ethernet
- Firmware
- Gigabit Ethernet (GigE)
- IP
- LAN
- Mbps
- NDI®
- PELCO
- PoE
- Port
- PTZ
- RJ45
- RS422, RS485, RS232
- Subnet
- Tally
- VISCA
- WAN
- White Balance
Brand : BirdDog
Model : P4K
Category : Security Camera