
UCSB90202-21 - Heating Universal Blue - Free user manual and instructions
Find the device manual for free UCSB90202-21 Universal Blue in PDF.


| Product Type | Wall-mounted electric fan heater (bathroom split) |
| Model | UCSB90202-21 |
| Brand | Universal Blue |
| Power Supply | AC 220-240V ~ 50/60Hz |
| Rated Power | 2000W (2 levels: 1000W / 2000W) |
| Dimensions (W x H x D) | 54 x 18.7 x 13.8 cm |
| IP Rating | IP23 (splash-proof) |
| Recommended Room Size | 15-20 m² |
| Color | White with inox front |
| Control Methods | Remote control (CR2025 battery) and Tuya Smart app (Wi-Fi) |
| Timer | 24-hour programmable timer |
| Thermostat Range | 10°C to 49°C |
| Heating Modes | Cold, Warm (1000W), Hot (2000W) |
| Safety Features | Overheat protection, child lock, automatic shut-off with cool-down fan |
| Window Open Function | Detects sudden temp drop (≥3°C in 1 min) and stops heating |
| Louver Control | Swing up/down via remote or app |
| Display | LED with room temperature and settings |
| Installation Height | At least 2 m above floor |
| Cleaning | Use soft damp cloth and neutral detergent; clean back filter by pressing top of plastic net |
| Battery for Remote | Lithium CR2025 3V (included) |
| Warranty | 2 years from date of purchase (conditions apply) |
Frequently Asked Questions - UCSB90202-21 Universal Blue
User questions about UCSB90202-21 Universal Blue
0 question about this device. Answer the ones you know or ask your own.
Ask a new question about this device
Download the instructions for your Heating in PDF format for free! Find your manual UCSB90202-21 - Universal Blue and take your electronic device back in hand. On this page are published all the documents necessary for the use of your device. UCSB90202-21 by Universal Blue.
USER MANUAL UCSB90202-21 Universal Blue
White/Inox bathroom split with Wi-Fi
UCSB90201-21 // UCSB90202-21
White/Inox Wi-Fi bathroom split
ÍNDICE
ESPAÑOL
Conexión WIFI:

Congratulations on the purchase of your product.
We recommend you to spend some time to read this Instruction Manual in order to fully understand how to use it correctly.
Read all the safety instructions carefully before use and keep this Instruction / Installation Manual for future reference.
Please, consider that this appliance is for domestic use only.
1. IMPORTANT SAFEGUARDS

READ ALL INSTRUCTIONS BEFORE USING.
When using this appliance, the following safety instructions should always be followed:
- Before using your new heater, please carefully read through the following instructions. KEEP THIS BOOKLET IN A SAFE PLACE SO THAT YOU MAY CONSULT IT LATER.
- After removing the packaging, make sure that the appliance is in good condition.
- The packaging materials may contain plastic, nails etc., which may be hazardous and therefore should not be left within the reach of children.
- The heater should be hung on the wall and make the wind outlet down or be placed on flat appliance. You must not place it precipitantly or tipsily.
- Please do not use the heater in the place where full of combustible or explosive gas. Don't cover the wind outlet.
- If the power supply cable is damaged, it must be replaced by the manufacturer or our service to avoid danger.
- The heater must not be located immediately below an electrical socket. The electrical socket must be equipped with earth wire, its capacity should be 250V\~10A or exceed 250V\~10A. The socket and the power plug should be in good connecting condition.
- If nobody is in using or you are repairing the heater, please pull off the plug.
- Please don't touch the heater by the wet hand or other conductor.
- If motor is not working properly, please stop it immediately.
- During using the heater, please do not open the door or window continually otherwise it will influence the heating effect.
- If want to shut off the heater, press the on/off switch to off, then the heater will keep the fan working 30 seconds until it blowing out cool wind, then the heater will stop working, and you may pull off the plug.
- Please remove the baffle before using the remote control.
- If don't use remote control, please remove the batteries and cover it with its insulating plastic to protect it from damage.
- The heater must be installed at least 2 m above the floor.
- If the heater needs repair, please ask for special person or our company authorized maintenance department.
- This appliance can be used by children aged from 8 years and above and persons with reduced physical, sensory or mental capabilities or lack of experience and knowledge if they have been given supervision or instruction concerning use of the appliance in a safe way and understand the hazards involved. Children shall not play with the appliance. Cleaning and user maintenance shall not be made by children without supervision.
- Children of less than 3 years should be kept away unless continuously supervised.
- Children aged from 3 years and less than 8 years shall only switch on/off the appliance provided that it has been placed or installed in its intended normal operating position and they have been given supervision or instruction concerning use of the appliance in a safe way and understand the hazards involved. Children aged from 3 years and less than 8 years shall not plug in, regulate and clean the appliance or perform user maintenance.

CAUTION: some parts of this product can become very hot and cause burns. Particular attention has to be given where children and vulnerable people are present.
OVERHEAT PROTECTION
This heater is protected with an overheat protection that switches off the appliance automatically in case of overheating. For example: due to the total or partial obstruction of the vents. In this case, unplug the appliance, wait about 30 seconds for it to cool and remove the object which is obstructing the vents. Then switch it back on as described above. The appliance should now operate normally. If the problem persist, please contact Customer Service for assistance.
2. PRODUCT FEATURES
| UCSB90201-21 |
| Power: 2000W |
| 2 power levels: 1000/2000W |
| 24H timer |
| Control by: remote control or APP mobile |
| Overheating protect system |
| Product dimensions (A x A x F): 54 x 18.7 x 13.8 cm |
| Display |
| IP23 protection |
| Perfect for 15-20 m2 rooms |
| Color: white |
| UCSB90202-21 |
| Power: 2000W |
| 2 power levels: 1000/2000W |
| 24H timer |
| Control by: remote control or APP mobile |
| Overheating protect system |
| Product dimensions (A x A x F): 54 x 18.7 x 13.8 cm |
| Display |
| IP23 protection |
| Perfect for 15-20 m2 rooms |
| Color: white with inox front |
3. INSTALLATION

The heater shall be installed and used according to the safe standard.
To avoid all dangers, follow the safety instructions.
The installation must be done by the service agent or similarly qualified persons in order to avoid a hazard.

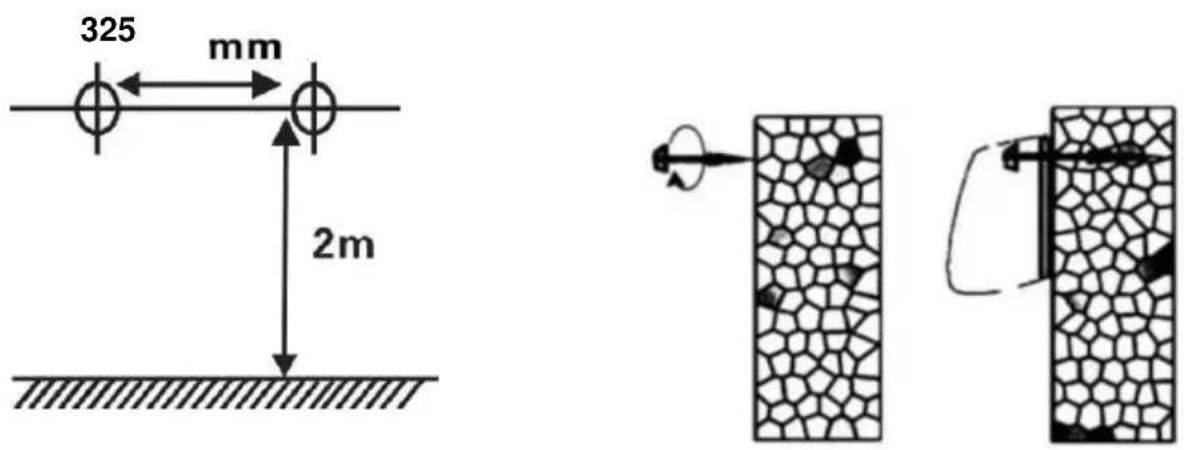
Important! Make sure that there are no electric cables or other installations (for example water pipes) near the drill holes. Make sure that the appliance is securely and vertically fitted to the wall.
Get two holes on the wall 2 m above the floor and near the corner more 25 mm, be sure to make the diameter just as same as the expanding pipe. Fix two screws on the expanding pipe, keep the tips of the screws out for 10mm, and hang up the machine after the screws are fixed enough.

4. OPERATION INSTRUCTIONS
- Before inserting the plug into an electrical outlet, make sure that the electrical supply in your area matches that on the rating label on the unit.
- Carefully remove the heater from the plastic bag and the carton.
- Place the heater on a firm level surface, setting the master button to “-” position plug the cord set into a AC220-240V electrical outlet, with “BEE” sounds the “Power” light is on and the heater will shows the room temperature.
General using
-
Turn the heater ON by pressing remote control the ON/OFF button, the unit will blow the cold air.
-
Pressing the "MODE" button on remote control, the unit will
blow the warm air and will light on.
- Pressing the "MODE" button second times on remote control,
the unit will blow the hot air and the will light on.
- Pressing the "MODE" button Three times on remote control, the unit will blow the cold air
PS: For smart operate, customer only press the one start button near about master button, the heater will working with hot air and Swing function.
24H Timer function
Press “ Ⓤ ” button ,set the timer up to 24 hours,keep press “ Ⓢ ” button to increase the hours from 00--24(00=close,01=1hour,02=2hours...24=24 hours ect.) and the “ ” light is on.
PS: set as "00" means no set timer, the " " light is off.
Thermostat instructions
- To adjust temperature, press the “-” and “+” to set the desired temperature and the temperature set from 10° C to 49° C
- When the air temperature drops 2 degree below the set temperature, the heater will start heating with "I/W"(1000W).
- When the air temperature drops 4 degree below the set temperature, the heater will start heating with "II/H"(2000W).
- When the air temperature high 1 degree or ≤ the set temperature, the heater will blow the cold air.
Window open function
- Press “Auto” button, the “💡” light is on. The appliance is working as smart saving energy models. (In this function, the
appliance is check and record environment temperature in immediately. It will stop working, when the appliance check the environment are drop ≥ 3 °C within 1 minute. The user should restart the appliance with “ON/OFF” button)
- Press " " button again, the " " light is off. Window Open Function is closed.
Child-lock function
Press “ 🔊 ” button, the heater light is off (except power light), he child lock function is activated.
Press "button again, the heater light is on, the child lock function is cancelled.
Wi-Fi function

Connection by WIFI
-
Use your phone to scan the QR code below or search "Tuya Smart" in Application on market to download and install the App.
-
Select your country code, enter your e-mail and tap "Get" to get a message containing verification on code.
-
Enter the verification on code in the message and tap "Login" to login the App.
-
Switch on the product and make sure the product is in WIFI covered environment. The indicator light will rapidly blinks. If the indicator light do not rapidly blinks, please press "One start Button" for 5 seconds and the product will have "bi" sound, then go to the App, tap "add device", as shown in the picture 1.

Pic 1
Pic 2
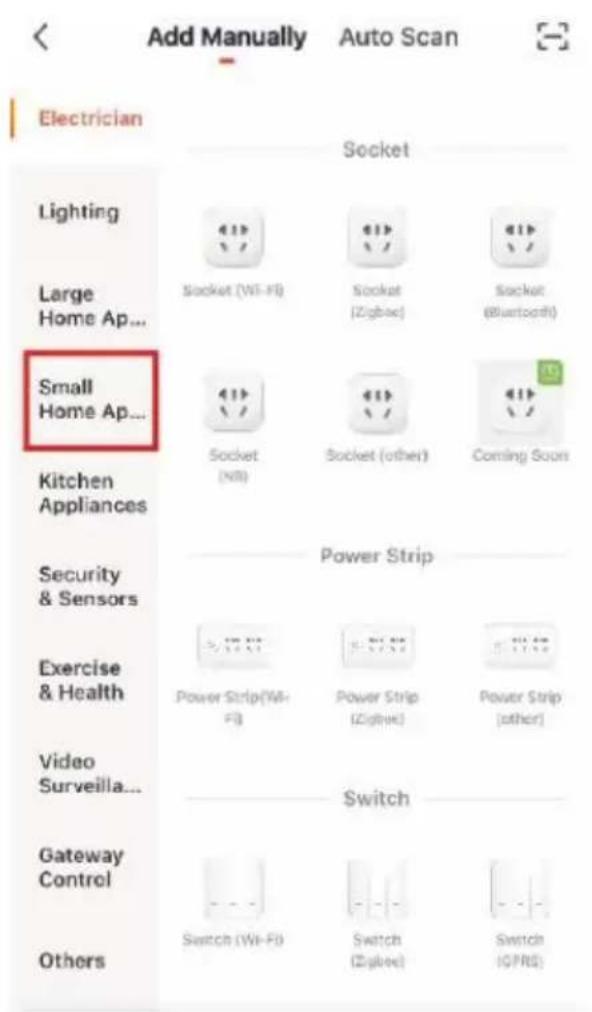
A. Press "Add Device" as shown in pic 1
B. Choose "Small Home Ap..." as shown in pic 2
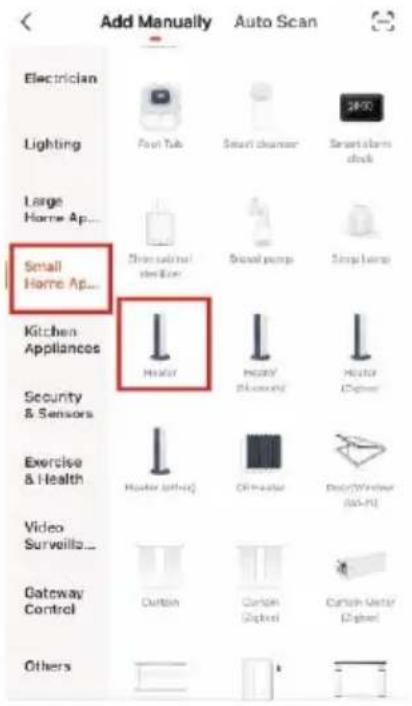
C. Choose your product from the list as shown in pic 3
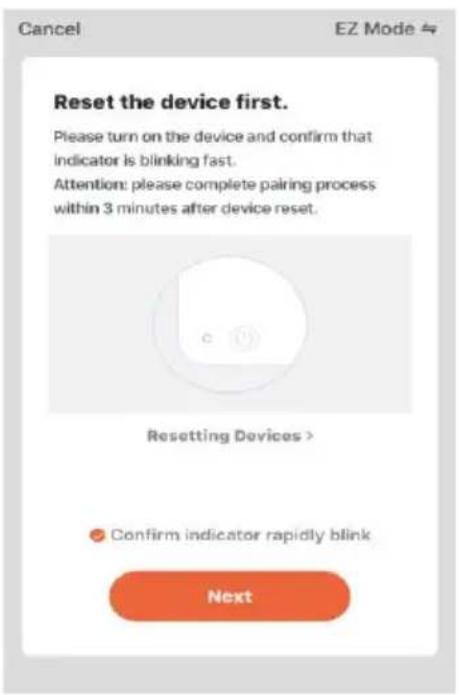
D. Press the "confirm indicator rapidly blinks" when the indicating light on device rapidly blinks, as shown in pic 4
E. If the indicating light don't blinks rapidly, please reset the device (follow the instructions indicated, Pic 4).
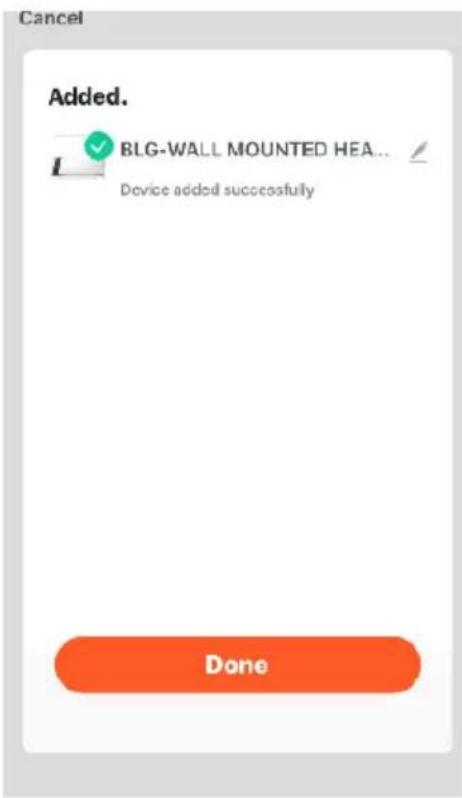
F. Input password of WIFI and then confirm, as shown in pic 5 G. Wait for the APP to connect with the device until it is connected successfully as shown in pic 6
Pic 3
Pic4

Pic 5
Pic 6

Pic 7

Pic 8
Operation by Wi-Fi
- You can operate the device by mobile under WIFI or 4G LTE environment, as shown in the picture 7.
- Press Switch, you can turn on/off the heater
- Press Level will shown in the picture 8.
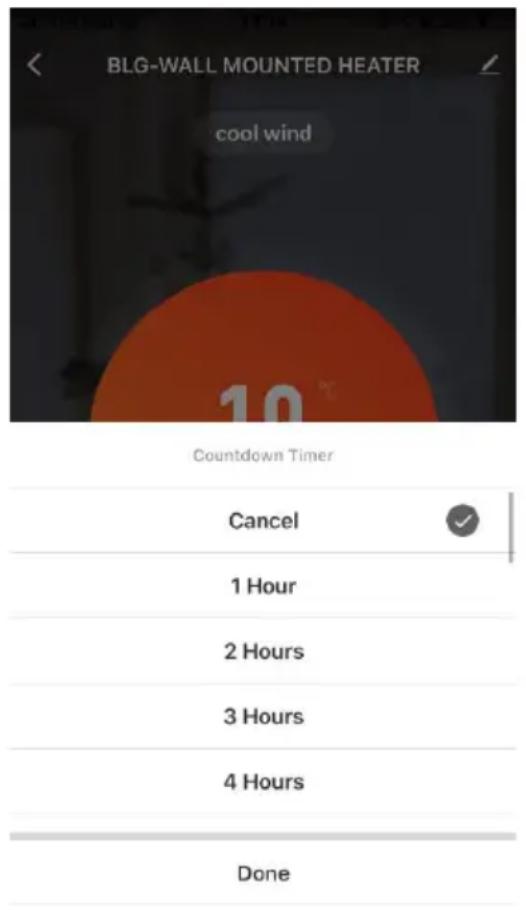
- Press Countdown Timer will shown in picture 9.
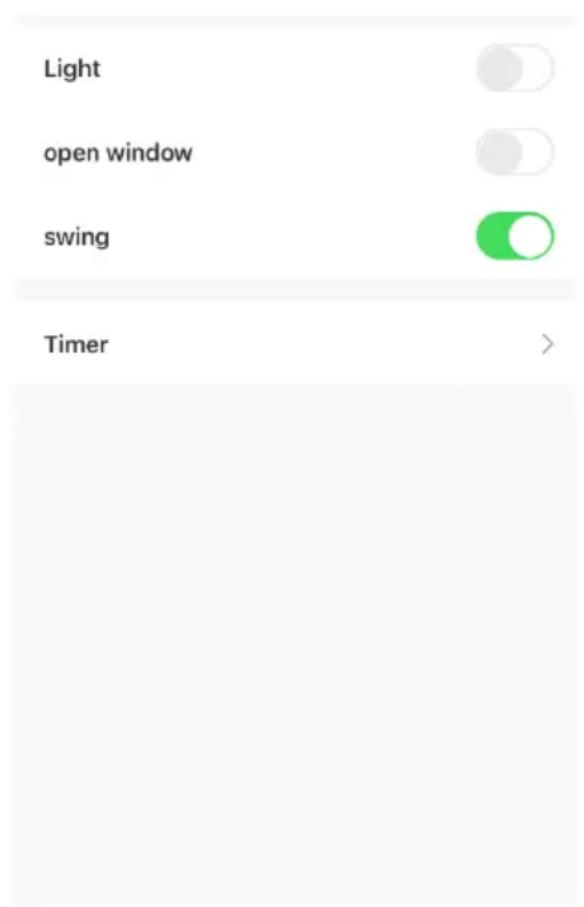
- Press Settings will shown in picture 10.
Pic 9
Pic 10
PS:
Light: Control the light in the display window
Open window: window open function as above
Swing : Louver swing up and down
Timer : Weekly timer
Select "Timer" button to operation:
A. Press the "Add schedule", as shown in pic 11
B. U can choose the weekly and timer what u want through Repeat and Switch ,pls note that u must keep the set temperature higher the currently temperate when ON the power
C. Press the "Save" button in top right corner, to save this during "stop or start" weekly timer operation, as shown in pic 12.
D. Once again operation to set the next during "stop or start" weekly timer.
E. Press the"<"button in top left corner, to check the record what u set.
F. Touch the record and slide to left, you can delete it as shown in pic 13

Pic 11
Pic 12
Pic 13
Operating sound
The appliance emits a beep upon each operation setting.
CONTROL PANEL VIEW
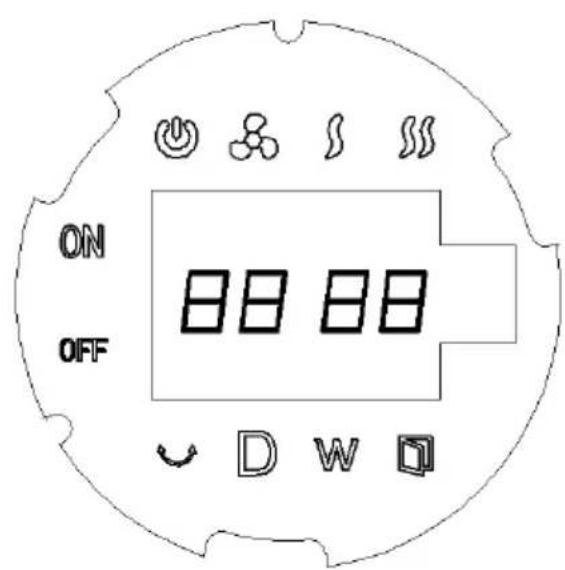

- Master button
- One start button
REMOTE CONTROL
- Remote control, please use Lithium battery CR2025 3V.
-
The remote control power button is labeled as such
-
"Main power button
- “”①Setting timer from 1-24 hours
- "Mode COLD,WARM,HOT 3 setting for selection
- “”Louver swing up and down
- “”Child-Lock function for heater
- "Auto Window Open Function
- “+” Increase
- “-” Decrease

PS: After the machine is started up, when the heating function is not turned on, it will be shut down directly. The product will not go into the process of shutdown waiting for 30 seconds, but will go into the standby state directly
CLEANING & MAINTENANCE
- Before undertaking any cleaning or maintenance on the appliance, disconnect it from the power supply.
- For cleaning it is recommended to use a soft moist rag and neutral detergent. Do not use an abrasive cloth or devices which could affect the appearance of the appliance. Check that the hot air outlet and the ventilation inlet are free of dust and dirt.
-
During cleaning, be careful not to touch the heating elements.
-
To open the filter on the back for cleaning, press the top of plastic net at back.
- In case of breakdown and/or poor functioning of the appliance, disconnect the appliance from the power supply and contact an authorised repairer.
NOTE: As a result of continual improvements, the design and specifications of the product within may differ slightly to the unit illustrated on the packaging.
5. ERP TABLE
| Item | Symbol | Value | Unit | Item | Unit |
| Heat output | Type of heat input, for electric storage local space heaters only (select one) | ||||
| Nominal heat output | Pno m | 2.0 | KW | Manual heat charge control, with integrated thermostat | N/A |
| Minimum heat output (indicative) | Pmin | 1.0 | KW | Manual heat charge control, with room and/or outdoor temperature feedback | N/A |
| Maximum continuous heat output | Pma x,c | 2.0 | KW | Electronic heat charge control with room and/or outdoor temperature feedback | N/A |
| Auxiliary electricity consumption | Fan assisted heat output | N/A | |||
| At nominal heat output | elma x | 0.00 | KW | Type of heat output/room temperature control (select one) | |
| At minimum heat output | elmin | 0.00 | KW | Single stage heat output and no room temperature control | No |
| In standby mode | eISB | 0.001 | KW | Two or more manual stages, no room temperature control | No |
| With mechanic thermostat room temperature control | No | |
| With electronic thermostat room temperature control | No | |
| Electronic room temperature control plus day timer | No | |
| Electronic room temperature control plus week timer | Yes | |
| Other control options (multiple selections possible) | ||
| Room temperature control, with presence detection | No | |
| Room temperature control, with open window detection | Yes | |
| With distance control option | Yes | |
| With adaptive start control | No | |
| With working time limitation | No | |
| With black bulb sensor | No | |
| Contact details | ||
6. ENVIRONMENTAL INFORMATION
This appliance is labelled in compliance with European directive 2012/19/EU for Waste Electrical and Electronic Equipment (WEEE). By ensuring that this appliance is disposed of correctly, you will help prevent any possible damage to the environment
and to human health, which might otherwise be caused if it were disposed of in the wrong way.
The symbol on the product indicates that it may not be treated as normal household waste. It should be taken to a collection point for the recycling of electrical and electronic goods.
This appliance requires specialist waste disposal. For further information regarding the treatment, recover and recycling of this product please contact your local council, your household waste disposal service, or the shop where you purchased it.
For more detailed information about treatment, recovery and recycling of this product, please contact your local city office, your household waste disposal service or the shop where you purchased the product.

The packaging materials are recyclable product. These materials can be deposited in public collection point for recycling.

For devices containing batteries or rechargeable batteries, these parts must be removed and disposed of in clearly marked recycling bins. Please go to the nearest recycling bin in your location or common store.
Please comply with your legal obligations and contribute protecting our environment.
7. AFTER-SALES SERVICE
This appliance has a warranty of 2 years from the date of purchase, considering the following notes:
- The guarantee is valid only on presentation of the product's purchase invoice.
- Damage caused during transport, negligence or misuse, incorrect assembly or installation, as well as external influences such as: atmospheric or electrical rays, flooding, humidity, etc. are not covered by the warranty.
- Damage caused as a result of improper installation, power connection (electricity, water, gas), drainage and disposal is also not covered by the warranty.
- Aesthetic damage (such as scratches, chips, etc.) arising from use are not covered by the warranty.
- This warranty ends when it is discovered that repairs, alterations or interventions have been made by anyone not authorised by Universal Blue.
- The warranty ends when the product has not been used for domestic use only.
- The warranty does not cover deficiencies resulting from improper use and periodic maintenance of the product as specified in the instruction manual.
- For induction and ceramic hobs, the product is loss of warranty in case it had been sealed with silicone or other product during its installation.
- Accessories or consumable components are not covered by the warranty.
- Rubber components are excluded from the warranty.
- The product is not covered by the warranty if it lacks the corresponding identification plate. The user must inform the technical service of the data included on the identification plate when required.
- In glass cooktops and other glass products, if the glass is broken, ripped or scratched as a result of a bump, fall or misuse it will not be covered by warranty
-
To make use of the guarantee go to the store where you purchased this product or contact us by:
-
By email, sat@universalblue.es. Please, attach the invoice, add your contact details and explain briefly what the issue is.
○ By phone, calling us to (0034) 968 893691. - In the following address:
UNIVERSAL FOR ENGINEERING INDUSTRIES SPAIN, SL C/ Decenio N1, Polígono Industrial Media Legua. 30565. Las Torres de Cotillas (Murcia)

Download this manual in our web site: www.universalblue.es
*Universal for Engineering Industries Spain, S.L. reserves the right to make any change in the specifications and features of the products without prior notice, due to the continuous improvement of the products. The images shown here are illustrative, so there may be slight differences between the images and the product you have purchased. Universal for Engineering Industries Spain, S.L., is not responsible for any printing errors.
universalblue
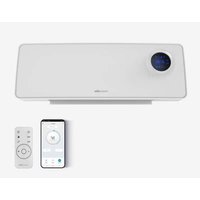


- WHITE/INOX BATHROOM SPLIT WITH WI-FI
- WHITE/INOX WI-FI BATHROOM SPLIT
- ÍNDICE
- ESPAÑOL
- CONEXIÓN WIFI
- IMPORTANT SAFEGUARDS
- READ ALL INSTRUCTIONS BEFORE USING
- CAUTION: SOME PARTS OF THIS PRODUCT CAN BECOME VERY HOT AND CAUSE BURNS. PARTICULAR ATTENTION HAS TO BE GIVEN WHERE CHILDREN AND VULNERABLE PEOPLE ARE PRESENT
- OVERHEAT PROTECTION
- PRODUCT FEATURES
- INSTALLATION
- THE HEATER SHALL BE INSTALLED AND USED ACCORDING TO THE SAFE STANDARD
- OPERATION INSTRUCTIONS
- GENERAL USING
- 24H TIMER FUNCTION
- THERMOSTAT INSTRUCTIONS
- WINDOW OPEN FUNCTION
- CHILD-LOCK FUNCTION
- WI-FI FUNCTION
- CONNECTION BY WIFI
- OPERATION BY WI-FI
- PS
- SELECT "TIMER" BUTTON TO OPERATION
- OPERATING SOUND
- CONTROL PANEL VIEW
- REMOTE CONTROL
- CLEANING & MAINTENANCE
- ERP TABLE
- ENVIRONMENTAL INFORMATION
- AFTER-SALES SERVICE
- UNIVERSAL FOR ENGINEERING INDUSTRIES SPAIN, SL C/ DECENIO N1, POLÍGONO INDUSTRIAL MEDIA LEGUA. 30565. LAS TORRES DE COTILLAS (MURCIA)
- UNIVERSALBLUE
Brand : Universal Blue
Model : UCSB90202-21
Category : Heating