XJ White - Uncategorized Digiquest - Free user manual and instructions
Find the device manual for free XJ White Digiquest in PDF.


| Product Type | Digital Photo Frame |
| Brand | Digiquest |
| Model | XJ White |
| Display Size | 10.1 inches |
| Resolution | 1024 x 600 pixels |
| Dimensions (W x H x D) | 260 x 180 x 20 mm |
| Weight | 450 g |
| Power Supply | 5V DC, 1A |
| Connectivity | USB 2.0, SD card slot |
| Supported Memory Cards | SD, SDHC, MMC |
| Image Formats | JPEG, BMP, PNG |
| Video Formats | AVI, MP4, MOV |
| Audio Formats | MP3, WMA |
| Built-in Speakers | 2 x 1W |
| Remote Control | Yes (included) |
| Clock/Calendar | Yes |
| Auto On/Off Timer | Yes |
| Frame Color | White |
| Accessories Included | Remote control, USB cable, power adapter, stand |
| Manual Pages | 59 |
Frequently Asked Questions - XJ White Digiquest
User questions about XJ White Digiquest
0 question about this device. Answer the ones you know or ask your own.
Ask a new question about this device
Download the instructions for your Uncategorized in PDF format for free! Find your manual XJ White - Digiquest and take your electronic device back in hand. On this page are published all the documents necessary for the use of your device. XJ White by Digiquest.
USER MANUAL XJ White Digiquest
DECODER DIGITALE TERRESTRE FULL HD
FULL HD DIGITAL TERRESTRIAL RECEIVER
MEDIA PLAYER XJ


■ MANUALE UTENTE
- USER MANUAL
INDICE
SICUREZZA E PRECAUZIONI 2
PANNELLI 6
TELECOMANDO SEMPLIFICATO TASTI GRANDI 2 in 1..... 7
TELECOMANDO STANDARD 8
natural_image
Simple line drawing of a trash bin with no text or symbols- RF INPUT CONNECTOR x1
(IEC-TYPE, IEC169-2, FEMALE)
- FREQUENCY RANGE:
174MHz\~230MHz(VHF)
470MHz \~862MHz (UHF)
- SIGNAL LEVEL: -15 \~ -70 dbm
DECODER
●Video decoder MPEG-2 MP@HL, AVC/H.264 HP @L4.1
MPEG-4 ASP SUPPORTED
HEVC/H.265 MP@L4.1
- Audio decoder MPEG-1 Layer 1,2/PCM
- INPUT RATE MAX. 48Mbit/s
- VIDEO FORMATS 4:3/,16:9 SWITCHABLE
• VIDEO OUTPUT HDMI, CVBS
- MODULATION QPSK,16QAM,64QAM, 256QAM
CONNECTION
●TUNER ANTENNA INPUTx1
- HDMI HDMI OUTPUT x1
- SCART TO TV x1
- DATA PORT USB slot x1
POWER SUPPLY
- INPUT VOLTAGE 12V...1A
Power supply included: Input 100-240V\~50/60Hz | Output: 12V... 1A. —
Versione SW: 145
| Manufacturer's name or trade mark, commercial registration number and address | ||
| Huizhou Hongye Electroic Technology Co., Ltd. 2th floor, No.302 of Mingyue Third Road, Tiechang Village, Shiwan Town | ||
| Information published | Value and precision | Unit |
| Model identifier | HY-01A120100EW05 | |
| Input voltage | 100-240V | V |
| Input AC frequency | 50/60 | Hz |
| Output voltage | 12 | V |
| Output current | 1 | A |
| Output power | 12 | W |
| Average active efficiency | ≥ 82.96 | % |
| Efficiency at low load (10 %) | 72.96 | % |
| No-load power consumption | ≤ 0.065 | W |
NOTE:
SAFETY INFORMATION 2
PANELS 5
EASY REMOTE CONTROL 2 in 1 LARGE KEYS ...... 6
STANDARD REMOTE CONTROL 7
SOME KEYS AND FUNCTIONS 7
SYSTEM CONNECTION 11
GETTING STARTED 12
MENU 13
CHANNEL LIST menu 13
CHANNEL SEARCH menu 15
LANGUAGE menu 15
AV SETTING menu 15
WARRANTY and ASSISTANCE 27
SAFETY INFORMATION
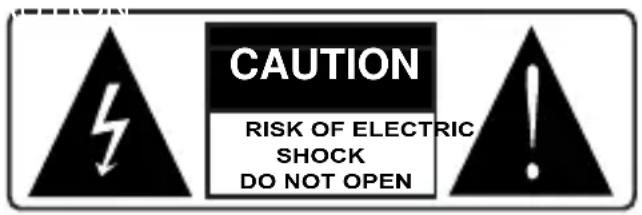
CAUTION: to reduce the risk of fire and electric shock, do not open the unit. All work must be carried out by a specialised technician. Opening the receiver will automatically void the warranty.

This symbol indicates dangerous volt inside the product, which may cause electric shock and personal injury.

This symbol indicates that there are important instructions accompanying the appliance.
CAUTION: the only way to disconnect the decoder from the mains is to remove the plug from the outlet. Make sure that the power outlet is easily accessible, so that you can easily disconnect the product if necessary. Read the manual carefully before using the decoder. Keep the instructions for future reference. Do not open the unit and/or the power supply, touching the internal components may cause electric shock. Contact with a voltage of 100-240V\~ can be fatal. Before connecting the decoder to the power supply, make sure that all connections have been made correctly. Always unplug the decoder from the power outlet before connecting or disconnecting the cables. Failure to observe these precautions can result in damage, fire or electric shock, which can result in serious injury!
POWER SUPPLY. If the model you have purchased requires a power supply unit, you must use the power supply unit supplied with the decoder to prevent damage to the unit. The use of a power supply other than the one supplied with the decoder will automatically relieve the manufacturer of all liability. Check that your power supply corresponds to that required for operation (see label on product or product specifications). Consult your energy manager if you are unsure of the features of your power supply. Do not attempt to repair or splice the power cord. Do not tamper with the power cord or plug. Make sure the power cord is not damaged, knotted, or pinched before use. It is recommended to disconnect the decoder from the power supply when not in use for a long period of time, during thunderstorms
or special events. Never unplug the unit from an outlet by pulling on the cable. Do not connect or disconnect with wet hands or bare feet. Do not use objects such as levers to disconnect the plug from an outlet. The power cord should be protected by a plastic cover to prevent it from being damaged or walked on. If you smell burnt or smoke, unplug the power cord immediately and contact your service representative.
OVERLOADED. Do not overload the power outlet, extension cord, or adapter as this may cause a fire or electrical shock. Always use standard certified cables. Do not connect or modify cables while the decoder is connected to the power supply. Do not use damaged power extension cords as they may cause electric shock or fire.
LIQUIDS. Do not expose this product to dripping or splashing, and do not place any objects with liquid inside, such as vases, etc., on the apparatus. Never place in a damp location or touch with wet or damp hands or during a thunderstorm. If liquid enters the decoder, disconnect it immediately and consult a service technician.
CLEANING. Disconnect the power cord from the outlet before cleaning the receiver. Always use a slightly damp cloth (no solvents, no detergents) for dusting.
VENTILATION. The slots in the receiver should be left uncovered to allow proper ventilation. Leave sufficient space around the equipment to ensure proper ventilation. Do not place the unit on carpets or the like.
OBJECTS. Never insert objects into the slots of the receiver. If this happens, disconnect the decoder and consult a technician.
USE BY ADULTS ONLY. The goods purchased are sophisticated electronic devices and are therefore not suitable for use by minors. No liability is accepted for damage to persons or property resulting from the use of the goods by minors. Keep the appliance out of the reach of children. Plastic bags in packaging can be dangerous. To avoid suffocation, keep the bags out of the reach of children. Batteries and other small parts can be swallowed by children. It is recommended to keep them out of reach.
ACCESSORIES. Do not use non-original accessories or spare parts as they may cause damage to the receiver.
CONNECT TO YOUR TV OR OTHER EQUIPMENT. Unplug this apparatus from the wall outlet before connecting or disconnecting any cables. Before making connections with other devices, read the operating instructions for the devices themselves. The antenna must be installed by a qualified technician.
LOCATION. Install the receiver in a location protected from direct sunlight or rain. Do not place near any heat sources. Do not place any other electronic equipment on the receiver.
Battery Handling: batteries may contain toxic agents that are hazardous to the environment. Therefore, dispose of the batteries immediately according to the prevailing statutory regulations. Never throw the batteries in normal household waste.
Information for Users on Disposal of Old Equipment and Batteries [European Union only] These symbols indicate that equipment with these symbols should not be disposed of as general household waste. If you want to dispose of the product or battery, please consider the collection systems or facilities for appropriate recycling.
Products Battery
Products
Correct disposal of this product prevents any potentially negative impact on the environment and human health that could arise from any inappropriate handling of the product itself. To receive more detailed information regarding disposal of your unit, we recommend that you contact the competent public agencies, the waste collection service or the shop where you purchased the product.
Manufactured by DIGIQUEST SOLUTIONS s.u.r.l. Head-quarter Via Avisio, 18 - 00048 Nettuno (RM) – Italy Made in China

DIGIQUEST SOLUTIONS s.u.r.l. declares that this product complies with Directive 2014/53 / EU. The full text of the EU Declaration of Conformity is available at the following Internet address: www.digiquest.it/certificazioni.html
FRONT PANEL

Buttons: Power on | Standby, VOL+, VOL-, CH+, CH-
IR sensor: receives the signal from the remote control.
Led: when the decoder is off the red led is on, when the decoder is on the led is off.
Display: shows the channel number. In standby it displays the time.
USB: to connect external USB memories.
REAR PANEL

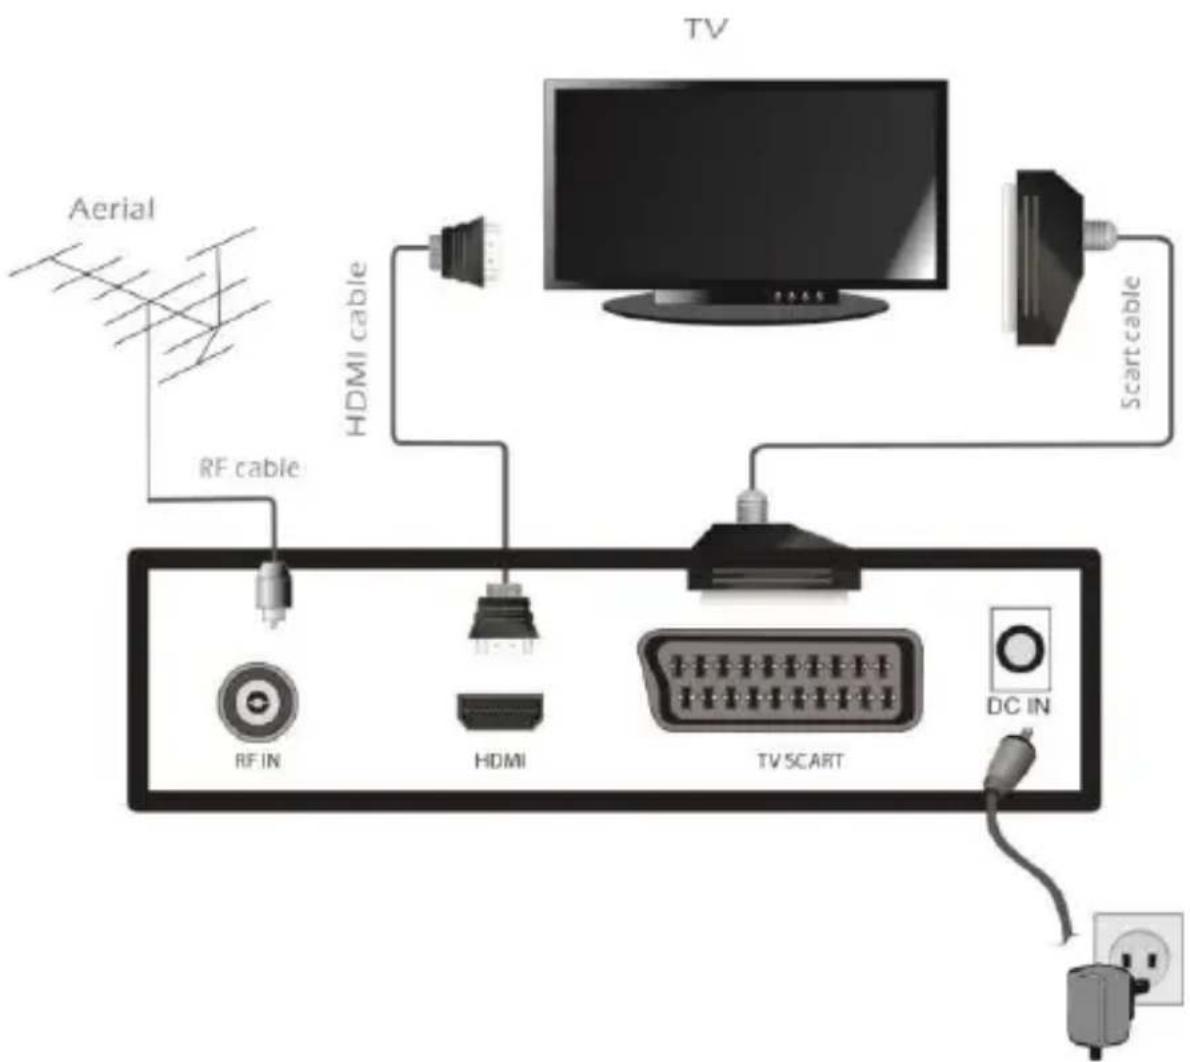
RF IN: for antenna connection.
HDMI: for connection to high definition TV with HDMI cable (not included).
SCART TV for connection to TV with SCART cable (not included).
DC IN for connection of the supplied 12V power supply.
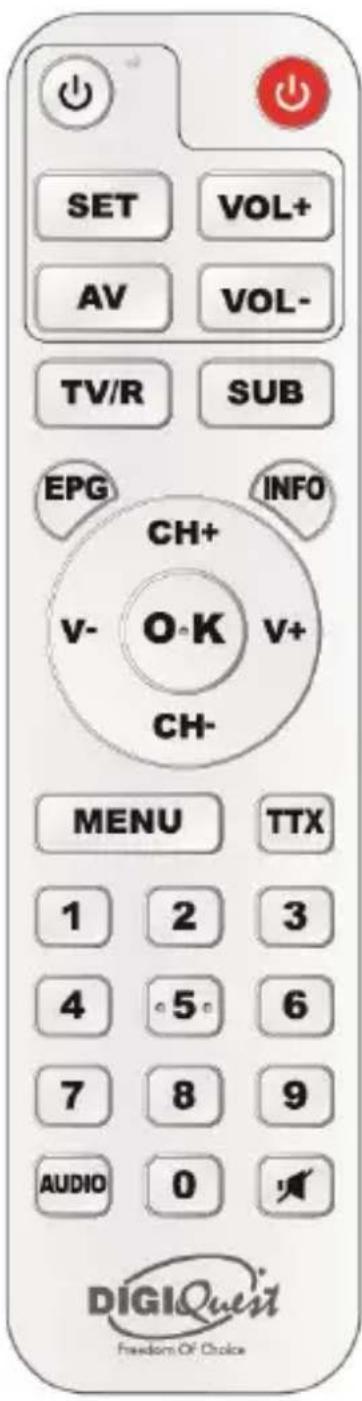
EASY REMOTE CONTROL 2 in 1 LARGE KEYS
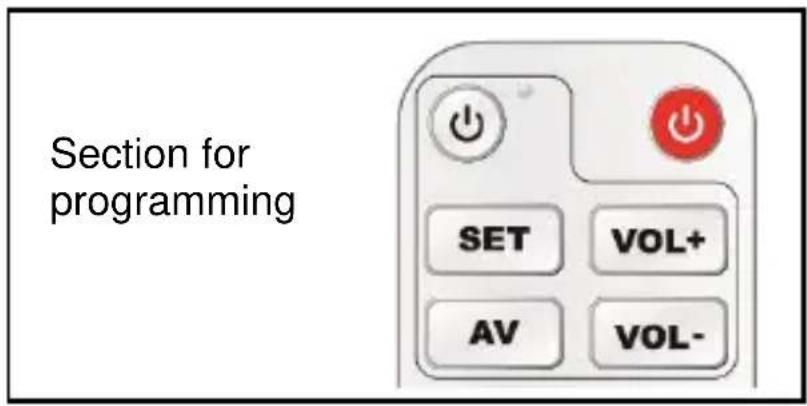
With the simplified remote control the possible operations are limited, use the standard remote control for all functions not present on this one. It can be programmed to manage some of the functions of the TV remote control (e.g. volume control, power off, channel change). To assign TV functions to the receiver remote control follow the procedure below:
- Place the remote control of the TV and the remote control of the cable box in front of each other; the sensors of both should communicate at a distance of about 3 cm.
-
Press the SET button (about 3 seconds) until the red LED lights up and stays solid. The remote control is now in learning mode.
-
Press one of the buttons in the
programming section (e.g. white, see drawing above), the red LED starts flashing.
- Press the button corresponding to the function you want to store on the TV remote control (e.g. ⏻ red). The red LED on
the remote control of the receiver will blink 3 times quickly and then turn solid; press the SET button to save.
Set one key at a time.
Other keys

RED: to turn on/off (standby).
TV/R: to change between TV and radio channels.
SUB: to view the subtitles.
EPG: key to open the program guide. To exit, use the MENU key.
CH+ / CH-: to scroll from one channel to another.
OK: to view the channel list.
V_+ / V_- : to increase or decrease the volume.
MENU: To enter and exit the menu. To exit all functions.
TTX: to open teletext (if available). Inside the teletext page if you press once the background of the window becomes transparent, if you press again you exit teletext (you can also use the MENU button to exit).
Tasti NUMERCI (0\~9): to enter a channel number.
AUDIO: to open the Audio Settings menu. To set the audio language. To exit, use the MENU button.

MUTO: to cancel the sound. Press again to activate it.
STARDARD REMOTE CONTROL

STANDBY: switch the STB on and standby mode.
MUTE: to cancel the sound. Press again to activate it.
▶ II: while a file is playing, pause is enabled and disabled.
■: to stop the playback of files.
● (red dot): no function.
INFO: to display the information bar at the bottom of the screen of the current and next program, pressing it again will enter the EPG, pressing it again will display the technical information.
COLOR KEYS: several functions in the menu.
TV/RADIO: switch between TV and Radio.
MEDIA: active in the Multimedia menu.
AUDIO: enter the audio setting menu.
BLU: opens the Autostandby menu.
EPG: Electronic Program Guide.
BACK: switch to previous viewed channel.
V- ◀ / ▶ V+: volume Up and Down.
Press to move the cursor into menu. During picture playback to rotate the picture.
OK: confirm a selection within a menu or display all programs in no-menu mode. To start playback of the files.
CH+▲ / ▼CH-: channel Up and Down.
Press to move the cursor into menu.
During picture playback to move to the next picture or back to the previous one.
MENU: Open and close the menu screen. To go back step by step in the menu.
EXIT: to save some settings in the menu; to go back step by step in the menu.
◀◀: fast backward while playing back a file.
▶▶: fast forward while playing back a file.
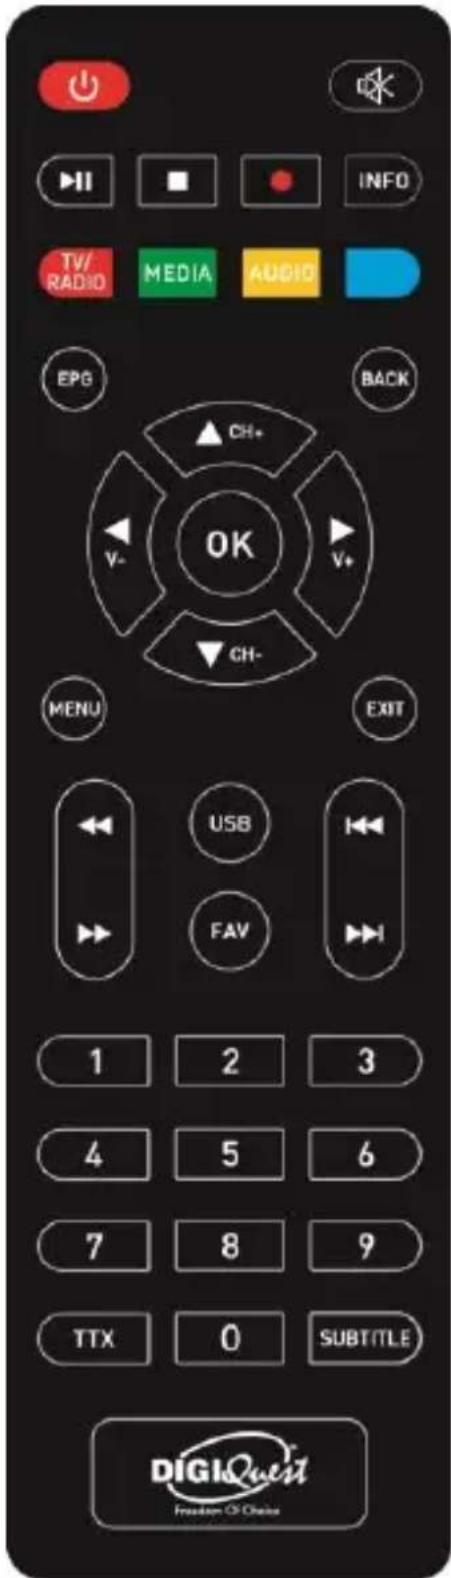
You can increase the speed by pressing the key several times. In audio files, the speed is unique.
USB: to open the Multimedia menu if a USB memory device is inserted.
FAV: show favorite lists if create.
|◀◀/▶▶: to move from one file to another.
(0\~9) Number keys: to switch channels. In the menu to enter values.
TTX: switch on teletext, if current channel has this option.
SUBTITLE: switch on subtitles, if current channel has this option.
Batteries
Not included. We recommend the use of rechargeable batteries to protect the environment.
Installing the Batteries
Remove the battery cover from rear of the remote control and place 2xAAA size batteries inside the compartment.
Please make sure the battery polarities match the polarity markings inside the compartment.
Using the Remote Control
To use the remote control, point it towards the front of the digital set top box. The remote control will not operate if its path is blocked. Sunlight or very bright light will decrease the sensitivity of the remote control.
SOME KEYS AND FUNCTIONS
Change channel
There are several ways to change channels:
- Scroll with the ▲ or ▼ keys.
- Enter the channel number using the Number keys.
- Press the OK button to open the channel list, scroll with the ▲ or ▼ buttons and press the OK button to display the selected one.
Channel List
During viewing, pressing the OK button displays the channel list. The list can also be accessed from within the menu. Scroll from channel to channel with the ▲ / ▼ buttons.
Press the GREEN key to activate the Search function, with the keyboard enter one or more letters of the channel to be searched and then move to the OK box and press the OK key.
Press the RED key to change the type of channels to be displayed in the list: All, FTA, CAS, HD.
Press the BLUE button, a bar appears outside the list with the various letters of the alphabet: by positioning with the / keys on the various letters in the list only the channels starting with the highlighted letter will appear.
Press the YELLOW key to enter the Sort function, the channels in the list can be displayed: in alphabetical order (A - Z and Z - A), by first displaying the FTA channels (in clear) and then the encoded channels (for a fee) (FTA/Coded), in LCN numerical order (default).
EPG
The Electronic Program Guide displays programming for each channel (if your station provides it). You can enter the EPG by pressing the EPG button on the remote control. The schedule of the selected channel will appear. To change the channel use the ▲ and ▼ buttons, the list of scheduled programs will appear in the right window. Use ▶ button to enter the right column and the ▲ or ▼ buttons to select the desired event. Press the INFO button to open the program description. Use the YELLOW button to switch between the columns. Press EXIT to leave the EPG.
SYSTEM CONNECTION
There are many different types of TV and other equipment that you can connect to the box. In this manual you will see some of the most common ways to connect your equipment.
WARNING: when making connections ALL the devices must be disconnected from the electrical socket.
NOTE: when the decoder is connected to the TV via HDMI, it may be necessary to select the source (eg. HDMI 1 or 2 etc.) by pressing the SOURCE button on the remote control of TV (depending on the brand, the button can also be identified with INPUT, AV, AUX, ZERO, etc.), otherwise no image appears.
flowchart
graph TD
    A["Aerial"] --> B["RF cable"]
    A --> C["HDMI cable"]
    A --> D["TV SCART"]
    D --> E["DC IN"]
    D --> F["Scart cable"]
    B --> G["RF IN"]
    C --> H["HDMI"]
    D --> I["TV SCART"]
GETTING STARTED
If you use the set-top box for the first time, please take just few steps to finish the common configurations before you enjoy it.
In the "Installation Guide" screen press ▼/▲ button to select the desired item and then press EXIT or OK button to back to the previous page or enter the next page.
- Set up the Country and Language using the keys ◀▶.
Press OK to go to the next screen.
- Set up the TV system, Resolution and Aspect mode.
Press OK to go to the next screen.
- Set up the Antenna power (function to be activated (On) only when using a portable antenna).
- FTA: if you leave No all available channels will be loaded, if you choose Yes only Free to Air channels will be loaded.
Press OK to go to the next screen.
- Enter a new password (PIN) of 4 digits and confirm it in the next line. Take care to note it down.
- Press OK to start the Channel Search.
You can exit the scan at any time by pressing EXIT on the remote control and confirming.
When the channel scan is finished, confirm with OK. A channel positioning conflict may occur: in this case a window will appear listing the channels found on two or more different frequencies. If the position proposed by the decoder is the desired one, just wait without pressing anything. If you want to change the channel to be stored, use the ▲ and ▼ keys to move to the desired channel and press OK.
IMPORTANT: during the waiting process, DO NOT perform any operation (e.g. press remote control buttons, turn off the receiver, disconnect the power supply), wait for the receiver to automatically position itself on a channel.
Note: the installation procedure can be repeated over and over again, just reset the receiver:
- Enter the Main Menu (MENU button).
- Press the ◀ or ▶ key to go to System menu and press the key to go to Factory settings. Press OK key and enter your password (PIN). Confirm whether or not to reset the decoder to Yes or No with the or key and press OK.
WARNING: when the decoder is reset, all settings entered by the user will be lost.
MENU
Press MENU button to enter the menu. The menu contains the following submenu: Channel List, Channel Search, Language, AV setting, Local Time Setting, System, Multimedia.
Use the ◀ or ▶ keys to move to the desired position and use the ▼ key to enter the submenu (window below) and move to the desired position. Press OK to enter. Press MENU or EXIT key to return one step.
CHANNEL LIST menu
This menu allows you to set up the channels.
TV/Radio Channel List
This menu allows you to set up Fav, Lock, Sort, Rename, Delete and Move for the selected TV/Radio channels.
- In Channel List menu, highlight the TV Channel List or Radio Channel List, press OK button to enter TV Channel List or Radio Channel List menu.
- Press ▲ or ▼ button to select the desired channel.
Use the remote control buttons at the bottom of the screen to activate the desired functions and save by pressing EXIT.
RED button: press to add the selected channel to Fav list.
GREEN button: lock the selected channel, you must enter your set password the first time you turn on the decoder.
BLUE button: press to switch the Sort type.
YELLOW button: press to delete all channels. You can recover erroneously deleted channels through the TV Channel Recycle List / Radio Channel Recycle List menu (see below).
1 button: press to delete the selected channel.
2 button: press to rename the selected channel.
OK button: to move the selected channel to the position you want (just enter the number). After this operation the channels will reverse their position.
TV/Radio Channel Recycle List
This menu allows you to recover the deleted channels from the TV/Radio channel list.
- Select TV Channel Recycle List or Radio Channel Recycle List, press OK to open the list of deleted channels (if it exists).
- Press ▲ or ▼ button to highlight the desired channel.
- Press OK button to recover the selected channel.
- Press EXIT button to back to the previous menu.
Parental Lock
Highlight the Parental Lock, press OK button, you will be asked to input your password. Inside the window that appears, press the ▲ or ▼ keys to select the desired item and the ◀ or ▶ keys to change the settings:
- Age Limit: Off/Age 7/ Age 14/Age18
- Menu Lock: On/Off
- Channel Lock: On/Off
- New PIN-Code: to change the password
- Confirm PIN-Code: to confirm the new password
Press EXIT or MENU button to back to the previous menu.
LCN
On/Off
Global Volume
If active (Yes) each channel will have the same volume intensity, if deactivated (No) the volume intensity will be autonomous.
CHANNEL SEARCH menu
Auto Search
In Channel Search menu, highlight the Auto Search and press OK button. A warning window appears. Highlight Yes, press OK button to delete all existing channels and then start autoscan. Highlight No, press OK button to cancel.
Manual Search
This menu allows you to set up manual channel search. Press ▲ or ▼, ◀ or ▶ and numeric buttons to set up Channel, Frequency and Bandwidth. Highlight Start Search and press OK button to start channel scan manually. Press EXIT or MENU button to back to the previous menu.
Antenna Power: Function to be activated (On) only when using a portable antenna.
FTA: Yes/No
Scan Mode: Reinstall/Update
LANGUAGE menu
This menu allows you to set up Language of system, Audio, and Subtitle (if available).
AV SETTING menu
- TV System: Auto/PAL/NTSC.
-
Resolution: set up various video resolutions
-
Aspect Mode: Auto/4:3LB/4:3PS/16:9LB/16:9PS.
- Video Effects: Default/Vivid/Standard
- Audio Output: LPCM Out / BS Out / SPDIF Out
- Audio Description: On/Off, if the following window lights up.
- AD Volume Offset: -3\~3
This menu allows you to set the region and the local time.
- Region: use this menu to change the region.
- GMT Usage: use this menu to open the usage of GMT By Region / User Define / Off.
- GMT Offset: the GMT offset range is "UTC -11:30 \~ UTC +12:00", increasing every half hour progressively (only valid in User Define mode for GMT Usage.)
- Summer Time: On/Off
- Date/Time: press numeric button to set the date/time (only valid in Off mode for GMT Usage).
SYSTEM menu
System Information
You will find here important information about the software and hardware.
Factory Setting
To reset the decoder and delete all existing channels. Use this function with caution, all stored data will be lost! Press OK key, you will be prompted to enter your password (PIN). After entering the correct password by pressing the numeric keys, a warning window will appear: highlight Yes, press OK key to reset the decoder, delete all channels and settings entered by the user. Highlight No, press OK key to cancel the operation.
Timer List
This menu allows you to set the program timer. Press OK button to enter the Timer List menu. Press BLUE button to enter the sub menu.
Timer Mode: Off/Once/Daily/Weekly.
Timer Service: Channel
Wakeup Channel: select a Wakeup channel.
Wakeup Date: set Wakeup Date by pressing numeric button.
On Time: set On Time by pressing numeric button.
End Time: set End Time by pressing numeric button.
Name: set a name by soft keyboard.
Highlight the Save after pressing cursor and numeric buttons to select your desired item, and then press OK button to add the program timer.
Once the events have been scheduled, they will all be displayed on the first screen of the Timer menu. You can place yourself on the line of an event and press the OK key to edit it, or press the RED key to delete it.
NOTE: When setting a timer, it is recommended to disable the Update functions, see the following chapters.
OSD Setting
- OSD Timeout: 3\~10
- OSD Transparency: Off/50%
- Switching Mode: Video Freeze/Black Screen
- Subtitle Display: On/Off
CEC set
If the TV to which this unit is connected has a CEC function, you can use the TV or set-top box remote control to control some key functions such as volume, power, and channel change.
Also activate the CEC function on your TV.
NOTES:
- Function only active if the decoder is connected to the TV via HDMI.
- If you activate the CEC function on a TV that is connected to multiple devices, you may need to select the TV source for that device.
- Even if TVs are equipped with CEC, compatibility is not guaranteed.
- If your TV or set-top box is not working properly, try turning off the CEC feature on both devices and checking for functionality.
- Activate CEC
To enable the CEC feature, this item must be set to On.
- STB ON and TV ON
Setting On activates simultaneous power on: pressing the power button on the TV will also turn on the decoder. Wait a few seconds.
- STB OFF and TV OFF
Setting On activates simultaneous power off: when you turn off the TV set, the decoder is also turned off. Wait a few seconds.
- STB Source Priority
If you select On when you turn on the power, the source to which your cable box is connected will have priority.
- TV volume through STB
If you set On, you will only be able to adjust the volume with the TV remote control.
USB Update/OTA Upgrade
This menu allows you to upgrade software version by USB/OTA.
- In System menu, highlight the USB Update or OTA Upgrade, press OK button to enter the sub menu.
- Press ▲ or ▼ button to highlight the desired item and press
◀ or ▶ to set up.
- Highlight Start and press OK button to update.
Press EXIT or MENU button to back to the previous menu.
Automatic Update Setting
This menu can make STB to upgrade the software version/channel list automatically at certain time, keep the software version and channel list fresh.
- In Standby mode: On/Off, activate or deactivate the STB to upgrade software version/channel list automatically at particular time in standby mode.
- In Operate mode: On/Off, activate or deactivate the STB to upgrade software version/channel list automatically at particular time in Operate mode.
- Time: press numeric button to set the Time for upgrade automatically.
- Repetition: Daily/Weekly
Auto Standby
Off/1 Hour/2 Hours/3 Hours. After 3 hours of total inactivity (no command) the decoder automatically switches off. If you want to deactivate this function select Off.
MULTIMEDIA menu
This function allows you to play the media files from the USB or HDD. You can view pictures, listen to music, play video files.
CAUTION: only files of the selected category will be visible, e.g., if the Music menu is selected, the other folders containing photos and videos will appear empty.
WARNINGS
- It is recommended to use hard disks with external power supply, as the USB port of the decoder alone cannot guarantee correct power supply: risk of damage to the disk and/or decoder!
-
The speed of detection of the connected memories depends on the technical characteristics of the memories themselves.
-
Compatibility with all USB memory devices on the market is not guaranteed.
- Never disconnect the USB memory device during media playback: risk of irreversible damage to the devices involved. The decoder will no longer recognize the memory.
- Not all hard drives are compatible: externally powered HDDs are recommended. The manufacturer is in no way responsible for any damage or loss of data.
Music
This menu allows you to play the music from the USB.
Press ▲ or ▼ button to highlight the desired item and press OK button to play the selected music. During playback, the buttons to be used for the various functions available are displayed at the bottom of the screen:
- RED button: press to switch the Sort Type.
- GREEN button: press to switch the partition of Hard disk.
- YELLOW button: to display the Play List if created.
- BLUE button: press to set repeat mode (Repeat Folder/Random Folder/Repeat One).
- VOL button: volume up and down.
- FAV button: press to add the selected music to Fav list.
Press EXIT or MENU button to back to the previous menu.
Pictures
This menu allows you to view the picture from the USB.
By selecting this menu you can access the image files (JPG, PNG and BMP) in the connected USB memory. At the bottom of the screen there are several options that can be selected by pressing the corresponding button:
- RED button: press to switch the Sort Type.
- GREEN button: press to switch the partition of Hard disk.
- YELLOW button: press to show and edit the Fav List.
- BLUE button: press to set slide show option.
- FAV button: press to add the selected picture to Fav list.
Press ▲ or ▼ button to highlight the desired item and press OK button to play the selected picture in full screen.
During playback, you can use the RED button to activate the zoom: to zoom in or out, use the ◀ and ▶ buttons. Press EXIT or MENU to return to the previous menu.
NOTE: The manufacturer cannot guarantee the playback of files even though the extension is supported: this depends on the Codec used, the data bit rate and the resolution.
Movies
This menu allows you to play the movies from the USB (AVI, MKV, MP4).
Press ▲ or ▼ button to highlight the desired item and press OK button twice to play the selected movie.
- GREEN button: press to switch the partition of Hard disk (if any).
Press EXIT or MENU button to back to the previous menu.
Device Information
This menu display some parameters of the external USB device.
Storage format
To format the connected USB memory. CAUTION all data will be deleted.
TROUBLESHOOTING
Before contacting the Service Department, check that the area of use of the decoder is covered by the digital terrestrial signal and that your antenna receives the signal correctly.
When an incident occurs, consult the table below before requesting service to identify the cause of the problem. A simple control or adjustment by the user is sometimes sufficient to solve the problem and restore proper operation. The most common drawbacks are generally connected to the cable connection. If none of the actions listed in the table help you solve the problem, log on to www.digiquest.it and you will be guided quickly to solve the problem, thanks to the different possibilities that will be offered to you (available updates, form for assistance request). Register now on the official website at www.digiquest.it/registrazione.html
Never open the receiver, danger! Opening will automatically void the warranty.
Do not switch on
Check that all connections have been made correctly and are securely plugged in.
Check cable integrity.
Try using the TV remote control.
Odour (smell) of burnt
Disconnect the decoder from the outlet and contact service immediately.
The decoder does not find channels
If you are using a directional antenna, make sure that it is oriented towards a STB-T transmitter and positioned correctly.
Make sure that you can receive the digital terrestrial signal in your area.
It is recommended to use a standard external antenna that normally has better features than a portable internal antenna.
Check the cable coming from the antenna and connections.
Replace the partitions or place a line amplifier.
Contact an antennist technician.
Pictures on the screen appear split (framed)
The decoder needs good signal quality for proper operation. Check that the reception system (antenna) is working properly.
The signal is too weak because of bad weather conditions, for example: wait for the signal to recover.
Remote control does not operate the decoder
Make sure the decoder is turned on.
Make sure that the remote control is pointing towards the front panel of the decoder and that there are no obstructions on the path.
Check the remote control batteries: they may have been inserted in the wrong direction or discharged.
Check that no liquid has leaked from the batteries.
Check that there are no stuck keys.
Make sure that there is no direct sunlight on the decoder.
A temporary transmission error has occurred, or the decoder software has lost some of its settings. Turn the unit off and disconnect it from power; allow a few minutes to elapse and then turn it on again.
Make sure that there are no transmitters in the vicinity that could interfere with remote control actions.
An incorrect function has been selected. Press the right key.
Verify that the decoder is properly connected to the power outlet and TV.
Try using the TV remote control.
No image or "No Signal" message
When connecting the decoder with HDMI, you may need to select the source (e.g. HDMI1) for the input used by pressing the SOURCE button on the TV remote control (depending on the brand, it can also be identified with INPUT, AV, AUX, ZERO, etc.).
Check the HDMI or SCART cable.
Disconnect and then reconnect the decoder.
"No Signal Absence" appears on the channel already tuned
Reset the decoder (see relative paragraph), or check the system status.
The word Codified (Scrambled) appears
The channel viewed is part of a paid package.
The image appears crushed or cut
The picture format in the AV setting > Aspect mode menu has
not been set according to the TV's characteristics. Try another format.
No sound heard
Check the HDMI or SCART connection cable.
Check whether the Mute function is activated. Use the decoder or TV remote control to turn it off.
Make sure the volume of your decoder or TV is high enough.
Press the volume buttons on the decoder or TV remote control to adjust.
Check that the decoder is properly connected to your TV or audio system.
Some connections to the decoder may have been "loose".
Try disabling the CEC function on both the TV and the set-top box.
Channel loss or decoder block. Deleting channel or FAV lists
Exclude all automatic updates and resume automatic channel tuning.
The inserted USB memory is not recognized
Not all USB devices are compatible. It is recommended to use powered HDDs that are equipped with their own power supply. Compatibility with large capacity USB devices is not guaranteed; if problems arise, we recommend that you run a partition or use a smaller capacity HDD.
NOTE: the manufacturer is not responsible for any damage or loss of data.
Some files are not recognized
The manufacturer cannot guarantee the playback of the files even though the extension is supported: this depends on the Codec used, the data bit rate and the resolution. Any codec update is the responsibility of the main board manufacturer, it is not possible to do it via SW.
The decoder or TV turns itself off
As required by the recent European energy saving regulations, this decoder switches OFF AUTOMATICALLY 3 hours after the last operation, TVs after 4 hours (autostandby). NOTE: you can disable this function in the relevant menus.
SPECIFICATIONS
TUNER & CHANNEL
- RF INPUT CONNECTOR x1
(IEC-TYPE, IEC169-2, FEMALE)
- FREQUENCY RANGE:
174MHz\~230MHz(VHF)
470MHz \~862MHz (UHF)
- SIGNAL LEVEL: -15 \~ -70 dbm
DECODER
●Video decoder MPEG-2 MP@HL, AVC/H.264 HP @L4.1
MPEG-4 ASP SUPPORTED
HEVC/H.265 MP@L4.1
- Audio decoder MPEG-1 Layer 1,2/PCM
- INPUT RATE MAX. 48Mbit/s
- VIDEO FORMATS 4:3/,16:9 SWITCHABLE
• VIDEO OUTPUT HDMI, CVBS - MODULATION QPSK,16QAM,64QAM, 256QAM
CONNECTION
●TUNER ANTENNA INPUTx1
- HDMI HDMI OUTPUT x1
- SCART TO TV x1
- DATA PORT USB slot x1
POWER SUPPLY
- INPUT VOLTAGE 12V...1A
Power supply included: Input 100-240V\~50/60Hz | Output: 12V... 1A.
Versione SW: 145
Technical Specifications Power supply included
Pursuant to Regulation 2019/1782, Annex II, point (b), the ecodesign requirements for the HY-01A120100EW05 external power supply are hereby referred to as follows
| Manufacturer's name or trade mark, commercial registration number and address | ||
| Huizhou Hongye Electroic Technology Co., Ltd. 2th floor, No.302 of Mingyue Third Road, Tiechang Village, Shiwan Town | ||
| Information published | Value and precision | Unit |
| Model identifier | HY-01A120100EW05 | |
| Input voltage | 100-240V | V |
| Input AC frequency | 50/60 | Hz |
| Output voltage | 12 | V |
| Output current | 1 | A |
| Output power | 12 | W |
| Average active efficiency | ≥ 82.96 | % |
| Efficiency at low load (10 %) | 72.96 | % |
| No-load power consumption | ≤ 0.065 | W |
NOTES
Specifications are subject to change without notice.
The contents of the manual may differ from the product or software provided and is subject to change without notice.
New software may change some features of the receiver.
All applications reproduced and the related trademarks belong to their respective owners.
In case of incorrect, incomplete or erroneous or mere transcription errors supplier (distributor) will be relieved of any responsibility and can refuse performance of the obligation related to the error.
Photos and illustrations are for illustrative purposes only and may not reflect the product image.
Due to updates or errors, the contents of this manual may not exactly match the actual product. Please refer to www.digiquest.it for further information or contact technical support info@digiquest.it
Thank you for purchasing a Digiquest product.
We encourage you to visit our website www.digiquest.it and sign up for our newsletter to stay up-to-date on our products. If your device has a serial number, register it now at www.digiquest.it/registrazione.html for maximum performance.
WARRANTY CONDITIONS
The purchase document (receipt or invoice), constitutes the indispensable documentation to assert your right of warranty. Keep it carefully and you will have privileged access to the Digiquest Solutions service circuit. We guarantee your equipment, intended for domestic use, as provided for by Legislative Decree. 06.09.2005 No. 206 (which implemented in Italy Directive 1999/44/EC) defined as the Consumer Code. The warranty will be automatically invalidated if: accidental breakage due to transport or dropping - tampering or modifications not authorized by the company - improper use or use not in accordance with specific instructions - incorrect connection to the power supply - repairs carried out by unauthorized personnel. ATTENTION: the plastic parts of the product are not covered by warranty as well as damage to the power cord due to wear and tear; any repair will therefore be charged to the owner. Transport costs and risks deriving therefrom are the total responsibility of the user. To view the terms of guarantee, please consult our website www.digiquest.it or contact our assistance.
HOW TO CONTACT ASSISTANCE
For any information, request, need or other requirement is necessary to contact the assistance.
Our website is the fastest and easiest way to communicate with technical service: www.digiquest.it
In the SUPPORT > ASSISTANCE section you can fill in a FORM, a form dedicated to troubleshooting.
You can also contact us through:
- EMAIL: postvendita@digiquest.it
- TELEPHONE +39 06 9857981 from Monday to Friday, from 9.30 to 12.30 and from 15.30 to 17.30.
PRIVACY: the processing of any personal data collected will take place in accordance with the provisions of Regulation (EU) 679/2016 and current legislation. The complete information is available on our website www.digiquest.it
- DECODER DIGITALE TERRESTRE FULL HD
- FULL HD DIGITAL TERRESTRIAL RECEIVER
- MEDIA PLAYER XJ
- INDICE
- DECODER
- CONNECTION
- POWER SUPPLY
- NOTE:
- SAFETY INFORMATION
- FRONT PANEL
- REAR PANEL
- EASY REMOTE CONTROL 2 in 1 LARGE KEYS
- Other keys
- STARDARD REMOTE CONTROL
- Batteries
- Installing the Batteries
- Using the Remote Control
- SOME KEYS AND FUNCTIONS
- Change channel
- Channel List
- EPG
- SYSTEM CONNECTION
- GETTING STARTED
- MENU
- CHANNEL LIST menu
- TV/Radio Channel List
- TV/Radio Channel Recycle List
- Parental Lock
- LCN
- Global Volume
- CHANNEL SEARCH menu
- Auto Search
- Manual Search
- LANGUAGE menu
- AV SETTING menu
- SYSTEM menu
- System Information
- Factory Setting
- Timer List
- OSD Setting
- CEC set
- NOTES:
- - Activate CEC
- - STB ON and TV ON
- - STB OFF and TV OFF
- - STB Source Priority
- - TV volume through STB
- USB Update/OTA Upgrade
- Automatic Update Setting
- Auto Standby
- MULTIMEDIA menu
- WARNINGS
- Music
- Pictures
- Movies
- Device Information
- Storage format
- TROUBLESHOOTING
- Do not switch on
- Odour (smell) of burnt
- The decoder does not find channels
- Pictures on the screen appear split (framed)
- Remote control does not operate the decoder
- No image or "No Signal" message
- "No Signal Absence" appears on the channel already tuned
- The word Codified (Scrambled) appears
- The image appears crushed or cut
- No sound heard
- Channel loss or decoder block. Deleting channel or FAV lists
- The inserted USB memory is not recognized
- Some files are not recognized
- The decoder or TV turns itself off
- SPECIFICATIONS
- TUNER & CHANNEL
- Technical Specifications Power supply included
- NOTES
- WARRANTY CONDITIONS
- HOW TO CONTACT ASSISTANCE
Brand : Digiquest
Model : XJ White
Category : Uncategorized