
WP 881 - Digital piano MK - Free user manual and instructions
Find the device manual for free WP 881 MK in PDF.


| Brand | MK |
| Model | WP 881 |
| Product Type | Digital Piano |
| Number of Keys | 88 |
| Number of Timbres | 140 (GM and Chinese folk) |
| Demo Songs | 16 |
| Metronome Tempos | 10 time signatures, tempo range 30-300 |
| Maximum Recording Notes | 700 |
| Power Supply | DC 12V (included adapter) |
| Headphone Jacks | 2 x 6.3 mm stereo |
| Audio Connections | Audio In, Audio Out, Pedal, USB-MIDI, UDISK (USB) |
| Built-in Speakers | Yes |
| Pedal Port | 3-in-1 (supports single or triple pedal) |
| USB-MIDI (APP) Port | For connection to mobile devices and computers |
| UDISK Music Player | Supports MP3 playback from USB drive |
| Key Functions | Split, Dual, Lesson, Record, Transpose, Octave, Touch, Sustain, Vibrato |
| Maintenance | Clean with soft dry cloth; avoid oil, grease, moisture |
| Safety | Indoor use only; keep away from heat, moisture, children; use only included power adapter |
| Stand Assembly | Included; requires Phillips and slot screwdrivers |
| Compliance | CE marked |
Frequently Asked Questions - WP 881 MK
User questions about WP 881 MK
0 question about this device. Answer the ones you know or ask your own.
Ask a new question about this device
Download the instructions for your Digital piano in PDF format for free! Find your manual WP 881 - MK and take your electronic device back in hand. On this page are published all the documents necessary for the use of your device. WP 881 by MK.
USER MANUAL WP 881 MK

- Głośniki.
- Power Switch.
- Master Volume.
- Function.
- Demo.
- Metronome.
- Lesson.
- Split.
-
Timbre.
-
Percussion.
- GM Timbre.
12 (+4). Click.
13 (+4). Record.
14 (+4). Touch.
15 (+4). Sustain.
16 (+4). Vibrato.
17 (+4). Transpose.
18 (+4). Octave.
19 (+4). Split volume.
20 (+4). Lower volume.
21 (+4). Upper volume.
22 (+4). Metronome volume.
23 (+4). Metronome.
24 (+4). Tempo.
25 (+4). Demo song.
25 (+11). GM Timbre selection.
26 (+4). Udisk music player.
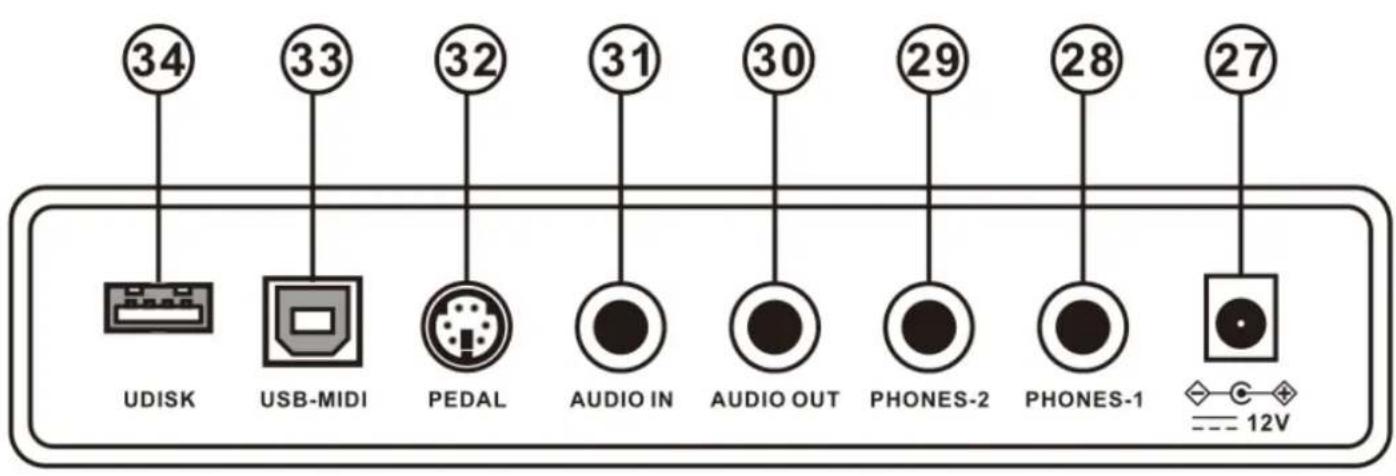
- DC 12V input.
- Phones-1.
- Phones-2.
- Audio Out.
- Audio In.
- Pedal.
- USB-MIDI.
- Udisk.
ENGLISH
Table of contents
Safety rules....15
Device maintenance 15
Device construction and operation....16
Information about used electrical and electronic equipment 25
Assembly guidelines for stand 25
Safety rules
 | Please read the user manual in detail before use. Please also keep it for future reference. The manual contains rules for the safe use of the device. |
 | After receiving the product, please unpack and check whether it is complete and whether there is any damage caused by transportation. If there is damage caused by transportation, please do not use this product and contact the dealer or manufacturer as soon as possible. |
 | WARNING! THE DEVICE MUST NOT BE DISPOSED OF WITH HOUSEHOLD WASTE. This symbol indicates that this product must not be disposed of with household waste, according to the EU and your national law. In order to prevent potential damage to the environment or health, the used product must be recycled. In accordance with current legislation, unusable electrical and electronic devices must be collected separately at the designated facilities for recycling, acting on the basis of applicable environmental standards. |
 | The product described in this manual comply with European directives and it is therefore CE marked. |
 | Keep the device away from children and unqualified persons. The manufacturer is not liable for damage caused by improper use. |
 | Before use, make sure the housing is not damaged. |
 | Use only the dedicated DC 12V power supply included with the product! Disconnect the product from the power supply by pulling on the power plug – do not pull directly on the power cord! Disconnect the device from the power supply before removing the housing or performing maintenance. If you find the power cord is damaged – do not use it! |
 | Indoor device, use in a well-ventilated room, keep away from moisture. Do not expose the product to direct sunlight. Do not store or use the device near a fire source! |
 | Do not expose the device to high temperatures! |
 | In the event of a malfunction, disconnect the device from the power supply immediately! |
Device maintenance
- The device may only be used by qualified personnel, damage caused by improper use or attempted repair is not covered by the warranty. There are no service parts inside the packaging, repairs may only be carried out by authorized service center.
- Do not allow the product to come into contact with oil, grease or any similar liquid!
- Regular cleaning allows of long term use and maintains proper operations. Use soft, dry cloth to clean the product.
Device construction and operation
Control panel and sockets

- Speakers.
- Power Switch.
- Master Volume.
- Function.
- Demo.
- Metronome.
- Lesson.
- Split.
-
Timbre.
-
Percussion.
- GM Timbre.
12 (+4). Click.
13 (+4). Record.
14 (+4). Touch.
15 (+4). Sustain.
16 (+4). Vibrato.
17 (+4). Transpose.
18 (+4). Octave.
19 (+4). Split volume.
20 (+4). Lower volume.
21 (+4). Upper volume.
22 (+4). Metronome volume.
23 (+4). Metronome.
24 (+4). Tempo.
25 (+4). Demo song.
25 (+11). GM Timbre selection.
26 (+4). Udisk music player.
- DC 12V input.
- Phones-1.
- Phones-2.
- Audio Out.
- Audio In.
- Pedal.
- USB-MIDI.
- Udisk.
Performance preparation
- AC/DC power adapter
Dedicated AC/DC power adapter for the piano should be used. Connect the output end of the power adapter to the power interface on the rear panel of the piano, and the other end to the power socket. Please note that the input voltage of the adapter should be in line with utility power voltage.
- Use of headphones
Two professional 6.3 mm dual-track headphones ports are provided on the piano. When connecting headphones to the PHONES-1 or PHONES-2 port on the rear panel of the piano, the speaker will be disabled automatically. In this way, you can carry out personal practice or four hands playing without disturbing other Caution! When using headphones, do not keep high volume for a long time, or else hearing damage may be caused.
- Connection with amplifier or audio device
The piano is configured with an in-built speaker. You may connect the piano to other external audio devices. Firstly, turn off the piano and the external audio device, secondly, connect one end of the audio cable to the AUDIO OUT (audio output) port on the rear panel of the piano, and finally connect the other end to the audio input port of the audio device.
- Audio input port
The piano is equipped with a stereo input function. Sound signals from mobile phone, MP3 player, compute and other audio devices can be input into the piano for playing. Firstly, turn off the piano, secondly, connect one end of the audio cable to the output port of an audio device, and the other end to the AUDIO IN port or the rear panel of the piano, finally, turn on the piano.
- Pedal port
The piano is configured with a 3-in-1 pedal port which can be used for the connection of a single pedal (sustain pedal) or three pedals (soft pedal, sustain pedal and damper pedal) to simulate various sound effects during the piano performance. Connect the pedal connector to the PEDAL port on the rear panel of the piano, and carry out required operations with the pedal.
- USB-MIDI (APP) port
The USB-MIDI (APP) port of the piano is used for the connection with a mobile phone or a tablet PC. Download and install APP teaching software to connect the piano with smart devices, facilitating teaching and learning. Connecting method: A dedicated OTG data cable of the piano should be used for the connection between the piano and a mobile phone or a tablet PC. The USB-MIDI (APP) port of the piano can also be used for the connection with other musical Instruments and computer with MIDI. You can output performance records to a computer for advanced recording, composing and editing with computer software, or input the MIDI music stored in the computer to the piano for playing.
- Play Udisk music
The piano is configured with an in-built Udisk music player with 32G memory, which can be used to play music of MP3 format. Insert a U disk into the UDISK port on the rear panel, press the [FUNCTION+] + UDISK MUSIC PLAYER [ON/OFF] buttons to play MP3 music. Press the [FUNCTION+] + UDISK MUSIC PLAYER [ ] buttons to play or pause a track. Press the [FUNCTION+] + UDISK MUSIC PLAYER.[ ] buttons to adjust the volume. Press the [FUNCTION+] [ ] or [ ] buttons to go to the previous or next track. Press the [FUNCTION+] + [ ] buttons to cycle through the repeat modes for continuous, random, or single playback. Press the [FUNCTION+] + UDISK MUSIC PLAYER [ON/OFF] buttons again to deactivate the MP3 music playing function.

Basic performance
- Power On/Off
Press the [POWER] button, the [PIANO] button light will light on, and then you may operate the piano as required.
• Master volume adjustment
Turn the [MASTER VOLUME] knob clockwise to increase master volume, and anti-clockwise to decrease master volume. The master volume controls all volumes simultaneously.
- Key tone
The click function is defaulted to be enabled, press the [FUNCTION+] button + function compound key on the keyboard, a prompt tone "click" will be heard. Press the [FUNCTION+] button + the [Click] key to enable or disable the key tone function.

- Timbre selection
The piano provides 140 timbres, from "000" to "139", for your selection. When the piano is turned on, the [PIANO] button light lights on. Default timbre: the piano provides 8 default timbres for your selection, among which, the default timbre of [GM TIMBRE] is "088 Pad 1 (New Age)". Select other timbres: press the [GM TIMBRE] button + [DEMO SONG/GM TIMBRE] keys to select standard GM timbre and Chinese folk timbre from "000" to "139".

- Play demo songs
Press the [DEMO] button to play the demo songs, and press the [DEMO] button again to stop playing. The piano provides 16 demo songs, from "00" to "15", for your selection. Press the [FUNCTION+] button + [DEMO SONG/GM TIMBRE] keys to select the corresponding demo song. During the demo song playing process, you can select other timbres for playing the demo song. Note: percussion and dual timbre is not applicable.

- Metronome
Press the [METRONOME] button to activate the metronome. Press the [METRONOME] button again to deactivate the metronome. The piano contains 10 tempos. Press the [FUNCTION+] button + the [METRONOME] 1/4\~12/8 keys for metronome setting.

The tempo is defaulted to be 120, which is adjustable between the range of "30" to "300". Press the [FUNCTION+] button + [Tempo] number + “-/+” keys to select the required tempo. Press the [FUNC-TION+] button + the [TAP] key of the [TEMPO] to restore the default value.

The piano contains 5 metronome volumes. Press the [FUNCTION+] button + the [METRONOME VOLUME] 1 - 5 keys for metronome volume setting.

- Effect change
Sustain: prolong the lasting time of a pitch. Press the [FUNCTION+] button + the [SUSTAIN - ON] key to enable the sustain effect. Press the [FUNCTION+] button + the [SUSTAIN - OFF] key to disable the sustain effect.
Vibrato: add a pulsating change to the pitch. Press the [FUNCTION+] button + the [VIBRATO - ON] key to enable the vibrato effect. Press the [FUNCTION+] button + the [VIBRATO - OFF] key to disable the vibrato effect.

Soft pedal: decrease the pitch volume. Press and hold the [soft pedal] to enable the soft effect, and release the pedal to disable such effect. Note: this function is only supported by the configuration with the optional items - three pedals.
Sustain pedal: prolong the lasting time of a pitch. Press and hold the [sustain pedal] to enable the sustain effect, and release the pedal to disable such effect. Note: this function is supported by both configurations with a single pedal or three pedals.
Damper pedal: prolong the lasting time of the pressed key. Press and hold the [sustain pedal] to enable the damper effect, and release the pedal to disable such effect. Note: this function is only supported by the configuration with the optional items - three pedals.
- Transpose
The transpose control function of the piano is adjustable from “-6” to “+6”, and the default setting is 0. Press the [FUNCTION+] button + the [TRANSPOSE -/+] keys for transposing within ±6.

The transpose function saves the trouble of raising and lowering the key when playing on the keyboard. You can play songs in every key in the same way as that for playing songs in key C. It may decrease the key by half-step (minor second), thus the keys positions for key C is changed to those for key B; press the "+" button to increase all keys by half-step (minor second), in this case, the tone of the key position of key C is changed to key C# or key Db. If the button is pressed for twice, key C will decrease to Bb; and if the button is pressed for fifth times, key C will decrease to key F. Press the "+" and "-" buttons simultaneously to reset key C.
- Touch control
Press the [FUNCTION+] button + [TOUCH] OFF, 1-3 keys to turn off or shift touch force among 3 grades.

- Split
The keyboard can be split into two zones, in this way, you can play two different timbres with your left and right hands respectively. You should set the timbre for the right hand side after the timbre that you were using before splitting is applied to the left-hand side. For example, you can set the timbre of the left-hand side to bass and the right-hand side to piano. Press the [SPLIT+] button to split the keyboard, and press the [SPLIT+] button again to disable the keyboard split. Press the [SPLIT+] button for the first time and press the key simultaneously to set the split point. The currently pressed key will be the first key of the right-hand side.

When the keyboard split function is enabled, the scale of the left-hand zone will increase by an octave, and the scale of the right-hand zone will decrease by an octave. Take the default split point as an example, scales of Keys A0 - G2# will change to those of Keys A1 - G3#, while scales of Keys A2 - C8 will change to those of Keys A1 - C7. Press the [FUNCTION+] button and [SPLIT] 1 - 5 keys to set the volume for the left-hand zone. After the keyboard split function is enabled, you can reselect a timbre for the right-hand zone.
- Dual timbre
Press any two timbre buttons simultaneously to enable the dual timbre function, in this case, the two selected timbre will be overlaid.

When overlay of other timbres are required, press the [GM TIMBRE] button + the [DEMO SONG/GM TIMBRE] key to select other timbres, and then press the [GM TIMBRE] and other [TIMBRE] buttons simultaneously. Both volumes for the upper layer and the lower layer have 5 grades: the volume of the
first selected timbre is adjusted via the upper volume by pressing the [FUNCTION+] button + the [UPPER VOLUME 1 - 5] keys on the keyboard; the volume of the later selected timbre is adjusted via the upper volume by pressing the [FUNCTION+] button + the [LOWER VOLUME 1 - 5] keys.

- Lesson mode
In the lesson mode, the 88 keys are split into two zones with identical tone and timbre, which facilitates the demonstration by teacher-level students, and two persons can play the piano simultaneously. Press the [LESSON] button for the first time to activate the lesson mode, press the [LESSON] button again to disable this function. Under the lesson mode, the scales of Keys A0 - C4 in the left zone will change to the scales of Keys A3 - C7, while the scales of Keys C4# - C8 in the right zone will change to the scales of Keys C3# - C7.

Under the lesson mode, you can perform octave adjustment from “-2” to “+2”, and the default setting is 0. Press the [FUNCTION+] button + the [OCTAVE] “-” / “+” keys for octave adjustment within ±2. For example, when adjusting octave to “-2”, the left zone will change to A0-C4 while the right zone will change to C0#-C4. Press the [FUNCTION+] button + [OCTAVE] “-” / “+” keys simultaneously to restore the default setting. Note: octave control can only be enabled under the lesson mode.

- Record mode
Press the [FUNCTION+] button + the [REC] key to enable the record mode. Press the [FUNCTION+] button + the [REC] key again to disable the record mode. Under the record mode, the metronome will be enabled automatically, and you can press any key to start recording. Press the [FUNCTION+] button + the [TEMPO] key to adjust the tempo. The piano can record 700 notes at maximum. When the storage memory is full, the record mode will be disabled and the metronome will shut down automatically. Press the [FUNCTION+] button + the [PLAY] key to play the records. During the playing process, press the [FUNCTION+] button + the [PLAY] key again to stop playing.

Timbre table
000 Acoustic Grand Piano
001 Bright Acoustic Piano
002 Electric Grand Piano
003 Honky-tonk Piano
004 Rhodes Pia
005 Chorused Piano
006 Harpsichord
007 Clavichord
008 Celesta
009 Glockenspiel
010 Music Box
011 Vibraphone
012 Marimba
013 Xylophone
014 Tubular Bell
015 Dulcimer
016 Drawbar Organ
017 Percussive Organ
018 Rock Organ
019 Church Organ
020 Reed Organ
021 Accordion
022 Harmonica
023 Tango Accordion
024 Acoustic Guitar (nylon)
025 Acoustic Guitar (steel)
026 Electric Guitar (jazz)
027 Electric Guitar (clean)
028 Electric Guitar (muted)
029 Overdriven Guitar
030 Distortion Guitar
031 Guitar Harmonics
032 Acoustic Bass
033 Electric Bass (finger)
034 Electric Bass (pick)
035 Fretless Bass
036 Slap Bass 1
037 Slap Bass 2
038 Synth Bass 1
039 Synth Bass 2
040 Violin
041 Viola
042 Cello
043 Contrabass
044 Tremolo Strings
045 Pizzicato Strings
046 Orchestral Harp
047 Timpani
048 String Ensemble 1
049 String Ensemble 2
050 Synth Strings 1
051 Synth Strings 2
052 Choir Aahs
053 Voice Oohs
054 Synth Voice
055 Orchestra Hit
056 Trumpet
057 Trombone
058 Tuba
059 Muted Trumpet
060 French Horn
061 Brass Section
062 Synth Brass 1
063 Synth Brass 2
064 Soprano Sax
065 Alto Sax
066 Tenor Sax
067 Baritone Sax
068 Oboe
069 English Horn
070 Bassoon
071 Clarinet
072 Piccolo
073 Flute
074 Recorder
075 Pan Flute
076 Bottle Blow
077 Shakubachi
078 Whistle
079 Ocarina
080 Lead 1 (square)
081 Lead 2 (sawtooth)
082 Lead 3 (callione lead)
083 Lead 4 (chiff lead)
084 Lead 5 (charang)
085 Lead 6 (voice)
086 Lead 7 (fifths)
087 Lead 8 (bass+lead)
088 Pad 1 (new age)
089 Pad 2 (warm)
090 Pad 3 (polysynth)
091 Pad 4 (choir)
092 Pad 5 (bowed)
093 Pad 6 (metallic)
094 Pad 7 (halo)
095 Pad 8 (sweep)
096 FX 1 (rain)
097 FX 2 (soundtrack)
098 FX 3 (crystal)
099 FX 4 (atmosphere)
100 FX 5 (brightness)
101 FX 6 (goblins)
102 FX 7 (echoes)
103 FX 8 (sci-fi)
104 Sitar
105 Banjo
106 Shamisen
107 Koto
108 Kalimba
109 Bagpipe
110 Fiddle
111 Shanai
112 Tinkle Bell
113 Agogo
114 Steel Drums
115 Woodblock
116 Taiko Drum
117 Melodic Tom
118 Synth Drum
119 Reverse Cymbal
120 Guitar Fret Noise
121 Breath Noise
122 Seashore
123 Bird Tweet
124 Telephone Ring
125 Helicopter
126 Applause
127 Gunshot
128 Yong Gin
129 Zheng
130 Zhong Ruan
131 Pi Pa
132 Big Souna
133 Souna
134 Er Hu
135 Yue Hu
136 Di Zi
137 Bong Di
138 Koto
139 Qu Di
Information about used electrical and electronic equipment
The main goal of European and national law regulations is to reduce the amount of waste produced from used electrical and electronic equipment, to ensure an appropriate level of collection, recovery and recycling of used equipment, and to increase public awareness of its harmfulness to the environment, at each stage of use of electrical and electronic equipment. Therefore, it should be pointed out that households play a key role in contributing to reuse and recovery, including recycling of used equipment. The user of electrical and electronic equipment – intended for households – is obliged to return it to authorized collector after its use. However, it should be remembered that products classified as electrical or electronic equipment should be disposed of at authorized collection points.
Assembly guidelines for stand

Please Install the wooden frames according to the diagram below (please prepare installation tools: large size phillips screwdriver and slot type screwdriver).
- Install box section: Place the box section⑦ into the groove on the bottom of the piano and tighten it with M5 screws①.

- Install the Rung®: mack the perforated side of the Rung facing backwards, and insert the M6 hammer nut® as shown in the diagram. Use a slot type screwdriver to adjust the hammer head nut to the holes on both baseboard. Then lock the rung® with M6 long screw® from behind of baseboard.

- Installation of angle iron bracket②: Install the iron brackets separately on the left and right baseboard(⑨&⑩) (please notice that the angle iron bracket's direction), and then tighten them with the M6 short screws③.

- Piano instillation : place the piano on the top of the wooden frame and lock the piano with M5 plastic head screws®.


Brand : MK
Model : WP 881
Category : Digital piano