
DO 7860 VLBW - Oven MIELE - Free user manual and instructions
Find the device manual for free DO 7860 VLBW MIELE in PDF.

| Product Type | Built-in Electric Oven |
| Brand | Miele |
| Model | DO 7860 VLBW |
| Dimensions (HxWxD) | 45 x 60 x 55 cm |
| Weight | 52 kg |
| Power Supply | 220-240 V, 50/60 Hz, 16 A |
| Total Connected Load | 3.6 kW |
| Energy Efficiency Class | A+ |
| Heating Methods | Convection, Top/Bottom Heat, Grill, Fan Grill, Intensive Bake, Moisture Plus |
| Cleaning System | Pyrolytic self-cleaning with catalytic back panel |
| Safety Features | Child lock, Automatic shut-off, CoolTouch door, System lock |
| Display | TFT Touch Display |
| Interior Capacity | 76 L |
| Number of Shelf Levels | 5 |
| Door Type | Full glass, soft-close |
| Spare Parts Availability | Replacement parts available via Miele service for at least 10 years |
| Warranty | 2 years manufacturer warranty |
| Repairability Index | 8.5/10 |
| Networking | Wi-Fi enabled for Miele@home app |
Frequently Asked Questions - DO 7860 VLBW MIELE
User questions about DO 7860 VLBW MIELE
0 question about this device. Answer the ones you know or ask your own.
Ask a new question about this device
Download the instructions for your Oven in PDF format for free! Find your manual DO 7860 VLBW - MIELE and take your electronic device back in hand. On this page are published all the documents necessary for the use of your device. DO 7860 VLBW by MIELE.
USER MANUAL DO 7860 VLBW MIELE
Operating and installation instructions Dialog oven
natural_image
Interior view of a kitchen oven with metal grilles and a mounted oven (no text or symbols visible)It is essential to read these operating and installation instructions before installing and using the appliance. This prevents both personal injury and damage to the appliance.
Warning and safety instructions 6
Caring for the environment 18
Overview.... 19
Controls.... 20
On/Off sensor.... 21
Sensor controls 21
Touch display 22
Symbols.... 23
Operating principles.... 24
Selecting a menu option 24
Scrolling through menus 24
Exiting a menu.... 24
Changing a value or setting.... 24
Changing values or settings during a programme 24
Changing a setting in a list.... 24
Entering numbers with the roller 24
Entering numbers using the numerical keypad.... 25
Changing the setting with a segment bar 25
Entering letters 25
Displaying Help 25
Features...... 26
Data plate 26
Items supplied.... 26
Accessories supplied and available to order.... 26
Safety features 29
PerfectClean treated surfaces.... 29
Pyrolytic accessories.... 29
Before using for the first time 30
Miele@home 30
Standard settings 31
Heating up the Dialog oven for the first time and rinsing the steam injection system.... 32
Settings 34
Settings overview 34
Opening the "Settings" menu.... 36
Language 36
Time.... 36
Date.... 36
QuickTouch 36
Start screen 37
Brightness 37
Colour scheme 37
Volume 37
Units 38
Adapting existing recipes to M Chef functions 46
Oven function.... 46
Temperature 46
Gourmet Units 46
Intensity...... 46
Duration.... 46
Shelf level 46
Gourmet Profi and Gourmet assistant.... 47
Main and sub-menus 48
Suitable cookware for M Chef functions.... 50
Suitable containers.... 50
Unsuitable containers.... 51
Energy saving tips 52
Operation.... 54
Changing values and settings for a cooking programme.... 55
Changing the temperature and the core temperature.... 55
Changing the number of Gourmet Units 55
Changing the intensity.... 56
Setting cooking durations 57
Cancelling cooking.... 58
Pre-heating the oven 58
Rapid Heat-up....59
Pre-heat 60
Crisp function 61
Change type of heating 61
Change function 61
Functions using moisture 62
Starting a cooking programme using moisture 63
Evaporate residual moisture.... 66
Automatic programmes 68
Using Automatic programmes.... 68
Usage notes 68
Search 69
Special applications.... 70
Defrost.... 70
Drying 72
Heat crockery 73
Prove yeast dough 73
Low temp. cooking....74
Sabbath programme 76
Bottling 77
Frozen food/Ready meals....79
User programmes.... 80
MyMiele 82
Baking.... 83
Tips on baking....83
Notes on the cooking charts 84
Notes on the oven functions 84
Roasting 86
Tips for roasting 86
Notes on the cooking charts 86
Notes on the oven functions 87
Food probe....88
Grilling 91
Tips for grilling.... 91
Notes on the cooking charts 92
Notes on the oven functions 93
Cleaning and care 94
Unsuitable cleaning agents 94
Removing normal soiling.... 95
Removing stubborn soiling.... 95
Pyrolytic cleaning 96
Descale.... 100
Problem solving guide 104
Service....108
Contact in case of fault 108
Warranty 108
Installation.... 109
Building-in dimensions.... 109
Installation in a tall or base unit.... 109
Side view 110
Connections and ventilation.... 111
Installing the Dialog oven 112
Electrical connection 113
Cooking charts 114
Creamed mixture.... 114
Rubbed in mixture.... 115
Yeast dough 116
Quark dough.... 117
Sponge mixture 117
Choux pastry, puff pastry, meringue.... 118
Savoury snacks 119
Beef 120
Pork 122
Veal 124
Lamb, game 125
Poultry, fish.... 126
Gourmet assistant 📄/ ✿ overview 127
Overview of Automatic programmes Auto 132
Copyright and licences 137
This Dialog oven complies with all relevant safety requirements.
However, inappropriate use can lead to personal injury and damage to property.
Please read these operating and installation instructions carefully before using the Dialog oven for the first time. They contain important information on safety, installation, use and maintenance of the appliance. This prevents both personal injury and damage to the Dialog oven.
In accordance with standard IEC 60335-1, Miele expressly and strongly advises that you read and follow the instructions in “Installation”, as well as in the “Warning and Safety instructions”.
Miele cannot be held liable for injury or damage caused by non-compliance with these instructions.
Keep these instructions in a safe place and pass them on to any future owner.
Correct application
This Dialog oven is designed for domestic use and for use in similar environments by guests in hotel or motel rooms, bed & breakfasts and other typical living quarters. This does not include common/shared facilities or commercial facilities within hotels, motels or bed & breakfasts.
This Dialog oven is not suitable for outdoor use.
The Dialog oven is intended only to cook, bake, roast, grill, defrost, bottle and dry food.
Any other use is not permitted.
▶ Fire hazard due to flammable materials. If flammable items were dried in the Dialog oven, the moisture in the items would evaporate. This could cause the materials to dry out and possibly self-ignite. Never use the Dialog oven to store or dry items which could ignite easily.
This Dialog oven is not intended for use by persons (including children) with reduced physical, sensory or mental capabilities, or lack of experience and knowledge, unless they are supervised whilst using it.
They may only use the Dialog oven unsupervised if they have been shown how to use it in a safe manner. They must be able to recognise and understand the dangers of misuse.
The oven compartment is equipped with special lamps to cope with particular conditions (e.g. temperature, moisture, chemical resistance, abrasion resistance and vibration). These special lamps must only be used for the purpose for which they are intended. They are not suitable for room lighting. Replacement lamps may only be fitted by a Miele authorised technician or by Miele.
This Dialog oven contains 2 light sources of the energy efficiency class G.
Safety with children
▶ Activate the system lock to ensure that children cannot switch on the Dialog oven inadvertently.
▶ Young children must not be allowed to use this appliance.
▶ Older children may only use the Dialog oven if its operation has been clearly explained to them and they are able to use it safely. They must be able to understand and recognise the possible dangers caused by incorrect operation.
▶ Cleaning work may only be carried out by older children under the supervision of an adult.
▶ Please supervise children in the vicinity of the Dialog oven. Do not allow them to play with the Dialog oven.
Risk of suffocation from packaging material. Whilst playing, children may become entangled in packaging material (such as plastic wrapping) or pull it over their head with the risk of suffocation. Keep packaging material away from children.
Risk of injury caused by hot surfaces. Children's skin is far more sensitive to high temperatures than that of adults. External parts of the Dialog oven such as the door glass, control panel and the vents become quite hot.
Do not let children touch the Dialog oven when it is in operation.
Risk of injury caused by hot surfaces. Children's skin is far more sensitive to high temperatures than that of adults. The Dialog oven gets much hotter during pyrolytic operation than during normal use. Do not let children touch the Dialog oven during pyrolytic cleaning.
Risk of injury from the open door. The oven door can support a maximum weight of 15 kg. Children could injure themselves on an open door.
Do not let children sit on the open door, lean against it or swing on it.
Technical safety
▶ Unauthorised installation, maintenance and repairs (including removal of any cover) can cause considerable danger for the user. Installation, maintenance and repairs must only be carried out by a Miele authorised technician.
▶ Damage to the Dialog oven can compromise your safety. Check the Dialog oven for visible signs of damage. Do not use a damaged Dialog oven.
▶ Temporary or permanent operation with a self-sufficient or non-mains synchronous energy supply system (e.g. isolated networks, back-up systems) is possible. A requirement for the operation is that the energy supply system complies with all current local and national requirements that apply to stand-alone, solar and/or battery systems.
The protective measures provided in the installation and in this Miele product must also be assured in their function and operation in isolated operation or in non-mains synchronous operation, or replaced with equivalent measures in the installation.
▶ Operating a damaged Dialog oven can result in electro-magnetic leakage and present a hazard to the user, and affect the functionality of electronic devices such as mobile phones. Do not use the appliance if:
- the door is warped.
- the door hinges are loose.
- the door seals are damaged.
- holes or cracks are visible in the casing, the door or the oven compartment walls.
The electrical safety of the Dialog oven can only be guaranteed when continuity is complete between it and an effective earthing system. It is essential that this basic safety requirement is present and tested regularly. If in doubt, the electrical installation should be checked by a qualified electrician.
▶ Ensure that the connection data on the Dialog oven's data plate (voltage and frequency) matches the mains electricity supply. This data must correspond in order to avoid the risk of damage to the Dialog oven. Compare this before connecting the appliance to the mains electricity. If in any doubt, consult a qualified electrician.
Multi-socket adapters and extension leads do not guarantee the required safety of the appliance. Do not use these to connect the Dialog oven to the mains electricity supply.
For safety reasons, this Dialog oven may only be used after it has been built in.
This Dialog oven must not be installed and operated in mobile installations (e.g. on a ship).
Risk of injury due to electric shock. Any contact with live connections or tampering with the electrical or mechanical components of the Dialog oven will endanger your safety and may lead to appliance malfunctions.
Do not open the Dialog oven housing under any circumstances.
The manufacturer's warranty will be invalidated if the appliance is not repaired by a Miele approved service technician.
▶ Miele can only guarantee the safety of the appliance when original Miele spare parts are used. Faulty components must only be replaced by original spare parts.
There are 2 seals around the door. These seals must never be removed.
If the mains connection cable is damaged, it must be replaced with a special connection cable by a suitably qualified and competent person in order to avoid a hazard (see “Installation - Electrical connection”).
During installation, maintenance and repair work, the Dialog oven must be completely disconnected from the mains electricity supply. To ensure this:
- Switch off the mains circuit breaker, or
- switch off at the wall socket and withdraw the plug. To do this, pull the plug and not the mains connection cable.
The Dialog oven requires a sufficient supply of cool air for efficient operation. Make sure that the supply of cool air is not hindered in any way (e.g. by heat insulation strips fitted in the housing unit). Furthermore, the required supply of cool air must not be excessively heated by other heat sources (e.g. solid fuel stoves).
If the Dialog oven is built in behind a furniture front (e.g. a door), do not close the door while the Dialog oven is in use. Heat and moisture can build up behind a closed furniture door. This can result in damage to the Dialog oven, the housing unit and the floor. Leave the furniture door open until the Dialog oven has cooled down completely.
Correct use
Risk of injury caused by hot surfaces. The Dialog oven gets hot when it is being used. You could burn yourself on the heating elements, oven compartment, accessories or food.
Wear oven gloves when placing food in the oven or removing it, and when adjusting oven shelves etc. in a hot oven.
To avoid fuelling any flames, do not open the oven door if smoke occurs inside the Dialog oven. Interrupt the programme by switching the Dialog oven off and disconnect it from the mains electricity supply. Do not open the door until the smoke has dispersed.
Due to the high temperatures radiated, objects left near the oven when it is switched on could start to burn. Do not use the Dialog oven to heat up the room.
▶ Oils and fats can ignite if allowed to overheat. Never leave the Dialog oven unattended when cooking with oil or fats. Do not use the Dialog oven for deep-fat frying. Never attempt to put out oil or fat fires with water. Switch the Dialog oven off and extinguish the flames by leaving the door closed.
Grilling food for excessively long cooking durations can cause it to dry out with the risk of catching fire. Do not exceed the recommended cooking durations.
▶ Please be aware that durations when cooking, reheating and defrosting using an M Chef function are often considerably shorter than when using a conventional function. Excessively long cooking durations can lead to food drying out and burning, or could even cause it to catch fire.
Never use an M Chef function or a Grill function to dry flowers or herbs. Instead, use the Fan Plus 📁 or Conventional Heat ☐ function and always ensure this type of procedure is supervised.
If using alcohol in your recipes, please be aware that high temperatures can cause the alcohol to evaporate. The vapour can catch fire on hot heating elements.
When using residual heat to keep food warm, corrosion from high air humidity and condensation can occur in the Dialog oven. This can also cause damage to the control panel, worktop and surrounding kitchen furniture. Keep the Dialog oven on and select the lowest temperature available for the selected function. The cooling fan will then continue to run and dissipate the moisture.
▶ Food which is stored in the oven compartment or left in it to be kept warm can dry out and the moisture released can lead to corrosion damage in the Dialog oven. Always cover food that is left in the oven to keep warm.
An accumulation of heat can cause the enamel on the floor of the oven to crack or flake off.
Never line the floor of the oven compartment with aluminium foil or oven liners.
If you wish to place crockery on the floor of the oven compartment during cooking, or place crockery on the floor of the oven compartment to heat it up, you can do so, but only with the Fan Plus function without the Rapid Heat-up function.
The oven compartment floor can become damaged by items being pushed around on it. When placing pots, pans or crockery on the oven compartment floor, ensure that you avoid pushing them around.
Danger of injury caused by steam. Pouring a cold liquid onto a hot surface creates steam, which can cause severe scalding. The sudden temperature change can also cause damage to hot surfaces. Never pour cold liquids directly onto hot surfaces.
Danger of injury caused by steam. During cooking processes with moisture injection and during the residual moisture evaporation process, steam is produced which can lead to severe scalding. Never open the door when bursts of steam are being injected or during the evaporation of residual water.
It is important that the temperature in the food being cooked is evenly distributed and sufficiently high.
This can be achieved by stirring or turning the food, and observing a sufficiently long standing time (see charts), which should be added to the time needed for reheating, defrosting or cooking.
During the standing time, the temperature is distributed evenly in the food.
Risk of injury caused by hot food. When heating food up, the heat is created directly in the food itself. For this reason, the crockery will remain cooler than the food (except when using ovenproof stoneware). The crockery is only warmed by the heat of the food. Before serving, always check the temperature of the actual food itself after taking it out of the oven. The temperature of the container is not an indication of the temperature of the food or liquid in it. This is particularly important when heating food for babies, children, and the elderly or infirm. After reheating food, especially food for babies and small children, stir the food or shake the container and check that the temperature does not pose any danger of burning. Double check after it has been left to stand.
The Dialog oven is not suitable for cleaning or disinfecting items. Items can get extremely hot. There is a risk of burning when items are removed from the oven.
Risk of injury from increased pressure in sealed containers or bottles. Pressure can build up when reheating food or drinks in sealed containers, jars or bottles, which can cause them to explode. Never cook or reheat food or liquids in sealed containers or bottles. Open containers beforehand. In the case of baby bottles, the screw top and teat must be removed.
When heating food, and in particular liquids, the boiling point may be reached without the production of typical bubbles. Liquids do not boil evenly throughout. This boiling delay can result in the liquid boiling over explosively. Take care when taking the container out of the oven, as the hot liquid can cause severe scalding. Under certain circumstances, the pressure can be so high that the door opens automatically.
Stir liquids well before reheating or cooking. After heating, wait at least 20 seconds before removing the container from the oven. In addition, a glass rod or similar item, if available, can be placed in the container during heating.
If you cook eggs without their shells, the yolks could explode due to the resulting pressure.
Prick the yolk several times before cooking to avoid this.
Eggs heated in their shells can burst, even after they have been taken out of the oven compartment.
Eggs can only be cooked in their shells in a specially designed egg-boiling device. Do not reheat hard boiled eggs using M Chef functions.
▶ Food with a thick skin or peel, such as tomatoes, sausage, potatoes and eggplants can burst when heated or cooked.
Pierce or score the skin of these types of food several times to allow steam to escape.
Do not use a thermometer containing mercury or liquid as these are not suitable for use with very high temperatures and break very easily.
Only use the Miele food probe supplied with the appliance to measure the temperature of the food.
▶ Cushions or pads filled with cherry kernels, gel, etc., such as those used in aromatherapy, can ignite when heated even after they have been removed from the oven.
Do not heat up these cushions in the Dialog oven.
Crockery and lids with hollow handles or knobs can collect moisture in the hollow spaces. When the moisture evaporates, pressure can build up and the item can explode. If the hollow recess is sufficiently ventilated, the item can be used.
Do not use crockery with hollow knobs or handles with the M Chef functions.
▶ Plastic containers which are not heat-resistant melt at high temperatures and could ignite and damage the Dialog oven.
Only use plastic containers that are heat-resistant. Follow the manufacturer's instructions.
▶ Unsuitable crockery can suffer damage and cause damage to the Dialog oven.
Do not use any closed metal containers, aluminium foil, cutlery, lead crystal glassware, temperature-sensitive plastics, metal clips or plastic or paper covered wire ties. (see “Suitable cookware for M Chef functions”).
Do not leave the Dialog oven unattended when heating or cooking food in inflammable materials.
▶ Fire hazard due to containers made of flammable materials.
Plastic disposable containers must meet the requirements specified for crockery under “Suitable cookware for M Chef functions”.
Do not leave the Dialog oven unattended when heating or cooking food in disposable containers made of plastic, paper or other inflammable materials.
▶ Heat-retaining bags usually contain a thin layer of aluminium foil that reflects electro-magnetic waves. Because of this, the paper surrounding the aluminium foil can become so hot that it combusts.
Do not use heat-retaining packaging, such as bags for grilled chicken, for warming food with M Chef functions.
▶ Heating up food in closed containers results in an increase in pressure which can cause them to explode.
Do not use tins for preserving or heating food.
Never use M Chef functions for bottling. Instead, use the Fan Plus 📁 or Conventional Heat 📄 function and always ensure this type of procedure is supervised.
Risk of injury from the open door. You could bang into the open door or trip over it. Avoid leaving the door open unnecessarily.
The door can support a maximum load of 15 kg. Do not lean or sit on an open door, or place heavy items on it. Make sure that nothing gets trapped between the door and the oven compartment. Doing so could damage the Dialog oven.
The following applies for stainless steel surfaces:
The coated stainless steel surface can be damaged by adhesives and will lose its dirt-repelling properties. Do not use sticky notes, adhesive tape or other types of adhesive on the stainless steel surface.
Magnets can cause scratches. Do not use the stainless steel surface as a magnetic notice board.
Cleaning and care
Risk of injury due to electric shock. The steam from a steam cleaning appliance could reach electrical components and cause a short circuit. Never use a steam cleaner for cleaning.
Excess spillage must be removed before cleaning. Coarse soiling in the oven compartment can cause thick smoke to develop. Coarse soiling should be removed from the oven compartment before running the pyrolytic cleaning programme.
Risk of injury caused by hazardous steam. During pyrolytic cleaning, steam, which can irritate mucous membranes, may be released.
During pyrolytic cleaning, do not stay in the kitchen for longer periods of time and do not let children and pets enter the kitchen. It is important to ensure that the kitchen is well ventilated during pyrolytic cleaning. Prevent odours from escaping into other rooms.
Scratches on the door glass can cause the glass to break. Do not use abrasive cleaners, hard sponges, brushes or sharp metal tools to clean the door glass.
In warm, moist environments, there is a higher probability of vermin infestations (e.g. cockroaches). Ensure the Dialog oven and the area surrounding it are always kept clean.
Damage caused by vermin is not covered by the warranty.
Accessories
▶ Only use original Miele accessories. If other parts are used, warranty, performance and product liability claims will be invalidated.
▶ Miele will guarantee to supply functional spare parts for a minimum of 10 years and up to 15 years following the discontinuation of your Dialog oven.
The Miele Gourmet oven dish HUB 62-22 (if available) must not be inserted into shelf level 1. This will damage the oven floor. Do not place a Miele oven dish on the upper support of shelf level 1 either as it will not be secured by the non-tip safety notches. As a general rule, use shelf level 2.
In the M Chef functions metal lids reflect electro-magnetic waves and hence prevent cooking. Roasting pans and pots must be used without a lid or with a glass lid with M Chef functions.
▶ Only use the Miele food probe supplied with the appliance. If it is faulty, it must be replaced with a new original Miele food probe.
The plastic on the food probe can melt at very high temperatures. Do not use the food probe when using the Grill functions (Exceptions: M Chef + Fan Grill 📄 and Fan Grill 🌐). Do not store the food probe in the oven compartment when it is not being used.
Accessories that are not suitable for pyrolytic cleaning will be damaged by the high temperatures. Remove all accessories that are not suitable for pyrolytic cleaning from the oven compartment before starting the pyrolytic cleaning programme. This also applies to optional accessories that are not suitable for pyrolytic cleaning (see “Cleaning and care”).
Disposal of the packing material
The transport and protective packaging has been selected from materials which are environmentally friendly for disposal, and can normally be recycled.
Recycling the packaging reduces the use of raw materials in the manufacturing process and also reduces the amount of waste in landfill sites. Ensure that any plastic wrappings, bags etc. are disposed of safely and kept out of the reach of babies and young children. Danger of suffocation.
Disposing of your old appliance
Electrical and electronic appliances often contain valuable materials. They also contain specific materials, compounds and components, which were essential for their correct function and safety. These could be hazardous to human health and to the environment if disposed of with your domestic waste or if handled incorrectly. Please do not, therefore, dispose of your old appliance with your household waste.
Please dispose of it at your local community waste collection / recycling centre for electrical and electronic appliances. You are also responsible for deleting any personal data that may be stored on the appliance prior to disposal. Please ensure that your old appliance poses no risk to children while being stored prior to disposal.
Dialog oven
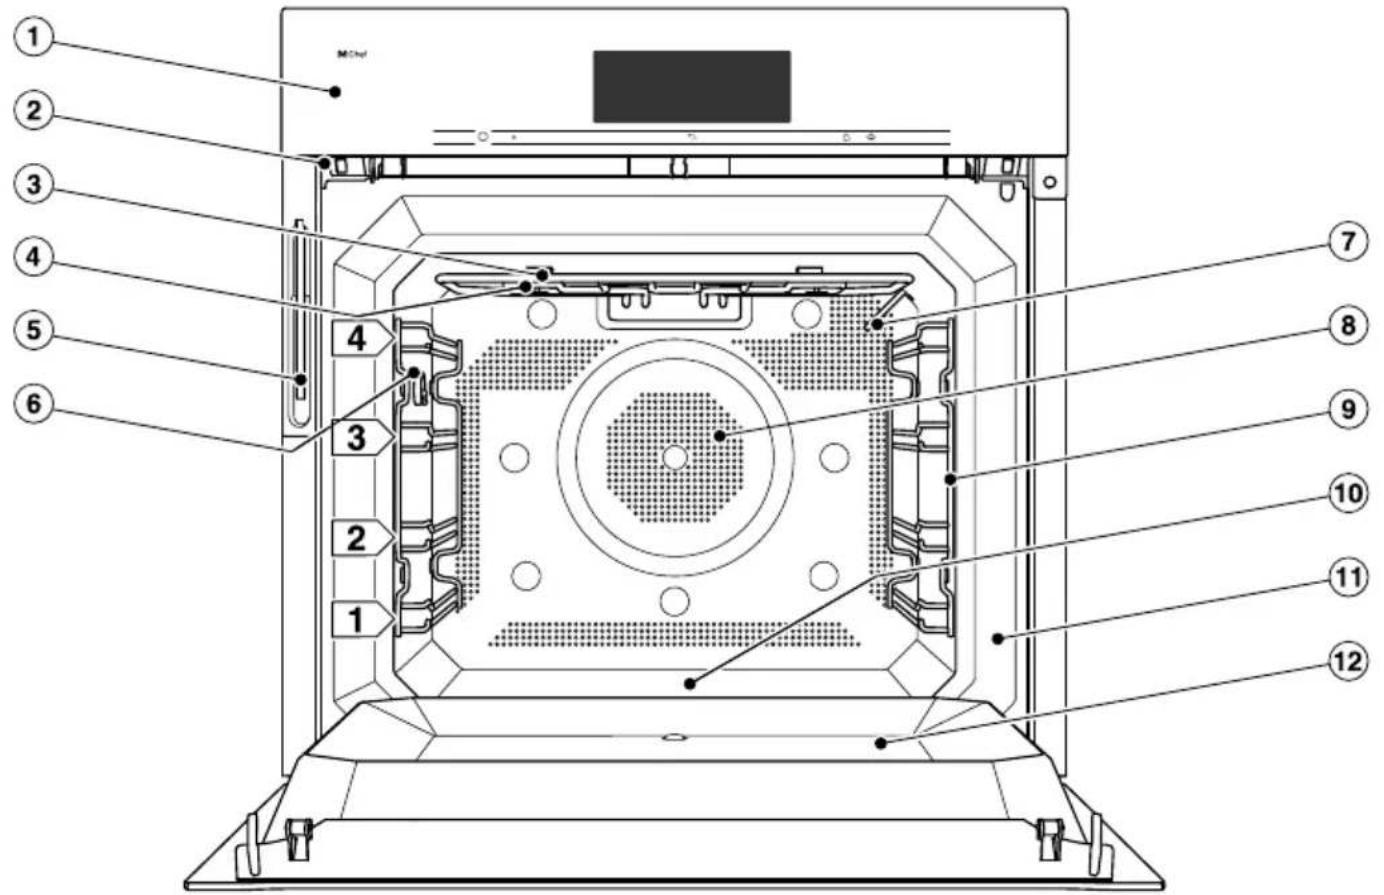
text_image
Technical diagram of a device interior with numbered components for identification① Control panel with M Chef logo
② Door lock for Pyrolytic cleaning
③ Top heat/grill element with antenna for M Chef functions
④ Steam outlet openings
⑤ Water intake pipe for the steam injection system
⑥ Connection socket for the food probe
⑦ Temperature sensor
⑧ Air inlet for the fan with ring heating element behind it
⑨ Shelf runners with 4 shelf levels
⑩ Oven floor with bottom heat element underneath it
⑪ Front frame with data plate
⑫ Door
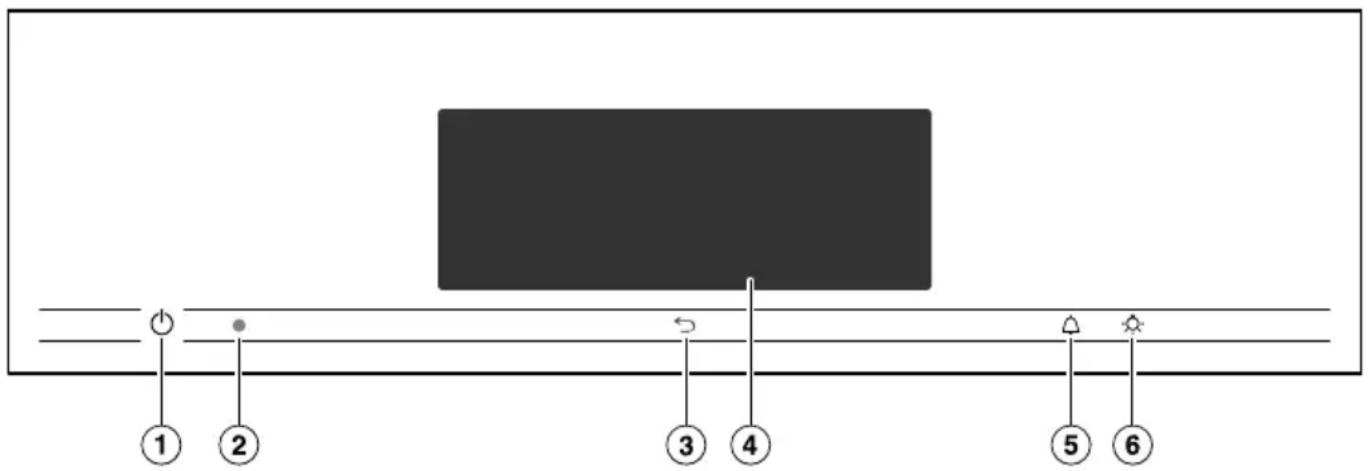
text_image
Diagram showing a rectangular block with six labeled points and directional arrows, likely illustrating a physical or engineering concept.① Recessed On/Off ⏻ sensor
For switching the Dialog oven on and off
② Optical interface
(for Miele service technicians only)
③ ← sensor
To go back a step
④ Touch display
For displaying information and for operation
⑤ 🔔 sensor
For setting the minute minder or alarms
⑥ sensor
For switching the oven interior lighting on and off
On/Off sensor
The On/Off ⏻ sensor is recessed and reacts to touch.
It is used for switching the Dialog oven on and off. As soon as the Dialog oven is switched on, the M Chef logo lights up on the top left-hand side of the control panel.
Sensor controls
The sensors react to touch. Every touch of a sensor is confirmed by a keypad tone. This keypad tone can be switched off by selecting the Volume | Keypad tone | Off setting.
| If you want the sensor controls to respond even when the Dialog oven is switched off, select QuickTouch | On with time. |
| Sensor Function | |
| ⇐ | Depending on which menu you are in, this will take you back a level or back to the main menu. |
| ⇐ | If a menu appears in the display or if a cooking programme is in progress, you can use this sensor to set a minute minder (e.g. when boiling eggs on the cooktop) or an alarm (a specific time) at any point (see “Alarm + minute minder”). |
| ⇐ | If a menu is visible in the display or if a cooking programme is running when you open the door, touching the 🔊 sensor will switch the oven interior lighting on or off.The oven interior lighting switches off automatically after about 1 minute. |
Touch display
The sensitive surface of the touch display can be scratched by pointed or sharp objects, e.g. pens.
Only touch the display with your fingers.
Make sure that water cannot get behind the touch display.
The touch display is split into multiple areas.
text_image
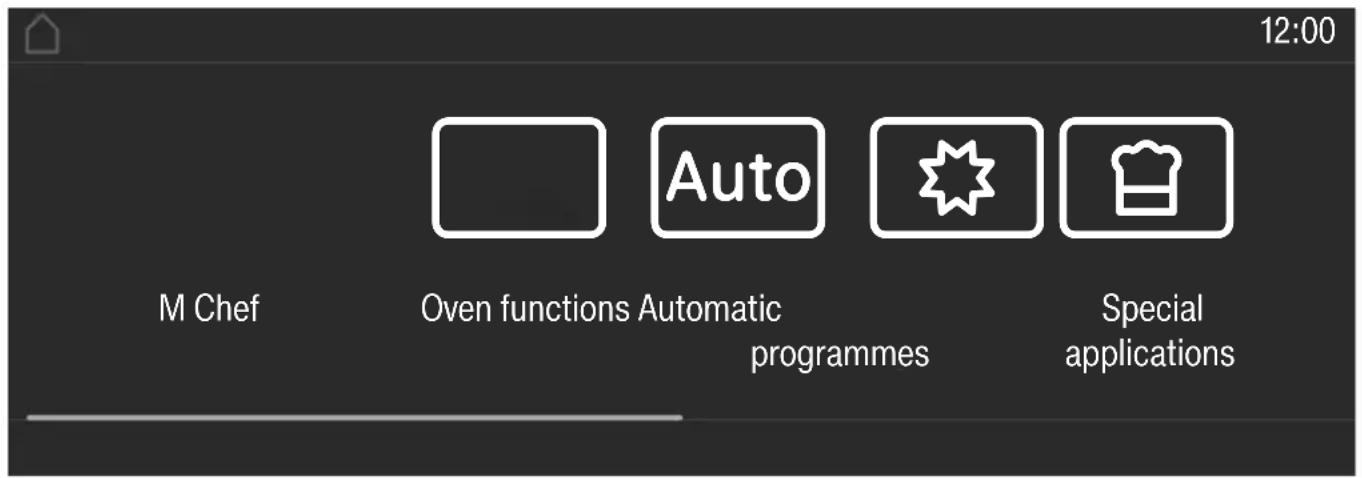
12:00 Auto M Chef Oven functions Automatic programmes Special applicationsThe menu path appears on the left of the header. The individual menu options are separated by a vertical line. ... I indicates that there are more options available, which are not visible because there is not enough space in the display.
If you touch a menu name in the header, the display will switch to that menu. To switch to the start screen, touch 🔒.
The time of day is shown on the right of the header. Additional symbols may also appear, e.g. SuperVision ☐.
The current menu and menu options are shown in the centre. You can scroll to the right or left by swiping your finger across the display to the right or left. Touch a menu option to select it (see “Operating principles”).
The operation fields that appear in the footer vary according to the menu that is selected; e.g. Change or OK.
Symbols
The following symbols may appear in the display:
| Symbol Meaning | |
| i This symbol indicates that there is additional information and advice about using the appliance. Select OK to confirm the information. | |
| ... I This indicates that there are more options available, which are not visible because there is not enough space in the display. | |
| Alarm | |
| Minute minder | |
| Some settings, e.g. display brightness and signal tone volume, are selected using a segment bar. | |
| The system lock or sensor lock is on (see “Settings – Safety”). The controls are locked. | |
| Core temperature when using the food probe | |
| Remote control (only appears if you are in the Miele@home system and have selected the Remote control | On setting). | |
| SuperVision (only appears if you are in the Miele@home system and have selected the SuperVision | SuperVision display | On setting) | |
You operate the Dialog oven via the touch display by touching the desired menu option.
Each time you touch a possible option the relevant characters (word and/or symbol) light up orange.
Fields for confirming an operating step are highlighted in green (e.g. OK).
Selecting a menu option
■ Touch the desired field or value in the touch display.
Scrolling through menus
You can scroll left or right.
■ Swipe across the screen. To do this, place your finger on the touch display and swipe it in the direction you want.
The bar at the bottom shows you where you are in the current menu.
Exiting a menu
■ Touch the sensor or touch the ... I symbol in the menu path.
■ Touch the △ symbol to switch to the status display.
Entries made before this which have not been confirmed with OK will not be saved.
Changing a value or setting
Changing values or settings during a programme
Depending on the function, as soon as a cooking programme is in progress, you can change the values or settings for this programme.
■ Touch the function, the temperature or the Gourmet Units in progress in the centre of the touch display, or touch Change.
The settings for the cooking process will appear.
■ Change the desired value or setting.
The value or setting will be saved.
Changing a setting in a list
The current setting is highlighted in orange.
■ Touch the desired setting.
The setting is now saved. This will take you back to the previous menu.
Entering numbers with the roller
■ Swipe the roller up or down until the value you want is displayed in the centre.
■ Confirm with OK.
The changed number is now saved.
Entering numbers using the numerical keypad
■ Touch ☐ in the bottom right of the input field.
The numerical keypad will appear.
■ Touch the required numbers.
As soon as you enter a valid value, OK turns green.
Use the arrow to delete the last entered number.
■ Confirm with OK.
The changed number is now saved.
Changing the setting with a segment bar
Some settings are represented by a
■■■■二二コ bar with seven segments. If all of the segments are illuminated, the maximum value is selected.
If none of the segments is illuminated or if only one is, the minimum value is selected or the setting is switched off altogether (e.g. buzzers).
■ Touch the corresponding segment on the segment bar to change the setting.
■ Select On or Off to switch the setting on or off.
■ Confirm your selection with OK.
The setting is now saved. This will take you back to the previous menu.
Entering letters
Letters are entered using a display keyboard. It is best to select short, memorable names.
■ Touch the letters or characters you want.
Useful tip: You can add a line break for longer programme names using the ∫ symbol.
■ Touch Save.
The name is now saved.
Displaying Help
Context-sensitive help is available for certain functions. Help appears on the bottom line.
■ Touch Help to display information in text and pictures.
■ Touch Close to return to the previous menu.
Data plate
The data plate located on the front frame of the oven is visible when the door is open.
The data plate states the model number, the serial number as well as connection data (voltage, frequency and maximum rated load).
Have this information available if you need to contact Miele so that any issues can be rectified as quickly as possible.
Items supplied
- Operating and installation instructions for using the Dialog oven functions
- A cookbook with recipes for the Automatic programmes and other functions
- Baking tray, universal tray and rack
- Food probe
- Screws for securing your Dialog oven in the housing unit
- Descaling tablets and a plastic tube with suction cup for descaling the steam injection system
Accessories supplied and available to order
All the accessories listed, as well as the cleaning and care products, are designed for the Miele Dialog oven.
These are available to order via the Miele online shop or directly from Miele (see the end of this booklet for contact details).
When ordering, please quote the model number of your Dialog oven and the reference number of the accessories required.
Shelf runners
Shelf runners for accessories are fitted on either side of the oven cavity for shelf levels 4_1 .
The shelf runners are suitable for pyrolytic cleaning and are fixed to the sides of the oven compartment.
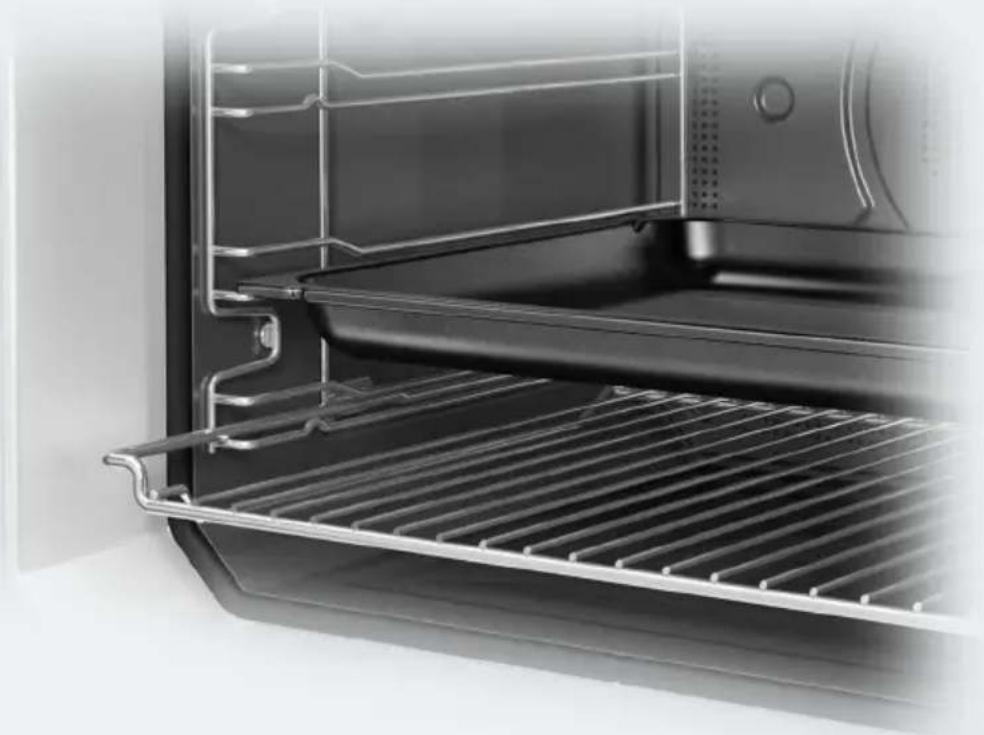
Each runner consists of 2 rails, one above the other. Accessories (e.g. the rack) are pushed into the oven between the two rails.
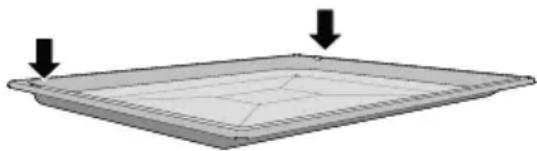
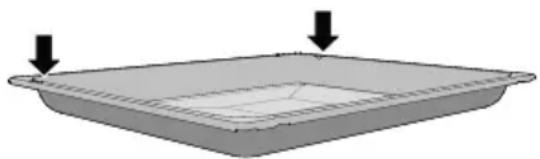
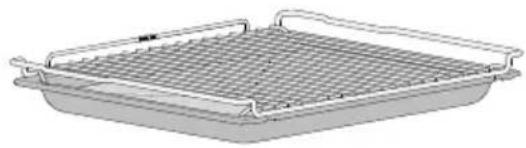
Baking tray, universal tray and rack with non-tip safety notches
Baking tray HBB 51:
natural_image
Simple diagram of a rectangular plate with two downward arrows indicating downward motion (no text or symbols)Universal tray HUBB 51:
natural_image
3D diagram of a rectangular container with two downward arrows indicating flow or movement (no text or symbols)Rack HBBR 52:

natural_image
Diagram of a mesh tray with two downward arrows indicating direction (no text or symbols)Insert these accessories into the shelf runners between the two rails of a shelf level.
Always position the rack with the non-tip notches at the back.
These accessories have non-tip safety notches towards the back of their short sides. The non-tip safety notches prevent the accessories from being pulled out completely from the shelf runners when you only wish to pull accessories out partially.
natural_image
Illustration of a rectangular metal tray with a grid pattern and two handles (no text or symbols)If you are using the universal tray with the rack on top, insert the tray between the rails of the shelf runners and the rack will automatically slide in above them.
The surfaces of the baking tray and the universal tray are treated with a PerfectClean enamel.
The rack is suitable for pyrolytic cleaning.
Grilling and roasting insert HGBB 51
natural_image
Three technical line drawings of a rectangular tray or container with internal structure, showing different top views (no text or symbols present)The grilling and roasting insert fits between the rack and the universal tray. The tray will collect meat juices and stop them from burning so that they can be used for making gravy and sauces.
The surface has been treated with PerfectClean enamel.
The grilling and roasting insert is not suitable for use with M Chef functions.
It must only be used with conventional cooking functions.
Round baking trays
natural_image
Simple 3D illustration of a bowl (no text or symbols)The solid round baking tray HBF 27-1 is suitable for cooking pizzas, flat cakes made with yeast or whisked mixtures, sweet and savoury tarts, baked desserts, flat bread, and can also be used for frozen cakes and pizzas.
The perforated round baking and AirFry tray HBFP 27-1 can be used for the same purposes as the perforated Gourmet baking and AirFry tray HBBL 71.
The surface of both baking trays has been treated with PerfectClean enamel.
■ Insert the rack and place the round baking tray on the rack.
The round perforated baking tray is not suitable for use with M Chef functions.
It must only be used with conventional cooking functions.
Baking stone HBS 70

natural_image
Black rectangular tray with a small protrusion on the right side (no text or symbols visible)The baking stone is ideal for items which need a well baked base such as pizza, quiche, bread, bread rolls and savoury snacks.
The baking stone is made from heat-retaining fireclay and is glazed. A paddle made of untreated wood is supplied with the baking stone for placing food on it and taking it off.
■ Slide the rack in and place the baking stone on it.
The baking stone is not suitable for use with M Chef functions. It must only be used with conventional cooking functions.
Food probe

natural_image
Line drawing of a pair of connected probes with beads (no text or symbols)Using the food probe enables the temperature during the cooking process to be monitored simply and accurately (see “Roasting - Food probe”).
Handle HEG
natural_image
Two types of kitchen utensils: a metal stand with two handles and a grater with chopsticks (no text or symbols)The handle makes it easier to take the universal tray, baking tray and rack out of the oven.
Gourmet oven dish HUB 62-22 Gourmet oven dish lid HBD 60-22
Unlike other oven dishes, the Miele Gourmet oven dish can be placed in the oven directly on the shelf runners.
Similar to the rack, it has anti-tip safety notches. This Gourmet dish is also suitable for use on an induction cooktop.
The surface of the oven dish has a non-stick coating.
A matching lid is available to order separately. Please quote the model number when ordering.
In the M Chef functions metal lids reflect electro-magnetic waves and hence prevent cooking.
Metal lids must only be used with conventional cooking functions. The Miele oven dish must only be used without the lid with M Chef functions.
Depth: 22 cm
HUB 62-22
natural_image
3D rendering of a rectangular tray with a mesh pattern, no text or symbols visibleHBD 60-22*
natural_image
Illustration of a rectangular object with a circular top and curved base, resembling a lid or cover (no text or symbols)* Only suitable for use with conventional cooking functions
Accessories for cleaning and care
- Descaling tablets, plastic tube with suction cup for descaling the Dialog oven
- Miele all purpose microfibre cloth
- Miele oven cleaner
Safety features
-
System lock 🔒
(see "Settings – Safety") -
Sensor lock
(see "Settings – Safety") -
Cooling fan
(see "Settings – Cooling fan run-on") -
Safety switch-off
This safety switch-off is activated automatically if the Dialog oven has been operating for an unusually long period of time. The period of time will depend on the particular oven function being used. -
Door
The door seals prevent electro- magnetic waves leaking. When the oven is operating, air is passed through the door to keep the outer pane cool.
- Door lock for pyrolytic cleaning At the beginning of a pyrolytic cleaning programme the door will lock for safety reasons. The door will only unlock when the temperature in the oven compartment has dropped to below 280 °C.
PerfectClean treated surfaces
Surfaces treated with PerfectClean enamel are characterised by their exceptional non-stick properties and ease of cleaning.
Food can be easily removed from these surfaces. Soiling from baking and roasting can be easily removed from these surfaces.
Food can be sliced or cut up on PerfectClean surfaces.
However, do not use ceramic knives as these will scratch the PerfectClean surface.
Surfaces treated with PerfectClean enamel can be cleaned as you would clean glass.
Read the instructions in “Cleaning and care” so that the benefits of the non-stick properties and easy cleaning are retained.
PerfectClean treated surfaces:
- Universal tray
- Baking tray
- Grilling and roasting insert
- Round baking and AirFry tray, perforated
- Round baking tray
Pyrolytic accessories
The shelf runners are suitable for pyrolytic cleaning and are fixed to the sides of the oven compartment. The rack HBBR 52 is suitable for pyrolytic cleaning and can be left in the oven compartment during pyrolytic cleaning.
See “Cleaning and care” for more information.
Miele@home
Your Dialog oven is equipped with an integrated Wi-Fi module.
In order to use it, you will need:
- a Wi-Fi network
- the Miele App
- a Miele user account. The user account can be created via the Miele App.
The Miele App will guide you as you connect your Dialog oven to your home Wi-Fi network.
Once your Dialog oven is connected to your Wi-Fi network, you can use the App for a number of actions, including the following:
- Call up information on the operating status of your Dialog oven
- Retrieve information on cooking processes that are in progress
- End cooking programmes that are in progress
Connecting your Dialog oven to your Wi-Fi network will increase energy consumption, even when the Dialog oven is switched off.
Make sure that the signal of your Wi-Fi network is sufficiently strong in the place where you want to install your Dialog oven.
Availability of the Wi-Fi connection
The Wi-Fi connection shares a frequency range with other appliances (including microwave ovens and remote control toys). This may result in sporadic or even complete connection failures. Therefore, a constant availability of featured functions cannot be guaranteed.
Miele@home availability
The ability to use the Miele App depends on the availability of the Miele@home service in your country.
The Miele@home service is not available in every country.
For information about availability, please visit www.miele.com.
Miele App
You can download the Miele App from the Apple App Store ^® or the Google Play Store ^™ free of charge (only functional in selected countries).


text_image
QR code image containing encoded data, no visible human-readable textSee “Settings – Miele@home” for information on setting up Miele@home.
Standard settings
The following settings must be made before starting up for the first time. You can change these settings again at a later time (see “Settings”).

Risk of injury caused by hot s.
The Dialog oven gets hot when it is being used.
For safety reasons, the Dialog oven must only be used after it has been built in.
The Dialog oven will switch on automatically when it is connected to the electricity supply.
Setting the language
■ Select the language you want.
If you have accidentally selected a language that you don't understand, proceed as described in "Settings – Language ▶".
Setting the location
■ Select the required location.
Setting the date
■ Set the day, month and year.
■ Confirm with OK.
Setting the time of day
■ Set the time of day in hours and minutes.
■ Confirm with OK.
Completing the commissioning process
■ Follow any further instructions in the display.
The appliance is now ready for use.
Heating up the Dialog oven for the first time and rinsing the steam injection system
When the Dialog oven is heated up for the first time it may give off a slight smell. This can be eliminated by heating the empty Dialog oven for at least an hour. It is a good idea to rinse out the steam injection system at the same time.
Ensure that the kitchen is well ventilated while the appliance is being heated up for the first time. Prevent odours from escaping into other rooms.
■ Remove any protective wrapping and stickers (except the data plate) from the Dialog oven and any accessories.
■ Before heating the oven up, wipe the interior with a damp cloth to remove any dust or bits of packaging that may have accumulated during storage and unpacking.
■ Insert all trays and the rack.
■ Switch the Dialog oven on with the On/Off ⏻ sensor.
The main menu will appear.
■ Select Oven functions □.
■ Select Moisture Plus 🔊.
The recommended temperature will appear (160 °C).
The oven heating and cooling fan will switch on.
■ Set the maximum possible temperature (250 °C).
■ Confirm with OK.
■ Select Automatic burst of steam.
The prompt to draw in water appears.
■ Fill a suitable container with the required amount of fresh tap water.
■ Open the door.
■ Pull the water intake pipe forwards (located below the control panel on the left).
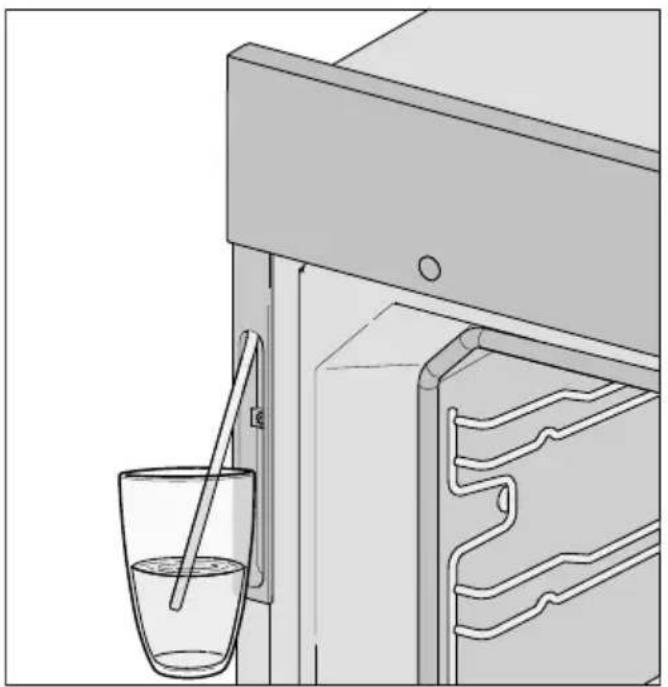
natural_image
Line drawing of a kitchen appliance with a glass bowl and handle, no text or symbols present■ Immerse the end of the water intake pipe in the container with tap water.
■ Confirm with OK.
The water intake process will begin.
The amount of water actually drawn up into the oven may be less than the amount specified as required, leaving a small amount in the container.
■ Remove the water container after the water intake process and close the door.
The message stating that the intake process is finished will go out.
The sound of the pump running can be heard again briefly. Residual water in the water intake pipe is being drawn into the oven.
After a short time a burst of steam will be released automatically.

Danger of injury caused by
The steam escaping is very hot. Do not open the door during a burst of steam.
Heat the Dialog oven up for at least an hour.
■ Switch the Dialog oven off with the On/Off ⏻ sensor after at least on hour.
Cleaning the oven compartment after heating it up for the first time

Risk of injury caused by hot s.
The Dialog oven gets hot when it is being used. You could burn yourself on the heating elements, the oven compartment, or accessories.
Allow the heating elements, oven compartment and the accessories to cool before manual cleaning.
■ Take all accessories out of the oven and clean them by hand (see "Cleaning and care").
■ Clean the oven compartment with a clean sponge and a solution of hot water and washing-up liquid or a clean, damp microfibre cloth.
■ Dry all surfaces with a soft cloth.
Leave the oven door open until the oven interior is completely dry.
Settings overview
| Menu option Available | settings |
| Select language | ... | deutsch | english | ...Location |
| Time Clock type | Analogue* | DigitalClock format24 h* | 12 h (am/pm)SetSynchronisePermitted* | Not permitted |
| Date | |
| QuickTouch On with time | Off* |
| Start screen Main menu* | M ChefOven functionsAutomatic programmesSpecial applicationsMyMieleUser programmes |
| Brightness Display |  M Chef M Chef |
| Colour scheme Bright | Dark* |
| Volume Buzzer tones |  Keypad tone Keypad tone Welcome melody Welcome melody |
| Units Weight |  Temperature Temperature |
* Factory settings
| Menu option Available | settings | |
| Cooling fan run-on Time-controlled | controlledTemperature-controlled* | |
| Pyrolytic With reminder | Without reminder* | |
| Recommended temperatures | ||
| Safety System lock | On | Off*Sensor lockOn | Off* | |
| Catalyser ■■■■■■■■■■■■■■■■■■■■■■■■■■■■■■■■■■■■■■■■■■■■■■■■■■■■■■■■■■■■■■■■■■■■■■■■■■■■■■■■■■■■■■■■■■■■■■■■■■■■■□■■■■■■■■■■■■■■■■■■■■■■■■■■■■■■■■■■■■■■■■■■■■■■■■■■■■■■■■■■■■■■■■■■■■■■■■■■■■■■■■■■■■■■■■■■■■■■■■■■■-■■■■■■■■■■■■■■■■■■■■■■■■■■■■■■■■■■■■■■■■■■■■■■■■■■■■■■■■■■■■■■■■■■■■■■■■■■■■■■■■■■■■■■■■■■■■■■■■■■■ | Off* | |
| Miele@home Module settings | Module status | Start module activity | IP settings | DNS settings | SSID settings | Network encryptionSystem settingsChange appliance name | Appliance list | Update appliance list | Sign on more appliances | Sign off from system | Set as time keeperWPS push button | |
| Remote control On | Off* | |
| SuperVision SuperVision display | On | Off*Display standbyOn* | Only if there is a faultAppliance optionsDisplay this appliance | Buzzer tones | |
| Showroom programme Demo mode | On | Off*M Chef■■■■■■■■■■■■■■■■■■■■■■■■■■■■■■■■■■■■■■■■■■■■■■■■■■■■■■■■■■■■■■■■■■■■■■■■■■■■■■■■■■■■■■■■■■■■■■■■■■■ | |
| Factory default Settings | User programmesRecommended temperaturesMyMiele | |
* Factory settings
Opening the "Settings" menu
In the ⚙️ Settings menu, you can personalise your Dialog oven by adapting the factory default settings to suit your requirements.
From the main menu:
■ Select ⚙️ Settings.
■ Select the desired setting.
You can check settings or change them.
Settings cannot be altered while a cooking programme is in progress.
Language
You can set your language and location.
After selecting and confirming your choice, the language you have selected will appear in the display.
Useful tip: If you have selected the wrong language by mistake, select ⚙ in the main menu. Follow the ▶ symbol to get back to the Select language ▶ sub-menu.
Time
Clock type
The time of day can be displayed in an Analogue (with a clock face) or Digital (h:min) format.
With the digital display, the date is also shown.
Clock format
The time of day can be displayed in the 24 or 12-hour format (24 h or 12 h (am/ pm)).
Set
Set the hours and then the minutes.
If there is a power cut, the current time of day will reappear once power has been restored. The time of day is saved for approx. 200 hours.
Synchronise
If the Dialog oven is connected to a Wi-Fi network and signed into the Miele App and you select Permitted, the time will be synchronised based on the location setting in the Miele App.
Date
Set the date.
When the Dialog oven is switched off, the date will only appear in the display if Time | Clock type | Digital has been selected.
QuickTouch
Select how you want the time of day to appear in the display when the Dialog oven is switched off:
- On with time
The time is always visible in the display. All sensor controls react to touch immediately.
- Off
The display is dark to save energy. The Dialog oven has to be switched on before it can be used.
- Night dimming
To save energy, the time is only visible in the display between 5:00 am and 11:00 pm. The display remains dark at all other times.
Start screen
The Dialog oven is factory-set for the main menu to appear when it is switched on. You can change this default setting so that, for instance, the oven functions or MyMiele settings appear in the display (see "MyMiele").
This new start screen will then appear when the Dialog oven is next switched on.
Select the sensor or follow the path in the header to get to the main menu.
Brightness
Display
The display brightness is represented by a segment bar.
- Maximum brightness
- ■ = = = = = □
Minimum brightness
M Chef
The brightness of the M Chef logo on the control panel is represented by a segment bar.
- Maximum brightness
- ■ = = = = = □
Minimum brightness
Colour scheme
Choose between a light or dark colour scheme for the display.
- Bright
The display has a light background with dark characters. - Dark
The display has a dark background with light characters.
Volume
Buzzer tones
If buzzers are switched on, a buzzer will sound when the set temperature is reached and at the end of a set time.
The volume of the buzzers is represented by a segment bar.
- Maximum volume
- [---]
Buzzers are switched off
Keypad tone
The volume of the tone that sounds each time you touch a sensor is represented by a segment bar.
- Maximum volume
- [---]
Keypad tone is switched off
Welcome melody
The melody that sounds when you touch the On/Off ⏻ sensor can be switched on or off.
Units
Weight
For Automatic programmes, you can set the weight of food in grams (g), pounds (lb) or pounds/ounces (lb/oz).
Temperature
You can set the temperature in degrees Celsius (°C) or degrees Fahrenheit (°F).
Cooling fan run-on
The cooling fan will continue to run for a while after the oven has been switched off to prevent humidity building up in the oven compartment, on the control panel or on the oven housing unit.
- Temperature-controlled
The cooling fan switches off when the temperature in the oven drops below 70 °C. - Time-controlled
The cooling fan switches off after a period of about 25 minutes.
Condensate can damage the housing unit, damage the worktop and lead to corrosion in the Dialog oven.
If you have set the cooling fan to Time-controlled and leave food in the oven compartment to keep warm, moisture levels in the oven will increase, leading to condensation forming on the fascia panel and surrounding kitchen furniture, and drops of moisture collecting under the worktop.
Do not leave food in the oven to keep it warm if you have set the cooling fan to Time-controlled.
Pyrolytic
You can set whether the recommendation for carrying out pyrolytic cleaning will appear (With reminder) or will not appear (Without reminder).
Recommended temperatures
If you frequently cook with different temperatures, it makes sense to change the recommended temperatures.
After selecting this option, a list of oven functions will appear in the display.
■ Select the function you want.
The recommended temperature will appear together with the range within which it can be changed.
■ Change the recommended temperature.
■ Confirm with OK.
Safety
System lock 🔒
The system lock prevents the Dialog oven being switched on by mistake. The alarm and minute minder can still be used when the system lock is active.
The system lock will remain activated even after a power failure.
- On
The system lock is switched on.
Before you can use the Dialog oven, switch it on and touch the 🔒 symbol for at least 6 seconds.
- Off
The system lock is deactivated. The Dialog oven can now be used as normal.
Sensor lock
The sensor lock prevents the cooking programme being switched off by mistake or settings being changed. Apart from the On/Off ⏻ sensor, the activated sensor lock prevents the sensors and fields in the display from working a few seconds after a programme has been started.
- On
The sensor lock is switched on. Touch the 🔊 symbol for at least 6 seconds to deactivate the sensor lock for a short period of time.
- Off
The sensor lock is deactivated. All sensor controls react to touch as normal.
Catalyser
The level of odour reduction is represented by a segment bar.

Maximum odour reduction

Catalyser is deactivated
Network
Your Dialog oven can be connected to your local WiFi network via its integrated WiFi module and then controlled using a mobile device (e.g. Smartphone or tablet PC).
Make sure that the signal of your Wi-Fi network is sufficiently strong in the place where you want to install your Dialog oven.
■ If you want to connect your Dialog oven to your local Wi-Fi network, select Network | On.
Miele@home
Your Dialog oven is a Miele@home compatible appliance with SuperVision functionality.
Your Dialog oven is fitted ex-works with a Wi-Fi communication module and is suitable for wireless communication.
There are a number of ways of connecting your Dialog oven to your Wi-Fi network: We recommend connecting your Dialog oven to your Wi-Fi network with the help of the Miele App or via WPS.
Module settings
If you would rather set up the connection to your router yourself instead of using the Miele@mobile App or WPS, or you have a special network configuration, you can enter the relevant settings yourself if you have the necessary technical knowledge.
- Module status
- Start module activity
- Restart
- Restart with default settings
- Restart in Service mode
- IP settings
- IP set to auto-retrieve
- IP address
- Subnet mask
- Standard gateway
- DNS settings
- DNS set to auto-retrieve
- DNS server 1
- DNS server 2
- SSID settings
- Enter SSID
- Search SSID
- Network encryption
- Authentication
- Network code
Select Network status to show the current module settings.
Starting module activity
If you wish to reset all entered settings and values for Miele@home, you can restore the factory default settings on your Wi-Fi module. Any settings that do not affect Miele@home will remain unchanged.
■ Select Restart with default settings and confirm with OK.
Please wait appears in the display.
A few minutes later Restart successful will appear in the display.
■ Confirm with OK.
The Wi-Fi module has been reset to its factory default settings.
If the factory default settings were not restored to your Wi-Fi module, repeat the instructions above.
System settings
- Change appliance name Enter the appliance name using the keyboard. You can add a line break for longer appliance names using the ∫ symbol. The new appliance name will be used by the communication module and by the Miele@mobile App.
- Appliance list Select this option to display signed on household appliances. Follow the instructions in the display.
- Update appliance list Select this option after signing on or signing off further household appliances.
- Sign on more appliances Select this option to sign on additional Miele@home compatible household appliances. Follow the instructions in the display.
- Sign off from system Select this option to sign the Dialog oven out of the Miele@home system and to deactivate SuperVision function. Follow the instructions in the display. Sign the Dialog oven out of the Miele@home system whenever the Dialog oven is being disposed of or sold, of if a used Dialog oven is being put into operation. This is the only way to ensure that all personal data has been removed and the previous owner will no longer be able to access the Dialog oven.
- Set as time keeper Select this option to synchronise the time of day on all networked appliances.
WPS push button
As an alternative to networking via the Miele@mobile App we recommend using WPS (Wireless Protected Setup). To do so, you will need a WPS-compatible router.
■ Select WPS push button.
Please wait appears in the display.
■ Activate the WPS function on your router within two minutes.
■ Once connection has been made, confirm the message with OK.
The Dialog oven will then go back to the Miele@home menu.
If the connection fails, you have probably not connected WPS on your router quickly enough. Repeat the steps above.
Remote control
If you have installed the Miele App on your mobile device, have access to the Miele@home system and have activated the remote control function (On), you can retrieve information on cooking programmes currently in progress in your Dialog oven or to end a programme in progress.
The 🔊 symbol will appear in the top right-hand corner of the display.
SuperVision
The Dialog oven is a Miele@home compatible appliance with SuperVision functionality for monitoring other household appliances in the Miele@home system.
The SuperVision function cannot be activated until the Miele@home system has been set up.
SuperVision display
- On
The SuperVision function is switched on.
The ☐ symbol will appear in the top right-hand corner of the display.
- Off
The SuperVision function is switched off. Further SuperVision functions are not available.
Display standby
The SuperVision display function is also available when the oven is in standby. However, the time of day display must be switched on (Settings | QuickTouch | On with time).
- On
Active domestic appliances that are signed on to the Miele@home system are always displayed.
- Only if there is a fault
Only faults on active domestic appliances are displayed.
Appliance options
All household appliances signed on to the Miele@home system are displayed. Once you have selected an appliance, you can access further settings:
- Display this appliance
- On
The SuperVision function for this appliance is switched on.
- Off
The SuperVision function for this appliance is switched off. The appliance is still signed on to the Miele@home system. Faults are displayed, even if the SuperVision function for the appliance has been switched off.
- Buzzer tones
You can select whether the buzzers are switched on (On) or switched off (Off) for this appliance.
Showroom programme
This function enables the Dialog oven to be demonstrated in showrooms without heating up. Do not activate this setting for domestic use.
Demo mode
If you have activated Demo mode, Demo mode is switched on. The appliance will not heat up will appear when you switch the Dialog oven on.
- On
Touch OK for at least 4 seconds to activate Demo mode.
- Off
Touch OK for at least 4 seconds to deactivate Demo mode. The Dialog oven can now be used as normal.
M Chef
The brightness of the M Chef logo can be adjusted on the Dialog oven (see "Settings - Brightness").
Factory default
- Settings
Any settings that have been altered will be reset to the factory default settings.
- User programmes
All User programmes will be deleted.
- Recommended temperatures
Any recommended temperatures that have been changed will be reset to the factory default settings.
- MyMiele
All MyMiele entries will be deleted.
Using the 🔒 sensor, you can set a minute minder duration to time any activity in the kitchen, e.g. boiling eggs on the cooktop, or an alarm for a specific time.
Two alarms can be set simultaneously, two minute minder durations or an alarm and a minute minder duration.
Using the Alarm function
The ⏻ alarm can be used to specify a particular time for a buzzer to sound.
Setting the alarm
If QuickTouch | Off has been selected, you will need to switch on the Dialog oven before setting the alarm. The alarm time will then appear in the display when the oven is switched off.
■ Select the 🔒 sensor.
■ Select New alarm.
■ Set the time for the alarm.
■ Confirm with OK.
When the oven is switched off, ⏻ and the alarm time will appear in the display instead of the time of day.
If you are cooking at the same time or if you are in a different menu, the alarm time and ⏻ will appear in the top right-hand corner of the display.
At the specified time for the alarm, ⏻ will flash in the display next to the time and a buzzer will sound.
■ Select the ⏱ sensor or the set alarm time in the display.
The buzzer will stop and the symbols in the display will go out.
Changing an alarm
■ Select the alarm in the display or select the 🔒 sensor and the desired alarm.
The set alarm time appears in the display.
■ Set the new time for the alarm.
■ Confirm with OK.
The adjusted alarm time is now saved and will appear in the display.
Deleting an alarm
■ Select the alarm in the display or select the 🔒 sensor and the desired alarm.
The set alarm time appears in the display.
■ Select Reset.
■ Confirm with OK.
The alarm will be deleted.
Using the minute minder function
The ⏱ minute minder can be used to time other activities in the kitchen, e.g. boiling eggs on the cooktop.
The minute minder can also be used at the same time as a cooking programme for which the start and finish times have been set (e.g. as a reminder to stir the food or add seasoning, etc.).
■ The maximum minute minder time that can be set is 9 hours, 59 minutes and 59 seconds.
Useful tip: When using a function that uses moisture, use the timer to remind you to inject steam manually at the desired time.
Setting the minute minder
If QuickTouch | Off has been selected, you will need to switch on the Dialog oven before setting the minute minder. The minute minder can then be seen counting down in the display when the oven is switched off.
Example: You want to boil some eggs and set a minute minder time of 6 minutes and 20 seconds.
■ Select the 🔒 sensor.
■ Select New minute minder time.
■ Set the minute minder time.
■ Confirm with OK.
When the Dialog oven is switched off, the minute minder time counts down in the display and 🔒 appears instead of the time of day.
If you are cooking at the same time or if you are in a different menu, the minute minder time and ⏱ will appear in the top right-hand corner of the display.
At the end of the minute minder time ⏱ will flash, the time will start counting up and a buzzer will sound.
■ Select the 🔒 sensor or the required minute minder in the display.
The buzzer will stop and the symbols in the display will go out.
Changing the time set for the minute minder
■ Select the minute minder in the display or select the 🔒 sensor and then the required minute minder duration.
The minute minder time selected appears.
■ Set a new minute minder duration.
■ Confirm with OK.
The changed minute minder duration is now saved and will count down in minutes. Minute minder durations under 10 minutes will count down in seconds.
Cancelling the minute minder
■ Select the minute minder in the display or select the 🔒 sensor and then the required minute minder duration.
The minute minder time selected appears.
■ Select Reset.
■ Confirm with OK.
The minute minder is now cancelled.
How it works
M Chef technology uses electromagnetic waves to heat the food.
The Dialog oven combines two different cooking methods:
- M Chef heats the entirety of the food using electro-magnetic waves.
- Conventional heating elements are also used to cook the food and brown it from the outside.
Antennae in the roof of the oven release electro-magnetic waves and measure how much energy penetrates the food at short intervals. The energy penetration rate depends on the type of food. Electro-magnetic waves penetrate cakes, for example, more efficiently than fatty food or frozen food.
Gourmet Units
Gourmet Units are the units that indicate how much energy has penetrated the food during cooking.
The Dialog oven regularly measures how much energy has penetrated the food and adapts the amount of energy yet to be released accordingly. The number of Gourmet Units able to penetrate the food depends, for example, on the weight and type of food being cooked.
The M Chef functions use a combination of M Chef technology and conventional heat. There are two different procedures for setting a cooking process:
- In addition to the temperature, you also have to set the number of Gourmet Units. This energy is then directed into the food until the number set has been used. The more Gourmet Units you set, the more energy the food receives.
- You do not set any Gourmet Units, just the temperature. Gourmet Units are automatically added to the food. This stops in the following instances:
- A maximum value of 2000 Gourmet Units has been reached.
- You interrupt the addition of Gourmet Units by selecting Stop.
- You end the cooking programme.
Intensity
The intensity determines how quickly energy will penetrate the food in the form of Gourmet Units.
- Strong
For most food, e.g. bread, flaky pastry, casseroles, terrines, roast meat and fish. Depending on the food, an average of 11 Gourmet Units penetrate the food per minute, with a maximum of 13 Gourmet Units per minute.
- Medium
For heavy creamed mixtures (e.g. chocolate cake and almond cake), tray bakes, rolls, pizza and meat. Depending on the food, an average of 9 Gourmet Units penetrate the food per minute.
- Gentle
For delicate food, e.g. cheese cake, crème caramel and soufflés. Depending on the food, an average of 3 Gourmet Units penetrate the food per minute.
These settings will vary depending on the food and should only be taken as a guide.
Useful tip: Recipes for M Chef functions and Automatic programmes can be found in the Dialog oven cookbook.
Adapting existing recipes to M Chef functions
The M Chef functions offer more settings than with conventional cooking functions.
The settings should be adapted to suit the food if you are using an M Chef function.
Oven function
The M Chef functions are a combination of M Chef technology and conventional methods of heating.
■ Use the M Chef function with the heating type that equates to the conventional heating type for your recipe (e.g. M Chef + Fan Plus instead of Fan Plus).
Temperature
■ Because of the short cooking durations with M Chef functions, the temperature should be set 20 °C higher than you would set it for a conventional function (e.g. 200 °C with M Chef + Conventional Heat instead of 180 °C for Conventional Heat). Grilling functions are the exception here, where the temperatures are the same.
Gourmet Units
■ For guidance, check the number of Gourmet Units used in a comparable recipe in the Dialog oven cookbook.
■ With M Chef functions you do not set any Gourmet Units, just the temperature.
■ Check the food at regular intervals. If the food has been cooked to your liking, take a note of the number of Gourmet Units required.
This way you will get a feel for how many Gourmet Units are needed for cooking different types of food.
With double the amount of ingredients for fish and seafood you need approx. 1.5 times the number of Gourmet Units, and for gratins and vegetables you need approx. 1.25 times the number of Gourmet Units. When cooking meat we recommend using the food probe.
Intensity
■ For guidance, check the Intensity setting used in a comparable recipe in the Dialog oven cookbook and see "M Chef - How it works" for more information.
Duration
Depending on the type of food being cooked, durations with M Chef functions are shorter than with their corresponding conventional functions.
■ Check whether the food is done after about half the time it would take to cook with a conventional function. If necessary, cook it for a little longer.
Shelf level
In general use Shelf level 2. Position the food centrally on the rack or baking tray. This will ensure even cooking results.
Gourmet Profi and Gourmet assistant
Go to M Chef ☐ in the main menu to find Gourmet Profi ☐ and Gourmet assistant ☐.
Gourmet Profi
If you want to carry out all settings for a cooking programme yourself, you will find the M Chef functions here such as M Chef + Fan Plus 📁 or M Chef + Auto Roast 📄 (see “Main and sub-menus”).
Depending on the type of food, select the relevant function and set the temperature, Gourmet Units and Intensity yourself (see “Operation”). The duration with an M Chef function will be shorter than with the corresponding conventional function and results will be better.
Useful tip: It is not essential to set the number of Gourmet Units. If you only set the temperature, Gourmet Units will be added as soon as the food is placed in the oven. Check the food at regular intervals to get a feel for how many Gourmet Units are required.
Gourmet assistant
If you need help choosing the right settings for a cooking programme, this function will help you with a variety of applications from bread and bread rolls to pizza, meat, fish and seafood, as well as bakes and vegetables.
The Dialog oven will recommend the settings to suit the food to ensure optimum results are achieved. The cooking function is predefined and cannot be changed. The recommended values for temperature, Gourmet Units, intensity and duration (depending on application) can be altered. The influence of these settings on cooking results is described under “Operation”.
Most applications follow the recipes in the Dialog oven cookbook. Results may be different if ingredients and quantities differ.
An overview of applications is provided at the end of this document under "Gourmet assistant overview".
Main and sub-menus
| Menu Recommended | value | Range |
| M Chef [IMAGE] | ||
| Gourmet Profi [IMAGE] | ||
| M Chef + Fan Plus [IMAGE] 180 °C 30–250 °C | ||
| M Chef + Conventional Heat [IMAGE] 200 °C | 30–280 °C | |
| M Chef + Moisture Plus [IMAGE] 180 °C 130–250 °C | ||
| M Chef + Intensive Bake [IMAGE] 190 °C 50–250 °C | ||
| M Chef + Auto Roast [IMAGE] 180 °C 100–230 °C | ||
| M Chef + Full Grill [IMAGE] 240 °C 200–300 °C | ||
| M Chef + Fan Grill [IMAGE] 200 °C 100–260 °C | ||
| Gourmet assistant [IMAGE] | ||
| Oven functions [IMAGE] | ||
| Fan Plus [IMAGE] 160 °C 30–250 °C | ||
| Conventional Heat [IMAGE] 180 °C 30–280 °C | ||
| Moisture Plus [IMAGE] 160 °C 130–250 °C | ||
| Intensive Bake [IMAGE] | 170 °C 50–250 °C | |
| Auto Roast [IMAGE] | 160 °C 100–230 °C | |
| Bottom Heat [IMAGE] | 190 °C | 100–280 °C |
| Top Heat [IMAGE] | 190 °C | 100–250 °C |
| Full Grill [IMAGE] | 240 °C 200–300 °C | |
| Economy Grill [IMAGE] | 240 °C 200–300 °C | |
| Fan Grill [IMAGE] | 200 °C 100–260 °C | |
| Automatic programmes [Auto] | ||
| Special applications | ||
| Defrost - - | ||
| Drying 80 °C 50-100 °C | ||
| Heat crockery 50 °C 50-80 °C | ||
| Prove yeast dough 35 °C 30-50 °C | ||
| Low temp. cooking 100 °C 80-120 °C | ||
| Sabbath programmeConventional Heat 180 °C 30-280 °CBottom Heat 190 °C 100-280 °C | ||
| User programmes | ||
| Settings | ||
| Maintenance | ||
| Descale | ||
| Pyrolytic | ||
| MyMiele ≈ | ||
In order for electro-magnetic waves to reach the food, they need to be able to penetrate the cooking containers being used. Electro-magnetic waves pass through porcelain, glass, cardboard and plastic, but not metal. Therefore, do not use crockery or lids containing metal. Metal reflects the electro-magnetic waves, resulting in sparks, and the waves are not absorbed by the metal.
⚠️ Fire hazard due to using unsuitable crockery in M Chef functions.
Unsuitable crockery can suffer damage and cause damage to the Dialog oven.
Make sure that the crockery you use with M Chef functions is suitable.
The type of material dishes are made from will influence cooking results and cooking durations.
Suitable containers
In the M Chef functions metal lids reflect electro-magnetic waves and hence prevent cooking.
Roasting pans and pots must be used without a lid or with a glass lid with M Chef functions.
You can use the following crockery and material in M Chef functions:
- Metal dishes such as springform tins, baking tins, roasting pans and pots are all suitable.
- Glass (heat-resistant glass, ceramic glass)
-
Porcelain
-
Without metallic decoration Metallic decoration (e.g. gold rims or cobalt blue) can cause sparking.
- Without hollow knobs and handles Moisture can gather in the hollow knobs and handles. When the moisture evaporates, pressure can build up and the item can explode.
- Roasting bags and tubes Please follow the manufacturer's instructions.
⚠️ Fire hazard due to metal parts.
Metal parts such as metal clips or plastic and paper ties that have wire running through them can heat inflammable materials until they burn. Do not use metal clips, or plastic and paper ties containing wire.
- Heat-resistant plastic containers and single use plastic containers Special plastic cooking containers are available from specialist retail outlets. To protect the environment, we do not recommend the use of single-use containers.
Plastics must be heat-resistant to a minimum of 150 °C . Otherwise the plastic may melt and fuse with the food.
Only use plastic containers that are heat-resistant (ovenproof).
Do not leave the Dialog oven unattended when heating or cooking food in disposable containers made of plastic, paper or other inflammable materials.
Unsuitable containers
Crockery and lids with hollow handles or knobs can collect moisture in the hollow spaces. When the moisture evaporates, pressure can build up and the item can explode. If the hollow recess is sufficiently ventilated, the item can be used.
Do not use crockery with hollow knobs or handles with the M Chef functions.
You must not use the following crockery and material in M Chef functions:
- Aluminium foil
- Cutlery and crockery with metallic decoration (e.g. gold rims, cobalt blue)
- Crockery with hollow handles
- Earthenware
⚠️ Risk of injury caused by hot crockery.
Earthenware can get very hot and may crack.
Do not use earthenware in M Chef functions.
- Wooden containers and clay pots Water in the material evaporates during cooking. This causes cracks to appear and the material will become damaged.
- Perforated baking tins
- Grilling and roasting insert HGBB 51
Cooking programmes
- Remove any accessories from the oven that are not required for a cooking process.
- In general, if a range of temperatures is given in a recipe or chart, it is best to select the lower temperature and to check the food after the shortest duration.
- Pre-heat the oven only if instructed to do so in the recipe or the cooking chart.
- Avoid opening the door during a cooking process. If the door is opened during a cooking process, the heat in the oven automatically switches off. The fan continues to operate. As soon as the door is closed again, the process will continue. If the door is opened during an M Chef programme, the supply of Gourmet Units is interrupted until the door is closed again.
-
It is best to use dark bakeware and cooking containers with a matte finish made of non-reflective materials (enamelled steel, heat-resistant glass, non-stick coated cast aluminium). Shiny materials such as stainless steel or aluminium reflect the heat, preventing it from reaching the food efficiently. Do not cover the oven floor or the rack with heat-reflective aluminium foil.
-
It is best to use metal baking tins if possible. Baking tins made from silicone, glass or ceramic may prevent the underside browning sufficiently.
- Monitor cooking durations to avoid wasting energy when cooking food. Set the cooking duration, or use the food probe.
- Most food can be cooked using M Chef + Fan Plus 📁 or Fan Plus 📁. Because the fan distributes the heat in the oven compartment straight away, it allows you to use a lower temperature than you would with M Chef + Conventional Heat 📁 or Conventional Heat 📁. It also enables you to cook on several shelf levels at the same time using the Fan Plus 📁 function.
- M Chef + Fan Grill 📁 and Fan Grill 📁 are the best functions for grilled dishes. With Fan Grill you can use lower temperatures than with other grill functions which use the maximum temperature setting.
- Dishes which you are unable to prepare at the same time should, if possible, be cooked one after the other in order to make use of existing heat in the oven.
Using residual heat
- The temperature in cooking programmes using temperatures above 140 °C which take longer than 30 minutes to cook can be turned down to the lowest possible temperature about 5 minutes before the end of cooking. The residual heat in the oven is sufficient for cooking the food. Do not switch the Dialog oven off (see “Warning and safety instructions”).
- If you have set a cooking duration for a cooking programme, the oven heating elements will switch off automatically shortly before the end of cooking. The residual heat in the oven is sufficient to complete the cooking process.
- It is best to start the pyrolytic cleaning programme immediately after a cooking programme. The residual heat in the oven will help reduce the amount of energy required.
Settings
Select the QuickTouch | Off setting for the control elements in order to reduce energy consumption.
Energy saving mode
The Dialog oven will switch itself off automatically to save energy if a programme is not being run and controls have not been operated. The time of day will appear in the display or the display will remain dark (see "Settings").
■ Switch the Dialog oven on.
The main menu will appear.
■ Select the function you want to use (see "Main and sub-menus").
The function will appear in the display. Depending on the function, the recommended values will appear in the display, including the temperature and the Gourmet Units for M Chef functions.
■ Change the recommended values for the cooking programme if necessary.
It is not essential to set a specific number of Gourmet Units for M Chef functions.
If the recommended values are used, the food will be cooked and browned by the heating elements from the outside and Gourmet Units will be automatically added to the food. This stops in the following instances:
- A maximum value of 2000 Gourmet Units has been reached.
- You interrupt the addition of Gourmet Units by selecting Stop.
- You end the cooking programme.
Read more about setting the recommended values in “Changing values and settings for a cooking programme”.
■ Confirm with OK.
■ If you have selected an operating mode without the function Pre-heat, push the food into the oven compartment.
■ If you have selected a function with the Pre-heat function, place the food in the oven as soon as Place food in the oven appears.
■ Close the door.
The required and the actual temperature will appear when using conventional cooking functions.
With M Chef functions, the required temperature will appear in the display, followed shortly afterwards by the addition of Gourmet Units in addition to the conventional heating method. The number of Gourmet Units can be followed in the display.
You will see the temperature increasing with all functions. A buzzer will sound when the selected temperature is reached for the first time.
■ Take the food out of the oven and switch the Dialog oven off at the end of the cooking programme.
Changing values and settings for a cooking programme
Depending on the function, as soon as a cooking programme is in progress, you can change the values or settings for this programme.
Depending on the function, you can change the following settings:
- Temperature
- Gourmet Units
- Intensity
- Duration
- Finish at
- Start at
- Core temperature
- Pre-heat
- Rapid Heat-up
- Crisp function
- Change type of heating
- Change function
Changing the temperature and the core temperature
You can also permanently reset the recommended temperature to suit your cooking preferences. See Settings | Recommended temperatures.
The ⚡ core temperature only appears if you are using the food probe (see “Roasting – Food probe”).
■ Select Change.
■ Change the temperature and the core temperature as required.
■ Confirm with OK.
The cooking programme will resume with the new target temperatures.
If the Pre-heat function has been activated and the temperature first set had not been reached before changing the temperature, Appliance is pre-heating. Do not place food in the oven yet will appear in the display.
Confirm the message with OK.
Changing the number of Gourmet Units
If you want to set a specific number of Gourmet units as well as the temperature when using M Chef functions, this energy will be added to the food until this number of units has been used up.
If you only set the temperature, and do not specify a number of Gourmet Units, then Gourmet Units will be automatically added to the food. This stops in the following instances:
- A maximum value of 2000 Gourmet Units has been reached.
- You interrupt the addition of Gourmet Units by selecting Stop.
- You end the cooking programme.
If you have set a cooking duration, the number of Gourmet units added will appear in the display as soon as the cooking programme has come to an end.
■ To increase the degree of doneness (e.g. to “well-done” instead of “medium” when roasting): Increase the number of Gourmet Units. This increases the cooking duration.
■ If the degree of doneness has almost been reached:
Reduce the number of Gourmet Units. This reduces the cooking duration.
■ The degree of doneness has already been reached, but the food has not browned sufficiently: Interrupt the addition of Gourmet Units by selecting Stop. The food will then be browned by the heating elements from the outside.
Increasing or reducing the number of Gourmet Units
■ Select Change.
■ Change the number of Gourmet Units
■ Confirm with OK.
Depending on the selection, Gourmet Units are added to the food.
Interrupting or stopping the addition of Gourmet Units
■ Select Stop.
The addition of Gourmet Units stops and the required temperature appears in the display.
■ To continue adding units, select Start.
The Gourmet Units will be added to the food and the number of units will appear in the display.
Changing the intensity
The intensity determines how quickly energy will penetrate the food in the form of Gourmet Units.
- Strong
For most food, e.g. bread, flaky pastry, casseroles, terrines, roast meat and fish. Depending on the food, an average of 11 Gourmet Units penetrate the food per minute, with a maximum of 13 Gourmet Units per minute.
- Medium
For heavy cake mixes (e.g. chocolate cake and almond cake), tray bakes, rolls, pizza and whole poultry. Depending on the food, an average of 9 Gourmet Units penetrate the food per minute.
- Gentle
For delicate food, e.g. cheese cake, crème caramel and soufflés. Depending on the food, an average of 3 Gourmet Units penetrate the food per minute.
These settings will vary depending on the food and should only be taken as a guide.
■ Select Change.
■ Select Open further settings.
■ Change the intensity
■ Confirm with OK.
The cooking programme will continue with the new intensity level.
Setting cooking durations
Cooking results can be adversely affected if there is a long delay between the food being placed in the oven and the start of cooking. Fresh food can change colour and even spoil.
When baking, the cake mixture or dough can dry out, and the raising agents can lose their effectiveness. Select as short a time as possible until the start of the cooking process.
Example: You have placed the food in the oven compartment, selected a function and the required settings such as the temperature.
By entering Duration, Finish at or Start at, you can automatically switch the cooking programme off or on and off.
You cannot combine Finish at and Start at with the Pre-heat function.
- Duration
Enter the required cooking duration for the food. At the end of this duration, the oven heating automatically switches off and if you are using M Chef functions, you can choose whether to add any remaining Gourmet Units to the food or not. The maximum duration that can be set is 12:00 hours.
- Finish at
Set the time at which you want cooking to finish. When this time is reached, the oven heating automatically switches off and if you are using M Chef functions, you can choose whether to add any remaining Gourmet Units to the food or not.
- Start at
This function will only appear in the menu if you have set a Duration or Finish at time. With Start at, you have to specify when you want the cooking programme to start. The oven will start heating up at that time automatically and Gourmet Units will be added to the food if you are using M Chef functions.
If all of the Gourmet Units set have not been used by the end of the cooking duration, Cooking finished. Continue with remaining Gourmet Units? will appear in the display.
If you confirm with Yes, cooking will continue until all Gourmet Units have been added.
If you select No, the cooking programme will stop.
If the set number of Gourmet Units has been added, but the duration has not been reached, the oven heating will remain switched on until the duration has been reached. No more Gourmet Units will be added to the food. The heating elements will continue to cook the food and heat and brown it from the outside until it is done.
■ Select Change.
■ Select Open further settings.
■ Set the required times.
■ Confirm with OK.
Changing the set cooking durations
■ Select Change.
■ Select Open further settings.
■ Select the desired time and change it.
■ Confirm with OK.
These settings will be deleted in the event of a power failure.
Deleting the set cooking durations
■ Select Change.
■ Select Open further settings.
■ Set the required duration to -- --.
■ Confirm with OK.
If you delete Duration, the set times for Finish at and Start at are also deleted.
If you delete Finish at or Start at, the cooking programme will start using the cooking duration set.
Cancelling cooking
■ Touch the sensor control twice.
■ When Cancel cooking? appears, select Yes.
The oven will stop heating up and Gourmet units will no longer be added if you are using M Chef functions. Any cooking durations set will be deleted.
Pre-heating the oven
The Rapid Heat-up function is used to quickly pre-heat the oven in some conventional cooking functions.
The Pre-heat function is used to quickly pre-heat the oven in all functions. If you have set a cooking duration, it will only start to count down when the target temperature is reached and you have placed the food in the oven.
It is only necessary to pre-heat the oven in a few instances.
Use the Dialog oven cookbook for guidance.
■ Most dishes can be placed in a cold oven. They will then make use of the heat produced during the heating-up phase.
■ Pre-heat the oven for the following preparations and oven functions:
- Dark bread dough as well as beef sirloin joints and fillet with the
M Chef + Fan Plus 📄,
M Chef + Moisture Plus 📋,
M Chef + Conventional Heat ☐,
Fan Plus 📁, Moisture Plus 🔊 and
Conventional Heat ☐ functions
- Cakes and pastries with a short cooking duration (approx. 30 minutes or less) as well as delicate items (e.g. sponge) with the
Conventional Heat ☐ function
(without the Rapid Heat-up function)
Rapid Heat-up
The Rapid Heat-up function is used to quickly pre-heat the oven.
The Rapid Heat-up function is switched on as the factory default setting for the following functions:
- Fan Plus
- Auto Roast
- Conventional Heat
- Moisture Plus △
If you set a temperature above 100 °C and the Rapid Heat-up function is switched on, a rapid heating-up phase heats the oven compartment to the set temperature. The top heat/grill element and the ring heating element come on together with the hot air fan.
Delicate items (e.g. sponge or biscuits) will brown too quickly on the top if the Rapid Heat-up function is used.
Switch off the Rapid Heat-up function for these items.
Switching off Rapid Heat-up for a cooking programme
The Rapid Heat-up function has to be switched off separately for each cooking programme.
Example: You have selected a conventional cooking function and the required settings such as the temperature.
You want to switch off the Rapid Heat-up function for this cooking programme.
■ Select Change.
■ Select Open further settings.
■ Select Pre-heat.
The Rapid Heat-up | On field will appear.
■ Select Rapid Heat-up.
Off will appear in the Rapid Heat-up field.
■ Confirm with OK.
The Rapid Heat-up function is switched off.
Instead of Rapid Heat-up, Heating-up phase will appear in the display.
Pre-heat
The Pre-heat function is generally switched on in all functions, except when you set a cooking programme to switch on and switch off automatically.
In the M Chef functions, Gourmet Units are not used during the heating-up phase. As soon as food is placed in the oven, it is heated up and browned by the heating elements from the outside and Gourmet units are added.
If you have set a cooking duration, it will only start to count down when the target temperature is reached and you have placed the food in the oven.
Start the cooking programme immediately without delaying the start time.
Switching off Pre-heat for a cooking programme
Example: You have selected an M Chef function and the required settings such as the temperature, Gourmet units and Intensity.
You want to switch off the Pre-heat function for this cooking programme.
■ Place the food in the oven.
■ Select Change.
■ Select Open further settings.
■ Select Pre-heat.
Off will appear in the Pre-heat field.
■ Confirm with OK.
The oven heating will switch on and Gourmet Units will be added during the heating-up phase. This stops in the following instances:
- A maximum value of 2000 Gourmet Units has been reached.
- You interrupt the addition of Gourmet Units by selecting Stop.
- You end the cooking programme.
Crisp function
It is a good idea to use the Crisp function (moisture reduction) when cooking food which has a moist topping e.g. quiche, pizza, tray bakes with fresh fruit toppings or muffins.
Poultry in particular gets a good crisp skin with this function.
Switching on the Crisp function
The Crisp function can be used with any oven function and has to be switched on separately for each cooking programme.
Example: You have selected a function and the required settings such as the temperature.
You want to switch on the Crisp function for this cooking programme.
■ Select Change.
■ Select Open further settings.
■ Select Crisp function.
On will appear in the Crisp function field.
■ Confirm with OK.
The Crisp function is switched on.
Change type of heating
This menu option only appears with the M Chef + Moisture Plus _ and Moisture Plus functions (see “Functions using moisture – Change type of heating”).
Change function
You can change to another function during a cooking programme.
■ Select Change.
■ Select Open further settings.
■ Select Change function.
■ Select the new function.
The new function appears in the display with its corresponding recommended values.
■ Set the values for the cooking programme and confirm with OK.
Your Dialog oven is equipped with a steam injection system for cooking with moisture. Baking, roasting and cooking with the M Chef + Moisture Plus ☐ and Moisture Plus ☐ functions guarantee optimum steam and air flow for even cooking and browning results.
Depending on the function, set the temperature and Gourmet Units (if required) and specify the number of bursts of steam.
After selecting the desired function, set the temperature and the number and type of bursts of steam (Automatic burst of steam, 1 burst of steam, 2 bursts of steam or 3 bursts of steam).
Fresh tap water is taken into the steam system via the tube underneath the control panel on the left.
Liquids, other than water, can cause damage to the Dialog oven.
Only use tap water when cooking with the addition of moisture.
The water is injected as bursts of steam into the oven compartment during the cooking programme. The steam outlets are located in the rear left corner of the ceiling of the oven compartment.
Suitable food
One burst of steam takes about 5–8 minutes. The number of bursts of steam and when they are injected will depend on the type of food being cooked:
- Yeast doughs will rise better if steam is released at the beginning of the programme.
- Bread and bread rolls rise better if steam is released at the start. Injecting a burst of steam at the end of the programme will give the bread and rolls a glistening crust.
- When roasting meat with a high fat content, injecting steam at the beginning of roasting will help render the fat.
Additional moisture is not suitable for mixtures which already contain a lot of moisture, such as meringues. These need to dry out during baking.
Useful tip: Use the Dialog oven cookbook for guidance.
Starting a cooking programme using moisture
It is normal for condensation to form on the inside of the door during a steam injection. This will evaporate during the course of the cooking programme.
■ Prepare the food and place it in the oven.
■ Select the function you want to use (M Chef + Moisture Plus ^B_ or Moisture Plus ^B_ ).
The recommended settings will appear in the display.
■ Change the recommended settings if necessary.
■ Confirm with OK.
The selection display for releasing the bursts of steam will appear.
Selecting bursts of steam
■ Select Automatic burst of steam, 1 burst of steam, 2 bursts of steam or 3 bursts of steam.
- Automatic burst of steam 1 burst of steam will be injected into the Dialog oven automatically after the heating-up phase.
- Manual You can release 1, 2 or 3 bursts of steam manually using the touch display.
- Time-controlled You can set the times for the bursts of steam to be released. The Dialog oven then releases 1, 2 or 3 bursts of steam at the set times.
If you are cooking food, e.g. bread or bread rolls, in a pre-heated oven, it is best to release the bursts of steam manually and switch on the Pre-heat function in the M Chef + Moisture Plus function. The first burst of steam should be released as soon as you have placed the food in the oven.
If you select more than one burst of steam, the second burst of steam cannot be released until the temperature in the oven compartment has reached at least 130 °C.
If you want to use the Pre-heat function with the M Chef + Moisture Plus function, be aware of the heating-up phase when it comes to manual and time-controlled bursts of steam (see "Operation – Pre-heat").
■ If you have selected Time-controlled, set the time for each burst of steam.
■ Confirm with OK.
The prompt to draw in water appears.
Preparing and starting the water intake process
■ Fill a suitable container with the required amount of fresh tap water.
■ Open the door.
■ Pull the water intake pipe forwards (located below the control panel on the left).
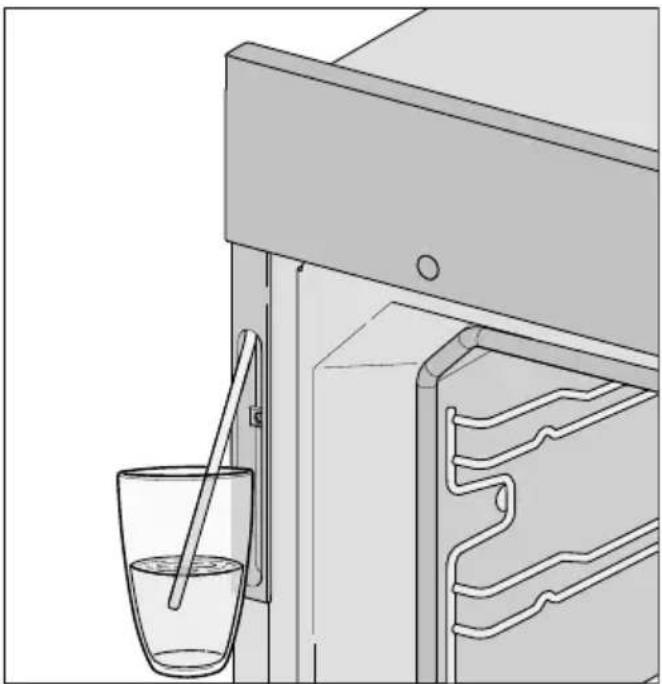
natural_image
Line drawing of a kitchen appliance with a glass bowl and a straw inserted, showing internal structure (no text or symbols)■ Immerse the end of the water intake pipe in the container with tap water.
■ Confirm with OK.
The water intake process will begin.
The amount of water actually drawn up into the oven may be less than the amount specified as required, leaving a small amount in the container.
The intake process can be interrupted and restarted at any time by selecting Stop or Start.
■ Remove the water container after the water intake process and close the door.
The message stating that the intake process is finished will go out.
The sound of the pump running can be heard again briefly. Residual water in the water intake pipe is being drawn into the oven.
The oven heating and cooling fan will switch on. The required and the actual temperature will appear.
You will see the temperature rising in the display. A buzzer will sound when the selected temperature is reached for the first time.
If you have selected Time-controlled, you can alter the time before any steam is released by selecting Change.
Change type of heating
The M Chef + Moisture Plus function uses M Chef + Fan Plus with the addition of moisture as standard.
The Moisture Plus ⚠‖‖ function uses Fan Plus with the addition of moisture as standard.
You can also use moisture with another method of heating instead of with Fan Plus:
- Conventional Heat
- Intensive Bake
- Auto Roast
■ Select Change.
■ Select Open further settings.
■ Select Change type of heating.
■ Select the type of heating you want.
■ Confirm with OK.
Cooking will be carried out using the selected type of heating.
With the M Chef + Moisture Plus ☐ _0.555 function, Gourmet units are also added to the food.
Injecting bursts of steam
⚠️ Danger of injury caused by steam.
Steam can cause severe scalding. In addition, steam condensing on the control panel will cause the sensor controls and the touch display to react more slowly.
Do not open the door during a burst of steam.
Automatic burst of steam
Once the heating-up phase is completed, the steam is released automatically.
The water will evaporate in the oven compartment and Burst of steam active will appear in the display.
After the burst of steam, Burst of steam finished will appear in the display.
■ Continue cooking until the end of the programme.
Manual
You can release the bursts of steam as soon as Start Manual burst of steam appears.
Please wait until the heating-up phase is completed to allow the steam to be distributed evenly by the warm air in the oven.
Useful tip: Refer to the recipes in the cookbook or the Miele App for tips on when to release the bursts of steam. Use the ⏻ Minute minder function to remind you of the timing.
■ Select Start.
The burst of steam will be released. Burst of steam active appears in the display.
■ Proceed as described to release further bursts of steam as soon as Start Manual burst of steam appears.
After the final burst of steam, Burst of steam finished will appear in the display.
■ Continue cooking until the end of the programme.
Time-controlled
The Dialog oven will release the burst of steam at the specified time.
Burst of steam active appears when the steam is being released.
After the final burst of steam, Burst of steam finished will appear in the display.
■ Continue cooking until the end of the programme.
Evaporate residual moisture
When cooking using the addition of moisture, the water will be equally distributed between the number of bursts of steam and used up as long as the programme is not interrupted.
If a programme using the addition of moisture is manually interrupted before all the bursts of steam have been injected or if there is a power cut, the water for these unused bursts of steam will remain in the steam injection system.
The next time M Chef + Moisture Plus ☐, Moisture Plus ☐ or an Automatic programme with moisture is used, Evaporate residual moisture? will appear in the display.
■ It is best to start the evaporation of residual water straight away so that only fresh water is used during the next cooking programme.
⚠️ Danger of injury caused by steam.
Steam can cause scalding.
Do not open the door during a burst of steam.
Depending on the amount of water, evaporation of residual water can take up to 30 minutes.
The oven compartment is heated up and the remaining water is evaporated, causing condensation to form in the oven compartment and on the door.
■ This condensation needs to be wiped off the door and the oven compartment once the oven has cooled down.
Starting residual moisture evaporation immediately

Danger of injury caused by
Steam can cause scalding.
Do not open the door during a burst of steam.
■ Select an oven function or an Automatic programme that uses the addition of moisture.
The Evaporate residual moisture? query will appear.
■ Select Yes.
Evaporate res. moisture and a time appear in the display.
The residual moisture evaporation process will start. You can follow the time counting down in the display.
The time shown in the display will depend on the amount of residual water left in the system. During the evaporation process, the duration may be adjusted by the system according to the actual amount of water present.
At the end of the residual moisture evaporation process Process finished appears.
■ Select the sensor.
A cooking programme with a function or an Automatic programme that uses moisture can now be run.
While the residual water is evaporating, the moisture will condense on the door and in the oven interior. This moisture needs to be wiped off after the oven has cooled down.
Skipping residual moisture evaporation
Skipping the residual moisture evaporation process can, in certain cases, cause water to overflow into the oven compartment. It is best not to cancel the evaporation process.
■ Select an oven function or an Automatic programme that uses the addition of moisture.
Evaporate residual moisture? appears in the display.
■ Select Skip.
A cooking programme with a function or an Automatic programme that uses moisture can now be run.
You will be prompted to carry out the evaporation of residual water the next time you select the function or an Automatic programme that uses moisture, and when you switch the oven off.
The wide range of Automatic programmes enable you to achieve excellent results with ease.
Most of the Automatic programmes use M Chef technology. Settings, e.g. the number of Gourmet Units and the Intensity, are automatically set in these programmes. Recipes for Automatic programmes can be found in the cookbook supplied with your Dialog oven.
An overview of applications is given at the end of this document in “Overview of Automatic programmes Auto”.
Using Automatic programmes
■ Select Automatic programmes Auto.
A list will appear.
■ Select the type of food.
The Automatic programmes available for the food type selected will then appear.
■ Select the Automatic programme that you want to use.
■ Follow the instructions in the display.
Some Automatic programmes will prompt you to use the food probe. Read the information under “Roasting – Food probe”.
The core temperature cannot be changed for the Automatic programmes.
Usage notes
- When using Automatic programmes, the recipes provided are designed as a guide only. Other similar recipes, including those using different quantities, can be used for the Automatic programme in question.
- After cooking, allow the oven compartment to cool down to room temperature again before starting an Automatic programme.
- Some Automatic programmes require a pre-heating phase before food can be placed in the oven. A prompt will appear in the display indicating when this needs to be done.
- Some Automatic programmes require the addition of liquid after a certain cooking duration. You will be prompted by a message in the display when this needs to be done (e.g for adding liquid).
- The duration quoted for Automatic programmes is an estimate. It may increase or decrease depending on the programme. The duration, in particular with meat, will vary depending on the initial temperature of the food.
- When using the food probe, the cooking duration will depend on when the core temperature is reached.
- If by the end of an Automatic programme the food is not cooked enough, select Continue cooking or Continue baking. Conventional heating will then be used for 2 minutes to continue cooking or baking the food.
Search
(Depending on language)
Under Automatic programmes, you can search by the name of the categories and the Automatic programmes.
There is a full text search which can also be used to search for parts of words.
From the main menu:
■ Select Automatic programmes Auto.
The category list will appear in the display.
■ Select Search.
■ Use the keyboard to type in the search text, e.g. "Bread".
The number of hits will be shown in the footer.
If no match is found, or if there are more than 40 matches, the hits field is deactivated and you will need to change the search text.
■ Select XX hits.
The categories and Automatic programmes found will then appear.
■ Select the desired Automatic programme, or the category and then the Automatic programme.
The Automatic programme will start.
■ Follow the instructions in the display.
This section provides information on the following applications:
- Defrost
- Drying
- Heat crockery
- Prove yeast dough
- Low temp. cooking
- Sabbath programme
- Bottling
- Frozen food/Ready meals
Defrost
This programme has been developed for gently defrosting frozen food, such as a whole chicken, minced meat, fish or fruit.
Air in the oven compartment is circulated by the fan and the frozen food is gently and rapidly defrosted by electro-magnetic waves.
You simply select the height and weight of the food and the Dialog oven then automatically calculates the number of Gourmet Units required.

Danger of bacteria!
Bacteria such as salmonella can cause life-threatening food poisoning.
It is particularly important to observe food hygiene rules when defrosting fish and meat, and in particular when defrosting poultry.
Do not use the liquid produced during defrosting.
Process the food as required as soon as it has been defrosted.
■ Measure the height of the frozen food and then weigh it.
■ Place the frozen food, unwrapped, in a bowl or dish that is suitable for use with M Chef functions.
■ Place the bowl or the dish on the rack.
■ Select Special applications ⚙️.
■ Select Defrost.
■ Select the depth of the frozen food, and then confirm with OK.
■ Enter the weight of the frozen food, and then confirm with OK.
■ Follow the instructions in the display.
The food will now be gently defrosted. Depending on the food, an average of 7 Gourmet Units are used per minute and the whole process takes 15–45 minutes.
■ Turn or stir the food when prompted to do so. Rotate food that is not suitable for turning over.
■ Food that weighs more than 1 kg should be turned or stirred several times during defrosting, even if you have not been prompted to do so by a display message. Rotate food that is not suitable for turning over. This will help you to achieve an even result.
Meat and poultry need to be fully defrosted before cooking. Fish, on the other hand, can be partially defrosted before cooking.
Fish, on the other hand, can be partially defrosted before cooking. Defrost so that the surface is sufficiently soft to take herbs and seasoning.
Defrosting a cream filled cake
Frozen cream cakes are a very delicate food that can be quickly and gently defrosted in the Dialog oven.
■ Place the frozen cream cake on a serving platter.
■ Place the platter on the rack.
■ Select Special applications ⚙️.
■ Select Defrost.
■ Enter the height of the cream cake, and then confirm with OK.
Useful tip: If the height of the cream cake is in between two settings, select the lower value.
■ Enter the weight of the cream cake, and then confirm with OK.
■ Reduce the number of recommended Gourmet Units to 15–20% and confirm with OK.
■ Follow the instructions in the display.
The cream cake will defrost gently. The process takes approx. 30 minutes.
■ Turn the cream cake when prompted to do so and then turn it every 8–10 minutes.
■ Check that it is defrosting evenly every time to turn it.
Drying
Drying is a traditional method of preserving fruit, certain vegetables and herbs.
It is important that fruit and vegetables are ripe and not bruised before they are dried.
■ Prepare the food for drying by cutting it up, and peeling and coring it if necessary.
■ Distribute the food for drying evenly in a single layer according to size over the rack or the universal tray.
■ Dry on a maximum of 2 levels at the same time.
Place the food for drying on shelf levels 2+3.
If using the rack and universal tray, place the universal tray below the rack.
■ Select Special applications ⭐.
■ Select Drying.
■ Alter the recommended temperature if necessary and then set the duration.
■ Follow the instructions in the display.
■ Turn the food for drying on the universal tray at regular intervals.
The drying times are longer for whole or halved food.
| Food | [h] | ||
| Fruit 60-70 2-8 | |||
| Vegetables 55-65 4-12 | |||
| Mushrooms 45-50 5-10 | |||
| Herbs* 30-35 4-8 |
☐ Special application/Function,
Temperature, ⏻ Drying time,
Drying Special application,
Conventional Heat function
* Dry herbs only on the universal tray on level 2 and use the Conventional Heat function, as the fan is switched on in the Drying Special application.
■ Reduce the temperature if condensation begins to form in the oven.
Removing the dried food
⚠️ Risk of injury caused by hot surfaces.
The Dialog oven gets hot when it is being used. You could burn yourself on the heating elements, the oven compartment, or accessories.
Use oven gloves when removing dried food from the oven.
■ Allow the dried fruit or vegetables to cool down after drying.
Dried fruit needs to be completely dry, but also soft and elastic. Juice should not escape when cut.
■ Store dried food in sealed glass jars or tins.
Heat crockery
By pre-heating the crockery, the food does not cool down as quickly.
Use heat-resistant crockery.
■ Place the rack on shelf level 2 and place the crockery to be pre-heated on it. Depending on the size of the crockery, you can also place it on the oven floor.
■ Select Special applications ⭐.
■ Select Heat crockery.
■ Alter the recommended temperature if necessary and then set the duration.
■ Follow the instructions in the display.

Risk of injury caused by hot s.
The Dialog oven gets hot when it is being used. You could burn yourself on the heating elements, the oven compartment, or accessories.
Droplets of water may have accumulated underneath the crockery.
Wear oven gloves when removing dishes from the oven.
Prove yeast dough
This programme is designed specifically for proving yeast dough without the addition of moisture.
If you wish to prove yeast dough with the addition of moisture, use the relevant Automatic programmes.
■ Select Special applications ⚙️.
■ Select Prove yeast dough.
■ Alter the recommended temperature if necessary and then set the duration.
■ Follow the instructions in the display.
Low temp. cooking
The Low temp. cooking method is ideal for cooking beef, pork, veal or lamb when a tender result is desired.
First briefly sear the meat all over at a high temperature on the cooktop in order to seal it.
Then place the meat in the pre-heated oven where the low temperature and long cooking duration will cook it to perfection and ensure it is very tender.
The meat will relax. The juices inside will start to circulate evenly throughout the meat to reach the outer layers. This gives very tender and succulent results.
■ Use lean meat which has been correctly hung and trimmed. Bones should be removed before cooking.
■ For searing, use a suitable cooking oil or fat that can withstand high temperatures (e.g. clarified butter, vegetable oil).
■ Do not cover meat during the cooking process.
The cooking duration takes approx. 2–4 hours depending on the weight and size of the meat and how well you want it cooked.
■ As soon as the cooking programme has finished, you can carve the meat straight from the oven. It does not need to rest.
■ The meat can be left in the oven compartment to keep warm until you serve it. This will not affect results in any way.
■ Serve on pre-heated plates with very hot sauce or gravy to prevent it cooling down too quickly. The meat is at the ideal temperature for eating straight away.
Using the Low temp. cooking Special application
Observe the information under "Roasting – Food probe".
■ Select Special applications 🙏.
■ Select Low temp. cooking.
■ Follow the instructions in the display. Place the necessary accessories in the oven compartment for the pre-heating phase.
■ Set the temperature and the core temperature.
■ While the oven is pre-heating, sear the meat on all sides on the cooktop.
Risk of burning due to hot surfaces.
The Dialog oven gets hot when it is being used. You could burn yourself on the heating elements, the oven compartment, or accessories.
Wear oven gloves when placing food in the oven or removing it, and when adjusting oven shelves etc. in a hot oven.
As soon as Place food in the oven and use the food probe appears in the display, place the seared meat on the rack and insert the metal tip of the food probe fully into the centre of the meat.
■ Close the door.
At the end of the programme, Process finished appears in the display and a buzzer sounds.
Using the Conventional Heat function
Refer to the information in the cooking charts at the end of this booklet.
Use the universal tray with the rack placed on top of it. Switch off the Rapid Heat-up function for the pre-heating phase.
■ Place the rack together with the universal tray on shelf level 2.
■ Select Oven functions □.
■ Select the Conventional Heat ☐ function and a temperature of 120 °C.
■ Switch off the Rapid Heat-up function.
■ Pre-heat the oven together with the universal tray and rack for approx. 15 minutes.
■ While the oven is pre-heating, sear the meat on all sides on the cooktop.
⚠️ Risk of burning due to hot surfaces.
The Dialog oven gets hot when it is being used. You could burn yourself on the heating elements, the oven compartment, or accessories.
Wear oven gloves when placing food in the oven or removing it, and when adjusting oven shelves etc. in a hot oven.
■ Place the seared meat on the oven rack.
■ Select Change.
■ Reduce the temperature to 100 °C (see “Cooking charts”).
■ Continue cooking until the end of the programme.
Sabbath programme
The Sabbath programme is for religious observance.
After you have selected the Special application, select the function and temperature.
The programme will only start after the door is opened and closed:
- After approx. 5 minutes, the cooking programme will begin using the Conventional Heat □ or Bottom Heat □ function.
- The Dialog oven will heat up to the temperature you have set and will maintain this temperature for a maximum of 72 hours.
- The interior lighting does not come on, even when the door is opened.
- Sabbath programme appears constantly in the display.
- The time of day does not appear.
Once the Sabbath programme has started, it cannot be changed or saved under User programmes.
Once a Sabbath programme has started, you can only end it prematurely by switching off the Dialog oven.
■ Select Special applications ⚙️.
■ Select Sabbath programme.
■ Select the function you want.
You will not be able to start this Special application if you have set a minute minder or an alarm.
■ Set the temperature.
■ Confirm with OK.
Sabbath programme 📋 and the set temperature will appear in the display.
■ Open the door when you want to start the programme.
■ Place the food in the oven.
■ Close the door.
The oven heating will switch on after 5 minutes.
The Dialog oven will switch off automatically after 72 hours. If you want to end the Special application prematurely:
■ Switch the Dialog oven off with the On/Off ⏻ sensor.
Bottling

Risk of infection from bacteria.
The spores of the botulinum bacterium are not sufficiently killed by bottling pulses and meat only once. Toxins may form which can lead to serious poisoning. These spores are only destroyed by reheating the food within 2 days after preserving.
After they have cooled down, always reheat pulses and meat a second time within 2 days.

Risk of injury from increased re in sealed tins.
Preserving and heating food in sealed tins will result in an increase in pressure, which can cause them to explode.
Do not use tins for preserving or heating food.
Preparing fruit and vegetables
The instructions are for 5 jars with a capacity of 1 litre each.
Only use special jars for preserving (preserving jars or jars with a screw cap). Only use undamaged jars and rubber rings.
■ Rinse the jars with hot water before bottling and fill them up to a maximum of 2 cm below the rim.
■ After you have filled the jars with the produce, clean the glass rims with a clean cloth and hot water and then seal the jars.
■ Place the universal tray on shelf level 1 and place the closed jars on the tray.
■ Select the Fan Plus ⚙ function and a temperature of 160–170 °C.
■ Wait until bubbles evenly rise in the jars.
Reduce the temperature in time to prevent the contents from boiling over.
Bottling fruit and gherkins
■ Set the specified continued warming temperature as soon as bubbles are visible in the jars, then leave the jars in the warm oven for the time specified.
Bottling vegetables
■ As soon as bubbles are visible in the jars, set the specified bottling temperature and cook the vegetables for the time specified.
■ After bottling, set the specified continued warming temperature, then leave the jars in the warm oven for the time specified.
| / | / | |
| Fruit -/- | 30 °C25–35 min. | |
| Gherkins -/- | 30 °C25–30 min. | |
| Beetroot | 120 °C30–40 min. | 30 °C25–30 min. |
| Beans (green or yellow) | 120 °C90–120 min. | 30 °C25–30 min. |
/ ⏻ Bottling temperature and time once bubbles are visible in the jars
Continued warming temperature and time
Removing the jars after bottling
⚠️ Risk of injury caused by hot surfaces.
The jars are very hot after bottling. Wear oven gloves when removing the jars from the oven.
■ Take the jars out of the oven.
■ Cover the jars with a towel and leave for approx. 24 hours in a draught-free area.
■ After they have cooled down, always reheat pulses and meat a second time within 2 days.
■ Remove the fasteners from the jars and make sure all jars are closed properly when storing them.
Either boil open jars again or store them in a cool place and consume the preserved fruit or vegetables immediately.
- Check the jars during storage. If jars have opened during storage or if the screw cap is bulging and does not make a popping noise when opened, destroy the contents.
Frozen food/Ready meals
Tips for cakes, pizza and baguettes
- Bake cakes, pizza and baguettes on baking paper on the rack.
Do not use the baking tray or the universal tray for frozen foods with a large surface area. The tray could become warped and difficult, or even impossible, to remove from the oven compartment when hot. Additional use will make the warping worse. - Use the lowest temperature recommended on the packaging.
Tips for oven chips, croquettes and similar items
- These frozen items can be cooked on the baking tray or universal tray. Place baking paper on the tray so that they cook gently.
- Select Conventional Heat ☐, switch off the Rapid Heat-up function and switch on the Crisp function.
- Use the highest temperature recommended on the packaging and place the frozen foods in the preheated oven.
- Turn food several times during cooking.
Preparing frozen food/ready meals
Handling food carefully will help protect your health. Cakes, pizzas and chips should be cooked until golden, not dark brown.
■ Select the function and temperature recommended on the manufacturer's packaging.
■ Pre-heat the oven.
■ Place the food in the pre-heated oven on the shelf level recommended on the packaging.
■ Check the food at the end of the shortest cooking duration recommended on the packaging.
You can save up to 20 User programmes:
- At the end of an Automatic programme, save it as a User programme.
- Save a cooking programme that has settings such as function, temperature, Gourmet Units, intensity and duration or core temperature once it has finished.
- You can use the Miele@mobile App to transmit programme settings for selected recipes to your Dialog oven and then start the programme. These settings are not saved.
If you wish to save the programme, you have to give it a name. When you call up and start your programme again, it will run automatically.
Saving a User programme
When a cooking programme that had the cooking duration or Gourmet units set or an Automatic programme has finished, Process finished and Save will appear in the display.
■ Select Save to save the last settings as a User programme.
A summary of your settings will appear in the display.
■ Check the settings and confirm with Accept.
■ Enter the programme name using the keyboard.
You can add a line break for longer programme names using the ∫ symbol.
Select the sensor control if you do not want to save the settings.
■ Once you have entered the programme name, select Save.
■ Confirm the message informing you that your programme name has been saved with OK.
Starting a User programme
■ Place the food in the oven.
■ Select User programmes 📄.
■ Select the required programme.
You can start the programme immediately or delay the start.
- Start now
The programme will start immediately. The oven heating will switch on immediately.
- Start later
This menu option only appears when you are using the food probe. Specify the time you want cooking to start. The oven heating will switch on automatically at the time you have set.
- Finish at
Specify the time at which the programme should finish. The oven heating will switch off automatically at the time you have set.
- Start at
Specify the time you want cooking to start. The oven heating will switch on automatically at the time you have set.
- Display cooking stages
A summary of your settings will appear in the display.
■ Select the required menu option.
The programme selected will begin straight away or at the time set.
Deleting User programmes
■ Select User programmes 📄.
The programme names appear in the display.
■ Select Edit.
■ Select Delete programme.
■ Select the required programme.
■ Confirm with OK.
The programme will be deleted.
Go to Settings | Factory default | User programmes to delete all User programmes at the same time.
Under MyMiele ⚙▶≡, you can save frequently used applications.
It is particularly useful with Automatic programmes as you do not need to work through every screen in order to start your programme.
Useful tip: You can also set menu options that you have entered into MyMiele to appear on the start screen (see "Settings – Start screen").
Adding an entry
You can add up to 20 entries.
■ Select MyMiele ≡≡.
■ Select Add entry.
You can select options listed in the following categories:
- M Chef
- Oven functions □
- Automatic programmes Auto
- Special applications
- User programmes
■ Confirm with OK.
The selected item and its respective symbol will appear in the list.
■ Proceed as above for further entries. Only options that have not yet been selected are available for selection.
The position of the MyMiele ≈ menu will change in the main menu.
Editing MyMiele
After selecting Edit, you can add entries (up to a maximum of 20), sort entries (if there are more than 4) or delete entries.
Deleting entries
■ Select MyMiele ≡≡.
■ Select Edit.
■ Select Delete entry.
■ Select the entry that you want to delete.
■ Confirm with OK.
The entry will then be removed from the list.
You can delete all entries at the same time via Settings | Factory default | MyMiele.
Sorting entries
The order can be rearranged as long as there are more than 4 entries.
■ Select MyMiele ≈≡.
■ Select Edit.
■ Select Sort entry.
■ Select the entry.
■ Select the position you want to move it to.
■ Confirm with OK.
The entry will now appear in the position you want it in.
Handling food carefully will help protect your health. Cakes, pizzas and chips should be cooked until golden, not dark brown.
Tips on baking
- If you are using M Chef functions, the food is cooked from the inside by electro-magnetic waves and at the same time browned on the outside by the heating elements. Cooking durations are shorter this way than with conventional functions. The set temperature is higher in order to achieve the level of browning required in the shorter time.
- Set a cooking duration. When baking, the oven should not be set to start a long time off. Otherwise the cake mixture or dough will dry out, and the raising agents will lose their effectiveness.
- Generally, you can use the rack, baking tray, universal tray and any type of baking tray made of heat-resistant material.
- The choice of bakeware depends on the oven function and how the food is prepared. It is best to use metal baking tins if possible. Baking tins made from silicone, glass or ceramic may prevent the underside browning sufficiently.
-
Avoid using bright, thin-walled tins as they give an uneven or poor browning result. In certain unfavourable conditions, the food will not bake properly.
-
Place cakes in rectangular tins on the rack with the longer side across the width of the oven for optimum heat distribution and even results.
- Always place bakeware on the rack.
- Bake cakes with fruit toppings or deep cakes on the universal tray.
Using baking paper
Miele accessories, e.g. the universal tray, are treated with PerfectClean enamel (see “Features”). Surfaces treated with PerfectClean enamel generally do not need to be greased or covered with baking paper.
■ Use baking paper when baking lye pastries (e.g. pretzels) because the sodium hydroxide can damage the PerfectClean treated surface.
■ Use baking paper when baking sponge, meringue, macaroons or similar items. These are more likely to stick due to their high egg white content.
■ Use baking paper when cooking frozen food on the rack.
Notes on the cooking charts
You can find the cooking charts at the end of this book.
Selecting the 🔊 temperature
■ As a general rule, select the lower temperature given in the chart. Baking at temperatures higher than those recommended may reduce the cooking duration, but will lead to uneven browning of the food, and unsatisfactory cooking results.
If you are using M Chef functions, the food is cooked from the inside by electro-magnetic waves and at the same time browned on the outside by the heating elements. Cooking durations are shorter this way than with conventional functions. The set temperature is higher in order to achieve the level of browning required in the shorter time.
Selecting the cooking duration ⏻
Unless otherwise stated, the cooking durations given in the cooking charts are for an oven compartment which has not been pre-heated. With a pre-heated oven compartment, shorten durations by around 10 minutes.
■ As a general rule, check whether the food is cooked after the shortest duration. Stick a wooden skewer into the food.
If it comes out clean without any batter/dough on it, the food is done.
Notes on the oven functions
You can find an overview of all the functions with their recommended values in “Main and sub-menus”.
Using Automatic programmes Auto
■ Follow the instructions in the display.
Use the Dialog oven cookbook for guidance.
Using M Chef + Fan Plus 📄
Use this function for baking cakes and bread.
■ Place the food on shelf level 2.
Using Fan Plus
Because the fan distributes the heat around the oven compartment straight away, you can use a lower temperature than you would with the Conventional Heat function.
Use this function for baking biscuits and cookies.
Use this function if you are baking on multiple shelf levels at the same time.
■ 1 shelf level: place flat items (e.g. biscuits) on shelf level 1.
■ 1 shelf level: place tray cakes and cakes in baking tins on shelf level 2.
■ 2 shelves: Place the food on shelf levels 2+3.
Useful tips
- If you are cooking on multiple shelf levels at the same time, slide the universal tray in on the lowest level.
- For moist biscuits and cakes, bake on a maximum of 2 shelf levels at once.
Using M Chef + Moisture Plus and Moisture Plus
Use these functions for cooking with moisture.
■ Place the food on shelf level 2.
Using M Chef + Intensive Bake and Intensive Bake
Use these functions for baking cakes with moist toppings.
Do not use these functions for baking thin biscuits.
■ M Chef + Intensive Bake ☐: Place the food on shelf level 2.
■ Intensive Bake 📁: Place the food on shelf level 1.
Using M Chef + Conventional Heat and Conventional Heat
Dark metal, enamel, or aluminium bakeware with a matte finish, as well as heat-resistant glass, ceramic, and coated bakeware can be used.
Use these functions for baking traditional recipes. If using an older recipe or cookbook, set the oven temperature 10 °C lower than that recommended. The cooking duration is shortened when you use the M Chef + Conventional Heat function.
■ Place the food on shelf level 2.
Tips for roasting
- You can use all crockery made from temperature-resistant materials, e.g. roasting dishes and pots (metal lids can only be used with conventional cooking functions), ovenproof glass dishes, roasting bags, universal trays, racks on top of universal trays. You should only use a grilling and roasting insert (if you have one) on the universal tray and a clay pot with conventional cooking functions.
- Pre-heating the oven compartment is only required when roasting beef sirloin joints and fillet. Pre-heating is generally not necessary.
- Use a roasting dish for roasting meat. The oven compartment will also stay cleaner than when roasting on the rack. It ensures that sufficient stock remains for making gravy.
- If you are using a roasting bag, follow the instructions on the packaging.
- If you are using the rack or an open roasting dish for roasting, you can add a little fat or oil to very lean meat or place a few strips of streaky bacon on the top.
-
Season the meat and place in the roasting dish. Dot with butter or brush with oil or cooking fat. For large lean cuts of meat (2–3 kg) and fatty poultry, add about 1/8 l of water to the dish.
-
Do not add too much liquid during cooking as this will hinder the browning of the meat. Browning only occurs towards the end of the cooking duration. Remove the lid about halfway through the cooking duration if a more intensive browning result is desired.
- At the end of the programme, take the food out of the oven compartment, cover it and leave to stand for about 10 minutes. This helps retain juices when the meat is carved.
- For a crisp finish, baste poultry 10 minutes before the end of the cooking duration with slightly salted water.
Notes on the cooking charts
You can find the cooking charts at the end of this book.
■ Take note of the temperature range, the shelf levels and the timings. These also take the type of cooking container, the size of the meat and cooking practices into account.
Selecting the 🔊 temperature
If you are using M Chef functions, the food is cooked from the inside by electro-magnetic waves and at the same time browned on the outside by the heating elements. Cooking durations are shorter this way than with conventional functions. The set temperature is higher in order to achieve the level of browning required in the shorter time.
■ As a general rule, select the lower temperature given in the chart. If higher temperatures are used than those specified, the meat will brown on the outside, but will not be properly cooked through.
■ When roasting on the rack, set a temperature approx. 10 °C lower than for roasting in an oven dish.
Selecting the cooking duration ⏻
Unless otherwise stated, the durations given in the cooking chart are for an oven compartment which has not been pre-heated.
■ The roasting time can be determined by multiplying the thickness of the roast [cm] with the time per cm [min./cm] stated below, depending on the type of meat:
- Beef/Venison: 15–18 min./cm
- Pork/Veal/Lamb: 12–15 min./cm
- Sirloin joints/Fillets: 8–10 min./cm
■ As a general rule, check whether the food is cooked after the shortest duration.
Cooking durations with M Chef functions are shorter than with conventional functions.
Use the Dialog oven cookbook for guidance.
Notes on the oven functions
You can find an overview of all the functions with their recommended values in “Main and sub-menus”.
Use the Bottom Heat ☐ function towards the end of the cooking duration to brown the base of the food.
Do not use the M Chef + Intensive Bake 📄 and Intensive Bake 📋 functions for roasting as the juices will become too dark.
Using Automatic programmes Auto
■ Follow the instructions in the display.
Use the Dialog oven cookbook for guidance.
Using M Chef + Fan Plus 📁 and Fan Plus 🌿
Use these functions for roasting meat, fish and poultry that needs to be well browned as well as sirloin joints and fillets.
Since the fan distributes the heat around the oven compartment straight away when using the Fan Plus function, it allows you to use a lower temperature than you would with the Conventional Heat function.
■ Place the food on shelf level 1.
Using M Chef + Auto Roast 📋 and Auto Roast 📋
Use these functions for roasting meat, fish and poultry that needs to be well browned as well as sirloin joints and fillets.
The oven heats initially to a high searing temperature (approx. 230 °C) during the heating-up phase. As soon as this temperature has been reached, the oven automatically drops the temperature back down to the pre-selected roasting temperature (continued roasting).
■ Place the food on shelf level 1.
Using M Chef + Moisture Plus and Moisture Plus
Use these functions for cooking with moisture.
■ Place the food on shelf level 1.
Using M Chef + Conventional Heat and Conventional Heat
Use this function for cooking traditional recipes. If using an older recipe or cookbook, set the oven temperature 10 °C lower than that recommended. This will not change the cooking duration.
■ Place the food on shelf level 1.
Food probe

natural_image
Line drawing of a pair of connected probes with beads (no text or symbols)The food probe enables the temperature to be monitored precisely during a cooking programme.
How it works
The metal tip of the food probe must be inserted into the centre of the food all the way to the handle. There is a temperature sensor in the metal tip which measures the core temperature of the food during cooking. The rise in the core temperature of the food reflects the progress of cooking. Set a lower or higher core temperature, depending on whether you want your roast to be rare, medium or well-done.
The core temperature can be set up to 99 °C. Information on food and respective core temperatures can be found in the cooking charts at the end of this book.
The cooking duration will be similar when cooking with or without the food probe.
Important notes on use
- You can place the meat in a pot or on the rack.
- The metal tip of the food probe must be fully inserted into the centre of the food so that the temperature sensor reaches more or less to the core.
- When cooking poultry, insert the metal tip into the thickest part of the breast. You can find the thickest part of the breast by pressing the area with your thumb and index finger.
- The metal tip must not touch any bone or be inserted in areas with a lot of fat. Heavily marbled areas and bones can cause cooking to end prematurely.
- If the meat is very heavily marbled with fat, select the highest core temperature given in the cooking charts.
- When using aluminium foil or roasting bags, insert the food probe through the foil/bag into the centre of the food. You can also place meat inside the bag or foil with the food probe already inserted. Follow the roasting bag manufacturer's instructions.
Using the food probe
■ Fully insert the metal tip of the food probe into the centre of the meat.
If you are cooking several pieces of meat at the same time, insert the food probe into the largest piece of meat.
■ Place the food in the oven.
text_image
Diagram showing a mechanical device with labeled parts and directional arrows indicating motion or assembly.■ Plug the food probe into the connection socket so that it clicks into place.
■ Close the door.
■ Select the oven function or Automatic programme.
■ Set the temperature and the core temperature if necessary.
The core temperature cannot be changed for the Automatic programmes.
Follow the instructions in the display.
The cooking programme finishes as soon as the core temperature is reached.
Risk of injury caused by hot surfaces.
The food probe can get hot. You can burn yourself on the food probe.
Wear oven gloves when removing the food probe.
Delaying the start of a cooking programme with food probe
You can also delay the start of the cooking programme to a later time.
■ Select Change | Open further settings and enter a time in the Start at field.
■ In Automatic programmes, select Start later.
You can estimate approximately when the food will be ready as the duration of the cooking programme is about the same as if you were cooking food without using the food probe.
You cannot set Duration and Finish at because the total cooking duration is determined by when the set core temperature is reached.
Using residual heat
The oven heating turns off shortly before the end of the cooking programme. The remaining heat in the oven is enough to finish the cooking programme.
Using the residual heat in the oven saves energy.
Energy save phase will appear in the display to show that the oven is in energy save mode. The measured core temperature is no longer visible.
The cooling fan continues to run, as does the hot air fan if a function using the fan has been selected.
Once the core temperature has been reached, Process finished will appear in the display and a buzzer will sound if buzzer tones are switched on.
Useful tip: If the food is not yet cooked sufficiently, insert the food probe into another place and repeat the programme.
Risk of injury caused by hot surfaces.
If you grill with the door open, hot air will escape from the oven instead of being cooled by the cooling fan. The control elements will get hot.
Grill with the oven door closed.
Tips for grilling
- Pre-heating is necessary when grilling. Pre-heat the top heat/grill element for approx. 5 minutes with the door closed.
- Trim the meat if necessary. Season meat 10-15 minutes before cooking.
- Add a little oil to lean meat if necessary. Do not use other types of fat as they can easily burn and cause smoke.
- Clean fish in the normal way. To enhance the flavour, season with a little salt. Fish can also be drizzled with lemon juice.
- Use the universal tray with the rack placed on top of it. The grilling and roasting insert should be used with conventional functions. The tray under the insert will collect the meat juices and stop them from burning so that they can be used for making gravy and sauces.
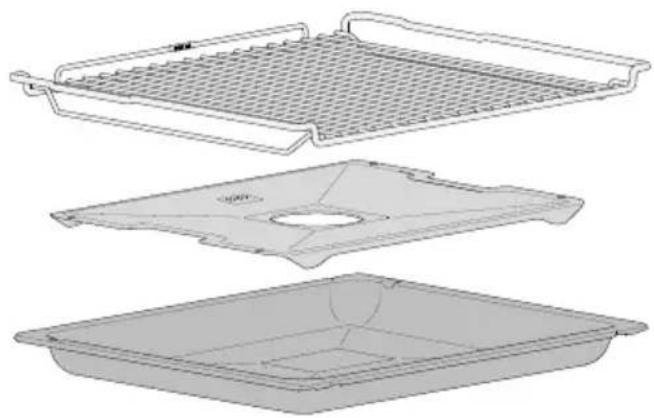
natural_image
Technical line drawings of three different plastic trays or compartments with no visible text or symbolsDo not use the baking tray.
- To grill, brush the rack with oil and then place the food on the rack.
Notes on the cooking charts
You can find the cooking charts at the end of this book.
■ Take note of the temperature range, the shelf levels and the timings. These take the size of the meat and cooking practices into account.
■ Check the food after the shortest duration quoted.
Selecting the temperature 🔊
■ As a general rule, select the lower temperature given in the chart. If higher temperatures than those specified are used, the meat will brown on the outside, but will not be properly cooked through.
Choosing a shelf level
■ Select the shelf level depending on the thickness of the food to be cooked.
■ Place flat food on shelf level 3 or 4.
■ Place thicker food on shelf level 1 or 2.
Selecting the cooking duration ⏻
- Grill thinner cuts of meat/slices of fish for approx. 6–8 minutes per side. It is best to grill food of a similar thickness at the same time so that the cooking durations do not vary too much.
■ As a general rule, check whether the food is cooked after the shortest duration.
■ To test the food, press down on the meat with a spoon. This lets you determine how well the meat has been cooked.
- Rare
If the meat gives easily to the pressure of the spoon, it will still be red on the inside.
- Medium
If there is some resistance, the inside will be pink.
- Well-done
If there is great resistance, it is cooked through.
Useful tip: If the surface of a thicker cut of meat is browned but the centre is still raw, move the food to a lower level or reduce the temperature and continue grilling. This will stop the surface from becoming excessively charred.
Notes on the oven functions
You can find an overview of all the functions with their recommended values in “Main and sub-menus”.
The plastic on the food probe can melt at very high temperatures.
Do not use the food probe when using the Grill functions.
Do not store the food probe in the oven compartment when it is not being used.
Using M Chef + Full Grill 📋 and Full Grill 🌐
Use these functions to grill flat thin cuts in large quantities and for browning large baked dishes.
Use the Full Grill 📋 function for thick toasts, muffins, cheese on toast, focaccia, bruschetta and bacon.
When using the M Chef + Full Grill ☐ function, the food is cooked from the inside by electro-magnetic waves and at the same time browned on the outside by the whole of the top heat/grill element. Grilling times are shorter than with the Full Grill ☐ function.
Using Economy Grill
Use this function to grill flat thin cuts in smaller quantities and for browning small baked dishes.
Only the centre of the top heat/grill element will get hot and glow red to generate the required heat.
Using M Chef + Fan Grill 📁 and Fan Grill 🌿
Use these functions for grilling thicker food, such as meat, fish, poultry and vegetables.
When using the M Chef + Fan Grill function, the food is cooked from the inside by electro-magnetic waves and at the same time browned on the outside by the top heat/grill element and the fan switching on and off alternately. Grilling times are shorter than with the Fan Grill function.
Useful tips
- It is not necessary to turn food when Fan Grilling. Only one side of the food, however, will become brown.
- When using red meat, pat the meat dry before Fan Grilling as this encourages a richer colour.
- Activate the Crisp function (moisture reduction) at the beginning of the cooking programme. This is great for items that are moist on the inside and should be crispy on the outside.

Risk of injury caused by hot s.
The Dialog oven gets hot when it is being used. You could burn yourself on the heating elements, the oven compartment, or accessories.
Allow the heating elements, oven compartment and the accessories to cool before manual cleaning.

Risk of injury due to electric
The steam from a steam cleaning appliance could reach electrical components and cause a short circuit.
Never use a steam cleaner for cleaning.
All surfaces could be discoloured or damaged if unsuitable cleaning agents are used. The Dialog oven front is particularly susceptible to damage from oven cleaners and descaling agent.
All surfaces of this appliance are susceptible to scratching. Scratches on glass surfaces could cause a breakage in certain circumstances.
Remove all cleaning agent residues immediately.
Unsuitable cleaning agents
To avoid damaging the surfaces of your appliance, do not use:
- cleaning agents containing soda, alkalines, ammonia, acids or chlorides
- cleaning agents containing descaling agents on the front
- abrasive cleaning agents, e.g. powder cleaners and cream cleaners
- solvent-based cleaning agents
- stainless steel cleaning agents
- dishwasher cleaners
- glass cleaning agents
- cleaning agents for ceramic cooktops
- hard, abrasive brushes or sponges, e.g. pot scourers, brushes or sponges which have been previously used with abrasive cleaning agents
- dirt eraser sponges
- sharp metal scrapers
- steel wool or metal scourers
- spot cleaning with mechanical cleaning agents
- oven cleaner
- stainless-steel spiral pads
If soiling is left on for any length of time, it may become impossible to remove. Continued use without regular cleaning will make the oven much harder to clean. Failure to maintain the oven in a clean condition could lead to deterioration of the surfaces that could adversely affect the life of the appliance and result in a hazardous situation. Remove any soiling immediately.
The accessories are not dishwasher-safe.
Useful tip: Soiling caused by spilled fruit juices and cake mixtures is best removed while the oven is still warm. Exercise caution and make sure the oven is not too hot.
Removing normal soiling
There is a delicate fibreglass seal around the front of the oven compartment to provide a seal for the oven door. This can be damaged by rubbing or scouring. Ideally, you should avoid cleaning it.
There are 2 seals around the door. These seals must never be removed.
Removing normal soiling
■ It is best to remove normal soiling immediately using a clean sponge and a solution of hot water and washing-up liquid, or a clean, damp microfibre cloth.
■ Remove any residual cleaning agent thoroughly with clean water. This is particularly important for any parts with a PerfectClean finish, as cleaning agent residues will impair the non-stick properties.
■ After cleaning, wipe the surfaces dry using a soft cloth.
Do not put the food probe into water or clean it in the dishwasher as this will damage it.
Clean the food probe with a damp cloth only.
Removing stubborn soiling
Spilled fruit and roasting juices may cause lasting discolouration or matte patches on surfaces. This discolouration will not affect the functional characteristics of the surface finish.
Do not attempt to remove these marks. Clean them following the instructions given here.
■ Baked-on deposits can be removed with a glass scraper or with a stainless steel spiral pad, hot water and washing-up liquid.
Using oven cleaners
■ Very stubborn soiling on PerfectClean surfaces can be cleaned using Miele Oven Cleaner. This cleaner must only be applied to cold surfaces.
If the oven spray gets into gaps and openings, a strong odour is generated during subsequent cooking programmes.
Do not spray the oven cleaner onto the roof of the oven compartment. Do not spray the oven cleaner into the gaps and openings of the oven compartment walls and rear wall.
■ Follow the instructions on the packaging.
Oven cleaners from other manufacturers must only be used in a cold oven and must not be left on for longer than 10 minutes.
If necessary, the scouring pad on the back of a non-scratching washing-up sponge can be used to remove the soiling after the soaking time.
■ Remove any residual cleaning agent thoroughly with clean water.
■ Dry all surfaces with a soft cloth.
Pyrolytic cleaning
Instead of cleaning the oven compartment by hand, you can run the Pyrolytic function.
During Pyrolytic cleaning the oven compartment reaches temperatures in excess of 400 °C. Any residual soiling is burnt off and turned to ash by the high temperatures.
There are 3 Pyrolytic settings available, each with a different duration.
- Level 1 for light soiling
- Level 2 for heavier soiling
- Level 3 for very heavy soiling
The oven door is automatically locked when the Pyrolytic cleaning process is started. It cannot be opened until after the programme has finished.
The timer can be used to delay the start time of the Pyrolytic cleaning programme, for instance to make use of cheaper electricity tariffs.
At the end of the Pyrolytic cleaning programme any residues such as ash from the pyrolytic process, which are formed depending on the oven compartment's degree of soiling, can be easily wiped away.
Preparing for pyrolytic cleaning
Accessories that are not suitable for pyrolytic cleaning will be damaged by the high temperatures.
Remove all accessories that are not suitable for pyrolytic cleaning from the oven before starting the pyrolytic cleaning programme. This also applies to non-pyrolytic accessories purchased separately to the oven.
The following accessories are suitable for pyrolytic cleaning and can be left in the oven compartment during pyrolytic cleaning:
- Shelf runners
- Rack HBBR 52
■ Take all non-pyrolytic accessories out of the oven.
■ Place the rack on the top shelf level.
Coarse soiling in the oven compartment can cause thick smoke to develop.
Burnt-on residues can leave lasting discolouration or matt patches on enamelled surfaces.
Before starting the Pyrolytic cleaning programme, remove coarse soiling from the oven compartment and scrape any burnt-on residues off enamelled surfaces with a glass scraper.
Starting pyrolytic cleaning

Risk of injury caused by ous steam.
During pyrolytic cleaning, steam, which can irritate mucous membranes, may be released.
During pyrolytic cleaning, do not stay in the kitchen for longer periods of time and do not let children and pets enter the kitchen.
It is important to ensure that the kitchen is well ventilated during pyrolytic cleaning. Prevent odours from escaping into other rooms.

Risk of injury caused by hot s.
The Dialog oven gets much hotter during pyrolytic operation than during normal use.
Do not let children touch the Dialog oven during pyrolytic cleaning.
■ Select Maintenance Ⓞ.
■ Select Pyrolytic.
■ Select the level required according to the amount of soiling.
■ Confirm with OK.
Follow the instructions in the display.
■ Confirm with OK.
You can start pyrolytic cleaning straight away or schedule it to begin at a later time.
Starting pyrolytic cleaning straight away
■ To start the pyrolytic cleaning programme straight away, select Start now.
■ Confirm with OK.
The pyrolytic cleaning programme will start.
The door will lock automatically. The oven heating and the cooling fan will switch on automatically.
The time left for the pyrolytic cleaning programme will start counting down in the display. It cannot be changed.
You can use the minute minder at the same time as running the cleaning programme. At the end of the minute minder time the buzzer will sound, ⏱ will start flashing and the time can be viewed counting up in the display. When you touch the ⏱ sensor, the acoustic and optical signals will switch off.
Starting pyrolytic cleaning at a later time
■ To start the pyrolytic cleaning programme later, select Start later.
■ Confirm with OK.
■ Set the time at which you want the pyrolytic cleaning programme to start.
■ Confirm with OK.
The door will lock automatically. Start at and the set start time will appear in the display.
You can reset the start time via Change at any point up to the starting time.
As soon as the start time is reached, the oven heating and the cooling fan will switch on automatically. The remaining duration of the programme will appear in the display.
Finalising pyrolytic cleaning
When the remaining time has elapsed, a message will appear in the display to tell you that the door is unlocking.
Process finished will appear in the display and a buzzer will sound as soon as the door has been unlocked.
■ Switch the Dialog oven off.
The visual and acoustic signals will switch off.
⚠️ Risk of injury caused by hot surfaces.
At the end of the Pyrolytic cleaning programme, the Dialog oven will still be very hot. You could burn yourself on the heating elements, the oven compartment, or accessories.
Allow the heating elements, oven compartment and accessories to cool down before removing any pyrolytic residues and before oiling the shelf runners.
■ Clean the oven compartment and accessories suitable for Pyrolytic cleaning to remove any pyrolytic residues (e.g. ash) that can build up depending on the degree of soiling in the oven compartment.
■ Add a few drops of heat-resistant cooking oil to some paper towels and use this to lubricate the shelf runners.
Most residues can be removed with warm water, a little washing-up liquid and a clean sponge or a clean, damp microfibre cloth.
There is a delicate fibreglass seal around the front of the oven compartment to provide a seal for the oven door. This can be damaged by rubbing or scouring. If possible, you should avoid cleaning this seal.
Enamelled surfaces can be permanently discoloured by spilled fruit juice. Such discolouration does not affect the properties of the enamel. Do not attempt to remove these marks.
Pyrolytic cleaning interrupted
The following events will cause the pyrolytic cleaning programme to stop:
- You switch the Dialog oven off.
- A power cut.
If pyrolytic cleaning is cancelled, the oven door will remain locked until the temperature inside the oven drops to below 280 °C.
If you switch the Dialog oven off, Switch appliance off? will appear in the display.
■ If you want to cancel the pyrolytic cleaning programme, select Yes.
The door will unlock as soon as the temperature in the oven drops below 280 °C and the Dialog oven will switch off.
■ If you want the pyrolytic cleaning programme to continue, select No.
The pyrolytic cleaning programme will then continue.
If there has been a power cut, Pyrolytic -cancelled will appear in the display once power is restored.
The door will unlock as soon as the temperature in the oven drops below 280 °C.
A buzzer sounds and Process finished appears.
■ Select the sensor.
■ Start the pyrolytic cleaning programme again.
Descale
The frequency of descaling will depend on how often you use the Moisture Plus function.
The descaling process can be run at any time.
However, to ensure that the oven functions correctly, you will be automatically prompted to run the descaling process for the steam injection system after a certain number of programmes.
The oven will count down in the display the last 10 programmes that can be run before it needs to be descaled. You will then not be able to run any function or Automatic programme using moisture.
These functions can only be used again after you have carried out the descaling process. All other functions and Automatic programmes without moisture can still be used.
Descaling process sequence
Once the descaling process has been started it must be completed through to the end. It cannot be cancelled.
The descaling process takes approx. 90 minutes and consists of several steps:
- Preparing the descaling process
- Drawing in the descaling solution
- Activation phase
- Rinse 1
- Rinse 2
- Rinse 3
- Evaporating residual moisture
Preparing the descaling process
Risk of damage from spilt descaling solution.
Sensitive surfaces and/or natural floors can suffer damage.
Wipe up any spillages of descaling agent immediately.
You will need a container of approx. 1 litre capacity.
A plastic tube (with suction cup) is supplied with your oven so that you do not have to hold the container with the descaling agent underneath the water intake pipe.
We recommend using the descaling tablets supplied. They have been specially developed for Miele appliances for optimum cleaning results.
Useful tip: Miele descaling tablets are available to order from the Miele online shop or directly from Miele.
Other descaling agents, which contain other acids besides citric acid and/or other undesirable substances, such as chlorides, could cause damage.
Moreover, the descaling result required cannot be guaranteed if the descaling solution does not have the appropriate concentration.
■ Fill the container with approx. 600 ml of cold tap water and thoroughly dissolve one descaling tablet in it.
Starting the descaling process
■ Select Maintenance Ⓞ.
■ Select Descale.
If the functions and Automatic programmes that use moisture injection are already disabled, the descaling process can be started immediately by touching OK.
■ Place the universal tray on the top shelf level to collect the descaling solution after it has been used. Confirm the message shown with OK.
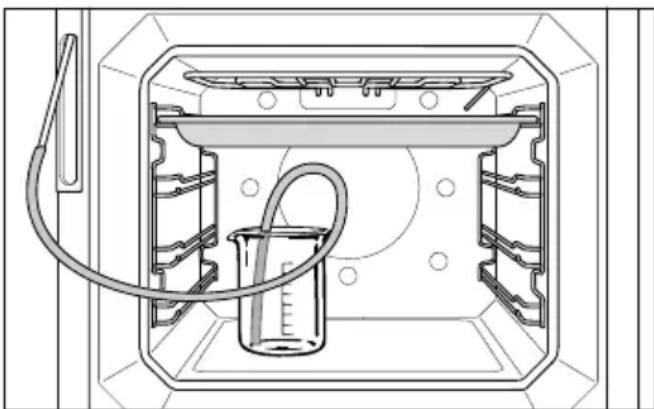
natural_image
Technical line drawing of a laboratory apparatus with a beaker and tubing (no text or symbols)■ Place the container with the descaling solution on the floor of the oven.
■ Attach one end of the plastic tube to the water intake pipe. Place the other end of the plastic tube in the bottom of the descaling solution container and secure the plastic tube to the container with the suction cup.
■ Confirm with OK.
The water intake process will begin. You will hear the noise of the pump.
The intake process can be interrupted and restarted at any time by selecting Stop or Start.
The amount of descaling solution specified can be more than the amount which is actually taken in. Some of the solution may therefore be left in the container at the end of descaling.
A message will appear in the display when the intake process is finished.
■ Confirm with OK.
The activation phase will begin. You can follow the duration as it counts down.
■ Leave the container with the tube connected to the water intake pipe in the oven. Top the container up with approx. 300 ml of water, as the system will need to draw in more liquid during the activation phase.
The system will take in more liquid at approximately 5-minute intervals. You will hear the noise of the pump.
The cooling fan remains switched on for the whole duration of the process.
A buzzer will sound at the end of the activation phase.
Rinsing the steam injection system after the activation phase
At the end of the activation phase the steam injection system will need to be rinsed out to remove all traces of descaling solution.
Cleaning is carried out by flushing approx. 1 litre of fresh tap water through the system three times. The water is collected in the universal tray.
■ Take the universal tray with the collected descaling agent out of the oven and empty it. Place the tray back in the oven again on the top shelf level.
■ Remove the plastic tube from the container.
■ Remove the container, rinse it out thoroughly and fill it with approx. 1 litre of fresh tap water.
■ Place the container back in the oven, insert the plastic tube, secure it to the container and close the door.
■ Confirm with OK.
The intake process for the first rinse will start.
Water will be flushed through the steam injection system and will then collect in the universal tray.
Messages will appear in the display to prepare for the second rinse.
■ Take the universal tray out of the oven and empty it. Place the tray back in the oven again on the top shelf level.
■ Remove the plastic tube from the container. Fill it with approx. 1 litre of fresh tap water.
■ Place the container back in the oven, insert the plastic tube and secure it to the container.
■ Confirm with OK.
■ Do the same for the third rinse.
Leave the universal tray (with the water which has collected in it from the third rinse) on the top oven shelf while the evaporation process takes place.
Evaporating residual moisture
After the third rinse residual moisture evaporation will begin.
■ Remove the container and tube from the oven.
■ Close the door.
■ Confirm with OK.

Danger of injury caused by
Steam can cause severe scalding.
Do not open the door while the residual moisture is being evaporated.
The oven heating will switch on and the duration of the evaporation process will count down in the display.
During the evaporation process, the duration may be adjusted by the system according to how much water is currently present.
Finalising the descaling process
At the end of the evaporation process a message will appear in the display with advice on cleaning after running the descaling programme.
■ Confirm with OK.
A buzzer sounds and Process finished appears.
■ Switch the Dialog oven off with the On/Off ⏻ sensor.

Risk of injury caused by hot s.
The Dialog oven gets hot when it is being used. You could burn yourself on the heating elements, the oven compartment, or accessories.
Allow the heating elements, oven compartment and the accessories to cool before manual cleaning.
■ Remove the universal tray with the collected liquid and empty it.
■ When the oven compartment has cooled down, clean away any condensation and descaling agent residues.
■ Leave the oven door open until the oven interior is completely dry.
Many malfunctions and minor faults that can occur in daily operation can be corrected without contacting Miele. This will save you time and money because you will not need a service call.
You can find information on how to remedy faults yourself at www.miele.com/service.
Please note, however, that a call-out charge will be applied to unnecessary service visits where the problem could have been rectified as described in these operating instructions.
| Problem Possible cause and remedy | |
| The display is dark. | You have selected the QuickTouch | Off setting. When the Dialog oven is switched off, the display is switched off.■ As soon as the Dialog oven is switched on, the main menu will appear. If you want the time of day to be displayed constantly, select QuickTouch | On with time. |
| There is no power to the Dialog oven.■ Check that the Dialog oven plug is correctly inserted into the socket and switched on.■ Check if the circuit breaker has tripped. Contact a qualified electrician or Miele. | |
| The signal tone does not sound. | The buzzers are deactivated or set at too low a volume.■ Switch on the buzzers or increase the volume with Settings | Volume | Buzzer tones. |
| The oven does not heat up. | Demo mode is active.You can select menu options in the display and the sensors, but the oven heating does not work.■ Deactivate demo mode by selecting Settings | Showroom programme | Demo mode | Off. |
| System lock 🔒 appears in the display when the oven is switched on. | The system lock 🔒 has been switched on.■ You can deactivate the system lock for a cooking programme by touching the 🔒 symbol for at least 6 seconds.■ If you want to permanently deactivate the system lock, select the Safety | System lock 🔒 | Off setting. |
| Power cut -process cancelled appears in the display. | There has been a brief power cut. This has caused the current cooking programme to stop.■ Switch the Dialog oven off and then back on again.■ Restart the cooking programme. |
| 12:00 appears in the display. | The power supply was interrupted for longer than 200 hours.■ Reset the time and date. |
| Maximum operating hours reached appears in the display. | The Dialog oven has been operating for an unusually long time. This has triggered the safety switch-off function.■ Confirm with OK. Touch the → sensor control to delete the message Process finished.The Dialog oven is ready to use again. |
| F32 appears in the display. | The door lock for pyrolytic cleaning has not locked.■ Switch the Dialog oven off and then back on again.Start the pyrolytic cleaning programme again.■ If the message appears again, contact Miele. |
| F33 appears in the display. | The door lock for pyrolytic cleaning has not opened.■ Switch the Dialog oven off and then back on again.■ If the door lock still does not deactivate itself, contact Miele. |
| ⚠️ and a fault code not listed here appears in the display. | A fault has occurred that you cannot resolve.■ Call Miele. |
| Function currently not available appears in the display after selecting the Descale function. | The steam injection system is faulty.■ Call Miele. |
| Moisture control faulty -Automatic programmes will operate without moisture appears in the display after selecting an Automatic programme. | The steam injection system is faulty.■ Call Miele.Automatic programmes can be run without using moisture. |
| Programmes using moisture will not take in water. | Demo mode is active. You can select menu options in the display and the sensors, but the steam injection system pump will not work.■ Deactivate demo mode by selecting Settings | Showroom programme | Demo mode | Off. |
| The pump for the steam injection system is faulty.■ Call Miele. | |
| During a cooking process with an M Chef function, the cooling fan is running with very high rpm. | The Dialog oven can get much hotter when using M Chef functions than it does with conventional functions. The speed will reduce automatically at the end of the cooking process.■ If it happens too frequently, check that the appliance is correctly installed (see “Installation”). |
| With very small amounts of food in the oven (e.g. baking 2 rolls) the dialog oven will heat up more than it would with larger amounts of food.■ It is better to cook larger amounts of food. | |
| A noise can be heard after a cooking process. | The cooling fan remains switched on after a cooking programme (see “Settings – Cooling fan run-on”). |
| The Dialog oven has switched itself off. | The Dialog oven will switch itself off automatically to save energy if no other action is taken within a certain time frame after switching it on or after the end of a cooking programme.■ Switch the Dialog oven back on again. |
| The food is unevenly cooked. | If food has browned too much in certain places, the temperature selected was too high.■ Select a lower temperature. |
| If there are hard bits or dry areas on the food, the intensity was set too high.■ Set a lower intensity level or set fewer Gourmet Units. | |
| Cakes and biscuits are not cooked properly after the duration given in the cooking chart. | A different temperature from the one given in the recipe has been used.■ Select the temperature required for the recipe. |
| The ingredient quantities used are different from those given in the recipe.■ Check whether you have amended the recipe. The addition of more liquid or more eggs makes a moister mix which would take longer to cook. | |
| The food is not sufficiently browned after adding the set number of Gourmet Units. | A temperature has been set that is too low.■ Select a higher temperature. For a more intensive browning level, finish cooking the food using a conventional function without Gourmet Units. |
| The browning of baked goods is uneven. | The wrong temperature or shelf level was selected.■ There will always be a slight unevenness in browning. If browning is very uneven, check whether the correct temperature and shelf level were selected. |
| The material or colour of the baking tin is not suitable for the oven function.■ Light-coloured and shiny bakeware is not very suitable for the M Chef + Conventional Heat [IMAGE] and Conventional Heat [IMAGE] functions. Dark, matte tins are best for baking.■ It is best to use metal baking tins with M Chef functions if possible. Baking tins made from silicone, glass or ceramic and baking tins with a silicone underlay may prevent the underside browning sufficiently. | |
| The catalyser for odour reduction is switched on. This can lead to an uneven browning result on more delicate food such as sponge cakes and biscuits.■ Select the Catalyser | Off setting. | |
| There is still soiling in the oven compartment after a pyrolytic cleaning programme. | The pyrolytic cleaning programme burns off soiling in the oven and leaves it as ash.■ Remove the ash using a damp microfibre cloth or a clean sponge and a solution of hot water and washing-up liquid. If there is still coarse soiling left in the oven after the pyrolytic cleaning programme, you should start the programme again, selecting a higher level if necessary. |
| The accessories make noises when being pushed into or pulled out of the oven. | The pyrolytic resistant surface of the shelf runners creates friction when accessories are being pushed into or pulled out of the oven.■ To reduce the friction, add a few drops of heat-resistant cooking oil to some paper towels and use this to lubricate the shelf runners. Repeat this after every pyrolytic cleaning programme. |
| The oven lighting does not switch on. | The oven interior lighting is faulty.■ Call Miele. |
You can find information on how to remedy faults yourself and about Miele spare parts at www.miele.com/service.
Contact in case of fault
In the event of any faults which you cannot remedy yourself, please contact Miele.
You can book a Miele customer service call-out online at www.miele.com.au/service or www.miele.co.nz/service.
Contact information for Miele can be found at the end of this booklet.
Please quote the model and serial number of your appliance when contacting Miele. This information can be found on the data plate.
This information is given on the data plate, visible on the front frame of the oven, with the door fully open.
Warranty
The manufacturer's warranty for this appliance is 2 years.
For further information, please refer to your warranty booklet.
Building-in dimensions
Dimensions are given in mm.
Installation in a tall or base unit
If the Dialog oven is to be installed in a base unit underneath a cooktop, please also observe the installation instructions for the cooktop as well as the building-in height required for the cooktop.
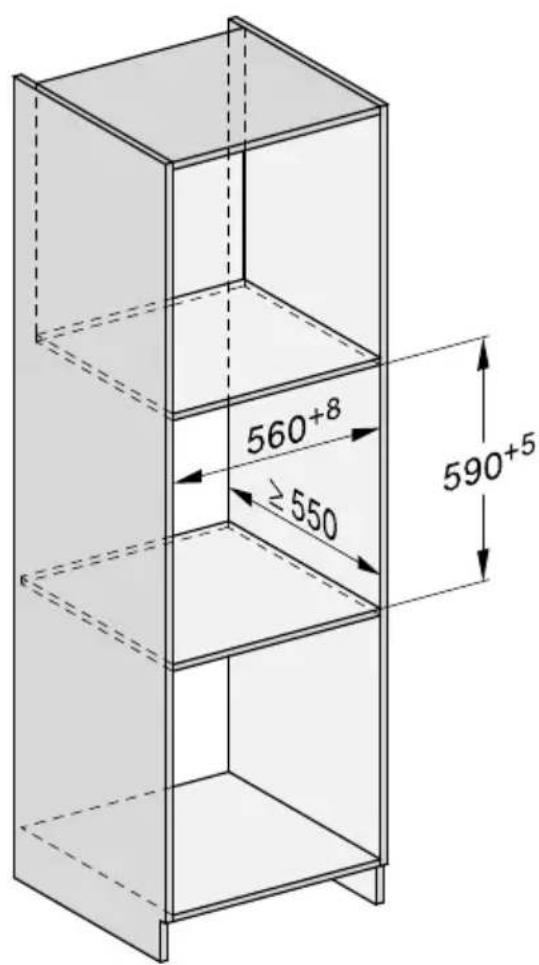
text_image
560+8 ≥550 590+5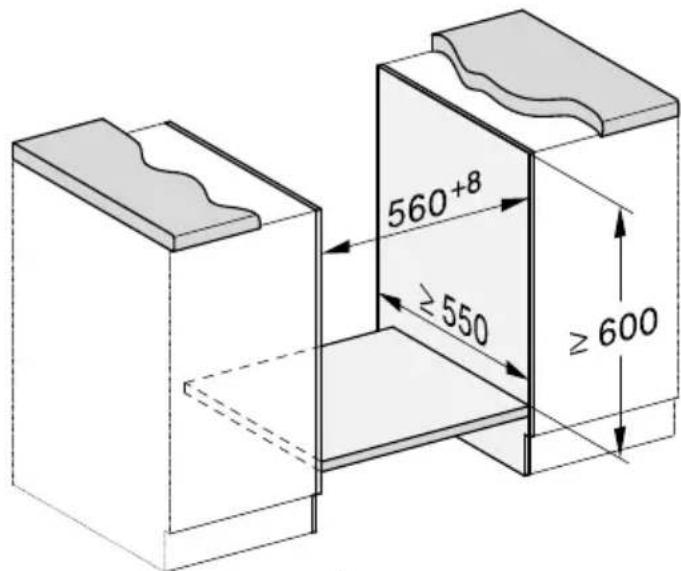
text_image
560+8 ≥550 ≥600
natural_image
3D diagram of a rectangular block with a dimension label '595' on its side (no other text or symbols)Side view
text_image
581 111.5 47 473.5 592 596 546 22 ≥2 4Connections and ventilation
text_image
596 27.3 230 595 ① ② ③ 35 ④
text_image
3 35 4 35① Front view
② Mains connection cable, length = 2000 mm
③ No connections permitted in this area
④ Ventilation cut-out, min. 150 cm ^2
Installing the Dialog oven
For safety reasons, the Dialog oven must only be used after it has been built in.
The Dialog oven requires a sufficient supply of cool air for efficient operation. The required supply of cool air must not be excessively heated by other heat sources (e.g. solid fuel stoves).
The following must be observed when installing the appliance:
Do not fit a back panel in the housing unit.
Ensure that the interim shelf that the Dialog oven sits on does not touch the wall.
Do not fit heat insulation strips to the side walls of the housing unit.
■ Before starting installation work, ensure that there is no power to the socket.
■ Connect the Dialog oven to the electrical supply.
Lifting the Dialog oven by the door handle could cause damage to the door.
Use the handle cut-outs on the side of the casing to lift the appliance.
■ Push the Dialog oven into the housing unit and align it.
■ Open the door.
text_image
Technical diagram showing mechanical assembly steps with labeled components and directional arrows■ Pull the water intake pipe forwards (located below the control panel on the left).
- Secure the Dialog oven to the side walls of the housing unit using the screws supplied.
Electrical connection
The Dialog oven is supplied with a mains connection cable and plug, ready for connection to a 50 Hz, 220–240 V supply.
The fuse rating must be at least 16 A.
The appliance must only be connected to a correctly installed earthed socket. All electrical work must be carried out by a suitably qualified and competent person in strict accordance with national and local safety regulations.
Ensure that the plug and switched socket are accessible at all times.
If the appliance is hardwired or if the switch is not accessible after installation, an additional means of disconnection must be provided.
Suitable means of disconnection include accessible switches with an all-pole contact gap of at least 3 mm. These include circuit breakers, fuses and contactors.
Voltage, rated load and fuse rating are given on the data plate situated at the front of the oven compartment. Please ensure the connection data matches the household supply.
When contacting Miele, please quote the following:
- Model number
- Serial number
- Connection data (voltage/frequency/maximum rated load)
If the mains connection cable is damaged, a new one must be fitted by a service technician authorised by Miele.
This Dialog oven complies with European Standard EN 55011. This appliance is classified as a Group 2, class B product.
Group 2 appliances use high frequency energy in the form of electro-magnetic waves to create heat in food.
Class B is assigned to appliances that are suitable for domestic use.
Temporary or permanent operation with a self-sufficient or non-mains synchronous energy supply system (e.g. isolated networks, back-up systems) is possible. A requirement for the operation is that the energy supply system complies with all current local and national requirements that apply to stand-alone, solar and/or battery systems.
The protective measures provided in the domestic installation and in this Miele product must also be assured in their function and operation in isolated operation or in non-mains synchronous operation, or replaced with equivalent measures in the installation.
Creamed mixture
| Cakes/biscuits (accessories) | [°C] | GU | INT | CF | ||||
| Muffins (tray) | 165 √ | 2 | 150 || | 25-3 | 5 - | |||
| 150-160 | - | 2 | - | - | 40-50 | - | ||
| Small cakes (1 tray) | 150 | - | 2 | - | - | 30-40 | - | |
| 170^1 | -2 | -- | 5-25 | - | ||||
| Small cakes (2 trays) | 150^1 | -2 | +3 | -30 | -40 | |||
| Madeira cake (loaf tin, 30 cm) | 170 - 2 | -- | 3 | 5-45 | - | ||||
| 160-170^1 | -2 | -- | 60-70 | - | ||||
| Marble cake (loaf tin, 30 cm/ring cake tin, ∅ 26 cm) | 200 | - | 2 | 200 | ||| | 30-40 | - | |
| 170-180 | - | 2 | - | - | 60-70 | - | ||
| Marble cake (Gugelhupf cake tin, ∅ 26 cm) | 200 | - | 2 | 250 | ||| | 30-40 | - | |
| 170-180 | √ | 2 | - | - | 60-70 | - | ||
| Nut cake (loaf tin, 30 cm) | 160 - 2 | 250 | || | 50-60 | √ | |||
| 150-160 | - | 2 | - | - | 65-75 | - | ||
| Nut cake (ring cake tin/ Gugelhupf cake tin, ∅ 26 cm) | 160 | √ | 2 | 270 | ||| | 40-50 | - | |
| 150-160 | √ | 2 | - | - | 65-75 | - | ||
| Ring cake (Gugelhupf cake tin, ∅ 26 cm) | 180 | - | 2 | 280 | ||| | 55-65 | - | |
| 150-160 | - | 2 | - | - | 80-90 | - | ||
| Fresh fruit cake (tray) | 180 - 2 | 220 | || 25- | 35 √ | ||||
| 160-170 - 1 | -- 40 | -50 | √ | |||||
| Fresh fruit cake (springform cake tin, ∅ 26 cm) | 160 √ | 2 | 300 || | 40-50 | √ | |||
| 160-170 - 2 | -- 55 | -65 | √ | |||||
| Flan base (flan base tin, ∅ 28 cm) | 160-170 | - | 2 | - | - | 30-40 | - | |
☐ Function, ⚙ Temperature, ⚙↑ Rapid Heat-up or Pre-heat (depending on function),
^4_1 Shelf level, GU Gourmet Units, INT Intensity (| Gentle, || Medium, || Strong), + Duration, CF Crisp function, = M Chef + Fan Plus, = Fan Plus, = M Chef + Conventional Heat,
☐ Conventional Heat, √ On, - Off, -- No value set
1 Pre-heat the oven before placing the food inside.
Rubbed in mixture
| Cakes/biscuits (accessories) | [°C] | GU | INT | CF | ||||
| Cookies (1 tray) | 150–160 | - | 2 | - | - | 25–35 | - | |
| Cookies (2 trays) | 150–160 | -2 | +3-- | 25–35^2 | - | |||
| Drop cookies (1 tray) | 140 | - | 2 | - | - | 18–25 | - | |
| 160^1 | -3 | --25–30 | - | |||||
| Drop cookies (2 trays) | 140–2 | +3-- | 60–70^2 | - | ||||
| Flan base (flan base tin,∅28 cm) | 180–190^1 | -2 | --20–30 | - | ||||
| Cheesecake (springform cake tin,∅26 cm) | 155–2 | 200 | 55–65 | - | ||||
| 150–160 | - | 2 | - | - | 85–95 | - | ||
| Apple cake (springform cake tin,∅20 cm) | 170 | - | 2 | - | - | 90–100 | - | |
| 180 | - | 2 | - | - | 70–80 | - | ||
| Apple pie (springform cake tin,∅26 cm) | 180–2 | 300 | 40–50 | √ | ||||
| 170–180 | - | 2 | - | - | 65–75 | - | ||
| Fresh fruit cake (springform cake tin,∅26 cm) | 170–2 | 300 | 45–55 | - | ||||
| 160–170 | - | 2 | - | - | 65–75 | - | ||
| Fresh fruit cake, glazed (tray) | 180–2 | 250 | 50–60 | √ | ||||
| 160–170 | -2 | --65–75 | √ | |||||
| Swiss fruit tart (tray) | 210–220 | √ | 1250||| | 35–45 | √ | |||
| 190–200 | -2 | --55–65 | √ |
☐ Function, 🔊 Temperature, 🔊↑ Rapid Heat-up or Pre-heat (depending on function),
_1^4 Shelf level, GU Gourmet Units, INT Intensity (| Gentle, || Medium, || Strong), ⊙ Duration,
CF Crisp function, ☐ M Chef + Fan Plus, ☐ Fan Plus, ☐ M Chef + Conventional Heat,
☐ Conventional Heat, ☐ M Chef + Intensive Bake, ☐ Intensive Bake, √ On, – Off
^1 Pre-heat the oven before placing the food inside.
^2 Take the baking trays out of the oven early if the food has already browned sufficiently before the specified cooking time has elapsed.
Yeast dough
| Cakes/biscuits (accessories) | [°C] | GU | INT | [min.] | CF | |||
| Bundt cake (Bundt cake tin, ∅ 24 cm) | 180 - 2 | 180 | | 40-50- | |||||
| 170-180 | - | 2 | - | - | 55-65 | - | ||
| Christmas Stollen | 170 - 2 | 180 | | 40-50- | |||||
| 150-160 | - | 2 | - | - | 70-80 | - | ||
| Streusel cake with/without fruit (tray) | 190 | - | 2 | 200 | || | 35-40 | √ | |
| 170-180 | - | 2 | - | - | 45-55 | √ | ||
| Fresh fruit cake (tray) | 190 - 3 | 200 | | 35-40 | √ | ||||
| 200 | √ | 3 | - | - | 45-55 | √ | ||
| Raisin whirls (tray) | 180 | √ | 2 | 140 | || | 20-30 | - | |
| 160-170 | - | 2 | - | - | 35-45 | - | ||
| White bread (free form), in 2 cooking stages | 200 | √ | 2 | -100 | -|| 20-30 | 12^4 | - | |
| White bread (loaf tin, 30 cm) | 200 | √ | 2 | 170 | |||| | 30-40^5 | - | |
| Wholegrain bread (loaf tin, 30 cm), in 2 cooking stages | 220 180^2 | √- | 2-- | 25^5 25-35 | - | |||
| Proving yeast dough | 30-35 | - | _3 | -- | 15-60 | - |
☐ Function, 🔊 Temperature, 🔊↑ Rapid Heat-up or Pre-heat (depending on function),
^4_1 Shelf level, GU Gourmet Units, INT Intensity (| Gentle, || Medium, || Strong), ⊕ Duration,
CF Crisp function, ☐ M Chef + Fan Plus, ☐ Fan Plus, ☐ M Chef + Conventional Heat,
Conventional Heat, Moisture Plus with method of heating Fan Plus, Moisture
Plus with method of heating Conventional Heat, √ On, – Off
1 Continue cooking with the new function.
^2 Reduce the temperature after the specified cooking duration and continue cooking.
3 Place the rack on the floor of the oven, and stand the bowl with the dough on the rack.
4 2 bursts of steam | Manual: Release the first burst of steam straight after placing the food in the oven and the second burst of steam after 5 minutes.
^5 2 bursts of steam | Time-controlled: Release the first burst of steam 1 minute after placing the food in the oven and the second burst of steam after 7 minutes.
Quark dough
| Cakes/biscuits (accessories) | [°C] | GU | INT | CF | ||||
| Streusel cake with/without fruit (tray) | 190-3 | 200 | | 35-40 √ | |||||
| 170-180-3 | --4 | 5-55 √ | ||||||
| Apple turnovers (tray) | 180-2 | 130 | | 20-30 - | |||||
| 160-170 | - | 2 | - | - | 30-40 | - | ||
☐ Function, ⚙ Temperature, ⚙↑ Rapid Heat-up or Pre-heat (depending on function),
^4_1 Shelf level, GU Gourmet Units, INT Intensity (| Gentle, || Medium, || Strong), ⊕ Duration,
CF Crisp function, ☐ M Chef + Fan Plus, ☐ M Chef + Conventional Heat,
☐ Conventional Heat, √ On, - Off
Sponge mixture
| Cakes/biscuits (accessories) | [°C] | GU | INT | CF | ||||
| Sponge cake base (2 eggs, springform cake tin, ∅ 26 cm) | 180 - 2 | 70 || | 15-2 | 0 - | ||||
| 170-180 | - | 2 | - | - | 25-30 | - | ||
| Sponge cake base (4-6 eggs, springform cake tin, ∅ 26 cm) | 180 √ | 2 | 50 || | 20-25 | √ | |||
| 170-180^1 | -2 | -- | 40-50 | √ | ||||
| Whisked sponge (springform cake tin, ∅ 26 cm) | 170-180 | - | 2 | - | - | 30-40 | - | |
| 160-170^1 | -2 | -- | 25-35 | - | ||||
| Sponge cake base (tray) | 180-190 | √ | 2 | - | - | 15-20 | - |
☐ Function, ⚙ Temperature, ⚙↑ Rapid Heat-up or Pre-heat (depending on function),
_1^4 Shelf level, GU Gourmet Units, INT Intensity (| Gentle, || Medium, || Strong), ⏻ Duration,
CF Crisp function, ☐ M Chef + Fan Plus, ☐ Fan Plus, ☐ M Chef + Conventional Heat,
☐ Conventional Heat, √ On, – Off
^1 Pre-heat the oven before placing the food inside.
Choux pastry, puff pastry, meringue
| Cakes/biscuits (accessories) | [°C] | GU | INT | CF | ||||
| Choux buns (tray) | 190 - 2 | 350 | || 30-40 √ | |||||
| 190^1 | -2 | -- 35-45 √ | ||||||
| Pastry puffs (tray) | 210 √ | 2 | 130 ||| 15-25 - | |||||
| 180-190 | - | 2 | - | - | 30-40 | - | ||
| Macaroons (1 tray) | 120-130 | -2 | -- 40-50 √ | |||||
| Macaroons (2 trays) | 120-130 | -2+3--45-55 √ | ||||||
| Apple strudel (tray) | 220^1 | -2 | 120 ||| 30-40 √ | |||||
| 200-210^1 | -2 | -- 45-55 √ | ||||||
☐ Function, ⚙ Temperature, ⚙↑ Rapid Heat-up or Pre-heat (depending on function),
^4_1 Shelf level, GU Gourmet Units, INT Intensity (| Gentle, || Medium, || Strong), ⓣ Duration,
CF Crisp function, ☐ M Chef + Fan Plus, ☐ Fan Plus, ☐ M Chef + Conventional Heat,
☐ Conventional Heat, √ On, - Off
^1 Pre-heat the oven before placing the food inside.
Savoury snacks
| Food (accessories) | [°C] | GU | INT | CF | ||||
| Savoury flan, shortcrust pastry (tray) | 240 √ | 2 2 | 20 ||| | 25-3 | 5 √ | |||
| 200-210 | √ | 2 - | -45 | -55 √ | ||||
| Onion tart (tray) | 190 √ | 2 2 | 50 || | 35-45 | √ | |||
| 180-190 | √ | 2 - | -50 | -60 √ | ||||
| Pizza, yeast dough (tray) | 220 √ | 2 1 | 00 || | 25-35 | √ | |||
| 200-210^3 | -2 | -- | 35-45 | √ | ||||
| Pizza, quark dough (tray) | 200-210^3 | -3 | -- | 35-45 | √ | |||
| Toast (rack) | 300^4 | √ | 3 -- | -5-8 | - | |||
| Baked dishes/gratins (e.g. toast) (rack on universal tray) | 250^4 | √ | 3 -- | -4-7 | - | |||
| Grilled vegetables (rack and universal tray)^1 | 275^4 | √ | 4/3 | -- | 5-10^5 | - | ||
| Corn on the cob (rack on universal tray) | 300^4 | √ | 3 -- | 15-25^6 | - |
☐ Function, 🔊 Temperature, 🔊↑ Rapid Heat-up or Pre-heat (depending on function), ☐ Shelf level, GU Gourmet Units, INT Intensity (| Gentle, || Medium, || Strong), ⏻ Duration, CF Crisp function, ☑ M Chef + Conventional Heat, ☐ Conventional Heat, ☑ Full Grill, √ On, – Off
^1 Place the rack on shelf level 4 and the universal tray on shelf level 3.
2 Depending on the amount, you can also use the Economy Grill ☐ function.
^3 Pre-heat the oven before placing the food inside.
^4 Pre-heat the oven for 5 minutes before placing the food inside.
^5 Turn the food halfway through cooking.
^6 Rotate the food several times during the cooking programme.
Beef
| Food (accessories) | GU | INT | ||||||
| Braised beef, approx. 1 kg (oven dish with lid) | 150-160 | √ | 2-- | 130-140^6 | -- | |||
| Fillet of beef (rare), approx. 1.3 kg (rack on universal tray) ^1 | 120^3 | √ | 2 | 60 | 3 | 0-40 | 45-48 | ||
| 130^3 100^4 | √ | 2 | --50 | -60 | 45-48 | |||
| Fillet of beef (medium), approx. 1.3 kg (rack on universal tray) ^1 | 120^3 | √ | 2 | 60 | 5 | 5-65 | 54-57 | ||
| 130^3 100^4 | √ | 2 | --11 | 0-12 | 0 54-57 | |||
| Fillet of beef (well-done), approx. 1.3 kg (rack on universal tray) ^1 | 120^3 | √ | 2 | 60 | 1 | 30-1 | 40 63-66 | ||
| 130^3 100^4 | √ | 2 | --20 | 0-21 | 0 63-66 | |||
| Sirloin joint (rare), approx. 1 kg (rack on universal tray) ^1 | 120^3 | √ | 2 | 70 | 3 | 0-40 | 45-48 | ||
| 130^3 100^4 | √ | 2 | --50 | -60 | 45-48 | |||
| Sirloin joint (medium), approx. 1 kg (rack on universal tray) ^1 | 120^3 | √ | 2 | 70 | 5 | 5-65 | 54-57 | ||
| 130^3 100^4 | √ | 2 | --11 | 0-12 | 0 54-57 | |||
| Sirloin joint (well-done), approx. 1 kg (rack on universal tray) ^1 | 120^3 | √ | 2 | 70 | 1 | 30-1 | 40 63-66 | ||
| 130^3 100^4 | √ | 2 | --20 | 0-21 | 0 63-66 | |||
| Burgers/Rissoles (rack on universal tray) ^1 | 300^5 | √ | 3 | -- | 15-25^7 | -- |
☐ Function, 🔊 Temperature, 🔊↑ Rapid Heat-up or Pre-heat (depending on function),
^4_1 Shelf level, GU Gourmet Units, INT Intensity (| Gentle, || Medium, || Strong), ⓣ Duration,
Core temperature, Fan Plus, M Chef + Conventional Heat, Special application Low temp. cooking, Full Grill, √ On, - Off
^1 Slide the rack and universal tray into the oven during the heating-up phase.
^2 Sear the meat on the cooktop first.
^3 Pre-heat the oven for 15 minutes before placing the food inside.
4 Reduce the temperature after the heating-up phase and continue cooking.
5 Pre-heat the oven for 5 minutes before placing the food inside.
^6 Add approx. 0.25 litres of liquid at the start of the cooking programme and roast with the lid on to start with. Remove the lid 100 minutes into the cooking duration and add around another 0.25 litres of liquid. Continue cooking.
^7 Turn the food halfway through cooking.
Pork
| Food (accessories) | [°C] | GU | INT | [min.] | [°C] | |||
| Pork joint/Pork neck roast, approx. 1.5 kg (roasting dish) | 150 √ | 2 | -- || | 110-120^10 | 85 | |||
| Pork joint/pork neck roast, approx. 1.5 kg (oven dish with lid) | 170–180 | √ | 2 | -- | 120-150^11 | 80–90 | ||
| Pork joint with crackling, approx. 2 kg (roasting dish), in 2 cooking stages | 130250200 60 | -2-80 | -- | 70 | 80–90 | |||
| Pork fillet, approx. 350 g (roasting dish) | 200 √ | 2 | 150 | || 15-25 -- | ||||
| Pork fillet, approx. 350 g (rack on universal tray) ^1 | 130^7 90– 100^8 | -2 | -- | 70–90 | 60–69 | |||
| Gammon joint, approx. 1 kg (dish and rack) | 140 | -2 | 500 | || | 70-80^12 | -- | ||
| Gammon joint, approx. 1 kg (rack on universal tray) ^1 | 130^7 95– 105^8 | -2 | -- | 140–160 63–66 | ||||
| Meat loaf, approx. 1 kg (dish and rack) | 230 √ | 2 | -- || | 40-50^13 | 75 | |||
| Meat loaf, approx. 1 kg (universal tray) | 190–200 | √ | 2 | - | - | 70–80 | 75–85 | |
| Bacon (rack and universal tray) ^2 | 275^9 | √ | 4/3 | - | - | 4–6 | -- | |
| Sausages (rack on universal tray) | 300^9 | √ | 3 | -- | 15-25^14 | -- | ||
☐ Function, 🔊 Temperature, 🔊↑ Rapid Heat-up or Pre-heat (depending on function),
^4_1 Shelf level, GU Gourmet Units, INT Intensity (| Gentle, || Medium, || Strong), ⏻ Duration,
Core temperature, ☐ M Chef + Fan Plus, ☐ Fan Plus, ☐ M Chef + Conventional Heat, ☐ Conventional Heat, ☐ Moisture Plus, ☐ Special application Low temp.
cooking, Full Grill, √ On, – Off, -- No value set
1 Slide the rack and universal tray into the oven during the heating-up phase.
2 Place the rack on shelf level 4 and the universal tray on shelf level 3.
3 3 bursts of steam | Time-controlled: Release the first burst of steam 5 minutes after placing the food in the oven, the second burst of steam after 20 minutes and the third burst of steam after 50 minutes.
Increase the temperature after 50 minutes. Turn the meat, add approx. 0.5 litres of liquid and continue cooking.
4 Change the function after 70 minutes, reduce the temperature and continue cooking.
5 Sear the meat on the cooktop first.
6 Depending on the amount, you can also use the Economy Grill function.
7 Pre-heat the oven for 15 minutes before placing the food inside.
8 Reduce the temperature after the heating-up phase and continue cooking.
9 Pre-heat the oven for 5 minutes before placing the food inside.
^10 After 30 minutes, add approx. 0.5 litres of liquid.
11 Roast with the lid on first. Remove the lid after roasting for 60 minutes and add approx. 0.5 litre of liquid.
^12 Add approx. 0.25 litres of liquid at the start.
^13 After 15 minutes, add approx. 0.25 litres of liquid.
^14 Turn the food halfway through cooking.
Veal
| Food (accessories) | [°C] | GU | INT | [°C] | ||||
| Braised veal, approx. 1 kg (oven dish with lid) | 160 | √ | 2 -- | 120-130^4 | -- | |||
| Fillet of veal (rare), approx. 1 kg (rack on universal tray) ^1 | 120^3 | √ | 2 70 | 30-40 | 45-48 | ||||
| 120^3 | √ | 2 -- 50-60 | 45-48 | |||||
| Fillet of veal (medium), approx. 1 kg (rack on universal tray) ^1 | 120^3 | √ | 2 70 | 55-65 | 54-57 | ||||
| 120^3 | √ | 2 -- 110-12 | 0 54-57 | |||||
| Fillet of veal (well-done), approx. 1 kg (rack on universal tray) ^1 | 120^3 | √ | 2 70 | 130-140 | 63-66 | ||||
| 120^3 | √ | 2 -- 200-21 | 0 63-66 | |||||
| Saddle of veal (rare), approx. 1 kg (rack on universal tray) ^1 | 120^3 | √ | 2 70 | 30-40 | 45-48 | ||||
| 120^3 | √ | 2 -- 50-60 | 45-48 | |||||
| Saddle of veal (medium), approx. 1 kg (rack on universal tray) ^1 | 120^3 | √ | 2 70 | 55-65 | 54-57 | ||||
| 120^3 | √ | 2 -- 110-12 | 0 54-57 | |||||
| Saddle of veal (well-done), approx. 1 kg (rack on universal tray) ^1 | 120^3 | √ | 2 70 | 130-140 | 63-66 | ||||
| 120^3 | √ | 2 -- 200-21 | 0 63-66 | |||||
☐ Function, 🔊 Temperature, 🔊↑ Rapid Heat-up or Pre-heat (depending on function),
^4_1 Shelf level, GU Gourmet Units, INT Intensity (| Gentle, || Medium, || Strong), + Duration,
Core temperature, Fan Plus, M Chef + Conventional Heat, Special application Low temp. cooking, √ On, - Off
^1 Slide the rack and universal tray into the oven during the heating-up phase.
^2 Sear the meat on the cooktop first.
3 Pre-heat the oven for 15 minutes before placing the food inside.
^4 Roast with the lid on first. Remove the lid after roasting for 90 minutes and add approx. 0.5 litres of liquid.
Lamb, game
| Food (accessories) | [°C] | GU | INT | [°C] | ||||
| Leg of lamb on the bone, approx. 1.5 kg (roasting dish) | 150 √ | 2 | 280 | | 80-110^5 | 64-82 | |||
| 170-180 | -2 | --80 | -120 | 64-82 | ||||
| Saddle of lamb, off the bone (rack on universal tray) ^1 | 130^3 95-105^4 | -2 | --40 | -60 | 54-66 | |||
| 180-190^3 | -2 | --15 | -25 | 54-66 | ||||
| Saddle of venison, off the bone (universal tray) | 160-170^3 | -2 | --70 | -90 | 60-80 | |||
| Roebuck saddle, off the bone (universal tray) | 140-150^3 | -2 | --25 | -35 | 60-80 | |||
| Leg of wild boar, off the bone, approx. 1 kg (roasting dish) | 150 √ | 2 | 220 | | 70-90^6 | 75-85 |
☐ Function, 🔊 Temperature, 🔊↑ Rapid Heat-up or Pre-heat (depending on function),
^4_1 Shelf level, GU Gourmet Units, INT Intensity (| Gentle, || Medium, || Strong), ⊙ Duration,
Core temperature, ☐ M Chef + Fan Plus, ☐ Conventional Heat, ☑ Special application Low temp. cooking, √ On, - Off
^1 Slide the rack and universal tray into the oven during the heating-up phase.
2 Sear the meat on the cooktop first.
^3 Pre-heat the oven for 15 minutes before placing the food inside.
^4 Reduce the temperature after the heating-up phase and continue cooking.
^5 Roast with the lid on first. Remove the lid after roasting for 40 minutes and add approx. 0.5 litres of liquid.
^6 Roast with the lid on first. Remove the lid after roasting for 30 minutes and add approx. 0.5 litres of liquid.
Poultry, fish
| Food (accessories) | [°C] | GU | INT | [min.] | [°C] | CF | |||
| Poultry, 0.8–1.5 kg (rack on universal tray) | 230 √ | 2 | -- || 3 | 0–40 | 75 √ | ||||
| 170–180 | 0 – 2 | -- | 55–65 | 80–85 √ | |||||
| Chicken, approx. 1.2 kg (rack on universal tray) | 190^1 | √ | 2 | - | 65–75^3 | -- - | |||
| Poultry, approx. 2 kg (e.g. duck) (roasting dish) | 190 220^2 | - 2 | 350 | || | 90–110^4 | 90 √ | |||
| 180–190 | 0 √ | 2 | -- | 100–120^5 | 85–90 | √ | |||
| Poultry, approx. 4 kg (e.g. goose) (roasting dish) | 160–170 | √ | 2 | - | - | 180–200 | 90–95 | √ | |
| Fish, 200–300 g (e.g. trout) (universal tray) | 200 | √ | 2 | 100 | ||| | 10–20 | 70–75 | - | |
| 220–230 | √ | 2 | -- | 20–30^6 | 70–75 | - | |||
| Trout, 2 pieces weighing 230–250 g each (universal tray) | 225^1 | √ | 2 | - | 12–17^3 | -- - | |||
| Fish, 1–1.5 kg (e.g. Australian salmon, ocean trout) (universal tray) | 225 | √ | 2 | -- | ||| | 20–30 | 70–75 | - |
☐ Function, ⚡ Temperature, ⚡↑ Rapid Heat-up or Pre-heat (depending on function),
☐ Shelf level, GU Gourmet Units, INT Intensity (| Gentle, || Medium, || Strong), ☑ Duration,
Core temperature, CF Crisp function, ☐ M Chef + Fan Plus, ☐ Fan Plus,
☐ Conventional Heat, ☐ Auto Roast, ☑ Fan Grill, ☐ Moisture Plus with method of heating Conventional Heat, √ On, ☐ Full Grill, – Off, -- No value set
^1 Pre-heat the oven for 5 minutes before placing the food inside.
2 Increase the temperature after around 70 minutes and continue cooking.
^3 Turn the food being grilled halfway through the cooking duration.
^4 Add approx. 0.25 litres of liquid at the start. Place the meat breast side down in the roasting dish. Turn the meat after 40 minutes and brush it with salted water after 60 minutes.
^5 Add approx. 0.25 litres of liquid at the start. Turn the meat after 60 minutes.
^6 Manually inject 1 burst of steam 5 minutes into the cooking programme.
The charts on the following pages list the Gourmet Assistant applications in your Dialog oven.
Recipes for items listed in the charts are to be found in the Dialog oven cookbook.
The cooking function is predefined and cannot be changed. The recommended values for temperature, Gourmet Units, intensity and duration can be altered.
If you wish to cook larger or smaller amounts than specified in the recipes, use a correspondingly larger or smaller tray or container, e.g. the round baking tray instead of the universal tray.
Ingredient quantities that differ from those in the recipe are listed accordingly. Otherwise, quantities are as per the recipe.
| Gourmet assistant |
| Cakes |
| Tray-baked cakes |
| Yeast butter cake (recipe: “Yeast butter cake”) |
| Streusel cake with fruit |
| Yeast dough (recipe: “Streusel cake with fruit (Yeast dough)”) |
| Quark and oil dough (recipe: “Streusel cake with fruit (Quark and oil dough)”) |
| Creamed cake |
| Marble cake (recipe for all tins: “Marble cake”) |
| Gugelhupf tin 24 cm (specified quantity of ingredients) |
| Rectangular tin 30 cm (0.7 times the quantity of ingredients) |
| Ring cake tin 26 cm (specified quantity of ingredients) |
| Sand cake (recipe for all tins: “Vanilla sand cake”) |
| Gugelhupf tin 24 cm |
| Rectangular tin 30 cm |
| Ring cake tin 26 cm |
| Bread |
| Focaccia (recipe: “Focaccia”) |
| Round baking tray (0.3 times the quantity of ingredients) |
| Universal tray (specified quantity of ingredients) |
| White bread |
| On tray (recipe: “White bread, fresh”) |
| 800 g (specified quantity of ingredients) |
| 800 g (1.25 times the quantity of ingredients) |
| Rectangular tin 25 cm (recipe: “White herb bread”, 0.8 times the quantity of ingredients) |
| Rectangular tin 30 cm (recipe: “White herb bread”, specified quantity of ingredients) |
| Mixed grain bread (recipe: “Mixed grain bread, fresh”) |
| Rectangular tin 25 cm (0.8 times the quantity of ingredients) |
| Rectangular tin 30 cm (specified quantity of ingredients) |
| Bread rolls |
| Sweet yeast rolls (recipe: “Raisin rolls”) |
| 5 pieces (half the quantity of ingredients) |
| 10 pieces (specified quantity of ingredients) |
| White rolls (recipe: “White rolls, fresh”) |
| 4 pieces (half the quantity of ingredients) |
| 8 pieces (specified quantity of ingredients) |
| Pizza & Quiche |
| Puff pastry parcels (recipe: “Sausage rolls”) |
| 4 pieces (0.7 times the quantity of ingredients) |
| 6 pieces (specified quantity of ingredients) |
| 8 pieces (1.3 times the quantity of ingredients) |
| Pizza (recipe: “Pizza (Yeast dough)”) |
| Baking tray (specified quantity of ingredients) |
| Round baking tray (half the quantity of ingredients) |
| Quiche (recipe: “Quiche Lorraine”) |
| Flan (recipe: “Cheese flan”) |
| Baking tray (double the quantity of ingredients) |
| Round baking tray (specified quantity of ingredients) |
| Meat |
| Poultry |
| Chicken, whole (recipe: “Chicken”) |
| Roast turkey breast (recipe: “Stuffed turkey breast”) |
| Veal |
| Fillet of veal (recipe for all degrees of doneness: “Fillet of veal”) |
| Rare / Medium / Well-done |
| Saddle of veal (recipe for all degrees of doneness: “Saddle of veal”) |
| Rare / Medium / Well-done |
| Beef |
| Fillet of beef (recipe for all degrees of doneness: “Fillet of beef”) |
| Rare / Medium / Well-done |
| Sirloin joint (recipe for all degrees of doneness: “Sirloin joint”) |
| Rare / Medium / Well-done |
| Pork |
| Meat loaf (recipe: “Meat loaf”) |
| Gammon joint (recipe: “Gammon joint”) |
| Pork roast (recipe: “Pork roast”) |
| Fillet of pork |
| Rare / Medium / Well-done |
Gourmet assistant overview
| Gourmet assistant |
| Fish |
| Salmon gratin (recipe: “Salmon gratin”) |
| 2 portions (0.3 times the quantity of ingredients) |
| 4 portions (0.7 times the quantity of ingredients) |
| 6 portions (specified quantity of ingredients) |
| 8 portions (1.3 times the quantity of ingredients) |
| Stuffed Aust. salmon (recipe: “Stuffed Aust. salmon”, without filling) |
| 600–1800 g (adjust quantity of ingredients to suit) |
| Pikeperch fillet (recipe: “Pikeperch on a bed of herbs”) |
| 400–1600 g (adjust quantity of ingredients to suit) |
| Seafood |
| Blue mussels (recipe: “Thai mussels”) |
| 500–2000 g (adjust quantity of ingredients to suit) |
| Bakes/Gratins |
| Potato gratin (recipe: “Potato gratin”) |
| 2 portions (half the quantity of ingredients) |
| 4 portions (specified quantity of ingredients) |
| 6 portions (1.5 times the quantity of ingredients) |
| 8 portions (double the quantity of ingredients) |
| Lasagne (recipe: “Lasagne”) |
| 2 portions (half the quantity of ingredients) |
| 4 portions (specified quantity of ingredients) |
| 6 portions (1.5 times the quantity of ingredients) |
| 8 portions (double the quantity of ingredients) |
| Pasta bake (recipe: “Pasta bake”) |
| 2 portions (half the quantity of ingredients) |
| 4 portions (specified quantity of ingredients) |
| 6 portions (1.5 times the quantity of ingredients) |
| 8 portions (double the quantity of ingredients) |
| Vegetables |
| Ratatouille (recipe: “Ratatouille”) |
| 500–3000 g (adjust quantity of ingredients to suit) |
| Root vegetables (recipe: “Oriental root vegetables”) |
| 500–2500 g (adjust quantity of ingredients to suit) |
Overview of Automatic programmes Auto
The charts on the following pages list the factory-set Automatic programmes on your Dialog oven.
The recipes for these programmes can be found in the Dialog oven cookbook.
| Automatic programmes | |
| M Chef menu | |
| Mince| Vegetables|Rice | |
| Kebab|Cauliflower|Focaccia | |
| Salmon| Chicken|Brioche | |
| Lamb|Veg| Potatoes | |
| Seafood| Salmon|Beef | |
| Ocean trout|Veg |Potatoes | |
| Hapuku| Chicken | |
| Cakes | |
| Apple sponge | |
| Gateau | |
| Yeast butter cake | |
| Prove yeast dough | |
| Caramel apple cake | |
| Cheesecake | |
| Coconut cake | |
| Almond cake | |
| Marble cake | |
| Vanilla sand cake | |
| Chocolate nut cake | |
| Streusel cake with fruit | |
| Yeast dough | |
| Quark and oil dough | |
| Tea cake | |
| Cinnamon macadamia ring | |
| Cookies/Muffins | |
| Biscuits | |
| Raisin whirls | |
| Chocolate cherry muffins | |
| Drop cookies | |
| Vanilla biscuits | |
| Walnut muffins | |
| Choux buns | |
| Bread | |
| Focaccia | |
| Plaited loaf | |
| Marbled plaited loaf | |
| White herb bread | |
| Tiger bread | |
| White bread, fresh | |
| Granary bread | |
| Mixed grain bread, fresh | |
| Mixed grain bread, frozen | |
| Sweet bread | |
| Bread rolls | |
| Croissants | |
| Raisin rolls | |
| Chocolate rolls | |
| White rolls, fresh | |
| White rolls, frozen | |
Overview of Automatic programmes Auto
| Automatic programmes | |
| Pizza & Quiche | |
| Vegetarian flan | |
| Cheese flan | |
| Kohlrabi strudel with lobster | |
| Salmon en croûte | |
| Pizza | |
| Yeast dough | |
| Quark and oil dough | |
| Quiche Lorraine | |
| Spinach parcels | |
| Tomato ricotta quiche | |
| Savoy cabbage strudel | |
| Sausage rolls | |
| Meat | |
| Poultry | |
| Duck | |
| Chicken | |
| Stuffed turkey breast | |
| Veal | |
| Fillet of veal | |
| Saddle of veal | |
| Beef | |
| Fillet of beef | |
| Sirloin joint | |
| Pork | |
| Meat loaf | |
| Gammon joint | |
| Pulled pork | |
| Pork roast | |
| Stuffed fillet of pork | |
| Fillet of pork en croute | |
| Fish | |
| Bream/Snapper with vegetables | |
| Fish in ice | |
| Blue eye trevalla with herb crust | |
| Confit salmon | |
| Salmon pie | |
| Salmon gratin | |
| Stuffed Aust. salmon | |
| Hapuku in salt crust | |
| Pikeperch on a bed of herbs | |
| Seafood | |
| Vegetables and prawns | |
| Confit scallops | |
| Thai mussels | |
| Bakes/Gratins | |
| Chicory gratin | |
| Potato gratin | |
| Lasagne | |
| Moussaka | |
| Pasta bake | |
| Paella | |
| Shepherd's pie | |
| Terrine & Co | |
| Minced meat pie | |
| Chicken and lobster terrine | |
| Salmon terrine | |
Overview of Automatic programmes Auto
| Automatic programmes |
| Vegetables |
| Antipasti |
| Eggplant |
| Champignons |
| Capsicum |
| Baked cauliflower |
| Fennel with Prosecco |
| Mixed vegetables |
| Ratatouille |
| Asparagus |
| Oriental root vegetables |
| Zucchini gratin |
| Desserts |
| Pineapple gratin |
| Baked yeast dumplings |
| Crème caramel |
| Crumble |
| Raspberry soufflé |
| Pumpkin soufflé |
| Key lime pie |
| Chocolate delight |
Miele utilises software for the operation and control of the appliance.
The copyright authorisation of Miele and other software providers (e.g. Adobe) is to be respected at all times.
Miele and its providers reserve all rights to software components.
The following actions are prohibited:
- Reproduction and distribution of the software,
- Generating modifications and derivative versions,
- Decompilation, reverse engineering, disassembling and other reductions of the software.
This product contains Adobe® Flash® Player Software under licence from Adobe Systems Incorporated, Adobe Macromedia Software LLC. Adobe and Flash are registered trademarks of Adobe Systems Incorporated.
Components are integrated in the software which fall under GNU General Public Licence and Open Source licences.
You can obtain an overview of the integrated Open Source components, along with a copy of the relevant licence, at www.miele.com/device-software-licences after entering your appliance's model code.
Miele can provide the source code for all software components licenced under GNU General Public Licence and comparable Open Source licences.
To obtain the relevant source code, please send an e-mail to info@miele.com.
Miele Australia Pty. Ltd.
ACN 005 635 398
ABN 96 005 635 398
Level 4, 141 Camberwell Road
Hawthorn East, VIC 3123
1300 464 353 (1300 4 MIELE)
info@miele.com.au
www.miele.com.au
Miele New Zealand Limited
IRD 98 463 631
8 College Hill
Freemans Bay, Auckland 1011
0800 464 353 (0800 4 MIELE)
customercare@miele.co.nz
www.miele.co.nz
Miele Global Headquarters
Germany
Miele & Cie. KG
Federal Republic of Germany
Miele
DO 7860