Zero Barista - Coffee machine Dalla Corte - Free user manual and instructions
Find the device manual for free Zero Barista Dalla Corte in PDF.


| Product Type | Professional espresso coffee machine |
| Model | Zero Barista |
| Brand | Dalla Corte |
| Number of Groups | 2 or 3 |
| Dimensions (3 groups) | 1090 x 525 x 540 mm (L x H x D) |
| Dimensions (2 groups) | 862 x 525 x 540 mm (L x H x D) |
| Weight (3 groups) | 110 kg |
| Weight (2 groups) | 80 kg |
| Power Supply | 220-240 V~ 50-60 Hz or 380-400 V~ 50-60 Hz |
| Power Consumption | 7000 W |
| Water Supply Connection | 3/8" hose, direct connection to mains |
| Drain Connection | Black spiral tube (included) |
| Functions | Espresso dispensing (single, double, continuous), hot water for tea, steam for milk, cup warming |
| Control Interface | Touch screen display per group, keypad for functions, levers for steam and coffee |
| Programmable Settings | Temperature per group, dose volumes, flow rate, boiler temperature, hot water dose, clock, liter counters |
| Boiler Type | Steam boiler with thermal switches |
| Safety Features | Thermal switches on boiler and pump, residual risk warnings for hot surfaces, mandatory grounding |
| Automatic Cleaning Cycles | Group washing (3 min), boiler washing (30 min) |
| Daily Maintenance | Clean wands, external parts, portafilters, shower heads; run group washing |
| Included Accessories | 3-4 filters, 2 filter holders, blind filter, cleaning cloth, tamper, shower head brush, spanners, hoses, drip tray |
| Intended Use | Professional use by qualified personnel |
| Certification | CE compliant (Machine Directive 2006/42/EC, EMC 2014/30/EU) |
Frequently Asked Questions - Zero Barista Dalla Corte
User questions about Zero Barista Dalla Corte
0 question about this device. Answer the ones you know or ask your own.
Ask a new question about this device
Download the instructions for your Coffee machine in PDF format for free! Find your manual Zero Barista - Dalla Corte and take your electronic device back in hand. On this page are published all the documents necessary for the use of your device. Zero Barista by Dalla Corte.
USER MANUAL Zero Barista Dalla Corte
natural_image
Technical line drawing of a mechanical assembly with no visible text or symbolsOPERATING INSTRUCTIONS
REVISION
MODEL ISSUE DATE REVISION DATE NOTES
"ZERO BARISTA" 0.0 12/2020 00
Congratulations on your purchase of the DALLA CORTE s.r.l. Espresso coffee machine "Zero Classic". Before using the machine, we advise you to read carefully this instruction manual which explains how to use the machine correctly. For any other requests or explanations, please contact your dealer or DALLA CORTE s.r.l. directly.
The reproduction and /or distribution of this Manual, in whole or in part, under any form and without the written consent of DALLA CORTE s.r.l. is strictly prohibited.
DALLA CORTE s.r.l. reserves the right to modify, without prior notice, the characteristics of the appliance described in this Manual.
In case of doubts or difficulty in understanding or interpreting this Document, the original/official version indicated as “ISTRUZIONI ORIGINALI” on the cover is deemed authentic.
The contents of this Manual have been thoroughly checked in order to assure they correspond to the machine described in this Manual.
Some of the images included in this Manual should only be considered as an example.
STRUCTURE OF THE MANUAL
This Manual is divided into 6 chapters.
CHAPTER 1 - GENERAL
This chapter gives the general information concerning the structure of this manual.
CHAPTER 2 - SAFETY
This chapter gives the description of the working principles and gives the general technical data.
CHAPTER 3 - GENERAL DESCRIPTION
This chapter gives the description of the working principles and gives the general technical data.
CHAPTER 4 - TRANSPORT AND INSTALLATION
This chapter gives the instructions for transport and installation of the machine.
CHAPTER 5 - USE
This chapter contains the instructions for commissioning and using the machine. It describes the various machine controls as well as the most important operating sequences and how to use of the diagnostic systems.
CHAPTER 6 - MAINTENANCE
This chapter provides information on the maintenance work to be performed on the machine.
TABLE OF CONTENTS
TABLE OF CONTENTS
1. GENERAL 1-1
1.1 INTRODUCTION.... 1-2
1.1.1 Symbols 1-2
2. SAFETY 2-1
2.1 GENERAL INFORMATION....2-2
2.2 INTENDED AND NON INTENDED USE 2-3
2.3 SAFETY INSTRUCTIONS 2-4
2.4 WORKING ENVIRONMENTAL CONDITIONS 2-7
2.4.1 Fire prevention system 2-7
2.4.2 Vibrations....2-7
2.4.3 Noise level 2-8
ESPRESSO "ZERO BARISTA" COFFEE MACHINES - OPERATING INSTRUCTIONS
2.4.4 Electromagnetic emissions 2-8
2.4.5 Fire prevention system 2-8
2.5 RESIDUAL RISKS 2-9
2.5.1 Residual risks 2-9
3. GENERAL DESCRIPTION....3-1
3.1 MACHINE COMPONENTS....3-2
3.2 MACHINE OUTFIT 3-4
3.3 TECHNICAL SPECIFICATIONS 3-4
4. TRANSPORT AND INSTALLATION 4-1
4.1 TRANSPORT AND INSTALLATION 4-2
4.1.1 Packing....4-2
4.1.2 Removing the packaging.... 4-3
TABLE OF CONTENTS
4.1.3 Installation....4-4
4.1.4 Connection to the water supply 4-5
4.1.5 Connection to the power supply 4-6
5. USE 5-1
5.1 CONTROLS ON MACHINE FRONT 5-2
5.2 KEYPAD FOR FUNCTIONS 5-3
5.3 KEYPAD FOR DISPENSING UNIT - COFFEE 1-2-3 5-3
5.4 DISPLAY FOR DISPENSING UNIT - COFFEE 1 (MAIN) 5-4
5.5 DISPLAY FOR DISPENSING UNIT - COFFEE 2 - 3 5-5
5.6 MAIN MENU OF THE DISPENSING UNIT - COFFE 1 5-6
5.7 MAIN MENU FOR DISPENSING UNIT - COFFEE 2 - 3 5-9
5.8 SETTING THE UNIT 5-12
5.8.1 Temperature 5-13
ESPRESSO "ZERO BARISTA" COFFEE MACHINES - OPERATING INSTRUCTIONS
5.8.2 Doses 5-14
5.8.1 Flow 5-16
5.9 SETTING THE MACHINE .... 5-17
5.9.1 Info 5-20
5.9.2 Boiler temp....5-26
5.9.3 Water-tea doses 5-27
5.9.4 Machine 5-27
5.9.5 Grinder 5-28
5.9.6 Data....5-28
5.9.7 Control panels 5-28
5.9.8 Clock....5-29
5.9.9 Liter counter 5-30
TABLE OF CONTENTS
5.9.10 Maintenance....5-30
5.9.11 Reset....5-30
5.9.12 Test 5-30
5.10 PREPARING A CUP OF ESPRESSO 5-31
5.11 PREPARING HOT MILK 5-32
5.12 HOT WATER DISPENSING 5-33
5.13 CUP HEATING PAD 5-33
5.14 ALARMS 5-34
5.14.1 Group alarms 5-35
5.14.2 Machine alarms 5-37
6. MAINTENANCE....6-1
6.1 CLEANING THE WANDS AND THE EXTERNAL PARTS OF MACHINE....6-2
6.2 CLEANING THE REMOVABLE PARTS 6-3
ESPRESSO "ZERO BARISTA" COFFEE MACHINES - OPERATING INSTRUCTIONS
6.3 CLEANING THE DISPENSING GROUP....6-4
6.4 BOILER WASHING....6-6
1. GENERAL
1.1 INTRODUCTION
Dalla Corte s.r.l. thanks you for having purchased its product.
Before using the machine, we advise you to read carefully this instruction manual in order to use and maintain it correctly.
In case of doubts or further explanations, please contact your dealer or Dalla Corte After-Sale Service.
Please keep this instruction manual in a safe place for further consultation. For any possible information or problems, please contact the competent personnel.
1.1.1 Symbols
| SYMBOL MEANING NOTES | ||
 | DANGER | Indicates a risk of accident/injury for the user. Pay maximum attention to the texts preceded by this symbol. |
 | ATTENTION | It warns against a possible deterioration /damage to the machine. Pay maximum attention to the texts preceded by this symbol |
 | WARNING NOTE | It is a warning for some key functions or useful information. Pay maximum attention to the texts preceded by this symbol. |
The manufacturer assumes no liability for any possible damage resulting from:
- Use of the machine not in accordance with the intended purposes;
- Use of non-genuine spare parts or accessories;
- Tampering with the power cord; • Repair not performed by the authorized service centers;
- Tampering with any other parts of the machine;
WARNINGS
- Keep all components of the packaging (plastic bags, polystyrene foam, nails, cardboards, etc...) out of reach of children. This material is a potential source of risk.
- Before connecting the machine, make sure that the plate data correspond with data of the electric distribution network.
- Do not expose the machine to bad weather. Do not install the machine in high humidity environments.
- The packaged machine is to be stored in a place sheltered from bad weather, dry and without moisture. The storage temperature must not be below +5°C.
-
In case of doubts, have the electric installation checked by qualified personnel only. The installation must meet the requirements of the current safety regulations (effective grounding, section of conductors adequate to the consumption power and life-saving circuit breaker).
-
The manufacturer will not be held responsible in case of damage to property and persons, caused by wrong installation or use.
- For part replacement, please contact a concessionaire or an authorized dealer. Only genuine parts are to be used.
- Do not stack more than 3 packages of the same type. Do not stack packages of different type on the package.
- The packages can be stacked for a maximum of three pieces of the same type. Do not stack heavy packages of other types on top of the packaging.
- It is advisable not to use adapters, multiple plug sockets and/or electrical extension cords. If their use becomes indispensable, it will be necessary to use products with certified quality (type IMQ, VDE, +s, etc...) and check that the power value stamped on them is higher than the power consumption [A = amperes] of the appliance connected to the mains.
CHAPTER 2 - SAFETY
2-1
2. SAFETY
2.1 GENERAL INFORMATION
Please read this manual carefully before use as it provides important information on the safety, use and maintenance of the equipment.
The User is obliged to inform and instruct the personnel on the accident risks, the safety devices installed on the machine as well as on the general accident prevention rules according to EU Directives and the national legislation of the country where the machine is installed.
The operators must know the position and operation of all machine controls and their relevant characteristics.
The operators must carefully read and understand the contents of this Manual.
Tampering with machine components, replacing them without authorization, using accessories capable of modifying the machine use as well as using non genuine parts can cause the risk of accidents.

DANGER
It is strictly forbidden to exclude/tamper with the safety devices installed on the machine. The Manufacturer cannot be held responsible for the machine safety if this obligation is not respected.
2.2 INTENDED AND NON INTENDED USE
This machine has been designed and manufactured for professional use by qualified personnel. It can:
- Dispense single or double doses of coffee powder.
- Dispense hot water: tea.
- Dispense hot steam (steam wand).
DANGER

The usage of the machine for purposes other than those described in this Manual is considered an IMPROPER USE and therefore dangerous.
The Manufacturer disclaims any liability in case of tampering with the machine, non-authorized modifications to the machine or maintenance operations performed by non-qualified personnel.
The Manufacturer disclaims any liability for damage to persons or property resulting from improper use of the machine and considers void any form and type of guarantee.

DANGER
In case of anomalous behavior of the machine or power supply failure, it is strictly forbidden to perform any operations on the machine.
Only qualified maintenance personnel are authorized to operate on the machine.
2.3 SAFETY INSTRUCTIONS
- Check that the electrical data indicated on the CE plate corresponds with the main electrical supply data to which the machine will be connected.
- Place the machine on a flat, horizontal and stable surface.
- The machine must be installed in premises indicated in the "INSTALLATION" section.
- Connection to the water supply is to be performed by a qualified technician in accordance with current laws.
- Water pressures and temperatures are indicated in the "CONNECTION TO WATER SUPPLY" section.
-
The machine described in this Manual has been designed and manufactured for dispensing coffee-based drinks, hot water and steam for hot beverages. Any other use is to be considered an improper and hazardous use. The Manufacturer disclaims any liability for damage resulting from improper or wrong use of the machine.
-
Before plugging the machine into the electric network, please make sure that the rated capacity and power are suitable for maximum energy consumption indicated on the machine.
- Do not install the machine near possible water jets or heat sources.
- The use and maintenance of the machine must be only performed by qualified personnel.
- We advise you not to use adapters or extension cords other than those advised by the manufacturer since they could damage the machine.
- Do not use the machine if the power cord, the plug or any other parts of the machine are damaged. In case of malfunctioning, contact the Manufacturer.
- Please adopt all precautions in order to protect the machine against electrical troubles:
- Do not perform any maintenance operations and/or transport with the machine plug inserted into socket or if the machine is hot.
- Do not remove the plug by pulling the power cord.
- Do not use the machine if the power cord is damaged.
- Do not touch the machine with wet hands.
- Do not turn the package and the machine upside down nor lie it on its side.
- Do not wash the machine using direct water jets (under pressure or with steam).
- Do not immerse the machine in water or in any other liquids.
- Children under eight years of age and persons with reduced mental, physical or sensory capabilities are not permitted to use the machine, unless they have been trained in its use by a person responsible for their safety. Take precautions to prevent children from playing with the appliance.
- Cleaning and maintenance to be carried out only by authorised personnel who have had appropriate training and must not be done by unsupervised children (see point 8).
- Do not place any containers of liquids over the machine.
ESPRESSO "ZERO BARISTA" COFFEE MACHINES- OPERATING INSTRUCTIONS

DANGER
Do not install nor use the machine if it is wet or very humid. Wait until you are sure the appliance is completely dry. Before installing or using it, the machine must be thoroughly checked by the maintenance personnel to make sure that the electric components are not damaged.
- For correct operation, the machine must be used in premises with temperature between +5°C and 30°C.
- Always use genuine parts and accessories certified by the Manufacturer.
- In case of defective working, damaged parts of the machine or if it stops working, switch it OFF and disconnect it from mains. Do not attempt to repair the machine. The machine must be repaired by a Manufacturer's qualified technician.
-
The rear boiler and the pump are equipped with thermal switches which stop the heating process in case of failure or overheating.
-
Do not obstruct the suction grids and/or heat dissipation grids, in particular the cup warming pad.
- Before performing any cleaning or maintenance operations, switch Off the machine and disconnect power cord.
- In case of prolonged storage at temperatures below 2^ , empty the hydraulic circuit of the appliance. Before switching On the machine, let it stay at least one hour in a place at ambient temperature.
- Access to the service zones is allowed only to experienced personnel, in particular with regard to safety and hygiene.

ATTENTION
As a precautionary measure, periodically check correct fastening of all safety devices. It is strictly forbidden to carry out modifications to the machine in order to prevent additional risks.
2.4 WORKING ENVIRONMENTAL CONDITIONS
2.4.1 Fire prevention system
The machine is not equipped with its own fire prevention system.
The Customer must evaluate the need to implement an appropriate fire prevention installation near the machine installation place in accordance with the safety regulations and fire prevention regulations in force in the country where the appliance is installed.
No flammable liquids circulate freely in the machine.
2.4.2 Vibrations
The machine is equipped with rubber anti-vibration pads. Under standard working conditions, the machine does not generate vibrations which can be harmful to persons and/or property.

ATTENTION
Any excessive vibrations can only be caused by a mechanical failure. This condition must be immediately signaled and eliminated in order not to jeopardize the safety of the machine and of personnel charged with the machine exploitation.
2.4.3 Noise level
Noise level has been measured in accordance with what indicated by the UNI EN ISO 9614-2 - Acoustic Directive.
The measured data is kept by the Manufacturer.
The acoustic, continuous and weighted pressure level is less than 70 dB.
2.4.4 Electromagnetic emissions
The machine is equipped with electronic components subject to the Electromagnetic Compatibility rule (conducted and radiated emissions).
The machine conforms to the provisions of the Electromagnetic Compatibility Directive (EMC).
The values of emissions are in accordance with the regulation thanks to the use of components which comply with the provisions of the Electromagnetic Compatibility Directive, appropriate connections and installation of filters (where necessary).
2.4.5 Fire prevention system
During the design phase, all the zones and hazardous parts have been assessed for residual risks and all possible precautions have been implemented in order to eliminate the risks of injuries to persons and damage to machine components.
2.5 RESIDUAL RISKS
2.5.1 Residual risks
After thoroughly assessing all possible risks of the machine, all the required precautions have been taken to eliminate these risks and limit the danger to the personnel exposed.
From the risk analysis carried out and stored in the Manufacturer's Technical File, the following residual risk has emerged:
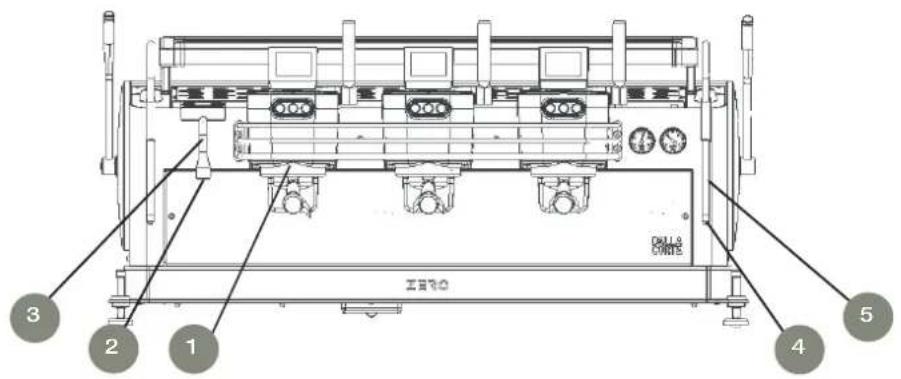
- Risk of scalding in the lower area of the coffee brewing unit (1) due to the high temperature it can reach.
• Risk of scalding in the lower area of the hot water nozzle (2) due to the high temperature it can reach. - Risk of scalding if the hot water nozzle (3) comes into contact, due to the high temperature it can reach.
- Risk of scalding in the lower area of the steam nozzle (4) due to the high temperature it can reach.
• Risk of burns in case of contact in the unprotected area of the steam nozzle (5) due to the high temperature it can reach.
ESPRESSO "ZERO BARISTA" COFFEE MACHINES- OPERATING INSTRUCTIONS
3. GENERAL DESCRIPTION
3.1 MACHINE COMPONENTS
This machine is intended for professional use by qualified personnel.
Each dispensing unit has a touch screen control panel to manage the dispensing and programming of machine functions.
The hot water controls are located near the hot water spout. The steam wands are operated by the side levers.
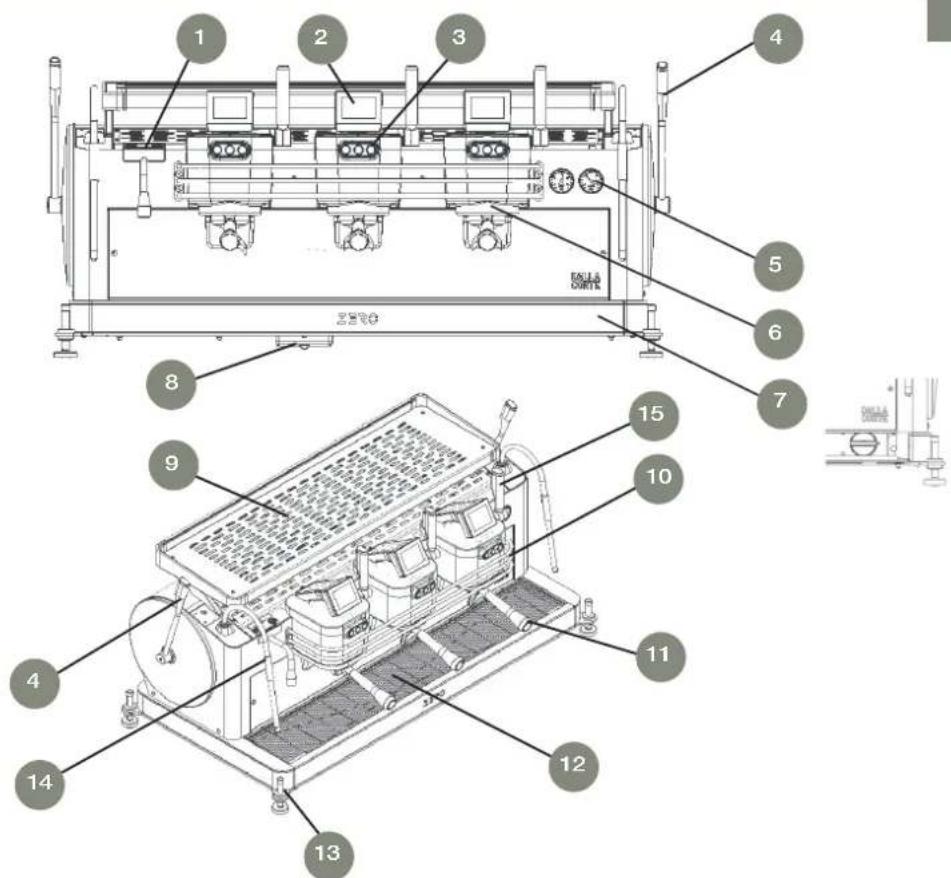
The machine consists of the following parts:
1 Service keyboard 6 Coffee dispense unit 11 Filter holder
2 Touch screen 7 On/Off switch (behind the basin) 12 Basin with cup support rack
3 Keyboard for coffee dispense unit 8 Drain pan 13 Adjustable feet
4 Steam lever 9 Cup warming pad 14 Steam lever
5 Boiler and pump manometers 10 Grid for coffee dispense unit protection 15 Coffee dispensing lever
3.2 MACHINE OUTFIT
The following parts are supplied with the machine.
• 3-4 filters / 2 cups H26 • 2-3 grid-type shower heads
• 2 filters / 1 cup H23 • Black spiral tube for water drain
• Filter-holder, complete / 1 cup • Cleaning cloth for external surfaces
• 2-3 filter-holders, complete / 2 cups • Tabletop rubber support for pressing coffee
- Hose, 3/8" L70 • Container for cleaning tablets
- Hose, 3/8" L150 • Coffee tamper with spanner for adjusting water delivery
- Shower heads brush • Blind filter
- Spanner for shower head cleaning
3.3 TECHNICAL SPECIFICATIONS
3 Units 2 Units
| Dimensions (l x h x p) | 1090 x 525 x 540 mm | 862 x 525 x 540 mm |
| Power supply | 220-240 V - 50-60 Hz / 380-400 V - 50-60 Hz | 220-240 V - 50-60 Hz / 380-400 V - 50-60 Hz |
| Weight | 110 kg | 80 kg |
| Power | 7000 W | 7000 W |
4. TRANSPORT AND INSTALLATION
4.1 TRANSPORT AND INSTALLATION
4.1.1 Packing
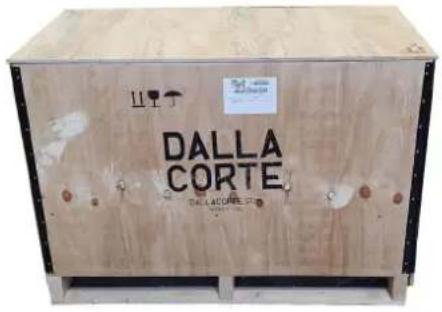
The machine is transported in wooden crates placed on a pallet. During transport, make sure that the crate is always in the correct position as shown on the external part of the crate.
Spare parts and the relevant technical documentation of the machine are included inside the crate. Keep this documentation for further consultation.
Do not turn the crate upside down. Do not lay the packaging on its side.
4.1.2 Removing the packaging
Make sure that there are no signs of damage to the packaging by checking it carefully before removal.
Open the top of the crate, remove the accessories, remove the angles and the wooden perimeter of the crate by pulling it upwards. Remove the fastening screws which are beneath the pallet and lift the machine.
Check the integrity of the machine, accessories, power cord and plug. In case of damage of the material, immediately inform the Manufacturer or the dealer.
After unpacking the machine, keep its packaging for further needs of transport. Keep the packaging out of reach of children.
Keep all packaging materials (plastic bags, polystyrene foam, nails, cardboards, etc...) out of reach of children. These materials are a possible source of danger. Do not dispose of packaging material in the environment. Dispose of these materials by entrusting them to specialized bodies.
4.1.3 Installation
Install the machine on a flat, well levelled, dry and sturdy surface. The distance from ground must be at least 80 cm.
It is not advisable to place the machine in niches or similar cavities in order to avoid operational problems, problems of supply and maintenance.
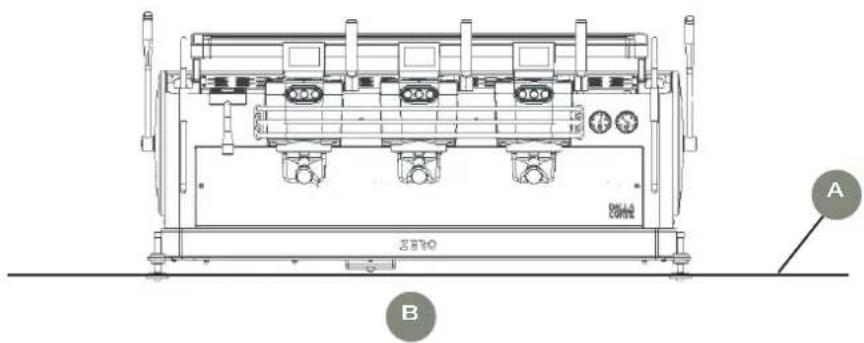
Provide for a slot of at least 100 x 100 mm on the supporting surface [A], mm for connecting the electric and hydraulic installations to the compartment below [B].
The machine is to be installed at a distance of at least 14 cm from walls.
Installation must be carried out in accordance with the regulations in force at the place of installation, according to the manufacturer's instructions and by qualified and authorised personnel.
The appliance must be installed in an area accessible only to authorised personnel. The appliance is not suitable for installation in a professional kitchen.
4.1.4 Connection to the water supply
The water supply line must be suitable for human consumption according to the standards of the country of installation. Provide a shut-off valve, which allows the supply source to be disconnected.
Water arriving from the mains must be softened and have a temperature of between +5°C and +45°C.
In order to carry out water connection, proceed as follows:
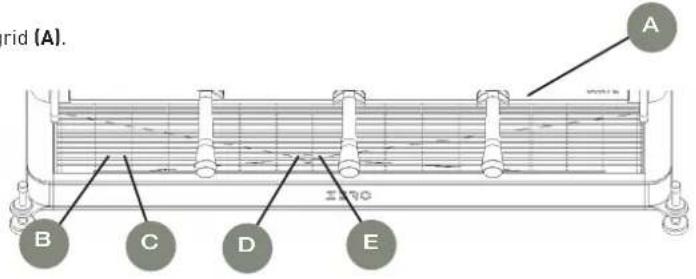
- Remove the cup support grid (A).
- Connect the machine to the water mains (B) by passing the loading pipe 3/8" (included in delivery) through the lower slot of the machine (C).
- Connect the drain pipe (D) (included in delivery) through the slot (E).
- Re-install the cup support grid (A).
4.1.5 Connection to the power supply
The machine is delivered ready for installation according to the nameplate data. Make sure that data of the electric line coincide with those indicated on the machine nameplate.
The machine is supplied without plug, as a fixed installation to the mains is expected.
It is therefore necessary to provide an omnipolar circuit breaker with class III overvoltage protection in accordance with the standards governing fixed wiring.
The electrical supply system must be equipped with a circuit breaker or automatic main switch with an efficient earth connection.
Grounding of the appliance is mandatory. The manufacturer will not be held liable in case this obligation is not observed.
Pay attention not to damage the power cord. Do not bend it, do not crush it and do not subject it to stresses.
In order to prevent possible damage, disconnect the machine removing the plug from socket. Do not pull on the power cord.

DANGER
Never touch the plug with wet hands.
CHAPTER 5 - USE
5-1
5. USE
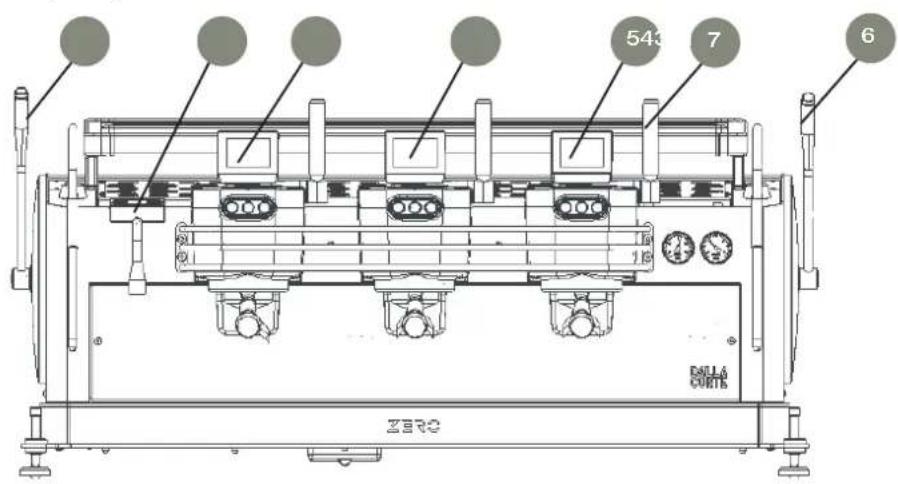
5.1 CONTROLS ON MACHINE FRONT
1 Steam lever 4 Button strip for dispensing unit coffee 2
2 Keypad for functions 5 Button strip for dispensing unit coffee 1
3 Button strip for dispensing unit coffee 3 6 Steam lever
7 Coffee dispensing lever
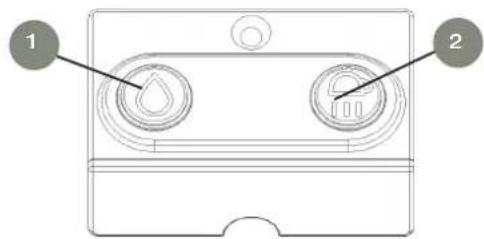
5.2 KEYPAD FOR FUNCTIONS
1 Hot water button
2 Cup warming button
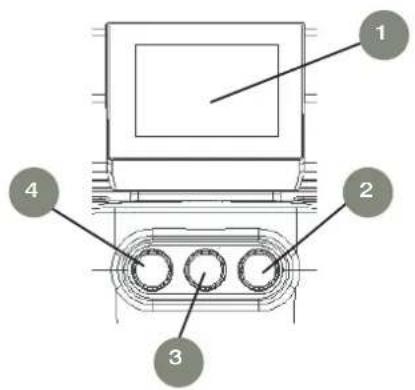
5.3 KEYPAD FOR DISPENSING UNIT - COFFEE 1-2-3
1 Display
2 Selection III button (by default = continuous selection)
3 Selection II button (by default = double dose)
4 Selection I button (by default = single dose)
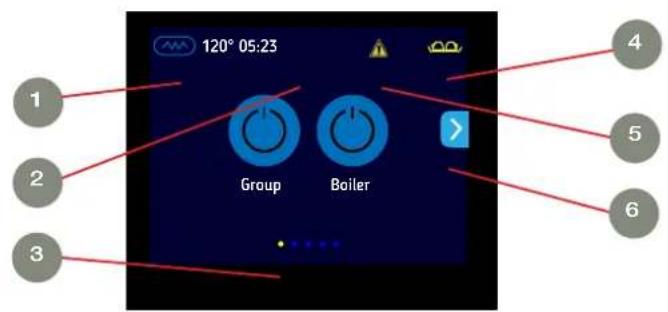
5.4 DISPLAY FOR DISPENSING UNIT - COFFEE 1 (MAIN)
1 Light indicator of status of steam boiler resistance (ON or OFF) and steam boiler temperature
4 Light indicator of status of cup heater (ON or OFF)
2 Light indicator of current hour
5 Alarm signal icon and relevant code. The code refers to the last alarm that has taken place in chronological order
3 Light indicator of the displayed page 6 Navigation icons through the pages
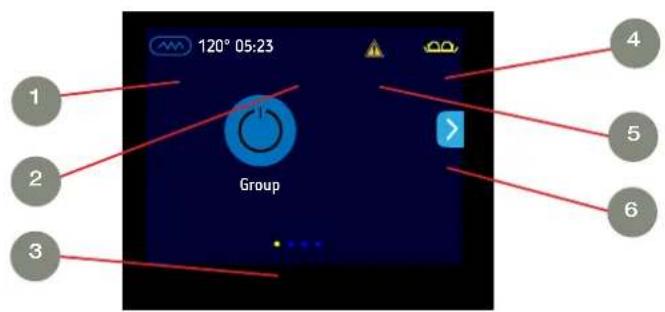
5.5 DISPLAY FOR DISPENSING UNIT - COFFEE 2 - 3
1 Light indicator of status of steam boiler resistance (ON or OFF) and steam boiler temperature
2 Light indicator of current hour
3 Light indicator of the displayed page 6 Navigation icons through the pages
4 Light indicator of the status of cup heater (ON or OFF)
5 Alarm signal icon and relevant code. The code refers to the last alarm that has taken place in chronological order
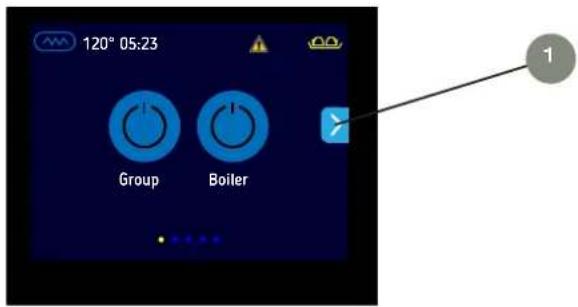
5.6 MAIN MENU OF THE DISPENSING UNIT - COFFE 1
By pressing the icon [1] on the main page, you can display the other pages of the main menu.
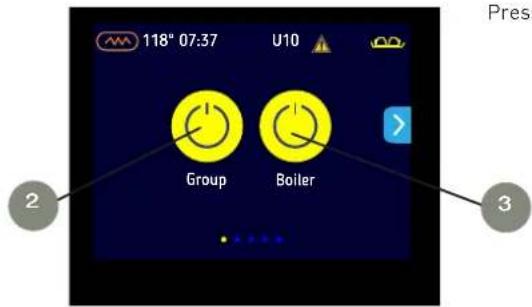
Press the icons [2] or [3] if you want to switch ON/OFF this unit (the icon turns yellow).
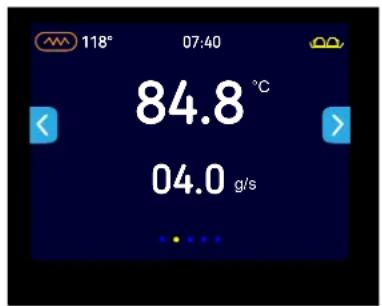
The second page of the main menu displays the set temperature (in °C) and the coffee flow (in g/s) set when dispensing with key.
Pressing on the screen at the temperature allows the hand shower to be rinsed..
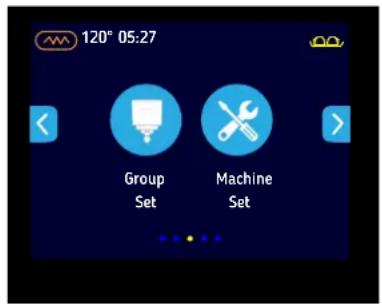
The third page of the main menu allows you to access the following functions:
- Group Set: these pages allow programming the unit.
- Machine Set: these pages allow programming the machine (only if no dosing or cycle is in progress).
ESPRESSO "ZERO BARISTA" COFFEE MACHINES - OPERATING INSTRUCTIONS
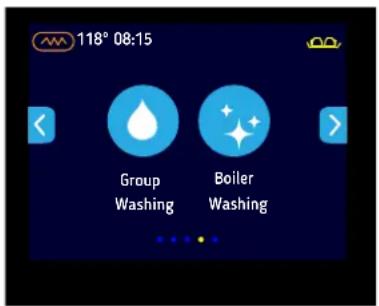
The fourth page of the main menu allows carrying out the following operations:
- Group Washing. Clean the unit.
- Boiler Washing. Clean the boiler.
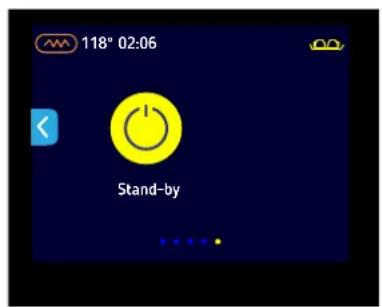
On the fifth page of the main menu it is possible to put the machine in stand by without using the main switch.
5.7 MAIN MENU FOR DISPENSING UNIT - COFFEE 2 - 3
By pressing the icon [1] on the main page, you can display the other pages of the main menu.
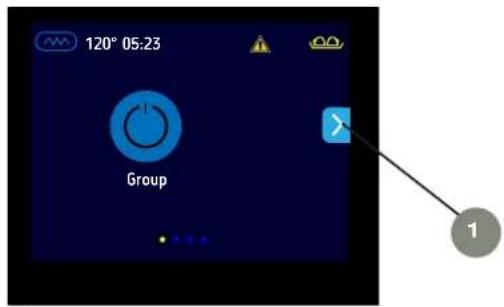
ESPRESSO "ZERO BARISTA" COFFEE MACHINES - OPERATING INSTRUCTIONS
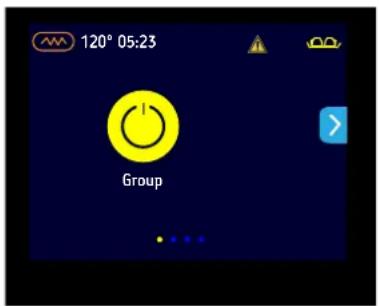
By pressing the Icon "Group", you can switch ON/OFF the unit (the icon turns yellow).
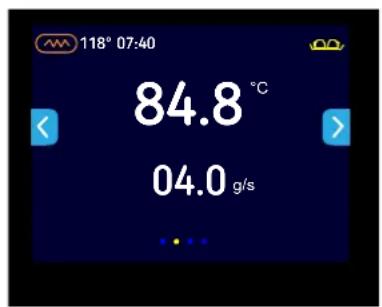
Nn the second page of the main menu, the temperature (in °C) and the coffee flow (in g/s) set in the brew mode are displayed.
Pressing on the screen at the temperature allows the hand shower to be rinsed.
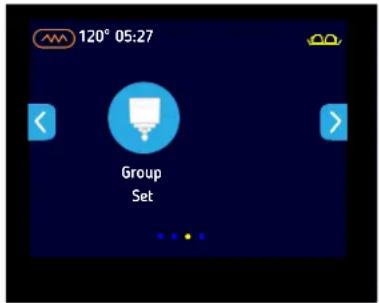
The third page of the main menu allows you to access to these functions:
- Group Set: Pages for setting the unit.
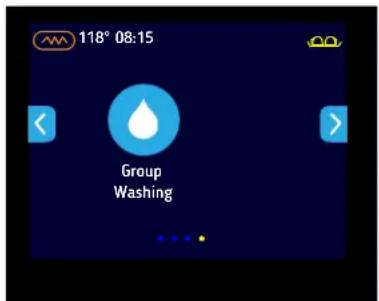
The fourth page of the main menu allows you to:
- Group Washing: carry out the cleaning of the unit.
5.8 SETTING THE UNIT
By pressing on the logo, on the third page of the main menu leads to the following page.

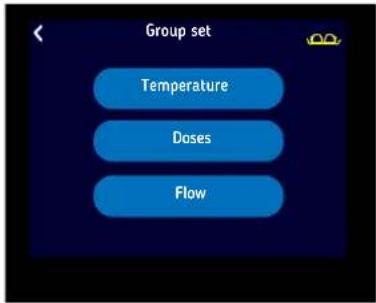
"Temperature": Access to the group temperature setting page.
"Doses": Access to the dose setting page.
"Flow": Access to the flow setting page.
5.8.1 Temperature
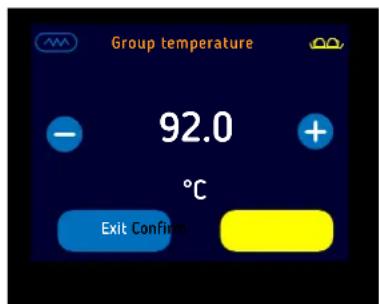
The keys "+" and "-" allow you to set the temperature of the unit and to save it by pressing "CONFIRM".
5.8.2 Doses
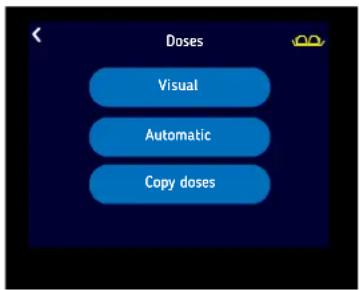
Visual
"Visual": access to the page displaying the set doses
"Automatica": access to the dose programming page.
"Copia dosi": access to the page from which you can copy the dose from the group
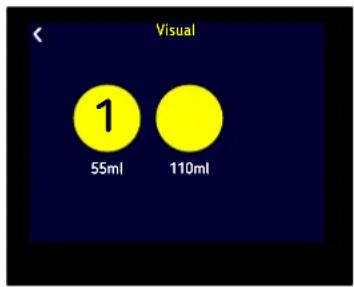
The set doses are displayed.
Automatica
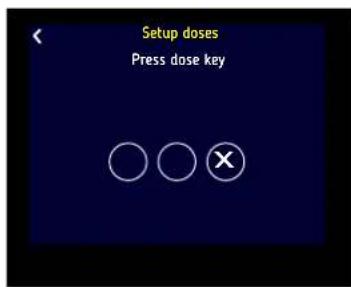
It is possible to program the doses to be used with the enabled keys. If the key is set as "Continuous", programming is not possible. The key appears with an "X".
Copy doses
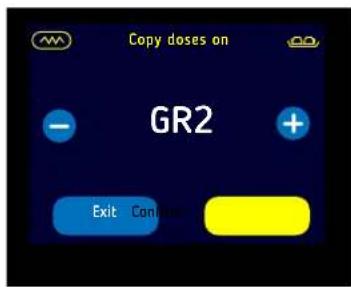
From group 1 it is possible to set the set dose to one of the other two groups.
5.8.1 Flow
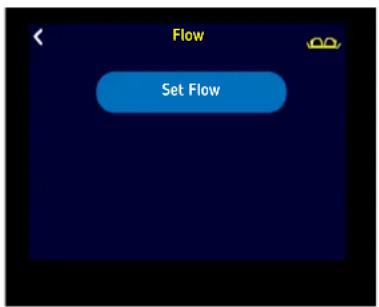
"Set flow": access to the display page of the set flow.
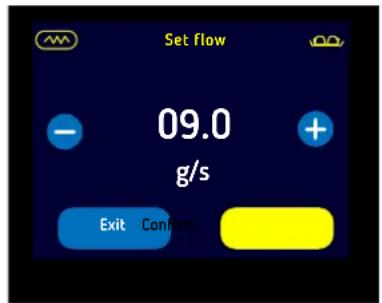
Using the "+" and "-" keys, the dose flow can be set and stored by pressing the "CONFIRM" key.
5.9 SETTING THE MACHINE

If you press on the icon on the setting pages, you can access to the machine setting page.
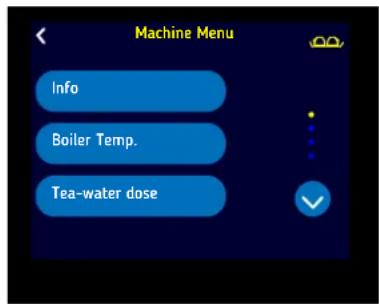
"Info": Access to the setting page of some functions of the machine.
"Boiler temp.": Access to the page for setting the boiler temperature.
"Tea-water dose": Access to the page for setting the hot water dose.
ESPRESSO "ZERO BARISTA" COFFEE MACHINES - OPERATING INSTRUCTIONS
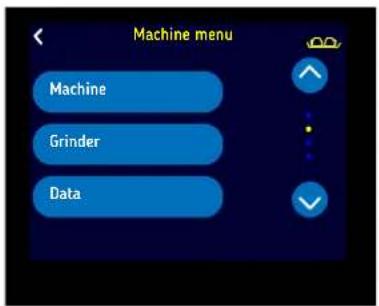
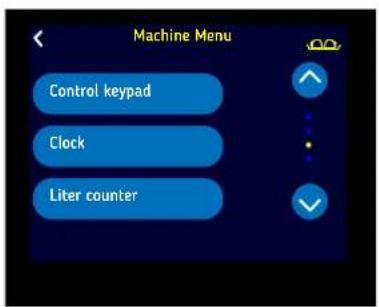
"Machine": access to the setting page of factory default parameters.
"Grinder": access to the setting page of coffee grinder.
“Data”: access to the page for language selection and measure units.
"Control keypad": access to the page for setting the keys of each coffee dispensing unit.
"Clock": access to the page for setting data and hour.
"Liter counter": Access to the page for setting the threshold of the liter counters.
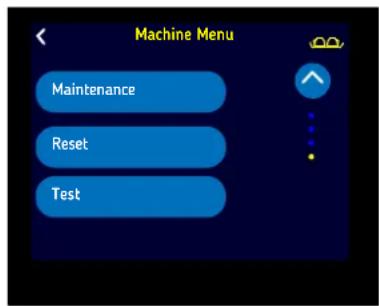
"Maintenance": Access to the machine's maintenance page.
"Reset": Access to the machine settings reset page.
"Test": Access to the machine test page.
These pages are password-protected and cannot be viewed by the user.
5.9.1 Info
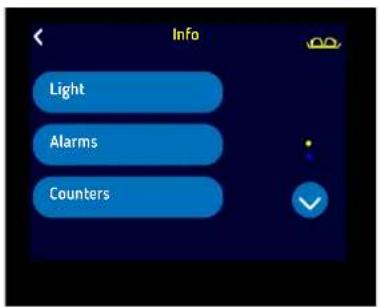
"Light": Allows accessing the setup page for light indicators.
"Alarms": Allows accessing the display page for current alarms.
"Counters": Allows accessing the display page for counters.
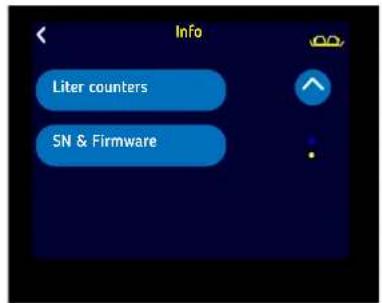
"Liter counters": Allows accessing the setup page for liter counters.
"SN & Firmware": Allows accessing the display page for machine serial data.
Light
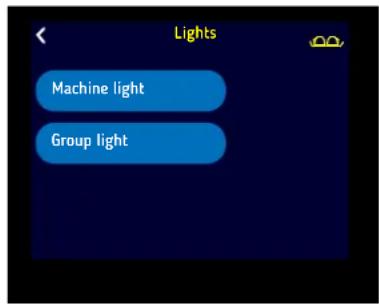
Pressing the "Light" key, will display the following page. It allows switching ON/OFF the machine light indicators.
Alarms
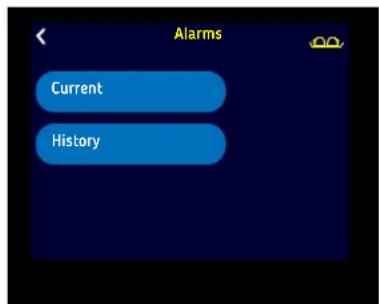
Pressing the "Alarms" key, will display the following page.
"Current": Allows accessing the machine alarms.
"History": Allows accessing the page of Alarm history
The machine and group alarms are displayed in the coffee 1 dispensing group.
The alarms of the group alone are displayed in the coffee 2 and 3 dispensing group.
Current alarms
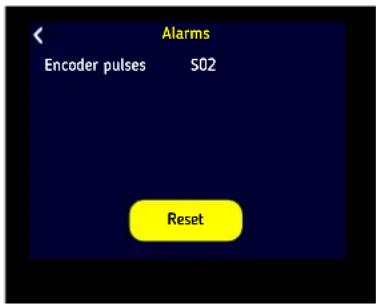
Pressing the "Current" key, will display the following page. It displays the current alarms on the machine.
To cancel the alarms, just press the "Reset" key.
Alarm history
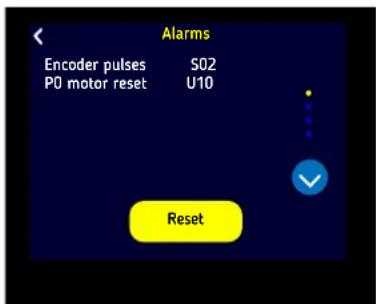
Pressing the "Alarm history" key, will display the following page. It shows all the alarms occurred on the machine.
To cancel the alarms, just press the "Reset" key.
Counters
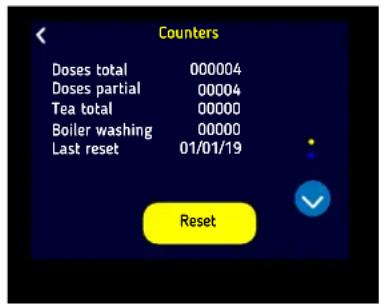
Pressing the "Counters" key, will display the following page. It displays total and partial counters present on the machine.
To reset the partial counters, press the "Reset" key (password-protected key).
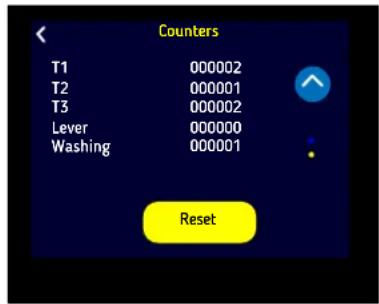
The second page of “Counters”, displays the dose counters of each group as well as the number of operations of the lever and number of cleaning cycles performed.
For these counters too, the reset is performed by pressing the "Reset" key (password-protected key).
Liter counter
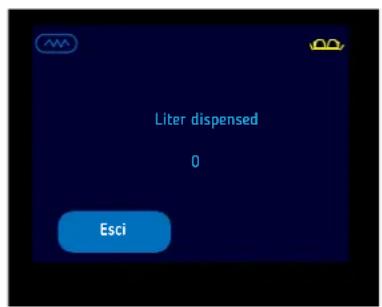
Pressing the "Liter counter", will display the following page. It allows you to display the quantity (liters) of water dispensed
SN & Firmware
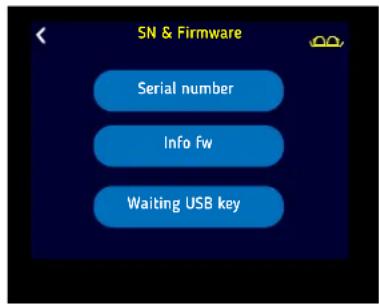
Pressing the "SN & Firmware", will display the following page.
"Serial number": Allows accessing the page that displays the serial number of the machine.
"Info fw": Allows accessing the page that displays the information on the machine firmware.
"Waiting for USB key": Password-protected function.
This page displays the machine serial number (this number is the same as the one indicated on the CE plate).
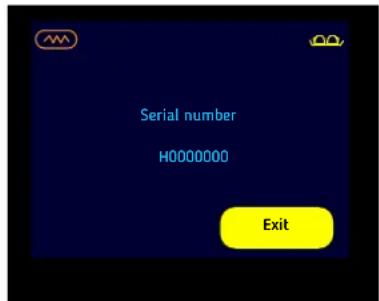
ESPRESSO "ZERO BARISTA" COFFEE MACHINES - OPERATING INSTRUCTIONS
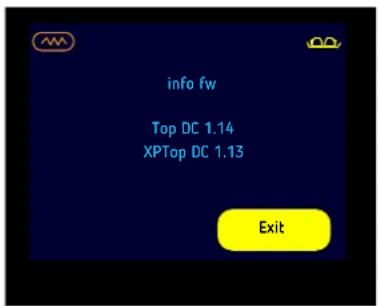
This page displays the firmware of the mother board (first line) and that of the display (second line).
5.9.2 Boiler temp.
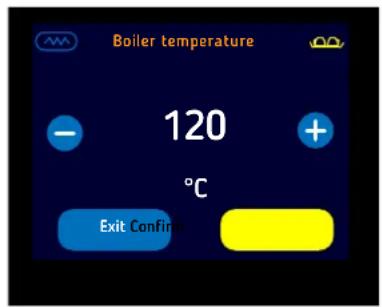
This page allows you to set the boiler temperature (hot water and steam) through the "+" and "-" keys. Save these values by pressing the "Confirm" key.
5.9.3 Water-tea doses
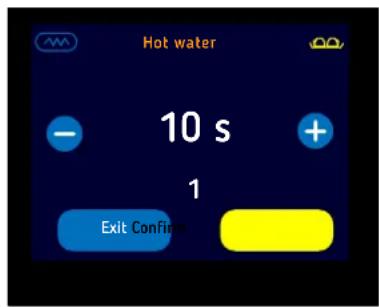
This page allows you to set the water dosing for tea (in seconds) through the "+" and "-" keys.
5.9.4 Machine
Password-protected page. It cannot be viewed by the User.
5.9.5 Grinder
Password-protected page. It cannot be viewed by the User.
5.9.6 Data
Password-protected page. It cannot be viewed by the User.
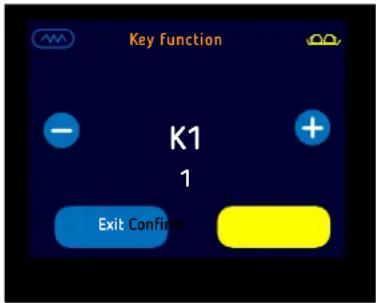
5.9.7 Control panels
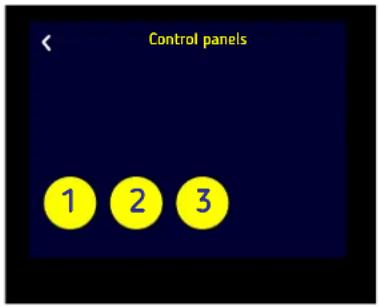
This page allows you to choose the key through which a function is to be set.
Pressing one of these keys, will display the following page.
5.9.8 Clock
This page allows you to set the function of each key through the "+" and "-" keys:
K1 - K2 - K3 = dosed dispensing
Continuous erogation
Purge
Press the "Confirm" key to save the selection.
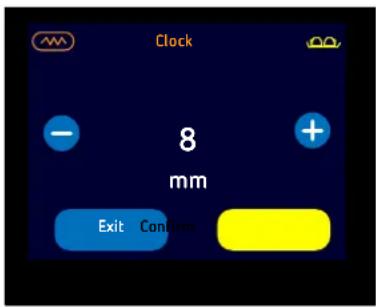
This page allows setting the date and hour through the "+" and "-" keys.
Pressing the "Confirm" key, will save the selection made and will go to the next case.
ESPRESSO "ZERO BARISTA" COFFEE MACHINES - OPERATING INSTRUCTIONS
5.9.9 Liter counter
Password-protected page. It cannot be viewed by the User.
5.9.10 Maintenance
Password-protected page. It cannot be viewed by the User.
5.9.11 Reset
Password-protected page. It cannot be viewed by the User.
5.9.12 Test
Password-protected page. It cannot be viewed by the User.
5.10 PREPARING A CUP OF ESPRESSO

NOTA
The secret to always obtain an excellent cup of coffee resides in keeping the portafilters always inserted in the dispensing groups when not in use
This precaution will always keep them at the correct temperature.
In order to prepare an optimum espresso, proceed as follows:
- Unlock the desired portafilter. Do not touch the hot metal parts.
- Clean the inner filter located inside the portafilter and remove any possible coffee residues.
-
Load the filter with the correct amount of freshly ground coffee and at the correct grinding point.
-
Press the coffee well using the provided coffee press and rinse the hand shower.
- Clean the filter edge and eliminate any coffee residues and lock the portafilter into the dispensing group.
- Press one of the two buttons on the group with automatic dosing.

DANGER
Keep your hands away from hot dispensing groups.
Do not touch the hot metal parts of the dispensing groups and portafilters. Risk of burns.
5.11 PREPARING HOT MILK
In order to prepare hot milk, proceed as follows:
• Pour the milk into a jug with handle.
- Insert the steam wand into the jug and open the steam cock (steam lever). When the milk has reached the desired temperature, close the lever-type cock.
- Remove the jug and, with a wet cloth, clean the wand so to prevent any milk incrustations of milk on the wand.
- Address the steam wand towards the basin grid and, protecting yourselves with the wet cloth from any possible steam jets, open the cock again just enough for eliminating all possible milk residues inside the wand.

DANGER
In order to use the steam wand, use the insulating handle. To avoid any possible burns, do not open the cock before inserting the wand into the milk jug.
5.12 HOT WATER DISPENSING
The machine is equipped with one button for time-dosed hot water and tea brewing process. Place a high-temperature resistant container (at least 125^ C) beneath the outlet diffuser, than press the appropriate button.

DANGER
In order to avoid possible burnings, never press the hot water buttons before placing a recipient under the dispending wand.
5.13 CUP HEATING PAD
Under special environmental conditions, the use of cups not sufficiently heated when brewing coffee results in an instant loss of about 25-50°C which means serving a warm espresso.
The built-in cup warmer is electric and can be activated by pressing the appropriate button. This function has 2 powers:
-
If the button is pressed once, the cup warmer operates intermittently, providing average heating; in this case, the icon on the display flashes.
-
Press the button a second time to set the maximum heating; the icon on the display remains fixed.
To switch off the heater, press the button again; the icon on the display no longer appears.
5.14 ALARMS
The machine is equipped with an electronic control that handles all the operational functions and checks correct working of all components.
In case of malfunctioning of one of the functions, this is recorded and/or displayed on the main page.
Some alarms are displayed but not safeguarded by the system because they are irrelevant to the good operation of the machine or to the safety for exposed persons and property.
5.14.1 Group alarms
The letter x in the "Code" column indicates the name of the group.
| ALARMCODECAUSESOLUTION | |||
| Timeout contatore volumetrico | AFx | Pulses of counter not read since 6 secs. | It resets if pulses are read again. If not, the "brewing process" alarm will trigger. |
| Motor pulse failure AMx1 | While motor moves, the relevant pulses are not read | Reset by calibrating the point 0 | |
| Motor start alarm AMx2 | Motor has encountered an unexpected mechanical lock | Reset by adjusting the point 0 | |
| Minimum boiler temperature of group x, short-circuited sensor | AGx3 | Temperature detected is lower than 0°C | Steam distribution shuts off. Press DEL key on the display to cancel the alarm |
| Maximum boiler temperature of group x, sensor interrupted | AGx2 | Temperature detected is higher than 127°C | It resets automatically when temperature goes below 126,5°C |
| Lever position alarm ALx1 | Wrong lever position while coffee dispensing is not in progress: e.g.: the lever is between two positions | Move the lever to rest position | |
ESPRESSO "ZERO BARISTA" COFFEE MACHINES - OPERATING INSTRUCTIONS
| ALARMCODECAUSESOLUTION | |||
| Lever serial communication ALx2 | The lever card does not dialogue with the display card for more than 5 secs. | It resets automatically by re-establishing the connection with the display card | |
| Motor point 0 recalibration AMx3 | Motor has not finished the last command imparted; e:g because of power failure; number of pulses out of expected range; last command terminated because of timeout, the barista model has been configured, during the test procedure the motor has been put in motion | Reset by calibrating the point 0. During some phases, this is made automatically | |
| Brewing process timeout Alx Pulses of CV not read since 120 secs To next dose | |||
| Motor movement timeout AMx4 | Motor has not reached the position in the expected time | Reset by calibrating the point 0. | |
| Flow calibration error | AMx5 | Position of motor encoder lower than 20 | Reset by calibrating the flow |
| Boiler heating timeout AGx1 | Boiler has not reached 40°C within 5 minutes from heating activation | Reset by putting the machine in stand-by and switching it On. | |
5.14.2 Machine alarms
The MCS alarms are reserved.
| ALARMCODECAUSESOLUTION | |||
| Corrupted data A00 | Settings read by the EEPROM are out of given range, the wrong value is replaced by the default one. | Switch OFF the machine and switch it ON again | |
| Boiler heating timeout AB1 | The boiler has not reached 40°C within 10 minutes from heating function activation | Reset by putting the machine in stand-by mode and switching it ON | |
| Minimum temperature of MCS steam wand | AMCS3 | Temperature detected is lower than 0°C | Reset by making the calibration. It resets automatically by solving the problem |
| Maximum temperature of MCS steam wand | AMCS2 | Temperature detected is higher than 151°C | It resets automatically by solving the problem |
| Minimum steam boiler temperature, short-circuited sensor | AB3 | Temperature detected is lower than 0°C | Switch OFF the machine and switch it ON again. |
| Maximum steam boiler temperature, sensor interrupted | AB2 | Temperature detected is higher than or equal to 128°C | Switch OFF the machine and switch it ON again |
| Minimum level in steam boiler | AL2 Minimum level sensor is uncovered | Resets automatically when the status of sensor covered is detected | |
| Filling timeout AL1 | Maximum level not reached within the set time. First filling timeout 8 secs, next fillings according to the value set in the machine | Switch OFF the machine and switch it ON again. | |
| Filter regeneration alarm AMA13 | Number of scheduled liters reached | Access the info for liter counter procedure in order to reset the alarm | |
| Maintenance alarm AMA12 Date | for scheduled maintenance reached | Access the info for maintenance procedure in order to reset the alarm | |
| Clock alarm A01 | Clock reading error since data read not correct | Resets automatically when first correct reading is made | |
| MCS timeout | AMCS1 | Set temperature not reached within 60 secs | Resets at next selection for steam wand |
| Timeout of cash register serial signal | AS3 | No response from cash register within 200 msec. | It resets automatically when next transmission is completed correctly |
| LCD serial signal alarm AS1 | One of the configured displays is not responding | It resets automatically when next transmission is completed correctly | |
CHAPTER 6 - MAINTENANCE
6-1
6. MAINTENANCE
6.1 CLEANING THE WANDS AND THE EXTERNAL PARTS OF MACHINE
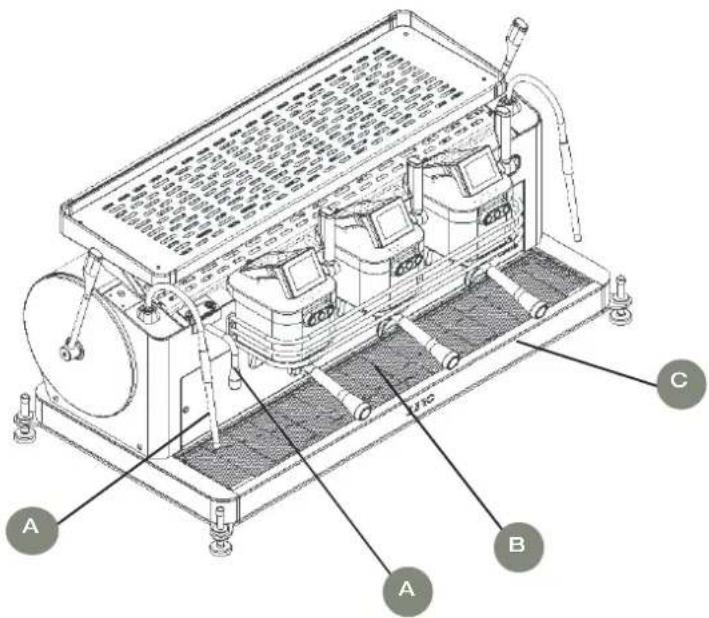
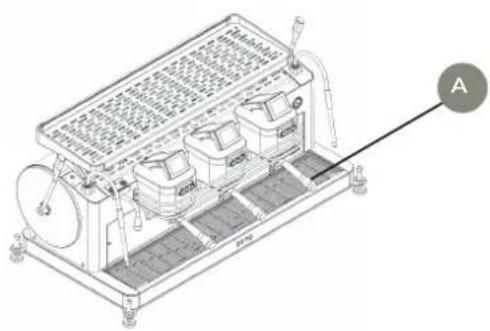
Clean the wands (A) and all external parts of the machine daily, including the grid (B) and the basin (C).
6.2 CLEANING THE REMOVABLE PARTS
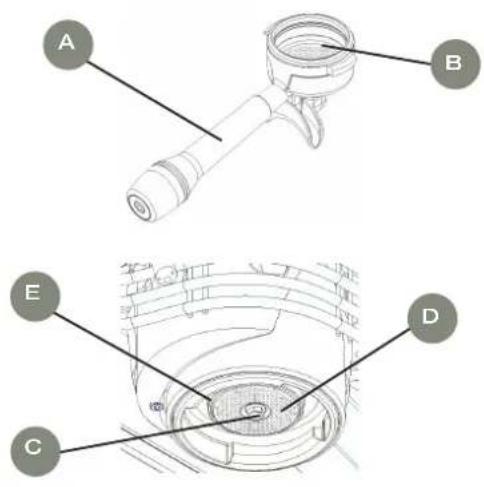
Clean the portafilter (A) and the inner filter (B) with water and detergent daily. Separate them before washing.
Unscrew the screw (C) with the appropriate spanner.
Remove the shower head (D) and the shower head holder (E) and wash them with water and detergent.
Reinstall the shower head and the shower head holder into their compartment and firmly screw the fastening screw. Pay attention not to damage the thread.
6.3 CLEANING THE DISPENSING GROUP
It is possible to run automatic cleaning cycles for cleaning the dispensing group (it lasts approximately 3 minutes). To run these cleaning cycles, proceed as follows:
- Unlock the portafilter (A) from the group to be cleaned, remove the filter (B) and put a blind filter (supplied with the machine) with a detergent tablet (this too supplied with the machine) inside the portafilter.
- Lock the portafilter.
natural_image
Technical line drawing of a mechanical device with multiple ports and a labeled component (A), no readable text or symbols present.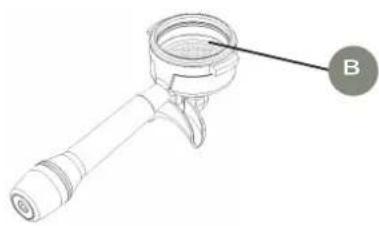
natural_image
Technical line drawing of a mechanical clamp or lever component with labeled point B (no text or symbols beyond label)- Open the fourth page of the main menu.
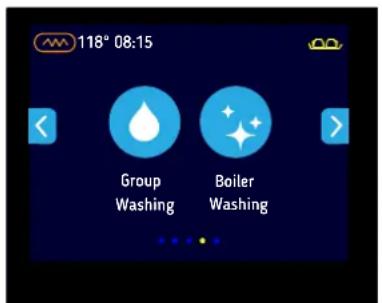

- Press the icon to run the group washing cycle. The machine performs a washing cycle of the circuit which lasts approximately 3 minutes.
- Do the same for the other 2 groups. Let a small quantity of water to flush out before reinstalling the portafilter and before starting to use the machine.
6.4 BOILER WASHING
To be sure that hot water for the brewing process is always clean and drinkable, wash the boiler daily. To perform this operation, proceed as follows:
- Insert a hose (not supplied with the machine) into the drain nozzle for hot water. The other end is to be inserted inside an adequate container or placed on a sink.
- Open the fourth page of the main menu.
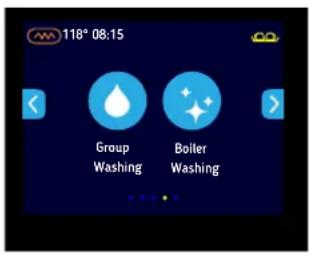

- Press the icone to wash the boiler.
- The machine will perform a washing cycle of the boiler which lasts approximately 30 minutes. It is recommended to run this cycle at the end of the working day.

DANGER
Make sure that the hose used to drain hot water is secured and cannot move. Risk of burns.
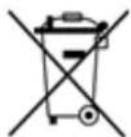
Disposal warnings
Warnings for the correct disposal of the product according to art. 14 of the European Directive 2012/19/EU of 07/07/2012.
At the end of its useful life, the product must NOT be disposed of with municipal waste. It can be delivered to the separate collection centres provided by the local authorities. Please contact your municipality or local authority for information on the separate collection systems available in your area or contact our authorised dealers. Appropriate separate collection for subsequent recycling, treatment and environmentally compatible disposal of the equipment contributes to avoiding possible negative effects on the environment and health and favours the reuse and/or recycling of the materials from which the equipment is made.
For information contact:
DALLA CORTE S.r.l. - Via Zambeletti, 10
Baranzate (MI) - Tel. +39 02 45486443
Machine certification
The machine is accompanied by the Declaration of Conformity CE. This document certifies that the machine meets the essential safety requirements requested by the Machine Directive 2006/42/CE (Annex II A) and the Electromagnetic Compatibility Directive 2014/30/EU.

NOTE
Any unauthorized modifications to the machine will void the CE certification issued by the Manufacturer.

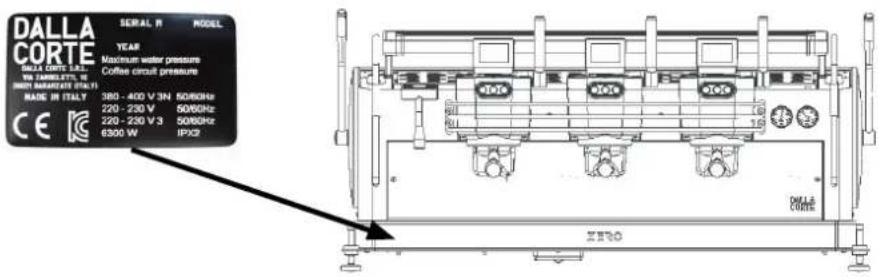
NOTE
The image below shows the emplacement of the CE plate which indicates the main machine identification data.
DALLA CORTE
natural_image
Technical line drawing of a large industrial machine labeled 'DALLA CORNE' (no other text or symbols)Via ZAMBELETTI, 10
20021 Baranzate (MI) Italy
T.+39 02 454 865 43
info@dallacorte.com
www.dallacorte.com
- REVISION
- MODEL ISSUE DATE REVISION DATE NOTES
- STRUCTURE OF THE MANUAL
- CHAPTER 1 - GENERAL
- CHAPTER 2 - SAFETY
- CHAPTER 3 - GENERAL DESCRIPTION
- CHAPTER 4 - TRANSPORT AND INSTALLATION
- CHAPTER 5 - USE
- CHAPTER 6 - MAINTENANCE
- TABLE OF CONTENTS
- GENERAL 1-1
- SAFETY 2-1
- ESPRESSO "ZERO BARISTA" COFFEE MACHINES - OPERATING INSTRUCTIONS
- GENERAL DESCRIPTION....3-1
- TRANSPORT AND INSTALLATION 4-1
- USE 5-1
- SETTING THE MACHINE .... 5-17
- MAINTENANCE....6-1
- GENERAL
- INTRODUCTION
- Symbols
- WARNINGS
- SAFETY
- GENERAL INFORMATION
- DANGER
- INTENDED AND NON INTENDED USE
- SAFETY INSTRUCTIONS
- ESPRESSO "ZERO BARISTA" COFFEE MACHINES- OPERATING INSTRUCTIONS
- ATTENTION
- WORKING ENVIRONMENTAL CONDITIONS
- Fire prevention system
- Vibrations
- Noise level
- Electromagnetic emissions
- Fire prevention system
- RESIDUAL RISKS
- Residual risks
- GENERAL DESCRIPTION
- MACHINE COMPONENTS
- MACHINE OUTFIT
- TECHNICAL SPECIFICATIONS
- TRANSPORT AND INSTALLATION
- TRANSPORT AND INSTALLATION
- Packing
- Removing the packaging
- Installation
- Connection to the water supply
- Connection to the power supply
- USE
- CONTROLS ON MACHINE FRONT
- KEYPAD FOR FUNCTIONS
- KEYPAD FOR DISPENSING UNIT - COFFEE 1-2-3
- DISPLAY FOR DISPENSING UNIT - COFFEE 1 (MAIN)
- DISPLAY FOR DISPENSING UNIT - COFFEE 2 - 3
- MAIN MENU OF THE DISPENSING UNIT - COFFE 1
- MAIN MENU FOR DISPENSING UNIT - COFFEE 2 - 3
- SETTING THE UNIT
- Temperature
- Doses
- Automatica
- Copy doses
- Flow
- SETTING THE MACHINE
- Info
- Light
- Alarms
- Current alarms
- Alarm history
- Counters
- Liter counter
- SN & Firmware
- Boiler temp.
- Water-tea doses
- Machine
- Grinder
- Data
- Control panels
- Liter counter
- Maintenance
- Reset
- Test
- PREPARING A CUP OF ESPRESSO
- NOTA
- PREPARING HOT MILK
- HOT WATER DISPENSING
- CUP HEATING PAD
- ALARMS
- Group alarms
- Machine alarms
- MAINTENANCE
- CLEANING THE WANDS AND THE EXTERNAL PARTS OF MACHINE
- CLEANING THE REMOVABLE PARTS
- CLEANING THE DISPENSING GROUP
- BOILER WASHING
- Disposal warnings
- Machine certification
- NOTE
- DALLA CORTE
Brand : Dalla Corte
Model : Zero Barista
Category : Coffee machine