
MoveMic MV-R - Uncategorized SHURE - Free user manual and instructions
Find the device manual for free MoveMic MV-R SHURE in PDF.


| Type | Wireless Lavalier Microphone Receiver (MV-R) |
| Dimensions (H x W x D) | 2 x 2.64 x 0.75 in (52.8 x 67 x 19 mm) |
| Net Weight | 81 g (2.86 oz) |
| Housing Material | Black PC/ABS Thermoplastic |
| Battery Type | Rechargeable Li-Ion Battery Pack |
| Nominal Voltage | 3.7 V DC |
| Battery Runtime (Normal Power) | Up to 8 hours |
| Battery Charge Time | 2.5 hours |
| Frequency Response | 50 Hz to 20 kHz |
| Dynamic Range | 100 dB A-weighted |
| Signal-to-Noise Ratio | 68 dB A-weighted |
| Maximum SPL | 130 dB SPL |
| Bit Depth | 24-bit |
| Sampling Rate | 48 kHz |
| Gain Adjustment Range | 0 to 60 dB |
| Range (Line of Sight) | Up to 100 ft (30 m) |
| Wireless Technology | Bluetooth Low Energy and Proprietary |
| RF Frequency Band | 2400 MHz to 2483.5 MHz |
| Connections | USB-C, 3.5mm Headphone Output, 3.5mm Camera Output (Mic/Line) |
| Included Accessories | MV-R Receiver, USB-C to USB-C Cable (15"), Roll Bag |
| Care Instructions | Clean with dry cloth; store at room temperature |
| Safety | Do not expose to water, heat, or open flames; battery replacement by Shure only |
| Reparability | Factory reset via menu; no user-serviceable parts |
Frequently Asked Questions - MoveMic MV-R SHURE
User questions about MoveMic MV-R SHURE
0 question about this device. Answer the ones you know or ask your own.
Ask a new question about this device
Download the instructions for your Uncategorized in PDF format for free! Find your manual MoveMic MV-R - SHURE and take your electronic device back in hand. On this page are published all the documents necessary for the use of your device. MoveMic MV-R by SHURE.
USER MANUAL MoveMic MV-R SHURE
Online user guide for the Shure MoveMic Kit. Pair the MoveMic cliplav to your device or the receiver. Shoot landscape or portrait video.
Stream to Facebook or YouTube. Adjust EQ, compression, update firmware, find supported devices, and troubleshoot.
Version: 1.5 (2024-D)
Table of Contents
MoveMic The Shure MoveMic 3
Quick Start Guide 3
Wearing the Mic 3
MoveMic Best Practices 3
General Description 3
Features 4
The Shure MoveMic 4
Powering the MoveMic On and Off 4
The MoveMic Charge Case 6
Charge Case Status LED Indicators 6
Important Tips for Care and Storage of Shure Rechargeable Batteries 7
The MOTIV Audio Application 7
Pairing to the MOTIV app 7
Mic Settings 8
The MOTIV Video Application 11
Features 11
Video Standby Mode 12
Video Record Mode 13
Live Streaming 14
Live Stream Using the MOTIV Video App 14
Easy Live Streaming to Facebook and More 15
Stream to Facebook 15
Stream to YouTube 15
While You Stream 15
Hardware Receiver 15
The MoveMic Receiver 15
MoveMic Receiver LED Indicators 16
Adjusting the Receiver 17
Connecting to the Receiver 18
Pairing to the Receiver 19
The Receiver Display 19
The Receiver Menu Tree 20
Recording Tips 21
Turn On Airplane Mode and Do Not Disturb 21
Capture Clear Sound 21
Use the Dark Theme 21
Monitor Your Sound 21
Gallery 21
Video Playback 22
Sharing Video Recordings 24
MoveMic Firmware Updates 24
Troubleshooting 25
System Requirements 26
System Requirements and Compatibility: iOS 26
System Requirements and Compatibility: Android 26
Accessories 26
Furnished Accessories 26
Optional Accessories 27
Specifications 27
The MoveMic 27
The MoveMic Charge Case 29
The MoveMic Receiver 29
Open Source Attribution 31
Certifications 31
MoveMic The Shure MoveMic
Quick Start Guide
- Charge: Make sure that battery is fully charged before first use.
- Download the Application: Follow steps for installation using the App Store or Google Play. The first time you use the MOTIV application you will be prompted to allow access to the device camera and microphone. You can grant Location Services permission and share usage analytics with Shure.
- Pair: Remove charged MoveMics from the charge case; power on and pair to the MOTIV application.
- Record: You are ready to start recording.
Note: We recommend that you use a wired connection to monitor your recordings. First plug-in your wired headphones and then pair the MoveMics to the app when using a mobile device. Plug directly into the receiver when using the hardware receiver. Monitoring your recording while using a Bluetooth headset is not recommended.
Wearing the Mic
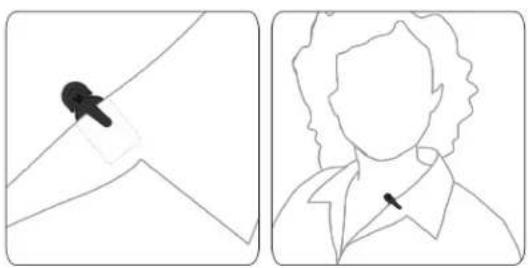
Wear the MoveMic with the clip facing out and the MoveMic body discretely hidden behind clothing to minimize camera visibility.
natural_image
Two line drawings: one showing a black object with a pointer, the other showing a person's profile outline (no text or symbols)MoveMic Best Practices
When recording with the MoveMic kit, use the following best practices:
• Always remain in line of sight from the MoveMic to your receiver; either the MV-R or your phone if utilizing the MOTIV app.
- Minimize distance for optimal video content and wireless performance. Many creators stay within 20ft (6m) to have the best visibility and strongest sound.
- Position the MoveMic so the body of the transmitter is placed behind clothing to minimize visibility on camera.
- When using with a mobile phone we recommend putting your device into airplane mode and Do Not Disturb to prevent interruptions to the recording caused by phone calls, texts or alerts.
- Only use wireless to connect to the MoveMic products. For optimal performance don't use other wireless devices at the same time, like wireless earphones or speakers, smart watches, gimbals or other devices.
General Description
The Shure® MoveMic Wireless Lavalier Microphone System provides instant video livestreaming or audio and video recording with high fidelity audio to your mobile device. The kit includes 2 discrete MoveMic lavalier microphones that use the MOTIV Audio or Video Recording application to adjust mic settings and record or stream to the web. The system is ideal for recording situations that require vocal clarity with a balanced tone and discrete form that works on the go.
Features
- Compatible with iOS and Android devices.
Note: See the compatibility tab on product pages for information on recommended Android devices. MoveMic One, MoveMic Two, MoveMic Two Receiver Kit and MoveMic Receiver.
- Plug-and-Play Operation supporting landscape and portrait recording
- Innovative, Discrete MoveMic Design, hybrid mic and clip, can be affixed to a variety of materials with excellent sound quality and reliability
- Flexible Recording Control with the MOTIV™ Audio and Video Recording applications which include remote gain adjustment settings
• Support for 1 or 2 microphone recordings
Tip: Turn on Airplane Mode and Do Not Disturb to prevent interruptions to the recording caused by phone calls, text messages, or alerts.
The Shure MoveMic
Powering the MoveMic On and Off
Power On: Press and hold the MoveMic power button for 3 seconds until both LEDs double flash. Continue to hold power button to put MoveMic into pairing mode.
Power Off: Press and hold the MoveMic power button for 3 seconds until the LED power indicator flashes red twice. Release the button. You can now put the MoveMic away.
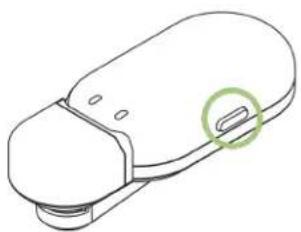
MoveMic Button Commands
natural_image
Line drawing of a computer mouse with a green circular highlight on the handle (no text or symbols)| MUTE/UNMUTE MIC | Press once |  | |
| POWER ON | Hold for 3 seconds |  | |
 | POWER OFF | Hold for 3 seconds or place mic into Charge Case and shut the lid |  |
 | PAIRING MODE | Hold 6 seconds from a powered-off state |  |
MoveMic LED Indicators
natural_image
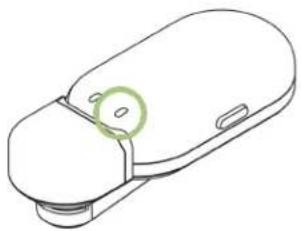
Line drawing of a computer mouse with a green circular highlight on the handle (no text or symbols)Power LED
| MoveMic On | Green double flash |
| Muted | Red solid |
| MoveMic Off | Red double flash, then off |
Note: No LEDs may also be an indication that LEDs have been toggled off in the MOTIV application.
natural_image
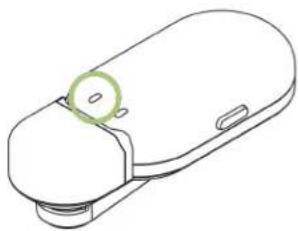
Line drawing of a mechanical device with a green circular annotation highlighting a specific part (no text or symbols present)Connection LED
| Pairing mode | Alternating red and blue |
| Successful Pair | Solid blue for 30 seconds |
| Low battery level | Red persistent flashing |
| Medium battery level | Solid amber for 30 seconds |
| High battery level | Solid green for 30 seconds |
| Unlocked | Green flashing |
| Locked | Amber flashing |
| Factory reset | Green and red triple flash |
Error
Red persistent slow flashing
The MoveMic Charge Case
The MoveMic Charge Case is a combination storage and charging case that is compact enough to fit inside your pocket. The magnetic lid keeps it securely closed to store the mics safely. The LED indicators on the outside of the case allow you to check the case and MoveMic battery levels when the lid is closed and the mics are docked inside. The case uses a rechargeable battery and can be connected to a laptop with the included USB-C cable when it requires charging. You can also charge the case with a charging brick (not included).
Tip: Ensure that the mics are charged and ready for instant recording by always keeping them docked in the Charge Case with the lid closed when not in use.
Charge Case Status LED Indicators
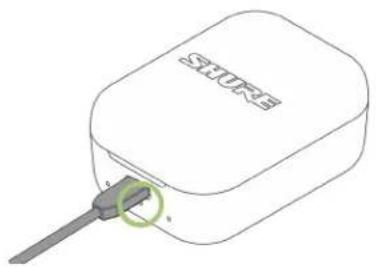
Charge Case status is the center LED.
natural_image
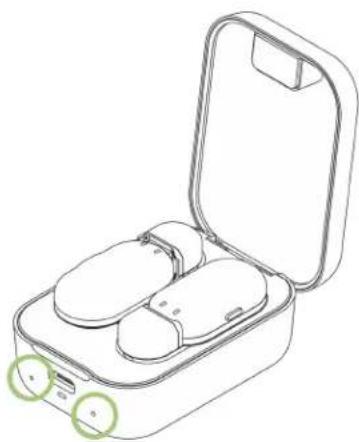
Line drawing of an open outdoor device with two buttons and a pair of earbuds (no text or symbols)MoveMic status indicators are located under each mic.
| Status | Color |
| Low battery | Red flash |
| Charging | Amber slow flash |
| Firmware update in progress | Green/Red alternating flash |
| Fully Charged | Green for 1 minute then off |
The Charge Case will go into Sleep mode after 1 minute of inactivity. To wake the case, close the lid.
Important Tips for Care and Storage of Shure Rechargeable Batteries
Proper care and storage of Shure batteries results in reliable performance and ensures a long lifetime.
• Always store batteries and transmitters at room temperature
- Ideally, batteries should be charged to approximately 40% of capacity for long-term storage
- During storage, check batteries every 6 months and recharge to 40% of capacity as needed
Important: Always fully charge a new battery before first use, if possible.
The MOTIV Audio Application
Use the Shure ^® MOTIV Audio application to connect to microphones, adjust gain levels, and to record, edit and share audio. The device stores the most recently used settings for quick setup each time you record.
Tip: Turn on Airplane Mode and Do Not Disturb to prevent interruptions to the recording caused by phone calls, text messages, or alerts.
Pairing to the MOTIV app
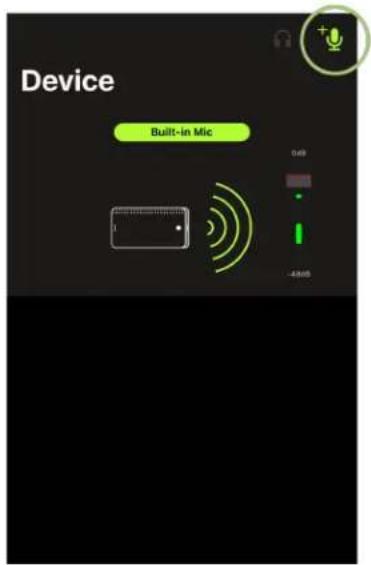
Circled icon is the Add Mic icon.
- Open the MOTIV application and tap the Device icon.
- Power on the MoveMic. Hold the Power On button long enough (6 seconds) to put the mic into pairing mode.
- Ensure that your mobile device Bluetooth is on.
-
In the MOTIV app, tap the Add Mic icon. The mic will appear in the list of available microphones.
-
Tap an available microphone to Pair. Successful connection will be indicated by solid blue connection LED for 30 seconds, and the device settings screen will open.
Microphones that have been paired to MOTIV will automatically reconnect the next time MOTIV is opened.
Unpairing a Microphone
Connect up to 2 microphones at a time to the MOTIV app. If you'd like to use a different microphone and two mics are already connected, disconnect a microphone to make a space available for the new mic.
- Tap the Add Mic icon to view all microphones that have been paired to the app.
- Tap a connected mic for the option to stay connected or Disconnect and Forget.
- When you disconnect a microphone, the channel is now available to pair to a second microphone.
Pairing a Second Microphone
To connect a second mic, just repeat the process.
- Open the MOTIV application. First mic is already connected.
- Power on and hold to turn on the second mic and put it into pairing mode.
- Tap the Add Mic icon.
- Select the mic you want to connect to.
- Mic is paired. Use MOTIV to adjust mic gain and select video settings as needed.
If a previously paired mic becomes disconnected, MOTIV may indicate that the mic is out of range. The application will try to reconnect for up to 30 seconds. If needed, follow the steps listed above to manually reconnect.
Mic Settings
Use the MOTIV app to change microphone settings and to record, edit, and share audio. The device stores the most recently used settings for quick setup each time you record.
Tip: Turn on Airplane Mode and Do Not Disturb to prevent interruptions to the recording caused by phone calls, text messages, or alerts.
Preset Modes
Three selectable modes optimize settings for gain, equalization, and compression. Set the microphone level and try the modes to find which sounds best. Preset modes can affect the strength of the input signal, so adjust the microphone level as needed after changing presets.
| Mode | Application | Characteristics |
 Speech Speech | speech | Equalization that emphasizes clarity and fullness, with gentle compression. |
 Singing Singing | solo or group vocal performances | Subtle equalization to add richness and clarity for a natural sound. |
| Flat | any | An unprocessed signal (no equalization or compression settings used). Adds flexibility when processing the audio after recording. |
Custom Presets
Create and save custom presets to quickly access frequently used mic settings.
- Start with the preset mode that best suits your application needs.
- Adjust advanced settings, like compression, for clarity and consistency.
- Tap Save to rename and save your new custom preset. The original preset will remain available.
- The new custom preset is added to your list.
To access saved presets:
- Tap the caret (arrow) in the Preset row to view your list of available presets.
- Tap custom preset and Apply Preset to instantly apply gain, stereo, equalization, and compression preferences.
Tip: You can save a custom preset at any point. Tap Save and give the current settings a new name.
Advanced Mic Settings
After you have selected the preset mode for your application, fine tune the sound of your recording with limiter, compressor, and equalizer controls. Your settings will be retained in the microphone when using other audio and video recording applications.
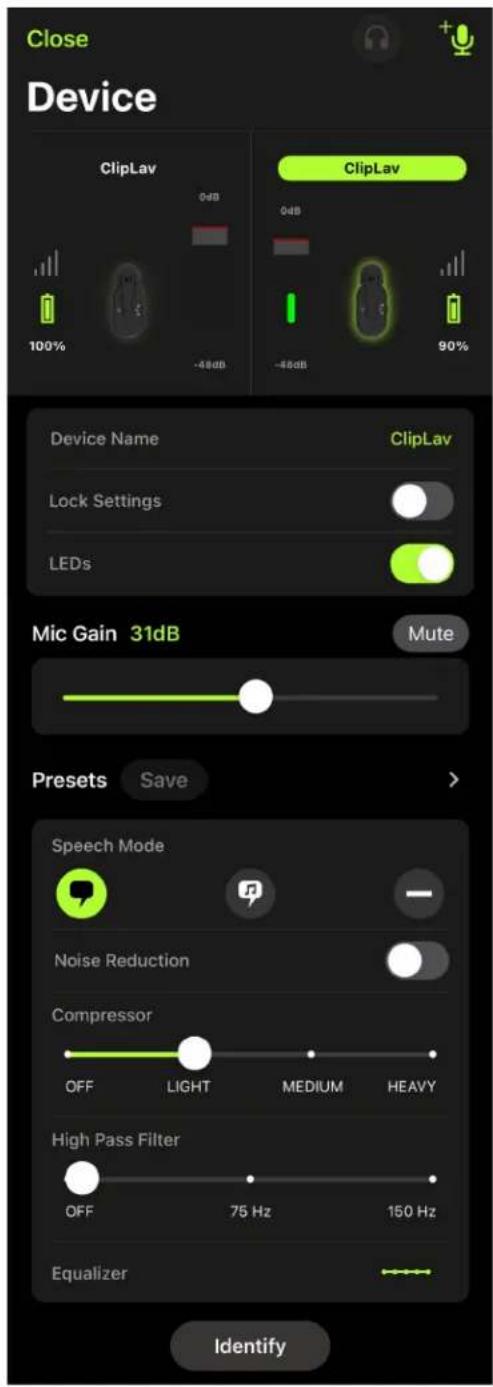
Device Name: Tap the Device Name if you'd like to customize your microphone name.
Lock Settings: Lock settings when you have dialed in your sound to ensure that nothing gets accidentally changed.
LEDs: Turn off the LEDs on the microphone transmitters for a more discrete mic presence.
Mic Gain: Use the mic gain slider to adjust the microphone input gain.
Mute: Press to mute and unmute the microphone.
Presets: Refer to the Presets and Custom Presets sections for more information on using presets and saving your own.
Noise Reduction: Significantly reduce the amount of noise in the signal caused by projectors, HVAC systems, or other environmental noise. It is a dynamic processor, which calculates the noise floor in the room and removes noise throughout the entire spectrum with maximum transparency. Use in rooms with controlled acoustics and minimal echoes for the most natural sound.
Compressor: Choose no compression, or select light or heavy compression to control volume when your sound source is dynamic. The compressor will narrow the dynamic range, which means that quiet signals are boosted and loud signals are lowered.
High Pass Filter: Choose no HPF for the most natural sound. Or select 75 Hz or 150 Hz to reduce wind noise, room noise, or proximity effect.
- 75 Hz Low frequency cutoff Provides a 6 dB-per-octave cutoff at 75 Hz. Helps eliminate floor rumble and low-frequency room noise from heating and air conditioning systems. This setting may also be used to compensate for proximity effect or to reduce low frequencies that make an instrument sound dull or muddy.
- 150 Hz Low frequency rolloff Provides a 6 dB-per-octave rolloff filter at 150 Hz. Use this to compensate for proximity effect or to reduce low frequencies that could make an instrument sound dull or muddy.
Equalizer: Change the preset modes to hear the DSP changes, and then use the equalizer to boost or cut bands of frequencies to improve sound clarity.
Identify: Select Identify in the receiver menu to quickly clear up confusion if you forget which microphone is one or two. The LED flashes for easy identification.
The MOTIV Video Application
The Shure MOTIV Video recording app provides instant video recording with uncompressed audio for your mobile device. Customize the sound with digital signal processing (DSP) preset modes, adjustable gain, and stereo width control.
Features
- Compatible with iOS, Android, PC and Mac devices.
Note: See https://www.shure.com/en-US/motiv-compatibility for information on recommended Android devices.
• Plug-and-Play Operation supporting landscape and portrait recording
- Flexible Recording Control includes gain adjustment settings
• Support for mono and stereo audio devices
- When used with MOTIV microphones, preset modes are available for a variety of recording situations.
Tip: Turn on Airplane Mode and Do Not Disturb to prevent interruptions to the recording caused by phone calls, text messages, or alerts.
Video Standby Mode
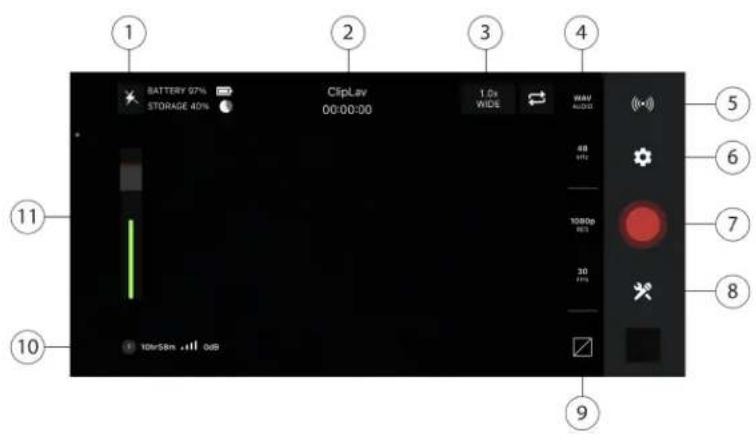
① Flash Use the flash when recording in low light situations.
② Connected Device/Recording Length/Focus Lock Device status will display the name of the connected MOTIV device. Recording length is displayed in hours, minutes, and seconds. See the Visual Settings topic for information on setting image focus and exposure.
③ Zoom Level/Reverse Camera Pinch the screen to adjust your zoom level for a closer view of your subject. Use the arrow circle icon to switch between front and back camera. Use the front-facing camera to shoot selfie videos.
④ Audio/Video Quality Settings Select your audio file type, sample rate, video frame rate and video resolution from a column of options.
Note: Option availability may vary based on your mobile device specifications.
• Audio file type: WAV, ALAC, AAC
• Sample rate: 44.1 kHz, 48 kHz
• Video resolution: 720p, 1080p, 4K
• Frame rate: 24 fps, 30 fps, 60 fps
⑤ Livestream Tap to access live stream options. See the Livestream topic for information on livestreaming options.
⑥ Settings Tap the application settings sprocket icon to select audio and video quality, face detection, light or dark theme appearance, to find version information, help materials, and to send feedback.
⑦ Record/Stop Button
⑧ Device Settings Tap to access the Device settings screen and pair microphones to the app.
⑨ Grid/Level/Off Display Tap through to display grid lines or a level for easy image composition. Or turn this feature off if you prefer a clean display.
⑩ Battery Life/Storage Space Displays percentage of remaining battery life and available storage space for your recording device.
Input Meter/Microphone Gain Displays the strength of the input signal. Tap the input meter to bring up the mic gain and direct monitoring sliders. You can adjust microphone gain during recording to match the volume of the sound source. Make live adjustments to ensure levels are in the target range (indicated by the shaded region of the input meter).
Visual Settings
Be sure to adjust your visual settings to get the best-looking video image. We recommend making adjustments in this order.
Zoom: Pinch to zoom in or out and frame your shot.
Brightness: Swipe up and down to set brightness level.

Focus: Tap to focus or tap and hold to lock brightness and focus. Tap again to release the lock.

Mic Gain Sliders
Access the mic gain sliders when you want to quickly adjust your volume. Tap the input meter to open the mic gain window. Use the sliders to determine how much of each input you hear. When you are finished adjusting the volume, tap outside the mic gain slider window to return to the standby or record view.
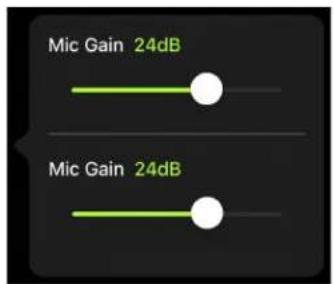
The top slider adjusts gain for first mic and the bottom slider adjusts mic gain for the second.
Video Record Mode
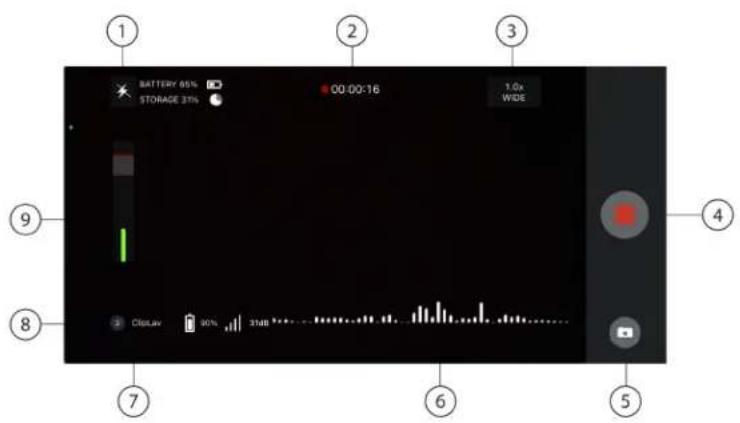
① Flash Use the flash when recording in low light situations.
② Connected Device Status/Recording Length/Focus Lock Status will display the model name of the connected MOTIV device. Recording length is displayed in hours, minutes, and seconds. The red dot will flash when video is recording. See the Visual Settings topic for more information on focus and exposure.
③ Zoom Level Pinch the screen to adjust your zoom level for a closer view of your subject.
④ Record/Stop Button Start and stop video recording.
Note: Video files are saved to the Photos application on your mobile device.
⑤ Camera Take a snapshot while video is recording.
⑥ Audio Recording The MOTIV Video recording application displays the audio waveform as it is being recorded.
⑦ Grid Use the grid lines to assist in composing your image.
⑧ Battery Life/Storage Space Displays percentage of remaining battery life and available storage space for your recording device.
⑨ Input Meter Displays the strength of the input signal. Tap the input meter to bring up the mic gain and direct monitoring sliders. You can adjust microphone gain during recording to match the volume of the sound source. Make live adjustments to ensure levels are in the target range (indicated by the shaded region of the input meter).
Compressed Format Recording
The MOTIV app records uncompressed audio files to provide the highest quality recording. However, you might find it more useful to record in a compressed file format. Compressed files take up less storage space allowing you more space on your device to record. It's also easier to share compressed files by message or email because compressed files use less data. Consider using a compressed format for recording demos or initial ideas because in this case it is more important to capture the idea than have the highest possible fidelity recording.
If you are unsure about which format to choose, start with the highest quality setting. You can always compress files later from your library if you find that you require smaller files sizes. See the Supported Audio Formats section to learn about the file formats that are available to you.
Remember: You can convert compressed audio to an uncompressed format, uncompressed audio to a compressed format and one type of compressed format to another. However, only WAV files can be edited. If you need to edit a file, convert the file to a WAV file first.
Live Streaming
Live Stream Using the MOTIV Video App
You can use the Shure MOTIV Video app to connect with Facebook or YouTube and live stream while using the MoveMic One and MoveMic Two with direct to phone connectivity. This allows you to capture and adjust professional quality audio as you stream to your live video feed.
Record a Test Run
Most streaming services provide the ability to do a unlisted test stream to a limited or private audience. Take advantage of this opportunity to test out your equipment and determine what settings sound best before you go live.
- Start the MOTIV Video app. Ensure that you are using the latest version of the app.
- Configure Audio/Video settings before you start to live stream.
- Connect 2 ClipLavs for stereo or 1 ClipLav for mono recording. Once recording starts you cannot change between stereo or mono audio without stopping the live stream.
- Adjust audio settings, like compression, for clarity and consistency.
- During live stream session, audio input monitoring and audio direct monitoring are available with same behaviors as video record mode.
- Tap Save to rename your live stream preset, or use the default name. The custom preset will be added to your list of presets.
Use the MOTIV app to live stream or to record videos. The app does not support simultaneous live streaming and video recording to the device.
Tip: Monitor with earphones to listen to playback without introducing echo.
Easy Live Streaming to Facebook and More
Stream to Facebook
- Open the MOTIV Video app.
- Pair the ClipLavs.
- Tap the Livestream icon and select Facebook Live. The Facebook login will open.
- Before you begin, add title and description. Select audience, where to post (timeline, page or group), stream bitrate and video quality.
- Tap Go Live. The countdown to your live stream will begin and you will be live. Begin the broadcast.
- End the broadcast from the MOTIV app by tapping the red Stop Record button.
Stream to YouTube
- Open the MOTIV Video app.
- Pair the ClipLavs.
- Tap the Livestream icon and select YouTube. The YouTube login will open.
- Log in to your YouTube account. Note: If the YouTube channel has less than 50 subscribers, you will be asked to use a RTMP/RTMPS connection to stream.
- Before you begin, add title and description. Select visibility (public or unlisted), stream bitrate and video quality.
- Tap Go Live. The countdown to your live stream will begin and you will be notified that the live stream is live. Begin the broadcast.
- If you have prescheduled a live stream, you can select that stream option or choose to start a new stream from the app.
- End the broadcast from the MOTIV app by tapping End Livestream.
While You Stream
- You can monitor comments and likes from your viewers as they come in from within the MOTIV app.
- View livestream viewer count to know how many viewers are watching.
If you are interested in starting a stream from another platform, log out of the first account from the MOTIV app. This way you will be free to log into another account. You cannot stream to more than one account at a time.
Hardware Receiver
The MoveMic Receiver
The MoveMic Two Receiver Kit expands recording options by adding a hardware receiver to the MoveMic kit. The receiver packs mic settings features into a palm-sized, portable package with incredible audio clarity, long-range transmission and easy to use features. Connect the receiver to your phone or camera, easily mounted using the cold shoe mount. Download the MOTIV Video app for a complete portable content creation kit.
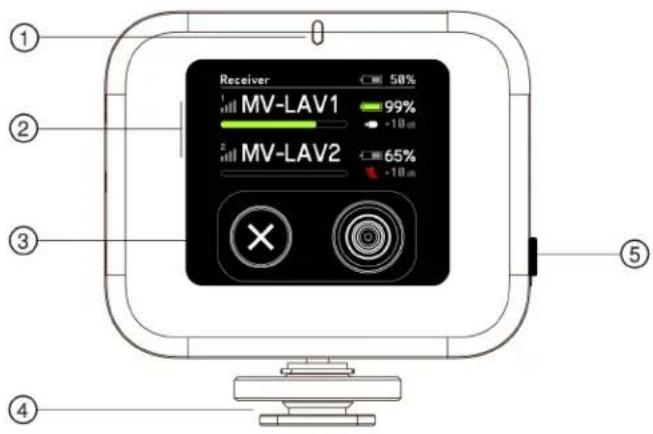
Front Panel
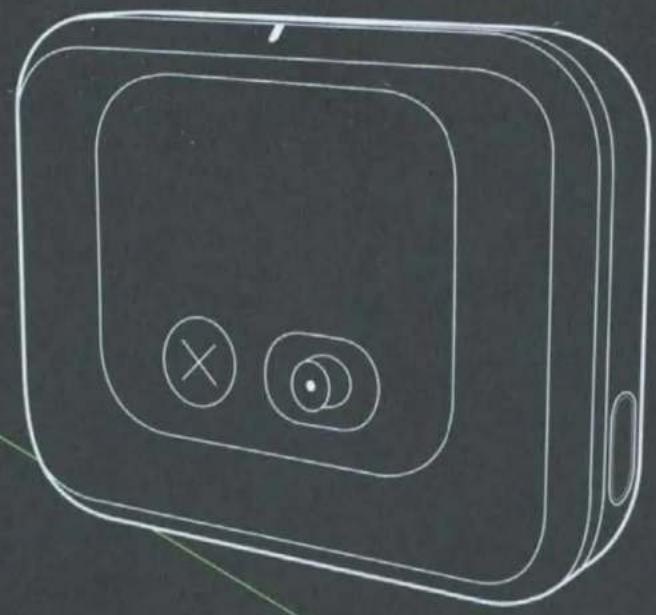
① LED status indicators Displays receiver information related to mic connection, battery and charge levels. See MoveMic Receiver LED Indicators topic for indicator status information.
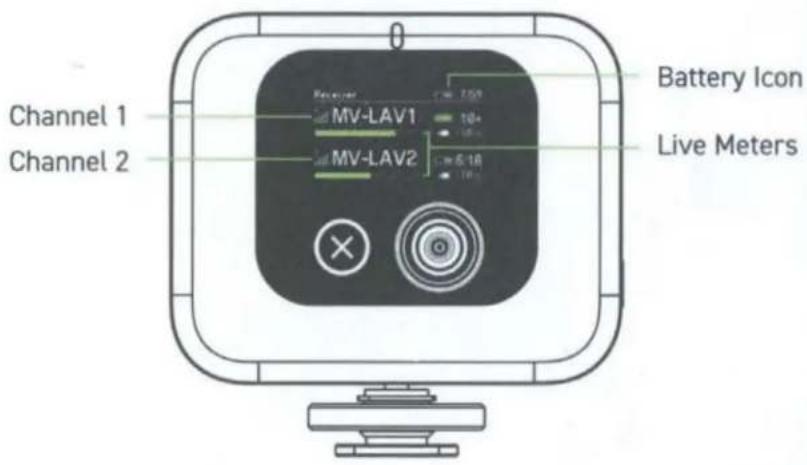
② Channel 1 / Channel 2 status Displays connection status, mic name, battery time percentage and audio gain levels. See Receiver Setup topic for more information.
③ Navigation buttons Use the left X button to cancel. Press the right button to enter or select a choice when navigating the receiver menu. Right button is also a directional toggle.
④ Cold shoe mount Use the cold shoe mount to secure the receiver to a camera or camera accessory.
⑤ Power button Press and hold to power the receiver on and off.
MoveMic Receiver LED Indicators
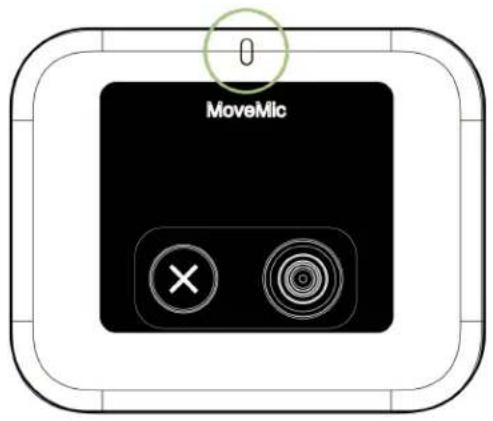
LED Indicator
| Status | Color |
| Seeking connection with mic | Blue flashing |
| Connected | Solid blue |
| Low battery level | Red persistent flashing |
| Charging in process | Amber flashing |
| Error | Red persistent slow flashing |
| Fully charged | Solid green for 60 seconds, then off |
Adjusting the Receiver
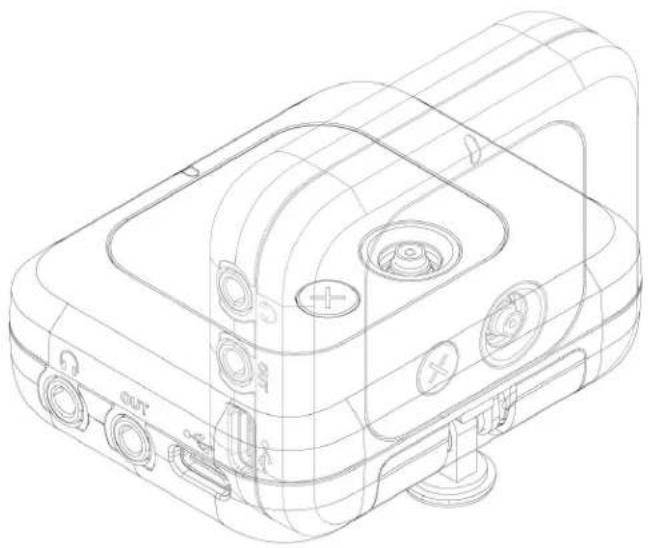
The receiver has a hinge and can be rotated 90 degrees horizontally or vertically to keep it securely out of the way when recording.
natural_image
Line drawing of a portable electronic device with ventilation slots and buttons (no text or symbols)Adjusting Receiver Position
Connecting to the Receiver
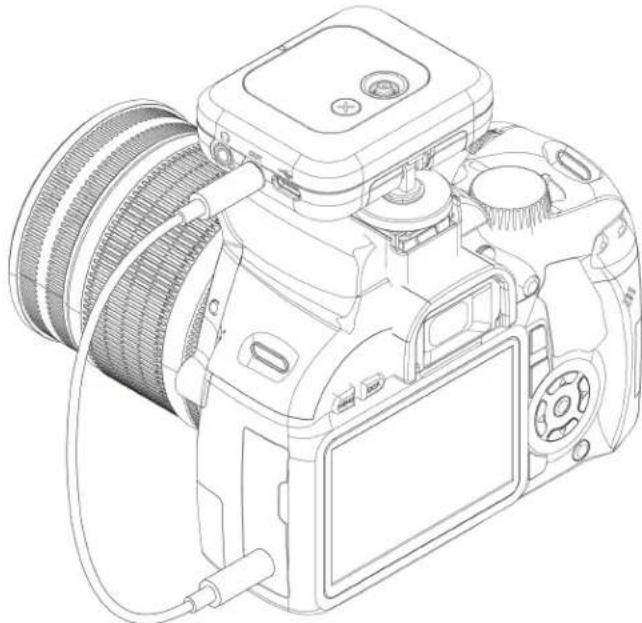
Connecting to the Camera
natural_image
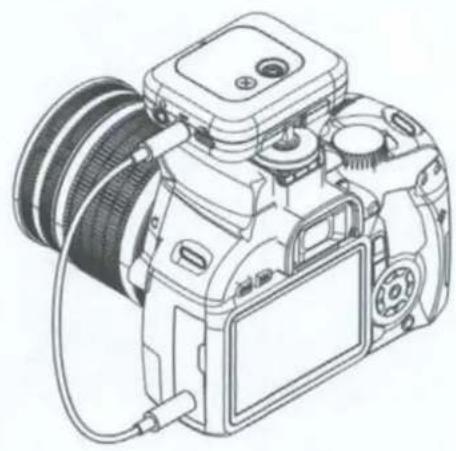
Line drawing of a DSLR camera with coiled cable and lens (no text or symbols)Mount the MoveMic receiver onto the cold shoe on top of your camera. Use the supplied 3.5mm to 3.5mm cable to connect the receiver to your camera.
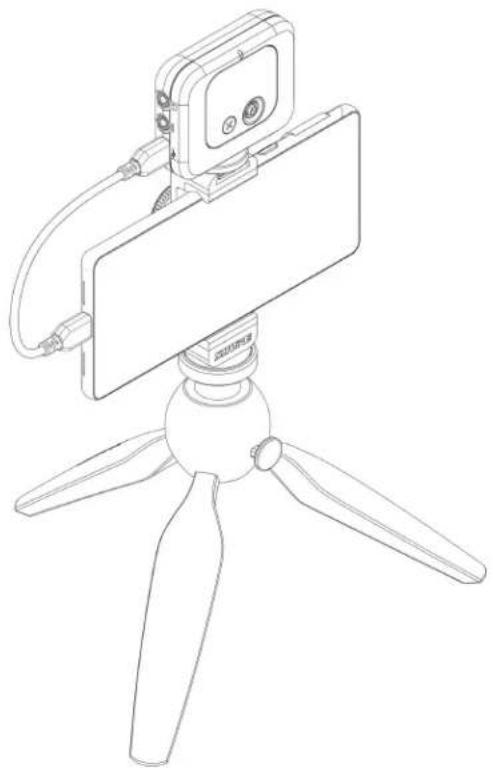
Connecting to the Phone
natural_image
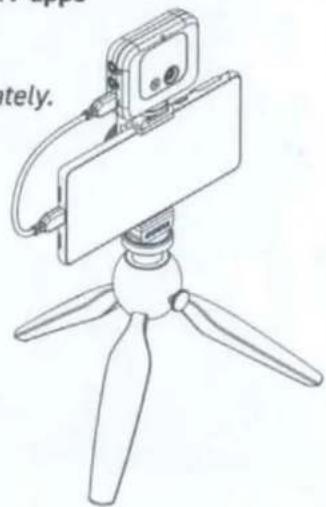
Line drawing of a handheld device mounted on a tripod with three propellers (no text or symbols)Use the supplied USB-C to USB-C cable to connect the MoveMic receiver to your phone or computer for additional compatibility to third party apps.
Pairing to the Receiver
Important: Ensure that the MoveMics and receiver are fully charged before the first use.
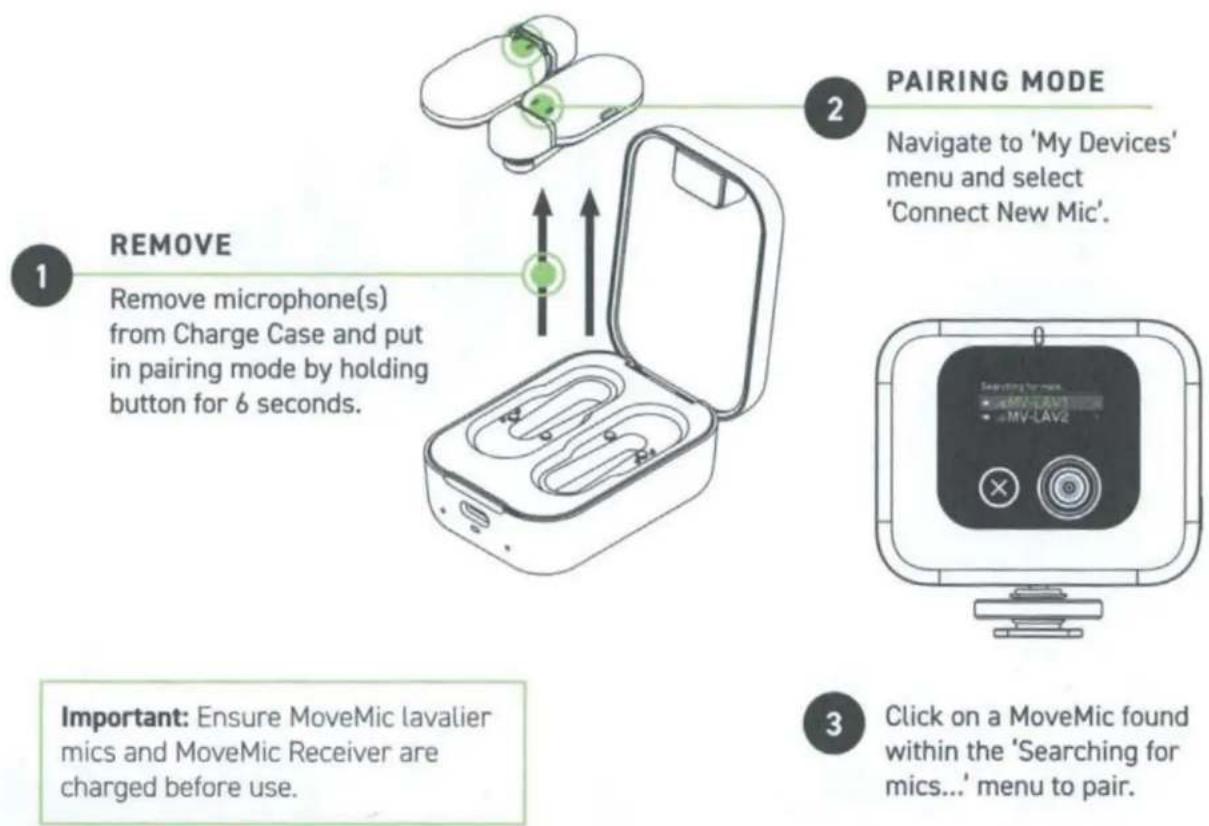
- Remove microphones from charge case and put in pairing mode. (Hold button for 6 seconds until blue light flashes)
- On the receiver, navigate to the My Devices menu. Select Connect New Mic.
- Select an available microphone in the Searching for mics menu to Pair.
Microphones that have been previously paired will automatically reconnect the next time they are used.
The Receiver Display
Use the MoveMic Receiver to rename microphones, review microphone and battery status and connect to a variety of input sources.
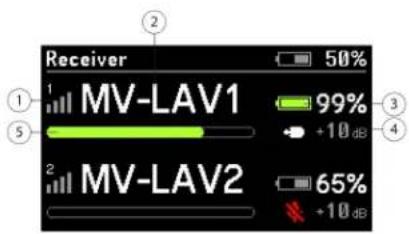
① Mic Connection Strength Displays connection levels between the mic and the receiver.
② Microphone Name Displays name to identifying microphones.
③ Mic Battery Level Displays icon and percentage of battery strength.
④ Microphone Status Displays microphone type and gain information.
⑤ Microphone Level Meter displays audio signal level and peaks.
The Receiver Menu Tree
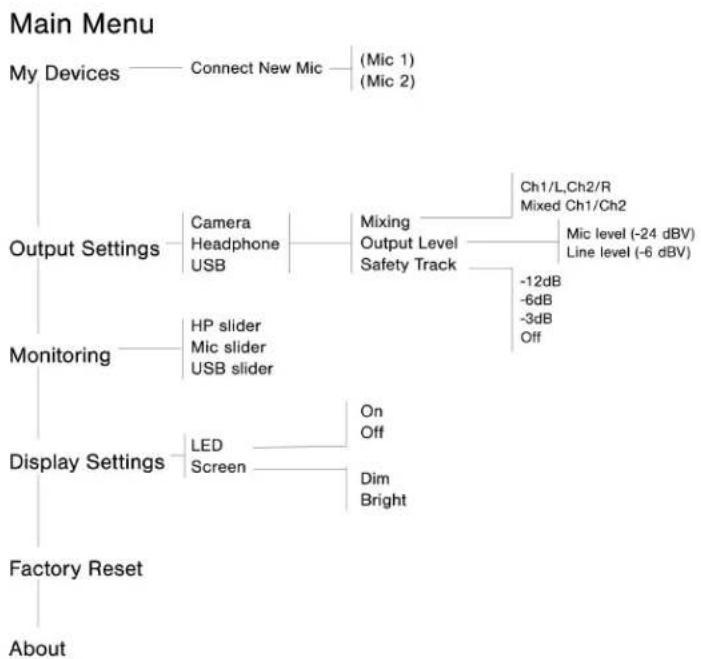
flowchart
graph TD
    A["Main Menu"] --> B["My Devices"]
    B --> C["Connect New Mic"]
    C --> D["(Mic 1) (Mic 2)"]
    A --> E["Output Settings"]
    E --> F["Camera Headphone USB"]
    E --> G["Mixing Output Level Safety Track"]
    G --> H["Ch1/L,Ch2/R Mixed Ch1/Ch2"]
    G --> I["Mic level (-24 dBV) Line level (-6 dBV)"]
    A --> J["Monitoring"]
    J --> K["HP slider Mic slider USB slider"]
    J --> L["Display Settings"]
    L --> M["LED Screen"]
    L --> N["On Off Dim Bright"]
    A --> O["Factory Reset"]
    O --> P["About"]
My Devices
- "Mic Name": Displays the name of connected mic. You can rename each mic for easy identification.
- Gain/Mute: Adjust the gain for each microphone so the loudest sounds peak at about 75% of the meter for best quality sound.
• Audio Effects: Your audio settings to dial in the optimal sound.
• LED: Turn the transmitter LED off or on. - Identify: Select Identify in the receiver menu to quickly clear up confusion if you forget which microphone is one or two. The LED flashes on the transmitter for easy identification.
- Mode: Use Presets to quickly optimize settings for your application.
Output Settings
- Safety Track: The Safety Track is a secondary recording to ensure that you'll have a backup file in case anything should happen to your audio. You can set the gain for the safety track here.
Monitoring
Display Settings
• LED: Turn the transmitter LED off or on.
• Screen: Adjust the brightness of the receiver screen
Factory Reset: When the receiver malfunctions use Factory Reset to completely reset the device to factory settings.
About: The About screen shows you the versions of software and firmware update that you have. When speaking to customer support you might be asked to provide this information.
Main Menu
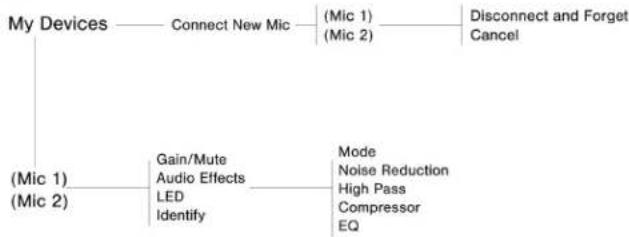
flowchart
graph TD
    A["My Devices"] --> B["Connect New Mic"]
    B --> C["(Mic 1) (Mic 2)"]
    B --> D["Disconnect and Forget Cancel"]
    A --> E["(Mic 1) (Mic 2)"]
    E --> F["Gain/Mute Audio Effects LED Identify"]
    E --> G["Mode Noise Reduction High Pass Compressor EQ"]
When mic is paired it moves to the top level of the menu tree for quick mic adjustment.
Recording Tips
Turn On Airplane Mode and Do Not Disturb
When you connect your microphones to your mobile device, be sure to enable Airplane Mode and Do Not Disturb. It's important to do this to avoid recording interference from phone calls, messages, and various notifications.
Note: Leave Airplane Mode off to add geolocation information to your audio file.
Capture Clear Sound
For best signal-to-noise ratio when using the MoveMic receiver start with the output level set to Line level and lower the volume on your camera. Then raise the volume until you get the strongest signal without peaking. If that doesn't work, switch output level to Mic level.
Use the Dark Theme
Select the Dark screen option to change the device application display from light gray to very dark gray. The darker display is ideal for discreet recording in low-light situations. A darker screen also conserves battery life.
You can access the theme appearance setting by going to Settings > Appearance
Monitor Your Sound
We recommend that you use a wired connection to monitor your recordings. When using the MoveMics, first plug-in your wired headphones and then pair the MoveMics to the app. Monitoring your recording while using a Bluetooth headset is not currently supported. The receiver has a headphone output which allows you to monitor directly from the receiver. Monitoring while recording allows you to make volume adjustments as needed for the highest quality recording.
Note: Use phone buttons to adjust monitoring volume.
Gallery
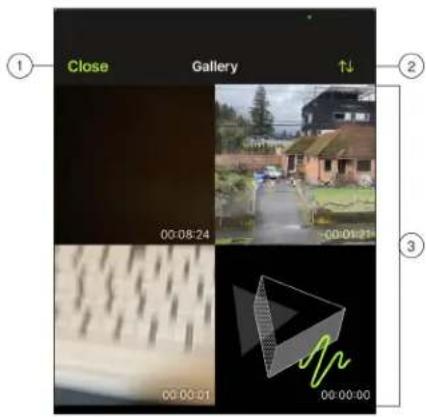
An example of the gallery in grid view.
① Close: Tap Close to exit out of the video gallery.
② Gallery View/Sort: Use the drop-down menu to chose your gallery and sort views.
- List view displays file details. Grid view displays thumbnail and file length. Card view displays scrollable full screen images with file information.
- Sort displays videos by date or size.
③ Track List: Displays your collection of recorded videos.
Note: iOS users have the ability to search for files in the MOTIV Library by using the Spotlight feature.
Video Playback
Tap the video in the gallery to access the Playback window.
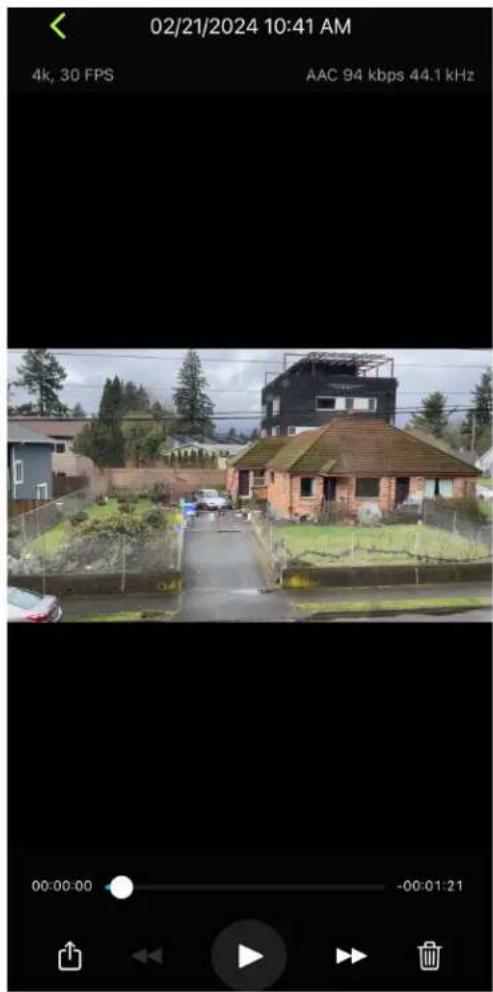
The Video Playback window displays
- Track Information: Audio and video formats, bit depth, and sample rate.
- Track Artwork: A representative thumbnail.
- File information: The recording date and time.
- Timeline: See where you are in the track as it progresses. The time elapsed and time remaining are displayed around the timeline.
- Share, Playback, Delete: Share your video. Rewind, Play/Pause and Fast-forward or permanently delete your video.

natural_image
Exterior view of a residential house with brick walls and surrounding greenery, captured in a video camera (no signage or text overlays)Sharing Video Recordings
Save to Camera Roll
Convert your audio into a video file that can be easily shared to social media from your device photo application (Camera Roll or Photos).
- Open the MOTIV application and go to the Library.
- Tap to highlight the file you want to share or convert.
- Tap the three dots to reveal file options.
- Select the Share button.
- Select Save to Camera Roll.
- You have the option to save a thumbnail or use a MOTIV image.
- The conversion will happen automatically. Large files will take longer to convert.
Note: The first time you save to Camera Roll you will be asked to grant permission for file sharing between applications. If you accidentally dismiss permissions, you can always change access in the device settings. Granting permission creates a MOTIV folder inside the photo app.
- When the conversion process is complete, you will receive a success notification to let you know that your track is available for sharing.
Save to Dropbox ^TM
Save your MOTIV files to Dropbox to store backup copies, free up space on your iOS device, or share to social media.
- Open the MOTIV application and go to the Library.
- Tap to highlight the file you want to share.
- Tap the three dots to reveal file options.
- Select Share, select More, select Dropbox.
Note: You may need to grant access between MOTIV and Dropbox. Selecting "Allow" creates a MOTIV folder inside Dropbox and links the applications.
- When the file successfully uploads, the file saved notification appears.
Note: Large files may take longer to upload.
Now that your file is uploaded to Dropbox, you can store backup copies of your recordings or share them on social media.
AirDrop ^® with MOTIV
MOTIV supports the ability to AirDrop WAV files to selected contacts.
- Open the MOTIV application and go to the Library.
- Tap to highlight the file you want to share.
- Tap the three dots to reveal file options.
- Select Share, select More, select AirDrop to view your AirDrop contacts.
MoveMic Firmware Updates
Firmware is embedded software in each component that controls functionality. Periodically, new versions of firmware are developed to incorporate additional features and enhancements. To take advantage of design improvements, download new versions of the firmware when prompted by the app.
Charge Case Update Tip: For best results, before updating make sure that the MoveMics are docked inside the charge case and fully charged. Connect the charge case to your device using the correct Lightning or USB cable. The charge case flashes amber to indicate that the firmware update is in progress.
If you run into problems updating the firmware, new versions of the firmware can be uploaded and installed using the Shure Update Utility.
Troubleshooting
| Issue | Solution |
| Mic no longer paired to MOTIV | Mic may unpair if it sits idle and is not being used, is placed back into the case or if the phone enters sleep mode. Close and reopen the app. The microphones will automatically attempt to re-pair.Tap the Add Mic icon to re-pair. You'll know that the connection is secure when the microphone name is visible in the status bar.If you are still experiencing pairing issues, tap the microphone icon and select Forget.Then follow pairing instructions with this clean start. |
| Microphone is paired, but the audio meter does not register a signal. | Edit the privacy setting for your recording device under SETTINGS >PRIVACY >MICRO-PHONE to give MOTIV permission to use the microphone. |
| Audio sounds bad or distant | To ensure that you are receiving audio from the MoveMic and not a built-in microphone, confirm that the MoveMic is connected. You'll know that the connection is secure when the microphone name is visible in the app.If you are using the hardware receiver, ensure that your cable connections are secure. |
| Audio is distorted | Use the audio meter to ensure that volume peaks are within the target range (the gray area). If the level reaches the red peak indicator of the input meter, tap the input meter to access mic gain and turn the gain down with the slider. |
| Audio is not in sync with video | Switch to a lower frame rate or resolution size. You might achieve better performance with a less system intensive frame rate. |
| Recording stops due to over-heating | MOTIV Video recording application responds to device overheating by disabling the meter and waveform display. If device continues to overheat, MOTIV will save your recording and shut down. Ensure that your device has cooled down before starting a new recording. |
| Unable to share file | If a file is too large to be shared, there are a couple options for reducing file size.Convert your file to a compressed file format.Connect your mobile device to your computer and use file transfer, like iTunes, to download the file to your desktop.Split your track in two, export both files and recombine them using audio editing software. |
| General troubleshooting | Ensure that the microphones and device are all charged.Ensure that MOTIV is updated to the most current version.Make sure that your phone's operating system is updated to the most current version.Check to see how the microphone works using a different device.Close and restart the application.Powering down and rebooting the device will clear the cache and can sometimes help with software performance. |
| Factory Reset | In the event that the MoveMics, charge case, receiver or app become unresponsive, it may be necessary to perform a factory reset to restore the item to factory settings.MoveMic: Perform a factory reset by toggling the MoveMic button off. Then press the power button quickly 2 times, press and hold for 10 seconds or longer on the third press to reset. MoveMic will triple flash green and red during the reset.Charge Case: The inside of the case has a pin hole reset.Receiver: Factory Reset can be found near the bottom of the hardware receiver menu.MOTIV app: Close and restart the application. |
System Requirements
System Requirements and Compatibility: iOS
- iOS: iOS 15 and higher
• iPhone: iPhone 12 and higher - iPad: iPad Pro (USB-C)
System Requirements and Compatibility: Android
Will work with any Android device that has:
• Android 12.0 (Snow Cone) and higher
• USB Audio Class 2.0 support and higher
- Bluetooth 5.0 and higher
Android is a trademark of Google Inc.
Note: See the compatibility tab on product pages for information on recommended Android devices. MoveMic One, MoveMic Two, MoveMic Two Receiver Kit and MoveMic Receiver.
Accessories
Furnished Accessories
MV-ONE
- 1 MoveMic Lav
- 1 foam windscreen
• AMV-USBC-USBC15: 1 USB-C to USB-C cable, 15" - 1 Charge Case
MV-TWO
• 2 MoveMic Lavs
• 2 foam windscreens
• AMV-USBC-USBC15: 1 USB-C to USB-C cable, 15"
• 1 Charge Case
MV-TWO-KIT
• 1 MV-R
• 2 MoveMic Lavs
• 2 foam windscreens
• AMV-USBC-USBC15: 1 USB-C to USB-C cable, 15"
• 1 Charge Case
- 1 Roll bag
Optional Accessories
• AMV-USBC-LTG15: 1 USB-C to Lightning cable, 15"
Specifications
The MoveMic
Frequency Response
50 Hz to 20 kHz
Dynamic Range
100 dB, A-weighted
Signal-to-Noise Ratio
68 dB SPL, A-weighted
Equivalent Input Noise
26 dB SPL, A-weighted
Maximum SPL
130 dB SPL
Nominal Voltage
3.7 V DC
Sensitivity (with MV-LAV)
-37 dBFS @94 dB SPL (1 Pascal RMS)
Bit Depth
24-bit
Sampling Rate
48 kHz
Gain Adjustment Range
0 to 60 dB
Range
Up to 100 ft (30m) line of sight
Radio Frequency Range
2400 MHz to 2483.5 MHz
Technology
Bluetooth Low Energy and Proprietary
RF Output Power
| SR7XW | +16 dBm |
| SR6XW | +9.66 dBm |
Dimensions
1.81 in. x 0.87 in. x 0.59 in. (46 mm x 22 mm x 15 mm)
Net Weight (no windscreen)
0.29 oz. (8.2g)
Housing
Black PC/ABS Thermoplastic
Water Resistance
IPX4
Battery Type
Rechargeable Li-Ion Coin Cell
Battery Runtime (Direct to Phone)
| Normal Power: | Up to 11.3 hours |
| High Power [1]: | Up to 8.7 hours |
Antenna
Sheet metal with copper-nickel-zinc alloy
[1] High Power is applicable in the Americas and isn't available in all regions.
Supported Audio Formats
Android
| PCM/WAV | Up to 352 KHz |
| AAC | 256, 128, 96 |
iOS
| PCM/WAV | Up to 352 KHz |
| MP4 Audio | Audio files: .mp4, .m4a, .m4p, .m4b |
| AAC | 256, 128, 96 |
| ALAC | Audio file: Apple Lossless |
The MoveMic Charge Case
MFi Certified
Yes
Dimensions
2.93 in. x 2.10 in. x 1.31 in. (74.5mm x 53.3mm x 33.2mm)
Net Weight
80.3g (2.83 oz)
Housing
Black PC/ABS Thermoplastic
Battery Type
Rechargeable Li-Ion Battery Pack
Nominal Voltage
3.7 V DC
Battery Operating Temperature
2 to 35 °C (35.6 to 95 °F) [1]
Battery Charge Time
2.5 Hours
USB Host Power Requirement
≥100 mA
[1] Charge rates are slower at colder temperatures (2 to 15 °C (35.6 to 59 °F))
The MoveMic Receiver
MFi Certified
Yes
Frequency Response
50 Hz to 20,000 Hz
Dynamic Range
100 dB, A-weighted
Signal-to-Noise Ratio
68 dB SPL, A-weighted
Equivalent Input Noise
26 dB SPL, A-weighted
Maximum SPL
130 dB SPL
Sensitivity (with MV-LAV)
-37 dBFS @94 dB SPL (1 Pascal RMS)
Bit Depth
24-bit
Sampling Rate
48 kHz
Gain Adjustment Range
0 to 60 dB
Minimum Load Impedance (Headphone)
16 Ω
Maximum Headphone Output Level
26.4mW @ 1% THD
Minimum Load Impedance (Camera Out)
2k Ω
Maximum Camera Output Level (Mic)
-26dBV
Maximum Camera Output Level (Line)
-8.3dBV
Range
Up to 100 ft (30m) line of sight
Radio Frequency Range
2400 MHz to 2483.5 MHz
RF Output Power
SR7XW
+16 dBm
SR6XW
+9.66 dBm
Dimensions
52.8 x 67 x 19 mm (2 x 2.64 x 0.75 in.), H x W x D
Weight
81 g (2.86 oz.)
Housing
Black PC/ABS
Antenna
Sheet metal (tin-plated steel)
Battery Type
Rechargeable Li-Ion Battery Pack
Battery Runtime (MoveMic to MV-R Receiver)
| Normal Power: | Up to 8 hours |
| High Power [1]: | Up to 7 hours |
Battery Runtime (MV-R Receiver)
| Normal Power: | Up to 8 hours |
| High Power [1]: | Up to 7 hours |
[1] High Power is applicable in the Americas and isn't available in all regions.
Open Source Attribution
https://content-files.shure.com/attributions/move-mic-attributions.pdf
Certifications
Meets essential requirements of the following European Directives:
• WEEE Directive 2012/19/EU, as amended by 2008/34/EC
• RoHS Directive EU 2015/863
Note: Please follow your regional recycling scheme for batteries and electronic waste
CE Notice
Hereby, Shure Incorporated declares that this product with CE Marking has been determined to be in compliance with European Union requirements.
The full text of the EU declaration of conformity is available at the following site: https://www.shure.com/en-EU/support/declarations-of-conformity.
UKCA Notice
Hereby, Shure Incorporated declares that this product with UKCA Marking has been determined to be in compliance with UK-CA requirements.
The full text of the UK declaration of conformity is available at the following site: https://www.shure.com/en-GB/support/declarations-of-conformity.
Made for iPad (5th generation), iPad (6th generation, iPad (7th generation, iPad (8th generation), iPad Air 2, iPad Air 3, iPad Mini 4, iPad Mini 5, iPad Pro 9.7-inch (1st generation), iPad Pro (12.9-inch) 1st generation, iPad Pro 10.5-inch 2017 (2nd generation), iPad Pro 12.9-inch 2017 (2nd generation), iPhone 6s, iPhone 6s Plus, iPhone SE, iPhone 7, iPhone 7 Plus, iPhone 8, iPhone 8 Plus, iPhone X, iPhone Xs, iPhone Xs Max, iPhone XR, iPhone 11, iPhone 11 Pro, iPhone 11 Pro Max, iPhone 12, iPhone 12 Mini, iPhone 12 Pro, iPhone 12 Pro Max, iPhone SE 2, iPod Touch (7th generation).
iPad, iPhone, iPod and iPod touch are trademarks of Apple Inc., registered in the U.S. and other countries. iPad Air, iPad mini, and Lightning are trademarks of Apple Inc. The trademark "iPhone" is used in Japan with a license from Aiphone K.K.
QUICK START GUIDE
SHURE
natural_image
Line drawing of a smartphone with two circular buttons and an X mark on the screen (no text or symbols)MOVEMIC | RECEIVER
CONNECT
CAMERA
Use supplied 3.5mm - 3.5mm cable to connect MoveMic Receiver to your camera.
Mount MoveMic Receiver onto the cold shoe on the top of your camera.
natural_image
Line drawing of a DSLR camera with attached cable and lens (no text or symbols)PHONE
Use supplied USB-C - USB-C cable to connect your MoveMic Receiver to the USB-C port on your phone.
Note, using MoveMic Receiver (wired) will give you additional compatibility to third party apps in comparison to using your MoveMic products via Bluetooth. Bluetooth is only recommended for use with ShurePlus MOTIV apps and approved apps.
Phone mount sold separately.
USB-C - Lightning sold separately for Lightning iPhones.
natural_image
Line drawing of a handheld device with four propellers and a mounted camera (no text or symbols)PAIRING
Full user guide available on shure.com, or scan the QR code for more help.

1 Name lavs (Mic 1, Mic 2) in menu on MoveMic Receiver.
2 Adjust and set gain for each microphone. Note, you may need different gain for each mic depending on the subject you are recording.
3 Check live meters on MoveMic Receiver home screen to ensure you're passing audio.
4 You're ready; start recording on your phone or camera.
Top Tip: Adjust the gain for each microphone so the loudest peaks fill about 75% of the meter for the best sound.
© 2023 Shure Incorporated. SHURE and the SHURE logotype are registered trademarks of Shure Incorporated or Shure Acquisition Holdings, Inc. For additional information, see shure.com/trademarks. Patents: shure.com/patents
27A53828 Printed in China
MOVEMIC™ WIRELESS
OWNERS MANUAL

natural_image
Warning symbol: white exclamation mark inside a triangle (no text or numbers)
natural_image
Pure line drawing of a U-shaped mechanical component without any text, numbers, or symbolsProduct Safety and Warranty Information





合格证
QC PASS
©2023 Shure Incorporated
27A53826 (Rev. 1)
Printed in China

Regulatory Model:
North America, South America, Russia | Wireless Lavalier Microphone: SC7LW
Rest of World | Wireless Lavalier Microphone: SC6LW
Charge Case : SPCCW
IMPORTANT SAFETY INSTRUCTIONS
- READ these instructions.
- KEEP these instructions.
- HEED all warnings.
- FOLLOW all instructions.
- DO NOT use this apparatus near water.
-
CLEAN ONLY with dry cloth.
-
DO NOT block any ventilation openings. Allow sufficient distances for adequate ventilation and install in accordance with the manufacturer's instructions.
-
DO NOT install near any heat sources such as open flames, radiators, heat registers, stoves, or other apparatus (including amplifiers) that produce heat. Do not place any open flame sources on the product.
-
PROTECT the power cord from being walked on or pinched, particularly at plugs, convenience receptacles, and the point where they exit from the apparatus.
-
ONLY USE attachments/accessories specified by the manufacturer.
-
UNPLUG this apparatus during lightning storms or when unused for long periods of time.
-
REFER all servicing to qualified service personnel. Servicing is required when the apparatus has been damaged in any way, such as power supply cord or plug is damaged, liquid has been spilled or objects have fallen into the apparatus, the apparatus has been exposed to rain or moisture, does not operate normally, or has been dropped.
-
DO NOT expose the apparatus to dripping and splashing. DO NOT put objects filled with liquids, such as vases, on the apparatus.
-
The MAINS plug or an appliance coupler shall remain readily operable.
-
The airborne noise of the Apparatus does not exceed 70dB (A).
-
Apparatus with CLASS I construction shall be connected to a MAINS socket outlet with a protective earthing connection.
-
To reduce the risk of fire or electric shock, do not expose this apparatus to rain or moisture.
- Do not attempt to modify this product. Doing so could result in personal injury and/or product failure.
- Operate this product within its specified operating temperature range.
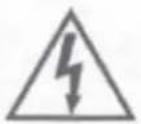 | This symbol indicates that dangerous voltage constituting a risk of electric shock is present within this unit. |
 | This symbol indicates that there are important operating and maintenance instructions in the literature accompanying this unit. |
For Products That Use Bluetooth
WARNING
♦ Follow instructions from manufacturer.
Product battery may explode or release toxic materials. Risk of fire or burns. Do not open, crush, modify, disassemble, heat above 140°F (60°C), or incinerate.
- Attention should be drawn to the environmental aspects of battery disposal.
Product shall not be exposed to excessive heat such as sunshine, fire, or the like.
Do NOT make unauthorized alterations to this product.
CAUTION
- Follow applicable laws regarding mobile phone and headphone use while driving.
This product contains magnetic material. Consult your physician on whether this might affect your implantable medical device.
Batteries (battery pack or batteries installed) shall not be exposed to excessive heat such as sunshine, fire or the like
♦ Batteries (battery pack or batteries installed) shall not be crushed or cut
♦ Batteries (battery pack or batteries installed) shall not be subjected to extremely low air pressure
Risk of fire or explosion if the battery is replaced by an incorrect type Note: Battery replacement to be performed only by Shure authorized service personnel.
Important Product Information LICENSING INFORMATION
Licensing: A ministerial license to operate this equipment may be required in certain areas. Consult your national authority for possible requirements. Changes or modifications not expressly approved by Shure Incorporated could void your authority to operate the equipment. Licensing of Shure wireless microphone equipment is the user's responsibility, and licensability depends on the user's classification and application, and on the selected frequency. Shure strongly urges the user to contact the appropriate telecommunications authority concerning proper licensing, and before choosing and ordering frequencies.
Information to the user
This equipment has been tested and found to comply with the limits for a Class B digital device, pursuant to part 15 of the FCC Rules. This equipment generates, uses, and can radiate radio frequency energy and, if not installed and used in accordance with the manufacturer's instruction manual, may cause interference with radio and television reception.
Notice: The FCC regulations provide that changes or modifications not expressly approved by Shure Incorporated could void your authority to operate this equipment.
These limits are designed to provide reasonable protection against harmful interference in a residential installation. This equipment generates uses and can radiate radio frequency energy and, if not installed and used in accordance with the instructions, may cause harmful interference to radio communications. However, there is no guarantee that interference will not occur in a particular installation. If this equipment does cause harmful interference to radio or television reception, which can be determined by turning the equipment off and
on, the user is encouraged to try to correct the interference by one or more of the following measures:
◆ Reorient or relocate the receiving antenna.
- Increase the separation between the equipment and the receiver.
Connect the equipment to an outlet on a circuit different from that to which the receiver is connected.
Consult the dealer or an experienced radio/TV technician for help.
This device complies with part 15 of the FCC Rules. Operation is subject to the following two conditions:
- This device may not cause harmful interference.
- This device must accept any interference received, including interference that may cause undesired operation.
This equipment complies with FCC/IC radiation exposure limits set forth for an uncontrolled environment.
Connection and use of this communications equipment is permitted by the Nigerian Communications Commission.
Canada Warning for Wireless
This device operates on a no-protection, no-interference basis. Should the user seek to obtain protection from other radio services operating in the same TV bands, a radio licence is required. For further details, consult Innovation, Science and Economic Development Canada's document Client Procedures Circular CPC-2-1-28, Voluntary Licensing of Licence-Exempt Low-Power Radio Apparatus in the TV Bands.
This device contains licence-exempt transmitter(s)/receiver(s) that comply with Innovation, Science and Economic Development Canada's licence-exempt RSS(s). Operation is subject to the following two conditions:
- This device may not cause interference.
- This device must accept any interference, including interference that may cause undesired operation of the device.
Note: EMC conformance testing is based on the use of supplied and recommended cable types. The use of other cable types may degrade EMC performance.
Changes or modifications not expressly approved by the manufacturer could void the user's authority to operate the equipment.
Changes or modifications not expressly approved by the party responsible for compliance could void the user's authority to operate the equipment.
Environmentally friendly disposal
Old electrical appliances must not be disposed of together with the residual waste, but have to be disposed of separately. The disposal at the communal collecting point via private persons is for free. The owner of old appliances is responsible to bring the appliances to these collecting points or to similar collection points. With this little personal effort, you contribute to recycle valuable raw materials and the treatment of toxic substances.
Certifications
Meets essential requirements of the following European Directives:
WEEE Directive 2012/19/EU, as amended by 2008/34/EC
◆ RoHS Directive EU 2015/863
Note: Please follow your regional recycling scheme for batteries and electronic waste. This product meets the Essential Requirements of all relevant European directives and is eligible for CE marking.
CE Notice:
Hereby, Shure Incorporated declares that this product with CE Marking has been determined to be in compliance with European Union requirements. The full text of the EU declaration of conformity is available at the following site: https://www.shure.com/en-EU/support/declarations-of-conformity.
Authorized European Importer:
Shure Europe GmbH
Department: Global Compliance
Jakob-Dieffenbacher-Str. 12
75031 Eppingen, Germany
Phone: +49-7262-92 49 0
Fax: +49-7262-92 49 11 4
Email: EMEAsupport@shure.de
UKCA Notice:
Hereby, Shure Incorporated declares that this product with UKCA Marking has been determined to be in compliance with UKCA requirements. The full text of the UK declaration of conformity is available at the following site: https://www.shure.com/en-GB/support/declarations-of-conformity.
Shure UK Limited - UK Importer
Unit 2, The IO Centre, Lea Road,
Waltham Abbey, Essex, EN9 1 AS, UK
Approved under the Declaration of Conformity (DoC) provision of FCC Part 15.
Bluetooth®
The Bluetooth® word mark and logos are registered trademarks owned by the Bluetooth SIG, Inc. and any use of such marks by Shure Incorporated is under license. Other trademarks and trade names are those of their respective owners.
LIMITED WARRANTY
Shure Incorporated ("Shure") hereby warrants to the original consumer purchaser only that, except as otherwise specified below, this product will be free in normal use of any defects in materials and workmanship for a period of two (2) years from the consumer's original date of purchase directly from Shure or from a Shure-authorized reseller.
Any rechargeable batteries contained in or packaged with this product are so warranted for a period of one (1) year from the consumer's original date of purchase. However, rechargeable batteries are consumable and their capacity will be reduced over time based on temperature, amount of time in storage, charging cycles, and other factors; hence reduction in battery capacity does not constitute a defect in material or workmanship.
At its sole option, Shure will repair or replace the defective product and promptly return it to you. In order for this warranty to be valid, the consumer must, at the time the product is returned, provide proof of purchase in the form of the original purchase receipt directly from Shure or from a Shure-authorized reseller. If Shure elects to replace the defective product, then Shure reserves the right to replace the defective product with another product of the same model or a model of at least comparable quality and features in Shure's sole determination.
If you believe this product is defective within the warranty period, carefully repack the unit, insure it and return it with proof of purchase, postage prepaid, to Shure Incorporated, Attention: Service Department, at the address below. Outside of the United States, return the product to your dealer or Authorized
Service Center. Addresses are listed on www.Shure.com or can be obtained by contacting Shure at the address listed below.
This warranty is not transferable. This warranty does not apply in cases of abuse or misuse of the product, use contrary to Shure's instruction, ordinary wear and tear, an act of God, negligent use, purchase from a party other than Shure or a Shure-authorized reseller, unauthorized repair, or modification of the product.
ALL IMPLIED WARRANTIES OF MERCHANTABILITY OR FITNESS FOR A PARTICULAR PURPOSE ARE HEREBY DISCLAIMED TO THE EXTENT PERMITTED UNDER APPLICABLE LAWS AND, TO THE EXTENT NOT PERMITTED, ARE HEREBY LIMITED TO THE DURATION AND TERMS OF THIS WARRANTY. SHURE ALSO HEREBY DISCLAIMS ALL LIABILITY FOR INCIDENTAL, SPECIAL, OR CONSEQUENTIAL DAMAGES.
Some states do not allow limitations on how long an implied warranty lasts, or the exclusion or limitation of incidental or consequential damages, so the above limitation may not apply to you. This warranty gives you specific legal rights, and you may have other rights which vary from state to state.
This warranty does not restrict the rights of the consumer mandated under applicable laws.
THIS WARRANTY SUPERSEDES ALL OTHER WARRANTIES THAT ARE ASSOCIATED OR INCLUDED WITH THIS PRODUCT, EXCEPT THAT ANY SOFTWARE CONTAINED IN OR PACKAGED WITH THIS PRODUCT IS EXCLUDED FROM THIS WARRANTY AND INSTEAD SHALL BE COVERED BY THE WARRANTY, IF ANY, PROVIDED IN SHURE'S END USER LICENSE AGREEMENT ACCOMPANYING SUCH SOFTWARE.
FOR ORIGINAL PURCHASES IN AUSTRALIA ONLY
LIMITED WARRANTY AGAINST DEFECTS
Shure Incorporated ("Shure") hereby warrants to the original consumer purchaser in Australia only that, except as otherwise specified below, this product will be free in normal use of any defects in materials and workmanship for a period of two (2) years from the consumer's original date of purchase directly from Shure or from a Shure-authorized reseller.
Any rechargeable batteries contained in or packaged with this product are so warranted for a period of one (1) year from the consumer's original date of purchase. However, rechargeable batteries are consumable and their capacity will be reduced over time based on temperature, amount of time in storage, charging cycles, and other factors; hence reduction in battery capacity does not constitute a defect in material or workmanship.
At its sole option, Shure will repair or replace the defective product and promptly return it to you. In order for this warranty to be valid, the consumer must, at the time the product is returned, provide proof of purchase in the form of the original purchase receipt directly from Shure or from a Shure-authorized reseller. If Shure elects to replace the defective product, then Shure reserves the right to replace the defective product with another product of the same model or a model of at least comparable quality and features in Shure's sole determination.
If you believe this product is defective within the warranty period, carefully repack the unit, insure it and return it with proof of purchase, postage prepaid, to Shure Incorporated, Attention: Service Department, at the address below. Outside of the United States, return the product to your dealer or Authorized Service Center. Addresses are listed on www.Shure.com or can be obtained by contacting Shure at the address listed below.
This warranty is not transferable. This warranty does not apply in cases of abuse or misuse of the product, use contrary to Shure's instruction, ordinary wear and tear, an act of God, negligent use, purchase from a party other than Shure or a Shure-authorized reseller, unauthorized repair, or modification of the product.
ALL IMPLIED WARRANTIES OF MERCHANTABILITY OR FITNESS FOR A PARTICULAR PURPOSE ARE HEREBY DISCLAIMED TO THE EXTENT PERMITTED UNDER APPLICABLE LAWS AND, TO THE EXTENT NOT PERMITTED, ARE HEREBY LIMITED TO THE EXTENT PERMITTED TO THE DURATION AND TERMS OF THIS WARRANTY. SHURE ALSO HEREBY DISCLAIMS ALL LIABILITY FOR INCIDENTAL, SPECIAL, OR CONSEQUENTIAL DAMAGES FOR ANY PURCHASER ACQUIRING THIS
PRODUCT, EXCEPT THAT THIS DOES NOT CONSTITUTE A DISCLAIMER OF RIGHTS GUARANTEED TO ANY "CONSUMER" UNDER THE AUSTRALIAN CONSUMER LAW.
This warranty gives purchasers of this product in Australia specific legal rights which are in addition to the rights and remedies of consumers under the Australian Consumer Law, which cannot be excluded or limited. If you are a “consumer” under the Australian Consumer Law, you are entitled to a replacement or refund for a major failure and for compensation for any other reasonably foreseeable loss or damage. You are also entitled to have the goods repaired or replaced if the goods fail to be of acceptable quality and the failure does not amount to a major failure.
THIS WARRANTY SUPERSEDES ALL OTHER WARRANTIES THAT ARE ASSOCIATED OR INCLUDED WITH THIS PRODUCT, EXCEPT THAT ANY SOFTWARE CONTAINED IN OR PACKAGED WITH THIS PRODUCT IS EXCLUDED FROM THIS WARRANTY AND INSTEAD SHALL BE COVERED BY THE WARRANTY, IF ANY, PROVIDED IN SHURE'S END USER LICENSE AGREEMENT ACCOMPANYING SUCH SOFTWARE.
Service Centers
United States, Canada, Latin America, Caribbean
Shure Incorporated
Attn: Service Department
945 Chaddick Dr.
Wheeling, IL 60090-6449 U.S.A.
Europe, Middle East, and Africa
Shure Europe GmbH
Attn: Service
Jakob-Dieffenbacher-Str. 12,
75031 Eppingen, Germany
IndonesiaService Center Resmi:
Jakarta Hotline (021) 612 6388
Medan (061) 6612550
Surabaya (031) 5032219
Jogjakarta (0274) 371710
Denpasar (0361) 766788
Makasar (0411) 324652
SHURE
United States, Canada, Latin America, Caribbean:
Shure Incorporated
5800 West Touhy Avenue
Niles, IL 60714-4608 USA
Phone:847-600-2000
Fax: 847-600-1212 (USA)
Fax:847-600-6446
Email: info@shure.com
Europe, Middle East, Africa:
Shure Europe GmbH - EU Importer
Jakob-Dieffenbacher - St. 12,
75031 Eppingen, Germany
Phone:+49-7262-92490
Fax:+49-7262-9249114
Unit 2, The IO Centre, Lea Road,
Waltham Abbey, Essex, EN9 1AS, UK
Asia, Pacific:
Shure Asia Limited
22/F,625 King's Road
North Point, Island East
Hong Kong
Phone:852-2893-4290
Fax: 852-2893-4055
- Table of Contents
- MoveMic The Shure MoveMic 3
- Quick Start Guide 3
- General Description 3
- The Shure MoveMic 4
- The MoveMic Charge Case 6
- The MOTIV Audio Application 7
- The MOTIV Video Application 11
- Live Streaming 14
- Hardware Receiver 15
- Recording Tips 21
- Gallery 21
- MoveMic Firmware Updates 24
- Troubleshooting 25
- System Requirements 26
- Accessories 26
- Specifications 27
- Certifications 31
- MoveMic The Shure MoveMic
- Quick Start Guide
- Wearing the Mic
- MoveMic Best Practices
- General Description
- Features
- The Shure MoveMic
- Powering the MoveMic On and Off
- MoveMic Button Commands
- MoveMic LED Indicators
- The MoveMic Charge Case
- Charge Case Status LED Indicators
- Important Tips for Care and Storage of Shure Rechargeable Batteries
- The MOTIV Audio Application
- Pairing to the MOTIV app
- Unpairing a Microphone
- Pairing a Second Microphone
- Mic Settings
- Preset Modes
- Custom Presets
- Advanced Mic Settings
- The MOTIV Video Application
- Video Standby Mode
- Visual Settings
- Mic Gain Sliders
- Video Record Mode
- Compressed Format Recording
- Live Streaming
- Live Stream Using the MOTIV Video App
- Record a Test Run
- Easy Live Streaming to Facebook and More
- Stream to Facebook
- Stream to YouTube
- While You Stream
- Hardware Receiver
- The MoveMic Receiver
- MoveMic Receiver LED Indicators
- Adjusting the Receiver
- Connecting to the Receiver
- Connecting to the Phone
- Pairing to the Receiver
- The Receiver Display
- The Receiver Menu Tree
- My Devices
- Output Settings
- Monitoring
- Display Settings
- Recording Tips
- Turn On Airplane Mode and Do Not Disturb
- Capture Clear Sound
- Use the Dark Theme
- Monitor Your Sound
- Gallery
- Video Playback
- The Video Playback window displays
- Sharing Video Recordings
- Save to Camera Roll
- Save to Dropbox TM
- AirDrop ® with MOTIV
- MoveMic Firmware Updates
- System Requirements
- System Requirements and Compatibility: iOS
- System Requirements and Compatibility: Android
- Accessories
- Furnished Accessories
- MV-ONE
- MV-TWO
- MV-TWO-KIT
- Optional Accessories
- Specifications
- The MoveMic
- Open Source Attribution
- Certifications
- CE Notice
- UKCA Notice
- SHURE
- CONNECT
- CAMERA
- PHONE
- PAIRING
- Full user guide available on shure.com, or scan the QR code for more help.
- MOVEMIC™ WIRELESS
- IMPORTANT SAFETY INSTRUCTIONS
- For Products That Use Bluetooth
- WARNING
- CAUTION
- Important Product Information LICENSING INFORMATION
- Information to the user
- Canada Warning for Wireless
- Environmentally friendly disposal
- CE Notice:
- UKCA Notice:
- Bluetooth®
- LIMITED WARRANTY
- FOR ORIGINAL PURCHASES IN AUSTRALIA ONLY
- LIMITED WARRANTY AGAINST DEFECTS
- Service Centers
Brand : SHURE
Model : MoveMic MV-R
Category : Uncategorized