
ALP-DANTE-LE - Soundcard Digigram - Free user manual and instructions
Find the device manual for free ALP-DANTE-LE Digigram in PDF.


| Product Type | Professional multichannel sound card with Dante connectivity |
| Brand | Digigram |
| Model | ALP-DANTE-LE |
| Bus Interface | PCI Express x1 (compatible x2, x4, x8, x16) |
| Form Factor | Low profile (79.2 mm bracket), standard height bracket included |
| Dimensions | 168 mm × 69 mm × 20 mm |
| Power Consumption | +3.3 V: 0.4 A; +12 V: 0.3 A |
| Sampling Rates | 44.1, 48, 88.2, 96, 176.4, 192 kHz |
| Audio Formats | PCM 16, 24, 32 bits |
| Channels | 64 playback / 64 record at 44.1/48 kHz; 32 at 88.2/96 kHz; 16 at 176.4/192 kHz |
| Dante Ports | 4 x Gigabit Ethernet RJ-45 (2 on main board, 2 on expansion board) |
| Network Modes | Switch mode (all ports switched) or Redundant mode (Primary/Secondary) |
| Internal Latency | Adjustable buffer size from 32 samples (default) up to 2048 samples |
| Supported Operating Systems | Windows 10 20H2+ (64-bit), Linux kernel 4.1+ (64-bit) |
| Audio Drivers | WASAPI, DirectSound, ASIO (Windows); ALSA (Linux) |
| Management Software | ALP-X Manager (Windows), AVS-Monitor for firmware, Dante Controller |
| Operating Temperature | 0°C to +50°C |
| Storage Temperature | -5°C to +70°C |
| Humidity (non-condensing) | 5% to 90% (operating), 0% to 95% (storage) |
| Certifications | EMC Directive 2014/30/EU, FCC Part 15 Subpart B (pending) |
Frequently Asked Questions - ALP-DANTE-LE Digigram
User questions about ALP-DANTE-LE Digigram
0 question about this device. Answer the ones you know or ask your own.
Ask a new question about this device
Download the instructions for your Soundcard in PDF format for free! Find your manual ALP-DANTE-LE - Digigram and take your electronic device back in hand. On this page are published all the documents necessary for the use of your device. ALP-DANTE-LE by Digigram.
USER MANUAL ALP-DANTE-LE Digigram
natural_image
Close-up of a blue DIGRAM network card with Ethernet ports and external connectors (no readable text or symbols beyond branding)
natural_image
Close-up of a blue DFIGARM PCI card with multiple ports and connectors (no visible text or symbols beyond branding)Professionalmulti-channelsoundcardwith DANTEconnectivity
November2023
| Author | Date | Status |
| SBT | 20/11/2023 | Release |
TABLEOFCONTENTS
1 INTRODUCTION 3
2IMPORTANTNOTICE4
3BOXCONTENTS5
4GENERALCHARACTERISTICS5
4.1 Mainhardware characteristics5
4.2 Mainsoftwarecharacteristics5
5REQUIREDCONFIGURATION6
5.1 Required hardware configuration6
5.2 NecessarysoftwareconfigurationunderWindows8
5.3 NecessarysoftwareconfigurationunderLinux8
6HARDWAREINSTALLATION9
6.1 Preparingthecard9
6.2Installingthecard 10
6.3InternalLEDs 10
7SOFTWAREINSTALLATIONUNDERWINDOWS 11
7.1 Veryfirstinstallation11
7.2 Updatingthedriverversion 12
7.3 Updating the firmware 12
7.4 Verifying the card installation 12
7.5Adjustingtheinternallatencyofthecard 15
7.6Replacingacard 16
7.7Changingtheorderofinstalledcards 16
8UNINSTALLINGTHEDRIVERUNDERWINDOWS 17
9CONFIGURINGTHECARDUNDERWINDOWSVIATHEALP-XMANAGERAPPLICATION 18
9.1 Installed ALP cards 18
9.2Samplingclock 18
9.3 Input and output vu-meters 20
9.4 Firmwareupdateprocedure 20
9.5Keyboardshortcuts 22
10ASIOCONTROLPANELforWindows 23
11SPECIFICATIONS 25
11.1Configuration 25
11.2Audiocharacteristics 25
11.3Connectors 25
11.4 Development environment 25
12APPENDICES 26
12.1LED 26
12.2Connectors 27
1INTRODUCTION
This document describes the installation and use of the Digigram PCI Express ALP-Dante card under Windows and Linux.
This card is part of the ALP-X professional sound cards range.
Copyright2023Digigram.Allrightsreserved.
NopartofthismanualmaybereproducedwithoutthepriorconsentofDigigram. Thisreservationincludes photocopying,translatingand/orreformattingtheinformationcontainedinthismanual.
Everything possible has been done to ensure the greatest accuracy, however, a diagram cannot be held liable for any error or omission and reserves the right to make modifications and improvements without prior notice.
DigigramandtheDigigramlogo,ALP-DANTEaretrademarksorbrandnamesofDigigramDigital.Allother marksareownedbytheirrespectivecompanies.
2IMPORTANTNOTICE
Certifications
Theproductiscurrentlybeingcertified.
This product has been designed in accordance with the following standards:
• EMC Directive 2014/30/EU.
• FCC Rules Part 15, Subpart B.
To ensure compliance with the standards listed above, the following rules must be followed:
- The cable supplied must not be modified.
- The additional cables used must have their respective shielding connected at each end.
Caution

An electrostatic discharge (ESD) can damage the card components. Take the following precautions to avoid such damage when handling the card:

Connect the card and everything entering into contact with it to the earth potential by providing a conductive surface and discharge paths. Take these precautions as a minimum:
- Unplug all power and signal sources.
- Place the card on an earthed conductive work surface.
- Connect to the earth potential using an anti-static strap or by holding an earthed object.
- Earth all the tools entering into contact with the card.
GiventheshortenedlengthofthePCIEXPRESS TM connectorandtheresultinglackof mechanicalstability, westronglyadviseagainsttransportingthecardsinstalledina computer, unlessitschassisorcasehasadeviceforholdingthecardfirmlyinplacetoavoid materialdamage.
3BOXCONTENTS
Thank you for purchasing a DIGIGRAM sound card in the ALP-X range.
The box contains:
- The ALP-Dante sound card equipped with a low-profile bracket (79.2 mm),
- The expansion card for 2 Eth ports equipped with a low profile bracket (the expansion card can be linked to the main board via the flat ribbon cable).
- a standard height bracket (full height: 120 mm) that can be fitted instead of the low profile one, and that receives the four Eth ports
4GENERALCHARACTERISTICS
ALP-Dante is a low profile PCI EXPRESS1 sound card. It can be inserted into and therefore operate in PCIe® x1, x4, x8 or x16 slots.
4.1 Mainhardwarecharacteristics
- Low profile
- Two Gbps Eth ports of the main board (PCIe slot).
- Two additional ports on the expansion board.
- The main board and the expansion board can have their own low profile brackets.
- The main board and the expansion board can use the same standard height bracket.
• Inter-card synchronisation
4.2 Mainsoftwarecharacteristics
- Low latency multi-card drivers
- Wasapi/DirectSound, and ASIO under Windows
- Alsa driver under Linux
- 64 playback channels & 64 recording channels at 44.1 and 48 kHz 32 playback channels & 32 recording channels at 88.2 and 96 kHz 16 playback channels & 16 recording channels at 176.4 and 192 kHz. Simultaneous acquisition and playback in PCM (8, 16 and 24 bit)
- The available Eth ports can be used in switch or redundant mode
- "ALP-X Manager" application installed with the driver
5REQUIREDCONFIGURATION
5.1 Requiredhardwareconfiguration
There are no particular hardware restrictions in terms of PC on using the ALP card and its driver. The PC can have standard height or low profile PCIe card slots.
A PCI EXPRESS™ (PCIe®) x1, x4, x8 or x16 slot must be available to plug in the card.
The processing power and memory required depend mainly on the operating system and the applications used on the PC.
Note: The driver of the card reports to the OS that it does not manage the Sleep mode. As a consequence, the PC should not go to sleep mode.
In case the PC goes to sleep mode under Windows, please proceed as follows to disable the sleep mode.

ThewindowssleepmodeforthePCIebusmustbedisabled.
Go to Windows Settings, System, and select "Power & sleep".
Select Never" for the option "Put the computer to sleep".

On the same window, click on "Additional power settings".

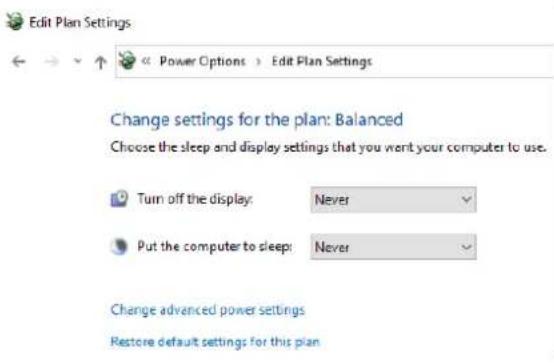 | Select “Change advanced power settings”. |
 | Select “PCI Express”, “Link State Power Management”, and select “Off” for the setting.Click on Ok to validate |
5.2NecessarysoftwareconfigurationunderWindows
ALP cards operate under Windows from 64-bit versions of Windows 10 from version 20H2.
To use your ALP-X card, you must install the driver included in the installation kit "ALP-X Kit". Download the latest version from the digigram website from the ALP-Dante card support page.
This driver supports all the ALP cards.
The "ALP-X Kit" installer is used to install the following components:
- a 64-bit WDM driver offering the WASAPI and DirectSound application interfaces,
- an ASIO driver (32 bits and 64 bits), with its "ALP-X ASIO Settings" configuration interface. Installing this component is optional,
- the "ALP-X Manager" application, which serves to adjust/view the ALP-X cards settings.. Installing this component is optional.

In your Windows system, It may be necessary to allow the applications to access the input audio devices of the sound cards.
Please proceed as follows:
- Go to the Windows Settings, and select Privacy.
- Select "Microphone"
- Activate the option "Allow apps to access your microphone" as shown here-after:


It is also necessary to have the "Windows Audio Endpoint Builder" running under Windows so that the WASAPI audio devices can be used.. On some Windows setups, this service may not be activated by default.
To check this, go to the Computer Management panel, Services, and browse to the line Windows Audio Endpoint Builder.

Double click on Windows Audio Endpoint Builder to display its properties.

From the "Service status" section, if the displayed status is not running, click on Start and then OK. Click on Cancel otherwise.
5.3NecessarysoftwareconfigurationunderLinux
ALP cards operate under Linux from the 64-bit Kernel 4.1x onwards (according to kernel.org). The Alsa driver for Linux is available for download. It is supplied as a DKMS package, which can therefore be used to compile the driver for the target Linux distribution used.
6HARDWAREINSTALLATION
Given the shortened length of the PCI EXPRESS ™ connector and the resulting lack of mechanical stability, we strongly advise against transporting the cards installed in a computer, unless it features a specific device for holding the card firmly in place to avoid material damage.
The card must be inserted in the computer before installing its driver.
6.1 Preparingthecard
Before attaching the card in the computer, make sure the card has the right bracket (low profile or standard profile).
Lowprofileconfigurations
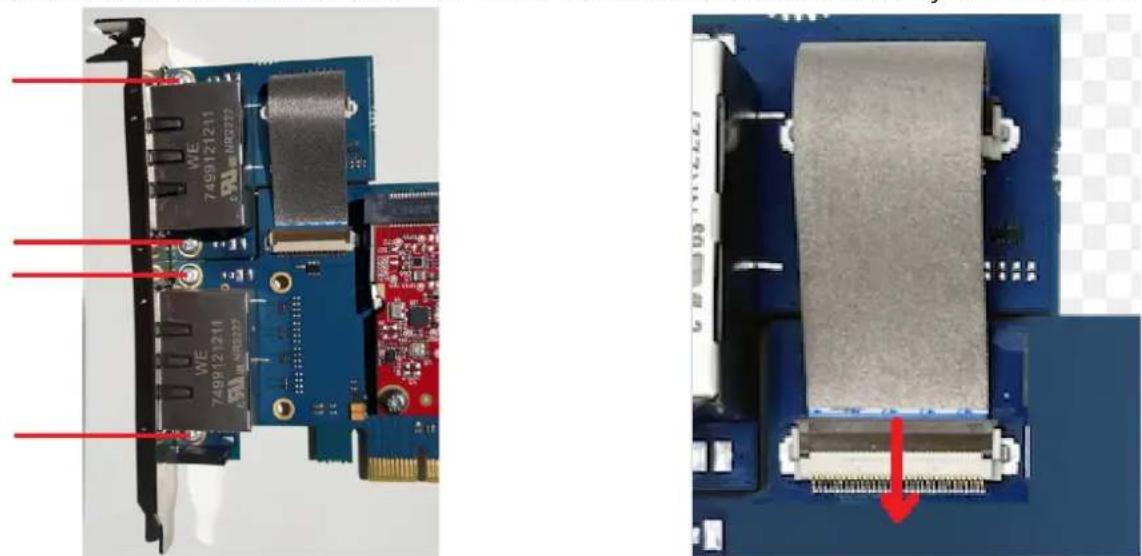
The card can be used with or without the expansion board. The expansion card does not need a PCIe connector, but occupies the slot of a PCIe card, and it can be installed on either side of the ALP-DANTE board.

ALP-DANTE board Expansion board
Standardprofileconfiguration
To install the card in a standard height PCIe slot, remove the low profile bracket from the ALP board and from the expansion board by loosening the two screws as shown on the pictures above.
Position the standard height bracket and retighten the two screws of the ALP board, and the two screws of the expansion board (See the four screws in the picture below).
If the ribbon from the expansion board is not connected to the main board, lift the brown cover of the connector on the main board to insert the ribbon cable as shown by the red arrow below.
natural_image
Close-up of a blue circuit board with internal components and a red arrow indicating a component detail (no readable text or symbols)6.2Installingthecard
Insert the card in the available PCIe slot and press to position it firmly.
Tighten the screw fixing the bracket to the chassis or lock the card using the device provided for this purpose on your computer.
6.3InternalLEDs
The ALP card features two internal LEDs on the edge of its mother board, as shown below. The state of these LEDs can be seen when the PC cover is open.
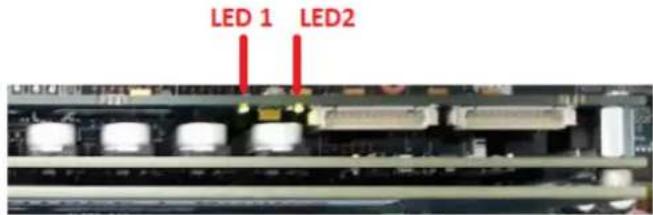
If the card and its on-board firmware are initialised correctly, LED 1 must be lit solid green, and LED 2 must flash every second (1 Hz).
If LED 2 flashes faster (twice per second - 2 Hz), this means that the firmware version that has been uploaded to the card is corrupted, and the card is running the backup factory firmware version. It is then necessary to re-install the appropriate firmware version.
7SOFTWAREINSTALLATIONUNDERWINDOWS
IMPORTANT
To install the software, you must have administrator rights on the computer.
Please visit the Digigram website at www.digigram.com to obtain the most recent driver.
Should you use a specific application developed or installed by a Digigram partner, this may mean using a specific driver version. In this case, confirm with your application supplier which driver version to use.
Any driver downloaded from our website has to be unpacked before installing it. Double click on the downloaded file to start the auto-extraction utility. You can choose the default destination (temporary Windows folder) or select another one.
7.1 Veryfirstinstallation
- Switch off the computer and insert the ALP card(s) in an available PCIe slot.
- Restart the computer.
- Click on Cancel if the "New device detected" wizard appears.
- Double click on the ALP driver installation file "ALP-X Kit vxx.exe"
 | Click on Next to continue with the installation. |
| Click on "I agree" to continue with the installation. | |
 | In this window, select the components to be installed in addition to the card driver.ALP-X Manager: application used to configure the settings of the ALP card(s) installed.Some software programs may have been designed with the ALP card settings controls built in. In this case, it may be recommended not to install the ALP-X Manager application.ALP-X ASIO Settings: this application is used to configure the ASIO driversettings. There is no need to install it if no application reliant on the ASIO interface is used. |
 | The driver is installed by default in the folder "C:\Program Files (x86)\Digigram\ALP-X".To change this folder, click on Browse and select a new destination.Click on Install to continue with the installation. |
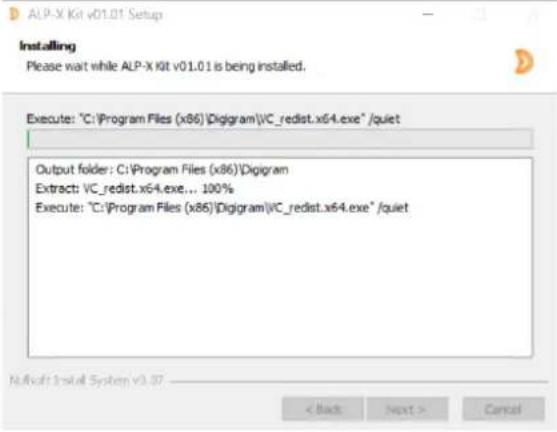 | The driver and selected components are being installed. |
7.2 Updatingthedriverversion
If you want to install a new driver version, double click on the new driver installation file "ALP-X Kit vxx.exe" (see the detailed procedure in the hereinabove chapter "Very first installation").
7.3 Updating the firmware
The ALP card features two on-board firmware: the "Dante" dedicated firmware, and the board firmware. Updating the firmware can be done from the AVS-Monitor application (see chapter Firmware update procedure). Both firmware can be updated from this application.
7.4 Verifying the card installation
Once the driver and card have been installed as per the process described hereinabove, you can verify that the card is installed correctly and working properly.
7.4.1 Presenceofplaybackandrecordingdevices
The audio devices exposed by the card driver are visible on the Windows Sound panel. To open it, right click on the loudspeaker icon in the Windows taskbar and select "Sounds":

The audio devices exposed by the card driver are visible from the "Play" and "Record" tabs.


If the card devices are not listed in the Windows Sound control panel:
- Make sure that the card is inserted correctly in the PCI slot and screwed to the computer chassis.
- Try to uninstall the ALP-X Kit (from the Windows control panel, Applications) and re-install it.
Playback to an output device of the ALP-DANTE can be tested by right clicking on it and selecting "Test". The VU-meter must then show modulation and the sound must be heard on the card output(s) according to the routing and levels configured in the ALP-X Manager application.

If several cards are installed, their devices have the same names (ALP PLAY and ALP REC), but the name of the card associated with each device differs (different card name, no index for the first card, and index starting from 2 for the following cards of the same model).
In the example below, the first card in the PCIe slot enumeration order is an ALP-DANTE, the second card is an ALP442e, and the third card is an ALP882e.
| Firstcard:ALP-DANTE | Secondcard:ALP442e | Thirdcard:ALP882e |
| ALPPLAY1-2DigigramALP-DANTEALPPLAY3-4DigigramALP-DANTE...ALPPLAY63-64DigigramALP-DANTE | ALPPLAY1-2DigigramALP442eALPPLAY3-4DigigramALP442e...ALPPLAY7-8DigigramALP442e | ALPPLAY1-2DigigramALP882eALPPLAY3-4DigigramALP882e...ALPPLAY15-16DigigramALP882e |
7.4.2 Carddetected by the Digigram ALP-X Manager application
The ALP-X Manager application, installed with the driver, is used to control and/or view the ALP card settings via a graphic interface. This application can be launched from the shortcut created on the desktop or from the start menu, Digigram group. The card must appear as below if it and its driver are installed correctly. Note that a maximum of eight ALP cards can be displayed and handled in ALP-X Manager.

7.4.3 CardavailabilityunderASIO
If the ASIO driver for the card has been installed (option to be selected during the installation procedure), then the card must be detected and displayed in the ASIO control panel. The control panel can be open from the ASIO-based software application.
All the present ALP cards must be listed in the "ACTIVE CARDS GROUP" selection list.

7.5Adjustingtheinternallatencyofthecard
The internal latency of the card is determined by the duration of sample buffers the card exchanges with the PC for playback and recording audio streams. By default, this duration is 32 sampling clock periods (0.67ms at 48 kHz).
The lower the internal latency, the lower the global latency of the card. However, a very low latency may lead to "choppy" audio on slow PCs. In this case it is necessary to increase the internal latency.
The internal latency of the card can be changed by electing the properties of the card, from the Windows Device Manager:
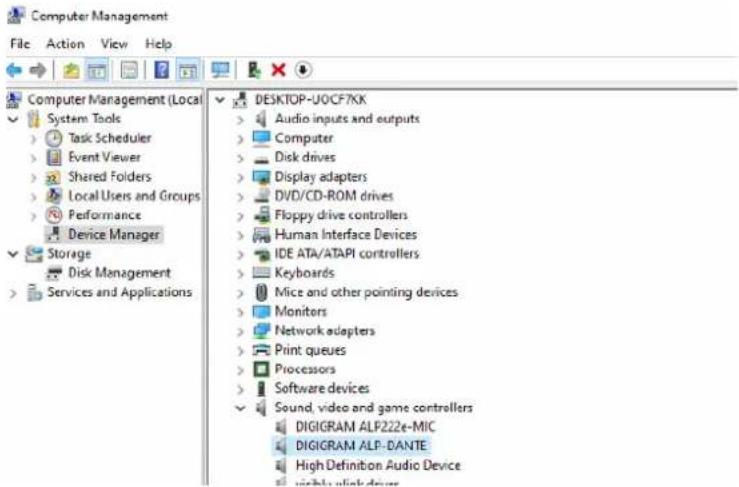
Right click on the ALP card, and select Properties, Advanced. The following window is displayed:
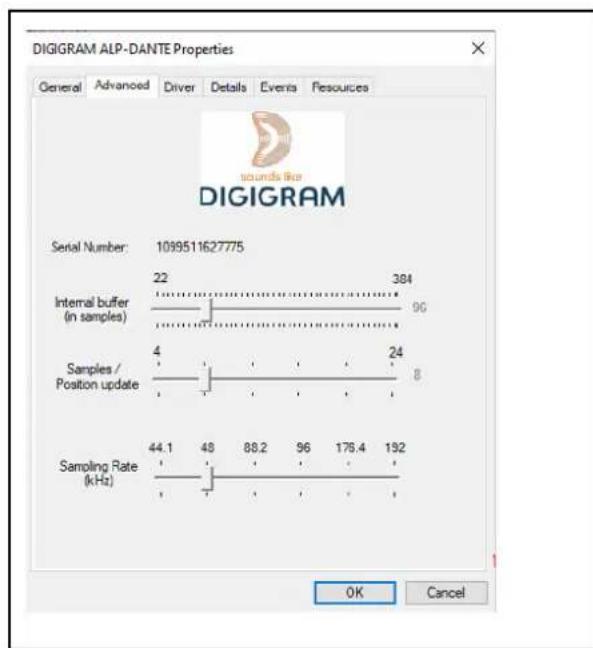
line
| Signal Type | Value | | ------------------------ | ----- | | Serial Number | 1099511627775 | | Internal buffer (in samples) | 22 | | Samples / Position update | 4 | | Sampling Rate (kHz) | 44.1 | | Sampling Rate (kHz) | 48 | | Sampling Rate (kHz) | 88.2 | | Sampling Rate (kHz) | 96 | | Sampling Rate (kHz) | 179.4 | | Sampling Rate (kHz) | 192 |Internalbuffer: size of the buffers exchanged between the card and the driver. The size is expressed in samples (ex: at 48 kHz, a value of 48 corresponds to 1ms buffer
Samples/Positionupdate: This parameter should not be modified without prior technical advice from Digigram. It serves for cases where audio dropouts are experienced whatever is the internal buffer setting.
Samplingrate: Select the sampling rate of the ALP-DANTE card. The ALP-X Manager application must be closed before selecting a new sampling rate value.
Select the new value, and click on "Ok".
The PC must be restarted.
7.6Replacingacard
If an ALP card has to be replaced by another one, it is strongly recommended to proceed as follows:
- Turn off the PC.
- Remove the card to be replaced.
- Restart the PC.
- Go to the Windows Device Manager, and select "Sound, video and game controllers". From the "View" menu, select "Show Hidden devices". Select the ALP card that was hidden and select "Uninstall".
- Turn off the PC.
- Insert the new card.
- Restart the PC.
7.7Changingtheorderofinstalledcards
If several ALP cards are installed, and you want to move cards from a slot to another, it is strongly recommended to proceed as follows:
- Turn off the PC.
- Remove the cards to be moved.
- Restart the PC.
-
Go to the Windows Device Manager, and select "Sound, video and game controllers". From the "View" menu, select "Show Hidden devices". Select the ALP cards that were hidden and select "Uninstall".
-
Turn off the PC.
- Insert the cards in the appropriate slots.
- Restart the PC.
8UNINSTALLINGTHEDRIVERUNDER WINDOWS
Proceed as follows to uninstall an ALP driver version.
Please note that uninstalling a version must be done prior to the installation of another version.
 | From Windows Start menu, open the "Settings" panel |
 AppsUninstall, defaults, optional features AppsUninstall, defaults, optional features | Click on the "Apps" icon. |
Apps & featuresOptional featuresApp execution aliasesSearch, sort, and filter by drive. If you would like to uninstall or move an app, select it from the list. Sort by: Name √ Filter by: All drives √50 apps found[60KC] 3D Viewer 16.0 KBMicrosoft Corporation 8/4/2022[ACHT] ALP-X Kit: 145 MB9/20/2022 Sort by: Name √ Filter by: All drives √50 apps found[60KC] 3D Viewer 16.0 KBMicrosoft Corporation 8/4/2022[ACHT] ALP-X Kit: 145 MB9/20/2022 | From the list of installed Apps & features, select ALP-X Kit |
| [SW4Z] Uninstall | Click on Uninstall.This will remove all the ALP-X ... components |
Apps & features
9CONFIGURINGTHECARDUNDERWINDOWS VIATHEALP-XMANAGERAPPLICATION
This application can be launched from the shortcut created on the desktop or from the start menu, Digigram group.
9.1 InstalledALPcards
When the application is launched, the window below is displayed and shows all the ALP cards installed in the PC.


If another view is displayed, click on the icon to display the list of ALP cards present and detected.
The following settings are displayed for each ALP card detected:
- its name: this is the name of the card on the ante network. This name can be modified from the Dante Controller application.
- its serial number,
• the on-board firmware version. - the size of buffers exchanged between the driver and the card (see Adjusting the internal latency of the card).
9.2Samplingclock
The sampling clock of the card is configurable from the Device Manager. The ALP-X Manager application must be closed before changing the sampling clock value.
Open the Windows device Manager, select the item "Sound, video and game controllers", and right click on your ALP-DANTE card to open its "Properties" control panel. Select the appropriate sampling frequency values.
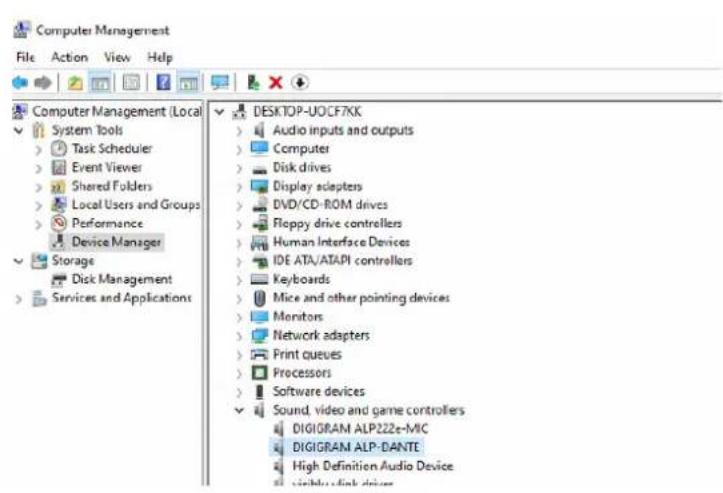

line
| Category | Value | | -------------------- | ----- | | General | 1055511027775 | | Advanced | 384 | | Driver | 56 | | Details | 0 | | Events | 24 | | Events | 8 | | Resources | 192 | | Sampling Rate (0-HO) | 44.1 | | Sampling Rate (0-HO) | 48 | | Sampling Rate (0-HO) | 88.2 | | Sampling Rate (0-HO) | 96 | | Sampling Rate (0-HO) | 176.4 | | Sampling Rate (0-HO) | 192 |Select OK to apply the changes. You will be prompted to restart the computer.
Click on the clock icon to display the clock settings of each present ALP card.


The sampling rate value of the card cannot be configured from the Dante Controller application (see section Using Dante Controller). As a consequence, make sure that the sampling clock value you set from the Windows device Manager matches the audio sampling rate on your Dante/AES67 network.
9.3 Input and output vu-meters
Click on the icon to access the "I/O Monitor" view.

This view displays the vu-meters for all input and output channels.
Input vu-meters reflect the audio modulation received from the Dante streams routed to the ALP-DANTE card. These are the channels to be acquired from the software application via the recording devices.
Output vu-meters reflect the audio modulation received by the card from each software playback device. Note that the output modulation is displayed even if the Dante network is disconnected.
The following table lists the various possible settings from the mixer view.
 | Vu-metersEach Vu-meter displays the input signal peak-meters in dBfs.Note that there is no clipping information that is reported. As a consequence, the clipping threshold adjustment that can be for from "Settings-> Audio meters" has no effect.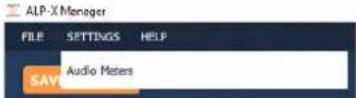 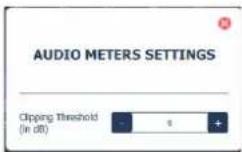 | |
 | Click on this icon to display the concerned pair of channels as two m channel strips. | |
| Click on this icon to display the concerned pair of channels as one st channel strip. | ||
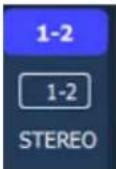 | ChannelstripnameClick on the channel strip name and enter a new name.Note: when a channel strip display is changed from mono to stereo, stereo to mono, the channel stream name goes back to the de name.As a consequence, it is recommended to keep the display mode used (mono or stereo) when the channel strip names have been changed. | |
9.4 Firmwareupdateprocedure
The ALP-DANTE card on-board firmware may have to be upgraded, and updates can be supplied by Digigram and prove necessary.
The firmware update has to be done from the AVS-Monitor application, which allows applying a new firmware through the Dante network. AVS-Monitor is an application from the company Auvitran which is owned by Digigram. It runs under Windows, and accesses the ALP-DANTE card through the Dante network. As a consequence, the NIC card selected in AVS-Monitor must be connected to the Dante network.
In case you have not already downloaded this application, click on the button on the right of the "Firmware version" field, as shown on the screen capture below.

AVS-Monitor is constantly updated on Auvitran's WEBsite. It always includes the most recent firmware version for the card. In case the PC running AVS-Monitor is connected to the internet, AVS-Monitor is updated.
When AVS-Monitor is started and the NIC card connected to the Dante network is selected, AVS-Monitor automatically detects the Dante products on the network.
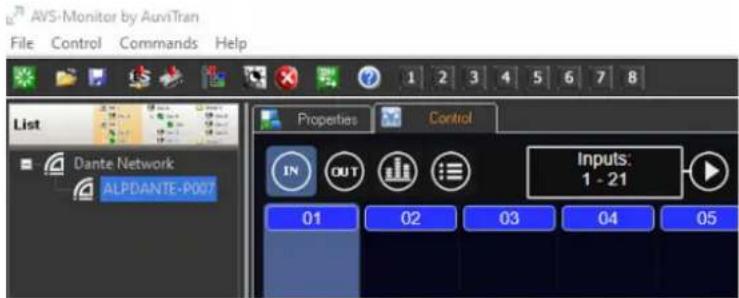
To update the firmware of the products, select "Launch Firmware manager" from the "Control" menu.
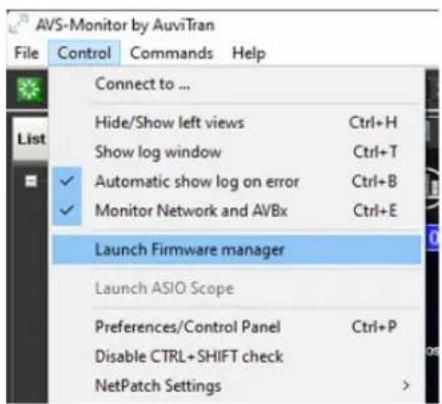
The Firmware manager application is started.
If the ALP-DANTE card(s) appears with unchecked boxes as shown below, this means that no firmware update is to be done.

If the ALP-DANTE card boxes are checked, then select "Update" on the bottom right of the Firmware Manager window to start the firmware update. Do not shut down the PC hosting the ALP-DANTE card during the firmware update.
A shutdown and restart of the computer hosting the ALP-DANTE card is necessary to take into account the new firmware.
9.5Creating, saving and loading settings sessions
The current configuration of all settings defined in ALP-X Manager can be saved. Go to the File menu and select "Save session as".
To load a configuration, go to the File menu and select "Open session".
To create a new configuration from blank settings, go to the File menu and select "New session".
9.6Keyboardshortcuts
| Keyboard shortcut | Action |
| Session | |
| Ctrl + S | Save |
| Ctrl + Alt + S | Save As |
| Ctrl + N | New |
| Ctrl + O | Open |
10ASIOCONTROLPANELforWindows
The ASIO control panel can be started from the Asio application, from the menu allowing for the settings of the audio device and the ASIO configuration.


Activecardsgroup/Asiochannelsallocation
This section is used to select the input channels and output channels that are managed by the ASIO driver and which can therefore be used by a application based on the ASIO interface.
For every card selected from the "ACTIVE CARDS GROUP" list, click on "ASIO CHANNELS ALLOCATION" button and select the channels to be used under ASIO.

To manage all the installed cards from your ASIO application, select all 'All ALP Boards" from the list of cards.
A card that is not used under ASIO can be used from a WASAPI or DirectSound application.

Buffersize(latency)
This section is used to select the size of audio buffers used by the ASI driver. This size is given as a number of samples and a cross-reference in duration is indicated for a sampling frequency of 48 kHz. The higher the buffer size, the higher the latency.
A small buffer size can lead to breaks in audio throughput on a low-powered machine or on a machine with a high processor lo
 | SamplesizeThis setting defines the format of samples exchanged between the application and the card driver. |
 | EnableDirectMonitoringControlThis feature has no impact on the ALP-DANTE. The hardware monitorin not supported. |
| BoostASIOpriorityThis option allows the system to run the ASIO process with high priority, thereby increasing the reliability of this process. Caution however, this can make other processes unstable. | |
 | AudioerrorsThis section is used to visualise current errors for playback and recordi via the ASIO driver. Errors frequently reflect too small an ASIO buffer size for the system's possibilities. Should they occur, then the buffer size needs to be increased until there are no more errors.Sync status errors reflect clock synchro errors (AES11 external clock, WordClock or inter-card synchro).Error counters can be reset to zero by clicking on the RESET button.Lastly, a time counter displays the time elapsed since the last counter reset. |
11 CONFIGURATION OF THEDANTE PARAMETERS
11.1 ConnectingtoaNetwork
In order to use your ALP-DANTE card, you will need to set up an Ethernet network connecting:
- The computer on which the ALP-DANTE card is installed. Connection is made through the ALP-DANTE card.
- The computer running Dante Controller (if it's not the same computer). Connection is made through the computer network adapter.
- Any other Dante/AES67-enabled audio device you may have
GigabitEthernetSupport
The ALP-DANTE card is designed to perform with Gigabit Ethernet networks. Connecting your card to a 100 Mbit/s Ethernet device is not supported. Make sure the port of the Ethernet switch the ALP-DANTE is connected to supports Gigabit Ethernet.
Choosing a Gigabit Ethernet Network Switch
You get the best performance out of your Dante network even if you use standard Gigabit Ethernet network switches. Dante uses standard Ethernet and IP Quality of Service (QoS) to ensure its high-quality synchronization is not affected, even on loaded networks. Make sure that you choose network switches which have the following features.
- DSCP-based QoS with four queues and strict priority queuing
- ACL filtering
- Fiber-optic cable support including SFP pluggable modules if you need to run long distances.
- Managed network switches: they allow you to manage them and monitor your network. If you have chosen a network switch that has been used before, you may need to check its settings again. For more information about choosing network switches, please visit the Support section of the Audinate website (www.audinate.com).
ChoosingEthernetCabling
Dante uses completely standard Ethernet and IP, so it also uses standard Ethernet cabling (STP), including Cat5e or higher and fiber-optic. Make sure your Ethernet cables and ports are in good condition. Remember that Ethernet cables which are Cat5e or higher have a maximum length of 100 metres at speeds of 1Gbps (the cable length limit depends on the cable type). If you require longer distances, you can use fiber-optic cables.
Switchmodeandredundantmode
In Switch mode, all 4 ports (or 2 ports if the expansion board is not used) are switched together and behave the same way. There is no “Primary” or “Secondary” capability. You can see your ALP-DANTE card as a regular 4 ports Giga-Ethernet switch. This mode allows you to build daisy-chained and/or star architecture easily. In some small architectures, it can reduce or even suppress the need for an external Gigabit Ethernet switch.
This mode is still valid when the AES67 mode is enabled.
The redundant mode allows using a redundant Dante network, with seamless switching between from the Primary network and the Secondary network.
When using the ALP-DANTE card without its expansion board, the two available ports behave as Primary and secondary ports.
When using the network expansion board, two switch ports are associated with the Primary network, and two other switch ports are associated with the Secondary network.
See section "Using Dante Controller" for configuring the mode.
See section "Connectors" to identify the Eth ports according to the selected mode.
NetworkConfiguration
Once you have installed the ALP-DANTE card in your computer and connected it to a network, you are in a position to start using Dante networking to set up audio routing between other Dante-enabled devices you may have on the network.
The Dante Controller application from Audinate allows setting up the audio routing over a Dante network. Please refer to the Audinate's WEB site for information about the Dante Controller, and for downloading it.
The ALP-DANTE card is a dedicated Dante audio interface, and cannot be used by the Dante Controller as a port for network control (configuring Dante devices, and routing audio).
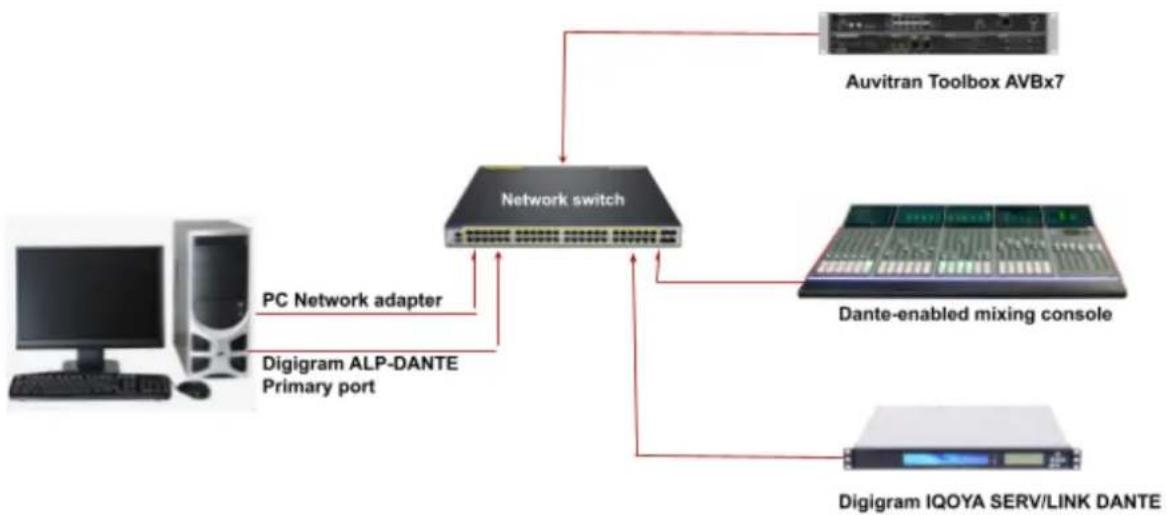
Network control must be performed via the standard network adapter on the computer on which Dante Controller is installed. If this is the same computer in which the ALP-DANTE card is installed, the computer must be connected to the Dante network via two Ethernet cables and a network switch: one cable connecting the ALP-DANTE card to the switch, and one connecting the PC NIC to the switch, as shown below.
flowchart
graph TD
    A["PC Network adapter"] --> B["Network switch"]
    C["Digigram ALP-DANTE Primary port"] --> B
    D["Auvitran Toolbox AVBx7"] --> B
    E["Dante-enabled mixing console"] --> B
    F["Digigram IQOYA SERV/LINK DANTE"] --> B
Basicnetworkconfiguration
If your network switch has a mix of Gigabit and 100Mbps ports, make sure you connect the ALP-DANTE card(s), and if possible all devices, to the Gigabit ports.
- Make sure all computers are set to automatically configure their IP address.
• Power on the network switch
- Connect your Ethernet cables from each device to the Gigabit ports of the network switch. You may need to reboot the computers if they have active previous IP network configurations. All devices will automatically be assigned IP network configurations.
- Use the Primary Ethernet port of the ALP-DANTE card to connect it to the Dante network.
ConnectionviaaRedundantNetwork
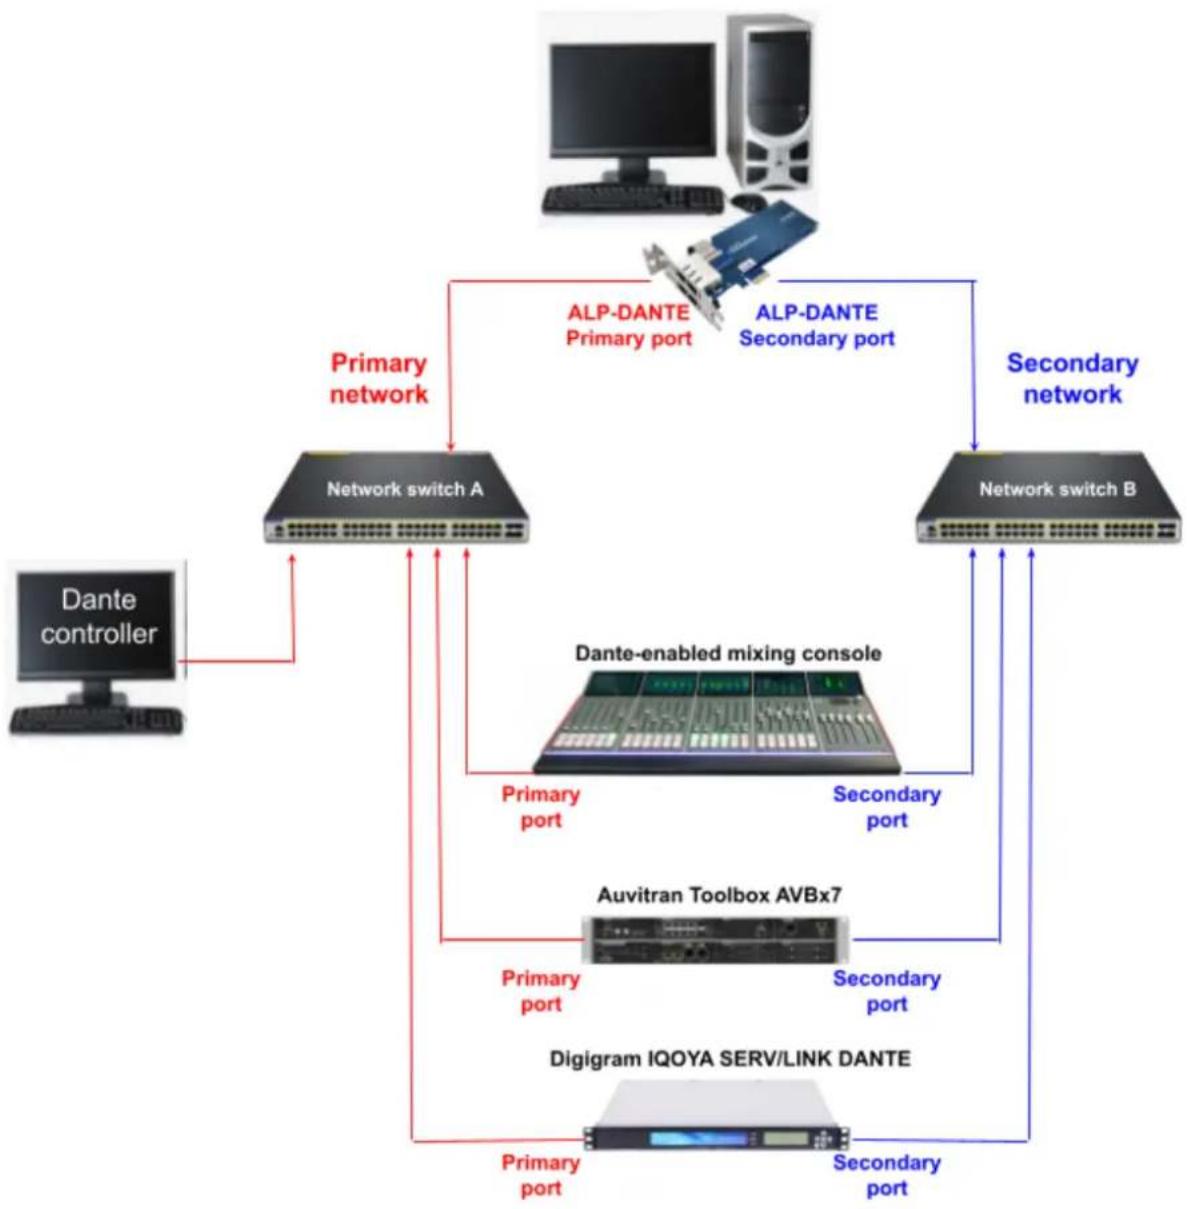
The Dante redundancy works by using two completely independent and separate networks,
the Primary Network and the Secondary Network. To set up and use Dante Redundancy, connect your redundant Dante-enabled device using duplicate network switches and Ethernet cables as shown below. Connect the following to the Primary Network only:
• Any computers running Dante Controller
- Any non-redundant Dante-enabled devices
All Dante-enabled devices that support redundancy should be connected to both the Primary and Secondary networks. The primary and secondary networks MUST NOT be interconnected at any point.
flowchart
graph TD
    A["Dante controller"] --> B["Network switch A"]
    B --> C["ALP-DANTE Primary port"]
    B --> D["ALP-DANTE Secondary port"]
    B --> E["Network switch B"]
    E --> F["Secondary network"]
    B --> G["Auvitran Toolbox AVBx7"]
    G --> H["Primary port"]
    G --> I["Secondary port"]
    G --> J["Primary port"]
    G --> K["Secondary port"]
    B --> L["Network switch A"]
    L --> M["ALP-DANTE Primary port"]
    L --> N["ALP-DANTE Secondary port"]
    L --> O["Network switch B"]
    O --> P["Secondary network"]
    L --> Q["Network switch A"]
    Q --> R["Primary port"]
    Q --> S["Secondary port"]
    Q --> T["Network switch B"]
    T --> U["Secondary network"]
    L --> V["Network switch A"]
    V --> W["ALP-DANTE Primary port"]
    V --> X["ALP-DANTE Secondary port"]
- Make sure all computers are set to automatically configure their IP address.
- Power on the network switch.
- Connect your Primary Ethernet cables from each device to the Gigabit ports of the Primary network switch.
- Connect your Secondary Ethernet cables from each device that supports redundancy to the Gigabit ports of the Secondary network network switch.
You may need to reboot the computers if they have active previous IP network configurations. All devices will automatically be assigned IP network configurations.
UNSUPPORTEDDANTENETWORK
ConfigurationsStraight-throughconnectiontoanotherDanteenableddevice
Because the ALP-DANTE is a dedicated audio interface, Dante Controller must connect to the network via the standard network adapter on the computer. Because of this, do not make a 'straight-through' connection from the ALP-DANTE to another Dante-enabled device.
Connecting Primary and Secondary redundant networks to the same network switch
When using Dante redundancy with any Dante-enabled device, two separate networks must be used. You CANNOT connect any secondary network connections to a network switch used for the primary network, or any primary network connections to a network switch used for the secondary network.
Dante Audio Data over Wireless Networks
Wireless Ethernet networks should not be used to carry Dante audio data, and Dante Controller installed on a PC or Mac will not allow selection of Wireless Ethernet interface or any other non-standard wired Ethernet interface. You should NOT install any wireless components in your Dante network.
Use of 100Mbps Network interface
The use of a 100 Mbps Ethernet device with the ALP-DANTE card is NOT SUPPORTED. You must connect the ALP-DANTE to Gigabit interfaces: Gigabit Ethernet network switch, Gigabit network interface on a PC or Mac.
11.2 Using DanteController
Please download the Dante Controller application from Audinate's WEB site.
The Dante Controller User Guide contains detailed information about all aspects of using it. This section below is only a brief overview.
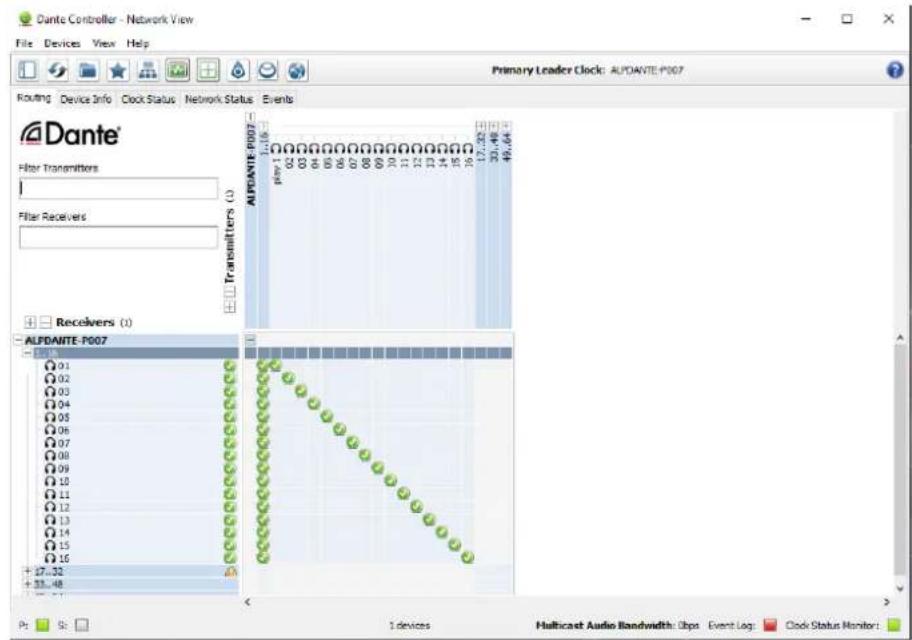
When you open the Dante Controller it displays the Network View, which shows all the Dante-enabled devices on the network. Initially it will display devices, but not channels within devices.
Devices with transmitter (Tx) channels will be displayed along the top row and devices with receiver (Rx) channels will be displayed in the left hand column.
Channels can be viewed by clicking on the + symbol next to Dante Transmitters or Dante Receivers, or the + symbol next to a particular Dante device.
DanteControllerNetworkView
SettingUpAudioRouting
The Dante Controller can be used to configure audio routing between Dante devices. In the expanded view, wherever there is a blue cell at the intersection of a transmitting channel column and an receiving channel row, it is possible to establish an audio routing between them.
Using the Network View, click on the cell at the intersection of a transmit and receive channel to configure an audio routing from the transmitting channel to the receiving channel. A green icon will appear when the routing is established. Click again to remove the routing.
NOTE
Ctrl+click on the cell at the intersection of the devices to configure the entire routing.
ConfiguringtheCard
To configure features of your ALP-DANTE, including its name, sample rate, and latency:
- Start the Dante Controller.
2. Select the device - either:
- Double-click on the device name in the Dante Controller Network View (either in the transmitter row, or the Receiver column), or,
- From the Network View menu, select Device -> Device View (or press Ctrl+D). This opens a Device View window for the selected device. If there are multiple computers with ALP-DANTE cards in your network, to identify a particular card:
- Look for the device name ending in the last six characters of its MAC address, or,
- After selecting a device at random, use the Identify feature in the Dante
Controller (see below) to check which card it is.
DeviceViewWindow
The Device View has five tabs: Receive, Transmit, Status, Device Config and Network Config. The Receive tab for a configured ALP-DANTE card is shown below.

Identifying Individual ALP-DANTE cards
When there are multiple computers with ALP-DANTE card in your network, you can use the Identify feature to know which card is which. Once you have selected a particular card within Device View in the Dante Controller, you can click on the Identify icon in the Device View toolbar. This will cause all of the LEDs on the ALP-DANTE card to flash green for about ten seconds.
ChangingtheDeviceName
By default the device name for the ALP-DANTE card is ****- nnnnnn, where **** is the name of the card and nnnnnn is a unique alphanumeric identifier consisting of the last six digits of the MAC address. This is the name the card will have when you first use it. It is possible to replace the ALP-DANTE card default device name with a custom, user-defined name. To do this open Device View in the Dante Controller, select the card you wish to modify in the Device View, and
change the Device Name in the Device Config tab. If you rename a device, you must re-establish any existing audio routing to and from the re-named device using its new name. Please refer to the Dante Controller User Guide for more information on renaming devices.
ChangingChannelLabels
To change channel labels in Dante Controller:
Open the Device View for the relevant device.
- Click the Receive or Transmit tab (depending on which channel labels you want to edit).
- Double-click the channel label.
- Enter a new value. Tx (transmit) labels must be specific to that device.
ChangingtheSampleRate
The sample rate of the ALP-DANTE card can only be modified from the Windows Device Manager panel. See section "Sampling clock".
If you attempt to change the sampling rate value from the Dante controller, Device view, Device config tab, the sampling rate value will not be changed.

SettingtheLatency
To adjust the latency setting, open a Device View for the selected device in Dante Controller, and select the Device Config tab. This allows several device settings to be viewed and modified. It shows the current receive latency setting and allows the user to change the operating receive latency for the selected device.
The allowed values are:
- 0.25ms - a suitable setting for a network containing 3 network switches
- 0.5ms - a suitable setting for a network containing where the signal path may encompass up to five network switches
- 1.0ms - a suitable setting for a network containing where the signal path may encompass up to ten network switches
- 5.0ms – a safe value for a network of almost any conceivable size
NOTE
Even if you set values suited for your network, various factors may cause some noises. If a value other than the current setting is selected a message will be displayed warning the user that the effect of changing the latency is that any existing audio routing to the device will be temporarily suspended, resulting in some loss of audio data. If you wish to make the change, select "Yes" button; otherwise select No.
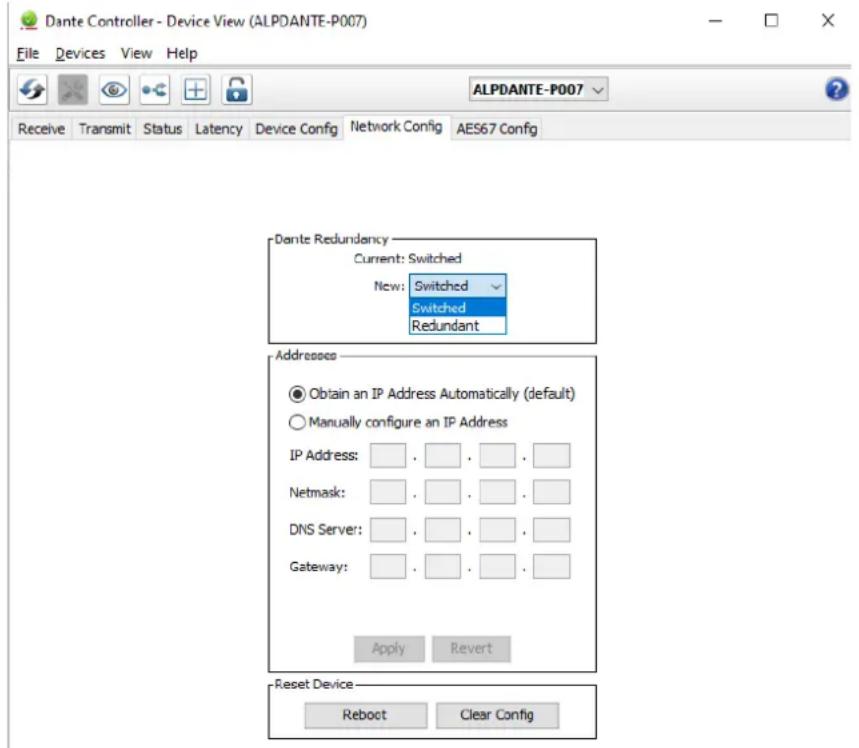
Switchandredundantmodes
The selection of the switch mode or redundant mode is available from the "Device view" by selecting the "Network configuration" tab.
AES67compatibilitymode
AES67 streams can be exchanged between the ALP-DANTE and AES67 devices.
The parameters of the AES67 compatible mode are:
- SAP (Session Announcement Protocol) must be supported.
This is one of four device discovery methods referenced in the AES67 standard. Check if the transmitting non-Dante AES67 device supports SAP. Otherwise Dante Controller cannot discover the audio flows coming from the device. Dante devices support SAP if their AES67 mode is enabled. Even if the non-Dante AES67 device does not directly support SAP, the vendor may have a software conversion tool available, providing wider compatibility.
- Multicast flow only (unicast is not supported yet).
- Up to 8 channels per flow.
- Multicast IP addresses must be in the range of 239.69.0.0 - 239.69.255.255/16.
In addition, the same network address range must be specified for other AES67
devices transmitting to Dante devices.
• 48 kHz sampling rate only.
- The Dante audio flows from/to the device will also be limited to 48 kHz if the device is engaged in AES67 mode.
• 24 bit (L24) only for transmission and reception.
- 2 milliseconds fixed latency for reception.
• Primary network only.
- 100 Mbps or slower connections are not supported.
The AES67 mode of the ALP-DANTE card can be set from the Dante controller.
Select the ALP-DANTE card, and go to the "AES67 Config" tab.
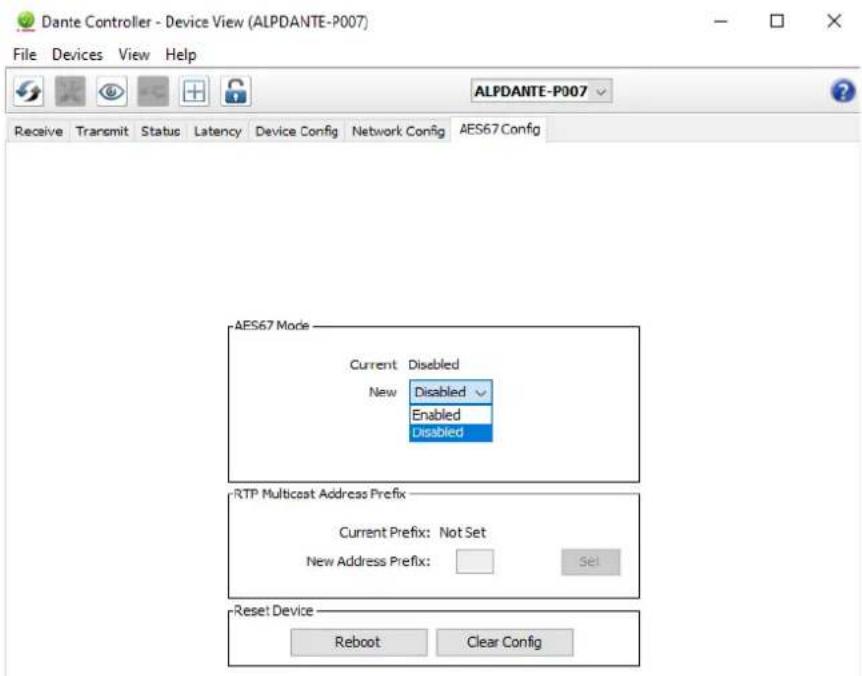
Apply "Clear Config" and reboot the Dante interface when enabling or disabling AES67 mode.
Common sense precautions should also avoid audio mishandling:
- If you modify the device labels, reboot the Dante interface after label modifications to update the AES67 signal name announcement
- Do not change the bit depth (default 24 bit) from Dante Controller or the console after enabling the AES67 mode.
- AES67 is Multicast only : create AES67 multicast transmission streams in Device View as usual, but tick "AES67 flow" first.
- In the Routing tab on Dante Controller, the non-Dante AES67 devices will appear in blue as the transmitters.
Clocking considerations
- AES67 mode on a Dante device enables both IEEE 1588 Precision Time Protocol (PTP) v1 and v2. A single clock domain must be created across both PTP v1 and v2 devices:
- Standard Dante devices support PTP v1 only
- AES67-enabled Dante devices support PTP v1 and PTP v2
- AES67 devices support PTP v2 only
- PTP v1 and v2 are not inter-compatible. One AES67-enabled Dante device will act as the boundary clock between PTP v1 and v2, bridging the two clock domains
Enabling ALP-DANTE as Master for both Dante and AES67.
- Enable the Dante card "Preferred Master" status
- Disable "Preferred Master" for all Dante devices that have AES67 disabled.
- Disable "Sync to External" for all devices.
- Assign a PTPv2 priority level of between 128 and 255 for all non-Dante devices
If another AES67 device (Grandmaster Clock, or another AES67 device) is the Master,
- Make sure the PTP v2 Master has a priority of between 1 and 100, and is using the "Media Profile" clock settings.
- Disable "Preferred Master" and "Sync To External" for all Dante devices. One AES67-enabled Dante device will automatically be selected as the Boundary clock, becoming the Dante Master.
- Make sure the Master Clock device is set to use the "Media profile" (not the "Default profile" because Dante devices do not support the Default profile.
12SPECIFICATIONS
12.1 Configuration
| Bus/Format | PCI EXPRESSTM x1 / Low profile (compatible x2, x4, x8, x16) |
| Dimensions | 168 mm × 69 mm × 20 mm |
| Consumption (+3.3 V/+12 V) | 0.4 A / 0.3 A |
| In operation: temperature/humidity (without condensation) | 0°C/+50°C • 5%/90% |
| Storage: temperature/humidity (without condensation) | -5°C/+70°C • 0%/95% |
12.2Audiocharacteristics
| Sampling frequency | 44.1, 48, 88.2, 96, 176.4, 192 kHz (set from Windows Device Manager, ALP-DANTE card properties) |
| Audio formats supported | PCM: 16, 24, 32 bits |
12.3Connectors
| Internal connectors | Inter-card synchronisation |
| External connectors | 4 x Gbps RJ-45 connectorsEither located on the standard height bracket, or 2 per low profile bracket (main board, and expansion board).Expansion board may not be connected if the two ports are required. |
12.4 Development environment
| Drivers | Windows: WASAPI, ASIOLinux: Alsa |
| Operating systems supported | Windows 10 from version 20H2, Enterprise version LTSC 1607Linux (from Kernel version 4.1 as per kernel.org) |
13APPENDICES
13.1LEDs
TheALPcardhasfourgreenLEDs:2LEDsonthePCB(onlyvisiblewhenthePCisopen)andtwoLEDs onthebracketsillustratedinthediagrambelow.
BracketLEDs
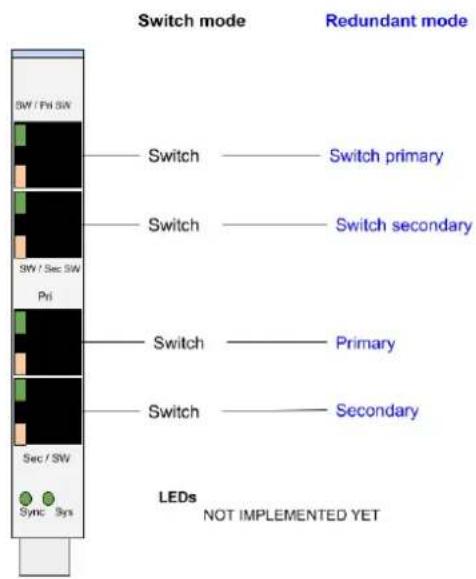
Internal LEDs

If the card and its on-board firmware are initialised correctly, LED 1 must be lit solid green, and LED 2 must flash every second (1 Hz).
If LED 2 flashes faster (twice per second - 2 Hz), this means that the firmware version that has been uploaded to the card is corrupted, and the card is running the backup factory firmware version. It is then necessary to re-install the appropriate firmware version.
| LED | Description | Behaviour |
| LED1 | Signalswhenthecardisinitialisedcorrectly | Solidgreenlit |
| LED2 | Signalsifthecardisrunningthelastupdated firmwareorthebackupfactoryfirmware version. | Flasheseveryseconds: Thecardrunsthelastuploadedfirmwareversion (normalbehaviour).IfthisLEDflashesdifferently,thecardrunsthe backupfactoryfirmwareinsteadofthelast uploadedversionThislastfirmwareiscorruptedin memoryandhastobeappliedagain. |
13.2Connectors
Card equipped with the low profile bracket.

Card equipped with the standard profile bracket
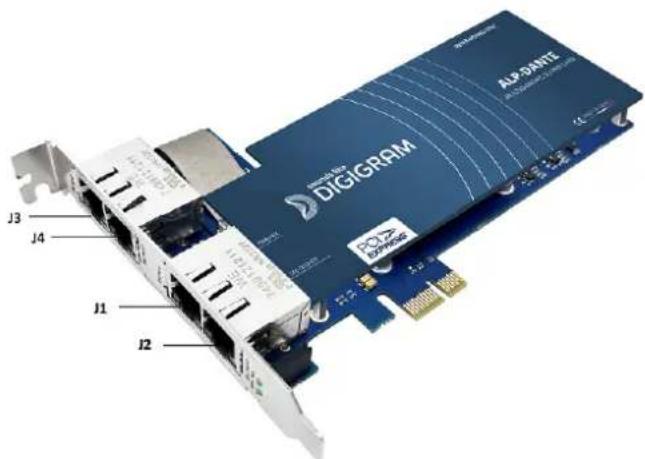
| Mode | J1 | J2 | J3 | J4 |
| Switch | Primary | Switch | Switch | Switch |
| Redundant | Primary | Secondary | Switch Primary | Switch Secondary |
Note: Switch and Redundant modes are configured from the Dante Controller application.
Pleasecontactyourdistributorforalltechnicalsupportissues

DIGIGRAM
DigigramDigital
82 Allée Galilée, 38330 Montbonnot - FRANCE
Tel: +33 (0)4 76 52 47 47
E-mail: info@digigram.com
DigigramAsiaPteLtd.
60 Albert Street - #09-11 OG Albert Complex Singapore 189969, Singapore
Tel.: +65 6291 2234 · Fax: +65 6291 3433
E-mail: info asia@digigram.com
Copyright 2023 Digigram. All rights reserved.
No part of this manual may be reproduced without the prior consent of Digigram. This reservation includes photocopying, translating and/or reformatting the information contained in this manual.
Everything possible has been done to ensure the greatest accuracy, however Diagram cannot be held liable for any typing error, error or omission and reserves the right to make modifications and improvements without prior notice.
Digigram and the Digigram logo are trademarks or brand names of Digigram Digital. All other marks are owned by their respective companies.


- Professionalmulti-channelsoundcardwith DANTEconnectivity
- TABLEOFCONTENTS
- INTRODUCTION 3
- 2IMPORTANTNOTICE4
- 3BOXCONTENTS5
- 4GENERALCHARACTERISTICS5
- 5REQUIREDCONFIGURATION6
- 6HARDWAREINSTALLATION9
- 7SOFTWAREINSTALLATIONUNDERWINDOWS 11
- 8UNINSTALLINGTHEDRIVERUNDERWINDOWS 17
- 9CONFIGURINGTHECARDUNDERWINDOWSVIATHEALP-XMANAGERAPPLICATION 18
- 10ASIOCONTROLPANELforWindows 23
- 11SPECIFICATIONS 25
- 12APPENDICES 26
- 1INTRODUCTION
- 2IMPORTANTNOTICE
- Certifications
- Caution
- 3BOXCONTENTS
- 4GENERALCHARACTERISTICS
- Mainhardwarecharacteristics
- Mainsoftwarecharacteristics
- 5REQUIREDCONFIGURATION
- Requiredhardwareconfiguration
- ThewindowssleepmodeforthePCIebusmustbedisabled.
- 5.2NecessarysoftwareconfigurationunderWindows
- 5.3NecessarysoftwareconfigurationunderLinux
- 6HARDWAREINSTALLATION
- Preparingthecard
- Lowprofileconfigurations
- Standardprofileconfiguration
- 6.2Installingthecard
- 6.3InternalLEDs
- 7SOFTWAREINSTALLATIONUNDERWINDOWS
- IMPORTANT
- Veryfirstinstallation
- Updatingthedriverversion
- Updating the firmware
- Verifying the card installation
- Presenceofplaybackandrecordingdevices
- Carddetected by the Digigram ALP-X Manager application
- CardavailabilityunderASIO
- 7.5Adjustingtheinternallatencyofthecard
- 7.6Replacingacard
- 7.7Changingtheorderofinstalledcards
- 8UNINSTALLINGTHEDRIVERUNDER WINDOWS
- Apps & features
- 9CONFIGURINGTHECARDUNDERWINDOWS VIATHEALP-XMANAGERAPPLICATION
- InstalledALPcards
- 9.2Samplingclock
- Input and output vu-meters
- Firmwareupdateprocedure
- 9.5Creating, saving and loading settings sessions
- 9.6Keyboardshortcuts
- 10ASIOCONTROLPANELforWindows
- Activecardsgroup/Asiochannelsallocation
- Buffersize(latency)
- CONFIGURATION OF THEDANTE PARAMETERS
- ConnectingtoaNetwork
- GigabitEthernetSupport
- ChoosingEthernetCabling
- Switchmodeandredundantmode
- NetworkConfiguration
- Basicnetworkconfiguration
- ConnectionviaaRedundantNetwork
- UNSUPPORTEDDANTENETWORK
- ConfigurationsStraight-throughconnectiontoanotherDanteenableddevice
- Connecting Primary and Secondary redundant networks to the same network switch
- Dante Audio Data over Wireless Networks
- Use of 100Mbps Network interface
- Using DanteController
- SettingUpAudioRouting
- ConfiguringtheCard
- Select the device - either:
- DeviceViewWindow
- Identifying Individual ALP-DANTE cards
- ChangingtheDeviceName
- ChangingChannelLabels
- ChangingtheSampleRate
- SettingtheLatency
- NOTE
- Switchandredundantmodes
- AES67compatibilitymode
- Clocking considerations
- 12SPECIFICATIONS
- Configuration
- 12.2Audiocharacteristics
- 12.3Connectors
- Development environment
- 13APPENDICES
- 13.1LEDs
- 13.2Connectors
- Pleasecontactyourdistributorforalltechnicalsupportissues
- DIGIGRAM
- DigigramDigital
- DigigramAsiaPteLtd.
Brand : Digigram
Model : ALP-DANTE-LE
Category : Soundcard