
KA 2005 Em - Coffee maker Kaiser - Free user manual and instructions
Find the device manual for free KA 2005 Em Kaiser in PDF.


| Product Type | Espresso Coffee Machine |
| Brand | Kaiser |
| Model | KA 2005 Em |
| Power Supply | 220-240 V AC, 50/60 Hz (grounded socket) |
| Coffee Temperature Settings | Low (70±5°C), Medium (75±5°C), High (80±5°C) |
| Water Hardness Settings | Soft (<10°dH / <180 mg/L CaCO3), Medium (10-20°dH / 180-300 mg/L), Hard (>20°dH / >360 mg/L) |
| Auto Power Off | After 30 minutes of inactivity |
| Cup Warmer | Yes (top surface heats up) |
| Steam Wand | Yes (cappuccino maker) |
| Hot Water Function | Yes (up to 120 seconds) |
| Filter Types Supported | Ground coffee (single/double), pods, small capsules, large capsules |
| Included Accessories | Filter holder, 1-cup filter, 2-cup filter, PODS filter, small capsule holder, large capsule holder, coffee tamper |
| Control Panel | 3 buttons: 1 cup, 2 cups, steam |
| Programming Menu | Adjustable coffee temperature, water hardness, cup amount, auto-off, factory reset |
| Water Tank | Removable, with MIN/MAX marks |
| Drip Tray | Removable with red float water level indicator |
| Safety Features | Child safety, auto shut-off, grounded plug, do not immerse |
| Cleaning | Hand wash recommended; descaling indicator lights |
| Material | Plastic and metal body |
Frequently Asked Questions - KA 2005 Em Kaiser
User questions about KA 2005 Em Kaiser
0 question about this device. Answer the ones you know or ask your own.
Ask a new question about this device
Download the instructions for your Coffee maker in PDF format for free! Find your manual KA 2005 Em - Kaiser and take your electronic device back in hand. On this page are published all the documents necessary for the use of your device. KA 2005 Em by Kaiser.
USER MANUAL KA 2005 Em Kaiser
we thank you for the acquisition of our technology.
We are sure that you have made the right choice. This product, which meets the highest requirements and meets international standards, will allow you to easily embody all your culinary skills, and its modern look, developed by the best European designers, will perfectly decorate your kitchen.
Please read the maintenance and operating instructions carefully before starting the device. Following the recommendations contained in it will protect you from possible troubles if the device is used incorrectly and will also allow you to reduce energy consumption. If the operation of the device complies with these instructions, our product will delight you for a long time.
Our devices fully comply with the basic requirements of safety, hygiene and environmental protection, which is confirmed by certificates of conformity.
With the thought of further improving the technical and operational characteristics of our household appliances, we reserve the right to make changes to the design and device that only positively affect the consumer qualities and properties of the product.
We wish you effective use of our company's products.
Yours faithfully
We inform you that our devices which are the object of the present operating instructions are assigned exclusively for domestic use.
EN
CONTENTS
SAFETY INSTRUCTIONS 8
TECHNICAL SAFETY 10
CHILD SAFETY 16
BRIEF DESCRIPTION 18
LOCATION DRAWING, CONTROL PANEL, ACCESSORIES 18
USAGE 20
Filling the tank with water 20
Switching on the appliance 20 for the first time
Customizing the program- 22 ming menu
Setting the coffee temperature 24
Adjusting the water hardness 26
Programming the amount of 28 coffee in a cup
Auto power Off function 30
Factory reset function 30
Getting hotter coffee and 32 warming cups
Making espresso with ground 34 coffee
Making Espresso using pods 38
Making Espresso using small 40 capsules
Making Espresso using large 42 capsules
EN
Making a cappuccino 44
Hot water supply 48
CARE AND MAINTENANCE 50
Boiler cooling 50
Cleaning the enclosure 50
Cleaning the drip tray 52
Cleaning coffee filters 54
Cleaning the pod filter 54
Cleaning capsule Filters 54
Cleaning the water tank 56
Cleaning the cappuccino 56 maker
Other types of cleaning 56
Descaling 58
Meaning of indicator lights 60
PERIODIC INSPECTION 62
RESPECT FOR THE ENVIRONMENT 68
EN
SAFETY INSTRUCTIONS
This appliance complies with statutory safety requirements.
Inappropriate use can, however, lead to personal injury and damage to property.
Please read this instruction carefully before using the appliance for the first time, to avoid the risk of accidents and damage of the appliance. The instruction contains important notes about installation, safety, use and maintenance of the appliance.
The manufacturer cannot be held liable for damage caused by non-compliance of this instruction.
Keep this instruction in a safe place. Pass it on to any future owner of the appliance.
EN
TECHNICAL SAFETY
Check the device for visible damage. Such damage may pose a threat to your safety. Never plug in a damaged device!
Use the appliance only indoors at room temperature not exceeding 2000 meters above sea level. It is forbidden to use the appliance outdoors.
Connect the appliance only to AC power via a grounded socket installed in accordance with the regulations.
Make sure that the grounding system in your home electrical wiring meets the requirements. Follow the instructions on the rating plate when connecting and operating the appliance.
Use the appliance only if there is no damage to the power cord or the appliance itself.
In the event of a malfunction, remove the plug from the socket and allow the appliance to cool.
Repairs to the appliance, such as the replacement of a damaged network cable, are only permitted by our service team for safety reasons.
Do not touch the hot surface of the appliance. Use knobs or buttons to adjust the modes.
To prevent fire, electric shock, and injury, do not immerse cord, plugs, or appliance in water or other liquid.
Do not operate the appliance with a damaged cord or plug, or after the appliance has stopped working or has been damaged in any way. Contact service.
EN
The appliance is only used for the preparation of coffee drinks. It is forbidden to use it for other purposes.
The surface of the heating element is subject to residual heating after use.
The appliance must not be placed in a cabinet during use.
Do not use the equipment in high temperatures, strong magnetic fields, and humid environments. Do not place the coffee machine on a hot surface, near a fire source, or on top of other electrical appliances, such as a refrigerator.
Place the coffee machine on a flat table or countertop and note that the machine should be at least 5 cm away from an object nearby and the back of the machine should be more than 20 cm away from the wall.
Do not touch the metal surface of the machine directly with your hand when operating the machine.
Clean and maintain your coffee machine parts regularly to ensure the quality of your coffee and ex-tend the life of your machine.
Do not turn off the power supply at will when the machine is running.
Please do not touch high-temperature components (such as high-pressure steam wand, water outlet, etc.) while using the machine.
This appliance is designed for making coffee or hot drinks. Be careful not to get burned by splashes of water or steam or due to improper use of the appliance.
EN
Use of accessories not recommended by the appliance manufacturer may result in personal injury.
Do not allow the cord to hang from the edge of the table or counter or touch the surface of the appliance.
It is forbidden to place the appliance on or near a gas or electric surface, as well as near a preheated oven.
Do not use this appliance for any purpose other than its intended use.
It is forbidden to use the appliance if it is covered or touches combustible materials, including curtains, drapes, walls or the like, while it is in operation.
Before cleaning, unplug the appliance from the mains to avoid electric shock.
The appliance is not intended to be operated using an external timer or a separate remote control system.
Wrap the cord around the bottom of the appliance to reduce table clutter and make it easier to store.
Any other service must be performed by an authorized service representative.

Importantly!
Surfaces may become hot during use.

EN
CHILD SAFETY
This appliance is not intended for use by children or persons whose physical, sensory or mental abilities, or lack of necessary experience and knowledge, do not allow them to operate the appliance safely without the supervision or direction of a responsible person who must ensure safe operation on their part.
Children should be supervised to ensure that they are not playing with the appliance.
This appliance is intended for use by children over 8 years of age or persons with reduced physical, sensory or mental capabilities, or lack the necessary experience and knowledge, under the supervision or instructions of a responsible person who must ensure safe operation on their part and the prevention of possible hazards.
Standing, sitting or leaning on different parts of the device is prohibited. Doing so may cause damage to the device and may also cause serious injury.
Children and pets should not be left unattended near the device when it is switched on. Children should not play in the immediate vicinity of the device, regardless of whether the device is on or off.
Do not allow children to play with the packaging material.
EN
BRIEF DESCRIPTION
Unpack the device. Remove all packaging material, stickers.
Before using the appliance for the first time, thoroughly clean all accessories and the water tank by rinsing them in hot water.

Do not operate the appliance without water.
The presence of water in the cavity under the tank is normal. Wipe with a sponge periodically.
This device is intended for home use only.
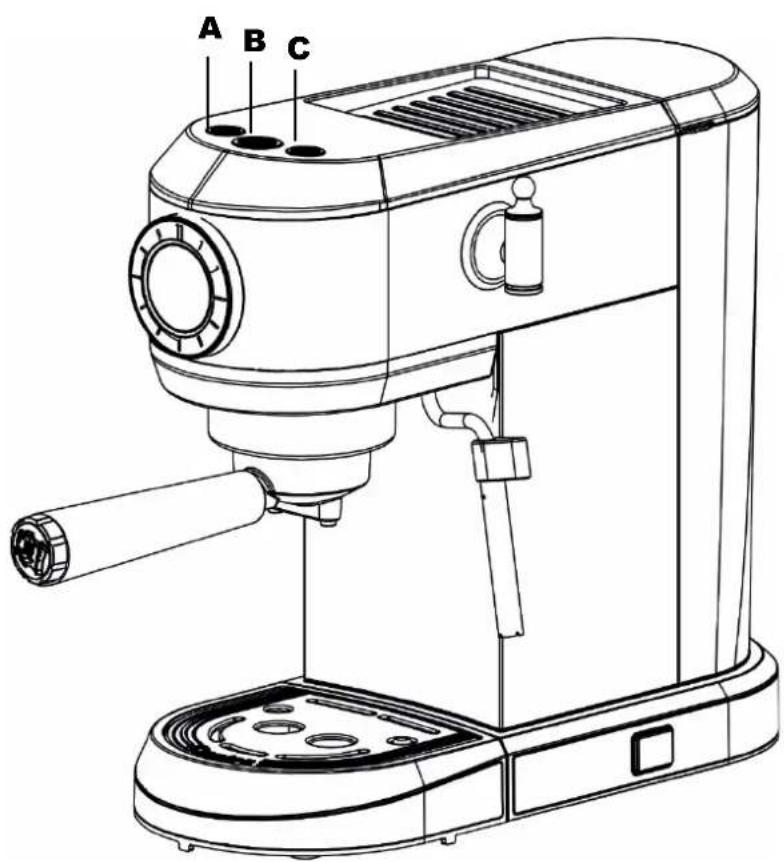
LOCATION DRAWING
Approximate arrangement of functional nodes:
- Cup warmer
- Water Tank
- Water Tank Cover
- Steam/Hot Water Handle
- Monometer
- Steam Supply Tube
- Boiler exhaust valve
- Cappuccino maker
-
On/off button
-
Tray for cups or glasses
CONTROL PANEL
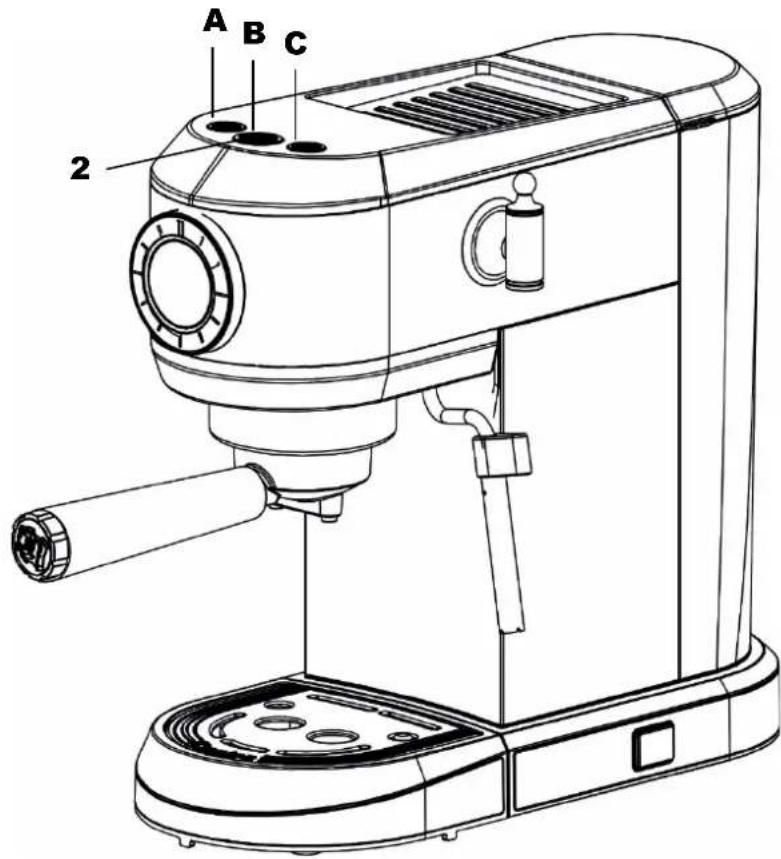
A. Coffee Brew Button - 1 Cup (Operation Indicator - White)
B. Coffee Brew Button - 2 Cups (Operation Indicator - White)
C. Steam Button (Operation Indicator - White)
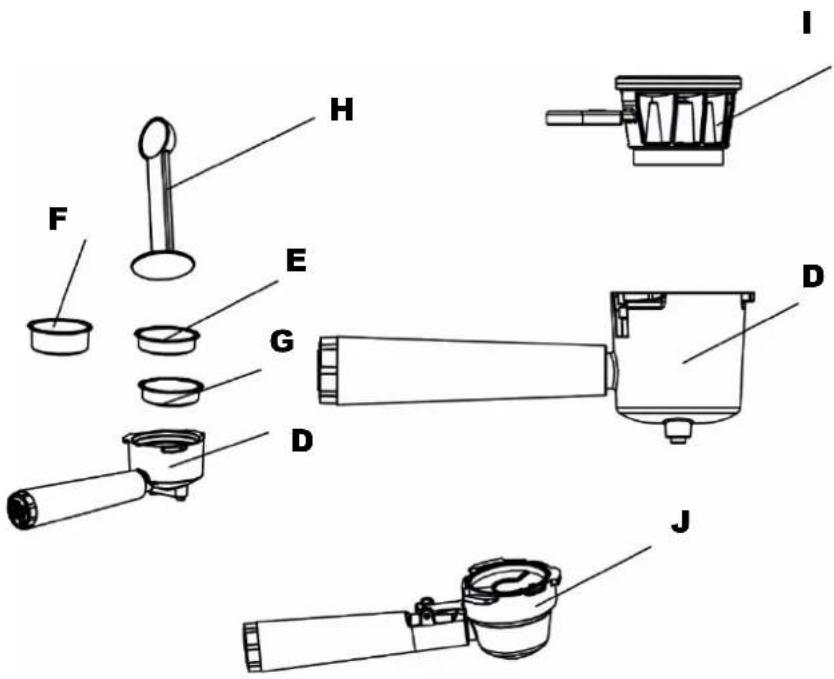
ACCESSORIES
D. Filter holder
E. 1 cup filter
F. 2 cup filter
G. PODS Filter
H. Dispenser/Pressure Dispenser
I. Capsule for small capsules
J. Capsule for large capsules
EN
USAGE
Filling the tank with water
To fill the tank with water, you need to:
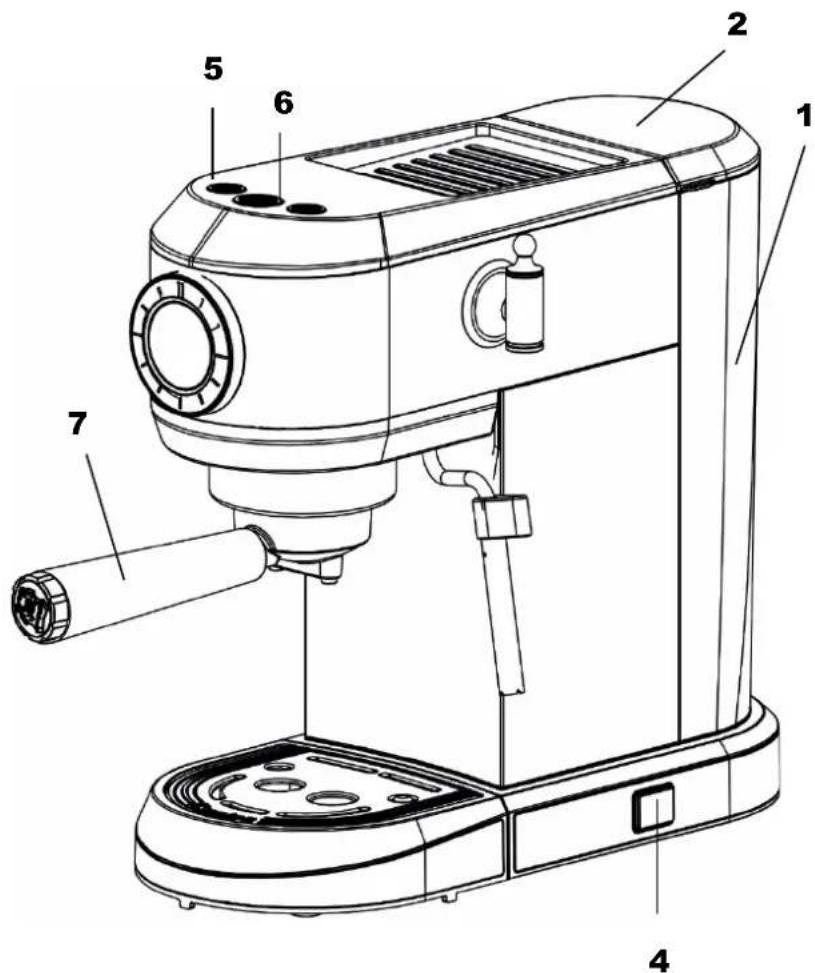
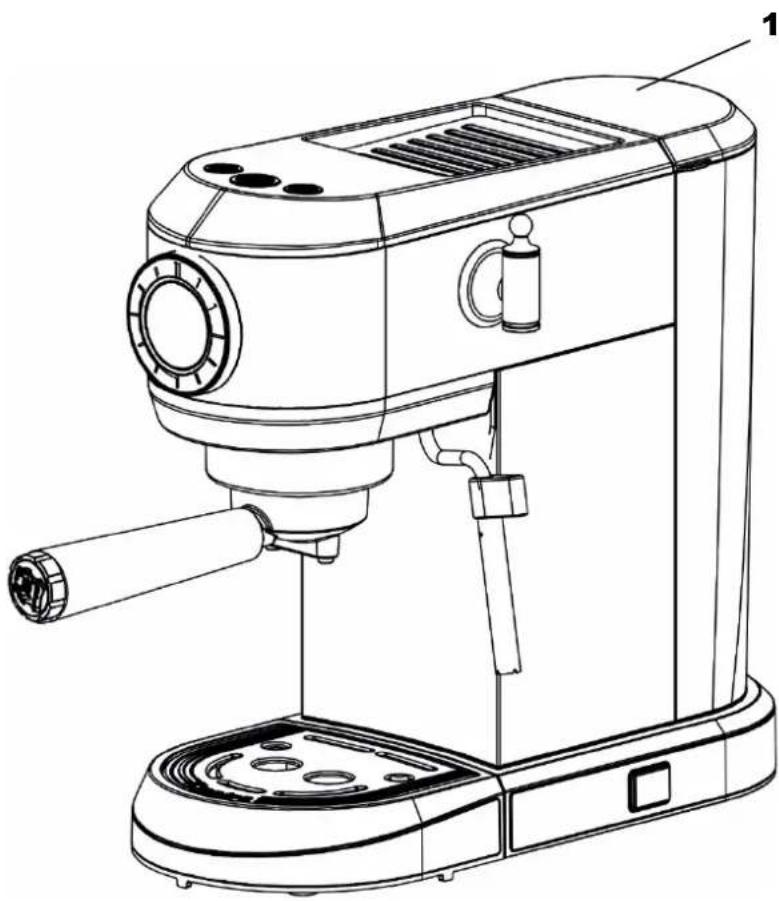
- Lift the cistern up and remove it 1.
- Open lid 2 and fill the tank with fresh and clean water without exceeding the MAX level.
- Put the cistern back in, pressing down slightly to open the valves located at the bottom of the cistern.
You can fill the tank without removing it. Just pour water into the tank using a different container of water.

Importantly!
Do not operate the appliance without water in the tank or without the tank.

Importantly!
Add water to the tank in a timely manner if the level is below the MIN mark.
Switching on the appliance for the first time
Rinse the inside of the appliance before the first use.
- Turn on the appliance by pressing the power button 4. The device will perform a self-diagnosis, which will be accompanied by the sequential flashing of three buttons.
Lights 5 and 6 will flash to indicate that the appliance is about to heat up.
At the end of this process, when the lights stop flashing and start to light evenly, the appliance will be ready for flushing.
• Install the filter holder on appliance 7.
EN
- Place the 0.5-liter container under the outlet duct of the boiler 8 and press button 9. Repeat this process 5 times.

Empty the container and place it under the hot water/steam supply unit 10.
- Turn the hot water or steam handle 11 to position 11 and supply hot water until the water tank 1 is completely emptied. Close the handle to position 0.
Customizing the programming menu
Before entering the menu, make sure that the device is ready to use.
- Then, hold button 12 for 5 seconds until the three buttons flash in series, indicating that the appliance has entered programming mode.
You can adjust the settings of the coffee machine as you wish.
Wait 15 seconds to exit the programming menu.


Importantly!
If no selections are made during this time, the device will automatically return to standby mode and save the outgoing settings.

EN
Setting the coffee temperature
In our coffee machine, you can set the temperature of the water to brew your coffee.
If you need to change the water temperature, follow these steps:
- Enter the programming menu (see Configuring the Programming Menu)
- Press button 1 to enter the coffee temperature selection mode.
The indicator for the current selection of the coffee temperature will illuminate.
Combination of indicators:
A - low temperature 70 +/-5°C
A, B - average temperature 75 +/- 5°C
A, B, C - high temperature 80 +/-5°C
The lights will flash sequentially.
- Press the button corresponding to the selected temperature: A for low; B for medium; C for high.
The button will start flashing three times to indicate that your selection is stored in memory. After that, the beep will sound twice.
The coffee machine automatically comes out of the menu and is ready to go.
EN
Adjusting the water hardness
Simultaneous flashing of the A, B, C lights after prolonged use signals that descaling is needed (see para. Maintenance & Care section)
The coffee machine is initially set to use water with a low level of hardness. For your convenience, you can adjust the level of water hardness in your area. In this way, the interval of the descaling operation is increased or decreased.
If you need to change the water hardness, follow these steps:
- Enter the programming menu (see Configuring the Programming Menu)
- Press button 2 to switch to water hardness selection mode.
The indicator for the current water hardness selection will illuminate.
Combination of indicators:
A - soft
A, B - medium
A, B, C - hard
The lights will flash sequentially.
- Press the button corresponding to the selected stiffness level in your region: A for low; B for medium; C for hard.
| A | A, B | A, B, C |
| <10°dH | 10°dH-20°dH | >20°dh |
| <18°fH | 18°fH-36°fH | >36°dh |
| <180mg/l CaCo3 | 180-300mg/l CaCo3 | >360mg/l CaCo3 |
The button will start flashing three times to indicate that your selection is stored in memory. After that, the beep will sound twice.
The coffee machine automatically comes out of the menu and is ready to go.
EN
Programming the amount of coffee in a cup
The machine is programmed to make standard portions of drinks. To change these quantities, follow these steps:

- Place one or two cups under the spouts of the filter holder 1.
- Press and hold down the desired programming button 2 or 3.
The machine will start serving the coffee, and the other coffee dispensing button will flash to indicate that the coffee machine is in programming mode.
Once the desired amount of coffee has been reached in the cup, release the button. The feed will stop, and the indicator will flash three times to indicate that the quantity is stored in memory.
When the two lights A and B of the coffee feed are steady, the machine is ready to go.

Importantly!
If the set coffee brew time is less than 15 seconds, the default value will be 20 seconds. If the button is not released during the coffee making process, the machine will automatically stop after 75 seconds, as the maximum time setting of the machine is 75 seconds, i.e. 20 seconds ≤ the user time ≤ 75 seconds.
EN
Auto power Off function
To save energy, the device is equipped with an automatic shutdown function that activates when you are idle for 30 minutes. After that, all lights will turn off.

To restore the operation of the device, just press any button on the control panel.
Factory reset function
Using this function, you can reset all menu settings and program values to factory settings.
To restore factory settings, follow these steps:
- Place the steam unit above the drip tray or place a mug underneath it.
- Enter the programming menu (see Configuring the programming menu).
- Turn the steam handle to position 1.
- Press button 2, the three lights will start flashing at the same time A, B, C, confirming the restoration of factory settings.
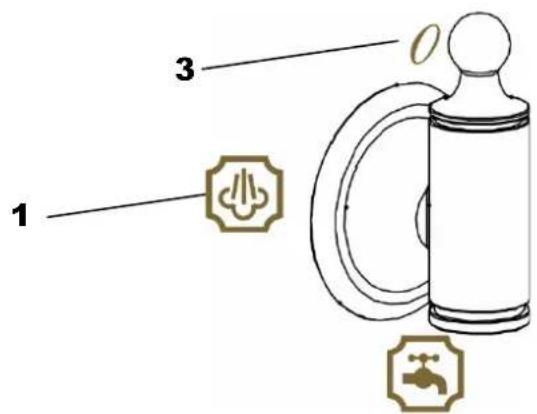
The lights will flash to signal the need to close the steam handle.
- Turn the handle to position 0 – 3.
Once the steam handle is closed, an audible alarm will sound and the appliance will be ready for operation
EN
Getting hotter coffee and warming cups
To achieve a hotter espresso, it is recommended to:

- Warm up the cups by rinsing them with hot water before making the coffee.
To do this, you need to:
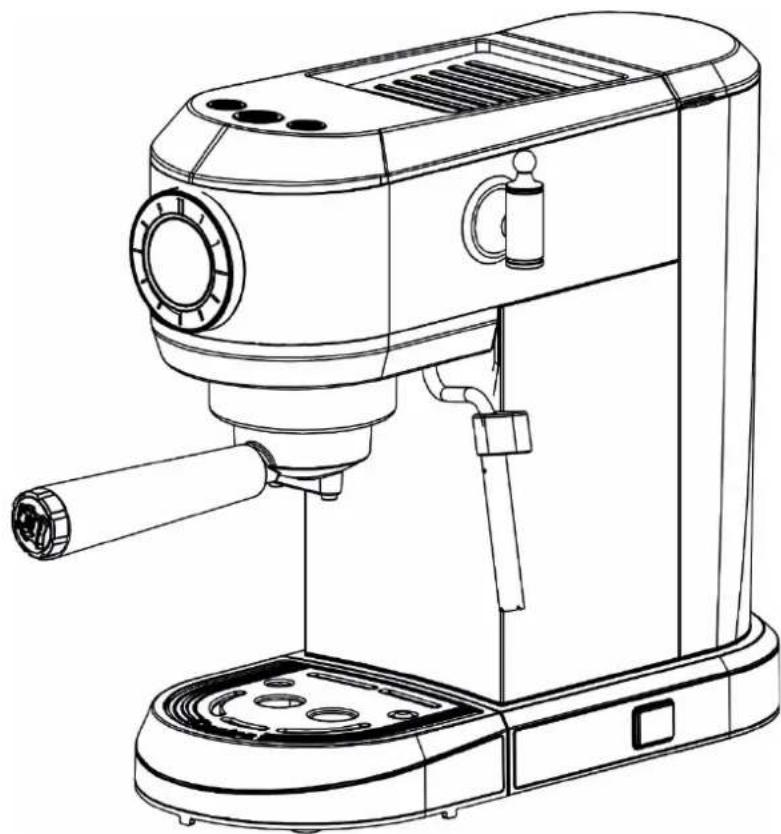
• Install the filter holder with filter 1 on the machine, but do not add coffee.
- Press the button 1 cup - 2 or 2 cup - 3 using the same cup you used to make your coffee to warm it up with hot water.
- Increase the temperature of the coffee in the programming menu (optional; see Setting the Coffee Temperature).
When the cup rack 4 becomes hot, place the cups intended for use on
natural_image
Line drawing of a modern coffee maker with handle and control panel (no text or symbols)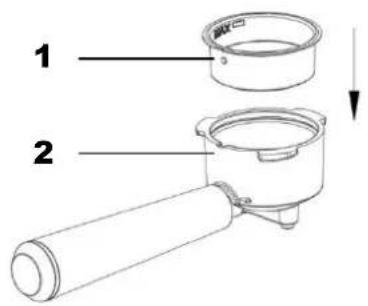

EN
Making espresso with ground coffee
To make espresso from ground coffee, you need:
- Insert the ground coffee filter 1 into the holder 2. Use the filter with the symbol embossed at the bottom to make one cup of CUP-1 coffee, or with the symbol embossed at the bottom to make 2 cups of CUP-2 coffee.
If you want to make one cup of coffee:
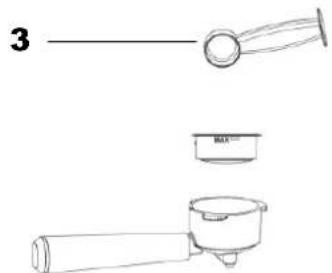
- Fill filter 1 marked CUP-1 with a straight portion of ground coffee using dispenser 2, about 8 g.
If you want to make two cups of coffee:
- Fill filter 1 marked CUP-2 with a straight batch of ground coffee using dispenser 2, about 15 g.

Importantly!
Fill the filter in small doses to avoid overfilling.

Importantly!
To ensure proper operation, the filter should always be checked before filling that there is no residue of ground coffee from previous use.
- Spread the ground coffee evenly and press it down lightly with the press down 4.
Pressing ground coffee is very important for making a good espresso. If you apply too much pressure, the coffee will be served slowly and will have a strong taste. If you don't apply enough pressure, the coffee will serve too quickly and will taste light.


EN
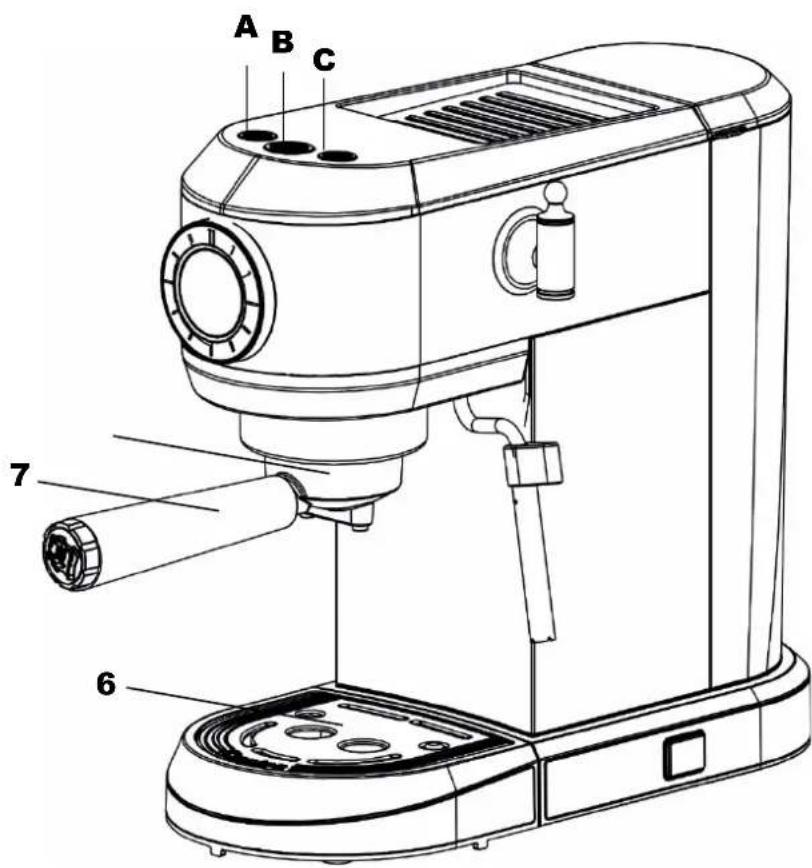
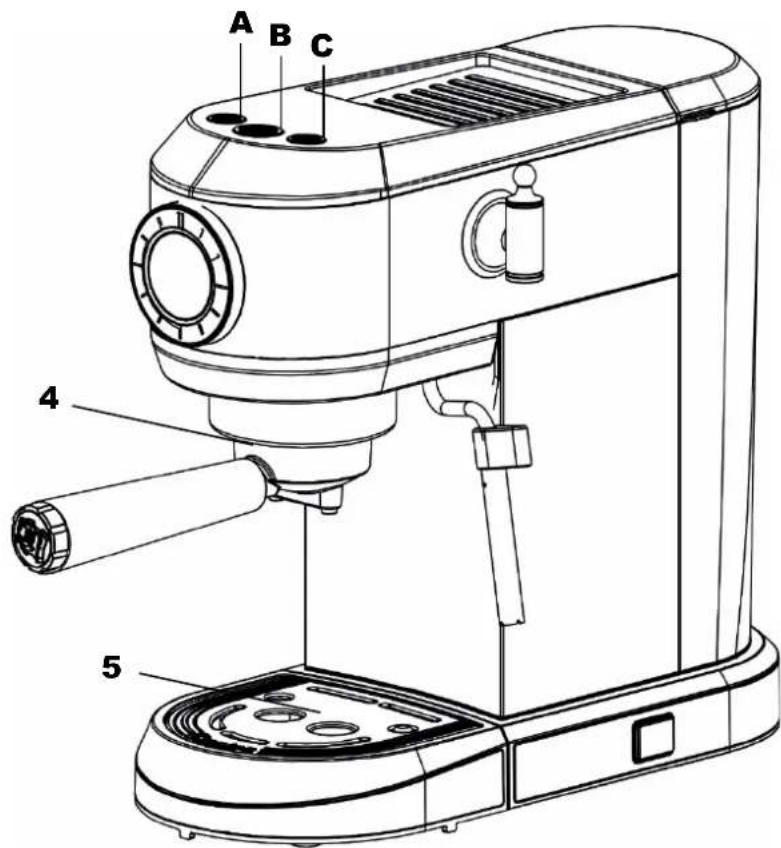
- Remove excess coffee from the edge of the filter holder and secure the holder to the machine 5.
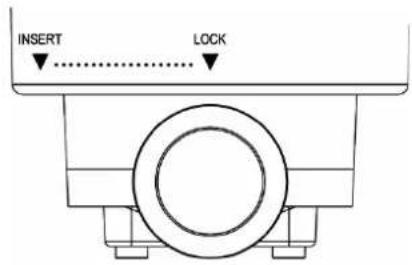
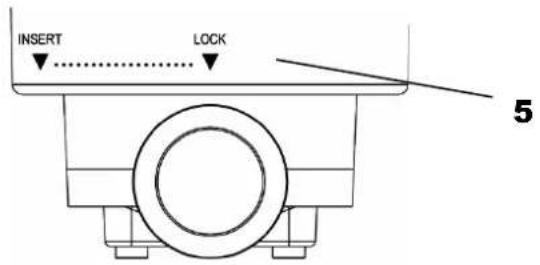
- Secure the holder in the coffee machine. For proper fastening, align the handle of the holder 7 with the symbol INSERT 5, secure the holder, and turn the handle to the right until it aligns with the LOCK position.
- Place the cup or cups under the nozzles of the filter holder 6.
• Make sure the coffee feed button lights are lit, then press the 1 cup A feed button or the 2 cup B button, the appliance will start serving coffee and automatically stop serving once brewing is complete. A beep will sound three times.
Importantly!
In the process of making coffee with the machine, its flow can be stopped at any time by pressing the previously pressed feed button.
The default coffee brew time is 25 seconds for a single cup and 38 seconds for a double cup. Coffee Temperature: Medium temperature (see Setting the Coffee Temperature).
• To remove the filter holder 7, turn the handle from right to left.
Importantly!
To avoid hot splashes and burns, never remove the filter holder when the machine is in feed mode, always wait a few seconds after feeding is complete.
EN
Making Espresso using pods
To make espresso from pods, you need:
- Insert the coffee filter for pods 1 into holder 2.
- Insert pod 3 as centrally as possible above the filter. Always follow the instructions on the pod packaging to install them correctly in the filter.
- Secure the holder in the coffee machine. For proper fastening, align the handle of the holder 7 with the symbol INSERT 5, secure the holder, and turn the handle to the right until it aligns with the LOCK position.
- Place the cup or cups under the nozzles of the filter holder 6.
- Make sure the coffee feed button lights are lit, then press the 1 cup A feed button or the 2 cup B button, the appliance will start serving coffee and automatically stop serving once brewing is complete. A beep will sound three times.
Importantly!
In the process of making coffee with the machine, its flow can be stopped at any time by pressing the previously pressed feed button.
The default coffee brew time is 25 seconds for a single cup and 38 seconds for a double cup. Coffee Temperature: Medium temperature (see Setting the Coffee Temperature).
• To remove the filter holder 7, turn the handle from right to left.


EN
Making Espresso using small capsules
To make espresso from small capsules, you need:
- Select Small Capsule Holder 1.
- Insert Small Capsule 2 of Coffee into Small Capsule Holder 1 as shown in Figure 2.
- Insert the capsule as centrally as possible above the filter. Always follow the instructions on the capsule packaging to properly insert them into the filter.
- Attach nozzle 3 to the holders by placing the handle according to the cutout on the filter.
- Secure the holder in the coffee machine. For proper fastening, align the holder handle 4 with the INSERT symbol, secure the holder, and rotate the handle to the right until it aligns with the LOCK position.
- Place the cup or cups under the spouts of the filter holder 5.
- Make sure the coffee feed button lights are lit, then press the 1 cup A feed button or the 2 cup B button, the appliance will start serving coffee and automatically stop serving once brewing is complete. A beep will sound three times.

Importantly!
In the process of making coffee with the machine, its flow can be stopped at any time by pressing the previously pressed feed button.
The default coffee brew time is 25 seconds for a single cup and 38 seconds for a double cup. Coffee Temperature: Medium temperature (see Setting the Coffee Temperature).
- To remove Filter Holder 1, turn the handle from right to left.



natural_image
Technical line drawing of a mechanical component with a cylindrical housing and attached bracket (no text or symbols)EN
Making Espresso using large capsules
To make espresso from large capsules, you need:
- Select Large Capsule Holder 1.
- Insert the large capsule 2 with the coffee into the large capsule holder 1 as shown in Figure 2.
- Fasten the cover of holder 3 to the holders. There is a needle on the lid that pierces the capsule.
- Secure the holder in the coffee machine. For proper fastening, align the holder handle 4 with the INSERT symbol, secure the holder, and rotate the handle to the right until it aligns with the LOCK position.
- Place the cup or cups under the spouts of the filter holder 5.
- Make sure the coffee feed button lights are lit, then press the 1 cup A feed button or the 2 cup B button, the appliance will start serving coffee and automatically stop serving once brewing is complete. A beep will sound three times.

Importantly!
In the process of making coffee with the machine, its flow can be stopped at any time by pressing the previously pressed feed button.
The default coffee brew time is 25 seconds for a single cup and 38 seconds for a double cup. Coffee Temperature: Medium temperature (see Setting the Coffee Temperature).
• To remove Filter Holder 1, turn the handle from right to left.
EN
Making a cappuccino
Prepare the espresso as directed in the previous sections, using cups that are large enough.

If you must use tall cups or glasses, remove the drip tray and place your vessel on a tray.
- Press the C button, the indicator flashes.
- Then pour 1 milk into the container at the rate of about 100 g for each serving of cappuccino. For a denser and fluffier foam, use skim or partially skimmed milk that has a refrigerator temperature (about 8°C). When choosing the size of the container, it should be taken into account that the volume of milk will increase by 2-3 times.
- During the heating process, the C indicator will flash. Wait for the beep. The C button indicator will then glow steadily and a double beep will sound, indicating that the boiler has reached the ideal temperature to generate steam.
- Place an empty container under the cappuccino maker 2 and open the handle 3 for a few seconds to drain any probable water droplets from the circuit. Close the handle.
- Place 1 container of milk under the cappuccinatore.
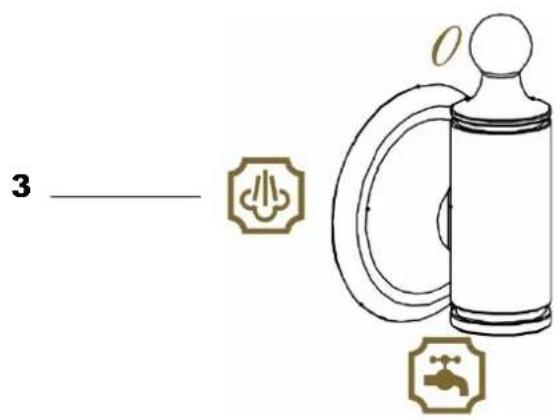
- Lower the cappuccino maker 2 into the milk container by a few millimeters. Turn the handle to the par 3 position. Steam will start flowing from the cappuccino maker, thanks to which the milk foams and increases in volume. For an even creamier foam, dip the cappuccino maker into the milk and slowly rotate the milk container from the bottom to the top.
EN

- Once the temperature has been reached (60°C is ideal) and the desired foam density is reached, stop the steam flow by turning the steam handle clockwise to position 0.
- Pour the frothed milk into the cups with the previously made espresso. Add sugar to taste and, if desired, sprinkle a little chocolate chip over the foam – the cappuccino is ready.
If you need to make several servings of cappuccino, you need to make a few cups of coffee first and only then froth the milk for all servings.
To exit steam mode, press any button. The lights flash to indicate that the temperature is too high to serve the coffee (see Boiler cooling).
It is recommended to steam for no more than 60 seconds.

Importantly!
To avoid hot splashes and burns, never remove the filter holder when the machine is in feed mode, always wait a few seconds after feeding is complete.

Importantly!
It is forbidden to install the cappuccino maker above the surface of the milk to avoid the possibility of scalding from milk splashes.

Importantly!
In order to maintain hygiene after the preparation of milk foam, the cappuccino maker should be wiped with a damp cloth in time so that milk residues do not stick to the steam wand. You can also let off steam for a few seconds to remove any remaining milk in the tube.
3

natural_image
Line drawing of a vintage-style alarm device with a faucet and handle, no text or symbols presentEN
Hot water supply
The coffee machine is equipped with a hot water function. To supply hot water, you need:

- Turn on the machine by pressing the ON/OFF button 1. Wait for the coffee serving lights A and B to illuminate.
- Place the container underneath the cappuccinatore.
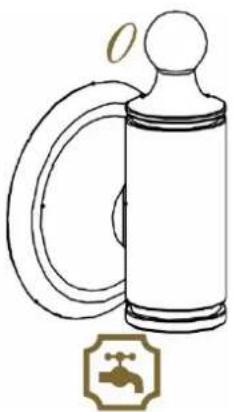
- Turn the lever to position 3 hot water.
Hot water will start flowing from the cappuccino maker.
To stop the hot water supply:
- Turn the lever to position 0.
After that, the machine will enter standby mode and be ready for further use. A double beep will sound.
It is recommended to supply water for no more than 120 seconds.

natural_image
Illustration of a vintage-style alarm device with two water drop symbols and a handle, labeled '3' (no text or symbols on the device itself)EN
CARE AND MAINTENANCE
natural_image
Line drawing of a coffee maker with handle and base, no text or symbols present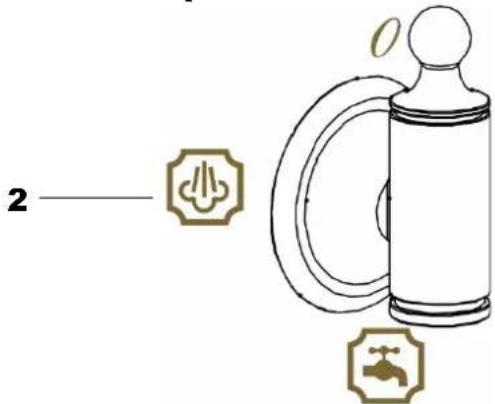
Boiler cooling
If you want to make coffee immediately after frothing the milk, then you need to cool the boiler first. If this is not done, the coffee may be burned.
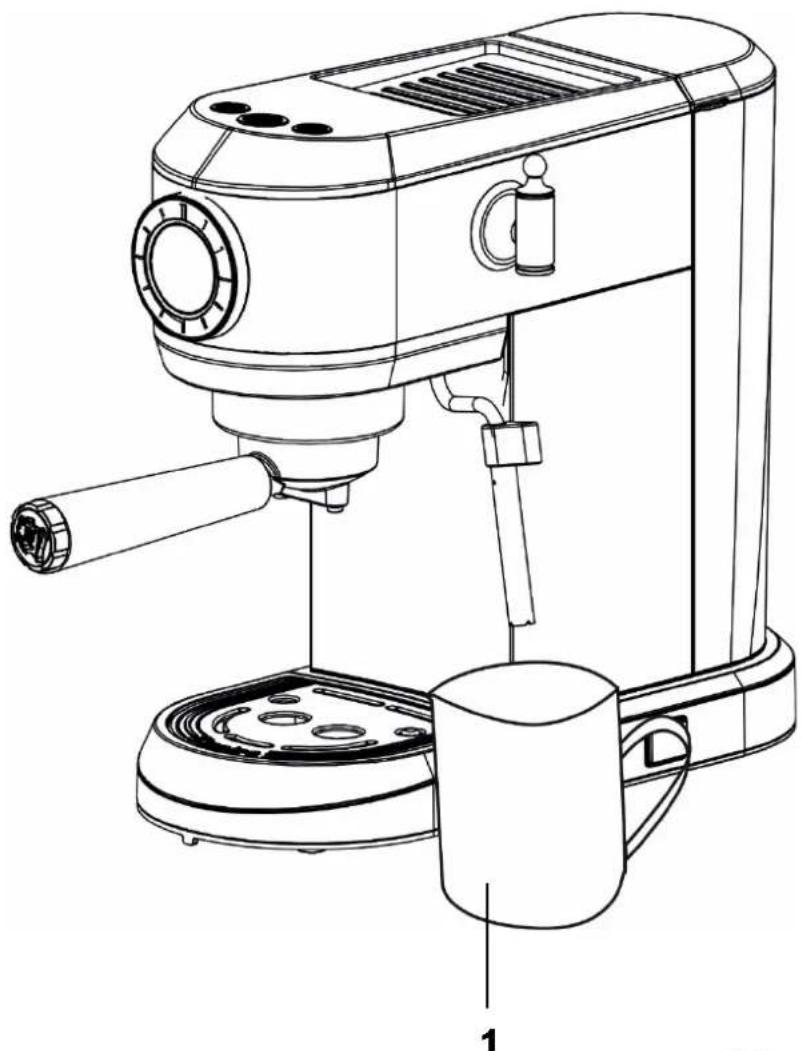
- Place the container under the cappuccino maker 1
- Open the steam handle to supply hot water and cool the boiler 2
- The hot water supply will stop automatically when the boiler cools down;
- When the pump stops working and no more water comes out, turn the handle to position 0.
The coffee machine is ready to go.
Cleaning the enclosure
Before performing any cleaning or maintenance procedures, turn off the unit, disconnect it from the power source, and allow it to cool down.
Do not use solvents or abrasive detergents or alcohol to clean the coffee machine.
Do not use metal objects to remove limescale or coffee residue. They can scratch metal and plastic parts. Use soft cloths for cleaning.
Regularly remove the drip tray, empty it and wash it thoroughly.
Do not submerge the coffee machine under water during cleaning.
EN
Cleaning the drip tray
The drip tray is equipped with a red float indicator for 1 water level. Before the indicator leaves the cup tray, remove the tray and clean it. Otherwise, water may overflow, which may cause damage to the machine, the support surface, or the surrounding area.
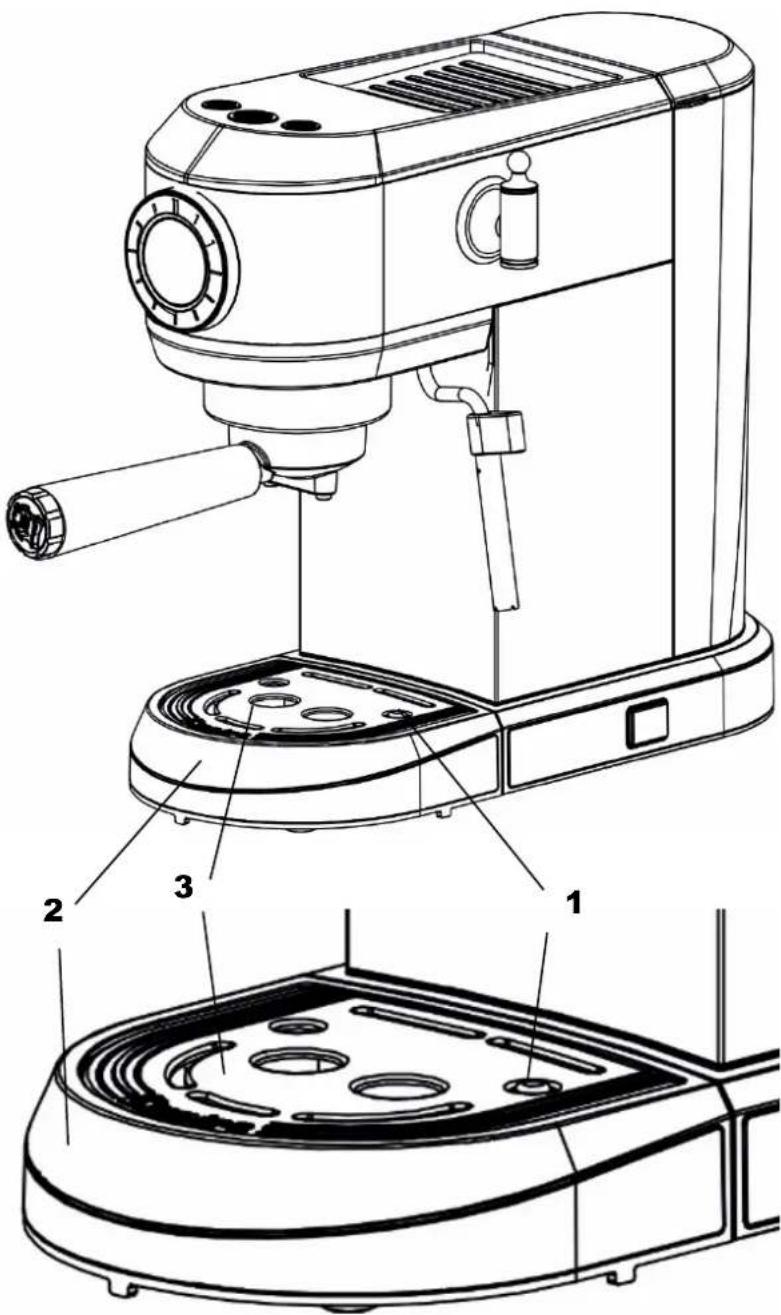
To clean the tray, you need to:
- Remove tray 2.
- Remove the 3 cup tray by pouring out the water and cleaning the tray with a cloth.
- Then, assemble the drip collection tray, rinse it with water, dry it, and put it back in place.
EN
Cleaning coffee filters
Regular cleaning of coffee filters is essential for quality taste.
Cleaning the filter for 1 or 2 cups

- Pull up and remove the perforated filter 1.
- Rinse the filters under running water. Dry thoroughly.
- Make sure the holes are not clogged at the bottom of the filter, otherwise clean them with a pin.
- Insert the perforated filter into place and push it all the way through.
Cleaning the pod filter
natural_image
Technical line drawing of a mechanical component with no visible text or symbols- Rinse the filters under running water. Dry thoroughly.
- Make sure the holes are not clogged at the bottom of the filter, otherwise clean them with a pin.
- Insert the perforated filter into place and push it all the way through.
Cleaning capsule filters
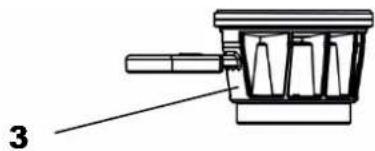
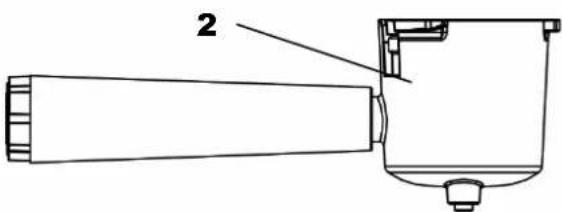
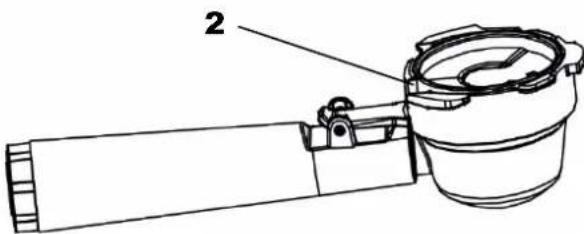
• After use, rinse the filter 2 and their components 3 under running water. Dry thoroughly.
- Make sure the holes are not clogged at the bottom of the filter.
Importantly!
Filters for ground coffee, for pods, filters for capsules, filter holders, drip tray, cup tray, water tank, cappuccino spout, coffee tamper - do not wash in the dishwasher. Can only be washed by hand using mild detergents.
natural_image
Line drawing of a standard espresso machine with handle and control panel (no text or symbols)EN
Cleaning the water tank
It is recommended to clean the water tank 1 once a month.
To clean the water tank, you need to:
- Lift the cistern up 1 and remove it.
- Clean with a damp cloth moistened with a small amount of mild detergent, rinse the inside under running water.
- Fill the tank with fresh water and return it to its place.
Cleaning the cappuccino maker
In order to maintain hygiene after the preparation of milk foam, the cappuccino maker should be wiped with a damp cloth in time so that milk residues do not stick to the steam wand. You can also let off steam for a few seconds to remove any remaining milk in the tube.
Other types of cleaning
It is not recommended to use solvents or abrasive detergents to clean the unit. A soft and damp cloth is sufficient for this purpose.
Clean the filter holder regularly.

EN
Descaling
You can always descale your coffee machine at any time, even if the indicator light is not on.
Prepare a descaler. Add it to water tank 1 and fill with 750ml of drinking water. You can find out the ratio of the detergent to water from the manufacturer.
• Install reservoir 1 into the machine.
- Place a container of at least 1 liter under the feed spout 2.
- Insert the filter holder without filter 3.
- Press the 2 cups A button to make an espresso. Repeat this step 4 times.
• After that, pour out the rest of the water and water tank 1.
Rinse the coffee machine with water (no coffee) (see First switching on of the device)
- Clean the filter under running water.
To clean the cappuccino maker, follow the instructions for making a cappuccino, replacing 100 ml of milk with 60 ml of water, and after cleaning, rinse with warm water.
After all these steps, the coffee machine will be descaled and ready to use.
EN
Meaning of indicator lights

flowchart
graph TD
    A["Step A: Breakfast cup icon"] --> B["Step B: Bread cup icon"]
    B --> C["Step C: Meatbell icon"]
| A → B → C |
| Activating the ON/OFF switch |
| Sequential flashing of the lights - the coffee machine performs a self-diagnosis, which it signals. |

| A - B |
| The coffee machine is on and ready to make coffee |
| The lights are flashing - the coffee machine is preheated and ready to brew coffee. |
| The lights are lit for a long time – the coffee machine is ready to make coffee. |
| C |
| Steam function required |
| The indicator light flashes – the coffee machine is heating up for further steam supply. |
| The indicator light is steady – the coffee machine is ready to the steam supply. |
| A - B |
| Steam handle open |
| The lights are flashing - close the steam handle. |
| A - B |
| Elevated boiler temperature |
| The lights are flashing - cool the boiler (see Boiler cooling). |
| A - B - C |
| Descaling Notification |
| The lights are constantly lit – de-scaling is required. |
| A - B - C |
| Technical malfunction |
| The lights flash at the same time. |
EN
PERIODIC INSPECTION
In addition to operations related to the routine care of the coffee machine, you should:
- Carry out periodic checks of the serviceability of the controls and working units of the toaster.
- Troubleshoot detected faults.
All repairs and adjustments and maintenance operations must be carried out by a service center or person with appropriate qualifications.

Attention!
It is the responsibility of the user to ensure that the appliance is in perfect condition and that it is properly maintained. If the Service Center is called due to improper maintenance, the call will be charged, even if the warranty is still valid.
Breakdowns that are caused by non-compliance with these Instructions are not recognized.
What if?
In the event of any malfunction, you should:
- Turn off the power supply
- Declare the need for repair (to a service center or other organization that has the appropriate rights).
However, during the period of operation, problems and malfunctions sometimes appear, some of which the consumer is able to eliminate on his own, provided that the rules given in the table below are followed. Before calling a service worker, carefully read and follow the following recommendations.
EN
| Problem | Possible causes | Solutions |
| Espresso is not coming in | There is no water in the cistern | Fill the cistern |
| The coffee outlets on the filter holder are clogged | Clean the spout holes on the filter holder | |
| Filter is clogged | Perform a cleanup (see Cleaning Coffee Filters) | |
| The cistern is not installed correctly and the valves at the bottom are not open. | Press the reservoir lightly to open the valves at the bottom. | |
| Presence of scale in the water system | Descal (see Descaling) | |
| Espresso coffee comes out of the edges of the filter holder, not the holes | Filter holder is not properly installed or dirty | Fasten the filter holder correctly and twist it forcefully until it stops |
| The boiler gasket has lost its elasticity or is dirty | Replace the espresso boiler gas- ket at the technical support center | |
| The holes on the filter holder spouts are plugged | Clean the spout holes on the filter holder | |
| Filter is clogged | Perform a cleanup (see Cleaning Coffee Filters) | |
| The filter holder does not attach to the appliance. | Too much coffee in the filter. | Use a dis- penser/presser and choose the right filter for cook- ing. |
| The coffee crema is light in color (the coffee comes out of the spout quickly). | Ground coffee is not pressed enough. | It is better to press the ground coffee. |
| Not enough ground coffee | Increase the amount of ground coffee | |
| Grinding the co- fee too coarsely. | Use only ground coffee for es- presso machines. | |
| Inadequate quality of ground coffee. | Substitute the type of ground coffee. | |
DE
| Problem | Possible cau-ses | Solutions |
DE
| Dark-colored coffee crema (coffee slowly comes out of the spout) | Ground Coffee Is Too Pressed | Reduce Coffee Pressing |
| Excess Ground Coffee | Reduce the amount of ground coffee | |
| Clogged espresso unit | Perform a cleanup (see Cleaning Coffee Filters) | |
| Filter is clogged | Perform a cleanup (see Cleaning Coffee Filters) | |
| Grinding the coffee too finely. | Use only ground coffee for espresso machines. | |
| The coffee grind is too fine or the coffee is too wet | Use only ground coffee for espresso machines, make sure it doesn't contain moisture. | |
| Presence of scale in the water system | Descale (see Descaling) | |
| After the coffee is served, the filter sticks to the coffee supply unit | Insert the filter holder again, serve the coffee, then remove the holder. | |
| Milk froth does not form when making a cappuccino. | Not cold enough milk. | The milk should have a cool temperature (like in the refrigerator) |
| The cappuccino maker is contaminated | Clean the cappuccino maker (see Cleaning the cappuccinator | |
| Presence of scale in the water system | Descale (see Descaling) | |
| Once descaling is complete, the appliance requests another rinse. | During the rinse cycle, the tank was not filled to the MAX mark | Descale (see Descaling) |
If, despite the recommendations, the problem could not be eliminated, contact the Customer Service.

Wichtig!
The documentation provided with this oven has been printed on chlorine free bleached paper or recycled paper to show respect for the environment.
The packaging has also been designed to avoid environmental impact. Packaging material is ecological and can be re-used or recycled.
By recycling the packaging, you will help save raw materials as well as reducing the bulk of domestic and industrial waste.
Disposing of the packaging
Please dispose of the packaging that came with your appliance in an environmentally friendly way.
Recycling in this way saves on resources and cuts down on waste.
Disposing of old appliances
The symbol on the product or on its packaging indicates that this product may not be treated as household waste. Instead, it shall be handed over to the applicable collection point for the recycling of electrical and electronic equipment.
By ensuring this product is disposed of correctly, you will help prevent potential negative consequences for the environment and human health, which could otherwise be caused by inappropriate waste handling of this product.
For more detailed information about recycling of this product, please contact your local city office, your household waste disposal service or the shop where you purchased the product.

natural_image
Simple line drawing of three chasing arrows forming a recycling symbol (no text or labels)
natural_image
Symbol of a trash bin crossed with two diagonal lines, representing no waste or discharge (no text or labels)

natural_image
Solid gray image with no visible content, text, or symbols.
Kaiser
Kaiser

natural_image
Three horizontal gray bars on white background, no text or symbols presentEC implementing regulation (EC) NO 1275/2008 + (EU) NO 801/2013 + (EU) 2016/2282 and its underlying framework directive 2009/125/EC


- EN
- CONTENTS
- SAFETY INSTRUCTIONS 8
- TECHNICAL SAFETY 10
- CHILD SAFETY 16
- BRIEF DESCRIPTION 18
- LOCATION DRAWING, CONTROL PANEL, ACCESSORIES 18
- USAGE 20
- CARE AND MAINTENANCE 50
- PERIODIC INSPECTION 62
- RESPECT FOR THE ENVIRONMENT 68
- SAFETY INSTRUCTIONS
- TECHNICAL SAFETY
- Importantly!
- CHILD SAFETY
- BRIEF DESCRIPTION
- LOCATION DRAWING
- CONTROL PANEL
- ACCESSORIES
- USAGE
- Filling the tank with water
- Switching on the appliance for the first time
- Customizing the programming menu
- Setting the coffee temperature
- Adjusting the water hardness
- Programming the amount of coffee in a cup
- Auto power Off function
- Factory reset function
- Getting hotter coffee and warming cups
- Making espresso with ground coffee
- Making Espresso using pods
- Making Espresso using small capsules
- Making Espresso using large capsules
- Making a cappuccino
- Hot water supply
- CARE AND MAINTENANCE
- Boiler cooling
- Cleaning the enclosure
- Cleaning the drip tray
- Cleaning coffee filters
- Cleaning the filter for 1 or 2 cups
- Cleaning the pod filter
- Cleaning capsule filters
- Cleaning the water tank
- Cleaning the cappuccino maker
- Other types of cleaning
- Descaling
- Meaning of indicator lights
- PERIODIC INSPECTION
- Attention!
- What if?
- Wichtig!
- Disposing of the packaging
- Disposing of old appliances
Brand : Kaiser
Model : KA 2005 Em
Category : Coffee maker