
Cloud Sport - Baby Scale Kolcraft - Free user manual and instructions
Find the device manual for free Cloud Sport Kolcraft in PDF.


| Type | Baby Scale |
| Brand | Kolcraft |
| Model | Cloud Sport |
| Weight Capacity | 20 kg (44 lb) |
| Graduation | 10 g (0.01 kg) |
| Platform Material | Tempered glass |
| Display Type | LCD digital |
| Power Source | 2 x AAA batteries (not included) |
| Battery Life | Approximately 6 months with normal use |
| Auto Shut-off | Yes, after 30 seconds |
| Tare Function | Yes |
| Units | kg, lb |
| Low Battery Indicator | Yes |
| Overload Indicator | Yes |
| Dimensions (L x W x H) | 30 x 25 x 3 cm |
| Product Weight | 0.5 kg |
| Cleaning Instructions | Wipe with a damp cloth; do not immerse in water |
| Storage | Keep in a dry place away from direct sunlight |
| Warranty | Manufacturer warranty (1 year) |
| Certifications | CE, RoHS |
Frequently Asked Questions - Cloud Sport Kolcraft
User questions about Cloud Sport Kolcraft
0 question about this device. Answer the ones you know or ask your own.
Ask a new question about this device
Download the instructions for your Baby Scale in PDF format for free! Find your manual Cloud Sport - Kolcraft and take your electronic device back in hand. On this page are published all the documents necessary for the use of your device. Cloud Sport by Kolcraft.
USER MANUAL Cloud Sport Kolcraft
Lightweight Stroller Carriola liviana
Kolcraft®

natural_image
Black and white photo of a Kolzalito baby stroller with geometric pattern design, displayed against a blurred bokeh background (no text or symbols visible on the device itself).Please direct any comments, questions or replacement part requests to:
Kolcraft® Consumer Service Department
1100 W Monroe St. Chicago, IL 60607
1-800-453-7673 in U.S. & Canada, 1-312-361-6490 outside U.S. & Canada
Central Standard Time, 8 am-5 pm Monday - Thursday, 8 am - 3 pm Friday
e-mail: customerservice@kolcraft.com
Model #: KL030
S119-R2 07/2020
WARNING
Avoid serious injury from falling or sliding out. Always use Restraint System.
Your child's safety depends on you. Proper stroller use cannot be assured unless you follow these instructions. DO NOT USE STROLLER UNTIL YOU READ AND UNDERSTAND THESE INSTRUCTIONS.
IMPORTANT SAFETY INFORMATION:
How to Keep Your Child Safe While Using this Stroller
- Adult assembly required.
- Never leave your child unattended while in stroller. Accidents can happen quickly while your back is turned. You must always keep your child in view while your child is in the stroller, even when sleeping. Do not use this product as a bed. Your child may become tangled in straps or pads and suffocate.
- Always use restraint system to keep child from standing up or falling out of the stroller.
- Always lock the stroller open before allowing your child in or near the stroller. This prevents injuries caused by stroller collapsing.
- Only use this stroller with children who weigh less than 50 lbs. (22.67 kg) and are no more than 40 inches (1 meter) tall. Use by larger children may damage the stroller, or cause a hazardous unstable condition to exist.
- Always set the wheel brakes when stroller is not moving, especially on an incline. This prevents the stroller from rolling away.
What to Avoid While Using this Stroller
- Always balance the weight of the stroller evenly. To prevent the stroller from becoming unstable, do not place parcels or accessory items on the stroller canopy, seat, or over the handle. Do not allow children to play with or hang onto the stroller.
- To prevent the stroller from becoming unstable, do not place more than 2 lbs. on the child tray.
- Never use this stroller on stairways or escalators.
- This is not an exercise stroller! Do not use this product while running, jogging, in-line skating or participating in other athletic activities.
• Take care when folding and unfolding to prevent finger pinching.
- Make sure children are clear of any moving parts if you adjust the stroller, otherwise they may be injured.
- DO NOT allow children to climb into stroller unassisted. Stroller may tip over and injure child.
- Only use replacement parts supplied by the manufacturer.
• DO NOT put child in basket.
• DO NOT lift by tray/bar or toys.
- DO NOT use any infant car seats with this product. Serious injury could occur.
- To prevent the stroller from becoming unstable or tipping do not put more than 10 lbs (4.54 kg) in the basket.
- Product may become unstable if a storage bag other than the one recommended by the manufacturer is used.
⚠️ADVERTENCIA
natural_image
Illustration of a baby stroller with four legs and backrest (no text or symbols)Stroller Frame
Estructura de la carriola

natural_image
Circular mechanical component with central hub and multiple evenly spaced holes (no text or symbols)Rear Wheels (2)
Ruedas traseras (2)

Front Wheel Assembly (2)
Montaje de la rueda frontal (2)
natural_image
Close-up of a black bicycle seatbelt mechanism with attached straps and a close-up inset showing the handle (no text or symbols visible)1 Remove any cardboard inserts or plastic ties used to protect the product during shipment.
2 Release the locking latch.
Suelte el seguro.

natural_image
Black-and-white photo of a folding chair with motion arrows indicating movement, no text or symbols visible③ Unfold, making sure both side locks snap into place.
4 Ensure frame side locks snap into place on both sides.
natural_image
Close-up of two mechanical components with metal rods and a mesh mesh, no visible text or symbolsnatural_image
Two-step illustration showing a person using a folding chair to adjust the seat frame (no text or symbols present)1 Insert the rear basket tube into the exposed basket frame behind the stroller seat until the spring buttons lock into place.
2 Attach the storage basket around the rear basket tube using the snaps.
1 Align front wheel assembly as shown. Tab must be facing away from stroller (towards you).
2 Push wheel assembly onto stroller leg until it snaps into place.
3 Repeat for other wheel. Tug firmly on each wheel assembly to be sure wheels are securely in place.
NOTE: To remove, squeeze tab and pull wheel off.
natural_image
Technical illustration of a mechanical component with no visible text or symbols5
natural_image
Mechanical assembly diagram showing a shaft and gear mechanism with an arrow indicating direction (no text or symbols)6

natural_image
Diagram showing a mechanical component before and after processing, with no visible text or symbols.1 Turn stroller over as shown.
② Position rear break assembly as shown, with brake levers pointing towards stroller handle.
3 Push rear break assembly onto rear leg tubes at the same time.
4 Make sure plastic tabs on rear break assembly lock into holes on rear legs as shown.
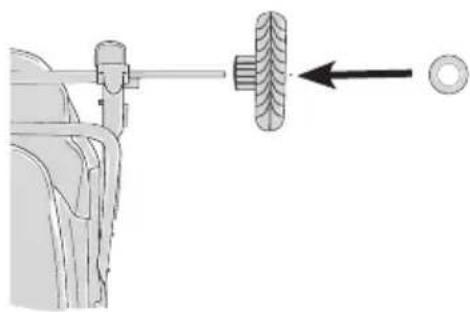
5 Slide a wheel onto the axle then slide a washer onto the axle.
6 Fit straight part of cotter pin through hole on axle as shown.
7 Line up each of the tabs in the hub cap with the slots in the wheel, snap hub cap into place.
8 Repeat for second side.
To prevent injury to your child, take care when inserting tray/bar into frame.
⚠️ADVERTENCIA
natural_image
Close-up of hands using a pliers to cut or adjust mechanical parts (no text or symbols visible)1 Position front tray over stroller frame.
natural_image
Close-up of hands using a tool to adjust or install a mechanical component (no visible text or symbols)2 Snap front tray over buttons on rails to secure.
To prevent the stroller from becoming unstable or tipping, do not place more than 3 lbs (1.36 kg) in this tray. Do not place hot liquids in this tray. Hot liquids can burn your child.
ADVERTENCIA
natural_image
Illustration of a bell with two arrows pointing to the handle (no text or symbols)1 To assemble, fit parent tray underneath one hand fold.
② Align tray holes with posts on handle and snap on.
3 To remove parent tray, pull each side up and out. For cleaning, parent tray is top rack dishwasher safe.
1 Push levers on both rear wheels down to lock.
2 Pull levers up to unlock.
Avoid serious injury from falling or sliding out. Always use restraint system. Do not use product without full 5-point Harness Restraint. Removing the shoulder straps will not adequately restrain child.
ADVERTENCIA
1 Lock foot brake to keep stroller from rolling.
natural_image
Diagram of two vertical connectors with attached fasteners, no text or symbols present② Place child in stroller.
3 Hook shoulder straps to waist belt.
natural_image
Mechanical assembly diagram showing two vertical connectors connected to a central shaft, with directional arrows indicating movement (no text or symbols)4 To fasten restraint system buckles - push together. Be sure both buckles are fastened to secure child safely.
natural_image
Diagram of a rope knot with directional arrows indicating rope movement (no text or symbols)5 To unsnap restraint system buckles - press tabs to release.
⑥ For proper fit, adjust shoulder straps and waist band as shown.
NOTE: For a secure fit, straps should be at or below the child's shoulder. Adjust straps to higher position as your child grows.
To readjust shoulder restraints, remove clips on restraint and thread through webbing on the seat to desired height.
To avoid finger entrapment or pinching, do not adjust the seat back while child is in the stroller.
⚠️ ADVERTENCIA
natural_image
Illustration of a person wearing a harness and tights (no text or symbols)Tighten
Apriete

natural_image
Black stroller with a triangular canopy and handle, shown in side profile (no text or symbols visible)natural_image
Black stroller with gray canopy and black handle, no visible text or symbols3 Push Button on handle with thumb, while holding thumb down, then press lever under handle at the same time to disengage lock.
NOTE: For the most compact fold, pull on the underside of the child tray after using the one-hand fold mechanism.
natural_image
Close-up of a stroller with visible wheels and a handle, no text or symbols present⑤ Engage locking latch.
Ponga el seguro.
NOTE: For the most compact fold, you may need to adjust the front wheel position as shown.


Brand : Kolcraft
Model : Cloud Sport
Category : Baby Scale