
Tiny Steps Roadster - Baby product Kolcraft - Free user manual and instructions
Find the device manual for free Tiny Steps Roadster Kolcraft in PDF.


| Product Type | Baby Walker / Ride-on Toy |
| Brand | Kolcraft |
| Model | Tiny Steps Roadster |
| Dimensions (L x W x H) | 30 x 20 x 18 inches |
| Weight | 5.5 lbs |
| Recommended Age | 6 months to 3 years |
| Maximum Weight Capacity | 30 lbs |
| Power Source | None (manual push / baby propulsion) |
| Battery Requirement | 2 x AA (for sound module, not included) |
| Main Features | Interactive activity tray, three-position speed control, folding design for storage |
| Wheel Type | Plastic swivel wheels with grip rings |
| Safety Features | Wide base for stability, anti-slip pads, meets ASTM F977 safety standards |
| Cleaning Instructions | Wipe with damp cloth; mild soap; do not immerse |
| Assembly Required | Yes, minor assembly (wheels, tray) |
| Spare Parts Availability | Available from Kolcraft customer service |
| Warranty | Limited 1-year warranty |
| Country of Origin | China |
Frequently Asked Questions - Tiny Steps Roadster Kolcraft
User questions about Tiny Steps Roadster Kolcraft
0 question about this device. Answer the ones you know or ask your own.
Ask a new question about this device
Download the instructions for your Baby product in PDF format for free! Find your manual Tiny Steps Roadster - Kolcraft and take your electronic device back in hand. On this page are published all the documents necessary for the use of your device. Tiny Steps Roadster by Kolcraft.
USER MANUAL Tiny Steps Roadster Kolcraft
2-in-1 Activity Walker
2 MODES
grow with your child

natural_image
Child playing a toy car with a black and white foam base (no text or symbols visible)
Electronic toy steering wheel with car sounds

Height-adjustable seat

Large grill with headlights offers a realistic automobile look
Kolcraft®

Scan for instructional video
natural_image
Black-and-white photo of a baby sitting on a toy car in a living room, with a coffee table and sofa in the background (no visible text or symbols)
Read all instructions BEFORE assembly and USE of the walker. Failure to follow these warnings and instructions could result in serious injury or death. For your child's safety, read the labels and the instructions before using product. Keep instructions for future use.
IMPORTANT SAFETY INFORMATION:
How to Keep Your Child Safe While Using this Product
- NEVER leave child unattended. Always keep child in view while IN WALKER
- CAUTION: Toys intended to be assembled by adult! Toys are intended to be played with while attached to the walker and are not intended to be played with when not attached to the walker.
- CHOKING HAZARD-Small parts. ADULT ASSEMBLY REQUIRED.
This package contains small parts which, before assembly, present a choking hazard to children under the age of three. Care should be taken during unpacking and assembly to insure that all small parts and plastic bags are accounted for and kept out of the reach of children. All fasteners should be fully tightened.
STAIR HAZARD
- Avoid serious injury or death. Block stairs / steps securely before using this walker.
- Use only on flat surfaces free of objects that could cause this walker to tip over. Never use near stairs, steps, thresholds, hills, roadways, or pools.
- To avoid burns, keep child away from hot liquids, stoves, radiators, space heaters, fireplaces, etc.
- Discontinue using this walker should it become damaged or broken.
- Never carry this walker with child in it. Never adjust seat while child is in product.
• DO NOT lift or carry by tray or toys.
• DO NOT use this walker until baby can sit up unassisted. - To reduce the chance of child slipping out of seat, check that both feet of child touch the floor.
- Discontinue use of activity walker (seated stage) when your child can stand unaided, walk unassisted or lift the walker off of the floor.
- To maintain stopping performance, clean friction strips regularly with damp cloth.
Only use this activity walker (seated stage) if your child MEETS ALL of the requirements below:
- Can support body weight with legs
- Weight is between 15 and 26 pounds (6.8 and 11.8 kgs)
- Height is less than 32 inches (80 cms) and child is not able to stand flat footed while in the walker.
To prevent battery leaks, which can burn skin and eyes:
- Remove batteries when storing product for a long time.
- Discard old batteries promptly in accordance with local laws and regulations.
• Always replace the entire set of batteries at one time. - Never mix old and new batteries, or batteries of different brands or types.
CARE & MAINTENANCE
-
Plastic Parts: Wipe clean with mild soap and a damp cloth. Air dry.
-
Seat Pad: Machine wash in cold water in gentle cycle. DO NOT use harsh detergents or bleach. DO NOT dry clean. Air or hang dry.
NOTE: To maintain stopping performance, clean friction strips regularly with damp cloth.
PARTS LIST
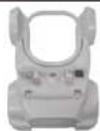
Tray

Grill
Sheet of Decals

Left Rear Leg Right Rear Leg Locking Rear Leg

Left Rear Leg Locking Collar

Collar
Front Leg

Screws (4)
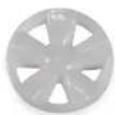
Hubcaps (4)
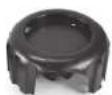
Back Tires (2)

Front Tires (2)

Seat Pad

Windshield Toy

Electronic Steering Wheel

Steering Wheel Locking Cup
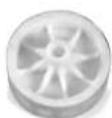

Axles (2)Rear Wheels (2)
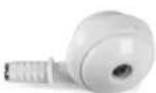
Front Casters (2)

Base
Tool Needed: Phillips screwdriver
Requires 2 AAA batteries (not Included)
Consumer Service: 1.800.453.7673
www.kolcraft.com
To Adhere the Decals
1

1 Place the headlight and grill stickers from the decal sheet as shown to the grill.
To Attach Grill to Tray
1

natural_image
Close-up of hands holding a white Kolorofix toy car (no visible text or symbols)1 Align the tabs of the grill with the slots on the front of the walker and snap into place.
Consumer Service: 1,800,453,7673
www.kolcraft.com
To Attach Legs to Tray
2

① Flip tray upside down, with the rear left tire well facing you, marked with an "L".
② Locate the left rear leg (as pictured) and place in the groove on the left tire well.
3
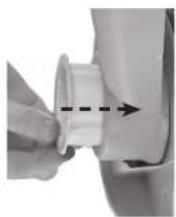
3 Locate the left rear leg locking collar. Align the L on the lip of the collar with the L of the tray. Snap the collar through the tray, securing the leg to the tray.
Repeat steps 2 & 3 for rear right leg.
4

4 Locate the front leg and place it in the front leg groove as shown, aligning the screw holes.
5

natural_image
Close-up of a hand using a screwdriver to adjust or install a mechanical component (no visible text or symbols)5 Secure the front leg to the tray with screws in all four places. Pull up on front leg to make sure the leg is secure.
Consumer Service: 1.800.453.7673 www.kolcraft.com
To Attach Tires to Tray
1
natural_image
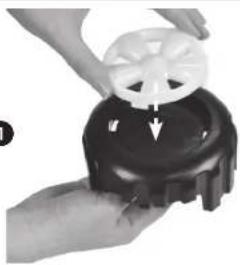
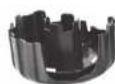
Close-up of hands holding a black plastic object with a white circular top, no visible text or symbols① Snap 4 hubcaps into tires.
Left Right

2

natural_image
Close-up of a hand holding a mechanical tool with a black handle and control knob (no visible text or symbols)2 Locate right back tire marked with an R. Fit tire into tire well marked with an R. Tire should slide easily over leg and securely snap into the tray. Repeat for other side.
3

natural_image
Close-up of a hand holding a black mechanical component with an arrow pointing to it, against a white background (no text or symbols visible)3 Locate 2 front tires. Align tire tabs with openings in tire well and snap securely into tray. Repeat for other side.
Consumer Service: 1.800.453.7673
www.kolcraft.com
To Attach Rear Wheels
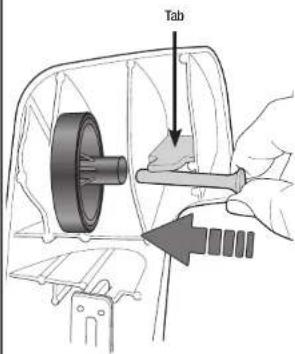
1 Flip base over to expose underside. Locate rear wheel opening in base of the walker.
2 Align holes of wheel with corresponding axle holes on the base of the walker. Plastic tab may need to be pushed to the side to expose the axle hole. The stem of the wheel should be facing the inside of the base.
3 Slide metal axle into holes from the inside towards the outside of the base until the head of the axle passes the plastic tab and the tab is able to hold the axle in place. Repeat for other wheel.
Attach Front Casters

natural_image
Mechanical diagram showing a gear and screw assembly with directional arrows (no text or labels)Top Lip of Caster Threads
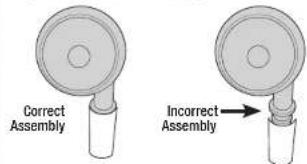
1 Insert the stem of one of the front casters into the hole in one of the front corners. Push firmly until the caster snaps (locks) into place. Pull up on caster to make sure it is locked in place.
CAUTION: Be sure the caster is inserted fully into the base. The top lip of the caster threads should be flush with the base hole. Nothing below this lip should be visible.
Consumer Service: 1.800.453.7673
www.kolcraft.com
To Attach Tray to Base
natural_image
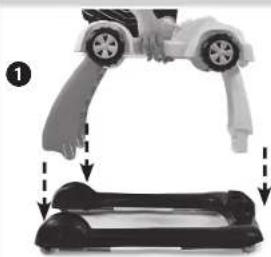
Illustration of a toy car being lifted by a hand, showing motion sequence (no text or symbols)1 Position assembled tray on top of base into appropriate slots.
natural_image
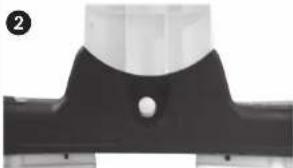
Close-up of a black mechanical component with a central hole and flange (no visible text or symbols)2 Snap front leg into place. Pull up on the tray to make sure the tray and base are secure.

natural_image
Person performing a massage or physical therapy technique on a dark surface, with a dashed arrow indicating the motion direction (no text or symbols visible)3 Push rear leg tab in and snap into place. Repeat with other rear leg.
To Attach Windshield Toy

natural_image
Close-up of a robotic device with a hand adjusting its top panel (no visible text or symbols)Take the windshield toy and snap into place on top of dashboard.
Consumer Service: 1,800,453,7673
www.kolcraft.com
To Install Batteries in Electronic Steering Wheel
2
natural_image
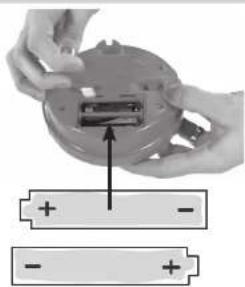
Close-up of hands installing a battery component into a circular housing (no text or symbols visible)To insert batteries, use a Phillips screwdriver to unfasten battery cover located on the bottom of the electronic toy steering wheel.
② Requires 2 "AAA" batteries (Not Included). Insert batteries as shown. Secure battery cover.
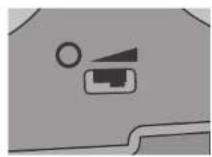
3 This toy has 2 levels of volume. Move switch to the middle position for low volume and to the far right for high volume. To turn off, move switch to "0" position.
3
To Attach Electronic Steering Wheel Toy

natural_image
Hand operating a small robot with a circular head and wheels (no visible text or symbols)① Place the steering wheel toy into the hole on the dashboard.
2

natural_image
Close-up of hands holding a medical device in a clinical setting (no visible text or symbols)2 Locate the steering wheel locking cup and snap over bottom of steering wheel on underside of tray. Two tabs will lock cup into place.
3 To Replace Batteries and Remove the Steering Wheel Toy: Push two tabs in and remove steering wheel locking cup. Pull up on steering wheel toy to remove.
Consumer Service: 1.800.453.7673 www.kolcraft.com
To Attach Seat Pad to Tray
1

1 Push crotch portion of the seat pad inside out to form seat, so that the fabric is below the seat back.
3
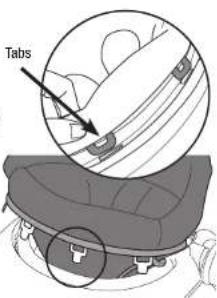
2 Place seat pad into seat ring located on tray. Align it so that the highest point of the seat pad aligns with back of walker ring.
3 Insert the 4 tabs on the seat pad into slots located around the front of the seat ring. Slide tabs through holes.
4

4 Underneath the tray, pull tabs and align into grooves.
5

natural_image
Illustration of a person's head and shoulders wearing a helmet (no text or symbols visible)⑤ Velcro the back of the seat pad around the rear of the seat ring.
Test: Push down hard on seating area of seat pad to make sure seat is securely in place.
CAUTION: Do not use walker if all tabs and Velcro are not secured properly, otherwise child may fall through walker.
Consumer Service: 1.800.453.7673
www.kolcraft.com
To Adjust Seat Pad Height
NOTE: As your child begins to grow, adjust height of walker via the seat pad so that their feet touch the ground when seated. To determine correct height after assembly, place child in walker and make sure both feet touch the ground. Always make sure seat pad is adjusted to the correct height position before placing child in product.

natural_image
Close-up of a mechanical belt buckle assembly with a white arrow pointing to a component (no text or symbols visible)① After seat pad is attached to tray, flip unit upside down to access the restraint strap on underside of seat pad.
2 Please note, to ensure proper operation, you will need to periodically adjust the seat restraint to accommodate your childs increased height. For smaller babies, seat pad should be extended to its lowest position. To adjust seat height, push button in on restraint strap to release restraint.
3 As baby grows, raise seat by tightening belt. This helps to prevent the child from placing their feet flat on ground and prevents your child from climbing out.
To Convert to Walk-Behind Walker

natural_image
Child playing a toy car with a black foam roller, no visible text or symbols1 Remove the seat pad by unfastening the 4 seat tabs from the tray and unsnapping the rear of the seat pad.
2 Your child can now stand behind the walker, using the texturized handle grip for support as they learn how to walk in the walk-behind mode.
Please direct any comments, questions or replacement part requests to:
Kolcraft® Consumer Service Department
1100 W Monroe St. Chicago, IL 60607
1-800-453-7673 in U.S., 1-312-361-6315 outside U.S.
8 am-5 pm (CT) Monday - Thursday, 8 am - 3 pm Friday (CT)
e-mail: customerservice@kolcraft.com


- Kolcraft®
- IMPORTANT SAFETY INFORMATION:
- How to Keep Your Child Safe While Using this Product
- STAIR HAZARD
- Only use this activity walker (seated stage) if your child MEETS ALL of the requirements below:
- CARE & MAINTENANCE
- To Attach Legs to Tray
- To Attach Tires to Tray
- To Attach Rear Wheels
- Attach Front Casters
- To Attach Tray to Base
- To Attach Windshield Toy
- To Install Batteries in Electronic Steering Wheel
- To Attach Electronic Steering Wheel Toy
- To Attach Seat Pad to Tray
- To Adjust Seat Pad Height
- To Convert to Walk-Behind Walker
Brand : Kolcraft
Model : Tiny Steps Roadster
Category : Baby product