
Rapid Photo Album Scanner - Audio/video converter Sharper Image - Free user manual and instructions
Find the device manual for free Rapid Photo Album Scanner Sharper Image in PDF.


| Product Type | Photo Album Scanner |
| Brand | Sharper Image |
| Model | Rapid Photo Album Scanner |
| Dimensions (H x W x D) | 18.2 x 20.9 x 16.2 cm |
| Net Weight | Approximately 1050 g |
| Power Supply | Power adapter 5V/1A (included) |
| Image Sensor | 1/2.33" 14 Mega CMOS Sensor |
| Display | 5" Color LCD |
| Scan Resolution | 14MP (native) / 22MP (interpolated) |
| Light Source | Photo: 24 white LEDs; Film: 3 white LEDs |
| Supported Media | Photos (from albums or loose), 35mm slides, 35mm film negatives (135, 110, 126), instant film (4x4, 4.2x3.2, 3.4x2.1 inches) |
| Interfaces | USB 2.0 Type-C, HDMI |
| Storage | SD card (max 32GB, 4GB included) |
| Focus | Fixed focus / Dual focus (via switch) |
| Adjustments | Brightness (+/-2 EV), RGB color balance |
| Included Accessories | User guide, 35mm negative holder, slide holder, power adapter, USB cable, cleaning brush, HDMI cable, 4GB SD card |
| System Requirements (PC) | Pentium P4 1.6GHz, 512MB RAM, USB 2.0, Windows XP/Vista/7/8/10 |
| System Requirements (Mac) | Power PC G5 or Intel Core Duo, 768MB RAM, USB 2.0, Mac OS 10.5+ |
| Cleaning and Maintenance | Use included brush to clean slot and glass surface periodically; format SD card if not compatible |
| Safety Warnings | Do not open case; keep away from water; use only included power accessories; if overheating, turn off and wait |
Frequently Asked Questions - Rapid Photo Album Scanner Sharper Image
User questions about Rapid Photo Album Scanner Sharper Image
0 question about this device. Answer the ones you know or ask your own.
Ask a new question about this device
Download the instructions for your Audio/video converter in PDF format for free! Find your manual Rapid Photo Album Scanner - Sharper Image and take your electronic device back in hand. On this page are published all the documents necessary for the use of your device. Rapid Photo Album Scanner by Sharper Image.
USER MANUAL Rapid Photo Album Scanner Sharper Image
Thank you for purchasing the Rapid Photo Album Scanner. Please take a moment to read this guide and save it for future reference.
INTRODUCTION
The Rapid Photo Album Scanner lets you quickly digitize pictures, without removing them from your photo album. Simply place it on top of the image you wish to copy and press a button. The built-in CMOS sensor and LEDs give you high-quality, glare-free results in seconds. This device also digitizes 35mm slides and film negatives, so all of your precious family memories can be digitized with one device.
INCLUDED ACCESSORIES
- User guide
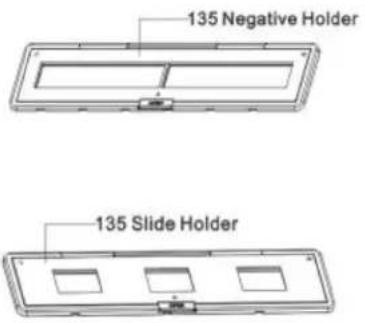
· 35mm negative holder - Slide holder
- Power adapter
- USB cable
· Cleaning brush
· HDMI cable
. 4GB SD memory card
PARTS IDENTIFICATION

IDENTIFICATION OF BUTTONS
A. Home / Preview
B. Playback
C. Brightness / RGB Forward
D. Resolution / Delete
E. Photo Size / Backward
F. Photo / Film Switch
G. Power On / Off
H. OK / Scan

SET UP
- Insert the included SD card into the SD Card Slot until the card clicks in place. Make sure that the gold side of the card is facing downward. Push once again to release the card. This unit supports SD cards up to a maximum of 32GB.
- Select the media you wish to scan. You can choose Photo [hard copy] or Film [slide or negative]. Be sure that BOTH the Photo/Film Focus Switch and the Photo/Film Light Switch are set to the appropriate media.
- Connect the power adapter to an AC outlet. Then connect the power adapter to the scanner via the Type-C USB cable.
- Press the Power Button of your scanner to turn on the electric power. You will see a pop-up screen of Home Page on the LCD. The scanner is now ready for use.
NOTE: The Photo Tray is used to keep dust out of the scanner. You can scan photos with or without the tray.
- Slide the Photo/Film Focus Switch to "PHOTO."
- Slide the Photo/Film Light Switch to "PHOTO."
- With the film tray removed, place the scanner on top of the image you wish to scan.
- Press the Power Button to turn on the scanner. You will see the Home Page. NOTE: Photo Scan will be the preset item to be selected. You may select the other item by pressing the 📄 or ⚙ RGB buttons.
- Under the Photo Scan, press the OK/ button to give you a preview on the LCD screen.
- Select the proper size of the photo [4"x6", 3.5"x5", 4"x4", 4.2"x3.2" or 3.4"x2.1"] by pressing the Photo Size button. The selected photo size is shown on the left hand side of the preview screen.
- Press the OK button to scan the picture. The scanned digital image will automatically store on your SD card. NOTE: 4"x4", 4.2"x3.2" and 3.4"x2.1" are common sizes of Polaroid and Fuji instant film.
NOTE: You can scan photos directly from a photo album without removing them from the album. If you see a black image on the LCD screen and do not see the image you want to scan, please check that both switches are on the "Photo" setting. Please do not insert the film holder into the scanner when scanning a photo.
SCANNING SLIDES AND FILM NEGATIVES
- Place your slide or negative into the appropriate media holder. [Keep the glossy surface of your film facing up]
- Close the holder.
- Slide the Photo/Film Focus Switch to "FILM."
- Slide the Photo/Film Light Switch to "FILM."
- Insert the loaded media holder properly into the slot, according to the ▲ or ● symbol shown on the scanner and media holder. (The holder can be inserted into either the left or the right opening.) TIP: Keep your picture in the rectangular white frame shown on the LCD screen.
- Select film type by pressing the Film Type button:
· 135 positive (slide)
· 135 negative film [color]
· 135 black & white negative film
TIP: To get the best digitized image, wait for the image display on the LCD screen to adjust the brightness and become stable. It normally takes 3 to 4 seconds, depending on the brightness of your film. NOTE: Improper film selection will give you improper color results.
- Press the OK button to scan the picture. The scanned digital image will automatically store on your SD card.
IMAGE RESOLUTION
There are 2 resolution levels: 14 megapixel and 22 megapixel scan [by interpolation]. The resolution is set by pressing the R/按钮 button on the Preview mode. The selected setting is shown on the lower right hand side of the preview screen.
HOME PAGE
At any time you can go back to the Home Page by pressing the m/p button. This will give you the options to select: Photo Scanning, USB Upload, Photo Gallery and Calendar mode.
BRIGHTNESS AND COLOR ADJUSTMENT
Normally, no adjustment is needed (the scanner will automatically set the proper brightness and colors for your scanning). However, you may wish to adjust the colors of old media that has faded over time.
Press the RGB button to adjust the brightness and colors of the image of the media to be scanned. Brightness and each color can be adjusted individually or a combination of the selected colors.
After pressing the RGB button, a selection table with icons of Brightness and colors Red [R], Green [G] and Blue [B] will appear for you to select. Press the button to select the item.
Adjust the amount of compensation of the selected items, then press the OK Button to confirm your adjustment.
You may press the OK button again to capture the image you adjusted.
Selecting the Reset 📋 icon will reset all your adjustments. NOTE: All your settings for scanning film of your last scanning will be reset when the power of the scanner is turned off by the Power Button or unplugged from the USB cable.
CONNECTING TO A COMPUTER
- Connect the Type-C USB cable to the scanner and terminal of your computer USB port.
- Turn on the power of both your computer and scanner.
- From the Home Page of the scanner (preset), select the USB Upload icon
- By pressing the connection. or button, and then press the OK button to activate the
- You can now use the device as a mass storage device or card reader and transfer files to your computer.
NOTE: If the connection fails, please check the loading of the SD Card, make sure that it is properly loaded in the Card Slot. Reload the SD Card and try again.
THE DATE AND TIME SETTING [CALENDAR]
You may set the Date and Time in the image file before scanning image. The Date and Time set will not be printed on the picture of the scanned image, it is only stored in the electronic file of the image.
From the Home Page of the scanner, select the Calendar icon
![Sharper Image Rapid Photo Album Scanner - THE DATE AND TIME SETTING [CALENDAR] - 1](/content/2026/05/910794/images/8485584336b7c8d806b269cca855e92873aeb447761d64c5db3b3e71415f0645.jpg)
by pressing the □ or RGB buttons, then OK to confirm your selection. You will see a date adjustment table as shown below:
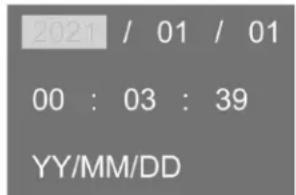
Press the Playback button ▶ to select the item you want to adjust. Use the. ◀ or RGB buttons to increase or reduce the number you are going to set, then press the OK button to confirm your selection.
NOTE: The range of the year for date adjustment is limited to 1980 to 2050.
PREVIEWING AND REVIEWING IMAGES ON A TV SCREEN
- Connect your Scanner and TV set by the HDMI Cable. Set your TV to the proper HDMI terminal that you are connecting, turn on the power of the Scanner and press the Galley Icon from the Home Page then press the OK button to review your scanned images on the TV screen.
- You may also connect the Scanner to TV set via USB setting, to review the captured images up to a 4K/2K image quality, depending on the maximum resolution of your TV set.
- For proper USB connection of your TV set please refer to the instruction manual of your TV set and treat your USB and Scanner connection as a Card Reader.
NOTE: When 22M scanning is selected, the preview resolution on the TV screen will reduce to 480P due to the transfer rate. The resolution of the scanned images save in the SD card will remain 22M with no reduction.
PLAYBACK MODE
- Press the Playback button to playback the digital images saved on your card. You will see the playback icon in the lower left hand corner.
- Press the UP button for forward reviewing.
- Press the DOWN button for backward reviewing.
- Press the Playback button again to start a slideshow.
- Press the Playback button again to go back to the original screen.
DELETE MODE
- To Delete an image: Under Playback Mode, press the Delete button ☑ once, and then the UP button to select YES. Press the OK button to delete the current image.
- To delete ALL images: Press the Delete button twice and then the UP button to select YES. Press the OK button to DELETE ALL.
NOTE:
- You must take at least one picture in order to enter Delete Mode.
- If you don't want to delete images, push the DOWN button once to select NO, then the OK button to exit the Delete Mode.
FORMATTING THE SD CARD
If your SD memory card is not compatible with the Rapid Photo Album Scanner, you will need to format it on your computer first.
NOTE: Formatting SD card will delete all the files in the card. Download your files in the SD card into your computer before the SD card is formatted.
CLEANING THE DEVICE
We suggest using the included brush to clean inside the slot and the glass surface periodically to produce a clear image. Please make sure your film negatives/mounted slides and their holders are clean before inserting into the device as well. Dust or dirt from the film holder will affect the quality of your scanned images.
SPECIFICATIONS
| Image Sensor 1/2.33" 14 Mega CMOS Sensor | |
| Preview and Review 5" Color LCD Display | |
| Lens Specification F/No=3.4, f=5.2mm | |
| Color Balance Automatic | |
| Exposure Control Automatic & Manual adjustment | |
| Compatible photo size 4X6 inches. and 3.5X5 inches | |
| Compatible instant film size 4"x4", 4.2" 3.2", 3.4"x2.1 | |
| Compatible print media Photo album/magazine/photo | |
| Compatible Film Size [auto cropping] 135 / 110 / 126 film size | |
| Compatible Film Type [auto converting] 50 x 50 mm SlideColor Negative FilmBlack & White Negative Film | |
| Focusing Fixed Focus / Dual Focus | |
| Exposure Value (Brightness) adjustment Yes (= 2.0 EV) | |
| PC Interface USB 2.0 | |
| USB Type | Type-C |
| Image Format | Photo 3:2 Ratio135 Film 3:2 Ratio110 Negative 4:3 Ratio126 Negative, 1:1 Ratio |
| Light Source | Photo: 24 white LEDs / Film 3 white LEDs |
| Power | Power adapter: 5V/1 amp |
| Net Weight | Approximately 1050 gm. |
| Dimension | 18.2 (H) x 20.9 (W) x 16.2 (D) cm |
NOTE: Specifications are subject to change without prior notice.
ICONS AND INDICATORS

Scan film (slides or negatives)
Connect to computer via USB
Review scanned photos on the SD card
Set date and time
Scan photos
Transparent film and slides
Color negative film
Black and white film
For 135 film negatives
For 110 film negatives (holder not included)
For 126 film negatives (holder not included)
Photo scanning shown on preview
Selected film type shown on preview: Transparent film
Selected film type shown on preview: Color negative film
Selected film type shown on preview: B&W negative film
Selected film size shown on preview: 135 film
Selected film size shown on preview: 110 film
Selected film size shown on preview: 126 film
Selected photo size (5 sizes to select)
Brightness setting: -2EV to +2EV
Resolution setting: 14M or 22M
Capacity of card: Full=3GB+, 3/4=2GB, 2/4=1GB, 1/4=0.5GB
Battery / Power indication
SD card malfunction: Not loaded, locked or not compatible
Reviewing picture from card: single picture
Reviewing pictures from card: Slide show
Brightness (EV) and colors adjustment scale
RGB color adjustment recover to default setting
Delete single image
Delete all scanned images
SD card and computer successfully connected
Computer connection fail
Wait for scanned image to be stored into the SD card
SYSTEM REQUIREMENTS
PC System Requirements
- Pentium® P4 1.6GHz or equivalent AMD Athlon
- Free USB2.0 port
. 512MB RAM - 500MB free hard disk space
· 1024 x 768 pixel color monitor - Windows® XP Service Pack II / Vista™, 32/64 bits Windows 7/Windows 8 / Windows 10
Mac System Requirements
- Power PC G5 or Intel Core Duo processor recommended
- Free USB2.0 port
· 768MB RAM - 500MB free hard disk space
· 1024 x 768 color monitor - Mac OS 10.5 and later
WARNING
- Do not try to open the case of the device or attempt to modify it in any way. There are no user-serviceable parts.
- Keep the device away from water and other liquids.
- Use only the included power accessories. Use of power sources not expressly recommended for this device may lead to overheating, distortion of the equipment, fire, electrical shock or other hazards.
· This device may become slightly warm during use. This does not indicate malfunction. - If the exterior of it needs cleaning, wipe it with a soft, dry cloth.
FCC NOTICE
This equipment has been tested and found to comply with the limits for a Class B Digitize device, pursuant to Part 15 of the FCC Rules. These limits are designed to provide reasonable protection against harmful interference in a residential installation. This equipment generates, uses and can radiate radio frequency energy. If not installed and used in accordance with the instruction, it may cause harmful interference to radio communication. However, there is no guarantee that interference will not occur in a particular installation. If this equipment does cause harmful interference to radio or television reception, which can be determined by turning the equipment on to off, the user is encouraged to try to correct the interference by one or more the following suggestions.
- Reorient or relocate the receiving antenna.
- Increase the distance between the equipment and the receiver.
- Connect the equipment to a different power outlet other than the one where the receiver is connected.
- Consult an experienced television or radio technician for help.
CAUTION
To comply with the limits for a Class B Digitize device, pursuant to Part 15 of the FCC Rules, this device must only be installed on computer equipment certified to comply with the Class B limits.
This unit may contain a microcomputer for signal processing and control function. In very rare situations, severe interference, noise from an external source, or static electricity may cause it to lockup. In the unlikely event that this should happen, turn off the unit, wait at least five seconds, and then turn it back on again.

- INTRODUCTION
- INCLUDED ACCESSORIES
- PARTS IDENTIFICATION
- IDENTIFICATION OF BUTTONS
- SET UP
- SCANNING SLIDES AND FILM NEGATIVES
- IMAGE RESOLUTION
- HOME PAGE
- BRIGHTNESS AND COLOR ADJUSTMENT
- CONNECTING TO A COMPUTER
- THE DATE AND TIME SETTING [CALENDAR]
- PREVIEWING AND REVIEWING IMAGES ON A TV SCREEN
- PLAYBACK MODE
- DELETE MODE
- NOTE
- FORMATTING THE SD CARD
- CLEANING THE DEVICE
- ICONS AND INDICATORS
- SYSTEM REQUIREMENTS
- PC SYSTEM REQUIREMENTS
- MAC SYSTEM REQUIREMENTS
- WARNING
- FCC NOTICE
- CAUTION
Brand : Sharper Image
Model : Rapid Photo Album Scanner
Category : Audio/video converter