
PIP-4 - Audiovisual Equipment Kramer - Free user manual and instructions
Find the device manual for free PIP-4 Kramer in PDF.


| Product Type | 4 Input Picture-in-Picture Inserter for composite video |
| Dimensions (W x D x H) | 21.5 cm x 17.7 cm x 4.4 cm (8.5" x 7" x 1.7") |
| Weight | 0.8 kg (1.76 lbs) approx. |
| Power Source | 5V DC, 450mA (supplied adapter) |
| Video Inputs | 4 composite video, 1Vpp @75Ω on BNC connectors |
| Video Outputs | 1 s-Video (4-pin) + 1 composite video (BNC), 1Vpp @75Ω |
| Digital Resolution | 10 bit |
| Signal-to-Noise Ratio | 60 dB (weighted) |
| Y/C Separation | Adaptive 4-line digital comb filters |
| Memory | Non-volatile memory for storage of 2 setups |
| Control Methods | Front panel buttons, OSD menu, IR remote, RS-232, Ethernet |
| Supported Video Standards | PAL and NTSC (auto-detected) |
| Operating Temperature | 0° to +55°C (32° to 131°F) |
| Storage Temperature | -45° to +72°C (-49° to 162°F) |
| Humidity | 10% to 90% RHL non-condensing |
| Accessories Included | Power supply, RC-4 Infrared Remote Controller with battery |
| Optional Accessories | RK-1 rack adapter |
| Warranty | 7 years (limited warranty by Kramer Electronics) |
| Maintenance | Clean with dry soft cloth; do not use liquids. No user-serviceable parts inside. |
| Safety Precautions | Use only provided power supply; disconnect power before servicing; keep away from moisture and heat. |
| Spare Parts / Repairability | Contact Kramer Electronics for any repairs; no user-replaceable parts. |
Frequently Asked Questions - PIP-4 Kramer
User questions about PIP-4 Kramer
0 question about this device. Answer the ones you know or ask your own.
Ask a new question about this device
Download the instructions for your Audiovisual Equipment in PDF format for free! Find your manual PIP-4 - Kramer and take your electronic device back in hand. On this page are published all the documents necessary for the use of your device. PIP-4 by Kramer.
USER MANUAL PIP-4 Kramer
Kramer Electronics, Ltd.

USER MANUAL
Model:
PIP-4
4 input Picture-in-Picture Inserter
Contents
1 Introduction 1
2 Getting Started 1
2.1 Quick Start 2
3 Overview 3
3.1 Recommendations for best performance 4
4 Defining the PIP-4, 4 input Picture-in-Picture Inserter 4
5 Connecting the PIP-4, 4 input Picture-in-Picture Inserter 7
5.1 Connecting a PC to the PIP-4 via RS-232 for Remote Operation 8
5.2 Connecting a PC to the PIP-4 via Ethernet for Remote Operation 8
5.2.1 Connecting the Ethernet Port Directly to a PC 8
5.2.2 Connecting the ETHERNET Port via a Network Hub 9
6 Operating the PIP-4 Locally 10
6.1 Operating the PIP-4 Using the Front Panel Buttons 10
6.1.1 Manipulating Video Panes 10
6.1.2 Navigating the OSD Menu 11
6.2 The OSD Menu 12
6.2.1 Display Submenu 12
6.2.2 Utility Submenu 13
6.3 Operating the PIP-4 Using the Mouse 14
7 Operating the PIP-4 Remotely 15
7.1 Operating the PIP-4 Using the PIP-4 Controller Software 15
7.1.1 The Menu Bar 16
7.1.2 The Quick Access Toolbar 17
7.1.3 Connecting to the Device 17
7.1.4 Windows Position 18
7.1.5 Connection Status 19
7.1.6 Changing the Layer Order 19
7.1.7 Implementing Multiple Actions At Once 19
7.1.8 Changing the Video Characteristics of a Channel 19
7.1.9 Upgrading the Firmware 20
7.1.10 Displaying the Device Details 20
7.1.11 Setting the IP Network Parameters 21
7.1.12 Displaying the PIP-4 Software Version Number 21
8 Resetting the PIP-4 Parameters to Factory Defaults 21
9 Technical Specifications 22
10 Default Communication Parameters 24
11 Communication Protocol 3000 24
11.1 Protocol 3000 Syntax 24
11.2 Command Parts Details 25
Figures
Figure 1: PIP-4 Front Panel 5
Figure 2: PIP-4 Rear Panel 6
Figure 3: Connecting the PIP-4, 4 input Picture-in-Picture Inserter 7
Figure 4: Local Area Connection Properties Window 9
Figure 5: Internet Protocol (TCP/IP) Properties Window 9
Figure 6: Video Pane Manipulation Buttons 10
Figure 7: OSD Menu Buttons 11
Figure 8: PIP-4 Controller Software Main Window 15
Figure 9: Quick Access Toolbar 17
Figure 10: Connect Window 18
Figure 11: Window Manipulation 18
Figure 12: Windows Setup Window 19
Figure 13: Device Details 20
Figure 14: About PIP-4 Controller Window 21
Tables
Table 1: PIP-4 Front Panel Features 5
Table 2: PIP-4 Rear Panel Features 6
Table 3: PIP-4 Menu Items 12
Table 4: The Display Submenu Options 12
Table 5: The Utility Submenu Options 13
Table 6: PIP-4 Controller Software Features 16
Table 7: Menu Bar Options 16
Table 8: Quick Access Toolbar Options 17
Table 9: Technical Specifications of the PIP-4, 4 input Picture-in-Picture Inserter 23
Table 10: Default Communication Parameters 24
Table 11: Instruction Codes for Protocol 3000 26
1 Introduction
Welcome to Kramer Electronics! Since 1981, Kramer Electronics has been providing a world of unique, creative, and affordable solutions to the vast range of problems that confront video, audio, presentation, and broadcasting professionals on a daily basis. In recent years, we have redesigned and upgraded most of our line, making the best even better!
Our 1,000-plus different models now appear in 14 groups that are clearly defined by function: GROUP 1: Distribution Amplifiers; GROUP 2: Switchers and Routers; GROUP 3: Control Systems; GROUP 4: Format/Standards Converters; GROUP 5: Range Extenders and Repeaters; GROUP 6: Specialty AV Products; GROUP 7: Scan Converters and Scalers; GROUP 8: Cables and Connectors; GROUP 9: Room Connectivity; GROUP 10: Accessories and Rack Adapters; GROUP 11: Sierra Video Products; GROUP 12: Digital Signage; GROUP 13: Audio; and GROUP 14: Collaboration.
Congratulations on purchasing your Kramer PIP-4, 4 input Picture-in-Picture Inserter, which is ideal for:
• Video production studios for source monitoring
• Teleconferencing using one screen
• Home theater multi-channel monitoring
• Security applications
The package includes the following items:
- PIP-4, 4 input Picture-in-Picture Inserter
- RC-4 Infrared Remote Controller (including batteries and manual ^Error! Bookmark not defined.)
• Power adapter (5V DC output) - This user manual
2 Getting Started
We recommend that you:
- Unpack the equipment carefully and save the original box and packaging materials for possible future shipment
- Review the contents of this user manual
- Go to www.kramerav.com/downloads/PIP-4 to check for up-to-date user manuals, application programs, and to check if firmware upgrades are available (where appropriate).
2.1 Achieving the Best Performance
To achieve the best performance:
- Use only good quality connection cables (we recommend Kramer high-performance, high-resolution cables) to avoid interference, deterioration in signal quality due to poor matching, and elevated noise levels (often associated with low quality cables)
- Do not secure the cables in tight bundles or roll the slack into tight coils
- Avoid interference from neighbouring electrical appliances that may adversely influence signal quality
- Position your PIP-4 away from moisture, excessive sunlight and dust

This equipment is to be used only inside a building. It may only be connected to other equipment that is installed inside a building.
2.2 Safety Instructions

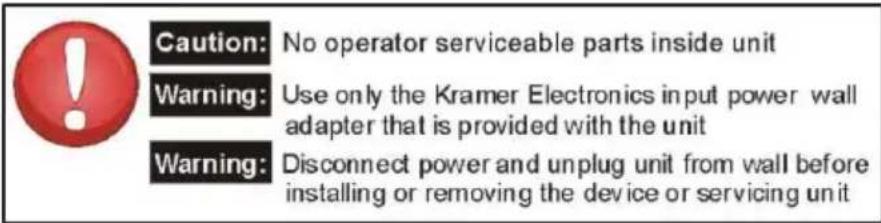
Caution: There are no operator serviceable parts inside the unit
Warning: Use only the Kramer Electronics power supply that is provided with the unit
Warning: Disconnect the power and unplug the unit from the wall before installing
2.3 Recycling Kramer Products
The Waste Electrical and Electronic Equipment (WEEE) Directive 2002/96/EC aims to reduce the amount of WEEE sent for disposal to landfill or incineration by requiring it to be collected and recycled. To comply with the WEEE Directive, Kramer Electronics has made arrangements with the European Advanced Recycling Network (EARN) and will cover any costs of treatment, recycling and recovery of waste Kramer Electronics branded equipment on arrival at the EARN facility. For details of Kramer's recycling arrangements in your particular country go to our recycling pages at http://www.kramerelectronics.com/support/recycling/.
2.4 Quick Start
The following quick start chart summarizes the basic setup and operation steps for the PIP-4.
Step 1: Mount the machine - see Section 5
Mount the machine in a rack or stick the 4 rubber feet to the underside
Step 2: Connect the inputs and outputs - see Section 5

flowchart
graph TD
    A["PC"] -->|Connect the inputs| B["Composite Video Player"]
    A -->|Connect the outputs| C["Composite Video Player"]
    A -->|Optional—Connect a PC via Ethernet/RS-232 for remote operation| D["s-Video Display"]
    A -->|Optional—Connect a PC via Ethernet/RS-232 for remote operation| E["Composite Video Display"]
    A -->|Optional—Connect a PC via Ethernet/RS-232 for remote operation| F["Computer"]
    B -->|CV| G["Composite Video Player"]
    C -->|CV| H["Composite Video Player"]
    D -->|Y/C| I["Composite Video Display"]
    E -->|CV| J["Composite Video Display"]
    F -->|ETH| K["Composite Video Display"]
Step 3: Turn the power on
Step 4: Operate the unit - see Section 6
□ Select an INPUT
☐ Manipulate the input appearance using the buttons or mouse
☐ Freeze the output image


Enter the OSD menu using buttons or mouse:
☐ ENTER the highlighted item/confirm an action
□ Use the Navigation buttons
☐ Freeze the output image
☐ ESC from the menu/stop a command


3 Overview
The high performance Kramer desktop PIP-4 is a picture-in-picture inserter for composite video signals.
The PIP-4 features:
- A multi-standard, picture-in-picture video inserter that accepts up to four composite video sources and displays them all on the same screen simultaneously
• s-Video and composite video outputs
• Non-volatile memory that retains the last setting ^1
With the PIP-4, you can:
- Position sources on the screen as desired and select their size dynamically using a mouse or by selection from a list
- Freeze the output
• Output video as both s-Video and composite signals
In addition, the PIP-4:
- Includes 10-bit video A/D and D/A converters throughout the unit, ensuring the highest quality video
- Can be operated locally via:
■ The front panel buttons
■ A user-friendly OSD (On-Screen Display) menu - Can be operated remotely via an IR remote controller, RS-232 and Ethernet
• Is rugged and dependable
3.1 Recommendations for best performance
To achieve the best performance:
- Connect only good quality connection cables ^2 thus avoiding interference, deterioration in signal quality due to poor matching, and elevated noise levels (often associated with low quality cables)
- Avoid interference from neighboring electrical appliances and position your PIP-4 away from moisture, excessive sunlight and dust
4 Defining the PIP-4, 4 input Picture-in-Picture Inserter
Figure 1 and Table 1 define the front panel of the PIP-4, 4 input Picture-in-Picture Inserter.

flowchart
graph TD
    A["1"] --> B["IR"]
    C["2"] --> B
    D["3"] --> E["POWER"]
    F["4"] --> G["IN 1"]
    F --> H["IN 2"]
    I["5"] --> J["+"]
    K["6"] --> J
    L["7"] --> M["-"]
    N["8"] --> M
    O["9"] --> P["MENU"]
    Q["10"] --> R["MOVE"]
    S["11"] --> T["SIZE"]
    U["12"] --> V["QUAD"]
    W["13"] --> X["ENTER"]
    Y["14"] --> Z["ESC"]
    AA["15"] --> AB["DISTORT"]
    AC["16"] --> AD["FULL"]
    AE["17"] --> AF["MOUSE"]
    AG["PIP-4"] --> AH["PIP-4"]
Figure 1: PIP-4 Front Panel
Table 1: PIP-4 Front Panel Features
| # | Feature | Function | |
| 1 | IR LED | Lights yellow when the unit receives IR signals | |
| 2 | IR Sensor | IR signal receiver | |
| 3 | POWER LED | Lights green when the unit is powered on | |
| 4 | IN 1 | Input Selector Buttons | Press to select input 1 |
| IN 2 | Press to select input 2 | ||
| IN 3 | Press to select input 3 | ||
| IN 4 | Press to select input 4 | ||
| 5 | ▼ Button | Navigation Buttons | In MOVE mode, moves the selected pane down.In SIZE mode, shrinks the selected pane.In DISTORT mode, moves the bottom of the pane down.In the OSD menu, moves the cursor down one option |
| 6 | ←/− Button | In MOVE mode, moves the selected pane left.When in SIZE mode, shrinks the selected pane.In DISTORT mode, moves the right hand side of the selected pane to the leIn the OSD menu, moves the cursor to the left | |
| 7 | ▲ Button | In MOVE mode, moves the selected pane up.In SIZE mode, expands the selected pane.In DISTORT mode, moves the bottom of the pane up.In the OSD menu, moves the cursor up one option | |
| 8 | →/+ Button | In MOVE mode, moves the selected pane right.When in SIZE mode, expands the selected pane.In DISTORT mode, moves the right hand side of the selected pane to the rigIn the OSD menu, moves the cursor to the right | |
| 9 | MENU Button | Press to display the OSD menu. Press again to exit the OSD menu | |
| 10 | MOVE Button | Moves the active pane. Press to enter the MOVE mode followed by one of t arrow buttons | |
| 11 | SIZE Button | Resizes the active pane while retaining the aspect ratio. Press to enter the SIZE mode followed by one of the arrow buttons | |
| 12 | QUAD Button | Press to display all 4 inputs in equally sized panes | |
| 13 | ENTER Button | When in the OSD menu, press to select the current option or to confirm an action | |
| 14 | ESC Button | Exits the OSD Menu | |
| 15 | DISTORT Button | Distorts the active pane by changing the aspect ratio. Press to enter the DISTORT mode followed by one of the arrow buttons | |
| 16 | FULL Button | Expands the active pane to full screen | |
| 17 | MOUSE USB Connector | Connect USB/PS/2 mouse for operating the OSD menu | |
Figure 2 and Table 2 define the rear panel of the PIP-4, 4 input Picture-in-Picture Inserter.

flowchart
graph TD
    A["18"] --> B["IN 1"]
    A --> C["IN 3"]
    B --> D["IN 2"]
    C --> E["IN 4"]
    F["19"] --> G["Y/C"]
    H["20"] --> I["CV"]
    J["21"] --> K["RESET"]
    L["22"] --> M["ETHERNET"]
    N["23"] --> O["RS-232"]
    P["24"] --> Q["5V DC"]
Figure 2: PIP-4 Rear Panel
Table 2: PIP-4 Rear Panel Features
| # | Feature | Function | |
| 18 | IN 1 | Composite Video BNC Input Connectors | Connect to composite video source 1 |
| IN 2 | Connect to composite video source 2 | ||
| IN 3 | Connect to composite video source 3 | ||
| IN 4 | Connect to composite video source 4 | ||
| 19 | OUTPUT | Y/C 4-pin s-Video Output Connector | Connect to the s-Video acceptor |
| 20 | CVBNC Output Connector | Connect to the composite video acceptor | |
| 21 | RESET Button | Press and hold while switching the unit on to reset all parameters to factory default values (see Section 8) | |
| 22 | ETHERNET RJ-45 Connector | Connect to LAN for remote operation using a PC | |
| 23 | RS-2329-pin D-sub Connector | Connect to a PC or other device for remote operation | |
| 24 | 5V DC Power Connector | Connect to supplied power adapter, center pin positive | |
5 Connecting the PIP-4, 4 input Picture-in-Picture Inserter
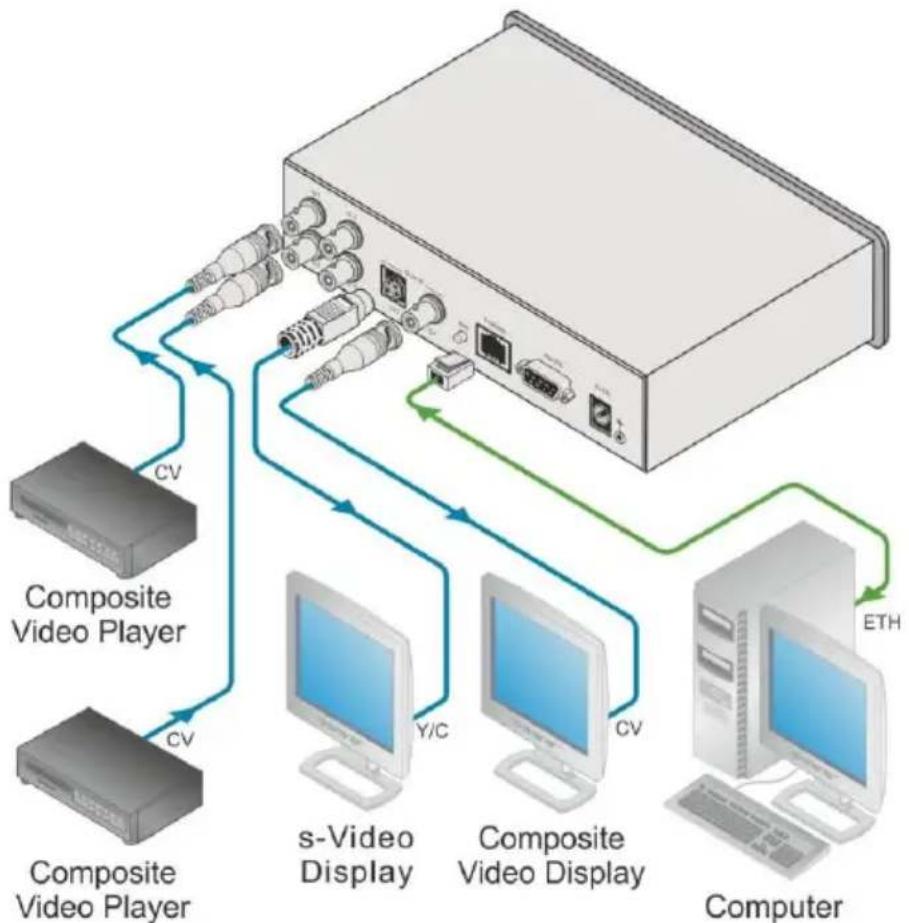
To connect ^1 the PIP-4 as illustrated in the example in Figure 3:
- Connect a composite video player source to the IN 1 BNC connector ^2 .
- Connect a composite video player source to the IN 2 BNC connector ^2 .
- Connect an s-Video display acceptor to the Y/C OUTPUT 4-pin s-Video connector ^3 .
- Connect a composite video display acceptor to the CV OUTPUT BNC connector ^3 .
- Optional—for remote operation, connect the ETHERNET RJ-45 connector to a LAN to which the PC is connected (see Section 5.2.2) ^4 .
- Connect the supplied power adapter to the unit and to the mains supply (not shown in Figure 3).
flowchart
graph TD
    A["Computer"] -->|ETH| B["s-Video Display"]
    A -->|CV| C["Composite Video Player"]
    B -->|Y/C| D["Composite Video Display"]
    C -->|CV| E["Composite Video Player"]
    D --> F["Server with port labels"]
    E --> G["Server with ports labeled 'CV'"]
    style A fill:#f9f,stroke:#333
    style B fill:#ccf,stroke:#333
    style C fill:#cfc,stroke:#333
    style D fill:#fcc,stroke:#333
    style E fill:#cff,stroke:#333
    style F fill:#ffc,stroke:#333
    style G fill:#cfc,stroke:#333
Figure 3: Connecting the PIP-4, 4 input Picture-in-Picture Inserter
5.1 Connecting a PC to the PIP-4 via RS-232 for Remote Operation
You can connect to the PIP-4 via an RS-232 connection using, for example, a PC. Note that a null-modem adapter/connection is not required.
To connect to the PIP-4 via RS-232:
- Connect the RS-232 9-pin D-sub rear panel port on the PIP-4 unit via a 9-wire straight cable (only pin 2 to pin 2, pin 3 to pin 3, and pin 5 to pin 5 need to be connected) to the RS-232 9-pin D-sub port on your PC
5.2 Connecting a PC to the PIP-4 via Ethernet for Remote Operation
You can connect to the PIP-4 via Ethernet using either of the following methods:
- Direct connection to the PC using a crossover cable (see Section 5.2.1)
- Connection via a network hub, switch, or router, using a straight-through cable (see Section 5.2.2)
5.2.1 Connecting the Ethernet Port Directly to a PC
You can connect the Ethernet port of the PIP-4 to the Ethernet port on your PC, via a crossover cable with RJ-45 connectors.
This type of connection is recommended for identifying the PIP-4 with the factory configured default IP address
To connect directly to your PC and to configure it:
- Using a crossover cable, connect the unit directly to your PC.
- Right-click the My Network Places icon on your desktop.
- Select Properties.
- Right-click Local Area Connection Properties.
- Select Properties. The Local Area Connection Properties window appears.
- Select the Internet Protocol (TCP/IP) and click the Properties Button (see Figure 4).

Figure 4: Local Area Connection Properties Window
- Select Use the following IP Address, and fill in the details as shown in Figure 5.
- Click OK.
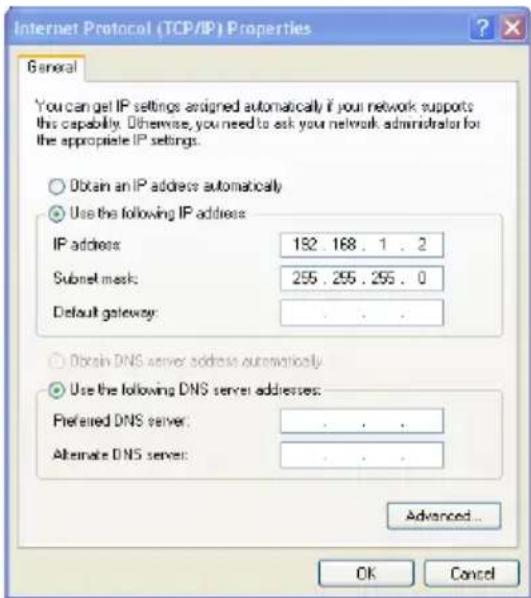
Figure 5: Internet Protocol (TCP/IP) Properties Window
5.2.2 Connecting the ETHERNET Port via a Network Hub
You can connect the Ethernet port of the PIP-4 to the Ethernet port on a network hub or network router, via a straight-through cable with RJ-45 connectors.
6 Operating the PIP-4 Locally
You can operate your PIP-4 locally via:
• The front panel buttons (see Section 6.1)
• A mouse (see Section 6.3)
• An IR remote controller
6.1 Operating the PIP-4 Using the Front Panel Buttons
The front panel buttons are used to:
- Manipulate video panes
- Navigate the OSD menu
Note: If there is no mouse activity for 20 seconds, the OSD closes automatically.
6.1.1 Manipulating Video Panes
You can use the front panel buttons (displayed within gray boxes in Figure 6) to manipulate the display (such as, changing size and aspect ratio) of each of the four inputs independently.

Figure 6: Video Pane Manipulation Buttons
The buttons operate in the following manner:
• IN 1 to IN 4: Select the input to manipulate
- , , , -, +: Move up, down, left/decrease and right/increase
- Move, Size, Quad, Distort and Full: Select an operation to perform on the pane
Example
To increase the size of the Input 3 window:
- Press IN 3.
The Input 3 window becomes active. Its outline becomes black and flashes. - Press SIZE.
Size is displayed in the Input 3 pane. - Repeatedly press or press and hold the ▶button until the window is the required size.
- Press ESC.
6.1.2 Navigating the OSD Menu
You can use the front panel OSD menu buttons (see Figure 7) to navigate the OSD in order to modify the video parameters (such as brightness and contrast) of each input independently.

flowchart
graph TD
    A["In 1"] --> B["Square"]
    C["In 2"] --> D["Square"]
    E["In 3"] --> F["Square"]
    G["In 4"] --> H["Square"]
    B --> I["Square - + Square"]
    D --> I
    F --> I
    H --> I
    I --> J["Menu"]
    I --> K["MOVE"]
    I --> L["SIZE"]
    I --> M["QUAD"]
    I --> N["ENTER"]
    I --> O["ESC"]
    I --> P["Distort"]
    I --> Q["FULL"]
Figure 7: OSD Menu Buttons
The buttons operate in the following manner:
- MENU: Display the OSD ^1 . Press again to exit the OSD from any level
- ENTER: Enter a menu item or accept a parameter value
- +, - : Increase/decrease a parameter value
- , , , : Navigate through the menu items
• ESC: Exit the OSD menu, a menu item or parameter value
Note: If there is no mouse activity for 20 seconds, the OSD closes automatically.
Example
To vertically mirror the Input 3 pane:
- Press IN 3.
The Input 3 window becomes active. Its outline becomes black and starts to flash. - Press MENU.
The OSD is displayed and Display is highlighted. - Press
The cursor moves to Screen. - Press ↓
Source is highlighted. - Press ENTER.
The Source Setup screen is displayed. - Check the Mirror V box.
- Click on the X to close the OSD.
6.2 The OSD Menu
The OSD menu provides access to the PIP-4 configuration. Using the OSD menu you can change the general display and individual input settings.
Table 3: PIP-4 Menu Items
| Menu Item | Submenu | Description |
| DISPLAY | Quad Full | Selects all 4 inputs to display |
| Source | Sets each input video pane's characteristics | |
| Zoom | Zooms the center of the selected pane to double size | |
| Overscan/Normal | Selects whether to display in normal or overscan mode | |
| UTILITY | Brightness | Sets the brightness of each input video signal |
| Contrast | Sets the contrast of each input video signal | |
| Sharpness | Sets the sharpness of each input video signal | |
| Hue | Sets the hue of each input video signal | |
| Color | Sets the color of each input video signal | |
| Store | Stores the current setting in one of the 10 presets | |
| Recall | Recalls one of the 10 presets | |
| Erase | Erases one of the 10 presets |
6.2.1 Display Submenu
Table 4 defines the Display submenu features.
Table 4: The Display Submenu Options
| Item | Parameter | Values |
| Full/Quad | Not applicable | Full/Quad |
| Source | Window | 0–3 |
| Source video | 0–3 | |
| Mirror V | On/Off | |
| Mirror H | On/Off | |
| Freeze | On/Off | |
| Blank | On/Off | |
| Zoom | Not applicable | On/Off |
| Overscan/Normal | Not applicable | Overscan/Normal |
6.2.2 Utility Submenu
Table 5 defines the utility submenu.
Table 5: The Utility Submenu Options
| Item | Parameter | Values |
| Brightness | Channel | 1–4 |
| Brightness | 1–255 | |
| Contrast | Channel | 1–4 |
| Contrast | 1–255 | |
| Sharpness | Channel | 1–4 |
| Sharpness | 0–15 | |
| Hue | Channel | 1–4 |
| Hue | 1–255 | |
| Color | Channel | 1–4 |
| Color | 1–255 |
6.3 Operating the PIP-4 Using the Mouse
The mouse control operates in the following manner:
- Left-click on a pane to select it
- Click and hold within a pane, and drag to move it
- Click and hold on the border of a pan, and drag to change the size and aspect ratio of the pane. Dragging the border of a pane over the opposite border of the pane flips the pane over (mirrors the pane)
- Right click anywhere to display the OSD Menu
- In the OSD Menu, left click to navigate the OSD and modify parameters
Note: If there is no mouse activity for 20 seconds, the OSD closes automatically.
Example
To change the brightness of Input 2:
- Left-click on the input 2 pane.
- Right-click to display the OSD.
- Use the mouse to navigate to Utility > Brightness.
- Left-click on Brightness.
The Brightness parameter setting is displayed. - Modify the setting to the required value using the Brightness left and right arrows.
- Click on the X to close the OSD.
Example
To vertically mirror the Input 3 pane:
- Right-click to display the OSD.
- Use the mouse to navigate to Display > Source.
- Click on the Source Video right arrow to select Input 3.
- Click Mirror V.
- Click on the X to close the OSD.
7 Operating the PIP-4 Remotely
You can operate your PIP-4 remotely via the following:
- IR remote controller
- Ethernet over a LAN
- RS-232 serial commands transmitted by a touch screen system, PC, or other serial controller
7.1 Operating the PIP-4 Using the PIP-4 Controller Software
The PIP-4 Control application ^1 is used to control the device via either RS-232 or Ethernet.
For details regarding connecting to the Ethernet port on the PIP-4, see Section 5.2.
The Controller software requires the following:
- Windows™ XP, Vista or Windows™ 7
• Microsoft .Net Framework version 3.5
To install the Controller software, download the software and run the setup file. After installation, running the Controller software for the first time displays a window similar to that shown in Figure 8.
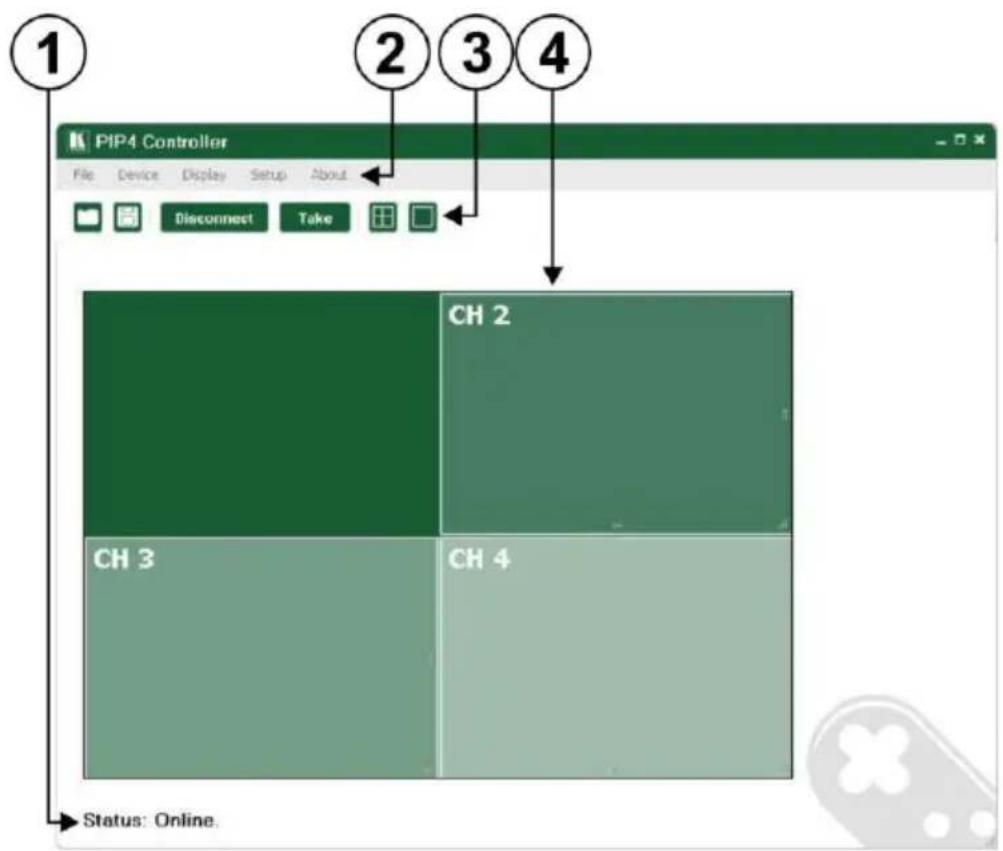
Figure 8: PIP-4 Controller Software Main Window
Table 6: PIP-4 Controller Software Features
| # | Feature | Function |
| 1 | Status Indicator | Indicates whether the controller software is online, online in Take mode, offline, or offline in Take mode |
| 2 | Menu Bar | Operate and configure the device using the Menu Bar options (s Section 7.1.1) |
| 3 | Quick Access Toolbar | Operate and configure the device using the quick access toolbar buttons (see Section 7.1.2) |
| 4 | Window Position | Modify window size and position by dragging and dropping individual windows (see Section 7.1.4) |
Note: Unless the device is in off-line mode (set by pressing the Take button), when a change is made on the device (for example, a different output is selected), the change is reflected almost immediately in the main window of the Controller Software. Similarly, if a change is made in the Controller Software, the change is reflected almost immediately on the device.
7.1.1 The Menu Bar
The menu bar options are shown in Table 7.
Table 7: Menu Bar Options
| Menu Bar Options | Sub Menu | Description |
| FILE | Open | Open an existing configuration |
| Save | Save the current configuration | |
| Exit | Exit the PIP-4 Controller software | |
| DEVICE | Connect/Disconnect | Connect or disconnect to the device (see Section 7.1.3) |
| Take/Update | Press Take to put the device in off-line mode. Press Update to implement waiting changes and return the device to on-line mode (see Section 7.1.7) | |
| Device Details | Retrieve, display and edit the device details, such as, model, unit name, version, etc. See Section 7.1.10 | |
| Firmware Update | Update the device firmware | |
| DISPLAY | Quad | Set the screen to display the quad 4-window configuratio |
| Full | Set the screen to display the single-window configuration | |
| Zoom | Enlarges and displays a movable region as a full screen | |
| Refresh | Retrieve all information from the device | |
| SETUP | Effects | Sets the following signal characteristics for each input: Brightness, Contrast, Sharpness, Hue and Color |
| Source | Sets the following source characteristics: Select Channel, Connect to Video Source, Mirror V, Mirro H, Freeze and Blank | |
| Turn Overscan On | Turns on overscan | |
| Store | Stores the current video configuration in one of 10 preset memories | |
| Recall | Recalls the video configuration from one of 10 preset memories | |
| Erase | Erases the video configuration from one of the 10 preset memories | |
| ABOUT | Displays the Step-in Software and Kramer company details | |
7.1.2 The Quick Access Toolbar
The Quick Access Toolbar buttons are shown in Figure 9 and described in Table 8.

Figure 9: Quick Access Toolbar
Table 8: Quick Access Toolbar Options
| Feature | Description |
 | Open an existing configuration |
 | Save the current configuration |
  | Connects to and disconnects from the device (see Section 7.1.3) |
  | Press Take to enable multiple off-line changes to be made Press Update to implement the changes (see Section 7.1.7) |
 | Set the screen to display the quad 4-window configuration |
 | Set the screen to display the single-window configuration |
7.1.3 Connecting to the Device
To connect to the device:
- Click the Connect button.
The window shown in Figure 10 appears.

Figure 10: Connect Window
-
Select the required method of connection option button:
-
For Ethernet, enter the IP address and Port number of the device. To set the default IP address and Port number, press the Default button.
- For a serial connection, select the required Com port from the drop-down list.
-
For a USB connection ^1 , select the required USB device from the drop-down menu.
If necessary, click Refresh Ports to update the USB port list. -
Click Connect.
If the connection is successful, the main window shown in Figure 8 appears. If the connection is not successful, a Timeout error message appears.
7.1.4 Windows Position
The windows can be manually manipulated in size and position.

Figure 11: Window Manipulation
To change the size of a window:
- Click, hold and drag the required window handle at the right hand side, bottom, or bottom right hand corner of the window
To change the position of a window:
- Click, hold and drag anywhere in the window
7.1.5 Connection Status
The connection status can be one of the following states:
- Online—the device is connected and being updated in real-time by the software
- Online, in take mode (not updating device)—the device is connected but changes are only implemented when the Update button is pressed
- Offline—in Take mode
- Offline—the device is not connected
7.1.6 Changing the Layer Order
You can change the order in which the windows are arranged simply by clicking on a window to raise it to the top.
7.1.7 Implementing Multiple Actions At Once
To implement multiple actions at once:
- Press the Take button to put the device in off-line mode.
The button changes to the Update button and the device is in off-line mode. - Perform the required actions, such as, switching and layer order changes.
- Press the Update button.
The button changes to the Take button and all changes are implemented.
7.1.8 Changing the Video Characteristics of a Channel
To change the video characteristics of a channel:
- Click Setup > Effects.
The Display Effects window appears as shown in Figure 12.

Figure 12: Windows Setup Window
-
Click and hold on the slider, dragging it to modify the required characteristic. For fine control of the slider, use the arrow buttons on your keyboard.
-
Click Close. The channel video characteristic is changed.
7.1.9 Upgrading the Firmware
To upgrade the firmware:
- Download the latest firmware file from http:www.kramerelectronics.com.
- Click Device > Firmware Upgrade.
- Browse to the firmware file that you downloaded.
- Click Open.
The current firmware version is checked and if this is older than the downloaded firmware, the downloaded firmware is installed.
Note: Do not interrupt the uploading process or the device may be damaged.
- Ignore the reset message and when the process is complete, reset the device by disconnecting the power and then reconnecting it.
7.1.10 Displaying the Device Details
To display the device details:
- Click Device > Device Details.
The device details are displayed, such as, model and serial number as shown in Figure 13.

Figure 13: Device Details
7.1.11 Setting the IP Network Parameters
To set the IP network parameters:
- Click Device > Device Details.
- Under Connectivity, edit the required parameter(s).
- Click Set Value.
A confirmation message appears. - Click OK.
The parameter is set. - Reboot the device.
7.1.12 Displaying the PIP-4 Software Version Number
To display the PIP-4 Software version number:
- From the Menu bar, click About.
The About PIP-4 Controller window appears as shown in Figure 14.
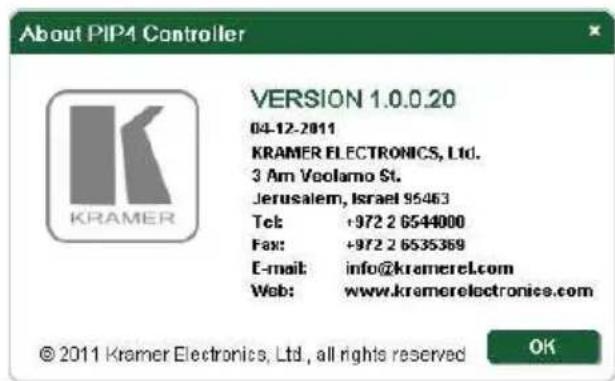
Figure 14: About PIP-4 Controller Window
- Click OK to close the window.
8 Resetting the PIP-4 Parameters to Factory Defaults
For a list of the factory default parameters see Section 11.
To reset all parameters to factory default values:
- Disconnect the power from the device.
- Press and hold the Reset button on the rear panel of the unit.
- While holding the Reset button, reconnect the power to the device.
- Wait until the video pane(s) are displayed. Release the Reset button. The parameters are reset to factory default values.
9 Using the PIP-4 Remote Controller
This section defines the PIP-4 remote controller.

| Number | Function |
| 1 | Video output ON |
| 2 | Video output OFF |
| 3 | Channel/window selection (buttons 1 through 4) |
| 4 | Menu |
| 5 | Up |
| 6 | Left / - |
| 7 | Enter |
| 8 | Down |
| 9 | Move |
| 10 | Size |
| 11 | Distort |
| 12 | Quad |
| 13 | Full |
| 14 | Escape |
| 15 | Right / + |
10 Technical Specifications
Table 9 lists the technical specifications ^1 of the PIP-4, 4 input Picture-in-Picture Inserter.
Table 9: Technical Specifications ^2 of the PIP-4, 4 input Picture-in-Picture Inserter
| INPUTS: | 4 composite video 1Vpp @75Ω on BNC connectors |
| OUTPUTS: | 1 s-Video 1Vpp, 0.3Vpp @75Ω on a 4-pin s-Video connector1 composite video 1Vpp @75Ω on a BNC connector |
| DIGITAL RESOLUTION: | 10 bit |
| S/N RATIO: | 60db (weighted) |
| YC SEPARATION: | Adaptive 4-line digital comb filters |
| MEMORY: | Non-volatile memory for storage of 2 setups |
| CONTROL: | Front-panel, OSD, RS-232 and Ethernet |
| POWER SOURCE: | 5V DC, 450mA |
| OPERATING TEMPERATURE: | 0° to +55°C (32° to 131°F) |
| STORAGE TEMPERATURE | -45° to +72°C (-49° to 162°F) |
| HUMIDITY: | 10% to 90%, RHL non-condensing |
| DIMENSIONS: | 21.5cm x 17.7cm x 4.4cm (8.5" x 7" x 1.7") W, D, H |
| WEIGHT: | 0.8kg (1.76lbs) approx. |
| ACCESSORIES: | Power Supply, RC-4 Infrared Remote Control |
| OPTIONS: | RK-1 rack adapter |
11 Default Communication Parameters
Table 10: Default Communication Parameters
| Protocol 3000 (Default) | ||
| Baud Rate: | 115,200 | |
| Data Bits: | 8 | |
| Stop Bits: | 1 | |
| Parity: | None | |
| Command Format: | ASCII | |
| Example (Output 1 to Input 1): | #AV 1>1 | |
| Ethernet | ||
| Default Settings | Reset Settings | |
| IP Address: 192.168.1.39Subnet Mask:Gateway: | Power cycle the unit while holding in the Factory Res button, located on the rear panel of the unit | |
| TCP Port #: 5000 | ||
| UDP Port #: 50000 | ||
12 Communication Protocol 3000
The Protocol 3000 ^d is an RS-232/Ethernet communication protocol that enables you to control the device from any standard terminal software (for example, Windows® HyperTerminal Application).
12.1 Protocol 3000 Syntax
Host message format:
| Start | Address (optional) | Body | Delimiter |
| # | Destination_id@ | message | CR |
Simple command (commands string with only one command without addressing):
| start | body | delimiter |
| # | Command SP Parameter_1,Parameter_2,... | CR |
Commands string (formal syntax with commands concatenation and addressing):
# Address@ Command_1 Parameter1_1,Parameter1_2,... |Command_2 Parameter2_1,Parameter2_2,... |Command_3 Parameter3_1,Parameter3_2,... |...CR
1 VER-0.1
Device message format:
| Start | Address (optional) | Body | Delimiter |
| ~ | Sender_id@ | message | CR LF |
Device long response (Echoing command):
| Start | Address (optional) | Body | Delimiter |
| ~ | Sender_id@ | command SP [param1 ,param2 ...] result | CR LF |
CR = Carriage return (ASCII 13 = 0x0D)
= Line feed (ASCII 10 = 0x0A)
= Space (ASCII 32 = 0x20)
12.2 Command Parts Details
Command:
Sequence of ASCII letters ('A'-'Z', 'a'-'z' and '-'').
Command will separate from parameters with at least single space.
Parameters:
Sequence of Alfa-Numeric ASCII chars ('0'-9', 'A'-Z', 'a'-z' and some special chars for specific commands), parameters will be separated by commas.
Message string:
Every command must to be entered as part of message string that begin with message starting char and end with message closing char, note that string can contain more then one command separated by pipe (") char.
Message starting char:
'#' for host command\query.
'\~' for machine response.
Device address (Optional, for Knet):
Knet Device ID follow by '@' char.
Query sign = '?' , will follow after some commands to define query request.
Message closing char =
Host messages - Carriage Return (ASCII 13), will be referred to by CR in this document.
Machine messages - Carriage Return (ASCII 13) + Line-Feed (ASCII 10), will be referred to by CRLF.
Spaces between parameters or command parts will be ignored.
Commands chain separator char:
When message string contains more than one command, commands will be separated by pipe ( "|").
Commands entering:
If terminal software used to connect over serial \ ethernet \ USB port, that possible to directly enter all commands characters (CR will be entered by Enter key, that key send also LF, but this char will be ignored by commands parser).
Sending commands from some controllers (like Crestron) require coding some characters in special form (like \X##). Anyway, there is a way to enter all ASCII characters, so it is possible to send all commands also from controller.
(Similar way can use for URL \ Telnet support that maybe will be added in future).
Commands forms:
Some commands have short name syntax beside the full name to allow faster typing, response is always in long syntax.
Commands chaining:
It is possible to enter multiple commands in same string by "|" char (pipe).
In this case the message starting char and the message closing char will be entered just one time, in the string beginning and at the end.
All the commands in string will not execute until the closing char will be entered.
Separate response will be sent for every command in the chain.
Input string max length:
64 characters.
Backward support:

Design note: transparent supporting for protocol 2000 will be implemented by switch protocol command from protocol 3000 to protocol 2000, in protocol 2000 there is already such a command to switch protocol to ASCII protocol (#56 : H38 H80 H83 H81).
Table 11: Instruction Codes for Protocol 3000
| Result Codes | |
| Syntax | |
| No error. Command running succeeded | COMMAND PARAMETER$ OK |
| Protocol Errors | |
| Syntax Error | ERR001 |
| Command not available for this device | ERR002 |
| Parameter is out of range | ERR003 |
| Unauthorized access (running command without the match login). | ERR004 |
| Help commands | ||
| Command | Syntax | Response |
| Protocol Handshaking | #CR | ~OK CRLF |
| Device initiated messages | |
| Command | Syntax |
| Start message | ~Protocol Start |
| Set/Get coordinate | #CRDTwin_num,x0,y0,x1,y1(win_num = 1-4; x0,y0 - top-left coordinate; x1,y1 - bottom-right coordinate)#CRDT?win_num(x0,x1 <=180; y0,y1 <=144(for PAL); y0,y1 <= 120(for NTSC))(win_num = 1-4 or 0(for output window)) |
| Set/Get Brightness / Contrast / Sharpness / Hue / Color | #BRIGHTNESSinp_num,vol(vol = 1-255)#BRIGHTNESS?inp_num#CONTRASTinp_num,vol(vol = 1-255)#CONTRAST?inp_num#SHARPNESSinp_num,vol(vol = 0-15)#SHARPNESS?inp_num#HUEinp_num,vol(vol = 1-255)#HUE?inp_num#COLORinp_num,vol(vol = 1-255)#COLOR?inp_num |
| Quad / Full | #QUAD#FULLwin_num |
| Set / Get Active window | #WINwin_num#WIN? |
| Set / Get window source | #SRC-VIDwin_num,in_num#SRC-VID?win_num |
| Set / Get Vertical Mirror Status / Horizontal Mirror Status / Freeze status Blank Status | #SRC-VMIRwin_num,status(status = 1 - ON, 0 - OFF)#SRC-VMIR?win_num#SRC-HMIRwin_num,status(status = 1 - ON, 0 - OFF)#SRC-HMIR?win_num#SRC-FREEZEwin_num,status(status = 1 - ON, 0 - OFF)#SRC-FREEZE?win_num#SRC-BLANKwin_num,status(status = 1 - ON, 0 - OFF) |
Communication Protocol 3000
| #SRC-BLANK? win_num | |
| Set / Get Normal / Overscan mode | #MODE mode (mode=0--normal, 1--overscan) #MODE? |
| Zoom On / Off | #ZOOM zoom_mode, X, Y (zoom_mode=1-ON,0-OFF; X=horizontal left, Y=vertical top) |
| Examples | |
| Function | Command Syntax |
| Set coordinates for window 2. Top left (60,0) and bottom right (150,80) | #CRDT 2, 60, 0, 150, 80 CR |
| Set brightness of input 3 to 140 | #BRIGHTNESS 3, 140 CR |
| Get contrast for input 4Response: Contrast of input 4 is 125 | #CONTRAST? 4 CR~CONTRAST 4, 125 CRLF |
| Freeze window 2 | #SRC-FREEZE 2, 1 CR |
| Preset commands | ||
| Command | Syntax | Response |
| Store current connections to preset | #PRST-STO PRESET CR Short form: #PSTO PRESET CR | ~PRST-STO PRESET RESULT CRLF |
| Recall saved preset | #PRST-RCL PRESET CR Short form: #PRCL PRESET CR | ~PRST-RCL PRESET RESULT CRLF |
| Delete saved preset | #PRST-DEL PRESET CR Short form: #PDEL PRESET CR | ~PRST-DEL PRESET RESULT CRLF |
| Read saved presets list | #PRST-LST? CR Short form: #PLST? CR | ~PRST-LST PRESET, PRESET, ... CRLF |
| Parameters Description: PRESET = Preset number = 1 - 10 OUT = Output in preset to show for, '*' for all. | ||
| Examples: | ||
| Store current Audio & Video connections to preset 5 | #PRST-STR 5CR | ~PRST-STR 5 OK CRLF |
| Recall Audio & Video connections from preset 3 | #PRCL 3CR | ~PRST-RCL 3 OK CRLF |
| Machine info commands | ||
| Command | Syntax | Response |
| * Time settings commands require admin authorization | ||
| Read in\outs count | #INFO-IO? CR | ~INFO-IO: IN INPUTS COUNT, OUT OUTPUTS COUNT CRLF |
| Read max presets count | #INFO-PRST? CR | ~INFO-PRST: VID PRESET_VIDEO_COUNT, AUD PRESET_AUDIO_COUNT CRLF |
| Reset configuration to factory default | #FACTORY CR | ~FACTORY RESULT CRLF |
| Identification commands | ||
| Command | Syntax | Response |
| Protocol Handshaking | #CR | ~OK CRLF |
| Read device model | #MODEL? CR | ~MODEL MACHINE_MODEL CRLF |
| Read device serial number | #SN? CR | ~SN SERIAL_NUMBER CRLF |
| Read device firmware version | #VERSION? CR | ~VERSION MAJOR MINOR BUILD REVISION CRLF |
| Set machine name | #NAME MACHINE_NAME CR | ~NAME MACHINE_NAME RESULT CRLF |
| Read machine name | #NAME? CR | ~NAME MACHINE_NAME CRLF |
| Reset machine name to factory default* | #NAME-RST CR | ~NAME-RST MACHINE_FACTORY_NAME RESULT CRLF |
| *Note: machine name not equal to model name. This name relevance for site viewer identification of specific machine or for network using (with DNS feature on).MACHINE NAME = Up to 14 Alfa-Numeric chars.*Machine factory name = Model name + last 4 digits from serial number. | ||
| Network settings commands | ||
| Set IP Address | #NET-IP IP_ADDRESS CR#NTIP CR | ~NET-IP IP_ADDRESS RESULT CRLF |
| Read IP Address | #NET-IP? CR#NTIP? CR | ~NET-IP IP_ADDRESS CRLF |
| Read MAC Address | #NET-MAC? CR#NTMC CR | ~NET-MAC MAC ADDRESCRLF CRLF |
| Set subnet mask | #NET-MASK SUBNET_MASK CR#NTMSK CR | ~NET-MASK SUBNET_MASK RESULT CRLF |
| Read subnet mask | #NET-MASK? CR#NTMSK? CR | ~NET-MASK SUBNET_MASK CRLF |
| Set gateway address | #NET-GATE GATEWAY_ADDRESS#NTGT | ~NET-GATE GATEWAY_ADDRESS RESULT |
| Read subnet mask | #NET-GATE?#NTGT? | ~NET-GATE GATEWAY ADDRES CRLF |
| Set DHCP mode | #NET-DHCP DHCP_MODE CR#NTDH CR | ~NET-DHCP DHCP_MODE RESULT CRLF |
| Read subnet mask | #NET-DHCP? CR#NTDH? CR | ~NET-DHCP DHCP_MODE CRLF |
| DHCP_MODE =0 – Don't use DHCP (Use IP set by factory or IP set command).1 – Try to use DHCP, if unavailable use IP as above. | ||
| Change protocol ethernet port | #ETH-PORT PROTOCOL , PORT CR#ETHP CR | ~ETH-PORT PROTOCOL ,PORT RESULT CRLF |
| Read protocol ethernet port | #ETH-PORT? PROTOCOL CR#ETHP? CR | ~ETH-PORT PROTOCOL ,PORT CRLF |
| PROTOCOL = TCP / UDP (transport layer protocol)PORT = ethernet port to enter protocol 3000 commands.1-65535 = User defined port0 - reset port to factory default (50000 for UDP, 5000 for TCP) | ||
LIMITED WARRANTY
The warranty obligations of Kramer Electronics for this product are limited to the terms set forth below:
What is Covered
This limited warranty covers defects in materials and workmanship in this product.
What is Not Covered
This limited warranty does not cover any damage, deterioration or malfunction resulting from any alteration, modification, improper or unreasonable use or maintenance, misuse, abuse, accident, neglect, exposure to excess moisture, fire, improper packing and shipping (such claims must be presented to the carrier), lightning, power surges, or other acts of nature. This limited warranty does not cover any damage, deterioration or malfunction resulting from the installation or removal of this product from any installation, any unauthorized tampering with this product, any repairs attempted by anyone unauthorized by Kramer Electronics to make such repairs, or any other cause which does not relate directly to a defect in materials and/or workmanship of this product. This limited warranty does not cover cartons, equipment enclosures, cables or accessories used in conjunction with this product.
Without limiting any other exclusion herein, Kramer Electronics does not warrant that the product covered hereby, including, without limitation, the technology and/or integrated circuit(s) included in the product, will not become obsolete or that such items are or will remain compatible with any other product or technology with which the product may be used.
How Long Does this Coverage Last
Seven years as of this printing; please check our Web site for the most current and accurate warranty information.
Who is Covered
Only the original purchaser of this product is covered under this limited warranty. This limited warranty is not transferable to subsequent purchasers or owners of this product.
What Kramer Electronics will do
Kramer Electronics will, at its sole option, provide one of the following three remedies to whatever extent it shall deem necessary to satisfy a proper claim under this limited warranty:
- Elect to repair or facilitate the repair of any defective parts within a reasonable period of time, free of any charge for the necessary parts and labor to complete the repair and restore this product to its proper operating condition. Kramer Electronics will also pay the shipping costs necessary to return this product once the repair is complete.
- Replace this product with a direct replacement or with a similar product deemed by Kramer Electronics to perform substantially the same function as the original product.
- Issue a refund of the original purchase price less depreciation to be determined based on the age of the product at the time remedy is sought under this limited warranty.
What Kramer Electronics will not do Under This Limited Warranty
If this product is returned to Kramer Electronics or the authorized dealer from which it was purchased or any other party authorized to repair Kramer Electronics products, this product must be insured during shipment, with the insurance and shipping charges prepaid by you. If this product is returned uninsured, you assume all risks of loss or damage during shipment. Kramer Electronics will not be responsible for any costs related to the removal or re-installation of this product from or into any installation. Kramer Electronics will not be responsible for any costs related to any setting up this product, any adjustment of user controls or any programming required for a specific installation of this product.
How to Obtain a Remedy under this Limited Warranty
To obtain a remedy under this limited warranty, you must contact either the authorized Kramer Electronics reseller from whom you purchased this product or the Kramer Electronics office nearest you. For a list of authorized Kramer Electronics resellers and/or Kramer Electronics authorized service providers, please visit our web site at www.kramerelectronics.com or contact the Kramer Electronics office nearest you.
In order to pursue any remedy under this limited warranty, you must possess an original, dated receipt as proof of purchase from an authorized Kramer Electronics reseller. If this product is returned under this limited warranty, a return authorization number, obtained from Kramer Electronics, will be required. You may also be directed to an authorized reseller or a person authorized by Kramer Electronics to repair the product.
If it is decided that this product should be returned directly to Kramer Electronics, this product should be properly packed, preferably in the original carton, for shipping. Cartons not bearing a return authorization number will be refused.
Limitation on Liability
THE MAXIMUM LIABILITY OF KRAMER ELECTRONICS UNDER THIS LIMITED WARRANTY SHALL NOT EXCEED THE ACTUAL PURCHASE PRICE PAID FOR THE PRODUCT. TO THE MAXIMUM EXTENT PERMITTED BY LAW, KRAMER ELECTRONICS IS NOT RESPONSIBLE FOR DIRECT, SPECIAL, INCIDENTAL OR CONSEQUENTIAL DAMAGES RESULTING FROM ANY BREACH OF WARRANTY OR CONDITION, OR UNDER ANY OTHER LEGAL THEORY. Some countries, districts or states do not allow the exclusion or limitation of relief, special, incidental, consequential or indirect damages, or the limitation of liability to specified amounts, so the above limitations or exclusions may not apply to you.
Exclusive Remedy
TO THE MAXIMUM EXTENT PERMITTED BY LAW, THIS LIMITED WARRANTY AND THE REMEDIES SET FORTH ABOVE ARE EXCLUSIVE AND IN LIEU OF ALL OTHER WARRANTIES, REMEDIES AND CONDITIONS, WHETHER ORAL OR WRITTEN, EXPRESS OR IMPLIED. TO THE MAXIMUM EXTENT PERMITTED BY LAW, KRAMER ELECTRONICS SPECIFICALLY DISCLAIMS ANY AND ALL IMPLIED WARRANTIES, INCLUDING, WITHOUT LIMITATION, WARRANTIES OF MERCHANTABILITY AND FITNESS FOR A PARTICULAR PURPOSE. IF KRAMER ELECTRONICS CANNOT LAWFULLY DISCLAIM OR EXCLUDE IMPLIED WARRANTIES UNDER APPLICABLE LAW, THEN ALL IMPLIED WARRANTIES COVERING THIS PRODUCT, INCLUDING WARRANTIES OF MERCHANTABILITY AND FITNESS FOR A PARTICULAR PURPOSE, SHALL APPLY TO THIS PRODUCT AS PROVIDED UNDER APPLICABLE LAW.
IF ANY PRODUCT TO WHICH THIS LIMITED WARRANTY APPLIES IS A "CONSUMER PRODUCT" UNDER THE MAGNUSON-MOSS WARRANTY ACT (15 U.S.C.A. §2301, ET SEQ.) OR OTHER APPLICABLE LAW, THE FOREGOING DISCLAIMER OF IMPLIED WARRANTIES SHALL NOT APPLY TO YOU, AND ALL IMPLIED WARRANTIES ON THIS PRODUCT, INCLUDING WARRANTIES OF MERCHANTABILITY AND FITNESS FOR THE PARTICULAR PURPOSE, SHALL APPLY AS PROVIDED UNDER APPLICABLE LAW.
Other Conditions
This limited warranty gives you specific legal rights, and you may have other rights which vary from country to country or state to state.
This limited warranty is void if (i) the label bearing the serial number of this product has been removed or defaced, (ii) the product is not distributed by Kramer Electronics or (iii) this product is not purchased from an authorized Kramer Electronics reseller. If you are unsure whether a reseller is an authorized Kramer Electronics reseller, please visit our Web site at www.kramerelectronics.com or contact a Kramer Electronics office from the list at the end of this document.
Your rights under this limited warranty are not diminished if you do not complete and return the product registration form or complete and submit the online product registration form. Kramer Electronics thanks you for purchasing a Kramer Electronics product. We hope it will give you years of satisfaction.
For the latest information on our products and a list of Kramer distributors, visit www.kramerelectronics.com where updates to this user manual may be found. We welcome your questions, comments and feedback.

Caution
Safety Warning:
Disconnect the unit from the power supply before opening/servicing.

CE


- Kramer Electronics, Ltd.
- USER MANUAL
- Contents
- Figures
- Tables
- Introduction
- Getting Started
- Achieving the Best Performance
- Safety Instructions
- Recycling Kramer Products
- Quick Start
- Step 1: Mount the machine - see Section 5
- Step 3: Turn the power on
- Overview
- Recommendations for best performance
- Defining the PIP-4, 4 input Picture-in-Picture Inserter
- Connecting the PIP-4, 4 input Picture-in-Picture Inserter
- To connect 1 the PIP-4 as illustrated in the example in Figure 3:
- Connecting a PC to the PIP-4 via RS-232 for Remote Operation
- Connecting a PC to the PIP-4 via Ethernet for Remote Operation
- Connecting the Ethernet Port Directly to a PC
- To connect directly to your PC and to configure it:
- Connecting the ETHERNET Port via a Network Hub
- Operating the PIP-4 Locally
- Operating the PIP-4 Using the Front Panel Buttons
- Manipulating Video Panes
- Example
- To increase the size of the Input 3 window:
- Navigating the OSD Menu
- To vertically mirror the Input 3 pane:
- The OSD Menu
- Display Submenu
- Utility Submenu
- Operating the PIP-4 Using the Mouse
- To change the brightness of Input 2:
- Operating the PIP-4 Remotely
- Operating the PIP-4 Using the PIP-4 Controller Software
- The Menu Bar
- The Quick Access Toolbar
- Connecting to the Device
- To connect to the device:
- Windows Position
- Connection Status
- Changing the Layer Order
- Implementing Multiple Actions At Once
- To implement multiple actions at once:
- Changing the Video Characteristics of a Channel
- To change the video characteristics of a channel:
- Upgrading the Firmware
- To upgrade the firmware:
- Displaying the Device Details
- To display the device details:
- Setting the IP Network Parameters
- To set the IP network parameters:
- Displaying the PIP-4 Software Version Number
- To display the PIP-4 Software version number:
- Resetting the PIP-4 Parameters to Factory Defaults
- To reset all parameters to factory default values:
- Using the PIP-4 Remote Controller
- Technical Specifications
- Default Communication Parameters
- Communication Protocol 3000
- Protocol 3000 Syntax
- Command Parts Details
- Command:
- Parameters:
- Message string:
- Message starting char:
- Commands chain separator char:
- Commands entering:
- Commands forms:
- Commands chaining:
- Input string max length:
- LIMITED WARRANTY
- What is Covered
- What is Not Covered
- How Long Does this Coverage Last
- Who is Covered
- What Kramer Electronics will do
- What Kramer Electronics will not do Under This Limited Warranty
- How to Obtain a Remedy under this Limited Warranty
- Limitation on Liability
- Exclusive Remedy
- Other Conditions
- Safety Warning:
Brand : Kramer
Model : PIP-4
Category : Audiovisual Equipment