
Acoustic Attack - Guitar effects pedal Hartke - Free user manual and instructions
Find the device manual for free Acoustic Attack Hartke in PDF.


| Product Type | Acoustic Instrument |
| Brand | Hartke |
| Model | Acoustic Attack |
| Dimensions (HxWxD) | 40 x 15 x 5 inches |
| Weight | 5 lbs (approx. 2.3 kg) |
| Body Material | Laminated wood with spruce top |
| Neck Material | Mahogany |
| Fingerboard | Rosewood |
| Number of Frets | 20 |
| Scale Length | 25.5 inches |
| Pickup | Passive undersaddle transducer |
| Controls | Volume, Tone |
| Output Jack | 1/4 inch mono |
| String Material | Phosphor bronze |
| Recommended String Gauge | Light (.012-.053) |
| Power Source | None (passive) or optional 9V battery for active preamp |
| Included Accessories | Hex key, strap buttons |
| Maintenance | Wipe with dry cloth; change strings periodically |
| Safety Precautions | Avoid extreme temperatures and humidity; keep away from liquids |
Frequently Asked Questions - Acoustic Attack Hartke
User questions about Acoustic Attack Hartke
0 question about this device. Answer the ones you know or ask your own.
Ask a new question about this device
Download the instructions for your Guitar effects pedal in PDF format for free! Find your manual Acoustic Attack - Hartke and take your electronic device back in hand. On this page are published all the documents necessary for the use of your device. Acoustic Attack by Hartke.
USER MANUAL Acoustic Attack Hartke
Printed June, 2008 v1.1
Hartke
45 Gilpin Avenue
Hauppauge, New York 11788-8816
Phone: 1-800-3-SAMSON (1-800-372-6766)
Fax: 631-784-2201
www.hartke.com
Table Of Contents
Acoustic Attack Introduction And Features 2
Introduction 2
Acoustic Attack Features 2
Acoustic Attack Front Panel Layout 3
Acoustic Attack Side Panel Layout 4
Operating The Acoustic Attack 5
Setting Up The Acoustic Attack 5
Power The Acoustic Attack 5
Phantom On - Off / Ground Connect / Lift Switch 5
Using Phantom Power 5
Installing The Battery 6
Using An Ac/dc Power Adapter 6
Control Knobs And Switches 6
Using The Equalizer 6
Acoustic Attack System Diagrams 8
Acoustic Attack Typical Set-ups 8
Direct Insertion Of An Instrument Into A Pa System 8
Using An External Effects Processor For Recording 9
Acoustic Attack Introduction and Features
Introduction
Congratulations on your purchase of the Acoustic Attack acoustic pre-amp/ direct box by Hartke! The Acoustic Attack is a high quality preamplifier designed specifically for acoustic instruments. The Acoustic Attack is a perfect solution for applications where you need to amplify or record an acoustic guitar, mandolin or even violin. Of course, you players of electric guitars with onboard piezo acoustic pick-ups can really enhance your set up by adding the Acoustic Attack to your arsenal of stomp boxes. The active three band equalizer with tube pre emulation will warm up any amplifier or recording. Plus with the MIX control you can dial-up just the right amount of tone enhancement that matches the personality of your sound. The convenient PAD switch makes the Acoustic Attack compatible with just about any PA system. The Acoustic Attack has extensive input and output connectors including 1/4-inch inputs, balanced XLR Direct Output and 1/4-inch Parallel outputs, providing maximum flexibility for patching in to amps, mixer and recorders. Rest assured, the Acoustic Attack will provide high quality and reliable performance thanks to its solid Hartke build construction. That's why the Acoustic Attack is perfectly at home in the studio or on the road. In fact, the aluminum extrusion and steel chassis ensure solid performance from night-to-night and venue-to-venue. Whether you are recording or playing live, the Acoustic Attack by Hartke will give you the sound you've been looking for.
Acoustic Attack Features
• Acoustic Guitar Pre-amp / Direct Box.
- Tube Pre Emulation Circuit warms up any amp or recording.
• Active 3-Band Equalizer.
- Sweepable Mid-Range frequency control with "notch" cut helps reduce feedback.
- PAD switch provides clean input for acoustics with Active or Passive pick-ups.
- Convenient 1/4-inch and XLR Outputs.
- Rugged aluminum extrusion construction.
• Three year extended warranty.
Acoustic Attack Front Panel Layout

1 OUTPUT - Control knob used to adjust the overall Output volume.
2 BASS - Control knob used to boost or cut the low frequencies.
3 MID – Used to boost or cut the midrange frequencies.
4 TREBLE - Control knob used to boost or cut the high frequencies.
5 FREQ – Used to adjust the center frequency of the MID control.
6 ON/OFF - Footswitch used to engage the effects.
7 ON/OFF LED – RED LED, which illuminates to indicate that the OUTPUT, BASS, MID, TREBLE and MIX, plus the Tube Pre Emulation functions are engaged.
8 MIX – Control knob used to adjust the blend between the dry signal and effected signal.
Acoustic Attack Side Panel Layout

A Power Inlet – Power inlet for connecting the optional AD006 9 Volt power adapter.
B PHANTOM ON / GROUND LIFT switch - Used to switch between phantom power or battery operation, and/or Ground Lift/Connect.
C OUTPUT - 1/4-inch jack carrying the line-level output signal, either affected or un-affected, depending on the ON/OFF switch.
D PAD switch – Push switch used to cut the level sent to the Direct Output by 20 dB.
E DIRECT OUTPUT - XLR balanced output connector carrying the mic-level output signal, either affected or un-affected, depending on the ON/OFF switch.

F DIRECT INPUT - Standard 1/4-inch input jack for connecting an additional signal, like from another effect, that bypasses the processing, but can be mixed with the signal connected to the Acoustic Attack's INPUT.
G INPUT – Standard 1/4-inch input jack for connecting a passive or active Acoustic.
Operating the Acoustic Attack
Setting Up the Acoustic Attack
The basic procedure for setting up and using your Acoustic Attack is simple and takes only a few minutes. Remove all packing materials (save them in case of need for future service).
Power the Acoustic Attack
You can power the Acoustic Attack with a standard 9-volt battery, a standard DC power adapter, or by applying standard 48-volt phantom power. You can use which ever power source is most convenient, however, you should keep in mind that there are, from time-to-time, trade-offs. You may have a well grounded live sound or studio set-up that will not exhibit ground loop problems, but when you are on the road or in other studios you can have ground loops. Because of possible ground loops, which are just a part of live sound and recording, you may want to consider using a battery to keep the grounds from the Acoustic Attack isolated from the grounds of the rest of your gear. You can check the phantom or AC operation with a quick sound check to listen for any buzzing. If there is no buzz you have a well-grounded system. If your hear buzzing, go to battery operation. Hey, life's a trade off, so is powering your audio gear.
Phantom On - Off / Ground Connect / Lift Switch
The PHANTOM ON -OFF / GROUND CONNECT / LIFT SWITCH is a latching switch that provides two functions at the same time. In the up position, the switch connects Ground on the XLR cable, and by doing that, the switch also allows the unit to be powered by a phantom power supply. When the switch is set to the down position, the Acoustic Attack is set to operate on phantom power. When the switch is in the up or out position, the ground is disconnected, and the phantom power operation is disabled, therefore the Acoustic Attack must be operated by battery.
Using Phantom Power
If you are connecting to a mixer that has phantom power, the Acoustic Attack can be powered by connecting a standard mic cable to the Direct Output. Be sure to check that the mixer's phantom power switch is set to the "on" position. Then, make sure that the PHANTOM ON - OFF /GROUND CONNECT / LIFT SWITCH is out so that phantom power is enabled.
WARNING: To avoid a possible loud pop that can damage speakers, be sure to mute your speaker system and Acoustic amp before un-plugging any mic cable with phantom power.
Operating the Acoustic Attack
Power the Acoustic Attack - continued Installing the Battery
Install a standard 9-volt battery by removing the battery door and attaching the battery to the terminal connector. Fit the battery into the compartment and reinstall the battery door.
Using an AC/DC Power Adapter
You can power the Acoustic Attack using the optional AC006 power supply available from your local Hartke dealer. Simply plug the power adapter into the DC inlet and then, plug the power adapter into a standard 110-volt power outlet.
Control Knobs and Switches
Before you get started you should get familiar with the various control knobs and switches on the Acoustic Attack and how they operate. The BASS, MID and TREBLE, as well as the MIX controls, are activated by the ON/OFF switch and are engaged when the red LED is illuminated.
Using the Equalizer
The BASS, MID and TREBLE knobs are used to adjust the overall tone of your acoustic guitar. These equalizer controls are active when the footswitch is set to "ON" indicated by the illuminated red LED. When the equalizer controls are set to the "5" position they are set flat and have no effect on the sound. If you want to add more lows or highs to your sound, move the BASS or TREBLE control knobs up, and if you want less low or highs move the respective knob down.
The MID control works in conjunction with the FREQ control, which selects the mid-range center frequency. You can sweep the mid range control from 170 Hz to 4 kHz. Use your ears and experiment with these knobs to get the sound that's best for your music. A good place to start is with the BASS, MID and TREBLE control set to "5" and then make small changes and listen to the difference.

Operating the Acoustic Attack
Using the MID control to Reduce Feedback
A good use of the MID control is to help reduce feedback. To do this, turn the MID control all the way down, (fully counter clock wise), raise the OUTPUT control or the volume on your amp right to right at the feedback level, then use the FREQ control and slowly sweep through the frequencies until the feedback goes way.

Using the MIX control
The Acoustic Attack incorporates a sweet sounding Tube Pre Emulation circuit designed to add the richness and overtones of a classic studio tube mic preamplifier. The MIX control is used to set the balance between your original clean signal with the Active Equalizer applied, and the signal that is effected by the Tube Pre Emulation circuit. If you set the MIX control all the way to the left or counter clockwise the signal will be 100 percent clean , or the same as the original output signal from your guitar with any EQ you have set. If you turn the MIX control all the way right, or fully clockwise, 100 percent of the signal will be effected by the Tube Pre Emulation. That is, no original clean signal, just the signal with any added Equalization and Tube Pre Emulation. Use the MIX control to add in just the right amount of warmth to your original sound.

The key to getting the sound that's perfect for your musical style is experimenting with all the controls since they are somewhat interactive. Start by making small changes and when you find a sound you like, write it down.
Acoustic Attack System Diagrams
Acoustic Attack Typical Set-ups
There are many different ways to use the Acoustic Attack, however, the basic connection is the same in most installations and applications. The following sections detail the connections for an acoustic guitar plugged into an Acoustic Attack which is feeding an on stage amplifier and the main PA mixer in a live situation, and also, using the pre-amp with external effects feeding a console in a recording situation. Follow these simple steps to get connected:
Direct Insertion of an Instrument into a PA System
One of the most common applications for using a DI, like the Acoustic Attack, is getting the signal of an acoustic guitar into the PA system. Simply put, the full-range frequencies produced by acoustic guitar are difficult to mic, so use of a DI box is almost always preferable. In addition, the signal going to PA system can be tweaked by the FOH (front of house) engineer, without affecting the sound the musician dials up on stage. Follow the diagram and steps below to connect a electric acoustic guitar to a PA mixer.
- Connect the output of the guitar or acoustic to the Acoustic Attack's INPUT.
- Connect Acoustic Attack's PARALLEL OUTPUT to the input of the guitar or acoustic amplifier.
- Connect Acoustic Attack's DIRECT OUTPUT to the input of main PA mixer.
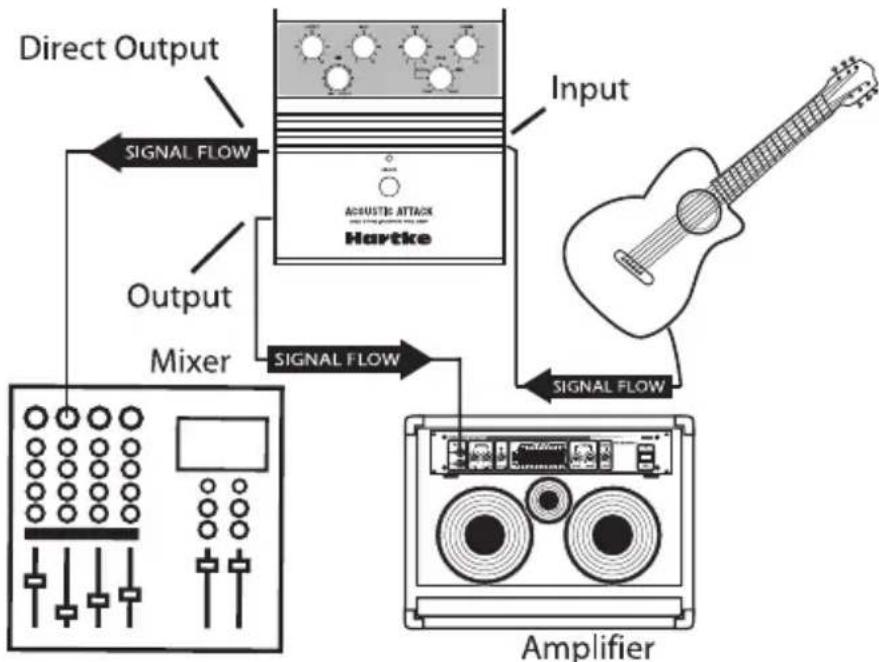
flowchart
graph TD
    A["Direct Output"] --> B["SIGNAL FLOW"]
    B --> C["Output"]
    C --> D["Mixer"]
    D --> E["SIGNAL FLOW"]
    E --> F["Amplifier"]
    F --> G["SIGNAL FLOW"]
    G --> H["Input"]
    H --> I["Acoustic Attack"]
    I --> J["Hartke"]
Acoustic Attack System Diagrams
Using an External Effects Processor for Recording
In a recording application, you can use the Acoustic Attack's Direct Input as a second input, with the OUTPUT to create an effects loop. This will allow you to add an additional effect like a digital multi-effects processor for delay, chorus and reverb and have them mixed in with the Acoustic Attack pre-amp for a killer front end for tracking your acoustic on your next recording. Follow the diagram below to connect an external signal processor.
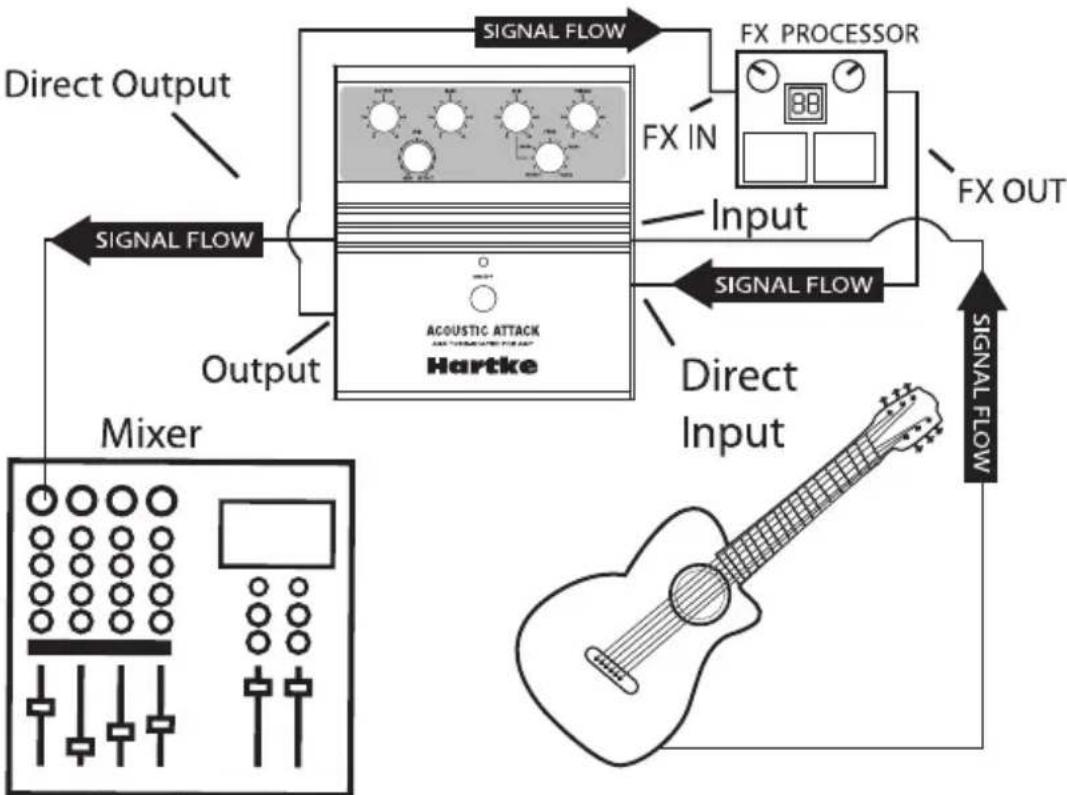
flowchart
graph TD
    A["Signal Flow"] --> B["ACOUSTIC ATTACK"]
    B --> C["Hartke"]
    C --> D["FX PROCESSOR"]
    D --> E["FX OUT"]
    F["Mixer"] --> G["Output"]
    G --> H["SIGNAL FLOW"]
    H --> I["FX IN"]
    I --> J["SIGNAL FLOW"]
    J --> K["FX OUT"]
    L["Direct Output"] --> M["Signal Flow"]
    M --> N["SIGNAL FLOW"]
    N --> O["FX IN"]
    O --> P["SIGNAL FLOW"]
    P --> Q["FX OUT"]
    R["Direct Input"] --> S["SIGNAL FLOW"]
    S --> T["FX IN"]
    T --> U["SIGNAL FLOW"]
    U --> V["FX OUT"]
Hartke
45 Gilpin Avenue
Hauppauge, New York 11788-8816
Phone: 1-800-3-SAMSON (1-800-372-6766)
Fax: 631-784-2201
www.hartke.com

- Table Of Contents
- Acoustic Attack Introduction and Features
- Introduction
- Acoustic Attack Features
- Acoustic Attack Front Panel Layout
- Acoustic Attack Side Panel Layout
- Operating the Acoustic Attack
- Setting Up the Acoustic Attack
- Power the Acoustic Attack
- Phantom On - Off / Ground Connect / Lift Switch
- Using Phantom Power
- Power the Acoustic Attack - continued Installing the Battery
- Using an AC/DC Power Adapter
- Control Knobs and Switches
- Using the Equalizer
- Using the MID control to Reduce Feedback
- Using the MIX control
- Acoustic Attack System Diagrams
- Acoustic Attack Typical Set-ups
- Direct Insertion of an Instrument into a PA System
- Using an External Effects Processor for Recording
Brand : Hartke
Model : Acoustic Attack
Category : Guitar effects pedal