
CL1000 - Computer console ATEN - Free user manual and instructions
Find the device manual for free CL1000 ATEN in PDF.


| Brand | ATEN |
| Model | CL1000 |
| Product Type | 19" LCD KVM Console |
| Dimensions (W x D x H) | 482 x 600 x 44 mm |
| Weight | 14.5 kg |
| Power Supply | 100-240 V AC, 50/60 Hz |
| Power Consumption | 120 W max |
| Display | 19" LCD, 1280 x 1024 resolution |
| Keyboard/Mouse Interface | PS/2 and USB |
| Number of KVM Ports | 1 (local console) |
| Mounting Type | 1U Rack, Sliding Rails |
| Operating Temperature | 0 to 40 °C |
| Operating Humidity | 0 to 80% RH (non-condensing) |
| Features | KVM switching, integrated display, keyboard and touchpad |
| Cleaning | Use a damp cloth; do not use liquid or aerosol products |
| Safety | Grounded plug mandatory; surge protector recommended |
| Warranty | 2 years |
Frequently Asked Questions - CL1000 ATEN
User questions about CL1000 ATEN
0 question about this device. Answer the ones you know or ask your own.
Ask a new question about this device
Download the instructions for your Computer console in PDF format for free! Find your manual CL1000 - ATEN and take your electronic device back in hand. On this page are published all the documents necessary for the use of your device. CL1000 by ATEN.
USER MANUAL CL1000 ATEN
natural_image
Black laptop with open rear panel and visible keyboard, isolated on white background (no text or symbols)FCC, CE Information
FEDERAL COMMUNICATIONS COMMISSION INTERFERENCE
STATEMENT: This equipment has been tested and found to comply with the limits for a Class A digital device, pursuant to Part 15 of the FCC Rules. These limits are designed to provide reasonable protection against harmful interference when the equipment is operated in a commercial environment.
This equipment generates, uses, and can radiate radio frequency energy and, if not installed and used in accordance with the instruction manual, may cause harmful interference to radio communications. Operation of this equipment in a residential area is likely to cause harmful interference in which case the user will be required to correct the interference at his own expense.
FCC Caution: Any changes or modifications not expressly approved by the party responsible for compliance could void the user's authority to operate this equipment.
CE Warning: This is a class A product. In a domestic environment this product may cause radio interference in which case the user may be required to take adequate measures.
RoHS
This product is RoHS compliant.
SJ/T 11364-2006
The following contains information that relates to China.
Be sure to register your product at our online support center:
| International http://eservice.aten.com |
Telephone Support
For telephone support, call this number:
| International 886-2-86 | 92-6959 |
| China 86-10-5255-0110 | |
| Japan 81-3-5615-5811 | |
| Korea 82-2-467-6789 | |
| North America 1-888-999-ATEN ext 4988 | |
| United Kingdom 44-8-4481-58923 | |
User Notice
All information, documentation, and specifications contained in this manual are subject to change without prior notification by the manufacturer. The manufacturer makes no representations or warranties, either expressed or implied, with respect to the contents hereof and specifically disclaims any warranties as to merchantability or fitness for any particular purpose. Any of the manufacturer's software described in this manual is sold or licensed as is. Should the programs prove defective following their purchase, the buyer (and not the manufacturer, its distributor, or its dealer), assumes the entire cost of all necessary servicing, repair and any incidental or consequential damages resulting from any defect in the software.
The manufacturer of this system is not responsible for any radio and/or TV interference caused by unauthorized modifications to this device. It is the responsibility of the user to correct such interference.
The manufacturer is not responsible for any damage incurred in the operation of this system if the correct operational voltage setting was not selected prior to operation. PLEASE VERIFY THAT THE VOLTAGE SETTING IS CORRECT BEFORE USE.
A typical LCD (Liquid Crystal Display) monitor has millions of pixels. A dead pixel refers to a pixel with a defect in its ability to display the correct color output. It most often looks like a tiny black or white spot on your screen, although it can be any other color. Since even a tiny dust particle on one of the pixels during the manufacturing process or a slight bump during shipping can create a dead pixel, the ISO 13406-2 norm defines 4 classes of acceptable screens with dead pixels--Class 1 is the best; Class 4 is the worst. Almost all manufacturers use Class 2 to establish their warranties, which allows a certain amount of dead pixels to exist before they will replace the screen. Since the manufacturers consider these screens to be acceptable under ISO specifications, we cannot be responsible for replacement or warranty of the TFT LCD panel.
Package Contents
Basic Package
The basic CL1000 package consists of:
◆ 1 CL1000 with Standard Rack Mount Kit
◆ 1 Custom KVM Cable Set
◆ 1 Power Cord
◆ 1 User Manual*
◆ 1 Quick Start Guide
Optional Equipment
Depending on any optional equipment that you may have purchased, one of the following may be included in your package:
♦ Standard Rack Mount Kit - Long
◆ Easy-Installation Rack Mount Kit - Short
◆ Easy-Installation Rack Mount Kit - Long
Check to make sure that all the components are present and that nothing got damaged in shipping. If you encounter a problem, contact your dealer.
Read this manual thoroughly and follow the installation and operation procedures carefully to prevent any damage to the unit, and/or any of the devices connected to it.
*Features may have been added to the CL1000 since this manual was printed. Please visit our website to download the most up-to-date version of the manual.
© Copyright 2008–2013 ATEN® International Co., Ltd.
Manual Part No. PAPE-0287-102G
Manual Date: 2014-02-24
ATEN and the ATEN logo are registered trademarks of ATEN International Co., Ltd. All rights reserved.
All other brand names and trademarks are the registered property of their respective owners.
Contents
FCC, CE Information .... ii
RoHS ii
SJ/T 11364-2006 ii
User Information ....iii
Online Registration .....iii
Telephone Support .....iii
User Notice .iv
Package Contents v
Basic Package v
Optional Equipment....v
About this Manual . . . . . . . . . . . . . . . . . . . . . . . . . . . . . . . . . . . . . . . . . . . . . . . . . . . . . . . . . . . . . . . . . . . . . . . . . . . . . . . . . . viii
Conventions ix
Product Information ix
1. Introduction
Overview....1
Features 2
Requirements 3
Switches and Computers 3
Cables 3
Operating Systems 3
Components 4
Front View....4
Rear View 5
2. Hardware Setup
Before you Begin 7
Standard Rack Mounting 7
Installation....9
3. Operation
Opening the Console 11
Closing the Console 12
Operating Precautions 13
LCD OSD Configuration 14
The LCD Buttons....14
The Adjustment Settings.... 15
Port ID Numbering & Port Selection 15
Appendix
Safety Instructions 17
General 17
Rack Mounting 19
Consignes de sécurité....20
Général 20
Montage sur bâti .....23
Technical Support 24
International....24
North America 24
Specifications 25
Optional Rack Mounting 26
About SPHD Connectors 29
Limited Warranty ....30
About this Manual
This User Manual is provided to help you get the most from your CL1000 system. It covers all aspects of installation, configuration and operation. An overview of the information found in the manual is provided below.
Chapter 1, Introduction, introduces you to the CL1000 system. Its purpose, features and benefits are presented, and its front and back panel components are described.
Chapter 2, Hardware Setup, provides step-by-step instructions for setting up your installation, and explains some basic operation procedures.
Chapter 3, Operation, explains the fundamental concepts involved in operating the CL1000.
An Appendix, provides specifications and other technical information regarding the CL1000.
Conventions
This manual uses the following conventions:
MonospacedIndicates text that you should key in.
[ ] Indicates keys you should press. For example, [Enter] means to press the Enter key. If keys need to be chorded, they appear together in the same bracket with a plus sign between them: [Ctrl+Alt].
- Numbered lists represent procedures with sequential steps.
◆ Bullet lists provide information, but do not involve sequential steps.
→ Indicates selecting the option (on a menu or dialog box, for example), that comes next. For example, Start → Run means to open the Start menu, and then select Run.

Indicates critical information.
Product Information
For information about all ATEN products and how they can help you connect without limits, visit ATEN on the Web or contact an ATEN Authorized Reseller. Visit ATEN on the Web for a list of locations and telephone numbers:
| International http://www.aten.com |
| North America http://www.aten-usa.com |
This Page Intentionally Left Blank
Overview
The CL1000 is a KVM console module that feature an integrated LCD panel, full keyboard, and touchpad in a 1U rack-mountable sliding housing. It was developed in response to the enormous popularity of the sliding console found on the CL1008 and CL1016 KVM switches. Those switches are made up of two major modules: the front-end sliding KVM Console module, and the back-end KVM Switch module.
The CL1000 is similar to the front-end Console module found on the CL1008 and CL1016. Its purpose is to serve as the front end sliding console for compatible KVM switches. ^1 By only having to purchase the CL1000, users who already have a compatible KVM switch can take advantage of the space saving and efficiency benefits of the sliding console module without the unnecessary expense of having to purchase a model that includes a KVM switch module.
Setup is fast and easy. Simply use the KVM cable set supplied with this package to link the CL1000's KVM port to the console port of your KVM switch and you are ready to go.
Features
- Integrated KVM console with a 17" LCD monitor in a sliding housing with top and bottom clearance for smooth operation in a 1U high system rack
- LCD module rotates up to 115° for a more comfortable viewing angle
- Standard rack mount kit included – optional Easy Rack Mounting (single person installation) rack mount kit available (requires separate purchase)
◆ Compatible with most PS/2 KVM switches
◆ Internal power supply
◆ High video resolution:
♦ Up to 1280 x 1024 @75Hz
◆ Supports DDC, DDC2, DDC2B
- DDC emulation of the LCD monitor
- Video settings of attached computers are automatically adjusted for optimal output to the LCD monitor
♦ Keyboard language support: English (US); English (UK); French; German; German (Swiss); Italian; Japanese; Hungarian; Korean; Spanish; Swedish; Traditional Chinese; Russian
Requirements
Switches and Computers
- The CL1000 supports most KVM switches that have PS/2 console port connectors. If you are unsure whether your switch is supported or not, check with your dealer.
- The integrated LCD monitor's maximum resolution is 1280 x 1024 @ 75 Hz. Make sure that none of the resolution settings of the connected computers exceed the LCD monitor's maximum resolution.
Cables
For optimum signal integrity and to simplify the layout, we strongly recommend that you use the high quality custom cable set provided with this package. Different length cable sets, described in the table below, can be purchased from your dealer.
| Length (m) Part Number | |
| 1.2 2L-5201P | |
| 1.8 2L-5202P | |
| 3.0 2L-5203P | |
| 6.0 2L-5206P | |
Operating Systems
Supported operating systems are shown in the table, below:
| OS Version | ||
| Windows 2000 and higher | ||
| Linux RedHat | 7.1–7.3, 8.0, 9.0, Fedora | Core 2–4 |
| SuSE 8.2, 9.3, 10 | ||
| Mandriva (Mandrake) 9, | 2005 Limited Edition, 2006 | |
| UNIX AIX 4.3 | 5L | |
| FreeBSD 4.2, 4.5 | ||
| Novell Netware | 5.0*, 6.0 | |
*This operating system does not support USB.
Components
Front View
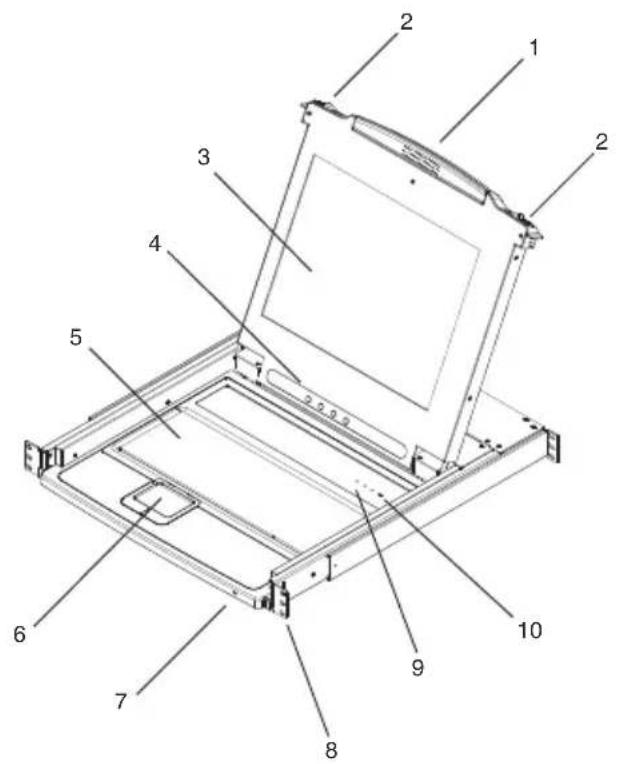
| No. Component Description | |
| 1 Handle Pull to slide the KVM module out; push to slide the module in. | |
| 2 Slide Release In order to slide the console out, you must first release it by moving this tab sideways. See page 11 for details on sliding the console in and out. | |
| 3 LCD Display After sliding the KVM module out, flip up the cover to access the LCD monitor. | |
| 4 LCD Controls The LCD On/Off switch is located here, as well as buttons to control the position and picture settings of the LCD display. See page 14, for details. | |
| 5 Keyboard | |
| 6 Touchpad | |
| 7 Power LED Lights dark green to indicate that the unit is receiving power. | |
| 8 Rack Mounting Brackets | The rack mounting brackets located at each corner of the unit secure the chassis to a system rack. |
| 9 Lock LEDs The Num Lock, Caps Lock, Scroll Lock LEDs are located here. | |
| 10 Reset Switch Located to the right of the Lock LEDs. Press this recessed switch in with a thin object to perform a system reset. | |
Rear View
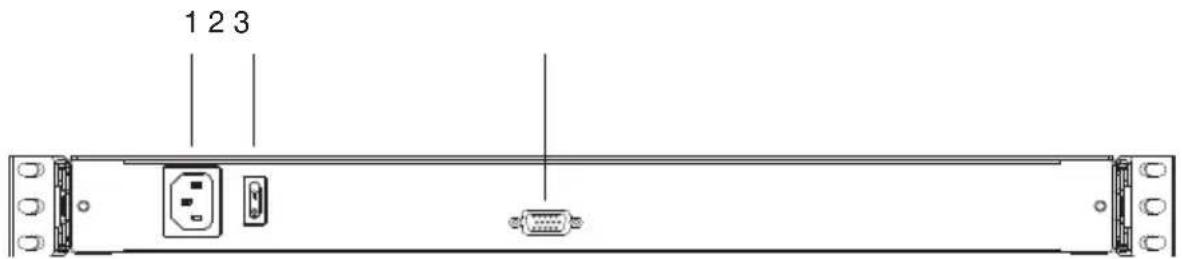
No. Component Description
1 Power Socket This is a standard 3-prong AC power socket. The power cord from your AC source plugs in here.
2 Power Switch This is a standard rocker switch that powers the unit On and Off.
3 KVM Port The cable that links the CL1000 to the KVM switch plugs in here.
Note: The shape of this SPHD connector has been specifically modified so that only KVM cables designed to work with this switch can plug in (see Cables, page 3, for details).
This Page Intentionally Left Blank
Before you Begin

-
Important safety information regarding the placement of this device is provided on page 17. Please review it before proceeding.
-
Make sure that power to all the devices you will be connecting up have been turned off. You must unplug the power cords of any computers that have the Keyboard Power On function.
Standard Rack Mounting
A standard rack mount kit is provided with your CL1000. The kit enables the console to be mounted in rack with a depth of 42–72 cm.

Note: 1. It takes two people to mount the console: one to hold it in place, the other to screw it in.
-
The standard rack mounting kit does not include screws or cage nuts. If you need additional screws or cage nuts, contact your rack dealer.
-
Optional mounting kits, including single person Easy Installation kits, are available with a separate purchase. See page 26 for optional rack mounting details.
To rack mount the console, do the following:
- While one person positions the CL1000 in the rack and holds it in place, the second person loosely screws the front brackets to the rack.

natural_image
Isometric technical drawing of a structural frame assembly with vertical supports and mounting holes (no text or symbols)- While the first person still holds the CL1000 in place, the second person slides the L brackets into the CL1000's side mounting brackets from the rear until the bracket flanges contact the rack, then screws the L brackets to the rack.

natural_image
Technical line drawing of a structural frame assembly with mounting brackets and support beams (no text or symbols)- After the L brackets have been secured, tighten the front bracket screws.
Note: Allow at least 5.1 cm on each side for proper ventilation, and at least 12.7 cm at the back for the power cord and cable clearance.
Installation
Refer to the installation diagram as you perform the installation steps. The numbers in the diagrams correspond to the numbers of the steps.
- Plug the SPHD connector end of the KVM cable provided with this unit into the CL1000's KVM port.
- Plug the keyboard, monitor, and mouse connectors of the KVM cable into their respective ports on the Console Section of the KVM switch.
- Plug the power cord into the CL1000's power socket and into an AC power source.
- Power up your KVM installation.
- Turn on the power to CL1000.

This Page Intentionally Left Blank
Chapter 3
Operation
Opening the Console
The CL1000's console is located under the top cover. To access the console, slide the console module out and raise the cover.
Note: As a safety precaution, to keep the console from accidentally sliding out, the console is locked into the In position. Before you can pull the console module out, you must release it by pushing the catches on the unit's front panel as indicated below.
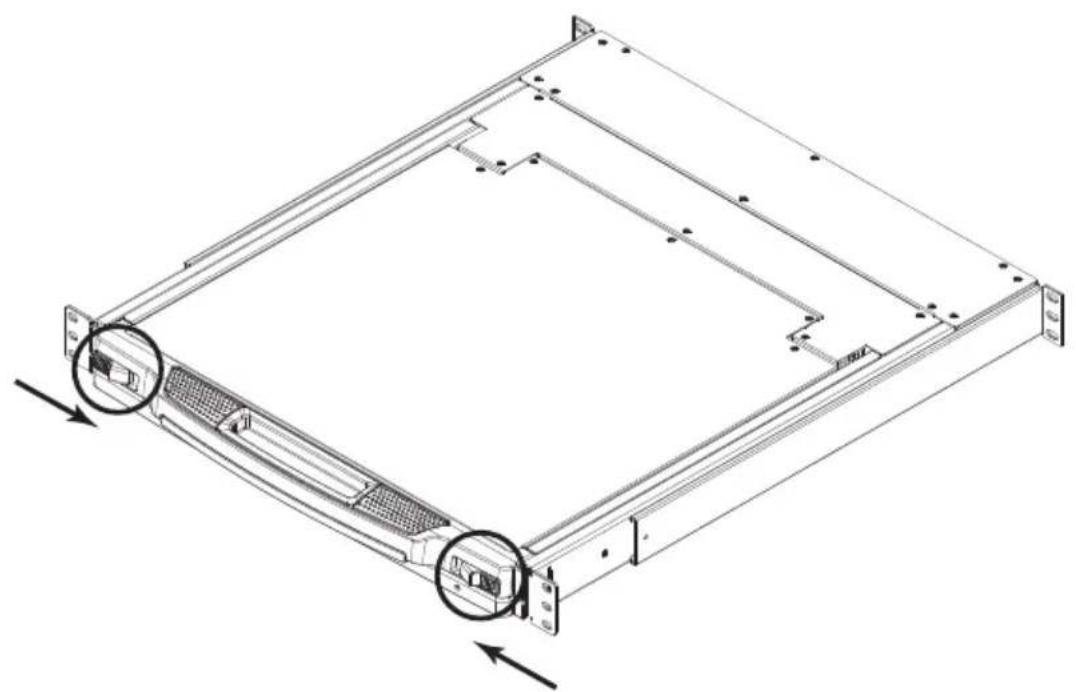
natural_image
Technical line drawing of a server rack frame with two circular annotations pointing to the front panel (no text or symbols present)Closing the Console
To slide the console module back in, close the cover and do the following:
- Pull the safety catches on the unit's side rails toward you and push the module in until it stops.
- Release the catches. Pull the module slightly toward you, then push it all the way in.

natural_image
Technical line drawing of a server rack frame with mounting brackets and ventilation slots (no text or symbols)Note: The reason for the two step procedure is to minimize the chances of you pinching your fingers when sliding the module in.
Operating Precautions

The maximum load bearing capacity of the keyboard module is 30 kg. Failure to heed the information below can result in damage to the keyboard module.
| Right!Rest your hands and arms lightly on the keyboard module as you work. | |
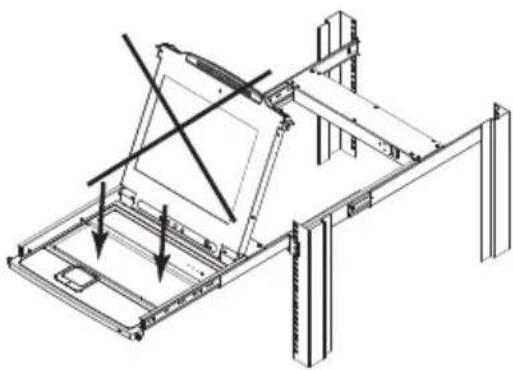 | Wrong!DO NOT lean your body weight on the keyboard module.DO NOT place heavy objects on the keyboard module. |
LCD OSD Configuration
The LCD Buttons
The LCD OSD allows you to set up and configure the LCD display. Four buttons are used to perform the configuration, as described in the table, below:
| Button Function | |
| MENU | When you have not entered the LCD OSD Menu function, pressing this button invokes the Menu function, and brings up the Main Menu.When you have entered the LCD OSD Menu function, and have reached a setting choice with the navigation buttons, pressing this button brings up its adjustment screen. |
| ▶|▲ | When navigating through the menus, this button moves you Right or Up. When making an adjustment, it increases the value. |
| ◀|▼ | When navigating through the menus, this button moves you Left or Down. When making an adjustment, it decreases the value. |
| EXIT | When you have not entered the LCD OSD Menu function, pressing this button performs an auto adjustment. An auto adjustment automatically configures all the settings for the LCD panel to what the OSD considers their optimum values to be.When you have entered the LCD OSD Menu function, pressing this button exits the current menu and returns you to the previous menu. Use it to leave an adjustment menu when you are satisfied with the adjustment you made.When you are at the Main Menu, pressing this button exits the LCD OSD. |
The Adjustment Settings
An explanation of the LCD OSD adjustment settings is given in the table below:
| Setting Explanation | |
| Brightness Adjusts the background black level of the screen image. | |
| Contrast Adjusts the foreground white level of the screen image. | |
| Phase If pixel jitter or horizontal line noise is visible on the display, your LCD may have the wrong phase setting. Adjust the phase setting to eliminate these problems. | |
| Clock If vertical banding is visible on the display, your LCD may have the wrong clock setting. Adjust the clock setting to eliminate vertical banding. | |
| H-Position Positions the display area on the LCD panel horizontally (moves the display area left or right). | |
| V-Position Positions the display area on the LCD panel vertically (moves the display area up or down). | |
| Color Temperature Adjusts the color quality of the display. You can adjust the warmth value, color balance, etc. The Adjust Color selection has a further submenu that lets you fine tune the RGB values. | |
| Language Selects the language that the OSD displays its menus in. | |
| OSD Duration Lets you set the amount of time the OSD displays on the screen. If there is no input for the amount of time you choose, the OSD display turns off. | |
| Reset Resets the adjustments on all menus and submenus to their factory default settings. Note: The Language setting does not return to the factory default, but remains at the one that you have set it to. |
Port ID Numbering & Port Selection
Port ID numbering and Port Selection follow the method used by the KVM switch connected to the CL1000. Consult your KVM switch's User Manual for details.
This Page Intentionally Left Blank
Safety Instructions
General
- This product is for indoor use only.
- Read all of these instructions. Save them for future reference.
◆ Follow all warnings and instructions marked on the device. - To prevent damage to your installation it is important that all devices are properly grounded.
- Do not place the device on any unstable surface (cart, stand, table, etc.). If the device falls, serious damage will result.
- Do not use the device near water.
- Do not place the device near, or over, radiators or heat registers.
- The device cabinet is provided with slots and openings to allow for adequate ventilation. To ensure reliable operation, and to protect against overheating, these openings must never be blocked or covered.
- The device should never be placed on a soft surface (bed, sofa, rug, etc.) as this will block its ventilation openings. Likewise, the device should not be placed in a built-in enclosure unless adequate ventilation has been provided.
- Never spill liquid of any kind on the device.
- Unplug the device from the wall outlet before cleaning. Do not use liquid or aerosol cleaners. Use a damp cloth for cleaning.
- The device should be operated from the type of power source indicated on the marking label. If you are not sure of the type of power available, consult your dealer or local power company.
- The device is designed for IT power distribution systems with 230V phase-to-phase voltage.
- The device is equipped with a 3-wire grounding type plug. This is a safety feature. If you are unable to insert the plug into the outlet, contact your electrician to replace your obsolete outlet. Do not attempt to defeat the purpose of the grounding-type plug. Always follow your local/national wiring codes.
(Continues on next page.)
(Continued from previous page.)
- Do not allow anything to rest on the power cord or cables. Route the power cord and cables so that they cannot be stepped on or tripped over.
- If an extension cord is used with this device make sure that the total of the ampere ratings of all products used on this cord does not exceed the extension cord ampere rating. Make sure that the total of all products plugged into the wall outlet does not exceed 15 amperes.
- To help protect your system from sudden, transient increases and decreases in electrical power, use a surge suppressor, line conditioner, or un-interruptible power supply (UPS).
- Position system cables and power cables carefully; Be sure that nothing rests on any cables.
- Never push objects of any kind into or through cabinet slots. They may touch dangerous voltage points or short out parts resulting in a risk of fire or electrical shock.
- Do not attempt to service the device yourself. Refer all servicing to qualified service personnel.
- If the following conditions occur, unplug the device from the wall outlet and bring it to qualified service personnel for repair.
- The power cord or plug has become damaged or frayed.
◆ Liquid has been spilled into the device. - The device has been exposed to rain or water.
- The device has been dropped, or the cabinet has been damaged.
- The device exhibits a distinct change in performance, indicating a need for service.
- The device does not operate normally when the operating instructions are followed.
- Only adjust those controls that are covered in the operating instructions. Improper adjustment of other controls may result in damage that will require extensive work by a qualified technician to repair.
- Do not connect the RJ-11 connector marked “UPGRADE” to a public telecommunication network.
Rack Mounting
- Before working on the rack, make sure that the stabilizers are secured to the rack, extended to the floor, and that the full weight of the rack rests on the floor. Install front and side stabilizers on a single rack or front stabilizers for joined multiple racks before working on the rack.
- Always load the rack from the bottom up, and load the heaviest item in the rack first.
- Make sure that the rack is level and stable before extending a device from the rack.
- Use caution when pressing the device rail release latches and sliding a device into or out of a rack; the slide rails can pinch your fingers.
- After a device is inserted into the rack, carefully extend the rail into a locking position, and then slide the device into the rack.
- Do not overload the AC supply branch circuit that provides power to the rack. The total rack load should not exceed 80 percent of the branch circuit rating.
- Make sure that all equipment used on the rack – including power strips and other electrical connectors – is properly grounded.
- Ensure that proper airflow is provided to devices in the rack.
- Ensure that the operating ambient temperature of the rack environment does not exceed the maximum ambient temperature specified for the equipment by the manufacturer
- Do not step on or stand on any device when servicing other devices in a rack.
- Caution: Slide/rail (LCD KVM) mounted equipment is not to be used as a shelf or a work space.

Technical Support
International
- For online technical support – including troubleshooting, documentation, and software updates: http://eservice.aten.com
- For telephone support, see page iii.
North America
| Email Support support@aten-usa.com | ||
| Online Technical Support | Troubleshooting Documentation Software Updates | http://www.aten-usa.com/support |
| Telephone Support 1-888-999-ATEN | ext 4988 | |
When you contact us, please have the following information ready beforehand:
◆ Product model number, serial number, and date of purchase.
- Your computer configuration, including operating system, revision level, expansion cards, and software.
◆ Any error messages displayed at the time the error occurred.
- The sequence of operations that led up to the error.
◆ Any other information you feel may be of help.
Specifications
| Function CL1000 | |||
| Connector KVM | M Ports 1 x SPHD-15 Female (Yellow) | ||
| Switches Power | 1 x Rocker | ||
| LCD Adjust 4 x Pushbutton | |||
| Reset 1 x Semi-recessed | Pushbutton | ||
| LEDs Power 1 | (Dark Green) | ||
| Lock Num 1 | (Green) | ||
| Caps 1 (Green) | |||
| Scroll 1 (Green) | |||
| Emulation Keyboard / Mouse PS/2 | |||
| Video | 1280 x 1024 @ 75 Hz; DDC2B | ||
| IP Rating | 100–240 V AC; 50/60 Hz; 1 A | ||
| Power Consumption | 120 V, 21 W; 230 V, 24 W | ||
| Environment | Operating Temp. | 0–40°C | |
| Storage Temp. | -20–60°C | ||
| Humidity | 0–90% RH Noncondensing | ||
| Physical Properties | Housing | Metal + Plastic | |
| Weight | 12.30 kg | ||
| Dimensions (L x W x H) 5 | 3.40 x 48.00 x 4.40 cm (19"/1U) | ||
Optional Rack Mounting
For convenience and flexibility, three optional rack mounting kits are available as shown in the following table:
| Bracket Type Size (cm) | |
| Standard Installation – Long 68.0–100.0 | |
| Easy Installation – Short 42.0–70.0 | |
| Easy Installation – Long 68.0–105.0 |
To install the long bracket standard rack mount kit, simply replace the short L brackets on the standard rack mount kit with the long ones, and mount the console according to the instructions given on page 7.
With an Easy-Installation kit, one person can mount the console. To install the Easy-Installation kit, do the following:
- Remove the standard L brackets, and the side mounting brackets from both sides of the console.

- Attach the left and right easy-installation mounting rails to the inside of the rack. The flange that supports the console will be to the inside.
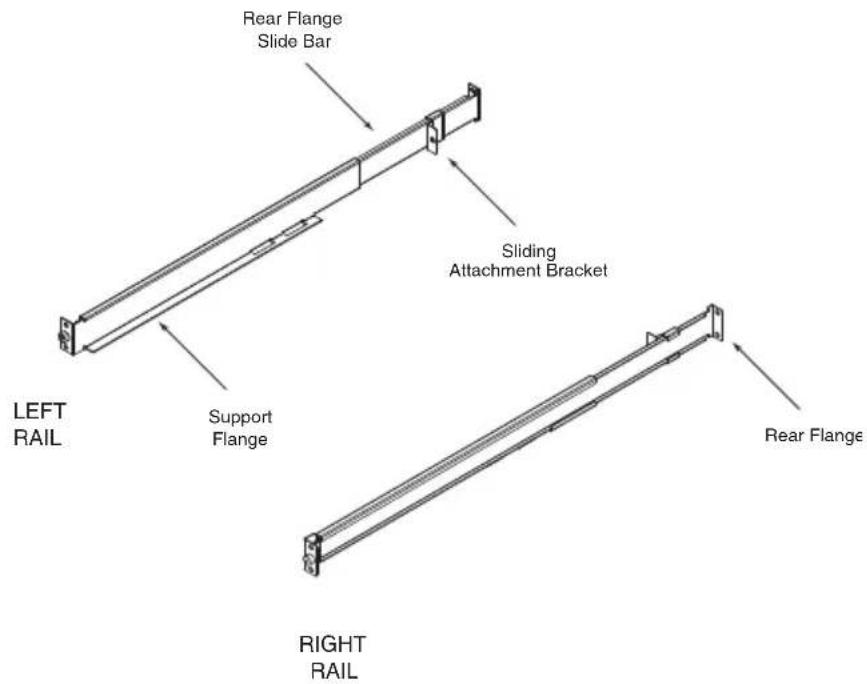
a) Screw the front flanges to the rack first.
b) Slide the bars with the rear flanges toward the rack until the flanges make contact with the rack, then screw the rear flanges to the rack.

natural_image
Technical line drawing of two structural beams with support posts and mounting brackets (no text or symbols)(Continues on next page.)
(Continued from previous page.)
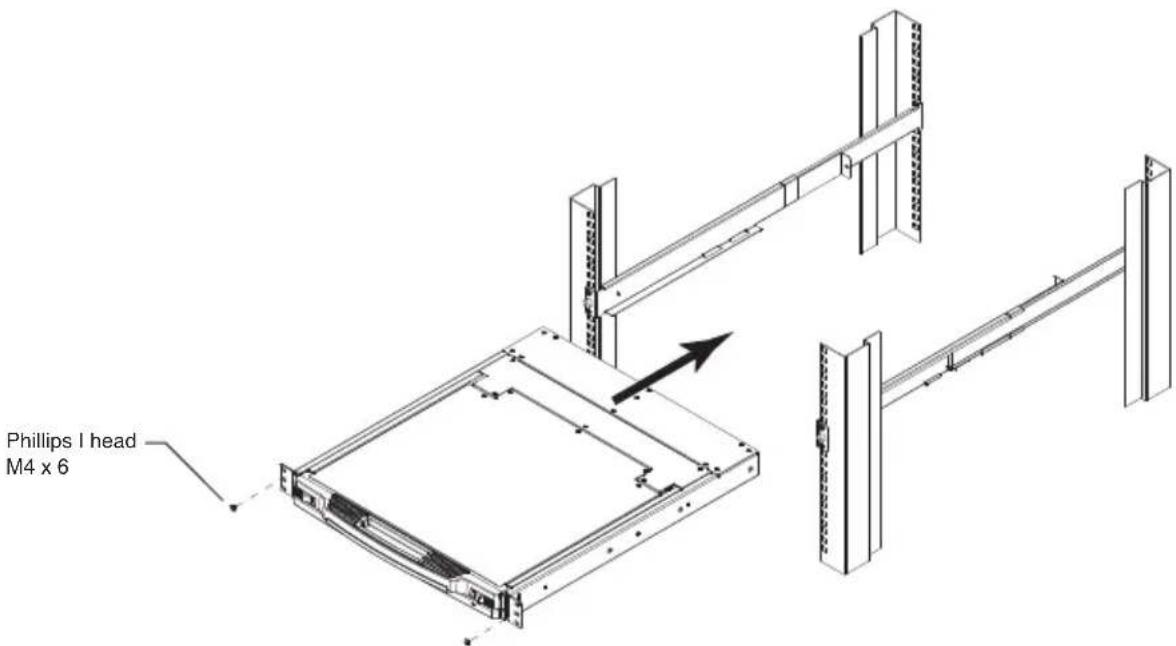
- Slide the console onto the support flanges. Use the screws supplied with this package to loosely attach the front of the console to the front of the rack (only tighten the screws part way).
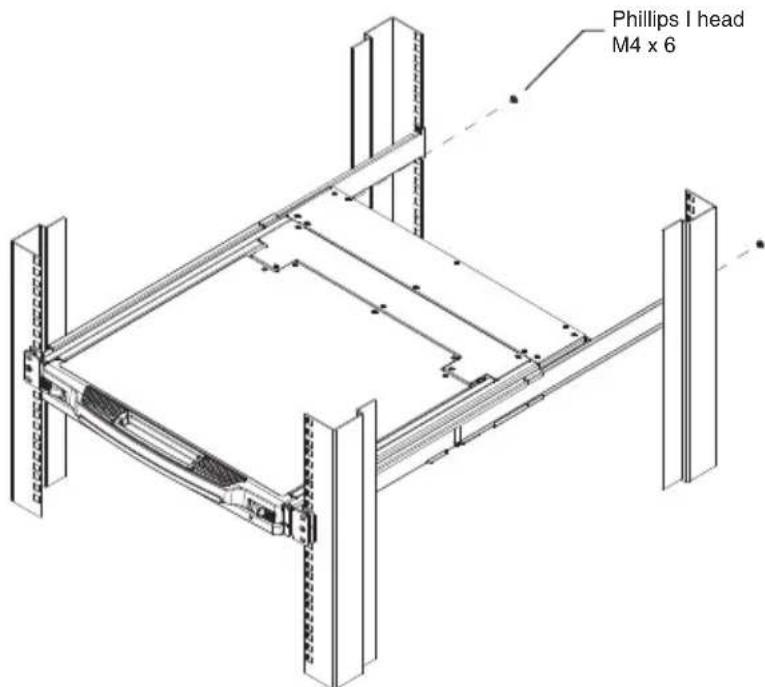
- Slide the sliding attachment brackets along the slide bars until they contact the rear of the console, then use the screws supplied with this package to attach the bars to the rear of the console (tighten the screws all the way).
- Slide the console open and closed a couple of times to be sure that it is properly aligned and operating smoothly. (See page 11 for opening and closing procedures.)
- After determining that the console is properly lined up and operating correctly, finish up by fully tightening down the partially tightened front attachment screws inserted in step 3.
About SPHD Connectors

This product uses SPHD connectors for its KVM and/or Console ports. We have specifically modified the shape of these connectors so that only KVM cables that we have designed to work with this product can be connected.
Limited Warranty
IN NO EVENT SHALL THE DIRECT VENDOR'S LIABILITY EXCEED THE PRICE PAID FOR THE PRODUCT FROM DIRECT, INDIRECT, SPECIAL, INCIDENTAL, OR CONSEQUENTIAL DAMAGES RESULTING FROM THE USE OF THE PRODUCT, DISK, OR ITS DOCUMENTATION.
The direct vendor makes no warranty or representation, expressed, implied, or statutory with respect to the contents or use of this documentation, and especially disclaims its quality, performance, merchantability, or fitness for any particular purpose.
The direct vendor also reserves the right to revise or update the device or documentation without obligation to notify any individual or entity of such revisions, or update. For further inquiries, please contact your direct vendor.
Index
C
Cables, 3
Components
Front View, 4
Rear View, 5
Conventions, ix
D
Dimensions, 21
E
Easy-Installation kit, 22
Emulation
DDC, DDC2, DDC2B, 2
F
FCC Information, ii
Features, 2
Front View, 4
|
Installing, 9
IP Rating, 21
K
KVM Port, 5
L
LCD
Buttons, 14
Display, 4
OSD configuration, 14
0
Online
Registration, iii
Operating Precautions, 13
Operating Temp., 21
Optional rack mounting, 22
P
Package Contents
Basic, v
Optional Equipment, v
Port ID
Numbering, 15
Power Consumption, 21
Power Socket, 5
Power Switch, 5
Precautions, 13
Product Information, ix
R
Rack Mounting
Optional, 22
Safety information, 19
Standard, 7
Rear View, 5
Requirements
Cables, 3
Operating Systems, 3
OS Support, 3
Switches and Computers, 3
Reset Switch, 4
RoHS, ii
s
Safety Instructions
General, 17
Rack Mounting, 19
SJ/T 11364-2006, ii
Slide Release, 4
Specifications, 21
SPHD Connectors, 25
Standard rack mounting, 7
Storage Temp., 21
T
Technical Support, 20
Telephone support, iii
Temperature
operating, 21
storage, 21
U
User Notice, iv
V
video resolution, 2
W
Warranty, 26
Weight, 21
- FCC, CE Information
- FEDERAL COMMUNICATIONS COMMISSION INTERFERENCE
- RoHS
- SJ/T 11364-2006
- Telephone Support
- User Notice
- Package Contents
- Basic Package
- Optional Equipment
- Contents
- Introduction
- Hardware Setup
- Operation
- Appendix
- About this Manual
- Conventions
- Product Information
- Overview
- Features
- Requirements
- Switches and Computers
- Cables
- Operating Systems
- Components
- Front View
- Rear View
- No. Component Description
- Before you Begin
- Standard Rack Mounting
- Installation
- Chapter 3
- Operation
- Opening the Console
- Closing the Console
- Operating Precautions
- LCD OSD Configuration
- The LCD Buttons
- The Adjustment Settings
- Port ID Numbering & Port Selection
- Safety Instructions
- General
- (Continued from previous page.)
- Rack Mounting
- Technical Support
- International
- Optional Rack Mounting
- About SPHD Connectors
- Limited Warranty
- Index
- C
- D
- E
- F
- |
- K
- L
- 0
- P
- R
- s
- T
- U
- V
- W
Brand : ATEN
Model : CL1000
Category : Computer console