408A - Uncategorized MBM - Free user manual and instructions
Find the device manual for free 408A MBM in PDF.


| Product Type | Paper Folder |
| Dimensions (in use) | 40.5 in × 21.5 in × 20 in (W × D × H) |
| Dimensions (storage) | 18 in × 21.5 in × 13 in (W × D × H) |
| Weight | 66 lb (30 kg) |
| Power Supply | 100–240 VAC, 50/60 Hz |
| Power Consumption | 50 W |
| Paper Size Range | 3.5 in × 5.0 in to 11 in × 17 in (single fold only for 3.5×5.0) |
| Paper Weight Range | 46.5 g/m² to 160 g/m² (up to 230 g/m² for single fold) |
| Folding Types | Single, Double Parallel, Fold-out, Letter, Zigzag, Gate, Cross, Non-standard |
| Processing Speed | 2,400 to 14,400 sheets/hour (single fold, letter size) |
| Paper Feed System | Three-roller friction feed/separation |
| Paper Stacking Capacity | 500 sheets (20 lb bond) |
| Operation Method | Color LCD touch panel with automatic settings |
| Additional Functions | Fold skew adjustment, jam detection, 4-digit counter (addition/subtraction/interval), automatic paper size detection (letter, legal, ledger), double feed detection, auxiliary paper guide for cross folding, automatic fold position setting by paper size input, memory for 36 fine adjustment patterns (6 paper sizes × 6 fold types), memory for 12 special folding patterns |
| Safety Features | Safety cover interlock, emergency stop, overload breaker, grounded power cord |
| Maintenance & Cleaning | Regular cleaning of folding rollers, paper feed rollers, sensors; replaceable consumables (feed rollers, separators) |
Frequently Asked Questions - 408A MBM
User questions about 408A MBM
0 question about this device. Answer the ones you know or ask your own.
Ask a new question about this device
Download the instructions for your Uncategorized in PDF format for free! Find your manual 408A - MBM and take your electronic device back in hand. On this page are published all the documents necessary for the use of your device. 408A by MBM.
USER MANUAL 408A MBM
natural_image
3D rendering of a gray printer with open lid and internal components (no visible text or symbols)MBM
CORPORATION
1-800-223-2508
www.mbmcorp.com
Rev. 1.01
Safety Instructions
Definition of Symbols and Notes
In this manual following names and signs stand for possible dangers.

Danger
This Symbol stands for immediate danger threatening the life and health of persons. Disregarding these instructions may cause severe damage to health and even serious injuries.

Caution
This symbol stands for an endangering situation that may occur. Disregarding these instructions may lead to slight injuries or damage to property.
| Danger | |
 | Make sure that the machine is electrically grounded. This prevents an electric shock when there is a leak of electricity. |
| Use the machine at 230VAC with a frequency of 50/60Hz. A fire may start or the machine may break down if a higher or lower voltage is used, or if an electric current with a frequency that is not within the range of frequency stated above. | |
| Do not place any object on this machine. A fire may start or electricity may leak if water or a foreign object enters inside the machine. | |
| Handle the power cable with care. A fire may start or an electric shock may be caused if the cable is damaged, broken, or processed, if a heavy object is placed on the cable, or if the cable is bent forcibly. | |
| Do not pull the power plug out of or put it in the electric outlet using a wet hand. Otherwise, an electric shock may be caused. | |
| Do not remove the cover of this machine. Otherwise, an electric shock or injury may be caused. | |
| Do not remodel this machine. Otherwise, a fire may break out or an electric shock may be caused. | |
| If the machine is used when it is in an abnormal condition, such as generating heat, emitting smoke, and giving out a strange smell, a fire may break out or an electric shock may be caused. Turn off the power switch immediately and then pull the power plug out of the electric outlet. Afterward, consult with your dealer. | |
| If abnormalities such as the power cable generating heat and giving out a strange smell are found, turn off the power switch immediately and then pull the power plug out of the electric outlet. Afterward, consult your dealer. | |
| If a foreign object enters into the machine, turn off the power switch first and then pull the power plug out of the electric outlet. Afterward, consult your dealer. | |
| If thunder approaches, pull the power cable out of the electric outlet to prevent a fire or breakdown caused by the falling of a thunderbolt. | |
| Caution | |
 | Do not let hairs, a necktie, or necklace hang above the drive of the machine. Doing so may cause an injury. |
| Do not put the machine on an unstable place such as a shaky stand and a slant floor. Doing so may cause the machine to drop or fall down, causing an injury. | |
| Do not put the machine in a moist or dusty place. Doing so may start a fire or cause an electric shock. | |
| Be sure to pull out the power cable while holding the plug. If the power plug is pulled out while holding the cable, a fire may break out or an electric shock may be caused. | |
| Be sure to pull the power plug out of the electric outlet first when moving this machine. Otherwise, the cable may be damaged, causing a fire or an electric shock. | |
| Be sure to pull the power plug out of the electric outlet for safety purposes when this machine is not in use for prolonged period such as consecutive holidays or for other reasons. | |
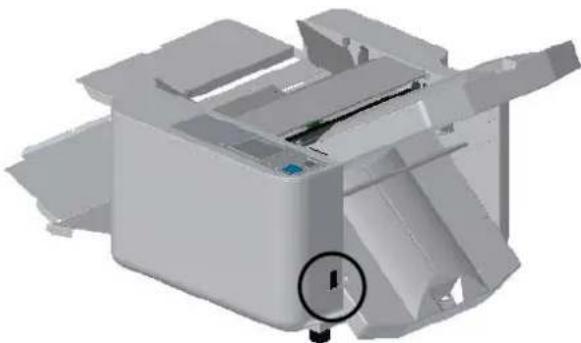
Warming
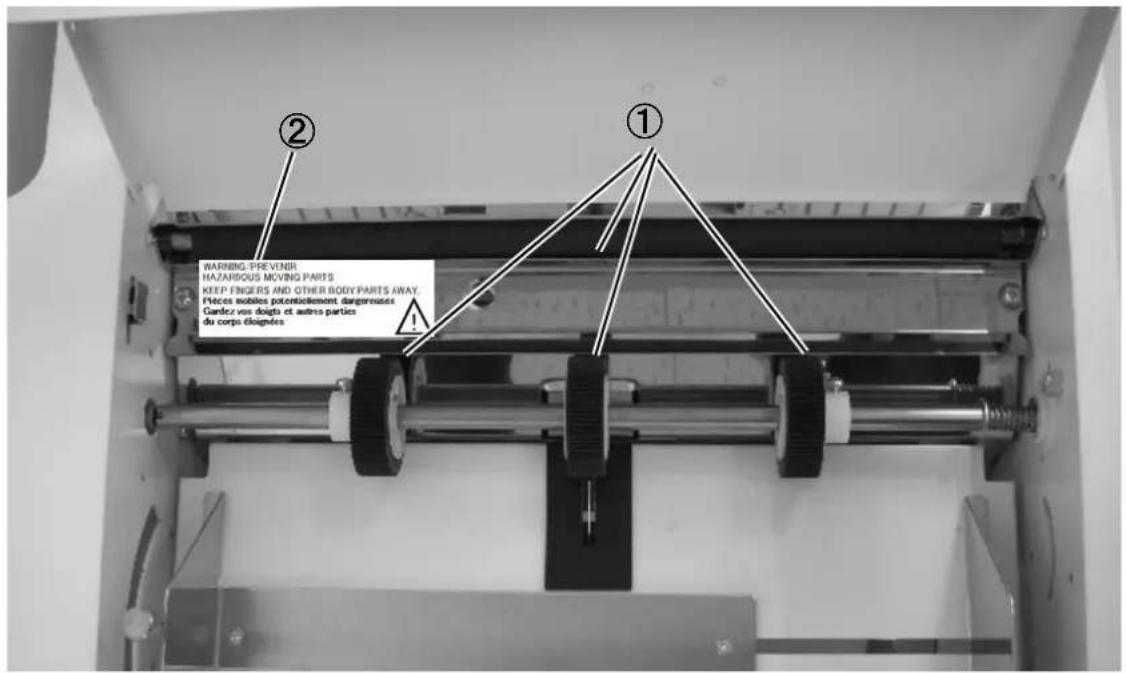
① Moving Parts
② Warning Label
WARNING/PREVENIR
HAZARDOUS MOVING PARTS
KEEP FINGERS AND OTHER BODY PARTS AWAY.
Please read this Operation Manual carefully before using this machine. Store the Operation Manual in a safe place so that it can be easily retrieved and referred to whenever required.
Since the specifications of this product are subject to change for the purpose of further improvement, the descriptions in the Operation Manual may be different from unit to unit even for the same model. Be sure not to refer this manual for one of a different model. Use this manual only for originally delivered model. Some components are omitted in the illustrations in this manual.
Content
1. Precautions on Installation
1-1 Installation location 8
1-2 Precautions in moving in....8
1-3 Check the content and quantity of accessories 9
2. Part Name
2-1 Appearance.... 10
2.2 Control panel....11
3. Matters That Require Particular Attention
3-1 Definition of terms
3-1-1 Explanation of mark 11
3-1-2 Term/Fold type description 11
3-2 Characteristics and intended purpose of use.... 12
3-3 When not in use.... 12
3-4 Precautions for use.... 12
4. Preparation....13
5. How to Use
5-1 Standard Folding of Standard-size Paper....15
5-2 To manually input paper length....17
5-3 Non-standard Folding.... 19
5-4 Cross Folding....21
5-5 Adjustment
5-5-1 Slant adjustment 22
5-5-2 Fine adjustment of fold position 23
5-6 Memorization/deletion of fold position of standard-size paper
5-6-1 Memorization of finely-adjusted fold position 26
5-6-2 Deletion of individual memory of fine adjustment.... 27
5-7 Memorization/deletion of fold position of non-standard fold and non-standard-size paper
5-7-1 Memorization of fold position 28
5-7-2 Calling up fold pattern memory 29
5-7-3 Deletion of entire fold pattern memory 30
5-8 Counter setting
5-8-1 Addition mode 31
5-8-2 Subtraction mode 32
5-8-3 Interval mode 33
5-9 Speed adjustment 34
5-10 Double feed detection function
5-10-1 What is double feed detection 35
5-10-2 Activation of double feed detection 35
5-10-3 Use of double feed detection 36
5-10-4 When the machine stops based on double feed detection error (E-52)....36
6. Maintenance Service, Inspection, Expendables
6-1 Cautions for maintenance service and inspection 37
6-2 Usual maintenance service 37
6-3 Expendable supplies.... 37
6-4 Removal and installation, and cleaning of folder roller 38
6-5 Cleaning of the paper feed, double feed detection, paper ejection photo sensors.... 39
6-6 Removal and installation of paper separator, paper feed rubber roller, brake rubber.....40
7. Trouble shooting and correction
7-1 Error display
7-1-1 Error display screen 41
7-1-2 List of Error Codes 42
7-2 Troubleshooting.... 43
8. Relocation or Disposal
8-1 Relocation
8-1-1 Removal of the machine from its present location 45
8-1-2 Transport 45
8-1-3 Installation.... 45
8-2 Disposal 45
9. Specifications 46
1. Precautions on Installation
1-1 : Installation location
Install this product where the following conditions can be fulfilled.
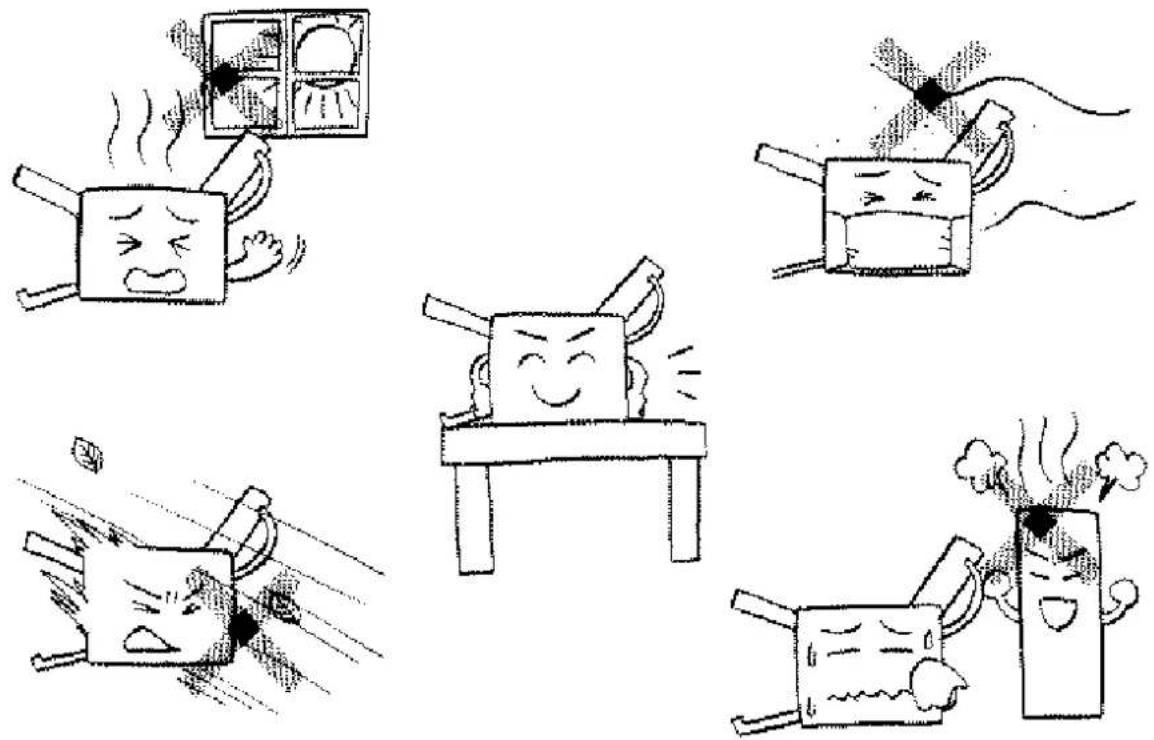
- Do not install it in a place exposed to direct sunlight.
- Avoid a location near a window.
- Do not install it in a dusty place or a place of high humidity.
- Do not install it in a place exposed to a direct wind or a location near a heating equipment.
• Install it on a sturdy and horizontally-located flat stand or table.
1-2 : Precautions in moving in
- Handle with care and do not subject the unit to shock or strong vibration.
- Ensure that the machine is carried by two persons wearing protective gloves, holding the four corners of the base firmly.
1-3 : Check the content and quantity of accessories
Check accessories immediately upon unpacking.
Should there be anything short, contact your distributor.
Also, fill out the warranty documents.
| Accessories | Qty | Illustration |
| Folding Table 1 | 1 |  |
| Folding Table 2 | 1 | 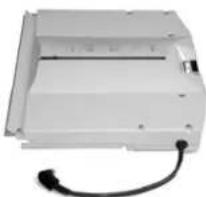 |
| Power cable | 1 | 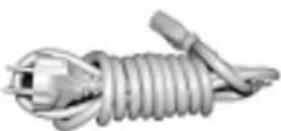 |
| Auxiliary paper guide(right and left) | One(1) each | 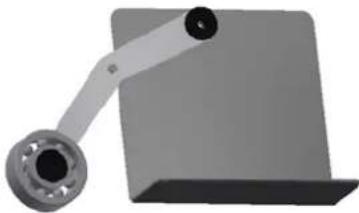 |
| Operation Manual | 1 |  |
| Handy Manual(1 page/A3 size) | 1 |  |
2. Part Name
2-1 : Appearance
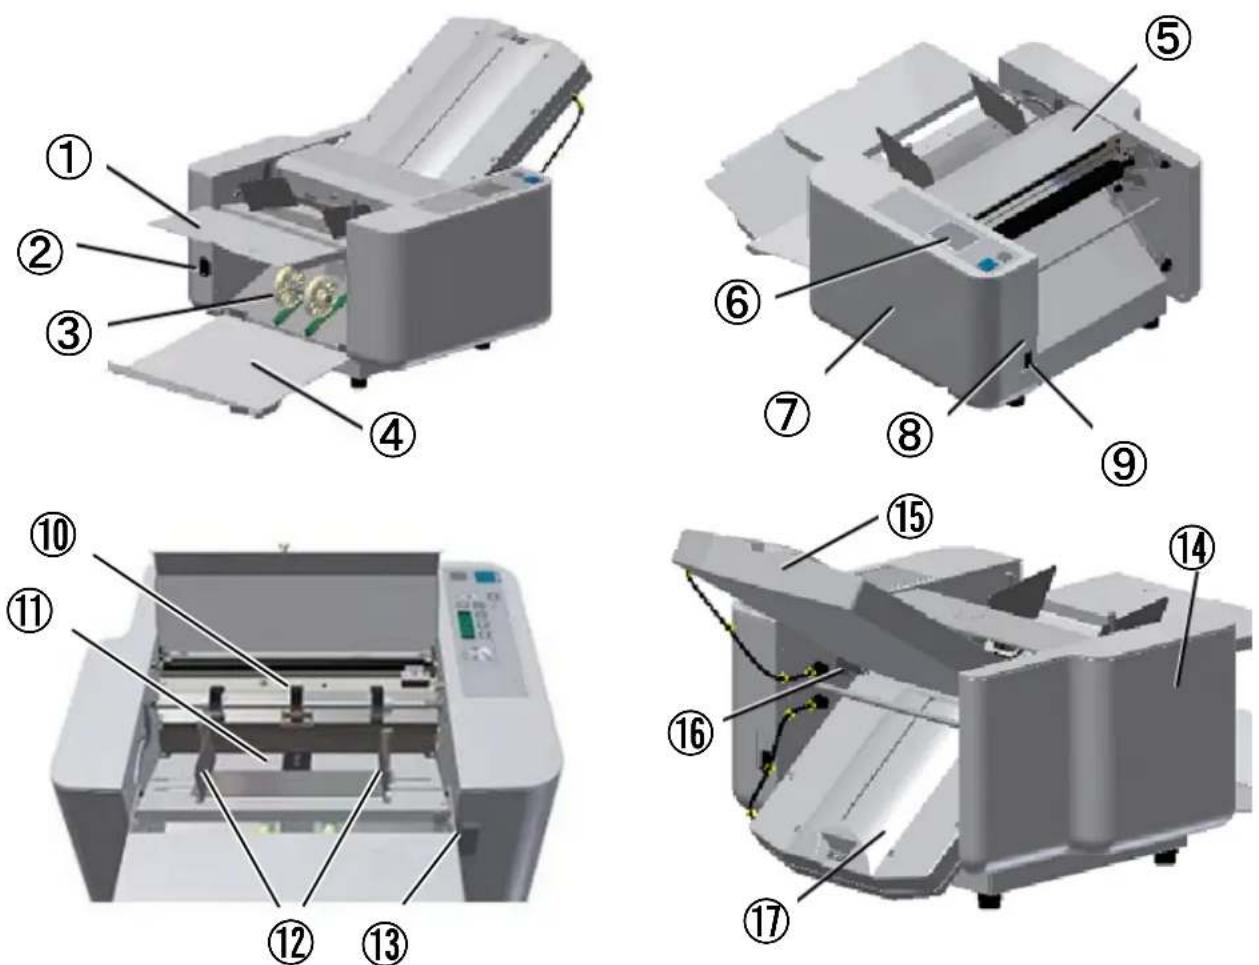
| No. | Name | Function | No. | Name | Function |
| 1 | Auxiliary table | For supporting larger paper | 11 | Paper feed table | For loading paper |
| 2 | Inlet For connecting the power cable | 12 | Paper guide For prevent slant paper feeding | ||
| 3 | Paper ejection roller Arranges and ejects folded paper | 13 | Paper feed table lever For feed table up and down. | ||
| 4 | Paper ejection table | For stacking folded paper | 14 | Left side cover | For protecting mechanical parts |
| 5 | Safety cover | The machine stops when this cover is opened. | 15 | Folding table 1 For performing the first fold | |
| 6 | Control panel For setting operation of machine | 16 | Folder roller setting lever | For removing and setting the folder roller | |
| 7 | Right side cover For protecting against mechanical/electrical parts | 17 | Folding table 2 For performing the second fold | ||
| 8 | Breaker | For protecting against overcurrent | |||
| 9 | Power switch | For turning on/off the power | |||
| 10 | Paper feed roller | Feeds one sheet of paper | |||
2-2 : Control panel
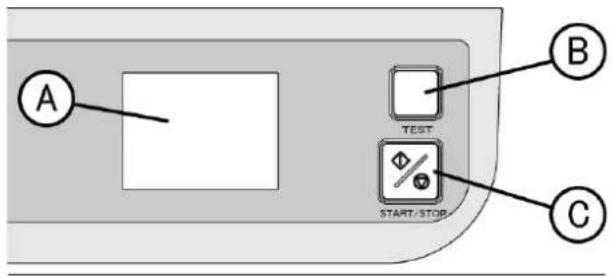
| Number | Name | Function |
| A Color LCD | Touch panel To enter operation | command and display |
| B “TEST” | key To perform test folding (two sheet without count) | |
| C | “START/STOP” key | To start and stop the machine |
3. Matters That Require Particular Attention
3-1 : Definition of terms
3-1-1 : Explanation of mark
Caution! .... Matters that require attention
Hint! Matters that are good to know
3-1-2 : Term/Fold type description
| Term | Description |
| Jam Paper is stuck inside the machine. | |
| Double feed Two or more sheets of paper are fed together. | |
| Slip Paper is not fed due to slippage. | |
| Fan out Separate | stuck sheets of paper by letting air in between them |
| Chart |  |  | 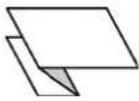 |  |  | 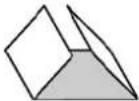 |
| Fold type Single fold | Double parallel fold | Fold-out fold Letter fold Zigzag | fold Gate fold | |||
The shaded parts in the illustrations show the upper side of the paper placed on the paper feed table.
3-2 : Characteristics and intended purpose of use
- Easy-to-read LCD color touch panel.
- High-speed paper folding.
- Automatic paper size detection, fold position setting, paper feed table adjustment (up-down), and paper ejection roller movement.
- For non-standard-paper or non-standard-fold, simply input paper length and fold type to automatically calculate fold position – no time-consuming manual calculation required.
- Memorizes up to 20 non-standard fold patterns.
Three parameters - fold position, speed, and paper ejection roller position - can be memorized.
- Interval mode
- Double feed detection function
- Cross folding
3-3 : When not in use
- Remove the power plug from the power outlet.
- Place the machine cover over the machine.
3-4 : Precautions for use
- Hold the center of the roller cover when opening or closing to prevent any danger of getting caught in the roller.
- Always conduct a test folding to check the fold position for particularly important documents.
- Regardless of the reasons, we will not be responsible or liable for folding misalignment and damage.
4. Preparation
- Install fold table 1 and 2 at the machine.
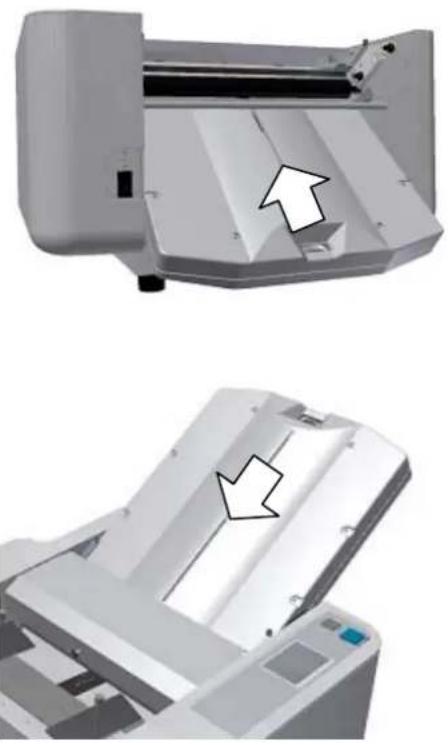
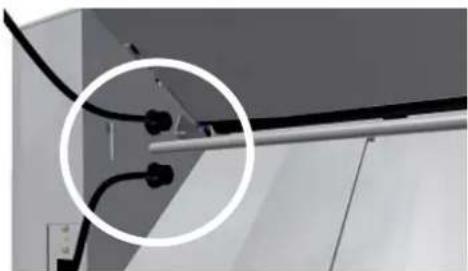
- Insert the plug into the connector.
natural_image
Close-up of electrical cables and wires mounted on a cabinet (no visible text or symbols)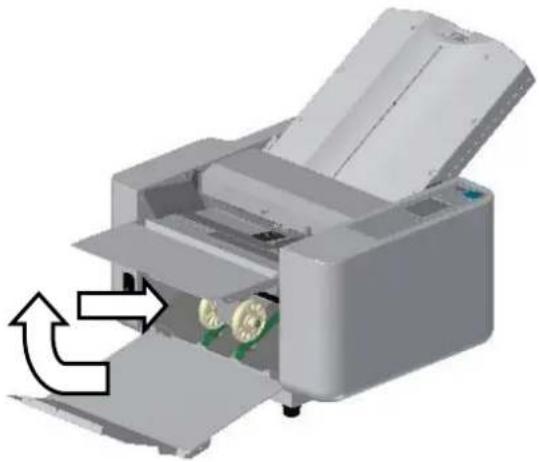
natural_image
3D rendering of a printer with paper feed and paper roll, showing internal components and directional arrows (no text or symbols)Pull out and extend the paper ejection table. Then, lift up and set flat the auxiliary table.
natural_image
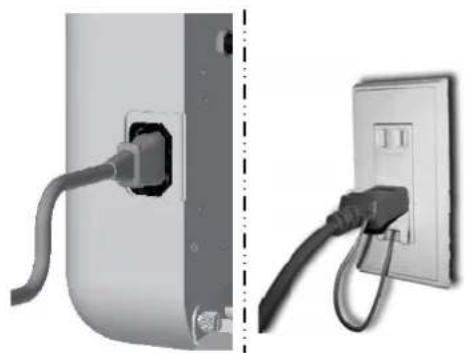
Two-panel image showing a wall-mounted plug connected to an electrical outlet, with no visible text or symbols.Insert the power cable into the outlet.
(The shape of plug may differ from the one shown in the illustration.)
Caution!
Be sure to unwind folded power cable before use.
Do not use any power cable other than provided as an accessory.
Be sure to ground the earth wire of the power cable.
natural_image
3D rendered image of a printer or scanner device with no visible text or symbolsWhen the power switch is on, the touch panel lights and the machine is ready to operation.
| Danger | |
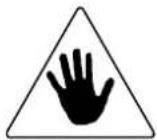 | Do not insert or remove the power plug with a wet hand.It may cause an electric shock. |
| Do not insert the ground (earth) wire of the power cable into the outlet or bring it into contact with the outlet. It may cause a fire or electric shock. |
5. How to Use
5-1 : Standard Folding of Standard-size Paper
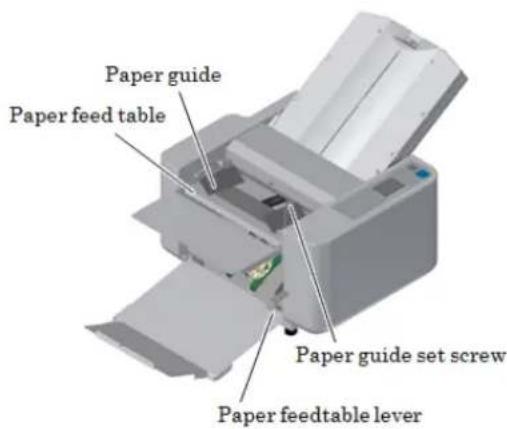
[1] Raise the paper feed table lever.
[2] Set the paper guide for the appropriate paper size.
[3] Neatly stack the paper on the feed table with the printed side facing up.
(printed side down in case of fold-out)
[4] Lower the paper feed table lever.
Caution!
Be sure to ensure that ink has dried completely on printed materials. In case of immediately after printed documents, they may cause jamming, double feeding, paper slippage or wrinkles.
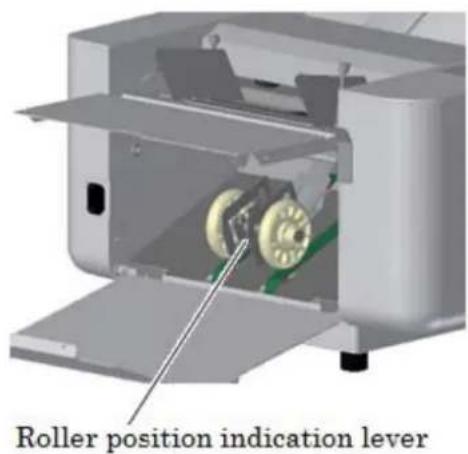
[5] Setting the paper exit roller:
The exit roller should be moved to the proper position according to the paper size. Refer to the “Roller Position Indication” label. If ejection is not performed properly, try a different position.
Example:
Set the roller to position ONE when using A3 paper.
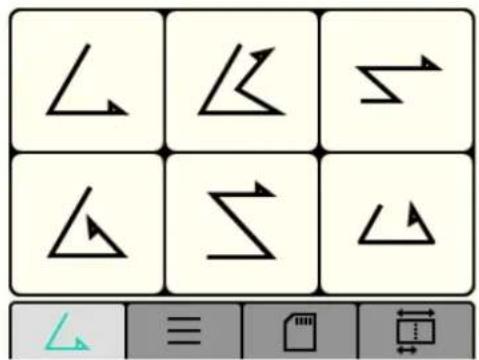
[6] Select the fold type.
Select from among the six fold types (Single, Double, parallel, Fold-out, Letter, Zigzag, Gate). Press the desired fold type key.
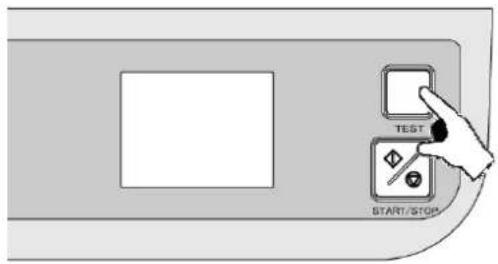
[7] Test folding
Press the "TEST" key, and one sheet will be folded.
(The counter display will remain to display [0].
Check the folding result with the folded paper.
Hint!
- Stains on the roller
- The paper guide is set askew, or it is not in close contact with the paper.
- The paper feed table is set askew.
- The paper is cut at a slant.
→ Refer to “5 - 5 Adjustment” on pages 21 to 24.
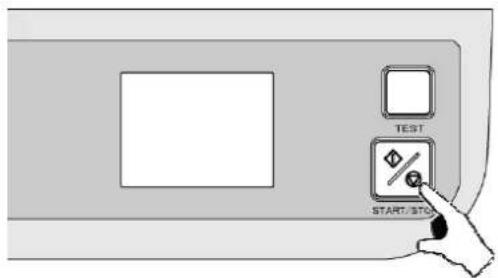
[8] Continuous folding
Press the "START/STOP" key, and the paper feed table will move up and the machine will continuously fold the paper.
When the "START/STOP" key is pressed while the machine is in operation, the machine will stop the operation, but the addition on the counter will continue.
If you wish to fold only the number of sheets desired, refer to "5-8-2 Subtraction Mode" on page 31.
5-2 : To manually input paper length
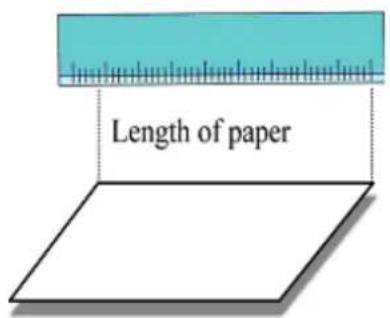
[1] Measure the length of paper in the direction of feeding paper.
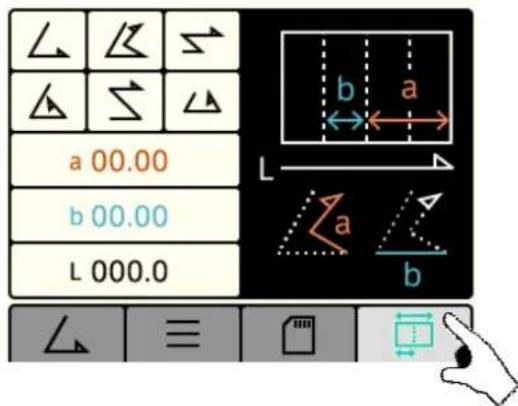
[2] Press the “Non-standard Fold” key
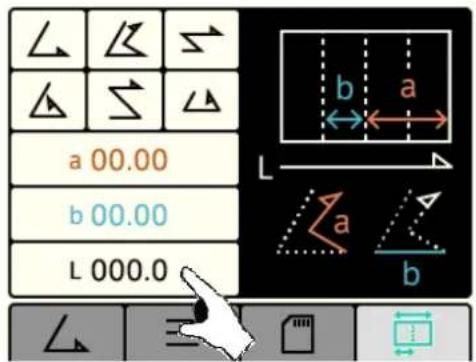
[3] Press the "Input Paper Length" key.
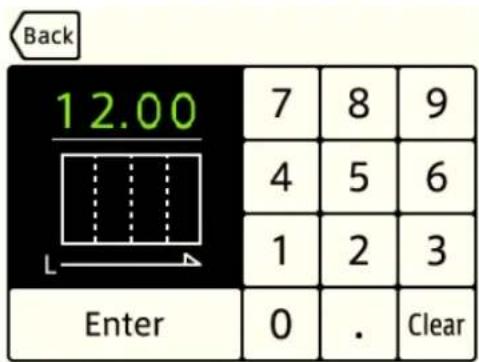
[4] Input the length of paper using numerical keys and press the “Enter” key.
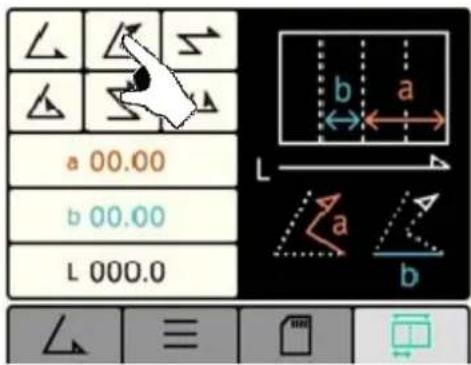
[5] Select the desired fold type from among the six fold type keys.
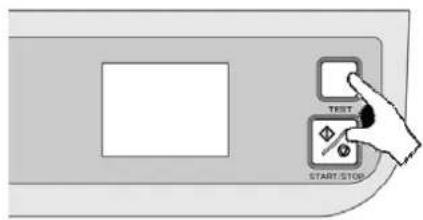
[6] Press the "TEST" key to perform test folding.
If test folding is satisfactory, proceed to step [7].
If it is not satisfactory, adjust folding misalignment.
=> Refer to "5.5 Adjustment" on pages 21 to 23.
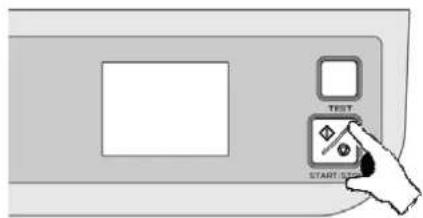
[7] Press the "START/STOP" key to start continuous folding.
5-3 : Non-standard Fold
- Automatic settings cannot be used for non-standard fold. Individual setting of paper size and specifications is required.
- It can be set for both standard-size paper and non-standard paper based on the following procedure.
[1] Using the standard-size or non-standard-size paper you want to fold, create a sample by folding the paper manually.
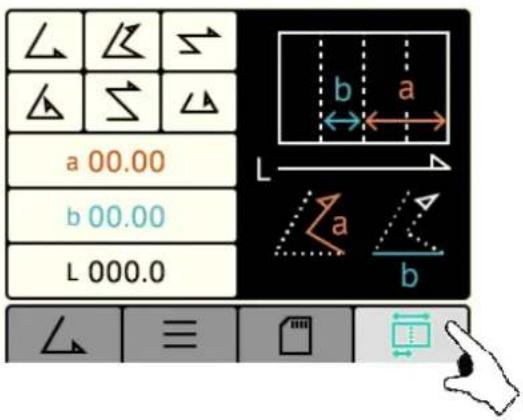
[2] Press the "Non-standard Fold" key
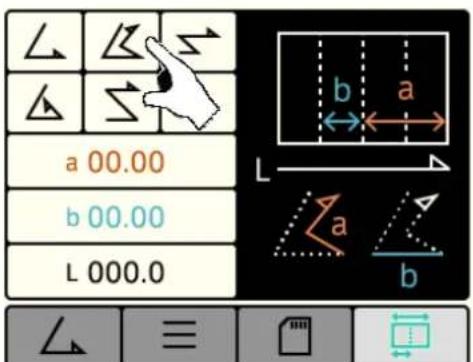
[3] Select the key of the fold type that is the nearest to the intended folding.
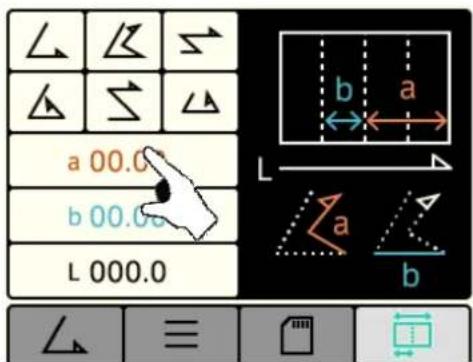
[4] Press the “a” key, and “b” key.
* In the case of single fold, there is no screen for inputting the length of "a" but only the length of "b" should be input.
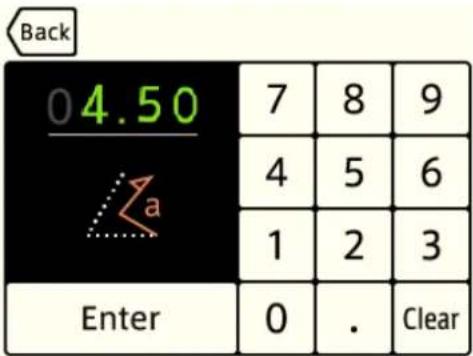
[5] Input the length of “a” using numerical keys and press the “Enter” key.
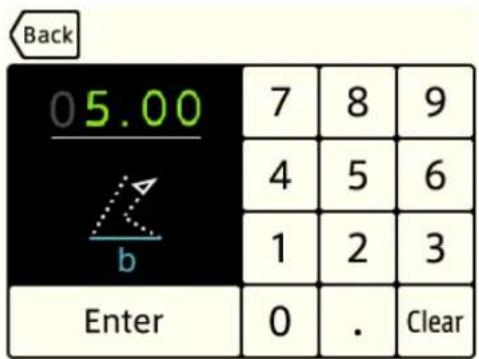
[6] Input the length of “b” using numerical keys and press the “Enter” button.
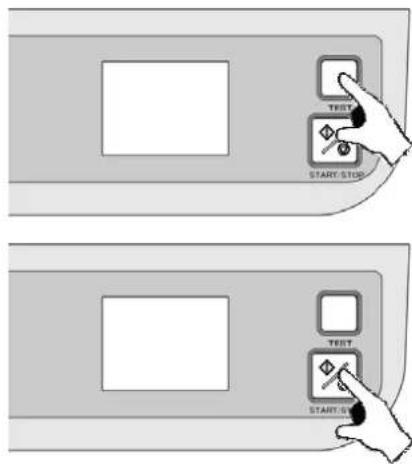
[7] Press the “TEST” key to perform test folding. If test folding is satisfactory, proceed to step [8]. If it is not satisfactory, adjust folding misalignment. => Refer to “5.5 Adjustment” on pages 21 to 23.
[8] Press the “START/STOP” key to start continuous folding.
5-4 : Cross Folding
flowchart
graph TD
    A["Rectangle"] --> B["Circle"]
    B --> C["Box Box"]
    C --> D["X"]
natural_image
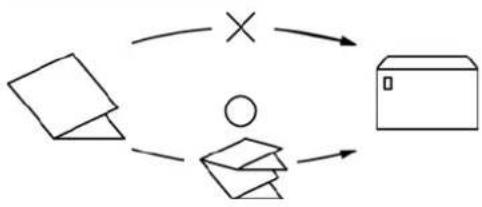
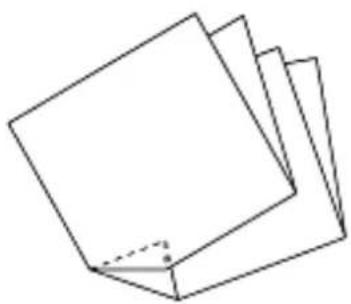
Simple line drawing of a stack of three sheets of paper (no text or symbols)• Cross-folding is to further perform double parallel fold or letter fold on a sheet of paper folded already by single fold.
- This is good for folding A3 size stock which is already folded by double parallel fold but still will not fit into a standard size envelope.
* Paper that can be used for cross folding varies according to the conditions such as type of paper, paper size, paper with lateral grain, paper with vertical grain, temperature and humidity, printing conditions.
It may occur that lateral slanting is larger than normal folding or the corner of the crease is folded inward, but this is not caused by machine failure.
Caution!
Press along the single folded line of the paper with fingers.
The amount of paper loaded should be less than normal (30 sheets or fewer).
Auxiliary paper guides should be placed away from built-in paper guides, and the roller should hold down the single folded line by the first folding process.
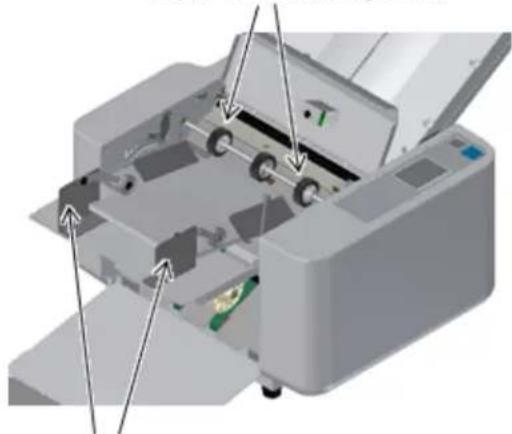
Paper feed auxiliary roller
natural_image
3D mechanical assembly diagram showing internal components with arrows indicating movement or force (no text or symbols present)Auxiliary paper guide
(1) Load single-folded paper on the feed table and secure it with the built-in paper guides from both sides.
(2) Slightly loosen the right and left screws of the paper feed auxiliary roller, and set them to where both ends of the paper are held down.
(3) Set the right and left auxiliary paper guides where the bearing at the edge will accommodate the previously single folded paper edge.
Caution!
As the holder of the paper feed auxiliary roller is made of resin, take care not to damage the holder by tightening the screws too tightly.
5-5: Adjustment
5-5-1 : Slant adjustment
natural_image
3D mechanical assembly diagram showing layered components with no visible text or symbols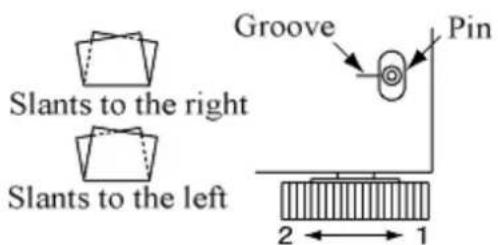
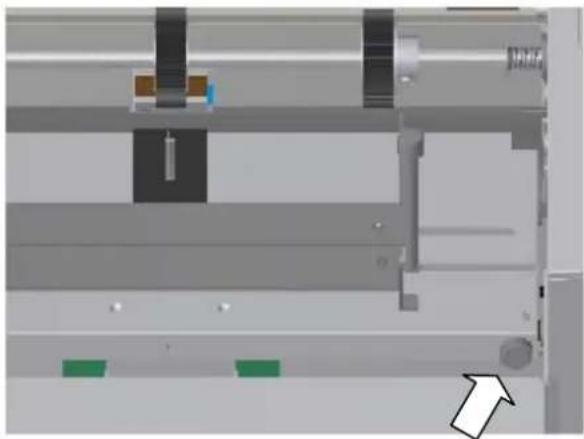
Feed angle adjustment knob
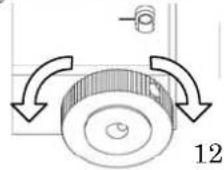
If the folding position is slanted because the paper is cut at a slant or for other reasons, it can be adjusted using the slant adjustment knob.
Turn the slant adjustment knob to the right direction 1, if the lower side of the folded paper slants to the right. Turn the knob to the left to the direction 2 if the lower side slants to the left.
(The basic position of the knob is the center where the pin is aligned with the slot.)
Caution!
Check if there is any space between the paper guides and the paper.
In cases other than single fold, put the folded paper at Table 1 face down to make a ejection adjustment.
If paper is reset at the paper feed table, start slant adjustment over again.
After specific job is completed, return the slant adjustment knob to its basic position, i.e., center in the slot.
slant
5-5-2 : Fine adjustment of fold position
If by test folds any folding misalignment is found after standard folding or non-standard folding is set, fine adjustment of the fold position should be made according to the following procedure.
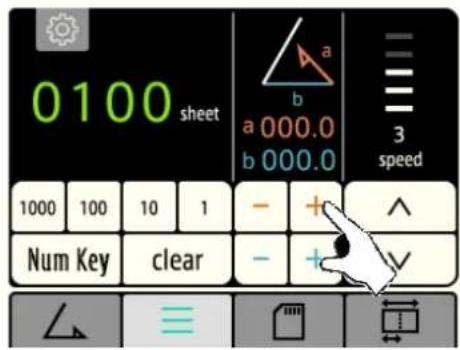
[1] In case of "a"
Press the “+/-” key and move the stopper to the desired position.
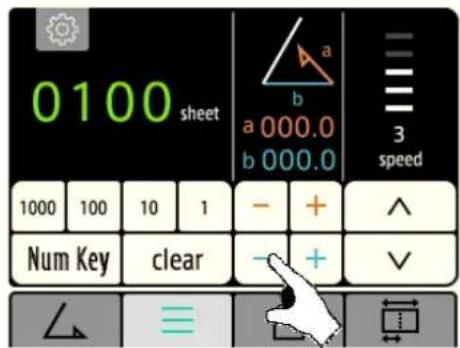
[2] In case of "b"
Press the “+/-” key and move the stopper to the desired position.
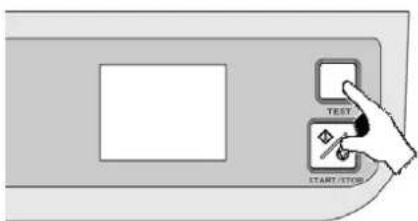
[3] Press the “TEST” key to perform test folding. If test folding is satisfactory, proceed to step [6]. If it is not satisfactory, adjust folding misalignment.
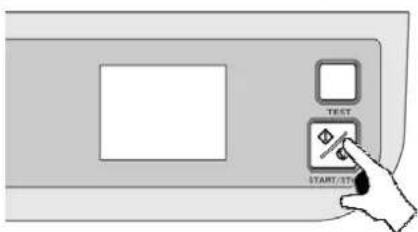
When readjustment is required, repeat the above procedure [1] to [4].
[4] Press the “START/STOP” key to conduct continuous folding
Using fine adjustment knob
Move the stopper using the stopper fine adjustment knob.
Caution: (In case the stopper fine adjustment knob is moved) When the Test key is pressed, the machine will continue to fold, and when the Start/Stop key is pressed, the machine will start to fold after the stopper is returned to the previous position
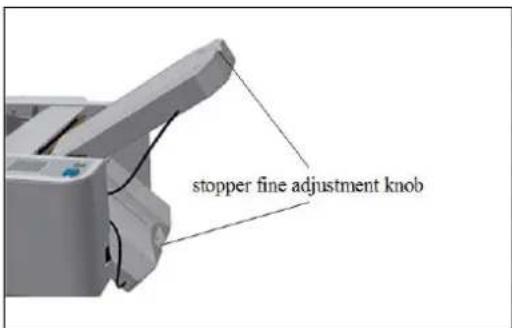
Fine Adjustment for Table 1
| Fold type Plane (A) | Direction to turn the Table 1 fine adjustment knob | ||
| Single folding | Table 1 is not used | ||
| Gate folding | 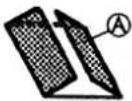 | Long |  |
| Short |  | ||
| Letter folding |  | Long |  |
| Short |  | ||
| Zigzag folding |  | Long |  |
| Short |  | ||
| Double parallel folding |  | Long |  |
| Short |  | ||
| Fold-out folding | 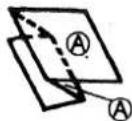 | Long |  |
| Short |  | ||
Fine Adjustment for Table 2
| Fold type Plane (B) | Direction to turn the Table 2 fine adjustment knob | ||
| Single folding | 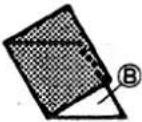 | Long |  |
| Short |  | ||
| Gate folding | 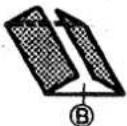 | Long |  |
| Short |  | ||
| Letter folding | 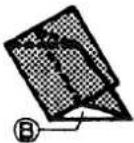 | Long |  |
| Short |  | ||
| Zigzag folding |  | Long |  |
| Short |  | ||
| Double parallel folding |  | Long |  |
| Short |  | ||
| Fold-out folding | 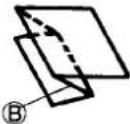 | Long |  |
| Short |  | ||
5-6 : Memorization/deletion of fold position of STANDARD-SIZE-PAPER
In the case of standard folding of standard-size paper, after the fold position is finely adjusted, the fold position can be memorized.
5-6-1 : Memorization of finely-adjusted fold position
Complete adjustment in advance so that desired folding is performed.
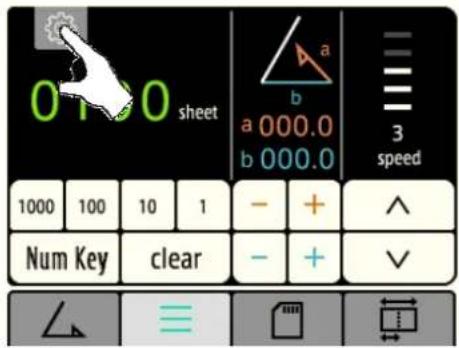
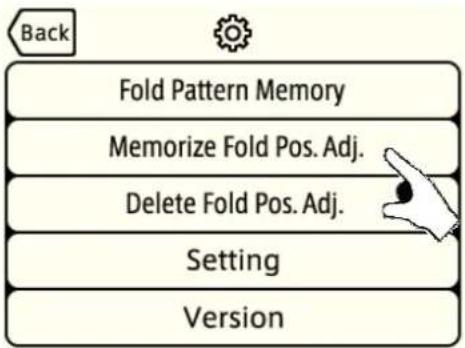
[1] Press the "Gear" key.
flowchart
graph TD
    A["Back"] --> B["Fold Pattern Memory"]
    B --> C["Memorize Fold Pos. Adj."]
    C --> D["Delete Fold Pos. Adj."]
    D --> E["Setting"]
    E --> F["Version"]
[2] Press the "Fold Pos. Adj. Memorize" key.
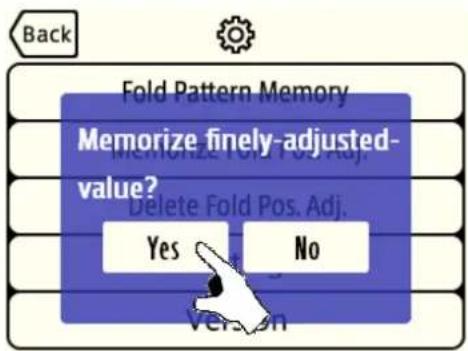
[3] Pressing the “YES” key, the finely-adjusted values will be memorized.
5-6-2 : Individual deletion of individual memory of fine adjustment
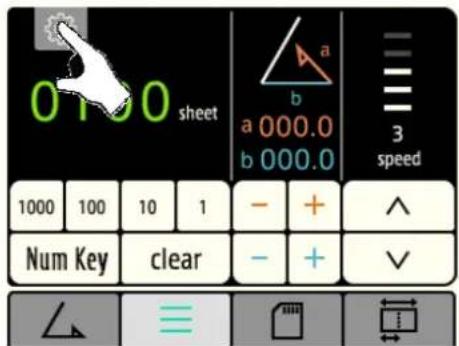
[1] Press the "Gear" key.
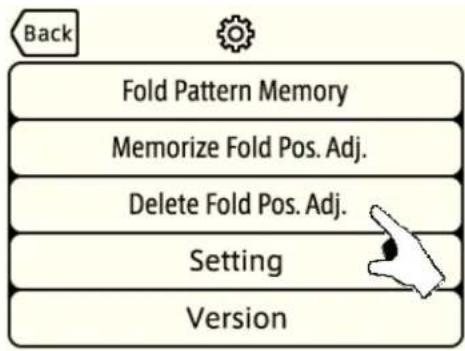
flowchart
graph TD
    A["Version"] --> B["Setting"]
    B --> C["Delete Fold Pos. Adj."]
    C --> D["Memorize Fold Pos. Adj."]
    D --> E["Fold Pattern Memory"]
[2] Press the "Fold Pos. Adj. Delete" key.
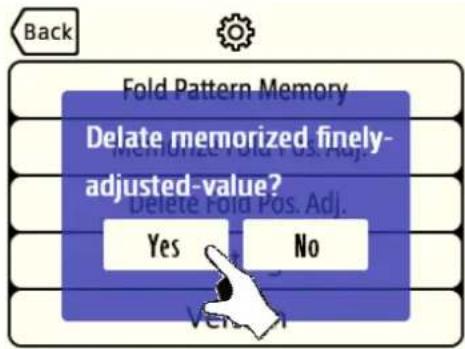
[3] Pressing the “Delete” key the finely-adjusted values will be deleted.
5-7 : Memorization/deletion of fold position of NON-STANDARD-FOLD and NON-STANDARD-SIZED PAPER
5-7-1 : Memorization of fold position
Complete in advance so that desired fold is performed.
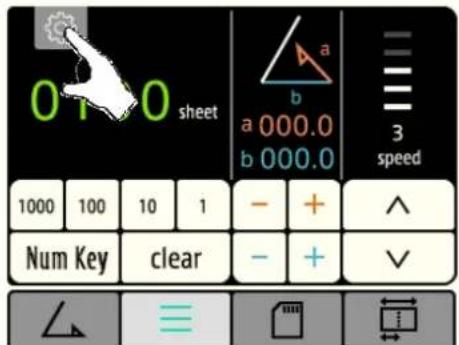
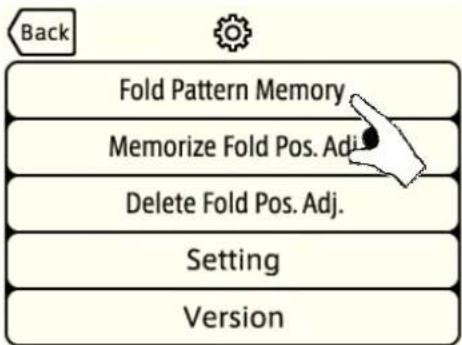
[1] Press the "Gear" key.
flowchart
graph TD
    A["Back"] --> B["Fold Pattern Memory"]
    B --> C["Memorize Fold Pos. Adj."]
    C --> D["Delete Fold Pos. Adj."]
    D --> E["Setting"]
    E --> F["Version"]
[2] Press the "Fold Pattern Memory" key.
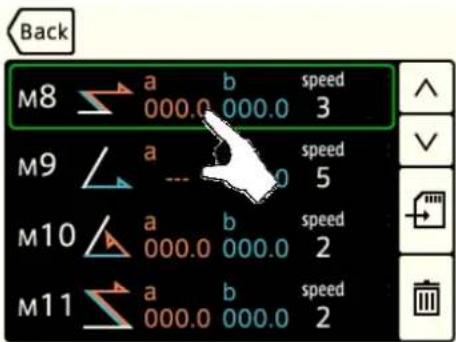
[3] Press the memory number window you want to memorize, and the present data will be memorized in the user memory.
Using “▲” and “▼” key, move the pages.
* As many as 12 pattern can be memorized.
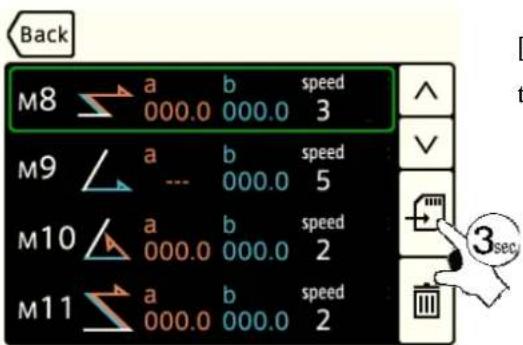
[4] Keep pressing the “Memory” for three seconds, and all the fold pattern values will be memorized.
5-7-2 : Calling up fold pattern memory
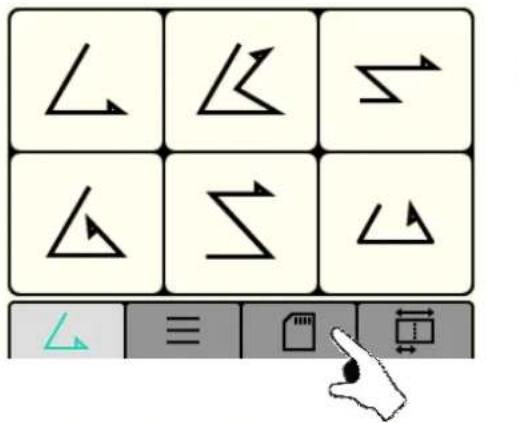
[1] Press the "Memory Fold" key.
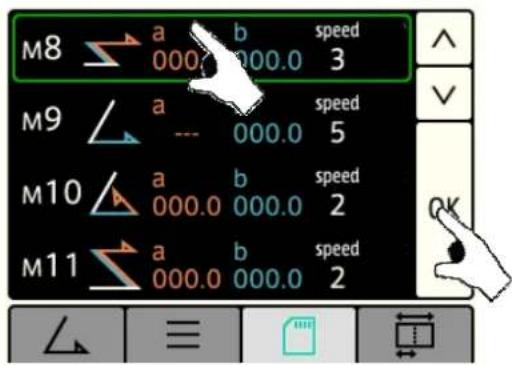
[2] Using “▲” and “▼” keys, select the memorized fold pattern and press the “OK” key.
Select desired memory number 01 thru 12 and press the window. Note, in case all factor are the same for paper size, folding pattern and speed, select by the register number.
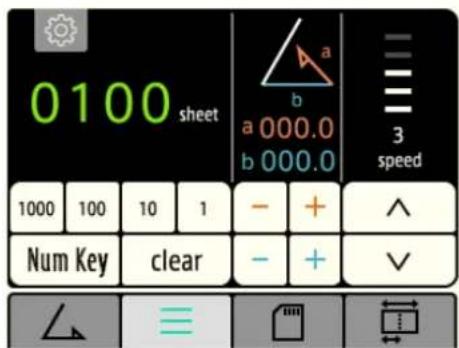
[3]Once desired folding patter is retrieved, read and confirm that paper size, folding pattern, speed and register numbers are correct.
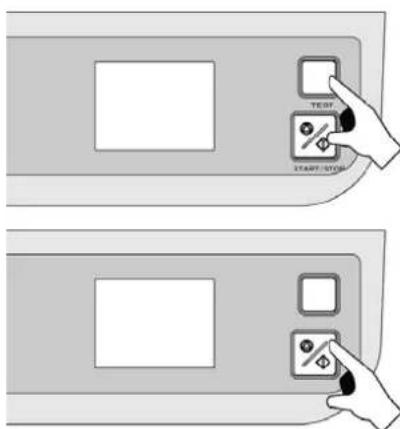
[4] Press the “TEST” key to perform test folding. If test folding is satisfactory, proceed to step [5]. If it is not satisfactory, adjust folding misalignment.
When readjustment is required, repeat the above procedure [1] to [4].
[5] Press the “START/STOP” key to conduct continuous folding
5-7-3 : Deletion of fold pattern memory
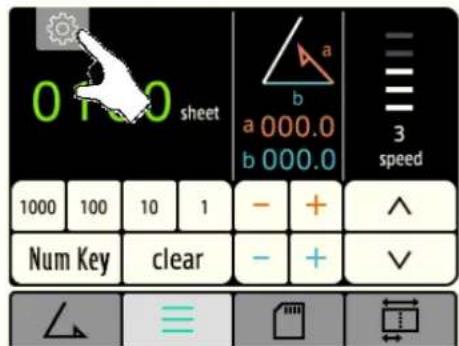
[1] Press the "Gear" key.
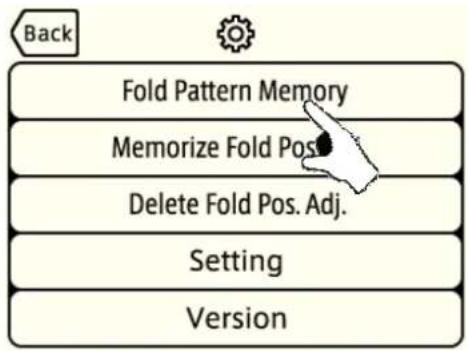
flowchart
graph TD
    A["Back"] --> B["Fold Pattern Memory"]
    B --> C["Memorize Fold Post"]
    C --> D["Delete Fold Pos. Adj."]
    D --> E["Setting"]
    E --> F["Version"]
[2] Press the "Fold Pattern Memory" key.
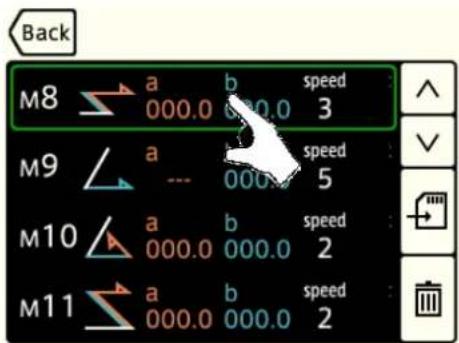
[3] Press the memory number window you want to memorize, and the present data will be memorized in the user memory.
Using “▲” and “▼” key, move the pages.
* As many as 12 pattern can be memorized.
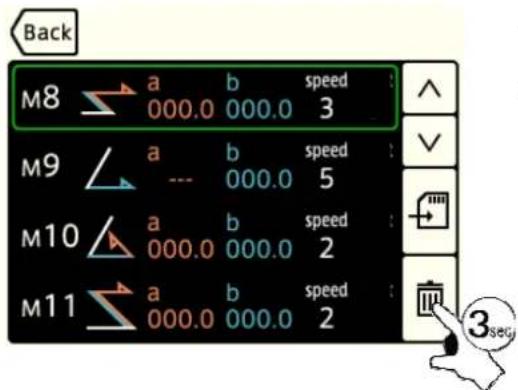
[4] Keep pressing the "Delete" for three seconds, and all the fold pattern values will be deleted.
5-8 : Counter setting
5-8-1 : Addition mode
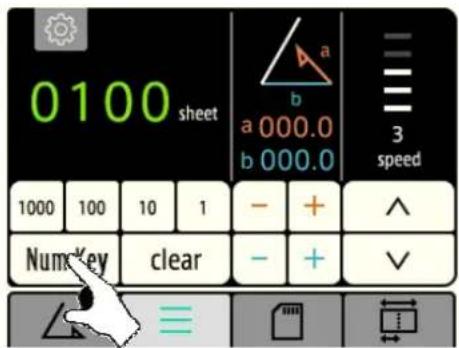
[1] Press the "Num Key" key
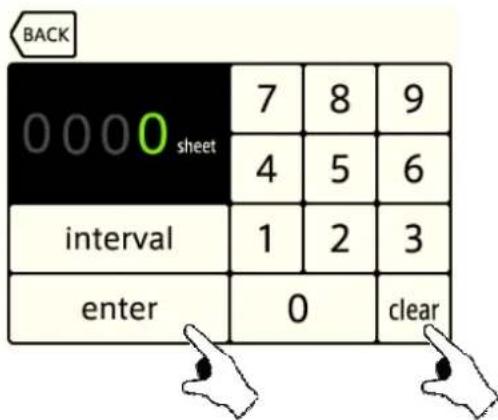
[2] Press the “clear” key to clear the counter, and press the “Enter” key.
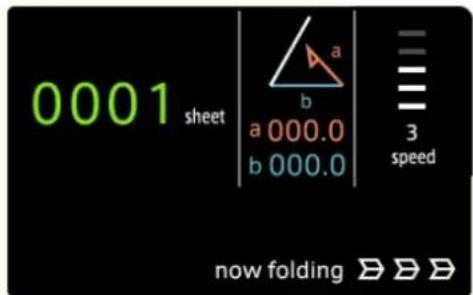
[3] When the Addition mode is selected, count only will be displayed on the counter display.
5-8-2 : Subtraction mode
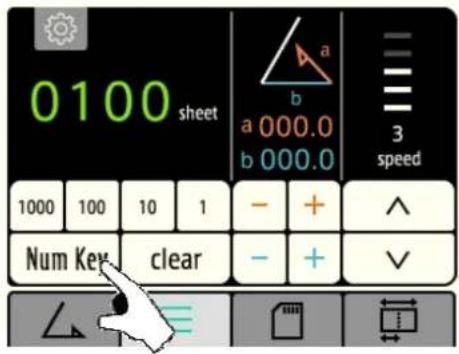
[1] Press the "Num Key" key
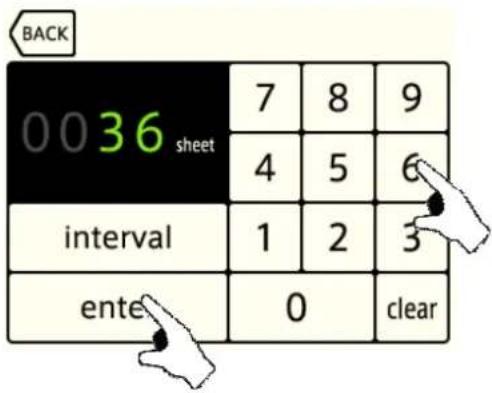
[2] Using numerical keys, input the number of sheets you want to fold in the counter and press the "Enter" key.
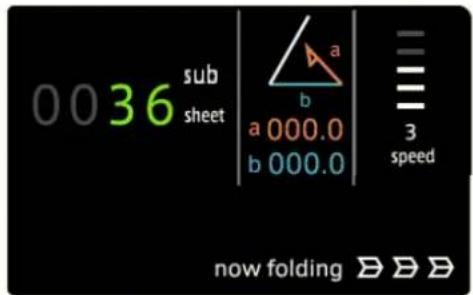
[3] While the Subtraction mode is activated, count and "SUB" will be displayed in the counter display.
5-8-3 : Interval mode
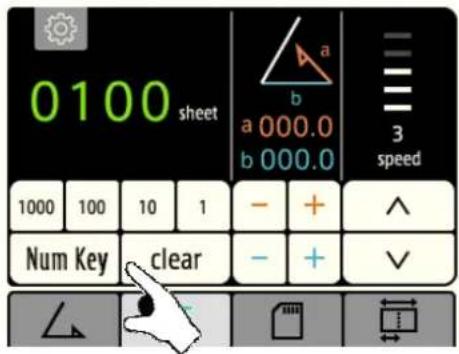
[1] Press the "Num Key" key
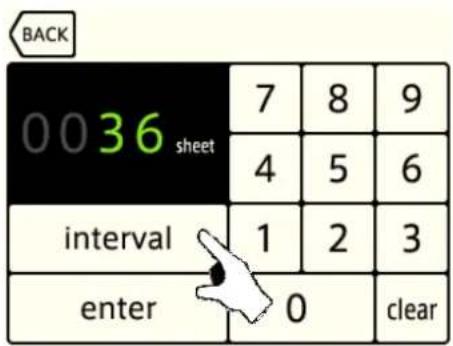
[2] Press the "Interval" key on the counter input screen, and the interval setting screen will be displayed.
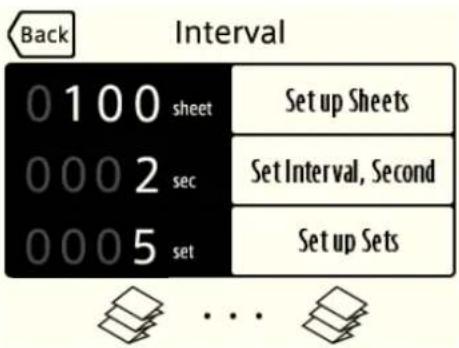
[3] Press the “Set up sheets” key. Input desired sheets quantity and press Enter. By the same procedure, set up “Set Interval Second” and “Set up Sets”.
- When all the values are input, will be displayed again.
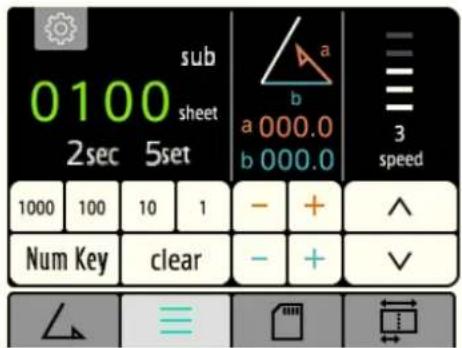
[4] When the Interval mode is activated, two values, namely, processed number of sheets and the number of sets will be displayed on the counter display.
5-9 : Speed adjustment
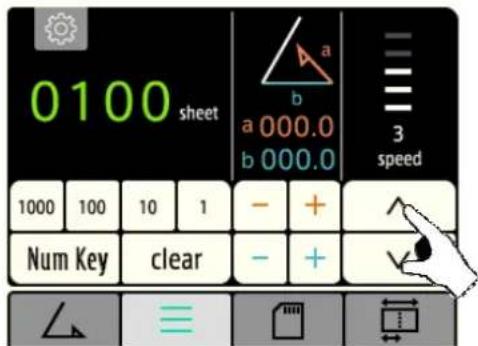
[1] Using “-” and “+” keys, set the speed (5 levels)
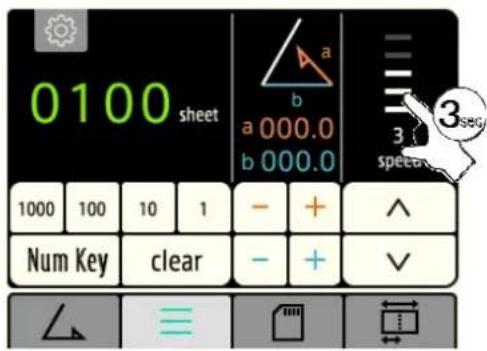
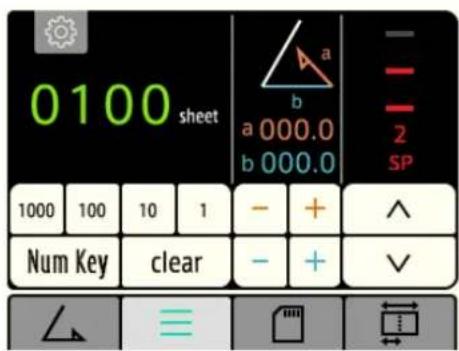
[2] Keep pressing the “speed” area for three seconds, the machine enters SPECIAL mode.
SP1: The machine operates in a silent manner. This mode is not suitable for sheets of thick paper.
SP2: Dedicated mode for sheets of thick paper.
SP3: The machine can perform folding work at high speed. Sheets of paper of A4 and smaller sizes can be folded only in two, inward three, and four.
5-10 : Double feed detection function
5-10-1: What is double feed detection?
Machine detects when two or more sheets are fed through together and the double-fed paper will be ejected on the folding table 1 which is located inside of rear cover without being folded.
* This function also detects differences in paper thickness and different print sheets, stopping the machine if such differences are detected. (Error Code E-52)
5-10-2 : Activation of double feed detection
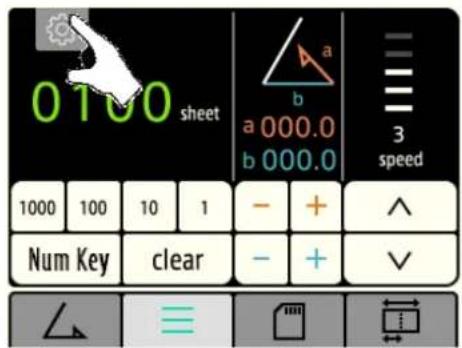
[1] Press the gear button and select the setting window.
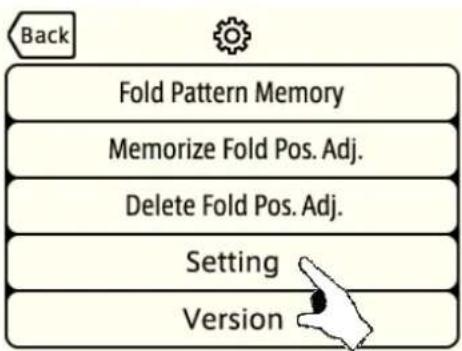
flowchart
graph TD
    A["Back"] --> B["Version"]
    B --> C["Setting"]
    C --> D["Delete Fold Pos. Adj."]
    D --> E["Memorize Fold Pos. Adj."]
    E --> F["Fold Pattern Memory"]
[2] Press the "Setting" key
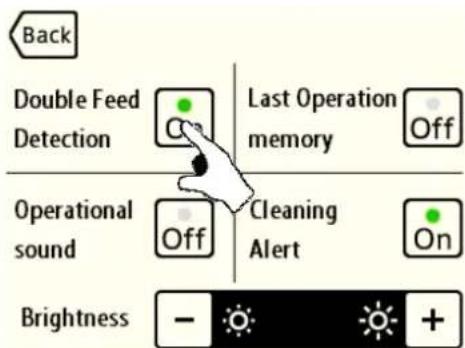
[3] Activating double feed function
Press the “Double Feed Detection” key to activate.
* When two or more sheets are fed together, or different prints are fed through, the machine will stop operating. (E-52)
[3] Canceling double feed detection function
Press the “Double Feed Detection” key to deactivate.
Cancel the double feed detection function in the situation such as:
* When performing cross folding
* When different prints, or paper of various thickness are being folded.
5-10-3 : Use of double feed detection
Notes: Make sure the double feed detection is activated.
It responds to all the fold types except cross folding.
[1] Perform test folding before starting actual operation.
* By the process of test fold, the machine memorizes paper thickness, print pattern, paper length. Based on the test fold data, it will detect double feed.
[2] Start folding operation as usual.
5-10-4: When the machine stops based on double feed detection error (E-52)
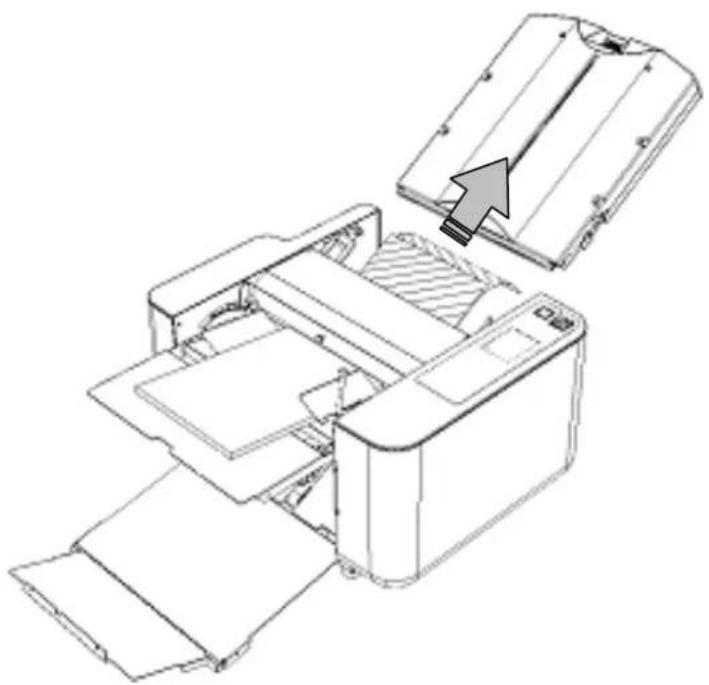
[1] Open the rear cover and remove the paper ejected by double feed.
[2] Close the rear cover and press the error release button to release the error (E-52). Then, the machine will be able to restart its operation.
* Note: The paper will not be ejected automatically.
The double fed paper is not folded and held at Table 1 so that they can be reused.
natural_image
Technical line drawing of a printer internal structure showing internal components and a highlighted section (no text or symbols)6. Maintenance Service, Inspection, Expendables
6-1 : Important points for maintenance service and inspection
6-2 : Usual maintenance service
Machine body
- If paper dust or dirt accumulates on the folding rollers, mechanical troubles may occur to the folding function. Therefore, place the machine cover over the machine when it is not in use.
- As for stains on the exterior parts, use dedicated cleaner.
Do not use solvent cleaning liquids as they may cause discoloration.
Folding roller
- If the folding rollers accumulate paper dust or ink from the printed material, it may may make the paper wrinkled or cause troubles such as paper jam. To prevent this, clean the roller regularly using the dedicated cleaner and cloth.
- Using a cloth dampened with dedicated cleaner, strongly rub and wipe off the folding rollers one by one until the cloth no longer picks up any dirt.
Paper feed rubber roller
- If the paper feed rubber roller or the paper separator acquires paper dust or ink from the printed material, the paper folding function will deteriorate, and it may cause paper jam or slippage. To prevent this, clean them using the dedicated cleaner.
6-3 : Expendable supplies
The paper feed rubber rollers and paper separators are consumable products.
Contact your dealer when they need replacing.
| Warning | |
 | When conducting inspections and maintenance service, be sure to remove the electric power plug from the outlet. If not, it may cause injuries or electric shock. |
6-4 : Removal and installation, and cleaning of folder roller
Two rollers can be removed and installed without using any tool. Thus, cleaning of the rollers and paper ejection photo sensor can be done easily. As the other two rollers cannot be removed, they should be cleaned while manually revolving them little by little.
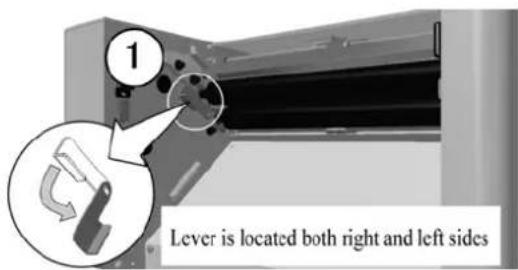
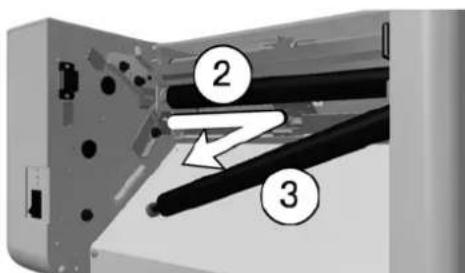
[How to remove the folder rollers]
Remove the rear cover and folding tables 1 and 2. Refer to the previous page.)
[1] Move down the roller setting lever to the OFF position.
The roller setting lever is located on both right and left sides.
[2] Slide the upper folder roller to the left.
(The shaft will come off from the left-side hole.)
[3] Remove the roller from the right-side hole.
By the same procedure, remove the lower folder roller.
natural_image
Technical illustration of a mechanical assembly with tool and component details (no text or symbols)- Clean the four rollers.
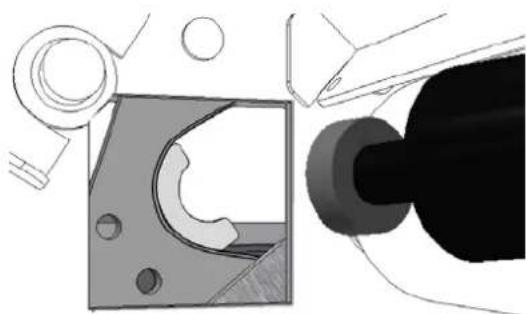
After the cleaning, in the reverse order of removal, set the lower roller first.
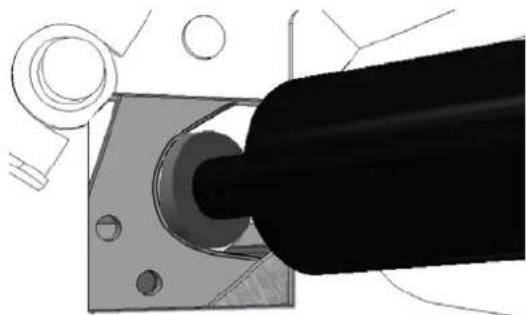
[How to set the folder roller]
[1] Insert the roller deep to the right.
[2] Slide the roller to the left.
[3] Move up the roller setting lever to the ON position.
natural_image
Technical illustration of a mechanical assembly with a black cylindrical component inserted into a metal bracket (no text or symbols visible)Caution!
If the roller is not firmly set, it may cause mechanical troubles. If it cannot be fixed, contact your dealer as shown on the back cover.
6-5 : Cleaning of the paper feed, double feed detection, paper ejection photo sensors
[ Cleaning the paper ejection photo sensor ]
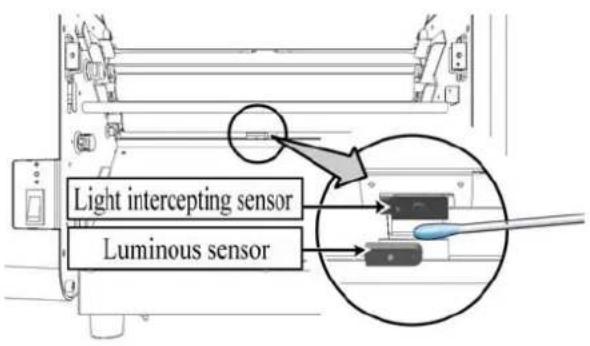
Diagram showing that the folder roller is removed (Refer to the figure on page 46.)
If only one sheet of paper is being fed, remove the paper dust on the part of the paper ejection photo sensor indicated by the arrow, using a soft cotton swab.
[ Cleaning the paper feed and double feed detection photo sensors ]
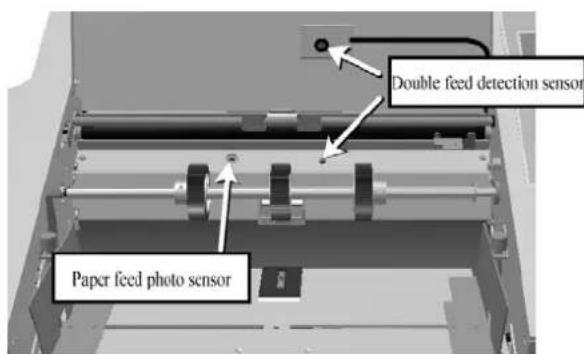
Open the safety cover, and using an air duster, clean [1] the surface of the paper feed photo sensor (black resin face), and [2] the surface of the double feed detection sensor.
(Instead of an air duster, a damp, but not dripping, cotton swab or similar implement may be used.)
Caution!
If using a cotton swab to clean the sensors, ensure that no cotton lint is left behind.
Insufficient cleaning may cause the paper feed to stop, or an error to occur after only the first sheet of paper is fed.
Only turn the machine on when the sensor has fully dried after cleaning.
6-6 : Removal and installation of paper separator, paper feed rubber roller, brake rubber
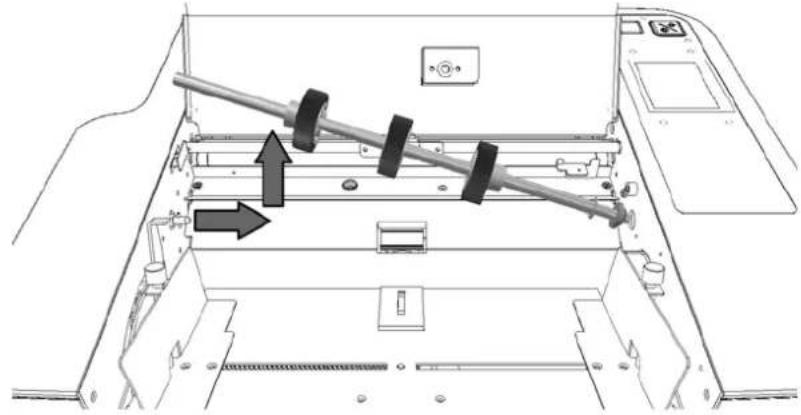
When replacing the paper feed rubber roller and paper separator, remove them in the following manner.
natural_image
Technical diagram of a mechanical device with internal components and directional arrows indicating movement (no text or symbols)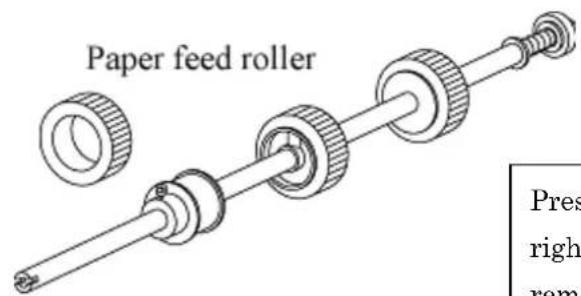
Press paper feed roller shaft to the right and spring loaded shaft will be removed without tools.
natural_image
3D rendered image of a simple rectangular table with two legs and a flat top (no text or symbols)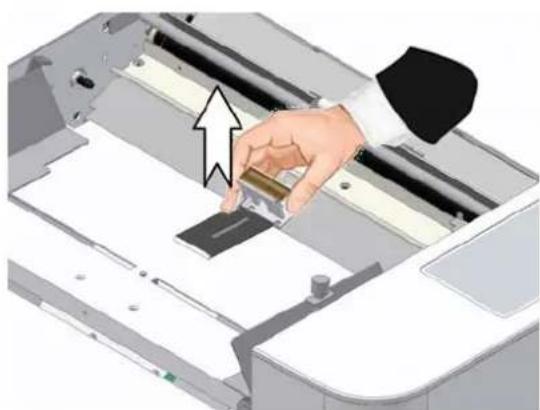
natural_image
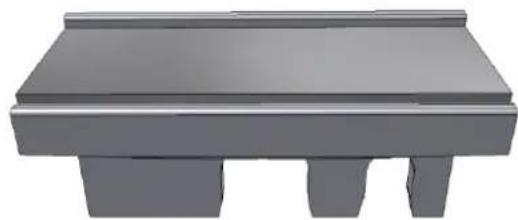
Illustration of a hand inserting a component into a printer's drawer (no text or symbols visible)Hold both ends of the paper separator (covered with resin) and pull it out.
When fitting it, proceed in the reverse order to the removal process.
To purchase above parts, contact your dealer.
7. Trouble shooting and correction
7-1 : Error display
7-1-1 : Error display screen
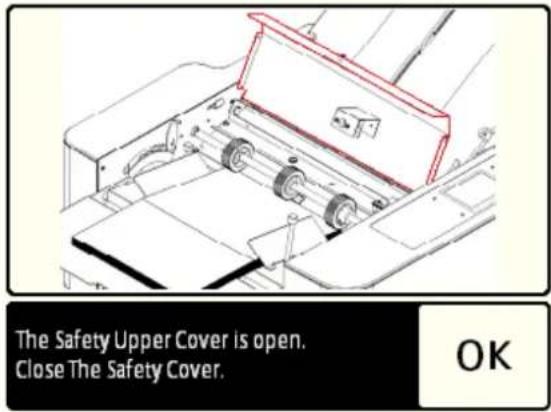
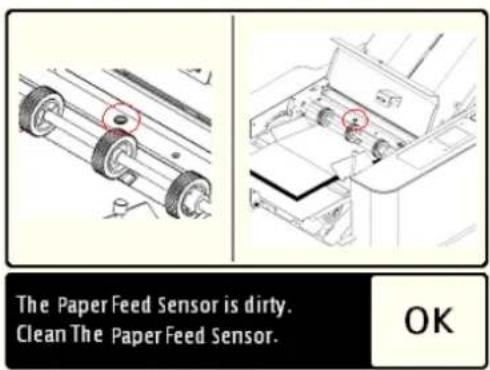
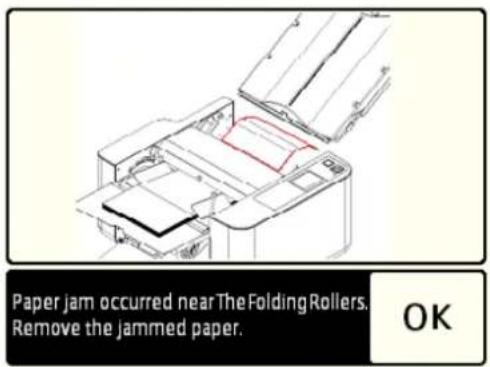
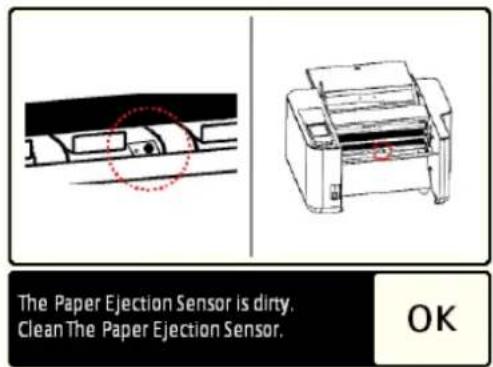
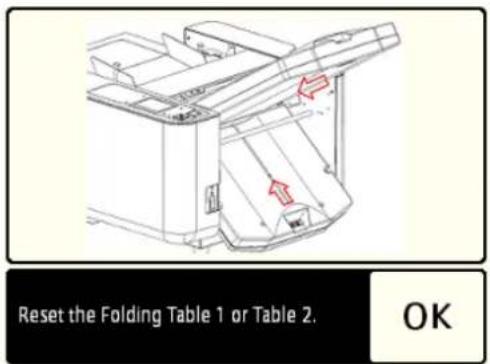
When an error occurs, location of trouble and error code will be shown in the display.
Remove the cause of error first and then press "OK" key and the specific error display will be cleared.
[ Typical error correction display screens ]
7-1-2 : List of Error Codes
| Error Code | Symptom | Countermeasures. |
| E-01 | The paper feed table lever is lowered. Feed Table is not being set to feed. | Raise the paper feed table lever. |
| E-02 | There is no paper, or the paper is not activating paper detection switch due to light weight. | Reset the paper or add some sheets of paper. When there are only a few sheets of paper, the paper detection switch may not be able to detect it. |
| E-03 | The paper did not reach as far as the paper feed sensor. | Paper feed slip occurred. Reset the paper and restart the operation. |
| E-04 | The paper feed sensor is dirty. Clean the paper feed sensor. (Refer to “6-5” on page 39) | |
| E-05 | Paper jam occurred near the paper feed sensor. Remove the paper and restart the operation. | |
| E-20 | Paper jam occurred near the paper ejection sensor. | Remove the jammed paper. |
| E-21 | The paper ejection sensor is dirty. Clean the paper ejection sensor. (Refer to “6-5 on page 39) | |
| E-30 | The safety cover (upper or rear cover) is open. Close the safety cover. | |
| E-31 | The Folding Table 1 or Table 2 didn’t move right. | Reset the Folding Table 1 or Table 2. |
| E-32 | The Folding Table 1 didn’t move right. Insert the plug into the Table 1 Connector. | |
| E-33 | The Folding Table 2 didn’t move right. Insert the plug into the Table 2 Connector. | |
| E-52 | Double feed. Two or more sheets were fed. Check the ejected paper. Also, fan out the loaded paper sufficiently and restart the operation. | |
| E-53 | The first sheet was double fed. Two or more sheets were fed. Check the ejected paper. Also, fan out the loaded paper sufficiently and restart the operation. | |
| E-70 | Motor has stopped. Paper jam occurred near the Folding Rollers. Remove the jammed paper. | |
| E-90 | EEPROM Error. Turn off power and turn on power again.. If it is not resolved, contact your dealer. | |
| E-91 | Touch panel communication error Reload the power. If it is not resolved, contact your dealer. |
7-2 : Troubleshooting
| Problem | Possible | Cause | Countermeasure |
| Folding misalignment occurs. | Fine adjustment is not made. Correct | ct the misalignment using the fine adjustment knob. | 5.5 Adjustment |
| The processing speed was changed during operation. | Do not change the speed during specified folding operation. | ||
| The folding roller is dirty. Clean the | folding roller. 6. Maintenance, | Service, Inspection, Expendables | |
| The paper guides are fixed in the right angle or not in close contact with the paper. | Make the paper guide in close contact with the paper. | ||
| The paper feed table is not set in the right angle. | Straighten the paper feed table using the slant adjustment knob | 5.5.1 Slant adjustment | |
| The paper is cut at a slant. Correct | it using the slant adjustment knob. | ||
| Paper is thin or curled paper is used. | Replace the paper or (if possible) turn it over. | ||
| Paper jam frequently occurs. | The folding roller is dirty. Clean the | folding roller 6. Maintenance, | Service, Inspection, Expendables |
| Folding roller is not properly set. Set the folding roller properly. | |||
| Paper out of specification is used. Use a designated paper. | |||
| Thicker paper is folded at a slower speed. | Increase the speed. | 5.9 Speed adjustment | |
| The folding tables 1 and 2 are not properly set. | Set the folding tables 1 and 2 properly. | ||
| Some torn paper is stuck at location where paper passes. | Check where the part is and remove the foreign paper. | ||
| The paper feed roller is dirty. | Clean the paper feed roller. | 6. Maintenance, Service, Inspection, Expendables | |
| Extreme static electricity | Spray commercially available antistatic spray. | ||
| Paper is not fed even when the “START” key is pressed. | There is no paper or only a few sheets on the paper feed table. | Load the paper on the paper feed table. | |
| The upper roller or rear cover is open. | Close the cover. | ||
| The paper ejection photo sensor is dirty. | Clean the paper ejection photo sensor. | 6.5 Cleaning of the paper ejection photo sensors | |
| Folded paper is wrinkled. | Paper is coiled around the folder roller. | Remove the tables 1 and 2 and remove the paper from the folding roller. | 6.5 Removal and installation, and cleaning of folder roller |
| The folding roller is dirty. Clean the | folding roller. 6. Maintenance, | Service, Inspection, Expendables | |
| Short grain paper is used or paper is not enough stiffness. | Slow the processing speed. | 5.9 Speed adjustment | |
| Paper out of specification is used. Use a designated paper. | |||
| Paper is thin or curled paper is used. | Replace the paper or (if possible) turn it over(up side down). | ||
| The power is not applied even when the power switch is turned on. | The power cable plug is not connected to the outlet. | Insert the power cable plug firmly into the outlet. | |
| The circuit breaker is actuated. Remove the cause (such as paper jam) and press the breaker button. | 2.1 Appearance | ||
| Paper jam occurs frequently at ejection area. | The position of paper ejection roller is not suitable for the paper size and fold. | Set the paper ejection roller in the optimal position. | 5.1 [5] Setting the paper eject roller |
| Full of ejected paper. Remove the paper. | |||
| Paper feed slippage occurs frequently. | The paper feed roller is worn out. | Replace the paper feed roller. | |
| The paper feed roller is stained or dirty with ink or paper dust. | Clean the paper feed roller. 6. | Maintenance, Service, Inspection, Expendables | |
| Paper out of specification is used. Use a designated paper. | |||
| The paper separator is dirty. | Clean the paper separator. | 6. Maintenance, Service, Inspection, Expendables | |
| Double feed frequently occurs. | The paper separator is worn out. | Replace the paper separator. | 6. Maintenance, Service, Inspection, Expendables |
| The paper separator is dirty. | Clean the paper separator. | 6. Maintenance, Service, Inspection, Expendables | |
| Sheets of printed paper is sticking each other. | Reset the paper after fanning them out sufficiently. | ||
| Paper out of specification is used. Use a designated paper. | |||
| A paper corner is folded. | Extremely paper is curled. | Correct the curl. | |
| Fine adjustment is not set properly. | Set the fine adjustment properly one again. | 5.5.2 Fine adjustment | |
| The folding tables 1 and 2 are not set properly. | Set the folding tables 1 and 2 properly. | ||
Caution!
Even paper quality is within the specifications, if it has already been folded, or is curled or wavy due to the heat of a printing machine, copier, printer, etc., the machine may not be able to fold it properly.
8. Relocation or Disposal
8-1 : Relocation
8-1-1 : Removal of the machine from its present location
- Turn off the power switch.
- Remove the power plug from the wall outlet.
- Lower the auxiliary table.
- Raise the paper ejection table and put it on the paper feed table, and hang it on the pin.
8-1-2 : Transport
- Transport the removed parts, attachments and Operation Manual together with the machine.
- Do not to expose the machine to strong vibration or shock.
- Ensure that the machine is carried by two persons wearing protective gloves, holding the four corners of the machine base firmly.
8-1-3 : Installation
When installing the machine at its new location, observe the same procedure as when first installing it. (Refer to "4. Preparation.")
8-2 : Disposal
When disposing of the machine, ask a contractor specialized in industrial waste disposal to handle it in accordance with the local regulations.
9. Specifications
| Model: | 408A |
| Paper Size | 3.5” x 5.0” to 11” x 17”3.5” X 5.0” size is for SINGLE fold only.5” x 7.2” size cannot be folded into GATE. |
| Paper Weight | 46.5g/ m2~160g/ m2 (160g/ m2 depends on paper size and quality.)230g/ m2 only for single fold (230g/ m2 depends on paper size and quality.) |
| Paper Quality | High-quality paper, high-quality paper for stencil printing, medium-quality paper, woody Even if paper is of the quality as recommended above, if it has already been folded, or is curled due to the heat of a printing machine, copier, printer, etc., the machine may not be able to fold it properly. |
| Folding Type | Single fold, double parallel fold, fold-out fold, letter fold, zigzag fold, gate fold, other non-standard fold patterns, cross fold using single fold |
| Fold dimension | Maximum fold dimensionsTable 1: 12.6” (zigzag, double parallel, and fold-out)Table 2: 8.5” (single, gate, and letter) |
| Minimum fold dimensionsTable 1: 2.0” (gate and letter)Table 2: 1.6” (single, zigzag, double parallel, and fold-out) | |
| Paper Feed System | Three-roller friction feed/separation system |
| Paper Stacking Capacity | 500 sheets (20 lb bond) |
| Processing Speed | 2,400 to 14,400 sheets per hour (based on single fold using letter size paper)When it is operating at the maximum speed, it stops when one sheet has passed after error occurs.Subject to some limitations depending on the fold type |
| Operation Method | Color LCD touch panel, automatic setting (based on built-in microcomputer) |
| Additional Functions | · Fold skew adjustment, paper jam detection ·4-digit counter (Addition/Subtraction modes, auto repeat)· Automatic paper size detection (letter, legal & ledger sizes)· Double feed detection· Auxiliary paper guide for cross folding· Automatic fold position setting by inputting paper size· Memory of 36 patterns of fine adjustment (6 types of paper size x 6 fold types)· Memory of 12 patterns of special folding |
| Power Consumption | 50W |
| Power Supply Used | 100-240VAC, 50/60 Hz |
| Dimensions | W 401/2” × D 211/2” × H 20” (during use)W 18” × D 211/2” × H 13” (during storage) |
| Net Weight | 66 lb |
The specifications and appearance of this machine are subject to change without notice for further improvement.
MEMO
MBM Corporation
- Safety Instructions
- Danger
- Caution
- Warming
- Content
- Precautions on Installation
- Part Name
- Matters That Require Particular Attention
- 3-1 Definition of terms
- Preparation....13
- How to Use
- 5-6 Memorization/deletion of fold position of standard-size paper
- 5-7 Memorization/deletion of fold position of non-standard fold and non-standard-size paper
- 5-8 Counter setting
- 5-9 Speed adjustment 34
- 5-10 Double feed detection function
- Maintenance Service, Inspection, Expendables
- Trouble shooting and correction
- 7-1 Error display
- 7-2 Troubleshooting.... 43
- Relocation or Disposal
- 8-1 Relocation
- 8-2 Disposal 45
- Specifications 46
- 1-1 : Installation location
- 1-2 : Precautions in moving in
- 1-3 : Check the content and quantity of accessories
- 2-1 : Appearance
- 2-2 : Control panel
- 3-1 : Definition of terms
- 3-2 : Characteristics and intended purpose of use
- 3-3 : When not in use
- 3-4 : Precautions for use
- Preparation
- Caution!
- 5-1 : Standard Folding of Standard-size Paper
- Example:
- Hint!
- 5-2 : To manually input paper length
- 5-3 : Non-standard Fold
- 5-4 : Cross Folding
- 5-5: Adjustment
- 5-5-1 : Slant adjustment
- 5-5-2 : Fine adjustment of fold position
- Using fine adjustment knob
- 5-6 : Memorization/deletion of fold position of STANDARD-SIZE-PAPER
- 5-6-1 : Memorization of finely-adjusted fold position
- 5-6-2 : Individual deletion of individual memory of fine adjustment
- 5-7 : Memorization/deletion of fold position of NON-STANDARD-FOLD and NON-STANDARD-SIZED PAPER
- 5-7-1 : Memorization of fold position
- 5-7-2 : Calling up fold pattern memory
- 5-7-3 : Deletion of fold pattern memory
- 5-8 : Counter setting
- 5-8-1 : Addition mode
- 5-8-2 : Subtraction mode
- 5-8-3 : Interval mode
- 5-9 : Speed adjustment
- 5-10 : Double feed detection function
- 5-10-1: What is double feed detection?
- 5-10-2 : Activation of double feed detection
- 5-10-3 : Use of double feed detection
- 5-10-4: When the machine stops based on double feed detection error (E-52)
- 6-1 : Important points for maintenance service and inspection
- 6-2 : Usual maintenance service
- Machine body
- Folding roller
- Paper feed rubber roller
- 6-3 : Expendable supplies
- 6-4 : Removal and installation, and cleaning of folder roller
- 6-5 : Cleaning of the paper feed, double feed detection, paper ejection photo sensors
- 6-6 : Removal and installation of paper separator, paper feed rubber roller, brake rubber
- 7-1 : Error display
- 7-1-1 : Error display screen
- 8-1 : Relocation
- Specifications
Brand : MBM
Model : 408A
Category : Uncategorized