
DP-300U - Print Server D-LINK - Free user manual and instructions
Find the device manual for free DP-300U D-LINK in PDF.


| Product Type | Print Server |
| Brand | D-Link |
| Model | DP-300U |
| Printer Ports | 2 x IEEE1284 Parallel (LPT1/LPT2), 1 x USB 1.1 |
| Network Interface | 10/100 Mbps Fast Ethernet (RJ-45) |
| Supported Protocols | TCP/IP, NetBEUI, AppleTalk, LPR |
| Management | Web-based, Telnet, PS Admin utility |
| Default IP Address | 192.168.0.10 |
| Power Supply | External, 5V DC / 2.5A |
| Dimensions | 7.58 x 4.66 x 1.22 in (192.5 x 118.4 x 31 mm) |
| Weight | Approx. 10.3 oz (292 g) |
| Operating Temperature | 32 to 122°F (0 to 50°C) |
| Storage Temperature | -13 to 131°F (-25 to 55°C) |
| Humidity | 5% to 95% non-condensing |
| LED Indicators | Power, Link/Act, USB, LPT1, LPT2 |
| Printer Compatibility | Extensive list of major brands (HP, Canon, Epson, etc.) |
| Supported OS | Windows XP/2000/NT/ME/98/95, Mac OS, Linux, Unix, NetWare |
| Emissions | FCC Class B, CE Class B, VCCI Class B |
| Warranty | 1 year hardware, 90 days software |
| Package Contents | DP-300U unit, CD with manual, Quick Installation Guide |
Frequently Asked Questions - DP-300U D-LINK
User questions about DP-300U D-LINK
0 question about this device. Answer the ones you know or ask your own.
Ask a new question about this device
Download the instructions for your Print Server in PDF format for free! Find your manual DP-300U - D-LINK and take your electronic device back in hand. On this page are published all the documents necessary for the use of your device. DP-300U by D-LINK.
USER MANUAL DP-300U D-LINK
Setting up the DP-300U 7
Getting Started 9
Using the Web Configuration....10
TCP/IP Printing for Windows XP 17
TCP/IP Printing for Windows 2000 ....26
TCP/IP Printing for Windows 98SE/ME 35
Unix/Linux Printing 46
Setting up AppleTalk or LPR Printing in MAC OSX 47
Setting up AppleTalk Printing in MAC OS9 54
Port Pinouts 58
Networking Basics ....59
Technical Specifications ....71
Contacting Technical Support 72
Warranty and Registration 73
Appendix: DP-300U Printer Compatibility List 75
Package Contents

Contents of Package:
D-Link DP-300U
Ethernet/USB Print Server
■ Manual and Warranty on CD
■ Printed Quick Installation Guide
If any of the above items are missing, please contact your reseller.
System Requirements:
A computer with an installed Ethernet adapter
Windows XP/2000/NT4/ME/98SE/95
■ Apple Mac OS with AppleTalk
Linux, Solaris, SCO Unix, AIX
NetWare 5.x (Native NDS)
- Internet Explorer 6.0, or Netscape Navigator version 6.0 or above, with JavaScript enabled
■ Printer must support required Operating System
Introduction
The D-Link DP-300U Print Server is an Ethernet/USB print server that connects to your Ethernet, Fast Ethernet or USB network anywhere you wish to locate printer services. The DP-300U manages the flow of print files from workstations or file servers to connected printers, delivering print jobs to printers much faster than a file server or a PC acting as a print server can. With two IEEE1284 parallel ports and one 1.1 USB port, DP-300U can connect to almost any make and model printer on the market today.
The DP-300U includes easy-to-use software to install on most Windows-based networks. Protocol support for TCP/IP, NetBEUI, and AppleTalk are provided to ensure seamless connection to major networking Operating Systems.
The DP-300U has a built in Web-Based management feature that allows users to easily configure and manage multiple print queues through TCP/IP. The DP-300U also supports Telnet as an alternative method to configure the unit.
The DP-300U improves network printing services in the following ways:
The DP-300U picks up the workload of managing print file traffic to its connected printers. This provides workload relief to your file servers, and allows the file servers' full capacity to be used for file access or other direct services to network users. On peer-to-peer networks, workstations can print directly to the Print Server without increasing the load of another workstation or server.
The DP-300U's parallel printer ports are IEEE1284-compliant high-speed bi-directional ports, which can transmit to high-speed laser printers much faster than a PC's parallel printer port. High-speed laser printers connected to the Print Server's parallel ports can be operated at their full capacity.
Because the DP-300U is very portable and inexpensive compared to a PC-based print server, and Print Server connects to your file servers through the network, printers can be deployed to locations of maximum convenience to users.
The DP-300U offers extraordinary flexibility, operating with all major network operating systems and protocols:
TCP/IP
UNIX lpr/lpd (HP-UX, SunOS, Solaris, SCO, UnixWare, IBM AIX) Windows NT/2000, Windows 95/98SE/ME, Windows XP NetWare 5.x NDPS LPR Remote Printing
NetBEUI
Windows NT/2000/XP, Windows 95/98SE/ME, Windows for Workgroups, Microsoft LAN Manager, IBM LAN Server
AppleTalk
MacOS EtherTalk
Windows-based setup and administration software, PS Admin, is supplied with the Print Server, making configuration and management quick and easy. The Print Server also supports configuration and management via the Telnet protocol for networks without Windows-compatible machines.
External Features
Port Connectors
The DP-300U's three printer ports are located on its rear panel. One USB and two identical parallel ports are labeled USB, LPT1 and LPT2. These printer ports are independently configurable using the PS Admin program or the print server's Telnet interface. (See the PS Admin User's Guide, available on the CD that came with the DP-300U, for information about configuring the print server's ports.) The Print Server also supports web configuration permitting users to configure settings through the web browser. Default IP Address as follows:
■ Default IP Address – 192.168.0.10
■ Subnet Mask – 255.255.255.0
Note:
The PC's IP Address must be in the same subnet as the Print Server's IP Address for the two devices to communicate. (For example, if your Print Server's IP Address is 192.168.0.10, with a subnet mask of 255.255.255.0, then your computer's IP Address should be 192.168.0.x, where x is a value between 1-254, excluding 10.)
Rear Panel Connectors
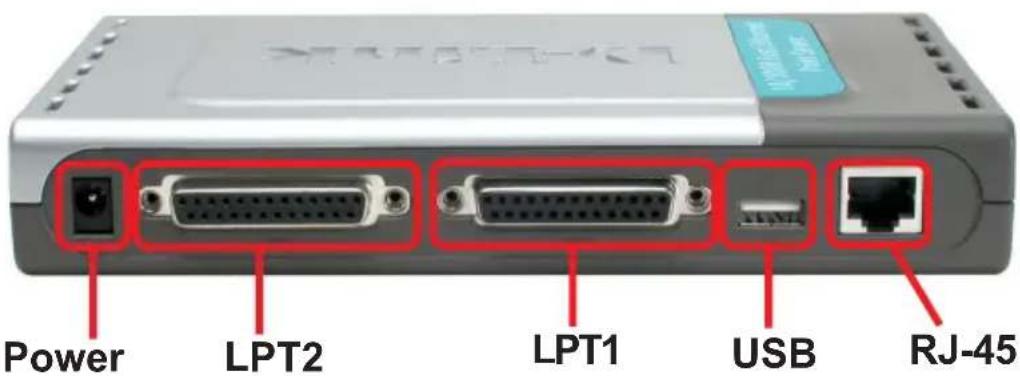
Network Cable Connector
The Print Server's rear panel features an RJ-45 connector for connection to 10Base-T Ethernet cabling or 100Base-TX Fast Ethernet cabling (which should be Category 5 twisted-pair cable). The port supports the NWay protocol, allowing the Print Server to automatically detect or negotiate the transmission speed of the network.
DC Power Connector
The DC power input connector is located on the Print Server's rear panel and is labeled DC 5V.
LED Indicators
The front panel of the Print Server features five LED indicators:

Front Panel LED Indicators
Power
Steady or flashing green confirms that the Print Server is powered ON.
Link/Act
Steady or flashing green confirms that the Print Server has a good connection to the Ethernet or Fast Ethernet network.
The indicator blinks off briefly to indicate that the Print Server is receiving or transmitting from the network.
USB, LPT1, LPT2
These LED indicators light to show that the Print Server is transferring print data through the appropriate parallel port or USB port.
These three indicators are also used by the Print Server's Power-ON Self Test (POST) to indicate any hardware failures.
Setting up the DP-300U Installing the Print Server
WARNING: Configuration problems may result if the Print Server is powered up without first establishing its network connection. Follow this procedure to avoid complications at the configuration stage.
- Confirm proper operation of each of the printers to be connected to the DP-300U.
- When you have confirmed proper operation of each printer, switch its power OFF.
- Confirm that your network is operating normally.
- Connect the DP-300U RJ-45 Connector to the network, using an Ethernet CAT5 cable.
-
While each printer is powered OFF, install the corresponding parallel or USB printer cable to connect the printer's parallel port or USB port to the printer port of the Print Server.
Switch on each connected printer.6. -
Plug the AC power adapter's DC output plug into the DC 5V power socket on the rear panel of the Print Server.
-
Plug the power adapter into a power outlet. This will supply power to the Print Server, as it has no external power switch. The green Power LED on the Print Server's front panel should illuminate steadily, and the Print Server's Self-Test will proceed. 7
Power ON Self-Test
Every DP-300U has been factory-tested to operate properly.
When the DP-300U is powered ON, it also automatically performs a Self-Test on each of its major components. The final result of the Self-Test is signaled by the state of the USB, LPT1 and LPT2 LED indicators following the Self-Test.
Preliminary to the actual component tests, the three LED indicators are tested to confirm their steady and flashing operation.
Immediately after power-up, all five of the green LEDs should illuminate steadily for several seconds. Then the USB, LPT1 and LPT2 LEDs should flash ON simultaneously three times. Irregularity of any of the three LEDs during these LED tests may mean there is a problem with the LEDs themselves.
The actual component tests immediately follow the LED tests. A normal (no fault) result is signaled by a simultaneous flashing of these three LEDs, followed by a quiescent state with all three LEDs dark.
If the Self-Test routine traps any component error, then following the LED tests the Self-Test will halt and the LEDs will continuously signal the error according to the following table. In the event of any such error signal, contact your dealer for correction of the faulty unit.
| LED Name | Faulty Component | ||
| USB | LPT1 | LPT2 | |
| low speed flashing | Need to reload firmware | ||
| ON | DRAM error | ||
| 1 long 2 short | Timer INT error | ||
| 1 long 3 short | Flash Protected | ||
| 1 long 5 short | Flash Erase/Program error | ||
| 1 long 6 short | LAN Controller error | ||
| 1 long 8 short | LPT1 Controller error | ||
| 1 long 9 short | LPT1 error | ||
| 1 long 12 short | LPT2 Controller error | ||
| 1 long 13 short | LPT2 error | ||
| 1 long 14 short | MII error | ||
| 1 long 18 short | USB error | ||
Getting Started
Below is a sample network using the DP-300U. The DP-300U has a built-in Web-based management feature that allows users to easily configure and manage multiple print queues through TCP/IP.

flowchart
graph TD
    A["Internet"] --> B["Cable/DSL Modem"]
    A --> C["Computer 1 Desktop PC or Laptop"]
    A --> D["Router"]
    A --> E["Inkjet Printer USB"]
    A --> F["Desktop PC or Laptop"]
    A --> G["Desktop PC or Laptop"]
    A --> H["Desktop PC or Laptop"]
    A --> I["Desktop PC or Laptop"]
    A --> J["Desktop PC or Laptop"]
    A --> K["Desktop PC or Laptop"]
    A --> L["Desktop PC or Laptop"]
    A --> M["Desktop PC or Laptop"]
    A --> N["Desktop PC or Laptop"]
    A --> O["Desktop PC or Laptop"]
    A --> P["Desktop PC or Laptop"]
    A --> Q["Desktop PC or Laptop"]
    A --> R["Desktop PC or Laptop"]
    A --> S["Desktop PC or Laptop"]
    A --> T["Desktop PC or Laptop"]
    A --> U["Desktop PC or Laptop"]
    A --> V["Desktop PC or Laptop"]
    A --> W["Desktop PC or Laptop"]
    A --> X["Desktop PC or Laptop"]
    A --> Y["Desktop PC or Laptop"]
    A --> Z["Desktop PC or Laptop"]
    A --> AA["Desktop PC or Laptop"]
    A --> AB["Desktop PC or Laptop"]
    A --> AC["Desktop PC or Laptop"]
    A --> AD["Desktop PC or Laptop"]
    A --> AE["Desktop PC or Laptop"]
    A --> AF["Desktop PC or Laptop"]
    A --> AG["Desktop PC or Laptop"]
    A --> AH["Desktop PC or Laptop"]
    A --> AI["Desktop PC or Laptop"]
    A --> AJ["Desktop PC or Laptop"]
    A --> AK["Desktop PC or Laptop"]
    A --> AL["Desktop PC or Laptop"]
    A --> AM["Desktop PC or Laptop"]
    A --> AN["Desktop PC or Laptop"]
    A --> AO["Desktop PC or Laptop"]
    A --> AP["Desktop PC or Laptop"]
    A --> AQ["Desktop PC or Laptop"]
    A --> AR["Desktop PC or Laptop"]
    A --> AS["Desktop PC or Laptop"]
    A --> AT["Desktop PC or Laptop"]
    A --> AU["Desktop PC or Laptop"]
    A --> AV["Desktop PC or Laptop"]
    A --> AW["Desktop PC or Laptop"]
    A --> AX["Desktop PC or Laptop"]
    A --> AY["Desktop PC or Laptop"]
    A --> AZ["Desktop PC or Laptop"]
    A --> BA["Desktop PC or Laptop"]
    A --> BB["Desktop PC or Laptop"]
    A --> BC["Desktop PC or Laptop"]
    A --> BD["Desktop PC or Laptop"]
    A --> BE["Desktop PC or Laptop"]
    A --> BF["Desktop PC or Laptop"]
    A --> BG["Desktop PC or Laptop"]
    A --> BH["Desktop PC or Laptop"]
    A --> BI["Desktop PC or Laptop"]
    A --> BJ["Desktop PC or Laptop"]
    A --> BK["Desktop PC or Laptop"]
    A --> BL["Desktop PC or Laptop"]
    A --> BM["Desktop PC or Laptop"]
    A --> BN["Desktop PC or Laptop"]
    A --> BO["Desktop PC or Laptop"]
    A --> BP["Desktop PC or Laptop"]
    A --> BQ["Desktop PC or Laptop"]
    A --> BR["Desktop PC or Laptop"]
    A --> BS["Desktop PC or Laptop"]
    A --> BT["Desktop PC or Laptop"]
    A --> BU["Desktop PC or Laptop"]
    A --> BV["Desktop PC or Laptop"]
    A --> BW["Desktop PC or Laptop"]
    A --> BX["Desktop PC or Laptop"]
    A --> BY["Desktop PC or Laptop"]
    A --> BZ["Desktop PC or Laptop"]
    A --> CA["Desktop PC or Laptop"]
    A --> CB["Desktop PC or Laptop"]
    A --> CC["Desktop PC or Laptop"]
    A --> CD["Desktop PC or Laptop"]
    A --> CE["Desktop PC or Laptop"]
    A --> CF["Desktop PC or Laptop"]
    A --> CG["Desktop PC or Laptop"]
    A --> CH["Desktop PC or Laptop"]
    A --> CI["Desktop PC or Laptop"]
    A --> CJ["Desktop PC or Laptop"]
    A --> CK["Desktop PC or Laptop"]
    A --> CR["Desktop PC or Laptop"]
    A --> CS["Desktop PC or Laptop"]
    A --> CT["Desktop PC or Laptop"]
    A --> CU["Desktop PC or Laptop"]
    A --> CV["Desktop PC or Laptop"]
    A --> CW["Desktop PC or Laptop"]
    A --> CX["Desktop PC or Laptop"]
    A --> CY["Desktop PC or Laptop"]
    A --> CZ["Desktop PC or Laptop"]
Warning!
Only a USB printer may be connected to the USB port of the DP-300U. Do not connect any other USB devices to the USB port of the DP-300U; to do so, may damage the unit and will void the warranty for this product.
For a list of printers that are compatible with the DP-300U, please see the Appendix in this manual. The compatibility list is not comprehensive. Even if it is not included in the list, your printer may be compatible with the DP-300U.
Using Web Configuration
Open your web browser and type http://192.168.0.10 in the address box, and press

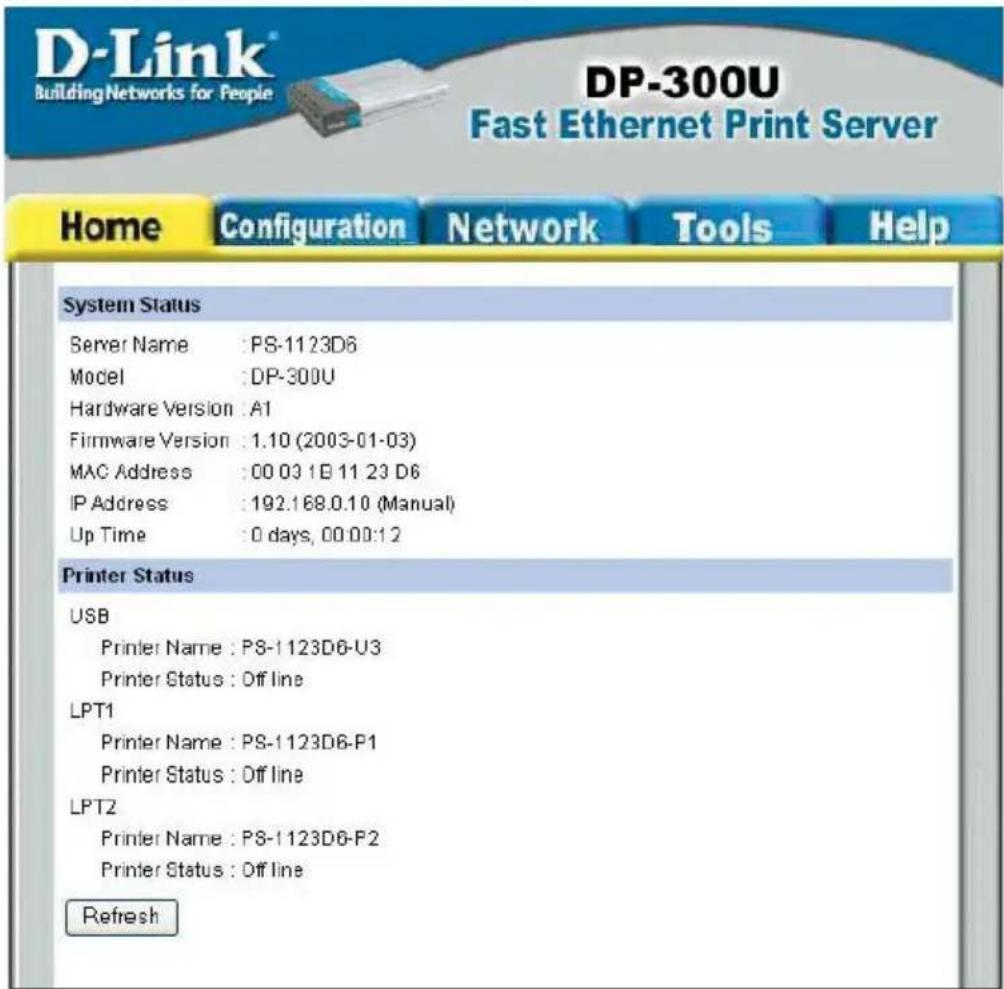
When you entered the default IP address, the main screen of the Print Server's configuration will appear (see below). In addition to the product information, you can access and control the Print Server's configuration through four links on the top of this main screen: Home, Configuration, Network, Tools, and Help.

Home
Click on Home tab from the tools bar of the main screen to display information of the DP-300U's System Status and Printer Status.
System Status and Printer Status
When you choose and enter the Home tab, it will show you the system information (see below), providing general information regarding the Print Server. Click on the
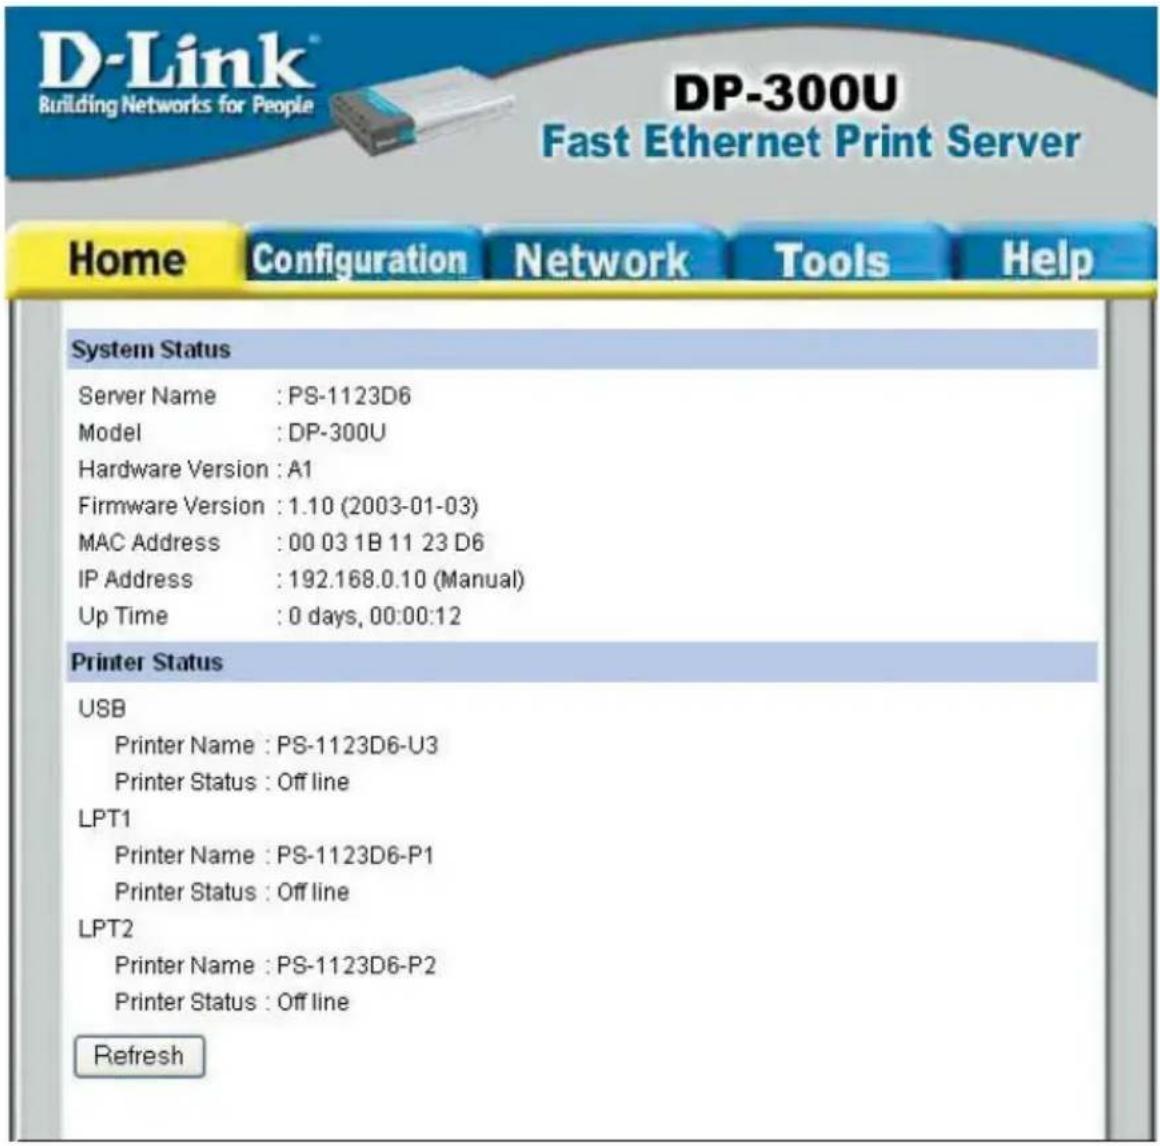
Server Name: The name assigned to the Print Server.
Model: The model of the Print Server.
Hardware Version: The version of the hardware on the Print Server.
Firmware Version: The version of the firmware and release date on the Print Server.
MAC Address: The MAC address of the Ethernet port.
IP Address: The IP Address of the Print Server.
Up Time: The length of time the Print Server has been up.
Configuration
Click on Configuration tab from the tools bar of the main screen to enter the Configuration Page; it provides the configuration options that include System Device and Port Setting
System Device and Port Setting
This option will show you settings required to configure the DP-300U Print Server. Consult your printers owner manual for the PJL(Printer Job Language) and print speed supported on your printer. Click the
Server Name: The name assigned to the Print Server.
Location: (optional) Input a comment indicating where the Print Server is located.
Admin Contact:
(Optional) Administrator name for the Print Server.
Password: By default the DP-300U does not have a password. This is a security risk; it is recommended that you enter a password for the Print Server.
Port Name: This is the assigned name for the USB or LPT port.
Description: (Optional) A brief description for the USB or LPT port.
Speed: Printer port speed, High or Low.
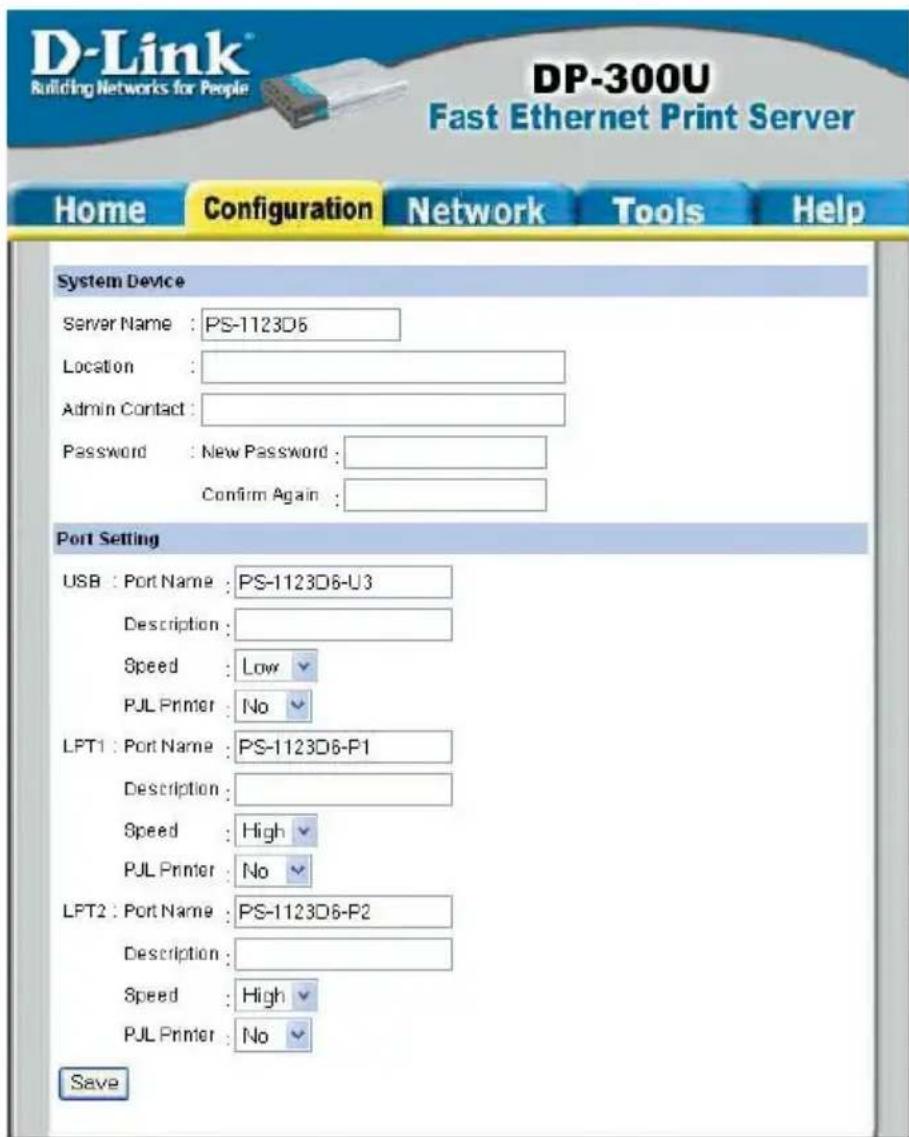
PJL Printer: This feature is used to support Hewlett-Packard PJL (Printer Job Language) standard for bi-directional printing. 12
Network
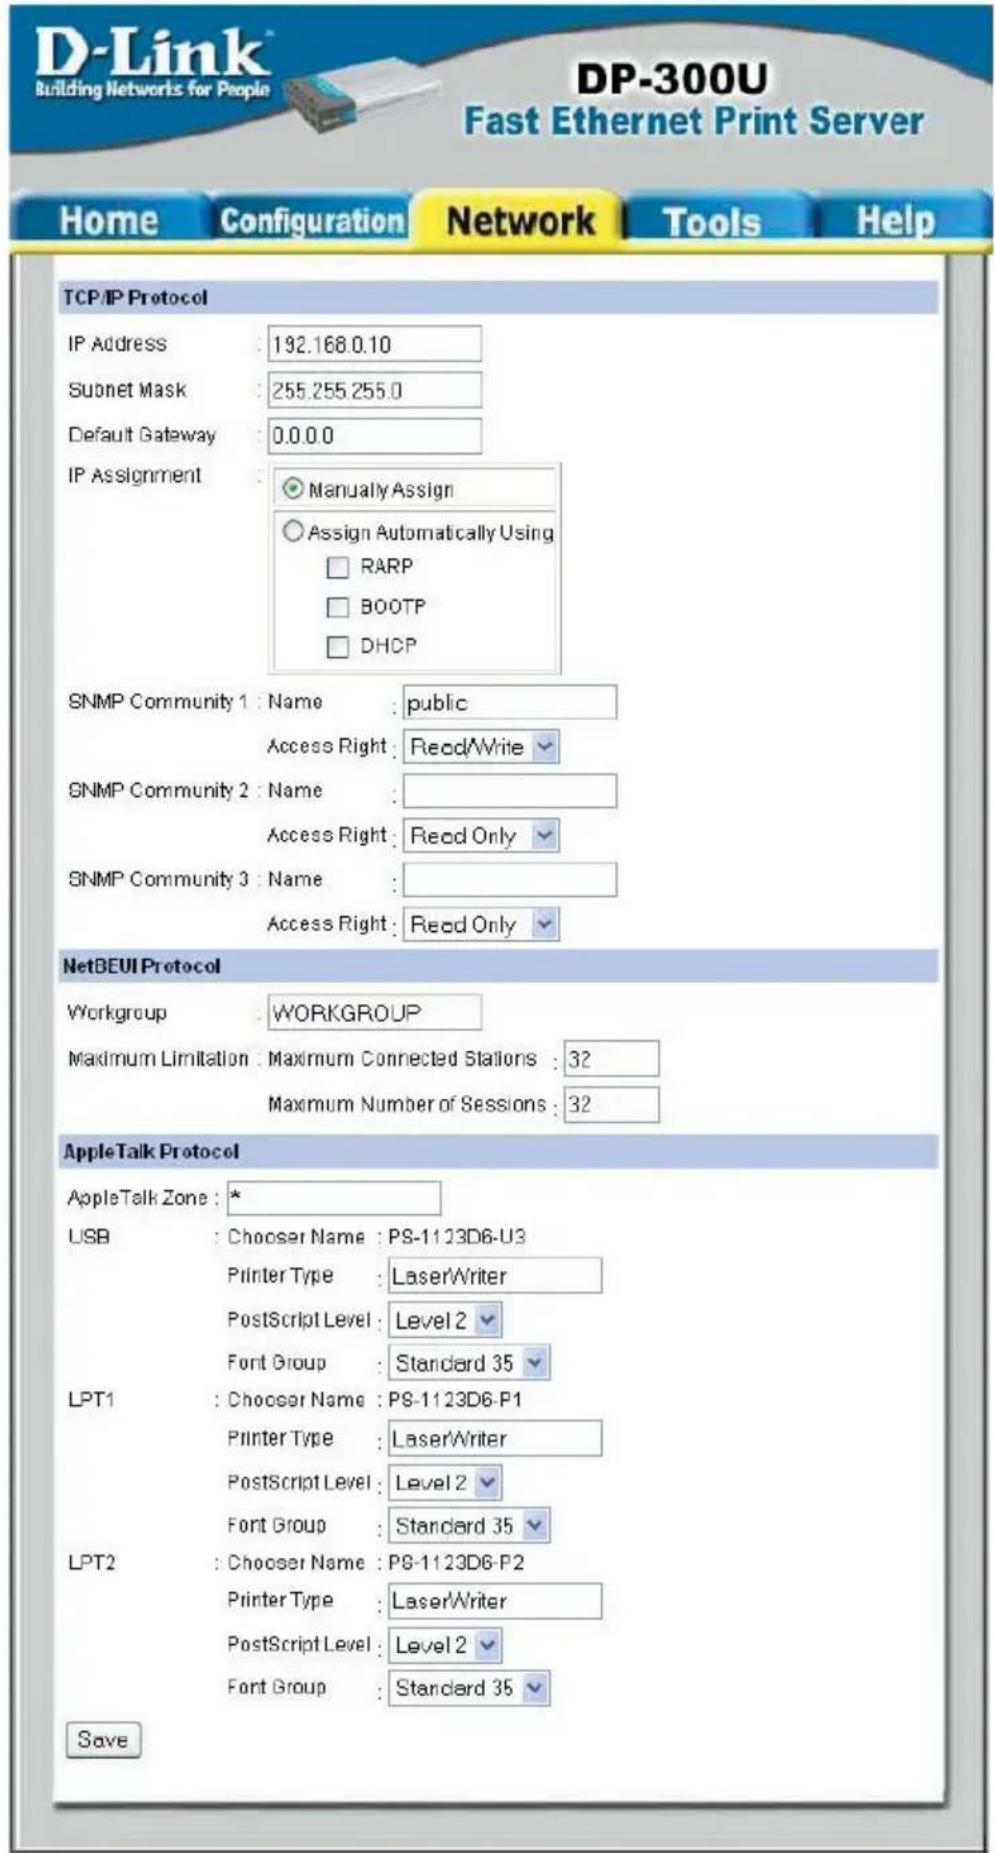
Click on the Network tab from the tools bar of the main screen to enter the Network Page; it provides network protocol configuration options that include TCP/IP, NetBEUI and AppleTalk
TCP/IP Protocol
The TCP/IP Protocol section will show you the settings required to configure the DP-300U Print Server for TCP/IP printing. If you forget your IP Address, you can use the PS Admin program to configure the DP-300U Print Server. The default IP Address is 192.168.0.10. Click the
NetBEUI Protocol
The NetBEUI Protocol section will show you the settings required to configure the DP-300U Print Server for NetBEUI printing. Click the
AppleTalk Protocol
The AppleTalk Protocol section will show you the settings required to configure the DP-300U Print Server for AppleTalk printing. Click the
Tools
Click on the Tools link from the tools bar of the main screen to enter the Tools Page; it provides the control options that include Print Test and Reset.
Print Test
Print Test section will allow you to send an ASCII text page from the print server to your printer. Your Parallel and USB printer will have to support native DOS mode for the test page to print.
Reset
Reset section will allow you to reset your print server. Click the

Help
Click on the Help link from the tools bar of the main screen to enter the Help Page, it provides a link to D-Link's support website. D-Link's support website will provide the most up to date information on your DP-300U Print Server. Please check the website regularly for product and firmware updates.

TCP/IP Printing for Windows XP
Open the web browser, and type in the IP Address of the DP-300U.
For example, type http://192.168.0.10 into the Location or Address field. Press the Enter or (Return) Key.
Note:
The PC's IP Address must be in the same subnet as the Print Server's IP Address for the two devices to communicate. (For example, if your Print Server's IP Address is 192.168.0.10, with a subnet mask of 255.255.255.0, then your computer's IP Address should be 192.168.0.x, where x is a value between 1-254, excluding 10.) See Networking Basics: Assigning a Static IP Address in this manual to find out how to change an IP Address.


TCP/IP Printing for Windows XP (continued)
At the Configuration window, write down the Port Names for future reference. You will need this information later in the configuration process.

TCP/IP Printing for Windows XP (continued)
When you select TCP/IP Protocol at the Network window, the screen below appears. (We recommend that you keep the default settings as shown.) If you need to make changes, make sure to click Save after you have made the changes. (You may wish to make a note of the IP Address.)

TCP/IP Printing for Windows XP (continued)
Go to Start > Settings > Printers and Faxes > Add a Printer

Click Next

TCP/IP Printing for Windows XP (continued)
Select Local Printer
Deselect Automatically detect and install my Plug and Play printer.
Click Next
Select Create a new port. At the pull-down menu, highlight Standard TCP/IP Port.
Click Next
Click Next

![Add Printer Wizard Select a Printer Port Computers communicate with printers through ports. Select the port you want your printer to use. If the port is not listed, you can create a new port. Use the following port: LPT1: [Recommended Printer Port] Note: Not computers use the LPT3 port to communicate with a local printer. The connector for this port should look something like this. Create a new port Type of port: Standard TCPAP Port < Back Next > Cancel](/content/2026/05/909097/images/0a385813da544902af10fa11ab0d0d44d99eaeaa75560482906b9ebf63f17933.jpg)

TCP/IP Printing for Windows XP (continued)
Type in the IP address of the Print Server (i.e. 192.168.0.10). The Port Name will automatically be filled in.
Click Next

Select Custom
Click Settings The screen below will appear.

Select LPR
Enter the Port Name in the LPR Settings Queue Name field.

Click OK
TCP/IP Printing for Windows XP (continued)
Click Next

Click Finish

TCP/IP Printing for Windows XP (continued)
Highlight the printer, as shown. If the desired printer is not on the list, click Have Disk and insert the printer driver disk that came with your printer to install the printer drivers.
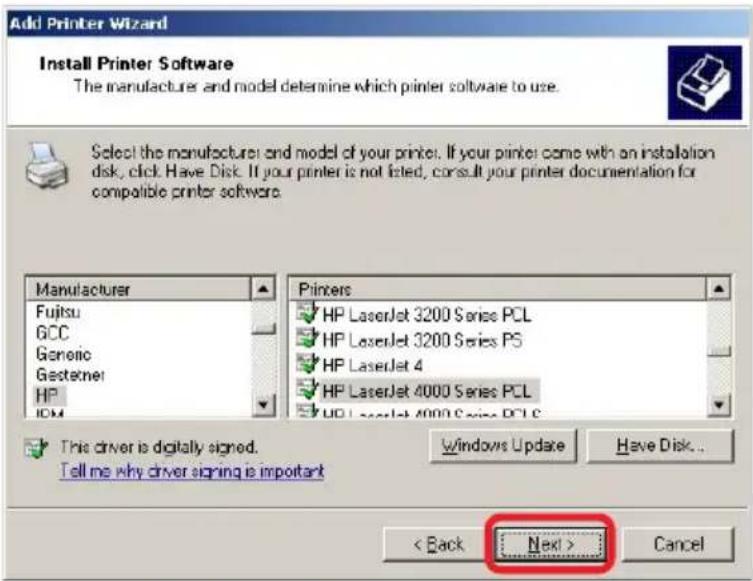
Click Next
At this screen, you can input a name for the printer.

Click Next

Click Next
TCP/IP Printing for Windows XP (continued)
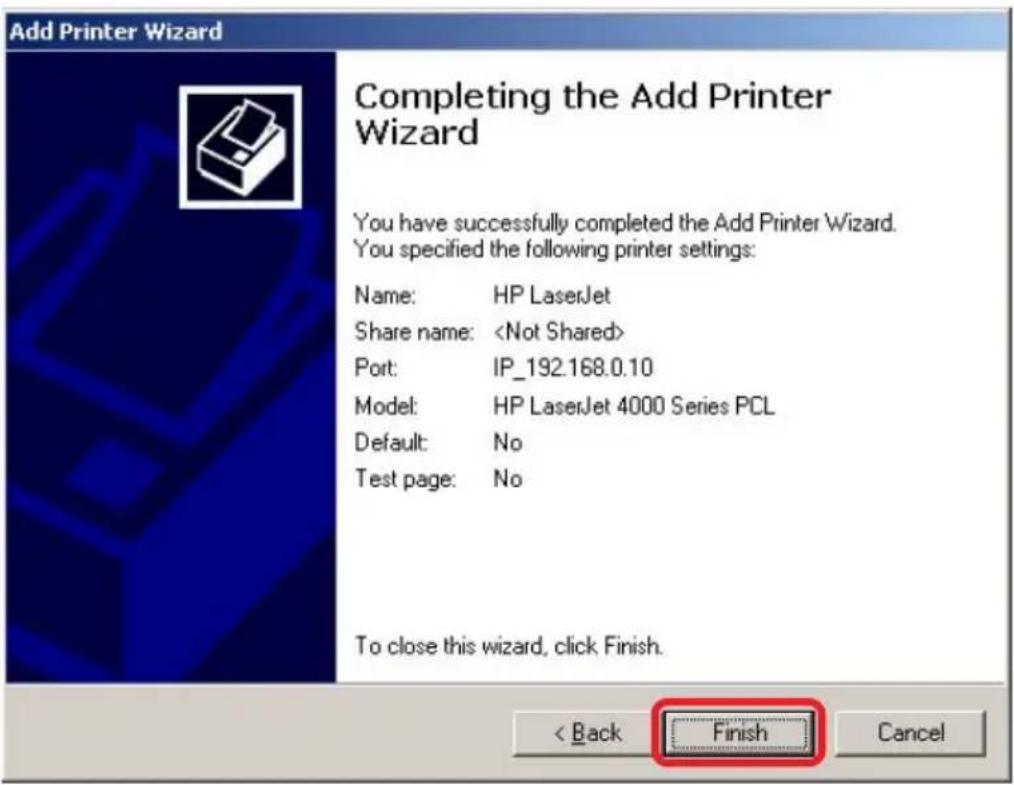
Click Finish
The printer is now ready for printing with Windows XP on your network.
TCP/IP Printing for Windows 2000
Open the web browser, and type in the IP Address of the DP-300U.
For example, type http://192.168.0.10 into the Location or Address field. Press the Enter or (Return) Key.
Note:
The PC's IP Address must be in the same subnet as the Print Server's IP Address for the two devices to communicate. (For example, if your Print Server's IP Address is 192.168.0.10, with a subnet mask of 255.255.255.0, then your computer's IP Address should be 192.168.0.x, where x is a value between 1-254, excluding 10.)


TCP/IP Printing for Windows 2000 (continued)
At the Configuration window, write down the Port Names for future reference. You will need this information later in the configuration process.

TCP/IP Printing for Windows 2000 (continued)
When you select TCP/IP Protocol at the Network window, the screen below appears. (We recommend that you keep the default settings as shown.) If you need to make changes, make sure to click Save after you have made the changes. (You may wish to make a note of the IP Address.)

TCP/IP Printing for Windows 2000 (continued)
Go to Start > Settings > Printers
Double-click on the Add Printer icon.


Click Next
TCP/IP Printing for Windows 2000 (continued)
Select Local Printer

Click Next
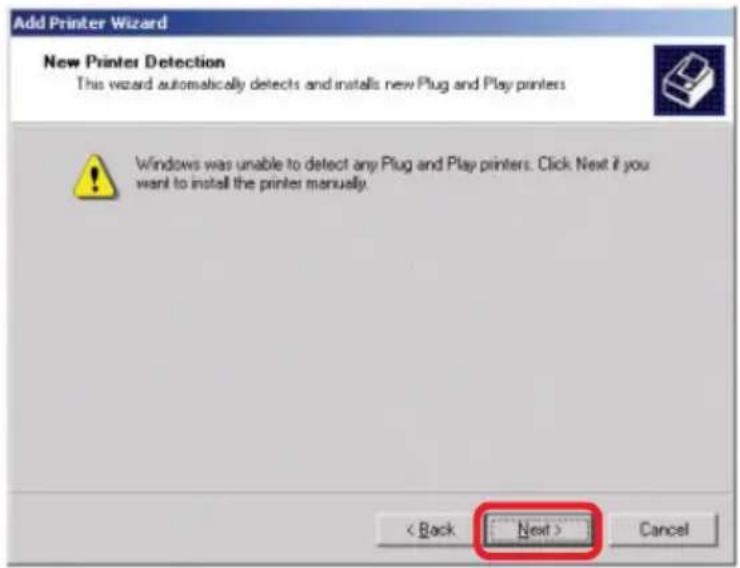
Select Create a new port at the pull-down menu, highlight Standard TCP/IP Port.

Click Next
TCP/IP Printing for Windows 2000 (continued)
Click Next

Type in the IP Address of the Print Server in the Printer Name or IP Address field. The Port Name field will automatically be filled in.

Click Next
Select Custom
Click Settings
The screen on the following page will appear.

TCP/IP Printing for Windows 2000 (continued)
Select LPR
Enter the Port Name in the LPR Settings Queue Name field. The Port Name shown here is only an example.
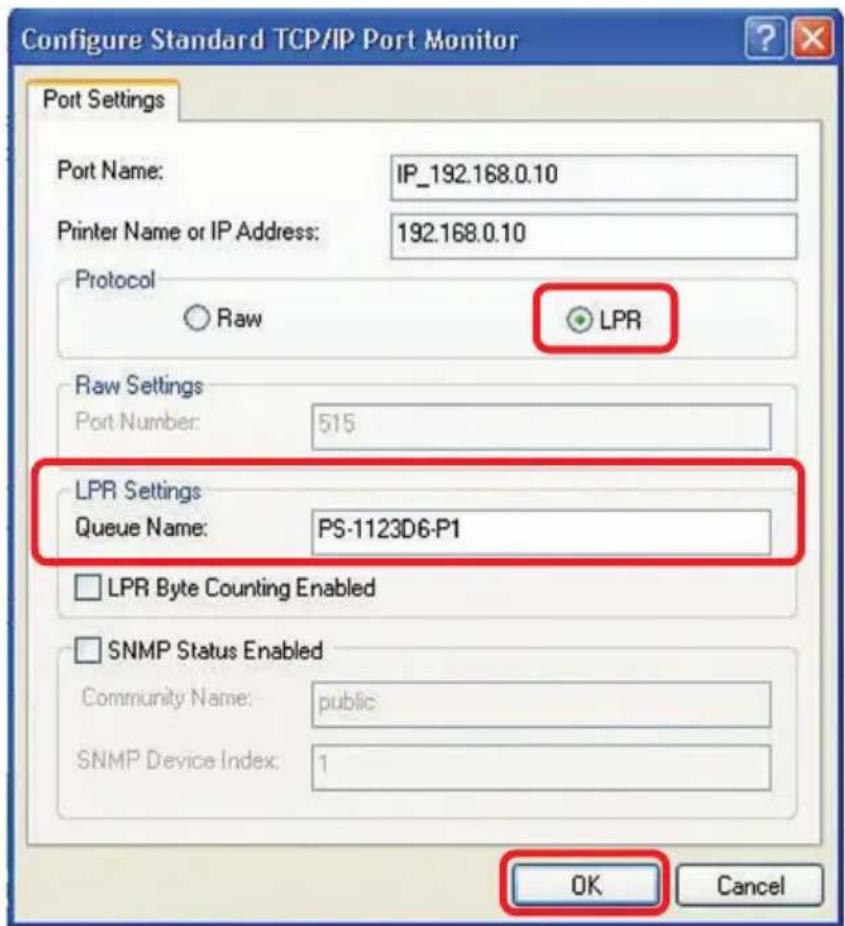
Click OK
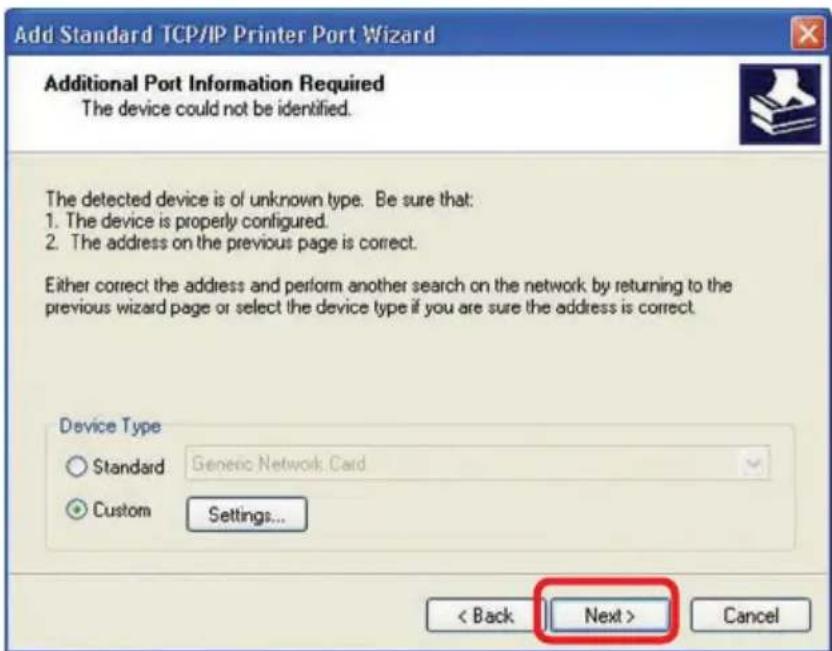
Click Next
TCP/IP Printing for Windows 2000 (continued)
Click Finish

Highlight the printer, as shown. If the desired printer is not on the list, click Have Disk and insert the printer driver disk that came with your printer to install the printer drivers.

Click Next
At this screen, you can input a name for the printer.

Click Next
TCP/IP Printing for Windows 2000 (continued)
Select Do not share this printer

Click Next
Select Yes to print a test page

Click Next

Click Finish
The printer is now ready for printing with Windows 2000 on your network.
TCP/IP Printing for Windows 98SE/ME
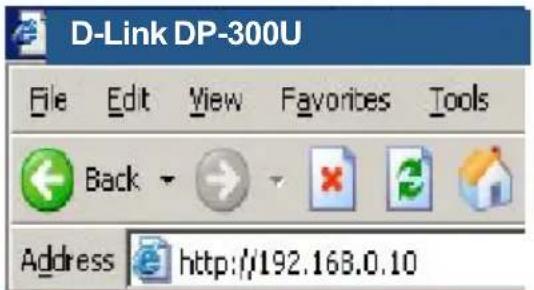
Open the web browser, and type in the IP Address of the DP-300U.
For example, type http://192.168.0.10 into the Location or Address field. Press the Enter or (Return) Key.
Note:
The PC's IP Address must be in the same subnet as the Print Server's IP Address for the two devices to communicate. (For example, if your Print Server's IP Address is 192.168.0.10, with a subnet mask of 255.255.255.0, then your computer's IP Address should be 192.168.0.x, where x is a value between 1-254, excluding 10.)
TCP/IP Printing for Windows 98SE/ME (continued)
At the Configuration window, write down the Port Names for future reference. You will need this information later in the configuration process. The Port Names shown here are only examples.

TCP/IP Printing for Windows 98SE/ME(continued)
When you select TCP/IP Protocol at the Network window, the screen below appears. (We recommend that you keep the default settings as shown.) If you need to make changes, make sure to click Save after you have made the changes. (You may wish to make a note of the IP Address.)

TCP/IP Printing for Windows 98SE/ME (continued)
Go to Start > Settings > Control Panel Double-click on Network
Click Add
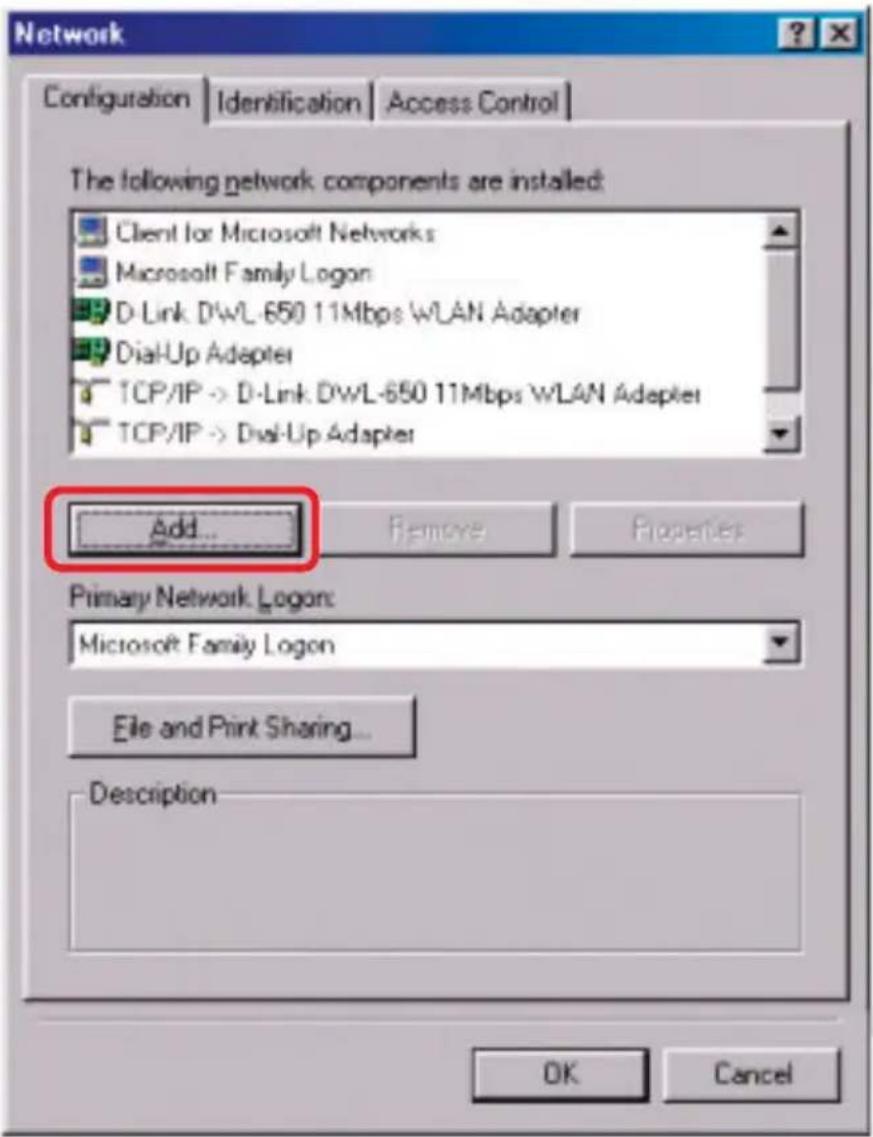
Highlight Client Click Add
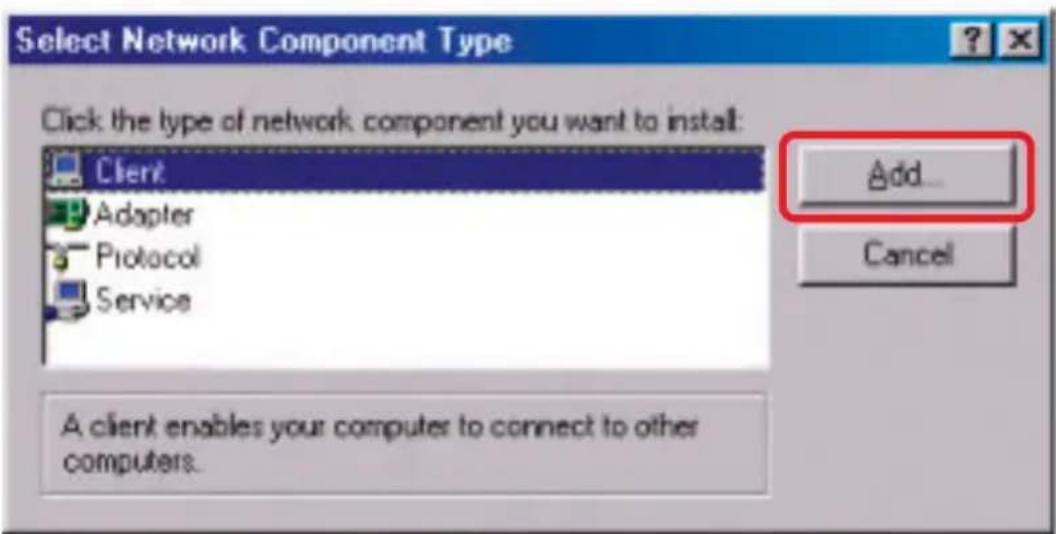
TCP/IP Printing for Windows 98SE/ME (continued)
At this window, click Have Disk.
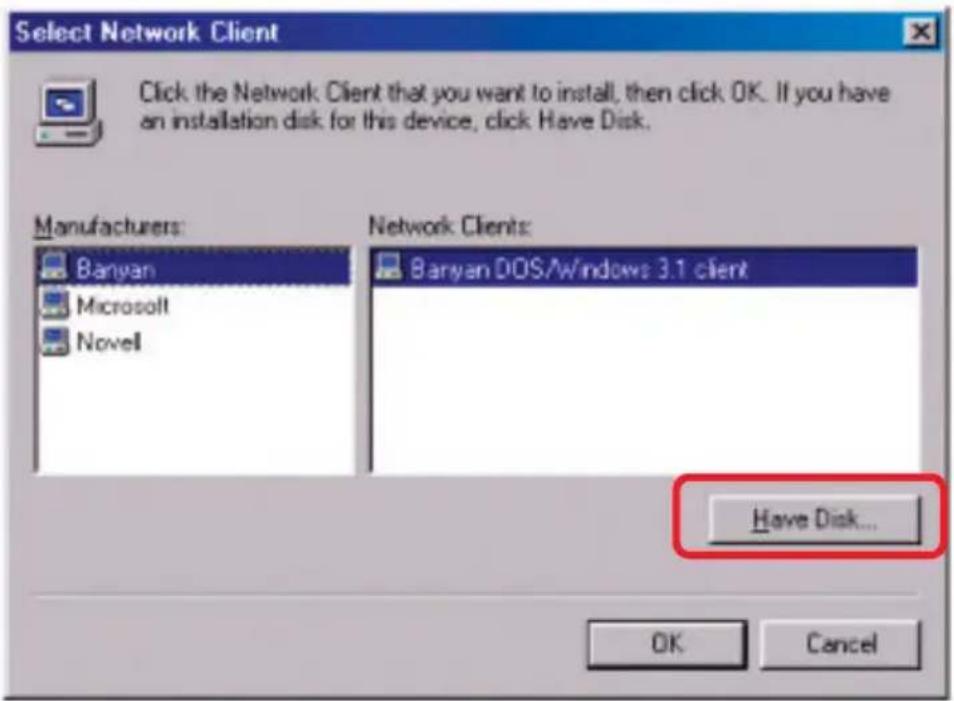
- Insert the DP-300U CD-ROM into your CD-ROM drive. Select the letter representing the CD-ROM drive on your computer from the pull-down menu.
- Double-click on the folder lpr.
- Highlight lpr.inf
- Click OK

Click OK to accept the location of the file.

TCP/IP Printing for Windows 98SE/ME (continued)
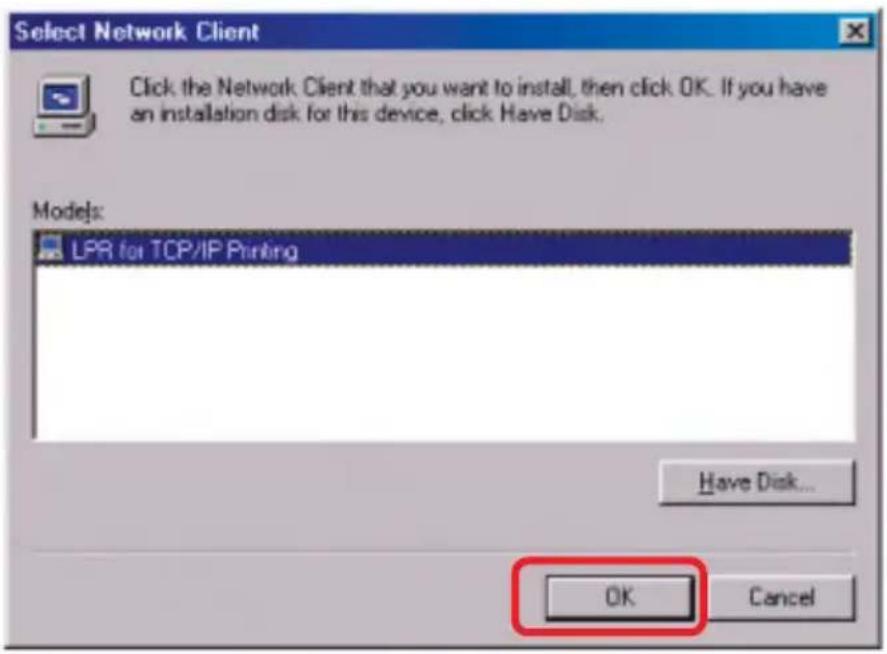
Click OK
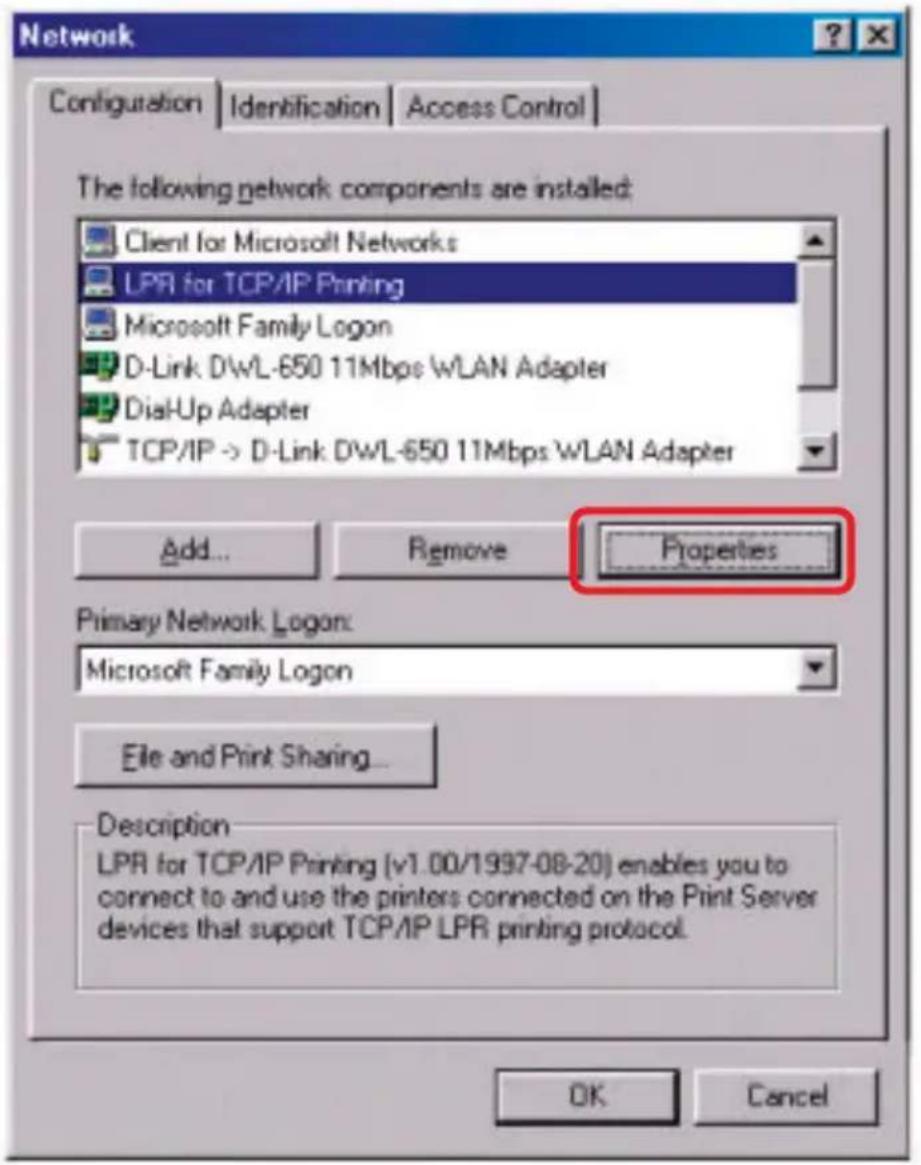
You should now be back to the Network Properties Page. Highlight LPR for TCP/IP Printing.
Click Properties
TCP/IP Printing for Windows 98SE/ME (continued)
Click Add Port

Type in the IP Address of the DP-300U. Make sure the Port Name is accurate. (The Port Name at right is just an example.)

Click OK
The Port name and IP Address will be displayed. (The Port Name at right is just an example.)

Click OK
TCP/IP Printing for Windows 98SE/ME (continued)

Click OK
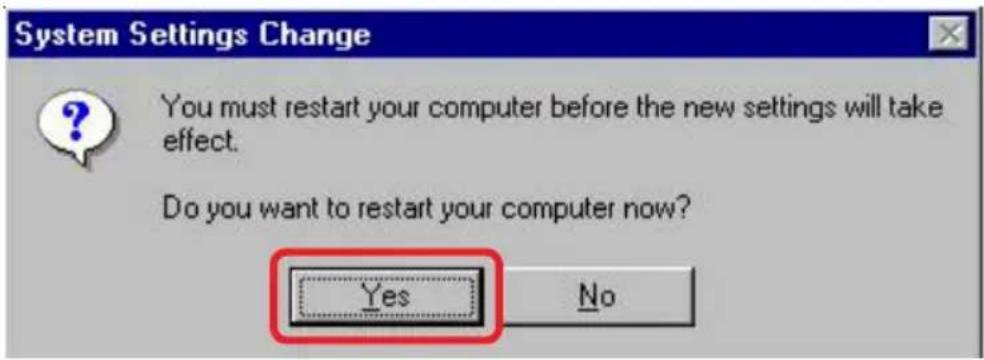
Windows will ask for a restart.
Click Yes
TCP/IP Printing for Windows 98SE/ME (continued)
Once your computer has rebooted, click on Start > Settings > Printers > Add Printer

Add Printer Wizard

natural_image
Illustration of vintage desktop computers and a printer with a colorful print (no text or symbols)This wizard will help you to install your printer quickly and easily.
To begin installing your printer, click Next.

When the Add Printer Wizard screen appears, Click Next.
Select Network Printer.
Click Next
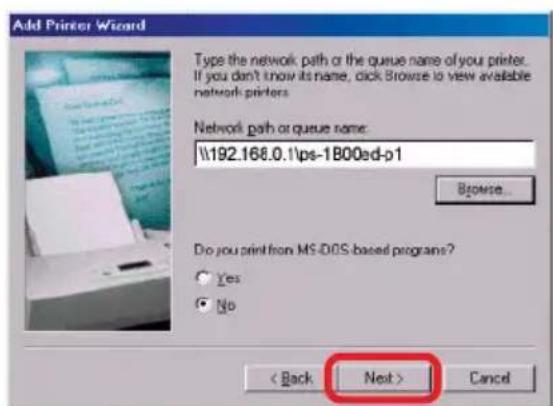
Type in the path if you know it, or Click Browse.
Add Printer Wizard

natural_image
Illustration of a vintage computer with monitor and printer on a green background (no text or symbols)How is this printer attached to your computer?
If it is directly attached to your computer, click Local Printer. If it is attached to another computer, click Network Printer
Local printer
Network printer
< Back
Next>
Cancel
Add Printer Wizard

natural_image
Illustration of vintage desktop computers and a printer with colored paper, placed on a green background (no text or symbols)Type the network path or the queue name of your printer. If you don't know its name, click Browse to view available network printers.
Network path or queue name:
Do you print from MS-DOS-based programs?
Yes
No
< Back
Next
Cancel
TCP/IP Printing for Windows 98SE/ME (continued)
At the next screen, browse for the printer port. Highlight the port as shown. (The Port Name in this window is just an example.)
Click OK
If the network path is not specified, type in the IP Address of the DP-300U and the Port Name. (The Port Name shown at right is just an example.)
Select Yes or No, to answer the question: Do you print from MS-DOS based programs?
Click Next
Highlight the printer, as shown. If the desired printer is not on the list, click Have Disk and insert the printer driver disk that came with your printer to install the printer drivers.
Click Next
Click Next


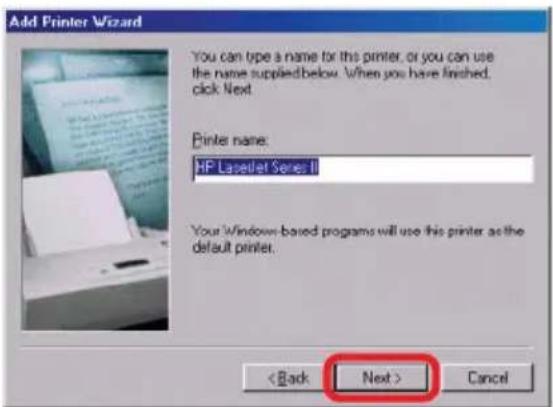
TCP/IP Printing for Windows 98SE/ME (continued)
Select Yes to print a test page.
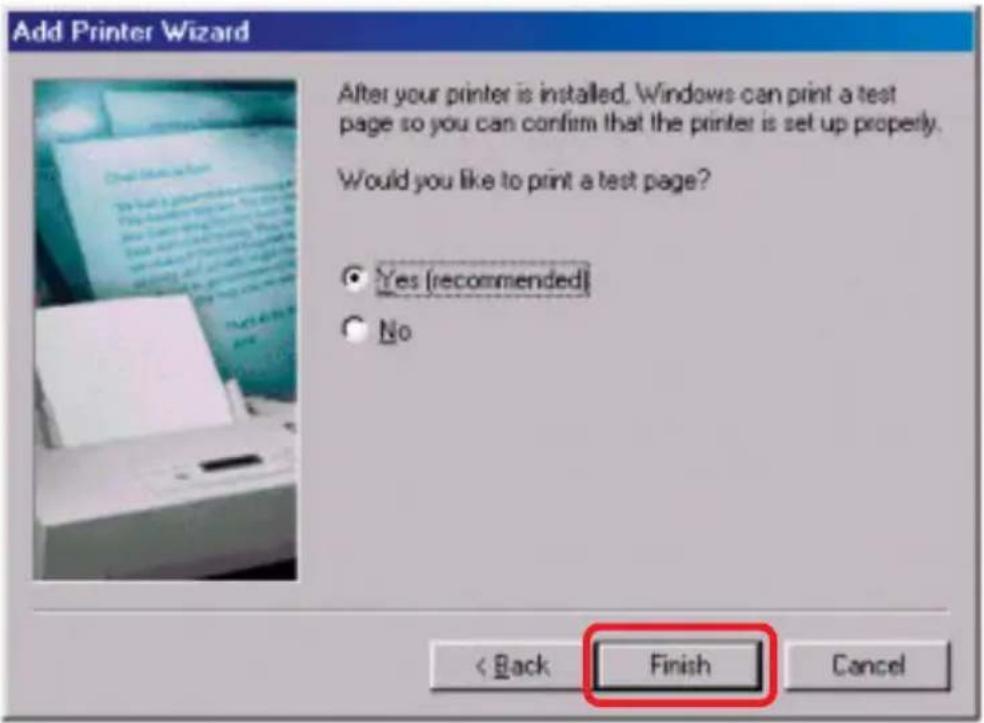
Click Finish
Go to Start > Settings > Printers
Check to see that your printer is installed.
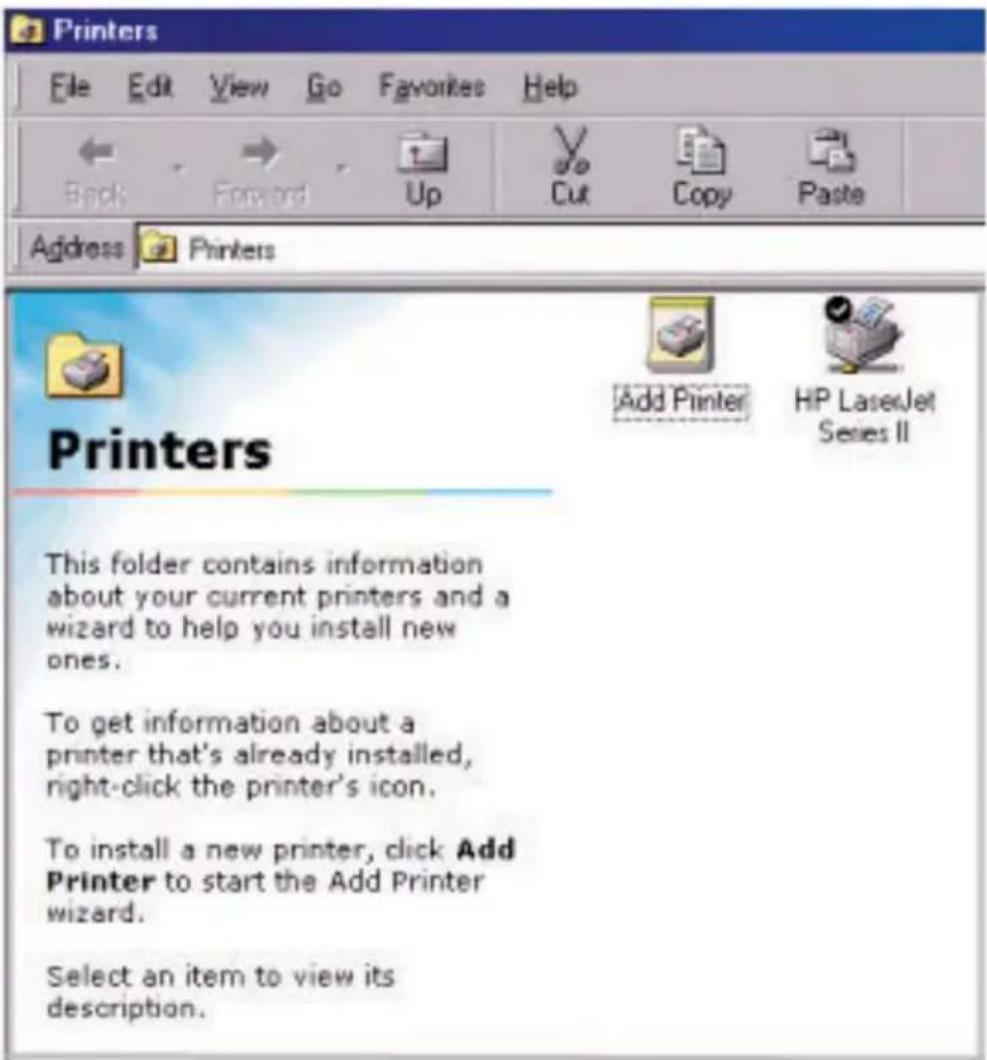
Unix/Linux Printing
Please refer to the PS Admin Manual on the CD included with your purchase for information on setting up the Print Server in Unix/Linux.
Setting up Apple Talk or LPR Printing in Mac OS X
Note: Mac OS printing is supported by Postscript printers only!
With Mac OSX you can use AppleTalk or LPR printers using IP protocols for printing through Print Servers. Follow the instructions below for setting up the Print Server. After attaching the Print Server to your network using the directions provided in the Quick Installation Guide, change the IP Address of your Macintosh to access the Print Server's web configuration.
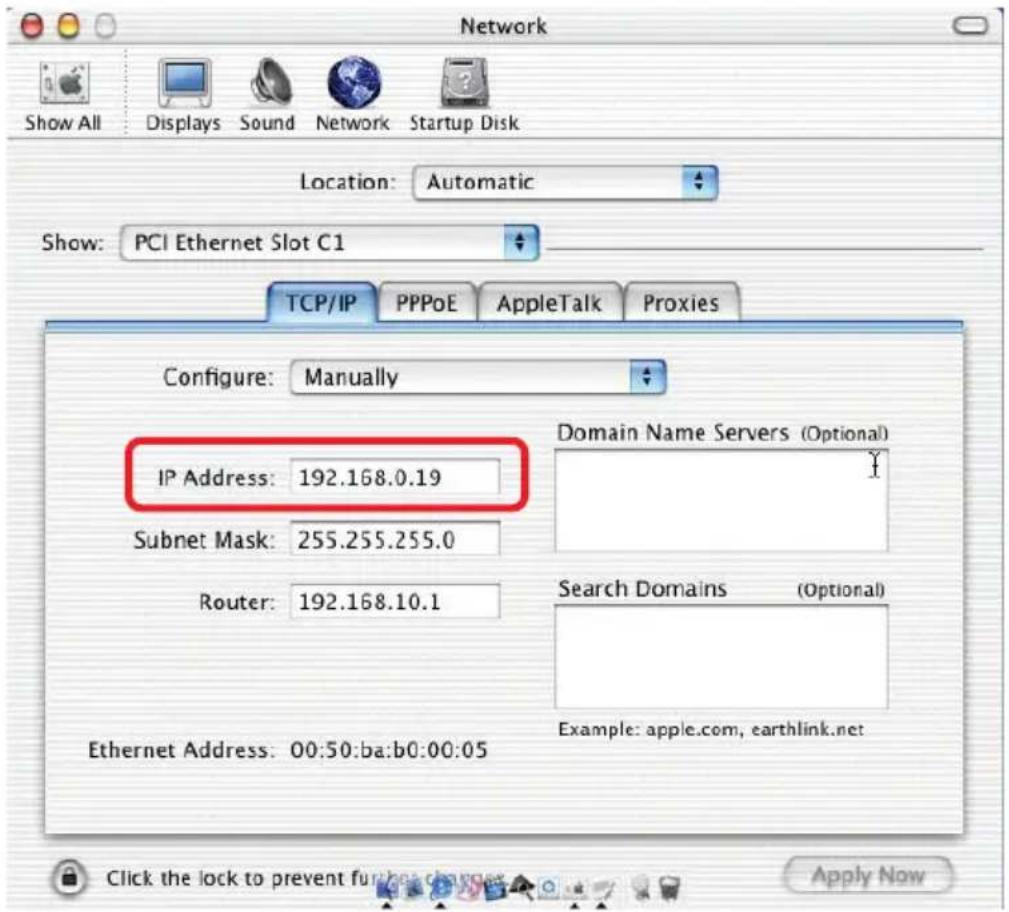
Open your System Preferences window and Click Network.
At the Configure pull-down menu, select Manually


Setting up Apple Talk or LPR Printing
in Mac OS X (continued)
The default IP Address of the Print Server is 192.168.0.10. Manually change your IP Address to 102.168.0.x, where x is any number between 1 and 254 (except 10 which is the IP Address of the Print Server.) The IP Addresses and Subnet Mask shown here are examples only.
Select the AppleTalk tab in this window and check Make AppleTalk Active.

Setting up Apple Talk or LPR Printing
in Mac OS X (continued)
Open your web browser window and type in the IP Address of the DP-300U (192.168.0.10). The web configuration for the DP-300U will appear. Please write down the printer names that appear in this window for future use.

Select the Network tab in the configuration window. Here you can modify the IP Address of the Print Server to conform to your network, if necessary. If AppleTalk will be used as the default printing protocol, the DP-300U's IP Address will not need to be altered.

Setting up Apple Talk or LPR Printing
in Mac OS X (continued)
To print, open a document and select File > Print from the menu.

Select Edit Printer List from the Printer dialog box.
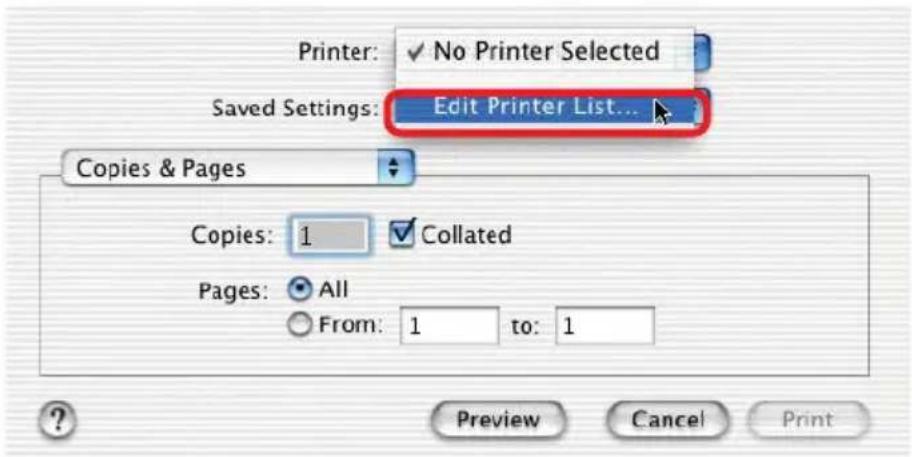
Click Add Printer

Setting up Apple Talk or LPR Printing
in Mac OS X (continued)
Select the printing protocol preferred, AppleTalk or LPR Printers using IP. In this example, AppleTalk has been selected.

AppleTalk protocol: After selecting AppleTalk the Port Names of the Print Server will be displayed. The Port Names shown here are examples only.
Click on the Port to which the post-script printer is connected.

Then select the printer model from the dialog box displayed here.
Click Add Printer and the Printer Port configuration is complete.
Select the Printer Port just configured in the Print window.
Click Print to print your document.
Setting up Apple Talk or LPR Printing
in Mac OS X (continued)
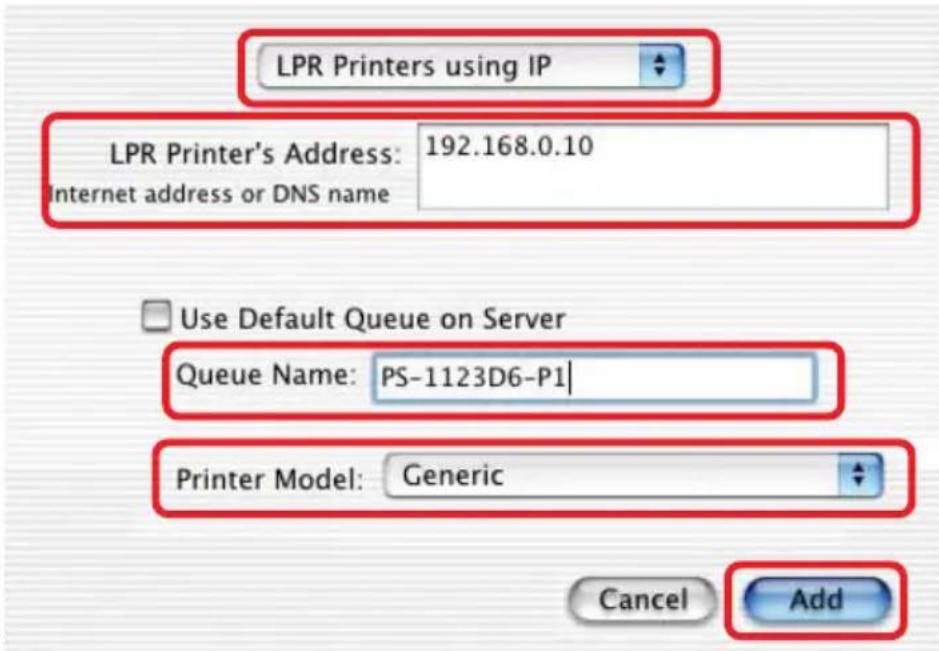
LPR Printers using IP protocol:
When you select LPR Printers using IP Protocol, this window will appear.
Type the IP Address of the Print Server into the LPR Printer's Address field.
In the Queue Name field, type in the Port Name of the post-script printer that is connected to the Print Server. The Port Name illustrated here is only an example.
Select the printer model from the dialog box.
Click Add and the process is complete.
Close all Print Center windows, select the Printer Port that was just selected.
Click Print to print the document.
Setting up Apple Talk Printing in Mac OS 9
Note: Mac OS printing is supported for Postscript printers only!
The AppleTalk network protocol is used with computers using the MacOS operating system. It can be used for network communications over standard Ethernet or Fast Ethernet using the EtherTalk transport, or over a proprietary low-speed LocalTalk transport.
Your Print Server can be used for network printing to PostScript printers. You can print from any MacOS computer connected to your Ethernet network, either directly using an EtherTalk connection, or indirectly through a LocalTalk-to-EtherTalk router.
NOTE: The Chooser name of a printer connected to one of the Print Server's ports is the same as its Port Name. If you are using AppleTalk printing, you will need to make sure that every Port Name is unique among all of the network printers in your AppleTalk zone. The Port Names shown in this manual are examples only.
Setting up the Print Server for AppleTalk Printing
To set up your Print Server so that it can be used for AppleTalk printing:
Make sure the AppleTalk protocol is enabled in your Macintosh.
Change the IP Address on one of the computers on your network to 192.168.0.x, where x is any number between 11-254.
Type 192.168.0.10 into the address field of your web browser. 192.168.0.10 is the default IP Address of the DP-300U.
Select the Network tab and scroll to the bottom to the AppleTalk protocol section
If your AppleTalk network is divided into AppleTalk zones, you will have to specify which zone the Print Server should be in. You should locate the Print Server in the same zone as most of the users who will be using it. If your network is not divided into zones, the AppleTalk Zone field should contain a single asterisk “*”.
Setting up Apple Talk Printing (continued)
For each Printer Port that will be used for AppleTalk printing, you may need to change the AppleTalk Port Settings. Press the appropriate Port Setting button to open the AppleTalk Port Configuration dialog window.
In this window you will see the Port's Chooser Name (which is the same as the Port Name). Port Names are examples only. Here you can change the Port's Settings:
Printer Type - Describes the type of printer. Most PostScript printers should use the LaserWriter type.
PostScriptLevel -
Describes whether the printer supports Level 1 PostScript or Level 2 PostScript. This information can usually be found in the printer's documentation or on the printer test page.

Font Group - Describes the print font options supported by the printer such as No Font, All Font, Standard 35, and Standard 13.
Click Save to save the changes made to the settings. The Print Server will restart itself and begin serving print jobs.
Printing from MacOS Client Workstations
The exact procedure for selecting a PostScript printer connected to your Print Server may vary slightly, depending on what printer driver version you are using. The procedure described below assumes you are using the LaserWriter 8.
To choose a printer connected to your Print Server as your MacOS workstation's default printer,
Open the Chooser by selecting Chooser from the Apple menu.
Select the LaserWriter 8 icon on the left. Make sure that AppleTalk is set to Active.
A list of all networked PostScript printers will be displayed:
Double-click the name of the Printer Port you wish to use. The Printer Ports shown are examples only.

Printing from MacOS Client Workstations (continued)
If you have not previously set this printer as the default, your computer will prompt you for a PostScript Printer Description file. Choose Select PPD.

Select the appropriate printer description file for your printer.
Click Open.
(If your printer is not listed, click Generic to use a generic printer description.)

If you wish to access this setting in the future, you can use the Setup button in the Chooser window.
The selected printer will become your computer's default printer. You may need to choose Page Setup in any applications you have open.
Port Pinouts
The following table lists the pinouts of the print server's 25-pin parallel port connector (identical to the connector used on most personal computers), as well as the 36-pin Centronics connector used on most printers.
Signal names beginning with n are active-low signals.
| 25-pin | Centronics | Signal | Source |
| 1 | 1 | nStrobe | Host |
| 2 | 2 | Data 1 | Bi-directional |
| 3 | 3 | Data 2 | Bi-directional |
| 4 | 4 | Data 3 | Bi-directional |
| 5 | 5 | Data 4 | Bi-directional |
| 6 | 6 | Data 5 | Bi-directional |
| 7 | 7 | Data 6 | Bi-directional |
| 8 | 8 | Data 7 | Bi-directional |
| 9 | 9 | Data 8 | Bi-directional |
| 10 | 10 | nAck | Printer |
| 11 | 11 | Busy | Printer |
| 12 | 12 | PError | Printer |
| 13 | 13 | Select | Printer |
| 14 | 14 | nAutoFd | Host |
| 15 | 32 | nFault | Printer |
| 16 | 31 | nInit | Host |
| 17 | 36 | nSelectIn | Host |
| 18-25 | 16,17,19-30 | Ground |
Networking Basics
Using the Network Setup Wizard in Windows XP
In this section you will learn how to establish a network at home or work, using Microsoft Windows XP.
Note: Please refer to websites such as http://www.homenethelp.com and http://www.microsoft.com/windows2000 for information about networking computers using Windows 2000, ME or 98SE.
Go to Start>Control Panel>Network Connections
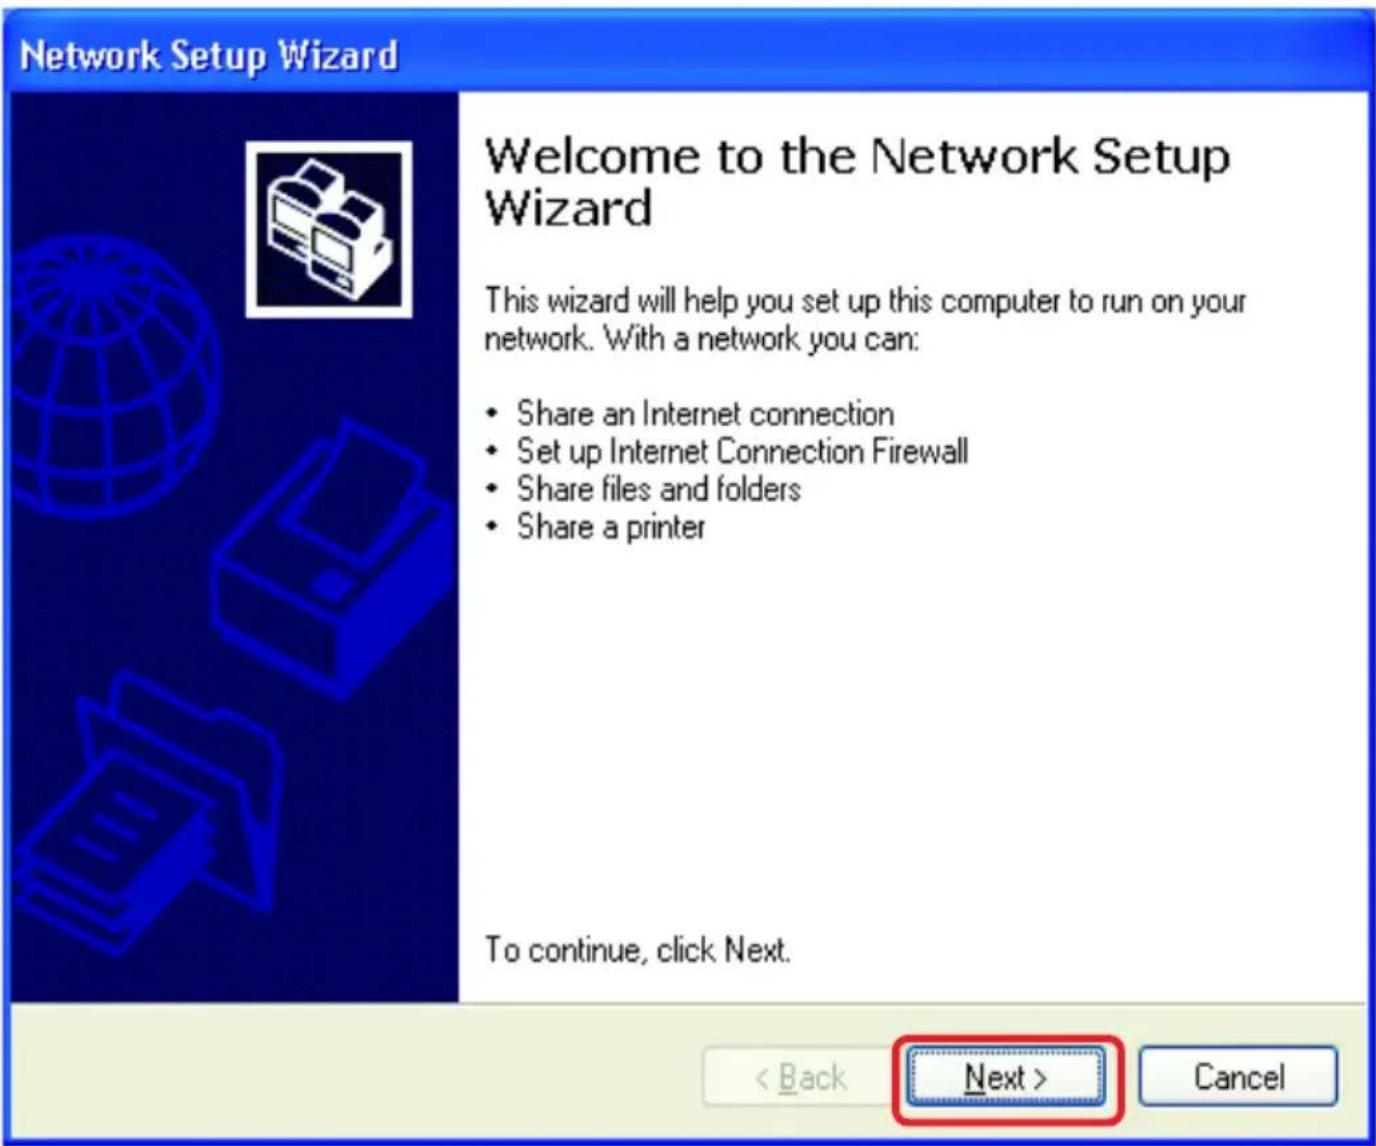
When this screen appears, Click Next
Networking Basics (continued)
Please follow all the instructions in this window:

In this window, select the best description of your computer. If your computer connects to the internet through a gateway/router, select the second option as shown.

Click Next
Networking Basics (continued)
Enter a Computer description and a Computer name (optional.)
Network Setup Wizard
Give this computer a description and name.
Computer description:
Mary's Computer
Examples: Family Room Computer or Monica's Computer
Computer name:
Office
Examples: FAMILY or MONICA
The current computer name is Office
Learn more about computer names and descriptions.
< Back
Next >
Cancel
Click Next
Enter a Workgroup name. All computers on your network should have the same Workgroup name.
Network Setup Wizard
Name your network.

Name your network by specifying a workgroup name below. All computers on your network should have the same workgroup name.
Workgroup name:
Accounting
Examples: HOME or OFFICE
Click Next
< Back
Next >
Cancel
Networking Basics (continued)
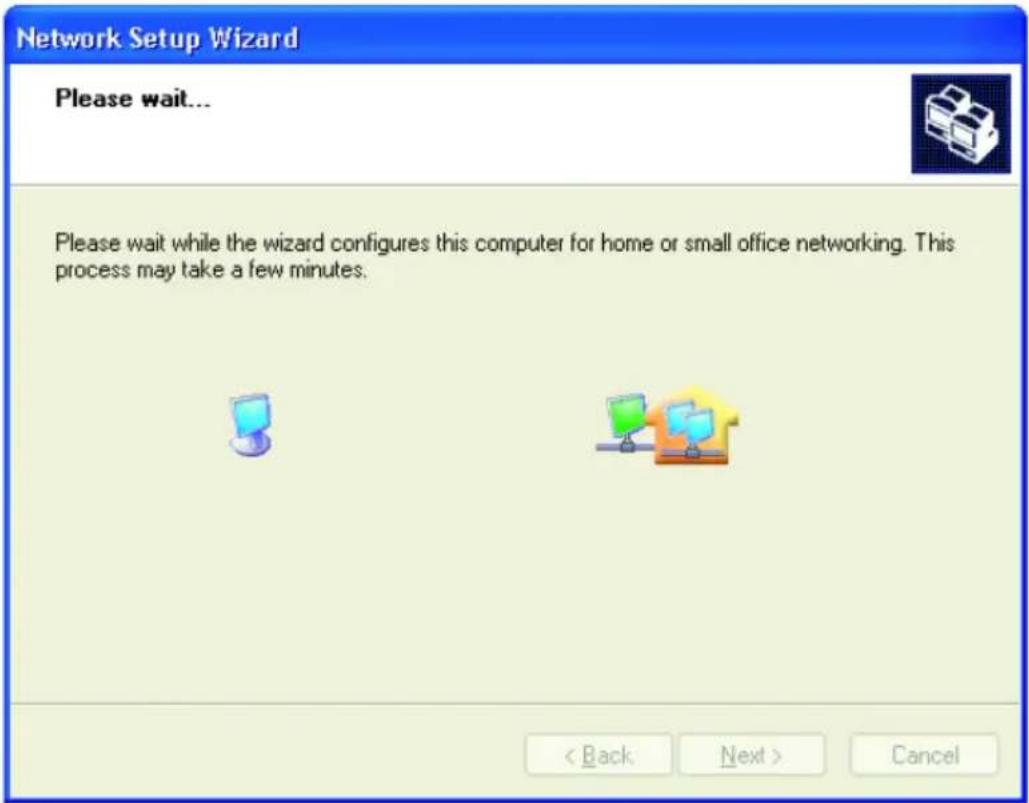
Please wait while the Network Setup Wizard applies the changes.
When the changes are complete, Click Next.

Please wait while the Network Setup Wizard configures the computer. This may take a few minutes.
Networking Basics (continued)
In this window, select the best option. In this example, Create a Network Setup Disk has been selected. You will run this disk on each of the computers on your network.
Click Next

Insert a disk into the Floppy Disk Drive, in this case drive A.

Format the disk if you wish, and Click Next
Networking Basics (continued)
Please wait while the Network Setup Wizard copies the files.

Please read the information under Here's how in the screen below. After you complete the Network Setup Wizard you will use the Network Setup Disk to run the Network Setup Wizard once on each of the computers on your network. To continue, Click Next.

Networking Basics (continued)

The new settings will take effect when you restart the computer. Click Yes to restart the computer.

You have completed configuring this computer. Next, you will need to run the Network Setup Disk on all the other computers on your network. After running the Network Setup Disk on all your computers, your new wireless network will be ready to use.
Networking Basics (continued)
How to assign a Name to your computer
To name your computer, please follow these directions in Windows XP:
- Click Start (in the lower left corner of the screen)
Right-click My Computer
Select Properties and Click

■ Select the Computer Name tab in the System Properties window.
You may enter a Computer Description (optional).
To rename the computer and join a domain, Click Change.

Networking Basics (continued)
How to assign a Name to your Computer
In this window, enter the Computer name
■ Select Workgroup and enter the name of the Workgroup
All computers on your network must have the same Workgroup name.
Click OK

How to find your IP Address in Windows XP
The adapter-equipped computers in your network must be in the same IP Address range. To verify the IP Address of the adapter, please do the following:
Right-click on the Local Area Connection icon in the task bar
Click on Status

Networking Basics (continued)
How to find your IP Address in Windows XP
This window will appear.
Click the Support tab
Click Close

Assigning a Static IP Address in Windows XP/2000
Note: Residential Gateways/Broadband Routers will automatically assign IP Addresses to the computers on the network, using DHCP (Dynamic Host Configuration Protocol) technology. If you are using a DHCP-capable Gateway/Broadband Router you will not need to assign Static IP Addresses.
If you are not using a DHCP capable Gateway/Broadband Router, or you need to assign a Static IP Address, please follow these instructions:
Go to Start
Double-click Control Panel

Networking Basics (continued)
Assigning a Static IP Address in Windows XP/2000
Double-click Network Connections

Right-click Local Area Connections
Double-click Properties

Networking Basics (continued)
Assigning a Static IP Address in Windows XP/2000
■ Click Internet Protocol (TCP/IP)
Click Properties
■ Select Use the following IP Address in the Internet Protocol (TCP/IP)Properties window.
Input your IP Address and subnet mask. (The IP Addresses on your network must be within the same range. For example, if one computer has an IP Address of 192.168.0.2, the other computers should have IP Addresses that are sequential, like 192.168.0.3 and 192.168.0.4. The subnet mask must be the same for all the computers on the network.)
Input your DNS server addresses. (Note: If you are entering a DNS server, you must enter the IP Address of the Default Gateway.)
The DNS server information will be supplied by your ISP (Internet Service Provider.)
Click OK


Technical Specifications
Printer Connection
Printer Port: IEEE 1284 standard bidirectional parallel interface with 25-pin connector. USB port (ver 1.1)
Bidirectional Communication: Hewlett-Packard PJL (Printer Job Language) standard for bidirectional communication.
Network Connection
Network Standards: IEEE 802.3 10Base-T Ethernet
Network Data Transfer Rate: 10/100 Mbps (megabits per second)
Network Connector: RJ-45 connector for 10Base-T Category 5 twisted-pair connection
Network Protocols
Ethernet Frame Types: 802.2, 802.3, Ethernet II, SNAP (auto-switching)
Transport Protocols: TCP/IP, NetBEUI, AppleTalk/EtherTalk, LPR
TCP/IP Protocols Supported: BOOTP, SNMP, Telnet, TFTP, FTP, LPD, RARP, DHCP
Management and Diagnostics
Standard: SNMP
MIBs: MIB-II (RFC 1213)
Diagnostic LED Indicators: Pw, Lk/Act, LPT1, LPT2, USB
Environmental and Physical
Power Supply: External power supply providing 5V/2.5A
Dimensions: 7.58" x 4.66" x 1.22" (192.5mm x 118.4mm x 31mm)
Weight: approx. 10.3 oz. (292g)
Operating Temperature: 32 to 122°F (0 to 50°C)
Storage Temperature: -13 to 131°F (-25 to 55°C)
Humidity: 5% to 95% non-condensing
Emissions: FCC Class B, CE Class B, VCCI Class B
Technical Support
You can find software updates and user documentation on the D-Link website.
D-Link provides free technical support for customers within the United States and within Canada for the duration of the warranty period on this product.
U.S. and Canadian customers can contact D-Link technical support through our website, or by phone.
Tech Support for customers within the United States:
D-Link Technical Support over the Telephone:
(877) 453-5465
24 hours a day, seven days a week.
D-Link Technical Support over the Internet:
http://support.dlink.com
email:support@dlink.com
Tech Support for customers within Canada:
D-Link Technical Support over the Telephone:
(800) 361-5265
Monday to Friday 8:30am to 9:00pm EST
D-Link Technical Support over the Internet:
http://support.dlink.ca
email:support@dlink.ca
When contacting technical support, please provide the following information:
- Serial number of the unit
- Model number or product name
- Software type and version number
Warranty and Registration
Subject to the terms and conditions set forth herein, D-Link Systems, Inc. ("D-Link") provides this Limited warranty for its product only to the person or entity that originally purchased the product from:
D-Link or its authorized reseller or distributor and
Products purchased and delivered within the fifty states of the United States, the District of Columbia, U.S. Possessions or Protectorates, U.S. Military Installations, addresses with an APO or FPO.
Limited Warranty: D-Link warrants that the hardware portion of the D-Link products described below will be free from material defects in workmanship and materials from the date of original retail purchase of the product, for the period set forth below applicable to the product type (“Warranty Period”), except as otherwise stated herein.
1-Year Limited Warranty for the Product(s) is defined as follows:
Hardware (excluding power supplies and fans)One (1) Year
Power Supplies and Fans One (1) Year
- Spare parts and spare kits Ninety (90) days
D-Link's sole obligation shall be to repair or replace the defective Hardware during the Warranty Period at no charge to the original owner or to refund at D-Link's sole discretion. Such repair or replacement will be rendered by D-Link at an Authorized D-Link Service Office. The replacement Hardware need not be new or have an identical make, model or part. D-Link may in its sole discretion replace the defective Hardware (or any part thereof) with any reconditioned product that D-Link reasonably determines is substantially equivalent (or superior) in all material respects to the defective Hardware. Repaired or replacement Hardware will be warranted for the remainder of the original Warranty Period from the date of original retail purchase. If a material defect is incapable of correction, or if D-Link determines in its sole discretion that it is not practical to repair or replace the defective Hardware, the price paid by the original purchaser for the defective Hardware will be refunded by D-Link upon return to D-Link of the defective Hardware. All Hardware (or part thereof) that is replaced by D-Link, or for which the purchase price is refunded, shall become the property of D-Link upon replacement or refund.
Limited Software Warranty: D-Link warrants that the software portion of the product ("Software") will substantially conform to D-Link's then current functional specifications for the Software, as set forth in the applicable documentation, from the date of original retail purchase of the Software for a period of ninety (90) days ("Warranty Period"), provided that the Software is properly installed on approved hardware and operated as contemplated in its documentation. D-Link further warrants that, during the Warranty Period, the magnetic media on which D-Link delivers the Software will be free of physical defects. D-Link's sole obligation shall be to replace the non-conforming Software (or defective media) with software that substantially conforms to D-Link's functional specifications for the Software or to refund at D-Link's sole discretion. Except as otherwise agreed by D-Link in writing, the replacement Software is provided only to the original licensee, and is subject to the terms and conditions of the license granted by D-Link for the Software. Software will be warranted for the remainder of the original Warranty Period from the date or original retail purchase. If a material non-conformance is incapable of correction, or if D-Link determines in its sole discretion that it is not practical to replace the non-conforming Software, the price paid by the original licensee for the non-conforming Software will be refunded by D-Link; provided that the non-conforming Software (and all copies thereof) is first returned to D-Link. The license granted respecting any Software for which a refund is given automatically terminates.
Non-Applicability of Warranty: The Limited Warranty provided hereunder for hardware and software of D-Link's products will not be applied to and does not cover any refurbished product and any product purchased through the inventory clearance or liquidation sale or other sales in which D-Link, the sellers, or the liquidators expressly disclaim their warranty obligation pertaining to the product and in that case, the product is being sold "As-Is" without any warranty whatsoever including, without limitation, the Limited Warranty as described herein, notwithstanding anything stated herein to the contrary.
Submitting A Claim: The customer shall return the product to the original purchase point based on its return policy. In case the return policy period has expired and the product is within warranty, the customer shall submit a claim to D-Link as outlined below:
The customer must submit with the product as part of the claim a written description of the Hardware defect or Software nonconformance in sufficient detail to allow D-Link to confirm the same.
The original product owner must obtain a Return Material Authorization ("RMA") number from the Authorized D-Link Service Office and, if requested, provide written proof of purchase of the product (such as a copy of the dated purchase invoice for the product) before the warranty service is provided.
After an RMA number is issued, the defective product must be packaged securely in the original or other suitable shipping package to ensure that it will not be damaged in transit, and the RMA number must be prominently marked on the outside of the package. Do not include any manuals or accessories in the shipping package. D-Link will only replace the defective portion of the Product and will not ship back any accessories.
The customer is responsible for all in-bound shipping charges to D-Link. No Cash on Delivery ("COD") is allowed. Products sent COD will either be rejected by D-Link or become the property of D-Link. Products shall be fully insured by the customer and shipped to D-Link Systems, Inc., 53 Discovery Drive, Irvine, CA 92618. D-Link will not be held responsible for any packages that are lost in transit to D-Link. The repaired or replaced packages will be shipped to the customer via UPS Ground or any common carrier selected by D-Link, with shipping charges prepaid. Expedited shipping is available if shipping charges are prepaid by the customer and upon request.
D-Link may reject or return any product that is not packaged and shipped in strict compliance with the foregoing requirements, or for which an RMA number is not visible from the outside of the package. The product owner agrees to pay D-Link's reasonable handling and return shipping charges for any product that is not packaged and shipped in accordance with the foregoing requirements, or that is determined by D-Link not to be defective or non-conforming.
What Is Not Covered: This limited warranty provided by D-Link does not cover: Products, if in D-Link's judgment, have been subjected to abuse, accident, alteration, modification, tampering, negligence, misuse, faulty installation, lack of reasonable care, repair or service in any way that is not contemplated in the documentation for the product, or if the model or serial number has been altered, tampered with, defaced or removed; Initial installation, installation and removal of the product for repair, and shipping costs; Operational adjustments covered in the operating manual for the product, and normal maintenance; Damage that occurs in shipment, due to act of God, failures due to power surge, and cosmetic damage; Any hardware, software, firmware or other products or services provided by anyone other than D-Link; Products that have been purchased from inventory clearance or liquidation sales or other sales in which D-Link, the sellers, or the liquidators expressly disclaim their warranty obligation pertaining to the product. Repair by anyone other than D-Link or an Authorized D-Link Service Office will void this Warranty.
Disclaimer of Other Warranties: EXCEPT FOR THE LIMITED WARRANTY SPECIFIED HEREIN, THE PRODUCT IS PROVIDED "AS-IS" WITHOUT ANY WARRANTY OF ANY KIND WHATSOEVER INCLUDING, WITHOUT LIMITATION, ANY WARRANTY OF MERCHANTABILITY, FITNESS FOR A PARTICULAR PURPOSE AND NON-INFRINGEMENT. IF ANY IMPLIED WARRANTY CANNOT BE DISCLAIMED IN ANY TERRITORY WHERE A PRODUCT IS SOLD, THE DURATION OF SUCH IMPLIED WARRANTY SHALL BE LIMITED TO NINETY (90) DAYS. EXCEPT AS EXPRESSLY COVERED UNDER THE LIMITED WARRANTY PROVIDED HEREIN, THE ENTIRE RISK AS TO THE QUALITY, SELECTION AND PERFORMANCE OF THE PRODUCT IS WITH THE PURCHASER OF THE PRODUCT.
Limitation of Liability: TO THE MAXIMUM EXTENT PERMITTED BY LAW, D-LINK IS NOT LIABLE UNDER ANY CONTRACT, NEGLIGENCE, STRICT LIABILITY OR OTHER LEGAL OR EQUITABLE THEORY FOR ANY LOSS OF USE OF THE PRODUCT, INCONVENIENCE OR DAMAGES OF ANY CHARACTER, WHETHER DIRECT, SPECIAL, INCIDENTAL OR CONSEQUENTIAL (INCLUDING, BUT NOT LIMITED TO, DAMAGES FOR LOSS OF GOODWILL, LOSS OF REVENUE OR PROFIT, WORK STOPPAGE, COMPUTER FAILURE OR MALFUNCTION, FAILURE OF OTHER EQUIPMENT OR COMPUTER PROGRAMS TO WHICH D-LINK'S PRODUCT IS CONNECTED WITH, LOSS OF INFORMATION OR DATA CONTAINED IN, STORED ON, OR INTEGRATED WITH ANY PRODUCT RETURNED TO D-LINK FOR WARRANTY SERVICE) RESULTING FROM THE USE OF THE PRODUCT, RELATING TO WARRANTY SERVICE, OR ARISING OUT OF ANY BREACH OF THIS LIMITED WARRANTY, EVEN IF D-LINK HAS BEEN ADVISED OF THE POSSIBILITY OF SUCH DAMAGES. THE SOLE REMEDY FOR A BREACH OF THE FOREGOING LIMITED WARRANTY IS REPAIR, REPLACEMENT OR REFUND OF THE DEFECTIVE OR NON-CONFORMING PRODUCT. THE MAXIMUM LIABILITY OF D-LINK UNDER THIS WARRANTY IS LIMITED TO THE PURCHASE PRICE OF THE PRODUCT COVERED BY THE WARRANTY. THE FOREGOING EXPRESS WRITTEN WARRANTIES AND REMEDIES ARE EXCLUSIVE AND ARE IN LIEU OF ANY OTHER WARRANTIES OR REMEDIES, EXPRESS, IMPLIED OR STATUTORY.
Governing Law: This Limited Warranty shall be governed by the laws of the State of California. Some states do not allow exclusion or limitation of incidental or consequential damages, or limitations on how long an implied warranty lasts, so the foregoing limitations and exclusions may not apply. This limited warranty provides specific legal rights and the product owner may also have other rights which vary from state to state.
Trademarks: D-Link is a registered trademark of D-Link Systems, Inc. Other trademarks or registered trademarks are the property of their respective manufacturers or owners.
Copyright Statement: No part of this publication or documentation accompanying this Product may be reproduced in any form or by any means or used to make any derivative such as translation, transformation, or adaptation without permission from D-Link Corporation/D-Link Systems, Inc., as stipulated by the United States Copyright Act of 1976. Contents are subject to change without prior notice. Copyright © 2002 by D-Link Corporation/D-Link Systems, Inc. All rights reserved.
CE Mark Warning: This is a Class B product. In a domestic environment, this product may cause radio interference, in which case the user may be required to take adequate measures.
FCC Statement: This equipment has been tested and found to comply with the limits for a Class B digital device, pursuant to part 15 of the FCC Rules. These limits are designed to provide reasonable protection against harmful interference in a residential installation. This equipment generates, uses, and can radiate radio frequency energy and, if not installed and used in accordance with the instructions, may cause harmful interference to radio communication. However, there is no guarantee that interference will not occur in a particular installation. If this equipment does cause harmful interference to radio or television reception, which can be determined by turning the equipment off and on, the user is encouraged to try to correct the interference by one or more of the following measures:
■ Reorient or relocate the receiving antenna.
Increase the separation between the equipment and receiver.
Connect the equipment into an outlet on a circuit different from that to which the receiver is connected.
Consult the dealer or an experienced radio/TV technician for help.
FCC Caution: Any changes or modifications not expressly approved by the party responsible for compliance could void the user's authority to operate this equipment.
This device complies with Part 15 of the FCC Rules. Operation is subject to the following two conditions: (1) This device may not cause harmful interference, and (2) this device must accept any interference received, including interference that may cause undesired operation.
IMPORTANT NOTE:
FCC Radiation Exposure Statement:
This equipment complies with FCC radiation exposure limits set forth for an uncontrolled environment. This equipment should be installed and operated with a minimum distance of about 8 inches (20cm) between the radiator and your body.
This transmitter must not be co-located or operated in conjunction with any other antenna or transmitter.
Register your D-Link product online at http://support.dlink.com/register/
Appendix:
DP-300U Printer Compatibility List
The Canon Printer
Canon BJC-255SP
Canon BJ-330
Canon BJC-600, 620
Canon BJC-2000SP
Canon BJC-4100, 4300, 4500, 4550
Canon BJC-6000, 6500
Canon BJC-7000
Canon BJC-8200
Canon LBP-720, 740
Canon Bubble Jet S520
The Epson Printer/plotter
Epson Stylus Photo 700, 710, 750
Epson Stylus Photo 870
Epson Stylus Photo 1200, 1270
Epson Stylus Photo EX
Epson Stylus Pro XL
Epson Stylus Color 400, 440, 460, 480
Epson Stylus Color 600, 640, 660
Epson Stylus Color 740
Epson Stylus Color 800, 850, 860
Epson Stylus Color 900
Epson Stylus Color 1160
Epson Stylus Color 1500, 1520
Epson Stylus Color 3000
Epson Stylus C60
Epson Stylus C80
Epson LQ-100
Epson LQ-300
Epson LQ-550, 570+
Epson LQ-1070C+
Epson LQ-2070, 2170C
Epson EPL-N2000, N2010
The Fujitsu Printer
Fuji 10V, 14V
Fuji DL-700
Fuji DL-3800
The HP Printer/Plotter
HP Portable
HP LaserJet III
HP LaserJet 4P, 4L, 4V
HP LaserJet 5L
HP LaserJet 6P, 6L
HP LaserJet 1100, 1100A
HP LaserJet 1200
HP LaserJet 2100, 2100M
HP LaserJet 2200
HP LaserColorJet 8500
HP DeskJet 400, 420
HP DeskJet 500, 550C, 560C
HP DeskJet 670C, 695C
HP DeskJet 720C
HP DeskJet 810C, 890C
HP DeskJet 920C
HP DeskJet 930C(new), 970CXI
HP DeskJet 1120C
HP DeskJet 1125C
HP DesignJet 350C
HP DesignJet 600C
HP LaserJet 4000
HP LaserJet 5000
HP OfficeJet T45, 710
Appendix: DP-300U Printer Compatibility List (continued)
The Lexmark Printer
| Lexmark 4039 10R |
| Lexmark 5700 |
| Lexmark Optra Color 45 |
| Lexmark Optra C710 |
| Lexmark Optra E, E+, E310 |
| Lexmark Optra K1220 |
| Lexmark Optra M410, M412 |
| Lexmark Optra N |
| Lexmark Optra R+ |
| Lexmark Optra S1250, S1855 |
| Lexmark Optra SC-1275 |
| Lexmark Optra SE-3455 |
| Lexmark Optra T614 |
| Lexmark Optra W810 |
| Lexmark Z53 |
Other Printers
| Brother HL-1260 |
| CD T120 |
| Citizen GSX-230 |
| Futek 84+ |
| OKI ML-391 |
| OKldata OL-400 |
| Olivetti JP450 |
| Panasonic 2023 |
| Panasonic KX-P1624 |
| Printtec PR856C |
| Star NX-2420 |
| Tektronix Phraser 350 |
The NEC Printer
| NEC P2200 |
| NEC P3200 |
| NEC P5300 |
| NEC P6300 |
| NEC P7300 |
Other printers from the brands listed above may also be supported.
For an updated compatibility list please visit: http://www.support.dlink.com


- Package Contents
- Contents of Package:
- System Requirements:
- Introduction
- TCP/IP
- NetBEUI
- AppleTalk
- External Features
- Port Connectors
- Note:
- Rear Panel Connectors
- Network Cable Connector
- DC Power Connector
- LED Indicators
- Front Panel LED Indicators
- Power
- Link/Act
- USB, LPT1, LPT2
- Setting up the DP-300U Installing the Print Server
- Power ON Self-Test
- Getting Started
- Warning!
- Using Web Configuration
- Home
- System Status and Printer Status
- Configuration
- System Device and Port Setting
- Admin Contact:
- Network
- TCP/IP Protocol
- NetBEUI Protocol
- AppleTalk Protocol
- Tools
- Print Test
- Reset
- Help
- TCP/IP Printing for Windows XP
- TCP/IP Printing for Windows XP (continued)
- Select Local Printer
- Click Finish
- TCP/IP Printing for Windows 2000
- TCP/IP Printing for Windows 2000 (continued)
- Click Next
- Select Custom
- Click Settings
- Select LPR
- TCP/IP Printing for Windows 98SE/ME
- TCP/IP Printing for Windows 98SE/ME (continued)
- TCP/IP Printing for Windows 98SE/ME(continued)
- Click OK
- Go to Start > Settings > Printers
- Unix/Linux Printing
- Setting up Apple Talk or LPR Printing in Mac OS X
- Setting up Apple Talk or LPR Printing
- in Mac OS X (continued)
- LPR Printers using IP protocol:
- Setting up Apple Talk Printing in Mac OS 9
- Setting up the Print Server for AppleTalk Printing
- Setting up Apple Talk Printing (continued)
- PostScriptLevel -
- Printing from MacOS Client Workstations
- Printing from MacOS Client Workstations (continued)
- Click Open.
- Port Pinouts
- Networking Basics
- Networking Basics (continued)
- Network Setup Wizard
- How to assign a Name to your computer
- How to find your IP Address in Windows XP
- Assigning a Static IP Address in Windows XP/2000
- Technical Specifications
- Printer Connection
- Network Connection
- Network Protocols
- Management and Diagnostics
- Environmental and Physical
- Technical Support
- Tech Support for customers within the United States:
- Tech Support for customers within Canada:
- Warranty and Registration
- IMPORTANT NOTE:
- FCC Radiation Exposure Statement:
- Appendix:
- DP-300U Printer Compatibility List
- The Canon Printer
- The Epson Printer/plotter
- The Fujitsu Printer
- The HP Printer/Plotter
- Appendix: DP-300U Printer Compatibility List (continued)
Brand : D-LINK
Model : DP-300U
Category : Print Server