LEDW24i+ - TV Reflexion - Free user manual and instructions
Find the device manual for free LEDW24i+ Reflexion in PDF.


| Product Type | LED Smart TV |
| Model | LEDW24i+ |
| Screen Size | 24 inch (60 cm) |
| Resolution | 1920 x 1080 (Full HD) |
| Aspect Ratio | 16:9 |
| Energy Efficiency Class | E |
| Power Consumption (On) | 18 W |
| Power Consumption (Standby) | < 0.5 W |
| Power Supply | DC 12V/3A or 24V/1.5A (via included adapter) |
| Weight (with stand) | 2.9 kg |
| Weight (complete) | 4.3 kg |
| Dimensions (W x D x H) with stand | 551 x 169 x 379 mm |
| Dimensions (W x D x H) without stand | 551 x 45 x 326 mm |
| VESA Mount | 100 x 100 mm |
| TV Standards | DVB-T/T2HD, DVB-S/S2, DVB-C, ATV |
| CI+ Slot | Yes (for CAM & Smart Card) |
| Smart TV Platform | Android 9.0 |
| Audio Output | 2 x 5 W |
| Connections | HDMI (2, one ARC), USB (2), RJ45, CI+, COAX OUT, Mini AV IN, Headphone |
| Wireless Connectivity | Wi-Fi 802.11b/g/n, Bluetooth 4.2 |
| Refresh Rate | 60 Hz |
| Response Time | 8.5 ms |
| Contrast Ratio | 3000:1 |
| Brightness | 220 cd/m² |
| Viewing Angle | 178° (both V and H) |
| Supported USB Storage | FAT32, NTFS (max 1 TB for recording) |
| Cleaning | Soft dry cloth; no solvents |
| Safety | Do not remove covers; unplug during storms; keep away from moisture |
Frequently Asked Questions - LEDW24i+ Reflexion
User questions about LEDW24i+ Reflexion
0 question about this device. Answer the ones you know or ask your own.
Ask a new question about this device
Download the instructions for your TV in PDF format for free! Find your manual LEDW24i+ - Reflexion and take your electronic device back in hand. On this page are published all the documents necessary for the use of your device. LEDW24i+ by Reflexion.
USER MANUAL LEDW24i+ Reflexion
19" (47cm) 22" (55cm) 24" (60cm) TFT-LED-Smart TV mit DVB-T/T2HD, DVB-S/S2, DVB-C, Cl+ Slot & Bluetooth
Model-No: LEDW19i+ / LEDW22i+ / LEDW24i+
natural_image
Line drawing of a flat-screen computer monitor with a stand at the bottom (no text or symbols)| English | German |
| CI+ Slot | CI+ Steckplatz |
| CAM | CAM |
| Smart Card | Smart Card |
19" (47cm) 22" (55cm) 24" (60cm)
TFT-LED-Smart TV with DVB-T/T2HD,
DVB-S/S2, DVB-C, Cl+ Slot & Bluetooth
Model No.: LEDW19i+ / LEDW22i+ / LEDW24i+
natural_image
Line drawing of a flat-screen monitor with a stand at the bottom (no text or symbols)Read the entire manual for the TV carefully before using the unit. Keep the instructions in a safe place for future reference.
SAFETY INFORMATION
IMPORTANT SAFETY INSTRUCTIONS - PLEASE READ CAREFULLY BEFORE USE.
Observe the safety instructions on the back of the TV.

Electrical Shock Prevention Warning. Do not remove any of the covers. No user-serviceable parts inside the unit. Have the appliance serviced by qualified personnel.
This symbol indicates important operating/maintenance instructions from this unit in the operating instructions.
This symbol indicates the risk of electric shock due to life-threatening voltage in this appliance.
Follow these instructions:
- Do not use this television near water.
- Use only a slightly damp cloth for cleaning.
-
Do not cover any of the ventilation openings.
-
Set up the unit in accordance with the Quick Start Guide supplied and these operating instructions.
- Note that the power supply cable must not be crushed or kinked and avoid running the power cable over sharp edges.
- Unplug the TV during lightning storms or when it will not be used for long periods of time.

Keep the appliance away from splashing and dripping water. Do not place any objects filled with liquids on the appliance.
Note:
- Do not place any open heat sources (stoves, candles, etc.) near or on the TV set.
IMPORTANT SAFETY INSTRUCTIONS
This appliance complies with all current safety regulations. The following safety tips are intended to protect the user from careless use and the dangers that may develop as a result.
- This appliance has been manufactured with the utmost care and has undergone a rigorous final inspection. However, as with any other electrical appliance, there is a possibility that problems may arise. Immediately disconnect the appliance from the mains in the event of smoke, intense heat or any other unnatural phenomenon.
- The mains plug or appliance plug is used to disconnect the appliance from the mains and should be easily accessible at all times.
- Only connect the unit to power sources that comply with the specifications of the unit. These can be found on the back of the unit and in the operating instructions.
- The mains socket should be near the unit and must be easy to reach.
- Pull the mains cable out of the socket by the plug. Never pull on the mains cable itself, it could be damaged and cause a short circuit.
-
When using a multiple socket, do not connect too many devices to the multiple socket to avoid overloading.
-
Keep rodents away from the appliance to avoid damaging the cables.
- To prevent injury, make sure that the power cable cannot be reached by small children or pulled out of the socket.
- Do not place the appliance near heat sources. The casing and the power cable could be damaged by the influence of heat.
- The screen is made of plastic that may chip if damaged. To prevent injury, carefully pick up sharp-edged plastic splinters.
- When setting up the unit, make sure it is on a firm and level surface.
- To protect the unit from lightning, disconnect the unit from the mains and unplug the antenna. Warning: Do not touch the RF antenna connector.
- Disconnect the unit from the mains if you are not going to use it for a long period of time or if you leave it unattended.
- When setting up the unit, make sure that there is sufficient ventilation. Never place the unit near heat sources and do not cover any of the ventilation openings.
- Avoid direct sunlight on the unit. Keep a clearance of 5 cm (2") from the surroundings when placing on a shelf.
- Keep water or moisture away from the unit. Do not use the unit in wet or humid environments such as the bathroom, a steam kitchen or near a swimming pool.
- Do not use the appliance if moisture condensation may occur.
- Any repairs must only be carried out by qualified personnel.
- Never open the appliance. Repairs that are not carried out by qualified personnel can be a possible cause of fire.
- Liquids spilled into the unit may be a cause of serious damage. Switch the unit OFF and disconnect it from the mains. Contact your dealer or customer service.
- Never remove the safety covers. There are no usable or serviceable components inside the unit. You would lose your warranty claim. The appliance may only be repaired by the manufacturer's service department.
- Never hit or shake the screen as this could damage the internal circuitry. Handle the remote control carefully and do not drop it.
- Clean the unit with a soft cloth. Never use solvents or oil-based liquids. For stubborn stains, you can use a damp cloth with diluted detergent.
- Teach your children how to use the Internet and do not let them play with the device unsupervised. The company Ultramedia GmbH & Co. Handels KG is not responsible for the Internet content shown.
- All illustrations in these operating instructions serve exclusively as examples and do not necessarily correspond to the actual device.
Headphone warning
Set the volume of the unit to a minimum before using headphones. A volume that is set too high can lead to hearing impairment / damage over a long period of time. Therefore, to protect your hearing, use a comfortable medium volume.
Installation location
Place the TV set on a stable and level surface. Avoid locations with direct sunlight. Soft, indirect light is recommended for pleasant TV viewing. To avoid damage to the set, place the TV set so that no objects can swing into the set. Do not place any objects in front of the remote control receiver of the TV set. This can lead to the unit no longer being able to be operated with the remote control.
WHAT'S IN THE BOX?
- Smart TV
• Power supply (AC: 230V) -
User manual
-
Remote control incl. 2pcs AAA batteries
• Active DVB-T antenna -
12V cable
• TV stand incl. screws
MOUNTING WALL BRACKET & TV STAND
Wall mount:
The TV set is equipped with mounting points (M4) for a wall bracket (wall bracket not included). The VESA hole spacing is 100x100 (Vesa100). Do not use screws that are too long, as you could damage components inside the unit.
Note:
- Follow the instructions on the wall bracket when installing it.
- Consult a specialist for the installation of the wall bracket if you have any questions.
Mounting TV stand:
FIG. 1
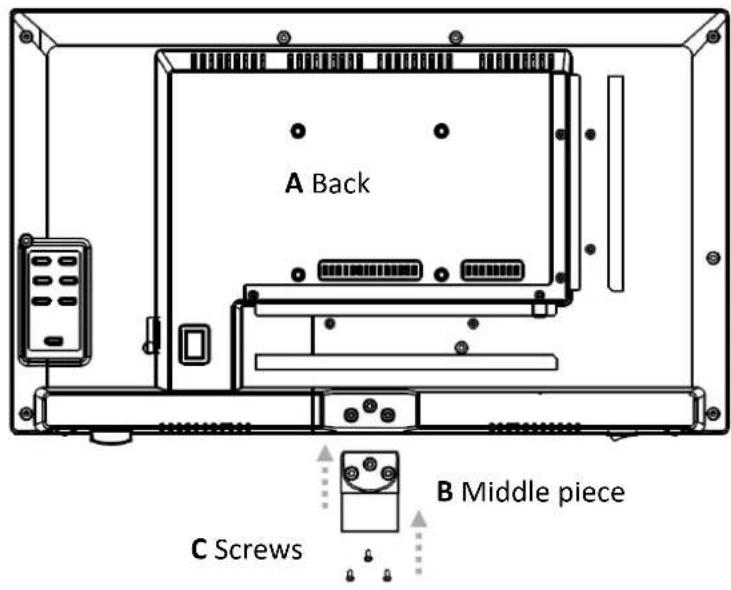
FIG. 2
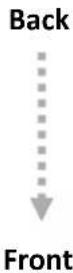
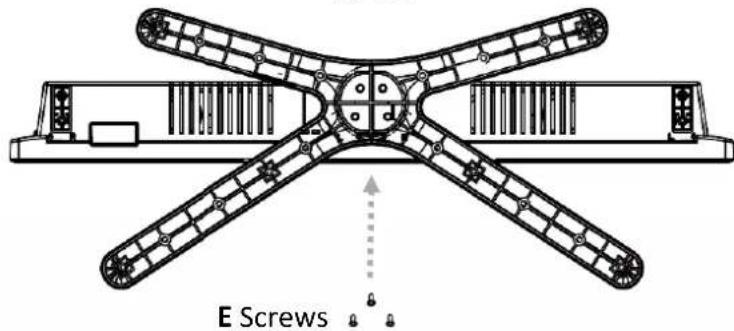
- Place the TV set (A) on a flat and lightly padded surface with the display facing downwards.
- Screw the middle piece (B) to the TV using the screws (C) supplied and a screwdriver (not included) (see FIG. 1).
- Hold the stand foot (D) against the underside of the middle piece (C) and ensure that it is correctly aligned (see FIG. 2).
- Screw the stand (D) to the TV with the screws (E).
OPERATING KEYS ON THE UNIT
The keys for close-up operation are located on the back of the unit.
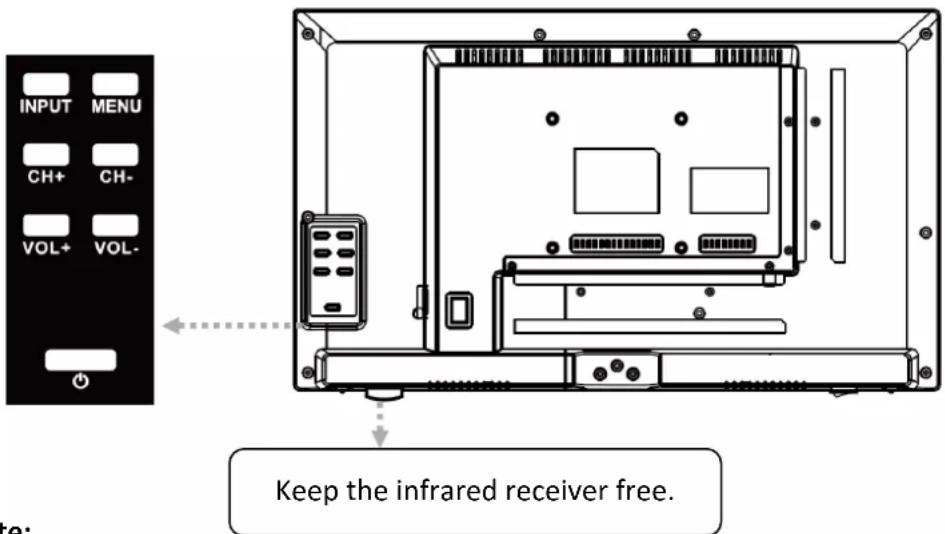
Note:
- Please keep the infrared receiver on the unit clear. Blocking the infrared receiver can lead to connection problems with the remote control.
| INPUT | Open the input sources menu. |
| MENU | Device menu: Open / Close |
| CH+ | CH+: Next programme |
| CH- | CH-: Previous programme |
| VOL+ | VOL+: Louder |
| VOL- | VOL-: Quieter |
| POWER | Power: On / Off (Standby) |
CONNECTIONS ON THE UNIT

| POWER INPUT(DC IN: 12V / 24V) | Mains connection for the power supply unit or the 12V car adapter. |
| RJ45 | Connection for the LAN cable. |
| CVBS OUT | Only mirrors the TV picture (no sound) from the mini AV input. |
| L/R LINE OUT | Cinch audio output. For connecting external audio devices. |
| HDMI 1 (ARC)HDMI 2 | Connection for an external HDMI device.e.g. Blu Ray player / soundbar.HDMI 1 is ARC capable. |
| TV1 (DVB-S/S2)TV2 (DVB-C/T2HD) | TV1: Connection of the satellite antenna.TV2: Connection of the DVB-T antenna or the cable system. |
| COAXIAL (OUT) | Digital audio output for external audio devices (e.g. amplifiers or soundbars). |
| CI+SLOT | Slot for CI+ modules for decoding encrypted TV programmes. |
| MINI AV IN | Connection of external AV devices via adapter (not included)e.g. video recorder |
| HEADPHONES | 3.5mm headphone jack. When used, the internal speakers are muted. |
| USB (5V 500mA) | 2x USB connection for USB sticks and hard disks (max. 1TB). |
REMOTE CONTROL
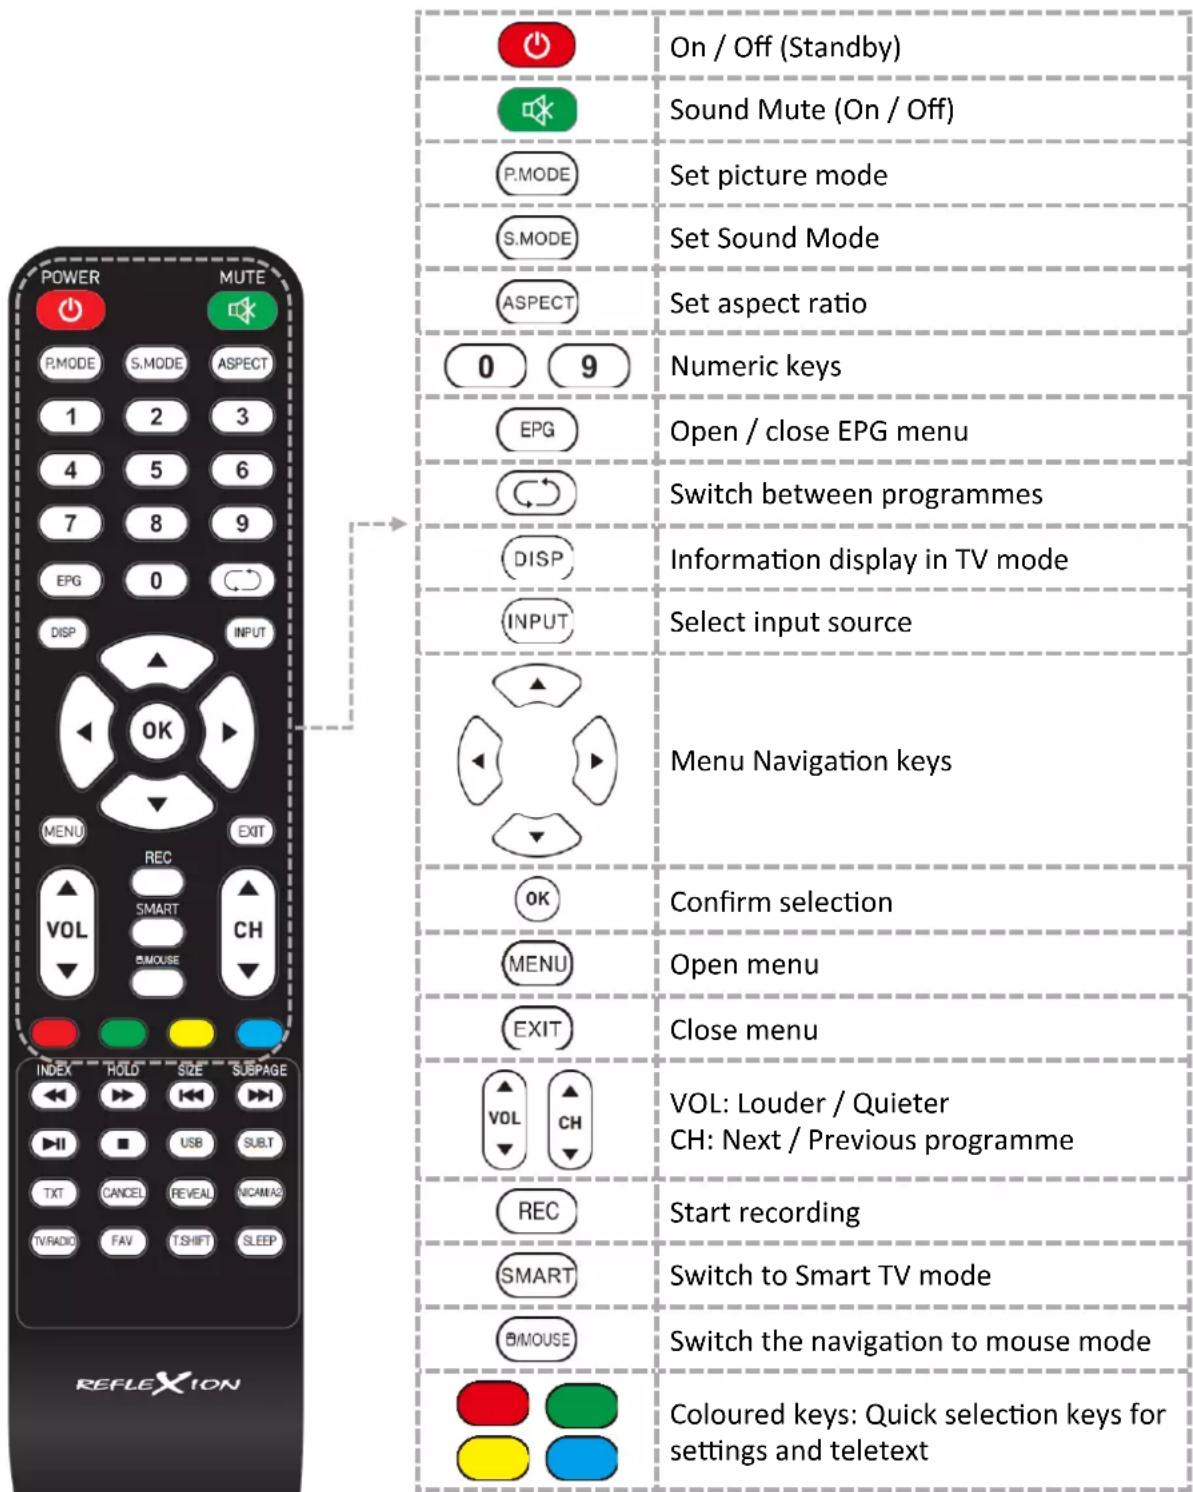
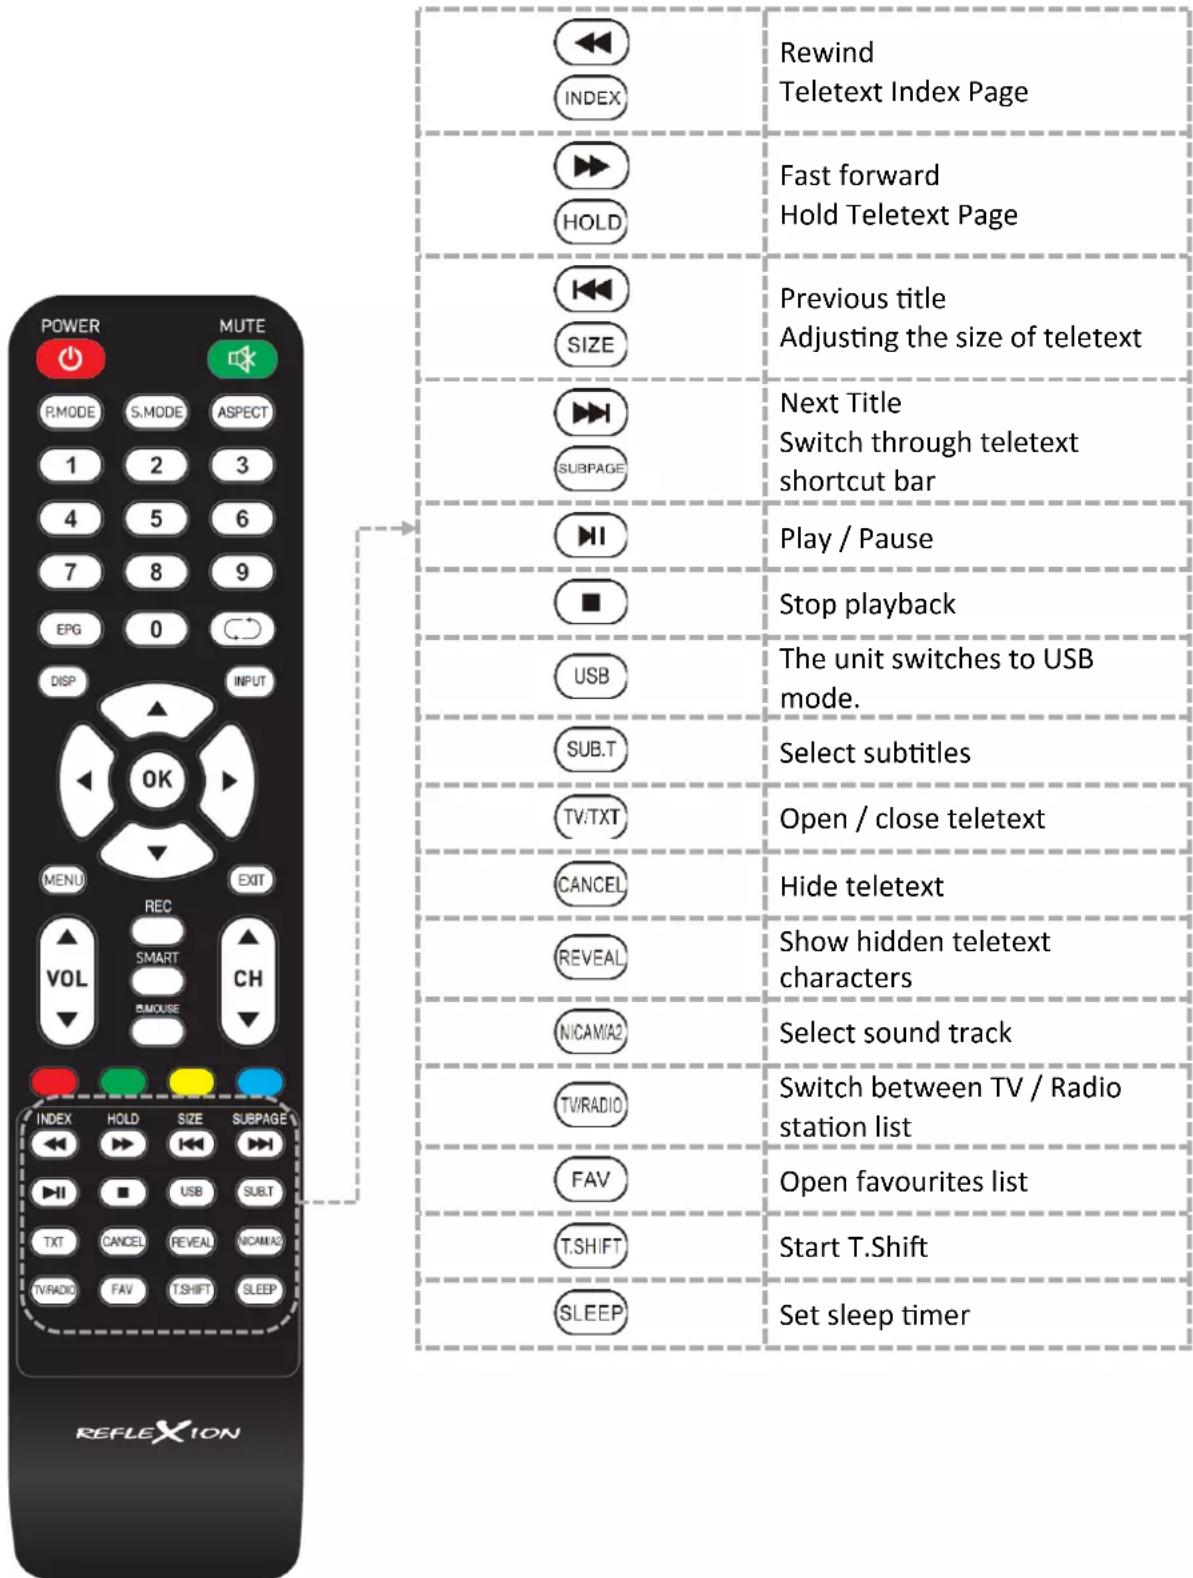
The remote control uses infrared waves (IR). Hold the remote control in the direction of the TV set. If the remote control is out of range or angle, the remote control may not work properly.
COMMON INTERFACE / CI - SLOT
This TV is equipped with a Cl+ slot and supports the following digital standards: DVB-T/T2HD, DVB-S/S2 and DVB-C
Common Interface / Slot
The CI slot (CI+) is designed to accept conditional access modules (CAM) and smart cards to access pay TV and other services. Contact your pay TV service provider for more information about modules and subscriptions.
Note:
- Conditional Access Modules and Smart Cards are sold separately.
- Switch off your TV before inserting Cl+ modules into the Cl slot.
- Then insert the Smart Card into the Cl+ module.
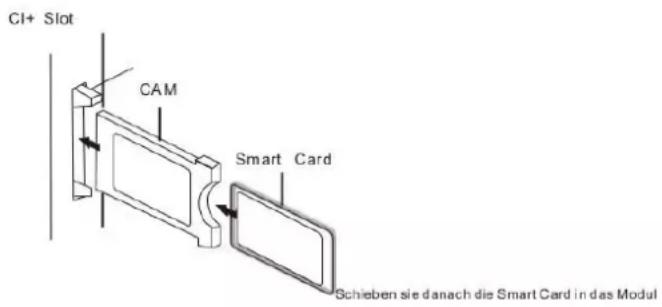
- Switch on the TV and make sure that DTV is selected as the source.
-
When the CAM is recognised, the following text appears on the screen: "CI module inserted". Wait a few seconds until the card is activated.
-
Now select the desired pay TV channel.
-
Detailed information about the smart card being used is displayed.
-
Press the Ⓞ key to enter the CI menu. Refer to the manual of the module for details on the settings.
-
When the module is removed, the following text is displayed on the screen: "CI module removed".
| English | German |
| CI+ Slot | CI+ Steckplatz |
| CAM | CAM |
| Smart Card | Smart Card |
PREPARE DEVICE
Check that all necessary cables and connections are ready.
- Connect the power supply unit or car adapter included in the scope of delivery to the DC IN 12/24V input of the unit. Connect the other side of the power supply unit or car adapter to the appropriate power source.
-
Insert the two AAA batteries into the remote control. Make sure that the polarity is correct.
-
Connect your satellite system, cable system or DVB antenna to the DVB-S2 or DVB-T2/C connections.
- Connect all other external devices (e.g. Blu Ray player etc.) to the appropriate connections on the TV set.
Note:
- Place the TV set on a flat and stable surface.
BASIC OPERATION
| Device On / Off (Standby). | |
 | Input Sources Menu: Open / Close. |
| Menu (Up / Down / Left / Right). | |
 | Select or confirm a menu item. Open the channel list. |
 | Open or close the main menu. |
 | Menu item back. |
 | Switch to Smart TV mode |
 | VOL: Louder / QuieterCH: Next / Previous programme |
 | Mute Sound (On / Off). |
FIRST INSTALLATION
Once you have connected the unit and connected to all units, follow the next steps to perform the initial installation of the unit.
- Operate the toggle switch on the unit so that it is in the on position.
- Press the key to switch on the unit.
- A menu for setting up the Smart TV will appear on the screen.
- Press the key to move to the next menu item.
- Language: Now set the desired menu language. "German" is preset as the default language. Press the key to continue with the German menu language. Press the key to adjust the menu language. Then use the or key to select the desired menu language. Press the key to confirm the selection. Press the key again to move to the next menu item.
- Network setting: Depending on the connection, you can make WLAN settings (wireless) or LAN settings (wired connection) to connect the unit to the Internet. If you
want to connect the unit to the Internet at a later time or not at all, you can simply press the Ⓞkey to skip the process.
-
Use the following buttons to make the menu settings.
-
Press the key to enter the selection.
- Use the keys to navigate in the menu.
LAN connection: Connect the LAN cable from your router to the RJ45 socket of the TV set. The network settings are made automatically (connection status: connected, the IP address is displayed here). Navigate to the menu item Next and press the Key to go to the next menu item.
Wi-Fi connection: Navigate to the WLAN icon to connect the unit wirelessly to the Internet. The following settings can be made.
• WI-FI: In this menu you can switch the WLAN function on/off.
• IP: The IP address is displayed here if the unit is connected to a network.
• Wi-Fi list: The Wi-Fi networks found are displayed here.
Set Wi-Fi
1) Select your wireless network from the Wi-Fi list and press the OK button.
2) The menu item Password is automatically selected.
3) Press the Ⓞok key to open the keyboard for password entry.
4) Enter your WLAN password. Use the ▲ keys to select the letters/numbers/characters. Press the Ⓞ key to confirm the entry. Once you have entered the password, navigate to the ▶ symbol at the bottom right of the keyboard and press the Ⓞ key. Then navigate to the ◀ symbol and press the Ⓞ key.
5) After you have successfully entered the password, the unit is connected to the network.
6) Now press the Ⓞ key to confirm the network settings and to move to the next menu item.
- Country: In this menu item you select the installation location of the unit. "Germany" is preset as the default country. Press the 🔍 key to continue with Germany as the
country. Press the key to adjust the country. Then use the keys to select the desired country. Press the key to confirm the selection. Press the key again to move to the next menu item.
- Select the "Finish" menu item and press the OK key to complete the first installation.
- You will now be taken to the Smart TV Home screen.
- An overlay (tv-launcher-ru-toptech) appears. Confirm by navigating to "Allow" and pressing the key.
INPUT SOURCES
- Press the key to open the "Input Source Menu".
- Use the keys to select the different input sources.
-
Press the key to confirm the selection.
-
The following connections are available. ATV, DVB-T, DVB-C, DVB-S, AV, HDMI1 (ARC), HDMI2
| ATV | Select this menu item if you have connected an analogue cable system or DVB-T antenna to the connection [DVB-T2/C]. |
| DVB-T (T2HD) | Select this menu item if you have connected a digital DVB-T antenna to the connection [DVB-T2/C]. |
| DVB-C | Select this menu item if you have connected a digital DVB-C cable system to the connection [DVB-T2/C]. |
| DVB-S (S2) | Select this menu item if you have connected a digital DVB-S antenna to the [DVB-S2] connection. |
| AV | Select this menu item if you have connected an external device (e.g. video recorder) to the [AV OUT] connection.(Mini AV adapter not included). |
| HDMI 1 (ARC) | Select this menu item if you have connected an external HDMI device (e.g. Blu Ray player) to the [HDMI1 ARC] connection. |
| HDMI 2 | Select this menu item if you have connected an external HDMI device (e.g. Blu Ray player) to the connection [HDMI2]. |
| MEDIA | Switch to USB Media mode. |
START STATION SEARCH
- Press the INPUT button on the remote control.
- Select the appropriate reception mode and confirm with the OK key.
• DVB-T
• DVB-C
• DVB-S
-
Now press the Ⓜkey and select the menu item [Program]. Then press the Ⓞkey to enter the menu.
-
Navigate to the menu item [Auto Search] and press the key.
-
Select the settings according to your TV connection.
-
Satellite system (DVB-S): The Preset Scan scan mode is recommended here.
-
DVB-T Antenna (DVB-T): Please check that you have set the menu item 5V antenna Feedback to On. Set the Search Type to DTV and the LCN Option to Off.
• Cable system (DVB-C): Set the Search Type to DTV and the LCN Option to Off. -
Navigate to Search and press the OK key.
-
The search begins. The number of DTV / radio and data stations found during the search is displayed.
- When the search is complete, the TV set displays the first TV channel in the channel list.
Note:
- Switch the LCN Option setting to Off. Otherwise, the channel list cannot be edited (sorted).
TV-MENU
In the TV menu you can make various settings for image / sound and programme settings. To open the TV menu, you must be in the ATV / DVB-T / DVB-C or DVB-S input source.
- Press the INPUT key and select one of the following input sources: ATV / DVB-T / DVB-C / DVB-S
- Now press the key to open the TV menu.
- The following setting options are available in the TV menu. Image / Sound / Program / Function / Time
IMAGE
In the image menu you can adjust the picture settings to your needs and save them.
- Press the key to open the TV menu.
- Select the Picture menu item with the keys.
- Press the key to enter the picture menu.
- The following menu items are available in the Menu screen:
| Picture Mode | In picture mode, the following preset picture modes are available.Vivid(Fixed image settings).Standard(Fixed image settings).Movie(Fixed image settings).User(Brightness, contrast and colour can be adjusted). |
| Brightness | Adjust the brightness. The menu item is only available in Picture Mode: User. |
| Contrast | Adjust the contrast. The menu item is only available in picture mode: User. |
| Color | Adjust the colour saturation. The menu item is only available in Picture Mode: User. |
| Sharpness | Adjust the sharpness of the picture. The menu item is only available in picture mode: User. |
| Aspect Ratio | Set the aspect ratio based on that of the image content.16:9Zoom 1Zoom 2Auto4:3 |
| HDMI Mode | Set the HDMI mode.Video Mode:Recommended for video playback.PC-Mode:When a PC is connected and the complete picture is not displayed. |
| Colour Temperature | Set the colour temperature.Cool:The image is set to bluish.Normal:The picture is set to neutral.Warm:The image is set to reddish. |
| Noise Reduction | Adjust the intensity of the noise reduction.Off:Noise reduction is deactivated.Low:Smallest noise reduction settingMedium:Medium noise reduction settingHigh:Highest noise reduction settingAuto:Automatic noise reduction setting. |
SOUND
In the sound menu you can adjust the sound settings to your needs and save them.
- Press the key to open the TV menu.
- Select the Sound menu item with the ▲▼▼ keys.
- Press the key to enter the Sound menu.
- The following menu items are available in the Sound menu:
| Sound Mode | In sound mode, the following preset sound modes are available.Standard(Fixed sound settings).Sports(Fixed sound settings).Movie(Fixed sound settings).Music(Fixed sound settings).User(The equaliser can be adjusted manually). |
| Equaliser | Adjust the 5-band equaliser to your needs. The equaliser is only available in User sound mode. |
| Balance | Changes the balance between the left and right speakers.0: Neutral setting- 1 to -50: Shifts the sound to the left speaker until the right speaker is completely deactivated at -50.1 to 50: Shifts the sound to the right speaker until the left speaker is completely deactivated at 50. |
| Auto Volume | If the setting is "On", the TV set automatically adjusts different volume outputs to the same level.OnOff |
| Surround | If the setting is set to "On", the unit automatically outputs virtual surround sound.OfOff |
| SPDIF Mode | Sets the output format for the digital audio output [COAXIAL OUT] and "Bluetooth".OffPCMRAWAuto |
| Audio Only | Deactivates the picture to save power, e.g. when listening to a radio station without picture content.OnOffNote:The picture is switched off. The sound continues to play. The picture can be reactivated with all keys except the 'eactivate the picture. except the 'eactivate the picture. |
PROGRAME
In the programme menu you can adjust the programme settings to your needs and save them.
- Press the key and select between:
• DVB-S
• DVB-C
• DVB-T
-
Press the key to open the TV menu.
-
Select the menu item Programmes with the keys.
- Press the key to enter the programme menu.
- The following menu items are available in the programmes menu:
| DVB-S | |
| Auto Search | Starts the automatic channel search.Country Select: Select the country according to the installation site.Scan Mode: Select the scan mode.Preset Scan (recommended)DefaultNetworkBlind ScanFast ScanOperator: Available for the Fast Scan Scan Mode. Select the provider.Satellite: Select the satellite. For Germany Astra 1KR/1L/1M/1N (Astra 19.2°E).Channel Type: Select the channel type.AllScrambleFreeService Type: Select the service type.AllDTVRadioLCN Option: Set the LCN option On or Off. If LCN is set to On, the yellow button in the channel edit menu is disabled. It is recommended to set the option to Off.Search: Starts the search. |
| DVBS Manual Search | Starts the manual channel search. The channels are automatically added to the channel list.Satellite: Select the satellite.Transponder: Select the transponder.Channel Type: Select the channel type.AllScrambleFreeService Type: Select the service type.AllDTVRadioSearch: Starts the search.Signal Quality: Displays the signal quality.Signal Strength Displays the signal strength. |
| 5V Antenna Feedback | Set the 5V supply voltage for external antennas at the DVB-T2/C connection On or Off. |
| Channel Edit | Edit the channel list.Red button: Delete a selected channel.Yellow button: Move a selected channel to the desired position.Blue button: Skips the marked station when switching through.FAV: Marks the selected station with a heart. Press the button again to stop favouring the channel.Press the key when the menu is closed to open the Favourites list. |
| DVB-S Channel Export (USB) | Export your configured satellite list as a backup to USB. |
| DVB-S Channel Import (USB) | Import your satellite list stored on USB. |
| Satellite Dish Setup(Satellite / Transponder) | Manage the transponders or satellites and adjust the LNB settings.EPG: Switch between the satellite and transponder list.Red button: Delete a selected transponder or satellite.Green button: Edit a selected transponder or satellite.Yellow button: Add a new transponder or satellite.Blue button: Start the search on a selected transponder or satellite. The existing channel list is deleted. |
| Satellite Dish Setup(LNB Settings) | Note:Normally, no adjustment needs to be made in the LNB settings. The setting is only recommended for experienced users.Select the desired satellite and press the key to enter the LNB setting.LNB Type: Adjust the setting based on your LNB.LNB Power: Set the LNB voltage for horizontal / vertical switching.13V/18V (Default)Off22Khz: Control signal for low / high switching.Auto (Default)OnOffUnicable Setting: Set the Unicable setting according to your Unicable satellite system.IF Freq: Press the key to open the frequency selection. Press the key again to edit the frequency. Select the IF (ID) corresponding to your LNB or multi-switch and enter the frequency.Sat Position: Select Satellite Position: SatA, SatBToneBurst: Set the toneburst On or Off according to your satellite system.DISEqC 1.0: Only active if DISEqC 1.1 is switched off. Adjust the setting according to your multi-switch configuration.DISEqC 1.1: Only active if DISEqC 1.0 is switched off. Adjust the setting according to your LNB / multiswitch configuration.DISEqC 1.2: Motor settings. Activates the Limit Settings menu item.Motor Setting: Only active if DISEqC 1.2 is set to On. Set the position settings for the satellite. |
| CI Information | Displays information about the inserted CI module and card. Only active if a module is inserted. The module and card are not included in the scope of delivery and must be purchased separately from the reception provider. |
| Signal Information | Displays reception information of the selected station. Only active when a station has been found. |
| DVB-T | |
| Auto Search | Starts the automatic channel search. The channels are automatically added to the channel list.Country Select: Select the country according to the installation site.Search Type: Select the search type.ATV+DTVDTV (Recommended)LCN Option: Set the LCN option On or Off. It is recommended to set it to Off, otherwise the yellow button in the Edit Channel menu is disabled.Search: Starts the search.Note:Please note that you must switch the option 5V antenna voltage On or Off according to the antenna used before the search run. |
| DVBT Manual Search | Starts the manual channel search. The channels are automatically added to the channel list.Frequency: Displays the frequency of the transmitter.Current CH: Select the programme. At the same time, the frequency is adjusted.Search: Starts the search.Signal Quality: Displays the signal quality.Signal Strength: Displays the signal strength. |
| 5V Antenna Feedback | Set the 5V supply voltage for external antennas at the DVB-T2/C connection On or Off.Passive antenna = OffActive antennas = OnActive antennas with own supply = Off |
| Channel Edit | Edit the channel list.Red button: Delete a selected channel.Yellow button: Move a selected channel to the desired position.Blue button: Skips the marked station when switching through.FAV: Marks the selected station with a heart. Press the button again to stop favour ting the channel.Press the key when the menu is closed to open the Favourites list. |
| CI Information | Displays information about the inserted CI module and card. Only active if a module is inserted. The module and card are not included in the scope of delivery and must be purchased separately from the reception provider. |
| Signal Information | Displays reception information of the selected station. Only active when a station has been found. |
| DVB-C | |
| Auto Search | Starts the automatic channel search. The channels are automatically added to the channel list.Country Select: Select the country according to the installation site.Scan Mode: Select the scan mode.Full ScanNetworkAdvanceSearch Type: Select the search type.ATV+DTVDTVFrequency: Only available for Network and Advanced Scan.AutoManual selectionNetwork ID: Only available for Network and Advanced Scan.AutoManual selectionLCN-Option: Set the LCN option On or Off. It is recommended to set it to Off, otherwise the yellow button in the Edit Channel menu is disabled.Search: Starts the search. |
| DVBC Manual Search | Starts the manual channel search. The channels are appended to the channel list.Frequency: Set the frequency.SymbolRate: Is fixed to Auto.Search: Starts the search.Signal Quality: Displays the signal quality.Signal Strength: Displays the signal strength. |
| 5V Antenna Feedback | Set the 5V supply voltage for external antennas at the DVB-T2/C connection On or Off. |
| Channel Edit | Edit the channel list.Red button: Delete a selected channel.Yellow button: Move a selected channel to the desired position.Blue button: Skips the marked station when switching through.FAV: Marks the selected station with a heart. Press the button again to stop favouring the channel.Press the key when the menu is closed to open the Favourites list. |
| CI Information | Displays information about the inserted CI module and card. Only active if a module is inserted. The module and card are not included in the scope of delivery and must be purchased separately from the reception provider. |
| Signal Information | Displays reception information of the selected station. Only active when a station has been found. |
FUNCTION
In the function menu you can adjust and save various general settings to suit your needs.
- Press the key to open the TV menu.
- Select the Function menu item with the keys.
- Press the Ⓞ key to enter the Function menu.
- The following menu items are available in the Function menu:
| OSD Time | Set the time after which the menu display is closed when there is no operation. |
| Lock | For more information, see the item Lock in these operating instructions. |
| CEC | Set the HDMI CEC settings. The option only applies to devices connected to the HDMI1 ARC and HDMI2 connections.CEC: Activates the CEC setting and the operation of other compatible devices with the TV remote control.Auto Standby: Switches off the connected device when the TV set is switched off.Auto Power On: Switches on connected devices when the TV set is switched on.ARC: Transmits the audio signal to externally connected devices (e.g. sound bars) via theHDMI1 ARCconnection.Device List: Displays the devices connected to HDMI1 and HDMI2. |
| PVR List | Manage the saved recordings.Red button: Deletes the selected recording.Playback window mode: Select a recording and press the Key to start playback.Full screen playback: Press the Key to start playback.Press the Key to select the window and then press the Key. The playback now changes to full screen playback. Press the Key to stop playback. |
| PVR Option | Set the settings for the recordings.Select Disk: Select the recording medium.Time Shift Size: Set the maximum size of the time shift file.Format Disk: Prepare the USB storage device for recording. Please note that when formatting the USB storage medium, all stored files will be deleted.Speed Check: Test the speed of the USB storage device. |
| Blue Screen | Set the background picture for the signal sources when there is no signal.On: Blue backgroundOff: Black background |
| Teletext Language | Select the teletext language. |
| Audio Language Setting | Select the audio language of the selected TV channel.Can also be selected via the Key. The selection depends on the available audio track from the TV programme. |
| Audio Language | Set the Preferred Audio Language to be selected automatically. |
| Second Audio Language | Set the Secondary Audio Language to be selected automatically. |
| Subtitle Language Setting | Select the subtitle of the selected TV channel. Can also be selected via the key. The selection depends on the available subtitles from the TV programme. |
| Subtitle Language | Set the Preferred Subtitle Language to be selected automatically. |
| Second Subtitle Language | Set the Secondary Subtitle Language to be selected automatically. |
| H.O.H | This option is for people with a hearing impairment. When “On” subtitle are activated automatically when available. |
| Reset | This menu item resets all settings (picture/sound) to the factory settings and the set switches off and restarts. The channel list and LNB settings are not reset. |
TIME
In the Time menu you can adjust and save time settings according to your needs.
-
Press the key to open the TV menu.
-
Select the menu item Time with the keys.
- Press the Ⓞk key to enter the Time menu.
- The following menu items are available in the Time menu:
| Date | Displays the date. Cannot be set manually. Is set via the TV signal. |
| Current Time | Displays the time. Cannot be set manually. Is set via the TV signal. |
| Sleep Timer | Set a time after which the unit should automatically switch to standby mode. Can also be set via the key. |
| Auto Standby | Set the time after which the unit should automatically switch to standby mode when there is no operation (default is 4 hours). |
LOCK
In the LOCK menu, you can adjust and save lock and hotel mode settings to suit your needs.
- Press the key to open the TV menu.
- Select the menu item Function with the ▲▼▼ keys.
- Press the Ⓞ key to enter the Function menu.
- Know navigate to LOCK and press the Ⓞ key.
- A password prompt appears. Enter the default password 0000. Press the EXIT key to interrupt the password prompt.
- The following menu items are available in the LOCK menu:
| System Lock | Set the system lock to On to gain access to the following menu items.Parental ControlChannel LockSet Password |
| Parental Control | Set a value for the protection of minors. TV content harmful to minors is secured with a password (only if supported by the TV channel). |
| Channel Lock | Lock individual TV channels. The channels are secured by entering a password. A close symbol indicates that the channel is locked. |
| Set Password | Here you can set a new password. Please make a good note of the new password. The default password is:0000 |
| Hotel | Hotel Mode: Various hotel mode settings can be made here.Hotel Mode: Set the hotel mode On or Off. A password prompt appears.Key Lock: Set the close control lock on the unit On or Off.Menu Lock: Set the menu lock On or Off. If the menu lock is activated, a password prompt appears when the key is pressed.Scan Lock: Set the search lock On or Off. If the search lock is set to On, the menu item Automatic search is locked.Input Lock: Set the menu item Lock Source On or Off to lock desired input sources. The current input source cannot be locked.Default Source: Select an input source with which the unit is to start.Channel Type: Select the channel type. Only active if ATV, DVB-T, DVB-C or DVB-S is selected as the default source and there are channels in the channel list.Default Channel: Select the channel with which the unit is to start. Only active if ATV, DVB-T, DVB-C orDVB-S is selected as the default source and there are channels in the channel list.Max Volume: Set the maximum volume level that the user can set.Default Volume: Set the volume at which the unit is to start.Import: Import the exported hotel mode settings and channel list.Export: Export the hotel mode settings and the channel list.Language: Set the default menu language.Aspect Ratio: Set the default aspect ratio.Restore: Resets the hotel mode to the default setting. |
EPG
- Press the EPG button to open or close the EPG menu.
- Use the following buttons to operate the EPG menu.
| EPG | Open / close EPG menu. | |
 | In the Navigate menu. | |
| Red button | Programme a USB recording. | |
| Yellow button | Displays the programmed recordings. | |
| Blue button | Set up a reminder for a programme. | |
USB RECORDING PROGRAMMING
- Insert an empty USB stick or a hard disk (max. 1 TB) into the USB socket of the unit. Please note that the USB mass storage device must be formatted FAT32.
- Press the MENU key and navigate to Function.
- Press the Ⓞ key and select the menu item PVR option.
- Press the button to open the menu.
- Under the menu item Select Disk, select the USB memory on which the recordings are to be saved.
- Then go to Format Disk so that the USB memory is converted to the correct format. Note:
- Formatting deletes all data from the USB memory.
- Now the USB memory is ready for recording.
Start recording
There are two ways to start a recording.
Instant recording:
Press the key on the remote control and the recording starts.
Press the key to stop recording.
EPG recording
Press the key to programme a recording. Press the Red button to programme the recording.
SMART TV
In Smart TV mode, various Internet-based content and apps are available to you.
- Press the button to switch to the Smart TV Home page.
- In the Smart TV area there are various settings and categories:
| Home | Certified Fresh Movies: Displays currently popular films.Functional Zone: The following functions are available:Source: Displays the input sources. Can also be displayed via the KeyMedia: Opens the media menu for USB playback.Picture / Music / VideoRecently: Displays the most recently opened apps.My Apps: Displays the installed apps.Eshare: Set up your smartphone to operate the TV set. Download the Eshare app on your Android or Apple smartphone and scan the QR code on the TV screen to connect the devices. Please note that the devices must be on the same network.Charts: Displays the most popular apps.Important:Use the Appstore in the Charts section to download the apps. Here you will find apps optimised for the TV set. |
| Video | Displays various film-based content. |
| Kids | Displays various child-based content. |
| Music | Displays various music-based content. |
| Sports | Displays various sports-based content. |
| Education | Displays various education-based content. |
SMART TV SETTINGS
In the Smart TV settings menu you can adjust and save various device-related settings to suit your needs.
- Navigate with the keys 🔊 🔒 🔔 🔔 to the Gear symbol in the top line on the screen.
- Now press the Ⓞk key to open the Smart TV menu.
- The following settings are available in the menu.
| General Settings | |
| Network & Internet | Wi-Fi: Activate On or deactivate Off the WLAN function. Available networks: Displays available Wi-Fi networks. Other options:Add new network: Manually add a new network.Scanning always available: Set whether apps and Google services should search for networks even when the WLAN is deactivated.EthernetProxy settings: Set up the proxy settings Manually. Recommended for experienced users only.IP settings: Correct the IP settings Manually. Recommended for experienced users only. |
| Accounts & Sign In | Check your accounts or log in to apps. |
| Apps | In this menu you can view and manage all installed apps and set permissions. |
| Device Preferences | In this menu you can make general settings for the Android operating system.Info: In this menu you will find information such as device name, status, version, etc.System update: In this menu you can determine whether updates are to be carried out automatically or check whether an update is available.Date & time: Set the following items:Automatic date & time: Set whether the time is to be updated via the Network or via the TV tuner. Set the option to Off to set the time and date manually.Set time zone: Set the time zone based on the installation location.Use 24-hour format: Set whether the time is to be displayed in 24-hour format On or in 12-hour format Off.Language: Set the menu language. Available are: English, German, Spanish, French, Dutch, etc.Keyboard: Here you can set various settings for the menu keyboard that appears.Sound: Set the system sounds On or Off.Storage: In this menu you can see the existing and available memory and manage it (delete apps).Google: In this menu you can set the Google Assistant.Reset: Reset the unit to the factory settings. All settings are deleted. The unit restarts and is then in the initial installation. |
| Bluetooth | In this menu you can pair an external Bluetooth device (e.g. Bluetooth speaker) with the TV set in order to transmit the TV sound to another device.1. As soon as you open the menu and the device is not yet connected to a Bluetooth device, the Bluetooth search begins automatically.2. The found Bluetooth devices are displayed. Select the desired device and press the OK button.If the unit is connected to a Bluetooth device, "Paired/Connected" is displayed under the Bluetooth device.Click on the paired device to manage it (change name / unpair).3. The following options are available under the Add Accessories menu item:Bluetooth: Set the Bluetooth function On or Off.Bluetooth and speaker output together: Set whether TV and Bluetooth sound should be output simultaneously.On: TV and Bluetooth sound are output.Off: Bluetooth sound is output. TV speakers are muted. |
MIRROR SMARTPHONE
To mirror a smartphone on the TV set, please proceed as follows.
- Press the

- Navigate to "Functional Zone" and select My Apps.
- The following apps are available:
| IMirror | IMirror is an app for mirroring Apple smartphones and tablets on the TV set.1. Start the app on the TV set and start the Airplay function on your Apple smartphone / tablet.2. Search for the TV set on the smartphone and select it.3. The devices are then connected and the smartphone display is shown on the TV set.Note:• The mobile device must be in the same network as the TV set. |
| Wi-Fi Display Sink | Wi-Fi Display Sink is an app to mirror Android smartphones and tablets to the TV set.1. Start the app on the TV set and start the Smart View function on your Android smartphone / tablet.2. Search for the TV set on the smartphone and select it.3. The devices are then connected and the smartphone display is shown on the TV set.Note:• The devices do not have to be in the same network if WLAN is directly supported by your Android device. |
TECHNICAL DATA USB CONNECTION
USB output voltage 5V / 500mA (not suitable for charging external devices)
USB stick Max. 1TB
USB hard disk Max. 1TB
Formatting FAT / FAT32 and NTSF (NTSF not for recording)
| MEDIA | FORMAT | CODEC | Note | |
| VIDEO | AUDIO | |||
| Movie | avi | MJPEG | MP3, WMA, AAC, PCM | Max. Resolution: 1280x720 Max. Frame rate: 60fps Max. Data rate: 20Mbps |
| Xvid, MPEG-4, H-265, WMV9/VC-1 | Max. Resolution: 1920x1080 Max. Frame rate: 60fps Max. Data rate: 150Mbps | |||
| .mp4 MPEG | MPEG-2, MPEG-4, H265, Xvid, MJPEG | MP3, AAC, PCM | ||
| .ts .trp | MPEG-1, MPEG-2, H.265, VC-1 | MP1, MP2, MP3, AAC | ||
| .mpg .mpeg | MPEG-1, MPEG-2 | MP1, MP2, MP3, AAC, PCM | ||
| .mov | MPEG-4, H.265, MJPEG | AAC, PCM | ||
| .dat | MPEG-1 | MP2, MPEG | ||
| .vob | MPEG-2 | MP1, MP2, MP3, PCM | ||
| .rm .rmvb | RV30, RV40 | AAC, COOK | Max. Resolution: 1920x1080 | |
| Picture | jpg | Max. Resolution: 13986x4000 | ||
| .jpeg | ||||
| bmp | Max. Resolution: 3648x2736 Pixel depth: 8 / 24 / 32 Bit | |||
| png | Max. Resolution: 3648x2736 | |||
| Music | MP3 | MP3 | ||
| AAC | MPEG2 AAC (LC) MPEG4 AAC LC | |||
| WMA | WMAV7 / V8 / V9 | |||
Errors and technical modifications excepted.
SIMPLE TROUBLESHOOTING
If the screen fails or there is a sharp drop in performance, check the TV using the following instructions: Also check connected devices to find the source of the fault. If the screen still does not work as expected, contact customer support.
No power
- Check that the mains adapter or the car adapter is connected to the TV set.
- Check that the toggle switch is in the on position.
No picture or no sound
- Check whether the mains adapter or the car adapter is connected to the TV set.
- Check the picture and sound settings.
- Check whether the antenna / cable system / satellite antenna is connected correctly.
- Change to another programme.
- Check that the connected devices (e.g. receiver) are connected correctly.
Poor picture quality
- Check that the antenna cable is connected correctly.
- Check the manual TV tuning of the TV channel.
- Change the picture settings: Brightness, colour, sharpness, contrast and hue. Make sure that the TV is not located near other electrical appliances that could cause radio frequency interference.
No colour
- Adjust the colour settings.
- Check that the selected programme is broadcast in colour.
- Make sure that the channel is tuned correctly.
The TV does not respond to the remote control
• Make sure there are no obstacles between the remote control and the TV.
- Make sure the remote control is within reach.
- Make sure that the batteries in the remote control are not dead.
No Internet content will be played back
- Check in the network settings whether the TV set is connected to your router.
- Check the settings of your router.
This TV is intended for household use and is classified as harmless with regard to electromagnetic waves. Therefore, you can use the unit in any location, including residential areas.
DATA SHEET
| Device type | LEDW19i+ | LEDW22i+ | LEDW24i+ | ||
| Manufacturer | Reflexion | ||||
| Energy efficiency class (standard SD) | E | ||||
| Power consumption "On" (default SD) | 12W | 15W | 18W | ||
| Power consumption "Off" / Standby | <0,5W | ||||
| Power consumption "networked standby | <0,5W | ||||
| Type of electric display | LCD / LED (Class 1) | ||||
| Aspect ratio | 16:9 | ||||
| Screen resolution (pixels) | 1366 x 768 | 1920 x 1080 | |||
| Screen diagonal (cm / inch) | 47cm / 19 inch | 55cm / 22 inch | 60cm / 24 inch | ||
| Visible screen area | 9.4dm^2 | 12,8dm^2 | 15,6dm^2 | ||
| Refresh rate / response time | 60Hz / 14ms | 60Hz / 5ms | 60Hz / 8,5ms | ||
| Power supply unit: Type of power supply | Input voltage | AC: 100-240V~50/60Hz | |||
| Output voltage | DC: 12V 3A | ||||
| Input voltage unit | 12V 3A / 24V 1,5A | ||||
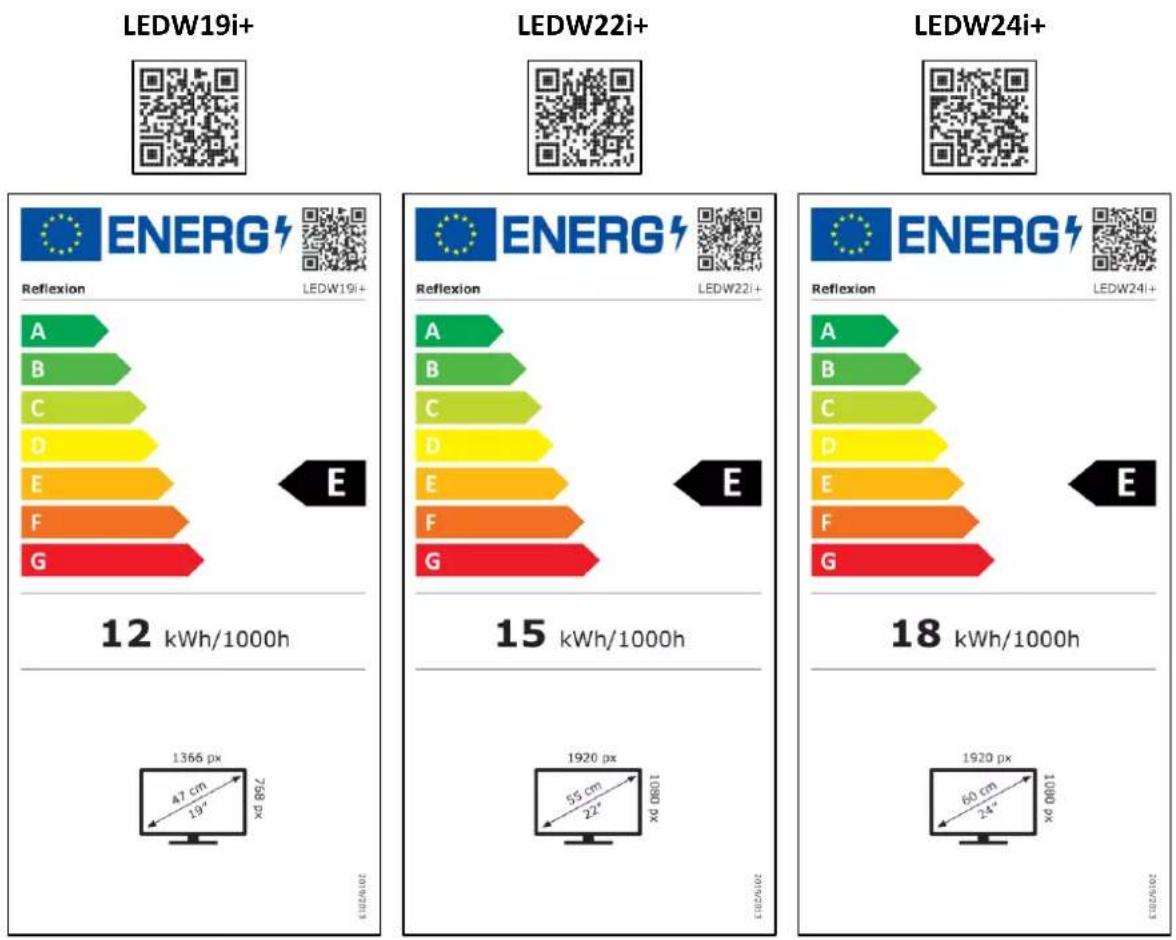
| Average annual consumption (kWh/1000h) | 12kWh/1000h | 15kWh/1000h | 18kWh/1000h | ||
| Contrast | 3000:1 | 4000:1 | 3000:1 | ||
| Brightness ( cd/m^2 ) | 200cd/m^2 | 220cd/m^2 | |||
| Colours | 16.7Mio Colours | ||||
| Viewing angle | V: 178° / H: 178° | ||||
| TV function | TV Standard | BG, DK, I, L/L | |||
| CH (ATV / DVB-T/C/S) | 100 / 1000 / 5000 | ||||
| Teletext (ATV / DTV) | 1000 / 1000 | ||||
| Connections | Power Input (DC 12V / 24V) | 1 | |||
| RJ45 | 1 | ||||
| CVBS (OUT) | 1 | ||||
| L/R (LINE OUT) | 1 | ||||
| HMDI 1 (ARC) | 1 | ||||
| HDMI 2 | 1 | ||||
| TV 1 (DVB-S/S2) | 1 | ||||
| TV 2 (DVB-C/T2) | 1 | ||||
| COAXIAL (OUT) | 1 | ||||
| CI+ SLOT | 1 | ||||
| MINI AV (IN) | 1 | ||||
| HEADPHONES (3,5mm) | 1 | ||||
| USB (5V / 500mA) | 2 | ||||
| WLAN / BLUETOOTH | WLAN: 802.11b/g/n 2,4 ~ 2,5 GHzBluetooth: V.4.2 2,4GHz | ||||
| Android version | Version 9.0 | ||||
| OSD language | English / German / French etc. | ||||
| AUDIO output | 2x 5W | ||||
| Weight (unit incl. foot) | 2,0 Kg | 2,6 Kg | 2,9 Kg | ||
| Weight complete | 3,2 Kg | 4,0 Kg | 4,3 Kg | ||
| MAXIMUM power consumption | 36W | ||||
| Peak luminance ratio in % | <65% | ||||
| Mercury content in mg / lead contained | 0,0mg / No | ||||
| VESA | 100 x 100 | ||||
| Dimensions with TV stand: (W/D/H) mm | 436 x 45 x 258 | 501 x 45 x 296 | 551 x 45 x 326 | ||
| Dimensions with foot: (W/D/H) mm | 436 x169 x 313 | 501 x 169 x 351 | 551 x 169 x 379 | ||
Design and specifications are subject to change without notice.
INFORMATION ON STORAGE AND OPERATION
| Humidity Storage and Operation | < 80% |
| Storage temperature | -10°C to +60°C |
| Use temperature | 0°C to 40°C |
SIMPLIFIED EU DECLARATION OF CONFORMITY
UltraMedia GmbH & Co. Handels KG hereby declares that the LEDW19i+, LEDW22i+ and LEDW24i+ comply with the CE and UKCA Directives of the EU and the United Kingdom (2014/53/EU).
The full text of the EU and UKCA Declaration of Conformity can be obtained from the following web address.
We hope you enjoy using the appliance.
Your UltraMedia Team
CE UK CA
DISPOSAL INSTRUCTIONS
This symbol on the product or in the instructions means that the appliance, electrical and electronic equipment and batteries must be disposed of separately from your household waste at the end of their working life. There are separate collection systems for recycling in the EU. For more information, please contact your local authority or your dealer.
BATTERY DISPOSAL INSTRUCTIONS
BATTERIES AND RECHARGEABLE BATTERIES MUST NOT BE DISPOSED OF WITH HOUSEHOLD WASTE! NON-PROFESSIONAL DISPOSAL OF BATTERIES AND ACCUMULATORS CAUSES ENVIRONMENTAL POLLUTION / DAMAGE.
EVERY CONSUMER IS LEGALLY OBLIGED TO DISPOSE OF BATTERIES AND ACCUMULATORS AT THE END OF THEIR LIFE CYCLE AT SUITABLE COLLECTION POINTS, FOR EXAMPLE, IN HIS OR HER MUNICIPALITY/BOROUGH OR AT RETAIL OUTLETS.
DROP-OFF AT COLLECTION POINTS IS FREE OF CHARGE. BY HANDING IN BATTERIES AND ACCUMULATORS AT COLLECTION POINTS, THEY ARE RECYCLED AND THUS DISPOSED OF IN AN ENVIRONMENTALLY FRIENDLY WAY.
DISPOSING OF BATTERIES AND ACCUMULATORS IN HOUSEHOLD WASTE DOES NOT ENSURE ENVIRONMENTALLY FRIENDLY DISPOSAL AND MAY CAUSE DAMAGE TO THE ENVIRONMENT. BATTERIES AND RECHARGEABLE BATTERIES MUST BE REMOVED FROM THE APPLIANCE BEFORE DISPOSAL. PLEASE RETURN ONLY IN DISCHARGED CONDITION!
*) MARKED WITH:
CD = CADMIUM,
HG = MERCURY,
PB = LEAD
HDMI INFORMATION
THE TERMS HDMI AND HDMI HIGH-DEFINITION MULTIMEDIA INTERFACE AND THE HDMI LOGO ARE TRADEMARKS OR REGISTERED TRADEMARKS OF HDMI LICENSING LLC IN THE UNITED STATES AND OTHER COUNTRIES.
ENERGY LABEL
WARRANTY
Dear Customer,
Thank you for choosing one of our products. Our products undergo precise quality control in the course of production. If one of our devices gives you cause for complaint, or you have questions about one of our devices, please call our customer support.
We give a 36 month warranty on TV and SAT devices, and a 24 month warranty on portable DVD and audio devices from the date of purchase. Outside of the warranty, we offer you a paid repair based on a cost estimate. Please contact our customer support before submitting.
The warranty relates to material and production defects. Your device will be repaired or replaced during the warranty period. Unfortunately, UltraMedia cannot reimburse the purchase price. Damage caused by improper use, the use of third-party accessories, falls, dust, water damage and signs of wear (e.g. scratches, optical wear and tear) caused by the customer or external influences are excluded from the guarantee.
In order to assert the warranty claims, send the device with all accessories, a copy of the invoice and the description of the fault to the address given below. Devices that do not have a proof of purchase cannot be guaranteed. Please do not forget to include your full address and a telephone number / email address for any queries.
Shipping to us takes place at your own expense. Unpaid parcels cannot be accepted and are returned to the sender.
Please pack the device securely for transport. UltraMedia assumes no liability for damage in transit that occurs on the way to us. After receiving your submission, we will process your device as soon as possible and send it back to you.
Before sending your device in, please contact our customer support or your specialist dealer, as many problems can also be solved over the phone.
- 19" (47cm) 22" (55cm) 24" (60cm) TFT-LED-Smart TV mit DVB-T/T2HD, DVB-S/S2, DVB-C, Cl+ Slot & Bluetooth
- SAFETY INFORMATION
- IMPORTANT SAFETY INSTRUCTIONS - PLEASE READ CAREFULLY BEFORE USE.
- Follow these instructions:
- Keep the appliance away from splashing and dripping water. Do not place any objects filled with liquids on the appliance.
- Note:
- IMPORTANT SAFETY INSTRUCTIONS
- Headphone warning
- Installation location
- WHAT'S IN THE BOX?
- MOUNTING WALL BRACKET & TV STAND
- Wall mount:
- Mounting TV stand:
- OPERATING KEYS ON THE UNIT
- REMOTE CONTROL
- COMMON INTERFACE / CI - SLOT
- Common Interface / Slot
- PREPARE DEVICE
- FIRST INSTALLATION
- Set Wi-Fi
- INPUT SOURCES
- START STATION SEARCH
- TV-MENU
- IMAGE
- SOUND
- PROGRAME
- FUNCTION
- TIME
- LOCK
- EPG
- USB RECORDING PROGRAMMING
- Start recording
- Instant recording:
- EPG recording
- SMART TV
- SMART TV SETTINGS
- MIRROR SMARTPHONE
- TECHNICAL DATA USB CONNECTION
- SIMPLE TROUBLESHOOTING
- No power
- No picture or no sound
- Poor picture quality
- No colour
- The TV does not respond to the remote control
- No Internet content will be played back
- SIMPLIFIED EU DECLARATION OF CONFORMITY
- DISPOSAL INSTRUCTIONS
- BATTERY DISPOSAL INSTRUCTIONS
- HDMI INFORMATION
- WARRANTY
Brand : Reflexion
Model : LEDW24i+
Category : TV