
ELPCS01 - Video projector EPSON - Free user manual and instructions
Find the device manual for free ELPCS01 EPSON in PDF.


| Product Type | Mobile video projector cabinet |
| Model | ELPCS01 |
| Brand | Epson |
| Dimensions (W x H x D) | 816 x 706 x 538 mm (31.8 x 27.6 x 21.1 in) |
| Weight | 41.9 kg (92.4 lb) |
| Power Supply | 100-120 V AC or 220-240 V AC, 50/60 Hz, 10 A |
| Power Consumption | Less than 0.5 W (standby) |
| Operating Temperature Range | 0 to 35°C (32 to 95°F) |
| Storage Temperature Range | -10 to 60°C (14 to 140°F) |
| Supported Projectors | Epson EB-810E / EB-815E only |
| Image Size Range | 80 to 160 inches (diagonal) |
| Connectivity | HDMI (2 inputs: exterior and interior), USB Type-C (exterior), USB Type-A (4 ports internal hub), RS-232C |
| Control Panel | Illuminated buttons: Power, A/V Mute, Source, Volume/Zoom/Shift adjustment, Function switch |
| Maximum Load Capacity (total) | 50 kg (110.2 lb) |
| PC Shelf Maximum Load | 3 kg (6.6 lb) |
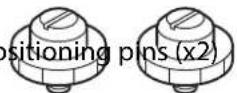
| Included Accessories | Power cord (4.5 m), PC shelf, projector fixing screws (x3), positioning pins (x2), top cover fixing screws (x4), hexagonal wrench, User's Guide, Warranty |
| Ventilation | Intake and exhaust vents on side plates (removable) |
| Mobility | Lockable casters for smooth movement and secure placement |
| Safety Features | Anti-tip design, lockable front panel, overload protection, emergency disconnection instructions |
| Maintenance | Clean/replace projector air filters via front panel (see projector manual) |
Frequently Asked Questions - ELPCS01 EPSON
User questions about ELPCS01 EPSON
0 question about this device. Answer the ones you know or ask your own.
Ask a new question about this device
Download the instructions for your Video projector in PDF format for free! Find your manual ELPCS01 - EPSON and take your electronic device back in hand. On this page are published all the documents necessary for the use of your device. ELPCS01 by EPSON.
USER MANUAL ELPCS01 EPSON
Safety Instructions .... 4
Explanation of symbols....
Symbols indicating an action that must not be done....5
Symbols indicating an action that should not be done 5
Warning 5
Caution 8
Notes on Handling and Storage..
Product Information
Product Information .... 11
Specifications ....11
Included Items....11
Product Parts and Functions ..... 12
Side 12
Control panel....14
Inside 14
Accessories 15
Using the Cabinet
How To 16
Screen Sizes and Installation Positions ..... 17
Maintenance 17
Solving Problems .... 18
Installing a Projector
Installing a Projector....19
Appendix
Notice 26
Trademarks 26
FCC Compliance Statement.....26
FCC Compliance Statement For United States Users 26
WARNING 26
For Canadian Users....
Indication of the manufacturer and the importer in accordance with requirements of EU directive....27
Indication of the manufacturer and the importer in accordance with requirements of United Kingdom directive ....
製造商及進口商 27
Contact List 28
EUROPE, MIDDLE EAST & AFRICA .....
NORTH, CENTRAL AMERICA & CARIBBEAN ISLANDS 29
SOUTH AMERICA 2
ASIA & OCEANIA....30
Product Disposal....
Copyright Notice ....
Copyrights 31

About this Product
The Epson ELPCS01 is a mobile display solution designed to allow users to display bright, beautiful images whenever and wherever needed. With its ability to display image sizes from 80 to 160", the ELPCS01 features an intuitive and easy to use illuminated control panel that allows simple image sizing, A/V Mute, source selection of HDMI1/HDMI2, as well as wireless network connection. The cabinet provides an HDMI input for easy external connections and a USB (Type-C) port connected to a built-in USB hub.

To access other display sources supported by the projector (Screen Mirroring/Miracast, USB, HDBaseT), use the projector's built in control panel or remote control.

Safety Instructions
All safety and operating instructions should be read before using the cabinet. After you have read all instructions, save this information for later reference.
Be sure to also carefully read the User's Guide for each device that will be housed in the cabinet, and follow the precautions and conditions for each device.
North America and Latin America
You can download the cabinet or projector User's Guides in various languages by visiting the following URLs and selecting your product:
https://www.epson.com/support (U.S.)
https://www.epson.ca/support (Canada)
https://www.latin.epson.com/support (Caribbean)
https://www.epson.com.br/suporte (Brazil)
https://www.latin.epson.com/soporte (Other Latin America regions)
Other Regions
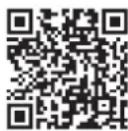
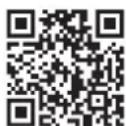
You can download the User's Guide in various languages from the projector's optional products support page by scanning this QR code. Switch to the language you need and download the guide.
Supported languages: English, French, German, Italian, Spanish, Portuguese, Danish, Swedish, Norwegian, Finnish, Traditional Chinese
For projectors that will be housed in cabinets (EB-810E/815E), be sure to read the User's Guide supplied with the projector carefully to use the projector properly. You can also download various User's Guides for the projectors from here.
Caution:
This projector cabinet is intended for use with EPSON projectors EB-810E/EB-815E only. Using it with other products may cause the cabinet to become unstable and injury to occur.
Explanation of symbols
To prevent personal injury or damage to property, the following symbols are used to show dangerous operation or handling. The following explains how they are displayed and their meanings. Make sure you understand them properly when reading the guide.
Warning:
This is a class A product. In a domestic environment this product may cause radio interference in which case the user may be required to take adequate measures.
 Warning Warning | This symbol indicates information that, if ignored, could result in serious personal injury or even death due to incorrect handling. |
 Caution Caution | This symbol indicates information that, if ignored, could result in personal injury or physical damage due to incorrect handling. |
Symbols indicating an action that must not be done

Do not do Do not

spray Do not disassemble

Symbols indicating an action that should not be done

Instructions

Disconnect the plug from the outlet
Warning
 Warning Warning | |
| Unplug the cabinet from the outlet and contact your dealer or the Epson service call center under the following conditions:If smoke, strange odors or strange noises come from the cabinet.If liquid or foreign objects get inside the cabinet.If the cabinet is knocked over or damaged.Continuing to use under these conditions may result in fire or electric shock. Do not try to repair this cabinet yourself. Place the cabinet near an easily accessible outlet so that the plug can be unplugged immediately when an error occurs. |  Disconnect the plug from the outlet Disconnect the plug from the outlet |
| Never open any covers on the cabinet except as specifically explained in the User's Guide. Never attempt to disassemble or modify the cabinet (including consumables).Electrical voltages inside the cabinet can cause fire, electrical shock, accidents, or severe injury to occur. |  Do not disas-semble Do not disas-semble |
| Do not use a power source with a voltage other than those specified in the User's Guide.Use of a different power source may result in fire or electric shock. |  Do not do Do not do |
| Check the specifications of the power cord.The power cord supplied with the cabinet is intended to comply with power supply requirements for the country of purchase. Only use the power cord that came with the cabinet. Additionally, the power cord and AC adapter supplied cannot be used with any electrical device other than the cabinet. When using overseas, check that the power supply voltage, outlet shape and electrical rating of the cabinet conform to the local standards, and purchase a proper power cord in the country. Using an inappropriate power cord could result in fire or electric shock. |  Instructions Instructions |
| [xwz7] Warning | |
| Take care when handling the power plug or power strip.Failure to comply with these precautions could result in fire or electric shock. Take the following precautions when handling.Do not modify the power plug.Do not overload wall outlets, extension cables, or power strips.Do not insert the plug into a dusty outlet.Insert the plug firmly into the outlet.Do not hold the plug with wet hands.Do not pull the power cord when disconnecting the plug; always be sure to hold the plug when disconnecting it.Use only the specified power supply and AC adapter. |  Instructions Instructions |
| Do not use the power cord if it is damaged.Otherwise, it could cause a fire or electric shock to occur.Do not modify the power cord.Do not place heavy objects on top of the power cord.Do not bend, twist or pull the power cord with too much force.Keep the power cord away from hot electrical appliances. | [44DX]Do not do |
| If the power cord becomes damaged (the core wire is exposed, the wire is broken, etc.), contact your dealer or the projector information center described in other User's Guides. | [0ZSW]Instructions |
| Do not touch the plug during an electrical storm.Failure to do so may cause an electric shock. |  Do not do Do not do |
| Do not use adhesives, lubricants, or oils on the projector or cabinet to prevent the screws from loosening. Additionally, do not use or store the cabinet in locations that are subject to excessive oily smoke, smoke, oil mist, or steam, locations where solvents or volatile chemicals are stored, or in locations where oil, detergents, chemicals, and so on may be spilled on the cabinet.If these materials are spilled on the product, they may cause the material to deteriorate and cause cracks in the case or other parts. |  Do not do Do not do |
| Do not use or store the cabinet in locations that may become abnormally hot or dry, such as in direct sunlight or near the exhaust vents of air conditioners or heaters.Excessive heat, dryness, or moisture may cause deformation, cracking, discoloration, tilting, or warping. Additionally, the adverse effect on internal parts of the cabinet may result in malfunction or fire. |  Do not do Do not do |
| Do not use or store the cabinet in locations exposed to high humidity and dust, such as on a kitchen counter, in a kitchen, or near a humidifier, or in locations exposed to oil smoke or steam.Otherwise, it could cause a fire or electric shock to occur. | [AABW]Do not do |
| Do not use or store the cabinet in locations where it will be subject to excessive dust or corrosive gas.Doing so may cause the device to malfunction, the quality of the projected image to decline, or the air filter to become clogged, resulting in malfunction or fire. |  Do not do Do not do |
| Do not use or store the cabinet in locations where it may be subject to water or rain, such as outdoors, in a bathroom or shower room, or in locations subject to high humidity.Otherwise, it could cause a fire or electric shock to occur. |  Do not do Do not do |
 Warning Warning | |
| Do not use the cabinet in places where flammable gases or explosive gases may be present in the atmosphere.The inside of the cabinet becomes hot. Flammable material contained in air dusters, insecticides, or deodorants may be sucked into the projector and ignite, causing fire and burns. If flammable sprays are used around the projector or cabinet, ensure that the area is adequately ventilated before use. |  Do not spray Do not spray |
| Be sure to lock the casters on the cabinet when using or storing the cabinet.If the cart moves during an incident, such as an earthquake, and hits people, walls, or objects, it may cause an injury or damage to equipment. |  Instructions Instructions |
| When moving the cabinet, grip it firmly with both hands.The cabinet may move on a slope and hit people or objects, causing an injury or damage to equipment. |  Instructions Instructions |
| Do not connect devices that require more than the allowable power to the power strip in the cabinet. (Power strip allowable power: Up to a total of 1000 W)Overheating of the cord may cause it to generate excessive heat and catch fire. |  Do not do Do not do |
| When storing an electronic device in the cabinet, read the User's Guide supplied with the device to use it correctly.Since the temperature will rise due to exhausted heat from the projector and stored devices, be sure to leave adequate space for ventilation. If the operating temperature range of the stored devices is likely to be exceeded, open the cabinet doors or panels or install appropriate ventilation equipment. When connecting the cabinet to a projector or electronic device with connecting cables, be careful not to apply excessive force to the cables. Doing so may cause equipment to malfunction or fire to occur. |  Instructions Instructions |
| Do not place vases or containers of liquid or chemicals on top of the cabinet.Spilling liquid of any kind into the cabinet may result in fire or electric shock. |  Do not do Do not do |
| Do not insert or drop metal, flammable, or foreign objects into the cabinet's intake or exhaust vents.Doing so may result in fire, electric shock, or burns. |  Do not do Do not do |
| Do not trap power cords or connecting cables between cabinet casters or in its doors.When moving the cabinet, make sure that power cords and connecting cables do not become entangled in the cabinet's casters. Doing so may damage the power cord or connecting cables, resulting in fire or electric shock. |  Do not do Do not do |
| Never look into the projector's projection window when the power is on.Be especially careful in operating environments where small children are present. When turning on the power using the remote control while you are some distance from the cabinet, make sure that no one is looking into the projection window. Also, do not look into the projection window using optical devices, such as a magnifying glass or telescope. |  Do not do Do not do |
| During projection, do not block the light from the projector with a book or other objects.If the light from the projector is blocked, the area on which the light shines becomes hot which could cause it to melt, burn, or start a fire. Also, the projection window may get hot due to the reflected light which could cause the cabinet to malfunction. To stop projection, use the A/V Mute function, or turn off the cabinet. |  Do not do Do not do |
| Do not use flammable gas sprays to remove dirt or dust from the projector's projection window, air filter, or the cabinet's intake or exhaust vents.The high heat generated by the cabinet may cause a fire. Use a vacuum cleaner or hand-operated air blower to remove dirt or dust that has adhered to parts. | [XXZT]Do not spray |
Caution
 Caution Caution | |
| Do not use the cabinet under the following circumstances.· Do not cover the cabinet with a blanket, curtain, tablecloth, vinyl or other cloths.· Avoid locations subject to high temperatures, such as near heating equipment. |  Do not do Do not do |
| When installing multiple cabinets side by side, be sure to read the precautions in the projector's User's Guide to ensure that heat from the exhaust vents does not enter the adjacent intake vents. |  Instructions Instructions |
| Do not install the cabinet on an unstable surface such as a floor that shakes or is tilted.It may tip, slip, or topple over and cause an injury. |  Do not do Do not do |
| Do not use the cabinet with loose bolts or screws.Doing so may cause the cabinet to break, resulting in injury or equipment malfunction. |  Do not do Do not do |
| While operating the unit, do not place your hands in any moving parts, such as doors or parts that open/close.Doing so may result in injury if your hands or fingers become trapped. |  Do not do Do not do |
| Before moving the cabinet, make sure there are no people or objects in the direction of movement.Failure to do so may result in injury or equipment malfunction if it strikes people or objects. |  Instructions Instructions |
| Do not store more than the maximum load capacity in the cabinet. (Maximum load: Up to a total of 50 kg (110.2 lb.) )If the maximum load is exceeded, shelves or other load-bearing items may fall and cause an injury. |  Do not do Do not do |
| Any removable shelves or stands should be securely attached to the cabinet.Incomplete installation may cause the shelf or stand to come off and objects to fall, resulting in damage or injury. (Maximum load of PC shelf: Up to a total of 3 kg (6.6 lb.)) |  Instructions Instructions |
| Do not sit on the PC shelf.Doing so may cause damage or people to fall and be injured. |  Do not do Do not do |
| Do not lean on, climb on, or place objects on the cabinet.Doing so may cause the cabinet to tip or topple over, resulting in injury. |  Do not do Do not do |
| Do not cover the cabinet's air intake or air exhaust vents.They provide ventilation and prevent the cabinet from overheating. |  Do not do Do not do |
| Do not place objects that may become warped or otherwise affected by heat near the air exhaust vent and do not put your face or hands near the vent while projection is in progress.Hot air from the air exhaust vent could cause burns, warping, or accidents to occur. |  Do not do Do not do |
| When in use, make sure the power cord and cables are routed to avoid tripping hazards.Failure to do so may cause people to fall and be injured. |  Instructions Instructions |
| Be sure to check that the power is turned off, the plug is disconnected from the outlet and all cables are disconnected before moving the cabinet.Otherwise, it could cause a fire or electric shock to occur. |  Instructions Instructions |
| Unplug the cabinet when it will not be used for extended periods.The insulation may deteriorate, which may result in fire. |  Instructions Instructions |
| Be sure to check that the plug is disconnected from the outlet and all cables are disconnected before cleaning.Failure to do so may cause an electric shock. |  Instructions Instructions |
| We recommend that you request internal cleaning once a year.If the interior of the cabinet has not been cleaned for a long time, dust may build up, which could cause fire or electric shock. |  Instructions Instructions |
| Before using the cabinet, ensure that the room is well-ventilated.There may be residual formaldehyde in wood paints and adhesives, which may cause allergic symptoms in people sensitive to chemical substances. |  Instructions Instructions |
Notes on Handling and Storage
- Do not use or store the cabinet in places where it might be subjected to high and low extremes of temperature. Furthermore, avoid places where the temperature may change suddenly. Be sure to observe the operating temperatures and storage temperatures given in this User's Guide when using and storing the cabinet. This may cause the wood to deform, split, or warp.
- The operating temperature range of the projector built into the cabinet may be lower than indicated (the surrounding ambient temperature) due to the effect of the exhausted heat from the devices stored in the rack. Be sure to leave adequate ventilation space and so on for the stored devices.
- When storing the cabinet, store it in a dry location.
- When the lens is moved from a cold to a warm location, condensation may form on the surface of the lens, and this may cause the images to appear fuzzy. Set the cabinet up about one hour before it is used.
- Do not use the cabinet in locations where it might be subjected to vibrations or shocks. Doing so may cause the image to be distorted or malfunctions to occur.
- Before connecting cables, check the shape and orientation of the connectors on any cable you plan to connect. Do not force a connector into a port if it does not fit. The device, projector, or cabinet could be damaged or could malfunction.
- Make sure you connect the cables for any devices to the projector or cabinet first, and then connect the power cord of the cabinet to an electrical outlet. Connecting devices while the power is on may cause a malfunction.
- Protective earthing terminal:
- The apparatus should be connected to a mains socket outlet with a protective earthing connection.
- Before cleaning the cabinet, turn off the cabinet and unplug the power cord.
• To remove dust or dirt, use a soft, dry, lint-free cloth. - If the cabinet is particularly dirty, moisten the cloth with water containing a small amount of neutral detergent, and then firmly wring the cloth dry before using it to wipe the cabinet's surface. Do not spray liquid directly on the cabinet.

Caution:
Do not use volatile substances such as wax, benzine, or thinner to clean the cabinet's surface. The quality of the cabinet's case may change or become discolored. Do not use canned air as the gases may leave a flammable residue.

Product Information
Specifications
| Item Specifications | |
| Dimensions W 816 mm | x H 706 mm x D 538 mm (31.8 x 27.6 x 21.1 in.) (dimensions may vary depending on installation conditions) |
| Weight 41.9 kg (92.4 lb.) | |
| Power supply 100 to 120 V AC 50/60 Hz 10 A (U.S., Canada, Japan, Taiwan)220 to 240 V AC 50/60 Hz 10 A (EU, U.K) | |
| Power consumption Less than 0.5 W | |
| Operating temperature range 0 to 35°C (32 to 95°F) (excluding external devices) | |
| Storage temperature range -10 to 60°C (14 to 140°F) | |
| USB-A Output USB1/2/3/4: 5V DC 1A (Total 3A Max.) | |
| USB-C Output 5V DC 3A, 9V DC 3A, 12V DC 3A, 15V DC 3A, 20V DC 2.25A(U.S., Canada, Japan, EU, U.K) | |
(English) This product is also designed for IT power distribution systems with phase-to-phase voltage 230V.
(Norwegian) Apparatet må tilkobles jordet stikkontakt.
(Swedish) Apparaten skall anslutas till jordat uttag.
(Finnish) Laite on liitettävä suojakoskettimilla varustettuun pistorasiaan.
Included Items
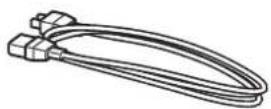
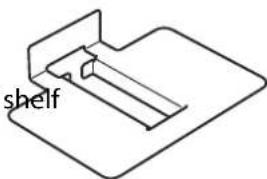
Power cord (4.5 m (14.8 ft.)) PC shelf
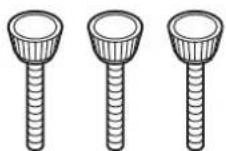
Projector fixing screws (x3) Positioning pins (x2)
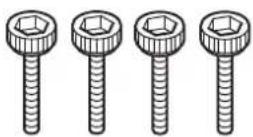
Top cover fixing screws (x4)
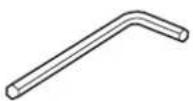
Hexagonal wrench
User's Guide Warranty (varies by region)
Product Parts and Functions
Side
Cabinet
Front Back
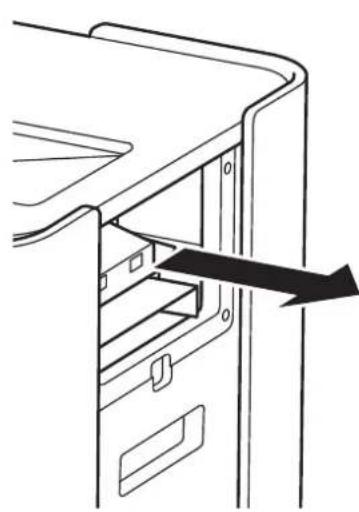
natural_image
Line drawing of a cabinet or rack with an arrow pointing to a component (no text or symbols present)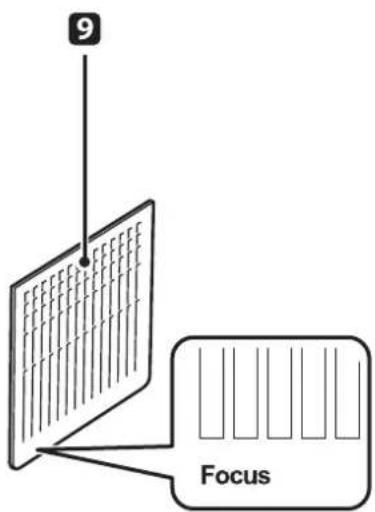
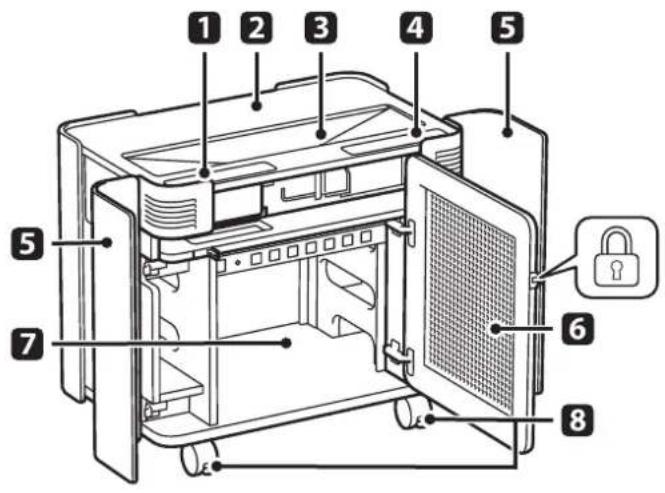
| No. Name | Functions and so on | |
| 1 | Control Panel Operates the projector. | |
| 2 | Top cover | An installed control panel for projector operations and video source input ports. |
| 3 | Projector The built-in projector. (Sold separately) | |
| 4 | Exterior IO Connects video source devices. Supports HDMI and USB Type-C. | |
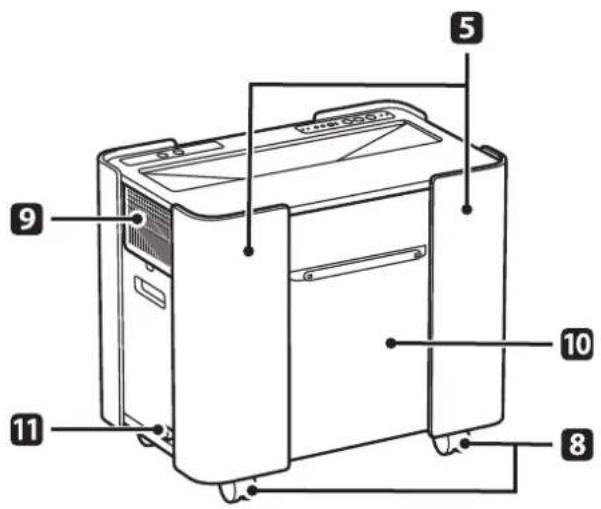
| 5 | Corner door (Front/Rear) Opens to the left or the right.You can adjust the position using the hinge. | |
| No. Name Functions and so on | ||
| 6 | Front Panel Open the front corner door before you open this panel. Open this when you require internal access, such as during filter maintenance for the projector. You can adjust the installation position using the hinge.You can lock it with a padlock and so on. You can adjust the installation position using the hinge.You can lock it with a padlock and so on. | |
| 7 | 19" Rack Allows you to install small PCs, audio equipment, or speakers. If you install equipment that uses an infrared remote control may affect remote control, remote control performance may be affected. If you install equipment that uses an infrared remote control may affect remote control, remote control performance may be affected. | |
| 8 | Caster Allows you to move the cabinet smoothly. These have a locking function allowing you to secure the cabinet in place. | |
| 9 | Side Plate (Right/Left) These have intake and exhaust vents that are attached by a magnet. Remove the Side Plate with the word Focus on it to access the projector's control panel. Remove the Side Plate with the word Focus on it to access the projector's control panel. | |
| 10 | Rear Panel Remove when installing internal devices. | |
| 11 | Power Inlet Connect to an external power source using the supplied power cord. | |
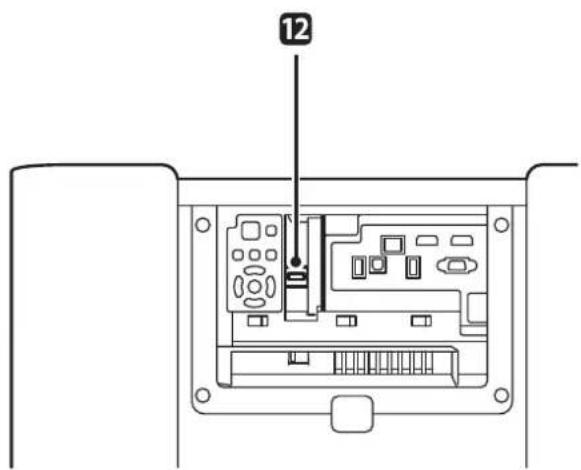
| 12 | Focus Lever (Projector) Adjusts the focus of the image. See the projector's User's Guide for more details on focus adjustments. Remove the Side Plate with the word Focus on it to access this lever. Remove the Side Plate with the word Focus on it to access this lever. | |
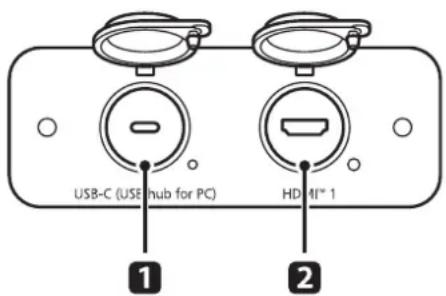
Exterior IO
| No. Name Function | ||
| 1 | USB connector (Type C) Connects to the internal USB hub. |  Supplying power and performing video communica-tion are not supported. Supplying power and performing video communica-tion are not supported. |
| 2 | HDMI connector Connects to HDMI1 on the projector. Used for connecting to image sources. You can switch the source on the control panel. | |
Control panel
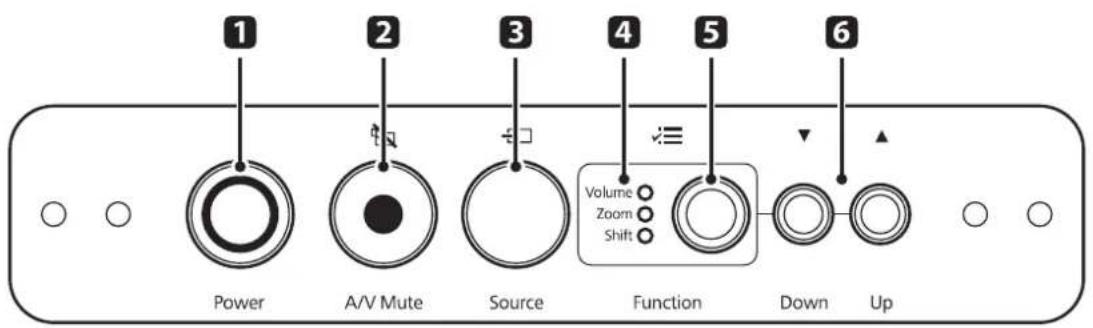
| No. Name Function | ||
| 1 | Power button Turns the power on or off. | |
| 2 | A/V Mute button Turns the A/V Mute function on or off. | |
| 3 | Source button Switches the source between HDMI1, HDMI2, and LAN.Use the remote control to switch to another image source. | |
| 4 | Function indicator LEDs | The currently selected function is indicated by the LEDs. |
| 5 | Switch function button Switches between functions. The selected function is indicated by the LEDs. | |
| 6 | Adjustment buttons Adjusts the selected function.Volume: Adjusts the volume.Zoom: Adjusts the screen size.Shift: Adjusts the vertical direction of the screen.Use the remote control for adjustments other than those above, such as left/right adjustments. | |
Inside
Internal IO

| No. Name Function | ||
| 1 | USB connector (Type A) USB hub connector that connects to the USB Type-C port of the exterior IO. Used for connecting to various USB devices. | |
| 2 | USB connector: Supplies power (Type A) | USB hub connector (with power supply function) that connects to the USB Type-C port of the exterior IO. Used for connecting to various USB devices. |
| 3 | HDMI connector Connects to | HDMI2 on the projector. Used for connecting to image sources. |
Internal Power Strip

The shape of the outlets varies depending on the country of sale. (This illustration is for North America.)
| No. Name Function | ||
| 1 | AC IN For external power input. (Cable already connected.) | |
| 2 | AC OUT For supplying power to various devices. At the time of purchase, three outlets are used to supply power to internal devices. | |
Accessories
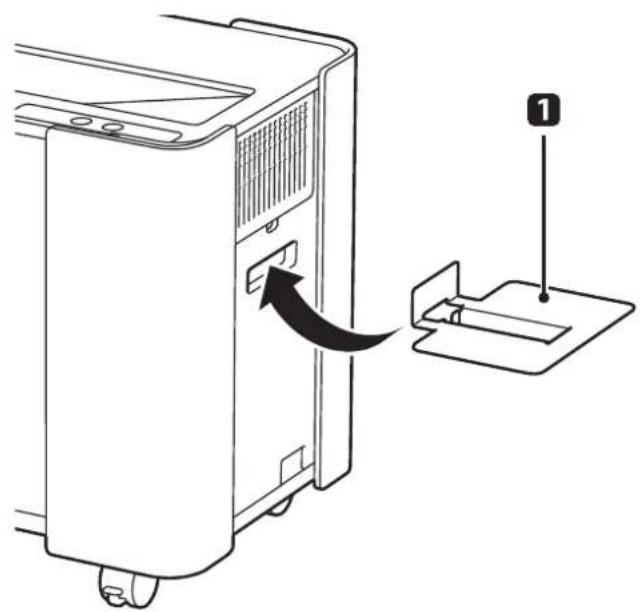
PC shelf
natural_image
Diagram of a desktop computer tower with an arrow indicating a location or movement, and a labeled component '1' pointing to the base panel (no text or symbols on the diagram itself)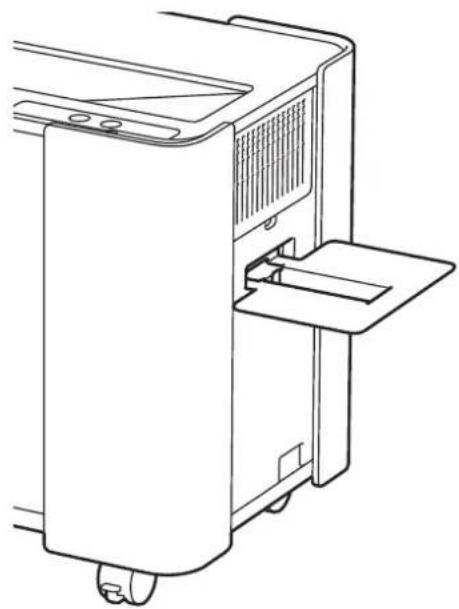
natural_image
Line drawing of a portable air conditioner unit with ventilation slots and a handle (no text or symbols)| No. Name Function | |
| 1 | PC shelf This shelf allows you to place a computer or other device. Attach it by hooking it into the hand hole on the side of the cabinet (up to 3 kg (6.6 lb.).) |

How To
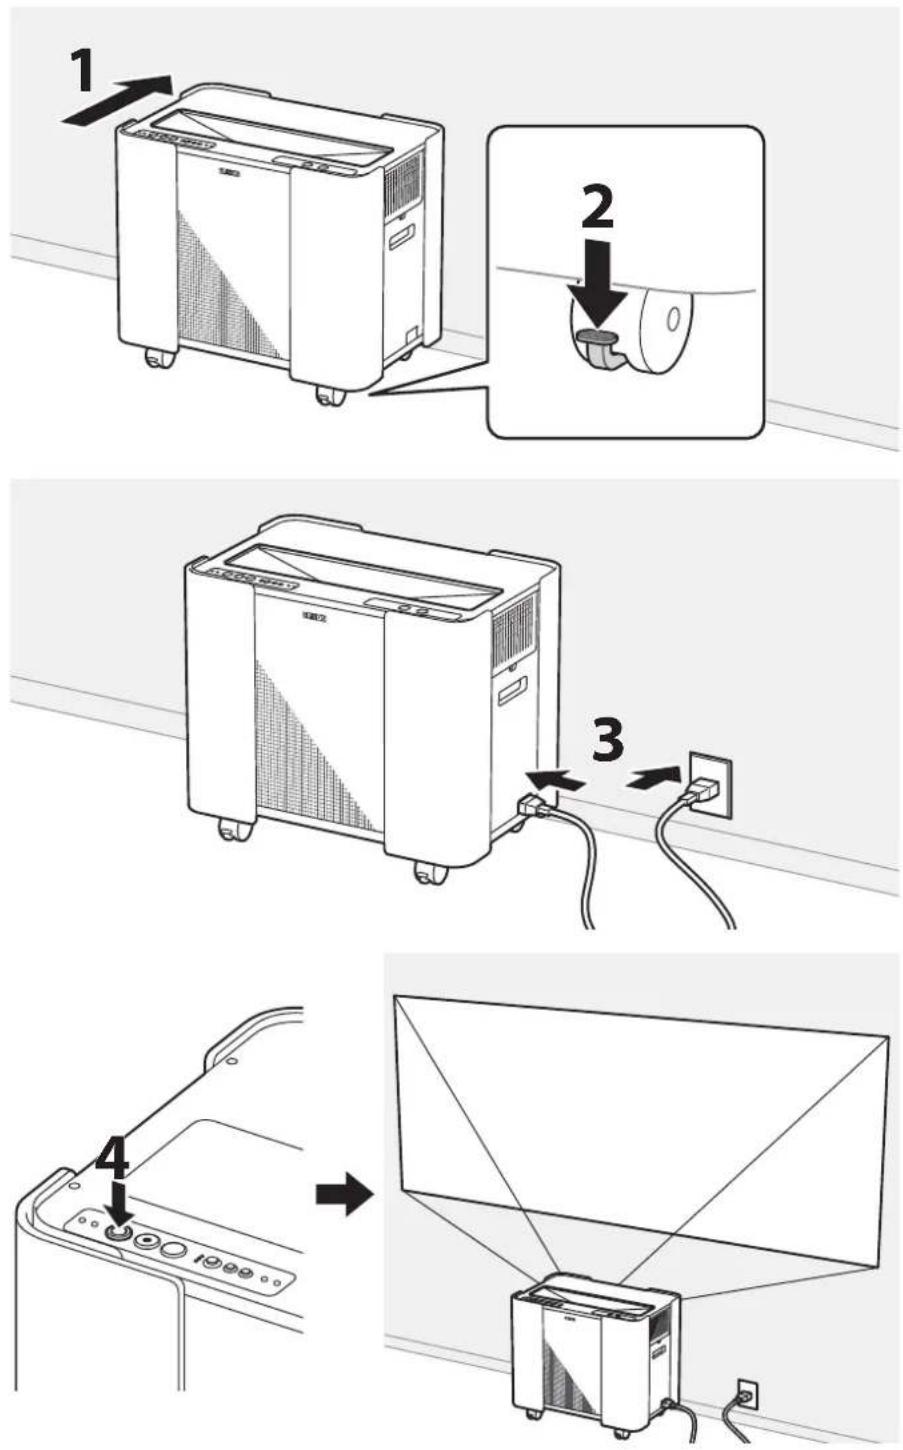

If part of the screen is distorted due to the condition of the wall, use the projector's adjustment features. See the projector's User's Guide for more details on making adjustments.
Screen Sizes and Installation Positions
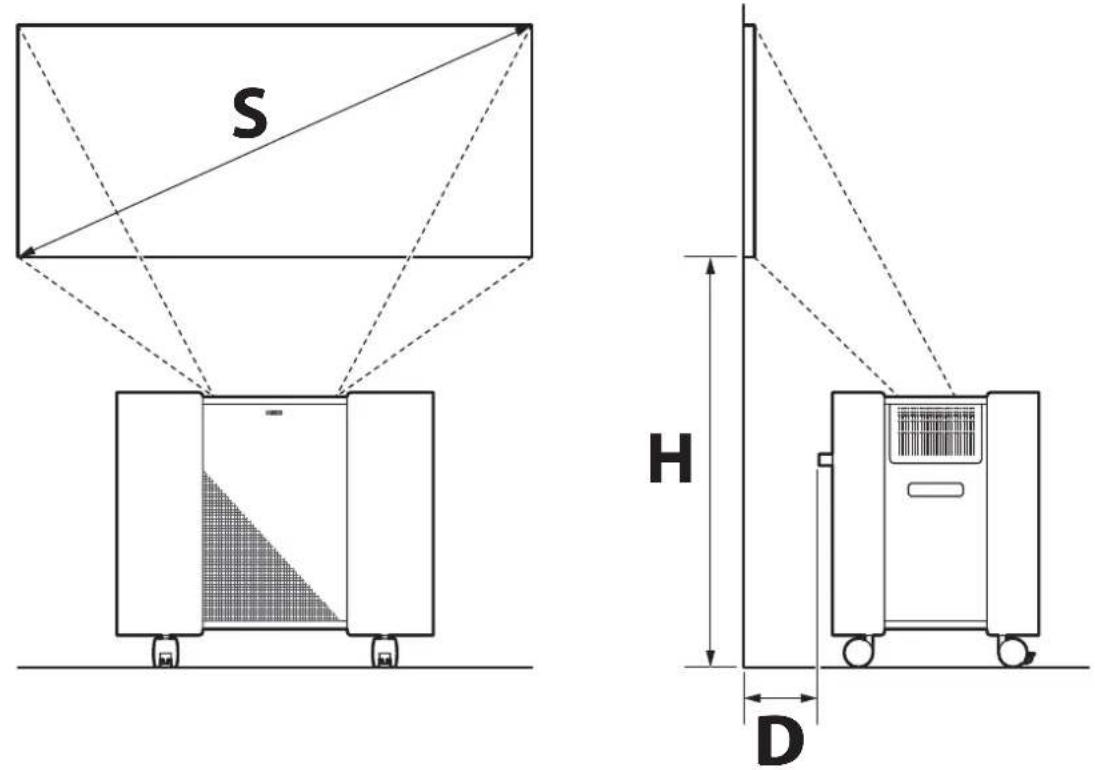
| 16:9 21:9 | 16:6 4:3 16:10 | |||||
| Min. | S 103 in. | 97 in. 95 in. 84 in. | 95 in. | |||
| H | 84.8 cm (33.4 in.) | 100.1 cm (39.4 in.) | 106.2 cm (41.8 in.) | 84.8 cm (33.4 in.) | 84.8 cm (33.4 in.) | |
| D 0 cm (0 in.) | 0 cm (0 in.) | 0 cm (0 in.) | (0 in.) | 0 cm (0 in.) | ||
| Max. | S 160 in. | 151 in. 148 in. | 30 in. 148 in. | |||
| H | 96.5 cm (38 in.) | 119.9 cm (47.2 in.) | 129.2 cm (50.9 in.) | 96.2 cm (37.9 in.) | 96.4 cm (38 in.) | |
| D | 21.5 cm (8.5 in.) | 21.0 cm (8.3 in.) | 20.8 cm (8.2 in.) | 21.1 cm (8.3 in.) | 21.3 cm (8.4 in.) | |
Dimension D is from the protruding part at the rear.
Maintenance
Be sure to clean or replace the projector's filters regularly. Open the front panel of the cabinet to access the filters. See the projector's User's Guide for more details on how to clean or replace the filters.
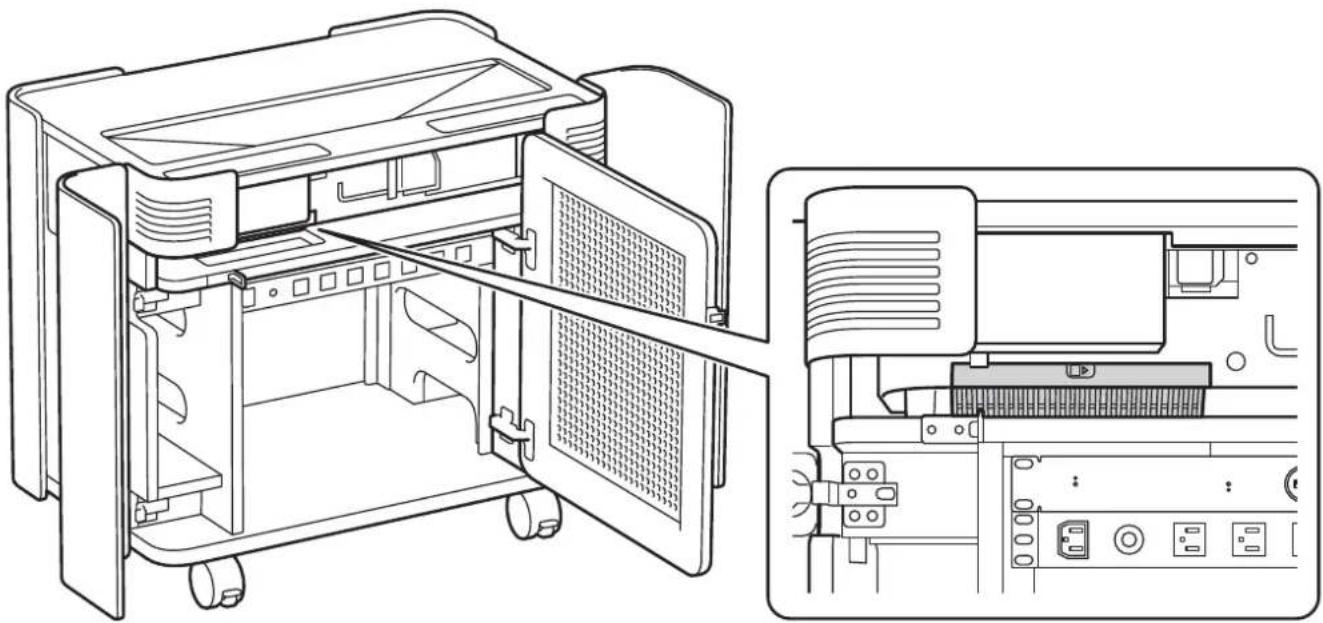
natural_image
Technical line drawing of an open computer case with internal components and a close-up view of the internal panel (no text or symbols)Solving Problems
| Problem Solutions | |
| No image displayed | Check if the A/V Mute function is activated.Restart the projector.Check the cable connections. |
| No audio | Check if the A/V Mute function is activated.Restart the projector.Check the cable connections. |
| Image is blurry | Check the resolution of the input source.Adjust the focus if the image is out of focus. |
| The screen is slanted | Check the installation position of the cabinet.Check that the projector in the cabinet is properly installed.If you are concerned about the image being tilted or distorted, use the projector's feet to adjust it before securing the projector to the cabinet with screws. You can also correct distortion using the projector's image shape correction functions. See the projector's User's Guide for more information. |
| The screen is dark | Check that the image is adjusted correctly on the input source device.Check the projector's settings. |
| LEDs on the control panel do not turn on | Check the power cord connections.Also check the power supply in the cabinet. |
| Cannot use the control panel to operate the projector when it is turned on using the remote control supplied with the projector. | Turn off the power using the remote control, and then turn on the power from the cabinet's control panel. |

Installing a Projector
Contact your local dealer or service representative for support on projector installation.
Supported projectors: EB-810E/815E

Carefully remove the front cover fixing points on the left and right side of the cover.

To replace the filter, remove the front cover.
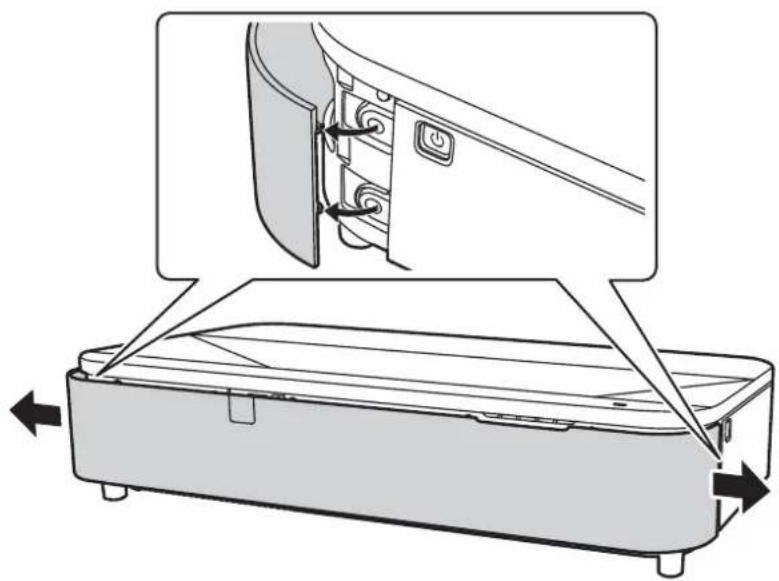
natural_image
Diagram showing a door handle assembly with an inset close-up of the component (no text or symbols present)
Remove the front cover.
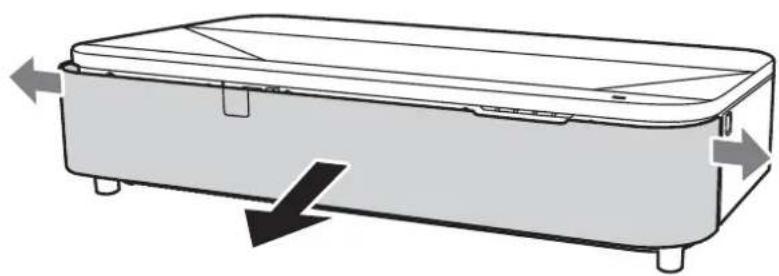
natural_image
Diagram of a rectangular device with four legs and a lid, showing directional arrows indicating movement or force (no text or symbols present)3
Remove the side cover.
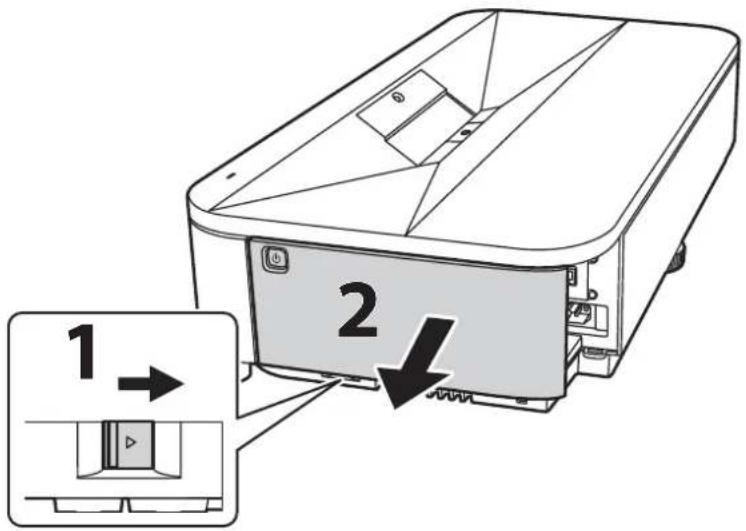
4
Detach the side cover from the fall prevention wire.
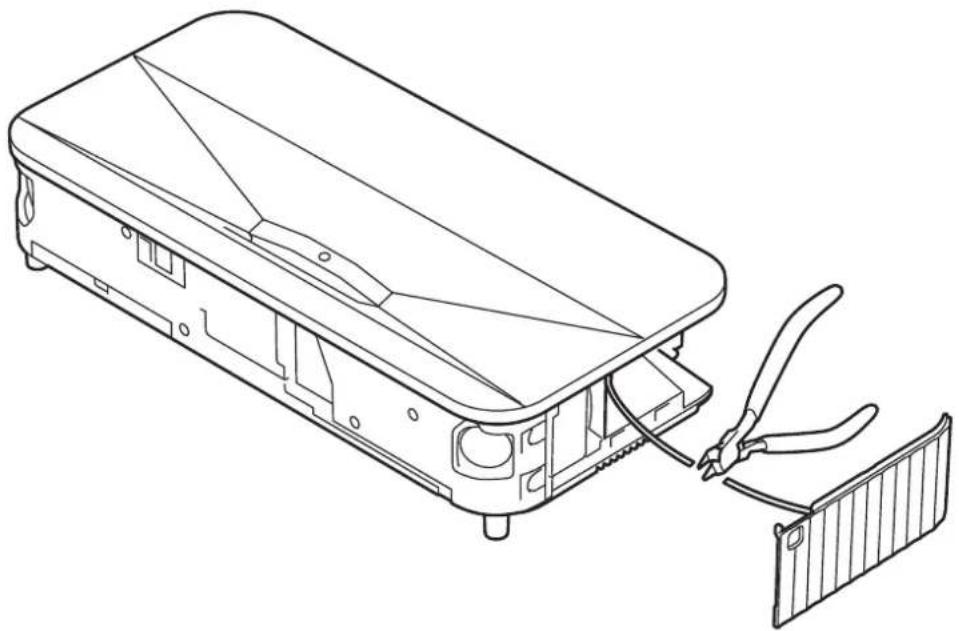
natural_image
Line drawing of an electronic device with a clamping tool inserted into a panel (no text or symbols)5
Attach the positioning pins to the bottom of the projector.
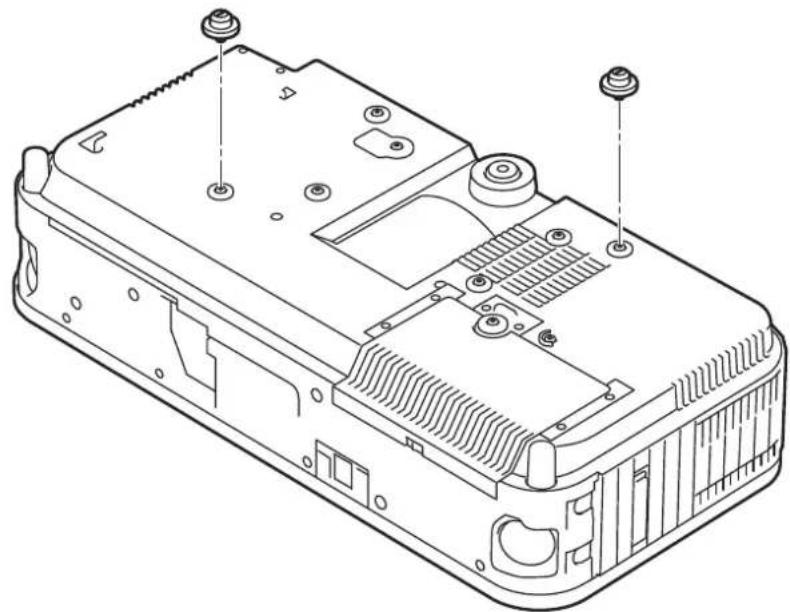
natural_image
Technical line drawing of a device chassis with mounting holes and internal components (no text or symbols)6
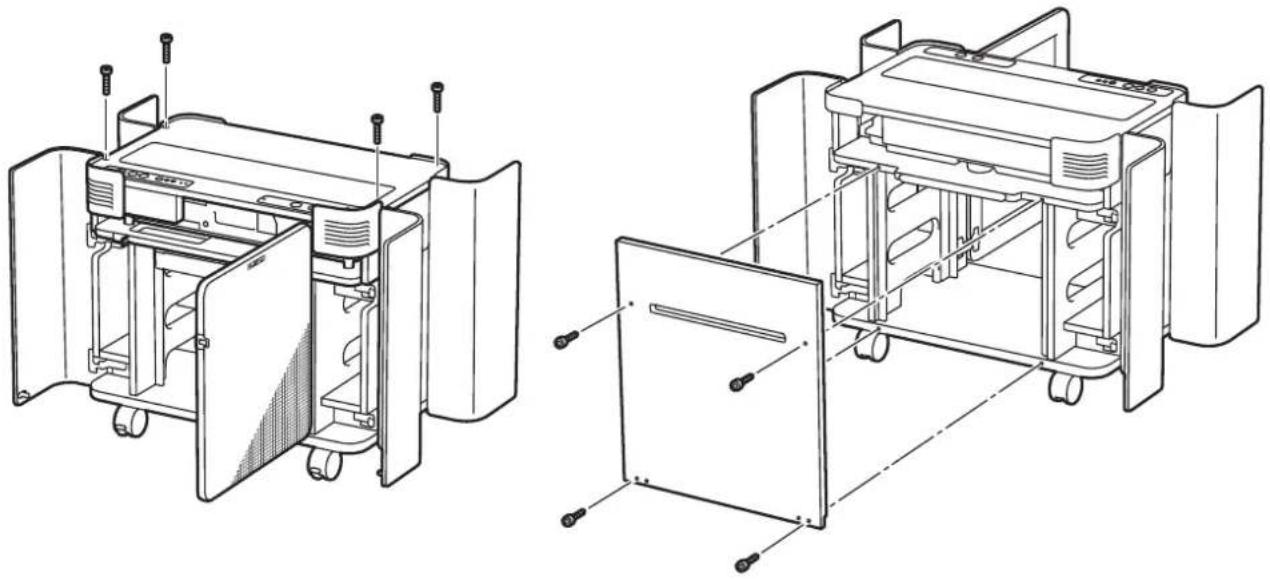
Remove the cabinet's top cover and rear panel.
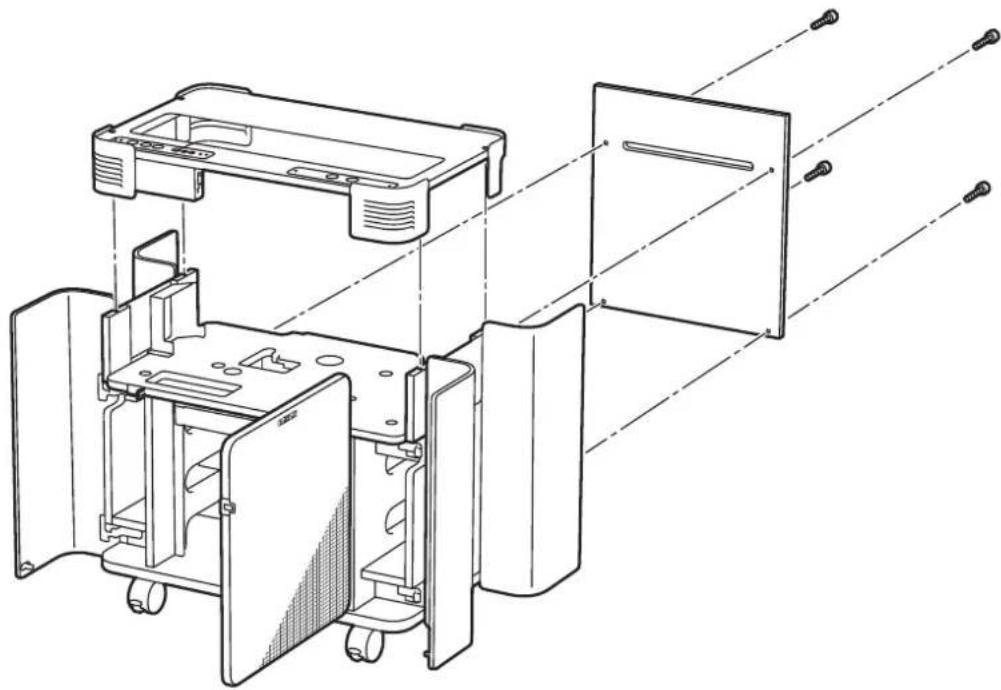
natural_image
Technical line drawing of an open refrigerator internal compartments and door, showing structural details without any text or symbols.7
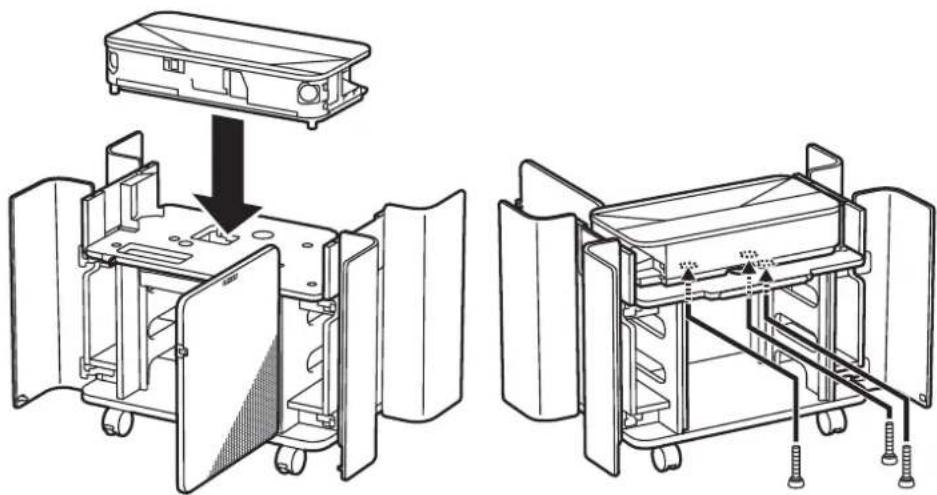
Place the projector on the cabinet and secure it with the projector fixing screws.

- Make sure there are no cables between the projector and the cabinet.
- Correctly align the positioning pins attached to the projector with the cabinet and place it flat on the cabinet.
natural_image
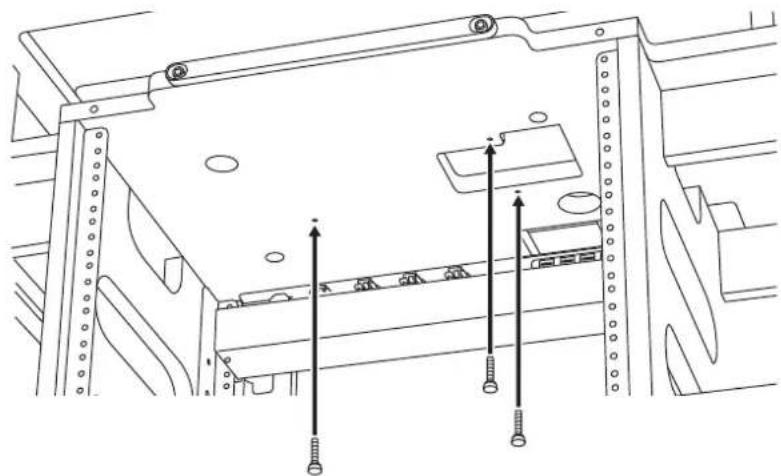
Technical line drawing of a device interior showing open and closed compartments with screw fasteners (no text or symbols)Insert the projector fixing screws from underneath the top of the cabinet.
natural_image
Technical line drawing of a mechanical assembly with screws and mounting holes (no text or symbols)8
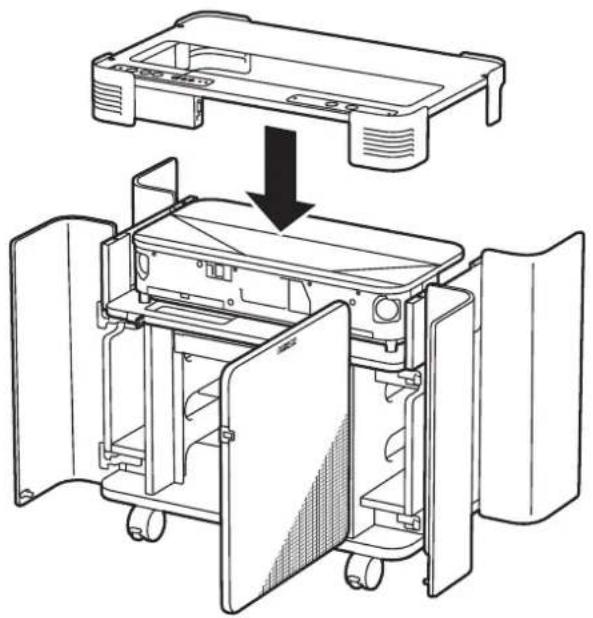
Replace the top cover.
natural_image
Technical line drawing of a device interior showing a box being opened and closed, with no visible text or symbols.
Connect necessary cables.

Remove the side plate to access the interface ports.
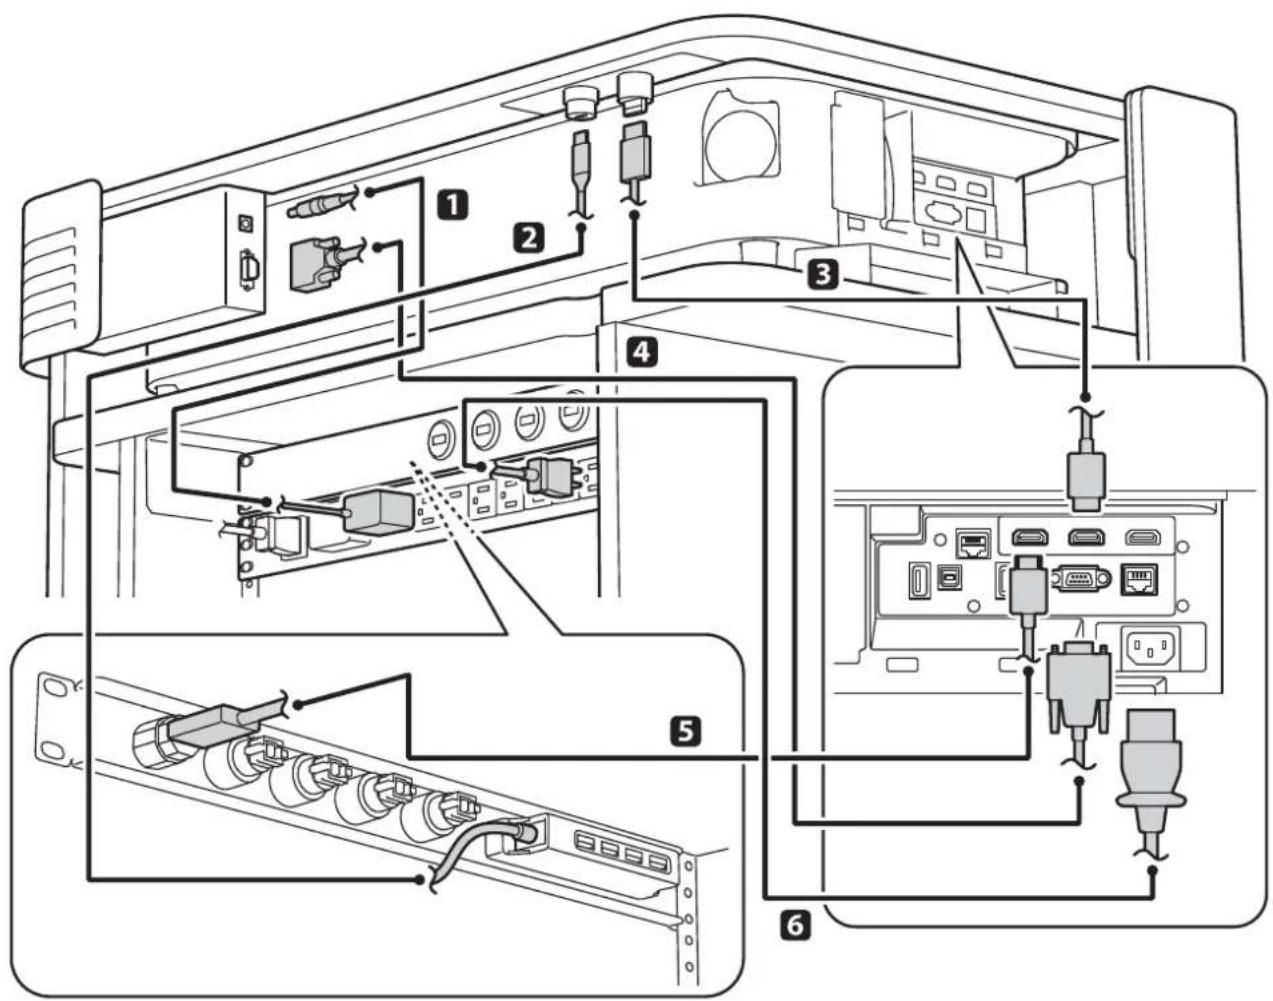
| Number Connection Details | |
| 1 | Connect the cable from the AC adapter for the power supply to the connector on the control panel. The adapter is connected to the internal power strip at the time of shipment. |
| 2 | Connect the USB hub to the USB connector on the exterior IO with a USB cable. |
| 3 | Connect the HDMI connector on the exterior IO to HDMI1 on the projector with an HDMI cable. |
| 4 | Connect the RS232C connector on the projector to the RS232C connector on the cabinet's control panel with a serial cable. |
| 5 | Connect the HDMI cable from the internal IO to HDMI2 on the projector. |
| 6 | Connect the internal power strip to the projector's power connector using the power cable supplied with the projector. |

Install/connect the necessary devices, and then reattach the top cover and rear panel with the screws.
Use the supplied top cover fixing screws (M5 black) for the top cover.
natural_image
Technical line drawings of a device interior showing internal components and mounting hardware (no text or symbols)
Notice
Trademarks
EPSON is a registered trademark of Seiko Epson Corporation.
HDMI, the HDMI Logo and High-Definition Multimedia Interface are trademarks or registered trademarks of HDMI Licensing Administrator, Inc.
HDMI
Other product names used herein are also for identification purposes only and may be trademarks of their respective owners. Epson disclaims any and all rights in those marks.
FCC Compliance Statement
Supplier's DECLARATION of CONFORMITY
According to 47CFR, Part 2 and 15
Class A digital devices, peripherals & switching power supplies
We: Epson America, Inc.
Located at: 3131 Katella Avenue, Los Alamitos, CA
Tel: 562-981-3840
Declare under sole responsibility that the product identified herein, complies with 47CFR Part 2 and 15 of the FCC rules as a Class A digital device. Each product marketed, is identical to the representative unit tested and found to be compliant with the standards. Records maintained continue to reflect the equipment being produced can be expected to be within the variation accepted, due to quantity production and testing on a statistical basis as required by 47CFR §2.906. Operation is subject to the following two conditions: (1) this device may not cause harmful interference, and (2) this device must accept any interference received, including interference that may cause undesired operation.
Trade Name: EPSON
Type of Product: PROJECTOR CABINET
Model: ELPCS01
FCC Compliance Statement For United States Users
This device complies with part 15 of the FCC Rules. Operation is subject to the following two conditions: (1) This device may not cause harmful interference, and (2) this device must accept any interference received, including interference that may cause undesired operation.
This equipment has been tested and found to comply with the limits for a Class A digital device, pursuant to Part 15 of the FCC Rules. These limits are designed to provide reasonable protection against harmful interference when the equipment is operated in commercial environment. This equipment generates, uses, and can radiate radio frequency energy and, if not installed and used in accordance with the instruction manual, may cause harmful interference to radio communications. Operation of this equipment in residential area is likely to cause harmful interference in which case the user will be required to correct the interference at this own expense.
WARNING
The connection of a non-shielded equipment interface cable to this equipment will invalidate the FCC Certification or Declaration of this device and may cause interference levels which exceed the limits
established by the FCC for this equipment. It is the responsibility of the user to obtain and use a shielded equipment interface cable with this device. If this equipment has more than one interface connector, do not leave cables connected to unused interfaces. Changes or modifications not expressly approved by the manufacturer could void the user's authority to operate the equipment.
For Canadian Users
CAN ICES (A) / NMB (A)
Indication of the manufacturer and the importer in accordance with requirements of EU directive
Manufacturer: SEIKO EPSON CORPORATION
Address: 3-5, Owa 3-chome, Suwa-shi, Nagano-ken 392-8502 Japan
Telephone: 81-266-52-3131
http://www.epson.com/
Importer: SEIKO EUROPE B.V.
Address: Atlas Arena, Asia Building, Hoogoorddreef 5,1101 BA Amsterdam Zuidoost The Netherlands
Telephone: 31-20-314-5000
http://www.epson.eu/
Indication of the manufacturer and the importer in accordance with requirements of United Kingdom directive
Manufacturer: SEIKO EPSON CORPORATION
Address: 3-5, Owa 3-chome, Suwa-shi, Nagano-ken 392-8502 Japan
Telephone: 81-266-52-3131
http://www.epson.com/
Importer: Epson (UK) Ltd.
Address: Westside, London Road, Hemel Hempstead, Hertfordshire, HP3 9TD, United Kingdom
http://www.epson.co.uk
製造商及進口商
製造商:SEIKO EPSON CORPORATION
地址:3-5, Owa 3-chome, Suwa-shi, Nagano-ken 392-8502 Japan
電話:81-266-52-3131
進口商:台灣愛普生科技股份有限公司
地址:台北市信義區松仁路100號15樓
電話:(02)8786-6688
Contact List
In the unlikely event of a malfunction during use, contact the appropriate region below.
A more up-to-date contact address can be obtained from the corresponding website listed here. If you do not find what you need on any of these pages, please visit the main Epson home page at www.epson.com.
EUROPE, MIDDLE EAST & AFRICA
| ALBANIA :ITD Sh.p.khttps://www.itd-al.com | ESTONIA :Epson Service Center Estoniahttp://www.epson.ee | LATVIA :Epson Service Center Latviahttp://www.epson.lv |
| AUSTRIA :Epson Deutschland GmbHhttp://www.epson.at | FINLAND :Epson Finlandhttp://www.epson.fi | LITHUANIA :Epson Service Center Lithuaniahttp://www.epson.lt |
| BELGIUM :Epson Europe B.V. Branch office Bel-giumhttps://www.epson.be | FRANCE & DOM-TOM TERRITORY :Epson France S.A.https://www.epson.fr | LUXEMBURG :Epson Europe B.V. Branch office Bel-giumhttps://www.epson.be |
| BOSNIA AND HERZEGOVINA :NET d.o.o. Computer Engineeringhttps://netcomp.rs | GERMANY :Epson Deutschland GmbHhttps://www.epson.de | NORTH MACEDONIA :Digit Computer Engineeringhttp://digit.net.mk |
| BULGARIA :Epson Service Center Bulgariahttp://www.kolbis.com | GREECE :Info Quest Technologies S.A.https://www.infoquest.gr | NETHERLANDS :Epson Europe B.V. Benelux sales of-icehttps://www.epson.nl |
| CROATIA :MR servis d.o.o.http://www.mrservis.hr | HUNGARY :Epson Europe B.V. Branch OfficeHungaryhttps://www.epson.hu | NORWAY :Epson Norwayhttps://www.epson.no |
| CYPRUS :A.T. Multitech Corporation Ltd.http://www.multitech.com.cy | IRELAND :Epson (UK) Ltd.https://www.epson.ie | POLAND :Epson Europe B.V. Branch Office Po-landhttps://www.epson.pl |
| CZECH REPUBLIC :Epson Europe B.V. Branch Office Czech Republichttps://www.epson.cz | ISRAEL :Epson Israelhttps://www.epson.co.il | PORTUGAL :Epson Iberica S.A.U. Branch Office Portugalhttps://www.epson.pt |
| DENMARK :Epson Denmarkhttps://www.epson.dk | ITALY :Epson Italia s.p.a.https://www.epson.it | ROMANIA :Epson Europe B.V. Branch Office Romaniahttps://www.epson.ro |
| RUSSIA :Epson CIShttps://epson.ru | KAZAKHSTAN :Epson Kazakhstan Rep. Officehttp://www.epson.kz | TURKEY :Tecpro Bilgi Teknolojileri Tic. ve San. Ltd. Sti.http://www.tecpro.com.tr |
| UKRAINE :Epson Kiev Rep. Officehttp://www.epson.ua | SLOVENIA :Birotehna d.o.o.http://www.birotehna.si | UK :Epson (UK) Ltd.https://www.epson.co.uk |
| SERBIA :Nepo System d.o.o.https://neposystem.rsAIGO Business System d.o.o. Beogradhttps://aigo.rs | SPAIN :Epson Ibérica, S.A.U.https://www.epson.es | AFRICA :https://www.epson.co.zaorhttps://www.epson.fr |
| SLOVAKIA :Epson Europe B.V. Branch Office Czech Republichttps://www.epson.sk | SWEDEN :Epson Swedenhttps://www.epson.se | SWITZERLAND :Epson Deutschland GmbH Branch office Switzerlandhttps://www.epson.ch |
| SOUTH AFRICA :Epson South Africahttps://www.epson.co.za | MIDDLE EAST :Epson (Middle East)https://www.epson.ae |
NORTH, CENTRAL AMERICA & CARIBBEAN ISLANDS
| CANADA :Epson Canada, Ltd.https://epson.ca | MEXICO :Epson Mexico, S.A. de C.V.https://epson.com.mx | U. S. A.:Epson America, Inc.https://epson.com/usa |
| COSTA RICA :Epson Costa Rica, S.A.https://epson.co.cr | ECUADOR :Epson Ecuadorhttps://epson.com.ec |
SOUTH AMERICA
| ARGENTINA :Epson Argentina S.R.L.https://epson.com.ar | CHILE :Epson Chile S.A.https://epson.cl | PERU :Epson Peru S.A.https://epson.com.pe |
| BRAZIL :Epson do Brasilhttps://epson.com.br | COLOMBIA :Epson Colombia Ltd.https://epson.com.co |
ASIA & OCEANIA
| AUSTRALIA :Epson Australia Pty. Ltd.https://www.epson.com.au | INDONESIA :PT. Epson Indonesiahttps://www.epson.co.id | PHILIPPINES :Epson Philippines Co.https://www.epson.com.ph |
| CHINA :Epson (China) Co., Ltd.https://www.epson.com.cn | KOREA :Epson Korea Co., Ltd.http://www.epson.co.kr | SINGAPORE :Epson Singapore Pte. Ltd.https://www.epson.com.sg |
| HONG KONG :Epson Hong Kong Ltd.https://www.epson.com.hk | MALAYSIA :Epson Malaysia Sdn. Bhd.https://www.epson.com.my | TAIWAN :Epson Taiwan Technology & Trading Ltd.https://www.epson.com.tw |
| INDIA :Epson India Pvt., Ltd.https://www.epson.co.in | NEW ZEALAND :Epson New Zealandhttps://www.epson.co.nz | THAILAND :Epson (Thailand) Co.,Ltd.https://www.epson.co.th |
| JAPAN :Seiko Epson Co.https://www.epson.jp |
Product Disposal
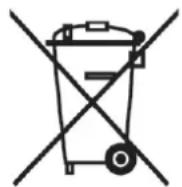
The crossed out wheeled bin label that can be found on your product indicates that this product should not be disposed of via the normal household waste stream. To prevent possible harm to the environment or human health please separate this product from other waste streams to ensure that it can be recycled in an environmentally sound manner. For more details on available collection facilities please contact your local government office or the retailer where you purchased this product.
Copyright Notice
All rights reserved. No part of this publication may be reproduced, stored in a retrieval system, or transmitted in any form or by any means, electronic, mechanical, photocopying, recording, or otherwise, without the prior written permission of Seiko Epson Corporation. No patent liability is assumed with respect to the use of the information contained herein. Neither is any liability assumed for damages resulting from the use of the information contained herein.
Neither Seiko Epson Corporation nor its affiliates shall be liable to the purchaser of this product or third parties for damages, losses, costs, or expenses incurred by the purchaser or third parties as a result of: accident, misuse, or abuse of this product or unauthorized modifications, repairs, or alterations to this product, or (excluding the U.S.) failure to strictly comply with Seiko Epson Corporation's operating and maintenance instructions.
Seiko Epson Corporation shall not be liable against any damages or problems arising from the use of any options or any consumable products other than those designated as Original Epson Products or Epson Approved Products by Seiko Epson Corporation.
The contents of this guide may be changed or updated without further notice.
Illustrations in this guide and the actual cabinet may differ.
Copyrights
This information is subject to change without notice.
© 2024 Seiko Epson Corporation
2024.9 414508402EN
- Safety Instructions .... 4
- Product Information
- Product Information .... 11
- Using the Cabinet
- How To 16
- Installing a Projector
- Installing a Projector....19
- Appendix
- Notice 26
- About this Product
- Safety Instructions
- North America and Latin America
- Other Regions
- Caution:
- Explanation of symbols
- Warning:
- Symbols indicating an action that must not be done
- Symbols indicating an action that should not be done
- Notes on Handling and Storage
- Included Items
- Product Parts and Functions
- Side
- Cabinet
- Exterior IO
- Control panel
- Inside
- Internal Power Strip
- Accessories
- PC shelf
- How To
- Maintenance
- 7
- Notice
- Trademarks
- HDMI
- FCC Compliance Statement
- Supplier's DECLARATION of CONFORMITY
- FCC Compliance Statement For United States Users
- WARNING
- For Canadian Users
- 製造商及進口商
- Contact List
- ASIA & OCEANIA
- Product Disposal
- Copyright Notice
- Copyrights
Brand : EPSON
Model : ELPCS01
Category : Video projector