DTR-20M - Electronic timer ENTES - Free user manual and instructions
Find the device manual for free DTR-20M ENTES in PDF.


| Product Type | Digital Time Relay |
| Brand | ENTES |
| Model | DTR-20M |
| Dimensions (H x W x D) | 90 mm x 70 mm x 60 mm |
| Weight | 0.2 kg |
| Power Supply | 24-240 V AC/DC |
| Time Ranges | 0.1 s to 999 h |
| Output Type | 2 relay outputs (SPDT, 8 A) |
| Display | Backlit LCD, 2 lines x 16 characters |
| Programming Method | Front panel push buttons |
| Functions | Delay on make, delay on break, cyclic timer, star-delta, multi-function |
| Mounting | DIN rail (35 mm) |
| Protection Degree | IP20 (front panel) |
| Operating Temperature | -20°C to +60°C |
| Storage Temperature | -30°C to +80°C |
| Humidity | Up to 95% RH (non-condensing) |
| Electrical Safety | IEC 60947-5-1 |
| EMC Compliance | EN 55011, EN 61000-6-2 |
| Maintenance | Clean with dry cloth; no user-serviceable parts |
| Spare Parts | None; device must be replaced if faulty |
| Warranty | 2 years from date of purchase |
Frequently Asked Questions - DTR-20M ENTES
User questions about DTR-20M ENTES
0 question about this device. Answer the ones you know or ask your own.
Ask a new question about this device
Download the instructions for your Electronic timer in PDF format for free! Find your manual DTR-20M - ENTES and take your electronic device back in hand. On this page are published all the documents necessary for the use of your device. DTR-20M by ENTES.
USER MANUAL DTR-20M ENTES
DTR-20/20M, which has a real time clock, is an electronic timer that calculates the sunset and sunrise periods automatically. It is designed for controlling the devices which are connected to its contacts according to sunset, sunrise and the time periods which are programmed by the user.

ESC Button :It is used to switch between monitoring menus. In the programming mode, it is used to cancel a parameter change or to return to the previous menu.
SET Button :It is used to switch between monitoring menus. When it is pressed for 3 seconds, programming mode is entered. In the programming mode, it is used to apply a parameter UP change or to enter to a menu.
DOWN Buttons: In the monitoring menu, it is used to switch between programs to show their activity in a day. When the DOWN button is pressed for 3 seconds, C1 relay goes into manual mode and when the UP button is pressed for 3 seconds, C2 relay goes into manual mode. In the programming menu; it is used to browse between menus, to select parameters and to adjust values with digits.
①
Precautions for Installation and Safe Use
If below precautions are not properly observed and carried out, it may result in cases with injury or death. - Disconnect power before working on the device.
-When device is connected to the network, do not remove the front panel.
-Do not clean the device with solvent or similar items. Only clean with dry cloth.
-Verify correct terminal connections before energizing the device.
-Install the device on the electrical panel.
-Contact your authorized reseller in case problems occur with your device.
No responsibility is assured by the manufacturer or any of its subsidiaries for any consequences rising out of the use of this material.
- The output loads connected to the relays do not function if auxiliary supply is absent. Even if the relay status is monitored as "on" (C 1 and/or C 2), auxiliary supply is a must for the operation. - There are two reserves in the device. Programmed data is protected by these reserves against power outages.
- Battery shelf life is 5 years.
- Reserve battery should only be changed by the authorized service.
MANUAL MODE :
In order to use the relay outputs manually, DTR-20 has to be in the monitoring mode. The DOWN button is used to switch the C1 relay to manual mode and the UP button is used to switch the C2 relay to manual mode. When the UP or DOWN button is pressed for 3 seconds, "MANUAL" indication appears on the screen. If this is done while the relay C1 or C2 is activated, that relay will be deactivated. If it is done while the relay C1 or C2 is deactivated, no switching will occur. After the relay C1 or C2 is in the manual mode; when the DOWN button is pressed again for 3 seconds, C1 relay will exit the manual mode and when the UP button is pressed again for 3 seconds, C2 relay will exit the manual mode. The relay will stay activated or deactivated according to the program flow. When both of the the relays are in manual mode, "AUTO" indication will disappear from the screen.
②
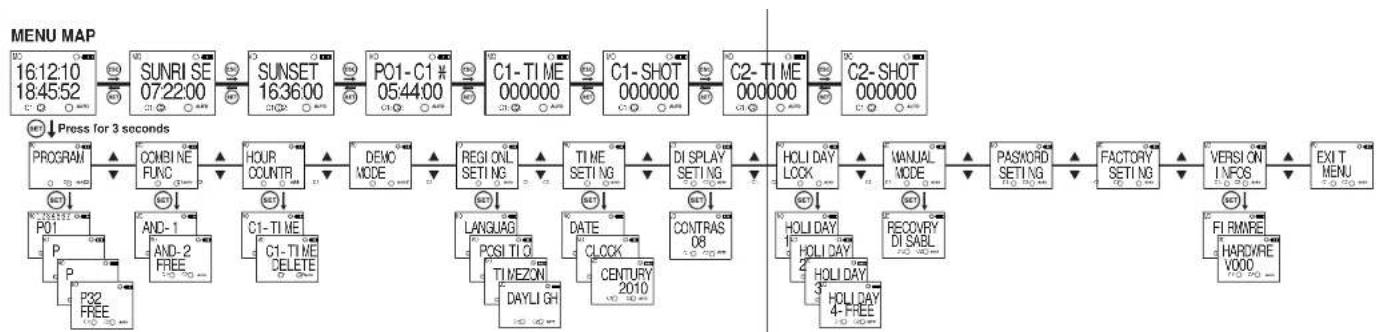
MONITORING MENU :
SET and ESC buttons are used to switch between menus in the monitoring mode. If the device is left unattended for 60 seconds in any menu other than the real time and date, it returns to the real time and date screen.

flowchart
graph TD
    A["Real Time and Date Menu"] --> B["SUNRI SE 07:22:00"]
    B --> C["SUNSET 16:36:00"]
    C --> D["P01-C1 05:44:00"]
    D --> E["Program Activity Time ▲▼ Menu"]
    E --> F["C1-TIME 000000"]
    F --> G["C1-SHOT 000000"]
    G --> H["C2-TIME 000000"]
    H --> I["C2-SHOT 000000"]
    I --> J["Operation Count for C2 Relay"]
    J --> K["Operation Count for C1 Relay"]
    K --> L["Activation Time for C1 Relay(Hours)"]
    L --> M["Activation Time for C2 Relay(Hours)"]
Program activity time menu shows the programs, which are stored on the device, in order according to program activity time. The active or finished programs can be shown with UP or DOWN buttons. The programs with a # sign next to them are the programs which are still active.
DTR 20/20M Menu Settings
If the "SAVE" option doesn't get accepted when returning to the monitoring menu, the changes which are made in the DTR 20/20M menus will be discarded. This isn't the case for "TIME SETTING"
③
menu. The changes which are done in "TIME SETTING" menu are applied immediately. When none of the keys are pressed in the programming menu, the device returns to monitoring menu and any changes which were made will be discarded. Refer to the menu map when configuring the DTR-20/20M menus.
- Program Menu:
There are 32 programs available to program between P01 and P32. The available settings for programs are relay selection, activation time, activation day, deactivation time, time conflict query and save. In addition to these, an appointed program has two additional settings as "EDI T" and "DELETE". If "EDI T" is selected for an appointed program, the existing settings of that program is shown and can be reconfigured. If "DELETE" is selected for an appointed program, that program will be deleted permanently.
Output Selection ( PXX- OUT ):
DTR-20 has 2 relay outputs as C1 and C2. The user must choose between C1 and C2 as the relay output which he want to control.
Activation Time Setting (PXX-ON):
There are 3 parameters: Time, sunrise and sunset. The user can select and set any of the 3 parameters which suits the application best.
Time Parameter (TIME):
This parameter is the adjustment of the relay according to the real time clock. If this parameter is selected, the user can enter an activation time between 00:00:00 (HH:mm:ss) and 23:59:59.
Sunrise Parameter ( SUNRI SE ):
This parameter is the adjustment of the relay according to sunrise time which is calculated in reference to the local coordinates and date. If this parameter is selected, the user can enter an activation time adding or subtracting 9:59:59(HH:mm:ss) to the local sunrise time. If the time after the subtraction corresponds to the day before, this parameter is adjusted as 00:00:00 for the current day.
Sunset Parameter ( SUNSET ):
This parameter is the adjustment of the relay according to sunset time which is calculated in reference to the local coordinates and date. If this parameter is selected, the user can enter an activation time adding or subtracting 9:59:59(HH:mm:ss) to the local sunset time. If the time after the addition corresponds to the day after, this parameter is adjusted as 23:59:59 for the current day.
④
Selection of Activation Days: The day/days in which the program will be activated is adjusted in this menu. If "ALL DAYS" "YES" is selected, the program will be activated for all days of the week. If "NO" is selected, the user will be asked to select "YES" or "NO" for the all of the days starting from Monday in which the program will be active. There are numbers 1 to 7 on the top section of the screen. These numbers stand for the days of the week, "1" indicates Monday. These numbers also help to indicate the days in which a program will be active without entering that appointed programs menu.
Deactivation Time Setting (PXX-OFF): There are 3 parameters: Time, sunrise and sunset. The user can select and set any of the 3 parameters in the best way. These parameters are the same as in the relay activation setting. In this menu, the user can select a different option than in the relay activation setting but the activation and deactivation times must be set differently. If the activation setting is selected as sunrise/sunset and the deactivation setting is selected as time, the deactivation time shouldn't be earlier than the activation setting. For the cases other than this one in which the deactivation time is set earlier than the activation time, the deactivation time is set for the next day.
Time Conflict Query: The device checks for any time conflicts between the existing programs and the newly entered program. If there is a time conflict, it warns the user with the "CROSS PXX" warning. If there isn't a time conflict, "PROGRAM VALI D" is shown on the screen. These warnings will be shown for 3 seconds. If a button is pressed before 3 seconds run out while a warning is displayed, the save menu is entered. Save: In this menu, the user is asked to approve the changed program or not. If the program is not confirmed by the user, it stays unchanged. If the program is confirmed by the user, the changes are kept on the memory but are not in effect. When the "SAVE" query is confirmed by the user while returning to the monitoring menu, the changes are saved to the memory. See application example 1 and 2
- Merge Function:
The merge function does a logical AND operation. In the common timeframe of the merged programs, the corresponding relay becomes active. This function can be used if at least two programs are assigned for the same relay output. There are 2 sub-menus as "AND-1" and "AND-2". There is a "DI SABL" parameter in these menus. When the user selects at least 2 programs, "FINI SH" parameter becomes accessible in this menu instead of this parameter. The user browses between the parameters with UP or DOWN buttons and selects the programs which he wants to merge with SET button. According to the selection of the output of the first selected program, the programs for the other output are excluded from the selectable programs
⑤
for the users convenience to easily select the programs with the same output. To finish the selection, "FI NI SH" parameter has to be selected. After this process, "AND-X" sub-menu will be set and shown as occupied. To disable the merge function, the user must select the "DI SABL" parameter. After this process, "AND-X" sub-menu will be set and shown as unoccupied. When the "SAVE" query is confirmed by the user while returning to the monitoring menu, the changes are saved to the memory.
- Relay Time Menu:
The operation counts and activation times of the C1 and C2 relays are reset in this menu. The user can reset any of the parameter/parameters of the C1 relay. There are 4 sub-menus as "C1-TIME", "C1-SHOT", "C2-TIME" and "C2-TIME". When the "SAVE" query is confirmed by the user while returning to the monitoring menu, the changes are saved to the memory.
● Settings Observation Menu:
The user can observe the sub-menu settings with 3 second intervals in this menu. The activation/deactivation time settings, merge function settings, holiday lock settings, time zone, summer/winter time setting, geographical coordinates and the parameter to which the exit from the manual mode is set can be displayed. UP, DOWN and ESC buttons enables the interval between screens to extend. The SET button provides a faster browsing between the sub-menus.

flowchart
graph LR
    A["DEMO MODE"] --> B["P01-C1"]
    B --> C["P31-C1 AND 1 AND 2"]
    C --> D["XXXX XXXXXX XXXX"]
    E["RECOVERY"] --> F["POS I TI O DAY HIGH TIME ZEN"]
    F --> G["HOLDY-X"]
    G --> H["XXXX XXX XXX XXX XXX"]
xxxx is a symbolic representation. The set parameters are shown here.
6
● Regional Settings Menu:
Geographical settings are done in this menu. The changes which are made in this menu are saved to the memory when the "SAVE" query is confirmed by the user while returning to the monitoring menu.
Language Menu: 4 language options as Turkish, English, German and Spanish. The user enters the language menu with SET button, chooses a language with UP or DOWN buttons and confirms this language with the SET button. When English, German or Spanish is selected, the change is applied immediately. But if the "SAVE" query isn't confirmed by the user while returning to the monitoring menu, the language doesn't change. When the language is changed, Location Menu parameters are changed too.
Location Menu: The sunrise and sunset times are automatically calculated according to the set coordinates. The user can choose to select the MANUAL parameter and enter latitude and longitude of the coordinate which he is in manually or to use the coordinates which are already saved on the devices memory. If the language is set as Turkish; the selectable options are 81 Turkish cities, Turkish Republic of Northern Cyprus and the districts of Alanya and Bodrum. For English, selectable options are 68 cities. For German, selectable options are 62 cities. For Spanish, selectable options are 57 cities. When any parameter other than MANUAL is selected, the time zone is adjusted automatically.
Time Zone Menu: The time zone for the geographical location in which the user resides is set in this menu. This parameter affects only the sunrise and sunset times according to the set location. Daylight Savings Time(DST) Menu: DST usage is set in this menu. There are 4 parameters.
Europe Parameter: According to the European DST settings; the DST starts when the local time is about to reach 03:00:00 and the clocks are turned 1 hour forward to 04:00:00 on the last Sunday of March. The DST ends when the local time is about to reach 02:00:00 and the clocks are turned 1 hour backward to 01:00:00 on the last Sunday of October.
USA Parameter: According to the USA DST settings: the DST starts when the local time is about to reach 02:00:00 and the clocks are turned 1 hour forward to 03:00:00 on the second Sunday of March. The DST ends when the local time is about to reach 02:00:00 and the clocks are turned 1 hour backward to 01:00:00 on the first Sunday of October.
Custom Parameter(CUSTOM): By choosing this parameter, the user first selects the month, the place of the day in that selected month(Ex.: The selection of the "second" parameter in the "second Saturday of March". It is selected as the week of the month.), the day, the time on which it will be turned forward for DST start.
⑦
The user then selects the month, the place of the day in that selected month(Ex.: The selection of the "second" parameter in the "second Saturday of September". It is selected as the week of the month.), the day, the time on which it will be turned backward for DST finish.
● Time Settings Menu:
The time settings are done in this menu. There are 3 sub-menus. The changes which are meade in this menu are immediately applied.
Date Menu(DATE): It is displayed as dd.mm.yy.
Clock Menu(CLOCK): It is displayed as HH.mm.ss.
Century Menu(CENTURY): The first two digits of the year which you're in is set in this menu. It is displayed
as yyyy. The last two digits come from the date setting. When the user wishes to set this value it
changes to yy--. It can be set between 19 and 25.

flowchart
graph LR
    A["DATE 16.08.10"] --> B["SET"]
    B --> C["DATE 16.08.10"]
    C --> D["SET"]
    D --> E["DATE 23.08.10"]
    E --> F["SET"]
    F --> G["CHANGED DATE"]
    G --> H["→"]
    H --> I["DATE 23.08.10"]

flowchart
graph LR
    A["CLOCK 20:53:40"] -->|SET| B["CLOCK 20:53:40"]
    B -->|SET| C["CLOCK 20:43:50"]
    C -->|SET| D["CHANGED CLOCK"]
    D --> E["CLOCK 20:43:50"]

flowchart
graph LR
    A["CENTURY 1910"] -->|ESC| B["SET"]
    B --> C["CENTURY 193--"]
    C -->|ESC| D["SET"]
    D --> E["Can be set between 19~25"]
    E --> F["CHANGED CENTRY"]
    F --> G["→ CENTURY 2010"]
⑧
- Display Settings Menu:
The contrast is adjusted between 00 an 15 in this menu.

flowchart
graph LR
    A["CONTRAS 08"] -->|ESC| B["CONTRAS 03"]
    B --> C{Can be set between 00-15}
    C --> D["CONTRAS 05"]
    D --> E["CONTRAS 05"]
    style A fill:#f9f,stroke:#333
    style B fill:#ccf,stroke:#333
    style C fill:#cfc,stroke:#333
    style D fill:#fcc,stroke:#333
    style E fill:#cff,stroke:#333
● Holiday Lock Menu:
In this menu, the set programs are deactivated for a time period which is entered by the user. 4 different holiday times can be entered by the user. The user must enter and approve the start date(as dd:mm), the start time(as HH:mm), the finish date(as dd:mm) and the finish time(as HH:mm) of a holiday. After the approval, "HOLDAY X-FULL" will appear on the screen. For an occupied holiday setting, "EDI T" ve "DELETE" options are available. If "EDI T" is selected for a holiday lock, the existing settings for that holiday lock can be observed and edited. If "DELETE" is selected for a holiday lock, the settings for that holiday lock is deleted. The changes are saved to the memory when the "SAVE" query is confirmed by the user while returning to the monitoring menu. See Program Example 3.
- Manual Mode Menu: The setting for leaving the manual mode after the device is set in manual mode is done in this menu. There are 3 parameters. The user can leave the manual mode with the DOWN button regardless of what parameter he chooses in this menu.
Disabled Parameter(DI SABL): When this parameter is selected; after the manual mode is enabled with the UP/DOWN buttons for any of the outputs, it must be disabled again with the UP/DOWN buttons. Program Parameter(NEXT-P): When this parameter is selected; after the relay/relays is/are activated or deactivated by a program in the program flow, the manual mode for the relay/relays will be disabled. Timer Parameter(TIMER): When this parameter is selected; the user will be prompted to enter the time as HH:mm. The device will start to count back from the entered time when the manual mode is enabled for the relay/relays. If the time is entered as 23:59, the manual mode will be disabled after 23 hours and 59 minutes. If the time is entered as 00:01, the manual mode will be disabled after 1 minute. There is a special case if the time is entered as 00:00. With this entered time, the manual mode will be disabled after 1 minute too.
⑨
- Password Settings Menu:
The activation and changing of a password is done in this menu. The factory default value for the password is "0000". The 4 digit password is prompted before entering this menu. If the password is activated, it isn't prompted again before entering this menu since the password was entered before entering the main programming menu.
Password Activation Menu: The password is activated or deactivated in this menu. It is activated as following:

flowchart
graph TD
    A["PASSWORD SETI NG"] -->|SET| B["PASSWORD 0000"]
    B -->|SET| C["PASSWORD 0000"]
    C -->|SET| D["PASSWORD DI SABL"]
    D -->|SET| E["PASSWORD DI SABL"]
    E -->|SET| F["Charges are saved"]
    F --> G["1608.10 16:40.51"]
    G --> H["Changes are discarded"]
    H --> I["SAVE yes no"]
    I --> J["Charges are discarded"]
    J --> K["Charges are shown"]
    K --> L["Charges is shown"]
    L --> M["Charges is shown"]
    M --> N["Charges is shown"]
    N --> O["Charges is shown"]
    O --> P["Charges is shown"]
    P --> Q["Charges is shown"]
    Q --> R["Charges is shown"]
    R --> S["Charges is shown"]
    S --> T["Charges is shown"]
    T --> U["Charges is shown"]
    U --> V["Charges is shown"]
    V --> W["Charges is shown"]
    W --> X["Charges is shown"]
    X --> Y["Charges is shown"]
    Y --> Z["Charges is shown"]
    Z --> AA["Charges is shown"]
    AA --> AB["Charges is shown"]
    AB --> AC["Charges is shown"]
    AC --> AD["Charges is shown"]
    AD --> AE["Charges is shown"]
    AE --> AF["Charges is shown"]
    AF --> AG["Charges is shown"]
    AG --> AH["Charges is shown"]
    AH --> AI["Charges is shown"]
    AI --> AJ["Charges is shown"]
    AJ --> AK["Charges is shown"]
    AK --> AL["Charges is shown"]
    AL --> AM["Charges is shown"]
    AM --> AN["Charges is shown"]
    AN --> AO["Charges is shown"]
    AO --> AP["Charges is shown"]
    AP --> AQ["Charges is shown"]
    AQ --> AR["Charges is shown"]
    AR --> AS["Charges is shown"]
    AS --> AT["Charges is shown"]
    AT --> AU["Charges is shown"]
    AU --> AV["Charges is shown"]
    AV --> AW["Charges is shown"]
    AW --> AX["Charges is shown"]
    AX --> AY["Charges is shown"]
⑩
Password Change Menu: The password is changed in this menu. It is done as following:
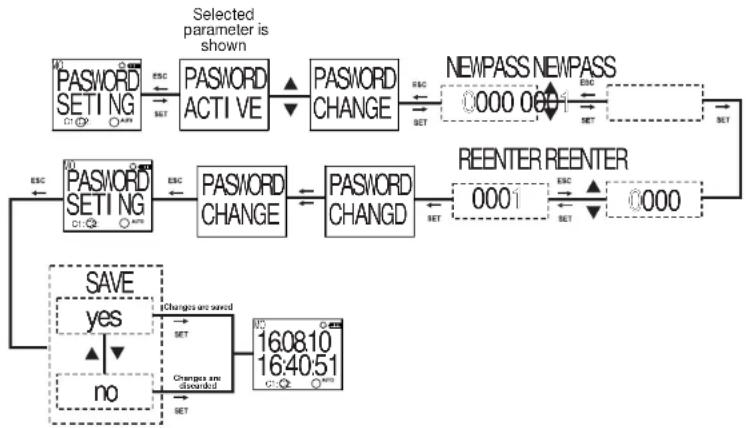
flowchart
graph TD
    A["Password SETTING"] -->|ESC SET| B["Password ACTIVE"]
    B -->|▲| C["PASSWORD CHANGE"]
    C -->|ESC SET| D["NEWPASS NEWPASS 0000 001"]
    D -->|SET| E["REENTER REENTER 0001"]
    E -->|SET| F["NO"]
    G["SAVE yes"] --> H["no"]
    H --> I["Changes are saved 16:08:10 16:40:51"]
    I --> J["Changes are distorted 16:08:10 16:40:51"]
    J --> K["ESC SET"]
    L["ESC"] --> M["Password SETTING"]
    M --> N["Password CHANGE"]
    N --> O["PASSWORD CHANGE"]
    O --> P["NEWPASS NEWPASS 0000 001"]
    P --> Q["REENTER REENTER 0001"]
    Q --> R["NO"]
11
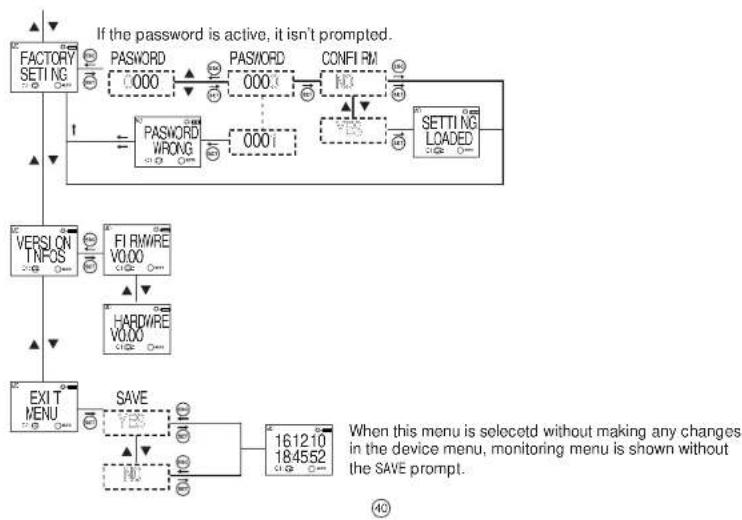
● Factory Setting Menu:
The device is returned to its factory settings in this menu. The 4 digit password is prompted before entering this menu. If the password is activated, it isn't prompted again before entering this menu since the password was entered before entering the main programming menu. The device returns to its factory settings when the "SAVE" query is confirmed by the user while returning to the monitoring menu. Time settings, relay operation count and relay operation time doesn't change.
- Version Information Menu:
The software and hardware versions of the device is shown in this menu.
● Exit from Main Programming Menu:
This menu is used to exit from the main programming menu. The ESC button can be used for this, too. If any changes are committed in the menus while in the main programming menu, an approval prompt is shown. If there aren't any changes, the monitoring menu is shown directly.
Factory Settings:
Program
P01: C1 relay will be activated everyday at sunset and will be deactivated everyday at sunrise
P02: C2 relay will be activated everyday at sunset and will be deactivated everyday at 23:59:59
P03....P32: FREE
Merge Function
AND-1: FREE
AND-2: FREE
Regional Settings
LANGUAGE: TURKISH
POSITION: ISTANBUL
TIME ZONE: 2:00
DAYLIGHT SAVING: EUROPEAN
Password
PASSWORD:0000
PASSWORD STATUS:INACTIVE
12
Display Settings
CONTRAST:08
Holiday Lock
Holiday Lock HOLIDAY 1: FREE
HOLIDAY-1. FREE HOLIDAY 2: FREE
HOLIDAY-2: FREE
HOLIDAY-3: FREE
HOLIDAY-4: FREE
Manual Mode
RECOVRY:PROGRAM
Activation Time
C1 TIME: Doesn't change
C1 SHOT: Doesn't change
01 SHOT. Doesn't change
C2 TIME: Doesn't change
C2 SHOT: Doesn't change
DTR Prog (External Memory) Settings Menu
External memory module is used to transfer the settings that you changed on one device onto another device of the same model. To achieve this, please follow the steps below:
- First, program the device that you want to transfer the settings from by using the buttons on it. Don't forget to save your changed settings when you exit the programming mode.
- Place your External Memory Module which came with your device to the External Memory Module slot of your device by paying attention to its direction.
- "External Memory" will appear on the display. By using the following menu instructions, select and approve the "Write Memory" option. After the "Write Okay" message appears on the display, remove the External Memory Module from DTR-20.
- Place the External Memory Module to the DTR-20 that you want to transfer the settings to. "External Memory" will appear on the display.
- By using the following menu instructions, select and approve the "Read Memory" option. After the "Read Okay" message appears on the display, remove the External Memory Module from DTR-20.
- To copy the program settings to more DTR-20 devices, repeat 4th and 5th steps.
External Memory Menu
Read Memory: It is the menu under External Memory Menu where settings on the External Memory Module are loaded to the DTR-20.
Edit Memory: It is the menu under External Memory Menu where settings on the External Memory Module are edited.
Write Memory: It is the menu under External Memory Menu where settings on the DTR-20 are loaded to the External Memory Module.
Note: External Memory Module does not affect the current date and time settings.
13

flowchart
graph TD
    A["PT EXTERNAL MEMORY C1:○C2:○ AUTO"] -->|ESC SET| B["PT READ MEMORY C1:○C2:○ AUTO"]
    B -->|ESC SET| C["PT EDI T MEMORY C1:○C2:○ AUTO"]
    C -->|ESC SET| D["PT WRI TE MEMORY C1:○C2:○ AUTO"]
    D -->|ESC SET| E["CONFI RM C1:○"]
    E -->|ESC SET| F["READ OKAY"]
    E -->|ESC SET| G["PROGRAM"]
    G -->|ESC SET| H["CONFI RM C1:○"]
    H -->|ESC SET| I["WRI TE OKAY"]
    H -->|ESC SET| J["READ OKAY"]
⑭
● DTR-IR Prog (Infrared Remote) Settings Menu

MODULE ON : After the device is energized for 3 seconds, MODULE ON message will be displayed. This message indicates that the communication module is on and it is ready to be used with DTR-IR Prog.

MODULE OFF : After removing power from the device for 3 seconds, MODULE OFF message will be displayed. This message indicates that communication module is off and DTR-IR Prog can't be used.

000/100 DONE : It indicates the progress of the operation during the writing and reading processes. It is displayed as a percent (%) value.

READ OK : It indicates that all the information on the DTR-20M device has been successfully transferred to the DTR-IR Prog device. When this message is displayed, Green LED of the DTR-IR Prog will turn on.
1516

WRITE OK : It indicates that all the information on the DTR-IR Prog has been successfully transferred to the DTR-20M device. When this message is displayed, Green LED of the DTR-IR Prog will turn on.

READ ERROR : It indicates that the data transfer from DTR-20M to DTR-IR Prog wasn't successful because of an interruption of the visual connection or because of the long distance between two devices. When this error is displayed, all data read by the DTR-IR Prog up until that point is discarded. Previously saved values on the DTR-IR Prog aren't deleted. When this message is displayed, Red LED of the DTR-IR Prog will turn on.

WRITE ERROR : It indicates that the data transfer from DTR-IR Prog to DTR-20M wasn't successful because of an interruption of the visual connection or because of the long distance between two devices. When this error is displayed, all data written to the DTR-20M up until that point is discarded. Previously saved values on the DTR-20M aren't deleted. When this message is displayed, Red LED of the DTR-IR Prog will turn on.
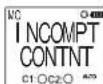
INCOMPATIBLE CONTENT : The data on the DTR-IR Prog device can only be transferred to a DTR model which the data is programmed for. If you try to transfer the data from the DTR-IR Prog device to an incompatible DTR device, this error message will be displayed. But you can read the content of any DTR device.This way, the data on the DTR-IR Prog device will belong to the appropriate DTR device. Ex: Data read from DTR-20M can't be written to DTR-20MT device. When this message is displayed, Red LED of the DTR-IR Prog will turn on.
O
DIMENSIONS

CONNECTION DIAGRAM

Note: The contact resistance at ohmic load (eg: Incandescent bulb, Resistance devices) is 16A. It is recommended to use a contactor if the inductive load (eg: AC motor, fluorescent, etc.) or capacitive load (eg: Led Drivers, UPS, Fluorescent (Electronic Ballast), etc.) switch. Otherwise adhesion may occur in relay contacts.
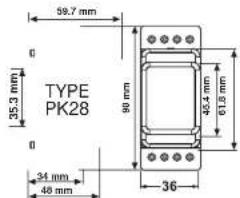
⑰
TECHNICAL FEATURES
| Electrical Features | |
| Operating Voltage (Un) | Please look at the side label |
| Output Contact | 2 C/O, 16 A / 4000 VA |
| Refresh Time | 1 sec. |
| Power Consumption | < 5 VA |
| Accuracy | ≤ 1 sec./Day |
| Screen Size | 1.3" LCD |
| Program Number | 32 |
| Battery Shelf Life | 5 Years |
| Mechanical Features | |
| Equipment Protection Class | Class II (☐) |
| Ambient Temperature | -10°C ... +55°C |
| Protection Class | IP20 |
| Installation | Rail Mount |
| Dimensions | PK25 |
| Weight | 0,2 kg |
| Quantity in 1 Package | 5 pcs |
Due to the structure of LCD screens, the liquid inside them starts to freeze below its operating temperature. This causes the screen to respond slower or not respond at all. Device's other functions are not affected from this and it opens/closes its relays as programmed. After the device temperature rises back to the operating range, LCD screen starts to work normally.
18
City Names and Their Screen Displays for the Language set in the Regional Settings Parameters for the Turkish Language Selection
| Cities | Displayed Name | Time Zone |
| Adana | R3HR | +2.00 |
| Aoyaman | R1VRM | +2.00 |
| Alyon | RPVQH | +2.00 |
| Ağrı | P8RJ | +2.00 |
| Akarsay | R1SARR | +2.00 |
| Amasya | R9RCYR | +2.00 |
| Ankara | R1WRRR | +2.00 |
| Antalya | R1RYL | +2.00 |
| Ardanan | R4RHR | +2.00 |
| Arvin | RRTYN | +2.00 |
| Aydin | RWTN | +2.00 |
| Balıkseir | RBLTIS | +2.00 |
| Bertin | R8PTN | +2.00 |
| Batman | R7PHN | +2.00 |
| Baybout | R9YSLR | +2.00 |
| Block | B1LEC | +2.00 |
| Bergol | B1NGOL | +2.00 |
| Birls | B1TLTS | +2.00 |
| Bolu | BOLU | +2.00 |
| Burdur | B3RLIP | +2.00 |
| Buria | B3LPA | +2.00 |
| Çanakkale | CRAKII | +2.00 |
| Çankın | CRAIJP | +2.00 |
| Çorum | CORM | +2.00 |
| Deniz | TENTAL | +2:00 |
| Diyarbakır | VYRKH | +2:00 |
| Düzoe | TURCE | +2:00 |
| Edine | ENTME | +2:00 |
| Elkşog | ELRTG | +2:00 |
| Erdican | ETLHE | +2:00 |
| Eşurun | EPZARU | +2:00 |
| Eşikyehir | ESKSE | +2:00 |
| Gizdantep | GRANTP | +2:00 |
| Gireaun | GPESU | +2:00 |
| Gümlçhane | BULSH | +2:00 |
| Haidan | HRIMP | +2:00 |
| Hatay | HTRY | +2:00 |
| Iğdr | LEJPR | +2:00 |
| İsperla | TSRRPT | +2:00 |
| İstanbul | CTRAH | +2:00 |
| İzmir | ITAPR | +2:00 |
| Kahramannmaraş | ITARRS | +2:00 |
| Karabük | ITARRBU | +2:00 |
| Karaman | ITARRPH | +2:00 |
| Kası | ITARS | +2:00 |
| Kastamuru | ITASTM | +2:00 |
| Kayesi | ITASER | +2:00 |
| Kırakale | ITPETH | +2:00 |
| Kirkaneli | H2HLA | +2.00 |
| Kurşehir | H1.PSEK | +2.00 |
| Kıla | H1.LIS | +2.00 |
| Kocaeli | H2.TREL | +2.00 |
| Konya | H3.NVA | +2.00 |
| Kılıbya | H4.TRHY | +2.00 |
| Meliya | H5.RTY | +2.00 |
| Marissa | H6.NSR | +2.00 |
| Mardin | H7.RJIN | +2.00 |
| Merin | H8.RSIN | +2.00 |
| Mujla | H9.LRA | +2.00 |
| Muj | H10 | +2.00 |
| Nevsphir | H11.VSEH | +2.00 |
| Njda | H12.VEIE | +2.00 |
| Ordu | H13.RU | +2.00 |
| Osmaniye | H14.SMRX | +2.00 |
| Rize | H15.RZE | +2.00 |
| Sakarya | H16.RRPV | +2.00 |
| Samsun | H17.SAMSUN | +2.00 |
| Sirt | H18.STY | +2.00 |
| Sinop | H19.SNDP | +2.00 |
| Sivas | H20.SLVS | +2.00 |
| Şankufa | H21.SUPRA | +2.00 |
| Şmak | H22.SPNRII | +2.00 |
| Tekrnej | TEKIRD | +2.00 |
| Tokat | TOKIRD | +2.00 |
| Trabzon | TRABZO | +2.00 |
| Tunceli | TUNCEL | +2.00 |
| Upak | USAKI | +2.00 |
| Van | VAN | +2.00 |
| Yalova | YALOVA | +2.00 |
| Yozgat | YOZGAT | +2.00 |
| Zonguldak | ZONGUL | +2.00 |
| Alanya | PLANRA | +2.00 |
| Bodrum | BODRUM | +2.00 |
| Lofiosa, IRNC | LEFIOS | +2.00 |
19
Parameters for the English Language Selection
| Cities | Displayed Name | Time Zone |
| Accra, Ghana | RCAR | +0.00 |
| Addis Ababa, Ethiopia | RJUSA | +3.00 |
| Aden, Yemen | AEN | +3.00 |
| Algiers, Algeria | RCER | +1.00 |
| Amman, Jordan | RMRN | +2.00 |
| Amsterdam, Netherlands | RHSER | +1.00 |
| Andorra la Vella, Andorra | RORER | +1.00 |
| Athens, Greece | ATHENS | +2.00 |
| Baku, Azerbaijan | BRU | +4.00 |
| Berut, Lebanon | BRUT | +2.00 |
| Bangkok, Thailand | BHSD | +7.00 |
| Bern, Switzerland | ERN | +1.00 |
| Bogota, Colombia | BOTA | -5.00 |
| Brussels, Belgium | PSSE | +1.00 |
| Buenos Aires, Argentina | BUENO | -3.00 |
| Calco, Egypt | CAYO | +2.00 |
| Caracas, Venezuela | CARR | +3.00 |
| Casablanca, Morocco | CBAL | +0.00 |
| Copenhagen, Denmark | COPEN | +1.00 |
| Damascus, Syria | AMBC | +2.00 |
| Dhaka, Bangladesh | DHRA | +6.00 |
| Doha, Qatar | QHA | +3.00 |
| Dubai, United Arab Emirates | UBET | +4.00 |
| Dublin, Ireland | UULIN | +0.00 |
| Berlin, Germany | BERLIN | +1.00 |
| Glasgow, Scotland | BLASCO | +0.00 |
| Helsinki, Finland | HELSIN | +2.00 |
| Havana, Cuba | HPRHR | -5.00 |
| Hong Kong, Hong Kong | HQHUB | +8.00 |
| Islamabad, Pakistan | SLBH | +5.00 |
| Istanbul, Turkey | SLBH | +2.00 |
| Johannesburg, South Africa | JOHES | +2.00 |
| Khorbum, Sudan | KHRTU | +3.00 |
| Kuala Lumpur, Malaysia | KLRAL | +8.00 |
| Kiev, Ukraine | KVTV | +2.00 |
| Lagos, Nigeria | LRGO | +1.00 |
| Lerkosa, TINC | LEFFOS | +2.00 |
| Lima, Peru | LYR | -5.00 |
| Lisbon, Portugal | LCSON | +0.00 |
| London, England | LONON | +0.00 |
| Madrid, Spain | MIRAJ | +1.00 |
| Manila, Philippines | MRNTLR | +8.00 |
| Mexico City, Mexico | MEICLO | -6.00 |
| Monrovia, Liberia | MONPOV | +0.00 |
| Moscow, Russia | MOSOVA | +3.00 |
| Nairobi, Kenya | NAIROB | +3.00 |
| New Delhi, India | NEQDEL | +5.30 |
| Oslo, Norway | OSLO | +1.00 |
| Paris, France | PAPTS | +1.00 |
| Pyongyang, North Korea | PVQEV | +9.00 |
| Barotonga, Cook Islands | PAROTN | 10.00 |
| Hejakwak, Iceland | PEVJY | +0.00 |
| Rio de Janeiro, Brazil | RTOUE | -3.00 |
| Riyac, Saudi Arabia | PYBH | +3.00 |
| Rome, Italy | RCME | +1.00 |
| San José, Costa Rica | SRIUOS | -6.00 |
| Santiago, Chile | SRNTAR | -4.00 |
| Seoul, South Korea | SEQL | +9.00 |
| Shanghai, PRC | SHANGH | +8.00 |
| Sofia, Bulgaria | SOFR | +2.00 |
| Singapore, Singapore | SINGAP | +8.00 |
| Stockholm, Sweden | STCHL | +1.00 |
| Sydney, Australia | SYNEHY | +10.00 |
| Tapol, Taiwan | TRPET | +8.00 |
| Tehran, Iran | TEHRN | +3.30 |
| Tripoli, Lebanon | TRPOL | +2.00 |
| Tokyo, Japan | TOMO | +9.00 |
| Vienna, Austria | VENN | +1.00 |
20
Parameters for the German Language Selection
| Cities | Displayed Nahre | Time Zone |
| Andermati | ANDERM | +1:00 |
| Augsburg | AUGSBU | +1:00 |
| Basel | BASEL | +1:00 |
| Bellellzona | BELLIN | +1:00 |
| Berlin | BERLIN | +1:00 |
| Bern | BERN | +1:00 |
| Biel | BIEL | +1:00 |
| Bregenz | BREGEN | +1:00 |
| Chur | CHUR | +1:00 |
| Dombim | DORNB1 | +1:00 |
| Dresden | DRESDE | +1:00 |
| Düsseldorf | DUESSE | +1:00 |
| Eisenstadt | EI SENS | +1:00 |
| Erfurt | ERFURT | +1:00 |
| Essen | ESSEN | +1:00 |
| Flensburg | FLENSB | +1:00 |
| Frankfurt | FRANKF | +1:00 |
| Freiburg | FREI BU | +1:00 |
| Fribourg | FRI BOU | +1:00 |
| Hafen | FRI EDR | +1:00 |
| Geneve | GENEVE | +1:00 |
| Graz | GRAZ | +1:00 |
| Hamburg | HAMBUR | +1:00 |
| Hannover | HANNOV | +1:00 |
| Ingolstadt | I NGOIS | -1:00 |
| Innsbruck | I VISBR | -1:00 |
| Karlsruhe | KARLSR | 1:00 |
| Kiel | KI EL | -1:00 |
| Klagenfurt | KLAGEN | 1:00 |
| Köln | KOELN | -1:00 |
| Konstanz | KONSTA | 1:00 |
| Krems | KRENS | -1:00 |
| Kreuzlingen | KREUZL | -1:00 |
| Lausanne | LAUSAN | 1:00 |
| Lienz | LI ENZ | -1:00 |
| Linz | LI NZ | -1:00 |
| Locarno | LOCARN | 1:00 |
| Lugano | LUGANO | 1:00 |
| Luzern | LUZERN | 1:00 |
| Magdeburg | MAGDEF | -1:00 |
| Melk | MELK | 1:00 |
| Montreux | KONTRE | 1:00 |
| München | MUEHCH | 1:00 |
| Nürnberg | NUERNE | 1:00 |
| Oldenburg | OLDBEW | 1:00 |
| Blod | RI ED | 1:00 |
| Rostock | ROSTOC | 1:00 |
| Rust | RUST | 1:00 |
| Salzburg | SALZB | +1.00 |
| St. Calle | SCALLE | +1.00 |
| Schaffhausen | SHAUSN | +1.00 |
| Sion | SIKN | +1.00 |
| Steyr | STEYR | +1.00 |
| St.Pölten | STPCEL | +1.00 |
| Stuttgart | STUTTG | +1.00 |
| Thun | THUN | +1.00 |
| Vienna | VIENNA | +1.00 |
| Villach | VILLAC | +1.00 |
| Waichaus | WAI DHT | +1.00 |
| Wels | WELS | +1.00 |
| Wiener Neusselt | MPNSTD | +1.00 |
21
Parameters for the Spanish Language Selection
APPLICATION EXAMPLE 1: On every weekday, the C1 relay will be activated 1 hour 35 minutes 51 seconds before the sunrise and be deactivated at 9 o'clock.
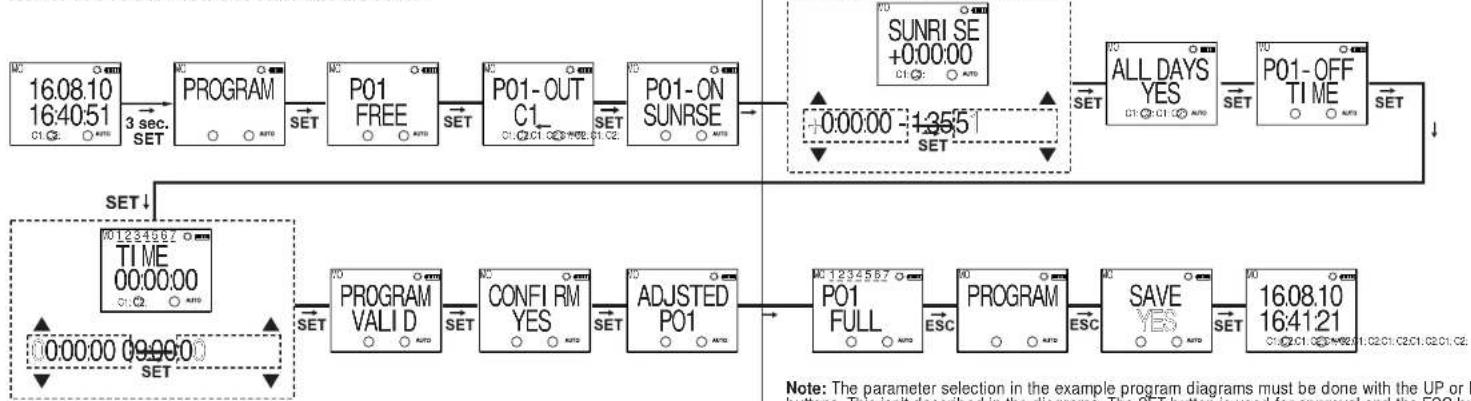
flowchart
graph TD
    A["16.08.10 16:40:51 C1.C2."] --> B["3 sec. SET"]
    B --> C["PROGRAM"]
    C --> D["P01 FREE"]
    D --> E["P01-OUT C1"]
    E --> F["P01-ON SUNRSE"]
    F --> G["SUNRI SE +0:00:00 C1.C2."]
    G --> H["+0:00:00 -1:255 SET"]
    H --> I["ALL DAYS YES C1.C2.C1.C2."]
    I --> J["P01-OFF TI ME"]
    J --> K["SET"]
    K --> L["16.08.10 16:41:21 C1.C2.C1.C2.C1.C2.C1.C2."]
    L --> M["SET"]
    M --> N["PROGRAM VALID"]
    N --> O["CONFIRM YES"]
    O --> P["ADJUSTED PO1"]
    P --> Q["P01 FULL"]
    Q --> R["PROGRAM"]
    R --> S["SAVE YES"]
    S --> T["SET"]
    T --> U["SET"]
    U --> V["SET"]
    V --> W["SET"]
    W --> X["SET"]
    X --> Y["SET"]
    Y --> Z["SET"]
    Z --> AA["SET"]
    AA --> AB["SET"]
    AB --> AC["SET"]
    AC --> AD["SET"]
    AD --> AE["SET"]
    AE --> AF["SET"]
23
Note: The parameter selection in the example program diagrams must be done with the UP or DOWN buttons. This isn't described in the diagrams. The SET button is used for approval and the ESC button is used for returning to the previous selection. The diagrams are for P01 and the programming is done the same way for the other programs.
24

flowchart
graph TD
    A["16.08.10 16:40:51 C1:02 AUTO"] --> B["3 sec. SET"]
    B --> C["PROGRAM"]
    C --> D["P01 FREE"]
    D --> E["P01-OUT C2"]
    E --> F["P01-ON TIME"]
    F --> G["+0:00:00 18:30:00 SET"]
    G --> H["ALL DAYS NO C1"]
    H --> I["MONDAY YES C1"]
    I --> J["TUESDAY NO C1"]
    J --> K["SET"]
    K --> L["SUNDAY NO C1:02 AUTO"]
    L --> M["P01-OFF SUNSET C1:02 AUTO"]
    M --> N["SUNSET +0:00:00 C1:02 AUTO"]
    N --> O["+0:00:00 +0:00:00 SET"]
    O --> P["PROGRAM VALID"]
    P --> Q["CONFIRM YES"]
    Q --> R["ADJUSTED P01"]
    R --> S["P01 FULL"]
    S --> T["PROGRAM"]
    T --> U["SAVE YES C1:02 C1:02 AUTO"]
    U --> V["SET"]
    V --> W["16.08.10 16:41:21 C1:02 AUTO"]

flowchart
graph TD
    A["16.08.10\n16:41:21\nSET"] --> B["HOLI DAY LOCK\nC:\( \text{AUTO} \)"]
    B --> C["HOLI DAY 1-FREE\nC:\( \text{AUTO} \)"]
    C --> D["START DATE\nC:\( \text{AUTO} \)"]
    D --> E["S- DATE\n01.01\nC:\( \text{AUTO} \)\( \text{SET} \)"]
    E --> F["S-CLOCK\n01.01\nC:\( \text{AUTO} \)\( \text{SET} \)"]
    F --> G["END DATE\nC:\( \text{AUTO} \)\( \text{SET} \)"]
    G --> H["E- DATE\n01.01\nC:\( \text{AUTO} \)\( \text{SET} \)"]
    H --> I["E-CLOCK\n01.01\nC:\( \text{AUTO} \)\( \text{SET} \)"]
    I --> J["HOLI DAY SAVED\nC:\( \text{AUTO} \)\( \text{SET} \)"]
    J --> K["HOLI DAY 1-FULL\nC:\( \text{AUTO} \)\( \text{ESC} \)"]
    K --> L["HOLI DAY LOCK\nC:\( \text{AUTO} \)\( \text{ESC} \)"]
    L --> M["SAVE YES\nC:\( \text{AUTO} \)\( \text{SET} \)"]
    M --> N["16.08.10\n16:41:21\nC:\( \text{AUTO} \)\( \text{SET} \)"]
flowchart
graph TD
    A["PROGRAM"] --> B["SUNRI SE 07:22:00"]
    B --> C["SUNSET 16:36:00"]
    C --> D["P01-C1 # 05:44:00"]
    D --> E["C1-TIME 000000"]
    E --> F["C1-SHOT 000000"]
    F --> G["C2-TIME 000000"]
    G --> H["C2-SHOT 000000"]
    H --> I["Press for 3 seconds"]
    I --> J["COMBI NE FUNC"]
    J --> K["HOUR COUNTR"]
    K --> L["DEMO MODE"]
    L --> M["REGI ONL SETI NG"]
    M --> N["TIME SETI NG"]
    N --> O["DI SPLAY SETI NG"]
    O --> P["HOLI DAY LOCK"]
    P --> Q["MANUAL MODE"]
    Q --> R["PASSWORD SETI NG"]
    R --> S["FACTORY SETI NG"]
    S --> T["VERSI ON INFOS"]
    T --> U["EXIT MENU"]
    U --> V["FI RMIRE HARDVIRE VODO"]
    V --> W["LANGUAGE POSI TI Q TIMEZON DAYLI GH"]
    W --> X["DATE CLOCK CENTURY 2010"]
    X --> Y["CONTRAS 08"]
    Y --> Z["HOLI DAY 15 HOLI DAY 2 HOLI DAY 3 HOLI DAY 4 FREE"]

If the "SAVE" query is not confirmed by the user while returning to the monitoring menu, the changes which are committed in the menus will be discarded(This doesn't apply to the Time Settings Menu).
* The device shows the entered programs in the order of their program flow in the menu display. The programs can be browsed with the UP or DOWN buttons. The programs with a #symbol next to them are the programs which didn't run yet.
29
(Monitoring Menu and Main Programming Menu screens are shown).
30

flowchart
graph TD
    A["PROGRAM"] --> B["P01 FULL"]
    B --> C["P01"]
    C --> D["EDIT / DELETE won't be shown for empty programs."]
    D --> E["P01"]
    E --> F["RESET"]
    F --> G["CONFIRM yes no"]
    G --> H["CALL DAYS MONDAY FRI DAY PO1-OFF"]
    H --> I["Deactivation time setting"]
    I --> J["TIME"]
    I --> K["sunr se"]
    I --> L["sunset"]
    J --> M["0:00:00 HH:mm:ss"]
    K --> N["0:00:00 HH:mm:ss"]
    L --> O["0:00:00 HH:mm:ss"]
    M --> P["Time conflict query"]
    N --> Q["CROSS PXX"]
    O --> R["CONFIRM yes no"]
    P --> S["PROGAM ADJUSTED PO1 The settings stay unchanged."]
    Q --> T["Press for 3 seconds."]
    R --> U["Program stays unchanged."]

flowchart
graph TD
    A["COMBI NE FUNC"] --> B["AND-1 FREE"]
    B --> C["AND-2 FREE"]
    C --> D["HOUR COUNTR"]
    D --> E["C1-TIME DELETE"]
    E --> F["CONFIRM"]
    F --> G["AND-1 UP RABL"]
    G --> H["ADJUSTED AND-1"]
    H --> I["AND-1 FREE"]
    I --> J["AND-1 FULL"]
    J --> K["AND-1 UP DOWN buttons. There is a "DI SABL" parameter in these menus. When the user selects at least 2 programs, "FINI SH" parameter becomes accessible in this menu instead of the "DI SABL" parameter. After the programs which will be merged are selected with the SET button, "FINI SH" parameter must be selected."]

flowchart
graph TD
    A["DEMO MODE"] --> B["P01-C1 PS1"]
    B --> C["C1 AND-1 AND 2"]
    C --> D["HOLI DAY"]
    D --> E["TIMEZON"]
    E --> F["DAYLIGHT"]
    F --> G["DI L TURKCE"]
    G --> H["POSITIO MANUAL"]
    H --> I["POSITIO ACCAA"]
    I --> J["POSITIO VI ENNA"]
    J --> K["POSITIO MANUAL"]
    K --> L["POSITIO CURRENT"]
    L --> M["POSITIO CURRENT"]
    M --> N["POSITIO CURRENT"]
    N --> O["POSITIO CURRENT"]
    O --> P["POSITIO CURRENT"]
    P --> Q["POSITIO CURRENT"]
    Q --> R["POSITIO CURRENT"]
    R --> S["POSITIO CURRENT"]
    S --> T["POSITIO CURRENT"]
    T --> U["POSITIO CURRENT"]
    U --> V["POSITIO CURRENT"]
    V --> W["POSITIO CURRENT"]
    W --> X["POSITIO CURRENT"]
    X --> Y["POSITIO CURRENT"]
    Y --> Z["POSITIO CURRENT"]
    Z --> AA["POSITIO CURRENT"]
    AA --> AB["POSITIO CURRENT"]
    AB --> AC["POSITIO CURRENT"]
    AC --> AD["POSITIO CURRENT"]
    AD --> AE["POSITIO CURRENT"]
    AE --> AF["POSITIO CURRENT"]
    AF --> AG["POSITIO CURRENT"]
    AG --> AH["POSITIO CURRENT"]
    AH --> AI["POSITIO CURRENT"]
    AI --> AJ["POSITIO CURRENT"]
    AJ --> AK["POSITIO CURRENT"]
    AK --> AL["POSITIO CURRENT"]
    AL --> AM["POSITIO CURRENT"]
    AM --> AN["POSITIO CURRENT"]
    AN --> AO["POSITIO CURRENT"]
    AO --> AP["POSITIO CURRENT"]
    AP --> AQ["POSITIO CURRENT"]
    AQ --> AR["POSITIO CURRENT"]
    AR --> AS["POSITIO CURRENT"]
    AS --> AT["POSITIO CURRENT"]
    AT --> AU["POSITIO CURRENT"]
    AU --> AV["POSITIO CURRENT"]
    AV --> AW["POSITIO CURRENT"]
    AW --> AX["POSITIO CURRENT"]
    AX --> AY["POSITIO CURRENT"]

flowchart
graph TD
    A["REGI OND SETTING"] --> B["LANGUAGE"]
    B --> C["POST TI O MANUAL"]
    C --> D["TI MEZON 330"]
    D --> E["TI MEZON TI MEZON TI MEZON TI MEZON"]
    E --> F["SUMMER TIME"]
    F --> G["DST Start Time Setting"]
    G --> H["S MONTH & S WEEK & S DAY & S HOUR W"]
    H --> I["DST Finish Time Setting"]
    I --> J["DAY W HOUR & DAY W HOUR"]
    J --> K["DAY LI GH ADUSTD"]
    K --> L["1"]
    style A fill:#f9f,stroke:#333
    style B fill:#f9f,stroke:#333
    style C fill:#f9f,stroke:#333
    style D fill:#f9f,stroke:#333
    style E fill:#f9f,stroke:#333
    style F fill:#f9f,stroke:#333
    style G fill:#f9f,stroke:#333
    style H fill:#f9f,stroke:#333
    style I fill:#f9f,stroke:#333
    style J fill:#f9f,stroke:#333
    style K fill:#f9f,stroke:#333
    style L fill:#f9f,stroke:#333

flowchart
graph TD
    A["TIME SETTING"] --> B["DATE 13.09.10"]
    B --> C["The last entered DATE is shown."]
    C --> D["DATE 13.09.11"]
    D --> E["CHANGED DATE"]
    A --> F["CLOCK 205340"]
    F --> G["The last entered CLOCK is shown."]
    G --> H["CLOCK 205340"]
    H --> I["CHANGED CLOCK"]
    A --> J["CENTURY 2011"]
    J --> K["The last entered CENTURY is shown."]
    K --> L["CENTURY 2011"]
    L --> M["CHANGED CENTURY"]
    A --> N["DISPLAY SETTING"]
    N --> O["CONTRAS 08"]
    O --> P["The last entered value is shown."]
    P --> Q["CONTRAS"]
    Q --> R["Can be set between 00~15"]
    R --> S["CONTRAS"]
    S --> T["CHANGED CENTURY"]
37

flowchart
graph TD
    A["HOLD DAY LOCK"] --> B["HOLD DAY 1-FREE"]
    B --> C["START DATE"]
    C --> D["S-DATE 1.01"]
    D --> E["S-CLOCK 0.00"]
    E --> F["END DATE"]
    F --> G["E-DATE 1.01"]
    G --> H["HOLD DAY SAVED"]
    H --> I["E-CLOCK 0.00"]
    I --> J["HOLD DAY 4-FREE"]
    J --> K["MANUAL MODE"]
    K --> L["RECOVERY DI SABL"]
    L --> M["Selected parameter is shown."]
    M --> N["R-TIMER 0.00"]
    N --> O["R-TIMER 0.00°C"]
    O --> P["→"]
    P --> Q["→"]
    Q --> R["→"]
    R --> S["→"]
    S --> T["→"]
    T --> U["→"]
    U --> V["→"]
    V --> W["→"]
    W --> X["→"]
    X --> Y["→"]
    Y --> Z["→"]
    Z --> AA["→"]
    AA --> AB["→"]
    AB --> AC["→"]
    AC --> AD["→"]
    AD --> AE["→"]
    AE --> AF["→"]
    AF --> AG["→"]
    AG --> AH["→"]
    AH --> AI["→"]
    AI --> AJ["→"]
    AJ --> AK["→"]
    AK --> AL["→"]
    AL --> AM["→"]
    AM --> AN["→"]
    AN --> AO["→"]
    AO --> AP["→"]
    AP --> AQ["→"]
    AQ --> AR["→"]
    AR --> AS["→"]
    AS --> AT["→"]
    AT --> AU["→"]
    AU --> AV["→"]
    AV --> AW["→"]
    AW --> AX["→"]
    AX --> AY["→"]
38

flowchart
graph TD
    A["If the password is active, it isn't prompted."] --> B["PASWORD SETTING"]
    B --> C["PASWORD 0000"]
    C --> D["PASWORD 0001"]
    D --> E["PASWORD DI SABL"]
    E --> F["Selected parameter is shown. PASSWORD"]
    F --> G["OR1"]
    G --> H["PASWORD CHANGE"]
    H --> I["NEWPASS 0000"]
    I --> J["NEWPASS 0001"]
    J --> K["REENTER 0000"]
    K --> L["REENTER 0001"]
    L --> M["PASWORD CHANGED"]
    M --> N["ENTRY WRONG"]
    N --> O["OR1"]
    O --> P["OR1"]
    P --> Q["OR1"]
    Q --> R["OR1"]
    R --> S["OR1"]
    S --> T["OR1"]
    T --> U["OR1"]
    U --> V["OR1"]
    V --> W["OR1"]
    W --> X["OR1"]
    X --> Y["OR1"]
    Y --> Z["OR1"]
flowchart
graph TD
    A["FACTORY SETTING"] --> B{If the password is active, it isn't prompted.}
    B -->|Yes| C["PASSWORD 0000"]
    B -->|No| D["PASSWORD 0001"]
    C --> E["PASSWORD WRONG"]
    D --> F["0001"]
    E --> G["CONFI RM NO"]
    F --> H["SETTING LOADED"]
    G --> I["VERSION TNFOS"]
    H --> I
    I --> J["FIRWIRE V0.00"]
    J --> K["HARDWIRE V0.00"]
    K --> L["EXIT MENU"]
    L --> M["SAVE"]
    M --> N["161210 184552"]
    N --> O["When this menu is selected without making any changes in the device menu, monitoring menu is shown without the SAVE prompt."]
- Precautions for Installation and Safe Use
- MANUAL MODE :
- MONITORING MENU :
- DTR 20/20M Menu Settings
- - Program Menu:
- Output Selection ( PXX- OUT ):
- Activation Time Setting (PXX-ON):
- Time Parameter (TIME):
- Sunrise Parameter ( SUNRI SE ):
- Sunset Parameter ( SUNSET ):
- - Merge Function:
- - Relay Time Menu:
- ● Settings Observation Menu:
- ● Regional Settings Menu:
- ● Time Settings Menu:
- DTR Prog (External Memory) Settings Menu
- External Memory Menu
- ● DTR-IR Prog (Infrared Remote) Settings Menu
Brand : ENTES
Model : DTR-20M
Category : Electronic timer