
NH-EH90JD1WM - Tumble drier PANASONIC - Free user manual and instructions
Find the device manual for free NH-EH90JD1WM PANASONIC in PDF.


| Brand | Panasonic |
| Model | NH-EH90JD1WM |
| Product Type | Heat Pump Tumble Dryer |
| Capacity | 10.0 kg (Cotton) |
| Dimensions (H x W x D) | 855 x 598 x 625 mm |
| Power Supply | AC 220-240 V, 10 A |
| Drying Technology | Heat Pump |
| Condenser | Built-in (condensed water box) with optional drain hose |
| Drying Programs | Cotton, Hygiene Dry, Towels, Wool, Synthetics, Shirts, Down Jacket, Quick Dry, Baby Care, Bedding, Warm Air, Cool Air |
| Dry Level Options | Ironing, Ready-to-wear, Storage |
| Additional Functions | Easy Iron, Child Lock, Preset Timer, Delayed Start |
| Display | Digital with remaining time indication and status indicators |
| Drum Light | Yes (30-second auto-off) |
| Filters | Upper filter (internal + external), lower filter, heat exchanger |
| Humidity Sensor | Yes (metal strip, clean regularly) |
| Drying Rack | Included (for wool, shoes, etc.) |
| Stacking Capability | With optional Panasonic stacking kit (N-SK4) |
| Door Opening | Front-loading, reversible? (not specified) |
| Safety Features | Child lock, overheat protection, door switch, filter clog indicator |
| Maintenance Intervals | Upper filter: after each cycle; Lower filter: weekly; Heat exchanger: monthly |
| Installation Requirements | Level surface, clearance: sides 2.5 cm, top 2.5 cm, rear 5 cm, separate grounded socket |
| Noise Level | Not specified; normal operation includes compressor and pump sounds |
Frequently Asked Questions - NH-EH90JD1WM PANASONIC
User questions about NH-EH90JD1WM PANASONIC
0 question about this device. Answer the ones you know or ask your own.
Ask a new question about this device
Download the instructions for your Tumble drier in PDF format for free! Find your manual NH-EH90JD1WM - PANASONIC and take your electronic device back in hand. On this page are published all the documents necessary for the use of your device. NH-EH90JD1WM by PANASONIC.
USER MANUAL NH-EH90JD1WM PANASONIC
Heat Pump Tumble Dryer (Household)
natural_image
Line drawing of a front-loading washing machine with circular vent and ventilation slots (no text or symbols)Thank you very much for purchasing our products!
- Please read this manual carefully before using the product so that it can be used correctly.
- Please make sure to read the "Safety information" (pages 2\~7) before using to ensure safe use.
- This manual is subject to technical changes without notice.
- Please keep this manual properly.
- This dryer contains reusable materials, so please provide support for proper disposal or recycling upon end of life, so as to protect the environment.
Contents
Instructions for use
Safety information....2
Name of parts....8
Accessories
Installation placement 9
Handling/Stacking installation/Installation placement and product dimensions
Installation....11
Drain hose connection
Post-installation inspection 12
Level adjustment/Installation confirmation/Post-installation test run
Description of the operation panel 13
Pre-operation inspection 15
First-time use/Sorting clothes/Preparing clothes/Tips on clothes care/
If clothes shrink
Use method
Operation method 17
Instructions for use 18
Drying rack
Program overview 19
Maintenance and service
Maintenance and service 21
Condensed water box/Dryer case/Humidity sensor/
Dryer door gasket/Cooling air inlet cleaning/Upper filter screen/
Lower filter screen and heat exchanger
If necessary
When the clothes drying effect is not good 26
Trouble shooting 28
Error codes 30
Safety information
In order to prevent problems before they occur and ensure no injury or property damage to users and others, the issues that must be observed in terms of safety are described as follows:
■ Ignoring instructions with the below symbols may cause the following consequences.

Warning

Attention
May cause serious personal injury May cause personal injury and damage to articles
■ The instructions required to be observed and understood as per the following symbols.

This symbol indicates prohibited operations.

This symbol indicates operations that must be observed.
Please stop use immediately when the following situations occur. Remove the power plug and contact Panasonic for inspection and repair!
• This dryer does not start up even after the power is turned on.
- There is an abnormal noise when this dryer is running.
• There is a burning smell.
Smoke, fire and electric shock may occur.
Keep away from sources of ignition such as lit candles, incense and cigarette!
It may cause fire or deformation.


No fire

Warning
During use
Be sure to remove the power plug from the socket when not in use!
This dryer may be damaged by a lightning strike in case of violation of the requirement.


During use Power supply · Electrical
Please do not place this dryer in humid places such as bathroom or position exposed to wind and rain!
Violation of the requirement may cause electric shock, fire, failure and deformation, etc.

Do not use the product in positions subject to water spray
Do not put clothes containing chemicals such as kerosene, gasoline, light gasoline, thinner and alcohol or stained by such chemicals!
Violation of the requirement may cause explosion or fire.

Prohibited Prohibited
Do not accumulate lint or cotton flock around this dryer.
Violation of the requirement may cause a fire.

Prohibited
Do not spray water directly on parts of the dryer during cleaning and maintenance!
Violation of the requirement may lead to short circuit and electric leakage.

Sprinkling is prohibited
Power supply · Electrical cord
Please separately use a single-phase two-pole grounded power socket rated at a voltage of AC 220-240V and a current of 10A or more!
If the power socket is shared with other electrical appliances, a fire may be caused due to heat.

The power plug must be completely inserted!
If the insertion is not complete, electric shock or heat may be caused. • Do not use damaged power cords or a loose socket.


WarningWarning
Dust and so on should be removed from the power plug regularly.
If dust and water scale accumulate on the plug, this will lead to the degradation of the moisture-proof insulation function and may therefore cause a fire.
- Please wipe with a dry cloth after removing the power plug.

Please avoid actions that may damage the power cord and power plug (Do not cause damage; do not process; keep away from thermal appliances; do not bend, twist, stretch, press with weight or bundle excessively)
Continued use in a damaged state may result in electric shock, short circuit, or fire.
- Please consult Panasonic for repair of power cord or plug.

Always remove the power plug from the socket when maintaining, cleaning or moving this dryer!
Violation of the requirement may cause electric shock or injury.

The plug must be removed
Do not touch the power plug with wet hands!
Violation of the requirement may cause electric shock.

Wet hands prohibited
To prevent injuries
Do not disassemble, repair or modify the dryer body without permission!
Violation of the requirement may lead to fire, abnormal operation, then injury.
• Please consult Panasonic for repair.

Disassembly is prohibited
Prevent kids from entering the drum, please absolutely prohibit kids from climbing or peering inside the drum. It is strictly forbidden to put living things into this dryer.

Prohibited

To prevent injuries
Do not touch the drum or the clothes inside until the drum has come to a complete stop!
Even if the rotation is slow, the clothes could get entangled with your hands and potentially cause harm. It is especially vital to prioritise the safety of children.

No touching
Do not put your hands and feet under the bottom of this dryer!
Violation of the requirement may result in injury.

Prohibited
Remove articles such as lighters and matches from pockets before drying clothes.

This electrical appliance is not designed for use by persons with physical, sensory or mentally impaired or mental deficiencies (including children), or persons lacking experience and knowledge, unless supervision or guidance is given by a person who can ensure their safety. It is necessary to prevent children from playing with this product.

Prohibited
Violation of the requirement may cause fire or lead to injury.
Power supply · Electrical cord
Do not pull on the electrical cord when pulling out the power plug, please grasp the plug by hand and pull it out!
Violation of the requirement may cause electric shock or fire due to short circuit.

Do not use if the socket hole is loose or if the power cord or plug is damaged!
Violation of the requirement may cause electric shock or fire due to short circuit.
- Please contact Panasonic for maintenance.

Prohibited

WarningWarning
Power supply · Electrical cord
If the power cord or power plug is damaged, or if the hole on the power socket is loose, please stop using immediately and contact a professional for replacement.
Poor contact may lead to hazards such as electric shock, electric leakage or fire.

This product applies to 220-240V only. In order to ensure your safety, it is required to use a three-pin socket and take care to check and ensure that your socket is properly and reliably grounded.

Grounding
There is a risk of electric shock when a fault or electric leakage occurs.

Attention
During use
Ensure that no clothes are entrapped by the dryer door when closing the door! Please make sure to remove loose threads and foreign objects from the door gasket!
Violation of the requirements may affect the drying effect because the door is not closed tightly.

Prohibited
Do not remove the clothes from the drum in the process of the drying operation. Do not touch metal parts such as the drum, the inside of the dryer door, or metal buttons on the clothes if it is necessary to manually turn the clothes over during the drying process.

Prohibited
There is a risk of burns.
In case of end-of-life disposal of this dryer, remove the dryer door!
Violation of the requirement may cause children to be trapped in the drum.


Attention
In order to prevent injury
Do not climb on this dryer or place fragile articles on this dryer!
Violation of the requirement may cause personal injury due to deformation or breakage, and the vibration during operation may cause falling and damage of the placed articles.

Prohibited
It is forbidden to put the following clothes into this dryer for drying.
- Do not use this dryer to dry clothes containing foam rubber or similar rubber material.
- Do not use this dryer if chemicals are used to clean clothes.
- Do not dry clothes that are still wet and have water dripping from them.
• Do not dry clothes that have not been washed.
Please avoid hitting glass parts with hard objects to prevent the glass from shattering and causing injury.

Prohibited

Prohibited
Name of parts
Condensed water box (refer to page 21)
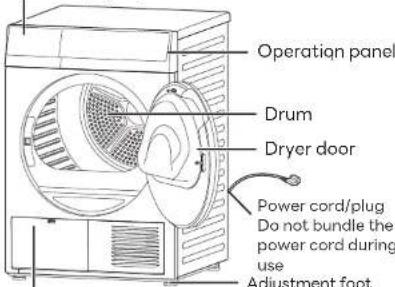
Heat exchanger cover (refer to page 25)
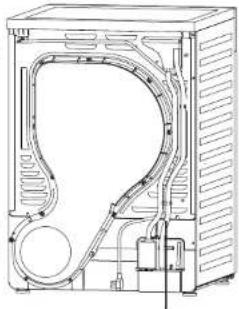
natural_image
Technical line drawing of a mechanical housing or enclosure with internal components and ventilation ducts (no text or symbols)Drain hose connection (refer to page 11)
Accessories
Please make sure that all accessories of this dryer are complete.
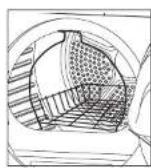
Drying rack×1 (refer to page 18)
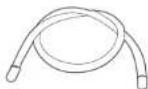
Drain hose × 1 (refer to page 11)

Instruction manual × 1
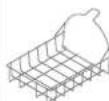
Using the drying rack, it is possible to dry clothes and footwear that are prone to pilling and will not roll
Installation placement Installation placement
Handling
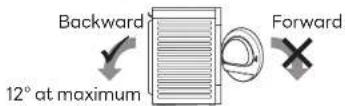
When the product is installed or moved, it must be handled by more than 2 adult persons. - When the product is handled in an inclined state, one person should stand at the rear of this machine to hold the protruding part of the top plate, and the other person should grasp the opening of the drum after opening the door in the front, as shown in the diagram. The inclination angle should not exceed 12^ , and only backward inclination is allowed, otherwise residual water may overflow.
Attention
- After the handling is completed, please let this dryer stand for at least one hour before connecting the power supply, otherwise the heat pump may be damaged.
Stacking installation
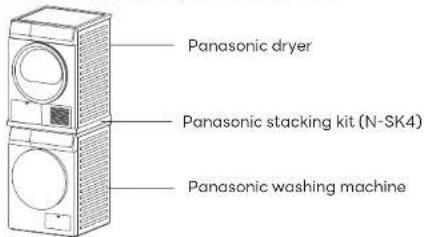
- This dryer can be stacked with selected Panasonic washing machines. - It is necessary to assemble a Panasonic stacking kit (N-SK4) when this dryer is stacked for use, and please contact Panasonic to purchase it if needed.
Attention
- If the Panasonic stacking kit is not installed, it is absolutely prohibited to stack the product. - When the product is stacked for installation, do not use the dryer on a platform above the ground to prevent falling. - In order to prevent excessive electric cord load from causing danger, do not use high-power electrical appliances at the same time.
Installation placement and product dimensions
Make sure that there is enough space for this dryer.
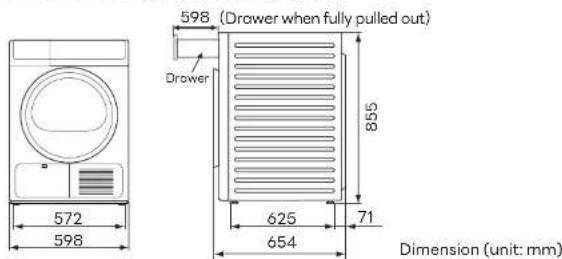
- Please confirm you have the required dimensions for installation.
※ The width of the required space should be at least 64 cm. This dryer requires at least 2.5 cm of clearance on the lateral sides, at least 2.5 cm on the top, and at least 5 cm on the back side, with clear space in front. - Remember to insert the power plug into a separate home dedicated socket and ensure that the socket is positioned in such a way that plug can be easily pulled out.
Attention
- Please install this dryer on a flat and solid surface to avoid excessive vibration and noise. When this dryer is placed on a platform above ground surface, please ensure that it is placed firmly to prevent it from falling.
- Do not install this dryer in places where it is subject to direct sunlight or may freeze in winter.
- Do not place carpets or other objects on the bottom of this dryer to avoid blocking the opening of the bottom.
- Pay attention to not to let the metal parts of the dryer case contact to the metal plates of furniture, stainless steel plates of a kitchen sink or other electrical appliances.
- Before using this dryer, all packaging (including the foam pad under the package) must be removed, otherwise it will cause damage during use.
- The nameplate indicates the rated power standard of this dryer.
Please confirm whether the power supply in your home meets this specification. - Never insert the power plug of this dryer into an extension cord or multi-pin socket.
Installation
Panasonic is not responsible for the accidents or damages caused by failure to install, inspect and test-run this dryer in accordance with the following methods.
Drain hose connection
- This dryer stores condensed water in the condensed water box by default (please refer to page 21), or the user can connect a drain hose to drain the condensed water directly as needed. After connecting the drain hose, please confirm that the drainage outlet is inserted into the appropriate drainage outlet. - Please follow the instructions below for operation to prevent water leakage. If you have any questions, please dial our service hotline for more information.
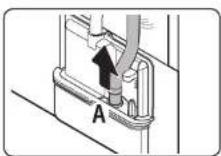
1. Pull the drain hose out of hole (A).
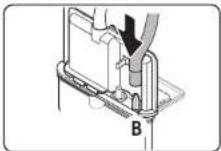
2. Plug the short hose into (B) pillar and make it fixed.
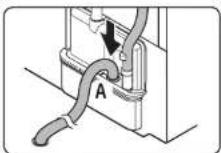
3. After the hose (long drainage hose) in accessories is connected to the hole (A) and inserted to the bottom, put the other end of the attached hose into the drainage outlet.
Attention
- When connecting the drain hose, please make sure that the highest point of the hose does not exceed the top cover of the product.
- Install the supplied drain hose in such a way that the end is inserted into a floor drain or other drainage outlet for direct water drainage.
- The end of the drain hose should not be submerged in water; water from the outside may flow back into the product.
- Water leakage may occur if the pipe is not fully connected to hole (A) or if there is a loose connection.
Post-installation inspection
Level adjustment
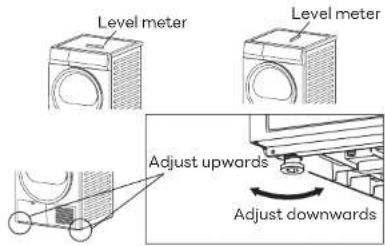
- When the four feet stand on the ground, this dryer must be level and balanced without swaying.
- By adjusting the height of the foot, the level can be adjusted with a level meter. (Place the level meter in the left and right, front and back positions)
- Adjust the height of foot (4 places) by turning in the direction as shown in the figure.
※The level meter is not provided as an accessory.
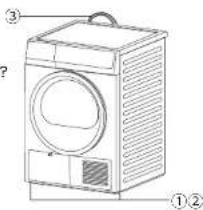
Installation confirmation
Confirm the following points:
① Installation site Whether the product is installed on a flat and solid surface? Whether there is any vibration during operation?
② Adjustment foot assembly
Whether it is securely installed?
③ Power cord connection
Whether separate socket rated 10A and 220-240V
AC is used?
Post-installation test run
Perform the following operations without clothes in the drum.
- Insert power plug.
- Close the dryer door.
- Press the "Power" button to turn on the dryer, then press the "Start/Pause" button. (Confirm whether there is any abnormal noise, whether the connection is loose and whether the dryer is operating normally)
Description of the operation panel
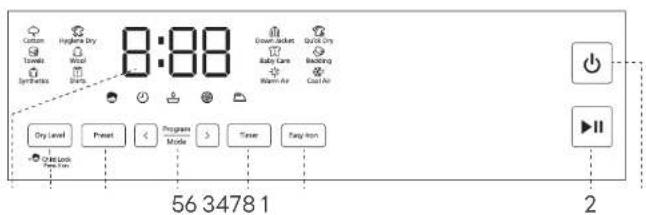
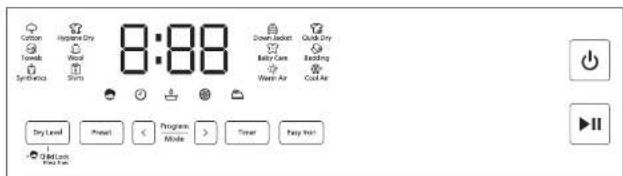
1. Power
Press this button to turn the power on and off. If the dryer is idle for 5 minutes after being powered on, the power will be turned off automatically.
When this dryer is running, press and hold the power button (for about 3 seconds) to shut down.
2. Start/Pause
Press this button to start or pause the program.
3. Easy Iron
Press this button to set the Easy Iron function.
Press this button to enable or disable the Easy Iron function, while the indicator light is constantly on or off.
After selecting the Easy Iron function, when the dryer has finished drying, the screen shows End. If the user does not take out the clothes, the dryer runs intermittently to rotate the drum, reducing the wrinkles formed by the long-term piles.
4. Timer
This button is for adjusting the drying time.
5. Program/Mode
Press the □ and ▶ to choose the program that suits your needs. When a program is selected, it flashes. (Please refer to pages 19 and 20)
6. Preset
Preset is available to set the end time of the program. In standby mode, press the button to enter the Preset setting state, then press the button to select the desired Preset time.
7. Dry Level
Press this button repeatedly to select the dryness level.
The higher the number of Dry Level, the drier the clothes
(1 for ironing, 2 for ready-to-wear, 3 for storage).
Ironing: the fabric has certain humidity, it is suitable for manual ironing after it is taken out.
Ready-to-wear: the fabric is dry and suitable for wearing or use.
Storage: the fabric is completely dry and suitable for cabinet storage.
8. Remaining time indication
It shows the approximate time left before the program ends.
※Subject to influence of factors such as the type of clothes, temperature conditions and program selection, the time displayed during operation may be changed at any time, and the actual running time may be slightly different from the displayed time.
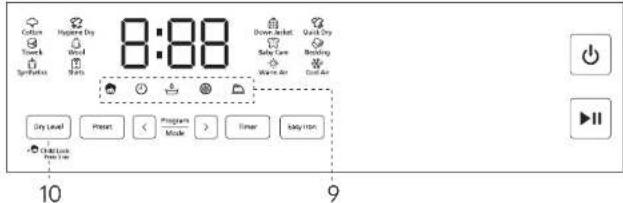
9. Status indicator
The following icons are displayed by indicator lights and cannot be selected.
| Indicator light | Description |
| The indicator light is on to indicate that the Child lock is turned on. | |
| The indicator light is on to indicate that the Preset function is turned on. | |
| The indicator light flashes to indicate that the condensed water box is full and should be emptied.- Pull out the condensed water box, pour out the water, then put it back in place. (Please refer to page 21) | |
| The indicator light flashes to indicate that the filter is blocked and should be cleaned. (Please refer to page 24)- Open the dryer door, clean the filter and put it back in place. | |
| The indicator light is on to indicate that the Easy Iron function is turned on. The indicator light flashes to indicate that the Easy Iron cycle is running |
10. Child lock
While powered on, press and hold the "Dry Level" for 3 seconds, you can enable child lock function. The child lock indicator light is constantly on to show that the function is turned on, and buttons other than the power button will remain locked. Even while powered off, it also remains locked. While powered on, press and hold the "Dry Level" for 3 seconds at any time, you can unlock it.
Pre-operation inspection
Operation method
First-time use
Please check the following items when the dryer is operated for the first time or the dryer is not used for a long time:
-
Connect the power supply.
-
If a drain hose is used, make sure that the drainage outlet of the drain hose is inserted into the appropriate drainage outlet.
For more detailed information, please refer to page 11.
Sorting clothes
※It is easier to choose the most suitable program and achieve the best drying effect after the clothes are sorted.
- Confirm the label on the clothes or refer to the corresponding clothes instructions of each program and sort the clothes for drying to avoid damage to the clothes. (Please refer to pages 19 and 20)
- Please "dry only" the clothes of the same fabric and texture.
(If clothes of different thicknesses or multi-layer fabrics are being dried at the same time, the drying effect of clothes will be different.)
Preparing clothes
■ Inspection of clothes (clothes with non-drying mark should not be placed in the dryer)
- Please check the pockets of the clothes and remove sharp objects such as hairpins and screws, etc. Violation of the requirement will damage the clothes.
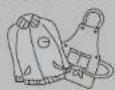
- Please tie the straps of articles such as aprons and pillowcases tightly, and if there are zippers or hard ornaments on the clothes, please zip up and turn them inside out.
Violation of the requirement will damage the clothes.
- Please separate clothes that fade easily. (Prevent mutual staining) - Clothes in red or dark blue etc. - Jeans, etc.
- It is recommended to use the drying rack for clothes that are prone to pilling.



Tips on clothes care
- Fold the clothes into a shape that will fit the dimension inside the drum and place the clothes flatly into the drum.
- When there are too many pieces of clothing, it is necessary to change the orientation of each piece of clothing to make the overall thickness even.
If clothes shrink
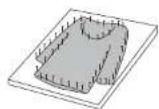
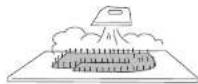
Pull the clothing to its original size and lay it flat on an ironing board. Use a pin to hold it in place to maintain its size and shape. Then spray steam on the clothing with an iron and allow to dry naturally.
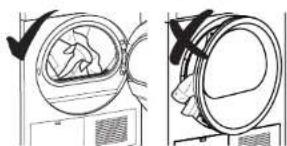
- Open the dryer door, then put the clothes into the drum.
※For more effective drying, do not stuff lumpy clothes into the drum in as one pile.
※To identify clothing for sorting and preparing to be dried, please refer to pages 15 and 20. - Close the dryer door, then press the "Power" button.
Attention
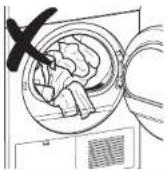
- Make sure that the clothes are not caught by the dryer door.
natural_image
Diagram showing two views of a washing machine with a handle, no text or symbols presentOperation method
Instructions for use
Attention
- Please do not put too much clothing in the drum.
※Too much clothing may affect the drying effect.
- Select the program you need.
■ The display will show the default running time.
Touch the "Dry Level" button when you need to select the Dry Level, and select the Dry Level you need.
※Please refer to pages 19 and 20 to select a suitable drying program.
- Select additional functions and other settings.
Please refer to pages 13 and 14 for description of additional functions such as child lock, Easy Iron etc., and other settings.
For more detailed information on the functions and running time of each program, please refer to pages 19 and 20.
- Press the "Start/Pause" button to start running.

A beep sounds and the operation ends.
※After the drying operation is completed, the display indicates "End", and some programs will operate automatically to rotate the clothes. At this time, you can also remove the clothing from the dryer.
Attention
- Please take out the clothing in a timely manner. Do not leave the clothes in the drum for a long time after the program is finished, as this may lead to deformation and wrinkling of the clothes.
Drying rack
- When you choose the Wool program, it is require to use the drying rack, otherwise it may cause pilling or shrinkage of wool clothes.
- The drying rack can also dry clothes and shoes that are prone to pilling or not suitable for rotation, and can be used for timed heating and timed cooling.
Installation steps
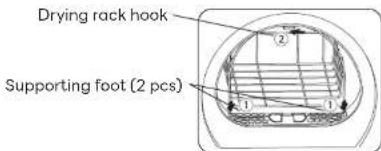
- Place the drying rack in the hole (①) as shown in the figure and hang it on the hook (②) on the top of the door.
- Note: Before using the dryer for the first time, remove the sponge and tape from the hook(②).
Attention
- The actual operation time may differ slightly from the displayed time.
- During program operation, the displayed time may vary depending on the weight of the clothes, the humidity and the ambient temperature until the end of the operation.
- Depending on the program selected, different additional functions can be used together.
- If a function that is not available is selected, an error warning tone will sound.
- If you dry fully wet clothes in a way other than timed drying, the operating time may be extended.
- Please do not put in clothes that exceed the maximum capacity.
- Please select "Down Jacket" program for down, otherwise the clothes may be damaged. After drying, gently beat the down to keep them fluffy and soft.
- When bed sheets and other large laundry are dried, it is recommended to use the
"Bedding" program. In case of situations such as clothes are wrapped into a ball or the center is wet, please shake the clothes loose before drying.
- For small quantity of clothes (less than 0.5 kg), it is recommended to use the timed drying.
- Once the operation starts, except the Easy Iron function, all other functions cannot be changed, please turn off the power and turn it on again.
Program overview
| Program | Applicable clothing types and conditions | Recommended capacity | Default time | Dry Level | ||
| 1 2 | 3 | |||||
| Cotton | Daily drying of cotton, linen and cotton blend clothes. | 10.0 kg | 1:58 | × | ● | ○ |
| Hygiene Dry* | Daily drying of cotton, linen and blend clothes, etc. | 3.0 kg | 2:00 | × | ● | ○ |
| Towels | Cotton towels and bath towels, etc. | 3.0 kg | 1:40 | × | ● | ○ |
| Wool | Wool or wool-blend clothes freshen-ing function, please use the drying rack for drying, and use the "Timer" function to adjust the drying time. | 1 piece | 0:20 | × | × | × |
| Synthetics | Drying of synthetic fiber or blend clothes. | 4.5 kg | 1:50 | ○ | ● | ○ |
| Shirts | Drying of shirts, smocks, and other clothes. | 1.5 kg | 0:50 | ○ | ● | ○ |
| Down Jacket | Drying of down, for effective protection of down feather. | 2.0 kg | 1:40 | × | ● | ○ |
| Quick Dry | Used for drying light and thin clothes. | 0.8 kg | 0:35 | × | ● | × |
| Baby Care | Suitable for drying baby clothes, small-size clothes. | 2.0 kg | 1:00 | × | ● | ○ |
| Program | Applicable clothing types and conditions | Recommended capacity | Default time | Dry Level | ||
| 12 | 3 | |||||
| Bedding | 4-in-1 bed clothes and blankets made of cotton, linen or chemical fiber materials. | 2.5 kg | 1:50 | ○ | ● | ○ |
| Warm Air | Timed heating, except for wool and silk clothes. | 5.0 kg | 0:20 | × | × | × |
| Cool Air | Timed operation, no heating. | 2.0 kg | 0:10 | × | × | × |
| Hygiene procedure | Bacteria removed | Bacteria removal rate |
| Hygiene Dry | Escherichia coli | 99.9% |
| Staphylococcus aureus | 99.9% |
✗ Not available Optional Default

* Hygiene drying procedure is tested as per QB/T 5132-2017
- For articles such as footwear and plush toys that cannot be turned over for drying, please put them on the drying rack and use warm air heating program for drying.
- Depending on the quantity of clothes, fabric, moisture content and ambient
temperature, the actual time required for drying is different from the displayed time.
Maintenance and service
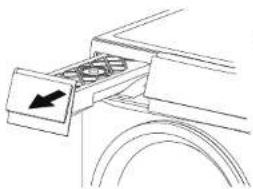
Condensed water will be generated when drying clothes, and this dryer will automatically store condensed water in the upper condensed water box. If indicator light flashes and reports U15 during the drying process, it indicates that the condensed water box is full, and the dryer will stop running. Please pull out the condensed water box, empty the box of water, then put the condensed water box back in place and press the power button to shut down and restart the dryer.
- The condensed water box will not work after installation of the drain hose.
- When the power is turned on, the indicator light ☐ flashes for several times to remind the user to empty the water box.
- Remove the condensed water from the condensed water box after each time of use.
natural_image
Pure mechanical component diagram without any text, numbers, or symbols- Pull out the condensed water box.
natural_image
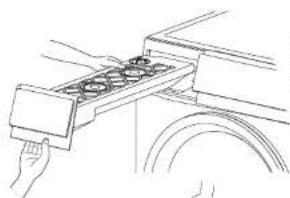
Line drawing of a hand holding a tray with multiple circular objects, next to a vehicle wheel (no text or symbols)- Hold the rear part of the condensed water box and take it out carefully to prevent water spillage.
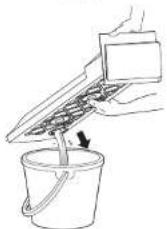
3. Pour out the condensed water from the condensed water box.
4. Put the condensed water box back in place and make sure it is properly secured.
Dryer caseCondensed water box
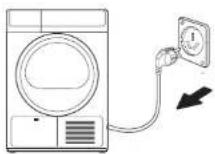
- For safety sake, please pull out the plug after turning off the power.
- Please do not touch with wet hands.
- For the sake of safety, please do not touch power cord or plug board, etc. with wet hands.
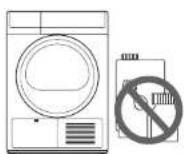
- Do not use volatile substances.
- Use of thinner, gasoline or bleach may cause discoloration of or damage to the product.
- Do not use synthetic detergent, benzene-containing detergent or thinner, etc.
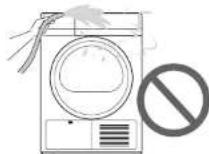
- Do not spill water on the surface of the dryer.
- Do not clean the product directly with water, which may lead to electric shock and product failure.
- Please clean the top of the dryer.
- Please use superfine fiber for cleaning.
- When the product is very dirty, please soak the superfine fiber in warm water, wring it out and wipe the product, and avoid the use of detergent. (In order to prevent discoloration of the product, use a mild detergent and wipe with a clean dry cloth.)
Maintenance and service
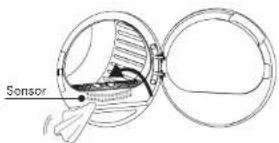
Humidity sensor
Unplug the dryer before cleaning and clean the surface of the sensor (metal strip) inside the dryer with a soft cloth.
• To ensure proper drying performance, please clean the surface of the sensor inside the feed opening regularly.
- Dust accumulated on the sensor will interfere with the measurement of dryness and lead to an increase of drying time.
警告Warning
- Do not use steel or other rough materials for cleaning.
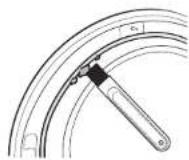
Dryer door gasket
The following actions should be done at the end of each drying cycle:
- Remove debris from the dryer door gasket.
• The debris may make it impossible to close the door tightly. - Open the dryer door for ventilation and drying at appropriate time.
• Violation of the requirement may cause abnormal odor.
Warning Warning
- Do not remove the rubber parts from the door.
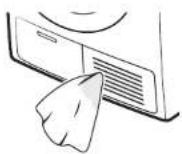
Cooling air inlet cleaning
- If dust accumulates at the air inlet on the front side of the product, please clean it with a damp cloth.
- Accumulated dust will flow into the product, which may cause abnormal operation or fire, please clean dust timely.
Upper filter screen
In order to reduce the drying time and save energy, please clean the upper filter before and after each drying cycle.
▶ Internal filter and external filter
- Open the door and pull the external filter upwards.
- Open the external filter case and pull the internal filter upwards.
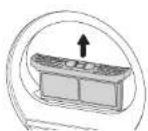
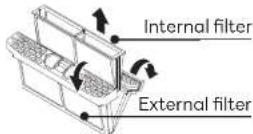
- Each filter should first be cleaned with a brush, then cleaned with water.
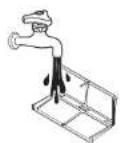
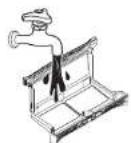
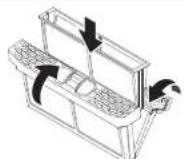
- After the filter is dried, put the internal filter back into the external filter and reinsert it into the original position.
- To avoid damage, please pay attention to the direction when installing.
- The color of the filter may change during use, which will not affect normal use.
警告Warning
- Do not use the dryer without the filter!
- When the dryer is powered on, the indicator light Ⓤ flashes for several times to remind the user to clean the filter in time.
- When the indicator flashes and the dryer stops working during operation, please open the door to clean the filter screen, then press the start/pause button to restart the dryer.
Maintenance and service
Lower filter screen and heat exchanger
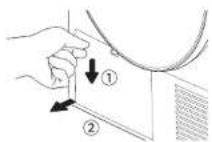
It is recommended to clean the lower filter once per week and the heat exchanger once per month. Extreme lint on the lower filter screen and heat exchanger will extend the drying time.
- Open the heat exchanger cover on the lower part of the dryer. (Open the cover by pressing it with your hand and pulling it outwards)
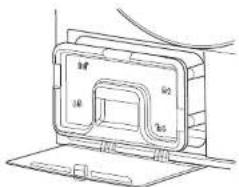
- Pull out the handle assembly and clean the filter with a brush to remove the lint accumulated on the filter, etc.
natural_image
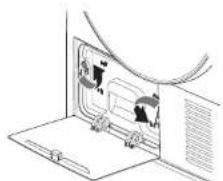
Technical line drawing of a device casing with labeled components (no text or symbols)- Turn the snap-close counterclockwise to the unlocked position.
natural_image
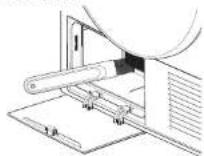
Diagram of a device with two panels showing internal components, no text or symbols present- Clean the surface of the dryer heat exchanger with a damp cloth or brush. The efficiency of the dryer can be substantially improved after removal of accumulated lint.
Warning
- Do not clean the sharp surface of the heat exchanger directly with your hands, please wear protective gloves.
- Applying pressure on the heat exchanger may cause deformation of the heat exchanger fins, but it does not affect use.
- Please do not sprinkle water directly for cleaning.
When the clothes drying effect is not good
Under such circumstances
The dryer is not running
What to do
- Confirm that the power plug is inserted into the power socket and the power socket is on.
- Please check the circuit breaker and fuse in the room.
- Confirm whether the dryer door is closed.
- When it is necessary to open the door while the dryer is running, press the "Start/Pause" button to restart.
- Please empty the water box.
- Please clean the filter.
The drying is not heating
- Please check the circuit breaker and fuse in the room.
- Confirm whether the filter and heat exchanger are cleaned and clean them if necessary.
- The program is Cool air.
Drying time is long and the dryer is unable to dry clothes
- Select the drying program as per the type of clothes.
- Whether put too many clothes in the drum and exceed the specified quantity.
- Whether the heat exchanger is cleaned.
- Whether the dryer is in the right environment.
- Whether the cooling air inlet of the dryer is blocked.
- Clean the filter.
The dryer makes noise
- Please check if there are any items such as nails, coins, buttons inside, please remove them in time.
- Make sure that the dryer is positioned upright on a flat and solid surface.
- A noise that sounds like blowing wind is a normal sound
When the clothes drying effect is not good
| Under such circumstances | What to do |
| Deformation of clothes | - Some clothes can be washed but are not suitable for drying.- Before drying, please check the washing label on the clothes. |
| There is cotton lint on the clothes | - Please confirm whether the filter is cleaned before putting in clothes.- Please separately dry clothes that are prone to generate lint or are prone to be stained with lint.- Confirm there are no articles in clothes pocket. |
| Clothes are wrinkled | - Select the right drying program as per the type of clothes.- Whether there are too many clothes in the drum. |
| Some clothing has residual moisture | - Reduce the amount of laundry for drying.- Turn the clothes over, then try drying them again.- Please dry clothes of similar thickness together. |
| There is a smell | - When there are smelly articles such as strong detergent, paint or varnish around, smell may enter the dryer with accompanying air. If there is such smell in the air, please use the dryer after ventilating. |
Trouble shooting
| Problem Possible solution | |
| The dryer does not work | - Power failure, blown fuse, or circuit breaker tripped.- The power plug is potentially not properly inserted into power socket.- Whether power supply is turned on?- Whether the "Start/Pause" button is pressed?- Whether dryer door is properly closed? |
| The buttons do not work | - Settings cannot be changed during drying. If it is necessary to change the settings, please turn off the dryer, and restart it for setting.- Whether the child lock is turned on? (Refer to page 14) |
| Intermittent operation | - This is not a failure; when the "Easy Iron" function is set, the inner drum rotates slowly and intermittently. |
| Synthetic clothes generate static electricity after drying. | - When rinsing clothes, addition of fabric softener for rinsing clothes can reduce electrostatic charge. |
| The filter is not blocked, but the light for filter still flashes. | - The indicator light may flash even after the filter is cleaned. this is not a failure; at the end of the drying process, the filter clogging warning light will flash to remind the user to clean the filter. |
| The remaining time displayed changes. | - The remaining time is continuously calculated and adjusted during operation. Therefore, the displayed time may change. |
| The running sound changes. | - This is normal; it is a change caused by the on/off of the compressor and the drainage pump. |
| Display of "End" after the program is completed. | - This is not a failure; it is used to remind the user that drying is completed, but the temperature in the inner drum is high, and air will be supplied for cooling for 3 hours at maximum. |
Trouble shooting
Error codes
| Problem | Possible solution |
| The light in the inner drum is off. | - When the dryer door is opened, the light in the inner drum will be lit for 30 seconds, then automatically off. To light it again, please close the dryer door and open it again. |
| The light in the inner drum is not on. | - During operation, the drum light can be turned on by touching any button other than the Power supply and Start/pause buttons.- After the operation is completed, the dryer will be automatically turned off, and the drum light will be turned on again after the dryer door is opened. |
| Abnormal sounds and serious vibration occur. | - Whether the dryer case is installed on a flat and solid ground? Is the adjustment foot locked?- Whether heavy clothes are unevenly positioned, please place clothes evenly.- Whether too many clothes are put in?- Whether metal foreign objects such as hairpins are entrapped? |
| ·Whether the condensed water box is full?→ Empty the condensed water out of the condensed water box and restart the dryer.(Refer to page 21)·Whether the drain hose is installed properly?→ Please install the drain hose correctly and restart the dryer.(Refer to page 11) | |
| U 12The door is open | ·Whether the door is opened during the operation of the dryer?→ Restart after closing the door.→ Appropriately reduce clothes to be dried.If the problem occurs repeatedly, please contact after-sales services. |
| → In case of a sign with H such as “H93”,Please remove power plug from socket and contact Panasonic. | |
| → Clean filter and restart.If the problem occurs repeatedly, please contact after-sales services. | |
| → Whether the ambient temperature is below 0°C? Transfer to a temperature of 5~35 °C for use.If the problem is happening repeatedly, please contact after-sales services. |
- Heat Pump Tumble Dryer (Household)
- Thank you very much for purchasing our products!
- Contents
- Instructions for use
- Use method
- Maintenance and service
- If necessary
- Safety information
- Warning
- Attention
- Please stop use immediately when the following situations occur. Remove the power plug and contact Panasonic for inspection and repair!
- Keep away from sources of ignition such as lit candles, incense and cigarette!
- During use
- Be sure to remove the power plug from the socket when not in use!
- During use Power supply · Electrical
- Power supply · Electrical cord
- WarningWarning
- To prevent injuries
- In order to prevent injury
- Name of parts
- Accessories
- Installation placement Installation placement
- Handling
- Stacking installation
- Installation placement and product dimensions
- Installation
- Drain hose connection
- Post-installation inspection
- Level adjustment
- Installation confirmation
- Confirm the following points:
- Post-installation test run
- Description of the operation panel
- Power
- Start/Pause
- Easy Iron
- Timer
- Program/Mode
- Preset
- Dry Level
- Remaining time indication
- Status indicator
- Child lock
- Pre-operation inspection
- Operation method
- First-time use
- Sorting clothes
- Preparing clothes
- Tips on clothes care
- If clothes shrink
- Drying rack
- Installation steps
- Dryer caseCondensed water box
- Humidity sensor
- 警告Warning
- Dryer door gasket
- Warning Warning
- Cooling air inlet cleaning
- Upper filter screen
- Lower filter screen and heat exchanger
- When the clothes drying effect is not good
- Under such circumstances
- What to do
- Trouble shooting
Brand : PANASONIC
Model : NH-EH90JD1WM
Category : Tumble drier