
NH-E70JA1 - Tumble dryer PANASONIC - Free user manual and instructions
Find the device manual for free NH-E70JA1 PANASONIC in PDF.


| Product Type | Tumble Dryer |
| Brand | Panasonic |
| Model | NH-E70JA1 |
| Drying Capacity | 7 kg |
| Installation Type | Freestanding |
| Drying System | Heat Pump |
| Energy Efficiency Class | A++ |
| Dimensions (H x W x D) | 84 cm x 60 cm x 60 cm |
| Weight | 42 kg |
| Electrical Supply | 220-240 V, 50 Hz |
| Rated Power Consumption | 700 W |
| Drying Programs | Cotton, Synthetics, Delicates, Mix, Time, Refresh |
| Additional Functions | Anti-crease, Delay start, Child lock |
| Noise Level | 65 dB (A) |
| Condenser Cleaning | Regular cleaning required, accessible via front panel |
| Filter Cleaning | After each cycle, accessible behind door |
| Safety Features | Overheat protection, door lock, auto shut-off |
| Spare Parts Availability | Filters, belts, heating elements, fans available from Panasonic service |
| Repairability Index | 7.5/10 (based on European standards) |
| Water Drainage | Optional drain hose or internal tank |
Frequently Asked Questions - NH-E70JA1 PANASONIC
User questions about NH-E70JA1 PANASONIC
0 question about this device. Answer the ones you know or ask your own.
Ask a new question about this device
Download the instructions for your Tumble dryer in PDF format for free! Find your manual NH-E70JA1 - PANASONIC and take your electronic device back in hand. On this page are published all the documents necessary for the use of your device. NH-E70JA1 by PANASONIC.
USER MANUAL NH-E70JA1 PANASONIC
Operating & Installation Instructions
Tumble Dryer
(Household Use)
Model:NH-E70JA1 NH-E80JA1
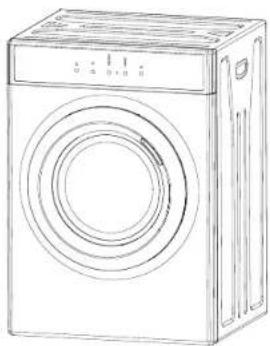
natural_image
Line drawing of a washing machine with circular vent and front panel (no text or symbols)Contents
| Safety & Warning | |
| Check your Tumble Dryer | |
| Before Drying | |
| Control Panel | |
| Operation Precaution | |
| Installation Instruction | 9 |
| Maintenance | |
| Troubleshooting & Specifications | 13 |
Thank you for purchasing this product.
- Read these instructions carefully for optimum performance and safety before use.
- Keep this manual for future reference.
JHDQ10113A1
Printed in China
01/2020
Panasonic Corporation
http://www.panasonic.com
Safety & Warning
Important Safeguards
When using electrical appliances, in order to reduce the risk of fire, electric shock, and/or injury to persons, basic safety precautions should always be followed, including:
For Your Safety
Read all instructions carefully, even if you are quite familiar with the appliance.
- This appliance is not intended for use by persons (including children) with reduced physical, sensory or mental capabilities, or lack of experience and knowledge, unless they have been given supervision or instruction concerning use of the appliance by a person responsible for their safety.
● Young children should be supervised to ensure that they do not play with the appliance. - INDOOR USE ONLY this appliance is not intended for outdoor use.
- Do not place naked flame sources, such as candles, on the appliance.
- Do not locate the appliance or cord near heat sources such as radiators, heaters, air ducts or direct sunlight.
- Do not block any of the ventilation openings. Ensure that vents are not covered by newspapers, tablecloths, curtains, etc.
- Do not run the cord under floor coverings. Instead, arrange the cord away from traffic areas where it will not become a trip hazard.
● To disconnect the appliance, turn the appliance off, switch off the power outlet and remove the plug from the power outlet. - Do not misuse the cord. Never carry the appliance by the cord or pull to disconnect it from the outlet. Instead, grasp the plug and pull to disconnect.
- Do not operate the appliance if it has a damaged cord or plug; after the appliance malfunctions; or has been dropped or damaged in any way. Consult the manufacturer.
-
Do not attempt to repair, disassemble or modify this appliance. The warranty becomes void if not serviced or repaired by a Qualified person.
-
Do not place items that have been soiled with flammable liquids inside the dryer without washing them with detergent thoroughly before hand.
- Do not excessively bend, stretch, twist or bind the power cord or place heavy objects on it.
- This appliance is only to be serviced by a qualified person. There are no user-serviceable parts inside.
- Do not use an extension cord with this appliance.
- Do not install in a tight fitting cabinet.
- Do not overload the laundry dryer.
- Ensure foreign objects do not find their way into the tub of the laundry dryer.
- The door window may be hot after a long drying cycle. Please ensure children are kept away from the machine.
- If the laundry dryer is not wall mounted, place in a flat, firm, dry and drafty place. Use the adjustable front legs to assist in leveling the dryer if need be. Do not place it on any soft material such as foam or plastic
- Do not use flammable or combustible materials such as gas, petrol, alcohol or lacquer in the laundry dryer.
● After turning off the power supply to the laundry dryer, wait at least 2 minutes before turning it back on again. - Please remove the transport packaging at the rear of the laundry dryer, prior to use.
- If the supply cord is damaged, it must be replaced by the manufacturer, its service agent or similarly qualified persons in order to avoid a hazard.
CAUTION: If this appliance is supplied from a cord extension set or an electrical portable outlet device, the cord extension set or electrical portable outlet device must be positioned so that it is not subject to splashing or ingress of moisture.
Note
Panasonic Corporation
http://www.panasonic.com
Safety & WarningNote
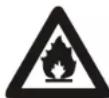
Oil-affected items can ignite spontaneously, especially when exposed to heat sources such as in a tumble dryer. The items become warm, causing an oxidation reaction in the oil. Oxidation creates heat. If the heat cannot escape, the items can become hot enough to catch fire. Piling, stacking or storing oil-affected items can prevent heat from escaping and so create a fire hazard.
- If it is unavoidable that fabrics that contain vegetable or cooking oil or have been contaminated by hair care products be placed in a tumble dryer they should first be washed in hot water with extra detergent-this will reduce, but not eliminate, the hazard.
- Do not dry unwashed items in the tumble dryer.
- Items that have been soiled with substances such as cooking oil, acetone, alcohol, petrol, kerosene, spot removers, turpentine, waxes and wax removers should be washed in hot water with an extra amount of detergent before being dried in the tumble dryer.
- Items such as foam rubber (latex foam), shower caps, waterproof textiles, rubber backed articles and clothes or pillows fitted with foam rubber pads should not be dried in the tumble dryer.
- The final part of a tumble dryer cycle occurs without heat (cool down cycle) to ensure that the items are left at a temperature to reduce wrinkling and ensure that the user will not be exposed to remaining heat that could cause injury.
- Remove all objects from pockets such as lighters and matches.
● The maximum mass of dry textile material in kilograms to be used in the appliance; - That the tumble dryer is not to be used if industrial chemicals have been used for cleaning;
- That the lint trap has to be cleaned frequently, if applicable;
- That lint must not be allowed to accumulate around the tumble dryer (not applicable for appliances intended to be vented to the exterior of the building);
- That adequate ventilation has to be provided to avoid the back flow of gases into the room from appliances burning other fuels, including open fires.
NOTE This instruction is not required if the tumble dryer discharges the air into the room.
- For appliances with ventilation openings in the base, that a carpet must not obstruct the openings;
- That exhaust air must not be discharged into a flue which is used for exhausting fumes from appliances burning gas or other fuels.
NOTE This instruction is not required if the tumble dryer discharges the air into the room.
- That the appliance must not be installed behind a lockable door, a sliding door or a door with a hinge on the opposite side to that of the tumble dryer, in such a way that a full opening of the tumble dryer door is restricted.
WARNING: Never stop a tumble dryer before the end of the drying cycle unless all items are quickly removed and spread out so that heat is dissipate.
Panasonic Corporation
http://www.panasonic.com
Save These Instructions
Checking Your Tumble Dryer Troubleshooting, Specification
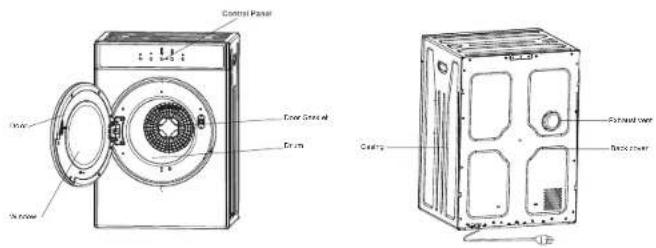
Your Tumble Dryer
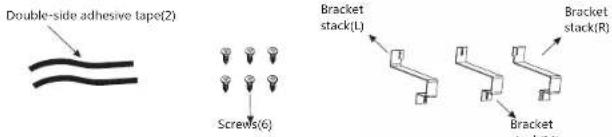
Dryer Accessories included in Product Package
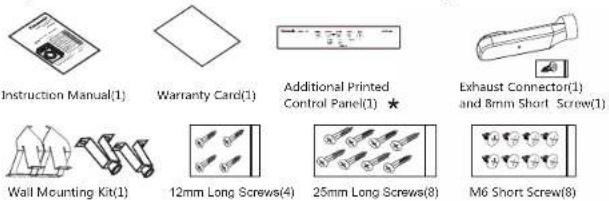
(*)This Accessories is only available for Malaysia, Singapore and New Zealand
Recommended Accessories
- Stacking System – Bracket Kit (Model No N-SK2): designed for stacked installation of these Dryer on top of Panasonic Front Loading Washing Machine with Model number NA-V****
- Venting Kit – Through Wall ): designed to extend the length of exhausting (Model No N-FH2 connector **
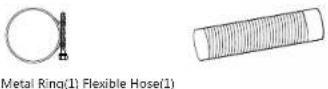
You can buy Stacking System - Bracket Kit (Model No N-SK2) & Venting Kit – Through Wall (Model No N-FH2) from your local appliances shop or Panasonic Appliances Part Distributor **: This Venting Kit – Through Wall is except for Thailand
Review the following pages before calling for service.
| Problem | Possible Cause | What to do |
| Drum does not turn | Is the door closed?Is the power cord inserted?Does the receptacle have power? | Close the door.Insert the power cord firmly.Check the power cord receptacle. |
| The laundry is not thoroughly dried | Are the front and back filters clogged?Is there too much laundry in the dryer?Have items been added whilst the dryer is in operation?Has the laundry become twisted whilst drying?Has the dryer been placed in a small and badly ventilated area?Have you set the dryer to Air Dry? | Clean the filter,Reduce the amount in the dryer.Re-dry the items again.Untwist the items and ro-dry.Place the dryer in a well-vented area.Try using 'Medium' or 'High' setting instead. |
| Dryer does not start | Is there a power failure?Is the power cord inserted firmly?Is the door closed? | Try again when there is power.Insert the power cord firmly. |
| Door opening alarm (all LED flash and 12 beep sounds) | Is the door closed? | Close the door and push "Start / Pause" button.Please unlock and push "Start / Pause" in case of Child Lock mode. |
Dryer Technical Specifications
| Model | NH-E70JA1 | NH-E80JA1 |
| Drying Capacity | 7.0 kg | 8.0 kg |
| Voltage | 220~240V 50/60Hz | 220~240V 50/60Hz |
| Rated Input | 1700 W | 1900 W |
| Net Weight | 27.5kg | 29kg |
| Dimensions | 600x565x850mm | 600x595x850mm |
Panasonic Corporation
http://www.panasonic.com
Before DryingMaintenance
Maintenance
Cleaning the Lint Filter
Please unplug the power cord prior to any cleaning. The lint filter must be in place whenever drying. It must be cleaned before each use.
1. Removing the filters
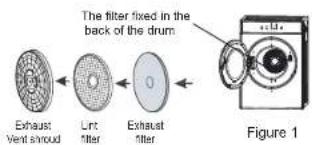
Remove by pulling outwards with fingers, inserted into the four holes around the exhaust vent shroud. The filter is in 3 parts: Exhaust vent shroud, lint filter and exhaust filter (as shown in figure1)
flowchart
graph LR
    A["Exhaust vent shroud"] --> B["Lint filter"]
    B --> C["Exhaust filter"]
    C --> D["0"]
    style A fill:#f9f,stroke:#333
    style B fill:#ccf,stroke:#333
    style C fill:#cfc,stroke:#333
    style D fill:#fcc,stroke:#333
    note right of D The filter fixed in the back of the drum
    Figure 1
2. Cleaning the filter
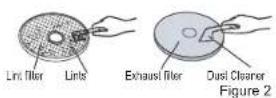
Separate "exhaust vent shroud", "lint filter" and "exhaust filter". Clean the lint on the lint filter and exhaust filter with a soft brush or vacuum cleaner. Do not damage the filters(as show in figure 2).
3. Re-installing the filter
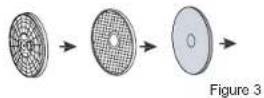
After cleaning, assemble in the sequence of "exhaust filter - lint filter- exhaust vent shroud", align the recesses in the center with the projection in the center of the drum. Make sure that it is firmly inserted (as shown in figure 3).
Cleaning of the Air Intake Filter
The filter should be cleaned once a month.
Remove by pulling outwards holding the upper and lower ends of the air intake shroud. Remove the filter inside the shroud and clean it with a soft brush. Reassemble and install as before.
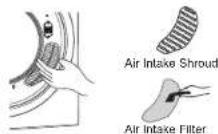
Slightly push upwards with your thumb until the latch hook disconnects, then remove.
Cleaning the interior & exterior of the Dryer
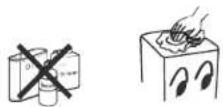
Do not wash directly with water.
Do not use thinner, gasoline or alcohol.
Do not use any type of spray cleaner when cleaning the interior. If dryer drum becomes stained, clean the drum with a damp cloth.
Remove any residue before drying the next load.
Clean cabinet with mild soap and water. Do not use harsh or abrasive cleaners, this could damage the dryer.
WARNING: Regularly clean the lint trap
Laundry Preparation
Electrical Requirements
The unit is required to be plugged into a three pin socket that is reliably grounded. Plug the power cord into the socket.
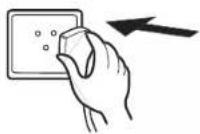
Loading the dryer
It is recommended that items are placed into the dryer one at a time. This ensures they are not tangled which results in uneven drying. When closing the dryer door prior to starting the unit ensures that items are not jammed in the door.
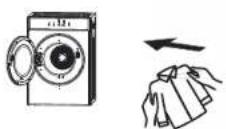
Tips before drying
Prior to loading the dryer check that the items do not have the following symbols anywhere on them. If they do, do not laundry dry these items.
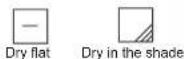
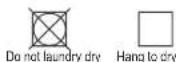

- Check the items to be dried do not have combustible materials or foreign objects within them i.e.: lighters, hair pins, coins.
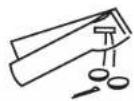
● Turn items with zippers inside out and fasten buckles.
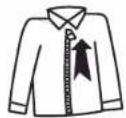
- Dryer heat may permanently set stains, ensure you check prior to drying that stains are removed
- Separate dark and light colored items as you would do when washing.
- For best results load the dryer with similar fabrics. Place small delicate items in a mesh bag and do not overload the dryer.
- The maximum mass is rated capacity of dry textile material for the dryer and do not overload. The laundry dryer is intended only for drying textile material washed in water.
- Regarding the cleaning of the filter cover, it is recommended to keep it clean after each use, because every time cleaning can reduce the drying time and extend the life of the filter. In addition, under normal operation, the service life of the Exhaust filter is 400 cycles, and the service life of the Lint filter is 800 cycles
Control Panel Installation Instruction
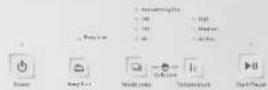
Control Panel Functions
Panasonic
SensorDining
POWER Button
Press this button to power on and the buzzer emits 1 beep or to power off and the buzzer emits 1 beep. When drying operation end, the buzzer emits 8 beeps and the light will automatically turn off after 12 seconds. But please make sure the dryer will turn off when not in use
Easy Iron
Touch this button to activate the Easy Iron program. The light above the button will come on, indicating that the Easy Iron program has been selected. When this program is selected, the dryer will add an 8-10 minute air-dry cycle after the set drying program. During this cycle only cool air (no heat) will be generated to help prevent creasing of the items just dried. NOTE: To ensure you get the most out of the Easy Iron function, do not overload the dryer. Remove the dried items from the dryer immediately and hang on coal hangers or fold.
Mode
Press the program button to cycle through the options.
a) Auto-sensing Dry*: The dryer will stop working when it detect that the laundry has been dried. Note: The Maximum running time of this program don't exceed 220 min. Certain materials may not be dry enough by the end of the cycle, if this occurs please try a fixed program instead. Not recommended for loads less than 2 Kg.
b) 180min (for 7kg): Select this program to run for 180 minutes to dry clothes.
220min (for 8kg): Select this program to run for 220 minutes to dry clothes.
c) 120min: Select this program to run for 120 minutes to dry clothes.
d) 60min: Select this program to run for 60 minutes to dry clothes.
Temperature Button
Press this button to cycle through the temp options
a) High: On this setting the dryer is working with two sets of heating elements running simultaneously, providing the strongest hot airflow
b) Medium: On this setting the dryer is working with one set of heating elements, providing the medium hot airflow.
c) Air Dry: On this setting the heating elements don't work. This function runs with cool air, primarily to air items that require freshening.
Start / Pause
Press this button to start or pause the dryer operation.
If the door is opened during operation, close the door and push this button to restart the dryer.
Push "Pause" button to change the program, then push "start" to restart a new program.
Child Lock
Push * Mode * and * Temperature* at the same time for 3 seconds until *Child lock* light comes on and the program is locked. All other buttons are locked. Push * Mode * and * Temperature* at the same time for 3 seconds to unlock. **Auto-sensing Dry* cycle is the recommended cycle for cotton items
Getting Started: Installation(Cont.)
Upside down installation
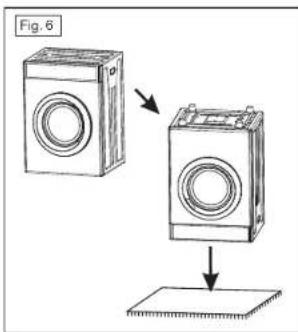
The dryer can be installed upside down, if this suits your setup better. To prepare the unit for upside down installation, proceed as follows:
- Place the dryer upside down on a firm horizontal surface, such as on a table or benchtop (Fig. 6).
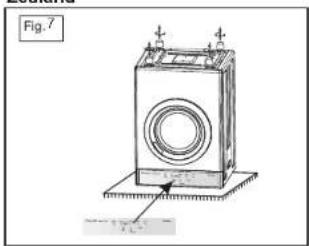
- Take the additional printed control panel from the wall-mounting kit and place it over the existing panel (Fig. 7).
- Remove the four legs from the dryer
-
Install 8 pcs M6 Short Screws into the 8 holes on the cabinet bottom. (Fig. 8)
-
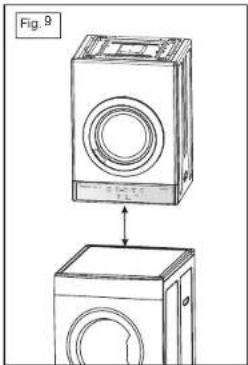
The dryer is now ready for upside down installation (Fig. 9).
* This upside down setting is recommended to combine with Wall mounting installation or in any case which the dryer is over height from human using requirement. Do NOT operate the dryer on top of a washing machine without the use of a suitable stacking kit (was not provided from Panasonic). Failure to do so could cause injury.
* This operation is only available for Malaysia, Singapore and New Zealand
natural_image
Line drawing of a washing machine with mounting base and label 'Fig. 7' (no text or symbols on the diagram itself)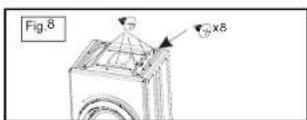
natural_image
Line drawing of a washing machine with top and front views, no text or symbols presentInstallation Instruction
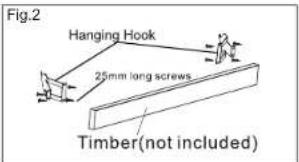
- To install the hanging hook to timber, start at Fig 2.
- Align hanging hooks and fasten screws tightly.
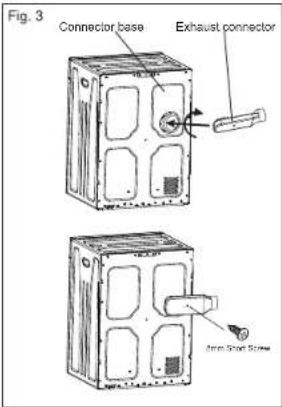
- Install the exhaust connector. Rotate the exhaust connector clockwise to fix it on the connector base.(as per Fig.3).
- Then install the 8mm short screw to fix it.
- For Normal mounting:
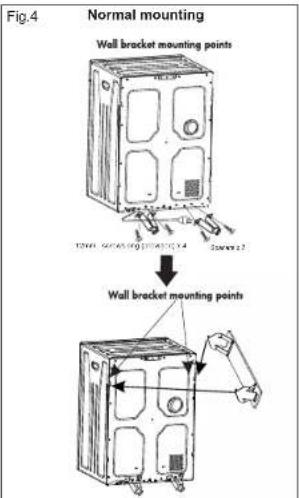
Using 4 x 12mm screws (provided) to fix the 2 spacers as per Fig 4.
For upside down mounting:
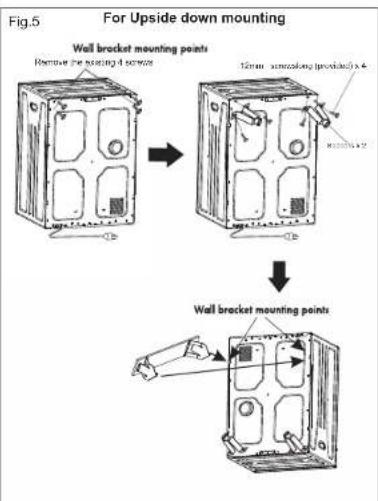
Remove the existing 4 screws and using 4 x 12mm screws (provided) to fix the 2 spacers as per Fig.5
- With assistance, mount dryer on wall bracket See Fig.4 Fig.5 final picture
Operation Precaution
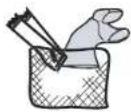
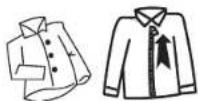
Delicate items should be placed into a nylon net bag prior to drying. It is not recommended to dry under wire bras in this unit.
Ensure that foreign objects do not find their way into the dryer. All pockets should be emptied, buttons, buckles and zips fastened. This will also help reduce impact noise when the items hit against the turning drum.
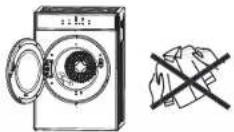
Do not add items into the dryer whilst it is in operation.
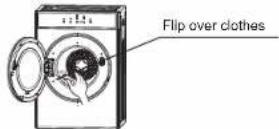
If drying large items such as a blanket, it is recommended that from time to time you open the dryer door, shake the item, place the item hack in the dryer and close the door. This will ensure even drying
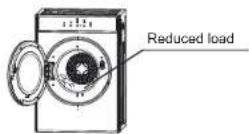
To ensure you get the most out of the Easy Iron function do not overload the dryer and remove the dried items from the dryer immediately and hang on coat hangers. Iron the items if desired.
To minimize the risk of fire in a laundry dryer, the following should be observed:
- Items that have been spotted or soaked with vegetable or cooking oil constitute a fire hazard and should not be placed in a laundry dryer.
Oil-affected items can ignite spontaneously, especially when exposed to heat sources such as in a laundry dryer. The items become warm, causing an oxidation reaction in the oil. Oxidation creates heat. If the heat cannot escape, the items can become hot enough to catch fire. Piling, stacking or storing oil-affected items can prevent heat from escaping and so create a fire hazard.
Relating to loading capacity or drum temperature, there are some cases the drying operation will be finished earlier than you selected.
Operation Precaution
If it is unavoidable that fabrics that contain vegetable or cooking oil or have been contaminated by hair care products be placed in a laundry dryer they should first be washed in hot water with extra detergent this will reduce, but not eliminate, the hazard.
"Easy Iron" function with 10min cool down cycle should be used after the high heat cycles to reduce the temperature of the items. They should not be taken out from the dryer or piled or slacked while hot.
Items that have been previously cleaned in, washed in, soaked in or spotted with petrol/gasoline, dry-cleaning solvents or other flammable or explosive substances should not be placed in a laundry dryer.
Highly flammable substances commonly used in domestic environments include acetone, denatured alcohol, petrol/gasoline, kerosene, spot removers(some brands), turpentine, waxes and wax removers.
- Items containing foam rubber (also known as latex foam) or similarly textured rubber, like materials should not be dried in a laundry dryer on a heat setting.
Foam rubber materials can, when heated, produce fire by spontaneous combustion. - Fabric softeners or similar products should not be used in a laundry dryer to eliminate the effects of static electricity unless this practice is specifically recommended by the manufacturer of the fabric softener or product.
● Undergarments that contain metal reinforcements should not be placed in a laundry dryer.
Damage to the laundry dryer can result if metal reinforcements come loose during drying. When available a drying rack could be used for such items. - Plastic articles such as shower caps or babies' waterproof napkin covers should not be placed in a laundry dryer.
● Rubber-backed articles, clothes fitted with foam rubber pads, pillows, galoshes and rubber-coated tennis shoes should not be placed in a laundry dryer.
Installation Instruction
Installation Instructions
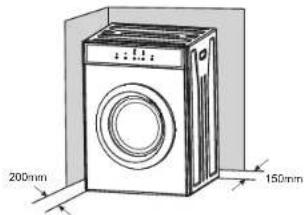
Place the dryer in a dry well ventilated area. It should be positioned away from heat and direct sunlight.
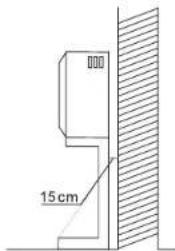
If the dryer is not wall mounted, it must be placed on firm horizontal ground. Do not place the dryer on carpet as this will block the intake. There should be at least 15cm between the dryer and the walls.
The dryer comes with fixed legs that need to be assembled to ensure stability.
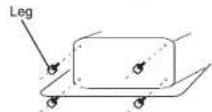
If the dryer is rack mounted. A secure bracket is required to ensure stability and prevent vibration. At least 15cm between the dryer and walls is required(The bracket is not included).
Wall Mounting Instructions
- Determine dryer position on wall and mark required bracket position.
* A minimum 50mm is needed between the top of the dryer and the ceiling for ease of installation.
* If mounting above a washing machine, allow sufficient room to open the lid of the washer.
| Tools required | ||
| Tools & parts required for Plaster/wooden wall | Drill & 3mm Bit | 1 |
| Philips Head Screw Driver | 1 | |
| Wood Screws, 12 × 50 mm Timber Screws | 4 | |
| Helper to lift dryer onto wall | 1 | |
| Wall Mounting Kit Includes | |||
| Description | Hanging brackets | 2 | |
| Plastic Spacers | 2 | ||
| Exhaust connector | 1 | ||
| 25mm Long Screws | 8 | ||
| 12mm Long Screws | 4 | ||
| 8mm Short Screws | 1 | ||
- Fix the wall hanging brackets (2 supplied) to the wall securely (eg. into the stud.) Fit a timber slat between the studs to mount the brackets onto if the stud position is too wide.
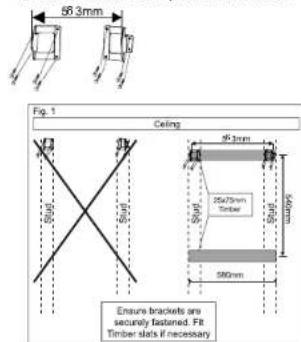
Note * Please make sure no electricity behind the screw position on the wall * Ensure the wall strength allow for this mounting installation.
- Operating & Installation Instructions
- Model:NH-E70JA1 NH-E80JA1
- Safety & Warning
- Important Safeguards
- For Your Safety
- Note
- Safety & WarningNote
- Save These Instructions
- Checking Your Tumble Dryer Troubleshooting, Specification
- Recommended Accessories
- Before DryingMaintenance
- Maintenance
- Cleaning the Lint Filter
- Removing the filters
- Cleaning the filter
- Re-installing the filter
- Cleaning of the Air Intake Filter
- Cleaning the interior & exterior of the Dryer
- WARNING: Regularly clean the lint trap
- Laundry Preparation
- Electrical Requirements
- Loading the dryer
- Tips before drying
- Control Panel Installation Instruction
- Control Panel Functions
- POWER Button
- Easy Iron
- Mode
- Temperature Button
- Start / Pause
- Child Lock
- Getting Started: Installation(Cont.)
- Upside down installation
- Installation Instruction
- Operation Precaution
- Wall Mounting Instructions
Brand : PANASONIC
Model : NH-E70JA1
Category : Tumble dryer