
VT-11024-4G - Security Camera V-TAC - Free user manual and instructions
Find the device manual for free VT-11024-4G V-TAC in PDF.


| Product Type | PTZ Solar Security Camera |
| Model | VT-11024-4G |
| Brand | V-TAC |
| Power Source | Solar panel + rechargeable 18650 battery |
| Wi-Fi | 2.4 GHz (2400-2483.5 MHz, 20dBm max) |
| Camera Type | PTZ (Pan, Tilt, Zoom) |
| Night Vision | Infrared LED and white light LED |
| Motion Detection | PIR sensor |
| Audio | Built-in microphone and speaker (two-way talk) |
| Storage | TF card (microSD) slot |
| Waterproof Rating | Weatherproof (IP rating not specified, but designed for outdoor use) |
| Installation Height | Recommended ~2.6 m |
| Solar Panel | Included, connects to camera with cable |
| App Compatibility | V-TAC Smart Light (iOS & Android) |
| Smart Assistant | Works with Google Home and Amazon Alexa |
| Dimensions (camera) | Approx. 15 x 12 x 12 cm (estimated) |
| Weight (camera) | Approx. 500 g (estimated) |
| Package Contents | Camera, solar panel, screw kit, hex spanner, screwdriver, screws, manual, position paper |
| Warranty | Standard manufacturer warranty (contact support@v-tac.eu) |
| Safety | Do not expose battery to water; dispose of electronic waste properly |
| Maintenance | Keep solar panel clean for optimal charging; ensure silicon flaps are sealed |
Frequently Asked Questions - VT-11024-4G V-TAC
User questions about VT-11024-4G V-TAC
0 question about this device. Answer the ones you know or ask your own.
Ask a new question about this device
Download the instructions for your Security Camera in PDF format for free! Find your manual VT-11024-4G - V-TAC and take your electronic device back in hand. On this page are published all the documents necessary for the use of your device. VT-11024-4G by V-TAC.
USER MANUAL VT-11024-4G V-TAC
WEEE Number: 80133970
INSTALLATION INSTRUCTION
PTZ SOLAR CAMERA
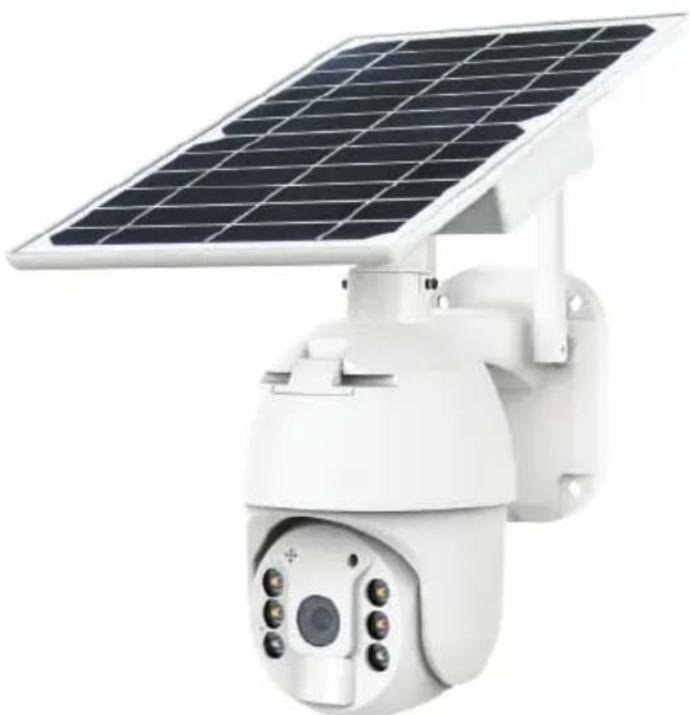
natural_image
White surveillance camera with a solar panel mounted on its side (no text or symbols visible)


INTRODUCTION
Thank you for selecting and buying V-TAC product. V-TAC will serve you the best. Please read these instructions carefully before starting the installing and keep this manual handy for future reference. If you have any another query, please contact our dealer or local vendor from whom you have purchased the product. They are trained and ready to serve you at the best.
IN CASE OF ANY QUERY/ISSUE WITH THE PRODUCT, PLEASE REACH OUT TO US AT: SUPPORT@V-TAC.EU FOR MORE PRODUCTS RANGE, INQUIRY PLEASE CONTACT OUR DISTRIBUTOR OR NEAREST DEALERS. V-TAC EUROPE LTD. BULGARIA, PLOVDIV 4000, BUL.L.KARAVELOW 9B
SAFETY WARNING
1) Do not allow the batteries or battery compartment to get wet prior to or during installation while your wireless camera is weatherproof and safe to use outside.
2) Do not exert external force or throw on the ptz camera.
3) PTZ camera should be stored in cool/dry place. Always make sure the environment is clean before installing the lamp.
4) Do not discard the PTZ camera with regular trash. PTZ camera are made with electronic components and should be properly disposed at designated locations with unified treatment like traditional electronic equipment.
NOTE:
- This device requires Wi-Fi Frequency 2.4Ghz
- Operating frequency (maximum transmitted power) 2400MHz -2483.5MHz (20dBm)

This marking indicates that this product should not be disposed of with other household wastes.

Caution, risk of electric shock.





MULTI-LANGUAGE MANUAL QR CODE
Please scan the QR code to access the manual in multiple languages.
PACKAGING LIST
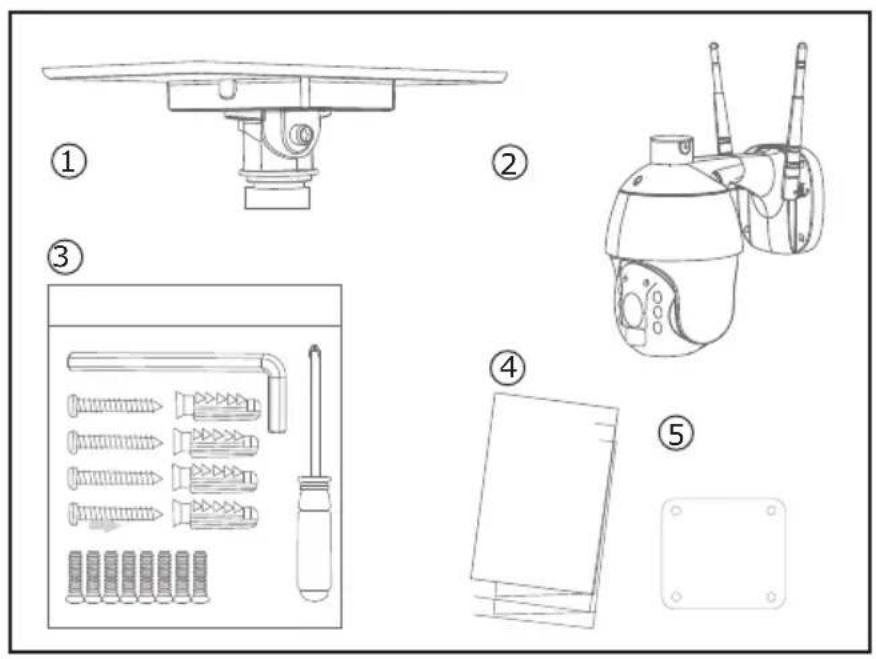
- Solar Panel (1pc)
- PTZ Camera (1pc)
- Screw kit (1pc)
• Hexagon Spanner (1pc) - Screw Driver (1pc)
- Screws (8pcs)
• Tapping Screw (4pcs)
• USB Charging Screw (1pc) - User Manual (1pc)
- Positon paper (1pc)
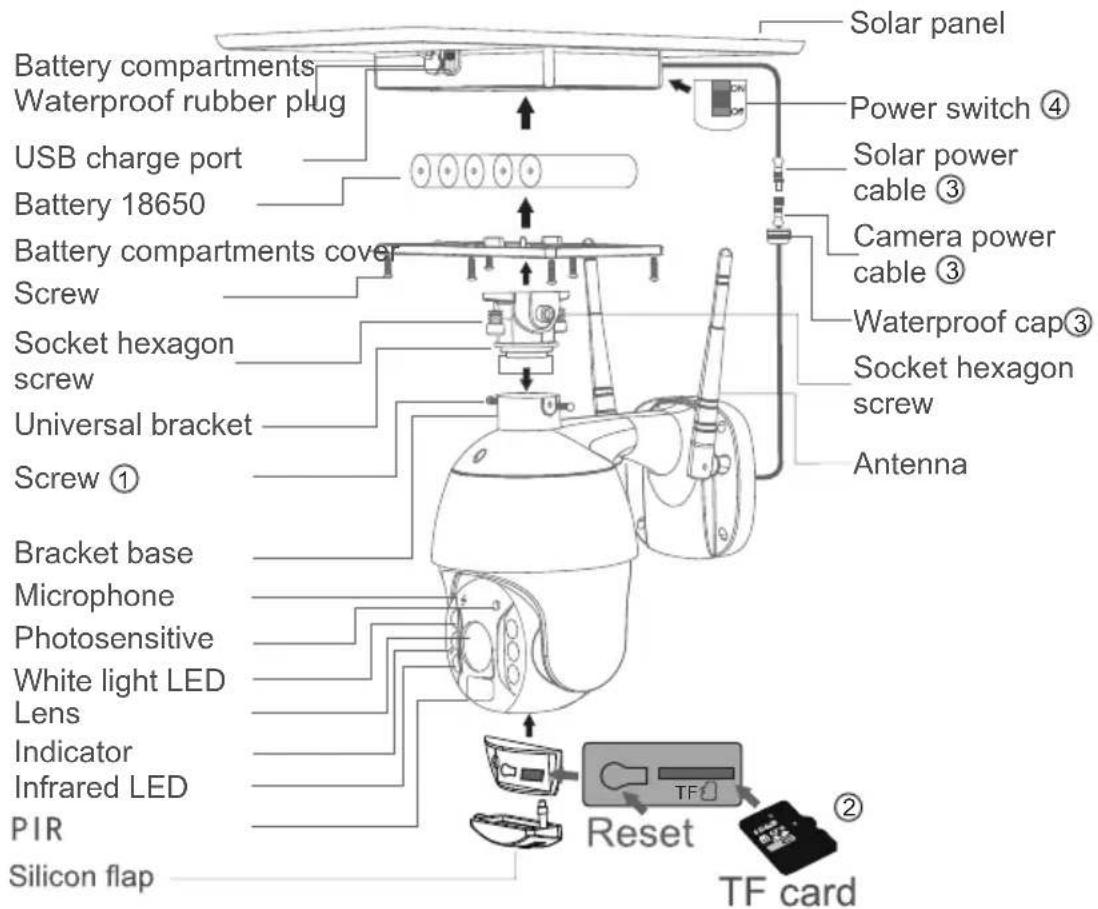
PRODUCT DIAGRAM
PROCESS
- Solar panel: connect panel to camera, fix a suitable angle with screws
- SD card installation: open thesilicon flap and insert the SD card, then make sure to close the silicon flap to avoid rain leakage
- insert TF card, then tightening the screws.. Power cable connect the cables between the panel and camera, then tightening the waterproof cap.
- Panel power-on: Remove the rubber of panel, make sure it is power on. Then put the rubber back to the panel.
INSTALLATION
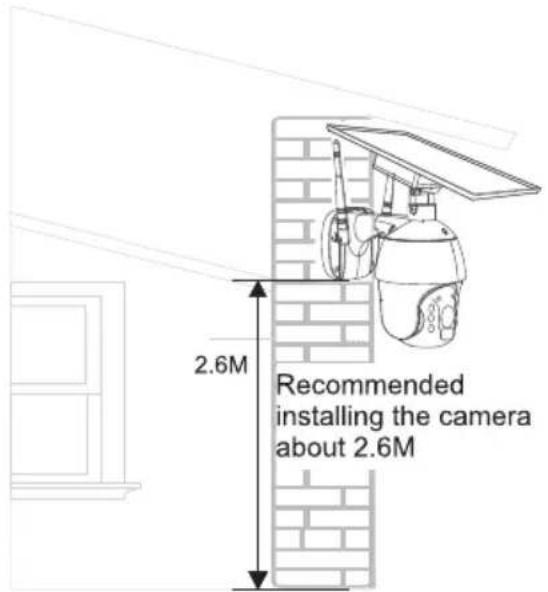
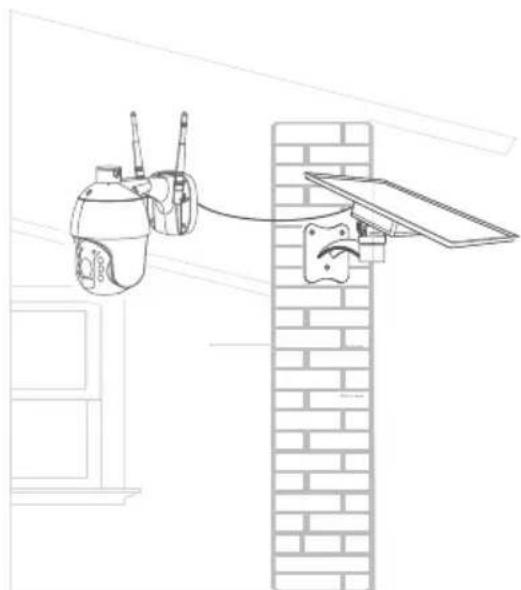
natural_image
Line drawing of a wall-mounted security camera mounted on a brick wall, no text or symbols presentAccessories needed (not standard configuration)
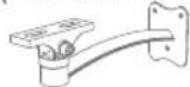
1*Bracket

1*Extra power cable 2M
APP INSTALLATION
Step 1: Disconnect the power supply and install the lamp.
Step 2: Turn the power ON to test the lamp.
Step 3: Enable WI-FI and bluetooth on your phone device.
Step 4: Scan the given QR code, or download "V-TAC Smart Light" from the App Store (iOS) or the Google Play Store (Android).
For ANDROID

For IOS

Step 5: Open the V-TAC Smart Light app and tap on register for creating a new account.
V-TAC Smart Light

Step 7: Enter the verification code which will be sent to your mobile number/email id, then assign a new password to your account and tap on "Confirm".
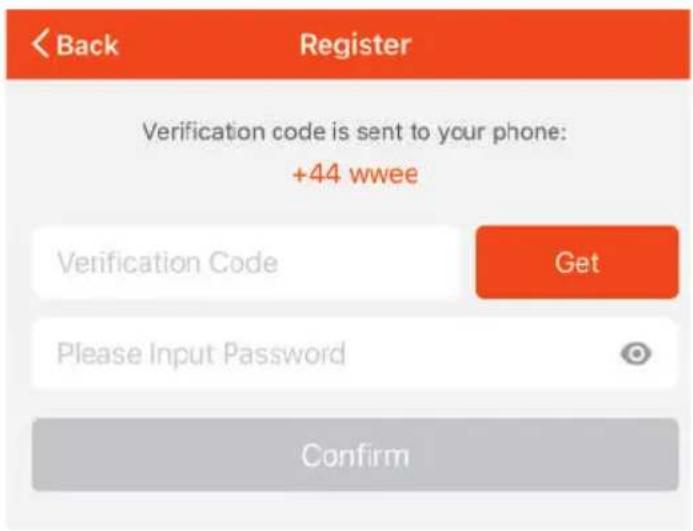
Step 6:
A) Mobile Number: Select the country, then enter your mobile number. Once done, tap 'Next'.
B) E-Mail: Enter your email id and tap on 'Next'.
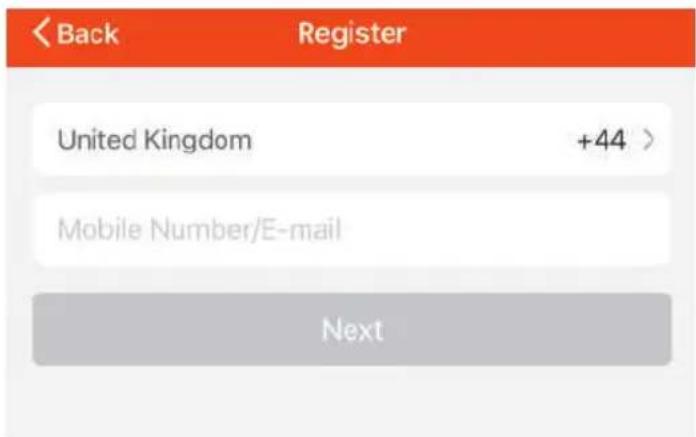
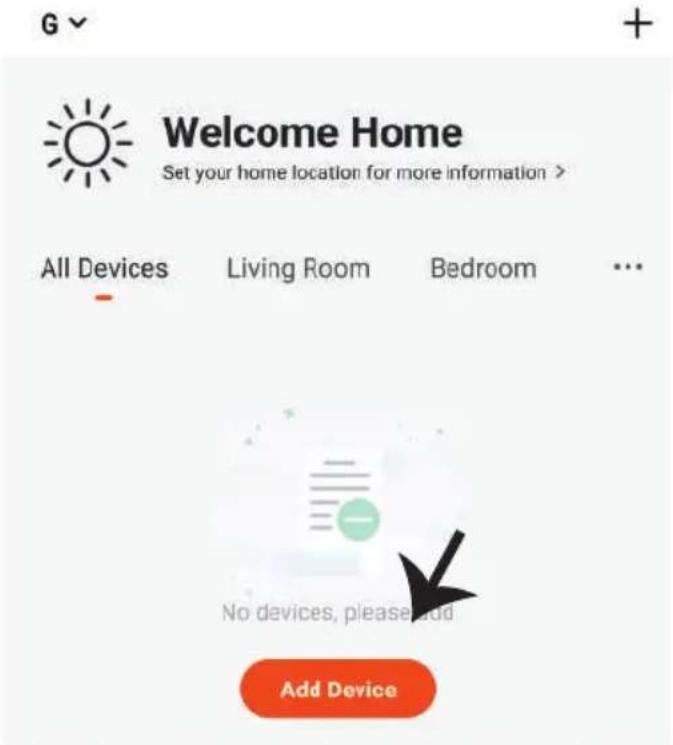
Step 8: Tap on 'Add Device' or the + sign. Make sure the lamp is switched on.
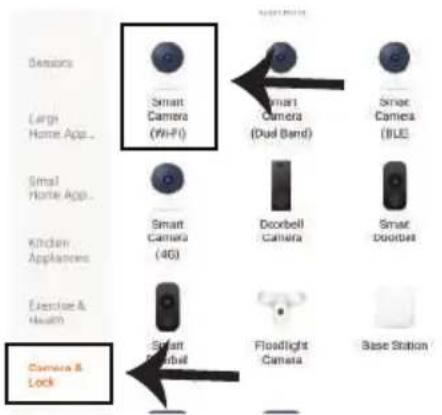
Step 9: Choose 'Camera & Lock' to start pairing the lamp to the app.
Step 10: You have 2 options to connect the device in the app
- QR Code on the camera with your mobile phone and after successfully pairing, it will prompt "Added successfully"
- Or Choose the "next step" and follow the below scheeshots
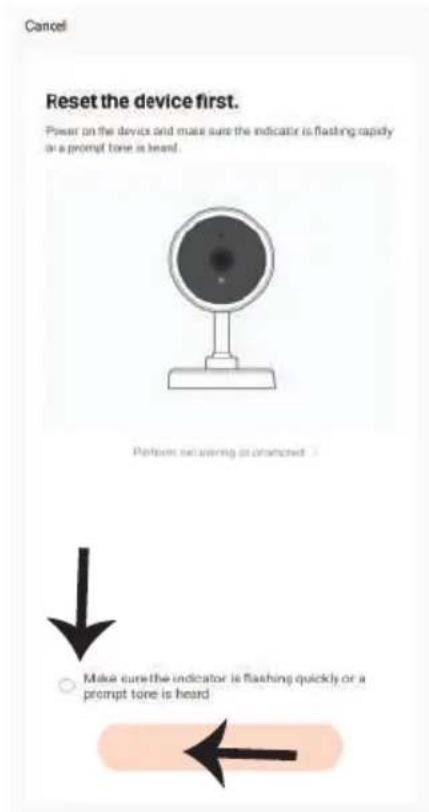
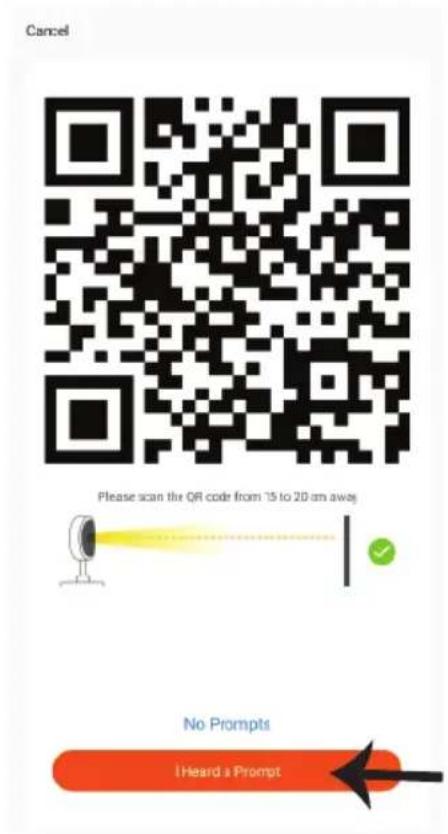
If you have any questions about the app using, you may got to category "me" to find the "Help Center" and check if you have the same issues.
If not, you can report the issue to our customer service and then your problems will be handled and answers will be given soon if you provide as much information as you can.
Cancel
Help
Why is there no prompt from the camera?
- Ensure that the lens is not blocked. If the camera lens has a protective film, remove it before you scan the QR code.
- Place the app QR code in front of the camera at a distance of 15 cm to 20 cm. Adjust the angle and distance until you hear a prompt.
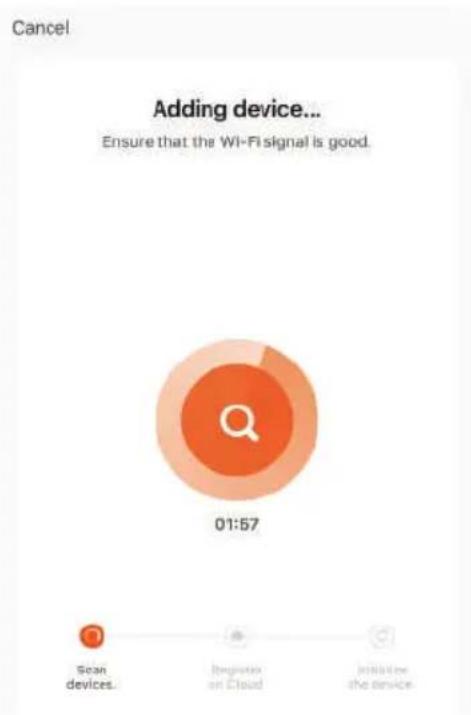
Step 11: Once you have successfully completed step 10, you will be redirected to below page, where the App searches, registers and initializes the device(lamp) (ref image below).
Step 12: Once your device is successfully added, rename the device to your preference.
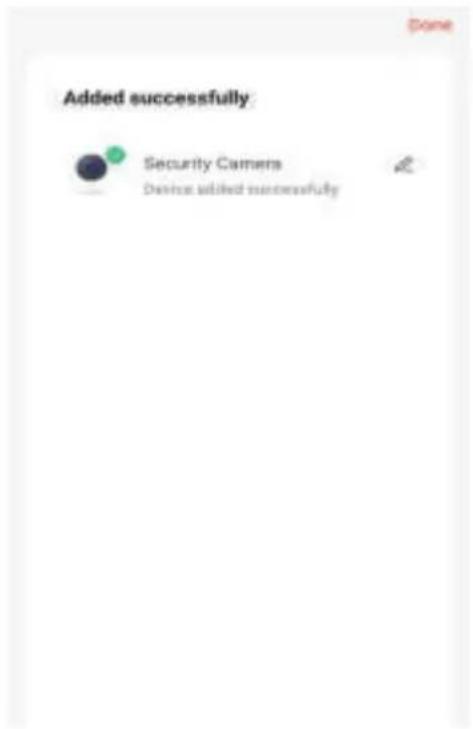
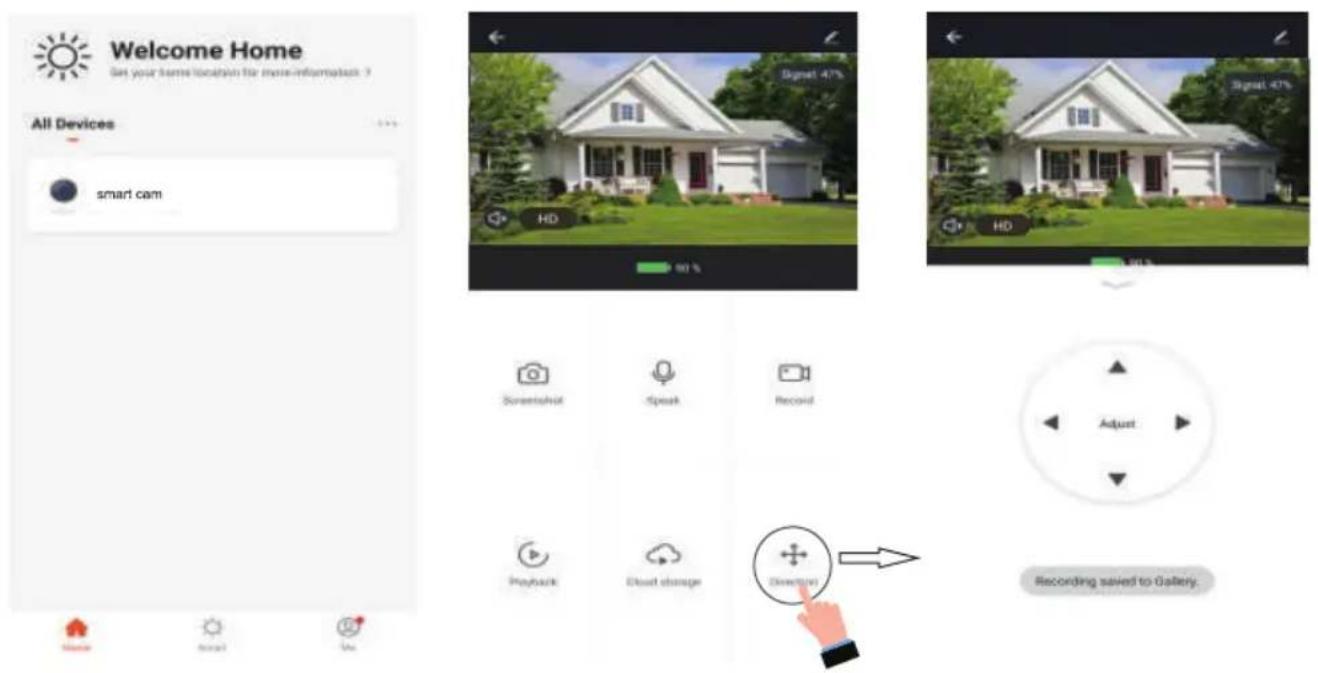
Step 13: After successfully pairing the ptz camera with the app, you can start controlling multiple features of the ptz camera through your mobile – speak, rotating the camera, and more.
ALEXA SETTINGS
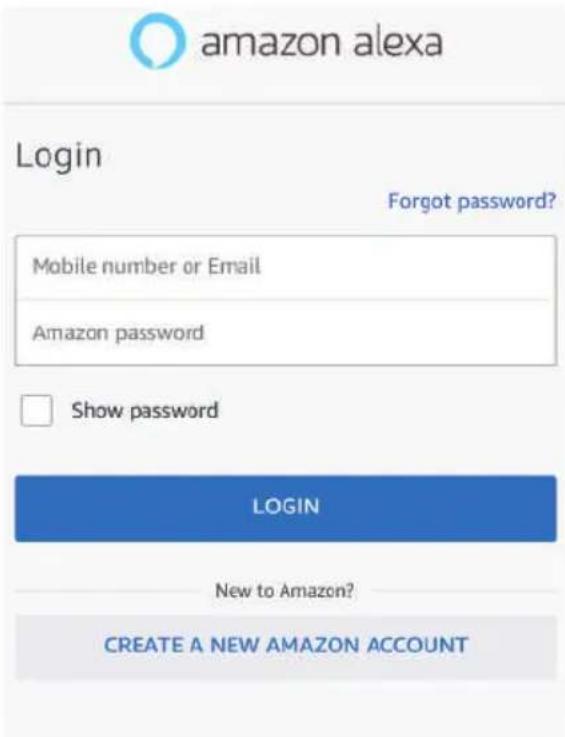
Step 1: Install the Amazon Alexa app via the App Store(iOS) or the Play Store (Android) and register. If you already have an existing account with Amazon Alexa, please proceed to logging in.
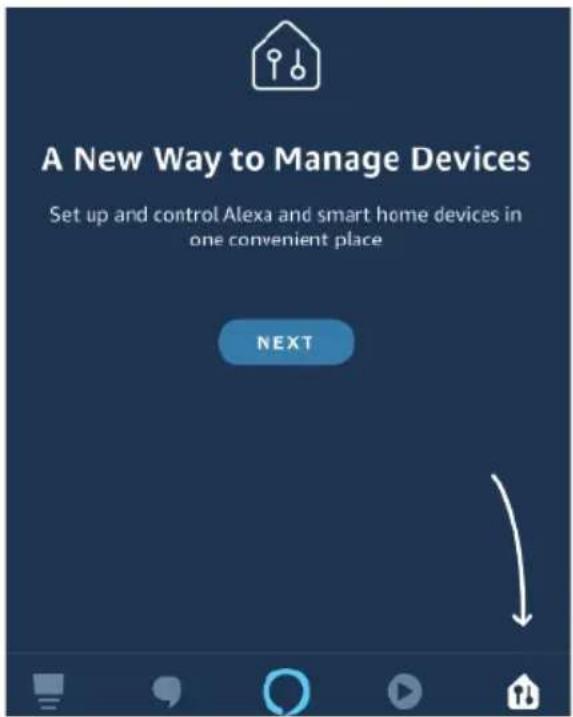
Step 2: Once you are on the Amazon Alexa home page, tap on the lower right icon — where the arrow is pointed— to add a new device and skill.
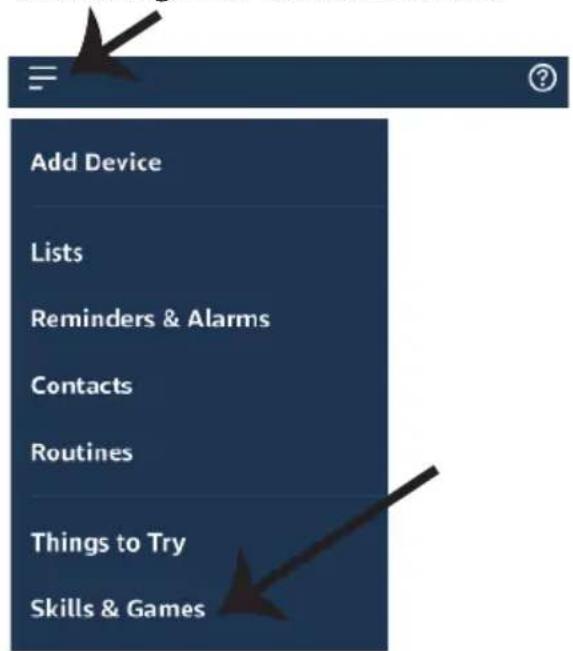
Step 3: Tap on = settings and tap on
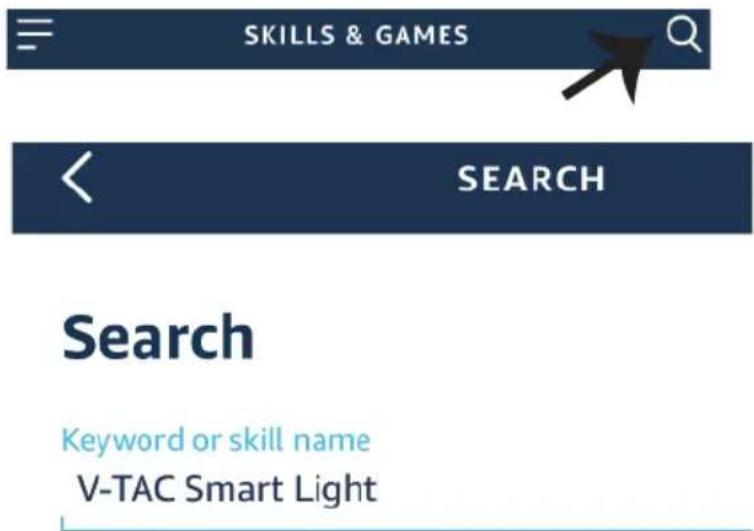
Step 4: Search for 'V-TAC Smart Light' on the "Skills & Games" page as shown below.
"skills and games" as shown below.
Step 5: Enable the Skill.
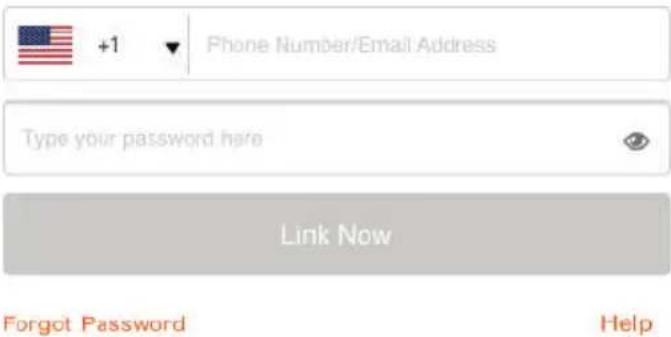
Step 6: Enter your V-TAC Smart Light login ID and password and tap on "Link Now"
ENABLE
Account linking in progress

+1

Phone Number/Email Address
Type your password here

Link Now
Forgot Password
Help
Step 7: Once you tap on Link Now, you will be redirected to a new page requesting for authorization(Ref Image below). Tap on "Authorize"
Step 8: You will receive confirmation of the account being linked successfully (Ref Image below)

Alexa by Amazon will be able to:
Receive your public profile Control your devices over internet
Done

skills-store.amazon.in

amazon alexa

V-TAC has been successfully linked.
What to do next:
→ Close this window to discover smart home devices you can control with Alexa.

Step 9: Discover your smart device on Alexa. Once you have enabled the skill A) You can use voice command "Alexa discover devices" to the Alexa device which you have.
B) To add device manually on home page tap on and tap on Add device, select the device which you are adding and tap on discover device.
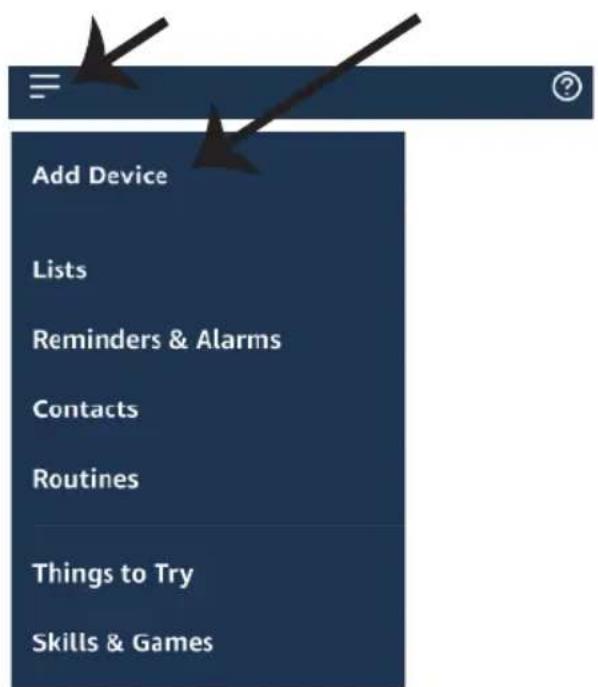
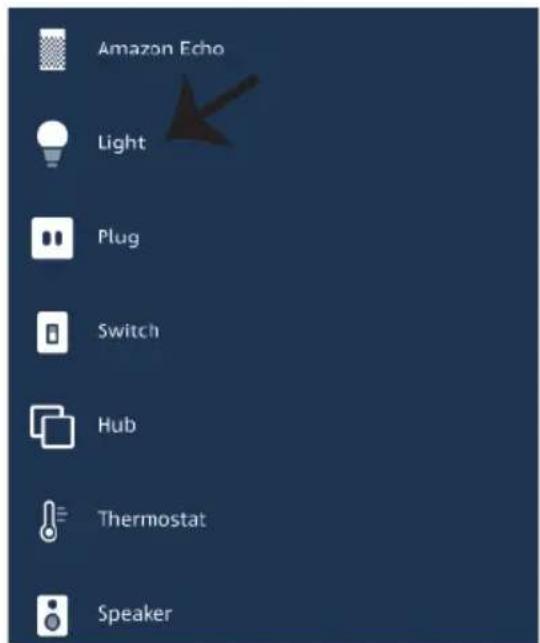
Note: Discovering the device must be done every time the device's name is changed on the app.
ALEXA Commands
Now, you can control your smart device using voice commands on Alexa.
Below are a few commands you can use:
➢! Alexa, turn on/off bedroom light.
➢! Alexa, set bedroom light to 50 percent.
➢! Alexa, set bedroom light to green.
➢! Alexa, set bedroom light to warm white.
THINGS TO REMEMBER BEFORE STARTING INSTALLATION:
- V-TAC Smart Light App & Amazon Alexa App
- Make sure you have Amazon Alexa Device(including Echo, Echo Tap, or Echo Dot)
- Smart Device - Lamp
- Stable Wifi network
GOOGLE HOME SETTINGS
Step 1:
a&b) Install the Google Home app via the App Store (iOS) or the Play Store (Android) and register. If you already have an existing account with Google Home, please proceed to logging in.
c) Create a New Home/Choose from the existing home if any.
d) Power ON the Google Home device and connect it to the App.(Then Proceed to step 2)
a. Welcome home
Your content and devices all in one place

natural_image
Abstract geometric shapes including triangles, squares, and circles (no text or symbols)GET STARTED >
b. Choose account
This account will be used to personalize your experience
c. Choose a home
You will be able to control the devices and services in this home.

Create another home
d. Plug in your device
Make sure your device is nearby and connected to power, then try again

Step 2: Once you are on the Google home page, tap on the Add "+" icon- to add a new device and skill. And then tap on Set up device as shown in below image.
a.

Play
Office

Broadcast

Add


Settings
Office
1 device

Office Speaker
Pause
b.

Add to Home

Set up device

Add home member

Create speaker group

Create new home
Add services

Music and audio

Videos and photos
Step 3: Make sure the Smart Bulb is paired with V-TAC Smart Light app before starting step 3. Tap on the arrow section as highlighted in the below image.
Set up
Set up new devices or add existing devices and services to your home
Step 4: Type "V-TAC Smart Light" on the search bar and tap on the icon of "V-TAC Smart Light"

V-TAC Smart Light

New devices

Set up new devices
Google Home, smart displays and devices labelled 'Made for Google' such as C by GE smart bulbs
Works with Google

Have something already set up?

Link your smart home services such as Philips Hue and TP-Link
Step 5: Sign In with your V-TAC Smart Light Login credentials to Link the Smart Light device
Step 6: Tap on Authorize in order to proceed to linking the device.

Google will be able to:
Receive your public profile Control your devices over internet

Step 7
a. Account will now be linked, please stay on the page you will be redirected in few seconds to select the device to add to your home.
b. Select the device and tap on Next as show in image b.

b. ✗ Choose device
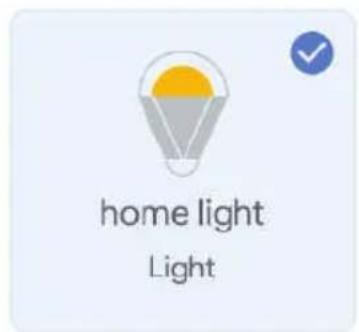
Step 8: Select the Home where you would like to add the Smart Light under. (Or) you can create a New home in order to add the Smart Light to it.
Step 9: You have successfully added Smart Light device to your Google home App.
Choose a home
You will be able to control the devices and services in this home.

Smart-Home

Office

Smart Home

Create another home
Smart-Home

Off

On

Add

Settings
Master bedroom
1 device

home light
Off
。

Local devices
1 device

Office Speaker
Step 10:
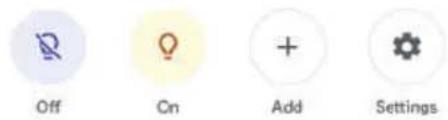
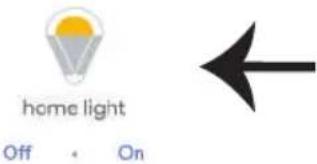
a. You can turn the Lamp On/OFF by taping on On/Off options as shown below. (OR) You can tap on the Smart Lamp.
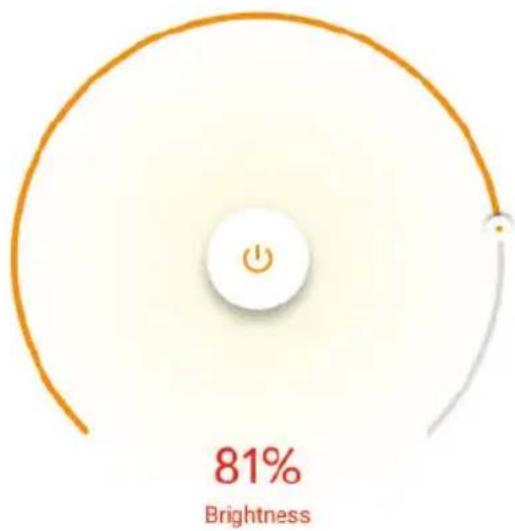
b. You will be redirected to page(as shown in image b) where you can control the lights "Power and Dimming functionality".
a. Smart-Home
Master bedroom
1 device
Local devices
1 device

b.
home light
Master bedroom
pie
| Metric | Value (%) | |---|---| | Brightness | 81 |Google Commands:
Now, you can control your smart device using voice commands on Google Home. Below are a few commands you can use:
➢! Ok, Google, turn on/off bedroom light
➢! Ok, Google, set bedroom light to 50 percent.
➢! Ok, Google, set bedroom light to green.
➢! Ok, Google, set bedroom light to warm white.
THINGS TO REMEMBER BEFORE STARTING INSTALLATION:
- V-TAC Smart Light App & Google Home App
- Make sure you have Google Home Device
- Smart Device - Lamp
- Stable Wifi network
- INSTALLATION INSTRUCTION
- INTRODUCTION
- SAFETY WARNING
- NOTE:
- PACKAGING LIST
- PRODUCT DIAGRAM
- PROCESS
- INSTALLATION
- APP INSTALLATION
- Step 10: You have 2 options to connect the device in the app
- Why is there no prompt from the camera?
- ALEXA SETTINGS
- ALEXA Commands
- THINGS TO REMEMBER BEFORE STARTING INSTALLATION:
- GOOGLE HOME SETTINGS
- Step 1:
- a. Welcome home
- b. Choose account
- c. Choose a home
- d. Plug in your device
- Set up
- Step 7
- Choose a home
- Smart-Home
- Master bedroom
- Local devices
- Step 10:
- Google Commands:
Brand : V-TAC
Model : VT-11024-4G
Category : Security Camera