
ELPMB64 - Video projector EPSON - Free user manual and instructions
Find the device manual for free ELPMB64 EPSON in PDF.


| Product Type | Wall Mount for Video Projector |
| Brand | Epson |
| Model | ELPMB64 |
| Weight | Approx. 21.4 lb (9.7 kg) |
| Maximum Load Capacity | 14.3 lb (6.5 kg) |
| Arm Length (from wall to projector) | 39.4 to 59.4 in (1000 to 1510 mm) |
| Vertical Height Adjustment | 0 to 5.3 in (0 to 134 mm) at min arm length; 0 to 9.1 in (0 to 230 mm) at max arm length |
| Vertical Tilt Adjustment | -7° to 17° (min arm length); -17° to 7° (max arm length) |
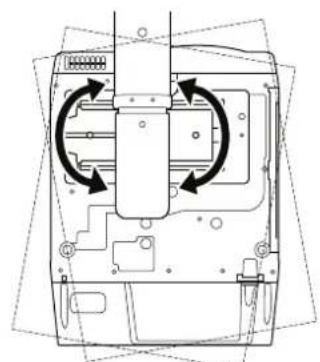
| Horizontal Rotation Adjustment | 0 to ±5° |
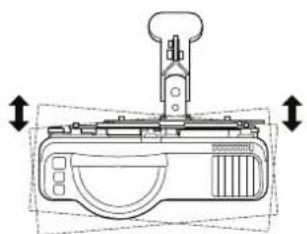
| Horizontal Roll Adjustment | 0 to ±5° |
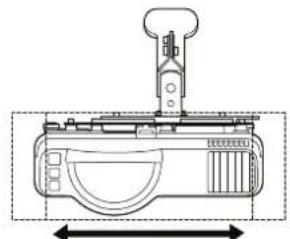
| Horizontal Slide Adjustment | 0 to ± 1.8 in (0 to ± 45 mm) |
| Compatible Projectors | Epson PowerLite EB-L200SX, EB-L200SW |
| Installation Surface | Concrete wall required |
| Mounting Hardware | M8 expansion anchors (minimum 3), M8 and M4 bolts included |
| Package Contents | Wall plate, arm unit, adjustment unit, projector attachment plate, wall plate cover, arm cover, cable cover, safety wire kit, hex wrenches, bolts |
| Safety Features | Safety wire kit included; regular inspection recommended |
| Professional Installation | Recommended; at least two qualified technicians |
| Operating Environment | Avoid vibration, shock, high humidity, dust, and oily smoke |
| Cleaning Instructions | Wipe with a dry, soft cloth; avoid adhesives, lubricants, or oils |
Frequently Asked Questions - ELPMB64 EPSON
User questions about ELPMB64 EPSON
0 question about this device. Answer the ones you know or ask your own.
Ask a new question about this device
Download the instructions for your Video projector in PDF format for free! Find your manual ELPMB64 - EPSON and take your electronic device back in hand. On this page are published all the documents necessary for the use of your device. ELPMB64 by EPSON.
USER MANUAL ELPMB64 EPSON
natural_image
Technical line drawing of a mechanical device with a long rod and attached housing (no text or symbols)About This Installation Guide
This guide describes how to mount the short-throw projectors PowerLite® EB-L200SX/EB-L200SW to a wall using the Epson® ELPMB64 wall mount.

Not all models are available in all markets.
Safety Instructions
For your safety, read all the instructions in this guide before using the wall mount. Incorrect handling that ignores instructions in this guide could damage the wall mount or could result in personal injury or property damage. Keep this installation guide on hand for future reference.
Read the safety instructions in the online User's Guide for your projector and follow the instructions in this document.
Explanation of Symbols
The warning marks shown below are used throughout this installation guide to prevent personal injury or property damage. Make sure you understand these warnings when reading this installation guide.
| Warning | This symbol indicates information that, if ignored, could possibly result in personal injury or even death due to incorrect handling. |
| Caution | This symbol indicates information that, if ignored, could possibly result in personal injury or physical damage due to incorrect handling. |
 | This symbol indicates related or useful information. |
 | Symbol indicating an action that must not be done |
 | Symbol indicating an action that should be done |
Safety Precautions for Installation
 Warning Warning | |
| The wall mount is designed specifically for mounting a projector and optional accessories to a wall. If anything other than a projector and optional accessories are mounted, the weight may result in damage.If the wall mount falls, it could cause personal injury or property damage. |  |
| The installation work (wall mounting) should be performed by qualified technicians using only approved mounting equipment. Incomplete or incorrect installation could cause the wall mount or projector to fall and cause personal injury or property damage. |  |
| Follow the instructions in this guide when installing the wall mount.If the instructions are not followed, the wall mount may fall, resulting in personal injury or property damage. |  |
| Turn off the projector when installing the mount to avoid fire or electric shock. |  |
| Handle the power cord carefully.Incorrect handling may cause fire or electric shock. Observe the following precautions when handling:Do not handle the power plug with wet hands.Do not use a power cord that is damaged or modified.Do not pull the power cord with too much force when routing it through the wall mount. | |
| Do not install the wall mount in a place where it might be subjected to vibration or shock.Vibration or shock could cause damage to the projector or mounting surface. It could also cause the wall mount or projector to fall and cause personal injury or property damage. | |
| Install the wall mount so that it can sufficiently support the weight of the projector and wall mount, and resist any horizontal vibration. Use M8 nuts and bolts.Nuts and bolts smaller than M8 could cause the wall mount to fall. Epson accepts no responsibility for any damage or injury caused by lack of wall strength or inadequate installation. | |
| The installation work should be performed by at least two qualified service personnel. If you need to loosen any screws during installation, be careful not to drop the wall mount.If the wall mount or projector falls, it could cause personal injury or property damage. | |
| When installing the wall mount, do not hold on to the cable cover to position the mount.Holding the mount by the cable cover could cause the cover to detach, resulting in personal injury or property damage. | |
| When you mount the projector on the wall with the wall mount, the wall requires enough strength to hold the projector and the wall mount.This wall mount should be installed on a concrete wall. Confirm the weight of the projector and the wall mount before installation, and maintain the strength of the wall. If the wall is not strong enough, reinforce the wall before installation. | |
| If you need to loosen any screws while installing, be careful not to drop the projector or the mount.If the wall mount or projector falls, it could cause personal injury or property damage. | |
| Inspect the wall mount on a regular basis to ensure there are no broken parts or loose bolts or screws.If there are any broken parts, stop using the wall mount immediately. If the wall mount or projector falls, it could cause personal injury or property damage. | |
| Never modify the wall mount. | |
| Do not disassemble or modify the projector.There are numerous high-voltage components inside the projector that could cause a fire, electric shock, or an accident. | |
| Do not hang on the wall mount or hang a heavy object on the wall mount.If the projector or wall mount falls, it could cause personal injury or property damage. | |
| Stop using the mount and contact Epson if any of the following occur:The mount is dropped or damaged during installation.The arm unit detaches from the wall or falls. | |
| Do not use adhesives, lubricants, or oils to install or adjust the wall mount.If you use adhesives to prevent the bolts or screws from loosening or things such as lubricants or oils on the part of the projector attached to the slide plate, the case may crack and cause the projector to fall, resulting in personal injury or property damage. | |
| Tighten all screws firmly after adjustment.Otherwise, the projector or wall mount may fall and cause personal injury or property damage. | |
| Never loosen the bolts and nuts after installation.Confirm that the screws have not become loose on a regular basis. If you find any loose screws, tighten them firmly. Otherwise, the projector or wall mount may fall and cause personal injury or property damage. | |
| When performing wiring, make sure the cable does not come into contact with any screws or bolts.Handling the cable incorrectly may cause fire or electric shock. | |
| Caution | |
| Do not install the wall mount in a location where the operating temperature for your projector model may be exceeded.Such an environment may damage the projector. | |
| Do not install in a location subject to oily smoke or smoke for events.If oils stick to the slide plate fixing part of the projector, the case may crack and cause the projector to fall, resulting in personal injury or property damage. | |
| Install the wall mount in a place free from excessive dust and humidity to prevent the lens or optical components from becoming dirty. | |
| Do not use excessive force when adjusting the wall mount.The wall mount may break, resulting in personal injury. | |
Location
- Determine where you will install the wall mount and prepare the location in advance. Also, make sure there is a gap of 16 to 26 inches (410 to 660 mm) from the top of the image projected onto the white board to the ceiling. See "Positioning the Projector" on page 10 for more details.
- Do not install the projector in a location where it might be subjected to vibration or shock. Vibration or shock could cause damage to the projector or mounting surface. It could also cause the wall mount or projector to fall, resulting in serious injury or death.
• Before installing the projector, verify the power supply wiring for the installation location. - Install the projector away from other electric devices such as fluorescent lights or air conditioners. Some kinds of fluorescent lights could interfere with the projector remote control.
• Install the projector away from direct sunlight and other bright light sources. - It is recommended to keep VGA computer cable length less than 66 feet (20 meters) to reduce external noise.
- If you want to hide the projector power plug under the wall plate cover, make sure the power outlet is located in the cutout on the left or right of the wall plate. Depending on where the plug is placed within the opening, there is between 1.9 to 2.3 inches (48 to 57.5 mm) of space between the cutout and the wall plate cover.
1 Package Contents

2 Specifications

3 Connecting Devices

4 Positioning the Projector

- Installation Measurements for PowerLite EB_L200SW - Wide
- Installation Measurements for PowerLite EB-L200SW - Tele
- Installation Measurements for PowerLite EB-L200SX - Wide
- Installation Measurements for PowerLite EB-L200SX - Tele
5 Installing the Projector

- Install the wall plate
- Assemble the wall mount
- Route the cables through the arm unit
- Attach the wall mount to the wall plate
- Attach the attachment plate to the projector
- Attach the projector to the adjustment unit
- Adjust the arm length
- Connect the power cord and other cables to the projector
- Attach the cable cover to the projector
- Turn on the projector and check the image
- Install the safety wire
- Attach the arm cover
- Attach the wall plate cover
1 Package Contents
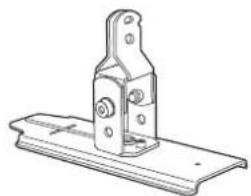
natural_image
Technical line drawing of a mechanical bracket or clamp assembly (no text or symbols)Adjustment unit
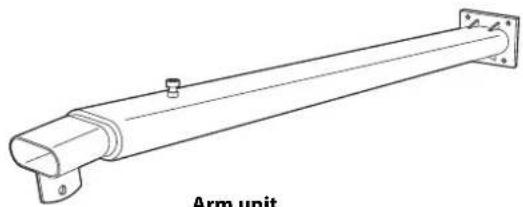
natural_image
Technical line drawing of a mechanical arm unit with mounting flanges and bolted joints (no text or symbols)Arm unit
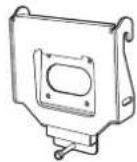
Arm plate
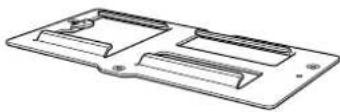
Projector attachment plate
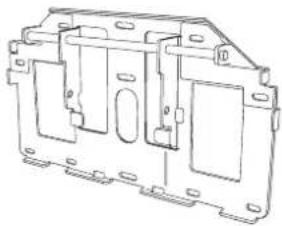
natural_image
Technical line drawing of a mechanical housing or enclosure component (no text or symbols)Wall plate
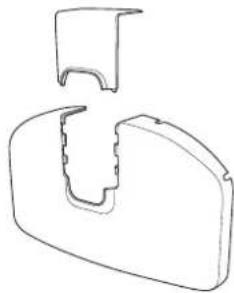
natural_image
Line drawing of a mechanical component with a U-shaped groove and a rectangular base (no text or symbols)Wall plate cover
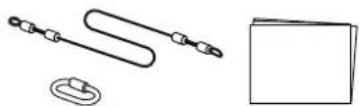
Safety wire kit
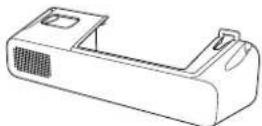
Cable cover
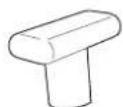
Arm cover
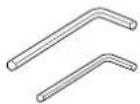
Hexagonal wrenches
| Shape Name | Quantity | |
 | M4 × 12 mm hexagon socket head cap bolt with washer | 1 |
 | M4 × 12 mm hexagon socket head cap bolt without washer | 6 |
 | M4 × 12 mm hexagon socket head cap bolt with washer/spring washer | 5 |
 | M8 × 16 mm hexagon socket head cap bolt without washer | 7 |
- Use the bolts or screws supplied with the wall mount to install it as directed in this guide. Do not substitute these bolts with any other types.
- You need to use commercially available M8 × 60 mm or 3/8 inch anchors (at least 3) to attach the wall plate to the wall.
• Gather the tools and parts you need before you begin installation.
2 Specifications
| Item Specification | |
| Weight Approx. 21.4 lb (9.7 kg) | |
| Maximum load capacity 14.3 lb (6.5 kg) | |
| Arm length 39.4 to 59.4 inches (1000 to | 1510 mm) (from wall plate attachment point to arm cover point) |
| Vertical height adjustment range 0 to 5 | 3 inches (0 to 134 mm) (arm length minimum)0 to 9.1 inches (0 to 230 mm) (arm length maximum) |
| Vertical tilt adjustment range -7 to 17° | (arm length minimum)-17 to 7° (arm length maximum) |
| Horizontal rotation adjustment range 0 | to ± 5° |
| Horizontal roll adjustment range 0 to ± | 5° |
| Horizontal slide adjustment range 0 to | ± 1.8 inches (45 mm) |
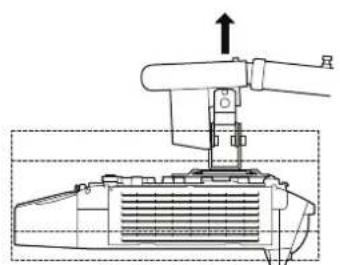
natural_image
Mechanical assembly diagram showing a lever pressing into a component (no text or symbols visible)Vertical height adjustment
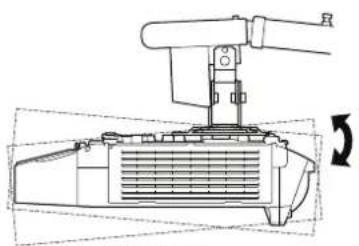
natural_image
Technical line drawing of a mechanical component with no visible text or symbolsVertical tilt adjustment
natural_image
Technical line drawing of a mechanical device with circular arrows indicating rotation or assembly (no text or symbols)Horizontal rotation adjustment
natural_image
Technical line drawing of a mechanical device with two downward arrows indicating motion or assembly (no text or symbols)Horizontal roll adjustment
natural_image
Technical line drawing of a mechanical device with no visible text or symbolsHorizontal slide adjustment
Wall plate
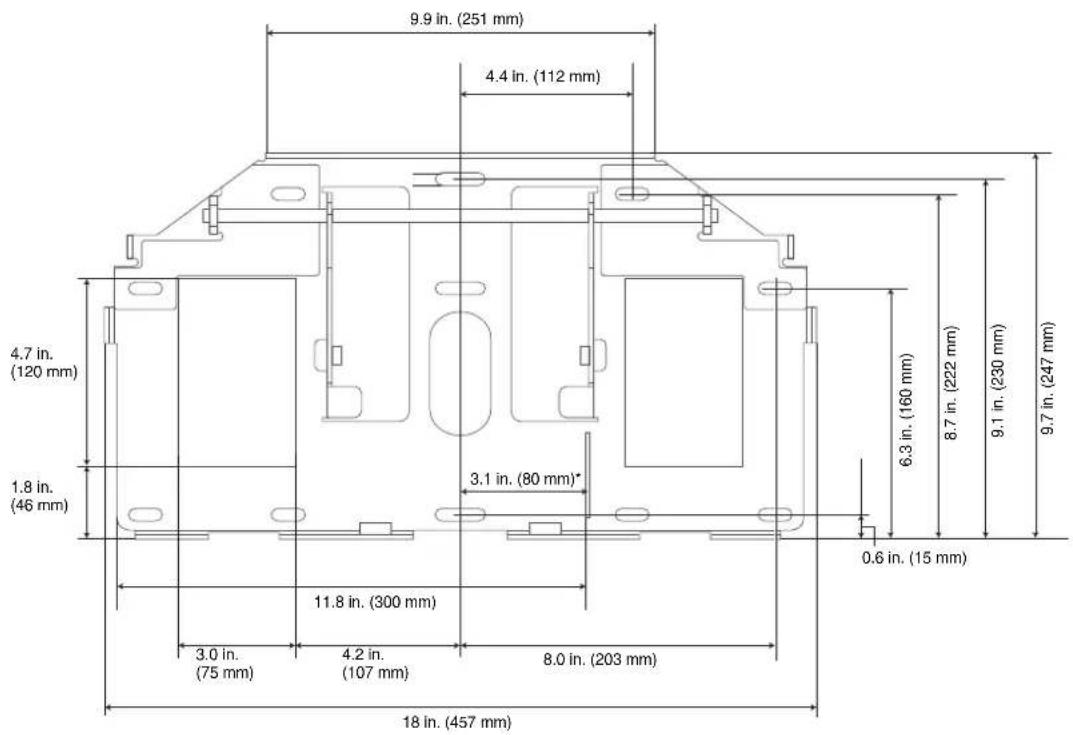
*Offset from the center of the projected image to the center of the wall plate.
Make sure you have the power cord, computer VGA or HDMI cable, and other parts at the location where the wall mount is to be installed.
Make sure you also have all necessary cables for devices, such as a document camera or microphone, that you will connect to the projector. This includes cables for any optional equipment that may be connected in the future. For details, refer to the online User's Guide or at epson.com/support (U.S.), epson.ca/support (Canada), or latin.epson.com/support (Caribbean).
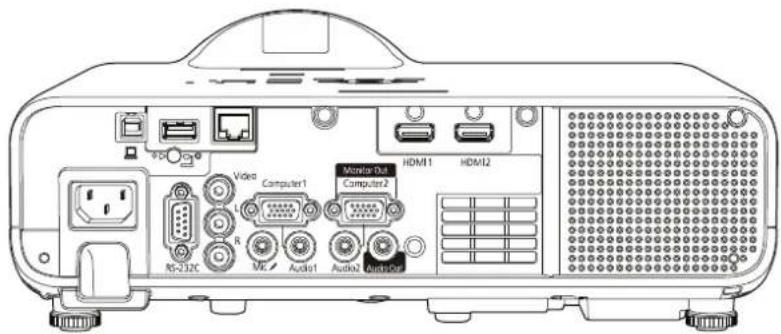
Connection example
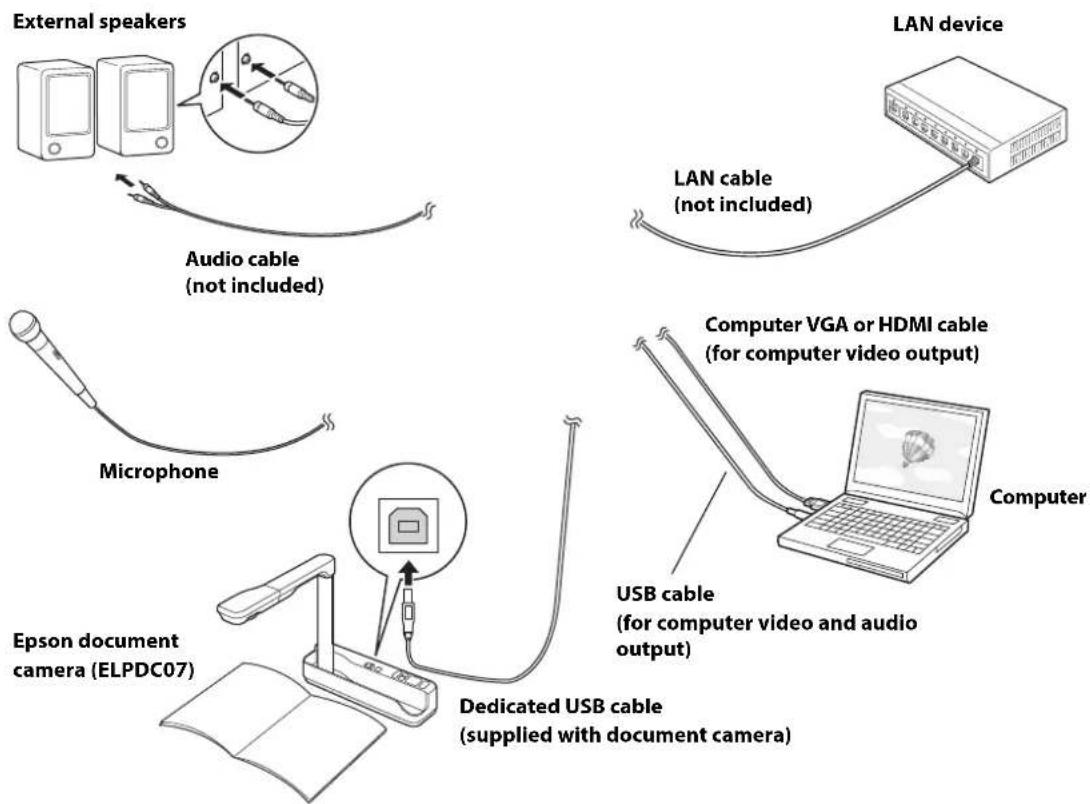
flowchart
graph TD
    A["External speakers"] -->|Audio cable (not included)| B["Microphone"]
    B --> C["Epson document camera (ELPDC07)"]
    C --> D["Dedicated USB cable (supplied with document camera)"]
    D --> E["Computer"]
    E --> F["USB cable (for computer video and audio output)"]
    F --> G["Computer VGA or HDMI cable (for computer video output)"]
    G --> H["LAN device"]
    H --> I["LAN cable (not included)"]
4 Positioning the Projector
The PowerLite EB-L200SW can project up to 113 inches diagonally for a WXGA image or 100 inches diagonally for an XGA image using this mount. The PowerLite EB-L200SX can project up to 106 inches diagonally for an XGA image. You can project onto a pre-installed whiteboard or directly onto a plain wall. The height of the included wall mount determines how high the image appears on the wall or whiteboard. The distance of the projector from the wall (once it is mounted on the adjustable arm of the wall mount) also affects image size and position.
If you are planning to project on a whiteboard, the image may not fill the entire board, depending on the aspect ratio. If you match the image height to the board's height, gaps may appear on the sides of the board.
Refer to the tables on the following pages and install the mount and projector to project images at the appropriate size. The values are only a guide. The recommended projection distance is 27.6 to 46.9 inches (70 to 119 cm).
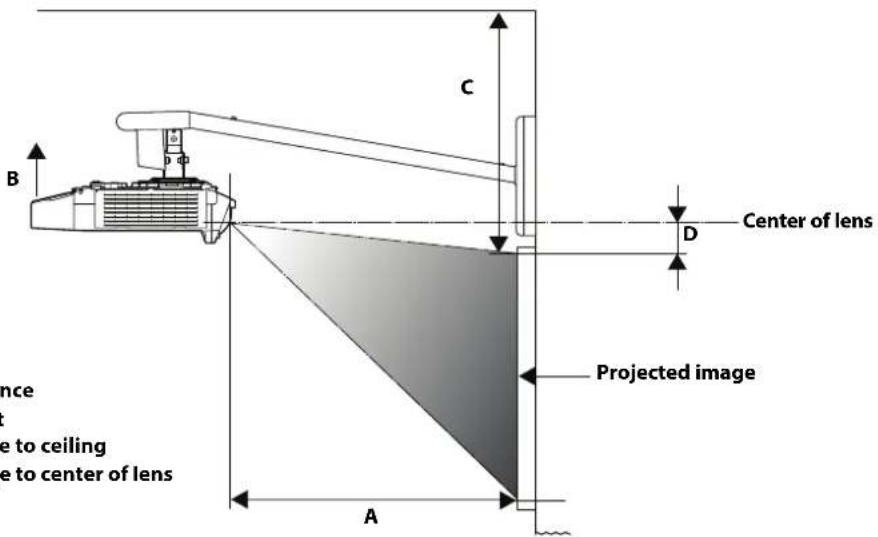
A: Minimum projection distance
B: Vertical height adjustment
C: Distance from top of image to ceiling
D: Distance from top of image to center of lens
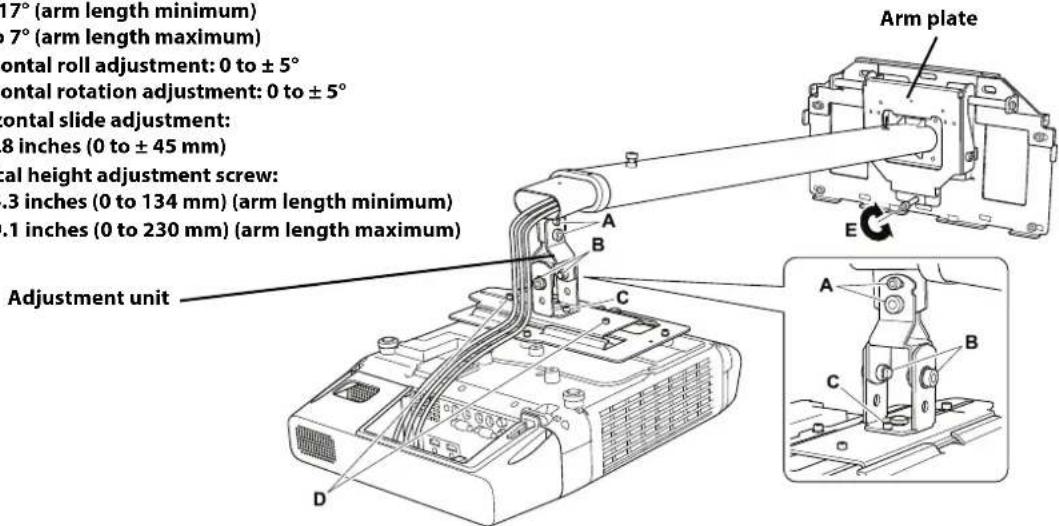
A: Vertical tilt adjustment:
-7 to 17° (arm length minimum)
-17 to 7° (arm length maximum)
B: Horizontal roll adjustment: 0 to ±5°
C: Horizontal rotation adjustment: 0 to ±5°
D: Horizontal slide adjustment:
0 to ± 1.8 inches (0 to ± 45 mm)
E: Vertical height adjustment screw:
0 to 5.3 inches (0 to 134 mm) (arm length minimum)
0 to 9.1 inches (0 to 230 mm) (arm length maximum)

The values in the measurement tables are based on a 2.4 inch (6 cm) thick whiteboard. Make sure your whiteboard is no more than 2.4 inch (6 cm) thick.
Installation Measurements for PowerLite EB_L200SW - Wide
| Screen size | 16:10 WXGA 4:3 XGA 16:9 Widescreen | |||||||||||
| Minimum projection distance (A)* | Vertical height adjustment (B)** | Distance from top of image to ceiling (C) | Distance from top of image to center of lens (D) | Minimum projection distance (A)* | Vertical height adjustment (B)** | Distance from top of image to ceiling (C) | Distance from top of image to center of lens (D) | Minimum projection distance (A)* | Vertical height adjustment (B)** | Distance from top of image to ceiling (C) | Distance from top of image to center of lens (D) | |
| 60 in. | ----27.6 in. (70 cm) | 1.6 in. (4 cm) | 16.9 in. (43 cm) | 4.3 in. (11 cm)--- | ||||||||
| 61 in. | ----28 in. (71 cm) | 2 in. (5 cm) | 17.3 in. (44 cm) | 4.3 in. (11 cm)--- | ||||||||
| 62 in. | ----28.3 in. (72 cm) | 2 in. (5 cm) | 17.3 in. (44 cm) | 4.3 in. (11 cm)--- | ||||||||
| 63 in. | ----29.1 in. (74 cm) | 2 in. (5 cm) | 17.3 in. (44 cm) | 4.3 in. (11 cm)--- | ||||||||
| 64 in. | ----29.5 in. (75 cm) | 2 in. (5 cm) | 17.3 in. (44 cm) | 4.3 in. (11 cm)--- | ||||||||
| 65 in. | ----29.9 in. (76 cm) | 2 in. (5 cm) | 17.3 in. (44 cm) | 4.7 in. (12 cm)--- | ||||||||
| 66 in. | - | - | - | - | 30.3 in. (77 cm) | 2 in. (5 cm) | 17.7 in. (45 cm) | 4.7 in. (12 cm) | 27.6 in. (70 cm) | 3.5 in. (9 cm) | 18.9 in. (48 cm) | 5.9 in. (15 cm) |
| 67 in. | - | - | - | - | 31.1 in. (79 cm) | 2 in. (5 cm) | 17.7 in. (45 cm) | 4.7 in. (12 cm) | 28 in. (71 cm) | 3.9 in. (10 cm) | 19.2 in. (49 cm) | 6.3 in. (16 cm) |
| 68 in. | 27.6 in. (70 cm) | 1.6 in. (4 cm) | 16.9 in. (43 cm) | 4.3 in. (11 cm) | 31.5 in. (80 cm) | 2 in. (5 cm) | 17.7 in. (45 cm) | 4.7 in. (12 cm) | 28.3 in. (72 cm) | 3.9 in. (10 cm) | 19.3 in. (49 cm) | 6.3 in. (16 cm) |
| 69 in. | 27.9 in. (71 cm) | 2 in. (5 cm) | 17.3 in. (44 cm) | 4.3 in. (11 cm) | 31.9 in. (81 cm) | 2 in. (5 cm) | 17.7 in. (45 cm) | 4.7 in. (12 cm) | 28.7 in. (73 cm) | 3.9 in. (10 cm) | 19.3 in. (49 cm) | 6.3 in. (16 cm) |
| 70 in. | 28.4 in. (72 cm) | 2 in. (5 cm) | 17.3 in. (44 cm) | 4.3 in. (11 cm) | 32.3 in. (82 cm) | 2 in. (5 cm) | 17.7 in. (45 cm) | 5.1 in. (13 cm) | 29.1 in. (74 cm) | 3.9 in. (10 cm) | 19.3 in. (49 cm) | 6.3 in. (16 cm) |
| 71 in. | 29 in. (73 cm) | 2 in. (5 cm) | 17.3 in. (44 cm) | 4.3 in. (11 cm) | 32.7 in. (83 cm) | 2 in. (5 cm) | 18.1 in. (46 cm) | 5.1 in. (13 cm) | 29.5 in. (75 cm) | 3.9 in. (10 cm) | 19.7 in. (50 cm) | 6.3 in. (16 cm) |
| 72 in. | 29.1 in. (74 cm) | 2 in. (5 cm) | 17.3 in. (44 cm) | 4.3 in. (11 cm) | 33.5 in. (85 cm) | 2 in. (5 cm) | 18.1 in. (46 cm) | 5.1 in. (13 cm) | 30.3 in. (77 cm) | 3.9 in. (10 cm) | 19.7 in. (50 cm) | 6.7 in. (17 cm) |
| 73 in. | 29.5 in. (75 cm) | 2 in. (5 cm) | 17.3 in. (44 cm) | 4.7 in. (12 cm) | 33.9 in. (86 cm) | 2 in. (5 cm) | 18.1 in. (46 cm) | 5.1 in. (13 cm) | 30.7 in. (78 cm) | 3.9 in. (10 cm) | 19.7 in. (50 cm) | 6.7 in. (17 cm) |
| 74 in. | 30.3 in. (77 cm) | 2 in. (5 cm) | 17.7 in. (45 cm) | 4.7 in. (12 cm) | 34.3 in. (87 cm) | 2.4 in. (6 cm) | 18.1 in. (46 cm) | 5.1 in. (13 cm) | 31.1 in. (79 cm) | 3.9 in. (10 cm) | 19.7 in. (50 cm) | 6.7 in. (17 cm) |
| 75 in. | 30.7 in. (78 cm) | 2 in. (5 cm) | 17.7 in. (45 cm) | 4.7 in. (12 cm) | 34.7 in. (88 cm) | 2.4 in. (6 cm) | 18.1 in. (46 cm) | 5.1 in. (13 cm) | 31.5 in. (80 cm) | 3.9 in. (10 cm) | 19.7 in. (50 cm) | 6.7 in. (17 cm) |
| 76 in. | 31.1 in. (79 cm) | 2 in. (5 cm) | 17.7 in. (45 cm) | 4.7 in. (12 cm) | 35.4 in. (90 cm) | 2.4 in. (6 cm) | 18.5 in. (47 cm) | 5..5 in. (14 cm) | 31.9 in. (81 cm) | 4.3 in. (11 cm) | 20.1 in. (51 cm) | 7.1 in. (18 cm) |
| 77 in. | 31.5 in. (80 cm) | 2 in. (5 cm) | 17.7 in. (45 cm) | 4.7 in. (12 cm) | 35.8 in. (91 cm) | 2.4 in. (6 cm) | 18.5 in. (47 cm) | 5..5 in. (14 cm) | 32.3 in. (82 cm) | 4.3 in. (11 cm) | 20.1 in. (51 cm) | 7.1 in. (18 cm) |
| 78 in. | 31.9 in. (81 cm) | 2 in. (5 cm) | 17.7 in. (45 cm) | 4.7 in. (12 cm) | 36.2 in. (92 cm) | 2.4 in. (6 cm) | 18.5 in. (47 cm) | 5..5 in. (14 cm) | 32.7 in. (83 cm) | 4.3 in. (11 cm) | 20.1 in. (51 cm) | 7.1 in. (18 cm) |
| 79 in. | 32.3 in. (82 cm) | 2 in. (5 cm) | 17.7 in. (45 cm) | 4.7 in. (12 cm) | 36.6 in. (93 cm) | 2.4 in. (6 cm) | 18.5 in. (47 cm) | 5..5 in. (14 cm) | 33.1 in. (84 cm) | 4.3 in. (11 cm) | 20.1 in. (51 cm) | 7.1 in. (18 cm) |
| 80 in. | 32.7 in. (83 cm) | 2 in. (5 cm) | 18.1 in. (46 cm) | 5.1 in. (13 cm) | 37 in. (94 cm) | 2.4 in. (6 cm) | 18.5 in. (47 cm) | 5..5 in. (14 cm) | 33.5 in. (85 cm) | 4.3 in. (11 cm) | 20.5 in. (52 cm) | 7.5 in. (19 cm) |
| 81 in. | 33 in. (84 cm) | 2 in. (5 cm) | 18.1 in. (46 cm) | 5.1 in. (13 cm) | 37.8 in. (96 cm) | 2.4 in. (6 cm) | 18.5 in. (47 cm) | 5.9 in. (15 cm) | 34.3 in. (87 cm) | 4.3 in. (11 cm) | 20.5 in. (52 cm) | 7.5 in. (19 cm) |
| 82 in. | 33.5 in. (85 cm) | 2.4 in. (6 cm) | 18.1 in. (46 cm) | 5.1 in. (13 cm) | 38.2 in. (97 cm) | 2.4 in. (6 cm) | 18.5 in. (47 cm) | 5.9 in. (15 cm) | 34.7 in. (88 cm) | 4.3 in. (11 cm) | 20.5 in. (52 cm) | 7.5 in. (19 cm) |
| 83 in. | 33.9 in. (86 cm) | 2.4 in. (6 cm) | 18.1 in. (46 cm) | 5.1 in. (13 cm) | 38.6 in. (98 cm) | 2.4 in. (6 cm) | 18.5 in. (47 cm) | 5.9 in. (15 cm) | 35 in. (89 cm) | 4.3 in. (11 cm) | 20.5 in. (52 cm) | 7.5 in. (19 cm) |
| 84 in. | 34.3 in. (87 cm) | 2.4 in. (6 cm) | 18.1 in. (46 cm) | 5.1 in. (13 cm) | 39 in. (99 cm) | 2.4 in. (6 cm) | 18.5 in. (47 cm) | 5.9 in. (15 cm) | 35.4 in. (90 cm) | 4.3 in. (11 cm) | 20.9 in. (53 cm) | 7.5 in. (19 cm) |
| 85 in. | 34.7 in. (88 cm) | 2.4 in. (6 cm) | 18.1 in. (46 cm) | 5.1 in. (13 cm) | 39.8 in. (101 cm) | 2.4 in. (6 cm) | 18.9 in. (48 cm) | 5.9 in. (15 cm) | 35.8 in. (91 cm) | 4.7 in. (12 cm) | 20.9 in. (53 cm) | 7.9 in. (20 cm) |
| 86 in. | 35.4 in. (90 cm) | 2.4 in. (6 cm) | 18.5 in. (47 cm) | 5..5 in. (14 cm) | 40.2 in. (102 cm) | 2.4 in. (6 cm) | 19.3 in. (49 cm) | 5.9 in. (15 cm) | 36.2 in. (92 cm) | 4.7 in. (12 cm) | 20.9 in. (53 cm) | 7.9 in. (20 cm) |
| 87 in. | 35.8 in. (91 cm) | 2.4 in. (6 cm) | 18.5 in. (47 cm) | 5..5 in. (14 cm) | 40.6 in. (103 cm) | 2.4 in. (6 cm) | 19.3 in. (49 cm) | 6.3 in. (16 cm) | 36.6 in. (93 cm) | 4.7 in. (12 cm) | 20.9 in. (53 cm) | 7.9 in. (20 cm) |
| 88 in. | 36.2 in. (92 cm) | 2.4 in. (6 cm) | 18.5 in. (47 cm) | 5..5 in. (14 cm) | 40.9 in. (104 cm) | 2.8 in. (7 cm) | 19.3 in. (49 cm) | 6.3 in. (16 cm) | 37 in. (94 cm) | 4.7 in. (12 cm) | 20.9 in. (53 cm) | 7.9 in. (20 cm) |
| 89 in. | 36.6 in. (93 cm) | 2.4 in. (6 cm) | 18.5 in. (47 cm) | 5..5 in. (14 cm) | 41.3 in. (105 cm) | 2.8 in. (7 cm) | 19.3 in. (49 cm) | 6.3 in. (16 cm) | 37.4 in. (95 cm) | 4.7 in. (12 cm) | 21.3 in. (54 cm) | 8.3 in. (21 cm) |
| 90 in. | 37 in. (94 cm) | 2.4 in. (6 cm) | 18.5 in. (47 cm) | 5..5 in. (14 cm) | 42.1 in. (107 cm) | 2.8 in. (7 cm) | 19.3 in. (49 cm) | 6.3 in. (16 cm) | 38.2 in. (97 cm) | 4.7 in. (12 cm) | 21.3 in. (54 cm) | 8.3 in. (21 cm) |
| 91 in. | 37.4 in. (95 cm) | 2.4 in. (6 cm) | 18.9 in. (48 cm) | 5..5 in. (14 cm) | 42.5 in. (108 cm) | 2.8 in. (7 cm) | 19.7 in. (50 cm) | 6.3 in. (16 cm) | 38.6 in. (98 cm) | 4.7 in. (12 cm) | 21.3 in. (54 cm) | 8.3 in. (21 cm) |
| 92 in. | 37.8 in. (96 cm) | 2.4 in. (6 cm) | 18.9 in. (48 cm) | 5.9 in. (15 cm) | 42.9 in. (109 cm) | 2.8 in. (7 cm) | 19.7 in. (50 cm) | 6.3 in. (16 cm) | 39 in. (99 cm) | 4.7 in. (12 cm) | 21.3 in. (54 cm) | 8.3 in. (21 cm) |
| 93 in. | 38.2 in. (97 cm) | 2.4 in. (6 cm) | 18.9 in. (48 cm) | 5.9 in. (15 cm) | 43.3 in. (110 cm) | 2.8 in. (7 cm) | 19.7 in. (50 cm) | 6.7 in. (17 cm) | 39.4 in. (100 cm) | 5.1 in. (13 cm) | 21.7 in. (55 cm) | 8.7 in. (22 cm) |
| 94 in. | 38.6 in. (98 cm) | 2.4 in. (6 cm) | 18.9 in. (48 cm) | 5.9 in. (15 cm) | 43.7 in. (111 cm) | 2.8 in. (7 cm) | 19.7 in. (50 cm) | 6.7 in. (17 cm) | 39.8 in. (101 cm) | 5.1 in. (13 cm) | 21.7 in. (55 cm) | 8.7 in. (22 cm) |
| 95 in. | 39 in. (99 cm) | 2.4 in. (6 cm) | 18.9 in. (48 cm) | 5.9 in. (15 cm) | 44.5 in. (113 cm) | 2.8 in. (7 cm) | 19.7 in. (50 cm) | 6.7 in. (17 cm) | 40.2 in. (102 cm) | 5.1 in. (13 cm) | 21.7 in. (55 cm) | 8.7 in. (22 cm) |
| 96 in. | 39.4 in. (100 cm) | 2.4 in. (6 cm) | 18.9 in. (48 cm) | 5.9 in. (15 cm) | 44.9 in. (114 cm) | 2.8 in. (7 cm) | 20.1 in. (51 cm) | 6.7 in. (17 cm) | 40.6 in. (103 cm) | 5.1 in. (13 cm) | 21.7 in. (55 cm) | 8.7 in. (22 cm) |
| 97 in. | 39.8 in. (101 cm) | 2.8 in. (7 cm) | 19.3 in. (49 cm) | 5.9 in. (15 cm) | 45.3 in. (115 cm) | 2.8 in. (7 cm) | 20.1 in. (51 cm) | 6.7 in. (17 cm) | 40.9 in. (104 cm) | 5.1 in. (13 cm) | 21.7 in. (55 cm) | 8.7 in. (22 cm) |
| 98 in. | 40.2 in. (102 cm) | 2.8 in. (7 cm) | 19.3 in. (49 cm) | 6.3 in. (16 cm) | 45.7 in. (116 cm) | 2.8 in. (7 cm) | 20.1 in. (51 cm) | 7.1 in. (18 cm) | 41.3 in. (105 cm) | 5.1 in. (13 cm) | 22.1 in. (56 cm) | 9.1 in. (23 cm) |
| Screen size | 16:10 WXGA 4:3 XGA 16:9 Widescreen | |||||||||||
| Minimum projection distance (A)* | Vertical height adjustment (B)** | Distance from top of image to ceiling (C) | Distance from top of image to center of lens (D) | Minimum projection distance (A)* | Vertical height adjustment (B)** | Distance from top of image to ceiling (C) | Distance from top of image to center of lens (D) | Minimum projection distance (A)* | Vertical height adjustment (B)** | Distance from top of image to ceiling (C) | Distance from top of image to center of lens (D) | |
| 99 in. | 40.9 in. (104 cm) | 2.8 in. (7 cm) | 19.3 in. (49 cm) | 6.3 in. (16 cm) | 46.5 in. (118 cm) | 2.8 in. (7 cm) | 20.1 in. (51 cm) | 7.1 in. (18 cm) | 41.7 in. (106 cm) | 5.1 in. (13 cm) | 22.1 in. (56 cm) | 9.1 in. (23 cm) |
| 100 in. | 41.3 in. (105 cm) | 2.8 in. (7 cm) | 19.3 in. (49 cm) | 6.3 in. (16 cm) | 46.9 in. (119 cm) | 2.8 in. (7 cm) | 20.1 in. (51 cm) | 7.1 in. (18 cm) | 42.5 in. (108 cm) | 5.1 in. (13 cm) | 22.1 in. (56 cm) | 9.1 in. (23 cm) |
| 101 in. | 41.7 in. (106 cm) | 2.8 in. (7 cm) | 19.3 in. (49 cm) | 6.3 in. (16 cm) | - | - | - | 42.9 in. (109 cm) | 5.1 in. (13 cm) | 22.1 in. (56 cm) | 9.1 in. (23 cm) | |
| 102 in. | 42.1 in. (107 cm) | 2.8 in. (7 cm) | 19.3 in. (49 cm) | 6.3 in. (16 cm) | - | - | - | 43.3 in. (110 cm) | 5.5 in. (14 cm) | 22.4 in. (57 cm) | 9.4 in. (24 cm) | |
| 103 in. | 42.5 in. (108 cm) | 2.8 in. (7 cm) | 19.7 in. (50 cm) | 6.3 in. (16 cm) | - | - | - | 43.7 in. (111 cm) | 5.5 in. (14 cm) | 22.4 in. (57 cm) | 9.4 in. (24 cm) | |
| 104 in. | 42.9 in. (109 cm) | 2.8 in. (7 cm) | 19.7 in. (50 cm) | 6.3 in. (16 cm) | - | - | - | 44.1 in. (112 cm) | 5.5 in. (14 cm) | 22.4 in. (57 cm) | 9.4 in. (24 cm) | |
| 105 in. | 43.3 in. (110 cm) | 2.8 in. (7 cm) | 19.7 in. (50 cm) | 6.7 in. (17 cm) | - | - | - | 44.5 in. (113 cm) | 5.5 in. (14 cm) | 22.4 in. (57 cm) | 9.4 in. (24 cm) | |
| 106 in. | 43.7 in. (111 cm) | 2.8 in. (7 cm) | 19.7 in. (50 cm) | 6.7 in. (17 cm) | - | - | - | 44.9 in. (114 cm) | 5.5 in. (14 cm) | 22.8 in. (58 cm) | 9.8 in. (25 cm) | |
| 107 in. | 44.1 in. (112 cm) | 2.8 in. (7 cm) | 19.7 in. (50 cm) | 6.7 in. (17 cm) | - | - | - | 45.3 in. (115 cm) | 5.5 in. (14 cm) | 22.8 in. (58 cm) | 9.8 in. (25 cm) | |
| 108 in. | 44.5 in. (113 cm) | 2.8 in. (7 cm) | 20.1 in. (51 cm) | 6.7 in. (17 cm) | - | - | - | 45.7 in. (116 cm) | 5.5 in. (14 cm) | 22.8 in. (58 cm) | 9.8 in. (25 cm) | |
| 109 in. | 44.9 in. (114 cm) | 2.8 in. (7 cm) | 20.1 in. (51 cm) | 6.7 in. (17 cm) | - | - | - | 46.5 in. (118 cm) | 5.5 in. (14 cm) | 22.8 in. (58 cm) | 9.8 in. (25 cm) | |
| 110 in. | 45.3 in. (115 cm) | 2.8 in. (7 cm) | 20.1 in. (51 cm) | 6.7 in. (17 cm) | - | - | - | 46.9 in. (119 cm) | 5.5 in. (14 cm) | 22.8 in. (58 cm) | 9.8 in. (25 cm) | |
| 111 in. | 45.7 in. (116 cm) | 2.8 in. (7 cm) 20.1 in. (51 cm) 7.1 in. (18 cm) ---- | ||||||||||
| 112 in. | 46.5 in. (118 cm) | 2.8 in. (7 cm) 20.1 in. (51 cm) 7.1 in. (18 cm) ---- | ||||||||||
| 113 in. | 46.9 in. (119 cm) | 2.8 in. (7 cm) 20.1 in. (51 cm) 7.1 in. (18 cm) ---- | ||||||||||
* Projection distance is measured from the projector lens to the projection surface.
** Vertical adjustments are made with the vertical height adjustment screw. (See item "E" in the image on page 10).
Installation Measurements for PowerLite EB-L200SW - Tele
| Screen size range Projection distance range (A) | Vertical height range (B) | Distance from top of projected image to ceiling range (C) | |
| 16:10 WXGA* | 50 - 84 in. 27.6 - 46.9 in. (70 - 11 cm) 0 - 6.7 in. (0 - 17 cm) 20.1 - 26 in. (51 - 66 cm) | ||
| 4:3 XGA* | 44 - 74 in. 27.2 - 46.9 in. (69 - 11 cm) 0 - 6.7 in. (0 - 17 cm) 20.1 - 26 in. (51 - 66 cm) | ||
| 16:9 Widescreen* | 48 - 82 in. 27.2 - 46.9 in. (69 - 11 cm) 2 - 9.1 in. (5 - 23 cm) 17.7 - 23.6 in. (45 - 60 cm) |
* Allow at least 5.5 in. (14 cm) of space between the top of the projected image and the bottom of the wall plate.
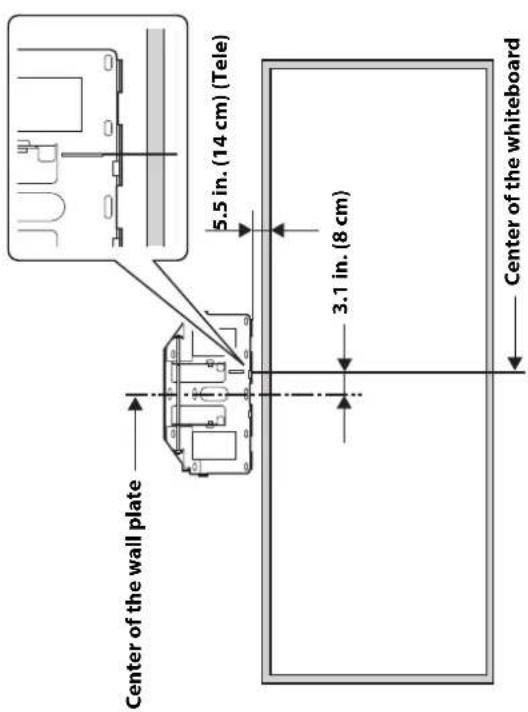
Installation Measurements for PowerLite EB-L200SX - Wide
| Screen size | 16:10 WXGA 4:3 XGA 16:9 Widescreen | |||||||||||
| Minimum projection distance (A)* | Vertical height adjustment (B)** | Distance from top of image to ceiling (C) | Distance from top of image to center of lens (D) | Minimum projection distance (A)* | Vertical height adjustment (B)** | Distance from top of image to ceiling (C) | Distance from top of image to center of lens (D) | Minimum projection distance (A)* | Vertical height adjustment (B)** | Distance from top of image to ceiling (C) | Distance from top of image to center of lens (D) | |
| 58 in. | ----27.6 in. | (70 cm) 5.9 in. | (15 cm) 20.9 in. (53 cm) | 7.9 in. (20 cm) | ||||||||
| 59 in. | ----28 in. | (71 cm) 6.3 in. | (16 cm) 21.3 in. (54 cm) | 8.3 in. (21 cm) | ||||||||
| 60 in. | 27.6 in. (70 cm) | 4.3 in. (11 cm) | 19.3 in. (49 cm) | 6.3 in. (16 cm) | - | - | - | - | 28.4 in. (72 cm) | 6.3 in. (16 cm) | 21.3 in. (54 cm) | 8.3 in. (21 cm) |
| 61 in. | 28.4 in. (72 cm) | 4.7 in. (12 cm) | 19.7 in. (50 cm) | 6.7 in. (17 cm) | - | - | - | - | 29.1 in. (74 cm) | 6.3 in. (16 cm) | 21.7 in. (55 cm) | 8.3 in. (21 cm) |
| 62 in. | 28.7 in. (73 cm) | 4.7 in. (12 cm) | 19.7 in. (50 cm) | 6.7 in. (17 cm) | - | - | - | - | 29.5 in. (75 cm) | 6.3 in. (16 cm) | 21.7 in. (55 cm) | 8.7 in. (22 cm) |
| 63 in. | 29.1 in. (74 cm) | 4.7 in. (12 cm) | 19.7 in. (50 cm) | 6.7 in. (17 cm) | 27.6 in. (70 cm) | 0.8 in. (2 cm) | 16.1 in. (41 cm) | 3.1 in. (8 cm) | 29.9 in. (76 cm) | 6.3 in. (16 cm) | 21.7 in. (55 cm) | 8.7 in. (22 cm) |
| 64 in. | 29.5 in. (75 cm) | 4.7 in. (12 cm) | 20.1 in. (51 cm) | 6.7 in. (17 cm) | 28 in. (71 cm) | 0.8 in. (2 cm) | 16.5 in. (42 cm) | 3.1 in. (8 cm) | 30.3 in. (77 cm) | 6.7 in. (17 cm) | 22.1 in. (56 cm) | 8.7 in. (22 cm) |
| 65 in. | 29.9 in. (76 cm) | 4.7 in. (12 cm) | 20.1 in. (51 cm) | 7.1 in. (18 cm) | 28.4 in. (72 cm) | 0.8 in. (2 cm) | 16.5 in. (42 cm) | 3.1 in. (8 cm) | 31.1 in. (79 cm) | 6.7 in. (17 cm) | 22.1 in. (56 cm) | 9.1 in. (23 cm) |
| 66 in. | 30.7 in. (78 cm) | 4.7 in. (12 cm) | 20.1 in. (51 cm) | 7.1 in. (18 cm) | 28.7 in. (73 cm) | 0.8 in. (2 cm) | 16.5 in. (42 cm) | 3.5 in. (9 cm) | 31.5 in. (80 cm) | 6.7 in. (17 cm) | 22.1 in. (56 cm) | 9.1 in. (23 cm) |
| 67 in. | 31.1 in. (79 cm) | 5.1 in. (13 cm) | 20.1 in. (51 cm) | 7.1 in. (18 cm) | 29.1 in. (74 cm) | 0.8 in. (2 cm) | 16.5 in. (42 cm) | 3.5 in. (9 cm) | 31.9 in. (81 cm) | 6.7 in. (17 cm) | 22.4 in (57 cm) | 9.1 in. (23 cm) |
| 68 in. | 31.5 in. (80 cm) | 5.1 in. (13 cm) | 20.5 in. (52 cm) | 7.1 in. (18 cm) | 29.5 in. (75 cm) | 0.8 in. (2 cm) | 16.5 in. (42 cm) | 3.5 in. (9 cm) | 32.3 in. (82 cm) | 6.7 in. (17 cm) | 22.4 in (57 cm) | 9.4 in. (24 cm) |
| 69 in. | 31.9 in. (81 cm) | 5.1 in. (13 cm) | 20.5 in. (52 cm) | 7.5 in. (19 cm) | 30.3 in. (77 cm) | 0.8 in. (2 cm) | 16.5 in. (42 cm) | 3.5 in. (9 cm) | 33.1 in. (84 cm) | 7.1 in. (18 cm) | 22.4 in (57 cm) | 9.4 in. (24 cm) |
| 70 in. | 32.7 in. (83 cm) | 5.1 in. (13 cm) | 20.5 in. (52 cm) | 7.5 in. (19 cm) | 30.7 in. (78 cm) | 0.8 in. (2 cm) | 16.5 in. (42 cm) | 3.5 in. (9 cm) | 33.5 in. (85 cm) | 7.1 in. (18 cm) | 22.8 in. (58 cm) | 9.4 in. (24 cm) |
| 71 in. | 33.1 in. (84 cm) | 5.1 in. (13 cm) | 20.5 in. (52 cm) | 7.5 in. (19 cm) | 31.1 in. (79 cm) | 0.8 in. (2 cm) | 16.9 in. (43 cm) | 3.5 in. (9 cm) | 33.9 in. (86 cm) | 7.1 in. (18 cm) | 22.8 in. (58 cm) | 9.8 in. (25 cm) |
| 72 in. | 33.5 in. (85 cm) | 5.1 in. (13 cm) | 20.9 in. (53 cm) | 7.9 in. (20 cm) | 31.5 in. (80 cm) | 0.8 in. (2 cm) | 16.9 in. (43 cm) | 3.5 in. (9 cm) | 34.3 in. (87 cm) | 7.1 in. (18 cm) | 22.8 in. (58 cm) | 9.8 in. (25 cm) |
| 73 in. | 33.9 in. (86 cm) | 5.1 in. (13 cm) | 20.9 in. (53 cm) | 7.9 in. (20 cm) | 31.9 in. (81 cm) | 0.8 in. (2 cm) | 16.9 in. (43 cm) | 3.5 in. (9 cm) | 35 in. (89 cm) | 7.5 in. (19 cm) | 23.2 in. (59 cm) | 9.8 in. (25 cm) |
| 74 in. | 34.3 in. (87 cm) | 5.5 in. (14 cm) | 20.9 in. (53 cm) | 7.9 in. (20 cm) | 32.3 in. (82 cm) | 0.8 in. (2 cm) | 16.9 in. (43 cm) | 3.9 in. (10 cm) | 35.4 in. (90 cm) | 7.5 in. (19 cm) | 23.2 in. (59 cm) | 10.2 in. (26 cm) |
| 75 in. | 35 in. (89 cm) | 5.5 in. (14 cm) | 21.3 in. (54 cm) | 7.9 in. (20 cm) | 32.7 in. (83 cm) | 0.8 in. (2 cm) | 16.9 in. (43 cm) | 3.9 in. (10 cm) | 35.8 in. (91 cm) | 7.5 in. (19 cm) | 23.6 in. (60 cm) | 10.2 in. (26 cm) |
| 76 in. | 35.4 in. (90 cm) | 5.5 in. (14 cm) | 21.3 in. (54 cm) | 8.3 in. (21 cm) | 33.5 in. (85 cm) | 0.8 in. (2 cm) | 16.9 in. (43 cm) | 3.9 in. (10 cm) | 36.2 in. (92 cm) | 7.5 in. (19 cm) | 23.6 in. (60 cm) | 10.2 in. (26 cm) |
| 77 in. | 35.8 in. (91 cm) | 5.5 in. (14 cm) | 21.3 in. (54 cm) | 8.3 in. (21 cm) | 33.9 in. (86 cm) | 0.8 in. (2 cm) | 16.9 in. (43 cm) | 3.9 in. (10 cm) | 37 in. (94 cm) | 7.5 in. (19 cm) | 23.6 in. (60 cm) | 10.6 in. (27 cm) |
| 78 in. | 36.2 in. (92 cm) | 5.5 in. (14 cm) | 21.3 in. (54 cm) | 8.3 in. (21 cm) | 34.3 in. (87 cm) | 0.8 in. (2 cm) | 17.3 in. (44 cm) | 3.9 in. (10 cm) | 37.4 in. (95 cm) | 7.9 in. (20 cm) | 23.6 in. (60 cm) | 10.6 in. (27 cm) |
| 79 in. | 37 in. (94 cm) | 5.5 in. (14 cm) | 21.7 in. (55 cm) | 8.3 in. (21 cm) | 34.7 in. (88 cm) | 0.8 in. (2 cm) | 17.3 in. (44 cm) | 3.9 in. (10 cm) | 37.8 in. (96 cm) | 7.9 in. (20 cm) | 23.6 in. (60 cm) | 11 in. (28) cm) |
| 80 in. | 37.4 in. (95 cm) | 5.5 in. (14 cm) | 21.7 in. (55 cm) | 8.7 in. (22 cm) | 35 in. (89 cm) | 0.8 in. (2 cm) | 17.3 in. (44 cm) | 3.9 in. (10 cm) | 38.6 in. (98 cm) | 7.9 in. (20 cm) | 23.6 in. (60 cm) | 11 in. (28) cm) |
| 81 in. | 37.8 in. (96 cm) | 5.9 in. (15 cm) | 21.7 in. (55 cm) | 8.7 in. (22 cm) | 35.4 in. (90 cm) | 0.8 in. (2 cm) | 17.3 in. (44 cm) | 3.9 in. (10 cm) | 39 in. (99 cm) | 7.9 in. (20 cm) | 23.6 in. (60 cm) | 11 in. (28) cm) |
| 82 in. | 38.2 in. (97 cm) | 5.9 in. (15 cm) | 22.1 in. (56 cm) | 8.7 in. (22 cm) | 36.2 in. (92 cm) | 0.8 in. (2 cm) | 17.3 in. (44 cm) | 4.3 in. (11 cm) | 39.4 in. (100 cm) | 7.9 in. (20 cm) | 23.6 in. (60 cm) | 11.4 in. (29) cm) |
| 83 in. | 38.6 in. (98 cm) | 5.9 in. (15 cm) | 22.1 in. (56 cm) | 9.1 in. (23 cm) | 36.6 in. (93 cm) | 0.8 in. (2 cm) | 17.3 in. (44 cm) | 4.3 in. (11 cm) | 39.8 in. (101 cm) | 8.3 in. (21 cm) | 23.6 in. (60 cm) | 11.4 in. (29) cm) |
| 84 in. | 39.4 in. (100 cm) | 5.9 in. (15 cm) | 22.1 in. (56 cm) | 9.1 in. (23 cm) | 37 in. (94 cm) | 0.8 in. (2 cm) | 17.3 in. (44 cm) | 4.3 in. (11 cm) | 40.6 in. (103 cm) | 8.3 in. (21 cm) | 23.6 in. (60 cm) | 11.4 in. (29) cm) |
| 85 in. | 39.8 in. (101 cm) | 5.9 in. (15 cm) | 22.1 in. (56 cm) | 9.1 in. (23 cm) | 37.4 in. (95 cm) | 0.8 in. (2 cm) | 17.7 in. (45 cm) | 4.3 in. (11 cm) | 40.9 in. (104 cm) | 8.3 in. (21 cm) | 23.6 in. (60 cm) | 11.8 in. (30) cm) |
| 86 in. | 40.2 in. (102 cm) | 5.9 in. (15 cm) | 22.4 in. (57 cm) | 9.1 in. (23 cm) | 37.8 in. (96 cm) | 0.8 in. (2 cm) | 17.7 in. (45 cm) | 4.3 in. (11 cm) | 41.3 in. (105 cm) | 8.3 in. (21 cm) | 23.6 in. (60 cm) | 11.8 in. (30) cm) |
| 87 in. | 40.6 in. (103 cm) | 6.3 in. (16 cm) | 22.4 in. (57 cm) | 9.4 in. (24 cm) | 38.2 in. (97 cm) | 0.8 in. (2 cm) | 17.7 in. (45 cm) | 4.3 in. (11 cm) | 41.7 in. (106 cm) | 8.3 in. (21 cm) | 23.6 in. (60 cm) | 11.8 in. (30) cm) |
| 88 in. | 41.3 in. (105 cm) | 6.3 in. (16 cm) | 22.4 in. (57 cm) | 9.4 in. (24 cm) | 38.6 in. (98 cm) | 0.8 in. (2 cm) | 17.7 in. (45 cm) | 4.3 in. (11 cm) | 42.5 in. (108 cm) | 8.7 in. (22 cm) | 23.6 in. (60 cm) | 12.2 in. (31) cm) |
| 89 in. | 41.7 in. (106 cm) | 6.3 in. (16 cm) | 22.4 in. (57 cm) | 9.4 in. (24 cm) | 39.4 in. (100 cm) | 0.8 in. (2 cm) | 17.7 in. (45 cm) | 4.3 in. (11 cm) | 42.9 in. (109 cm) | 8.7 in. (22 cm) | 23.6 in. (60 cm) | 12.2 in. (31) cm) |
| 90 in. | 42.1 in. (107 cm) | 6.3 in. (16 cm) | 22.8 in. (58 cm) | 9.4 in. (24 cm) | 39.8 in. (101 cm) | 0.8 in. (2 cm) | 17.7 in. (45 cm) | 4.7 in. (12 cm) | 43.3 in. (110 cm) | 8.7 in. (22 cm) | 23.6 in. (60 cm) | 12.2 in. (31) cm) |
| 91 in. | 42.5 in. (108 cm) | 6.3 in. (16 cm) | 22.8 in. (58 cm) | 9.8 in. (25 cm) | 40.2 in. (102 cm) | 0.8 in. (2 cm) | 17.7 in. (45 cm) | 4.7 in. (12 cm) | 43.7 in. (111 cm) | 8.7 in. (22 cm) | 23.6 in. (60 cm) | 12.6 in. (32) cm) |
| 92 in. | 42.9 in. (109 cm) | 6.3 in. (16 cm) | 22.8 in. (58 cm) | 9.8 in. (25 cm) | 40.6 in. (103 cm) | 0.8 in. (2 cm) | 17.7 in. (45 cm) | 4.7 in. (12 cm) | 44.5 in. (113 cm) | 8.7 in. (22 cm) | 23.6 in. (60 cm) | 12.6 in. (32) cm) |
| 93 in. | 43.7 in. (111 cm) | 6.3 in. (16 cm) | 23.2 in. (59 cm) | 9.8 in. (25 cm) | 40.9 in. (104 cm) | 0.8 in. (2 cm) | 18.1 in. (46 cm) | 4.7 in. (12 cm) | 44.9 in. (114 cm) | 9.1 in. (23 cm) | 23.6 in. (60 cm) | 12.6 in. (32) cm) |
| 94 in. | 44.1 in. (112 cm) | 6.7 in. (17 cm) | 23.2 in. (59 cm) | 10.2 in. (26 cm) | 41.3 in. (105 cm) | 0.8 in. (2 cm) | 18.1 in. (46 cm) | 4.7 in. (12 cm) | 45.3 in. (115 cm) | 9.1 in. (23 cm) | 23.6 in. (60 cm) | 13 in. (33) cm) |
| 95 in. | 44.5 in. (113 cm) | 6.7 in. (17 cm) | 23.2 in. (59 cm) | 10.2 in. (26 cm) | 42.1 in. (107 cm) | 0.8 in. (2 cm) | 18.1 in. (46 cm) | 4.7 in. (12 cm) | 45.7 in. (116 cm) | 9.1 in. (23 cm) | 23.6 in. (60 cm) | 13 in. (33) cm) |
| 96 in. | 44.9 in. (114 cm) | 6.7 in. (17 cm) | 23.2 in. (59 cm) | 10.2 in. (26 cm) | 42.5 in. (108 cm) | 0.8 in. (2 cm) | 18.1 in. (46 cm) | 4.7 in. (12 cm) | 46.5 in. (118 cm) | 9.1 in. (23 cm) | 23.6 in. (60 cm) | 13 in. (33) cm) |
| Screen size | 16:10 WXGA 4:3 XGA 16:9 Widescreen | |||||||||||
| Minimum projection distance (A)* | Vertical height adjustment (B)** | Distance from top of image to ceiling (C) | Distance from top of image to center of lens (D) | Minimum projection distance (A)* | Vertical height adjustment (B)** | Distance from top of image to ceiling (C) | Distance from top of image to center of lens (D) | Minimum projection distance (A)* | Vertical height adjustment (B)** | Distance from top of image to ceiling (C) | Distance from top of image to center of lens (D) | |
| 97 in. | 45.7 in. (116 cm) | 6.7 in. (17 cm) | 23.6 in. (60 cm) | 10.2 in. (26 cm) | 42.9 in. (109 cm) | 0.8 in. (2 cm) | 18.1 in. (46 cm) | 5.1 in. (13 cm) | 46.9 in. (119 cm) | 9.1 in. (23 cm) | 23.6 in. (60 cm) | 13.4 in. (34 cm) |
| 98 in. | 46.1 in. (117 cm) | 6.7 in. (17 cm) | 23.6 in. (60 cm) | 10.6 in. (27 cm) | 43.3 in. (110 cm) | 0.8 in. (2 cm) | 18.1 in. (46 cm) | 5.1 in. (13 cm) | - | - | - | |
| 99 in. | 46.5 in. (118 cm) | 6.7 in. (17 cm) | 23.6 in. (60 cm) | 10.6 in. (27 cm) | 43.7 in. (111 cm) | 0.8 in. (2 cm) | 18.1 in. (46 cm) | 5.1 in. (13 cm) | - | - | - | |
| 100 in. | 46.9 in. (119 cm) | 6.7 in. (17 cm) | 23.6 in. (60 cm) | 10.6 in. (27 cm) | 44.1 in. (112 cm) | 0.8 in. (2 cm) | 18.5 in. (47 cm) | 5.1 in. (13 cm) | - | - | - | |
| 101 in. | ---- 44.9 in. (114 cm) | 0.8 in. (2 cm) | 18.5 in. (47 cm) | 5.1 in. (13 cm)--- | ||||||||
| 102 in. | ---- 45.3 in. (115 cm) | 0.8 in. (2 cm) | 18.5 in. (47 cm) | 5.1 in. (13 cm)--- | ||||||||
| 103 in. | ---- 45.7 in. (116 cm) | 0.8 in. (2 cm) | 18.5 in. (47 cm) | 5.1 in. (13 cm)--- | ||||||||
| 104 in. | ---- 46.1 in. (117 cm) | 0.8 in. (2 cm) | 18.5 in. (47 cm) | 5.1 in. (13 cm)--- | ||||||||
| 105 in. | ---- 46.5 in. (118 cm) | 0.8 in. (2 cm) | 18.5 in. (47 cm) | 5.5 in. (14 cm)--- | ||||||||
| 106 in. | ---- 46.9 in. (119 cm) | 0.8 in. (2 cm) | 18.9 in. (48 cm) | 5.5 in. (14 cm)--- | ||||||||
* Projection distance is measured from the projector lens to the projection surface.
** Vertical adjustments are made with the vertical height adjustment screw. (See item "E" in the image on page 10).
Installation Measurements for PowerLite EB-L200SX - Tele
| Screen size range | Projection distance range (A) | Vertical adjustment range (B) | Distance from top of projected image to ceiling range (C) | |
| 16:10 WXGA* | 44 - 74 in. | 27.6 - 46.9 in. (70 - 119 cm) | 0 - 7.1 in. (0 - 18 cm) | 19.7 - 25.6 in. (50 - 65 cm) |
| 4:3 XGA** | 46 - 78 in. | 27.2 - 46.5 in. (69 - 118 cm) | 2 - 8.7 in. (5 - 22 cm) | 17.7 - 23.6 in. (45 - 60 cm) |
| 16:9 Widescreen* | 43 - 72 in. | 27.6 - 46.9 in. (70 - 119 cm) | 2 - 9.1 in. (5 - 23 cm) | 17.7 - 23.6 in. (45 - 60 cm) |
* Allow at least 7.9 inches (20 cm) of space between the top of the projected image and the bottom of the wall plate. ** Allow at least 2 inches (5 cm) of space between the top of the projected image and the bottom of the wall plate.
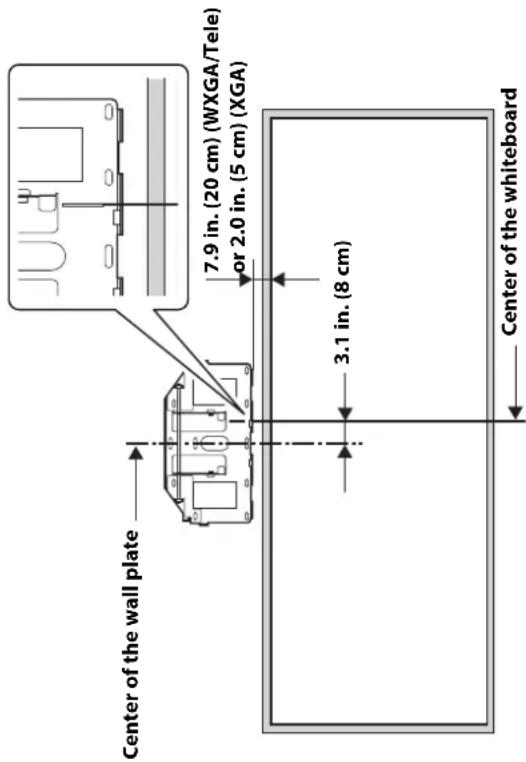
If you have a pre-existing interactive whiteboard, refer to the table below to identify common models and sizes. If your board is listed here, use the dimensions to reference the installation requirements found on pages 11 through 18.
Interactive whiteboard sizes
| Diagonal size specification | 16:10 WXGA 4:3 XGA 16:9 Widescreen | ||
| 64 inches — | SMARTTM Board® 660Promethean ActivBoard 164 | — | |
| 77 inches — SMART | Board 680 | SMART BoardX880 | — |
| 78 inches — Promethean ActivBoard 178 / 378 — | |||
| 87 inches SMART Board | 685SMART BoardX 885Promethean ActivBoard 387Promethean ActivBoard 587 pro | — | — |
| 94 inches — — SMART Board 690 | |||
| 95 inches — — Promethean ActivBoard 395 | Promethean ActivBoard 595 pro | ||
Make sure to follow the steps below to install the wall mount. If you ignore these steps, the wall mount could fall and cause personal injury or property damage.
Warning
☐ When you mount the projector on the wall with the wall mount, the wall requires enough strength to hold the projector, the wall mount, and the cables. This wall mount should be installed on a concrete wall. Confirm the weight of the projector, the wall mount, and the cables before installation, and maintain the strength of the wall. If the wall is not strong enough, reinforce the wall before installation.
☐ Install the wall mount so that it can sufficiently support the weight of the projector and wall mount, and resist any horizontal vibration. Use M8 nuts and bolts. Nuts and bolts smaller than M8 could cause the wall mount to fall.
☐ Epson accepts no responsibility for any damage or injury caused by lack of wall strength or inadequate installation.

At the point where the wall mount is installed, make sure there is a gap of 16 to 26 inches (410 to 660 mm) from the top of the image projected onto the white board to the ceiling. See "Positioning the Projector" on page 10 for more details.
1. Install the wall plate
- Determine where you want to install the wall plate, and then mark that position on the wall.
- Align the marked line on the wall plate with the vertical center of the whiteboard, as shown in the illustration below. The line is 3.1 inches (8 cm) to the right of the vertical center of the wall plate. Allow at least a 2 inch (5 cm) gap (PowerLite EB-L200SW) or a 5.5 inch (14 cm) gap (PowerLite EB-L200SX) between the top of the projected image and the bottom of the wall plate. However, if you are using the maximum (tele) screen size, refer to the tables on the previous pages.
After installing, you can slide the projector horizontally 1.8 inches (4.5 cm) by using the slider on the adjustment unit. See "Turn on the projector and check the image" on page 26 for more details.
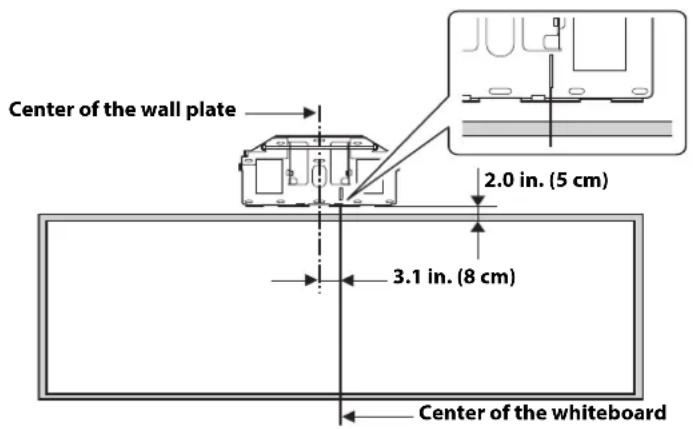
- Position the wall plate over the marks you made in step 1, and then mark the position of the wall plate's mounting holes as shown in the following illustration.
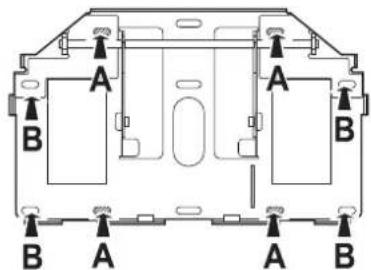
Use at least three mounting holes. If you are securing the wall plate in four places, drill the holes indicated by A or B in the illustration below.
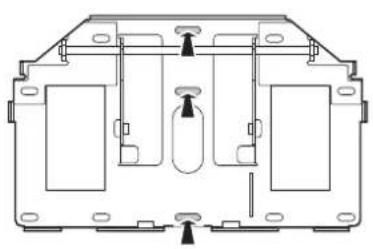
natural_image
Technical line drawing of a mechanical housing or enclosure with internal components and mounting holes (no text or symbols)Three mounting holes
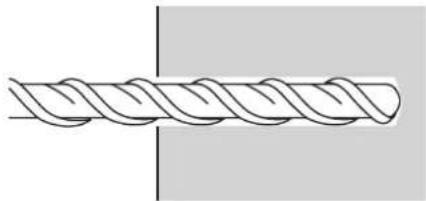
- Drill holes of the following diameters and depths at the points you marked.
| Drill diameter 0.3 in. (8.5 mm) | |
| Pilot hole depth 1.6 in. (40 mm) | |
| Anchor hole depth 1.4 in. (35 mm) |
natural_image
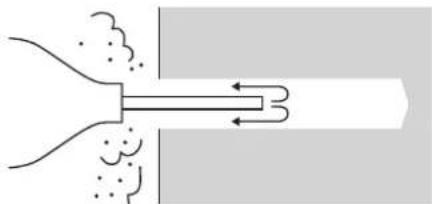
Pure line drawing of a twisted rope or helix without any text, numbers, or symbols- Use a device such as a dust pump to clean out concrete dust from the hole.
natural_image
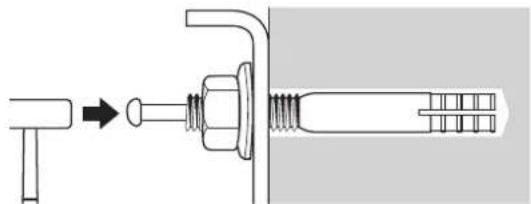
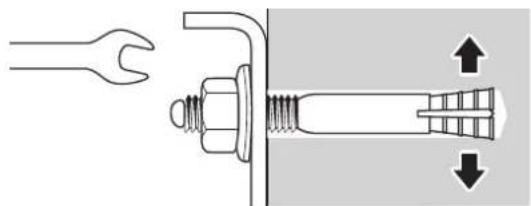
Diagram of a funnel emitting particles into a pipe with directional arrows (no text or labels)- Position the wall plate on the wall and insert M8 × 60 mm expansion anchors into the holes. Attach the nut and tap it with a hammer until the core touches the top of the anchor.
natural_image
Diagram of a mechanical assembly showing a bolt and nut assembly (no text or symbols)- Tighten the nut with a wrench to secure the wall plate to the wall.
natural_image
Technical diagram showing a wrench inserted into a bolted joint with directional arrows indicating movement (no text or symbols present)2. Assemble the wall mount
-
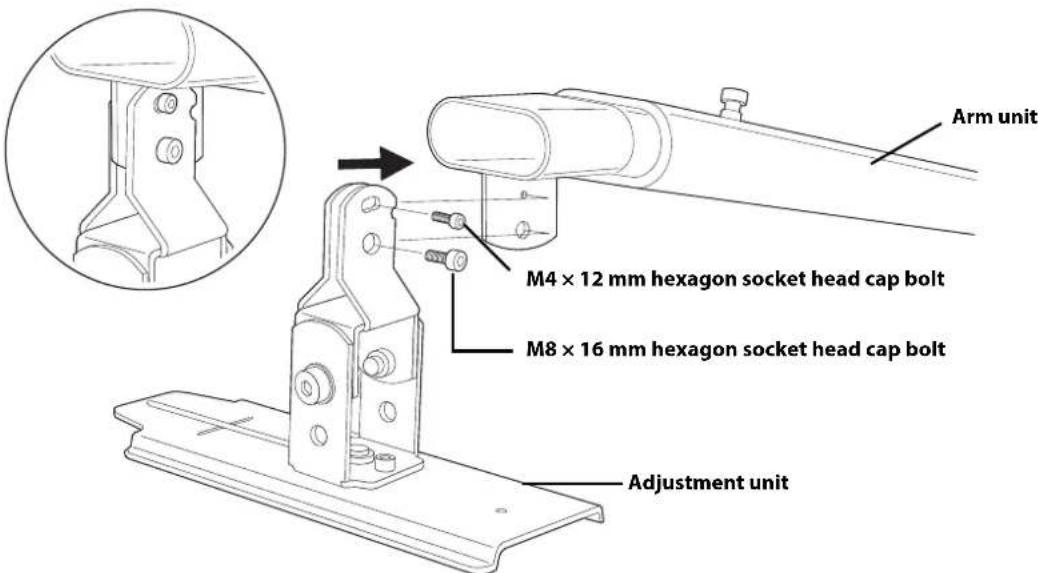
Attach the adjustment unit to the arm unit.
-
Partially tighten the M4 × 12 mm hexagon socket head cap bolt and M8 × 16 mm hexagon socket head cap bolt using the hexagonal wrenches (M4 and M8).
- Attach the arm plate using a hexagonal wrench (M8) and four M8 × 16 mm hexagon socket head cap bolts. Tighten the bolts firmly.
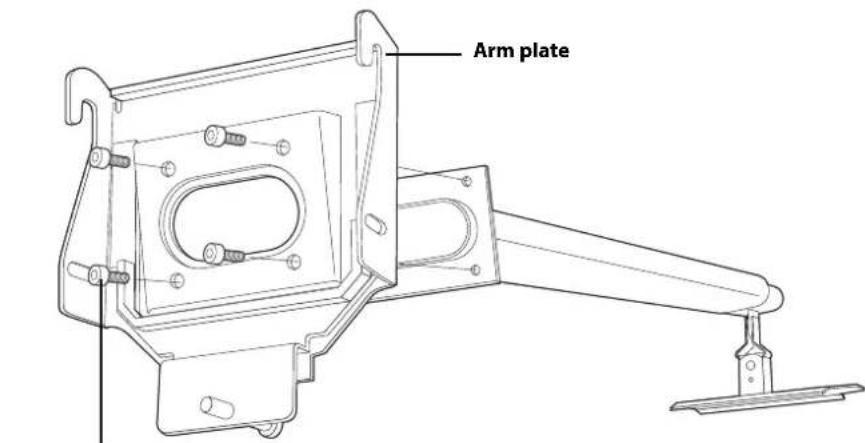
M8 × 16 mm hexagon socket head cap bolt (×4)
3. Route the cables through the arm unit
Route the projector's power cord and any additional cables connecting to the projector through the arm unit.

Be sure to also route the cables for any optional equipment (for example document camera, speakers, etc.) that may be used in the future. Otherwise, each time you need to connect another device, you will need to remove the projector from the mount to connect additional cables.
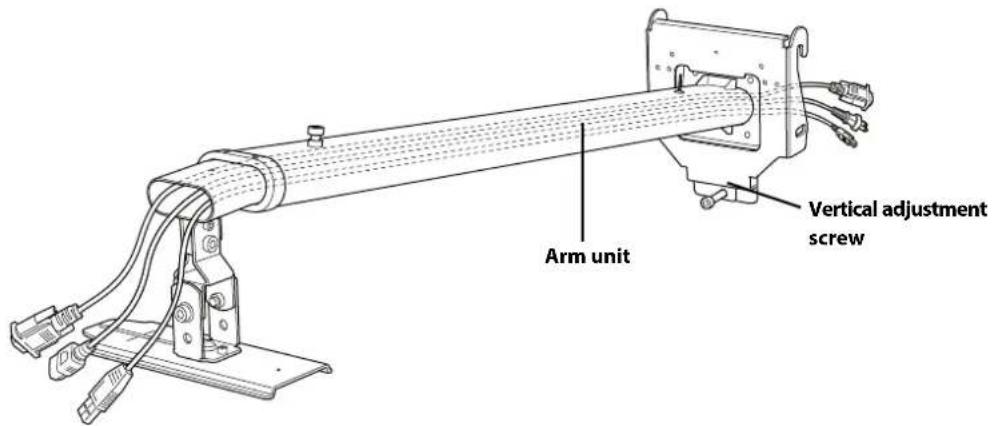
Caution
Problems may occur if you use this product without routing the cables through the arm unit.

Route the USB cable so that the type B connector emerges on the projector side. Epson recommends labeling any duplicate cables so that additional connections can be more easily identified.
4. Attach the wall mount to the wall plate
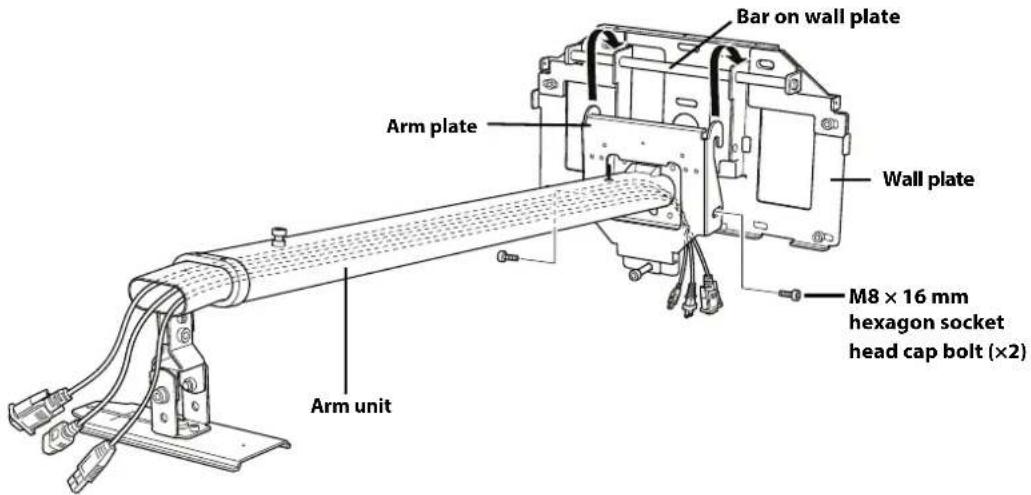
- Attach the hook on the arm plate to the bar on the wall plate.
- Partially tighten two M8 × 16 mm hexagon socket head cap bolts to secure the arm plate.
Caution
Take care not to trap the cables between the mount arm and wall plate.
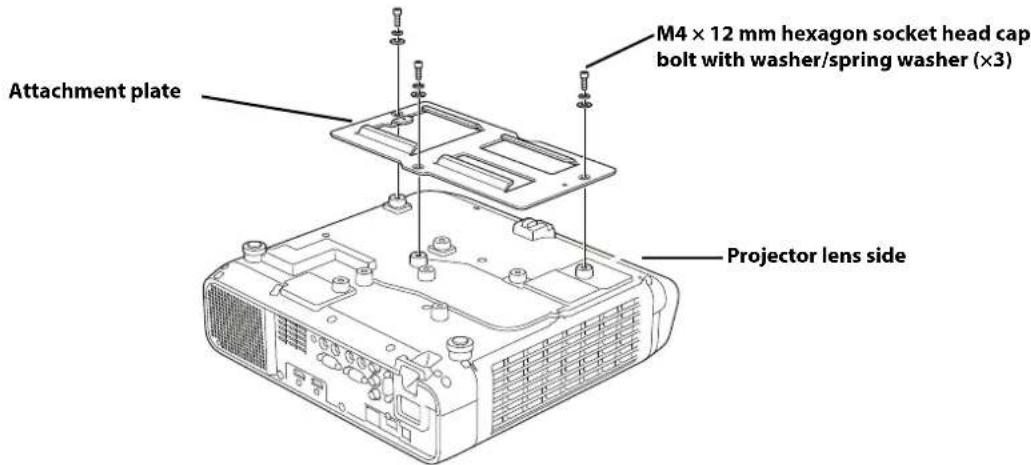
5. Attach the attachment plate to the projector
- Place the projector upside down.
- Attach the attachment plate to the projector using the hexagonal wrench (M4) and three M4 × 12 mm bolts with washers/spring washers.
Warning
When installing or adjusting the wall mount, do not use adhesives to prevent the bolts from loosening and do not use lubricants or oils on the projector slide plate. This may cause the case to crack and the projector to fall, resulting in personal injury or property damage.

Tighten the bolts firmly.
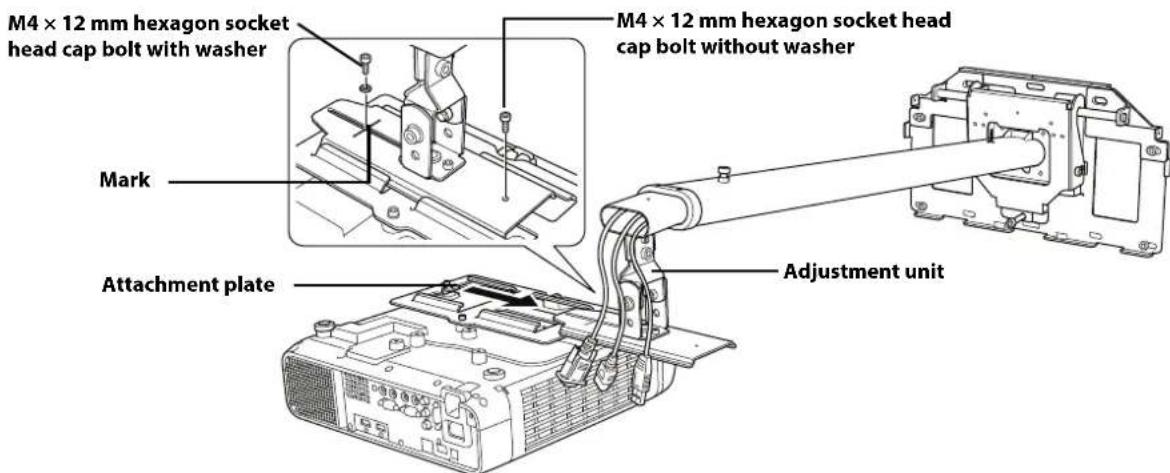
6. Attach the projector to the adjustment unit
- Slide the attachment plate onto the adjustment unit as shown below.
- Partially tighten two M4 × 12 mm bolts at the points marked on the adjustment unit as shown below.
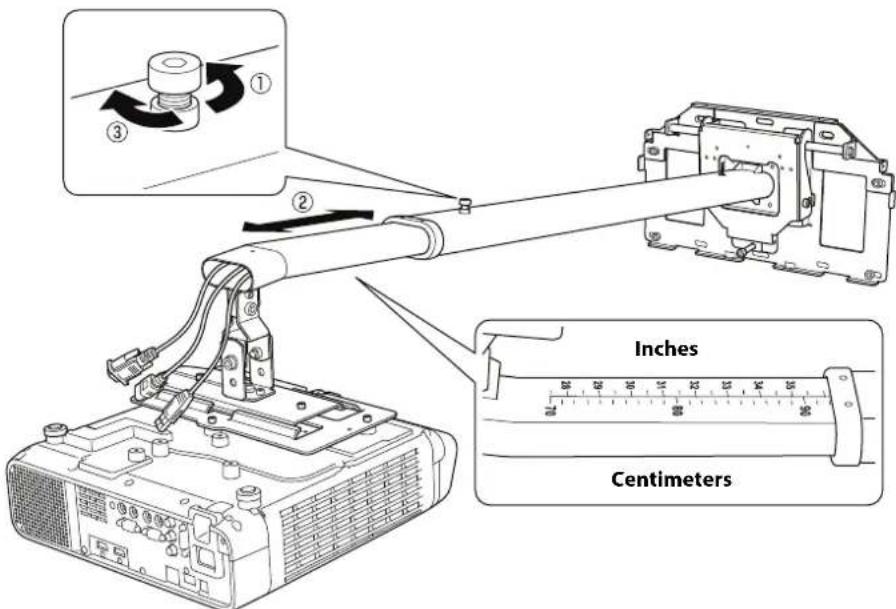
7. Adjust the arm length
- Loosen the screw on the arm (). ①
- Adjust the length of the arm using the measure on the bottom to match the projection distance recommended in "Positioning the Projector" on page 10 (⑫)
- After adjusting the length, secure the arm position temporarily by tightening the screw on top (13)
8. Connect the power cord and other cables to the projector
Connect any necessary cables such as the power cord, computer cable, HDMI cable, audio cables, and USB cable to the projector.
If you are planning to run the cables inside the wall, make sure you follow all local electrical codes. If you are running the cables outside the wall, use a cable management system to keep the cables from obstructing the image. An optional cable management system is available from Epson (part # ELPCK01).
9. Attach the cable cover to the projector
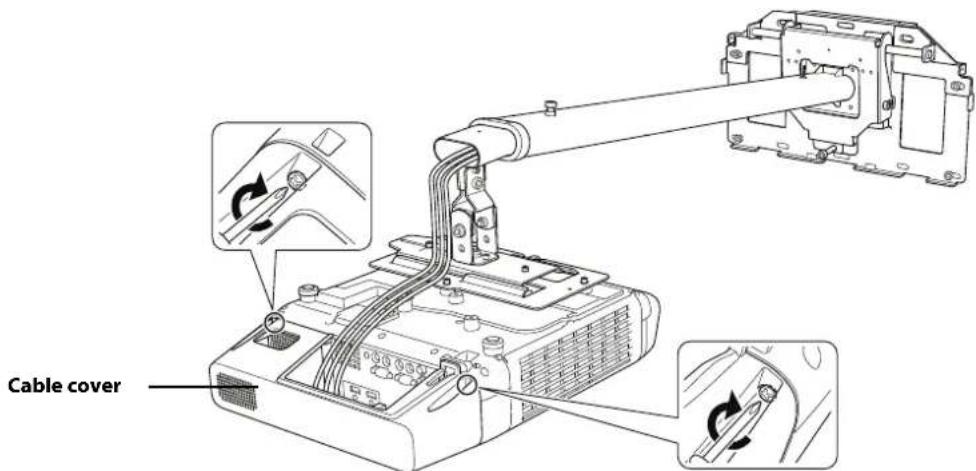
Take up the cable slack, and then attach the cable cover and use a cross-head screwdriver to tighten the screws (2) and secure the cable cover.
10. Turn on the projector and check the image
- Plug in and turn on the projector.
- Hold down the A/V Mute button on the remote control for five seconds to flip the image top-to-bottom.
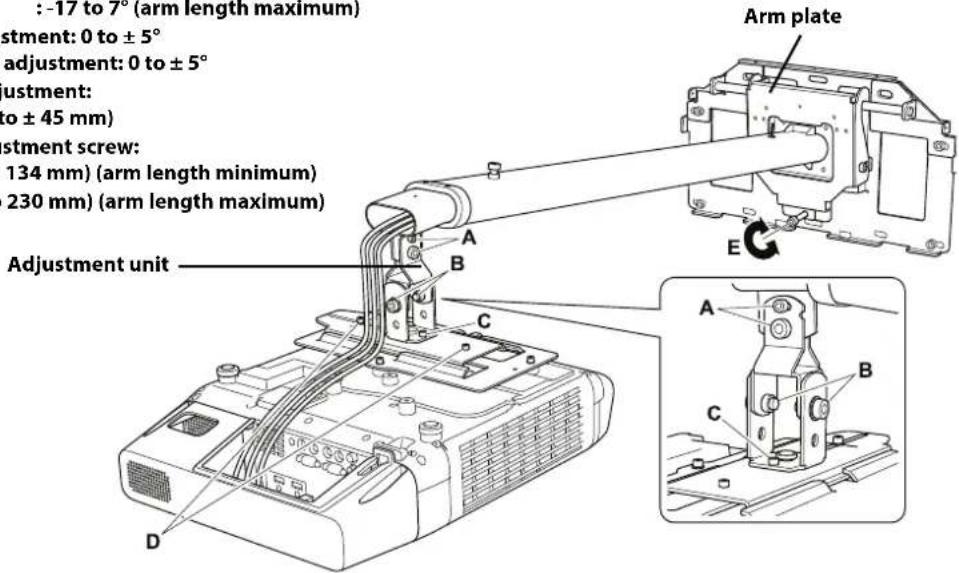
- Adjust the vertical height of the arm using screw (E) on the bottom of the arm plate. The arm rises when you tighten the screw, and lowers when you loosen it.
- Loosen the screws on the adjustment unit (A, B, C, and D) as shown below to adjust the image position.
A: Vertical tilt adjustment: -7 to 17° (arm length minimum) : -17 to 7° (arm length maximum)
B: Horizontal roll adjustment: 0 to ± 5°
C: Horizontal rotation adjustment: 0 to ±5°
D: Horizontal slide adjustment:
0 to ± 1.8 inches (0 to ± 45 mm)
E: Vertical height adjustment screw:
0 to 5.3 inches (0 to 134 mm) (arm length minimum)
0 to 9.1 inches (0 to 230 mm) (arm length maximum)
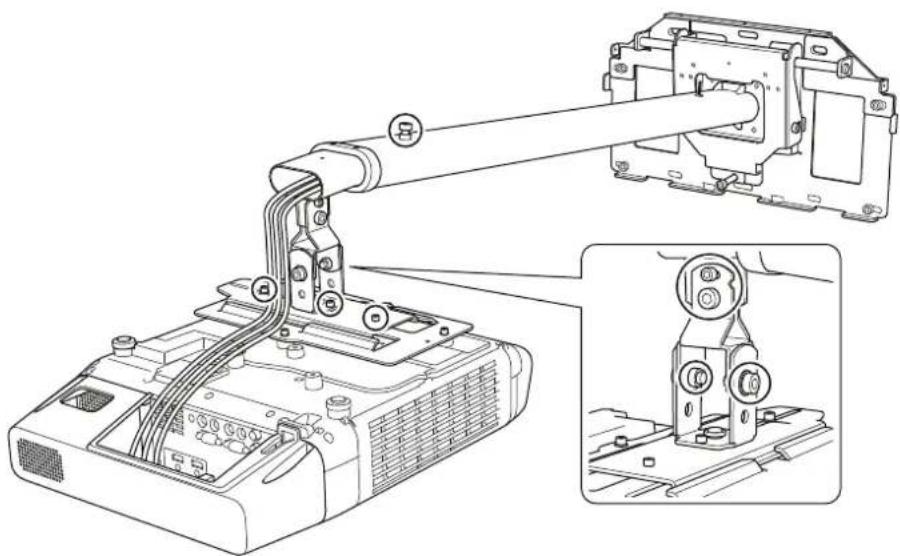
- Firmly tighten the screws on the arm unit and adjustment unit using the hexagonal wrenches (M4 and M8).
Warning
Tighten all screws firmly. Otherwise, the projector or wall mount may fall and cause personal injury or property damage.
natural_image
Technical line drawing of a mechanical device with attached cable and housing, showing assembly details (no text or symbols)11. Install the safety wire
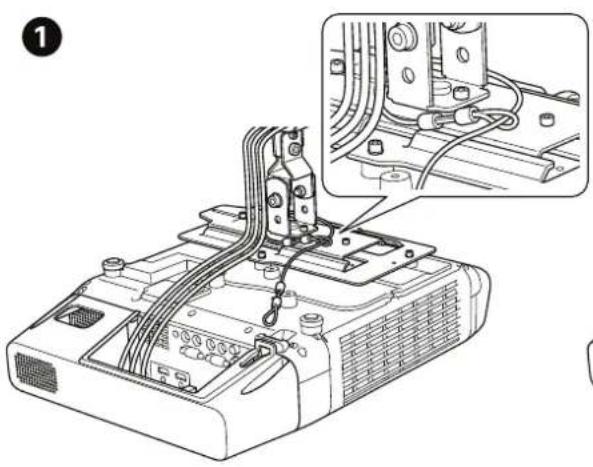
Loop one end of the safety wire around the wall mount as shown and use the included carabiner to clip the other end of the wire to the projector. Make sure you tighten the carabiner lock.
natural_image
Technical diagram of an electronic device with wiring and connectors, showing a close-up inset (no text or symbols)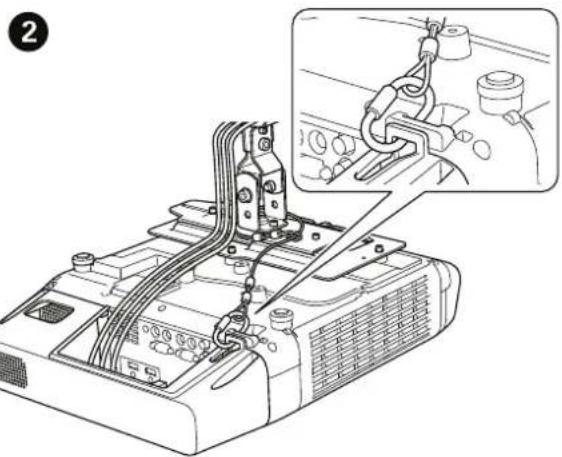
natural_image
Diagram of a mechanical device with wiring and connectors, showing a close-up inset of a cable being inserted into a housing (no text or symbols present)12. Attach the arm cover
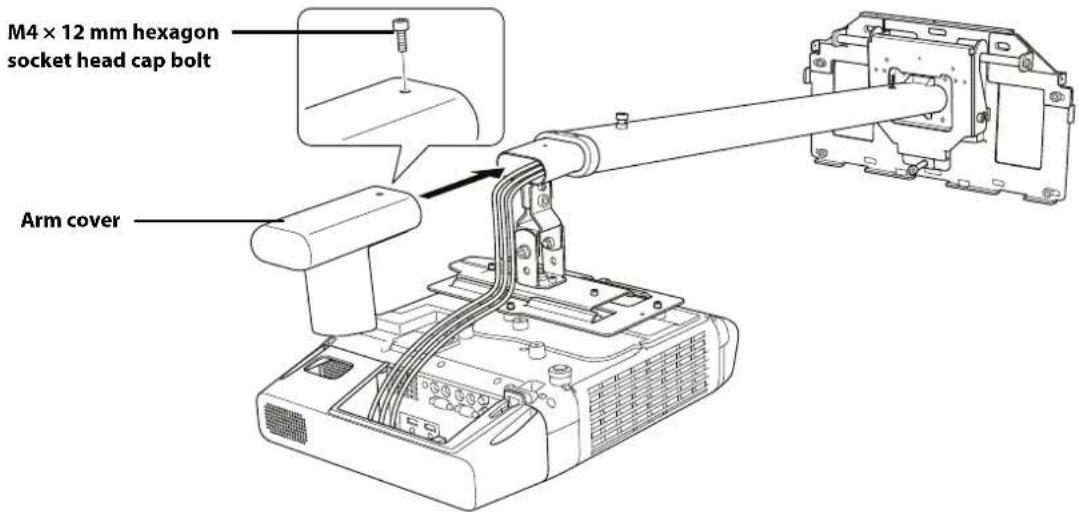
Secure the arm cover with a hexagonal wrench (M4) and an M4 × 12 mm hexagon socket head cap bolt.
13. Attach the wall plate cover
Secure the wall plate cover with a hexagonal wrench (M4) and three M4 × 12 mm hexagon socket head cap bolts.
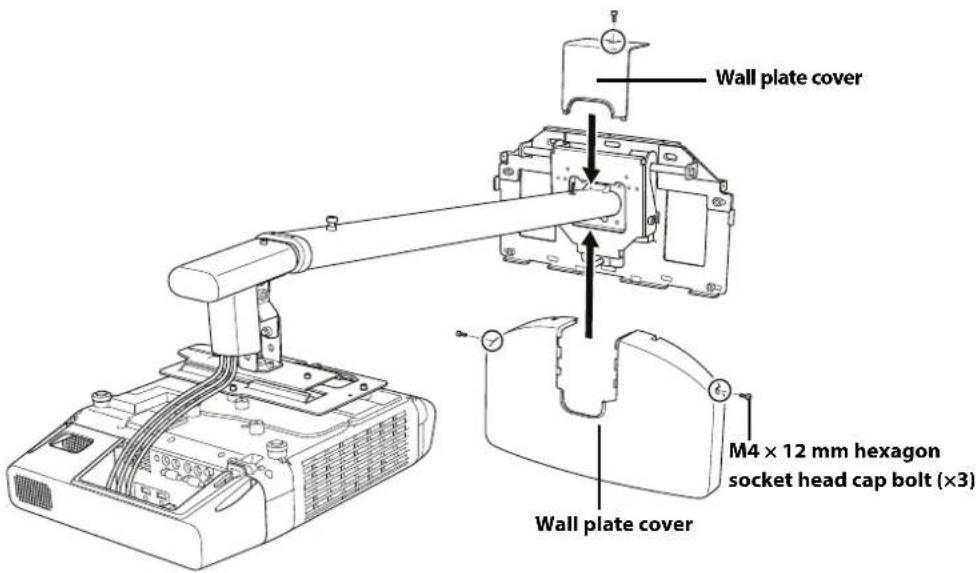

Depending on how the cables are wired, you may need to cut out parts of the wall plate cover to allow the cables to be passed through it.
When cutting the thin section of the wall plate cover and passing the cables through, make sure you smooth off any sharp edges to prevent damaging the cables.
Make sure you operate the cutter safely.

Caution
Only a specialist should remove or reinstall the projector for maintenance and repairs. Refer to the projector User's Guide for instructions on maintenance and repairs.

Warning
☐ Never loosen the bolts and nuts after installation. Regularly confirm that the bolts and screws have not become loose. If you find any loose bolts or screws, tighten them firmly. Otherwise, the projector or wall mount may fall and cause personal injury or property damage.
☐ Do not hang on the wall mount or hang a heavy object on the wall mount. If the projector or wall mount falls, it could cause personal injury or property damage.

After installation of the projector is complete, make sure you leave the remote control and batteries in the room with the projector.
- About This Installation Guide
- Safety Instructions
- Explanation of Symbols
- Safety Precautions for Installation
- Location
- Package Contents
- Specifications
- Connecting Devices
- Positioning the Projector
- Installing the Projector
- Warning
- Install the wall plate
- Assemble the wall mount
- Route the cables through the arm unit
- Caution
- Attach the wall mount to the wall plate
- Attach the attachment plate to the projector
- Attach the projector to the adjustment unit
- Adjust the arm length
- Connect the power cord and other cables to the projector
- Attach the cable cover to the projector
- Turn on the projector and check the image
- Install the safety wire
- Attach the arm cover
- Attach the wall plate cover
Brand : EPSON
Model : ELPMB64
Category : Video projector