TONNA353 - Range hood KKT Kolbe - Free user manual and instructions
Find the device manual for free TONNA353 KKT Kolbe in PDF.


| Product Type | Cooker Hood (Range Hood) |
| Brand | KKT Kolbe |
| Model | TONNA353 |
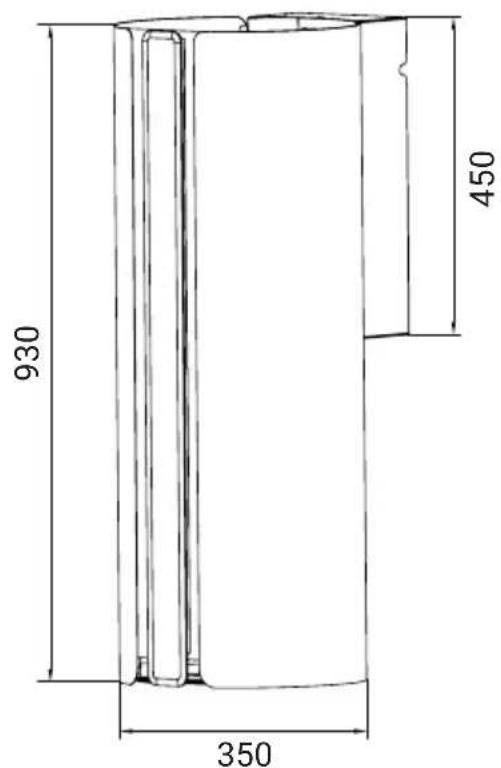
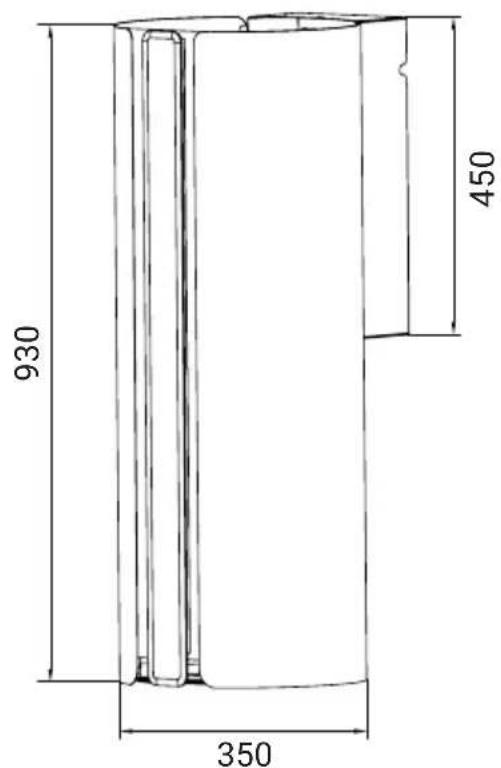
| Dimensions (W x D x H) | 350 x 350 x 930 mm |
| Weight | 15.9 kg |
| Power Consumption | 106.5 W (total), 30 W (most efficient mode) |
| Standby Power Consumption | 0.48 W |
| Voltage / Frequency | 220-240 V / 50 Hz |
| Number of Power Levels | 9 |
| Lighting | LED, 1 x 6.5 W, 54 lx |
| Maximum Airflow | 479 m³/h |
| Airflow in Most Efficient Mode | 197 m³/h |
| Maximum Noise Level | 58 dB |
| Exhaust Outlet Diameter | 150 mm |
| Cable Length | 1.3 m |
| Energy Efficiency Class | A+ |
| Grease Filter | Dishwasher-safe metal, clean every 2-3 weeks |
| Activated Carbon Filter | Type K116, replace every 3-12 months |
| Operating Modes | Exhaust air or recirculation |
| Controls | Touch sensor keys, digital display, delay function |
| Minimum Installation Height (Electric/Gas/Solid Fuel) | 65-70 cm / 70 cm / 85 cm |
| Included Accessories | Exhaust hose, carbon filter, non-return valve, mounting template, screws, dowels |
Frequently Asked Questions - TONNA353 KKT Kolbe
User questions about TONNA353 KKT Kolbe
0 question about this device. Answer the ones you know or ask your own.
Ask a new question about this device
Download the instructions for your Range hood in PDF format for free! Find your manual TONNA353 - KKT Kolbe and take your electronic device back in hand. On this page are published all the documents necessary for the use of your device. TONNA353 by KKT Kolbe.
USER MANUAL TONNA353 KKT Kolbe
User's manual → English language
Modell: TONNA353
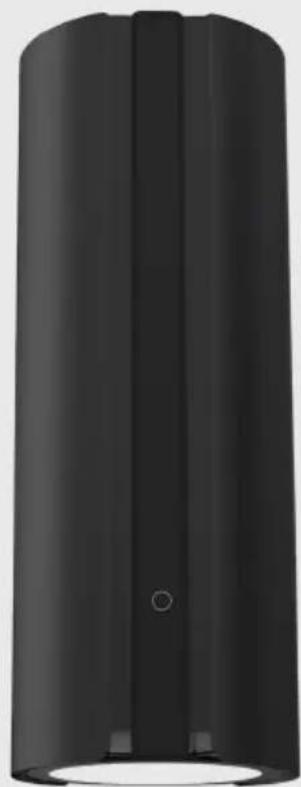
natural_image
Black cylindrical object with a small circular hole at the bottom (no text or symbols visible)
KKT Kolbe Customer Service 55
natural_image
Diagram of a cylindrical device with upward and downward arrows indicating flow or movement (no text or symbols)Umluftbetrieb
natural_image
Hand holding a small object with an arrow pointing downward, enclosed in a circle (no text or symbols)

2-3 W.

ACHTUNG!
natural_image
Simple line drawing of a hand holding a small object against a diagonal line, enclosed in a circle (no text or symbols)natural_image
Cross-sectional diagram of a circular fan or vent with internal blades and central hub (no text or symbols)
natural_image
Simple line drawing of a cylindrical object with an open circular base and a label '1' (no text or symbols on the object itself)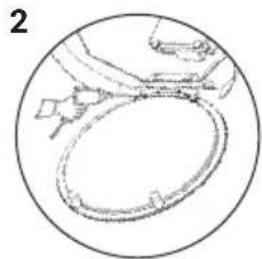
natural_image
Simple line drawing of a circular object with internal lines and a small object, no text or symbols present.7. Problemlösung

WARNUNG!
Kochfeldart Abstand (a)
Glaskeramik-Kochfeld / Gusskochplatten 65-70 cm
Gaskochfeld 70 cm
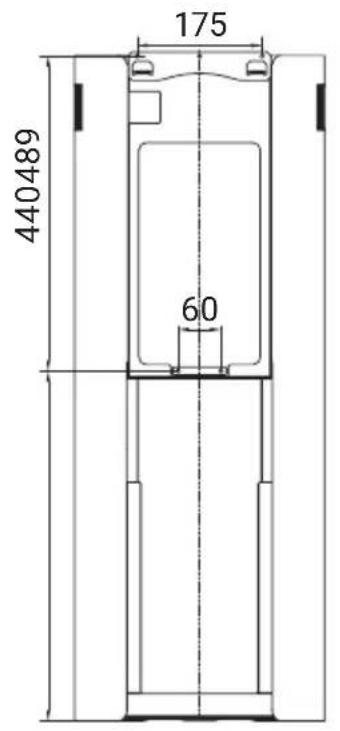
Geräteabmessungen
Angaben in mm
natural_image
Pure architectural or engineering line drawing of a grid-patterned structure with no text, numbers, or symbols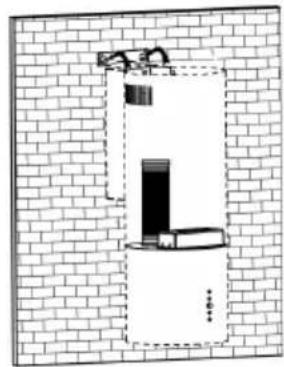
natural_image
Diagram of a vertical structure inside a brick wall, showing a cylindrical component and a top bracket (no text or symbols)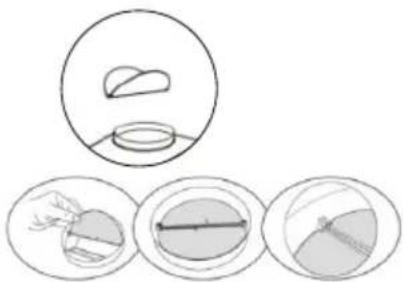
natural_image
Three circular diagrams showing abstract shapes and shading, no text or symbols present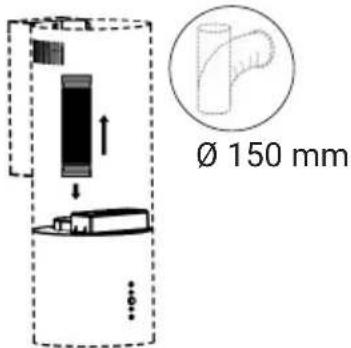
KKT Kolbe Customer Service
KKT KOLBE Kundenservice
Tel. 09502 667930
Mail: info@kolbe.de
www: www.kolbe.de
for your cooker hood
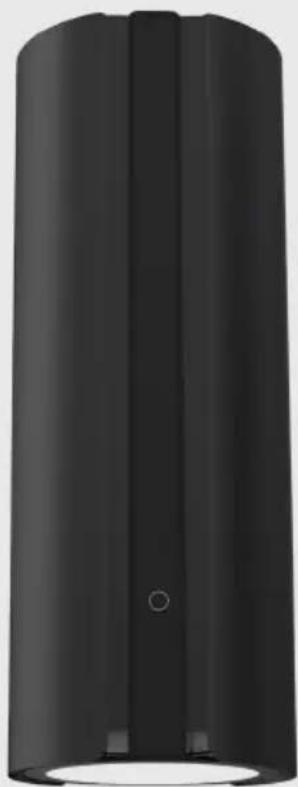
Model: TONNA353
natural_image
Black cylindrical object with a small circular hole and a small hole at the bottom (no text or symbols visible)
Thank you for your confidence and congratulations on the purchase of your new cooker hood!
Read this manual carefully and thoroughly before unpacking the appliance.
It contains important information about safe installation, maintenance and use, as well as important warnings about the use of your appliance.
Mark the passages that are important to you, keep the manual so that you can refer to it at any time and also pass it on to other users, as well as the installer of the appli- ance.
In view of the continuous development, we reserve the right to make any necessary modifications to the appliance and / or the manual in order to better meet the requirements of user-friendliness, user protection and current technical standards.
You can find the latest version of your user manual as well as further data, documents and information on the corresponding product page or in the "Questions & Answers" section of our online shop at www.kolbe.de.
You have chosen a good appliance that will serve you for many years with proper operation and care.
Should you have any complaints despite our thorough quality control, please contact our in-house customer service.
They will be happy to help you.
To ensure a smooth process in the event of any queries, we recommend that you note the respective 20-digit serial number of your appliance in the corresponding field below.
This can be found on the rating label of your appliance or on its packaging.
Your KKT KOLBE - Team
Serial number of my appliance:
KKT KOLBE
User's manual
Cooker hood, model: TONNA353
Version 1.0
KKT KOLBE is a registered trademark.
Table of contents
Important Safety Instructions 4
Further Notes and Icons 14
1. Product Overview ...... 18
1.1 Packing list
1.2 Construction and properties of the appliance
2. Operating Principle and Use of the Appliance 21
2.1 Intended use and functional principle
2.2 Operating modes
3. Notes Before Use 24
3.1 Unpacking and preparing the appliance
3.2 Commissioning the cooker hood
4. Operation, Setting and Use 25
4.1 Notes on using the touch control
4.2 Control panel and display
4.3 Key operation and setting
5. Recommendations for Use, Guidelines and Tips 29
5.1 Efficient use of the cooker hood
6. Cleaning and Maintenance 31
6.1 Cleaning the appliance components
6.2 Removing and cleaning the metal grease filter
6.3 Replacing or fitting/removing the activated carbon filter
6.4 Replacing the LED lamps
7. Troubleshooting 38
8. Installation of the cooker hood 41
8.1 Important notes and installation requirements
8.2 Choosing the mounting position
8.3 Installation dimensions / alignment
8.4 Installation preparation and instructions
8.5 Mounting the appliance
8.6 Connection to the power supply
9. Technical Data 53
KKT Kolbe Customer Service 55
Important Safety Instructions
This manual is the basis for the safe use of your appliance.
Read and follow the instructions carefully before installing and operating the energy storage system!
The manufacturer is not responsible for any damage or problems caused by failure to follow the instructions, incorrect installation or improper handling.
Intended use

WARNING!
Dangers to life and limb and risks of damage!
This appliance may present a potential hazard to persons and the environment due to lack of prerequisites or knowledge for its handling! To avoid this, observe the following instructions.
- Keep children under 8 years and pets at a safe distance from the appliance!
- Children aged from 8 years and above or persons with reduced physical, sensory or mental capabilities or lack of experience and knowledge must not use, clean or generally maintain this appliance unless they are supervised or have been given instruction concerning use of the appliance in a safe way by a person responsible for their safety and understand the hazards involved!
- Do not allow children to play with the appliance, its components or near the appliance.
- The appliance is designed for private use in a domestic environment and is intended for extracting cooking vapours produced during food preparation. Use it only for its intended purpose.
- The appliance is intended for use in combination with a standard household hob and is not suitable for grills, solid fuel fires or for commercial use.
-
The appliance is intended for use up to a maximum altitude of 2000 metres above sea level.
-
The appliance is not intended for operation via a separate remote control or an external timer.
- Unused electrical equipment is a safety hazard. Do not leave the appliance switched on unused and disconnect it from the power supply if you are not going to use it for a long period of time!
General warnings

WARNING!
Danger to life and injury!
- This appliance should be installed and commissioned by a suitably qualified professional in compliance with the applicable regulations and standards, as well as the relevant instructions in this manual! To do this, the appliance must be disconnected from the power supply!
- Keep all packaging materials, assembly accessories and small parts out of reach of children and pets! These can be very dangerous if, for example, they are pulled over the head or swallowed!
- Using defective or damaged equipment can be very dangerous! Before use, make sure that the product and its components are in complete and perfect condition!
In the event of malfunction or damage, do not use the appliance, immediately disconnect it from the power supply and contact customer service or appropriately qualified personnel!
- There is a risk of electric shock, fire and injury if the appliance is repaired, modified or serviced by unqualified persons!
These may only be carried out by a suitably qualified specialist in compliance with all applicable safety regulations, including the instructions in this manual and the appliance must be disconnected from the power supply for this purpose!
Never attempt to make changes to appliance components, cables or plugs by yourself and do not disassemble any parts of the appliance if this is not expressly instructed in this manual!
Only open the housing if this is described in the context of assembly and cleaning!
- If the cooker hood and room air-dependent fireplaces or appliances are operated simultaneously with exhaust air, insufficient supply air can cause a negative pressure, drawing smoke and toxic combustion gases from chimneys or exhaust air shafts back into the living rooms!
In this case there is a danger to life!
Always ensure that there is a sufficient supply of fresh air when the cooker bonnet is in exhaust air mode! Follow the notes and instructions in the installation chapter!
- Edges and components can be sharp-edged and cause injuries! Exercise appropriate caution during any handling and protect yourself if necessary, e.g. with work gloves!
- If not installed properly, the appliance may be unstable and fall down! Follow all the instructions in the installation chapter carefully and make sure the mounting is solid and secure!
- Note that the appliance can heat up considerably due to rising heat during cooking!
Be careful and do not touch the housing and the grease filters until they have cooled down!
- The light from LED lamps is very intense and can damage the eyes!
Avoid looking directly into the switched-on lamps, especially for babies!
- Do not place any objects on the appliance or its components!
These may fall and cause injury or damage!

WARNING!
Risk of electric shock / Dangers from electricity!
- To avoid electric shock and damage, disconnect the appliance from the power supply during installation, maintenance, cleaning or other work on it!
- Before use, check whether the technical data on the appliance's rating plate (especially voltage in V and frequency in Hz) are compatible with the local conditions!
If this is not the case, return the appliance to the point of sale! If anything is unclear, contact your electricity supplier! - The appliance is fitted with a grounding plug and must be connected to a grounded outlet installed in accordance with all applicable regulations! If you are unsure, consult a qualified electrician!
- Modifications to the power supply system may only be carried out by a certified electrician!
There is a risk of life-threatening electric shock for unqualified persons!
- Do not use multiple sockets or extension cables to connect the appliance!
These do not provide the necessary safety!
- To avoid damage to the power cable and associated hazards, make sure that it is not bent or crushed and cannot come into contact with hot surfaces, sharp edges or similar!
Do not pull the plug out of the socket by the cable, but grasp it directly!
• Always keep the cable dry!
- Contact of liquids or moisture with live parts may cause a short circuit or electric shock!
Do not use pressure washers or steam cleaners to clean the appliance!
- To avoid possible electric shock due to creeping current, do not operate the appliance with wet or damp hands and wear footwear during operation!

WARNING! Fire hazard!
- If an exhaust air hose is connected, it must be made of heat- and fire-resistant material and, if necessary, be routed outside in a separate exhaust air shaft leading outside or connected to it!
It must not be routed through any other shafts or chimneys in order to avoid fire hazards!
- Deposits of oil or grease, especially in the filter and inside the appliance, can quickly ignite when heated!
Clean the appliance and filter regularly and never operate the appliance without a grease filter!
- Do not use an open fire under the cooker hood (e.g. for flambéing)!
Open flames and the resulting rising heat can set fire to the appliance!
Do not operate gas burners under the appliance without cookware that matches their size and regulate the flame so that it does not pass over the bottom of the cookware! Do not operate high-power burners or wok burners with more than 5kW or two gas cooking zones at the same time with the highest flame for more than 15 minutes!
- Flying sparks near the bonnet can cause a fire! The appliance may only be installed near a fireplace for solid fuels (e.g. wood or coal) if there is a closed, non-removable cover on the fireplace!
- In particular when frying or heating oils and fats, never leave your cooking food unattended because of the risk of fire! Note that the risk of spontaneous combustion increases if oil or fat is used repeatedly!
- In case of fire, cut off the gas and electricity supply and carefully smother the flames with a fire blanket or similar!
Never extinguish burning oil or grease with water! After extinguishing, have the appliance checked by a suitably qualified professional! - Deposits of oil or grease in the filter and inside the appliance, can ignite when heated!
Clean the appliance and filter regularly as described in the relevant section and never operate the cooker hood without a grease filter!

WARNING!
Causes for damage and functional impairments with possible consequential dangers to life and limb!
- During installation, strictly observe the safety distances and other instructions given in this manual to avoid damage, e.g. due to heat exposure.
• Always keep the appliance in a clean condition, clean the metal filter and, if applicable, change the carbon filter at the recommended intervals to avoid functional impairments, damage and hazards due to deposits of grease and dirt!
Observe the notes and instructions in the corresponding section of this manual for this! - To avoid damaging the surfaces, do not use aggressive or abrasive cleaning agents or utensils and follow the instructions in the relevant chapter for cleaning and maintenance!
- During cooking, moisture is produced, which can cause long-term damage to surfaces! To avoid this, always switch the appliance on when cooking!
Further Notes and Icons
In this manual
Symbols for hazards and information

Warning of danger to persons and of damage
Read the safety instructions marked with this symbol particularly carefully and act in accordance with the instructions in order to avoid danger!
Also pass on these instructions to other users and the installer!
Danger grading by combined signal words:
WARNING!
Indication of a hazardous situation which, if not avoided, may result in death or serious injury
CAUTION!
Indication of a hazardous situation which, if not avoided, may result in minor or moderate injury
ATTENTION!
Indication of a situation which, if not avoided, may result in damage to the product or on objects in its surroundings

Information and tips
Following the instructions marked with this symbol will provide you with useful information, make the respective procedure easier and may save you some problems.
Note on illustrations
The figures in this manual are for illustrative purposes and may occasionally differ slightly from the appearance.
Appliance, components and accessories
Symbols on appliance parts, accessories, etc.
The following symbols attached to the appliance, its components and accessories (if applicable) indicate important information for the safe operation of the appliance. Do not remove or damage them, always ensure good visibility and replace damaged symbols!

General danger warning!
There is a potential hazard! Behave with appropriate caution.

Warning of electrical voltage!
Some components of the product are live during and also after operation! Take care not to come into contact with them and take appropriate protective measures if necessary.

Warning of flammable substances!
Contained or emerging substances, liquids or gases easily self-ignite! Avoid contact with ignition sources or sources of danger, e.g. also water or air!

Warning of hot surface!
The product may become hot during operation and cause injury and damage. Do not touch it until it has cooled down and keep the clearances around the appliance recommended in this manual.

Follow these instructions for use
Read this manual carefully, before using the product and pass on the relevant information to other users and the installer.

EU conformity
The product complies with the applicable EU requirements regarding safety, environmental protection and health protection.
Disposal and environmental protection
Note icons for disposal
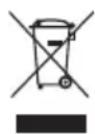
No disposal in household waste (WEEE marking)
Do not dispose of the product as unsorted waste! Take it to a collection point for the recycling of electrical and electronic equipment for reuse and recovery. To do this, have a qualified electrician remove the cable.

Recyclable material (Möbius strip)
Separate the relevant components of the product by type from the residual waste and dispose of them in accordance with local regulations.

Recyclable material (Triman symbol)
Separate the product from residual waste for disposal according to the accompanying sorting instructions.
General notes on disposal
- Improper disposal may endanger the environment and human health! By ensuring that the product and its packaging are disposed of properly, you will help to avoid possible hazards. This also applies to the disposal of old appliances, if applicable.
- The packaging materials used have been carefully selected and should be recycled to reduce raw material consumption and waste. Separate their components by type and dispose of them accordingly.
- For information on current disposal methods and recycling, contact your local authorities, your waste disposal company or the vendor.
Note on environmental protection by saving energy
- Follow the recommendations for use in this manual to save energy by using the appliance efficiently and thus help to protect the environment!
Notes on transporting the appliance
If you need to transport the appliance after unpacking / at a later time, observe the following instructions to avoid damage:
- Keep the original packaging of the product and always transport the appliance packed in it in the same way as when it was delivered. Observe the markings on it.
If the original packaging is not present:
- Secure all loose / detachable parts so that they cannot touch each other.
- Avoid any impact on the product and its components and take appropriate protective measures if necessary.
- Ensure a horizontal position during transport and when putting down.
Storage instructions
If you need to store the product for a certain period of time, observe the following instructions to avoid damage:
- Pack the appliance together with desiccant bags if possible in the original carton or similar packaging and seal it with adhesive tape.
- Choose a dry and clean storage place.
- Make sure to keep it in an horizontal position.
- Do not load the packaging.
- Only store the appliance for as long as absolutely necessary.
- Do not store the product near chemically aggressive or corrosive substances to avoid possible corrosion.
- Check the appliance regularly for visible damage during the storage period and replace the packaging if necessary.
1. Product Overview
1.1 Packing list
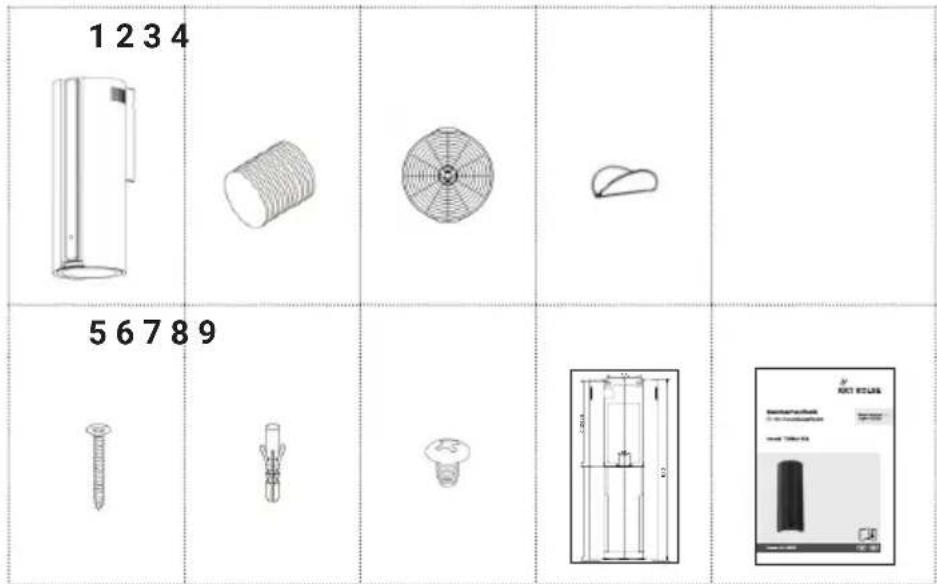
Open the packaging and take out the contents as described under "Unpacking and preparing the appliance", and check the contents according to the following list:
1 1× Cooker hood, model TONNA353 including metal grease filter, lighting, connection cable and plug
2 1× Exhaust air hose, ∅ 150 mm
3 1× Activated carbon filter
4 1× Non-return valve, 2-part
5 5× ST 4 × 30 mm screws
6 5×∅ 8 × 35 mm Plastic dowels
7 1× ST 4 × 6 mm screws
8 1× Installation template
9 1× User's manual
1.2 Construction and properties of the appliance
Appliance components
1 Hood body
2 Sensor key control panel and digital display
3 Lighting
4 Edge extraction plate (foldable) / Access to the inside of the appliance, metal grease filter and carbon filter, if applicable
5 Exhaust air slots for recirculation mode
6 Suspension
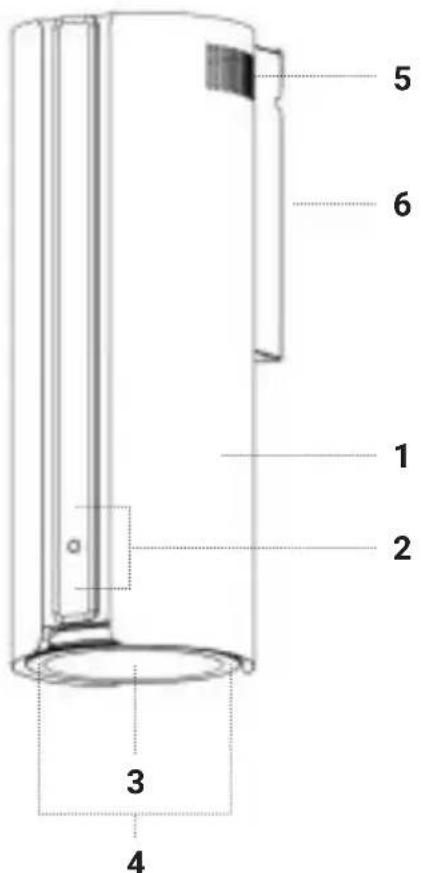
Features and further properties
- 9 power levels
- TouchSelect sensor keys
- LED digital display
- LED lighting
- Dishwasher-safe metal grease filter
- Edge extraction
Selectable functions
(for operation, see relevant chapter)
- Delay function / Auto-Off: (Automatic switch-off after a pre-set time)
Dimensions
Width: 350 mm
Depth: 370 mm
Height: 930 mm
2. Operating Principle and Use of the Appliance
2.1 Intended use and functional principle
Your cooker hood draws off fumes and odours produced during cooking and creates fresh room air.
The appliance can be used in both exhaust air and recirculation mode.
The air is sucked in by the fan motor, blown through the exhaust outlet of the bonnet body and, depending on the operating mode used and the corresponding installation, passed on (see the following sections and "Installation...").
Particles of grease and dirt, fumes and, to a certain extent, moisture are absorbed by the metal grease filter; however, additional ventilation may be necessary, especially in recirculation mode.

CAUTION!
Health risks and risk of damage!
Moisture remaining in living spaces can lead to harmful mould growth and damage to surfaces! Do not rely entirely on the extractor fan's suction power to ensure sufficient air exchange during and after cooking!
For odour control in recirculation mode, the supplied activated carbon filter is additionally installed (see relevant sections under "Installation..." and "Cleaning...").
2.2 Operating modes
Exhaust air mode
In the version with exhaust air to the outside, the air drawn in is freed from grease and fumes by the metal grease filter and led outdoors through an exhaust air duct.
A backflow or inflow of outside air is prevented by a non-return valve.
For exhaust air operation, the preconditions mentioned in the installation chapter must be fulfilled and the corresponding instructions must be followed exactly!
If implementation is not possible as described, use the extractor fan only in recirculation mode!

WARNING! Danger to life!
If the cooker hood and room air-dependent fireplaces or appliances are operated at the same time, insufficient supply air can cause a negative pressure, which draws smoke and toxic combustion gases back into the living spaces!
In this case there is a danger to life!
Inadequate installation can additionally result in fire and health risks as well as operational malfunctions!
For exhaust air operation, observe and follow the corresponding notes and instructions in the installation chapter exactly!
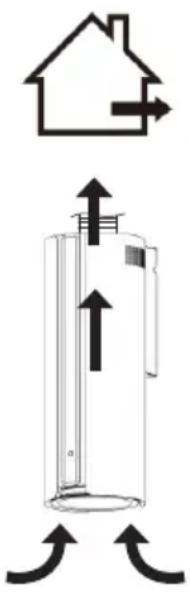
natural_image
Diagram of a cylindrical device with upward and downward arrows indicating flow or movement (no text or symbols)Recirculation mode
In the recirculation version, the air drawn in is cleaned of grease and fumes by the metal grease filter and returned to the room.
The connection to an exhaust air duct is not required during installation.
To remove odours from the pre-filtered air, the supplied activated carbon filter should be installed (see relevant section of the installation instructions).

Operation with active carbon filter
The carbon filter removes odour particles produced during cooking from the air already pre-filtered by the grease filter.
For optimum odour absorption, follow the recommendations for use of the cooker hood.
Note that the air flow rate may be reduced and the noise level increased when operating with an additional carbon filter.
If the cooker hood is used in recirculation mode, the amount of room air remains unchanged and there is no negative pressure in the room.
Simultaneous operation of a room-air dependent fireplace or appliances is harmless.
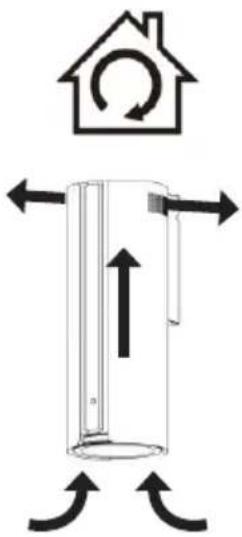
3. Notes Before Use
3.1 Unpacking and preparing the appliance

Smell perception during unpacking
A slight odour may be noticeable when unpacking the appliance.
This is normal and harmless and will soon disappear.
- When unpacking the appliance, make sure that it has not been damaged during transport.

WARNING!
Risk of injury and electric shock!
If you notice any damage to the appliance, its cable or other components, do not connect it and do not put it into operation!
This can be very dangerous!
Contact the customer service.
- We recommend writing down the 20-digit serial number on the inner cover of this manual for possible queries.
- If the appliance has been properly installed (see relevant sections), before using it, ensure that all packaging materials, stickers, protective films and transport protection materials have been removed from the product and properly disposed of and that any remaining small parts such as assembly materials are safely maintained.

WARNING!
Danger of suffocation!
Small parts, foils etc. can be very dangerous if they are swallowed or pulled over the head, for example!
Always keep them out of reach of children and pets.
- Before installing and operating the appliance, clean it as described in the relevant chapter.
- For commissioning, observe the corresponding section!
3.2 Commissioning the cooker hood
- Only operate the appliance if it is in perfect condition and has been properly installed, ideally by a suitably qualified specialist!
- Make sure that the appliance and its surroundings are completely clean so that no dirt such as dust, residues from installation or residues of transport protection agents can be sucked in!
- Make sure that the metal grease filter and in the case of recirculation operation, also the activated carbon filter is / are properly inserted (For insertion procedure, see corresponding section/s under "Cleaning...")!
- To operate the appliance, proceed as described in "Operation, setting and use".
4. Operation, Setting and Use
4.1 Notes on using the touch control
The control panels of the appliance consists of sensor keys that react to touch.
To use these, observe the following instructions:
- Do not exert much pressure on the controls. It is sufficient to touch them.
- Only touch one sensor key at a time.
- Use the ball of the finger, not the tip (see illustration) and operate the sensor keys as described in the following sections.
- Make sure that the control panel is always clean and dry. Even a thin film of moisture can make the sensor keys difficult or impossible to operate.
- Avoid swiping across the control panel during operation to prevent unintentional changes to the settings.
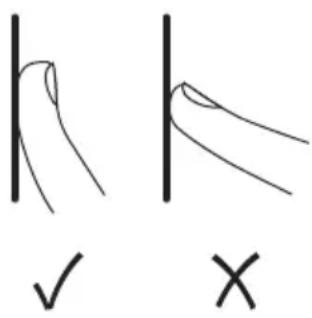
4.2 Control panel and display
The following overview is a brief description of the display and key functions.
For detailed operating instructions, see the following sections.
| 1 | ○ | On / Off / Display frame | Switching the appliance on / off / Digital display |
| 8. | Digital display | Display of the currently selected power level / run-on time if appli-cable (countdown to auto-off) | |
| 2 | Light | Switching on / off the lighting | |
| 3 | Upward control | Increasing the power level / the time setting | |
| 4 | ☒ | Downward control | Decreasing the power level / the time setting |
| 5 | ☒ | Delay function / Auto-Off | Setting the delay function by touching for 3 seconds |


4.3 Key operation and setting
Switching the appliance on and off
- When the appliance is switched off, only the round display frame or the on/off key is visible.
Touch it to switch the appliance on.
When the power indicator appears in the centre of the circle, the appliance is ready for operation (standby state).
• To switch off the appliance in operating status and stop all running functions, also use the on/off key
Adjusting the lighting
- To switch the lighting on or off, use the key when the appliance switched on.

Note on display illumination
If no key is touched for 2 minutes in operating mode, the display light is automatically switched off.
To switch it on again, touch any key.
Adjusting the power levels
- When the appliance is switched on, touch the key to start fan operation at the first power level.
- To increase the power, touch the key again repeatedly until the desired power level (up to max. 9) is set.
• To reduce the power, use the ⚫key in the same way. - The selected power level is shown on the display.
Delay function / Auto-off
- In standby state, touch the key for 3 seconds to activate the delay function.
- The default setting for the time period until automatic switch-off is 1 minute.
When the display switches to the time setting and starts flashing, you can use the ☐ and ☑ keys to adjust it to 2 to 9 minutes, or accept the 1 minute setting by not touching the control panel any further.
• After 10 seconds without further key operation the time setting is saved.
- The countdown to automatic switch-off begins as soon as the extractor is in operation.
- To change the time setting or deactivate the delay function, use the key again.
5. Recommendations for Use, Guidelines and Tips

WARNING!
Danger to life!
Simultaneous exhaust air operation of the cooker hood and room air-dependent fireplaces or appliances can result in life-threatening hazards!
Always follow the corresponding notes and instructions under "Operating modes" and "Installation"!

WARNING!
Fire hazard!
Open flames and intense heat can set the appliance or grease accumulations in filters on fire!
Do not use an open fire under the cooker hood (e.g. for flambéing), do not use gas hobs without suitably sized cookware and regulate the flames so that they do not reach above the base of the cookware!
Clean the appliance regularly as described to avoid hazards caused by fat deposits!
Especially oils, fats, alcohol or food containing them heat up quickly and can easily self-ignite at very high temperatures!
Food can burn, cause harmful smoke or catch fire!
Do not leave it unattended!
In the event of a fire, switch off the power supply by tripping the fuse and carefully smother the flames with a fire blanket or similar!
Never extinguish burning oil or grease with water!

CAUTION!
Risk of burns!
The appliance or certain components may be hot during operation and for some time afterwards!
Be careful when using the appliance!
5.1 Efficient use of the cooker hood
Your appliance complies with the latest standards and its energy consumption has already been optimised to a large extent technically.
However, please also observe the following instructions, in order to optimise the effective performance of the cooker hood and keep its energy consumption as low as possible:
- For efficient and trouble-free operation, always ensure sufficient supply air and avoid draughts.
Note: Supply air from above and opposite the cooking area generally increases efficiency. - Switch on the appliance early to create a stable air circulation and to avoid the distribution of cooking vapours in the room even before switching on.
- Also ensure stable air circulation during operation.
For example, avoid turbulence of cooking vapours due to air blasts, draughts or similar. - Always adjust the power level to the amount of cooking vapours produced so that they can be completely removed.
- However, for recirculation operation, note that a slow air flow better ensures the time needed for odour absorption.
- If possible, use a lid for your cookware to keep cooking fumes low and thus avoid increased power demand and condensation.
- Leave the cooker hood running on a low power setting after cooking, until the room air has been cleared of any remaining steams and odours.
- As soon as the cooker hood is no longer needed, switch it off.
- Switch off the lighting when it is not needed.
- Clean or change the filters at the recommended intervals to avoid build-up of impurities, increased energy consumption and functional impairment.

6. Cleaning and Maintenance

WARNING! Fire hazard!
If the cleaning instructions are not followed, there is a risk of grease deposits that can ignite when exposed to heat! Clean the appliance regularly, especially the grease filter, and ensure that it is always in place during operation to avoid grease deposits inside the appliance! If you are using a carbon filter, replace it at the recommended intervals!

WARNING! Risk of electric shock!
Before cleaning and maintenance work, disconnect the cooker hood from the power supply by pulling out the mains plug of the appliance or switching off or unscrewing the fuse of the domestic installation!
Contact of moisture with live components can cause an electric shock and/or short circuit! Do not use excessive amounts of liquid for cleaning and do not use high-pressure or steam jet cleaners!

CAUTION! Risk of burns!
The appliance can become hot during operation! Allow all components to cool down before you start cleaning!
The lighting may be hot after operation! Before replacing the LED lamps, allow them to cool down!

CAUTION! Risk of injury!
Internal components can be sharp-edged! Protect yourself accordingly against injuries, e.g. when changing the filter!

ATTENTION! Risk of damage!
Do not use any aggressive or acidic or alcoholic cleaning agents, scouring agents or abrasive, sharp or pointed utensils for cleaning!
These can damage or discolour the appliance's surfaces and the control panel!
Before use, check the manufacturer's instructions of your cleaning agents and utensils for appropriate suitability!
Cleaning residues can damage the appliance's surfaces!
Always remove them immediately and completely!

ATTENTION! Possible functional impairment!
Filters clogged with grease and/or dirt particles can severely impair the function of the cooker hood and spread unpleasant odours.
Clean the metal grease filter and, for recirculation mode, change the activated carbon filter at the recommended intervals!
6.1 Cleaning the appliance components
To ensure that the appliance retains its appearance
and remains fully functional, take good care of it!
Always keep all parts of the appliance clean and remove any soiling imme-
diately, as described in the following sections
and in compliance with all previous instructions!
We recommend regular basic cleaning at least every 2 months.
General instructions for cleaning the appliance surfaces
- Use a soft cloth moistened with lukewarm water and a mild household cleaner or mild soapy water for cleaning.
- Clean all surfaces until all dirt has been completely removed.
- Then dry the appliance thoroughly with a soft cloth.
Glass surfaces
- Also clean these as described above or
- use a commercially available glass cleaner according to the manufacturer's instructions.
- Do not use a glass scraper! This can damage the glass!
- Dry the appliance thoroughly with a soft cloth after cleaning.
Stainless steel / metal surfaces
- Also clean these as described above or
- use a commercially available non-abrasive stainless steel cleaning agent, if applicable in the grinding direction. Make sure that the stainless steel cleaner does not come into contact with painted surfaces or operating elements!
- Then dry the appliance thoroughly
- For care, you can apply a thin layer of stainless steel care product from a specialist retailer using a soft cloth.

Note on functional impairments due to soiling or moisture on the control panel
Even a small film of moisture on the control panel, which may be barely visible, can lead to the sensor keys no longer being operable or only being operable to a limited extent.
Make sure that the area around the controls and your hands are completely clean and dry before using the appliance again.
6.2 Removing and cleaning the metal grease filter
Removing the metal grease filter
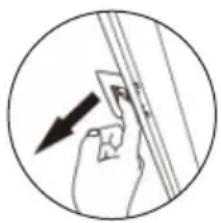
- Open the flap on the bottom of the appliance to access the filter.
- Pull back the pusher of the filter so that the lock releases.
- Tilt the filter slightly out of the holder opening and secure it with your second hand so that it cannot fall down and cause damage.
- Remove the filter from the appliance.
Cleaning the metal grease filter
Clean the metal grease filter every 2-3 weeks, depending on the frequency of use of the cooker hood, as described in the following sections, repeating the process if necessary.
natural_image
Hand holding a small object with an arrow pointing downward, enclosed in a circle (no text or symbols)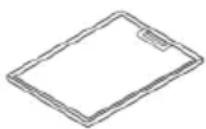

2-3 w.

ATTENTION!
Risk of damage!
To avoid damaging the filter, do not use any sharp or pointed cleaning utensils or aggressive or acidic cleaning agents! Avoid alkaline cleaning agents (pH value above 7)!
Make sure you use a sufficient but appropriate amount of cleaning agent so that the grease can dissolve! If the amount of cleaning agent is not sufficient, the grease will saponify, which means that the filter can only be degreased with aggressive special cleaning agents or must be replaced!

Metal discolouration due to cleaning
Frequent cleaning, especially in the dishwasher, or the use of aggressive cleaning agents can cause changes in the colour of the metal surface.
These have no influence on the function of the metal components and are not grounds for complaint.
Manual cleaning
- Soak the metal filter in hot water with detergent for approx. 1 hour.
- Then clean it with a soft brush. Be careful not to damage the metal mesh of the filter.
- Rinse it well with hot water afterwards.
- Let the filter dry well after cleaning.
Cleaning in the dishwasher
- Soak heavily soiled metal filters well in hot rinse water also before cleaning in the dishwasher.
- Rinse the metal filter separately from the dishes to avoid possible grease deposits on the dishes and accumulation of food residues in the mesh of the filter.
- Place the filter vertically and loosely in the dishwasher without it being clamped, preferably with the filter side facing downwards.
- Select a temperature setting of 55 - 65 °C.
- Make sure that the filter is dry before you put it back in.
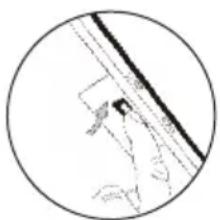
Inserting the metal filter
• After cleaning, allow the filter to dry thoroughly before carefully reinserting it into the cooker hood.
- Re-insert the metal grease filter into the cooker hood in the reverse order to that in which it was removed.
- Make sure that the lock is engaged and the filter is correctly positioned so that it cannot come loose, fall down and cause damage!
- Close the flap on the bottom of the appliance again.
natural_image
Simple line drawing of a hand holding a small object against a diagonal line, enclosed in a circle (no text or symbols)6.3 Replacing or fitting/removing the activated carbon filter
Replacing the activated carbon filter for recirculation mode
Activated carbon filters cannot be washed or regenerated and must be replaced every 3-12 months, depending on the frequency of use of your cooker hood.
To use your appliance in recirculation mode, insert the activated carbon filter supplied and replace it only with one of the same type (see "Technical Data") as follows:
Fitting the activated carbon filter
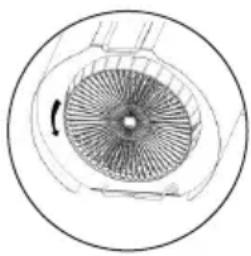
- Open the flap on the bottom of the appliance and remove the metal grease filter as described in the relevant section of this chapter so that the inside of the appliance is accessible.
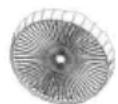
- Place the activated carbon filter on the fan motor and screw it clockwise onto the motor housing.
- Make sure that the filter is stable and correctly positioned so that it cannot come loose, fall down and cause noise and damage!
- Reinsert the metal filter and close the flap on the bottom of the appliance as described in the corresponding section of this chapter.
Disassembling and reinserting the activated carbon filter
- To remove a used activated carbon filter, proceed in reverse order to the installation procedure.
- Then replace it by fitting a new carbon filter of the same type on the motor as described above.
- Dispose of the activated carbon filter properly.

3-12 m.
natural_image
Cross-sectional diagram of a circular mechanical component with internal blades and central hub (no text or symbols)
6.4 Replacing the LED lamps

WARNING! Risk of electric shock!
To avoid the associated dangers, all work involving the LED lighting may only be carried out by a suitably qualified person!
For this purpose, the appliance must be disconnected from the power supply!

CAUTION! Risk of injury!
The light from LED lamps is very bright and can damage your eyes! Avoid looking directly into the light when it is switched on! Pay also attention to children in this regard, especially babies!
Proceed as follows to replace the lighting:
- Obtain a new LED strip of the same type as that already installed in the model.

Properties of the LED lamps
- Lamp type: L25, strip, 850 mm
- Wattage: 6.5 W
-
Voltage: DC: 12 V
-
Make sure that the appliance is completely disconnected from the power supply and that the lighting has cooled down before you start replacing the lamp!
- Open the flap on the bottom of the appliance and remove the metal grease filter as described in the relevant section.
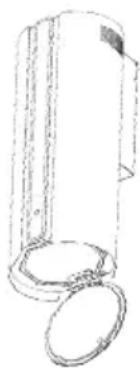
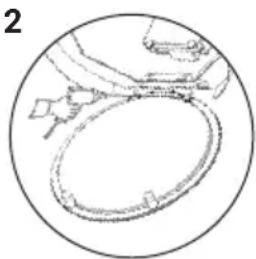
- Disconnect the plug of the lamp and remove the lighting component from the appliance by unscrewing the 4 fastening screws (2). Support it so that it cannot fall down.
- Replace the light with one of the same type and screw the lighting component back on.
1
natural_image
Simple line drawing of a cylindrical object with two circular ends, resembling a mechanical or architectural component (no text or symbols)2
natural_image
Simple line drawing of a mechanical component or assembly (no text or symbols)7. Troubleshooting

WARNING!
Risk of electric shock, injury and damage!
Do not use the appliance in case of damage or defect!
This can be dangerous!
Disconnect it from the power supply immediately.
Repairs and modifications are very dangerous
for unqualified persons and can cause damage!
Never carry out repairs or modifications to the appliance your-
self and do not disassemble it!
The following table may help you to find your own solutions to possible problems with the appliance.
If the suggested solutions mentioned above do not solve a problem,
contact the customer service or a suitably qualified specialist!
Problem Possible cause Possible solution
| The appliance cannot be switched on. | No power supply Make sure that the appliance is fully and properly connected to an intact power supply (see corresponding section). | |
| The touch control is difficult to operate. | Moisture film or soiling on the control panel | Make sure that the control panel is completely clean and dry.Note that a thin film of moisture may not be visible. |
| The keys are not operated correctly. | Follow the instructions under "... using the touch control". | |
Problem Possible cause Possible solution
| The lighting does not work. | The lamps must be replaced. | Replace the lamps with new ones as described in the corresponding section. |
| Incorrect installation of the lamps | Check the installation of the lamps and correct it if necessary. If you are unsure, contact a qualified person. | |
| Insufficient extraction performance | Too great distance between the appliance and the cooktop | Install the appliance at a lower height. Follow the installation instructions! |
| Draughts Close doors and windows. | ||
| Negative pressure in the room due to insufficient air supply | Always ensure a sufficient supply of fresh air in compliance with the relevant the relevant sections! | |
| Clogged / soiled filters | Clean the metal grease filter or replace the activated carbon filter as described in the relevant section. | |
| Too small air duct cross-section | Observe the notes and instructions regarding the air ducting! | |
| Blocked airways Check the air duct for blockages (e.g. fly screen, blocked flap of the non-return valve, immovable louvres on the outer cover plate, etc.) and remove any foreign objects. | ||
| Backflow of exhaust air due to unfavourable installation conditions | Lateral barriers at the height of the exhaust air slots in the shaft can deflect the exhaust air flow in recirculation mode or if the exhaust air hose is not fitted in exhaust air mode and thereby reducing the suction power! Observe the instructions for recirculation mode under "... Installation requirements"! | |
Problem Possible cause Possible solution
| Droplet formation Clogged / soiled filters | Clean or change the filter/s as described in the relevant section. | |
| Unfavourable exhaust air duct | ||
| Increased noise development during operation | Insufficient fixing of the appliance or its components | Check the appliance for loose parts. |
| Fan speed increase due to insufficient air supply | Check the fan and air duct for blockages (e.g. blocking cable or similar) and follow the instructions for the exhaust air ducting. | |
| The appliance vibrates during operation. | Insufficient fixing Check that the appliance is installed correctly and stably.If necessary, tighten any loose screws or fix any loose mounting parts. | |
| Abnormal noise / odour | Technical defect Contact customer serviceor an appropriately qualified specialist. | |
| The lighting works, but fan operation does not start. | ||
8. Installation of the cooker hood
8.1 Important notes and installation requirements

WARNING!
Risk of electric shock, injury and risk of damage!!
Incorrect installation may result in hazards and the appliance may be unstable and fall down, which can cause damage!
Follow all instructions in this manual carefully and ensure that the appliance is mounted securely and safely!
We recommend that the appliance is installed by suitably qualified personnel!

CAUTION!
Risk of injury!
Some parts of the unit can be sharp-edged! Protect yourself accordingly when handling the appliance, e.g. with work gloves!
For installation, all applicable regulations, including the instructions, dimensions and spacing regulations in this manual, must be observed and complied with!
This applies in particular to the requirements listed in the following sections!
Requirements according to the operating modes
The installation requirements with regard to the structural conditions depend on the desired operating mode.
The appliance can be used in one of the following operating modes:
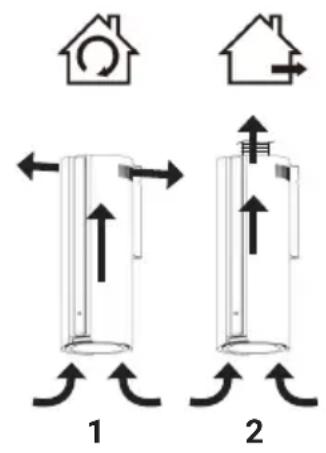
- Recirculation mode with return of the exhaust air into the room through the exhaust air openings in the shaft (1)
- Exhaust air operation with air ducting to the outside through an air duct or a permanently installed exhaust air pipe (2)
Please also refer to the corresponding sections under "Functionality ..."!
Notes for recirculation mode
If you use the appliance as a recirculation hood, no special structural measures or requirements are necessary.
However, please note the following:
- Before commissioning, fit the activated carbon filter on the fan motor as described in the corresponding section under "Cleaning ...".
Note: Be aware that the carbon filter serves to bind odours and supplements the metal grease filter, but does not replace it! Never use the appliance without the metal grease filter in place to avoid the risk of fire, damage and malfunctions as a result of grease deposits! - If possible, make sure that there are no nearby boundaries, such as furniture or niche walls, at the height of the lateral exhaust air slots in the shaft to ensure that the exhaust air can be directed back into the room unhindered. Otherwise, the exhaust air could be deflected downwards / back to the extractor, which could result in poor extraction performance. If side barriers are unavoidable, you can try to block the backflow by closing the side niche below the exhaust air openings with heat-resistant material.
An exhaust air hose is not required for recirculation mode.

Requirements for exhaust air operation

WARNING! Danger to life!
If the cooker hood and room air-dependent fireplaces or appliances are operated at the same time, insufficient supply air may cause a negative pressure, drawing smoke and toxic combustion gases back into the living spaces!
In this case there is a danger to life!
Ensure sufficient fresh air supply, as described below!

If you use the appliance in exhaust air mode, make sure that the following requirements are met!
If this is not the case, use the cooker hood in recirculation mode!
- For exhaust air operation, it must be ensured that sufficient fresh air flows into the room at all times while the cooker hood is in operation so that no negative pressure of more than 4 Pa (4 x 10⁻⁵ bar) can occur! This can be achieved e.g. by non-closable openings in doors, windows, in connection with a supply air / exhaust air wall box or by other technical measures.
A supply/exhaust air wall box alone does not guarantee compliance with the limit value!
Ask your chimney sweep to advise you on the ventilation system for the house and the appropriate ventilation measures!
The regulations issued by the local authorities must be strictly observed!
- For the exhaust air ducting, there must be an exhaust air shaft in your house intended exclusively for the cooker hood, a permanently installed exhaust air pipe or an exhaust air wall box with an outlet to the outside (for further information on the exhaust air ducting, see the following section).
- The extracted air must not be routed through any ducts through which vapours produced by the combustion of gas or other fuels are discharged! If the exhaust air is to be led into a flue or exhaust chimney that is not in use, the consent of the responsible master chimney sweep must be obtained.
- To direct the exhaust air flow of the appliance into the exhaust air duct selected for this purpose, the air outlet of the hood body must be connected with the opening of your exhaust air duct. To do this, procure an exhaust air hose with a diameter of 150 mm made of heat-resistant material and attach it to the air outlet of the hood body as described in the relevant section under "Mounting...".

Filter use in exhaust air mode:
A carbon filter is only useful if the hood is used in re circulation mode.
Therefore, do not fit the supplied carbon filter or remove it if it is already installed.
However, never use the appliance without the metal grease filter in place to avoid the risk of fire, damage and malfunctions due to grease deposits!

Information on non-return valves:
Installing non-return valves in the exhaust air system prevents incorrect air flow, i.e. an unfavourable exchange of air between the room air and the returning outside air. This also prevents malfunctions of the extractor fan, such as reduced suction power.
If no such device is integrated in the exhaust air system of your kitchen, fit the two-part non-return valve supplied in the exhaust air outlet of the hood body, as described under "Mounting...".
Note: In apartment buildings with a shared air shaft, a non-return valve is required for each kitchen.
Notes on the exhaust air ducting to the air outlet

ATTENTION!
Risk of malfunction!
An inadequately constructed, unfavourably routed or shaped exhaust air line can significantly impair the function of the appliance! Follow the instructions in this section carefully, to avoid problems such as reduced extraction performance, noise development or increased running noise, grease deposits or condensate formation!
Make sure that the following conditions for proper exhaust air ducting up to the air outlet can be guaranteed:
- The entire exhaust air pipe must be made of non-combustible material and must not be routed through a duct together with gas or hot air pipes or similar.
-
The exhaust air duct should have the following properties:
-
As short and straight route as possible with few bends and large radii (max. bend 120°)
- Inner diameter or inner cross-section min. 150 mm (if applicable incl. wall box)
- Round or rounded cross-section (e.g. round ducts or flat ducts with rounded corners)
- Smooth surfaces on the inside
- Even course without constrictions or blockages (e.g. fly screens, rigid blades at the air outlet)
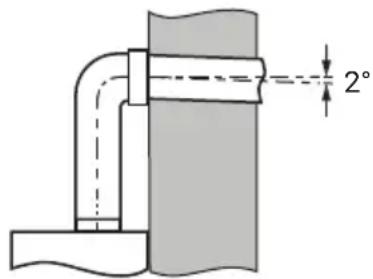
- If the exhaust air duct is laid horizontally, a minimum gradient of 1 cm per meter or an angle of inclination of 2^ must be maintained in order to avoid the return of condensation water (see illustration).
- If the exhaust air duct is routed through unheated or cool rooms (e.g. attics), it must be insulated to prevent additional condensation.
- An additional condensation water barrier may be necessary (available in leading DIY stores).
- For the roof version, a double-walled roof hood with condensate drainage to the outside should be used.
- All connections must be sealed.
- Ensure that the non-return valve can open and close freely after the exhaust air duct has been installed.
Installation location and environment
This appliance is designed for private use in a domestic environment and can be installed in a kitchen above a standard household hob, for example.
The following restrictions must be observed:
- The appliance is not suitable for use above barbecues or open fireplaces for solid fuels.
- The appliance is not intended for commercial use.
- Observe the manufacturer's instructions for cooking appliances that are to be used in combination with the cooker hood, in particular whether the operation of a cooker hood above it is permitted.
8.2 Choosing the mounting position
- For optimum extractor performance, select a position of the appliance in the center above the cooktop.
- Check the route of electrical cables, pipes, etc. in the installation environment to avoid drilling into them during installation.
- If possible, select the installation position so that the appliance is easily accessible during and after installation, e.g. for cleaning and maintenance.
- For recirculation mode, follow the corresponding instructions under "... installation requirements" in the section "Notes for recirculation mode".
Mounting surface / substrate
- Check the desired mounting surface for load-bearing capacity and strength with regard to the weight of the hood and only use suitable mounting material.

Notes:
- The screws and plastic dowels supplied are intended for solid masonry.
If necessary, replace them according to the substrate, as described under "Mounting...". - Make sure that the required drill hole depth (dowel length + 10 mm) is possible at the selected location in order to ensure a firm hold of the dowels.
- Check the mounting surface for unevenness and level it out if necessary. The mounting surface must be level and vertical.
8.3 Installation dimensions / alignment

ATTENTION!
Risk of damage and malfunction!
If the distance between the cooktop and the cooker hood
is too small, the appliance may be damaged!
If the distance is too great, the suction power can be
severely restricted!
Observe the following distance specifications
or adapt them to the safety distances of the cooking appliance(s)
used, if these are specified larger by the manufacturer!
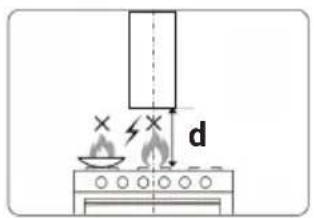
To ensure optimum extraction performance, the cooker hood should be installed at a distance of 65-70 cm above the cooktop.
However, observe the following guidelines according to your hob type:
Cooktops with coal / oil / wood firing 85 cm
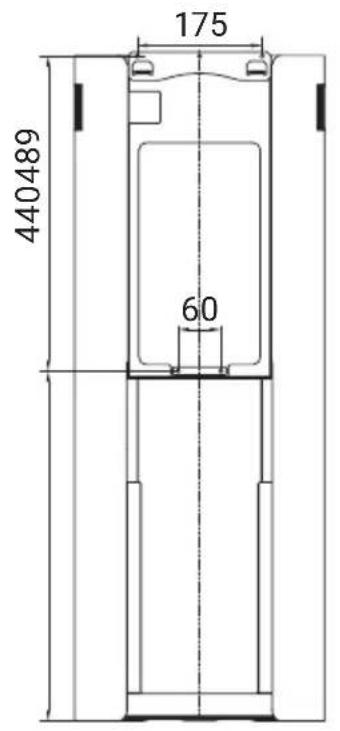
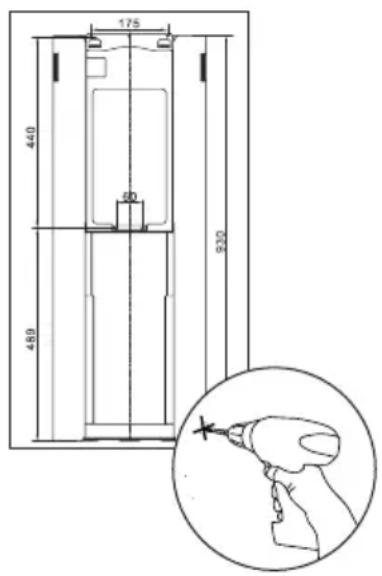
Appliance dimensions
Specifications in mm
8.4 Installation preparation and instructions

CAUTION! Risk of injury!
Some components of the unit can be sharp-edged!
Protect yourself from injury during installation, e.g. by wearing work gloves!
The appliance is heavy!
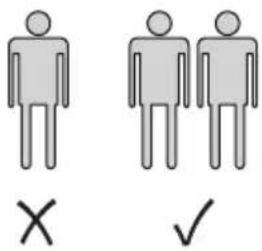
Do not move and mount the appliance alone, but with at least one other person and use suitable aids!
Notes before installation
- Follow the instructions given in the chapter "Notes before use" before installing the cooker hood!
-
Clean the appliance and the area around the installation position thoroughly before and after installation so that no dirt such as dust, residues from installation or residues of transport protection agents can be sucked in during commissioning!
• Have the following ready for the fitting of the appliance: -
Cooker hood
- Supplied and, if applicable, procured accessories including installation template and this manual
- Pencil or similar for markings (1)
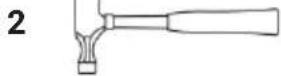
- Hammer (2)
- Spirit level or similar (3)
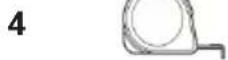
- Measuring tool (4)
- Screwdriver (5)
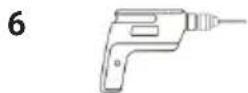
- Drilling machine, powered screwdriver or similar (6)
1
3

8.5 Mounting the appliance

Note on avoiding deposits
If the cooker hood is not installed horizontally, grease and/or condensation may collect in the corners / edges of the appliance! Check the correct alignment of the appliance with a spirit level during and after installation!
Proceed for installation on solid masonry, as described in the following section.
If the appliance is to be attached to a wall of a different nature (e.g. plasterboard, aerated concrete, Poroton bricks) replace the supplied mounting materials according to the substrate!
If the mounting surface is made of wood, you may be able to do without dowels.
However, always ensure a secure hold!
- Determine the desired position for installing the cooker hood or the corresponding wall brackets in the center above your cooktop in accordance with the distance regulations and dimensions mentioned above.
- Attach the supplied mounting template to the wall accordingly.
- Drill one hole each at the corresponding markings on the template according to the length + 10 mm and the diameter of the dowels.
- Remove the paper template again.
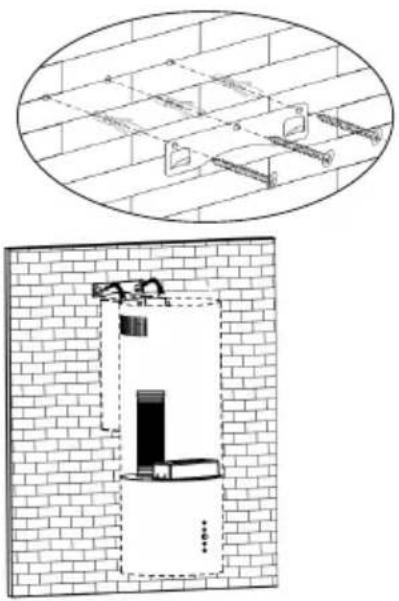
- Carefully tap a dowel into each drill hole with a hammer, place the wall bracket on them and secure it to the wall by screwing the ST4×30 screws supplied into the dowels and tightening them.
- Lift the hood body with at least 2 people and hang it on the wall bracket.
• Install the supplied non-return valve in the exhaust air outlet on the top of the hood body with the opening direction of the flaps upwards.
Note: For recirculation mode or if the room's exhaust air duct already has a non-return valve, this step is not necessary.
- For exhaust air operation, attach an exhaust air hose with a diameter of 150 mm made of heat-resistant material to the air outlet of the hood body and connect it to the further exhaust air duct.
Note: This step is not necessary for recirculation mode.
natural_image
Technical diagram showing a ceiling structure with support fixtures and a close-up of a mounted device inside a brick wall (no text or symbols)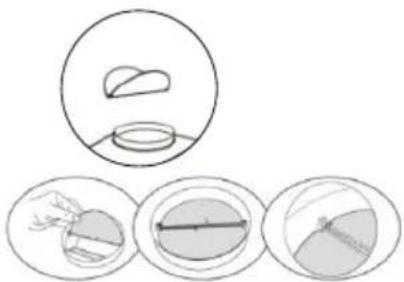
natural_image
Three circular diagrams showing abstract shapes and cross-sections, no text or symbols present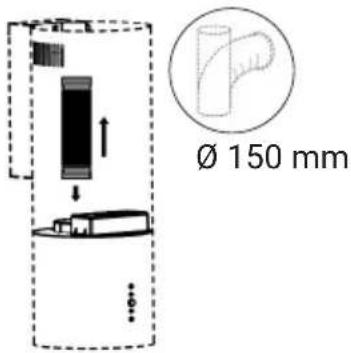
8.6 Connection to the power supply
The appliance cable is fitted with a standard plug. To connect it to a socket, follow the instructions below:
- Do not connect the appliance to the mains until it has been properly installed!
- Before connecting the appliance, make sure that the local mains voltage (V) and frequency (Hz) match the specifications on the rating plate!
- If the plug is no longer accessible after installation, ensure that an easily accessible all-pole circuit breaker (fuse) with a contact gap of at least 3 mm is integrated into the appliance's circuit, which complies with the applicable regulations and ensures complete disconnection of the appliance from the power supply in an emergency!
- Connect the plug of the mains cable directly to a properly earthed socket outlet near the appliance!
- Do not use multiple sockets or extension cables to connect the appliance to the mains! These do not guarantee the necessary safety!
- Make sure that the cable cannot be kinked or twisted during and after installation and that its temperature never exceeds 75°C.
9. Technical Data
Model designations TONNA353
Type Wall mounted hood with headroom
Venting type Convertible
Number of power levels 9
Lighting type LED
Lighting energy consumption 1 x 6.5 W
Number of grease filters 1
Activated carbon filter type K116
Energy efficiency class A+
Lighting energy efficiency class D
Fluid dynamic efficiency class B
Grease filter efficiency class D
maximum sound power level 58 dB
Air flow volume 197 m³/h in most energy efficient mode
Air flow volume at maximum power 479 m³/h
Average illuminance of the lighting system onto cooking surface 54 lx
Power 106.5 W
Measured power consumption in standby mode
Measured power consumption in off mode 0.48 W
Electrical power 30 W in most energy efficient mode
Voltage / Frequency 220 - 240 V / 50 Hz
Dimensions (W × D × H) 350 × 350 × 930 mm
Exhaust outlet diameter 150 mm
Cable length 1.3 m
Weight 15.9 kg
Note on product conformity
Model designation:
TONNA353
Cooker hood
Manufacturer / Distributor:
For the above-mentioned product, the corresponding EC Declaration of Conformity is available.
Some of the relevant documents can be viewed and downloaded from our website under the corresponding product page.
You are welcome to obtain the complete documents upon written request via the above contact address.
Jan Kolbe
Head of Product Management

KKT Kolbe Customer Service
We are happy to help if you have technical questions or problems with your appliance, or if something should break down.
You can contact our customer service at:
KKT KOLBE customer service
Tel. 0049 9502 667930
Mail: info@kolbe.de
www: www.kolbe.de
→ Further data and documents can be found on our website under "Questions & Answers".

Please have the following information ready:
- Customer number
• Date of the invoice or delivery note
• Appliance type (Model number) - Serial number
Note:
You will find the 20-digit serial number on the rating label of your appliance or on the outside of the packaging box. If noted, you will also find it on the inner cover of this manual.
Thanks for reading. We wish you lots of fun with your appliance.
- Umluftbetrieb
- ACHTUNG!
- Problemlösung
- WARNUNG!
- Kochfeldart Abstand (a)
- Geräteabmessungen
- KKT Kolbe Customer Service
- KKT KOLBE Kundenservice
- Thank you for your confidence and congratulations on the purchase of your new cooker hood!
- You can find the latest version of your user manual as well as further data, documents and information on the corresponding product page or in the "Questions & Answers" section of our online shop at www.kolbe.de.
- Your KKT KOLBE - Team
- KKT KOLBE
- User's manual
- Table of contents
- Important Safety Instructions 4
- Further Notes and Icons 14
- Product Overview ...... 18
- Operating Principle and Use of the Appliance 21
- Notes Before Use 24
- Operation, Setting and Use 25
- Recommendations for Use, Guidelines and Tips 29
- Cleaning and Maintenance 31
- Troubleshooting 38
- Installation of the cooker hood 41
- Technical Data 53
- KKT Kolbe Customer Service 55
- Important Safety Instructions
- Intended use
- WARNING!
- General warnings
- Danger to life and injury!
- Risk of electric shock / Dangers from electricity!
- WARNING! Fire hazard!
- Causes for damage and functional impairments with possible consequential dangers to life and limb!
- Further Notes and Icons
- In this manual
- Warning of danger to persons and of damage
- Danger grading by combined signal words:
- CAUTION!
- ATTENTION!
- Information and tips
- Note on illustrations
- Appliance, components and accessories
- Symbols on appliance parts, accessories, etc.
- General danger warning!
- Warning of electrical voltage!
- Warning of flammable substances!
- Warning of hot surface!
- Follow these instructions for use
- EU conformity
- Disposal and environmental protection
- Note icons for disposal
- No disposal in household waste (WEEE marking)
- Recyclable material (Möbius strip)
- Recyclable material (Triman symbol)
- General notes on disposal
- Note on environmental protection by saving energy
- Notes on transporting the appliance
- Storage instructions
- Product Overview
- Packing list
- Construction and properties of the appliance
- Appliance components
- Features and further properties
- Selectable functions
- Dimensions
- Operating Principle and Use of the Appliance
- Intended use and functional principle
- Health risks and risk of damage!
- Operating modes
- Exhaust air mode
- WARNING! Danger to life!
- Recirculation mode
- Operation with active carbon filter
- Notes Before Use
- Unpacking and preparing the appliance
- Smell perception during unpacking
- Risk of injury and electric shock!
- Danger of suffocation!
- Commissioning the cooker hood
- Operation, Setting and Use
- Notes on using the touch control
- Control panel and display
- Key operation and setting
- Switching the appliance on and off
- Adjusting the lighting
- Note on display illumination
- Adjusting the power levels
- Delay function / Auto-off
- Recommendations for Use, Guidelines and Tips
- Danger to life!
- Fire hazard!
- Risk of burns!
- Efficient use of the cooker hood
- Cleaning and Maintenance
- WARNING! Risk of electric shock!
- CAUTION! Risk of burns!
- CAUTION! Risk of injury!
- ATTENTION! Risk of damage!
- ATTENTION! Possible functional impairment!
- Cleaning the appliance components
- General instructions for cleaning the appliance surfaces
- Glass surfaces
- Stainless steel / metal surfaces
- Note on functional impairments due to soiling or moisture on the control panel
- Removing and cleaning the metal grease filter
- Removing the metal grease filter
- Cleaning the metal grease filter
- Risk of damage!
- Metal discolouration due to cleaning
- Manual cleaning
- Cleaning in the dishwasher
- Inserting the metal filter
- Replacing or fitting/removing the activated carbon filter
- Replacing the activated carbon filter for recirculation mode
- Fitting the activated carbon filter
- Disassembling and reinserting the activated carbon filter
- Replacing the LED lamps
- Properties of the LED lamps
- Troubleshooting
- Installation of the cooker hood
- Important notes and installation requirements
- Requirements according to the operating modes
- Notes for recirculation mode
- Requirements for exhaust air operation
- Filter use in exhaust air mode:
- Information on non-return valves:
- Notes on the exhaust air ducting to the air outlet
- Risk of malfunction!
- Installation location and environment
- Choosing the mounting position
- Mounting surface / substrate
- Notes:
- Installation dimensions / alignment
- Risk of damage and malfunction!
- Appliance dimensions
- Installation preparation and instructions
- Notes before installation
- Mounting the appliance
- Note on avoiding deposits
- Connection to the power supply
- Technical Data
- Note on product conformity
- Note:
Brand : KKT Kolbe
Model : TONNA353
Category : Range hood