
Compact 12000 Baby - Lighting ARRI - Free user manual and instructions
Find the device manual for free Compact 12000 Baby ARRI in PDF.


| Product Type | Daylight Fresnel Lamphead |
| Brand | ARRI |
| Model | Compact 12000 Baby |
| Power Consumption | 12,000 W (requires matching ballast) |
| Lamp Type | Daylight discharge lamp (HMI type) |
| Protection Class | Class I, Protection Rate IP23 |
| Beam Adjustment | Focus knob for spot/flood adjustment |
| Accessory Mount | Spring loaded top latch for barndoor, snoot, louvre shutter; rear slot for filters/diffuser frames |
| Lamp Holder | ARRI lamp holder with lock lever and support |
| Lens Door | Front opening with release lock for lamp exchange |
| Safety Devices | Safety switch, wire guard, labyrinth sealing, safety chain/wire attachment |
| Stirrup | Adjustable on center of mass |
| Cooling | Vent slots (do not cover) |
| Minimum Distance to Flammable Objects | 1,500 cm (15 m) |
| Weight (estimated) | Approximately 30 kg |
Frequently Asked Questions - Compact 12000 Baby ARRI
User questions about Compact 12000 Baby ARRI
0 question about this device. Answer the ones you know or ask your own.
Ask a new question about this device
Download the instructions for your Lighting in PDF format for free! Find your manual Compact 12000 Baby - ARRI and take your electronic device back in hand. On this page are published all the documents necessary for the use of your device. Compact 12000 Baby by ARRI.
USER MANUAL Compact 12000 Baby ARRI
Ident.No. L5.80492.0
Inhaltsverzeichnis:
COMPACT 12000; Ident No. L1.7579x.x
Table of Contents:
Notes:
Page
2
Important Safety Instructions: Page 2
Technical Data: Page 2
Warning! Heat and Ultra Violet Radiation: Page 2
Product Description: Page 3
General Instructions: Page 4
Protection of the Lamphead: Page 4
Protective Devices: Page 4
Putting into Operation: Page 4
Lamp Exchange / Inserting the Lamp: Page 4
Installing Accessories: Page 5
Maintenance:
Page
5
Stirrup adjustment on center of mass Page 5
ARRI Service Locations Page 5
- Please read the following operating instructions very carefully before using this fixture for the first time. They contain important information about operating ARRI-Lighting equipment.
- For your own safety, please follow all safety instructions and warnings.
- Please also follow the operating instructions of the ballasts and the instructions of the lamp manufacturers.
Important Safety Instructions:
- Caution high voltage! Danger!
Before replacing the lamp, disconnect lamphead from power supply or mains
- Caution! Lamp may be hot!
Allow the lamp to cool down sufficiently before replacing.
- Do not switch on the lamphead without a correct fitted lamp!
- Protection devices may not be removed except for service purpose by qualified personnel, and must be reattached immediately.
- Warning! Do not bridge safety switch (18).
- Do not switch on without a lens and/or reflector.
- CAUTION! The housing of the lamphead can reach high temperatures. Please refer to the following table for maximal values.
- Do not cover vent slots.
• Always keep the cables a reasonable distance away from the housing.
• Do not directly illuminate other lampheads. Risk of overheating or fire! - The lamp shall be exchanged if it has become damaged or thermally deformation.
- The lens must be exchanged if it has visibly damaged to such an extent that their effectiveness is impaired, for example by cracks or deep scratches. The reflector must be exchanged when it becomes dull or deformed.
- Do not operate the lamphead if any damage to cables, plugs, lampholder or wire guards are detected. Please contact an ARRI-Service location (refer to page 5 for contacts).
WARNUNG! WÄRME- UND UV-EMISSION:
- Do not operate without complete lamp enclosure in place or when lens is damaged.
- Do not stare directly at lamp in operation.
- Do not operate closer than 1.500 cm to flammable objects.
- Operation at a distance closer than 1.500 cm may be harmful to eyes and skin.
- The COMPACT 12000 daylight lamphead is developed by computer aided design, provided with the latest lighting technology and conforms to the International Standard IEC 60598-2-17.
The compact, strong housing and superb optical performance makes it ideal for professional studio and location applications.
- The positioning of the operating elements is clear, the accessibility is easy.
- The lens door (2) can be opened for lamp exchange or maintenance using the lens door release lock (13).
- The ARRI lamp holder opens and locks easily using the lamp lock lever (17) and opening the lamp support (16).
- A spring loaded top latch (1) allows the rapid exchange of accessories such as barndoor and filters etc.
- The light beam can be adjusted very easily by a focus knob (5) at the front and rear casting.
- The adjustment of the stirrup to the center of mass can be done easily.
- The identification plate (10) is located at the side of the housing and contains all necessary technical information.
natural_image
Interior view of a mechanical or optical device with no visible text or symbolsBild 3 / Picture 3
Index:
General Instructions:
- Do not touch the lamp quartz envelope with bare hands. Burned-in finger-prints reduce the durability of the lamp.
- Take care when installing a lamp. All contacts must be dry and free of contamination and corrosion.
- Whenever the fixture has been transported, check to be sure that the lamp is correctly seated in the lamp holder.
- Use original spare parts and accessories only.
Protection of the Lamphead:
- Whenever the lamphead is used suspended it must be protected against falling by a safety chain/wire. This safety chain/wire must be suitable dimensioned.
- The bearing strength of the safety chain/wire and the coupling links must be sufficient to hold at least 10 times the weight of the luminaire system.
Protective Devices:
- Protective class I, Protective rate 23
• Fresnel lens with safety wire guard - Labyrinth sealing
• Spring loaded top latch
• Safety chain/wire attachment
Putting into operation:
- IMPORTANT: Please follow the operating instructions of the ballast.
- Ensure that a functional lamp is inserted into the lamphead! Replace all lamps with visible damages (see chapter “Lamp exchange/Inserting the lamp”)
- Check that the ballast is switched off.
- Insert the connector of the lamphead (male) into the ballast output connector (female)
- Switch on the lamphead by pushing the ON/OFF switch (9) into the "On/I" position.
- By switching the ballast, the lamphead is powered on.
Lamp exchange/ Inserting the lamp Picture 3:
• Warning: High Voltage! Risk of life!
- Before opening the lensdoor (2) disconnect the lamphead from the ballast.
- CAUTION - Hot Lamp. Allow the lamp to cool down sufficiently before replacing.
- Press the lens door release lock (13) and open lens door (2) to the front.
- Turn the lamp lock lever (17) into the left end position (anticlockwise) and open the lamp support (16).
- Remove the lamp (15) carefully by holding the lamp at its socket.
- Hold the lamp to be inserted by its socket. Do not touch the glass bulb of the lamp (burned-in fingerprints reduce the lifetime of the lamp). Please follow the cleaning instructions of the lamp manufacturer.
- Carefully insert the lamp (15) into the lamp holder. The identification marked at the lamp socket should point the front.
- Turn the lamp lock lever (17) into the right end position and close the lamp support (16).
- Use only lamps of the correct wattage. Lamphead wattage must match lamp power.
- Shut the lens door. The lens door release lock (13) must be fitted carefully.
natural_image
Two parallel diagonal lines with arrows pointing downward, no text or symbols presentTechnische Änderungen vorbehalten! Design and specifications subject to change without notice!
ARRI Service Werkstätten / ARRI Service Locations
| Germany | Germany | USA | USA | Canada | Great | Britain | |
| ARNOLD & RICHTERCINE TECHNIKGmbH & Co. Betriebs KGPulvermühleD-83071 Stephanskirchen | ARRI LightingSolution GmbH | ARRI IncNew York Office | ARRI IncBurbank Office | ARRI Canada LTD. | ARRI (GB) LTD. | ARRI ITALIA SRL | |
| 617 Route 303,Blauvelt,NY 109131123 | 600 N. Victory Blvd.Burbank,CA 915021639 | 415 Horner Avenue,Unit 11, Etobicoke,Ontario M8W 4W3 | 2 Highbridge,Oxford RoadUxbridge MiddlesexUB8 1LX | Viale Edison 318I-20099 Sesto S.G.Milano | |||
| Tel.+49(0)8036-3009-0Fax +49(0)8036-2471 | Tel.+49(0)30-678233-0Fax+49(0)30-67823399 | Tel.+1(845)353-1400Fax+1(845)425-1250 | Tel.+1(818)841-7070Fax+1(818)848-4028 | Tel.+1(416)255-3335Fax+1(416)255-3399 | Tel.+44(0)1895-457000Fax+44(0)1895-457001 | Tel.+39(02)26227175Fax+39(02)2421692 | |
Internet: WWW.ARRI.COM
natural_image
Close-up of a mechanical component with no visible text or symbolsBild 4 / picture 4:
Installing Accessories Picture 4:
- Push the hinge pin (1a) to the right to open the top latch (1)
- Insert the accessories (barndoor, snoot or louvre shutter) into the front slot (1b) of the accessory bracket.
- The rear slot (1c) of the accessory bracket holds filters or diffuser frames.
- Turn down the top latch without pushing the hinge pin (1a). The top latch will be fixed in locked position automatically.
- WARNING! Do not use lamphead with closed barndoors. Risk of fire or damage of lamphead!
- Tight the screws (20a) on both sides carefully.
Maintenance:
- Please clean the reflector and fresnel lens in appropriate time intervals with a common glass cleaning agent. After cleaning, polish the surface with a soft cloth.
- Please check that the reflector shows no kind of deformation or damages.
- Keep the contact surfaces of the electrical connections and lamp holder clean.
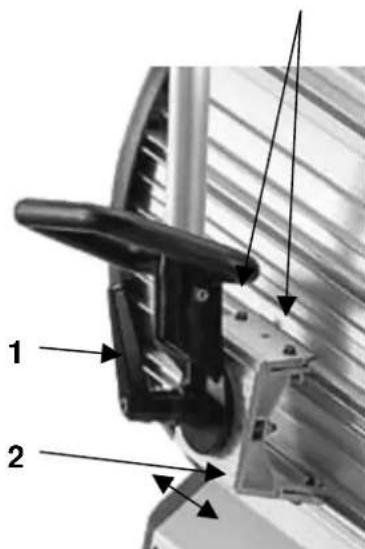
Bild 5 / Picture 5
Stirrup Adjustment on center of mass (Picture 5):
- Loose the screws (20a) on both sides.
- Position the stirrup mounting bracket (20) to centre of mass.
- Inhaltsverzeichnis:
- COMPACT 12000; Ident No. L1.7579x.x
- Table of Contents:
- Important Safety Instructions:
- Index:
- General Instructions:
- Protection of the Lamphead:
- Protective Devices:
- Putting into operation:
- Lamp exchange/ Inserting the lamp Picture 3:
- Installing Accessories Picture 4:
- Maintenance:
- Stirrup Adjustment on center of mass (Picture 5):
Brand : ARRI
Model : Compact 12000 Baby
Category : Lighting