PTC330N - Security Camera AVer - Free user manual and instructions
Find the device manual for free PTC330N AVer in PDF.


| Product Type | AI Auto Tracking PTZ Camera (NDI|HX) |
| Brand | AVer |
| Model | PTC330N |
| Image Sensor | 1/2.5" 2M Exmor CMOS |
| Effective Pixels | 2 Megapixels |
| Optical Zoom | 30X |
| Digital Zoom | 12X |
| Lens Focal Length | f = 4.3 mm (Wide) to 129 mm (Tele) |
| Aperture (Iris) | F1.6 (Wide) to F4.7 (Tele) |
| Minimum Illumination | 0.7 lux (IRE50, F1.5, 30fps) |
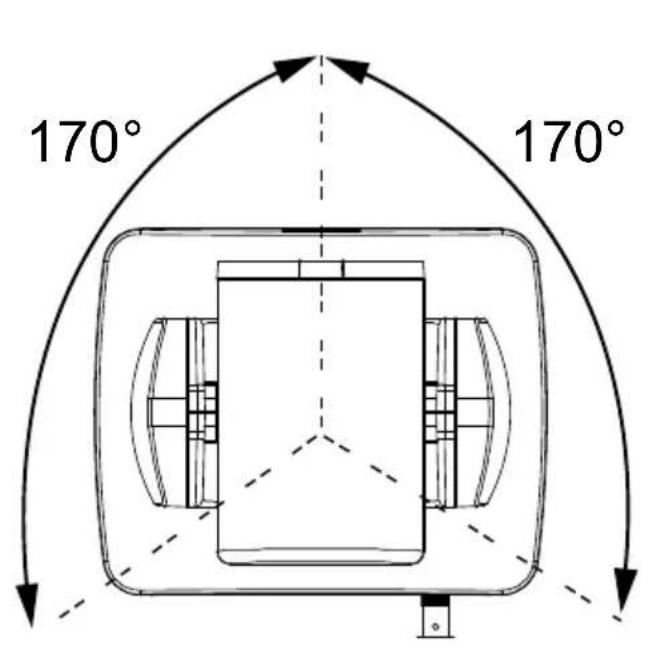
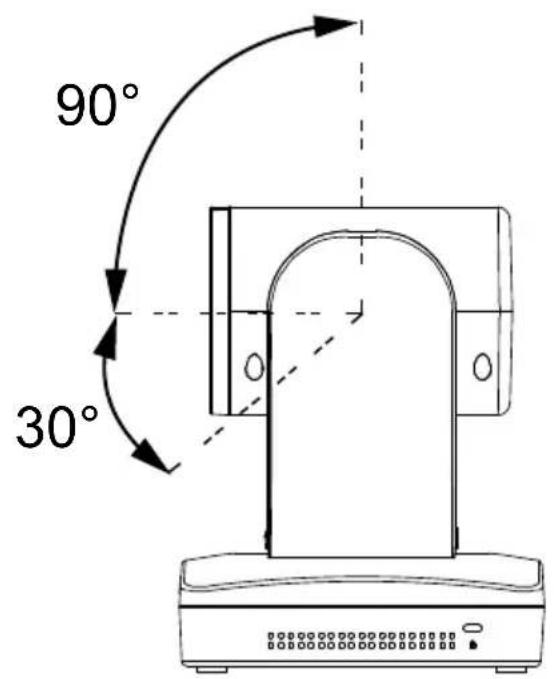
| Pan / Tilt Angles | Pan: ±170°, Tilt: +90° / -30° |
| Pan / Tilt Speed (Manual) | Pan: 0.1° to 100°/sec, Tilt: 0.1° to 100°/sec |
| Preset Speed | Pan: 200°/sec, Tilt: 200°/sec |
| Preset Positions | 10 (IR remote), 255 (RS-232) |
| Video Outputs | 3G-SDI, HDMI, IP, USB |
| Audio | 2ch stereo, MIC in, Line in |
| Power Requirement | DC 12V/2A or PoE+ (IEEE 802.3at) |
| Power Consumption | 18W |
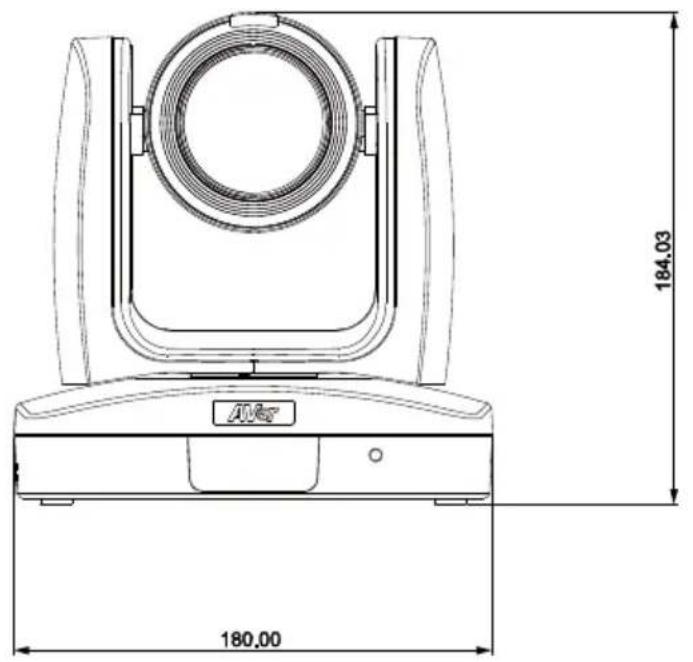
| Dimensions (W x D x H) | 180 x 145 x 183.5 mm |
| Net Weight | 1.7 kg |
| Network Interface | 10/100/1000 Base-T |
| Video Compression | H.264, H.265, MJPEG, NDI|HX |
| Auto Tracking Modes | Presenter, Zone, Hybrid |
| USB | USB 3.0, UVC 1.1, UAC 1.0 |
| Remote Control | Infrared |
| Security | Kensington lock slot |
Frequently Asked Questions - PTC330N AVer
User questions about PTC330N AVer
0 question about this device. Answer the ones you know or ask your own.
Ask a new question about this device
Download the instructions for your Security Camera in PDF format for free! Find your manual PTC330N - AVer and take your electronic device back in hand. On this page are published all the documents necessary for the use of your device. PTC330N by AVer.
USER MANUAL PTC330N AVer
natural_image
Line drawing of a medical imaging device with a coiled cable and base (no text or symbols)AI Auto Tracking PTZ Camera
PTC310/ PTC310H /PTC310U
PTC330/ PTC330U
*NDI model:PTC310N/PTC310UN/PTC330N
User Manual
FCC NOTICE (Class A)

This device complies with Part 15 of the FCC Rules. The operation is subject to the following two conditions: (1) this device may not cause harmful interference, and (2) this device must accept any interference received, including interference that may cause undesired operation.
NOTE- This equipment has been tested and found to comply with the limits for a Class A digital device, pursuant to Part 15 of the FCC Rules. These limits are designed to provide reasonable protection against harmful interference in a residential installation. This equipment generates uses and can radiate radio frequency energy and, if not installed and used in accordance with the instructions, may cause harmful interference to radio communications. However, there is no guarantee that interference will not occur in a particular installation. If this equipment does cause harmful interference to radio or television reception, which can be determined by turning the equipment off and on, the user is encouraged to try to correct the interference by one or more of the following measures:
● Reorient or relocate the receiving antenna.
- Increase the separation between the equipment and receiver.
- Connect the equipment into an outlet on a circuit different from that to which the receiver is connected.
- Consult the dealer or an experienced radio/television technician for help.
Class A ITE
Class A ITE is a category of all other ITE which satisfies the class A ITE limits but not the class B ITE limits. Such equipment should not be restricted in its sale but the following warning shall be included in the instructions for use:
Warning - This is a class A product. In a domestic environment, this product may cause radio interference in which case the user may be required to take adequate measures.
European Community Compliance Statement (Class A)

This product is herewith confirmed to comply with the requirements set out in the Council Directives on the Approximation of the laws of the Member States relating to Electromagnetic Compatibility Directive 2014/30/EU.
Warning - This is a Class A product. In a domestic environment, this product may cause radio interference in which case the user may be required to take adequate measures to correct this interference.
DISCLAIMER
No warranty or representation, either expressed or implied, is made with respect to the contents of this documentation, its quality, performance, merchantability, or fitness for a particular purpose. Information presented in this documentation has been carefully checked for reliability; however, no responsibility is assumed for inaccuracies. The information contained in this documentation is subject to change without notice.
In no event will AVer Information Inc. be liable for direct, indirect, special, incidental, or consequential damages arising out of the use or inability to use this product or documentation, even if advised of the possibility of such damages.
TRADEMARKS
“AVer” is a trademark owned by AVer Information Inc. Other trademarks used herein for description purpose only belong to each of their companies.
COPYRIGHT
©2021 AVer Information Inc. All rights reserved.
All rights of this object belong to AVer Information Inc. Reproduced or transmitted in any form or by any means without the prior written permission of AVer Information Inc. is prohibited. All information or specifications are subject to change without prior notice.
NOTICE
SPECIFICATIONS ARE SUBJECT TO CHANGE WITHOUT PRIOR NOTICE. THE INFORMATION CONTAINED HEREIN IS TO BE CONSIDERED FOR REFERENCE ONLY.
Remote Control Battery Safety Information
- Store batteries in a cool and dry place.
- Do not throw away used batteries in the trash. Properly dispose of used batteries through specially approved disposal methods.
- Remove the batteries if they are not in use for long periods of time. Battery leakage and corrosion can damage the remote control. Dispose of batteries safely and through approved disposal methods.
- Do not use old batteries with new batteries.
- Do not mix and use different types of batteries: alkaline, standard (carbon-zinc) or rechargeable (nickel-cadmium).
- Do not dispose of batteries in a fire.
- Do not attempt to short-circuit the battery terminals.
CAUTION
- Risk of explosion if battery is replaced by an incorrect type.
- Dispose of used batteries in a safe and proper manner.
WARNING
■ To reduce the risk of fire or electric shock, do not expose this appliance to rain or moisture. Warranty will be void if any unauthorized modifications are done to the product.
■ Do not drop the camera or subject it to physical shock.
■ Use the correct power supply voltage to avoid the damaging camera.
■ Do not place the camera where the cord can be stepped on as this may result in fraying or damage to the lead or the plug.
■ Hold the bottom of the camera with both hands to move the camera. Do not grab the lens or lens holder to move the camera.
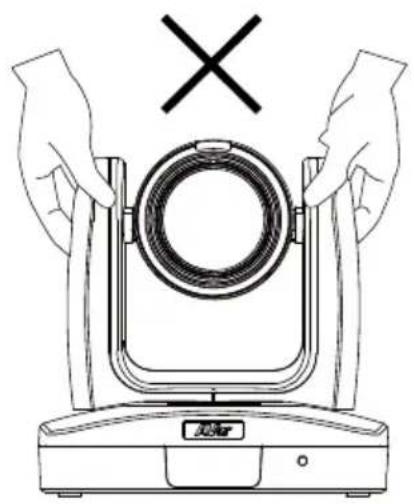
natural_image
Line drawing of hands holding a circular device with a cross symbol above (no text or labels)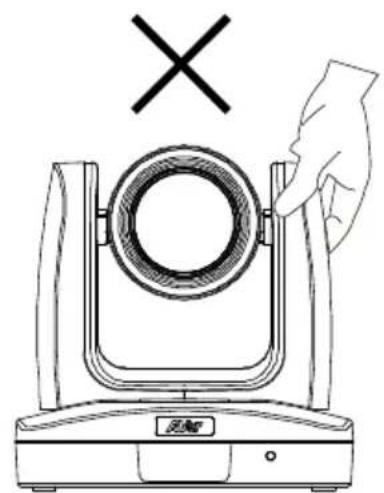
natural_image
Line drawing of a hand holding a circular device with a cross symbol above it, no text or symbols present.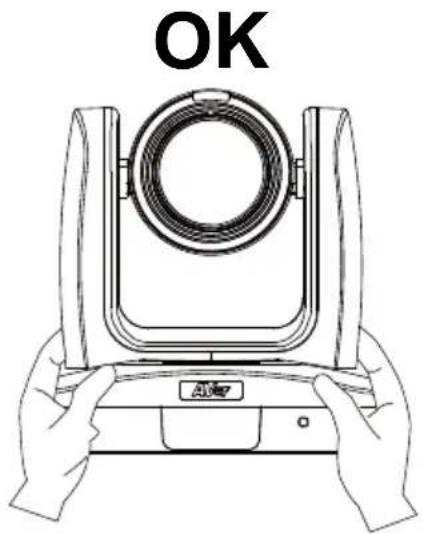
natural_image
Line drawing of hands holding a camera lens with 'OK' text above (no other symbols or text)Contents
Package Contents....1
Product Introduction....2
Sources 2
Overview 2
LED Indicator....3
Pan and Tilt Angle 3
Dimension 4
Device Connection .... 5
Video Output Connection 6
RS232 and RS422 Connection 7
Audio Input Connection ....11
PoE Connection ....11
Install Cable Fixing Plate 13
Ceiling installation 14
Installation for Auto Tracking Performance.... 15
Remote Control 16
Setup the Camera.... 18
OSD Menu....18
Setup IP Address of the Camera 18
Static IP 18
DHCP 19
OSD Tree 20
Camera....20
Advanced Setting....21
Video Output....21
Network 21
System....22
Web Setup....23
Using the AVer IPCam Utility to Find the Camera.... 23
Using AVer PTZ Management Software to Find the Camera.... 24
Make a Connection to the Camera via Browser 25
Live View 26
Pan-Tilt-Zoom Control....26
Focus....27
Manual Pan-Tile-Zoom and Preset Speed Adjustment ....27
Preset Setting 28
Tracking Control 28
Click Tracking Function....29
Camera Settings....30
Exposure 30
Image Process....30
Video & Audio 31
Get 4K (2160p) output ....31
Network 34
RTMP Setting 34
Using RTSP Connect to Camera 35
SRT Stream....36
Tracking Setting....38
Presenter Mode 38
Zone Mode ....40
Hybrid Mode 42
Quick Setup for Tracking....44
Presenter Mode 44
Zone Mode 44
System 45
Upgrade Firmware 46
VISCA RS232 Command Table 47
Visca over IP Settings 48
CGI command 49
Specification....51
PTC310 51
PTC310H....54
PTC310N....57
PTC310U....61
PTC310UN 64
PTC330 68
PTC330N....71
PTC330U....75
Package Contents
Camera unit
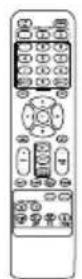
Remote control
Cable ties(x5)
Quick Start Guide
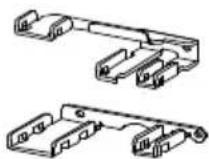
Cable Fixing plates(x2)

M2 x 4mm
Screw(x4)
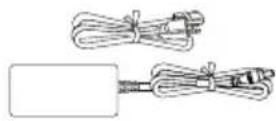
Power adapter & Power cord

1/4"-20L=6.5mm Screw(x3)
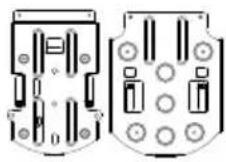
Ceiling mount bracket(x2)

M3 x 6mm
Screw(x3)
*The power cord will vary depending on the standard power outlet of the country where it is sold.
Optional accessory
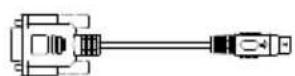
RS232 Din8 to D-Sub9 Cable
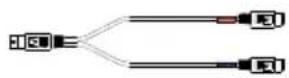
RS232 In/Out Y Cable
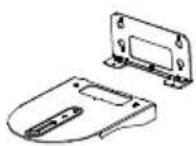
Wall mount bracket
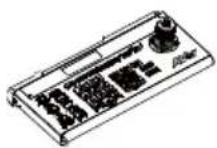
Camera
Controller (CL01)
* For detail on optional accessories, consult your local dealer.
Product Introduction
Sources
PTC300 Intro Video
https://www.youtube.com/watch?v=j25xQbkSmPc
PTC300 Series Feature Video
https://www.youtube.com/watch?v=VJh1m5RWhLw
AVer Tech (Setup)
https://www.youtube.com/channel/UC8rQt7Pe3_4Rh-K4p1eXfNw

Overview
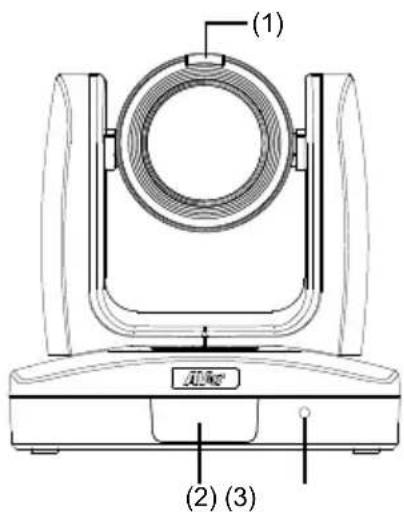
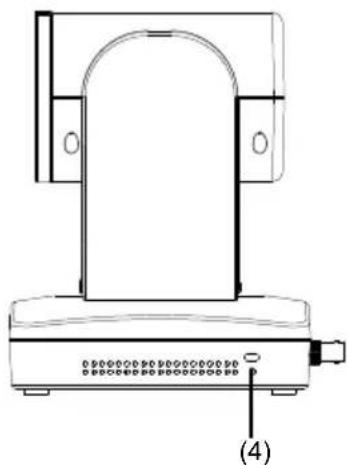
natural_image
Technical line drawing of a mechanical device with mounting base and control panel (no text or symbols)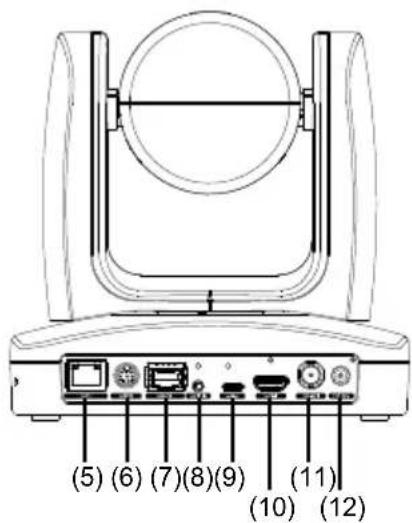
| (1) Tally Lamp (*1) | (5) PoE+ IEEE 802.3AT | (9) USB 3.0 Port (Type C) |
| (2) IR Sensor | (6) RS232 Port | (10) HDMI Port |
| (3) Power Indicator | (7) RS422 Port | (11) 3G-SDI Port (*2) |
| (4) Kensington Lock (8) Audio In (12) DC Power Jack |
*1: Line input level: 1Vrms (max.).
Mic input level: 50mVrms (max.); Supplied voltage: 2.5V
*2: This feature (3G-SDI) is not supported on PTC310H & PTC310HN.
LED Indicator
| LED | Status |
| Blue(Solid) Normal Operation | |
| Blue(Blinking) Auto Tracking On | |
| Orange(Blinking) Camera Initialization | |
| Orange(Solid) Standby | |
| Red(Blinking) FW Updating | |
Pan and Tilt Angle
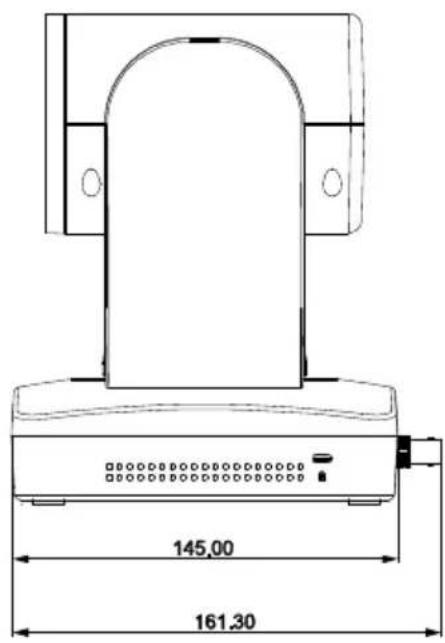
Dimension
Unit: mm
Device Connection
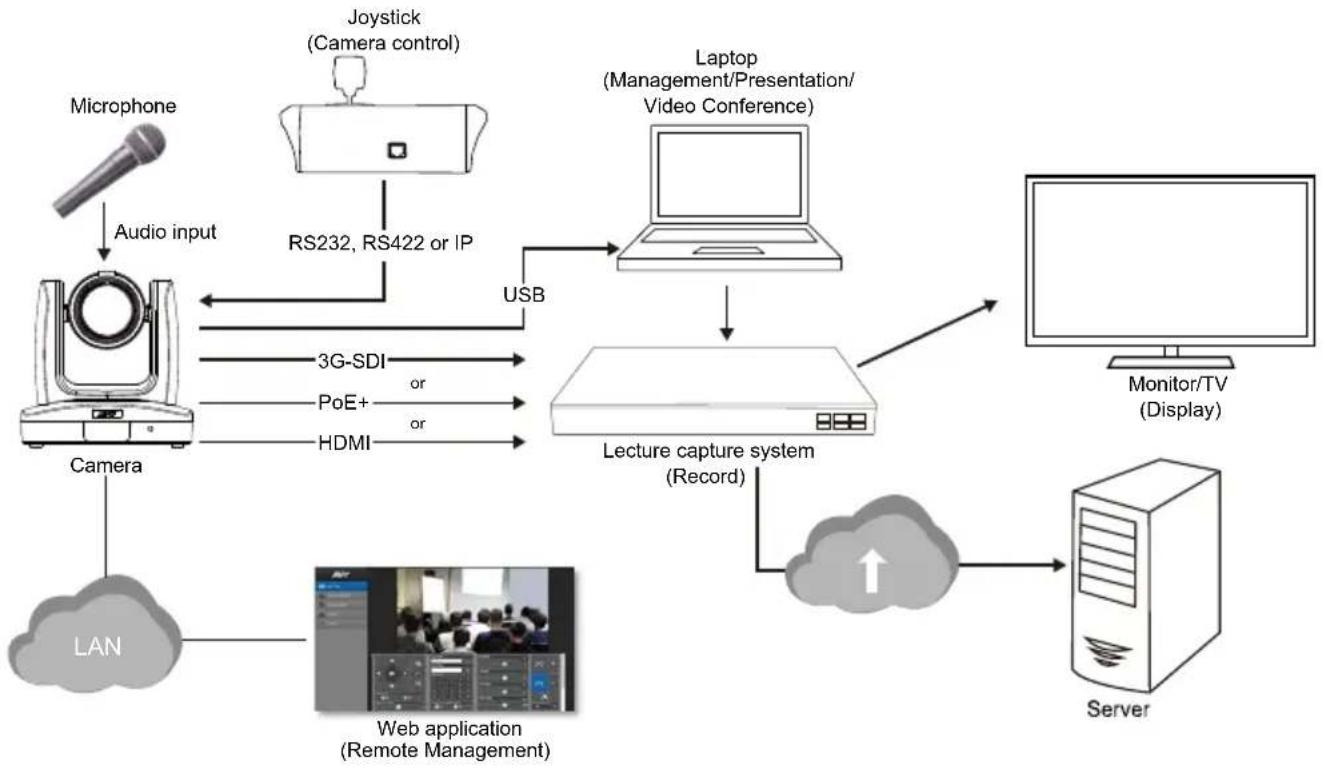
flowchart
graph TD
    A["Microphone"] -->|Audio input| B["Camera"]
    B --> C["LAN"]
    C --> D["Web application (Remote Management)"]
    D --> E["Lecture capture system (Record)"]
    E --> F["Laptop (Management/Presentation/Video Conference)"]
    F --> G["Monitor/TV (Display)"]
    G --> H["Server"]
    H --> I["Cloud with upward arrow"]
    I --> E
    B --> J["RS232, RS422 or IP"]
    J --> K["USB"]
    K --> L["3G-SDI or PoE+ or HDMI"]
Video Output Connection
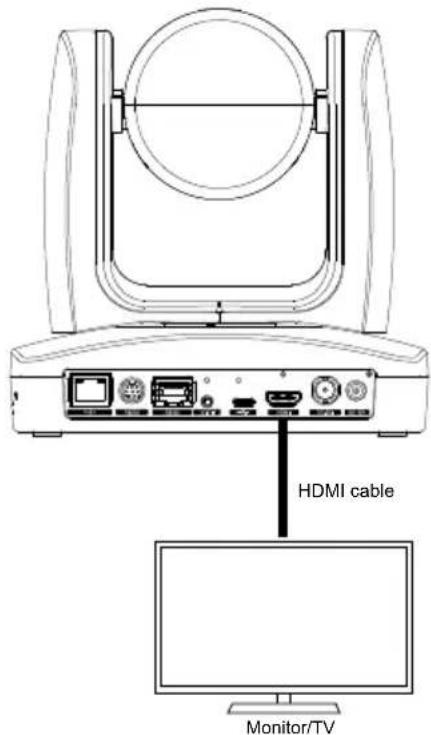
HDMI
Use the HDMI cable to connect with monitor or TV for video output.
3G-SDI
Connect to 3G-SDI monitor for video output. (This feature "3G-SDI" is not supported on PTC310H & PTC310HN.)
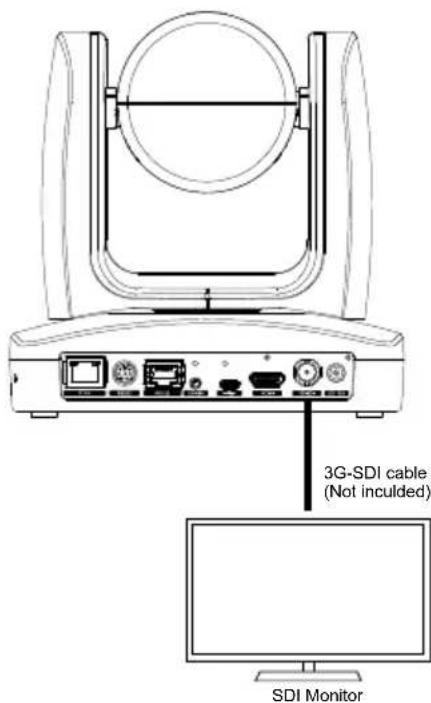
[Note] HDMI and 3G-SDI monitors can be connected to camera and output live video simultaneously; Assuming HDMI monitor is well connected before the camera turned on, the OSD menu will be displayed on HDMI monitor in default."
RS232 and RS422 Connection
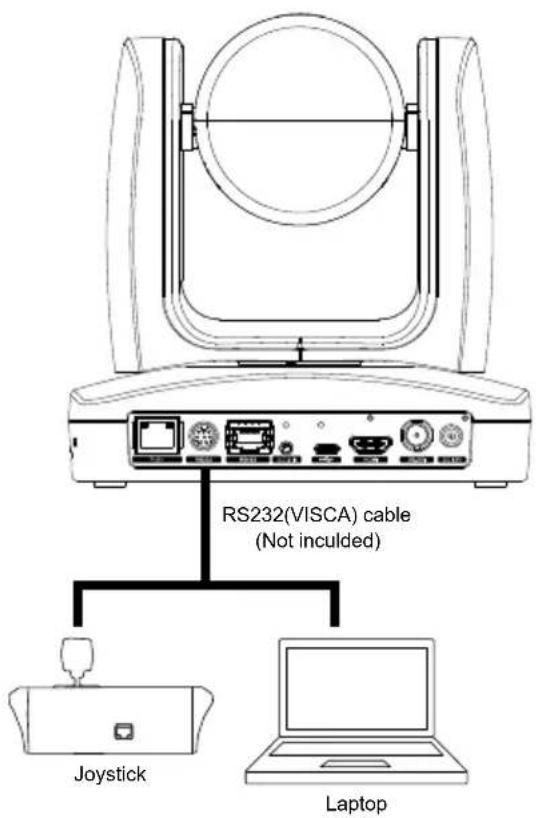
Connect through the RS232 or RS422 for camera control.
RS232
● RS232 Port Pin Definition
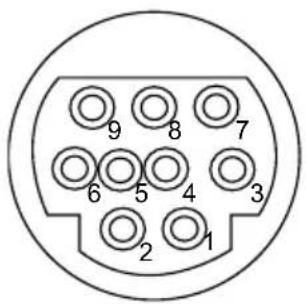
| Function | Mini DIN9 PIN # | I/O Type | Signal Description | |
| VISCA IN | 1 Output DTR Data Terminal Ready | |||
| 2 Input DSR Data Set Ready | ||||
| 3 Output TXD Transmit Data | ||||
| 6 Input RXD Receiver Data | ||||
| VISCA OUT | 7 Output DTR Data Terminal Ready | |||
| 4 Input DSR Data Set Ready | ||||
| 8 Output TXD Transmit Data | ||||
| 9 Input RXD Receiver Data | ||||
| 5 | --- | --- | Not connect | |
flowchart
graph LR
    A["Mini DIN9"] --> B["Connect to AVer camera"]
    C["IN(Mini DIN8)"] --> D["Connect to controller or PC"]
    C --> E["Connect to next camera"]
    F["OUT(Mini DIN8)"] --> D
    F --> E
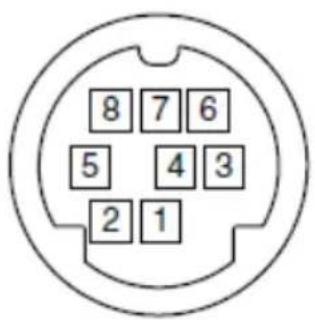
| No. | Signal |
| 1 | DTR |
| 2 | DSR |
| 3 | TXD |
| 4 | GND |
| 5 | RXD |
| 6 | GND |
| 7 | NC |
| 8 | NC |
● Din8 to D-Sub9 Cable Pin Definition
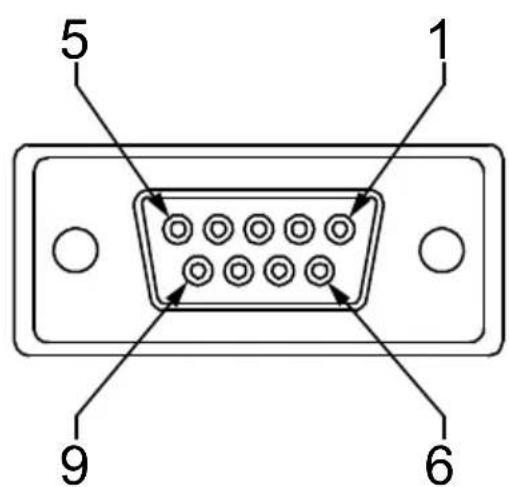
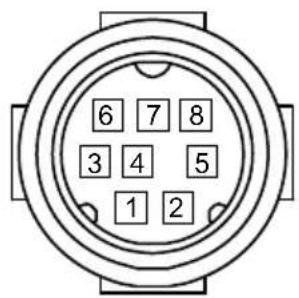

RS422
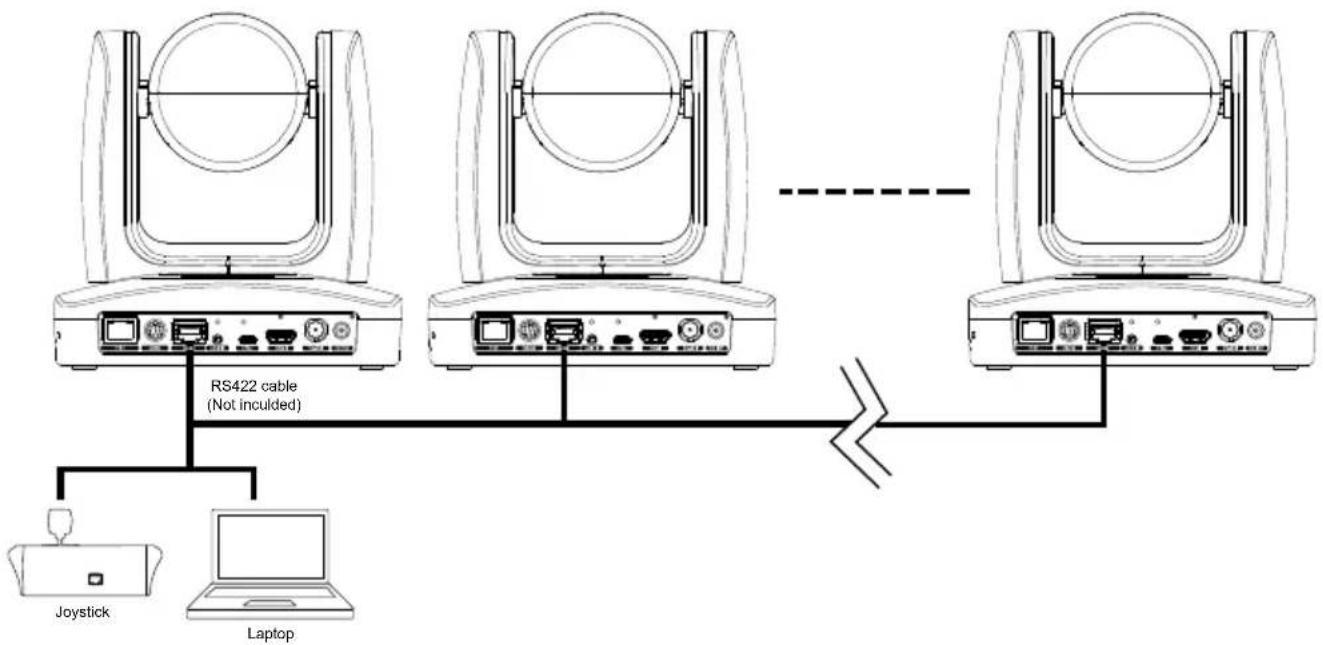
flowchart
graph TD
    A["RS422 cable (Not inculcd)"] --> B["Laptop"]
    C["Joystick"] --> A
    D["Router"] --> E["RS422 cable (Not inculcd)"]
    style A fill:#f9f,stroke:#333
    style B fill:#ccf,stroke:#333
    style C fill:#cfc,stroke:#333
    style D fill:#fcc,stroke:#333
    style E fill:#cff,stroke:#333
[Note] Use cat5e splitter for multi-camera connection.
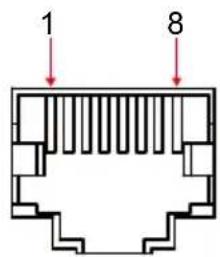
| RS422 Pin | |||
| No. | Pin No. | Pin | |
| 1 | TX- 5 | TX+ | |
| 2 | TX+ 6 | RX+ | |
| 3 | RX- 7 | RX- | |
| 4 | TX- 8 | RX+ | |
Cat5e splitter pin assignment:
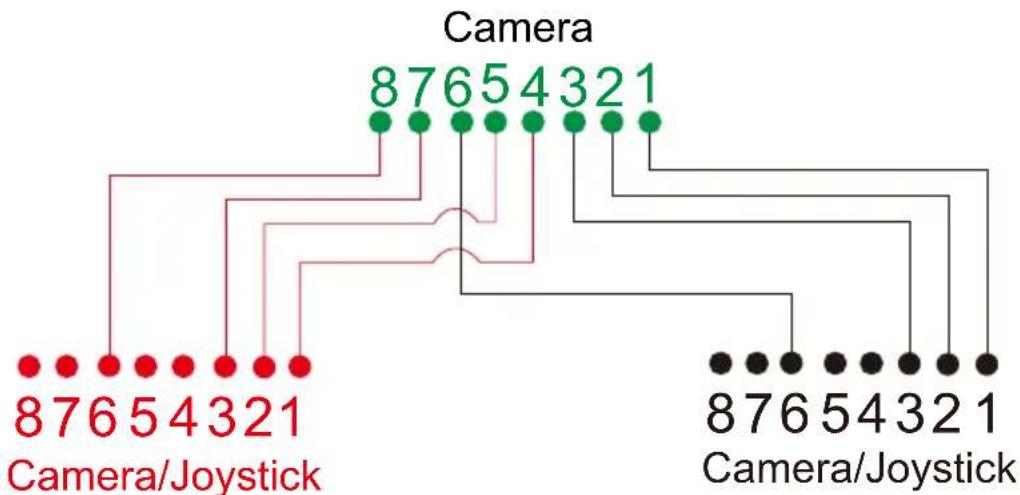
flowchart
graph TD
    A["876 5 4 3 21"] --> B["Camera"]
    C["876 5 4 3 21"] --> D["Camera/Joystick"]
    E["876 5 4 3 21"] --> F["Camera/Joystick"]
    G["876 5 4 3 21"] --> H["Camera/Joystick"]
    I["876 5 4 3 21"] --> J["Camera/Joystick"]
    K["876 5 4 3 21"] --> L["Camera/Joystick"]
    M["876 5 4 3 21"] --> N["Camera/Joystick"]
    O["876 5 4 3 21"] --> P["Camera/Joystick"]
    Q["876 5 4 3 21"] --> R["Camera/Joystick"]
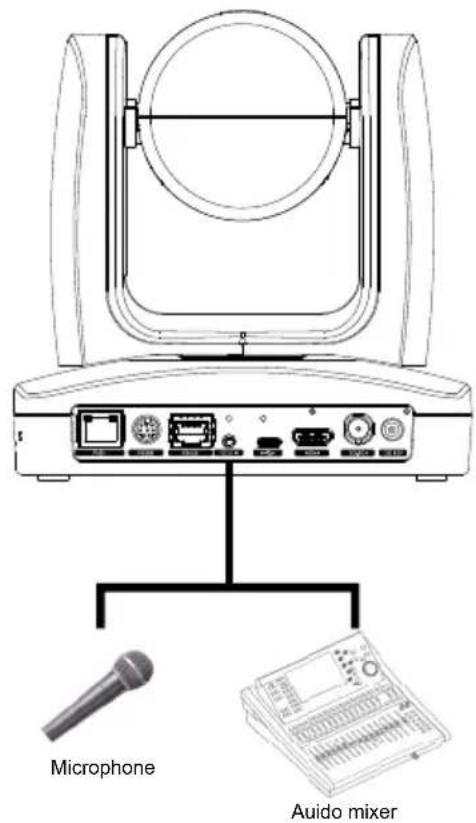
Audio Input Connection
Connect the audio device for audio receiving.
[Note]
- Line input level: 1Vrms (max.).
- Mic input level: 50mVrms (max.); Supplied voltage:2.5V.
PoE Connection
Connect the camera to the router or switch through the PoE+ port.
[Note] Only support IEEE 802.3AT PoE+ standard.
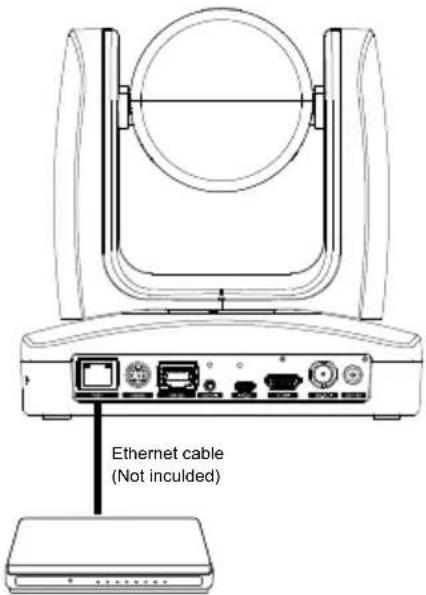
Router/PoE Switch
Install Cable Fixing Plate
① Secure the cable fixing plate to the camera with screws.
Screw: 4screws, M2 x 4mm(Included in the package)
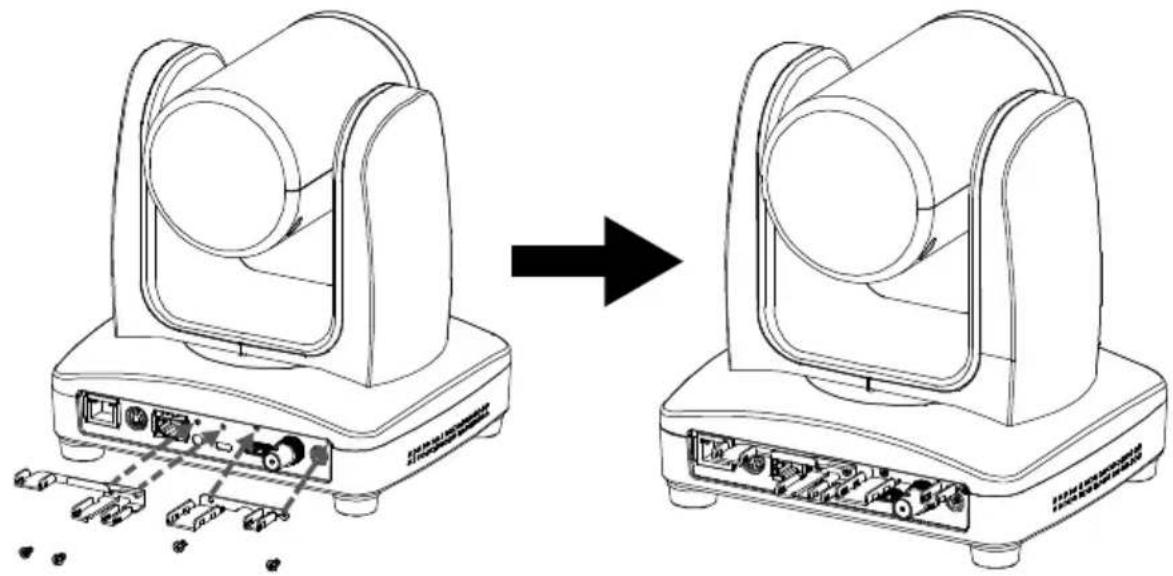
natural_image
Diagram showing device transformation from a multi-stage optical or radar system to a multi-stage optical or radar device (no text or symbols present)② Plug-in cables.
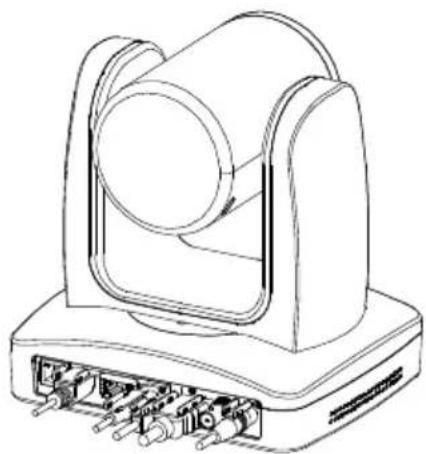
natural_image
Technical line drawing of a mechanical device with ports and housing (no text or symbols)③ Using cable ties to secure the cable and cable fixing plate.
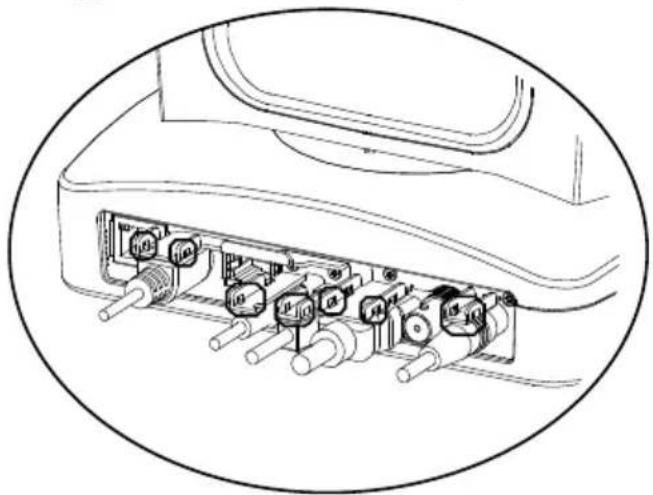
natural_image
Technical line drawing of an electronic device internal structure with multiple ports and connectors (no text or symbols)Ceiling installation
- Secure the mount bracket on the ceiling.
Screw: 4 screws, M4 x 10mm (Not Included in the package)
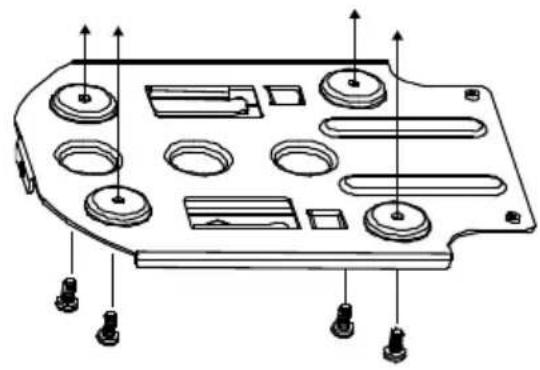
natural_image
Technical line drawing of a mechanical component with multiple circular features and mounting holes (no text or symbols)- Install the mount bracket on the camera.
Screw: 3 screw, 1/4"-20 L=6.5mm(Included in the package)
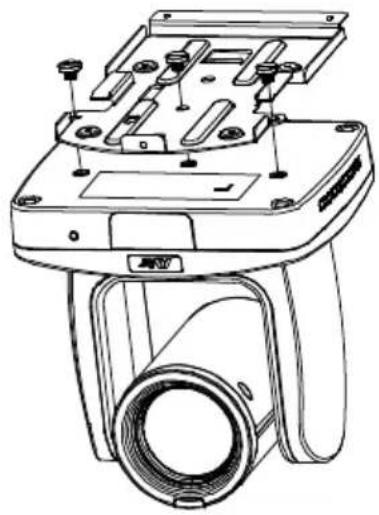
natural_image
Technical line drawing of a camera module with mounting holes and a cylindrical lens (no text or symbols)- Slide the mount bracket with the camera into the mount bracket which secured on the ceiling.
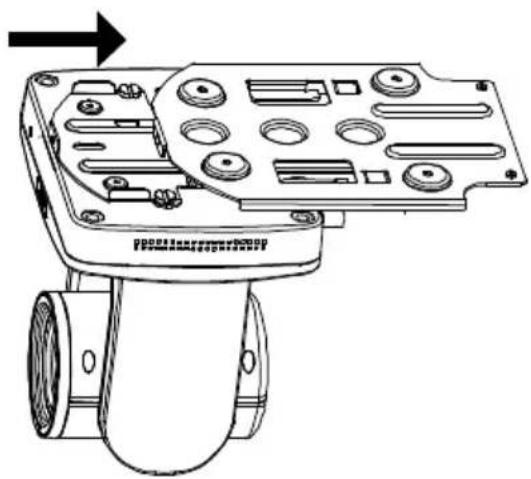
natural_image
Technical line drawing of a mechanical device with mounting holes and a cylindrical component (no text or symbols)- Secure the camera with screws.
Screw: 3 screws, M3 x 6mm( Not Included in the package)
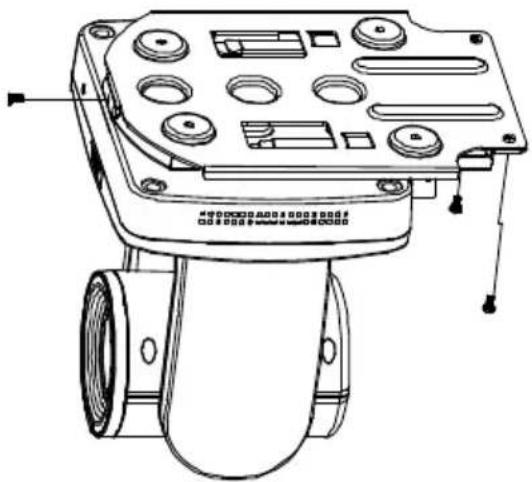
natural_image
Technical line drawing of a mechanical device with multiple ports and mounting holes (no text or symbols)[Note] Connects necessary cables after sliding the camera into the mount bracket.
Installation for Auto Tracking Performance
• Maximum/Minimum distance from the camera to tracking target
| Upper body tracking Full body tracking | ||
| PTC310 | 1.3~16 meters | 2.2~28 meters |
| PTC330 | 1.4~44 meters | 2.5~76 meters |
• Installed 2\~3 meters high from the floor.
- No human-outline figure on posters/screens/monitors/TVs in the background.
• Less than three people in a single camera view.
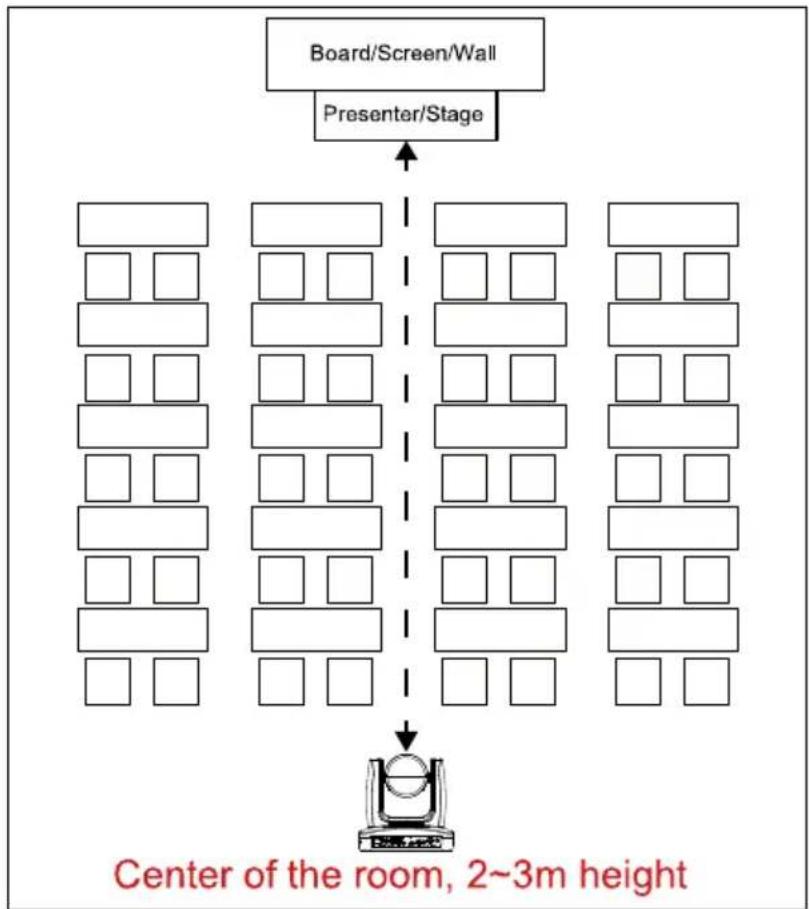
flowchart
graph TD
    A["Board/Screen/Wall"] --> B["Presenter/Stage"]
    B --> C["Room 1"]
    B --> D["Room 2"]
    B --> E["Room 3"]
    B --> F["Room 4"]
    B --> G["Room 5"]
    B --> H["Room 6"]
    B --> I["Room 7"]
    B --> J["Room 8"]
    B --> K["Room 9"]
    B --> L["Room 10"]
    style A fill:#f9f,stroke:#333
    style B fill:#ccf,stroke:#333
    style C fill:#cfc,stroke:#333
    style D fill:#cfc,stroke:#333
    style E fill:#cfc,stroke:#333
    style F fill:#cfc,stroke:#333
    style G fill:#cfc,stroke:#333
    style H fill:#cfc,stroke:#333
    style I fill:#cfc,stroke:#333
    style J fill:#cfc,stroke:#333
    style K fill:#cfc,stroke:#333
    style L fill:#fcc,stroke:#333
    note right of L "Center of the room, 2~3m height"
Remote Control
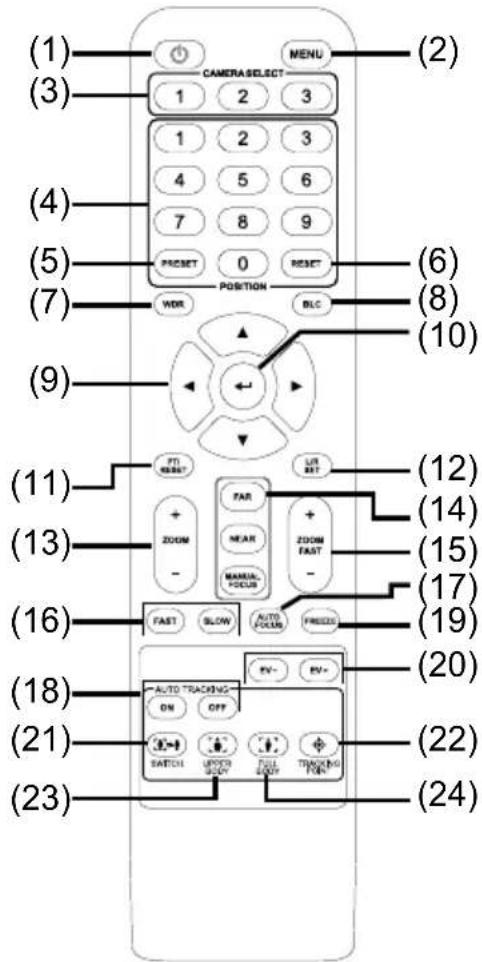
| Name Function | |
| (1) Power | Turn the unit on/standby. |
| (2) Menu | Open and exit the OSD menu. |
| (3) Camera Select | CAM1 to CAM3 buttonSelects a camera to operate. |
| (4) Numeric Pad | ■ Use for setting the preset position 0~9.■ Press number button (0~9) to move the camera to pre-configure preset position 0~9. |
| (5) Preset | Press and hold “Preset” + “Number button (0~9)” to set the preset position. |
| (6) Reset | Press and hold “Reset” + “Number button (0~9)” to cancel pre-configure preset position. |
| (7) WDR | Turn on/off WDR function. |
| (8) BLC | Turn on/off backlight compensation. |
| (9) ▲,▼,◀, & ▶ Pan and tilt the camera. | |
| (10) Enter | When open the OSD menu and Confirm the selection or make a selection in OSD menu. |
| (11) PT Reset | Reset the Pan-Tilt position. (Re-calibration) |
| (12) L/R DIR | Left and right orientation setting.- Press and hold “L/R DIR” button + number button “1” to set the direction of the camera panning movement opposite to that indicated by the arrow of the ◀/► buttons.- Press and hold“L/R DIR” button + number button “2” to set the direction of the camera panning movement same as the arrow of the ◀/► buttons. |
| (13) Zoom +/- | Zoom in/out slow. |
| (14) MF/Far/Near | Enable manual focus. Use Far/Near to adjust the focus. |
| (15) Zoom Fast +/- | Zoom in/out fast. |
| (16) Pan-tilt Fast/Slow | Pan-Tilt speed adjustment.(24-speed) |
| (17) AF | Auto focus. |
| (18) Auto Tracking | Auto Tracking on/off. |
| (19) Freeze | Freeze the live image |
| (20) EV +/- | EV level adjustment. |
| (21) Switch | Change presenter (Tracking target) |
| (22) Tracking Point | When presenter enters this area, the camera will start tracking.Short press the button will recall preset1,Long press(over 0.5sec) the button will switch tracking mode (v0.0.0000.21 or later FW). |
| (23) Upper Body | Presenter's size on screen is upper body. |
| (24) Full Body | Presenter's size on screen is Full body. |
Setup the Camera
OSD Menu
Press MENON on the remote controller to call out the OSD menu and use
▲, ▼, ◀, ▶ and
button to operate the OSD menu.
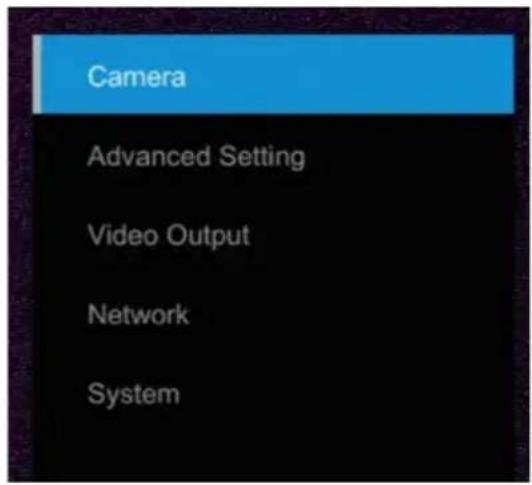
Setup IP Address of the Camera
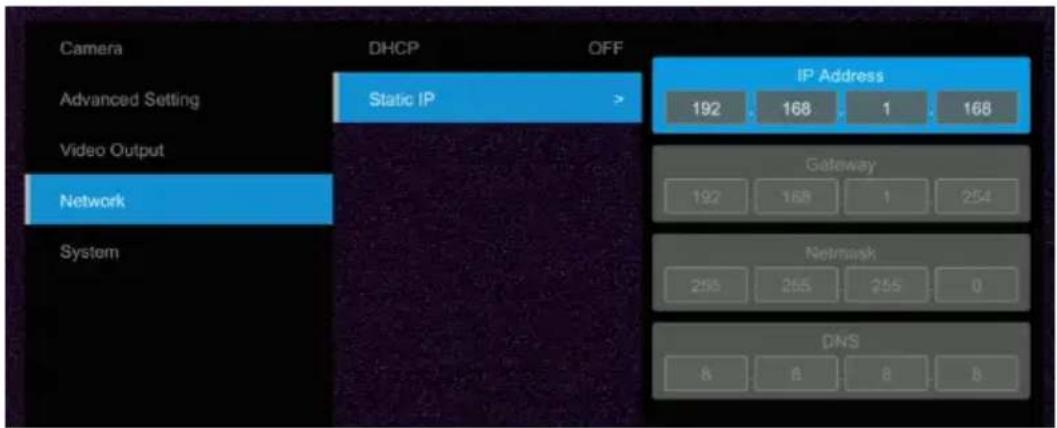
Static IP
- Press button on the remote controller to call out OSD menu.
- Go to Network > Static IP.
[Note] Turn the DHCP off before setup static IP (Network > DHCP > Off).
- Select the IP address, Gateway, Mask, and DNS to configure. Press ⬇ and use◀, ▶, number pad to enter the data.
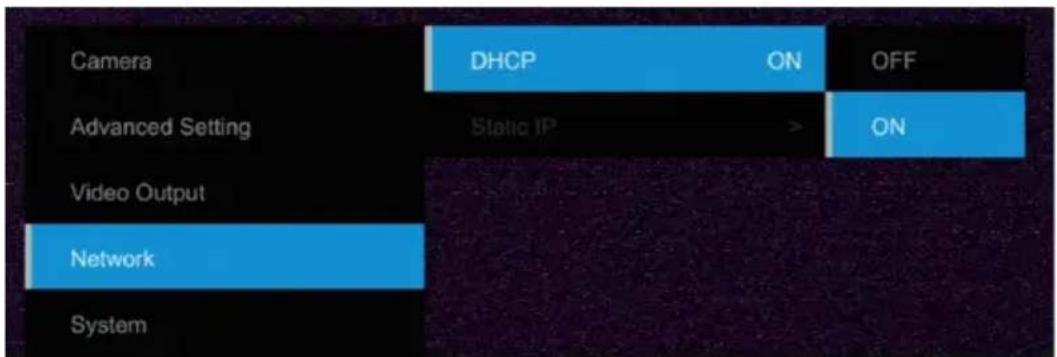
DHCP
- Press button on the remote controller to call out OSD menu.
- Go to Network > DHCP > On.
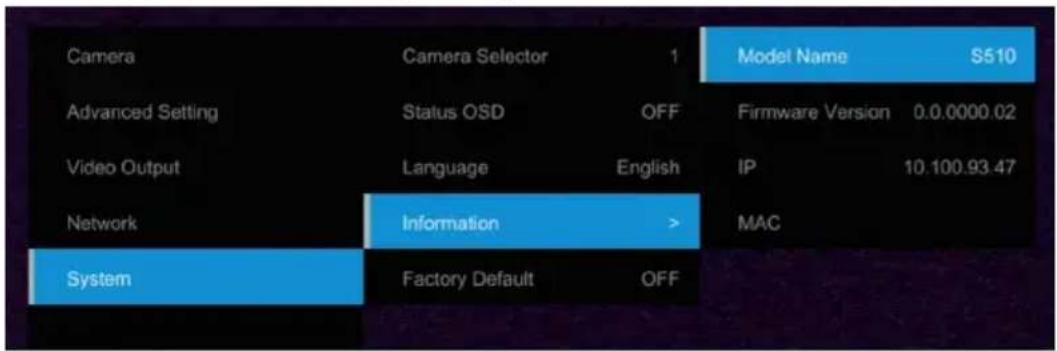
- After turn the DHCP on, the user can go to System > Information to view IP address.
OSD Tree
Camera
Setup camera parameters – Exposure mode, White balance, Pan-Tilt Zoom, Noise reduction, Frequency, Saturation, Contrast, Sharpness, Mirror, and Flip.
| Camera Exposure Mode | ||
| Full Auto | Exposure Value/Gain Limit Level/Slow Shutter | |
| Shutter Priority | Exposure Value/Shutter Speed/Gain Limit Level | |
| Iris Priority | Exposure Value/Iris Level/Gain Limit Level/Slow Shutter | |
| Manual | Iris Level/Shutter Speed/Gain Level | |
| Bright | 0 - 31 | |
| White Balance | Auto/AWT/Indoor/Outdoor | [Note] AWB auto range is about 3500K color temperature, when the color temperature is less than 3500K, please use AWT. |
| R Gain | 0~255 | |
| B Gain | 0~255 | |
| Pan Tilt Zoom | Pan/Tilt Slow /Preset Speed/Digital Zoom/Digital Zoom Limit | |
| Noise Filter | OFF/Low/Medium/High | |
| Saturation | 0~10 | |
| Contrast | 0~4 | |
| Sharpness | 0~3 | |
| Mirror | OFF/ON | |
| Flip | OFF/ON | |
Advanced Setting
| Advanced Setting | Audio | |
| Input Type | Mic in/Line in | |
| Auto Gain Control | OFF/ON | |
| Noise Suppression | OFF/Low/Normal | |
| Audio Volume | 0 ~ 10 | |
| Control | ||
| Type | RS232/RS422 | |
| Protocol | VISCA/Pelco-P/ Pelco-D | |
| Camera Address | 1~7 | |
| Baud Rate | 2400/4800/9600/38400 | |
| Tracking | ON/OFF |
Video Output
Select video resolution.(2160p is supported on PTC310U and PTC330U only)
| Priority Mode 2160P/1080P |
| Frequency 50Hz/59.94Hz/60Hz |
| Video Format 2160p/30 2160p/29.97 2160p/25 1080p/60 |
| 1080p/59.94 1080p/30 1080i/60 1080i/59.94 |
| 720p/60 720p/59.94 1080p/50 1080p/25 |
| 1080il/50 720i/50 |
Network
Setup IP mode – DHCP or static IP.
| Network | DHCP | Off/On |
| Static IP | IP Address | |
| Gateway | ||
| Netmask | ||
| DNS |
System
■ Status OSD: Enable/disable Preset status (Save Preset, Call Preset, Cancel Preset) display on the screen.
■ Camera Selector: Set the camera ID 1\~3 for using remote controller on multiple cameras control (also see (2) Camera select in Remote Control chapter).
■ NDI: Enable/disable NDI function. For detail setting refer to Setup NDI Function chapter.
■ Tally: Enable tally function.
| System Camera Selector 1~3 | |
| Status OSD | OFF/ON |
| Language English/繁中 | |
| NDI OFF/ON | |
| Tally Disable/Enable | |
| Information Model Name/Firmware | Version/IP /MAC |
| Factory Default OFF/ON |
Web Setup
Connect the camera from a remote site through the internet.
Using the AVer IPCam Utility to Find the Camera
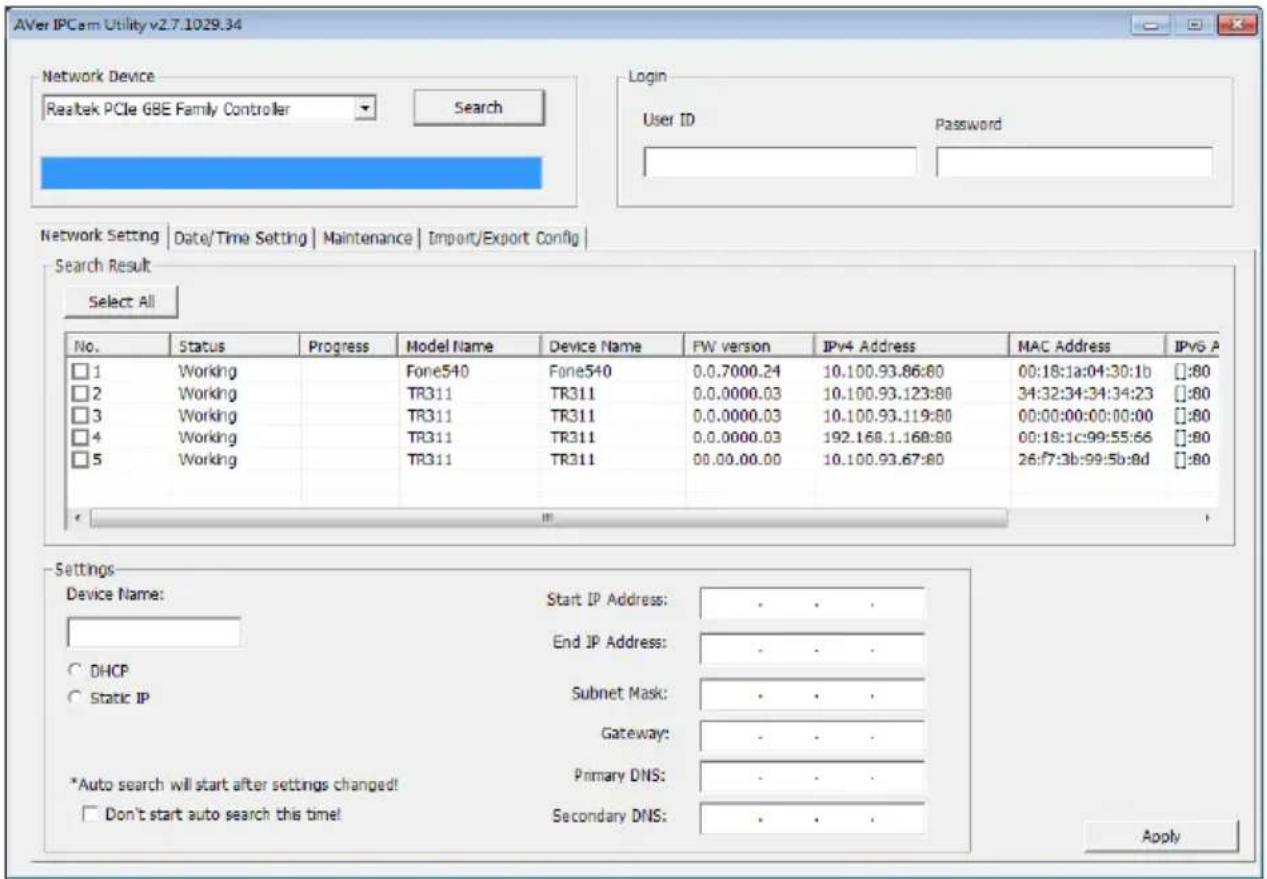
To find the IP address of your cameras, you can execute the IPCam Utility installer. Follow the below steps to find the IP address of the camera.
- Download the IPCam Utility from http://www.aver.com/download-center.
- Run the IPCam Utility
- Click Search, and all available devices will be listed on the screen
- Select a camera from the list.
-
The corresponding fields of IP address will display.
-
Double-click on the IP address of the camera from the list can connect to the camera through the browser.
[Note] If IPCam utility cannot find the camera, please check following:
- Please make sure the Ethernet connection of camera is well connected.
- The camera and PC (IPCam utility) are in the same LAN segment.
Using AVer PTZ Management Software to Find the Camera
To find the IP address of your cameras, you can download the install the AVer PTZ Management Software. Follow the below steps to find the IP address of the camera.
- Download the AVer PTZ Management Software from https://www.aver.com/download-center
- Select the "Software" tab and download the Windows program and install it.
- After setting up the user ID and password, login to the software(default Username/Password: admin/admin) then
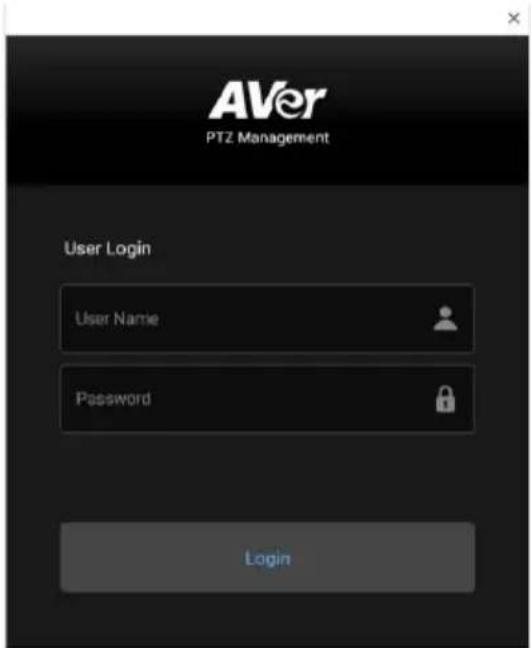
- Select "Setup", "Add" and then "Auto Search".
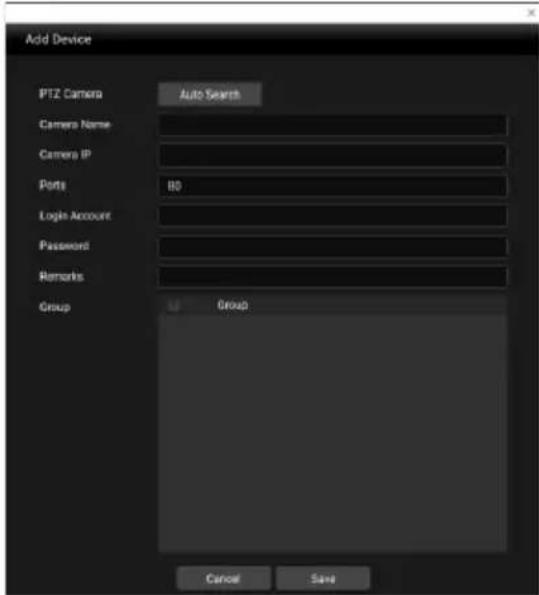
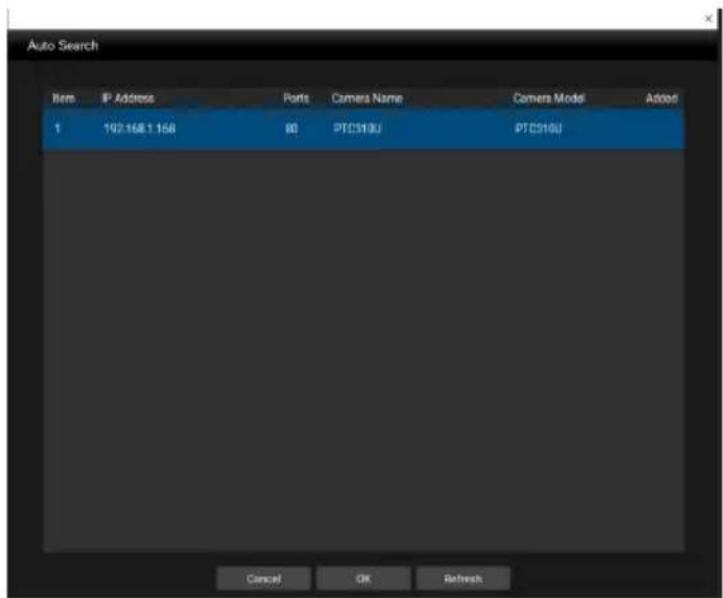
Make a Connection to the Camera via Browser
- Find the IP address of the camera. Call out OSD menu and select "System" > "Information" Or use AVer IPCam utility to find the IP address of the camera.
| Camera | Camera Selector | 1 | Model Name | S510 |
| Advanced Setting | Status OSD | OFF | Firmware Version | 0.0.0000.02 |
| Video Output | Language | English | IP | 10.100.93.47 |
| Network | Information | > | MAC | |
| System | Factory Default | OFF |
- Open the browser and enter the IP address of the camera. The PC/laptop is required an internet access.
After connecting to the camera, enter the user account and password (default is admin/admin) to login Web.
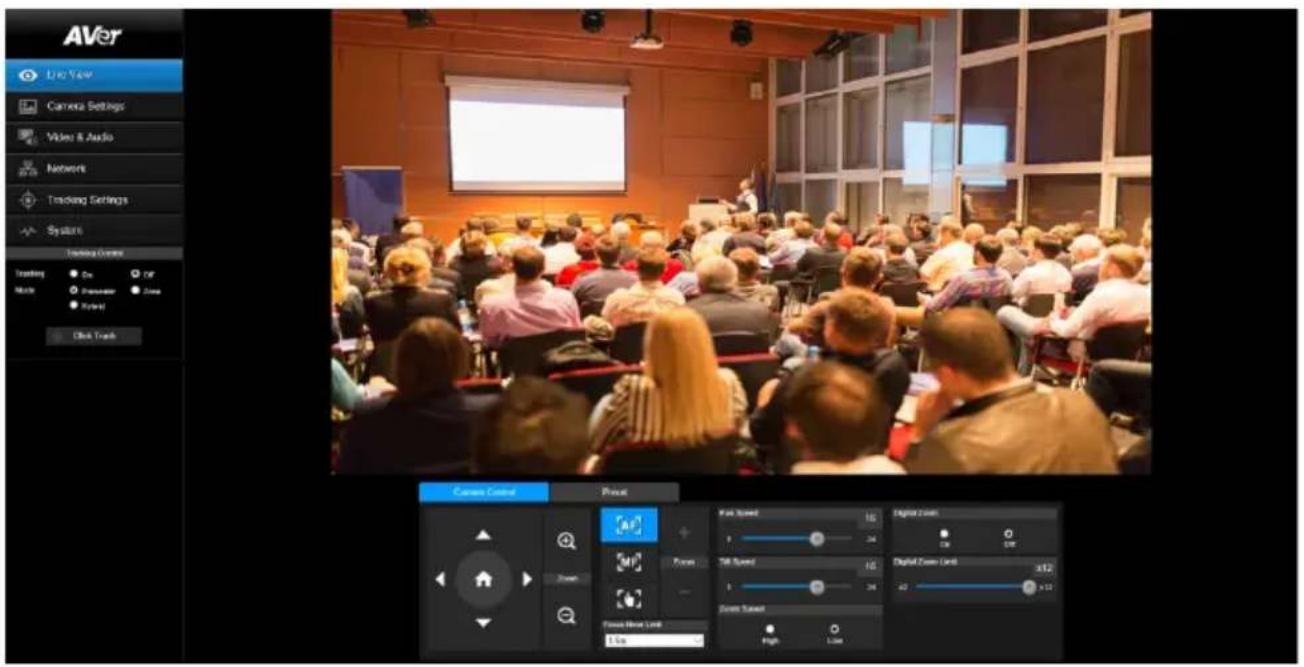
Live View
In live view, the user can setup Camera Control (zoom in/out, focus, camera direction control), Preset setting, and Tracking Control(on, off, tracking mode).
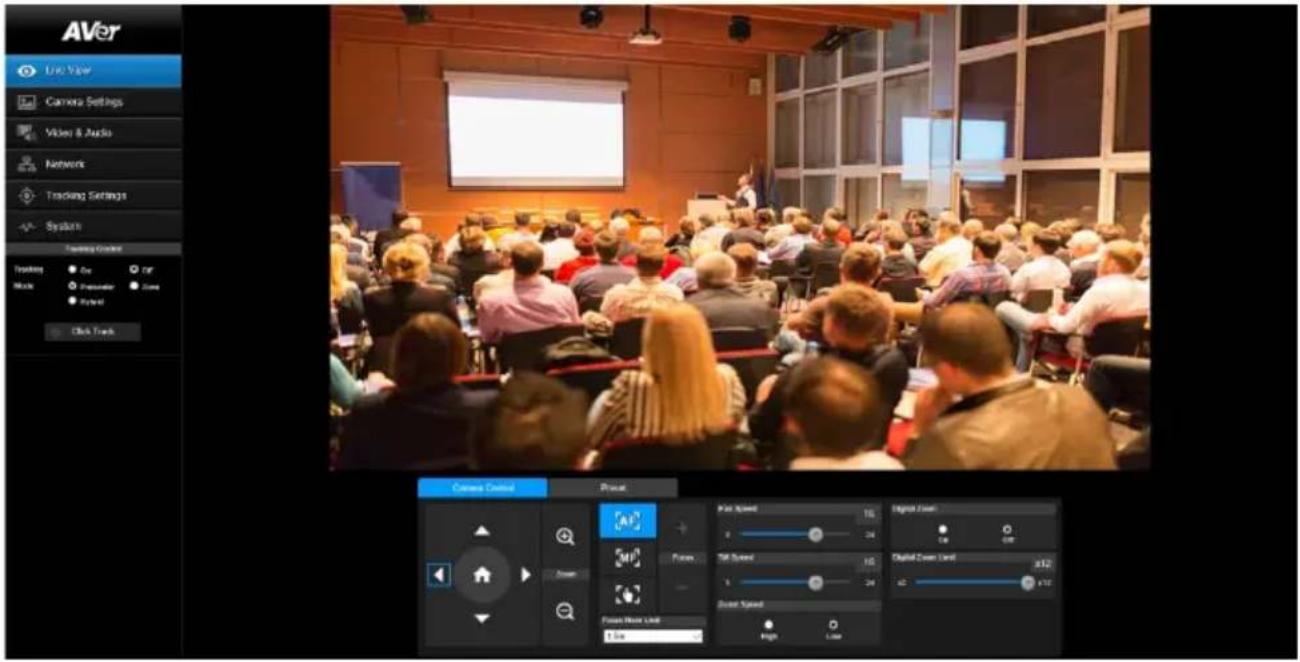
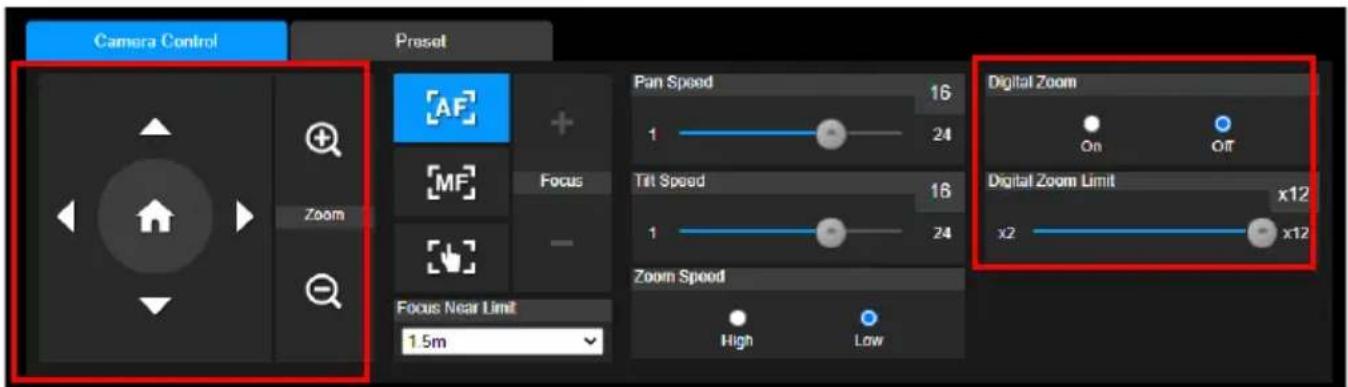
Pan-Tilt-Zoom Control
To operate the PTZ Camera motion.
Use △, △, and △ to adjust the camera view position and use and


to zoom. Select to back to default position.
Digital Zoom: Enable/disable digital zoom function. Move the scroll to adjust the limit of digital zoom.
Focus
Switch to auto (AF) or manual (MF) focus. The manual focus use + and – to adjust focus. Press “+” to adjust focus to the far end and focusing on a far subject; press “-” to adjust focus to near end and focusing on a near subject.
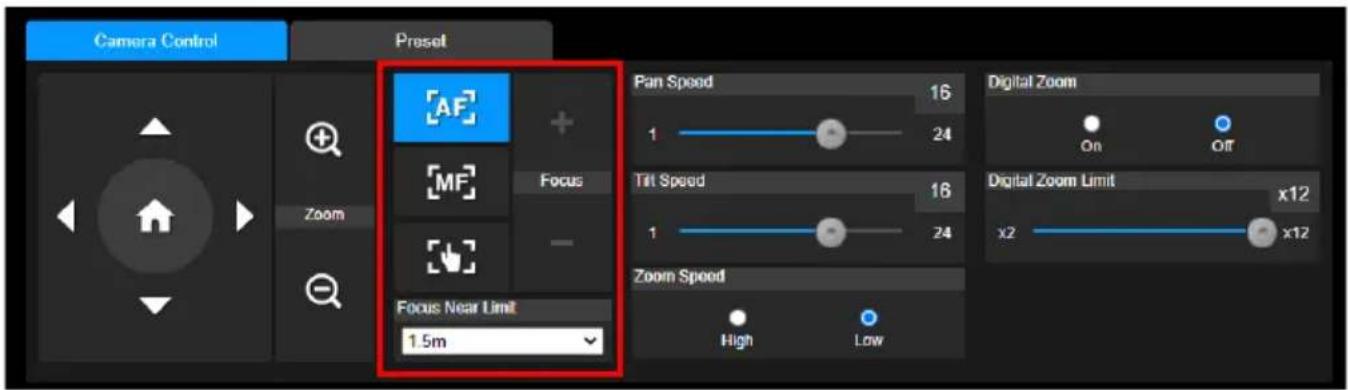
One push focus(
By clicking the button to adjust Lens focus automatically once.
Focus Near Limit: Set the focus distance limit.
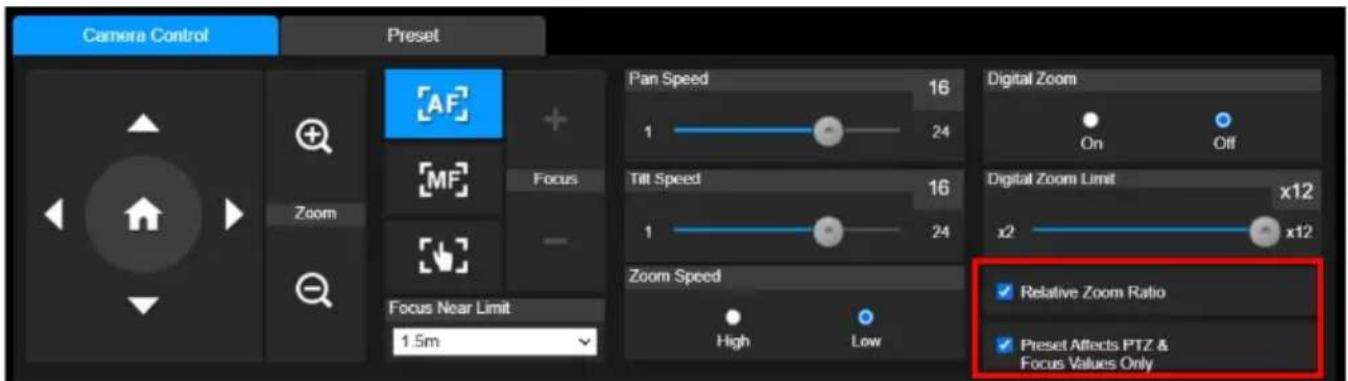
Manual Pan-Tile-Zoom and Preset Speed Adjustment
Adjust the speed of manual Pan-Tilt-Zoom and Preset operation. Enable/Disable the slow mode for manual pan-tilt operation. There are totally 24 levels for manual pan-tilt speed adjustment and 2 levels (Low/High) for zoom speed adjustment. There are 5 levels for preset speed adjustment.
■ Pan/Tilt Slow: When this option is set to ON, the maximum speed of manual pan-tilt operation is 40^/sec ; when this option is set to Off, the maximum speed of manual pan-tilt operation is 100^/sec .
■ Relative Zoom Ratio: When the camera zoomed in to a high ratio, pan and tilt movement will automatically slow down.
■ Preset Affects PTZ & Focus Values Only: When enable this button, the preset point affects PTZ & Focus values only.
Preset Setting
Setup preset position and view preset position.
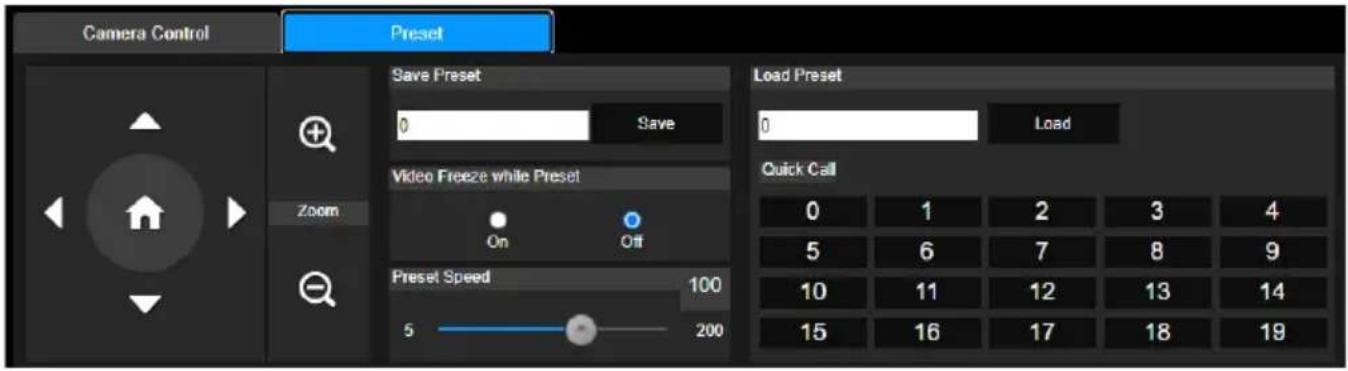
- Select the "Preset" tab in live view interface.
- Use , , , and to adjust camera view position.
- Enter preset position number (0\~255) in Save Preset column and select "Save" to save the position.
- To call the preset position, enter a preset number (0\~255) in Load Preset column or select the preset number (0\~19) from Quick Call section.(Recalling preset will disable auto tracking)
- Video Freeze with Preset: On/Off the screen view freeze function. When "Video Freeze with Preset" is on, during the preset operation, the screen will freeze until the operation is done.
Tracking Control
Enable/disable tracking function, select tracking mode, and operate one-click tracking function.
■ Tracking mode(Tracking mode setup refer to Tracking Settings section)
➢ Presenter: Camera will start tracking when object enter the tracking point (preset point) and the face of object is detected.
Zone: Camera will start tracking when object is moving between the preset tracking block area.
Hybrid: Mix the Presenter mode and Zone mode together.
Click Tracking Function
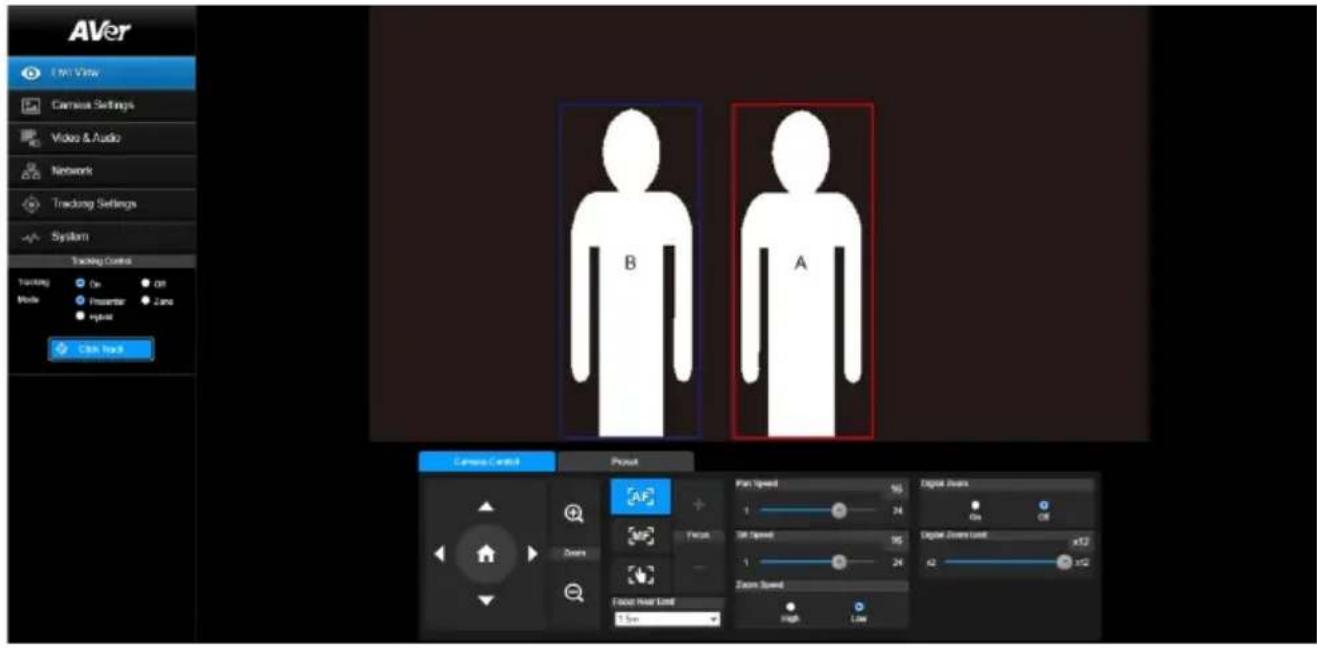
This function allows user to change tracking object while auto tracking.
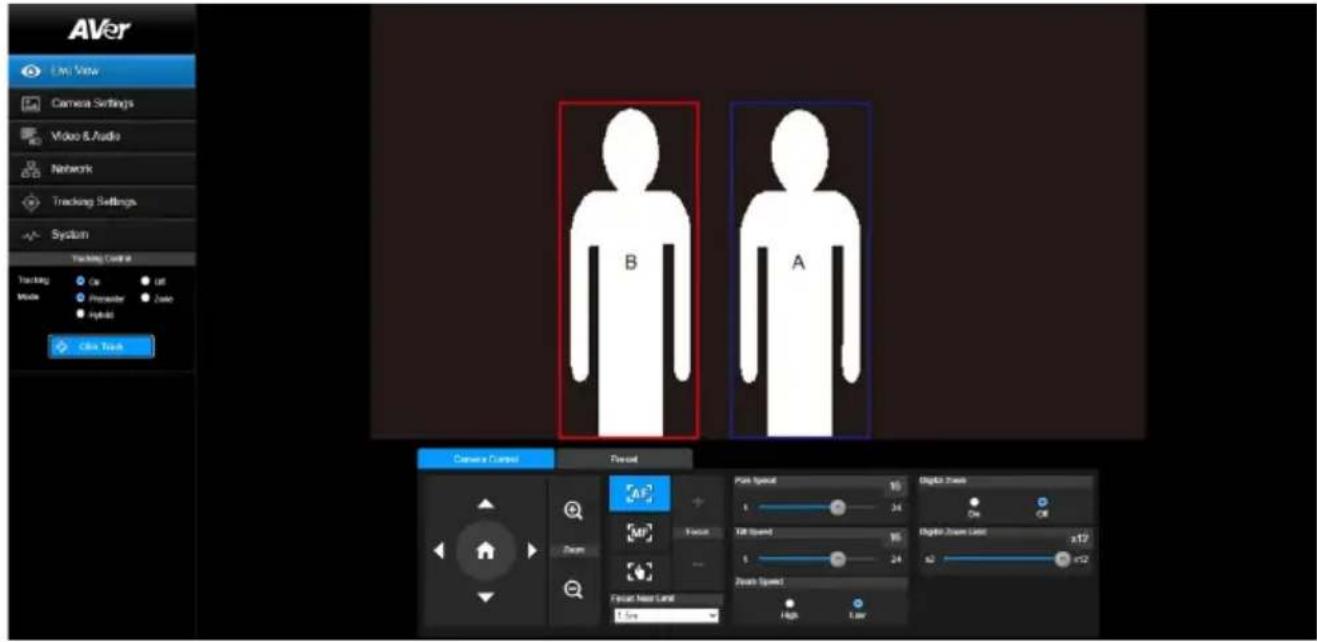
- Select Click Track button. A red frame is targeted on the tracking object and a blue frame is targeted on another object on the live screen.
- Click the object and when frame change to red means the tracking object is changed to the selected one.
Camera Settings
Exposure
Setup the exposure type -- Full auto, Iris priority, Shutter priority, or manual.
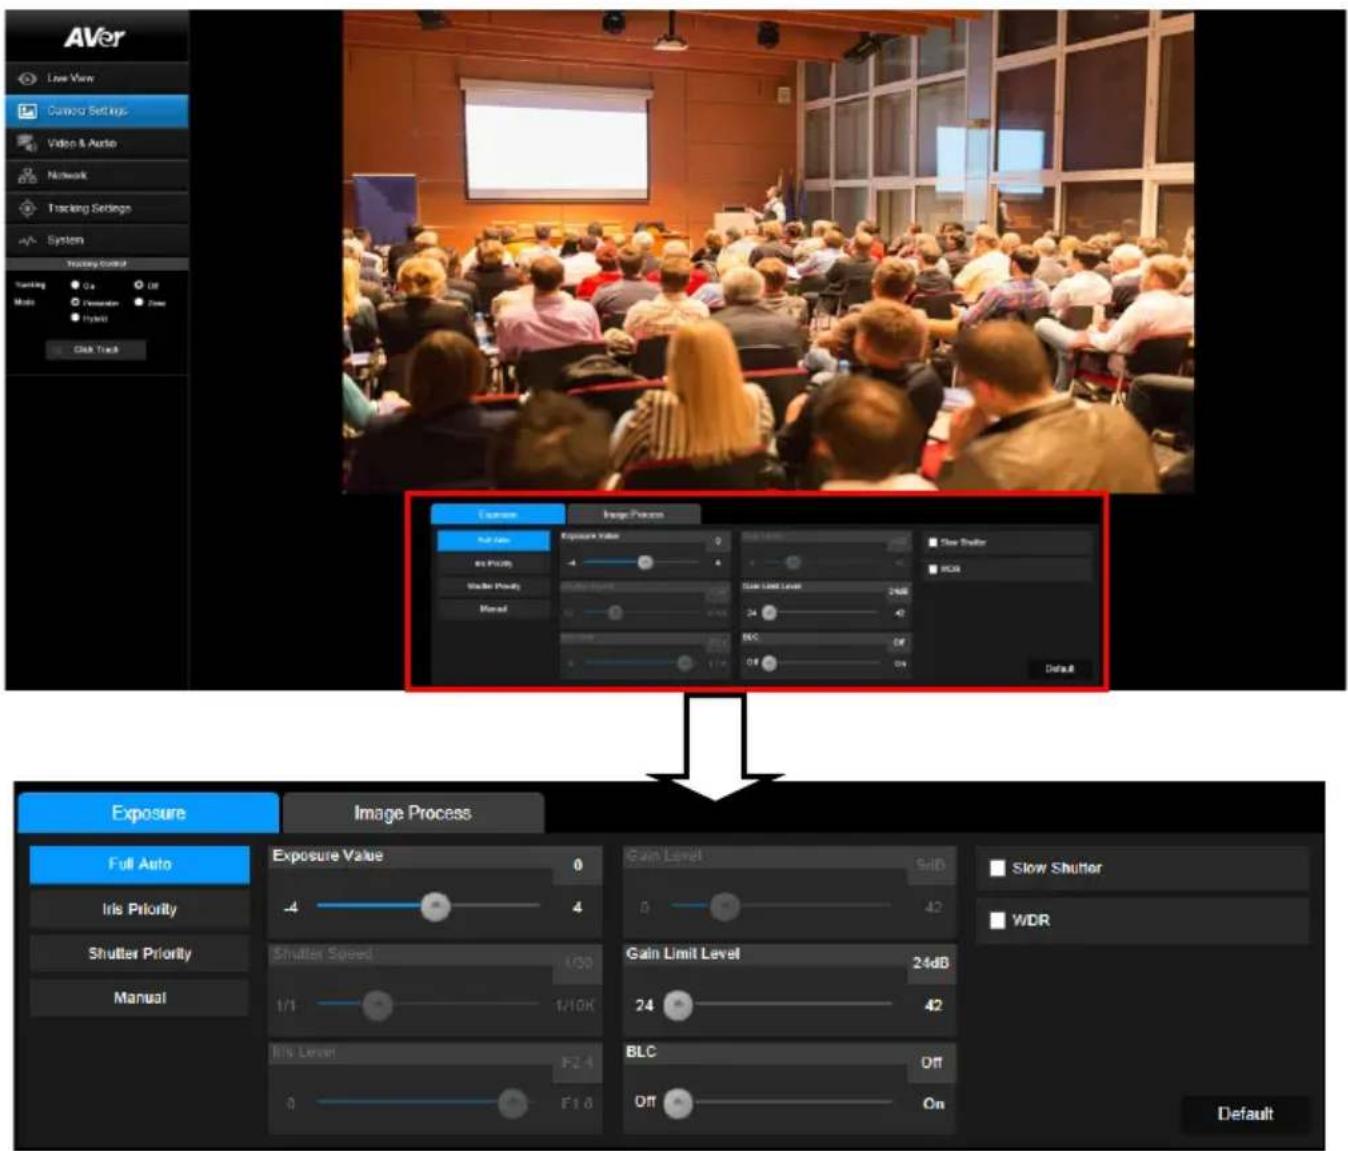
flowchart
graph TD
    A["Add Attendance"] --> B["Exposure"]
    B --> C["Full Auto"]
    C --> D["Iris Priority"]
    C --> E["Shutter Priority"]
    C --> F["Manual"]
    B --> G["Image Process"]
    G --> H["Exposure Value: 0, 4, 1/1, 1/10K, F2.4, F1.8"]
    G --> I["Gain Level: 5dB, 0, 42, 24, 42"]
    G --> J["Gain Limit Level: 24dB, 24, Off, On"]
    G --> K["Slow Shutter: WDR"]
Image Process
Setup the white balance, saturation, contrast, sharpness, noise filter, power frequency, flip, and mirror. Select the "Image Process" tab in camera setting interface.
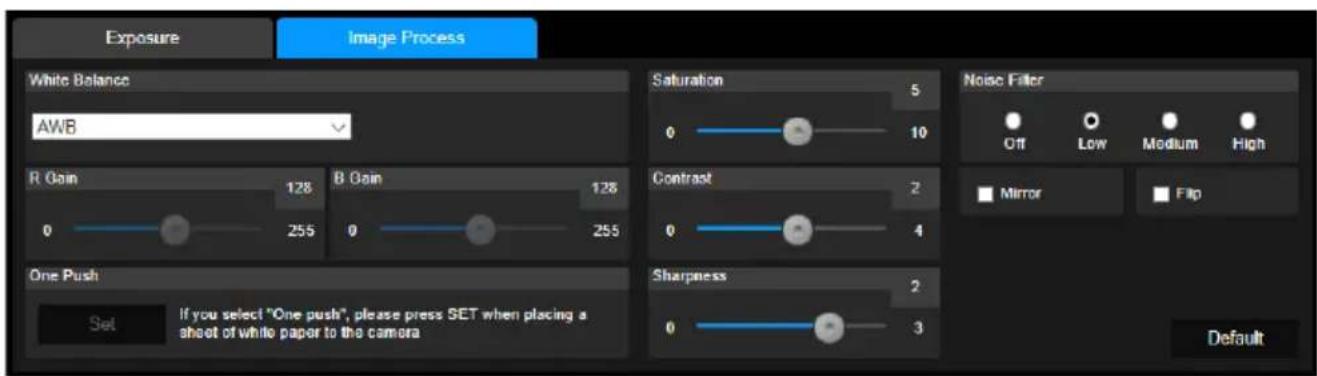
Video & Audio
The user can setup Video Mode, Video output, Framerate, Bitrate, I-VOP internal, Encode type, Rate control, Audio input type, Audio volume, and Sampling Rate.
Video mode in the stream only, the frame rate is up to 60fps and in USB+ Streaming mode is up to 30fps.
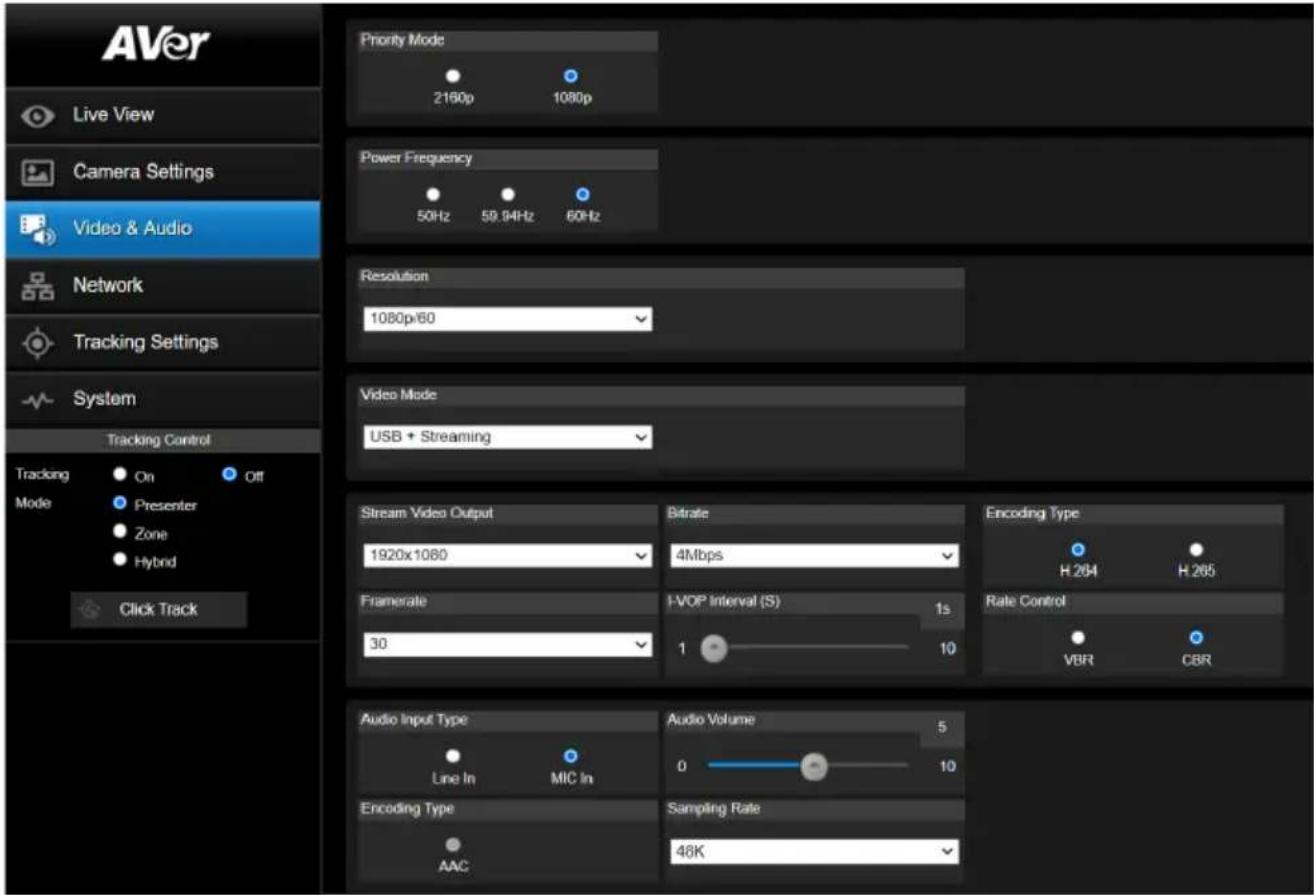
Get 4K (2160p) output
- Make sure that your HDMI monitor and cable support 4K (HDMI2.0 or above), select 2160p at Priority Mode via either web or OSD menu. Select 2160p/30 resolution at OSD menu to get 4K HDMI output. (3G-SDI does not support 4K)
- Select "USB Only" at Video Mode to get 4k USB output(live stream will be off)
- Select "Stream Only" at Video Mode to get 4k live stream output (USB will be disabled)
Setup NDI Function
NDI service only support on NDI models: PTC310N, PTC310UN, PTC310HN, PTC330N.
- Enable NDI mode by selecting "NDI" as video mode in Video & Audio page. To disable the NDI function, select other mode. The camera will reboot after selecting NDI mode.
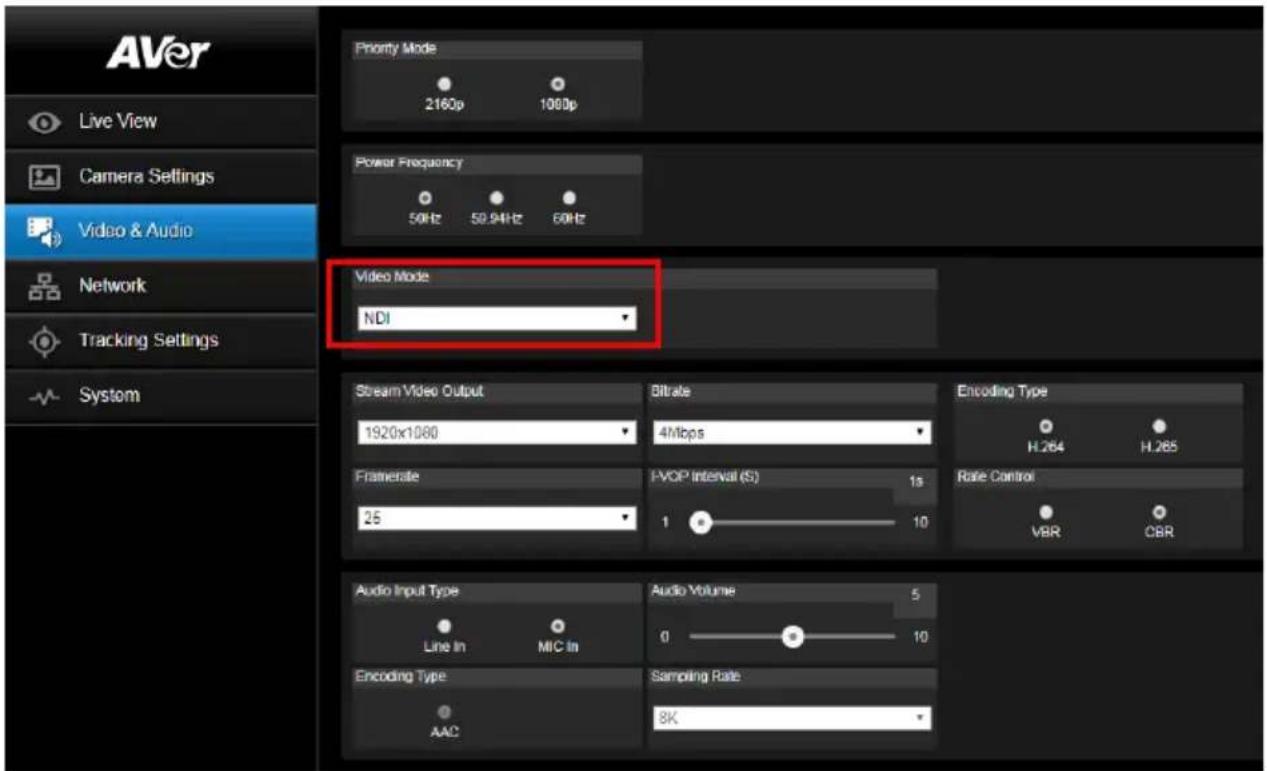
-
User can setup the following functions:
-
Stream Video Output: Select video output resolution.
● Framerate: Select framerate of the camera. - Encoding Type: Select encoding type – H.264 or H.265.
- Sampling Rate: Select sampling rate value.
- Audio Input Type: select audio input type – Line In or MIC In.
- Bitrate: Select bitrate value – 521kbps, 1Mbps, 2Mbps, 4Mbps, 8Mbps, 16Mbps, 32Mbps.
- I-VOP interval(S): Move scroll bra to set the value – 1s to 10s.
- Audio Volume: Move scroll bra to set the volume value – 0 to 10.
-
Rate control: select the rate control type – VBR or CBR.
-
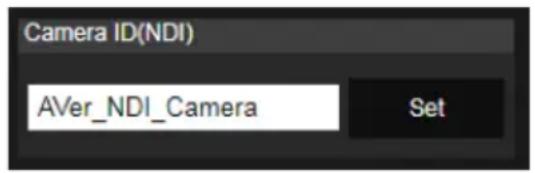
Set the identity name for display on NDI interface. Select System > Camera ID(NDI).
Enter the name as user wanted. The maximum character is 10. After entering the name, select the Set button to save and manually restart the PTZ camera for the settings to take effect.
The following characters can be displayed for camera ID:
| Numeric characters | 0123456789 |
| Alphabetical characters (upper and lower cases) | ABCDEFGHIJKLMNOPQRSTUVWXYZ abcdefghijklmnopqrstuvwxyz |
| Symbols | ! @ # $ % ^ & * ( ) , . ∧ ; :” ’ + = < > ? [ ] { } | - _ ` ~ \ / |
Network
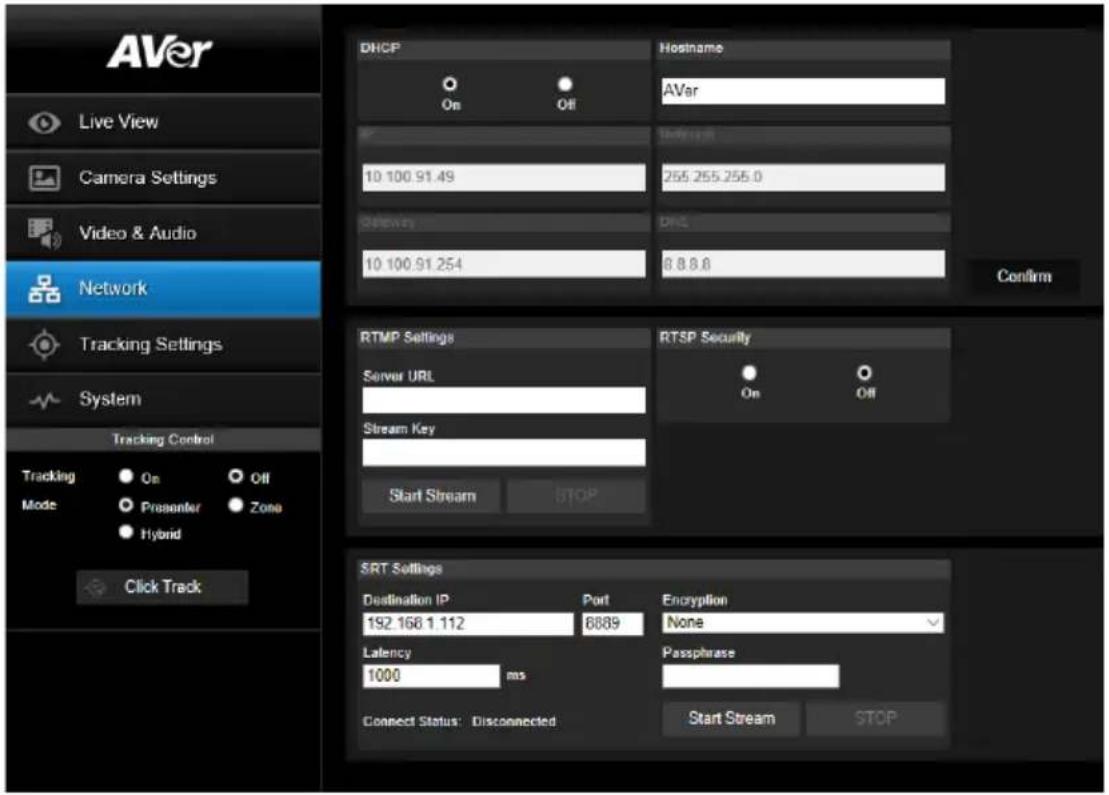
Setup IP address of camera – DHCP or static IP, netmask, gateway, and DNS. After setting, select "Confirm" to apply settings.
Hostname: To change the display of Hostname, allow to name the camera in other device ex IP Router. The default Hostname of camera is AVer.
RTMP Setting
Setup for uploading the camera's live view to the broadcasting platform (ex: Youtube).
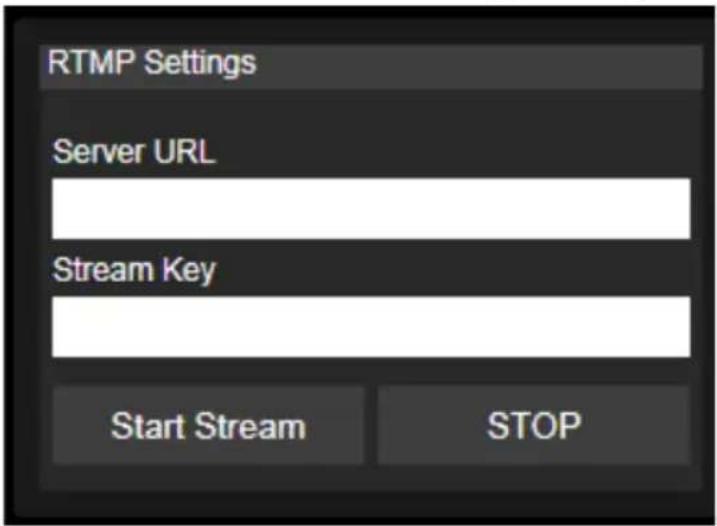
Get the RTMP server URL and stream key from the broadcasting platform and enter in "Server URL" and "Stream key" column.
Select "Start stream" to begin uploading the live video of the camera to the broadcasting platform. Select "Stop" to stop uploading the video.
[Note] To get the RTMP server URL and stream key, please refer to the instruction of broadcasting.
Using RTSP Connect to Camera
To use RTSP player connecting to the camera; please enter the following RTSP URL in your application such as VLC, PotPlayer or Quick Time.
"rtsp://IP address of camera/live_st1"
For Example: rtsp://192.168.1.168/live_st1
(the camera default IP address: 192.168.1.168)
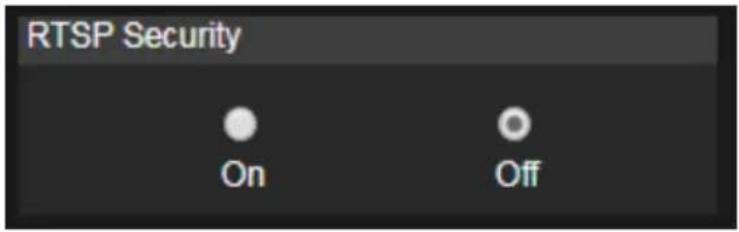
Enable/disable RTSP security function if needed.
(When RTSP Security is On, the RTSP stream ID/Password will be synced to the web login User name/ Password.)
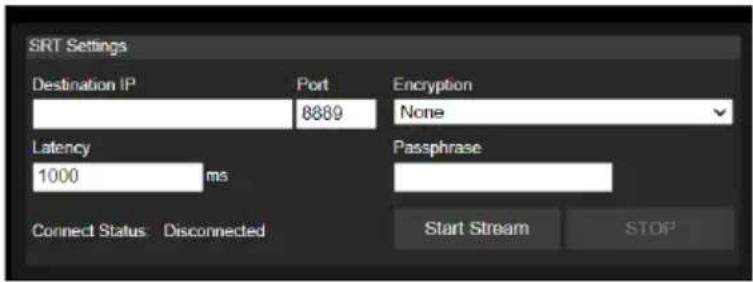
SRT Stream
Example 1 vMix:
Set the workstation and the PTC300 camera in the same network. Check the workstation's IP address (Destination IP). Example:
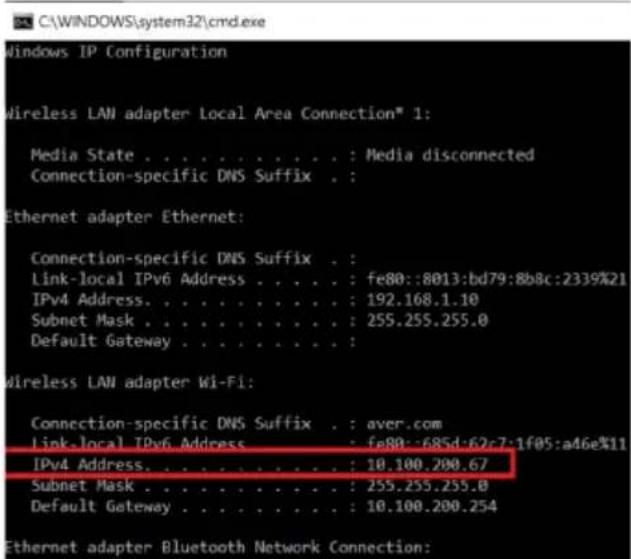
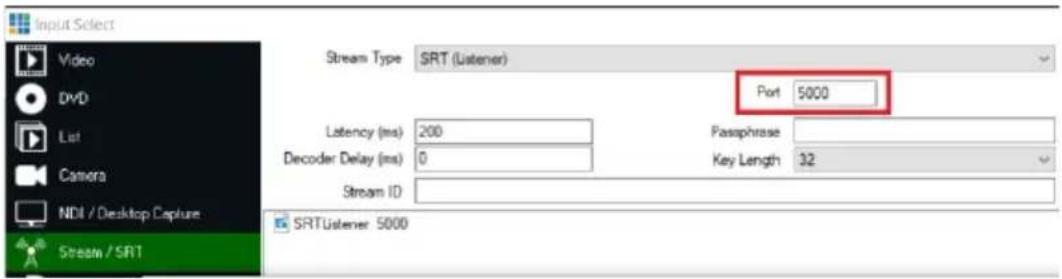
Select SRT(Listener) from Stream Type in vMix Input Select window.
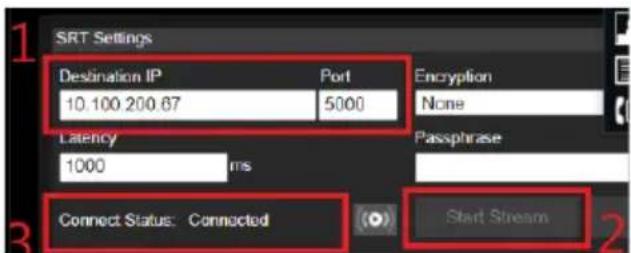
Enter the information into the SRT Settings PTC310 web interface, then click on "Start Stream", Connect Status shows "Connected".
Example2 OBS (Open Broadcaster Software)
Set the workstation and the PTC300 camera in the same network. Check the workstation's IP address (Destination IP). Example:

Open OBS, add a scene, add a source, enter srt://Work Station IP:port?mode=listener
Example: srt://10.100.105.127:8889?mode=listener
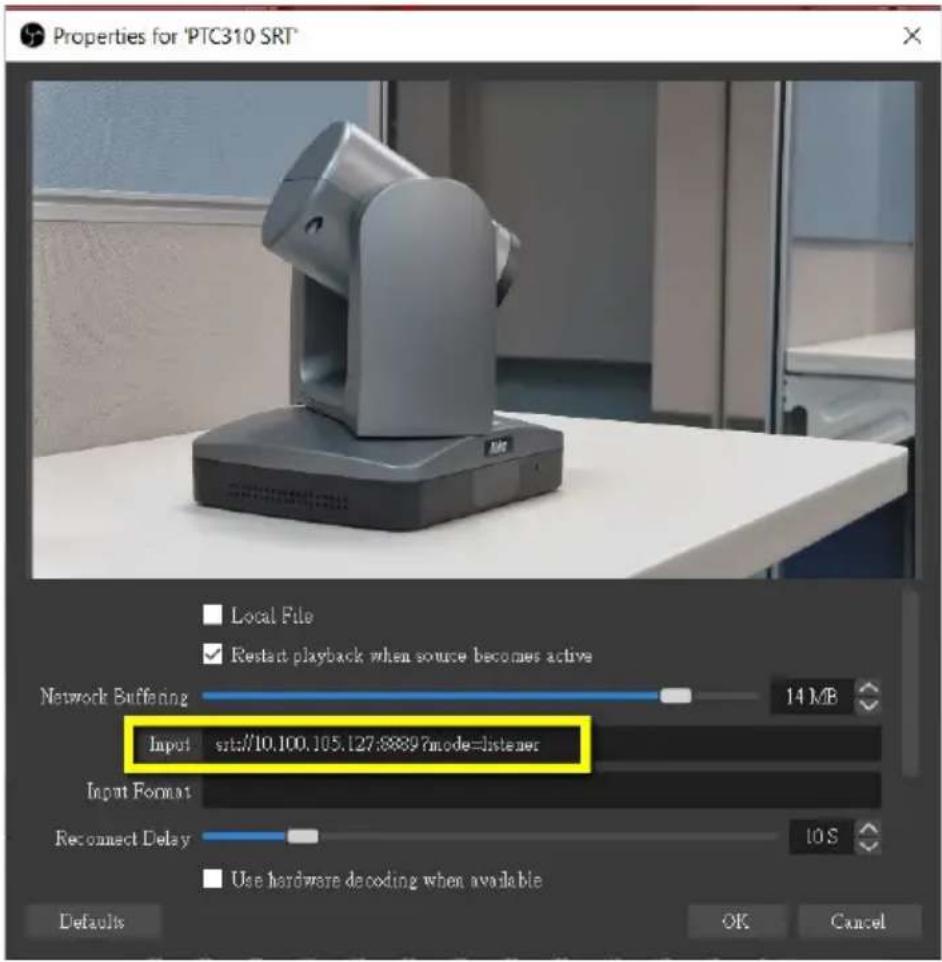
[Note] If there is no image, please try right click on the source->Transform->Fit to screen to re-scale image.
Tracking Setting
Set up Tracking mode – Presenter, Zone, and Hybrid mode.
Presenter Mode
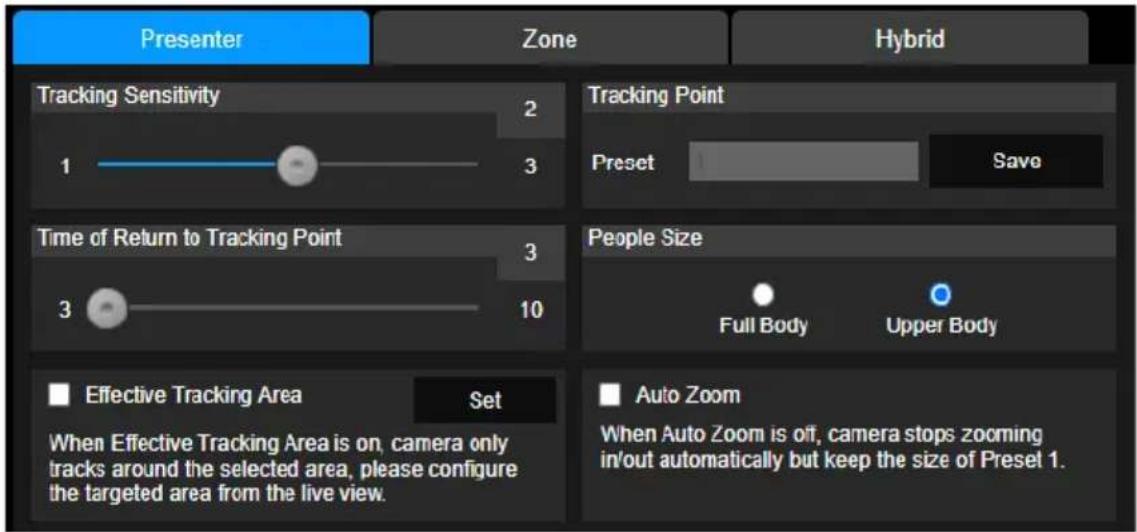
Camera will start tracking when object enters the tracking point (preset point).
- Use

to adjust the camera to tracking point
(preset position).
- Then, select Save to Preset 1 to save the tracking point.
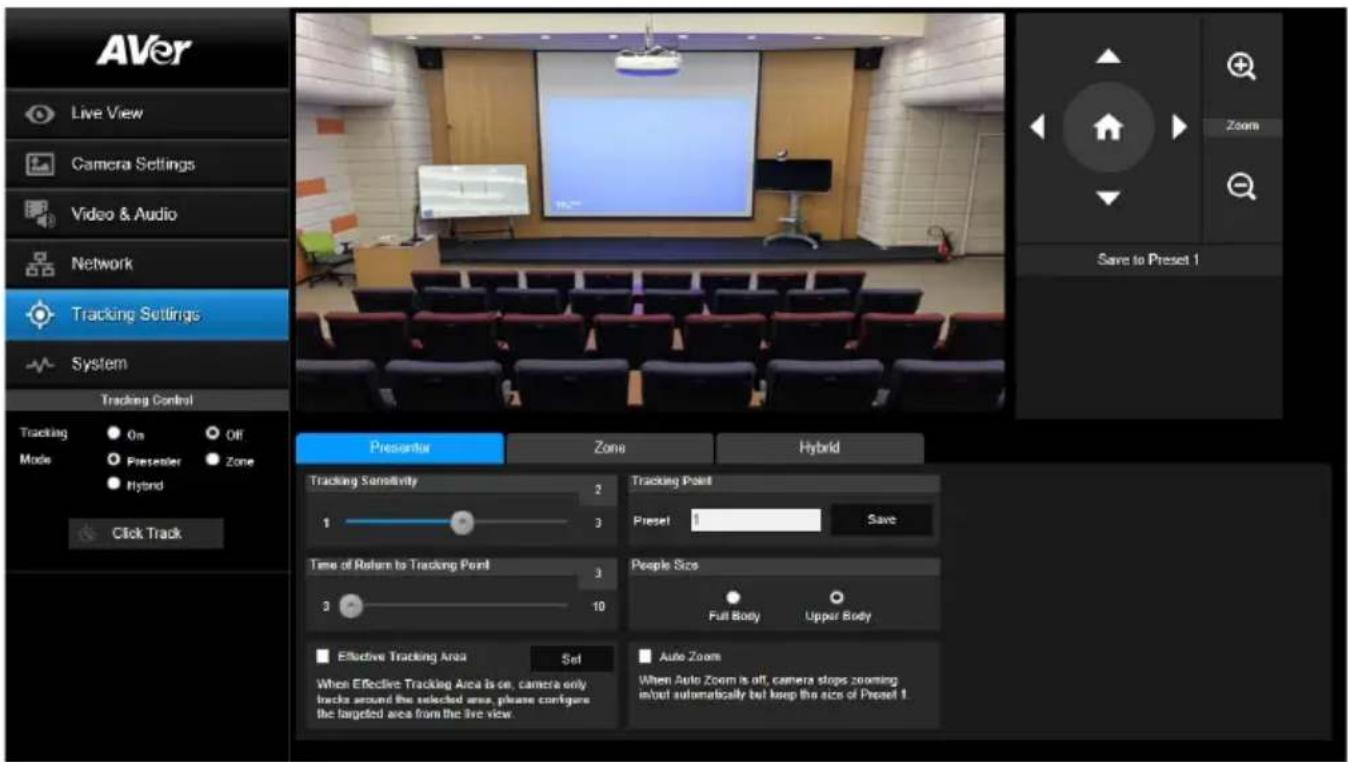
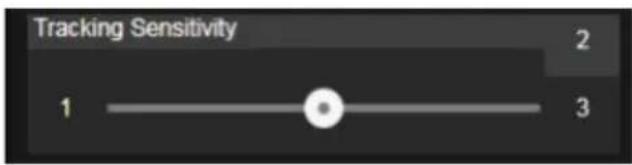
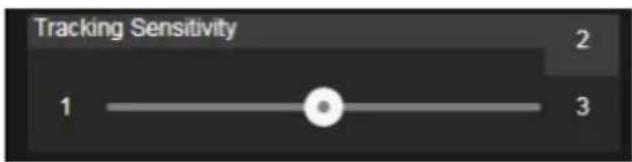
- Tracking Sensitivity: Set the sensitive level of tracking. Move bar to set the value. The current value is displayed at upper right corner.
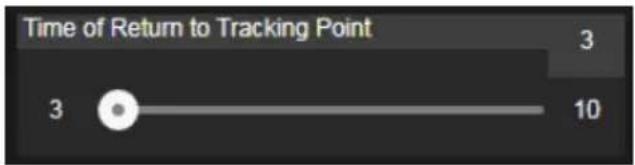
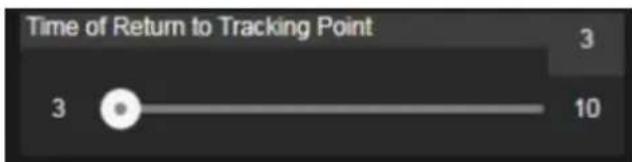
- Time of Return to Tracking Point: Set the idle time for camera returning to tracking point. Move bar to set the value (in seconds). The current value is displayed at upper right corner.
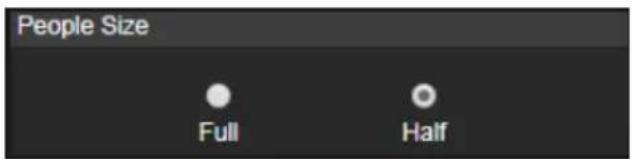
- People Size: Select the people in full or half size while tracking.
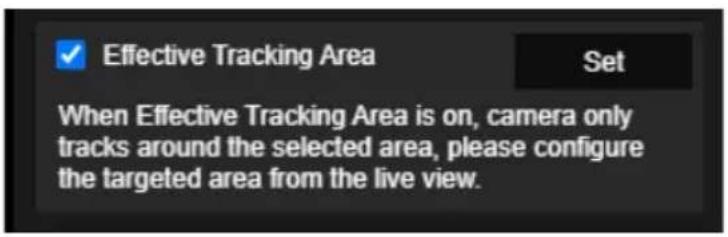
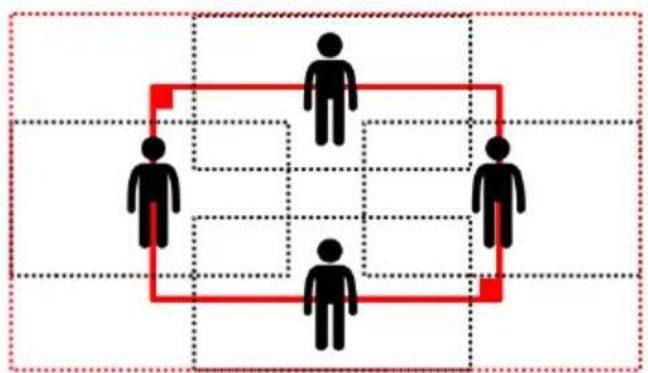
- Effect Tracking Area: When Effective Tracking Area function is on, camera only tracks around the selected area. Check the box to turn on the Effective Tracking Area function then click Set to configure the targeted area in the live view. Move the upper left corner and the lower right corner of the red solid frame to define the targeted area.
flowchart
graph TD
    A["Top Human"] --> B["Bottom Human"]
    C["Top Human"] --> D["Bottom Human"]
    E["Bottom Human"] --> F["Bottom Human"]
    G["Bottom Human"] --> H["Bottom Human"]
    I["Bottom Human"] --> J["Bottom Human"]
    K["Bottom Human"] --> L["Bottom Human"]
    M["Bottom Human"] --> N["Bottom Human"]
    O["Bottom Human"] --> P["Bottom Human"]
    Q["Bottom Human"] --> R["Bottom Human"]
    S["Bottom Human"] --> T["Bottom Human"]
    U["Bottom Human"] --> V["Bottom Human"]
    W["Bottom Human"] --> X["Bottom Human"]
    Y["Bottom Human"] --> Z["Bottom Human"]
    AA["Bottom Human"] --> AB["Bottom Human"]
    AC["Bottom Human"] --> AD["Bottom Human"]
    AE["Bottom Human"] --> AF["Bottom Human"]
    AG["Bottom Human"] --> AH["Bottom Human"]
    AI["Bottom Human"] --> AJ["Bottom Human"]
    AK["Bottom Human"] --> AL["Bottom Human"]
    AM["Bottom Human"] --> AN["Bottom Human"]
    AO["Bottom Human"] --> AP["Bottom Human"]
    AQ["Bottom Human"] --> AR["Bottom Human"]
    AS["Bottom Human"] --> AT["Bottom Human"]
    AU["Bottom Human"] --> AV["Bottom Human"]
    AW["Bottom Human"] --> AX["Bottom Human"]
[Note] The position of the red solid frame corresponds to the central position of the presenter. The black dotted frames represent the tracking areas for different positions of the presenter. Therefore, the red dotted frame is the actual effective tracking area of the red solid frame.
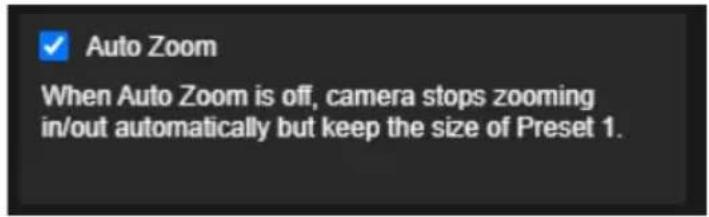
- Auto Zoom: When Auto Zoom is off, camera stops zooming in/out automatically but keep the size of Preset 1.
Zone Mode
Setup the block area for the camera to detect object and follow-up the object to move the camera when the object is in block area that user has set.
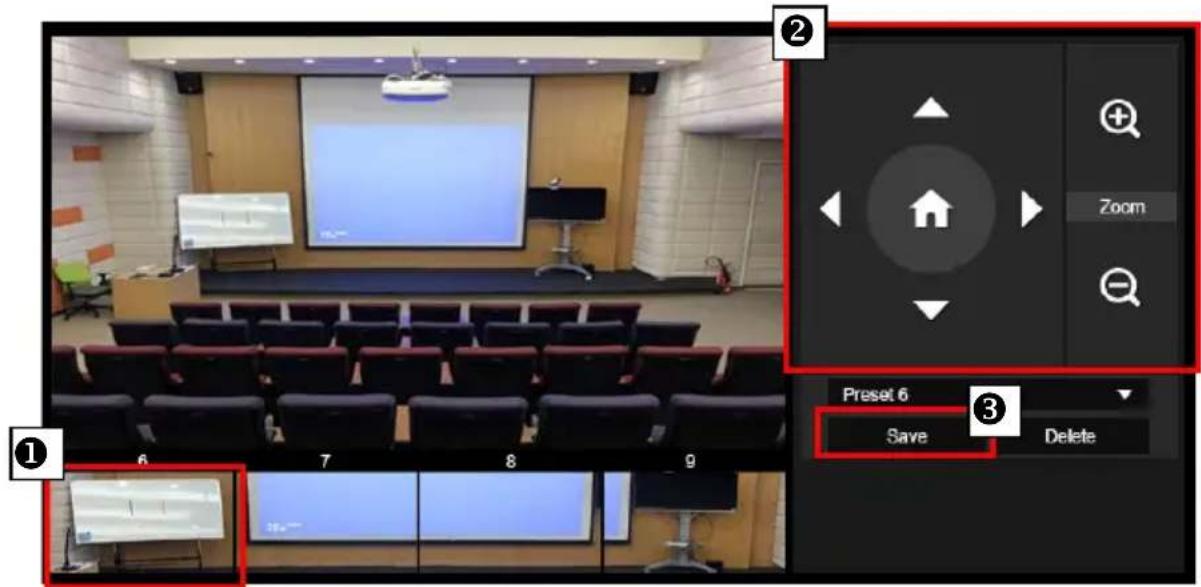
- Select the Blocks (2, 3, or 4). Each block is corresponding to one preset position. The maximum is 4 blocks (4 preset positions).
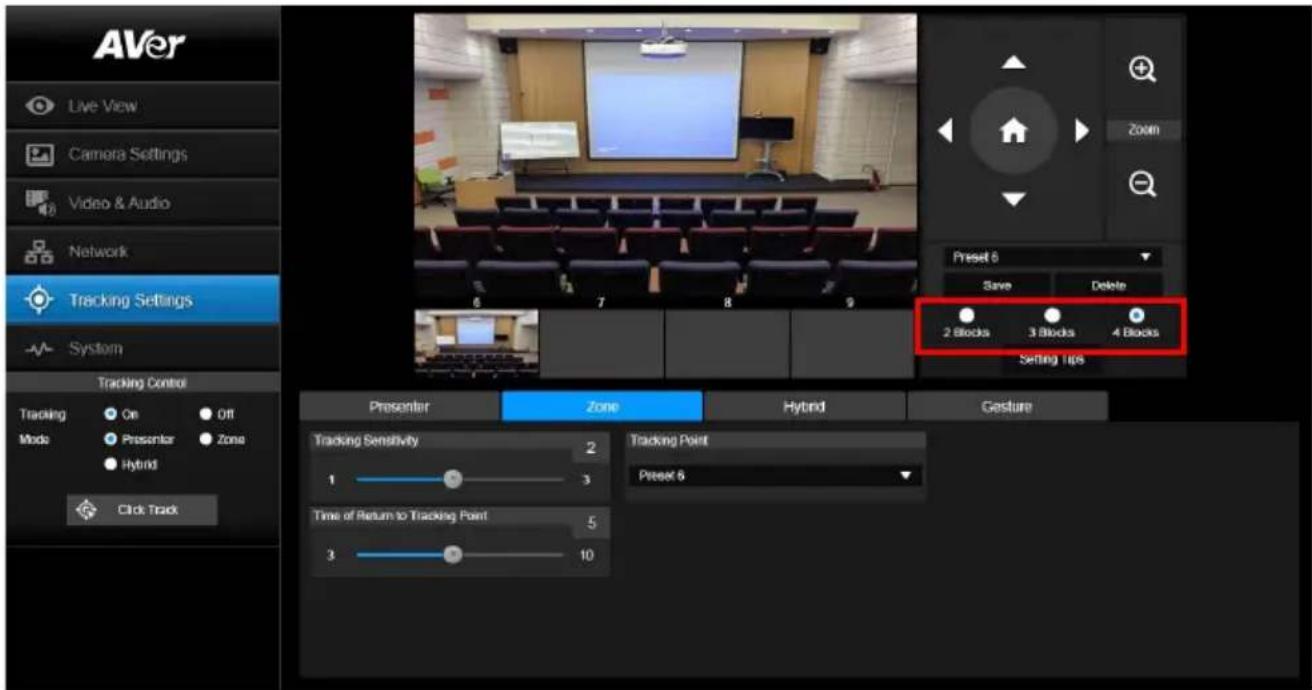
- Select the block and Set the preset positions in order (preset 6 to preset 9). Use




Save" to save
the preset position. And, a snapshot of the preset image will show at corresponding image display box. Repeat the step to set another preset position.
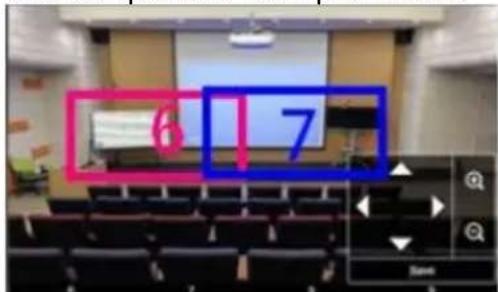
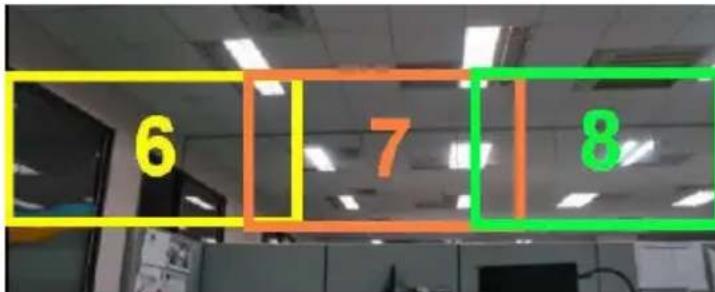
[Note] Set each preset overlapping the next preset view (one man width overlap), no or less zoom between presets. Examples below:
[Note] Set the preset view to clearly see at least 60% upper body of the preseter to ensure tracking accuracy. Make sure there is no any other human-outline poster/TV/monitor in the background.
Preset for Zone Mode, Example:
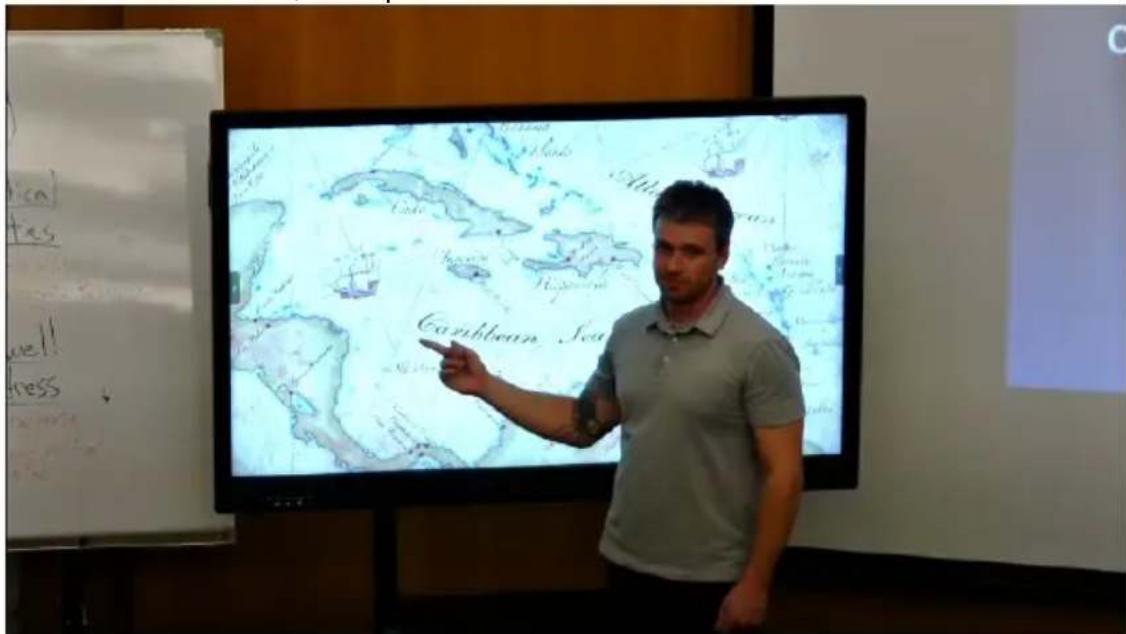
- Tracking Sensitivity: Set the sensitive level of tracking. Move bar to set the value. The current value is displayed at upper right corner.
- Time of Return to Tracking Point: Set the idle time for camera returning to tracking point. Move bar to set the value (in seconds). The current value is displayed at upper right corner.
Hybrid Mode
This function allows the user to use two types of tracking modes: "Presenter mode" and "Zone mode" at the same time. When the presenter enters selected preset points, it will change to Zone position; when the presenter leaves the preset points, camera will follow presenter to do Auto Tracking function.
- Mix two tracking modes "Presenter" and "Zone" at the same time. For Hybrid mode, do not set Zone preset points overlapping or close to each other. It is recommended to leave some distance between Zone preset points.
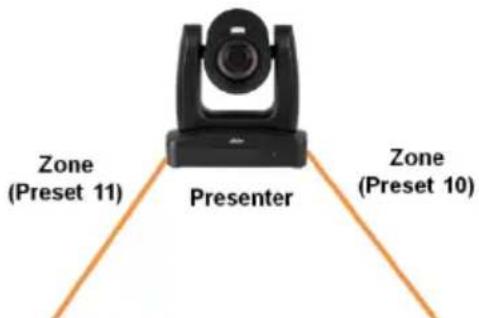
- Use direction control panel to move the camera to desired position and select "save" to save the preset position. And, a snapshot of the preset image will show at corresponding image display box. Select preset position and select "Delete" to delete the saved preset position.(Preset 10,11,12,13)
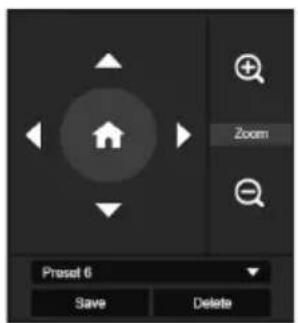
- Set the sensitive level of tracking. Move bar to set the value. The current value is displayed at upper right corner.
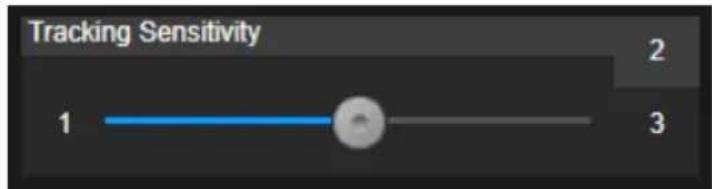
- Set the idle time for camera returning to tracking point. Move bar to set the value (in seconds). The current value is displayed at upper right corner.
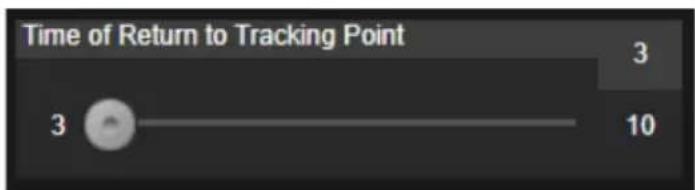
- When losing tracking target and going back to Tracking Point.
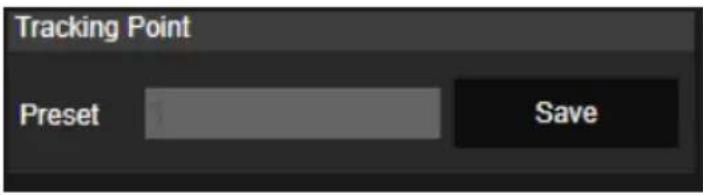
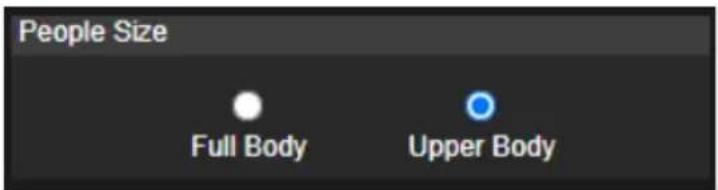
- Presenter size, Full body will show the whole Body on screen and Upper will only show half body.
Quick Setup for Tracking
Presenter Mode
-
Use IR remote to adjust the camera view properly then save to preset1 as the initial position
-
Press tracking "On" button on IR remote, here you go!
-
Press "UPPER BODY" key to get closer view (up to 60% body), or FULL BODY to see entire presenter in the view.
-
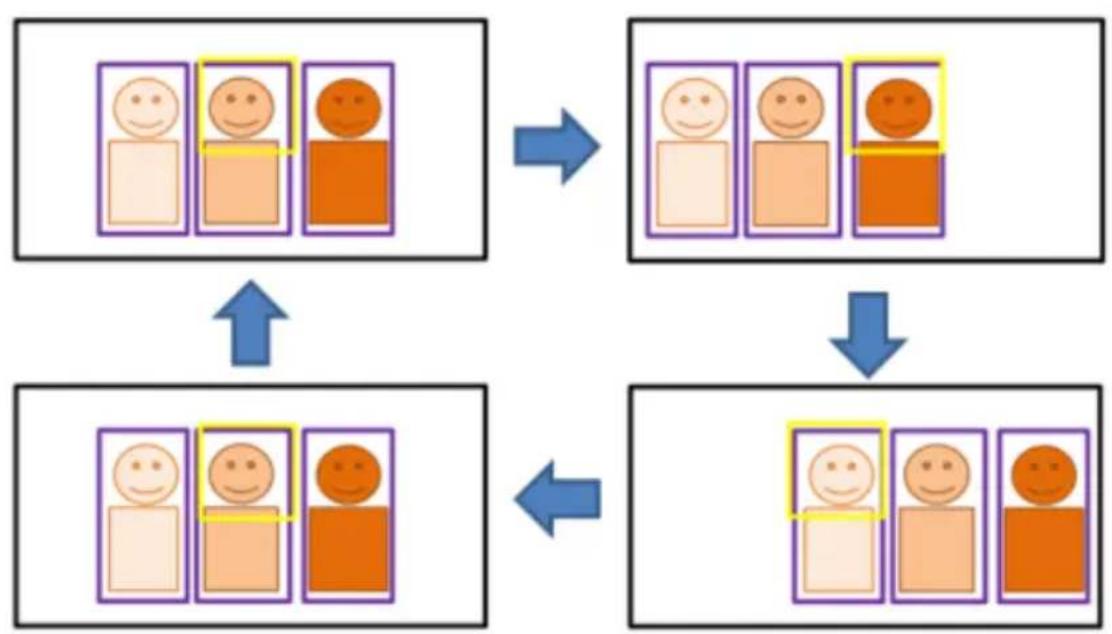
Press "Switch" key to switch between presenters. Initially the camera tracks the one who is in the center of view. Every switch follows the sequence: left to right, then back to far left one in the camera view(see picture below). To see which presenter is being tracked, press numeric key"7" for seven times to call/cancel engineering mode while tracking, you will see purple boxes shown on all human-outline objects, and who under yellow box is being tracked.
flowchart
graph TD
    A["Group 1: Smiling Face Icon"] --> B["Group 2: Smiling Face Icon"]
    B --> C["Group 3: Smiling Face Icon"]
    C --> D["Group 4: Smiling Face Icon"]
    D --> E["Group 5: Smiling Face Icon"]
    E --> F["Group 6: Smiling Face Icon"]
    F --> G["Group 7: Smiling Face Icon"]
Zone Mode
2 blocks initially selected and preset 6 is initially the start position. But if you prefer 3 or 4 blocks for Zone mode tracking and prefer another preset as start position, go to web setting.
-
Use IR remote to adjust the camera view properly then save to preset6, preset7
-
Long press "Tracking Point" to switch tracking mode from Presenter Mode to Zone Mode (the hotkey supported at firmware v0.0.0000.21 or later)
-
Press "ON", here you go!
System
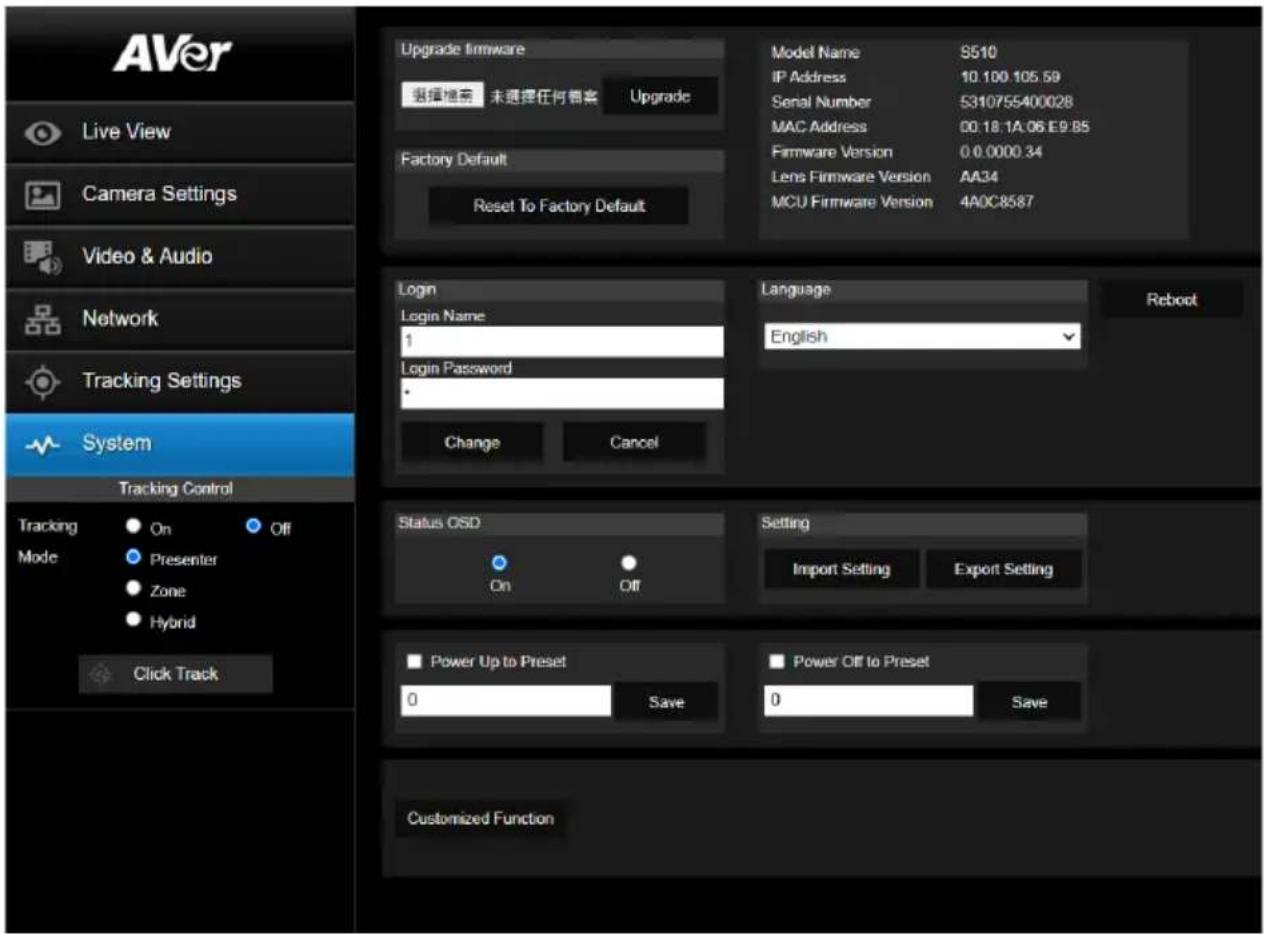
■ System information: It displays Model Name, IP Address, Serial Number, MAC Address and Firmware Version.
■ Factory Default: Reset the camera back to factory default value.
■ Login in: The default login in name and password are admin/admin. User can change if needed.
■ Status OSD: Enable/disable Preset status (Save Preset, Call Preset, Cancel Preset) display on the screen.
■ Language: Change the Web UI language.
■ Camera ID (NDI): Set the camera ID as identification for NDI function. To setup NDI function, please refer to NDI Function section.
■ Power Up to Preset/ Power off to preset: If enabling Power Up/Off to Preset function, the camera will move to the saved preset point in the field when the camera powers up/off.
■ Reboot: To restart the camera from web page.
■ Customized Function: Ability to execute some specific functions by using VISCA command.
Upgrade Firmware
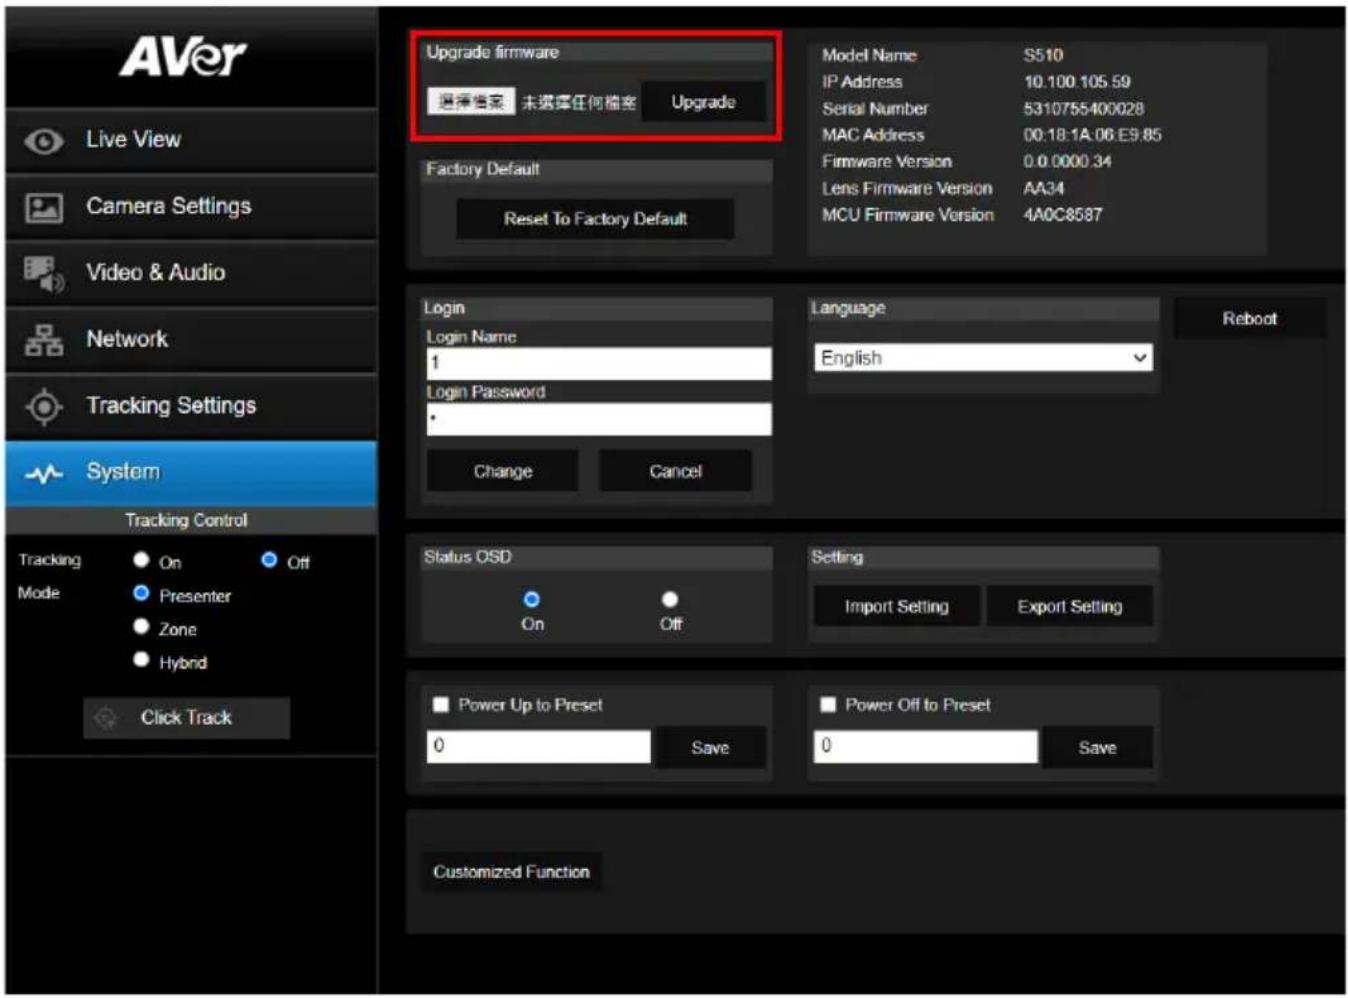
- Download the newest firmware from http://www.aver.com/download-center.
- Connect to the camera through the browser.
- Select System > Browse the FW file > Upgrade firmware
- Select the firmware and select the "Upgrade" button.
- After updating, refresh the browser.
| Command Set | Command Command | Packet Comments | |
| CAM_Power | On 8x 01 04 00 02 FF | Power ON/OFF | |
| Off 8x 01 04 00 03 FF | |||
| CAM_Zoom | Stop 8x 01 04 07 00 FF | ||
| Tele(Variable) 8x 01 04 07 | 2p FF | p=0 (Low) to 7 (High) | |
| Wide(Variable) 8x 01 04 07 | 3p FF | ||
| CAM_Focus | Stop 8x 01 04 08 00 FF | ||
| Auto Focus 8x 01 04 38 02 | FF | ||
| Manual Focus | 8x 01 04 38 03 FF | ||
| One Push 8x 01 04 18 01 | FF | ||
| Direct | 8x 01 04 47 0p 0q 0r 0s FF pqrs: Zoom Position | ||
| CAM_WB | Auto | 8x 01 04 35 00 FF Normal Auto | |
| ATW 8x 01 04 35 04 FF | |||
| Indoor | 8x 01 04 35 01 FF | ||
| Outdoor 8x 01 04 35 02 FF | |||
| One Push WB 8x 01 04 35 | 03 FF One Push WB mode | ||
| Manual | 8x 01 04 35 05 FF Manual Control mode | ||
| One Push 8x 01 04 10 05 | FF One Push WB Trigger | ||
| CAM_RGain | Up | 8x 01 04 03 02 FF Manual Control of R Gain | |
| Down | 8x 01 04 03 03 FF | ||
| CAM_Bgain | Up | 8x 01 04 04 02 FF Manual Control of B Gain | |
| Down | 8x 01 04 04 03 FF | ||
| CAM_AE | Full Auto | 8x 01 04 39 00 FF Automatic Exposure mode | |
| Manual | 8x 01 04 39 03 FF Manual Control mode | ||
| Shutter Priority | 8x 01 04 39 0A FF | Shutter Priority Automatic Exposure mode | |
| Iris Priority | 8x 01 04 39 0B FF | Iris Priority Automatic Exposure mode | |
| Bright | 8x 01 04 39 0D FF | Bright Mode (Manual control) | |
| CAM_Shutter | Up | 8x 01 04 0A 02 FF | Shutter Setting |
| Down | 8x 01 04 0A 03 FF | ||
| CAM_Iris | Up | 8x 01 04 0B 02 FF | Iris Setting |
| Down | 8x 01 04 0B 03 FF | ||
| CAM_Gain | Up | 8x 01 04 0C 02 FF | Gain Setting |
| Down | 8x 01 04 0C 03 FF | ||
| CAM_Bright | Up | 8x 01 04 0D 02 FF | Bright Setting |
| Down | 8x 01 04 0D 03 FF | ||
| Up | 8x 01 04 0E 02 FF | Exposure Compensation Amount Setting | |
| Down | 8x 01 04 0E 03 FF | ||
| CAM_Backlight | On 8x 01 04 33 02 FF Back Light Compensation ON/OFF | ||
| Off 8x 01 04 33 03 FF | |||
| CAM_Preset | Reset | 8x 01 04 3F 00 pp FF | pp: Preset Number 0x00~0xFF |
| Set | 8x 01 04 3F 01 pp FF | ||
| Recall | 8x 01 04 3F 02 pp FF | ||
| CAM_Menu | On/Off | 8x 01 06 06 10 FF | Display ON/OFF |
| Pan-tilt Drive | Up | 8x 01 06 01 VV WW 03 01 FF | VV: Pan speed setting 0x01 (low speed) to 0x18 (high speed)WW: Tilt speed setting 0x01 (low speed) to 0x18 (high speed) |
| Down | 8x 01 06 01 VV WW 03 02 FF | ||
| Left | 8x 01 06 01 VV WW 01 03 FF | ||
| Right | 8x 01 06 01 VV WW 02 03 FF | ||
| UpDownLeft | 8x 01 06 01 VV WW 01 01 FF | ||
| UpDownRight 8x 01 06 01 VV WW | W 02 01 FF | ||
| DownLeft | 8x 01 06 01 VV WW 01 02 FF | ||
| DownRight | 8x 01 06 01 VV WW 02 02 FF | ||
| Stop 8x 01 06 01 VV WW | 03 03 FF | ||
| Home | 8x 01 06 04 FF | ||
| Reset | 8x 01 06 05 FF | ||
| Absolute Position (v26 or above) | 8x 01 06 02 VV WW 0Y 0Y 0Y 0Z 0Z 0Z FF | VV: Pan speed setting 0x01 (low speed) to 0x18 (high speed)WW: Tilt speed setting 0x01 (low speed) to 0x18 (high speed)YYYY: Pan Position 8A14 to 762C (CENTER 0000)ZZZZ: Tilt Position 468B to E898 (Image Flip: OFF) (CENTER 0000) | |
| CAM_Wdr | On | 8x 01 04 3D 02 FF | Wdr ON/OFF |
| Off 8x 01 04 3D 03 FF | |||
| CAM_MenuEnter | 8x 01 7E 01 02 00 01 FF | Enter Submenu | |
| Tally Lamp ON | 8x 01 7E 01 0A 00 02 FF | ||
| Tally Lamp OFF | 8x 01 7E 01 0A 00 03 FF | ||
| Freeze | Freeze On | 81 01 04 62 02 FF | Freeze On Immediately |
| Freeze Off | 81 01 04 62 03 FF | Freeze Off Immediately | |
| Preset Freeze On | 81 01 04 62 22 FF | Freeze On When Running Preset | |
| Preset Freeze Off | 81 01 04 62 23 FF | Freeze Off When Running Preset | |
| Auto Tracking | On 8x 01 04 7D 02 FF | Auto tracking ON/OFF | |
| Off 8x 01 04 7D 03 FF | |||
| CAM_Memory Special | Set | 8x 01 04 3F 01 pp FF | pp: 0x00 To 0xFF normal presetpp: 0x5F => Trun on OSD menupp: 0xA0 => Full Bodypp: 0xA1 => Upper Bodypp: 0xA2 => Tracking Pointpp: 0xA3 => Switchpp: 0xA4 => Presenter mode (support with v25 or newer firmware)pp: 0xA5 => Zone mode (support with v25 or newer firmware) |
| Inquiry Command Command Packet Reply Packet Comments | |||
| CAM_PowerInq | 8x 09 04 00 FF | y0 50 02 FF On | |
| y0 50 03 FF Off | |||
| CAM_WBModelInq | 8x 09 04 35 FF | y0 50 00 FF Auto | |
| y0 50 01 FF In Door | |||
| y0 50 02 FF Out Door | |||
| y0 50 03 FF One Push WB | |||
| y0 50 04 FF ATW | |||
| y0 50 05 FF Manual | |||
| CAM_RGainInq 8x 09 04 43 FF y0 50 00 00 0p 0q FF pq: R Gain | |||
| CAM_BGainInq 8x 09 04 44 FF y0 50 00 00 0p 0q FF pq: B Gain | |||
| CAM_AEModelInq | 8x 09 04 39 FF | y0 50 00 FF Full Auto | |
| y0 50 03 FF Manual | |||
| y0 50 0A FF Shutter Priority | |||
| y0 50 0B FF Iris Priority | |||
| y0 50 0D FF Bright | |||
| CAM_ShutterPosInq | 8x 09 04 4A FF | y0 50 00 00 0p 0q FF | pq: Shutter Position |
| CAM_IrisPosInq | 8x 09 04 4B FF | y0 50 00 00 0p 0q FF | pq: Iris Position |
| CAM_GainPosInq | 8x 09 04 4C FF | y0 50 00 00 0p 0q FF | pq: Gain Position |
| CAM_BrightPosInq | 8x 09 04 4D FF | y0 50 00 00 0p 0q FF | pq: Bright Position |
| CAM_ExpCompPosInq | 8x 09 04 4E FF | y0 50 00 00 0p 0q FF | pq: ExpComp Position |
| CAM_FocusModelInq | 8x 09 04 38 FF | y0 50 02 FF Auto Focus | |
| y0 50 03 FF Manual Focus | |||
| CAM_FocusPosInq | 8x 09 04 48 FF | y0 50 0p 0q 0r 0s FF | pqrs: Focus Position |
| zoom_Pos_Inq | 8x 09 04 47 FF y0 50 0p 0q 0r 0s FF | pqrs: Zoom Posin | Zoom Position |
| PT_Pos_Inq | 8x 09 06 12 FF | y0 50 0Y 0Y 0Y 0Y 0Z 0Z 0Z 0Z FF | YYYY: Pan Position 8A14 to 762C (CENTER 0000)ZZZZ: Tilt Position 468B to E898 (Image Flip: OFF) (CENTER 0000) |
The x value = VISCA Camera ID: 1 to 7 for RS232/RS422 connection.
Visca over IP Settings
VISCA over IP
PORT
| Internet protocol | IPV4 |
| Transport protocol | UDP |
| Port address | S2381 |
FORMAT
| byte 0 | byte 1 | byte 2 | byte 3 | byte 4 | byte 5 | byte 6 | byte 7 | byte8 | ~~ byte23 | |
| func | Payload type | Payload length | Sequence number | Payload (1 to 16 bytes) | ||||||
| data | Value1 | Value2 | 1~16 (0x0001~0x0010) | 0X00000000 ~ 0XFFFFFFF | VISCA Packet (see page VISCA) | |||||
Payload type
| Name | Value1 | Value2 | Description |
| VISCA command | 0x01 | 0x00 | Stores the VISCA command. |
| VISCA inquiry | 0x01 | 0x10 | Stores the VISCA inquiry. |
| VISCA reply | 0x01 | 0x11 | Stores the reply for the VISCA command or VISCA inquiry |
Sequence number
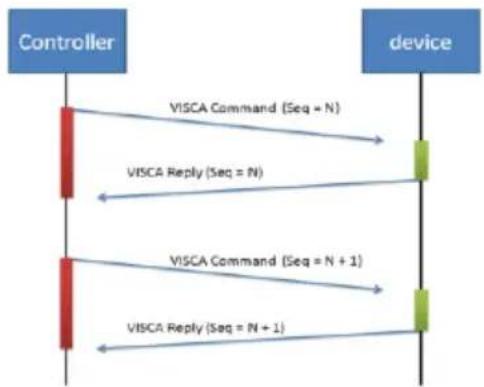
flowchart
graph TD
    A["Controller"] -->|VISCA Command (Seq = N)| B["device"]
    A -->|VISCA Reply (Seq = N)| B
    A -->|VISCA Command (Seq = N + 1)| B
    A -->|VISCA Reply (Seq = N + 1)| B
Sequence number = N
The x value should be 1 for Visca-over-IP string, e.g. 01 00 00 09 00 00 00 01 81 01 06 01 07 07 01 03 FF
CGI command
| CGI List for Video Transmission | |||||
| CGI item name | URL | Command | Parameter Name | Parameter value | Description |
| Get JPEG | /snapshot | 1280x720 jpg | |||
| Get RTSP stream | rtsp://ip/live_st1 | ||||
| CGI List for Camera Control | |||||
| CGI item name | URL Command | Parameter Name | Parameter value | Description | |
| up start | /cgi-bin?SetPtzf= | 1,0,1&(random) | |||
| up end | /cgi-bin?SetPtzf= | 1,0,2&(random) | |||
| down start | /cgi-bin?SetPtzf= | 1,1,1&(random) | |||
| down end | /cgi-bin?SetPtzf= | 1,1,2&(random) | |||
| left start | /cgi-bin?SetPtzf= | 0,1,1&(random) | |||
| left end | /cgi-bin?SetPtzf= | 0,1,2&(random) | |||
| right start | /cgi-bin?SetPtzf= | 0,0,1&(random) | |||
| right end | /cgi-bin?SetPtzf= | 0,0,2&(random) | |||
| zoom_in start | /cgi-bin?SetPtzf= | 2,0,1&(random) | |||
| zoom_in end | /cgi-bin?SetPtzf= | 2,0,2&(random) | |||
| zoom_out start | /cgi-bin?SetPtzf= | 2,1,1&(random) | |||
| zoom_out end | /cgi-bin?SetPtzf= | 2,1,2&(random) | |||
| set preset: | /cgi-bin?ActPreset= | 1,N&(random) | N : position | ||
| load preset: | /cgi-bin?ActPreset= | 0,N&(random) | N : position | ||
| CGI List for Various Settings | |||||
| CGI item name | URL | Command | Parameter Name | Parameter value | Description |
| exposure value | /cgi-bin?Set= | img_expo_expo,3,N&(random) | value | 1 ~ 9 | N : value |
| saturation | /cgi-bin?Set= | img_saturation,3,N&(random) | value | 0 ~ 10 | N : value |
| contrast | /cgi-bin?Set= | img_contrast,3,N&(random) | value | 0 ~ 4 | N : value |
| Tracking on: | /cgi-bin?Set= | trk_tracking,3,1&(random) | |||
| Tracking off: | /cgi-bin?Set= | trk_tracking,3,0&(random) | |||
| Tracking Presenter Mode: | /cgi-bin?Set= | trk_mode,3,1&(random) | |||
| Tracking Zone Mode: | /cgi-bin?Set= | trk_mode,3,2&(random) | |||
Specification
PTC310
| Camera | |
| Image Sensor 1/2.8" 1080p Exmor CMOS | |
| Effective Picture Elements 2 Megapixels | |
| Output Resolutions | Auto1080p/60, 1080p/59.94, 1080p/50, 1080p/30,1080p/29.97, 1080p/25, 720p/60, 720p/59.94, 720p/50,720p/30, 720p/29.97, 720p/25 |
| Minimum Illumination 0.4 lux (IRE50, F1.6, 30fps) | |
| S/N Ratio ≥ 50 dB | |
| Gain Auto, Manual | |
| TV Line 900 (Center) | |
| Shutter Speed 1/1 s to 1/10,000 sec | |
| Exposure Control | Auto, Manual, Bright mode, Priority AE (Shutter, IRIS),BLC, WDR |
| White Balance | Auto, ATW, Indoor, Outdoor, One push, Manual |
| Optical Zoom 12X | |
| Digital Zoom 12X | |
| Sensor Zoom 2X | |
| Viewing Angles | DFOV: 78° (Wide) to 9° (Tele)HFOV: 70° (Wide) to 8° (Tele)VFOV: 42° (Wide) to 5° (Tele) |
| Focal Length f = 3.9 mm (Wide) to 39 mm (Tele) | |
| Aperture (Iris) F = 1.6 (Wide) to 3.0 (Tele) | |
| Minimum Working Distance 0.3 m (Wide), 1.5 m (Tele) | |
| Camera | |
| Pan / Tilt Angles Pan : ±170°, Tilt : +90° / -30° | |
| Pan / Tilt Speed (Manual) Pan : 0.1° to 100° / sec, Tilt : 0.1° to 100° / sec | |
| Preset Speed Pan : 200° / sec, Tilt : 200° / sec | |
| Preset Positions 10 (IR), 255 (RS-232) | |
| Camera Control - Interface RS-232 (DIN8), RS-422 (RJ45), IP | |
| Camera Control - Protocols VISCA / PELCO-D (RS-232 / RS-422 / IP), CGI (IP) | |
| Image Processing Noise Reduction (2D / 3D), Flip, Mirror | |
| Power Frequency 50 Hz, 60 Hz | |
| AI Auto Tracking Functions | |
| Tracking Mode Presenter Mode, Zone Mode | |
| Audio | |
| Channel 2ch Stereo | |
| Codec AAC (48 / 44.1 / 32 / 24K), G.711, PCM (8K) | |
| Sample Rate 48 KHz | |
| Interface | |
| Video Outputs HDMI, IP, USB, 3G-SDI | |
| Audio Outputs HDMI, IP, USB | |
| Audio Inputs MIC in, Line in | |
| General | |
| Power Requirement AC 100 - 240V to DC | 12V/2A or above |
| Power Consumption 18W | |
| PoE | PoE+ |
| Dimensions (W x D x H) | W180*D145*H183.5mm |
| Net Weight | 1.7 (±0.1) kg |
| Application | Indoor |
| Tally | Yes |
| Security | Kensington Slot |
| Remote Control | Infrared |
| Operating Conditions Temperature : 0 °C to +40 °C ; Humidity : 20% to 80% | |
| Storage Conditions Temperature : -20°C to +60°C ; Humidity: 20% to 95% | |
| IP Streaming | |
| Resolution 1080p 60fps | |
| Network Video Compress Formats H.264, H.265, MJPEG | |
| Maximum Frame Rate 1080p 60fps | |
| Bit-rate Control Modes VBR, CBR (selectable) | |
| Range of Bit-rate Setting 512 Kbps to 32 Mbps | |
| Network Interface 10 / 100 / 1000 Base-T | |
| Multi-stream Capability | 2(RTSP / Web Page), 1080p 60fps (max.) |
| Network Protocols | IPv6, IPv4, TCP, UDP, ARP, IMCP, IGMP, HTTP,DHCP, RTP / RTCP, RTSP, RTMP, VISCA over IP |
| NDI® | HX Capability No | |
| USB | |
| Connector USB 3.0 | |
| Video Format MJPEG | |
| Maximum Video Resolution 1080p | |
| USB Video Class (UVC) UVC 1.1 | |
| Web UI | |
| Live Video Preview Yes | |
| Camera PTZ Control Pan, Tilt, Zoom, Focus, Preset Control | |
| Camera / Image Adjustment Exposure, White Balance, Picture | |
| Network Configuration DHCP, IP Address, Gateway, Subnet Mask, DNS | |
| Software Tools | |
| Device IP Searching, Configuration Tool | Support Windows® 7 or later |
| Warranty | |
| Camera 3 Years | |
| Accessories 1 Year | |
PTC310H
| Camera | |
| Image Sensor 1/2.8” 4K Exmor CMOS | |
| Effective Picture Elements 8 Megapixels | |
| Output Resolutions | Auto2160p/30, 2160p/25, 2160p/29.97, 1080p/60,1080p/59.94, 1080p/50, 1080p/30, 1080p/29.97,1080p/25, 720p/60, 720p/59.94, 720p/50, 720p/30,720p/29.97, 720p/25 |
| Minimum Illumination 0.4 lux (IRE50, F1.6, 30fps) | |
| S/N Ratio ≥ 50 dB | |
| Gain Auto, Manual | |
| TV Line 1400 (Center) | |
| Shutter Speed 1/1 s to 1/10,000 sec | |
| Exposure Control | Auto, Manual, Bright mode, Priority AE (Shutter, IRIS),BLC, WDR |
| White Balance | Auto, ATW, Indoor, Outdoor, One push, Manual |
| Optical Zoom 12X | |
| Digital Zoom 12X | |
| Sensor Zoom 2X | |
| Viewing Angles | DFOV: 78° (Wide) to 7° (Tele)HFOV: 70° (Wide) to 6° (Tele)VFOV: 42° (Wide) to 3° (Tele) |
| Focal Length f = 3.9 mm (Wide) to 46.8 mm (Tele) | |
| Aperture (Iris) F = 1.6 (Wide) to 2.8 (Tele) | |
| Minimum Working Distance | 0.3 m (Wide), 1.5 m (Tele) |
| Pan / Tilt Angles Pan : ±170°, Tilt : +90° / -30° | |
| Pan / Tilt Speed (Manual) Pan : 0.1° to 100° / sec, Tilt : 0.1° to 100° / sec | |
| Preset Speed Pan : 200° / sec, Tilt : 200° / sec | |
| Preset Positions 10 (IR), 255 (RS-232) | |
| Camera Control - Interface RS-232 (DIN8), RS-422 (RJ45), IP | |
| Camera Control - Protocols VISCA / PELCO-D (RS-232 / RS-422 / IP), CGI (IP) | |
| Image Processing Noise Reduction (2D / 3D), Flip, Mirror | |
| Power Frequency 50 Hz, 60 Hz | |
| AI Auto Tracking Functions | |
| Tracking Mode Presenter Mode, Zone Mode | |
| Audio | |
| Channel 2ch Stereo | |
| Codec AAC (48 / 44.1 / 32 / 24K), G.711, PCM (8K) | |
| Sample Rate 48 KHz | |
| Interface | |
| Video Outputs HDMI, IP, USB | |
| Audio Outputs HDMI, IP, USB | |
| Audio Inputs MIC in, Line in | |
| General | |
| Power Requirement AC 100 - 240V to DC | 12V/2A and above |
| Power Consumption | 18W |
| PoE | PoE+ |
| Dimensions (W x D x H) | W180*D145*H183.5mm |
| Net Weight | 1.7 (±0.1) kg |
| Application | Indoor |
| Tally | Yes |
| Security Kensington Slot | |
| Remote Control Infrared | |
| Operating Conditions Temperature : 0 °C to +40 °C ; Humidity : 20% to 80% | |
| Storage Conditions Temperature : -20°C to +60°C ; Humidity: 20% to 95% | |
| IP Streaming | |
| Resolution 4K 30fps, 1080p 60fps | |
| Network Video Compress Formats H.264, H.265, MJPEG | |
| Maximum Frame Rate 4K 30fps, 1080p 60fps | |
| Bit-rate Control Modes VBR, CBR (selectable) | |
| Range of Bit-rate Setting 512 Kbps to 32 Mbps | |
| Network Interface 10 / 100 / 1000 Base-T | |
| Multi-stream Capability | 2(RTSP / Web Page), 1080p 60fps (max.) |
| Network Protocols | IPv6, IPv4, TCP, UDP, ARP, IMCP, IGMP, HTTP,DHCP, RTP / RTCP, RTSP, RTMP, VISCA over IP,SRT |
| NDI® | HX Capability No | |
| USB | |
| Connector USB 3.0 | |
| Video Format MJPEG | |
| Maximum Video Resolution 1080p | |
| USB Video Class (UVC) UVC 1.1 | |
| Web UI | |
| Live Video Preview Yes | |
| Camera PTZ Control Pan, Tilt, Zoom, Focus, Preset Control | |
| Camera / Image Adjustment Exposure, White Balance, Picture | |
| Network Configuration DHCP, IP Address, Gateway, Subnet Mask, DNS | |
| Software Tools | |
| Device IP Searching, Configuration Tool Support Windows ^® 7 or later | |
| Warranty | |
| Camera 3 Years | |
| Accessories 1 Year | |
PTC310N
| Camera | |
| Image Sensor 1/2.8" 1080p Exmor CMOS | |
| Effective Picture Elements 2 Megapixels | |
| Output Resolutions | Auto1080p/60, 1080p/59.94, 1080p/50, 1080p/30,1080p/29.97, 1080p/25, 720p/60, 720p/59.94, 720p/50,720p/30, 720p/29.97, 720p/25 |
| Minimum Illumination 0.4 lux (IRE50, F1.6, 30fps) | |
| S/N Ratio ≥ 50 dB | |
| Gain Auto, Manual | |
| TV Line 900 (Center) | |
| Shutter Speed 1/1 s to 1/10,000 sec | |
| Exposure Control | Auto, Manual, Bright mode, Priority AE (Shutter, IRIS),BLC, WDR |
| White Balance | Auto, ATW, Indoor, Outdoor, One push, Manual |
| Optical Zoom | 12X |
| Digital Zoom 12X | |
| Sensor Zoom 2X | |
| Viewing Angles | DFOV: 78° (Wide) to 7° (Tele)HFOV: 70° (Wide) to 6° (Tele)VFOV: 42° (Wide) to 3° (Tele) |
| Focal Length f = 3.9 mm (Wide) to 46.8 mm (Tele) | |
| Aperture (Iris) F = 1.6 (Wide) to 2.8 (Tele) | |
| Minimum Working Distance 0.3 m (Wide), 1.5 m (Tele) | |
| Camera | |
| Pan / Tilt Angles Pan : ±170°, Tilt : +90° / -30° | |
| Pan / Tilt Speed (Manual) Pan : 0.1° to 100° / sec, Tilt : 0.1° to 100° / sec | |
| Preset Speed Pan : 200° / sec, Tilt : 200° / sec | |
| Preset Positions 10 (IR), 255 (RS-232) | |
| Camera Control - Interface RS-232 (DIN8), RS-422 (RJ45), IP | |
| Camera Control - Protocols VISCA / PELCO-D (RS-232 / RS-422 / IP), CGI (IP) | |
| Image Processing Noise Reduction (2D / 3D), Flip, Mirror | |
| Power Frequency 50 Hz, 60 Hz | |
| AI Auto Tracking Functions | |
| Tracking Mode Presenter Mode, Zone Mode | |
| Audio | |
| Channel 2ch Stereo | |
| Codec | AAC (48 / 44.1 / 32 / 24K), G.711, PCM (8K) |
| Sample Rate 48 KHz | |
| Interface | |
| Video Outputs | 3G-SDI, HDMI, IP, USB |
| Audio Outputs | 3G-SDI, HDMI, IP, USB |
| Audio Inputs | MIC in, Line in |
| General | |
| Power Requirement AC 100 - 240V to DC | 12V/2A and above |
| Power Consumption 18W | |
| PoE PoE+ | |
| Dimensions (W x D x H) W180*D145*H183.5mm | |
| Net Weight 1.7 (±0.1) kg | |
| General | |
| Application Indoor | |
| Tally Yes | |
| Security Kensington Slot | |
| Remote Control Infrared | |
| Operating Conditions Temperature : 0 °C to +40 °C ; Humidity : 20% to 80% | |
| Storage Conditions Temperature : -20°C to +60°C ; Humidity: 20% to 95% | |
| IP Streaming | |
| Resolution 1080p 60fps | |
| Network Video Compress Formats H.264, H.265, MJPEG, NDI | |
| Maximum Frame Rate 1080p 60fps | |
| Bit-rate Control Modes | VBR, CBR (selectable) |
| Range of Bit-rate Setting | 512 Kbps to 32 Mbps |
| Network Interface | 10 / 100 / 1000 Base-T |
| Multi-stream Capability | 2(RTSP / Web Page), 1080p 60fps (max.) |
| Network Protocols | IPv6, IPv4, TCP, UDP, ARP, IMCP, IGMP, HTTP,DHCP, RTP / RTCP, RTSP, RTMP, VISCA over IP,SRT, NDI |
| NDI® | HX Capability Yes | |
| USB | |
| Connector | USB 3.0 |
| Video Format MJPEG | |
| Maximum Video Resolution 1080p | |
| USB Video Class (UVC) UVC 1.1 | |
| Web UI | |
| Live Video Preview Yes | |
| Camera PTZ Control Pan, Tilt, Zoom, Focus, Preset Control | |
| Camera / Image Adjustment Exposure, White Balance, Picture | |
| Network Configuration DHCP, IP Address, Gateway, Subnet Mask, DNS | |
| Software Tools | |
| Device IP Searching, Configuration Tool Support Windows ^® 7 or later | |
| Warranty | |
| Camera 3 Years | |
| Accessories 1 Year | |
| Camera | |
| Image Sensor 1/2.8" 4K Exmor CMOS | |
| Effective Picture Elements 8 Megapixels | |
| Output Resolutions | Auto4K/30, 4K/29.97, 4K/25, 1080p/60, 1080p/59.94,1080p/50, 1080p/30, 1080p/29.97, 1080p/25, 720p/60,720p/59.94, 720p/50, 720p/30, 720p/29.97, 720p/25 |
| Minimum Illumination 0.4 lux (IRE50, F1.6, 30fps) | |
| S/N Ratio ≥ 50 dB | |
| Gain Auto, Manual | |
| TV Line 1400 (Center) | |
| Shutter Speed | 1/1 s to 1/10,000 sec |
| Exposure Control | Auto, Manual, Bright mode, Priority AE (Shutter, IRIS),BLC, WDR |
| White Balance | Auto, ATW, Indoor, Outdoor, One push, Manual |
| Optical Zoom 12X | |
| Digital Zoom 12X | |
| Sensor Zoom 2X | |
| Viewing Angles | DFOV: 78° (Wide) to 7° (Tele)HFOV: 70° (Wide) to 6° (Tele)VFOV: 42° (Wide) to 3° (Tele) |
| Focal Length f = 3.9 mm (Wide) to 46.8 mm (Tele) | |
| Aperture (Iris) F = 1.6 (Wide) to 2.8 (Tele) | |
| Minimum Working Distance 0.3 m (Wide), | 1.5 m (Tele) |
| Pan / Tilt Angles Pan : ±170°, Tilt : +90° / -30° | |
| Pan / Tilt Speed (Manual) Pan : 0.1° to 100° / sec, Tilt : 0.1° to 100° / sec | |
| Preset Speed Pan : 200° / sec, Tilt : 200° / sec | |
| Preset Positions 10 (IR), 255 (RS-232) | |
| Camera Control - Interface RS-232 (DIN8), RS-422 (RJ45), IP | |
| Camera Control - Protocols VISCA / PELCO-D (RS-232 / RS-422 / IP), CGI (IP) | |
| Image Processing Noise Reduction (2D / 3D), Flip, Mirror | |
| Power Frequency 50 Hz, 60 Hz | |
| AI Auto Tracking Functions | |
| Tracking Mode Presenter Mode, Zone Mode | |
| Audio | |
| Channel 2ch Stereo | |
| Codec AAC (48 / 44.1 / 32 / 24K), G.711, PCM (8K) | |
| Sample Rate 48 KHz | |
| Interface | |
| Video Outputs 3G-SDI, HDMI, IP, USB | |
| Audio Outputs 3G-SDI, HDMI, IP, USB | |
| Audio Inputs MIC in, Line in | |
| General | |
| Power Requirement AC 100 - 240V to DC | 12V/2A and above |
| Power Consumption 18W | |
| PoE | PoE+ |
| Dimensions (W x W x H) | W180*D145*H183.5mm |
| Net Weight | 1.7 (±0.1) kg |
| Application | Indoor |
| Tally | Yes |
| Security | Kensington Slot |
| General | |
| Remote Control Infrared | |
| Operating Conditions Temperature : 0 °C to +40 °C ; Humidity : 20% to 80% | |
| Storage Conditions Temperature : -20°C to +60°C ; Humidity: 20% to 95% | |
| IP Streaming | |
| Resolution 4K 30fps | |
| Network Video Compress Formats H.264, H.265, MJPEG | |
| Maximum Frame Rate 4K 30fps or 1080p 60fps | |
| Bit-rate Control Modes VBR, CBR (selectable) | |
| Range of Bit-rate Setting 512 Kbps to 32 Mbps | |
| Network Interface 10 / 100 / 1000 Base-T | |
| Multi-stream Capability | 2(RTSP / Web Page), 1080p 60fps (max.) |
| Network Protocols | IPv6, IPv4, TCP, UDP, ARP, IMCP, IGMP, HTTP,DHCP, RTP / RTCP, RTSP, RTMP, VISCA over IP,SRT |
| NDI® | HX Capability No | |
| USB | |
| Connector USB 3.0 | |
| Video Format MJPEG | |
| Maximum Video Resolution 2160p | |
| USB Video Class (UVC) UVC 1.1 | |
| Web UI | |
| Live Video Preview Yes | |
| Camera PTZ Control Pan, Tilt, Zoom, Focus, Preset Control | |
| Camera / Image Adjustment Exposure, White Balance, Picture | |
| Network Configuration DHCP, IP Address, Gateway, Subnet Mask, DNS | |
| Software Tools | |
| Device IP Searching, Configuration Tool Support Windows® 7 or later | |
| Warranty | |
| Camera 3 Years | |
| Accessories 1 Year | |
PTC310UN
| Camera | |
| Image Sensor 1/2.8” 4K Exmor CMOS | |
| Effective Picture Elements 8 Megapixels | |
| Output Resolutions | Auto4K/30, 4K/29.97, 4K/25, 1080p/60, 1080p/59.94,1080p/50, 1080p/30, 1080p/29.97, 1080p/25, 720p/60,720p/59.94, 720p/50, 720p/30, 720p/29.97, 720p/25 |
| Minimum Illumination 0.4 lux (IRE50, F1.6, 30fps) | |
| S/N Ratio ≥ 50 dB | |
| Gain Auto, Manual | |
| TV Line 1400 (Center) | |
| Shutter Speed | 1/1 s to 1/10,000 sec |
| Exposure Control | Auto, Manual, Bright mode, Priority AE (Shutter, IRIS),BLC, WDR |
| White Balance | Auto, ATW, Indoor, Outdoor, One push, Manual |
| Optical Zoom 12X | |
| Digital Zoom 12X | |
| Sensor Zoom 2X | |
| Viewing Angles | DFOV: 78° (Wide) to 7° (Tele)HFOV: 70° (Wide) to 6° (Tele)VFOV: 42° (Wide) to 3° (Tele) |
| Focal Length f = 3.9 mm (Wide) to 46.8 mm (Tele) | |
| Aperture (Iris) F = 1.6 (Wide) to 2.8 (Tele) | |
| Minimum Working Distance 0.3 m (Wide), 1.5 m (Tele) | |
| Pan / Tilt Angles Pan : ±170°, Tilt : +90° / -30° | |
| Pan / Tilt Speed (Manual) Pan : 0.1° to 100° / sec, Tilt : 0.1° to 100° / sec | |
| Camera | |
| Preset Speed Pan : 200° / sec, Tilt : 200° / sec | |
| Preset Positions 10 (IR), 255 (RS-232) | |
| Camera Control - Interface RS-232 (DIN8), RS-422 (RJ45), IP | |
| Camera Control - Protocols VISCA / PELCO-D (RS-232 / RS-422 / IP), CGI (IP) | |
| Image Processing Noise Reduction (2D / 3D), Flip, Mirror | |
| Power Frequency 50 Hz, 60 Hz | |
| AI Auto Tracking Functions | |
| Tracking Mode Presenter Mode, Zone Mode | |
| Audio | |
| Channel 2ch Stereo | |
| Codec AAC (48 / 44.1 / 32 / 24K), G.711, PCM (8K) | |
| Sample Rate 48 KHz | |
| Interface | |
| Video Outputs 3G-SDI, HDMI, IP, USB | |
| Audio Outputs 3G-SDI, HDMI, IP, USB | |
| Audio Inputs MIC in, Line in | |
| General | |
| Power Requirement AC 100 - 240V to DC | 12V/2A and above |
| Power Consumption 18W | |
| PoE | PoE+ |
| Dimensions (W x W x H) | W180*D145*H183.5mm |
| Net Weight | 1.7 (±0.1) kg |
| Application | Indoor |
| Tally | Yes |
| Security | Kensington Slot |
| General | |
| Remote Control Infrared | |
| Operating Conditions Temperature : 0 °C to +40 °C ; Humidity : 20% to 80% | |
| Storage Conditions Temperature : -20°C to +60°C ; Humidity: 20% to 95% | |
| IP Streaming | |
| Resolution 4K 30fps | |
| Network Video Compress Formats H.264, H.265, MJPEG | |
| Maximum Frame Rate 4K 30fps or 1080p 60fps | |
| Bit-rate Control Modes VBR, CBR (selectable) | |
| Range of Bit-rate Setting 512 Kbps to 32 Mbps | |
| Network Interface 10 / 100 / 1000 Base-T | |
| Multi-stream Capability | 2(RTSP / Web Page), 1080p 60fps (max.) |
| Network Protocols | IPv6, IPv4, TCP, UDP, ARP, IMCP, IGMP, HTTP,DHCP, RTP / RTCP, RTSP, RTMP, VISCA over IP,SRT |
| NDI® | HX Capability Yes | |
| USB | |
| Connector USB 3.0 | |
| Video Format MJPEG | |
| Maximum Video Resolution 2160p | |
| USB Video Class (UVC) UVC 1.1 | |
| Web UI | |
| Live Video Preview Yes | |
| Camera PTZ Control Pan, Tilt, Zoom, Focus, Preset Control | |
| Camera / Image Adjustment Exposure, White Balance, Picture | |
| Network Configuration DHCP, IP Address, Gateway, Subnet Mask, DNS | |
| Software Tools | |
| Device IP Searching, Configuration Tool Support Windows® 7 or later | |
| Warranty | |
| Camera 3 Years | |
| Accessories 1 Year | |
PTC330
| Camera | |
| Image Sensor 1/2.5” 2M Exmor CMOS | |
| Effective Picture Elements 2 Megapixels | |
| Output Resolutions | Auto1080p/60, 1080p/59.94, 1080p/50, 1080p/30,1080p/29.97, 1080p/25, 720p/60, 720p/59.94, 720p/50,720p/30, 720p/29.97, 720p/25 |
| Minimum Illumination 0.7 lux (IRE50, F1.5, 30fps) | |
| S/N Ratio ≥ 50 dB | |
| Gain Auto, Manual | |
| TV Line 900 (center/wide) | |
| Shutter Speed 1/1 to 1/32,000 sec | |
| Exposure Control Auto, Manual, Priority AE (Shutter, IRIS), BLC, WDR | |
| White Balance | Auto, Manual |
| Optical Zoom 30X | |
| Digital Zoom 12X | |
| Sensor Zoom 2X | |
| Viewing Angles | DFOV : 72.9° (Wide) to 2.64° (Tele)HFOV : 65.1° (Wide) to 2.34° (Tele)VFOV : 38.4° (Wide) to 1.36° (Tele) |
| Focal Length f = 4.3 mm (Wide) to 129 mm (Tele) | |
| Aperture (Iris) | F = 1.6 (Wide) to 4.7 (Tele) |
| Minimum Working Distance | Wide 0.01 m,Tele 1.2 m |
| Pan / Tilt Angles Pan : ±170°, Tilt : +90° / -30° | |
| Pan / Tilt Speed (Manual) Pan : 0.1° to 100° / sec, Tilt : 0.1° to 100° / sec | |
| Camera | |
| Preset Speed Pan : 200° / sec, Tilt : 200° / sec | |
| Preset Positions 10 (IR), 255 (RS-232) | |
| Camera Control - Interface RS-232 (DIN8), RS-422 (RJ45), IP | |
| Camera Control - Protocols | VISCA / PELCO-D (RS-232 / RS-422 / IP), CGI (IP) |
| Image Processing Noise Reduction (2D / 3D), Flip, Mirror | |
| Power Frequency 50 Hz, 60 Hz | |
| AI Auto Tracking Functions | |
| Tracking Mode Presenter Mode, Zone Mode, Hybrid Mode | |
| Audio | |
| Channel | 2ch Stereo |
| Codec | AAC-LC (48 / 44.1 / 32 / 24K), G.711, PCM (8K) |
| Sample Rate 48 / 44.1 / 32 / 24 / 16 / 8 KHz | |
| Interface | |
| Video Outputs 3G-SDI, HDMI, IP, USB | |
| Audio Outputs 3G-SDI, HDMI, IP, USB | |
| Audio Inputs MIC in, Line in | |
| General | |
| Power Requirement AC 100 - 240V to DC | 12V/2A and above |
| Power Consumption 18W | |
| PoE PoE+ | |
| Dimensions (W x D x H) W180*D145*H183.5mm | |
| Net Weight 1.7 (±0.1) kg | |
| Application Indoor | |
| Tally Yes | |
| Security Kensington Slot | |
| Remote Control Infrared | |
| General | |
| Operating Conditions Temperature : 0 °C to +40 °C ; Humidity : 20% to 80% | |
| Storage Conditions Temperature : -20°C to +60°C ; Humidity: 20% to 95% | |
| IP Streaming | |
| Resolution 1080p60 | |
| Network Video Compress Formats | H.264, H.265, MJPEG |
| Maximum Frame Rate | 1080p 60fps |
| Bit-rate Control Modes | VBR, CBR (selectable) |
| Range of Bit-rate Setting | 512 Kbps to 32 Mbps |
| Network Interface | 10 / 100 / 1000 Base-T |
| Multi-stream Capability | 2(RTSP / Web Page), 1080p 60fps (max.) |
| Network Protocols | IPv6, IPv4, TCP, UDP, ARP, IMCP, IGMP, HTTP,DHCP, RTP / RTCP, RTSP, RTMP, VISCA over IP |
| NDI® | HX Capability No | |
| USB | |
| Connector USB 3.0 | |
| Video Format MJPEG | |
| Maximum Video Resolution 1080p | |
| USB Video Class (UVC) UVC 1.1 | |
| USB Audio Class (UAC) UAC 1.0 | |
| Web UI | |
| Live Video Preview Yes | |
| Camera PTZ Control Pan, Tilt, Zoom, Focus, Preset Control | |
| Camera / Image Adjustment Exposure, White Balance, Picture | |
| Network Configuration DHCP, IP Address, Gateway, Subnet Mask, DNS | |
| Software Tools | |
| Device IP Searching, Configuration Tool Support Windows® 7 or later | |
| Warranty | |
| Camera 3 Years | |
| Accessories 1 Year | |
PTC330N
| Camera | |
| Image Sensor 1/2.5” 2M Exmor CMOS | |
| Effective Picture Elements 2 Megapixels | |
| Output Resolutions | Auto1080p/60, 1080p/59.94, 1080p/50, 1080p/30,1080p/29.97, 1080p/25, 720p/60, 720p/59.94, 720p/50,720p/30, 720p/29.97, 720p/25 |
| Minimum Illumination | 0.7 lux (IRE50, F1.5, 30fps) |
| S/N Ratio ≥ 50 dB | |
| Gain Auto, Manual | |
| TV Line 900 (center/wide) | |
| Shutter Speed 1/1 to 1/32,000 sec | |
| Exposure Control Auto, Manual, Priority AE (Shutter, IRIS), BLC, WDR | |
| White Balance Auto, Manual | |
| Optical Zoom 30X | |
| Digital Zoom 12X | |
| Sensor Zoom 2X | |
| Viewing Angles | DFOV: 72.9° (Wide) to 2.64° (Tele)HFOV: 65.1° (Wide) to 2.34° (Tele)VFOV: 38.4° (Wide) to 1.36° (Tele) |
| Focal Length f = 4.3 mm (Wide) to 129 mm (Tele) | |
| Aperture (Iris) | F = 1.6 (Wide) to 4.7 (Tele) |
| Minimum Working Distance | Wide 0.01 m,Tele 1.2 m |
| Pan / Tilt Angles Pan : ±170°, Tilt : +90° / -30° | |
| Pan / Tilt Speed (Manual) Pan : 0.1° to 100° / sec, Tilt : 0.1° to 100° / sec | |
| Camera | |
| Preset Speed Pan : 200° / sec, Tilt : 200° / sec | |
| Preset Positions | 10 (IR), 255 (RS-232) |
| Camera Control - Interface | RS-232 (DIN8), RS-422 (RJ45), IP |
| Camera Control - Protocols | VISCA / PELCO-D (RS-232 / RS-422 / IP), CGI (IP) |
| Image Processing | Noise Reduction (2D / 3D), Flip, Mirror |
| Power Frequency | 50 Hz, 60 Hz |
| AI Auto Tracking Functions | |
| Tracking Mode Presenter Mode, Zone Mode, Hybrid Mode | |
| Audio | |
| Channel 2ch Stereo | |
| Codec AAC-LC (48 / 44.1 / 32 / 24K), G.711, PCM (8K) | |
| Sample Rate 48 / 44.1 / 32 / 24 / 16 / 8 KHz | |
| Interface | |
| Video Outputs 3G-SDI, HDMI, IP, USB | |
| Audio Outputs 3G-SDI, HDMI, IP, USB | |
| Audio Inputs MIC in, Line in | |
| General | |
| Power Requirement AC 100 - 240V to DC | 12V/2A and above |
| Power Consumption 18W | |
| PoE PoE+ | |
| Dimensions (W x D x H) W180*D145*H183.5mm | |
| Net Weight 1.7 (±0.1) kg | |
| Application Indoor | |
| Tally Yes | |
| Security Kensington Slot | |
| Remote Control | Infrared |
| General | |
| Operating Conditions | Temperature : 0 °C to +40 °C ; Humidity : 20% to 80% |
| Storage Conditions | Temperature : -20°C to +60°C ; Humidity: 20% to 95% |
| IP Streaming | |
| Resolution | 1080p60 |
| Network Video Compress Formats | H.264, H.265, MJPEG |
| Maximum Frame Rate | 1080p 60fps |
| Bit-rate Control Modes VBR, CBR (selectable) | |
| Range of Bit-rate Setting 512 Kbps to 32 Mbps | |
| Network Interface 10 / 100 / 1000 Base-T | |
| Multi-stream Capability | 2(RTSP / Web Page), 1080p 60fps (max.) |
| Network Protocols | IPv6, IPv4, TCP, UDP, ARP, IMCP, IGMP, HTTP,DHCP, RTP / RTCP, RTSP, RTMP, VISCA over IP |
| NDI® | HX Capability Yes | |
| USB | |
| Connector USB 3.0 | |
| Video Format MJPEG | |
| Maximum Video Resolution 1080p | |
| USB Video Class (UVC) UVC 1.1 | |
| USB Audio Class (UAC) UAC 1.0 | |
| Web UI | |
| Live Video Preview Yes | |
| Camera PTZ Control Pan, Tilt, Zoom, Focus, Preset Control | |
| Camera / Image Adjustment Exposure, White Balance, Picture | |
| Network Configuration DHCP, IP Address, | Gateway, Subnet Mask, DNS |
| Software Tools | |
| Device IP Searching, Configuration Tool | Support Windows® 7 or later |
| Warranty | |
| Camera 3 Years | |
| Accessories 1 Year | |
| Camera | |
| Image Sensor 1/2.5" 4K Exmor CMOS | |
| Effective Picture Elements 8 Megapixels | |
| Output Resolutions | Auto4K/30, 4K/29.97, 4K/25, 1080p/60, 1080p/59.94,1080p/50, 1080p/30, 1080p/29.97, 1080p/25, 720p/60,720p/59.94, 720p/50, 720p/30, 720p/29.97, 720p/25 |
| Minimum Illumination 2.7 lux (IRE50, F1.5, 30fps) | |
| S/N Ratio ≥ 50 dB | |
| Gain Auto, Manual | |
| TV Line 1400 (Center) | |
| Shutter Speed 1/1 to 1/32,000 sec | |
| Exposure Control Auto, Manual, Priority AE (Shutter, IRIS), BLC, WDR | |
| White Balance Auto, Manual | |
| Optical Zoom 30X | |
| Digital Zoom 12X | |
| Sensor Zoom 2X | |
| Viewing Angles | DFOV: 75° (Wide) to 3° (Tele)HFOV: 68° (Wide) to 2.8° (Tele)VFOV: 40° (Wide) to 1.6° (Tele) |
| Focal Length f = 4.8 mm (Wide) to 144 mm (Tele) | |
| Aperture (Iris) | F = 1.5 (Wide) to 3.4 (Tele) |
| Minimum Working Distance | 1.5 m to Infinity |
| Pan / Tilt Angles | Pan: ±170°, Tilt: +90° / -30° |
| Pan / Tilt Speed (Manual) | Pan: 0.1° to 100° / sec, Tilt: 0.1° to 100° / sec |
| Preset Speed Pan : 200° / sec, Tilt : 200° / sec | |
| Preset Positions 10 (IR), 255 (RS-232) | |
| Camera Control - Interface | RS-232 (DIN8), RS-422 (RJ45), IP |
| Camera Control - Protocols VISCA / PELCO-D (RS-232 / RS-422 / IP), CGI (IP) | |
| Image Processing Noise Reduction (2D / 3D), Flip, Mirror | |
| Power Frequency Auto, 50 Hz, 60 Hz | |
| AI Auto Tracking Functions | |
| Tracking Mode Presenter Mode, Zone Mode | |
| Audio | |
| Channel 2ch Stereo | |
| Codec AAC-LC (48 / 44.1 / 32 / 24K), G.711, PCM (8K) | |
| Sample Rate 48 / 44.1 / 32 / 24 / 16 / 8 KHz | |
| Interface | |
| Video Outputs 3G-SDI, HDMI, IP, USB | |
| Audio Outputs 3G-SDI, HDMI, IP, USB | |
| Audio Inputs MIC in, Line in | |
| General | |
| Power Requirement AC 100 - 240V to DC | 12V/2A and above |
| Power Consumption 18W | |
| PoE PoE+ | |
| Dimensions (W x D x H) | W180*D145*H183.5mm |
| Net Weight | 1.7 (±0.1) kg |
| Application | Indoor |
| Tally | Yes |
| Security | Kensington Slot |
| Remote Control | Infrared |
| General | |
| Operating Conditions Temperature : 0 °C to +40 °C ; Humidity : 20% to 80% | |
| Storage Conditions Temperature : -20°C to +60°C ; Humidity: 20% to 95% | |
| IP Streaming | |
| Resolution 4K 30fps | |
| Network Video Compress Formats H.264, H.265, MJPEG | |
| Maximum Frame Rate 4K 30fps or 1080p 60fps | |
| Bit-rate Control Modes VBR, CBR (selectable) | |
| Range of Bit-rate Setting 512 Kbps to 32 Mbps | |
| Network Interface 10 / 100 / 1000 Base-T | |
| Multi-stream Capability | 2(RTSP / Web Page), 1080p 60fps (max.) |
| Network Protocols | IPv6, IPv4, TCP, UDP, ARP, IMCP, IGMP, HTTP,DHCP, RTP / RTCP, RTSP, RTMP, VISCA over IP |
| NDI® | HX Capability No | |
| USB | |
| Connector USB 3.0 | |
| Video Format MJPEG | |
| Maximum Video Resolution 2160p | |
| USB Video Class (UVC) UVC 1.1 | |
| USB Audio Class (UAC) UAC 1.0 | |
| Web UI | |
| Live Video Preview Yes | |
| Camera PTZ Control Pan, Tilt, Zoom, Focus, Preset Control | |
| Camera / Image Adjustment Exposure, White Balance, Picture | |
| Network Configuration DHCP, IP Address, Gateway, Subnet Mask, DNS | |
| Software Tools | |
| Device IP Searching, Configuration Tool Support Windows® 7 or later | |
| Warranty | |
| Camera 3 Years | |
| Accessories 1 Year | |
- AI Auto Tracking PTZ Camera
- FCC NOTICE (Class A)
- Class A ITE
- European Community Compliance Statement (Class A)
- DISCLAIMER
- TRADEMARKS
- COPYRIGHT
- NOTICE
- Remote Control Battery Safety Information
- CAUTION
- WARNING
- Contents
- Package Contents
- Optional accessory
- Product Introduction
- Sources
- Overview
- LED Indicator
- Pan and Tilt Angle
- Dimension
- Device Connection
- Video Output Connection
- HDMI
- 3G-SDI
- RS232 and RS422 Connection
- RS422
- Audio Input Connection
- [Note]
- PoE Connection
- Install Cable Fixing Plate
- Ceiling installation
- Installation for Auto Tracking Performance
- Remote Control
- Setup the Camera
- OSD Menu
- Setup IP Address of the Camera
- Static IP
- DHCP
- OSD Tree
- Camera
- Video Output
- Network
- System
- Web Setup
- Using the AVer IPCam Utility to Find the Camera
- Using AVer PTZ Management Software to Find the Camera
- Make a Connection to the Camera via Browser
- Live View
- Pan-Tilt-Zoom Control
- Focus
- Manual Pan-Tile-Zoom and Preset Speed Adjustment
- Preset Setting
- Tracking Control
- Click Tracking Function
- Camera Settings
- Exposure
- Image Process
- Video & Audio
- Get 4K (2160p) output
- Setup NDI Function
- NDI service only support on NDI models: PTC310N, PTC310UN, PTC310HN, PTC330N.
- RTMP Setting
- Using RTSP Connect to Camera
- SRT Stream
- Example 1 vMix:
- Example2 OBS (Open Broadcaster Software)
- Tracking Setting
- Presenter Mode
- Zone Mode
- Hybrid Mode
- Quick Setup for Tracking
- Upgrade Firmware
- Visca over IP Settings
- CGI command
- Specification
Brand : AVer
Model : PTC330N
Category : Security Camera