
EHVH08SU18CB6W - Chauffe-eau instantané et chauffe-eau DAIKIN - Free user manual and instructions
Find the device manual for free EHVH08SU18CB6W DAIKIN in PDF.


| Product Type | Low Temperature Split Heat Pump (Space Heating & Domestic Hot Water) |
| Brand | Daikin |
| Model | EHVH08SU18CB6W |
| Refrigerant | R410A (GWP 2087.5) |
| Space Heating Capability | Heating only (not cooling) |
| Domestic Hot Water (DHW) Control Modes | Reheat, Scheduled, Scheduled + Reheat |
| User Interface | LCD display with buttons, home pages, menu structure |
| Temperature Control Options | Room thermostat, leaving water temperature, external room thermostat |
| Scheduling | Weekly schedules for room temperature, leaving water temperature, DHW tank temperature, quiet mode, electricity price |
| Advanced Features | Quiet mode, holiday mode, weather-dependent operation, booster DHW mode, disinfection mode |
| Energy Price Settings | Fixed fuel price, 3 electricity price levels with weekly timer |
| Safety Precautions | Risk of electric shock, burning, explosion; do not rinse unit; keep area clean; water pressure >1 bar |
| Maintenance | Yearly professional maintenance; clean user interface with soft damp cloth; check water pressure regularly |
| Disposal | Comply with WEEE directive; contact installer for dismantling |
| Documentation Formats | Operation manual (paper), User reference guide (digital) |
Frequently Asked Questions - EHVH08SU18CB6W DAIKIN
User questions about EHVH08SU18CB6W DAIKIN
0 question about this device. Answer the ones you know or ask your own.
Ask a new question about this device
Download the instructions for your Chauffe-eau instantané et chauffe-eau in PDF format for free! Find your manual EHVH08SU18CB6W - DAIKIN and take your electronic device back in hand. On this page are published all the documents necessary for the use of your device. EHVH08SU18CB6W by DAIKIN.
USER MANUAL EHVH08SU18CB6W DAIKIN
User reference guide
Daikin Altherma – Low temperature split
natural_image
Illustration of a refrigerator with a digital display and control buttons (no text or symbols)EHVH04SU18CB6W
EHVH08SU18CB6W
EHVH08SU26CB6W
EHVH11SU26CB6W
EHVH16SU26CB6W
User reference guide
Daikin Altherma - Low temperature split
English
Table of contents
1 General safety precautions 2
1.1 About the documentation .... 2
1.1.1 Meaning of warnings and symbols.... 2
1.2 For the user .... 3
2 About this document 3
3 About the system 4
3.1 Components in a typical system layout 4
4 Operation 4
4.1 Overview: Operation.... 4
4.2 The user interface at a glance.... 4
4.2.1 Buttons.... 4
4.2.2 Status icons .... 5
4.3 Basic usage....5
4.3.1 Using home pages 5
4.3.2 Using the menu structure.... 5
4.3.3 Turning ON/OFF controls.... 5
4.4 Space heating control....6
4.4.1 About space heating control 6
4.4.2 Setting the space operation mode 6
4.4.3 Determining which temperature control you are using 6
4.4.4 Room thermostat control - About room thermostat control 6
4.4.5 Room thermostat control - Using the room temperature home page....7
4.4.6 Room thermostat control - Using the leaving water temperature home pages....9
4.4.7 Leaving water temperature control - About leaving water temperature control 9
4.4.8 Leaving water temperature control - Using leaving water temperature control according to a schedule .... 10
4.4.9 Leaving water temperature control - Using leaving water temperature control NOT according to a schedule.... 10
4.4.10 External room thermostat control - About external room thermostat control 10
4.4.11 External room thermostat control - Using external room thermostat control 10
4.5 Domestic hot water control.... 10
4.5.1 About domestic hot water control.... 10
4.5.2 Reheat mode 11
4.5.3 Scheduled mode 11
4.5.4 Scheduled + reheat mode.... 12
4.5.5 Using the DHW tank temperature home page.... 12
4.6.1 About changing the user permission level 13
4.6.2 Using quiet mode 13
4.6.3 Using holiday mode 14
4.6.4 Reading out information.... 15
4.6.5 Configuring date, time, units of measurement, contrast and backlight 15
4.6.6 Configuring user profile and home pages.... 16
4.6.7 Locking and unlocking buttons and functions 16
4.7 Preset values and schedules 16
4.7.1 Using preset values 16
4.7.2 Using and programming schedules ...... 17
4.7.3 Schedules: Example 17
4.7.4 Predefined schedules: Room temperature + leaving water temperature (main).... 18
4.7.5 Predefined schedules: Leaving water temperature (additional) 18
4.7.6 Predefined schedules: DHW tank temperature..... 18
4.8 Weather dependent operation.... 18
4.8.1 To set the weather dependent settings.... 18
4.9 Menu structure: Overview user settings 20
4.10 Installer settings: Tables to be filled in by installer 21
4.10.1 Quick wizard 21
4.10.2 Space heating control 21
4.10.3 Domestic hot water control [A.4] 21
4.10.4 Contact/helpdesk number [6.3.2] 21
5 Setting the energy prices 21
5.1 To set the fuel price.... 21
5.2 To set the electricity price.... 21
5.3 To set the electricity price schedule timer 22
5.4 About energy prices in case of an incentive per kWh renewable energy.... 22
5.4.1 To set the fuel price in case of an incentive per kWh renewable energy 22
5.4.2 To set the electricity price in case of an incentive per kWh renewable energy 22
5.4.3 Example 22
6 Energy saving tips 22
7 Maintenance and service 23
7.1 Overview: Maintenance and service 23
7.2 To find the contact/helpdesk number 23
8 Troubleshooting 23
8.1 Overview: Troubleshooting.... 23
8.2 To check the error history.... 23
8.3 To check the warning history.... 23
8.4 Symptom: You are feeling too cold (hot) in your living room..... 23
8.5 Symptom: The water at the tap is too cold 23
8.6 Symptom: Heat pump failure.... 23
9 Relocation 24
9.1 Overview: Relocation 24
10 Disposal 24
10.1 Overview: Disposal....24
11 Glossary 24
1 General safety precautions
1.1 About the documentation
- The original documentation is written in English. All other languages are translations.
- The precautions described in this document cover very important topics, follow them carefully.
- The installation of the system, and all activities described in the installation manual and the installer reference guide must be performed by an authorized installer.
1.1.1 Meaning of warnings and symbols

DANGER
Indicates a situation that results in death or serious injury.

DANGER: RISK OF ELECTROCUTION
Indicates a situation that could result in electrocution.

DANGER: RISK OF BURNING
Indicates a situation that could result in burning because of extreme hot or cold temperatures.

DANGER: RISK OF EXPLOSION
Indicates a situation that could result in explosion.

WARNING
Indicates a situation that could result in death or serious injury.

WARNING: FLAMMABLE MATERIAL

CAUTION
Indicates a situation that could result in minor or moderate injury.

NOTICE
Indicates a situation that could result in equipment or property damage.

INFORMATION
Indicates useful tips or additional information.
Symbol Explanation

Before installation, read the installation and operation manual, and the wiring instruction sheet.

Before performing maintenance and service tasks, read the service manual.

For more information, see the installer and user reference guide.
1.2 For the user
- If you are not sure how to operate the unit, contact your installer.
- This appliance can be used by children aged from 8 years and above and persons with reduced physical, sensory or mental capabilities or lack of experience and knowledge if they have been given supervision or instruction concerning use of the appliance in a safe way and understand the hazards involved. Children shall not play with the appliance. Cleaning and user maintenance shall not be made by children without supervision.

WARNING
To prevent electric shocks or fire:
- Do NOT rinse the unit.
- Do NOT operate the unit with wet hands.
- Do NOT place any objects containing water on the unit.

NOTICE
- Do NOT place any objects or equipment on top of the unit.
- Do NOT sit, climb or stand on the unit.
- Units are marked with the following symbol:


This means that electrical and electronic products may not be mixed with unsorted household waste. Do NOT try to dismantle the system yourself: the dismantling of the system, treatment of the refrigerant, of oil and of other parts must be done by an authorized installer and must comply with applicable legislation. Units must be treated at a specialized treatment facility for reuse, recycling and recovery. By ensuring this product is disposed of correctly, you will help to prevent potential negative consequences for the environment and human health. For more information, contact your installer or local authority.
- Batteries are marked with the following symbol:

This means that the batteries may not be mixed with unsorted household waste. If a chemical symbol is printed beneath the symbol, this chemical symbol means that the battery contains a heavy metal above a certain concentration.
Possible chemical symbols are: Pb: lead (>0.004%).
Waste batteries must be treated at a specialized treatment facility for reuse. By ensuring waste batteries are disposed of correctly, you will help to prevent potential negative consequences for the environment and human health.
2 About this document
Thank you for purchasing this product. Please:
- Read the documentation carefully before operating the user interface to ensure the best possible performance.
- Request the installer to inform you about the settings that he used to configure your system. Check if he has filled in the installer settings tables. If not, request him to do so.
- Keep the documentation for future reference.
Target audience
End users
Documentation set
This document is part of a documentation set. The complete set consists of:
-
General safety precautions:
-
Safety instructions that you must read before operating your system
- Format: Paper (in the box of the indoor unit)
- Operation manual:
- Quick guide for basic usage
- Format: Paper (in the box of the indoor unit)
- User reference guide:
- Detailed step-by-step instructions and background information for basic and advanced usage
- Format: Digital files on http://www.daikineurope.com/support-and-manuals/product-information/
Latest revisions of the supplied documentation may be available on the regional Daikin website or via your installer.
The original documentation is written in English. All other languages are translations.
Available screens
Depending on your system layout and installer configuration, not all screens in this document may be available on your user interface.
Breadcrumbs
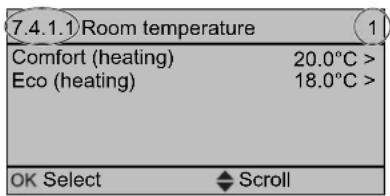
Breadcrumbs help you to locate where you are in the menu structure of the user interface. This document also mentions these breadcrumbs.
3 About the system
Example: Go to [7.4.1.1]: User settings > Preset values > Room temperature > Comfort (heating)
3 About the system
Depending on the system layout, the system can:
- Heat up a space
- Produce domestic hot water
3.1 Components in a typical system layout
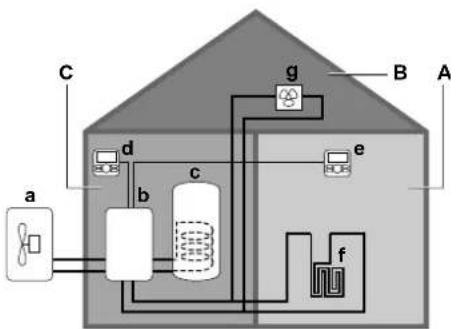
A Main zone. Example: Living room.
B Additional zone. Example: Bedroom.
C Technical room. Example: Garage.
a Outdoor unit heat pump
b Indoor unit heat pump
c Domestic hot water (DHW) tank
d User interface at the indoor unit
e User interface in the living room, used as room thermostat
f Underfloor heating
g Heat pump convectors or fan coil units
4 Operation
4.1 Overview: Operation
You can operate the system via the user interface. This part describes how to use the user interface:
| Part Description | |
| At a glance • Buttons | • Status icons |
| Basic usage Information | about:• Home pages, where you can read out and change settings that are meant fo daily usage• Menu structure, where you can read out and configure settings that are NOT meant for daily usage• ON/OFF controls |
| Space heating control | How to control space heating:• Setting the space operation mode• Controlling the temperature |
| Domestic hot water control | How to control domestic hot water:• Reheat mode• Scheduled mode• Scheduled + reheat mode |
| Part Description | |
| Advanced usage | Information about: ·Quiet mode ·Holiday mode ·Reading out information ·Date, time, units of measurement, contrast and backlight ·User profile and home pages ·Locking and unlocking buttons and functions |
| Preset values and schedules | ·How to use preset values ·How to select and program schedules ·Overview of predefined schedules |
| Menu structure | Overview of menu structure |
| Installer settings table | Overview of installer settings |
4.2 The user interface at a glance
4.2.1 Buttons
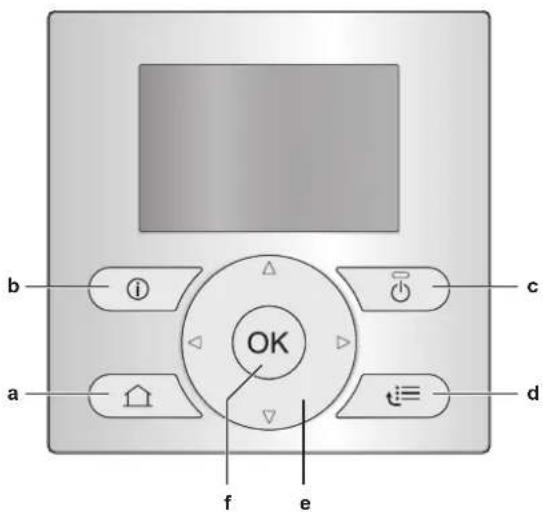
a HOME PAGES
- Switches between home pages (when you are on a home page).
- Goes to the default home page (when you are in the menu structure).
b Ⓞ MALFUNCTION INFORMATION
If a malfunction occurs, ① is displayed on the home pages. Press Ⓤ to display more information about the malfunction.
c ON/OFF
Turns ON or OFF one of the controls (room temperature, leaving water temperature, DHW tank temperature).
d MENU STRUCTURE/BACK
- Opens the menu structure (when you are on a home page).
- Goes up a level (when you are navigating through the menu structure).
- Goes back 1 step (example: when you are programming a schedule in the menu structure).
e NAVIGATING/CHANGING SETTINGS
- Navigates the cursor on the display.
- Navigates through the menu structure.
- Changes settings.
- Selects a mode.
f OK OK
- Confirms a selection.
- Enters a submenu in the menu structure.
- Switches between displaying actual and desired values, or between displaying actual and offset values (if applicable) on the home pages.
- Goes to the next step (when you are programming a schedule in the menu structure).
- Enables you to activate or deactivate button lock if pressed for more than 5 seconds on a home page.
- Enables you to activate or deactivate a function lock if pressed for more than 5 seconds in the main menu of the menu structure.

INFORMATION
If you press 📋 while changing settings, the changes will NOT be applied.
4.2.2 Status icons
| Icon Description | |
 | Space operation mode = Heating. |
 | Not available. |
 | Unit is operating. |
 | Desired room temperature = preset value (Comfort; daytime). |
 | Desired room temperature = preset value (Eco; nighttime). |
 | • On the room temperature home page: Desired room temperature = according to the selected schedule.• On the DHW tank temperature home page: DHW tank mode = Scheduled mode. |
 | DHW tank mode = Reheat mode. |
 | DHW tank mode = Scheduled + reheat mode. |
 | Domestic hot water operation. |
 | Actual temperature. |
 | Desired temperature. |
 | At the next scheduled action, the desired temperature will increase. |
 | At the next scheduled action, the desired temperature will NOT change. |
 | At the next scheduled action, the desired temperature will decrease. |
| [AZAC] | The preset value (Comfort or Eco) or scheduled value is temporarily overruled. |
 | The DHW tank booster mode is active or ready to be activated. |
| [WBAW] | Quiet mode is active. |
 | Holiday mode is active or ready to be activated. |
| [C088] | Button lock mode and/or function lock mode is active. |
 | An external heat source is active. Example: Gas burner. |
 | The disinfection mode is active. |
 | A malfunction occurred. Press display more information about the malfunction. |
| [ZW6W] | Weather-dependent mode is active. |
 | User permission level = Installer. |
 | Defrost/oil return mode is active. |
| [HH08] | Hot start mode is active. |
| Icon Description | |
| Emergency operation is active. | |
4.3 Basic usage
4.3.1 Using home pages
About home pages
You can use the home pages to read out and change settings that are meant for daily usage. What you can see and do on the home pages is described where applicable. Depending on your system layout, the following home pages may be possible:
- Room temperature (Room)
- Main leaving water temperature (LWT main)
• Additional leaving water temperature (LWT add) - DHW tank temperature (Tank)
To go to a home page
1 Press.
Result: One of the home pages is displayed.
2 Press again to display the next home page (if any).
4.3.2 Using the menu structure
About the menu structure
You can use the menu structure to read out and configure settings that are NOT meant for daily usage. What you can see and do in the menu structure is described where applicable. For an overview of the menu structure, see "4.9 Menu structure: Overview user settings" on page 20.
To go to the menu structure
1 From a home page, press

Result: The menu structure is displayed.
| 1 | |
| Set time/date | > |
| Holiday | > |
| Quiet mode | Auto > |
| Operation mode | Heating > |
| Select schedules | |
| Information | |
| OK Select | ◀ Scroll |
To navigate in the menu structure
Use ▲ ▼ ◀ ▶ OK

4.3.3 Turning ON/OFF controls
About turning ON/OFF controls
| Before you can control... | You have to turn ON... |
| Room temperature | Room temperature control (Room) |
| Main (+ additional) leaving water temperature | Main (+ additional) leaving water temperature control (LWT main and LWT add)Main and additional leaving water temperature control are always turned ON or OFF together. |
| DHW tank temperature | Domestic hot water control (Tank) |
4 Operation
| If you turn ON... Then... | |
| Room temperature control Main (+ | additional) leaving water temperature control is automatically turned ON. |
| Main (+ additional) leaving water temperature control | Room temperature control is NOT automatically turned ON. |
| If you turn OFF... Then... | |
| Room temperature control Main (+ | additional) leaving water temperature control is NOT automatically turned OFF. |
| Main (+ additional) leaving water temperature control | Room temperature control is automatically turned OFF. |
To check if a control is turned ON or OFF
1 Go to the home page of the control. Example: Room temperature home page (Room).
2 Check if the LED is ON or OFF. Note: If the control is turned OFF, OFF is also displayed on the screen.
To turn ON or OFF the room temperature control
1 Go to the room temperature home page (Room).
2 Press .
To turn ON or OFF the leaving water temperature (main + additional) control
1 Go to one of the following the home pages:
- Main leaving water temperature home page (LWT main)
- Additional leaving water temperature home page (LWT add)
2 Press .
To turn ON or OFF the domestic hot water control
1 Go to the DHW tank temperature home page (Tank).
2 Press .
4.4 Space heating control
4.4.1 About space heating control
Controlling space heating typically consists of the following stages:
1 Setting the space operation mode
2 Controlling the temperature
Depending on the system layout and installer configuration, you use a different temperature control:
- Room thermostat control (linked or NOT linked to leaving water temperature)
- Leaving water temperature control
- External room thermostat control
4.4.2 Setting the space operation mode
About space operation modes
The heat pump is a heating only model. The system can heat up a space, but NOT cool down a space.
4.4.3 Determining which temperature control you are using
To determine which temperature control you are using (method 1)
Check the installer settings table filled in by the installer.
To determine which temperature control you are using (method 2)
If you have 2 user interfaces, perform the following procedure on the user interface at the indoor unit.
Prerequisite: You switched the permission level to Advanced end user.
1 Press Multiple times to switch between home pages, and check if the additional leaving water temperature home page (LWT add) is available:
| If ... | Then you have... |
| Available | A main zone and an additional zone |
| NOT available | Only a main zone |
| Typical additional leaving water temperature home page: | |
| User profile = Basic | User profile = Detailed |
| Mon 15:20LWT add45°CDesired temperature | 45°C◆Mon 15:20LWT addDesired temperatureMon 17:30 |
2 Check the following:
| If... | Then the temperature control is... | |
| Main zone | Additional zone (if any) | |
| Room temperature is listed under: [6.1]: Information > Sensor information | Room thermostat control.Go to next step to check if leaving water set point and room temperature set point are linked. | External room thermostat control. |
| Thermostat main A is listed under: [6.5]: Information > Actuators | External room thermostat control. | |
| Else | Leaving water temperature control. | |
3 Only for room thermostat control: Go to the main leaving water temperature home page (LWT main) and check the following:
| Is ♦ displayed next to the set point? | Then leaving water set point and room temperature set point are... |
| Yes | NOT linked.You can set the leaving water set point on the home page. |
| No | Linked by their preset values. You can set the preset values in the menu structure. |
4.4.4 Room thermostat control - About room thermostat control
Room thermostat control means that you control the following:
- Room temperature of the main zone
- Leaving water temperature of the main zone
Room temperature of the main zone
To control the room temperature of the main zone, you can do the following:
| You can... Location | |
| Read out the actual and desired room temperature. | Room temperature home page |
| Temporarily overrule the room temperature schedule. | |
| Change the mode from scheduled to preset value.If you do this, you also have to define (in the menu structure):• Preset values• Overrule period (Temperature lock) | Room temperature home page if user profile = Detailed |
| Select which room temperature schedule you want to use. | Menu structure |
| Program schedules. | |
| Define preset values that are used by the room temperature schedule, and when you change the mode from scheduled to preset value. |
See also:
- "4.4.5 Room thermostat control - Using the room temperature home page" on page 7
- "To set the overrule period" on page 8
- "4.7 Preset values and schedules" on page 16
Leaving water temperature of the main zone
To control the leaving water temperature of the main zone, you can do the following:
| You can... Location | |
| Read out the desired leaving water temperature. | Leaving water temperature home page (main) |
| Adjust the leaving water temperature. | |
| Condition: Leaving water set point is NOT linked with the room temperature set point. | |
| Only change this if the desired room temperature cannot be reached. | |
| Define preset values. | Menu structure |
| Condition: Leaving water set point is linked with the room temperature set point. | |
| Only change this if the desired room temperature cannot be reached. |
See also:
- "4.4.6 Room thermostat control - Using the leaving water temperature home pages" on page 9
- "4.7 Preset values and schedules" on page 16
4.4.5 Room thermostat control - Using the room temperature home page
Typical room temperature home pages
Depending on the user profile, the user interface gives you either a basic or a detailed home page. To set the user profile, refer to "4.6.6 Configuring user profile and home pages" on page 16.
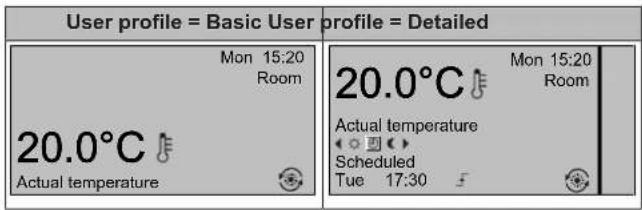
To read out the actual and desired room temperature
1 Go to the room temperature home page (Room).
Result: You can read out the actual temperature.
20.0°C
Actual temperature
2 Press . OK
Result: You can read out the desired temperature.
22.0°C
Desired temperature
To temporarily overrule the room temperature schedule
1 Go to the room temperature home page (Room).
2 Use 🔒 to 📄 just the temperature.
To change the mode from scheduled to preset value
Prerequisite: User profile = Detailed.
1 Go to the room temperature home page (Room).
2 Press to elect a preset value ( or ).
Result: The mode will return to Scheduled according to the overrule period.
Example: Temporarily overruling the schedule AND changing the mode to preset value
You have configured the following settings:
| Settings | Description | |
| Preset values | Comfort (heating) = 20°C | Desired temperature when you are at home. |
| Eco (heating) = 18°C | Desired temperature: ·When you are away ·During the night | |
| Settings | Description | |
| Preset values | Comfort (heating) = 20°C | Desired temperature when you are at home. |
| Eco (heating) = 18°C | Desired temperature: ·When you are away ·During the night | |
4 Operation
| Settings Description | ||
| Schedule 07:00 | Comfort You are at home. | Desired temperature = preset value (Comfort (heating)). |
| 09:00 Eco You are away. | Desired temperature = preset value (Eco (heating)). | |
| 17:00 Comfort You are at home. | Desired temperature = preset value (Comfort (heating)). | |
| 19:00 21°C You are at home and want it to be a little warmer. | Desired temperature = custom temperature. | |
| 23:00 Eco Desired temperature = preset value (Eco (heating)). | ||
| Overrule period (Temperature lock) | 2 hours If you temporarily overrule the schedule by a preset value, after 2 hours the schedule will be used again. | |
If user profile = Basic, then you can temporarily overrule the room temperature schedule by pressing ▲. ▼
| Situation Description | |
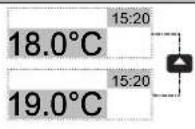 | 15:20 => Scheduled temperature = preset value (Eco (heating)) = 18°C.You temporarily overrule the schedule.Desired temperature = custom temperature = 19°C.At the next scheduled action (17:00), the schedule will be used again. |
If user profile = Detailed, then you can:
- Temporarily overrule the room temperature schedule by pressing ▲ (same as if user profile = Basic)
- Change the mode from scheduled to a preset value by pressing or
| Situation Description | |
| Room temperature schedule is used.15:20 => Desired temperature = preset value (Eco (heating)) = 18°C.The next scheduled action is at 17:00 and the desired temperature will then increase. | |
| Situation Description | ||
| 18.0°CScheduledMon 17:00 | 19.0°CScheduledMon 17:00 | You temporarily overrule the schedule.Desired temperature = custom temperature = 19°C.At the next scheduled action (17:00), the schedule will be used again. |
| 18.0°CScheduledMon 17:00 | 20.0°CScheduledMon 17:20 | You change the mode from scheduled to preset value (Comfort (heating)).Desired temperature = preset value (Comfort (heating)) = 20°C.After 2 hours, the schedule will be used again (17:20 => 20°C). |
| 20.0°CScheduledMon 17:20 | 21.0°CScheduledMon 17:20 | Before you have changed the mode from scheduled to preset value, and now you temporarily overrule the preset value.Desired temperature = custom temperature = 21°C.After 2 hours, the schedule will be used again (17:20 => 20°C). |
To set the overrule period
Prerequisite: You switched the permission level to Advanced end user.
1 Go to [7.2]: user settings > Temperature lock.
2 Select a value and press : OK
- Permanent
- hours (2, 4, 6, 8)
Usage example: You have a party
If you are in the following situation:
- You are using the following room temperature schedule:
- 17:00 preset value (Comfort) = 20°C
- 23:00 preset value (Eco) = 18°C
- Tonight you have a party and you want to use the preset value (Comfort) until 02:00.
Then you can do the following:
1 Set the overrule period (Temperature lock) to 6 hours.
2 At 20:00, go to the room temperature home page (Room).
3 Press 1 select.
Result: The preset value (Comfort) will be used until 02:00. After that, the schedule will be used again.
Usage example: You go away for a couple of hours
If you are in the following situation:
- You are using the following room temperature schedule:
- 08:00 preset value (Comfort) = 20°C
- 23:00 preset value (Eco) = 18°C
- At 14:00, you go away for 3 hours.
Then you can do the following:
1 Set the overrule period (Temperature lock) to 2 hours.
2 Go to the room temperature home page (Room).
3 Press Select.
Result: For the next 2 hours, the room will NOT be heated to the scheduled 20^ C, but to the preset value (Eco = 18^ C). After the 2 hours, the room will heat up again to the scheduled 20^ C.
Advantage:
You save energy because you do NOT heat the room unnecessary, and by the time you come home the room is warm again.
4.4.6 Room thermostat control - Using the leaving water temperature home pages

INFORMATION
The leaving water is the water that is sent to the heat emitters. The desired leaving water temperature is set by your installer in accordance with the heat emitter type.
Example: Underfloor heating is designed for lower leaving water temperature than radiators and heat pump convectors and/or fan coil units. You only have to adjust leaving water temperature settings in case of problems.
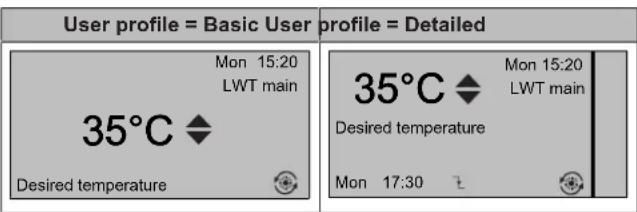
Typical leaving water temperature home pages
Main zone:
Additional zone:
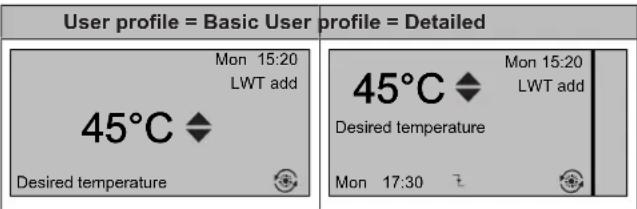
To read out the desired leaving water temperature (main + additional)
Go to the leaving water temperature home page (LWT main or LWT add).
To adjust/overrule the leaving water temperature (NOT linked to room temperature setpoint)

INFORMATION
To see if the leaving water temperature setpoint is linked to the room temperature setpoint, see "4.4.3 Determining which temperature control you are using" on page 6.
To adjust the leaving water temperature (main)
1 Go to the main leaving water temperature home page (LWT main).
2 Press

or
adju
st. Example:
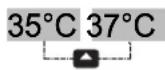

INFORMATION
In case of weather dependency, an offset value can be modified.
To adjust the leaving water temperature (additional)
1 Go to the additional leaving water temperature home page (LWT add).
2 Press

or
adjust. Example:
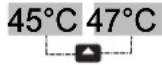

INFORMATION
In case of weather dependency, an offset value can be modified.
To adjust/overrule the leaving water temperature (linked to room temperature setpoint)

INFORMATION
To see if the leaving water temperature setpoint is linked to the room temperature setpoint, see "4.4.3 Determining which temperature control you are using" on page 6.
To set leaving water temperature preset values (main)

INFORMATION
You cannot adjust/overrule the leaving water temperature (main) for room thermostat control with linked leaving water temperatures. However if necessary, you can adjust the desired leaving water temperature (main) by adjusting preset values.

INFORMATION
Adjusting the leaving water temperature is permanent unless the leaving water temperature is according to a schedule. In that case the overruling is valid until the next scheduled action.
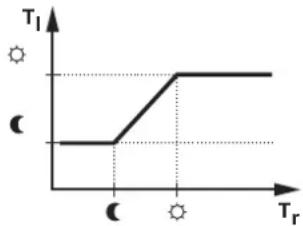
1 Go to [7.4.2]:

User settings > Preset values > LWT main.
2 Set the Preset values according to following graph.
Example: Room thermostat comfort temperature will correspond with leaving water comfort temperature.
line
| T_r | T_l | | --- | --- | | 0 | 0 | | 1 | 0 | | 2 | 2 | | 3 | 2 | | 4 | 2 | | 5 | 2 | | 6 | 2 | | 7 | 2 | | 8 | 2 | | 9 | 2 | | 10 | 2 | | 11 | 2 | | 12 | 2 | | 13 | 2 | | 14 | 2 | | 15 | 2 | | 16 | 2 | | 17 | 2 | | 18 | 2 | | 19 | 2 | | 20 | 2 | | 21 | 2 | | 22 | 2 | | 23 | 2 | | 24 | 2 | | 25 | 2 | | 26 | 2 | | 27 | 2 | | 28 | 2 | | 29 | 2 | | 30 | 2 | | 31 | 2 | | 32 | 2 | | 33 | 2 | | 34 | 2 | | 35 | 2 | | 36 | 2 | | 37 | 2 | | 38 | 2 | | 39 | 2 | | 40 | 2 | | 41 | 2 | | 42 | 2 | | 43 | 2 | | 44 | 2 | | 45 | 2 | | 46 | 2 | | 47 | 2 | | 48 | 2 | | 49 | 2 | | 50 | 2 | | 51 | 2 | | 52 | 2 | | 53 | 2 | | 54 | 2 | | 55 | 2 | | 56 | 2 | | 57 | 2 | | 58 | 2 | | 59 | 2 | | 60 | 2 | | 61 | 2 | | 62 | 2 | | 63 | 2 | | 64 | 2 | | 65 | 2 | | 66 | 2 | | 67 | 2 | | 68 | 2 | | 69 | 2 | | 70 | 2 | | 71 | 2 | | 72 | 2 | | 73 | 2 | | 74 | 2 | | 75 | 2 | | 76 | 2 | | 77 | 2 | | 78 | 2 | | 79 | 2 | | | |- T_r : Room temperature
- T_1 : Leaving water temperature
3 Press

or
adjust/overrule.
To adjust the leaving water temperature (additional)
1 Go to the additional leaving water temperature home page (LWT add).
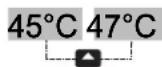
2 Press

or ▼ adjust. Example:


INFORMATION
In case of weather dependency, an offset value can be modified.
4.4.7 Leaving water temperature control - About leaving water temperature control
Leaving water temperature control means that you only control the leaving water temperature. To control the leaving water temperature, you can do the following:
4 Operation
| You can... Location | |
| Read out the desired leaving water temperature (main + additional). | Leaving water temperature home pages (main + additional) |
| Adjust/overrule the leaving water temperature (main).Adjust the leaving water temperature (additional). | |
| Select which leaving water temperature schedule (main + additional) you want to use. | Menu structure |
| Program leaving water temperature schedule (main + additional). | |
| Define preset values that are used by the leaving water temperature schedule (main). |
See also:
- "4.4.6 Room thermostat control - Using the leaving water temperature home pages" on page 9
- "4.7 Preset values and schedules" on page 16
4.4.8 Leaving water temperature control - Using leaving water temperature control according to a schedule
To set leaving water temperature preset values (main)

INFORMATION
Adjusting the leaving water temperature is permanent unless the leaving water temperature is according to a schedule. In that case the overruling is valid until the next scheduled action.
1 Go to [7.4.2]: >user settings > Preset values > LWT main.
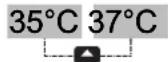
2 Press to overrule. Example:
To adjust the leaving water temperature (additional)
1 Go to the additional leaving water temperature home page (LWT add).
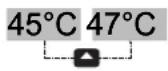
2 Press to just. Example:

INFORMATION
In case of weather dependency, an offset value can be modified.
4.4.9 Leaving water temperature control - Using leaving water temperature control NOT according to a schedule
To adjust the leaving water temperature (main)
1 Go to the main leaving water temperature home page (LWT main).
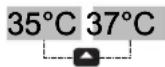
2 Press to adjust. Example:
To adjust the leaving water temperature (additional)
1 Go to the additional leaving water temperature home page (LWT add).
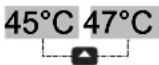
2 Press
to just. Example:

INFORMATION
In case of weather dependency, an offset value can be modified.
4.4.10 External room thermostat control - About external room thermostat control
External room thermostat control means that you control the following:
- Room temperature on the external thermostat control
- Leaving water temperature on the user interface (Daikin)
To control the leaving water temperature, you can do the following:
| You can... Location | |
| Read out the desired leaving water temperature. | Leaving water temperature home pages (main + additional) |
| Adjust the desired leaving water temperature. | |
| Only change this if the desired room temperature cannot be reached. |
See also: "4.4.6 Room thermostat control - Using the leaving water temperature home pages" on page 9
4.4.11 External room thermostat control - Using external room thermostat control
To adjust the leaving water temperature (main)
1 Go to the main leaving water temperature home page (LWT main).
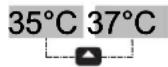
2 Press to adjust. Example:
To adjust the leaving water temperature (additional)
1 Go to the additional leaving water temperature home page (LWT add).


INFORMATION
In case of weather dependency, an offset value can be modified.
4.5 Domestic hot water control

CAUTION
Only for EHVH_SU_CB6W models.
When using the domestic hot water tank to produce hot water, do NOT turn OFF the heat pump. Reason: the electrical backup heater from the space heating circuit is used during disinfection of the domestic hot water tank.
4.5.1 About domestic hot water control
Depending on the DHW tank mode (installer setting), you use a different domestic hot water control:
- Reheat mode
- Scheduled mode
- Scheduled + reheat mode

CAUTION
The booster heater permission schedule is used to restrict or allow booster heater operation based on a weekly program. Advice: In order to avoid unsuccessful disinfection function, at least allow the booster heater (by the weekly program) for minimum 4 hours starting from the scheduled start-up of disinfection. If the booster heater is restricted during disinfection, this function will NOT be successful and the applicable warning AH will be generated.

INFORMATION
In case of error code AH and no interruption of the disinfection function occurred due to domestic hot water tapping, following actions are recommended:
- When the Domestic hot water > Type > Reheat or Reheat + sched. is selected, it is recommended to program the start-up of the disinfection function at least 4 hours later than the last expected large hot water tapping. This start-up can be set by installer settings (disinfection function).
- When the Domestic hot water > Type > Scheduled only is selected, it is recommended to program a Storage eco 3 hours before the scheduled start-up of the disinfection function to preheat the tank.
To determine which DHW tank mode you are using (method 1)
Check the installer settings table filled in by the installer.
To determine which DHW tank mode you are using (method 2)
Prerequisite: User profile = Detailed.
1 Go to the DHW tank temperature home page (Tank).
2 Check which icons are displayed:
| If... is displayed Then the DHW tank mode =... | |
| Reheat mode | |
| Scheduled mode | |
| Scheduled + reheat mode | |
4.5.2 Reheat mode
In reheat mode ( ), the DHW tank continuously heats up to the temperature shown on the DHW tank temperature home page (example: 50°C).
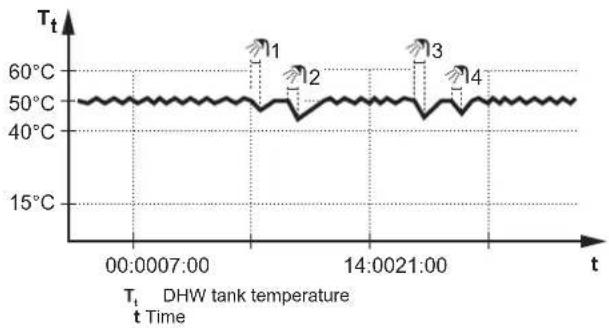
line
| Time | Tt (°C) | | ----------------- | ------- | | 00:00:07:00 | ~50 | | 14:00:21:00 | ~50 | | 14:00:21:00 | ~50 |
INFORMATION
There is a risk of space heating capacity shortage/comfort problem (in case of frequent domestic hot water operation, frequent and long space heating interruption will happen) when selecting [6-0D]=0 ([A.4.1] Domestic hot water Type=Reheat only).

INFORMATION
When the DHW tank mode is reheat, the risk for capacity shortage and comfort problem is significant. In case of frequent reheat operation, space heating function is regularly interrupted.
In reheat mode, you can do the following:
| You can... | Location |
| Read out the desired reheat temperature. | DHW tank temperature home page |
| Adjust the reheat temperature. | |
| Condition: ♦ is displayed on the DHW tank temperature home page. | |
| Activate the DHW tank booster mode. | |
| Program a booster heater allowance schedule to restrict when the booster heater can operate. | Menu structure |
| Example: Only allow the booster heater to operate during the night. | |
| (Only for field supplied domestic hot water pump for secondary return) | |
| Program a domestic hot water pump schedule to determine when to turn ON and OFF the pump. | |
| When turned ON, the pump runs and makes sure hot water is instantly available at the tap. To save energy, only turn ON the pump during periods of the day when instant hot water is necessary. |
See also:
- "4.5.5 Using the DHW tank temperature home page" on page 12
- "4.5.6 Using the DHW tank booster mode" on page 13
- "4.7 Preset values and schedules" on page 16
4.5.3 Scheduled mode
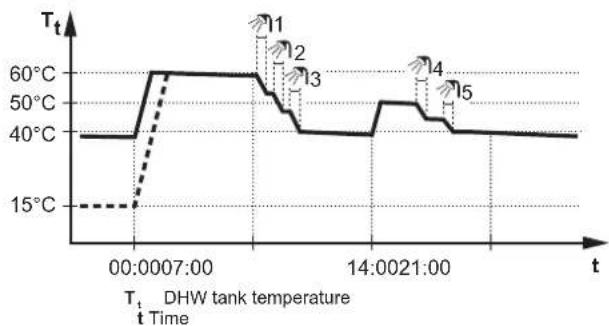
In scheduled mode (2), the DHW tank produces hot water corresponding to a schedule. The best time to allow the tank to produce hot water is at night, because the space heating demand is lower.
Example:
line
| t | Tt | | -------------- | ------ | | 00:00:07:00 | 60°C | | 14:00:21:00 | 40°C |- Initially, the DHW tank temperature is the same as the temperature of the domestic water entering the DHW tank (example: 15°C).
4 Operation
- At 00:00 the DHW tank is programmed to heat up the water to a preset value (example: Storage comfort = 60^ ).
- During the morning, you consume hot water and the DHW tank temperature decreases.
- At 14:00 the DHW tank is programmed to heat up the water to a preset value (example: Storage eco = 50^ ). Hot water is available again.
- During the afternoon and evening, you consume hot water again and the DHW tank temperature decreases again.
- At 00:00 the next day, the cycle repeats.
In scheduled mode, you can do the following:
| You can... Location | |
| Read out the active or next scheduled desired temperature. | DHW tank temperature home page |
| Overrule the active or next scheduled desired temperature. | |
| Condition: ♦ is displayed on the DHW tank temperature home page. | |
| Activate the DHW tank booster mode. | |
| Select a DHW tank temperature schedule. Menu structure | |
| Program a DHW tank temperature schedule. | |
| Define preset values that are used by the DHW tank temperature schedule. | |
| Program a booster heater allowance schedule to restrict when the booster heater can operate. | |
| Example: Only allow the booster heater to operate during the night. | |
| (Only for field supplied domestic hot water pump for secondary return) | |
| Program a domestic hot water pump schedule to determine when to turn ON and OFF the pump. | |
| When turned ON, the pump runs and makes sure hot water is instantly available at the tap. To save energy, only turn ON the pump during periods of the day when instant hot water is necessary. | |
See also:
- "4.5.5 Using the DHW tank temperature home page" on page 12
- "4.5.6 Using the DHW tank booster mode" on page 13
- "4.7 Preset values and schedules" on page 16
4.5.4 Scheduled + reheat mode
In scheduled + reheat mode ( ), the domestic hot water control is the same as in scheduled mode. However, when the DHW tank temperature drops below a preset value (=reheat tank temperature – hysteresis value; example: 35°C), the DHW tank heats up until it reaches the reheat set point (example: 45°C). This ensures that a minimum amount of hot water is available at all times.
Example:
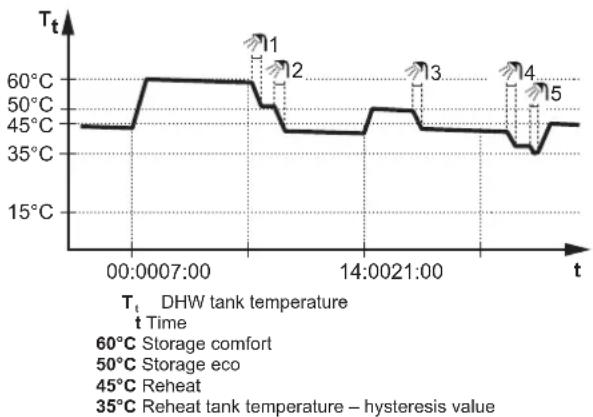
line
| Time | Temperature (°C) | | ----------------- | ---------------- | | 00:00:07:00 | 60 | | 14:00:21:00 | 45 | | 14:30:21:00 | 50 | | 14:30:31:00 | 45 |In scheduled + reheat mode, you can do the following:
| You can... Location | |
| Do the same things as in scheduled mode. — | |
| Adjust the preset value (Reheat). Menu structure |
See also:
- "4.5.3 Scheduled mode" on page 11
- "4.7 Preset values and schedules" on page 16
4.5.5 Using the DHW tank temperature home page
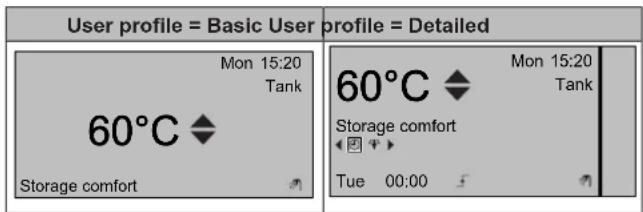
Typical DHW tank temperature home pages
Depending on the user profile, the user interface gives you either a basic or a detailed home page. The examples in the illustrations below are in DHW tank mode = Scheduled.
To read out and adjust the desired reheat temperature (in scheduled and reheat mode)
1 Go to [7.4.3.3]: 📋 > User settings > Preset values > Tank temperature > Reheat.
Result: You can read out the desired reheat temperature.
2 Press ▲ or ▼ to adjust.
To read out and overrule the active or next scheduled desired temperature (in scheduled mode or scheduled + reheat mode)
1 Go to the DHW tank temperature home page (Tank).
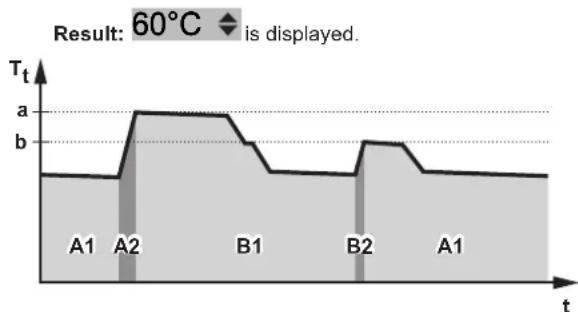
area
Result: 60°C is displayed. | Time Point | Value | | :--- | :--- | | A1 | b | | A2 | b | | B1 | b | | B2 | b | | A1 | b || During period... You can read out... | |
| A1 The next scheduled | action (a) |
| A2 The active action (a) | |
| B1 The next scheduled | action (b) |
| B2 The active action (b) | |
2 Press d to overrule. Note: If the desired temperature is weather dependent, you cannot change it on the home page.
Usage example: You need more hot water than scheduled
If you are in the following situation:
- Current time = 10:30
- Next scheduled action of the DHW tank = Heat up to the preset value (Eco; example: 55°C and sufficient for 2 persons) at 14:00
- This evening you need hot water for 3 persons
Then you can do the following:
1 Go to the DHW tank temperature home page (Tank).
2 Overrule the next scheduled action by changing from 55°C to 60°C.
Advantages:
- You will have sufficient hot water (= comfortable).
- You do NOT have to change the schedule (= easy).
- You do NOT have to activate the DHW tank booster mode (= energy saving).
You can use the DHW tank booster mode to immediately start heating up the water to the preset value (Storage comfort). However, this consumes extra energy.
To check if the DHW tank booster mode is active
1 Go to the DHW tank temperature home page (Tank).
2 Check the following:
- In user profile = Basic: If is displayed, the DHW tank booster mode is active.
- In user profile = Detailed: If is selected, the DHW tank booster mode is active.
To activate the DHW tank booster mode (user profile = Basic)
1 Go to the DHW tank temperature home page (Tank).
2 Press For more than 5 seconds.
To activate the DHW tank booster mode (user profile = Detailed)
1 Go to the DHW tank temperature home page (Tank).
2 Press to select
Usage example: You immediately need more hot water
If you are in the following situation:
- You already consumed most of your hot water.
- You cannot wait for the next scheduled action to heat up the DHW tank.
Then you can activate the DHW tank booster mode.
Advantage: The DHW tank immediately starts heating up the water to the preset value (Storage comfort).

INFORMATION
When the DHW tank booster mode is active, the risk of space heating and capacity shortage comfort problems is significant. In case of frequent domestic hot water operation, frequent and long space heating interruptions will happen.
4.6 Advanced usage
4.6.1 About changing the user permission level
The amount of information you can read out in the menu structure depends on your user permission level:
- End user (= default)
- Adv. end user: You can read out more information.
To set the user permission level to Advanced end user
1 Go to the main menu or any of its submenus:
2 Press ☐ for more than 4 seconds.
Result: The user permission level switches to Adv. end user. Additional information is displayed and "+" is added to the menu title. The user permission level will stay in Adv. end user until set otherwise.
To set the user permission level to End user
1 Press 📄 for more than 4 seconds.
Result: The user permission level switches to End user. The user interface will return to the default home screen.
4.6.2 Using quiet mode
About quiet mode
You can use quiet mode to decrease the sound of the outdoor unit. However, this also decreases the heating capacity of the system. There are multiple quiet mode levels.
You can:
- Completely deactivate quiet mode
- Manually activate a quiet mode level until the next scheduled action
- Use and program a quiet mode schedule
Possible quiet mode levels
- For EHVH04+08
| Level | Description |
| Level 1 | Most quiet. Under all circumstances, performance will be reduced. |
| Level 2 | Medium quiet. Under all circumstances, reduced performance is possible. |
| Level 3 | Least quiet. At colder ambient conditions, reduced performance can be happen. |
- For EHVH11+16
| Level | Description |
| Level 1 | Most quiet. Under all circumstances, performance will be reduced. |
To check if quiet mode is active
1 Press 📁 to go to one of the home pages.
2 If is displayed, quiet mode is active.
To use quiet mode
Prerequisite: You switched the permission level to Advanced end user.
1 Go to [3]: Quiet mode.
4 Operation
2 Do one of the following:
| If you want to... Then... | |
| Completely deactivate quiet mode | Select Always OFF and press OK. |
| Manually activate a quiet mode level | Select On and press Go to [7.4.4]: User settings > Preset values > Quiet level.Select a level and press OK |
| Use and program a quiet mode schedule | Select Automatic and press OK.Program a schedule. See "4.7.2 Using and programming schedules" on page 17. |
Usage example: Baby is sleeping in the afternoon
If you are in the following situation:
- You have programmed a quiet mode schedule:
- During the night: Level 1 (= most quiet).
- During the day: OFF to ensure the heating capacity of the system.
- However, during the afternoon the baby is sleeping and you want it to be quiet.
Then you can do the following:
Prerequisite: You switched the permission level to Advanced end user.
1 Go to [3]: > quiet mode.
2 Select On and press . OK
3 Go to [7.4.4]: >user settings > Preset values > Quiet level.
4 Select Level 1 and press . OK
Advantage:
The outdoor unit runs in its most quiet level.
4.6.3 Using holiday mode
About holiday mode
During your holiday, you can use the holiday mode to deviate from your normal schedules without having to change them. You can only use holiday mode if temperature control = room thermostat control. See also "4.4.3 Determining which temperature control you are using" on page 6.
Using holiday mode typically consists of the following stages:
1 Configuring the holiday for one of the following situations:
| Situation Then.. | |
| You stay at home during your holiday | You have to select a day: space heating will be according to the desired room temperature of the selected day. |
| Situation Then.. | |
| You go away during your holiday | You have to configure space heating settings. ·Space heating will be according to these settings. ·Domestic hot water operation can be turned ON or OFF. If you decide to turn it OFF, disinfection mode will remain active. |
2 Activating the holiday mode.
- If you do NOT activate, the configured holiday settings will NOT be used.
- If you activate:
| Period | Then... |
| Before and after your holiday | Your normal schedules will be used. |
| During your holiday | The configured holiday settings will be used. |
To check if holiday mode is activated and/or running
1 Press go to one of the home pages.
2 Check the following:
| If... is displayed | Then... |
| One of the following holiday modes is activated: ·Holiday mode (Away) is activated, but NOT running yet. ·Holiday mode (Home) is activated. You cannot see if the holiday mode is already running. | |
| Holiday mode (Away) is activated and running. |
To configure the holiday (when you stay at home)
Prerequisite: You switched the permission level to Advanced end user.
1 Go to [2.2]: Holiday > Holiday mode.
2 Select Home.
3 Configure the holiday mode settings (when you stay at home).
4 Activate the holiday mode.
Possible holiday mode settings (when you stay at home)
| Setting | Description |
| From and Until | First and last day of your holiday. |
| Use day schedule | Day schedule used during your holiday.Example: Saturday |

INFORMATION
Switch to Adv. end user if you want to change the Use day schedule setting.
To configure the holiday (when you go away)
Prerequisite: You switched the permission level to Advanced end user.
1 Go to [2.2]: Holiday > Holiday mode.
2 Select Leave.
3 Configure the holiday mode settings (when you go away).
4 Activate the holiday mode.
Possible holiday mode settings (when you go away)
| Setting Description | |
| From and Until First and last day of your holiday. | |
| Operation mode | Operation mode used during your holiday. |
| Heating Set point | used during your holiday when the unit is operating in heating mode. |
| DHW Turn ON or | OFF domestic hot water operation during your holiday. |

INFORMATION
You can only change the From and Until settings in the End user level. For changing the other settings, you have to switch to Adv. end user level.
To activate or deactivate the holiday mode
Prerequisite: You have configured the holiday.
1 Go to [2.1]: >Holiday > Holiday.
2 Do one of the following:
- To activate, select Yes and press .OK
- To deactivate, select No and press .OK
Usage example: You go away during the winter
If you are in the following situation:
- In 2 days, you go away for 2 weeks during the winter.
- You want to save energy, but prevent your house from freezing.
Then you can do the following:
Prerequisite: You switched the permission level to Advanced end user.
1 Configure the holiday. Go to [2]: 📋 Holiday, and configure the following settings:
| Setting Value | |
| Holiday mode Away | |
| From 2 February 2014 | |
| Until 16 February 2014 | |
| Operation mode | Heating |
| Heating | 12°C |
2 Activate the holiday mode.
- Go to [2.1]: Holiday > Holiday.
- Select Yes and press .OK
Advantage:
- Before and after your holiday, your normal schedule will be used.
- During your holiday, you save energy and prevent your house from freezing.
Usage example: You come home during your holiday
If you are in the following situation:
- You configured and activated the holiday mode (Away).
- During your holiday, you come home for a few hours and want to use your normal schedule.
Then you can do the following:
1 Deactivate the holiday mode.
2 When you go away again, activate the holiday mode again.
Advantage:
You do NOT have to change your schedule or holiday configuration.
4.6.4 Reading out information
To read out information
Prerequisite: You switched the permission level to Advanced end user.
1 Go to [6]: Information.
Possible read-out information
| In menu... | You can read out... |
| [6.1] Sensor information | Room, tank or DHW, outside, and leaving water temperature. (If applicable) |
| [6.2] Energy metering | Produced energy, consumed electricity, and consumed gas. |
| [6.3] Error handling | Error history and contact/helpdesk number. |
| [6.4] User permission level | Current user permission level. |
| [6.5] Actuators | Status/mode of each actuator.Example:Domestic hot water pump ON/OFF. |
| [6.6] Operation modes | Current operation mode.Example:Defrost/oil return mode. |
| [6.7] Running hours | Running hours of the system. |
| [6.8] Version | Version information about the system. |
4.6.5 Configuring date, time, units of measurement, contrast and backlight
To configure time and date
Prerequisite: You switched the permission level to Advanced end user.
1 Go to [1]: Set time/date.

INFORMATION
Switch to Adv. end user to change daylight saving time and 12/24h notation.
To configure units of measurement
Prerequisite: You switched the permission level to Advanced end user.
1 Go to [7.6]: User settings > Unit of measurement.
Possible units of measurement settings
| Setting | Possible units of measurement |
| Decimal point | • Dot• Comma |
| Temperature | • °C• °F |
| Produced energy | • kWh• MBtu |
| Flow | • l/min• GPM |
To configure the contrast of the user interface
Prerequisite: You switched the permission level to Advanced end user.
1 Go to [7.1.1]: User settings > Display > Contrast.
4 Operation
To configure the backlit LCD time of the user interface
Prerequisite: You switched the permission level to Advanced end user.
1 Go to [7.1.2]: User settings > Display > Backlit LCD time.
4.6.6 Configuring user profile and home pages
To set a user profile
Prerequisite: You switched the permission level to Advanced end user.
1 Go to [7.1.3]: User settings > Display > User profile.
2 Select a user profile and press . OK
Possible user profiles
If user profile = Detailed, you can see and do more on the home pages.
| User profile Example | |
| Basic | 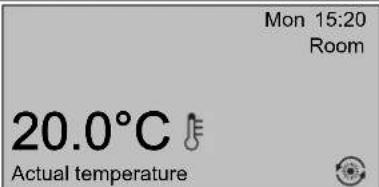 |
| Detailed | |
To configure which home pages are made available to the end user
Prerequisite: You switched the permission level to Advanced end user.
1 Go to [7.1.4]: User settings > Display > Available home pages.
Result: The home pages that are possible for your system layout are listed.
2 Select a home page and press . OK
3 Do one of the following:
- To display the home page, select Yes and press OK
- To hide the home page, select No and press OK
4.6.7 Locking and unlocking buttons and functions
About locking and unlocking
You can use the following locking modes:
- Button lock: Locks all buttons to prevent children from changing settings.
- Function lock: Locks a specific function to prevent people from changing its settings.
Possible function locks
| Lock If active, people cannot... | |
| Room On/OFF Turn ON or OFF the | the room temperature control. |
| LWT On/OFF Turn ON or OFF the | leaving water temperature (main + additional) control. |
| Lock If active, people cannot... | |
| Tank On/OFF Turn ON or OFF the domestic hot water control. | |
| Temperature up/down Adjust temperatures. | |
| Quiet mode Use quiet mode. | |
| Holiday | Use holiday mode. |
| Operation mode | Set the space operation mode. |
| User settings | Change settings in [7]: ☑User settings. |
To check if locking is active
1 Press go to one of the home pages.
2 If is displayed, button lock is active.
Note: If you are on a home page and try to use a function that is locked, 🔒 is displayed for 1 second.
To activate or deactivate button lock
1 Press go to one of the home pages.
2 Press OK more than 5 seconds.
To activate or deactivate a function lock
1 Press 📋 go to the menu structure.
2 Press more than 5 seconds.
3 Select a function and press . OK
4 Select Lock or Unlock, and press . OK
4.7 Preset values and schedules
4.7.1 Using preset values
About preset values
You can define preset values for multiple controls. Preset values make it easy to use the same value in many places (schedules and room temperature home page (☐ and ☐)). If you later want to change the value, you only have to do it in one place.
To define preset values
1 Go to [7.4]: user settings > Preset values.
2 Select for which control you want to define a preset value. Example: Room temperature.
3 Select a preset value and press OK. Example: Comfort (heating).
4 Select a temperature and press . OK
Possible preset values
| Control | Preset value | Where used |
| Room temperature | Comfort | · Room temperature schedules· Room temperature home page (◇ and ⬆) if user profile = Detailed |
| Eco | ||
| LWT main | Comfort | Main leaving water temperature schedules |
| Eco | ||
| Tank temperature | Storage comfort | DHW tank temperature schedule if DHW tank mode is· Scheduled· Scheduled + reheat |
| Storage eco | ||
| Reheat | DHW tank temperature schedule if DHW tank mode = Scheduled + reheat | |
| Control Preset value Where used | ||
| Quiet level Used when quiet mode is | set to On | |
| Elec price High | MediumLow | Only when the Bivalent setting is activated (installer setting). |
| Fuel price Only when the Bivalent | setting is activated (installer setting). | |
4.7.2 Using and programming schedules
About schedules
Depending on your system layout and installer configuration, schedules (predefined and/or user-defined) for multiple controls may be available.
You can:
- Select which schedules you currently want to use.
- Program your own schedules if the predefined schedules are not satisfactory. The actions you can program are control specific.
Possible actions per control
| Control Possible actions | |
| Room temperature | Program when to heat up a space:Comfort (preset value)Eco (preset value)[Custom temperature] |
| Main leaving water temperature | |
| Additional leaving water temperature | Program when the additional leaving water temperature is turned ON and OFF. |
| DHW tank temperature | Program when to heat up the DHW tank. The possible actions depend on an installer setting.Possible actions 1:Storage comfort (preset value) (a)Storage eco (preset value) (a)Storage stop (b) |
| Booster heater allowance | Program when the booster heater can operate.Example: Only allow the booster heater to operate during the night. |
| Quiet mode Program | when the unit has to use which quiet mode level:Level 1Level 2Level 3OFF |
| (Only for field supplied domestic hot water pump for secondary return)Domestic hot water pump | Program when the domestic hot water pump is turned ON and OFF. |
| Electricity price Program when a certain electricity tariff is valid. | |
(a) Start heating up until the desired setpoint (Comfort/Eco) is reached.
(b) Stop heating, even if the desired temperature is not reached yet; example: if electric tariffs are higher during the day, you can program a stop at 06:00.
To select which schedule you currently want to use
1 Go to [5]: Select schedules.
2 Select for which control you want to use a schedule. Example: [5.1] Room temperature.
3 Select for which operation mode you want to use a schedule. Example: [5.1.1] Heating.
4 Select a predefined or user-defined schedule and press . OK
To program a schedule
1 Go to [7.3]: User settings > Set schedules.
2 Open an empty, predefined or user-defined schedule.
3 Change it.
4 Save it.
Guidelines when programming
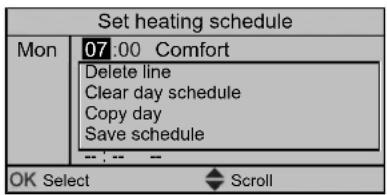
You can:
- Delete lines from the schedule
- Clear a day schedule
- Copy from one day to others
Usage example: You work in a 3-shift system
If you work in a 3-shift system, you can do the following:
1 Program 3 room temperature schedules in heating mode and give them appropriate names. Example: EarlyShift, DayShift and LateShift
2 Select the schedule that you currently want to use.
4.7.3 Schedules: Example

INFORMATION
The procedures to program other schedules are similar.
In this example:
- Room temperature schedule in heating mode
- Monday = Tuesday = Wednesday = Thursday = Friday
- Saturday = Sunday
To program the schedule
1 Go to [7.3.1.1]: 📋 > User settings > Set schedules > Room temp. > Set heating schedule.
2 Select Empty and press . OK
3 Program the schedule for Monday. See below for more details.
4 Copy from Monday to Tuesday, Wednesday, Thursday and Friday. See below for more details.
5 Program the schedule for Saturday.
6 Copy from Saturday to Sunday.
7 Save the schedule and give it a name. See below for more details.
To program the schedule for Monday
1 Use 📄 to ▼ect Monday.
2 Press to enter the schedule for Monday.
3 Program the schedule for Monday:
4 Operation
- Use 4d to lect an entry.
- Use ▲ and ▼ change the value of an entry.
To copy from one day to another
1 Select the day from which you want to copy and press OK. Example: Monday.
2 Select Copy day and press OK.
3 Set the days you want to copy to Yes and press OK. Example: Tuesday = Yes, Wednesday = Yes, Thursday = Yes and Friday = Yes.
To save the schedule
1 Press OK, select Save schedule and press OK
2 Select User defined 1, User defined 2 or User defined 3 and press OK.
3 Change the name and press OK. (Only applicable for room temperature schedules). Example: MyWeekSchedule
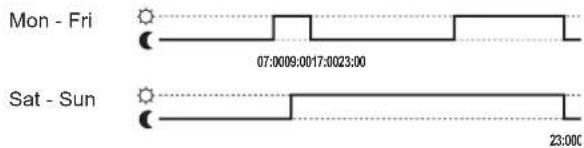
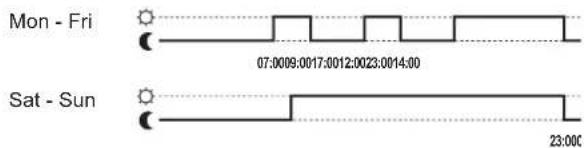
4.7.4 Predefined schedules: Room temperature + leaving water temperature (main)
☐: Desired temperature = Preset value (Comfort)
C: Desired temperature = Preset value (Eco)
Predefined 1
Predefined 2
Predefined 3

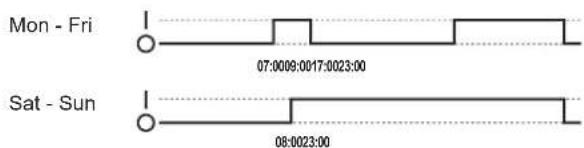
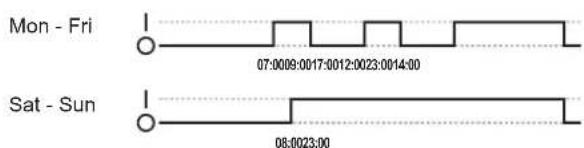
4.7.5 Predefined schedules: Leaving water temperature (additional)
I: Additional zone = On
O: Additional zone = OFF
Predefined 1
Predefined 2
Predefined 3

4.7.6 Predefined schedules: DHW tank temperature
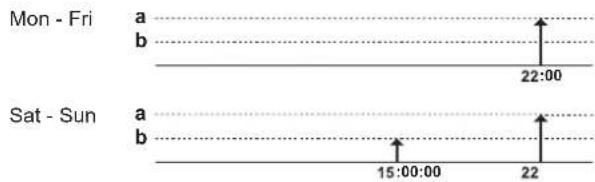
a Start production of domestic hot water. Desired DHW tank temperature = Preset value (Storage comfort) b Start production of domestic hot water. Desired DHW tank temperature = Preset value (Storage eco)
Predefined 1

Predefined 2

Predefined 3
4.8 Weather dependent operation
In space heating control, the leaving water temperature setpoint mode can be:
- Fixed
- Weather-dependent (the leaving water temperature is determined automatically depending on the outdoor temperature)
To select the setpoint mode, see the installer reference guide.
To set the parameters for the weather-dependent curve, see below.
4.8.1 To set the weather dependent settings
Prerequisite: You switched the permission level to Advanced end user.
1 Go to [7.7]: > User settings > Set weather dependent.
2 For main leaving water temperature zone [7.7.1], modify with 🏠, 🚡, 📌, 🙏, 🗑, 🟢, 🟣, 🟩, 🟪, 🟫, , , , , 🟰, , , , , , , , , , , , , , , , , , , , , , , , , , , , , , , , , , , , , 🟅, 🟅, 🟅, 🟅, 🟅, 🟅, 🟅, 🟅, 🟅, 🟅, 🟅, 🟅, 🟅, 🟅, 🟅, 🟅, 🟅, 🟅, 🟅, 🟅,
3 If applicable, for additional leaving water temperature zone [7.7.2], modify with 📋, 🚗, 🐃 and confirm with . OK
Set weather-dependent heating
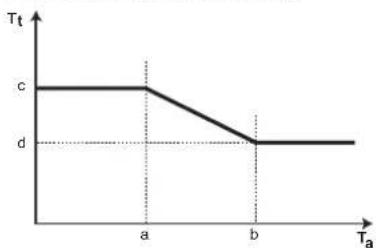
line
| Point | Ta | Tt | |---|---|---| | a | 0 | c | | b | 1 | d | | c | 2 | c | | d | 3 | d |T_t Target leaving water temperature
T. Outdoor temperature
a Low outdoor ambient temperature
b High outdoor ambient temperature
c Desired leaving water temperature when the outdoor temperature equals or drops below the low ambient temperature. Note: in heating, this value should be higher than (d) as for low outdoor temperatures warmer water is required.
d Desired leaving water temperature when the outdoor temperature equals or rises above the high ambient temperature. Note: in heating, this value should be lower than (c) as for high outdoor temperatures less warm water is required.
4.9 Menu structure: Overview user settings
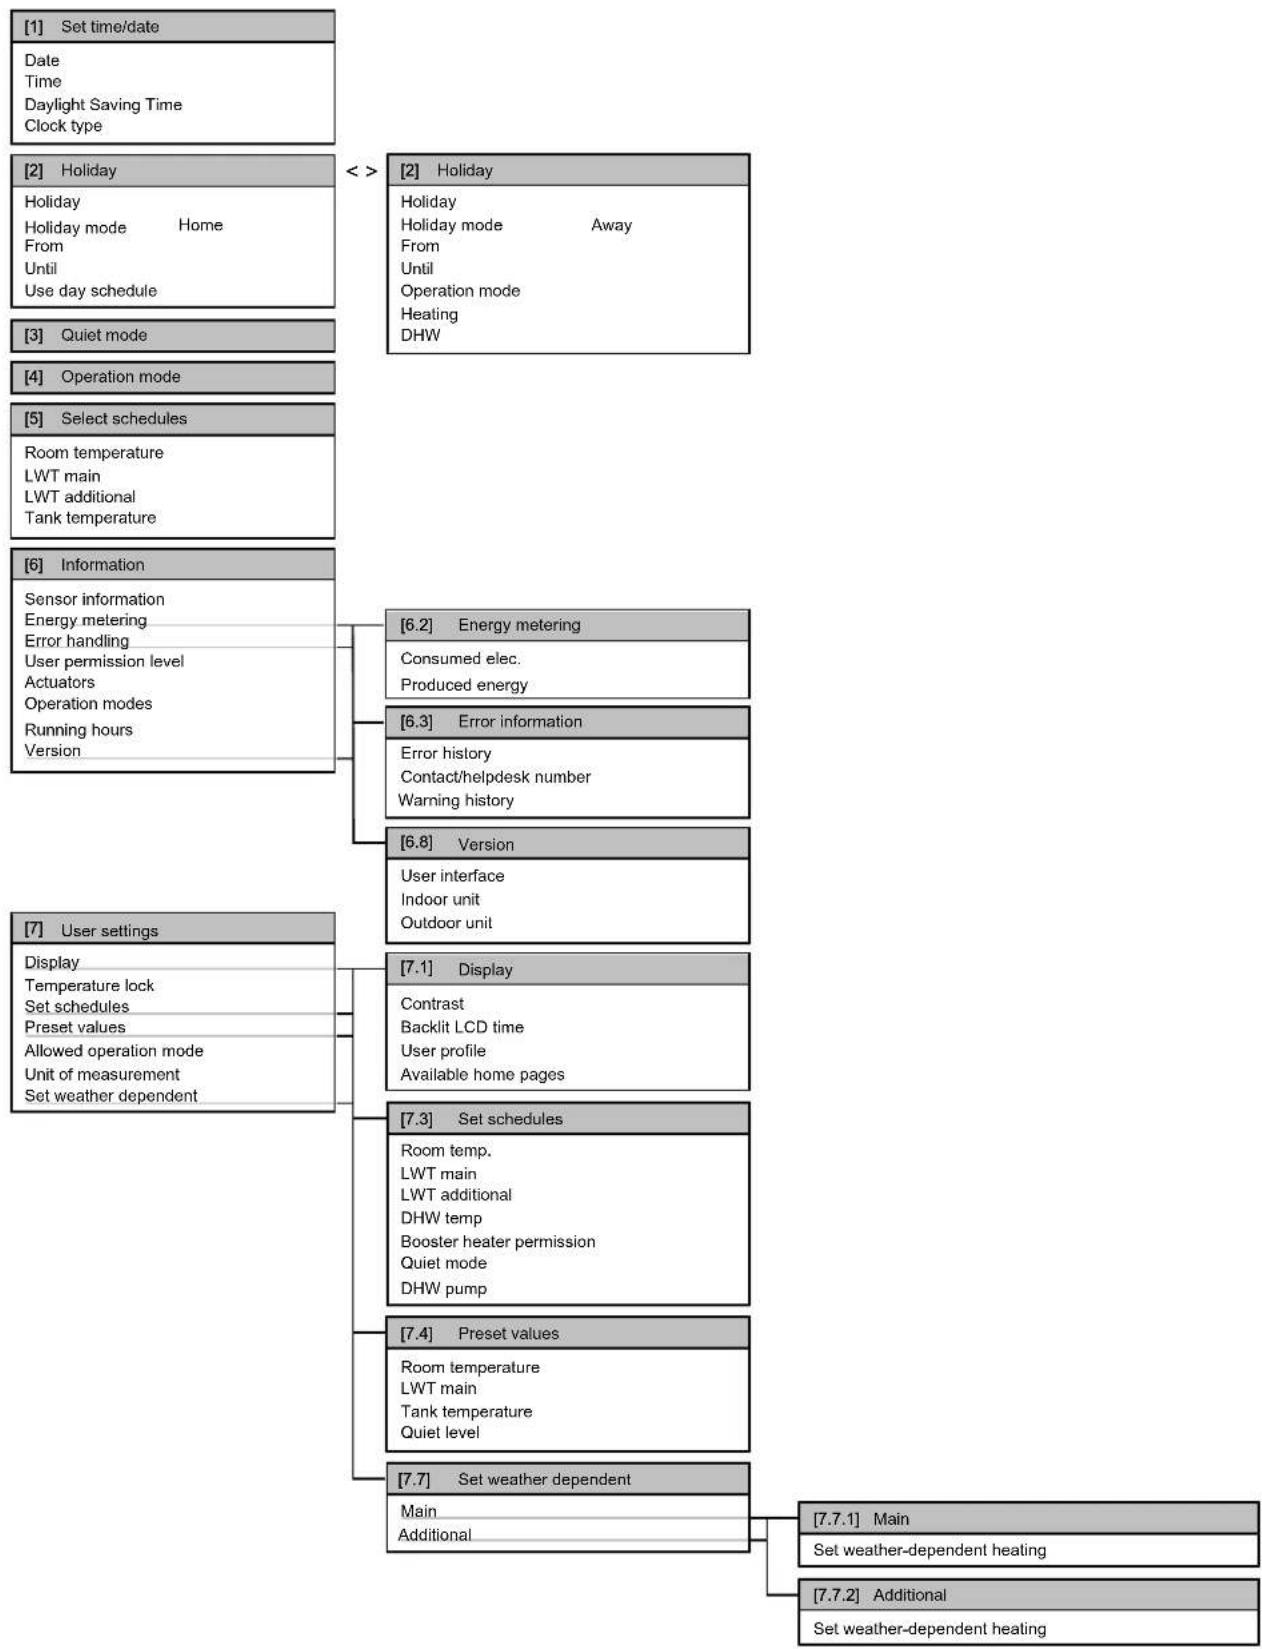
flowchart
graph TD
    A["[1"] Set time/date\nDate\nTime\nDaylight Saving Time\nClock type] --> B["[2"] Holiday\nHoliday\nHoliday mode Home\nFrom\nUntil\nUse day schedule]
    B --> C["[3"] Quiet mode]
    C --> D["[4"] Operation mode]
    D --> E["[5"] Select schedules\nRoom temperature\nLWT main\nLWT additional\nTank temperature]
    E --> F["[6"] Information\nSensor information\nEnergy metering\nError handling\nUser permission level\nActuators\nOperation modes\nRunning hours\Version]
    F --> G["[7"] User settings\nDisplay\nTemperature lock\nSet schedules\nPreset values\nAllowed operation mode\nUnit of measurement\nSet weather dependent]

    B --> H["[2"] Holiday\nHoliday\nHoliday mode Away\nFrom\nUntil\nOperation mode\nHeating\nDHW]
    H --> I["[6.2"] Energy metering\nConsumed elec.\nProduced energy]
    I --> J["[6.3"] Error information\nError history\nContact/helpdesk number\nWarning history]
    J --> K["[6.8"] Version\nUser interface\nIndoor unit\nOutdoor unit]
    K --> L["[7.1"] Display\nContrast\nBacklit LCD time\nUser profile\nAvailable home pages]
    L --> M["[7.3"] Set schedules\nRoom temp.\nLWT main\nLWT additional\nDHW temp\nBooster heater permission\nQuiet mode\nDHW pump]
    M --> N["[7.4"] Preset values\nRoom temperature\nLWT main\nTank temperature\nQuiet level]
    N --> O["[7.7"] Set weather dependent\nMain\nAdditional]

    H --> P["[7.7.1"] Main\nSet weather-dependent heating]
    O --> Q["[7.7.2"] Additional\nSet weather-dependent heating]

INFORMATION
Depending on the selected installer settings, settings will be visible/invisible.
4.10 Installer settings: Tables to be filled in by installer
4.10.1 Quick wizard
| Setting Default Fill in... | |||
| Backup heater configuration (only for unified backup heater) [A.2.1.5] | |||
| BUH type 0 (1P,(1/2)) | |||
| Forced off contact [A.2.1.6] | |||
| Forced off contact 0 (No) | |||
| Space heating settings [A.2.1] | |||
| Unit control method 2 (RT control) | |||
| User interface location 1 (In room) | |||
| Number of LWT zones 1 (1 LWT zone) | |||
| Pump operation mode 2 (Request) | |||
| Domestic hot water settings [A.2.2] | |||
| DHW operation Depends on | model | ||
| DHW pump 0 (No) | |||
| Thermostats [A.2.2] | |||
| Contact type main 2 (H/C request) | |||
| Contact type add. 2 (H/C request) | |||
| External sensor 0 (No) | |||
| Digital I/O PCB [A.2.2.6] | |||
| Ext. backup heat src 0 (No) | |||
| Solar kit | 0 (No) | ||
| Alarm output | 0 (Normally open) | ||
| Bottom plate heater | 0 (No) | ||
| Demand PCB [A.2.2.7] | |||
| Demand PCB | 0 (No) | ||
| Energy metering [A.2.2] | |||
| External kWh meter 1 | 0 (No) | ||
| External kWh meter 2 | 0 (No) | ||
| Capacities (energy metering) [A.2.3] | |||
| Booster heater | 2.4 kW | ||
| BUH: step 1 | 3 kW | ||
| BUH: step 2 | 3 kW | ||
| Bottom plate heater | 0 W | ||
4.10.2 Space heating control
| Setting Default Fill in... | |||
| Leaving water temperature: Main zone [A.3.1.1] | |||
| LWT setpoint mode 1 (WD) | |||
| Leaving water temperature: Additional zone [A.3.1.2] | |||
| LWT setpoint mode 1 (WD) | |||
| Leaving water temperature: Delta T source [A.3.1.3] | |||
| Heating | 5°C | ||
| Leaving water temperature: Modulation [A.3.1.1.5] | |||
| Modulated LWT | 0 (No) | ||
| Leaving water temperature: Emitter type [A.3.1.1.7] | |||
| Emitter type | 1 (Slow) | ||
4.10.3 Domestic hot water control [A.4]
| Setting | Default | Fill in... |
| Type | 2 (Scheduled only) | |
| Maximum setpoint 65°C |
![DAIKIN EHVH08SU18CB6W - Domestic hot water control [A.4] - 1](/content/2026/05/905040/images/b32ee2c5399a7a7932d6034e815cd00b85fcb9d5b0bfc26dc173616a16716e43.jpg)
INFORMATION
There is a risk of space heating capacity shortage/comfort problem (in case of frequent domestic hot water operation, frequent and long space heating interruption will happen) when selecting [6-0D]=0 ([A.4.1] Domestic hot water Type=Reheat only).

INFORMATION
When the DHW tank booster mode is active, the risk of space heating and capacity shortage comfort problems is significant. In case of frequent domestic hot water operation, frequent and long space heating interruptions will happen.
4.10.4 Contact/helpdesk number [6.3.2]
| Setting | Default | Fill in... |
| Contact/helpdesk number | — |
5 Setting the energy prices
If your system's savings mode is set to Economical, it allows you to set:
- a fixed fuel price
- 3 electricity price levels
- a weekly schedule timer for electricity prices.
The savings mode is set by the installer and can be either ecological or economical. In ecological mode, the primary energy use is minimised; in economical mode, the running costs. Discuss with the installer which savings mode is preferred. Refer to the installation manual for more information.
Example: How to set the energy prices on the user interface?
| Price | Value in breadcrumb |
| Fuel: 5.3 euro cent/kWh | [7.4.6]=5.3 |
| Fuel: 4.8 pence/kWh | [7.4.6]=4.8 |
| Electricity: 12 euro cent/kWh | [7.4.5.1]=12 |
| Electricity: 12.49 pence/kWh | [7.4.5.1]=12 |
5.1 To set the fuel price
1 Go to [7.4.6]: > User settings > Preset values > Fuel price.
2 Use ▲ and ▼ to set the correct price.
3 Press OK to confirm.

INFORMATION
- Price value ranging from 0.00\~290 valuta/MBtu (with 2 significant values).
- Price value ranging from 0.00\~990 valuta/kWh (with 2 significant values).
5.2 To set the electricity price
1 Go to [7.4.5]: > User settings > Preset values > Elec price.
2 Use ▶ and ▼ to set the correct prices for High, Medium and Low, according to your electricity tariff.
6 Energy saving tips
3 Press tOKonfirm.

INFORMATION
Price value ranging from 0.00\~990 valuta/kWh (with 2 significant values).

INFORMATION
If no schedule is set, the Elec price for High is taken into account.
5.3 To set the electricity price schedule timer
1 Go to [7.3.8]: >user settings > Set schedules > Elec price.
2 Program the schedule according to the High, Medium and Low electricity prices for each time interval.
3 Press to save the schedule.

INFORMATION
The values for High, Medium and Low correspond with the electricity price values for High, Medium and Low previously set. If no schedule is set, the electricity price for High is taken into account.
5.4 About energy prices in case of an incentive per kWh renewable energy
An incentive can be taken into account when setting the energy prices. Although the running cost can increase, the total operation cost, taking into account the reimbursement will be optimized.

NOTICE
Make sure to modify the setting of the energy prices at the end of the incentive period.
5.4.1 To set the fuel price in case of an incentive per kWh renewable energy
Prerequisite: Calculate the value for the fuel price with the following formula: actual fuel price+(incentive/kWh×0.9)
1 Go to [7.4.6]: user settings > Preset values > Fuel price.
2 Use and to the correct price.
3 Press tOK confirm.
5.4.2 To set the electricity price in case of an incentive per kWh renewable energy
Prerequisite: Calculate the value for the electricity price with following formula: actual electricity price+incentive/kWh.
1 Go to [7.4.5]: user settings > Preset values > Elec price.
2 Use and to set the correct prices for High, Medium and Low, according to your electricity tariff.
3 Press to confirm.
5.4.3 Example
This is an example and the prices and/or values used in this example are NOT accurate.
| Data Pence/kWh | |
| Fuel price 4.08 | |
| Electricity price | 12.49 |
| Renewable heat incentive per kWh | 5 |
Calculation of the fuel price:
Fuel price=Actual fuel price+(incentive/kWh×0.9)
Fuel price=4.08+(5×0.9)
Fuel price=8.58
Calculation of the electricity price:
Electricity price=Actual electricity price+incentive/kWh
Electricity price=12.49+5
Electricity price=17.49
| Price | Value in breadcrumb |
| Fuel: 4.08 pence/kWh | [7.4.6]=8.58 |
| Electricity: 12.49 pence/kWh | [7.4.5]=17.49 |
6 Energy saving tips
Tips about room temperature
- Make sure the desired room temperature is NEVER too high, but ALWAYS according to your actual needs. Each saved degree can save up to 6% of heating costs.
- Do NOT increase the desired room temperature to speed up space heating. The space will NOT heat up faster.
- When your system layout contains slow heat emitters (example: under floor heating), avoid large fluctuation of the desired room temperature and do NOT let the room temperature drop too low. It will take more time and energy to heat up the room again.
- Use a weekly schedule for your normal space heating needs. If necessary, you can easily deviate from the schedule:
- For shorter periods: You can overrule the scheduled room temperature. Example: When you have a party, or when you are leaving for a couple of hours.
- For longer periods: You can use the holiday mode. Example: When you stay at home during your holiday, or when you go away during your holiday.
Tips about leaving water temperature
- In heating mode, a lower desired leaving water temperature results in lower energy consumption and better performance.
- Set the desired leaving water temperature in accordance with the heat emitter type. Example: Underfloor heating is designed for lower leaving water temperature than radiators and heat pump convectors.
Tips about DHW tank temperature
- Use a weekly schedule for your normal domestic hot water needs (only in scheduled mode).
- Program to heat up the DHW tank to a preset value (Storage comfort = higher DHW tank temperature) during the night, because then space heating demand is lower.
- If heating up the DHW tank once at night is not sufficient, program to additionally heat up the DHW tank to a preset value (Storage eco = lower DHW tank temperature) during the day.
- Make sure the desired DHW tank temperature is NOT too high. Example: After installation, lower the DHW tank temperature daily by 1°C and check if you still have enough hot water.
- Program to turn ON the domestic hot water pump only during periods of the day when instant hot water is necessary. Example: In the morning and evening.
7 Maintenance and service
7.1 Overview: Maintenance and service
The installer has to perform a yearly maintenance. You can find the contact/helpdesk number via the user interface.
As end user, you have to:
- Keep the area around the unit clean.
- Keep the user interface clean with a soft damp cloth. Do NOT use any detergents.
- Regularly check if the water pressure indicated on the manometer is above 1 bar.
Refrigerant
This product contains fluorinated greenhouse gases. Do NOT vent gases into the atmosphere.
Refrigerant type: R410A
Global warming potential (GWP) value: 2087.5

NOTICE
In Europe, the greenhouse gas emissions of the total refrigerant charge in the system (expressed as tonnes CO_2 -equivalent) is used to determine the maintenance intervals. Follow the applicable legislation.
Formula to calculate the greenhouse gas emissions: GWP value of the refrigerant × Total refrigerant charge [in kg] / 1000
Please contact your installer for more information.
7.2 To find the contact/helpdesk number
Prerequisite: You switched the permission level to Advanced end user.
1 Go to [6.3.2]: > Information > Error handling > Contact/helpdesk number.
8 Troubleshooting
8.1 Overview: Troubleshooting
If a malfunction occurs, is displayed on the home pages. You can press 📄 display more information about the malfunction.
For the symptoms listed below, you can try to solve the problem yourself. For any other problem, contact your installer. You can find the contact/helpdesk number via the user interface.
8.2 To check the error history
Prerequisite: Only available if ⓘis displayed on the home pages.
1 Go to [6.3.1]: Information > Error handling > Error history.
8.3 To check the warning history
Prerequisite: Only available if ⓘ is displayed on the home pages.
1 Go to [6.3.1]: > Information > Error handling > Warning history.
8.4 Symptom: You are feeling too cold (hot) in your living room
| Possible cause | Corrective action |
| The desired room temperature is too low (high). | Increase (decrease) the desired room temperature.If the problem recurs daily, do one of the following:Increase (decrease) the room temperature preset value.Adjust the room temperature schedule. |
| The desired room temperature cannot be reached. | Increase the desired leaving water temperature in accordance with the heat emitter type. |
8.5 Symptom: The water at the tap is too cold
| Possible cause | Corrective action |
| You ran out of domestic hot water because of unusual high consumption. | If you immediately need domestic hot water, activate the DHW tank booster mode. However, this consumes extra energy. |
| The desired DHW tank temperature is too low. | If you can wait, overrule (increase) the active or next scheduled desired temperature so that more hot water will be produced exceptionally.If the problems recurs daily, do one of the following:Increase the DHW tank temperature preset value.Adjust the DHW tank temperature schedule.Example: Program to additionally heat up the DHW tank to a preset value (Storage eco = lower tank temperature) during the day. |
8.6 Symptom: Heat pump failure
When the heat pump fails to operate, the backup heater and booster heater can serve as an emergency heater and either automatically or non-automatically take over the heat load.
- When auto emergency is activated and a heat pump failure occurs:
- The backup heater will automatically take over the heat load.
- The booster heater will automatically take over the domestic hot water production.
- When auto emergency is not activated and a heat pump failure occurs, the domestic hot water and space heating operations will stop and need to be recovered manually. The user interface will then ask you to confirm whether the backup heater or booster heater can take over the heat load or not.
When the heat pump fails, Ⓤwill appear on the user interface.
| Possible cause Corrective action | |
| Heat pump is damaged. • Press to view a description of the problem.• Press again.• Select OK allow the backup heater to take over the heat load.• Call your local dealer to get the heat pump fixed. |

INFORMATION
When the backup heater or booster heater takes over the heat load, electricity consumption will be considerably higher.
9 Relocation
9.1 Overview: Relocation
If you want to relocate parts of your system (user interface, indoor unit, outdoor unit, DHW tank...), contact your installer. You can find the contact/helpdesk number via the user interface.
10 Disposal
10.1 Overview: Disposal
If you want to dispose parts of your system (user interface, indoor unit, outdoor unit, DHW tank...), contact your installer. You can find the contact/helpdesk number via the user interface.
11 Glossary
DHW = Domestic hot water
Hot water used, in any type of building, for domestic purposes.
LWT = Leaving water temperature
Water temperature at the water outlet of the heat pump.
Dealer
Sales distributor for the product.
Authorized installer
Technical skilled person who is qualified to install the product.
User
Person who is owner of the product and/or operates the product.
Applicable legislation
All international, European, national and local directives, laws, regulations and/or codes that are relevant and applicable for a certain product or domain.
Service company
Qualified company which can perform or coordinate the required service to the product.
Installation manual
Instruction manual specified for a certain product or application, explaining how to install, configure and maintain it.
Operation manual
Instruction manual specified for a certain product or application, explaining how to operate it.
Accessories
Labels, manuals, information sheets and equipment that are delivered with the product and that need to be installed according to the instructions in the accompanying documentation.
Optional equipment
Equipment made or approved by Daikin that can be combined with the product according to the instructions in the accompanying documentation.
Field supply
Equipment not made by Daikin that can be combined with the product according to the instructions in the accompanying documentation.

natural_image
Blank grid paper with no text, numbers, or symbols

natural_image
Blank grid paper with no text, numbers, or symbols

natural_image
Blank grid paper with no text, numbers, or symbols- User reference guide
- Daikin Altherma – Low temperature split
- Table of contents
- General safety precautions 2
- About this document 3
- About the system 4
- Operation 4
- Setting the energy prices 21
- Energy saving tips 22
- Maintenance and service 23
- Troubleshooting 23
- Relocation 24
- Disposal 24
- Glossary 24
- General safety precautions
- About the documentation
- Meaning of warnings and symbols
- WARNING
- WARNING: FLAMMABLE MATERIAL
- CAUTION
- NOTICE
- INFORMATION
- For the user
- About this document
- Target audience
- Documentation set
- Available screens
- Breadcrumbs
- About the system
- Components in a typical system layout
- Operation
- Overview: Operation
- The user interface at a glance
- Buttons
- Status icons
- Basic usage
- Using home pages
- About home pages
- To go to a home page
- Using the menu structure
- About the menu structure
- To go to the menu structure
- To navigate in the menu structure
- Turning ON/OFF controls
- To check if a control is turned ON or OFF
- To turn ON or OFF the room temperature control
- To turn ON or OFF the leaving water temperature (main + additional) control
- To turn ON or OFF the domestic hot water control
- Space heating control
- About space heating control
- Setting the space operation mode
- About space operation modes
- Determining which temperature control you are using
- To determine which temperature control you are using (method 1)
- To determine which temperature control you are using (method 2)
- Room thermostat control - About room thermostat control
- Room temperature of the main zone
- Leaving water temperature of the main zone
- Room thermostat control - Using the room temperature home page
- Typical room temperature home pages
- To read out the actual and desired room temperature
- To temporarily overrule the room temperature schedule
- To change the mode from scheduled to preset value
- Example: Temporarily overruling the schedule AND changing the mode to preset value
- To set the overrule period
- Usage example: You have a party
- Usage example: You go away for a couple of hours
- Room thermostat control - Using the leaving water temperature home pages
- Typical leaving water temperature home pages
- To read out the desired leaving water temperature (main + additional)
- To adjust/overrule the leaving water temperature (NOT linked to room temperature setpoint)
- To adjust the leaving water temperature (main)
- To adjust the leaving water temperature (additional)
- To adjust/overrule the leaving water temperature (linked to room temperature setpoint)
- To set leaving water temperature preset values (main)
- Leaving water temperature control - About leaving water temperature control
- Leaving water temperature control - Using leaving water temperature control according to a schedule
- Leaving water temperature control - Using leaving water temperature control NOT according to a schedule
- External room thermostat control - About external room thermostat control
- External room thermostat control - Using external room thermostat control
- Domestic hot water control
- About domestic hot water control
- Reheat mode
- Scheduled mode
- Scheduled + reheat mode
- Using the DHW tank temperature home page
- Typical DHW tank temperature home pages
- To read out and adjust the desired reheat temperature (in scheduled and reheat mode)
- Usage example: You need more hot water than scheduled
- To check if the DHW tank booster mode is active
- To activate the DHW tank booster mode (user profile = Basic)
- To activate the DHW tank booster mode (user profile = Detailed)
- Usage example: You immediately need more hot water
- Advanced usage
- About changing the user permission level
- To set the user permission level to Advanced end user
- To set the user permission level to End user
- Using quiet mode
- About quiet mode
- Possible quiet mode levels
- To check if quiet mode is active
- To use quiet mode
- Usage example: Baby is sleeping in the afternoon
- Using holiday mode
- About holiday mode
- To check if holiday mode is activated and/or running
- To configure the holiday (when you stay at home)
- To configure the holiday (when you go away)
- To activate or deactivate the holiday mode
- Usage example: You go away during the winter
- Usage example: You come home during your holiday
- Reading out information
- To read out information
- Configuring date, time, units of measurement, contrast and backlight
- To configure time and date
- To configure units of measurement
- To configure the contrast of the user interface
- To configure the backlit LCD time of the user interface
- Configuring user profile and home pages
- To set a user profile
- Possible user profiles
- To configure which home pages are made available to the end user
- Locking and unlocking buttons and functions
- About locking and unlocking
- To check if locking is active
- To activate or deactivate button lock
- To activate or deactivate a function lock
- Preset values and schedules
- Using preset values
- About preset values
- To define preset values
- Using and programming schedules
- About schedules
- To select which schedule you currently want to use
- To program a schedule
- Guidelines when programming
- Usage example: You work in a 3-shift system
- Schedules: Example
- To program the schedule
- To program the schedule for Monday
- To copy from one day to another
- To save the schedule
- Predefined schedules: Room temperature + leaving water temperature (main)
- Predefined 1
- Predefined 2
- Predefined 3
- Predefined schedules: Leaving water temperature (additional)
- Predefined schedules: DHW tank temperature
- Weather dependent operation
- To set the weather dependent settings
- Menu structure: Overview user settings
- Installer settings: Tables to be filled in by installer
- Quick wizard
- Space heating control
- Domestic hot water control [A.4]
- Contact/helpdesk number [6.3.2]
- Setting the energy prices
- To set the fuel price
- To set the electricity price
- Energy saving tips
- To set the electricity price schedule timer
- About energy prices in case of an incentive per kWh renewable energy
- To set the fuel price in case of an incentive per kWh renewable energy
- To set the electricity price in case of an incentive per kWh renewable energy
- Example
- Calculation of the fuel price:
- Calculation of the electricity price:
- Tips about room temperature
- Tips about leaving water temperature
- Tips about DHW tank temperature
- Maintenance and service
- Overview: Maintenance and service
- Refrigerant
- To find the contact/helpdesk number
- Troubleshooting
- Overview: Troubleshooting
- To check the error history
- To check the warning history
- Symptom: You are feeling too cold (hot) in your living room
- Symptom: The water at the tap is too cold
- Symptom: Heat pump failure
- Relocation
- Overview: Relocation
- Disposal
- Overview: Disposal
- Glossary
- DHW = Domestic hot water
- LWT = Leaving water temperature
- Dealer
- Authorized installer
- User
- Applicable legislation
- Service company
- Installation manual
- Operation manual
- Accessories
- Optional equipment
- Field supply
Brand : DAIKIN
Model : EHVH08SU18CB6W
Category : Chauffe-eau instantané et chauffe-eau