UKS 110 A+ - Refrigerator Respekta - Free user manual and instructions
Find the device manual for free UKS 110 A+ Respekta in PDF.


| Product Type | Built-under Refrigerator with Freezer Compartment |
| Brand | Respekta |
| Model | UKS 110 A+ |
| Energy Efficiency Class | A+ |
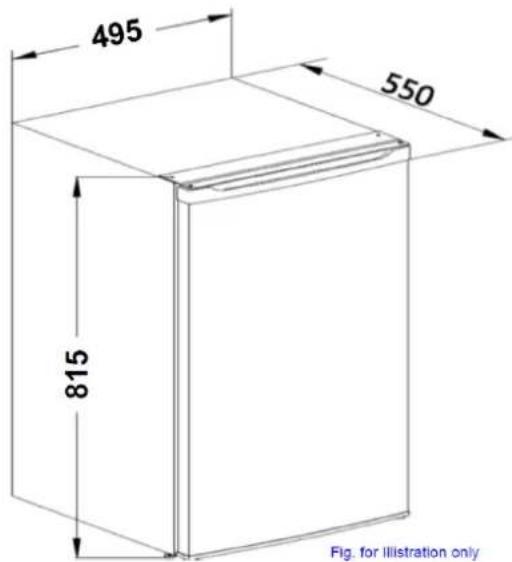
| Dimensions (H x W x D) | Approx. 820 x 596 x 550 mm |
| Power Supply | 220-240 V, 50 Hz |
| Refrigerant | R600a (isobutane) |
| Freezer Star Rating | 4-star (suitable for freezing fresh food) |
| Temperature Control | Mechanical thermostat with dial |
| Super Cool / Freeze Function | Yes (separate buttons for rapid cooling and freezing) |
| Interior Light | Yes, max 15 W, E14 bulb |
| Defrosting | Automatic defrost in fridge; manual defrost for freezer |
| Shelves | Adjustable glass shelves |
| Door Compartments | Adjustable door bins and bottle holder |
| Reversible Door | Yes (hinge can be moved from right to left) |
| Warranty | 24 months (manufacturer warranty) |
| Cleaning | Hand wash with warm water and mild detergent; avoid abrasive cleaners |
| Safety Features | Child-proof door (locked after decommissioning); grounded plug |
| Installation | Requires at least 2-4 hours standing before first use; built-under compatible |
| Climate Class | SN (10°C to 32°C) |
Frequently Asked Questions - UKS 110 A+ Respekta
User questions about UKS 110 A+ Respekta
0 question about this device. Answer the ones you know or ask your own.
Ask a new question about this device
Download the instructions for your Refrigerator in PDF format for free! Find your manual UKS 110 A+ - Respekta and take your electronic device back in hand. On this page are published all the documents necessary for the use of your device. UKS 110 A+ by Respekta.
USER MANUAL UKS 110 A+ Respekta
Operating- and Installation Instruction Built-under Refrigerator
UKS110
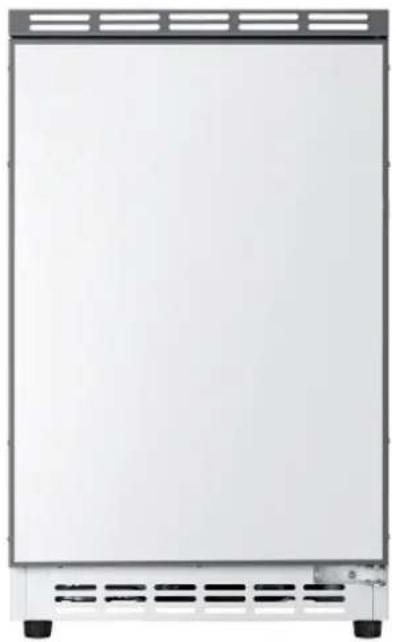
natural_image
Front view of a white rectangular appliance with ventilation grilles and mounting feet (no visible text or symbols)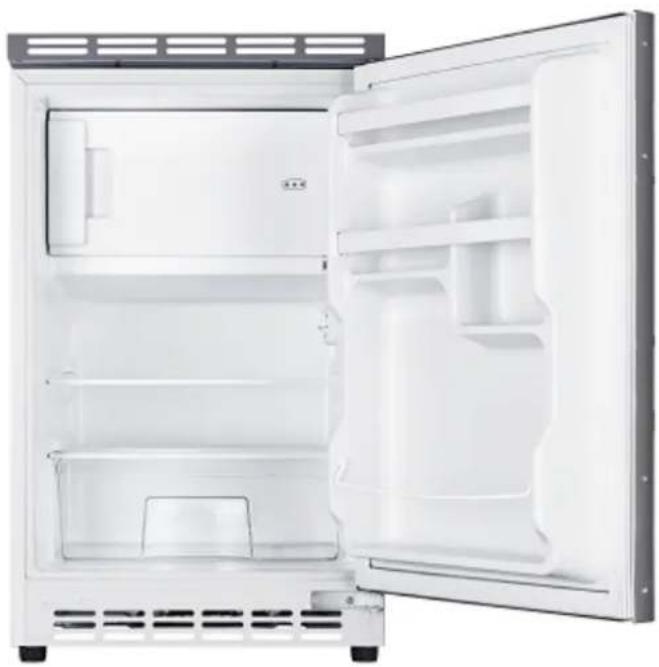
natural_image
Interior view of a white refrigerator with open doors and ventilation grilles (no visible text or symbols)TR-14BUAA
CE
D
DECLARATION OF CONFORMITY
The manufacturer of the product/s described herein, to which this description refers, declares on its sole responsibility that the product/s meet the relevant fundamental safety, health and protection requirements of the relevant EU guidelines and that the corresponding test reports are available for examination by the relevant authorities and can be requested from the seller of the appliance, especially with regard to CE Declaration of Conformity issued by the manufacturer or with the manufacturer's approval.
Moreover, the manufacturer declares that the parts of the appliance described in this user manual, which come into contact with fresh food, do not contain any toxic substances.
Inhaltsverzeichnis
Kapitel No. Seite
natural_image
Technical line drawing of a mechanical device with internal components and directional arrows (no text or symbols)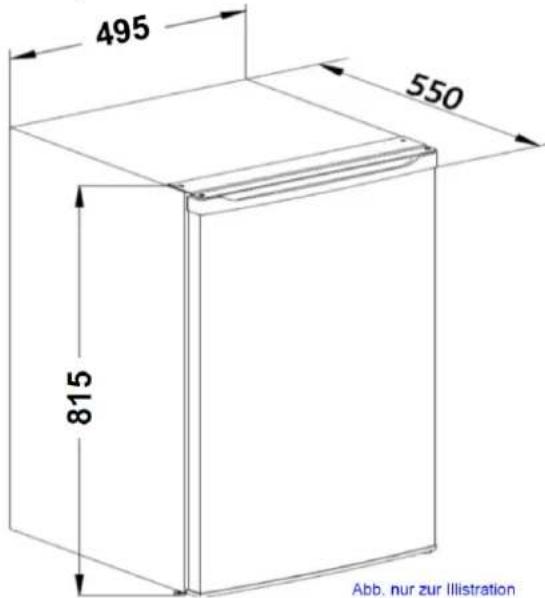
The manufacturer does not take any responsibility for damage caused by the buyer.
This device has been manufactured and tested according to the latest methods. Irrespective of the seller's / dealer's statutory warranty obligation, the manufacturer provides a 6-month warranty for faultless material and faultless production for a period of 24 months from the date of purchase.
The warranty expires in case of intervention by the buyer or by third parties.
Damage caused by improper handling or operation, by incorrect installation or storage, by improper connection, improper installation, as well as by force majeure or other external influences, are not covered by the guarantee. We reserve the right to repair or replace defective parts or to exchange the device in case of complaints.
Only if repair (s) or replacement of the device, the intended use by the manufacturer should not be finally achieved, the buyer can demand warranty within six months, calculated from the date of purchase, reduction of the purchase price or cancellation of the purchase contract.
Claims for damages, including consequential damages, unless they are based on intent or gross negligence excluded.
In the case of unnecessary or unjustified use of the customer service, we charge the usual time and track charge for our service.
Complaints must be reported immediately after the detection of an error.
The replacement of light bulbs by our customer service technician is not subject to the warranty guidelines and is therefore subject to a charge. There is no warranty for bulbs.
The warranty claim has to be proven by the buyer, by presenting the purchase receipt. The warranty is valid within the Federal Republic of Germany.
Contents Page
Safety advices....2-3
Electrical Safety Instruction (for appliances with BSI plug only) 4
1 Protection of the environment and instructions for disposal 5
2 Selecting the installation location 5
3 Installing the appliance .... 5
4 The rating plate 6
5 Connecting to the power supply 6
6 Operating.... 6
7 Super-cooling/freezing function.... 7
8 Interior light 7
9 Changing the lamp 7
10 Temperature zones 7
11 Arranging the products 7
12 Moving the storage elements.... 8
13 Freezer compartment 8
Important Notes for storage of frozen food.... 8
14 Preparing ice cubes, ice cream etc. 9
15 Placing the appliance out of service 9
16 Cleaning and care 9
17 Freeze / Storage of fresh food 10
18 Defrost.... 11
19 Troubleshooting guide Self-diagnosis fault rectification 11
20 What is when 12
21 Getting your appliance serviced / After-sales service 13
22 Build in into a fitted kitchen 13
23 Warranty.... 13
24 Components 14
25 Storage table (only for appliances with 3- or 4-star freezer compartment).... 15
26 Built-in / -under Instruction.... 16
27 Decorative frame assembly....17
28 Change of door hinge: Following the above chapter.... 18
29 Warranty Conditions.... 19
Please read these user instructions carefully to understand, quickly and thoroughly, how to use your new fridge / freezer. Underline any parts you consider particularly important. Look after this document so that you may consult it in future or pass it on to any future owners.
You have purchased a reliable appliance which will serve you for many years if it is used and maintained correctly.
The detailed illustrations can be found on the last pages of this user manual.
The ambient temperature affects the function of your equipment considerably. Please consider chapter "Climate category" page 6.
This appliance is designed for domestic use. If it is installed for professional or commercial use, the standards applicable to the respective trade must be observed.
The appliance has been tested against leakage in compliance with the relevant legal safety standards.
In excessive stress of the appliance, for example through commercial use, the guarantee duration for the compressor reduces itself to 50%.
Should you have bought your new fridge / freezer to replace an old appliance, please make sure that all existing latch- or bolt-locks on the old appliance are destroyed, before you dispose of it.
This will ensure that a child cannot get trapped inside.
Please have the old appliance ecologically disposed of by a company specialised in environmental protection, since the appliance may contain harmful components in the refrigerant and this must be removed with special equipment. Please check with your dealer or with your local authority.

Make sure that the refrigerating system containing the refrigerant, especially the condenser at the back of the liance, is not damaged during transportation to the disposal or collection site, so that you can be sure that the igerant does not leak out. Details of the utilised refrigerant and insulation propellant are on the rating plate fixed to the appliance.
Explanation of information symbols
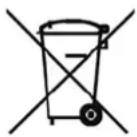
This symbol on the product or its packaging indicates that this product is not to be treated as normal domestic waste but must be disposed of through a special collection depot for recycling electrical and electronic equipment.
Through your contribution to the correct disposal of this product you are protecting the environment and the health and welfare of your fellows.
Incorrect disposal endangers the environment and your health. You can obtain more information on the recycling of this product from your local council authorities, your waste disposers or the sales outlet from which you purchased the product.
The following symbol has the following significance:

This is a safety information symbol.
This is to be found in particular with all descriptions of actions where there is a possibility of danger for persons. Pay attention to this safety information and behave with appropriate care.
Pass these warnings on to other users.

This is a warning symbol
This is to be found with descriptions of actions where special care is necessary to prevent damage to appliances. Pass this safety information on to all users of the appliances.

Danger scalding hazard

Risk of electric shock

This symbol refers to useful hints and tips and draws your attention to the correct procedure and behaviour.
Compliance with the information marked with this symbol will spare you many problems.

Safety advices
Risk of asphyxiation for children!
Take care to ensure that the sheet plastic packaging material does not become a deadly trap for unwary children. Hazards for children and for people with physical, sensory or mental impairments!
This appliance is not suitable for use by persons (including children) with physical, sensory or mental impairments, nor for use by people without the necessary experience and/or knowledge, unless they are supervised by a person responsible for their safety, or unless they have received instructions in advance regarding the safe use of the appliance.
Never leave children unsupervised near the appliance, regardless of whether or not it is switched on or off. They could trap themselves inside it. Therefore, once the appliance has been decommissioned, you should remove the handle from the appliance, or render it unusable.
Caution! Never touch the iced up walls of the interior (or your frozen goods or ice cream) with wet hands. You might injure yourself, even if your skin is dry. If necessary, use a dry cloth to handle frozen goods.
Risk of electric shock!
- The appliance operates at a hazardous voltage. Touching electrically live components can cause serious injuries, and may even prove lethal.
- Only ever connect up the appliance to a specified, installed 'Schuko' (standard earthed) receptacle.
- Never start up this appliance if the mains power cable is defective, or if the appliance shows visible signs of damage.
- If you establish the presence of damage in transit or other visible signs of damage, you should immediately notify the person who sold it to you.
- All repair work on the appliance must be carried out by an authorised specialist. Only ever use components that comply with the original appliance data.
- The appliance contains electrical and mechanical components that are essential to protect against potential hazards.
-
Never open the housing, and never insert any objects through openings.
-
Never touch the connector with wet hands, and never pull it out of its socket by pulling on the cable.
- Never plug the appliance into a multi-gang socket.
- If a fault occurs, unplug the mains connector before cleaning the appliance. Always pull the connector itself, i.e. do not pull on the cable to disconnect it.
- The mains connector must be readily accessible after setting up the appliance.
- Never use an extension cable.
- At the end of its service life, render the appliance unusable:
- Pull out the mains connector and sever the connector cable.
- Render the locks on the doors and covers unusable, i.e. make it impossible for them to be opened. This will prevent children at play shutting themselves in and putting their lives at risk.
Risk of explosion!
Never store explosive substances or spray cans with combustible propellants in the appliance because these could cause combustible mixtures to form and explode.
Never freeze beverages containing carbon dioxide, i.e. fizzy drinks! Their containers might otherwise burst!
Only store strong (high-proof) alcoholic beverages upright in firmly sealed bottles.
Do not place glass or metal containers containing fluids in the freezer cabinet.
Refrigerant hazard!
The refrigerant circuit of your appliance contains an environmentally compatible but combustible refrigerant.
Mechanical interventions in the refrigerant system should only ever me made by authorised specialists.
Do not damage the refrigerant circuit, e.g. by puncturing the refrigerant channels on the evaporator with sharp objects, bending pipework etc. Escaping refrigerant is combustible and can cause injuries to the eyes.
In such cases, flush the eyes with clean water and seek immediate medical attention. Risk of injury!
The foodstuffs and the inside walls are at a very low temperature. Never touch them with wet hands. To do so can cause skin injuries. Damage to skin is even possible if your skin is dry.
Risk of burns caused by low temperatures!
- You should therefore never put ice cubes or iced lollies in your mouth immediately after removing them from the freezer cabinet.
- Never use damaged refrigerator batteries.
- If fluid escapes from refrigerator batteries, do not swallow it!
- Do not refreeze thawed or thawing foodstuffs. There is a risk of food-poisoning.
- Never use plinths, drawers, doors etc. as steps or for support. You might injure yourself.
Caution!
- The thermal insulation on your appliance is made of polyurethane with environmentally compatible pentane foam insulation.
- Never clean this appliance with the help of electric heaters, peelers, knives or other tools with a naked flame such as candles etc. The thermal insulation and the internal container are heat-sensitive and could melt.
- Never use corrosive or abrasive cleaning agents or sponges to clean this appliance. These might damage the surfaces.
Fire hazard!
- Never place appliances that radiate heat, such as microwaves, toasters etc., on this appliance.
- Ventilation slots must not be covered or blocked.
- Never use corrosive or abrasive cleaning agents or sponges to clean this appliance. These might damage the surfaces.
Fire hazard!
- Never place appliances that radiate heat, such as microwaves, toasters etc., on this appliance.
- Ventilation slots must not be covered or blocked.
Electrical Safety Instruction
THIS APPLIANCE MUST BE EARTHED.
IF THE MAINS LEAD OF THE APPLIANCE IS FITTED WITH A PLUG:
FUSE REPLACEMENT
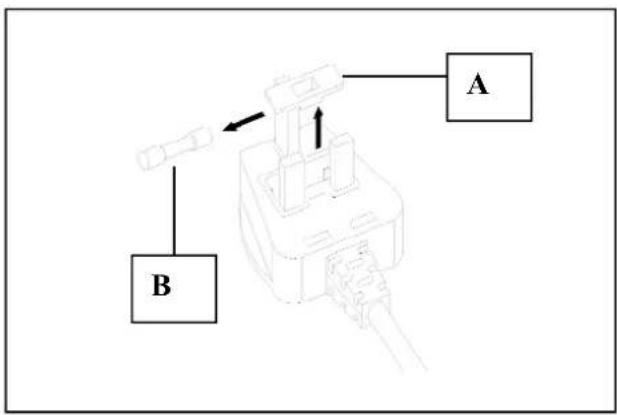
If the mains lead of this appliance is fitted with a BS 1363A 13 amp fused plug, to change a fuse in this type of plug use a A.S.T.A. approved fuse to BS 1362 type and proceed as follow:
- Remove the fuse cover (A)
- Remove the fuse (B)
- Fit replacement fuse into plug
- Refit the fuse cover
flowchart
graph TD
    A["A"] --> B["B"]
    B --> A

IMPORTANT:
The fuse cover mast be refitted when changing a fuse and if the fuse cover is lost the plug must not be used until a correct replacement is fitted. Correct replacements are identified by the colour insert or the colour embossed in words on the base of the plug. Replacement fuse cover are available from your local electrical store.
For appliances with BSI plug only
CONNECTION TO A REWIREABLE PLUG
If the fitted plug is not suitable for your socket outlet, then it should be cut off and disposed of in order to avoid a possible shock hazard should it be inserted into a 13A socket elsewhere.
A suitable alternative plug should then be fitted to the cable.
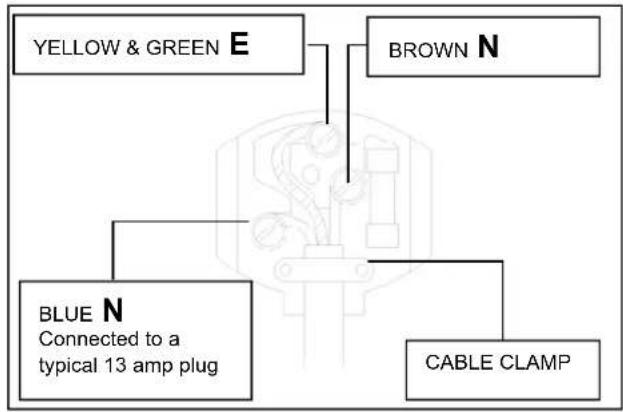
The wires in this mains lead are coloured in accordance with the following code:
BLUE "NEUTRAL" (N)
BROWN "LIVE" (L)
YELLOW & GREEN "EARTH" (E)
flowchart
graph TD
    A["YELLOW & GREEN E"] --> C["Blue N Connected to a typical 13 amp plug"]
    B["BROWN N"] --> C
    D["CABLE CLAMP"] --> C
- The YELLOW & GREEN wire must be connected to the terminal in the plug which s marked with the letter E
or by the Earth symbol

or coloured green or yellow & green
-
The BLUE wire must be connected to the terminal which is marked with the letter N or coloured black
-
The BROW wire mast be connected to the terminal which is marked with the letter L or coloured red
The user instructions apply to several models, for this reason there may be some differences in the details given, according to the type of the appliance.
1 Protecting the environment / advice for disposal
Packing
serves to protect the appliance during transportation and recyclable materials have been used for packaging. Corrugated board/cardboard (mainly from waste paper)
- shaped parts in PS (foamed CFC-free polystyrene)
• foils and bags in PE (polyethylene)
• strapping tapes in PP (polypropylene)
Please hand over all packaging to the nearest official collection point, so that all the different materials can be re-used or recycled as far as possible and any illegal depositing of such materials is thus avoided.
2 Deciding where to locate your appliance
In order to avoid any damage or injury to persons or things, the appliance should be unpacked by two people and placed in the chosen location
Before positioning it, check that your new appliance has no visible outer damage.
On no account should you start up your appliance if it is damaged.
Check the appliance carefully for:
- Damage to the packaging which might indicate that the appliance has been mishandled during transportation.
• Damage to the outer casing
• Any visible damage to the cable / plug
STOP If in any doubt let the customer service department check the appliance.
It must at all costs be avoided, that any environmentally damaging refrigerant leaks out by starting up the appliance.
3 Installing your appliance
a) Unpack the fridge / freezer.
b) In order not to unnecessarily waste raw materials, the handles (requiring smaller packaging) have not been mounted onto the separate parts of the appliance.
c) Mount the door handles and at the same time any other enclosed parts according to the relevant instructions enclosed separately.
d) Remove any objects from inside the appliance.
e) Carefully remove all film and adhesive tape from the casing from the door
f) Remove any polystyrene pieces from around the compressor (if present).
g) Remove all documents and accessories from inside the appliance.
h) Clean the inside of the appliance with lukewarm water and vinegar and dry it thoroughly with a soft cloth.

Do not use washing liquids, sharp or sive household products or any other ning agents containing soda.
Note:
- Make sure that the pipes for the circulation of the refrigerant are not damaged in any way during installation of the appliance.
- The appliance must only be used for the purpose for which it is intended.
- The appliance must be placed on a firm, level surface. This is the only way to ensure that the refrigerant can circulate freely and thus ensure that your appliance will work efficiently.
- If possible, place your appliance in a cool, well aired, dry room.
- Do not place your appliance in direct sunlight, nor in a room at high temperature.
- Do not place your appliance in the vicinity of any sources of direct heat such as heating, ovens, cooking stove etc. (This would mean the compressor would have to work harder and as a result the power consumption would be considerably higher).
If installation near a direct heat source cannot be avoided, we recommend fitting a suitable insulation plate between the appliance and the heat source (do not use asbestos), or at least the following minimum distances must be observed:
• from a gas or electric cooker 3cm
• from a radiator or oven etc. 30 cm
• from another refrigerating appliance 2 cm
• from washing mach./dishwasher 2 cm

Do not place any appliances, such as owaves, toasters etc. which give off heat on the chance.
Never obstruct the ventilation grille (as far as available)
Always pull out the plug itself and never pull the cable when cutting the appliance off from the mains supply.

WARNING!
Leave the appliance standing in its final position for at least 2 – 4 hours before switching it on, so that the circulation of the refrigerant stabilises and no operating problems occur.
Before connecting up the appliance, make sure that it is absolutely dry inside - especially in the corners.

Depending on its composition, the refrigerant be easily inflammable. The refrigerant circuit has been hermetically sealed and has been tested many of the risks for possible leaks.
Any inexpert interference might well create a fire hazard. Make sure nothing mechanically effects the circulation of the refrigerant, nor, in particular, the accessible parts around the compressor.

Only expert professional personnel should vene on the refrigerating system.

Warning!
Any refrigerant spilling out can injure your eyes. In the event of eye contact with the refrigerant, wash your eyes instantly under plenty of running water and call/consult a doctor (an eye specialist) immediately.
Climate category
The appliance, according to its climate category, is meant for use at certain room temperatures. These temperatures should not be exceeded! The climate category for your particular appliance is marked on the rating plate. The categories are:
| Name of climate category | Suitable room temperatures |
| SN | + 10°C to + 32°C |
| N | + 18°C to + 32°C |
| ST | + 16°C to + 38°C |
| T | + 16°C to + 43°C |
4 The rating plate
The rating plate with the technical data is affixed at the side on the inner wall or on the back of the appliance.
Take a note of the technical data
Copy here below the technical data from the rating plate so that it is easily accessible without having to move the appliance.
Model-/TypeN°......
Gross capacity......Litres
Net capacity Litres......Litres
Operating voltage.....V\~50 Hz
Maximum absorbed power ......(W)Watt
Safety fuse ....(A) Amp
Power consumption.....kWh/24h
Freezer capacity....kg/24h
5 Connecting up your appliance to the mains

Your appliance must be connected only to a grounded power socket which complies with relevant standards and has been installed by an authorised specialist.
Before you plug in your appliance to the power socket, make absolutely sure that the voltage (V) and the safety fuse (A) for the main fuse box stated on the appliance's rating plate match your electrical supply.
If these do not match, notify the nearest service department or your dealer immediately.

- The appliance must not be connected up to an inverse rectifier (e.g. solar panels).
- The appliance is not to be connected via an extension cable.
6 Using your appliance
Switching on / off and Selecting the Temperature Temperature dial (Thermostat)
The temperature dial switches the appliance on and off and sets the cooling temperature.
a) Switching on the appliance:
Turn the temperature controller clockwise. The appliance is switched on. (Turn the controller only as far as the stop, otherwise it will be damaged)
- The interior light is switched on (not fitted to all models)
- The compressor runs until the set temperature is reached inside the appliance.
- The internal temperature is shown in the display (not installed in all appliance models).
b) Temperature settings:
Turn dial left to lowest setting = slight cooling
Turn dial right to highest setting = lowest temperature
The temperature must be set according to:
- the appliance's room temperature
• quantity of stored food
• how often the appliance is opened
We recommend a medium setting. You will soon learn, through observation, which is the most suitable setting for your requirements.
Use a coin or a screwdriver to adjust the control thermostat on your freezer.
A correct temperature setting is important for storing food. Food is spoiled very quickly by micro-organisms and this can be hindered or delayed by a correct storage temperature. The temperature influences the rate of growth of micro-organisms. These processes are slowed down by a falling temperature.
This is why we recommend a middle setting of the temperature controller (ca. 7°C or lower)
c) Switching off: Turn the controller counter clock wise as far as the stop.
- Interior light in fridge compartment goes out
- Compressor is switched off
- The temperature display (where fitted) goes out
Pilot lights:
If your appliance is equipped with pilot lights, they indicate the following:
The green pilot light - when present - must always remain on when the appliance is connected up to the electrical supply and is switched on. It is very important to pay attention to this because in the event of a power failure, the red and yellow pilot lights stop operating and no longer provide a warning.
If the red pilot light comes on there may be several reasons for this, namely:
• The appliance is being started up for the first time
- It is being restarted after defrosting of the freezer compartment
- The freezer compartment has been refilled with fresh food
In these cases it is quite normal for the red pilot light to be on. It goes off automatically when the temperature inside the freezer compartment reaches approximately -18°C. (only valid for 3-Star and 4-Star compartments)
Switch on (if provided) the SUPER COOL- or SUPPER FREEZE SWITCH (switch off again no more than 24 hours later or when the red light goes off).
If possible, do not open the freezer compartment until the red light has gone off.
If the red pilot light continues to remain on after 12 to 24 hours, there may be a serious problem.
In this case consult the chapter:
„What to do when....“ (Troubleshooting guide)
7 Super-cooling Super freezing function
(not fitted to all models):
The super cooling function enables the fridge compartment to be cooled very fast to ca. 2 °C.
It is recommended to use the supercooling-button function if you want to cool large amounts of fresh foods or drinks quickly. Press where available the super cooling button.
The corresponding indicator light illuminates when available.
The unit is now working with the highest possible cooling capacity and the temperature drops. Switch off the super cooling button after about 4 to 6 hours.
In some models, the Super cool function switches off automatically.
- Press the Super cooling button to switch off the function.
- The indicator light (where available) goes out.
- The unit is now working again at normal power.
The same principle applies to the Super freeze button for fast freezing of fresh food in the freezer. However this function should be switched off after 6-12 hours only, depending on the filled in fresh food quantity.
8 Interior light
(not fitted to all models)
A switch is installed on all appliances fitted with a light. When the fridge is switched on via the temperature controller, the light is switched on automatically when the door is opened and off when the door is closed. The lamp is protected by a transparent cover.
Use only replacement lamps of max. 15 W with base E 14.
To change the lamp, proceed according to the separately enclosed instructions and / or the illustration at the back of these instructions.
9 Changing the lamp:
(see chapter "Components"
Never fit a lamp with a higher wattage rating than that stated above. The voltage (V) marked on the lamp must always correspond to that shown on the appliance rating plate.
10 Temperature zones
Through natural air circulation, different temperature zones are produced inside the fridge compartment which are suitable for storing different products. The coldest zone is directly above the vegetable tray(s); that is to say in the lowest area and against the rear wall (suitable for instance for sausages and meat products); the warmest zone is in the upper front and in the door (suitable for butter and cheese for spreading).
So arrange your produce according to the following table and store it so that the air can circulate properly. Do not pack items in too closely.
In normal operation the temperature display (where fitted) on the control panel shows the actual temperature in the central zone inside the appliance.
If the temperature in the appliance is not in the possible temperature display range (between 2 and 8 °C), only a line shows in the temperature display.
11 Arrangement of the produce (from top to bottom)
1. Door compartments
a) Butter, cheese
b) Eggs
c) Small glasses or bottles, cans, herbs and spices
d) Large beverage bottles, cans
2. Fridge compartment (metal racks / glass shelves)
a) Preserves
b) Bread and confectionery, ready-cooked meals
c) Dairy products / sausage and meat product s
d) Sausage and meat products
e) Fruit, vegetables, salad belong to the vegetable drawer
12 Moving the storage elements
In some appliance models the storage elements can be moved according to the height of the products.
- Pull the element forward as far as the stop and take it out from the front by lifting.
- Replace the storage element at the desired location with the rear edge upwards.
- The rear edge must be upwards to prevent products from touching and freezer to the rear wall.
Divided storage element (where fitted)
The front part of a divided storage element can be taken out. This enables higher products to be placed on the lower storage element.
Moving the storage / bottle retainers in the inside of the door (not possible in all models)
- Release the storage / bottle retainer from its mountings by pressing together at the side and pulling out from the front.
- Replace the storage / bottle retainer at the desired location. Make sure that it is correctly and firmly engaged in the mountings.
Moving the bottle holder
(not available in all models)
The bottle holder can be moved left or right. This renders individual bottles more secure when opening and closing the door.

- Food products which are susceptible to taking on or giving off aroma or taste are always to be stored in closed containers or suitable packing.
- Fruit, vegetables and salad produce can be stored unpacked in the vegetable tray(s).
- Suitable packing materials for food are reusable plastic film, aluminium foil, also metal or glass containers.
- Products are not to touch the rear wall, otherwise they can freeze on.
• Always leave hot food and beverages outside the fridge sufficiently long to cool. - Always open the door briefly so that the appliance interior is not warmed. This saves Energy.
- Never store explosive materials or products with flammable propellants (e.g. cream dispensers with pressure capsules, spray cans) Risk of explosion!
- Do not place edible oil in expandable containers in the fridge door. These can cause stress cracks in the plastic of the door.
- High percentage alcohol is only to be stored in the cold zone, upright and absolutely securely sealed.
13 Freezer compartment (where fitted)
The 3-star ( ^ ) or 4-star ( ^ / ^* ) freezer compartment is suitable for storing deep frozen food (already frozen food), for freezer and short-term (2-3 weeks) storage of small quantities of fresh food, also for preparing ice cubes and ice creams, sorbets etc.
Be sure to comply with the producer's directives on the storage period for frozen food.

Freezer compartments with a 2-star designation
(**) reach -12^ and colder.
Freezer compartments with a 1-star designation (\*) reach -6^ and colder.
They are therefore not suitable for deep freezer and for the long-term storage of fresh food.
However, depending on their type, fresh food or deep frozen food can be kept here for 3 to 5 days longer than in the fridge compartment.
So-called ice compartments (no star designation) reach 0^ C and colder. They are the least suitable for freezer and long-term storage of food.
However, all the above mentioned compartments are excellent for preparing ice cubes.
The cooling / freezing temperature is set via the temperature controller. A temperature of -18^ is necessary to freeze fresh food and for the long-term storage of food. In the refrigerator a temperature between 5^-7^ is required.
At this temperature the growth of micro-organisms is largely inhibited. Once the temperature rises above 10^ C, decomposition by the micro-organisms commences and the storage life of the food products is reduced.
For this reason fully or partly defrosted food is only to be refrozen if it has been processed to a ready-to-eat meal (cooking or roasting). The high cooking temperatures will ensure that most micro-organisms will be destroyed.
The higher the setting at the temperature controller, the lower the temperature in the appliance.
A middle setting of the temperature controller is sufficient for normal use of the appliance and the short-term storage of food in the freezer compartment.
We recommend a setting between middle and maximum for normal use and for longer-term storage of food in the freezer compartment.

Important Notes for storage of frozen food
- Do not store cans and bottles of beverages containing carbon dioxide in the freezer compartment. The contents expand on being frozen and can burst the container. Risk of injury and damage!
- Bottles placed in the freezer compartment for rapid cooling must be taken out after one hour at the most. The bottles can burst. Risk of injury and damage!
- Before deep frozen ice creams and ice lollies are eaten, they should be left a few minutes after removal
from the appliance. This is to prevent injury to the lips and tongue (torn skin). For the same reason, avoid contact between wet hands and the ice covered internal walls.
i Important information
- Store only properly packed deep frozen food in the freezer compartment.
- When storing ready-to-eat deep frozen food, note the use-by date stated by the producer.
- Remember that only good quality fresh food is suitable for freezer.
- Freeze fresh food in suitably sized portions.
- Never freeze more than 1-2 kg of food.
- Be sure to use suitable packing materials (reusable plastic film, aluminium foil, freezer containers).
- Press all the air from the packet.
- Seal the packets with elastic bands, plastic clips, string or cold-resistant adhesive tape.
- Plastic film bags and tubes can also be sealed with a film welding appliance.
- Mark the sealed packet with contents, weight and date of freezer.
- Place the produce with its broad surface on the floor of the freezer compartments so that that it freezes right through in the shortest possible time.
- To prevent them freezer together make sure that packets are dry before placing in the compartment.
- To prevent partial defrosting place food to be frozen so that it is not in contact with food already frozen.
- Do not refreeze fully or partly defrosted food unless it is to be processed to a ready-to-eat meal (cooking or roasting).
- Do not consume food which has been stored beyond its use-by date. This can result in food poisoning.
14 Preparing ice cubes, ice cream, sorbets etc.
- Ice cubes: Three-quarters fill the ice cube tray with water and place this on the floor of the freezer compartment. The ice cubes can easily be removed from the tray by placing the tray briefly under running water.
- Ice cream: Use an ice cube tray without the separator. Ice cream containing fat (cream) will take longer to freeze than water-based ice cream. The ice cream can be easily removed from the tray by placing that tray briefly under running water.
15 Placing the appliance out of service
If the appliance is to be placed out of service for a long period, turn the temperature controller to „0“ and clean the appliance as described in the chapter "Cleaning".
i To prevent odours and the formation of mould, leave the appliance door open all the while it is not in use.
16 Cleaning and care
Before cleaning it is important to pull out the mains connector plug or unscrew / trip the line-side fuse.
For the upkeep of the external appearance of your fridge / freezer, clean the outside every now and again with furniture polish or with an enamel protecting product (never, on any account use it inside). Clean the door seal with warm water now and again but do not use any cleaning products. Do not apply any oil or grease to the door seal.
Clean the inside of the appliance at regular intervals.
- You are recommended to clean the fridge compartment at least once per month and the freezer compartment after each defrosting.
- Remove the produce from both compartments and store in a cool place.
• Take out all the removable parts from the appliance. - The various parts inside the fridge / freezer are generally not suitable for dishwashers. These should
- be washed by hand with warm water and a little washing-up liquid. Never use the cleaning agent neat and on no account use any abrasive or acid, i.e. chemical cleaning products. A general all purpose pH neutral cleaning agent is recommended.

The use of steam cleaning appliances is extremely dangerous and is therefore strictly forbidden.
- Wipe the interiors and accessories with clean water and dry everything with a cloth. Then leave the appliance to air for 3-4 minutes.
- Do not damage or remove the rating plate from the inside of the appliance – it is important for the after-sales service and for the subsequent disposal.
- Take care that no cleaning water comes into contact with current-carrying parts inside the appliance.
- If the rear of the appliance is fitted with a heat exchanger, - also known as a condenser – periodically remove any accumulation of dust and fluff. Dust a nd fluff obstruct the dissipation of heat from the interior and considerably increase the energy consumption. The best way to remove dust from the heat exchange is to use a soft brush or a feather whisk.
- Make certain that the water from defrosting can run off unhindered via the channel. Clean out the drain aperture occasionally, using a cotton wool bud or similar.
No cleaning water is to run through the defrost water drain hole. This would cause the evaporation trap to overflow and cleaning water would spill out on to the floor.
17 Freezing / Storing fresh food
Almost all fresh products are suitable for freezing and storing in the freezer.
For the most common of these products, a storage guide with details of acceptable storage times and the most suitable packaging is provided. (see "Food storage guide" at the back of this user manual).
Prepare ice cubes:
Fill the ice cube trays at 2/3 with water.
The ice cubes dissolve by twisting the tray or by holding the tray under running water for a short time.
Label fresh products clearly as they are not easy to identify when deep frozen in transparent freezer-bags.
We recommend using commercially available labels for frozen foods.
Pack fresh products in portions suitable for your needs to avoid defrosting quantities that are too big for you to use up in one day.
Label the portions with at least the following information:
• Product name (e.g. beef fillet)
• Weight of the Portion
• Quantity (number of pieces)
- Freezing date
- Use by date (see "Food storage guide")
Then continue as follows:
a) Berries, fruits with peel, herbs etc. should be laid out loose for freezing on the freezing tray (not all models are supplied with this) in the upper part of the freezer and then put into freezer bags after about 12 hours. Store the filled freezer bags in one of the available drawers.
Fresh food should be placed in the top drawer and moved down to one of the lower drawers after approx. 24 hours. Avoid putting fresh foods directly in contact with deep frozen food. The deep frozen food could defrost and may not last out the normal storage time.
b) Within a period of 24 hours fill up the freezer only with the adequate quantities of fresh food for the freezing capacity of your freezer.
Consult the information on the rating plate (* XX kg/24h).
c) If your freezer is equipped with SWITCH, switch it on (the yellow light will come on) this is not strictly necessary when filling up with already frozen foods (e.g. deep frozen foods).
WARNING! Switch off the SUPER FREEZE SWITCH after 24 hours at the latest (the yellow light will go off).
d) Set the temperature dial to a medium to high setting.
e) Keep the temperature in the freezing compartment under control preferably by placing a suitable thermometer with a scale range of up to -26^ C.
The storage temperature must always be at least - 18°C.
Refilling the freezer compartment with fresh (not frozen) food
Make sure that you wait at least 24 hours before refilling with fresh food, in adequate quantities for the freezing capacity of your freezer (XX kg/24h).
Maximum capacity
In order to ensure correct storage of frozen food, never fill the drawers up to the top.
Set the temperature dial strictly according to the filling capacity.
To save energy in normal room temperatures ( +18^ to +22^ ) we recommend setting the temperature dial to a medium setting.
Storage time
The storage time for ready deep-frozen products depends on the type of product and on its ingredients.
For this reason, you should strictly follow the producer's instructions on the packaging.
When you want to freeze fresh foods yourself, consult the Food storage guide at the back of this user manual.
Once frozen foods have been defrosted, they should be used up within between 12 to 24 hours.

Do not eat any food beyond its storage time, this could lead to food poisoning.
Refrigerating storage battery
(not supplied with all appliances)
Refrigerating storage batteries serve two functions:
- In the event of a power cut, the storage battery prevents the temperature inside the appliance from
- going up too much – this preserves the quality of the food for longer.
- Put storage batteries with the flat side in contact with the uppermost evaporation panel or in the top compartment.
- Storage batteries can also be used to keep foods cool in a cool box.
• Storage batteries reach their maximum refrigerating - capacity after they have been in the freezer for about 24 hours at - 18° C or lower and are then placed in one of the cool boxes that are commercially available.
Precautions and advice
- Whenever cleaning or defrosting, remove the power plug or switch off the main fuse.
After closing the freezer door, do not open it immediately and do not force it open under any circumstances. The vacuum created by the sealing of the door is dispersed after about 1 - 2 minutes, so that the door can be opened normally again.
- To prevent condensation and ice forming, allow cooked food to cool down to room temperature before closing the lid of the dish and before storage.
- Leave the freezer door open as briefly as possible to avoid wasting energy and to prevent an excessive amount of ice forming in the freezer compartment.
- If the red pilot light comes on unexpectedly or stays on for a long period of time, do not open the door on any account and take appropriate measures immediately (see chapter "What to do when....."
- Never use a screwdriver or any other sharp-edged metal tool to remove the layers of ice. The inside walls are very delicate and can be easily damaged by sharp edges. Use only plastic or wooden scrapers with no sharp edges.
18 Defrosting
a) Fridge
Whilst the compressor (refrigeration unit) is running frost and condensation can form on the rear wall. These do not have to be removed as the fridge automaticly defrosts.
The defrost water runs from the channel via the drain hole, into a vessel from which it evaporates.
Some refrigerator models have no automatic defrosting.
These appliances can be recognised by the fact that they have no run-off channel (with a hole) for the defrosted water on the internal rear panel of the refrigerator (see Appliance components Section (6)).
These refrigerators must be defrosted by hand from time to time. The procedure is similar to that used for defrosting a freezer compartment (see Chapter 17 b) Freezer compartment)
b) Freezer compartment (where fitted)
The freezer compartment with static function does not automatically defrost as the frozen produce is not permitted to defrost.
Defrost the freezer compartment occasionally, at the latest however when a ca. 5 cm thick coating of ice has formed. Carry out the actions described in the chapter "Cleaning and care" and the following steps.

For appliances with no-frost function (frost free) is process is not required

Potential hazards
Never use electrical appliances such as hairdryers, hot air fans, steam cleaners, defrosting sprays or open flames (e.g. candles) for defrosting the freezer compartment.
The plastic interior could melt and the emerging foam – gas could be ignited by sparks or open flame.

Never use a steam cleaning appliance to melt tings of ice in the appliance (extremely high risk electric shock)

Hints
- Remove the frozen produce and wrap it in layers of newspaper or blankets.
- Keep the frozen produce in a cool place until the freezer compartment is once more ready to use.
- Leave the door of the freezer compartment open.
- The layers of frost and ice in the freezer compartment are formed through normal operation. After a certain thickness is exceeded, these act as insulation and impair the transfer of cold.
-
Do not scrape off this frost or ice coating as this can damage the evaporator surface.
-
Carry out defrosting as quickly as possible to prevent the removed produce from defrosting.
- Continuously remove the water with a sponge
- or pull out and empty the water tray underneath, in the fridge compartment (not fitted to all models)
- Pull out the plug – where fitted - from the water drain hole and replace the water tray in its guideway.
- You can speed up the defrosting by placing a vessel of hot (not boiling) water with a pot stand in the freezer compartment. In this case close the freezer compartment door.
- Take care that the water tray – where fitted – does not overflow.
- When the freezer compartment is fully defrosted, empty the water collected in the tray into your kitchen sink.
- Replace the plug in the water drain hole and replace the water tray.
- Wipe the freezer compartment dry and replace the produce.
- Re-connect the power supply to your appliance.
- Switch the appliance back on with the temperature controller (see chapter "Switching on/off – Temperature selection") and – where fitted – press the fast freeze- and or the fast cooling button (see chapter "Super-cooling Super freezing function"
- Close the appliance door.
19 Troubleshooting guide
High quality manufacturing processes and the use of the latest refrigerating and freezer technology will basically ensure the trouble-free functioning of your appliance.
If you suspect any fault, before contacting your nearest service department directly or via your dealer, make sure you have followed all instructions and advice given in this user manual.

The compressor (also known as the refrigerating motor) must not operate continuously.
It is controlled by a thermostat which you set on the temperature dial and switches on automatically when the set temperature in the appliance is exceeded and switches off automatically when it is reached again.
Noise can be heard in every compressor - refrigerating system when it is switched on. These noises are produced when the motor in the compressor is running and by the refrigerant flowing through the refrigerating system circuit. These noises are normal and do not indicate any fault in the functioning of your appliance.
In unheated rooms and in cold weather conditions, condensation can build up on the outer walls of the appliance.
This does not mean there is a fault and it will disappear when the temperature increases.
Only call the service department, if after analysis of the possible fault factors, you cannot find any cause for the defect or you are not able to eliminate the fault.
Therefore first check under: „what to do when ......“
20 What to do when ....
a) The appliance does not function (it's not running).
Please check:
- Is the plug in good order and is it plugged in the socket properly?
• Is the electricity coming through? - (check this by possibly plugging in a small appliance such as a hand mixer or hair dryer etc.)
- Is the appliance switched on? (Temperature dial should not be set to "0").
- Is the house installation fuse screwed in and intact, or reset?
b) The appliance is not getting sufficiently cold Compressor is running too often
Please check:
Did you make sure that the fridge / freezer was left to stand for at least 2 hours before switching it on? (To stabilise the circulation of the refrigerating fluid) see: "starting up".
If no; Pull out the appliance plug connector, lift appliance with door closed on to one side for a short time, or place in an inclined position and then back on its feet. Plug in again after 2 hours. Do not open the door for ca. 12 hours.
- If the door is closing correctly, the door seal is firmly and uniformly pressed against the casing.
Test: place a sheet or writing paper between the seal and the casing and close the door. The paper should be difficult to pull out on all sides.)
Call the after-sales service if the paper can be pulled out without resistance at one or more points.
- Heavy ice formation on the internal walls of the freezer compartment (see „Cleaning and care“)
- Is the appliance exposed to direct sunlight or is it sited too close to a heat source (stove, radiator etc.)
Protect the appliance from direct sunlight / check distance from heat source / place insulation board between appliance and heat source. (see "Selecting installation location") - Is it filled with an excessive quantity of fresh food
- Is the aeration and venting ok, is the ventilation grille covered or is the heat exchanger (condenser) on the rear outside wall of the appliance laden with dust?
c) The temperature in the fridge compartment is too low
- Set the temperature controller to a lower setting
- Check whether the freezer compartment door is correctly closed
- Has a large amount (more than 1 kg) of fresh food been frozen? (this will cause the refrigeration unit to run for a very long time and the temperature in the fridge compartment will automatically fall)
- Has the super cooling function – where fitted – not cut out
d) The frozen produce defrosts because it is too warm in the freezer compartment
- Has the room temperature for which your appliance is designed, been fallen below ? (if the room temperature is too low, the refrigeration unit runs less frequently. Therefore it can be too warm in the freezer compartment)
- Increase the room temperature
e) Has a thick coating of ice formed in the freezer compartment?
- Check whether the door of the freezer compartment closes correctly
- If the frozen produce is frozen in place, release it using a blunt object, e.g. with the handle of a spoon
- Allow the freezer compartment to defrost and then clean it (see chapter „Defrosting“)
An excessively thick coating of ice reduces the cooling capacity and the current consumption increases.
f) The interior light does not function
Check as follows
• Is the light contact switch jammed?
- If not, then the lamp is defective. Change the lamp as described in chapter „Interior light – changing the lamp“
g) Appliance is excessively noisy
Check as follows:
- Is the appliance standing firmly on the floor, are adjacent items of furniture or objects being caused to vibrate by the running fridge/freezer? Ensure that all parts mounted to the rear wall can vibrate freely;
- carefully bend aside any contacting parts or increase the distance between the appliance and the obstacle.
- Are all removable parts correctly seated in the appliance?
- Are any bottles or containers touching?
Note; Flowing sounds in the refrigerant circuit cannot be avoided.

In no case are any interventions of a technical nature to be made to the appliance or attempts made to -repair it yourself.
21 Getting your appliance serviced
Any repairs or interventions on the appliance should only be carried out by the responsible service department, as otherwise the user may run considerable risks and the guarantee may no longer be valid.
Consult the enclosed guarantee card or the separately enclosed list of after sales centres, to see which company is responsible for servicing your appliance.
If there is no indication of the nearest service department in the documentation provided, then contact your dealer.
Repairs by the service department to eliminate faults which have occurred because of non-adherence to the information and advice given in this user manual, have to be charged to the customer and are not covered by your dealer's guarantee.
In order to receive immediate help, make sure you have ready the following essential data to identify your appliance:
- Appliance type and model (see the rating plate)
- Date of purchase
• Name and place of your dealer
• Description of the fault
22 Build in the appliance in a fitted kitchen
If your appliance can be built in a fitted kitchen, the relevant instructions are included among the other appliance documentation.
23 Warranty
The general terms and duration of the warranty are those stated on the warranty card here enclosed, or supplied by your dealer at the time of purchase.

Your purchase receipt is important to the warranty of.
The warranty on illuminants is excluded

The manufacturer works constantly at the further development of all products. Please therefore bear this mind as the form, set up and technology are subject change, without prior notice.
Refrigerator
natural_image
Technical line drawing of a mechanical device with internal components and directional arrows (no text or symbols)*depending on model
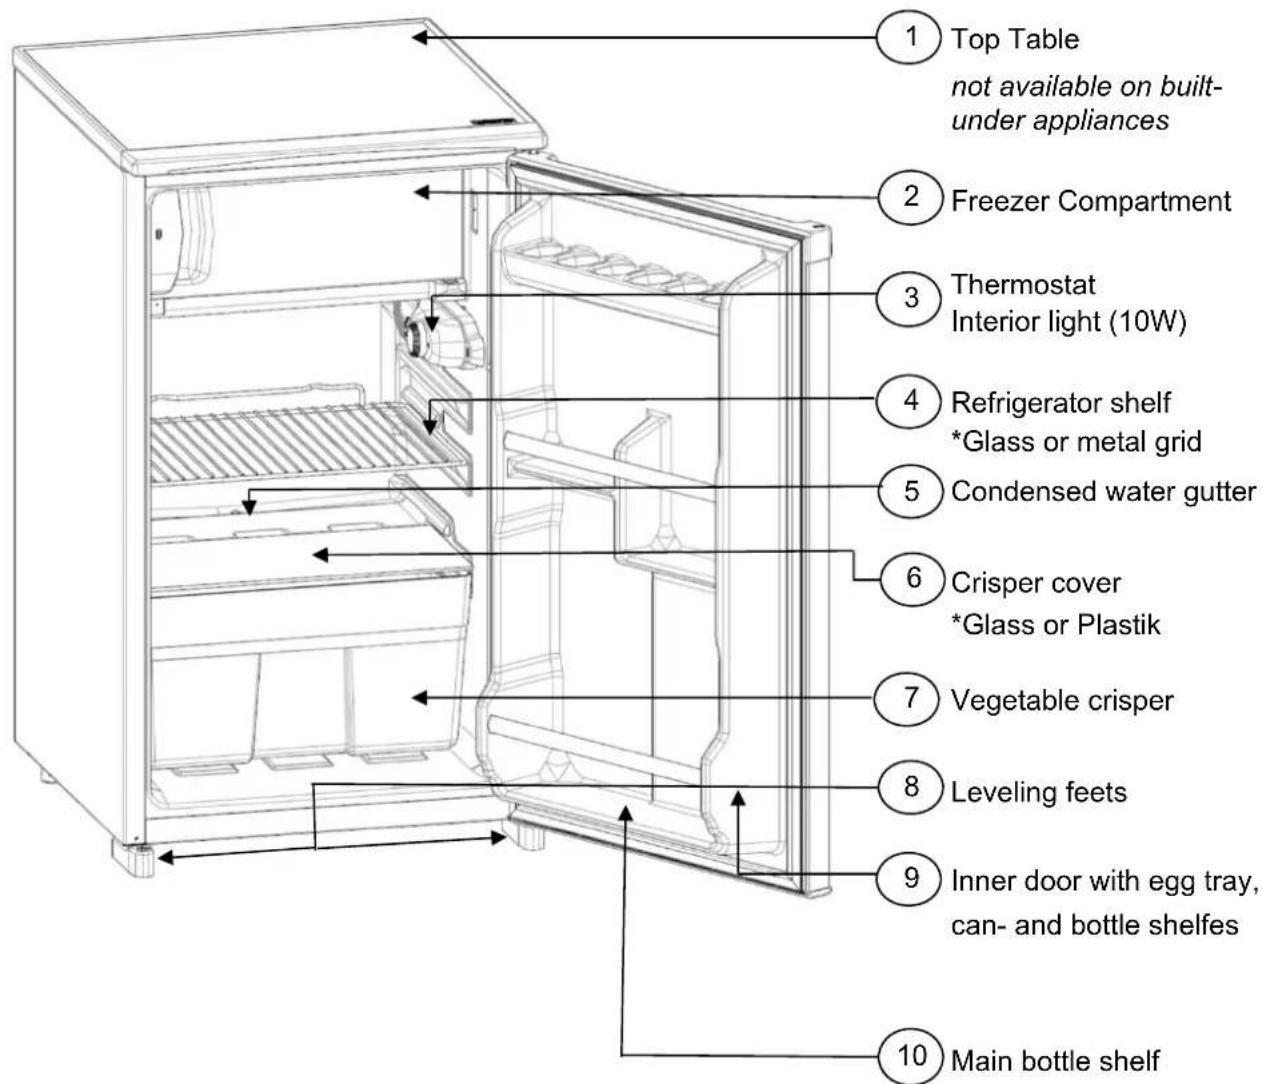
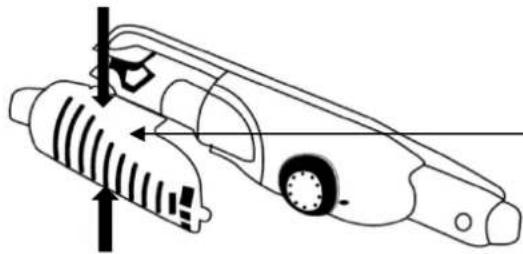
11)Replacing the lamp:
Unplug the appliance from the power supply.
Squeeze and remove the lamp cover (11).
Change the present lamp with a new one of not more than 10W.
Replace the lamp cover and plug the unit after waiting 5 minutes.
No guarantee is given for lamps.
| Stars Temperature Aoolication | recommended storage time | ||
| 0 3 bis -4 °C | short-term storage of frozen products | 1 to 2 days | |
 | min. -6 °C | short-term storage of frozen products | up to 1 week |
 | min. -12 °C | medium-term storage of frozen products | up to 3 weeks |
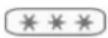 | min. -18 °C | long-term storage of frozen products | several months (depending on the food) |
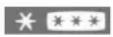 | min. -18 °C | Freezing of food and long-term storage of frozen products | several months (depending on the food) |

Devices with a 0-, 1-, 2- or 3 star compartment are not suitable for freezing fresh
Storage time in the 3- and 4 star freezer or freezer compartment
| Type of frozen food | Storage time (in Months) |
| Fruits | 8 - 12 |
| Vegetables | 6 - 12 |
| Bread | 1 - 3 |
| Meet | 3 - 12* |
| Cheese | 2 - 4 |
| Cake | 2 - 6 |
| Butter | 6 - 8 |
| Hard cheese | 2 - 4 |
| Soft cheese | 4 - 6 |
| Cream / Milk | 2 - 3 |
| Cooked meals | 1 - 3 |
In the case of bought frozen foods, observe the information on the packaging from the manufacturer.
* It is better not to refreeze meet once it has thawed.
Refrigerator with Freezer copartment

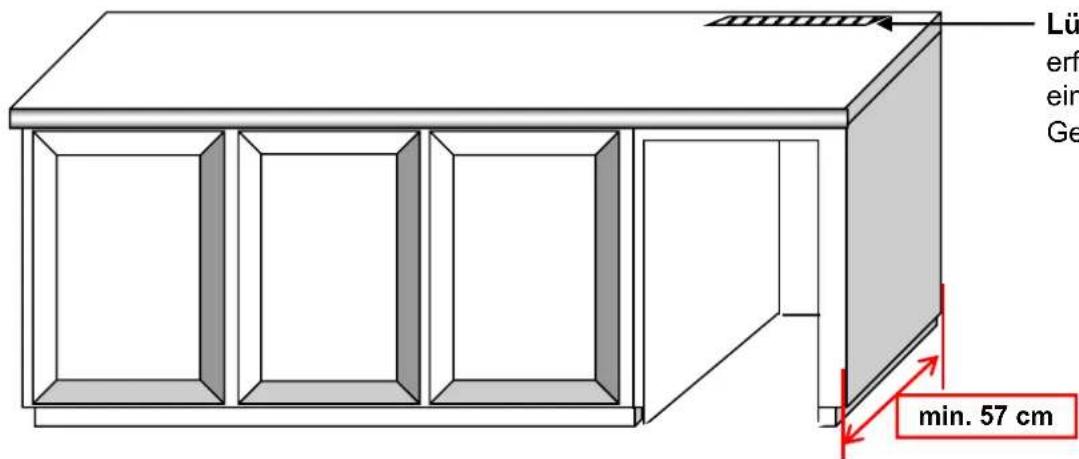
If the power plug isn't accessible anymore after built under the appliance, an electric contractor must be installed. (Switch with a contact opening of at least 3mm)
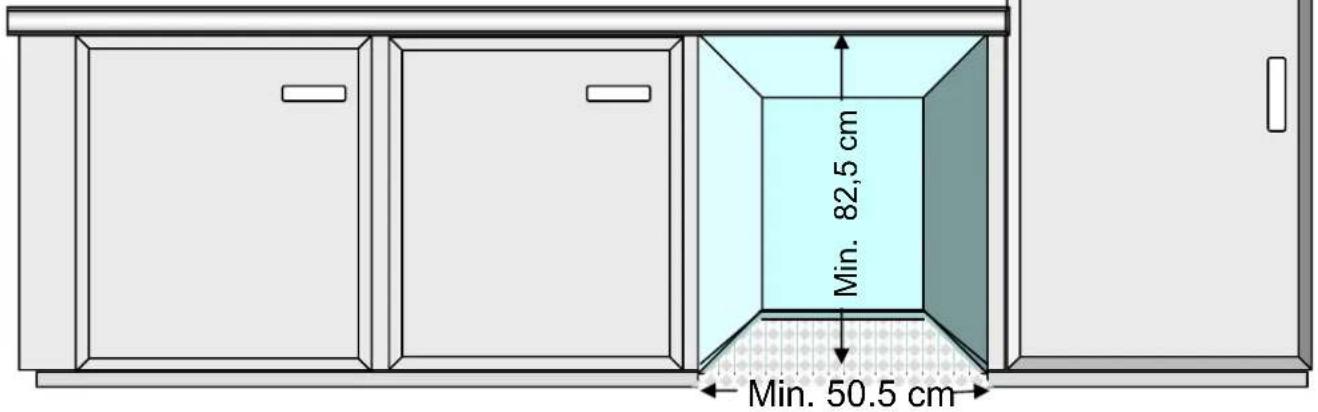
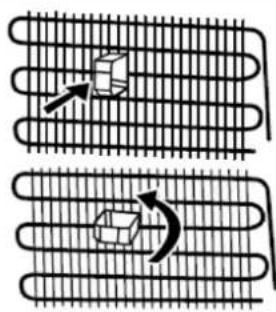
The condenser on the back of the appliance must not touch a wall.
Please mount Plastic spacer by turning it 90° as shown here below
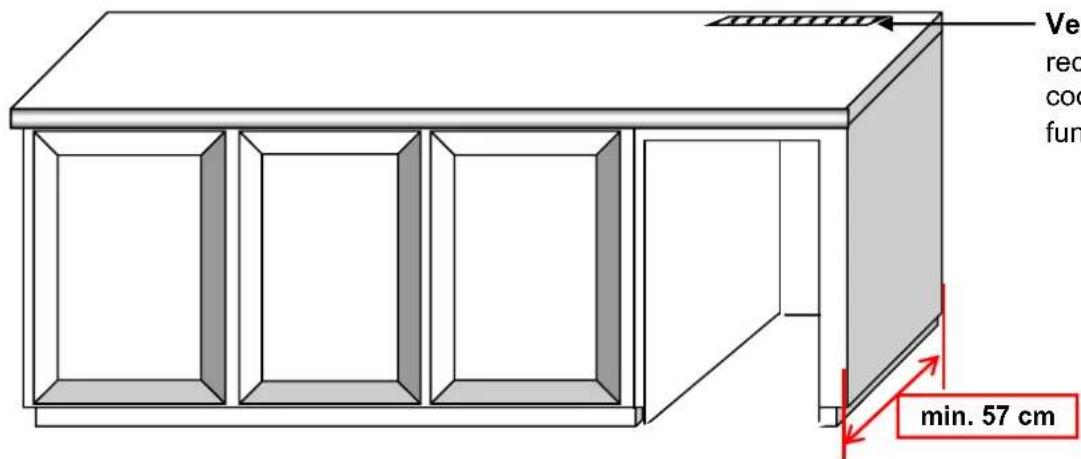
Ventilation Grill required for proper cooling / freezing function
REFRIGERATOR
Note: Assembly of the decorative frame by two people recommended
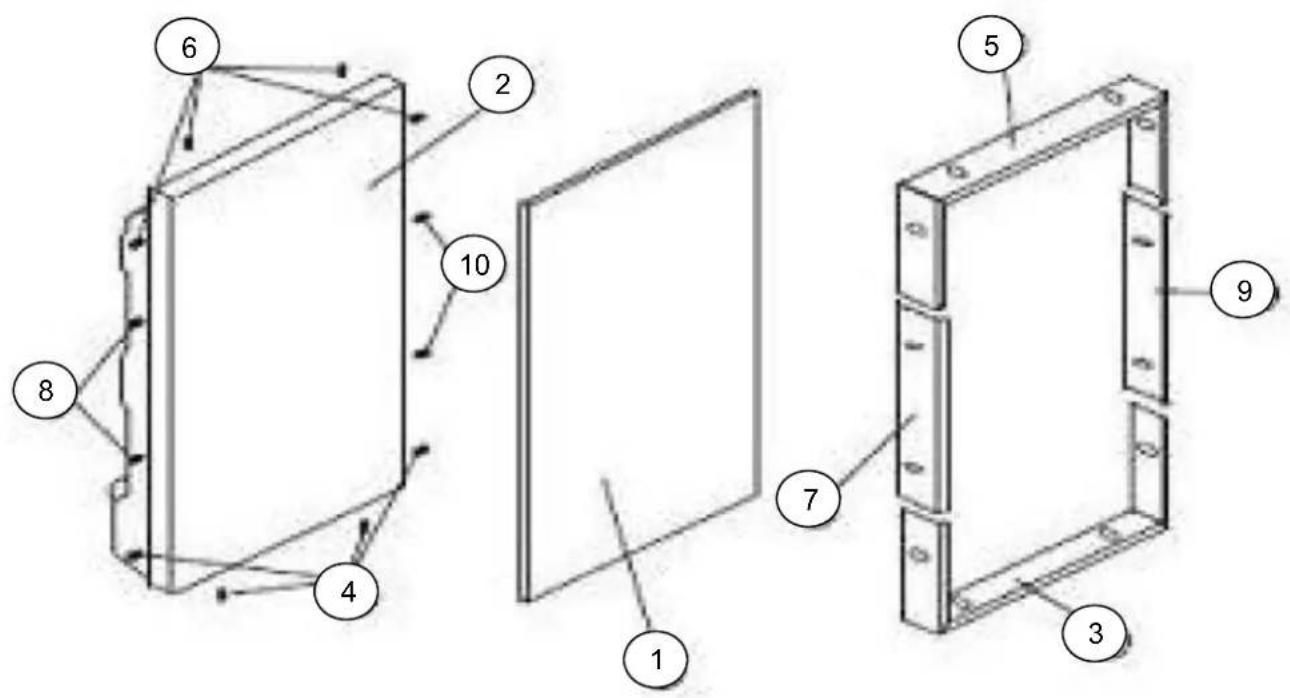
a) Place the decorative panel (1) on the surface of the appliance door (2)
b) Fasten the frame component (5) with 4 screws (6) to the top of the decorative panel (1)
c) Fasten the frame component (3) with 4 screws (4) to the underside of the decorative panel (1)
d) Fasten the frame component (9) with 2 screws (10) on the right side of the decorative panel (1)
e) Fasten the frame component (7) with 2 screws (8) on the left side of the decorative panel (1)
REFRIGERATOR
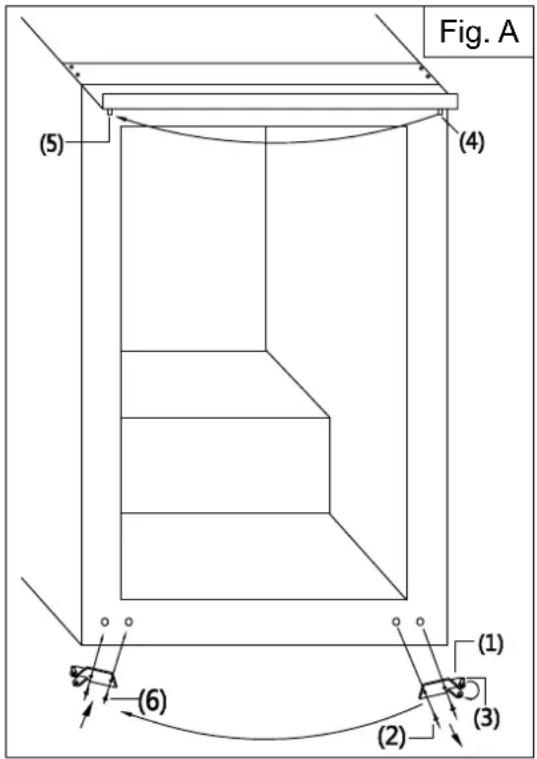
Usually the Appliance is factured with the door hinge on the right side. If necessary, one may change the door hinge from the right to the left side. BEWFORE BUILT IN THE APPLIANCE
Note: To be able to perform the following operations better tilt the unit gently 30 to 40 degrees backward, for example, against a wall. Use packaging material as a base.
- Unscrew the right bottom hinge (1) and close holes with the screws (2).
Unscrew the hinge axis (3) and screw it on the opposite side of the hinge, then we get the reversed hinge(6). - Unhook the door from the pin (4) by sliding down the door Put some packing material on the floor and put the door outside down in the material.
- Unscrew bolt (4) from the top right and screw the bolt in the hole on the opposite side of the appliance
- Insert the door back and hang it now on the bolt (5) located to the left
- Remove the screw hole plug on the left bottom.
- Fix the reversed hinge (6) with screws on the left bottom.
- Check that the refrigerator door closes tightly and tighten all the screws.
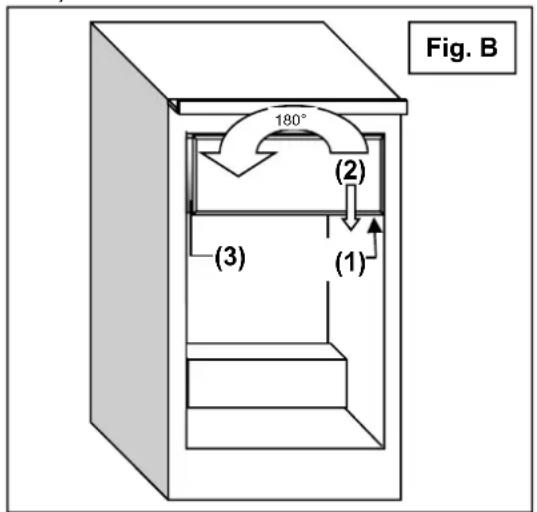
B) Change freeze compartment door-hinge (Fig. B) (as far as available)
- Remove the two screws (1) under the freezer compartment and put them aside.
- Move the door (2) downwards, remove it and put it aside.
- Unscrew the plastic part (3) on the left side wall and fix it on recess on the opposite side.
- Turn the freezer compartment door 180 degrees and reinstall it.
- Fix the hinge with the screws you have removed in step 1.
Technical changes reserved Pictures for illustration only
GARANTIEBEDINGUNGEN
The manufacturer does not take any responsibility for damage caused by the buyer.
This device has been manufactured and tested according to the latest methods. Irrespective of the seller's / dealer's statutory warranty obligation, the manufacturer provides a 6-month warranty for faultless material and faultless production for a period of 24 months from the date of purchase.
The warranty expires in case of intervention by the buyer or by third parties.
Damage caused by improper handling or operation, by incorrect installation or storage, by improper connection, improper installation, as well as by force majeure or other external influences, are not covered by the guarantee. We reserve the right to repair or replace defective parts or to exchange the device in case of complaints.
Only if repair (s) or replacement of the device, the intended use by the manufacturer should not be finally achieved, the buyer can demand warranty within six months, calculated from the date of purchase, reduction of the purchase price or cancellation of the purchase contract.
Claims for damages, including consequential damages, unless they are based on intent or gross negligence excluded.
In the case of unnecessary or unjustified use of the customer service, we charge the usual time and track charge for our service.
Complaints must be reported immediately after the detection of an error.
The replacement of light bulbs by our customer service technician is not subject to the warranty guidelines and is therefore subject to a charge. There is no warranty for bulbs.
The warranty claim has to be proven by the buyer, by presenting the purchase receipt. The warranty is valid within the Federal Republic of Germany.
- Operating- and Installation Instruction Built-under Refrigerator
- CE
- DECLARATION OF CONFORMITY
- Inhaltsverzeichnis
- Kapitel No. Seite
- Contents Page
- Explanation of information symbols
- The following symbol has the following significance:
- This is a safety information symbol.
- This is a warning symbol
- Danger scalding hazard
- Risk of electric shock
- Safety advices
- Risk of asphyxiation for children!
- Risk of electric shock!
- Risk of explosion!
- Refrigerant hazard!
- Risk of burns caused by low temperatures!
- Caution!
- Fire hazard!
- Electrical Safety Instruction
- FUSE REPLACEMENT
- IMPORTANT:
- For appliances with BSI plug only
- CONNECTION TO A REWIREABLE PLUG
- Protecting the environment / advice for disposal
- Packing
- Deciding where to locate your appliance
- Installing your appliance
- Note:
- WARNING!
- Climate category
- The rating plate
- Take a note of the technical data
- Connecting up your appliance to the mains
- Using your appliance
- Switching on / off and Selecting the Temperature Temperature dial (Thermostat)
- a) Switching on the appliance:
- b) Temperature settings:
- This is why we recommend a middle setting of the temperature controller (ca. 7°C or lower)
- Pilot lights:
- Super-cooling Super freezing function
- Interior light
- Changing the lamp:
- Temperature zones
- Arrangement of the produce (from top to bottom)
- Door compartments
- Fridge compartment (metal racks / glass shelves)
- Moving the storage elements
- Divided storage element (where fitted)
- Moving the storage / bottle retainers in the inside of the door (not possible in all models)
- Moving the bottle holder
- Freezer compartment (where fitted)
- Freezer compartments with a 2-star designation
- Freezer compartments with a 1-star designation (\*) reach -6°C and colder.
- So-called ice compartments (no star designation) reach 0° C and colder. They are the least suitable for freezer and long-term storage of food.
- Important Notes for storage of frozen food
- i Important information
- Preparing ice cubes, ice cream, sorbets etc.
- Placing the appliance out of service
- Cleaning and care
- The use of steam cleaning appliances is extremely dangerous and is therefore strictly forbidden.
- Freezing / Storing fresh food
- Prepare ice cubes:
- Then continue as follows:
- The storage temperature must always be at least - 18°C.
- Refilling the freezer compartment with fresh (not frozen) food
- Maximum capacity
- Storage time
- Do not eat any food beyond its storage time, this could lead to food poisoning.
- Refrigerating storage battery
- Precautions and advice
- Defrosting
- a) Fridge
- b) Freezer compartment (where fitted)
- For appliances with no-frost function (frost free) is process is not required
- Potential hazards
- Never use a steam cleaning appliance to melt tings of ice in the appliance (extremely high risk electric shock)
- Hints
- Troubleshooting guide
- Please check:
- Getting your appliance serviced
- Build in the appliance in a fitted kitchen
- Warranty
- 11)Replacing the lamp:
- Storage time in the 3- and 4 star freezer or freezer compartment
- Refrigerator with Freezer copartment
- REFRIGERATOR
- B) Change freeze compartment door-hinge (Fig. B) (as far as available)
- GARANTIEBEDINGUNGEN
Brand : Respekta
Model : UKS 110 A+
Category : Refrigerator