
CPB101 - Grill DOMETIC - Free user manual and instructions
Find the device manual for free CPB101 DOMETIC in PDF.


| Product Type | Portable Gas Grill |
| Brand | Dometic |
| Model | CPB101 |
| Fuel Type | Butane/Propane gas |
| Dimensions (approx) | 40 x 30 x 20 cm |
| Weight (approx) | 5 kg |
| Cooking Area | Approx. 25 x 20 cm |
| Ignition Type | Piezo electric |
| Material | Stainless steel and enamel |
| Power Output | 2.5 kW (approx) |
| Gas Consumption | 180 g/h (approx) |
| Easy Cleaning | Removable drip tray |
| Safety Features | Gas regulator, flame failure device |
| Spare Parts Available | Yes, from Dometic service |
| Repairability | Modular design, replaceable parts |
| Warranty | 1 year (check local regulations) |
Frequently Asked Questions - CPB101 DOMETIC
User questions about CPB101 DOMETIC
0 question about this device. Answer the ones you know or ask your own.
Ask a new question about this device
Download the instructions for your Grill in PDF format for free! Find your manual CPB101 - DOMETIC and take your electronic device back in hand. On this page are published all the documents necessary for the use of your device. CPB101 by DOMETIC.
USER MANUAL CPB101 DOMETIC
CPB101

Portable BBQ
Installation and Operating Manual
© 2020 Dometic Group. The visual appearance of the contents of this manual is protected by copyright and design law. The underlying technical design and the products contained herein may be protected by design, patent or be patent pending. The trademarks mentioned in this manual belong to Dometic Sweden AB. All rights are reserved.
3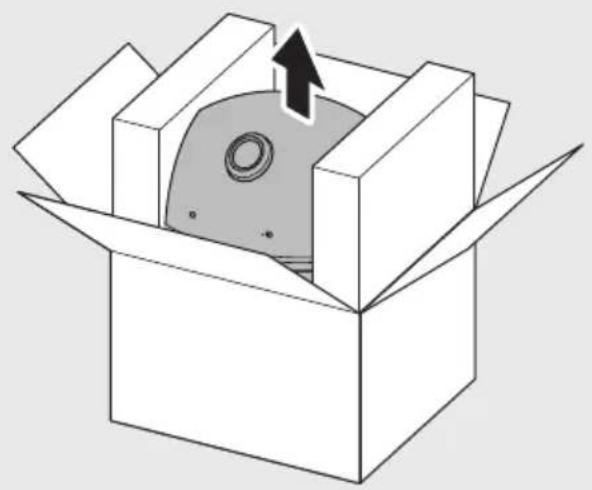
4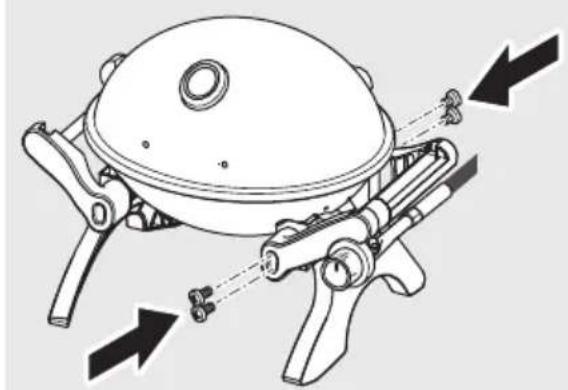
Important. Read these instructions for use carefully.
Familiarise yourself with the appliance before connecting it to its gas container. Keep these instructions for future reference. If the device is passed on to another person, this manual must be handed over to the user along with it.
Contents
1 Explanation of symbols ..... 11 2 General safety instructions ..... 11 3 Scope of delivery .....14 4 Intended use....14 5 Before initial use ....15 6 Using the device .....16 7 Cleaning and maintaining the device .....19 8 Troubleshooting 20 9 Warranty 21 10 Disposal....21 11 Technical data 22
1 Explanation of symbols

WARNING!
Safety instruction: Indicates a hazardous situation that, if not avoided, could result in death or serious injury.

CAUTION!
Safety instruction: Indicates a hazardous situation that, if not avoided, could result in minor or moderate injury.

NOTICE!
Indicates a situation that, if not avoided, can result in property damage.

NOTE
Supplementary information for operating the product.
2 General safety instructions
The manufacturer accepts no liability for damage in the following cases:
- Faulty assembly or connection
- Damage to the product resulting from mechanical influences • Alterations to the product without express permission from the manufacturer
- Use for purposes other than those described in the operating manual
2.1 General safety

WARNING!
- This appliance shall only be used in an above ground open-air situation with natural ventilation, without stagnant areas, where gas leakage and products of combustion are rapidly dispersed by wind and natural convection.
- Only use Universal LPG (propane/butane). Do not use any other fuel sources. Product is designed for use with 4 kg and 9 kg LPG cylinders.
2.2 Safety precautions when handling liquid gas

WARNING!
• After use, always disconnect the gas cylinder. - Store gas cylinders away from heating or cooking devices and other light or heat sources in a well-ventilated area out of the reach of children. - Never store liquid gas cylinders in unventilated areas or below ground level (funnel-shaped holes in the ground). - Never store liquid gas cylinders in buildings such as garages. - Any indoor storage must comply with AS/NZS 1596. - Do not store gas cylinders on their side. - Keep liquid gas cylinders away from direct sunlight. The temperature should not exceed 50 °C.
2.3 Operating the device safely

WARNING!
- Beware of suffocation.
While burning liquid gas, the device also consumes oxygen. When used indoors, there is a risk of suffocation due to insufficient oxygen.
Only use the device outdoors. Under no circumstances use it indoors. Never use the device in a garage, porch, or tent.
- If there is a leak on your device (smell of gas):
- Immediately attempt to turn off the cylinder valve.
- Remove the device to a well-ventilated location away from any ignition source.
- Check for leaks using soapy water.
- Do not try to detect leaks using a flame.
- If the odor continues, keep away from the device and immediately call your gas supplier or your fire department.
- Do not use this device if it is leaking, damaged, or does not operate properly.
- Check that seals between the device and the gas cylinder are in place and in good condition before connecting the gas cylinder.
- Do not use the device if it has damaged or worn seals.
- Only use the hose assembly as supplied with this device for connection to the cylinder – do not use adapters.
- Avoid twisting or kinking the flexible hose.
- This device can be used by children aged from 8 years and above and persons with reduced physical, sensory or mental capabilities or lack of experience and knowledge if they have been given supervision or instruction concerning use of the device in a safe way and understand the hazards involved.
- Children must be supervised to ensure that they do not play with the device.
- Cleaning shall not be conducted by children without supervision.
- Only operate the device when you or another person can attend to it.
- Wear appropriate clothing when using the device. Do not wear loose-fitting clothing which could easily catch fire.
- Do not move the device during operation.
- Leave the device to cool down properly before you touch it with bare hands.
- Replace porous or damaged hoses immediately.
- This device must only be serviced by an authorized person.
- Never change the nozzles, injector or burners.
- Use the device for cooking only. Never use it for other purposes.
- The device must not be positioned under any overhead combustible construction.
- The advised minimum distances (300 mm) from combustible materials must be maintained at all times.
• DO NOT MODIFY THIS APPLIANCE.
• DO NOT PLACE ARTICLES ON OR AGAINST THIS APPLIANCE.
- DO NOT USE OR STORE FLAMMABLE MATERIALS IN OR NEAR THIS APPLIANCE.
• DO NOT SPRAY AEROSOLS IN THE VICINITY OF THIS APPLIANCE WHILE IT IS IN OPERATION.

NOTICE!
- Hot parts should not be allowed to come into contact with oil, water or any other liquids.
- Never move the device when it is still hot.
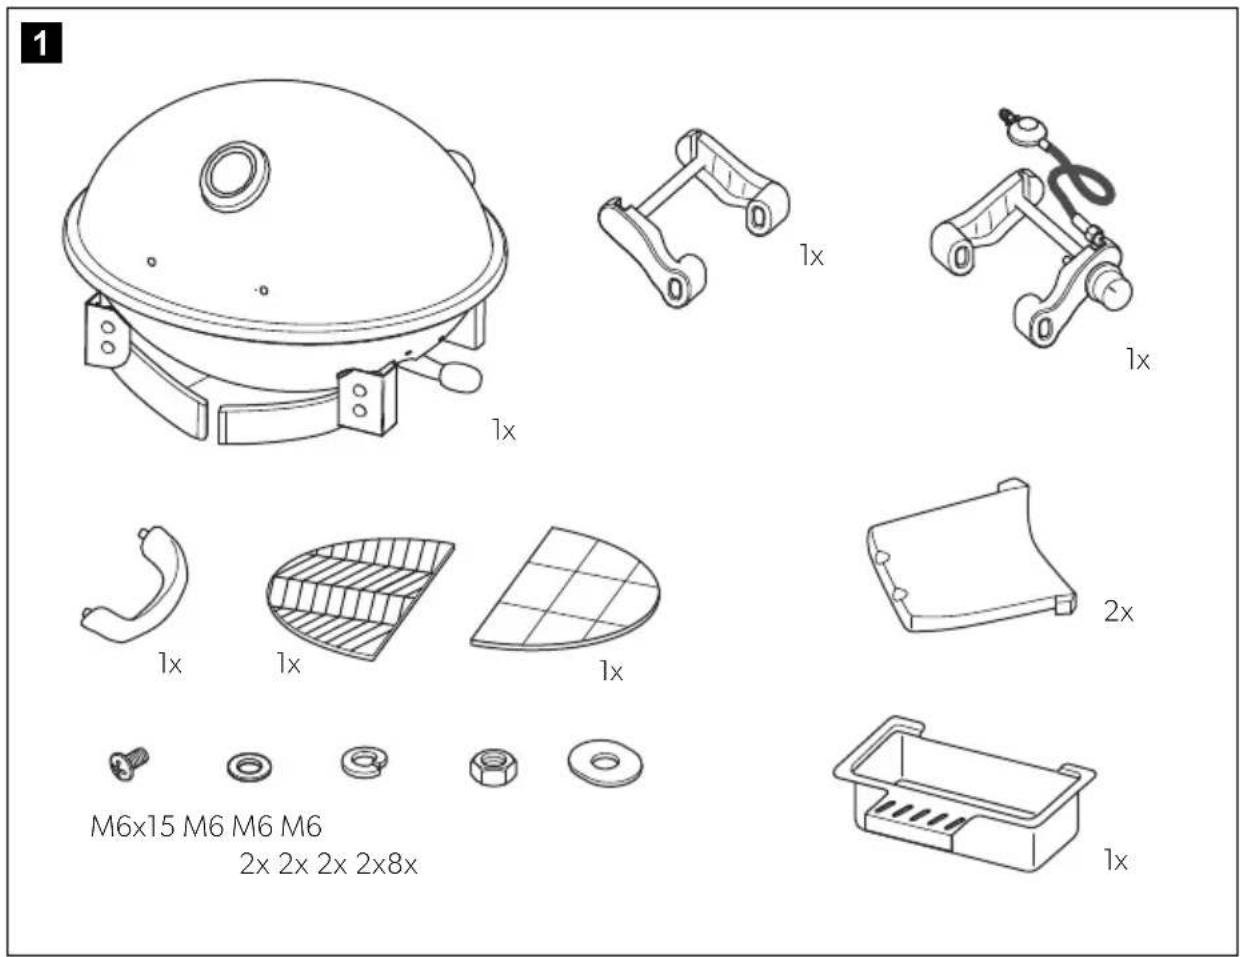
3 Scope of delivery
See fig. 1, page 3.
4 Intended use
The Dometic CPB101 portable BBQ is intended for domestic mobile outdoor use only. Do not use for commercial purposes including events in clubs or similar events.
Any enclosure in which the appliance is used shall comply with one of the following (see fig. 2, page 3):
- An enclosure with walls on all sides, but at least one permanent opening at ground level and no overhead cover.
- Within a partial enclosure that includes an overhead cover and no more than two walls.
- Within a partial enclosure that includes an overhead cover and more than two walls, the following shall apply: – at least 25% of the total wall area is completely open; and – at least 30% of the remaining wall area is open and unrestricted.
- In the case of balconies, at least 20% of the total of the side, back and front wall areas shall be and remain open and unrestricted.
Let the device cool down completely before putting it in a tent or awning.

WARNING!
To ensure safe operation of the BBQ only one cast iron hot plate may be used at a time.
5 Before initial use
The permitted gas pressure can be found on the type plate of the device.
Always use the supplied gas hose and regulator. If this becomes damaged please contact the manufacturer's support (see back page) to organise a replacement.
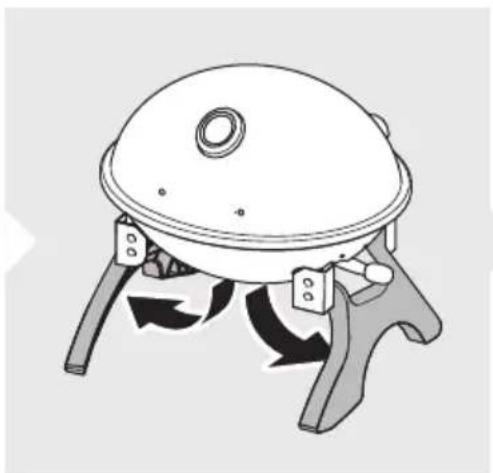
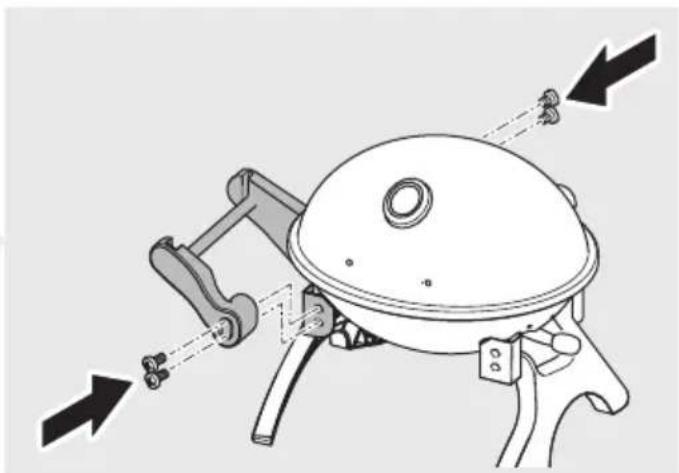
Assembling the portable BBQ
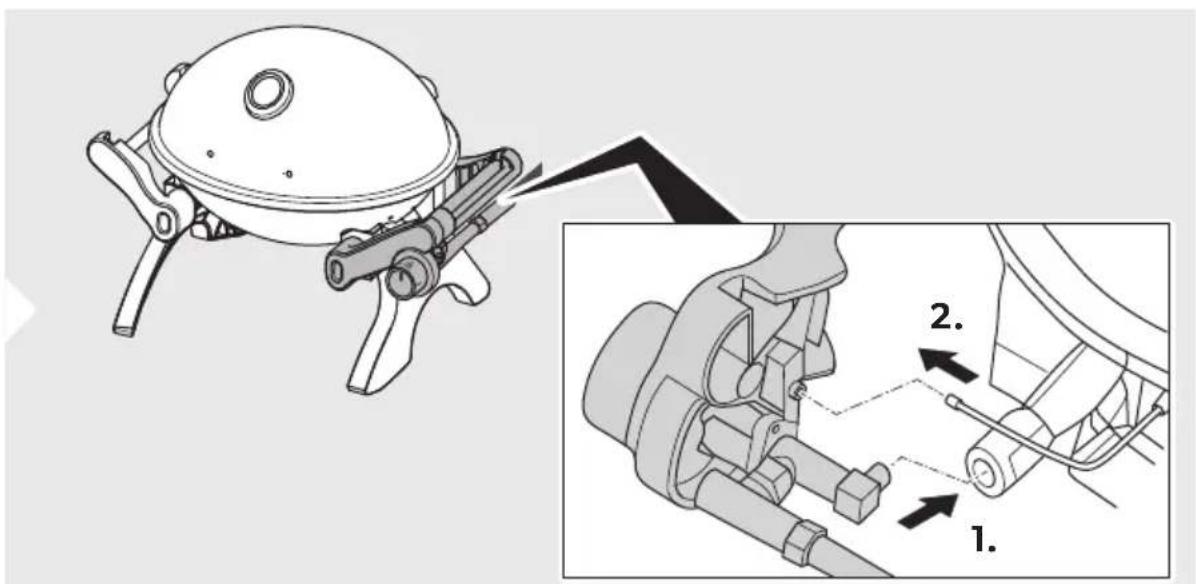
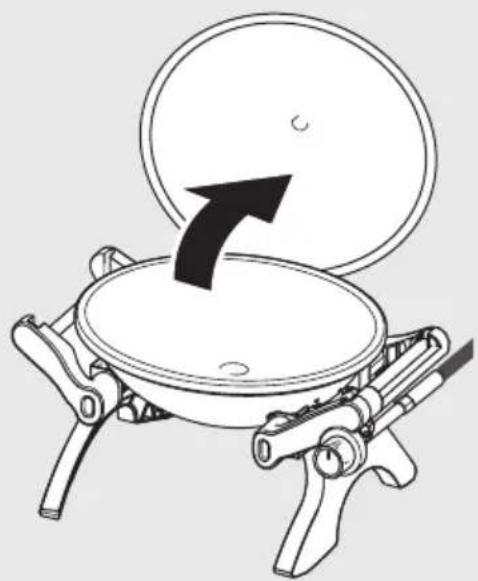
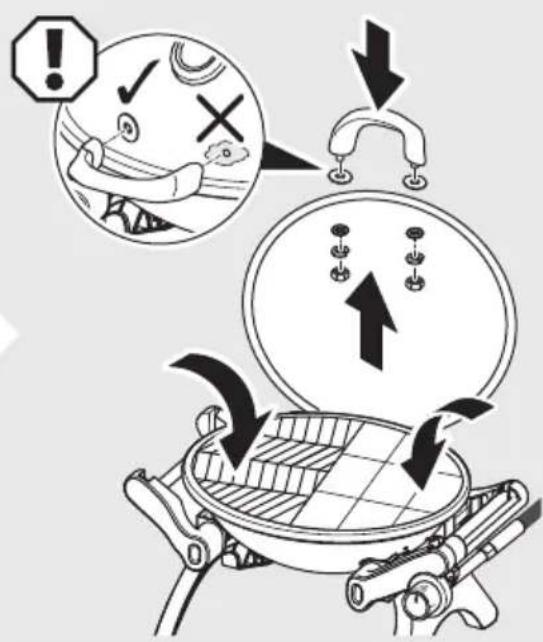
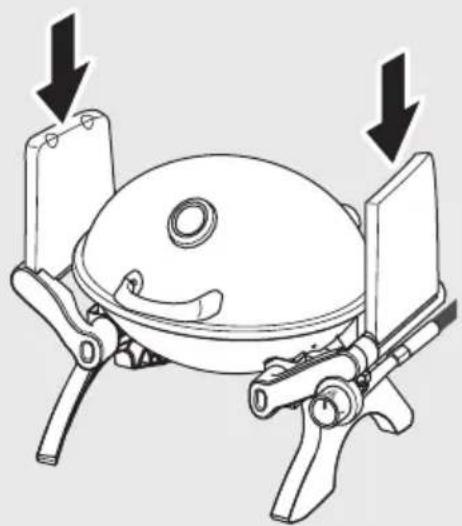
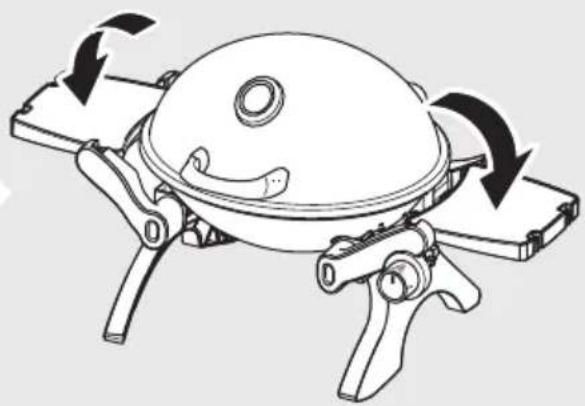
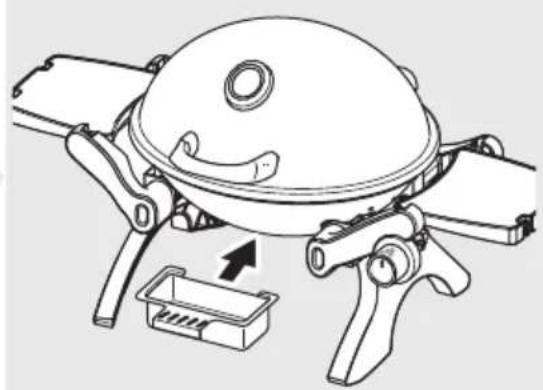
▶ Proceed as follows: fig. 3, page 4 and fig. 4, page 5.

NOTICE!
Failure to use supplied fibre washers will cause the enamel coating to crack (see detail ⚠ in fig. 4, page 5).
Treating the cooking surface of the BBQ
▶ Coat the cooking surface of the BBQ in a light coating of cooking oil. ▶ Connect the device to the gas cylinder (chapter "Connecting the device to the gas cylinder" on page 16). Ignite the device (chapter "Igniting the device" on page 17) and set the burner to low heat. ▶ Let the burner burn for 20 minutes. During this time the original coating of the BBQ plates may come off. ▶ Turn off the device and allow it to cool. ▶ Clean the cooking surface.
6 Using the device
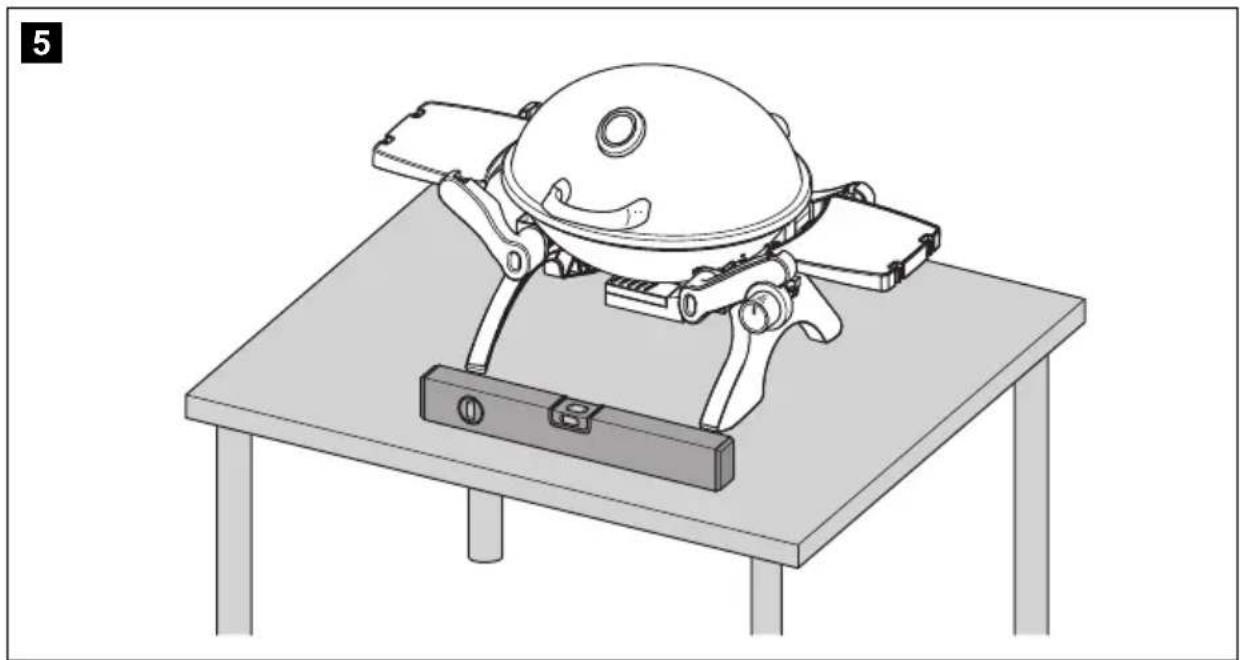
Placing the device (fig. 5, page 6)
When selecting the location for barbecuing, observe the following instructions:
- Set up the device outdoors in a well-ventilated place. Do not place it in a dip to prevent any gases from accumulating there.
- The ground must be firm, level and stable.
- Keep the device protected from the wind.
- Never operate the device under any overhead combustible construction such as tent, pavilion, sun shade, awning, tree etc.
- Never place the device near flammable materials, even when cooling down. Keep a distance of at least 300 mm from sides and back.
- Never place the device near flammable liquids. Keep a distance of at least 8 m.
- Observe the safety instructions, see chapter "Safety precautions when handling liquid gas" on page 12.
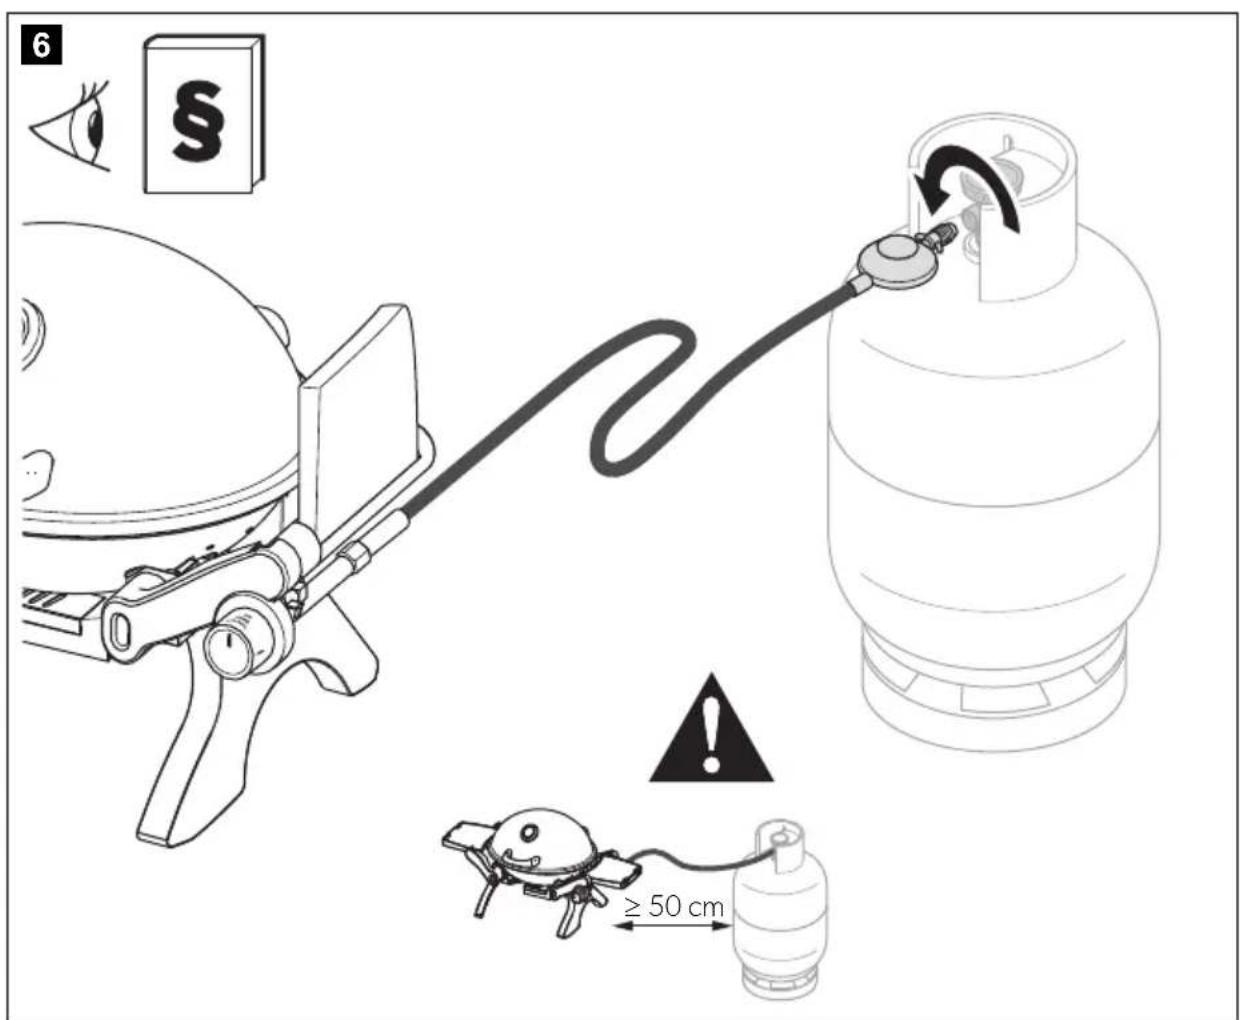
Connecting the device to the gas cylinder
▶ Proceed as follows: fig. 6, page 6. ▶ After connecting the device to the gas supply, check the gas pipe for leakage using a foaming agent, e.g. with soap. Never use a naked flame to test for gas leaks.
Igniting the device

WARNING! Beware of injury
- Only use the device when you or another person can attend to it.
- Before igniting the BBQ, ensure that there is no grease build-up on the hotplate or in the grease tray, as this may lead to unexpected flare-ups.
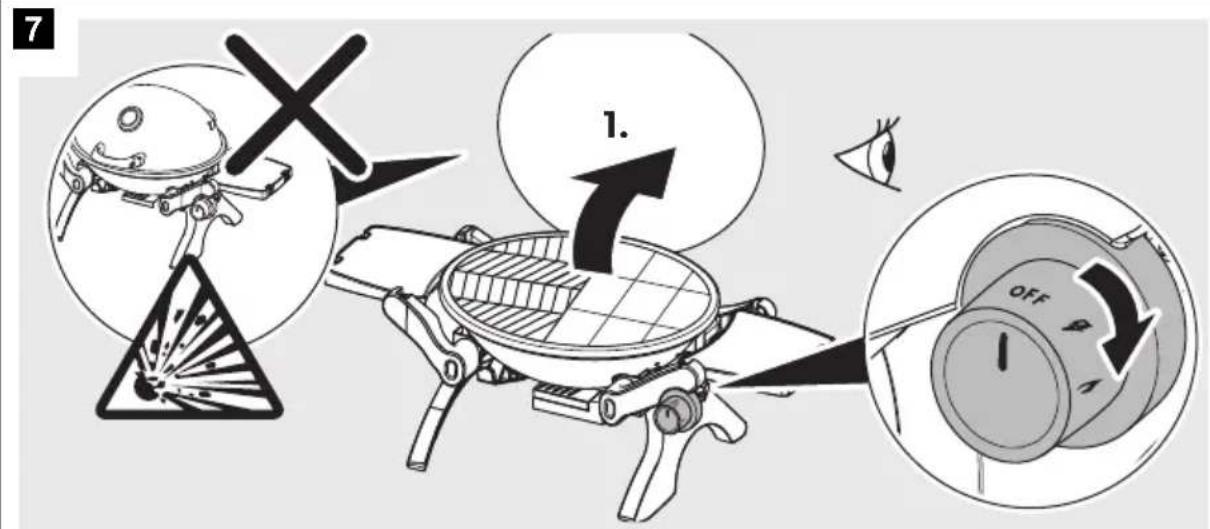
- Ignite the burners as soon as you have turned on the gas supply. Otherwise, gas can accumulate in the burner area and cause an explosion.

NOTE
- While it is operating, you will be able to hear a slight noise caused by the gas flowing out. This is completely normal.
- Smoke can occur when using it for the first time. This is caused by burning deposits of machine oil and stops after approx. 10 minutes.
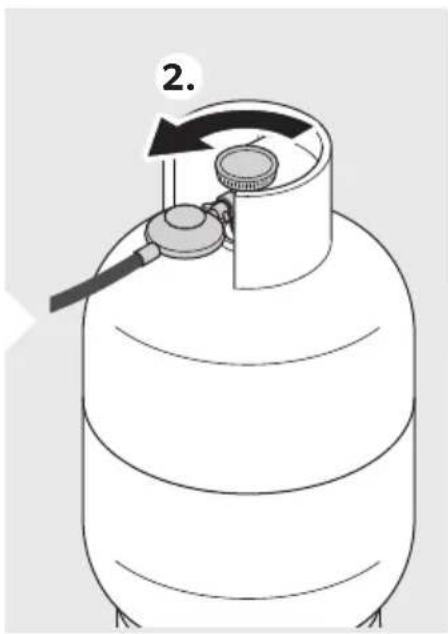
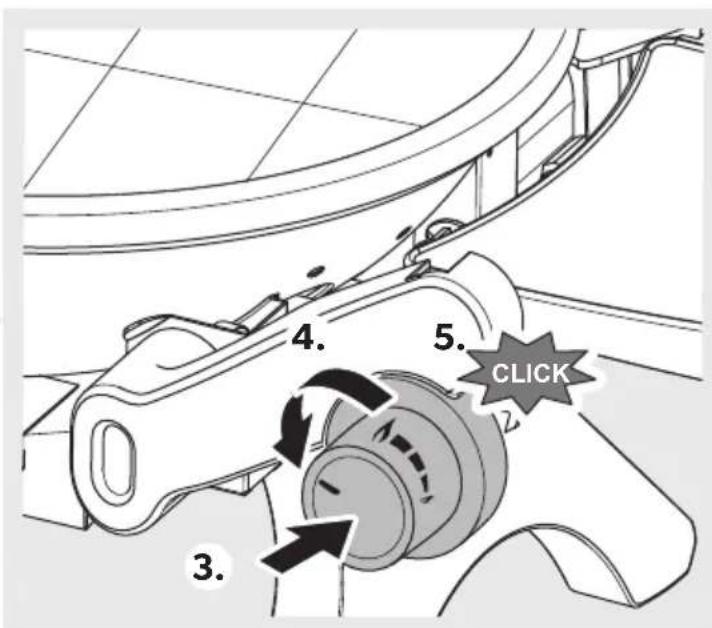
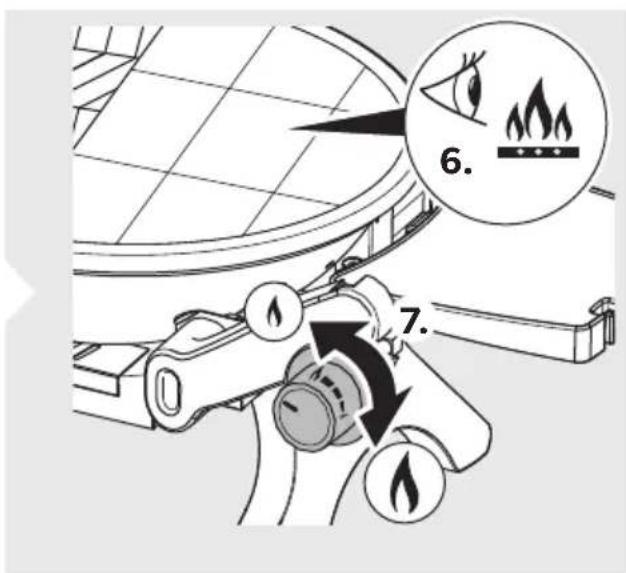
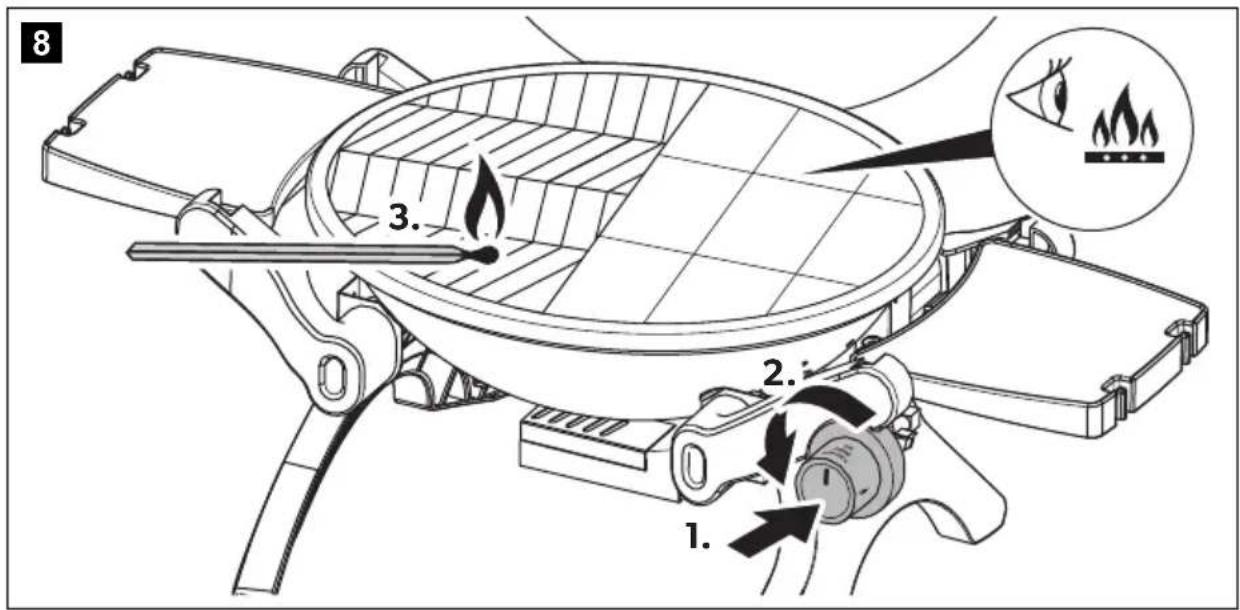
▶ Proceed as follows: fig. 7, page 7. ▶ If the burner does not ignite after 3 attempts, turn off the gas and wait 10 seconds for the gas to clear. ▶ Try again with the piezo igniter or light the device manually using a long match or long-neck lighter (fig. 8, page 8). Do not use a cigarette lighter. ▶ After lighting, check that the burner has properly ignited. The flames must be burning along the whole length of both sides of the burner pipe.
Barbecuing
Please observe the following instructions when barbecuing:
- Before barbecuing, coat the cooking surface of the portable BBQ with a liberal coating of cooking oil, which will assist in preventing food from sticking.
- The device must be warmed up before use. Light the burner and allow it to operate on high setting for 3–5 minutes.
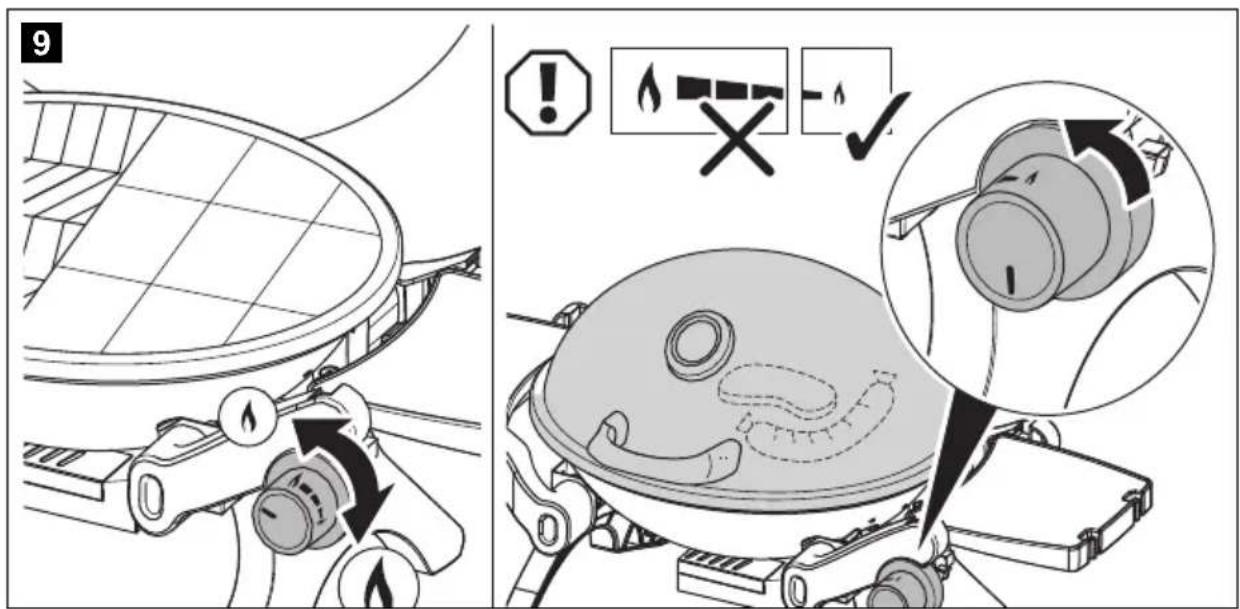
- When barbecuing, control the temperature by adjusting the control knob between high (▲) and low flame setting (▲): fig. 9, page 8.
- When barbecuing meat, don't turn it continually over. For moist, juicy meat, turn it once only during barbecuing. Juices rise to the top of meat during barbecuing and then settle.
Each time meat is turned, juices are lost and the meat becomes drier.
- Flare-ups sometimes occur when food drippings fall onto the hot surfaces in the firebox and ignite. Some flaring is normal and desirable as it helps impart the unique flavors associated with barbequed foods. Controlling the intensity of the flare-ups is necessary in order to avoid burned or unevenly cooked foods and to prevent the possibility of accidental fire. Always monitor the device closely when cooking and turn the flame level down (A) or off if flare-ups intensify.
Turning off the device
▶ Proceed as follows: fig. 10, page 8.
Packing up and storing the device

CAUTION! Beware of burns
The device is very hot when you use it. Leave the device to cool down before you clean, dismantle or transport it.
▶ Disconnect the gas cylinder. ▶ Clean the device (chapter "Cleaning and maintaining the device" on page 19). ▶ Pack up the device once it has cooled down.
Replacing the gas cylinder

WARNING! Beware of injury
Change the gas cylinder in a well-ventilated location.
Ensure that there are no open flames in the vicinity.
Only replace the gas cylinder when the device is switched off.
▶ Completely close the valve on the gas cylinder. ▶ Unscrew the regulator from the cylinder. ▶ Check the condition of the gas hose. Replace the hose line if the material is brittle or porous. ▶ Tightly screw the regulator by hand into the new cylinder.
7 Cleaning and maintaining the device

NOTICE!
- Do not use any sharp or hard objects for cleaning since they may damage the device.
- Only use standard cleaning agents.
- Do not use a steam cleaner to clean the device under any circumstances.

NOTE
The grill grid and the grease tray can be placed in the dishwasher for convenient cleaning.
▶ While the grill grid is still hot, remove any remaining food residue using a long-handled brush and a scraper. ▶ Allow the device to cool down properly before cleaning the rest of it (fig. 11, page 9). ▶ Clean the surfaces. Ensure to remove sticky fat and oil residue. ▶ Coat the cooking surface of the portable BBQ with cooking oil for continued protection against corrosion. ▶ Allow the device to dry before packing and storing. ▶ Treat the cooking surface of the portable BBQ from time to time in order to maintain the non-stick properties of the cast iron surface (see chapter “Treating the cooking surface of the BBQ” on page 15).
▶ Check the burner periodically for any sort of blockage.
- If any flame ports are blocked, use a wire brush to unblock them.
- If the burner is blocked, use a stiff wire or pipe cleaner to unblock it.
- Ensure the mesh at the burner air inlet is clean. It must be clean to ensure safe operation of the burner.
▶ Have a suitable authorized and qualified person perform a thorough examination of the device at least every 5 years.
8 Troubleshooting
Due to unforeseen circumstances the appliance may not operate as designed.
Indications of this are flashing back in the burner, large soft yellow flames, flames lifting extensively away from the burner and the appliance not igniting or remaining alight.
In these cases, check your gas supply to ensure there is sufficient gas, no leaks and the valves are opened sufficiently for use. If this is the case and the problem/s still persists, you will need to contact a suitably qualified authorized person to service your appliance.
Repairs to the gas supply parts on the device may only be carried out by a qualified technician.
▶ Shut off the gas supply immediately if a fault occurs. ▶ Check again that the device has been assembled correctly and the parts are undamaged, especially the gas hose. ▶ Replace damaged parts. ▶ Only use the device again when all the faults have been rectified.
9 Warranty
If the product does not work as it should, please contact your retailer or the manufacturer's branch in your country (see dometic.com/dealer). The warranty applicable to your product is 1 year(s).
For repair and warranty processing, please include the following documents when you send in the device:
• A copy of the receipt with purchasing date - A reason for the claim or description of the fault
Australia only
Our goods come with guarantees that cannot be excluded under the Australian Consumer Law. You are entitled to a replacement or refund for a major failure and for compensation for any other reasonably foreseeable loss or damage. You are also entitled to have the goods repaired or replaced if the goods fail to be of acceptable quality and the failure does not amount to a major failure.
New Zealand only
This warranty policy is subject to the conditions and guarantees which are mandatory as implied by the Consumer Guarantees Act 1993 (NZ).
10 Disposal
▶ Place the packaging material in the appropriate recycling waste bins wherever possible.
11 Technical data
| Dometic CPB101 | |
| Connection pressure: 2.75 kPa | |
| Gas consumption: 255 g/h | |
| Gas category: Universal LPG | |
| Injector size: 0.91 mm | |
| Thread connection: 5/8" – 18UNF | |
| Dimensions: Without side trays: 430 x 640 x 420 mmWith side trays: 430 x 940 x 420 mm | |
| Weight: 9.2 kg | |
| Certification: |  |
dometic.com
YOUR LOCAL DEALER
dometic.com/dealer
YOUR LOCAL SUPPORT
dometic.com/contact
dometic.com/sales-offices
- IMPORTANT. READ THESE INSTRUCTIONS FOR USE CAREFULLY
- CONTENTS
- EXPLANATION OF SYMBOLS
- WARNING
- CAUTION
- NOTICE
- NOTE
- GENERAL SAFETY INSTRUCTIONS
- GENERAL SAFETY
- SAFETY PRECAUTIONS WHEN HANDLING LIQUID GAS
- OPERATING THE DEVICE SAFELY
- BEWARE OF SUFFOCATION
- SCOPE OF DELIVERY
- INTENDED USE
- BEFORE INITIAL USE
- ASSEMBLING THE PORTABLE BBQ
- TREATING THE COOKING SURFACE OF THE BBQ
- USING THE DEVICE
- PLACING THE DEVICE (FIG. 5, PAGE 6)
- CONNECTING THE DEVICE TO THE GAS CYLINDER
- IGNITING THE DEVICE
- WARNING! BEWARE OF INJURY
- BARBECUING
- TURNING OFF THE DEVICE
- PACKING UP AND STORING THE DEVICE
- CAUTION! BEWARE OF BURNS
- REPLACING THE GAS CYLINDER
- CLEANING AND MAINTAINING THE DEVICE
- TROUBLESHOOTING
- WARRANTY
- AUSTRALIA ONLY
- NEW ZEALAND ONLY
- DISPOSAL
- TECHNICAL DATA
Brand : DOMETIC
Model : CPB101
Category : Grill