
DRW331 - Drone GPX - Free user manual and instructions
Find the device manual for free DRW331 GPX in PDF.


| Product Type | Quadcopter Drone with Wi-Fi Camera |
| Brand | GPX |
| Model | DRW331 |
| Dimensions (LWH) | 27 x 27 x 9 cm (11.6 x 11.6 x 3.5 in) |
| Weight | 91 g (3.20 oz) |
| Battery Type | Rechargeable Lithium Polymer (LiPo) |
| Charge Time | Approx. 70-90 minutes |
| Flight Time | 6-8 minutes |
| Control Distance | Up to 328 ft (100 m) via Wi-Fi or remote |
| Remote Control Frequency | 2.4 GHz |
| Remote Control Battery | 4 AA batteries (not included) |
| Camera | Adjustable angle Wi-Fi camera |
| Gyroscope | 6-axis |
| Speed Settings | Low, Medium, High |
| Headless Mode | Yes |
| Flip Function | 360° flip |
| Altitude Hold | Yes (via app) |
| Navigation Lights | LED |
| App Compatibility | Sky Rider Cruise (iOS/Android) |
| Recommended Age | 14 years and older (adult supervision required) |
| Warranty | 30-day limited |
| Included Accessories | Remote control, USB charging cable, LiPo battery, 2 replacement rotors, smartphone cradle, screwdriver, user's guide |
| FCC Classification | Class B digital device |
| Emergency Stop | Press and hold Landing/Stop button |
Frequently Asked Questions - DRW331 GPX
User questions about DRW331 GPX
0 question about this device. Answer the ones you know or ask your own.
Ask a new question about this device
Download the instructions for your Drone in PDF format for free! Find your manual DRW331 - GPX and take your electronic device back in hand. On this page are published all the documents necessary for the use of your device. DRW331 by GPX.
USER MANUAL DRW331 GPX
Quadcopter Drone with Wi-Fi Camera

natural_image
3D rendering of a quadcopter drone with extended wings and propellers (no text or symbols visible)
User's Guide for Model DRW331 v2762-01
Warnings & Precautions
Important Safety Instructions
- Read and follow all instructions.
- Keep these instructions for future reference.
+ Heed all Warnings.
• Intended for children ages 14 and higher. Adult
supervision is required.
- Only use attachments/accessories specified by the
manufacturer.
• Before flying, always check the body, rotors, and
battery for any damage or obstructions.
- Battery should be free from cracks or swelling.
- Keep the rotors clear of any obstructions and body
parts to avoid potential damage and injury
- Manufacturer and dealer assume no liability for accidental damages from improper use or installation of parts, or from damage incurred from worn or broken parts.
• Pilots are responsible for their actions and any
damage caused from improper use
- Pilots should keep the craft in sight at all times during flight. If you lose sight of the craft at any time, power down and cease flight immediately.
- Only fly in large, open areas that are free from obstacles or potential hazards, such as trees, power lines, ceiling fans, and the like.
• Flying over bodies of water is not recommended.
- Flying at night is not (recommended)
- Never try to retrieve the craft from areas you cannot
safety reach, such as roundups of trees.
- Never launch the craft from your hand. - Never leave the craft unattended while it is powered on or while the battery is charging.
FCC Warnings
Warning: Changes or modifications to this unit not expressly approved by the party responsible for compliance could void the user's authority to operate the equipment.
NOTE: This equipment has been tested and found to comply with the limits for a Class B digital device, pursuant to Part 15 of the FCC Rules. These limits are designed to provide reasonable protection against harmful interference in a residential installation. This equipment generates, uses, and can radiate radio frequency energy and, if not installed and used in accordance with the instructions, may cause harmful interference to radio communications. However, there is no guarantee that interference will not occur in a particular installation. If this equipment does cause harmful interference to radio or television reception, which can be determined by turning the equipment off and on, the user is encouraged to try to correct the interference by one or more of the following measures.
• Reorient or relocate the receiving antenna.
- Increase the separation between the equipment and receiver.
- Connect the equipment into an outlet on a circuit different from that to which the receiver is connected.
- Consult the dealer or an experienced radio/TV technician for help.
Additional Warnings & Precautions
- WARNING: To reduce the risk of fire or electric shock, do not expose this apparatus to rain, moisture, dripping, or splashing.
- CAUTION: Use of controls or adjustments or performance of procedures other than those specified may result in personal injury.
- WARNING: Changes or modifications to this unit not expressly approved by the party responsible for compliance could void the user's authority to operate the equipment.
- CAUTION: Danger of explosion if battery is incorrectly replaced. Replace only with the same or equivalent type.
- Lithium batteries, like all rechargeable batteries, are recyclable and should be recycled or disposed of according to state and local guidelines. They should never be disposed of in normal household waste, and they should never be incinerated, as they might explode. Contact your local government for disposal or recycling practices in your area.
• WARNING: Shock hazard - Do Not Open.
- Battery shall not be exposed to excessive heat such as sunshine, fire, or the like.
- Keep new and used batteries away from children. If the battery compartment does not close securely, stop using the product and keep it away from children.
• If you think batteries might have been swallowed or placed inside any part of the body, seek immediate medical attention.
• Do not mix old and new batteries.
• Completely replace all old batteries with new ones.
- Do not mix alkaline, standard (carbon-zinc), or rechargeable (ni-cad, ni-mh, etc) batteries.
- Batteries should be recycled or disposed of as per state and local guidelines.
Table of Contents
Thunderbird 2 Wi-Fi Drone
FAA Information: Flying Your Drone Under the Special Rule for Model Aircraft - 4
Features -
Includes - 4
Diagram & Specifications - 5
Assembly
Rotor Guards - 6
Legs - 6
Remote Control
Functions - 7
Battery Installation - 8
Charging the Battery
Information & Procedure - 9
Flying
Remote Link & Calibration - 10
Trim Adjustment & Countering Drift - 11
Forward/Backward "Pitch" Trim - 11
Spin 'Yaw' Trim - 11
Left & Right "Roll/Bank" Trim - 11
Remote Trim Reset - 12
Gyroscope Recalibration - 12
Flight Controls - 13
When You're Finished Flying - 13
Emergency Stop - 13
Tips for Safe Operation - 14
Speed Setting - 1/4
Headless Mode - 1/4
Flips - 15
Sky Rider Cruise App
Free Download - 16
Connect to WI-FI - 16
Settings Screen - 17
Screen Controls - 18
Flight Controls - 19
Using the Remote & App Together - 20
3D Mode - 21
Parts & Repair
Parts Replacement - 22
Rotor Replacement - 22
Troubleshooting
Troubleshooting Guide - 23
Customer Support
Contact Information - 24
International Support - 24
Warranty - 24
Thunderbird 2 Wi-Fi Drone
FAA Information: Flying Your Drone Under the Special Rule for Model Aircraft
To fly under the Special Rule for Model Aircraft you must:
• Fly for hobby or recreation ONLY
- Register your model aircraft
• Fly within visual line-of-sight
- Follow community-based safety guidelines and fly within the programming of a nationwide community-based organization
• Fly a drone under 55 lbs. unless certified by a community-based organization
- Never fly near other aircraft
- Notify the airport and air traffic control tower prior to flying within 5 miles of an airport
- Never fly near emergency response efforts
You alone are responsible for safely and responsibly flying your drone. For more information on FAA Rules and Guidelines for flying Unmanned Aerial Systems please visit: http://www.faa.gov/uas/
Features
- 6-axis gyroscope
• Free app for Wi-Fi viewing - Adjustable angle Wi-Fi camera
- Altitude hold
- 3 speeds
• Control distance: up to 328 feet (Wi-Fi or remote)
• LED navigation lights - Operating time: 6-8 minutes
- Charge time: approx. 70-90 minutes
Includes
• 2.4GHz remote control: requires 4 AA
batteries (not included)
- USB charging cable
• Rechargeable lithium polymer battery
- 2 replacement rotors
- Attachable smartphone cradle for
remote control
- Screwdriver
- User's Guide
Diagram & Specifications
• Dimensions: 27 x 27 x 9cm/11.6 x 11.6 x 3.5 in. (LWH)
• Weight: 91g/3.20oz/0.2olb


Assembly
Rotor Guards
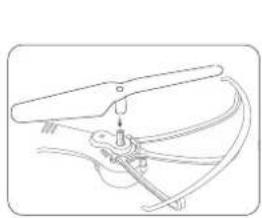
Attach each rotor guard as shown, using the included small screws and then lighten in the center location using the included screwdriver.
natural_image
Line drawing of a mechanical assembly with no visible text or symbols
natural_image
Line drawing of a mechanical tool or bracket with a suspended rod and curved base (no text or symbols)Legs
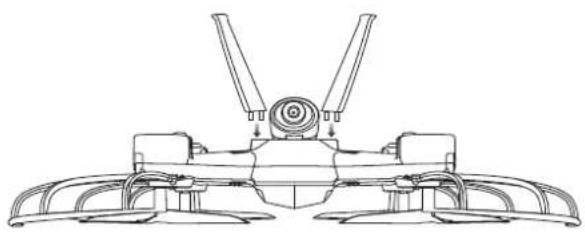
Place each leg on the underside of the craft as shown in the figure below.
natural_image
Technical line drawing of a mechanical assembly with no visible text or symbols
Remote Control
Functions
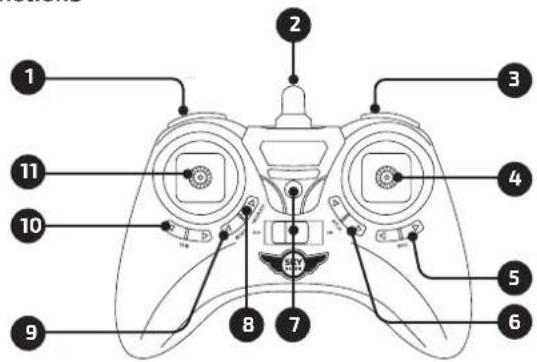
- Speed Setting
- Antenna
- 360° Flip
- Right Control Stick Pitch: push forward/backward Roll/Bank: push left/right
- "Roll/Bank" Trim
-
"Pitch" Trim
-
Power Switch/Power Indicator Light
- Headless Mode
- Trim Reset
- "Yaw" Trim
- Left Control Stick Ascend: Push forward. Descend: Push backward. Yaw/Spin: Push left or right.
Battery Installation

natural_image
Line drawing of a game controller with handle and control panel (no text or symbols)x4 AA batteries


Charging the BatteryRemote Control
Information & Procedure
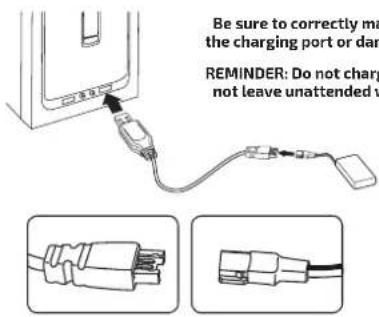
The craft's battery must be charged before it can be flown. To avoid risk of injury or damage, be sure the craft and remote control are both powered OFF and remove the battery
from the craft when charging. Charging time is approximately 70-90 minutes. Charge fully before use for best performance. Connect the battery plug to the USB charging plug, then connect the USB end (included) to the USB port of a powered ON computer or USB power adapter (not included).
While charging, the cable will display a red light.
When charging is complete, the light will turn OFF.

natural_image
Three-step diagram showing a mechanical device with downward force arrows, no text or symbols present.Remove the battery from the bottom of the craft.

Flying
Remote Link & Calibration
Before flying, the craft and the remote must be linked together and the gyroscopes on the craft must be allowed to calibrate.
Begin with the battery installed, the battery compartment closed, and the craft and remote powered OFF.
Step 1
Power ON the craft and place it on a flat surface. This is necessary for the craft's gyroscopes to properly align. The lights on the craft will blink as it searches for a signal from the remote.

Front
Be sure the craft and yourself are facing the same forward direction, this will help with orientation while flying.
Step 2
Power ON the remote. The light on the remote will blink as it searches for the signal from the craft. An audible chime will sound when the remote and the craft have linked.
Step 3
Push the Left Control Stick (throttle) fully forward, wait for a chime to sound, then pull the stick fully rearward, and wait for a second chime.

natural_image
Line drawing of a game controller with directional arrows indicating movement (no text or symbols)Step 4
To start/stop the rotors, push both control sticks down and to the outside as shown in the diagram. Once the rotors have started, the craft is ready for flight.

natural_image
Line drawing of a game controller with two rotary buttons and a central dial (no text or symbols)
Trim Adjustment & Countering Drift
Even after a craft is calibrated, it may still drift while airborne. To counter this effect you can adjust the trim for better control. However, adjusting the trim may not entirely eliminate drifting. Air currents and other factors can still affect the craft's handling.
Making Trim Adjustments
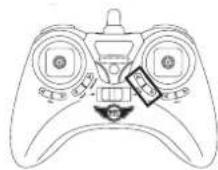
Press the Trim buttons to adjust the craft trim accordingly.
For example, if the craft is drifting forward, press the Backward Trim button until the craft is balanced.
To avoid potential damage, adjust the trim while attempting a stable hover and adjust one trim setting at a time to avoid confusion.
Forward/Backward "Pitch" Trim
Spin "Yaw" Trim

Left & Right "Roll/Bank" Trim

natural_image
Line drawing of a handheld gaming controller with dual dials and a small display (no text or symbols)
Flying
Remote Trim Reset
If you are still having difficulty flying, it may help to reset the trim adjustments on the remote. Do not attempt to do this while flying, safely land the craft first.
Press the Trim Reset button on the remote. The remote will chime once, and the lights on the craft will blink rapidly. When the lights return to normal, the trim reset is complete.

Gyroscope Recalibration
If the craft is having difficulty flying or is behaving erratically, it's gyroscopes may need to be recalibrated. Do not attempt to do this while flying, safely land the craft first, and place it on a flat surface.
Note: The craft and the remote should already be linked together.
Pull down and to the right on both control sticks for 2-3 seconds. The remote will chime once, and the lights on the craft will blink rapidly. When the lights return to normal, the recalibration is complete.

natural_image
Line drawing of a game controller with two motors and directional arrows indicating control buttons (no text or symbols)
Flight Controls
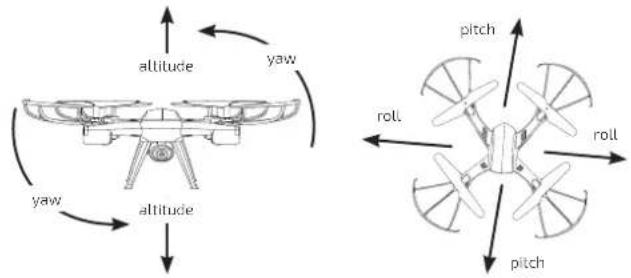

When You're Finished Flying
After landing, keep the Left Control Stick (throttle) in the lowest position and wait for the rotors to stop spinning. Power OFF the remote BEFORE powering OFF the craft. This will ensure that no signals are accidentally sent by the remote, reducing the chance of injury. After this is done, it is safe to pick up and power OFF the craft.
Emergency Stop
If the craft is having difficulty flying, is out of control, or otherwise behaving erratically, you can press and hold the Landing/Stop button to stop the rotors and the craft will fall to the ground.

Flying
Tips for Safe Operation
- It is recommended to only fly in large, open spaces that are free of obstacles like power lines, trees, ceiling fans, etc.
- When flying indoors avoid walls and ceilings, as the craft may be drawn towards them if closer than 2-3 feet.
- Stand behind the craft when first taking off, so that you and the craft are facing the same "forward" direction. This will help with orientation when the craft is airborne.
- Novice pilots should move the controls slowly and deliberately to get used to the craft's flying characteristics. Try using one control at a time.
• Practice basic flight operations like take off, hovering, and landing. - If you get into trouble or if anything obstructs the rotors, cut power immediately and safely clear the obstruction. Check for possible damage before flying again.
Speed Setting
Press the Speed button on the remote to change the craft's speed setting.
- Low: Provides smooth and predictable control of the craft. The remote will chime once to indicate the low speed setting.
- Medium: The craft will move and respond faster to all control inputs. The remote will chime twice to indicate the medium speed setting.
- High: Highest setting for maximum performance. The remote will chime three times to indicate the high speed setting.
Headless Mode
Before using Headless Mode be sure you and the craft are facing the same "forward" direction, otherwise the craft will not fly correctly. To activate Headless Mode, press the Headless Mode button (see page 7) on the remote control. All of the LED lights will flash while Headless Mode is ON. Press the button again to deactivate Headless Mode.
While Headless Mode is active the craft will fly in whatever direction the Right Control Stick is moved, regardless of where the front of the craft is pointing. For example, if the front of the craft was pointed straight ahead but is now pointed right 90°, when you push forward on the stick the craft will fly forwards as if it was still pointed straight ahead. This can be useful if you become disoriented while flying and cannot visually determine which direction the craft is facing.
Flips
Before attempting a flip, be sure that there is enough clear space around the craft, ideally 9-10 ft. in all directions. It is not recommended to attempt to flip around or through any obstacles, as this may result in unintended damage.
Press the 360° Flip button and the craft will automatically do a flip.
Sky Rider Cruise App

The Sky Rider Cruise app will display the image from the craft's camera on your smartphone's screen, allowing you to capture images and video of your flights. Connect your smartphone to the craft's Wi-Fi signal and start flying!
Free Download
Scan the appropriate QR code with your smartphone or search for "Sky Rider Cruise" in the Apple App Store or Google Play Store.
Connect to Wi-Fi
NOTE: Wi-Fi control may be interrupted by interference from other nearby Wi-Fi equipment.
Before beginning, make sure your phone's Wi-Fi is enabled and the craft is powered ON.
- From your smartphone, open the Wi-Fi settings menu, then search for and select Sky Rider Cruisexxx to connect to the craft.
- Once connected, open the app. You will see the Home Screen (image below). From here you can adjust settings and start using the app.

natural_image
Drone flying over a tropical beach with a small boat and palm tree, no visible text or symbols- Start
- FAQ
- Settings


Android

Apple
Settings Screen

Altitude Hold/Hover- This setting will lock the aircraft at the altitude it is currently at.
Right Hand Mode - Reverses the locations of the Left and Right flight controls on the screen.

Sky Rider Cruise App
Screen Controls

Gravity Sensor Mode uses the G-Sensor in your phone to control the craft. Tilt the phone forward, back, left and right to control the pitch and roll of the craft. Throttle and yaw are still manually controlled from the Left Directional Control.
Camera & Video
Use the Photo and Video buttons to document your flight. Images and video are saved to your phone and can be viewed later by pressing the Gallery button.
Flight Controls


Sky Rider Cruise App
Using the Remote & App Together
It can be easier to capture photos and video by using the remote to fly the drone and using the app in a viewing only method. Use the app and the remote together by attaching the smartphone holder (included) to the remote and placing your phone in the holder.
Follow the steps below to connect to the remote and the app in the proper sequence.
- First, connect the remote to the craft like normal. Connecting the remote first overrides any control signals from the app.
- Next, use your phone to connect to the craft's Wi-Fi. Open the app and go to the Flight Screen. Leave the Flight Controls off for the best view from the drone's camera.
- Use the controls on the remote to fly the craft while the Wi-Fi camera streams to your phone.
- When you're finished flying, power down the remote and craft like normal.
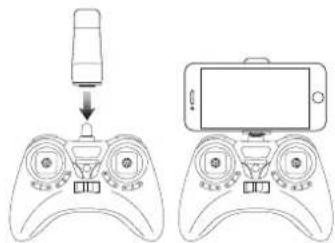
To release pull upwards on the holder.
3D Mode
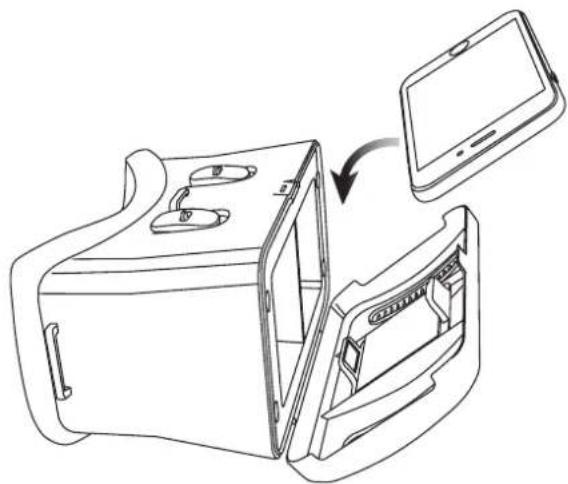
VR Mode splits the phone's screen for use in a VR headset. Press the 3D button on the screen to turn this feature ON or OFF. Use VR Mode to give a friend a fully immersive, point-of-view flying adventure.
NOTE:
- On screen flight controls are locked out in VR Mode. You must have the regular remote connected in order to fly the craft.
- We do not recommend flying the craft while wearing a headset. The craft's camera has a limited forward view and the headset will completely obscure the user's peripheral vision and situational awareness. Pilots assume all risk and are responsible for any damage caused by improper use.
natural_image
Line drawing of a device interior showing a door, panel, and screen with an arrow indicating transformation (no text or symbols)
Parts & Repair
REMINDER: Pilots are responsible for any damage caused by improper use.
Parts Replacement
Standard parts such as extra batteries and remotes are available online for purchase when in stock. However, any non-standard parts such as cameras, screws, bodies, etc. can be ordered by placing an inquiry with our parts department at: partsinfo@dpiinc.com.
Rotor Replacement
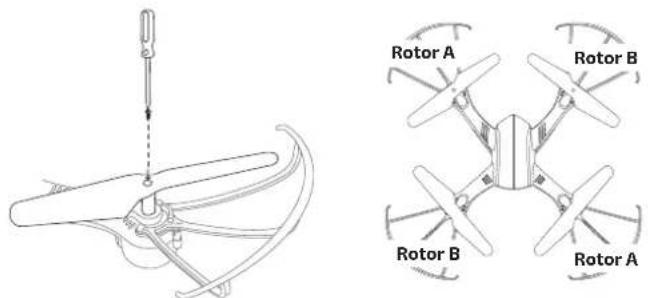
The craft comes with replacement rotors if the originals are broken or badly damaged. Use the included screwdriver to remove the rotor retaining screw that holds the rotor to the motor shaft. Once the retaining screw is out, pull upwards on the rotor to remove it from the motor shaft. Installation of the new rotor is the reverse of the removal process. Be sure to tighten the rotor retaining screw firmly, but do not over tighten.
It is extremely important to use the correct rotor (A or B) for replacement. Using the incorrect rotor will make the craft impossible to control. The marking can be found on the rotor near the shaft.
Troubleshooting
Troubleshooting Guide
| PROBLEM POSSIBLE CAUSES SOLUTION | ||
| Craft does not respond to controls. | · No power to remote or craft.· Poor contact between power plugs.· Craft is out of range. | · Check remote batteries, replace if needed.· Check craft battery, be sure it is fully charged.· Be sure the power plugs are firmly connected.· Be sure the remote has an unobstructed line of slight to the craft.· Remain within the remote's 328 ft. range. |
| Craft is difficult to control or flies erratically. | · Gyroscopes may be misaligned. | · Power OFF remote and craft and reconnect (see pg. 10). |
| Craft drifts while in flight. | · Trim not set or needs adjustment. | · Adjust trim settings (see pg. 12). |
| Craft suffers from mechanical trouble. | · Damage to body, rotors or other major components. | · Repair or replace parts as needed. |
| LED Lights ON but craft does not respond to controls. | · Low battery power. · Recharge the battery. | |

Customer Support
Contact Information
Website: www.gpx.com
Email Support: prodinfo@dpiinc.com
Email Parts: partsinfo@dpiinc.com
Phone Support: 1-888-999-4215
Warranty
See included 30 Day Warranty for warranty information. Warranty and the most up-to-date version of this User's Guide can also be found at: www.gpx.com
International Support
To download this User's Guide in English, Spanish, and French, or to get answers to frequently asked questions, visit the support section at: www.gpx.com
Protect for Today Sustain for Tomorrow
Copyright © 2020 Digital Products International (DPI, Inc.) All other trademarks appearing herein are the property of their respective owners. Specifications are subject to change without notice.



- Warnings & Precautions
- Important Safety Instructions
- FCC Warnings
- Additional Warnings & Precautions
- Table of Contents
- Thunderbird 2 Wi-Fi Drone
- Assembly
- Remote Control
- Charging the Battery
- Flying
- Sky Rider Cruise App
- Parts & Repair
- Troubleshooting
- Customer Support
- FAA Information: Flying Your Drone Under the Special Rule for Model Aircraft
- Features
- Includes
- Diagram & Specifications
- Rotor Guards
- Legs
- Charging the BatteryRemote Control
- Information & Procedure
- Remote Link & Calibration
- Step 1
- Step 2
- Step 3
- Step 4
- Trim Adjustment & Countering Drift
- Making Trim Adjustments
- Forward/Backward "Pitch" Trim
- Spin "Yaw" Trim
- Left & Right "Roll/Bank" Trim
- Remote Trim Reset
- Gyroscope Recalibration
- When You're Finished Flying
- Emergency Stop
- Tips for Safe Operation
- Speed Setting
- Headless Mode
- Flips
- Free Download
- Connect to Wi-Fi
- Camera & Video
- Using the Remote & App Together
- 3D Mode
- NOTE:
- Parts Replacement
- Rotor Replacement
- Contact Information
- Warranty
- International Support
Brand : GPX
Model : DRW331
Category : Drone